

PATTI QUANTUM Series, QUANTUM Gold Operator's Manual

®
PATTI
Pneumatic Adhesion Tensile Testing Instrument
QUANTUM
SERIES
OPERATOR'S MANUAL
(
GOLD MODEL)
GOLD

®
PATTI
Pneumatic Adhesion Tensile Testing Instrument
QUANTUM
SERIES
OPERATOR’S MANUAL
(
GOLD MODEL)
GOLD
MODEL PATTI® QUANTUM_____________
SERIAL NUMBER______________________
SOFTWARE VERSION__________________
SALES REPRESENTATIVE______________
DATE OF DELIVERY___________________
WARRANTY EXPIRATION DATE________

TABLE OF CONTENTS
Instrument Description............................................................................................................1
Cross-Sectional Schematics of Piston Assemblies..................................................................2
Safety Precautions...................................................................................................................3
Initial PATTI® QUANTUM GOLD Software Installation Procedure*..................................5
PATTI® QUANTUM GOLD Operation Procedure
I. Pre-Test Preparation..............................................................................................7
A. Pull Stub Attachment...............................................................................7
B. Cross-Sectional Schematics of Pull-Stub Adhered To Coating...............8
C. PATTI
®
Connection Illustration............................................................10
D. Control Module Layout Illustrations.............................................11 & 12
E. Instrument Preparation............................................................................13
II. Test Procedure....................................................................................................15
A. Control Module-Test Surface Interfacing..............................................15
B. Control Module Operation.....................................................................16
C. PQGold Software Screenshot and Quick Reference Guide...................17
D. PQGold Software Suite Pre-Test Setup.................................................18
E. PQGold Software Suite Post-Test Operation...................................19 (5)
i. USB Camera Photo-documentation Procedure...................20 (8b)
ii. Generating a Report of the Pull-Test....................................21 (8c)
*ONLY NEEDED IF ATTEMPTING TO INSTALL THE PQGOLD SOFTWARE ON A
COMPUTER OTHER THAN THE ONE INCLUDED IN YOUR PACKAGE!

TABLE OF CONTENTS (cont')
III. Post-Test Instructions.........................................................................................22
A. Preparing for further testing..................................................................22
B. Close-out Procedure..............................................................................22
C. Analysis (for those not using PQGold Software Suite).........................23
Appendices
Frequently Asked Questions (FAQ) [Appendix A]....................................................25
Initial Bluetooth Configuration Instructions* [Appendix B].....................................27
ASTM D4541 (page 1 included) [Appendix C].........................................................28
Piston Conversion Table(s).........................................................................Appendix D
(reference only; software performs calculation)
Warranty & Warranty Registration..............................................................Appendix E
PQGold Software*..................................................................................Rear Binder Pocket
Software Quick Reference Sheet.........................................................................Rear Cover
*ONLY NEEDED IF ATTEMPTING TO INSTALL THE PQGOLD SOFTWARE ON A
COMPUTER OTHER THAN THE ONE INCLUDED IN YOUR PACKAGE!

INSTRUMENT DESCRIPTION
The PATTI® system applies a true axial (relative to stub axis) tensile pull test. The tensile values
obtained quantitatively measure the bond between a paint, film, coating or adhesive and the substance
substrate. The PATTI® conforms to ASTM D4541, “Pull Off Strength of Coatings Using Portable Adhesion
Testers,” and is listed in Annex A.4 as the only self-aligning, pneumatic instrument. The surface to be tested
can be smooth, rough, porous, flat or even curved and bond strengths of up to 10,000 psi can be tested with
®
the PATTI
custom applications are not only welcomed, but encouraged.
(using the F-20 piston). Advances in PATTI® technology have been mainly customer-driven, so
In a typical test, the first step is to properly attach a “pull-stub” to the test surface. Once the pull-stub
epoxy has cured, a self-aligning piston is attached to the pull-stub (see illustration on opposite page). The
control module is supplied with pressurized gas and then connected to the piston via a hose. The user slowly
increases the pressure to the piston until separation occurs between the pull-stub and the coating/test surface
(or until some predetermined pressure is reached). The control module will indicate the maximum pressure
applied to the piston, with or without pull-stub detachment. This burst pressure is then converted into tensile
strength (psi) by consulting a table for the appropriate piston and pull-stub. It is recommended that at least
three pull-tests are performed and statistically compared for a given surface before a definitive pull-off
pressure is assumed.
1
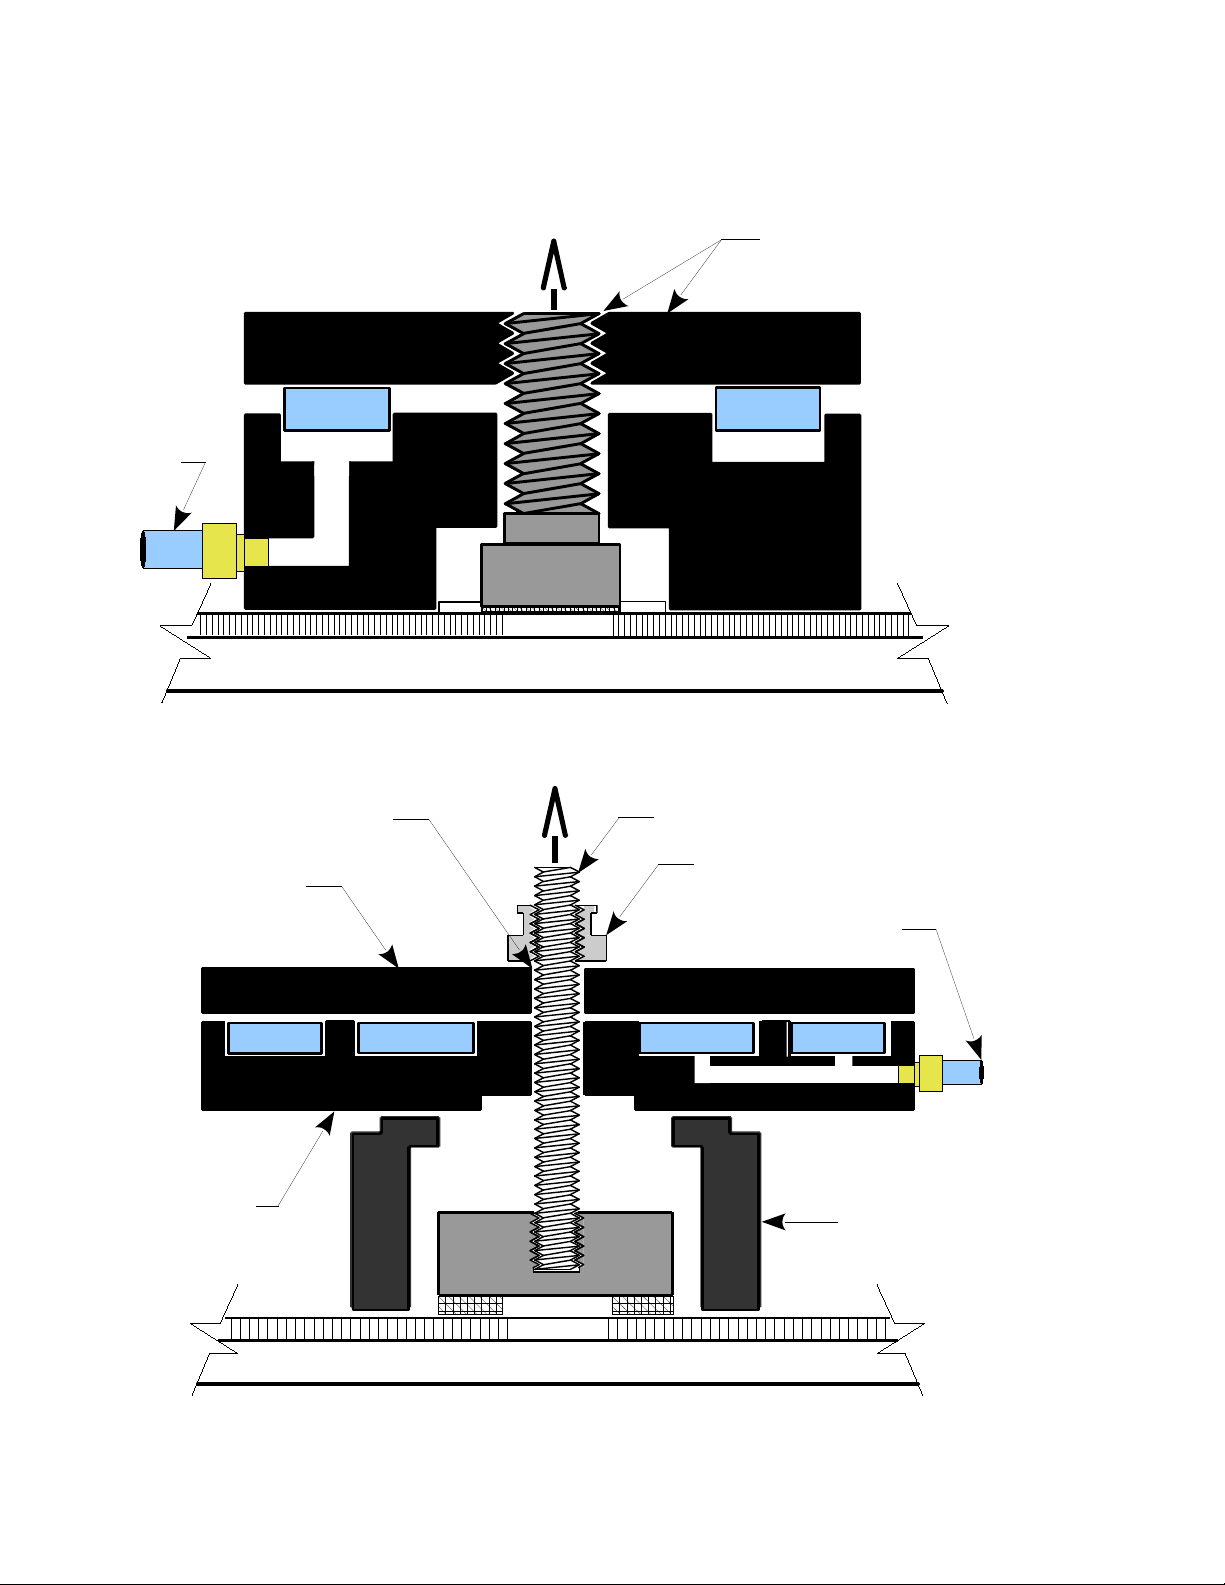
CROSS-SECTIONAL SCHEMATICS
OF SELF-ALIGNING PISTON ASSEMBLIES
PISTON
PRESSURE
HOSE
(BLUE)
PULLING FORCE
GASKET
PULL-STUB
COATING
SUBSTRATE
REACTION PLATE
WITH THREADED
CENTER HOLE
GASKET
FIGURE 1: STANDARD PISTON ASSEMBLY
PULLING FORCE
STRAIGHT CENTER HOLE
(NOT THREADED)
REACTION PLATE
GASKET
PISTON BODY
ALL-THREAD ROD
KNURLED-KNOB
PISTON PRESSURE
HOSE (BLUE)
GASKET
STAND-OFF RING
(MAY DIFFER
FROM PICTURE)
PULL-STUB
ADHESIVE
COATING
SUBSTRATE
FIGURE 2: CONCRETE PISTON ASSEMBLY
2

SAFETY PRECAUTIONS
● Pull-Stub attachment
○ Always follow the epoxy/adhesive manufacturer's instructions.
○ Use latex gloves while mixing and applying adhesives to the test surface to avoid contact between
the adhesive and bare skin.
○ A well-ventilated area is recommended when handling uncured adhesives.
● CO
cartridges
2
○ Keep cartridges out of direct sunlight.
○ Do not expose cartridges to temperatures above 49 °C / 120 °F.
○ Never dispose of full cartridges.
○ Do not attempt to remove the CO
cartridge holder from the control module if a CO2 cartridge is
2
installed in the holder and supply pressure gauge does not indicate 0 psi. Doing so will result in
rapid depressurization of remaining CO2 in cartridge!
● Prior to testing
○ Safety goggles are recommended during each and every test.
○ Do not apply pressures in excess of 150 psi to the supply air inlet.
○ Turn on the control module and ensure that the display indicates 0 psi (+/- 1 psi) before attaching
the blue piston hose to the piston outlet connection on the control module.
○ Ensure that hose connections have been fully threaded or seated prior to performing a test.
● During testing
○ Stand clear of the piston after it has been attached to the pull-stub due to the high pressures
present.
○ Never attempt to open the control module as high pressures may be present. No internal user
adjustments are needed.
● After testing
○ Do not attempt to remove the piston or any of the hose connections without properly
depressurizing the system according to the instructions in this manual.
● Battery precautions (9V and/or Laptop Battery)
○ Do not store batteries in the control module if the unit will not be used for a long period of time.
○ Do not dispose of in fire.
○ Never attempt to short circuit or disassemble.
○ Do not use if leakage is detected.
○ Recycle or dispose of used batteries properly.
3

4

PATTI® QUANTUM GOLD SOFTWARE INSTALLATION PROCEDURE
ONLY NEEDED IF ATTEMPTING TO INSTALL THE PQGOLD SOFTWARE ON A
COMPUTER OTHER THAN THE ONE INCLUDED IN YOUR PACKAGE!
System Requirements:
● Microsoft Windows enabled machine with Microsoft 2000 or later Operating System
(may not be compatible with Windows Vista)
● 500 MB free Hard Drive space
● 1 available USB port for basic operation (2 required if connecting the unit to your
computer via USB while using the USB camera simultaneously)
● OPTIONAL: native Bluetooth capability or third party Bluetooth Dongle
(may be sold separately)
1. Identify the Thumb Drive that was packaged with your PATTI® Quantum Gold. Insert it into a
USB port on your computer. Exit any other programs that are currently running.
Go to the Start menu and select My Computer. Double-click on the Thumb Drive folder labeled
PQGold vxxx. Navigate through the Installer folder and the Volume folder to double-click on
setup.exe to run the installer. It is recommended that you allow the software to install the
components in the default locations. Otherwise the App may not be able to find called
components when needed. Click Next.
2. Read and accept the National Instruments License Agreements. Click Next.
3. Wait for installation of the National Instruments software to complete. Note that this may take
20 minutes or longer depending on the speed of your computer.
Click Finish to exit the National Instruments Installer.
5. If you are using Windows XP and the USB camera drivers do not install automatically, locate
the MicroCapture folder on the Thumb Drive and click on setup.exe. Follow the steps
presented. The drivers will be automatically installed on Windows 7 machines.
6. Once you install this software package on another computer, you will need to register the ActiveX
controls to enable the imaging properties of the USB microscope. To do this, perform the
following steps (Windows 7):
a. Click start and type cmd in the search box. Do not press enter afterward.
b. In the window that appears, right-click on cmd.exe and choose Run as administrator.
c. Once at the command prompt, type the following exactly:
regsvr32 "C:\Program Files\P.A.T.T.I. Quantum Gold\data\IVDX.ocx"
Then press ENTER. You should receive a notification that the control was registered
successfully. If not, check the path by attempting to navigate to the control on your hard
drive.
5

PATTI® QUANTUM GOLD SOFTWARE INSTALLATION PROCEDURE
d. Again, at the command prompt, type the following exactly:
regsvr32 "C:\Program Files\P.A.T.T.I. Quantum Gold\data\CamViewITaddons.ocx"
then press enter. you should receive a notification that the control was registered
successfully. if not, check the path by attempting to navigate to the control on your hard
drive. close the command prompt window.
7. Determine which COM Port your computer will use to communicate with the PATTI®
Quantum Gold Control Module:
a. Go to the Start menu. Right-click on My Computer select Manage.
b. In the left-hand directory, left-click Device Manager to bring the contents into the
right-hand directory.
c. In the right-hand directory, click on the + sign next to Ports (COM & LPT) to expand
the contents of the directory.
i. To use the included USB--> RS232 Cable, look for the COM Port number that
corresponds to the selection titled Prolific... and record it for use later.
ii. To use Bluetooth (wireless data transmission) you may note the COM Port
number that corresponds to the selection titled Bluetooth Serial Port. However,
there are other settings that need to be configured properly to use Bluetooth. If
you are having problems connecting via Bluetooth, consult the Initial
Bluetooth Configuration Instructions (Appendix B) at the end of this manual.
8. You can use MAX (which will install a shortcut on your desktop) to rename your preferred
method of connecting to your P.A.T.T.I. Quantum Gold control unit. To do so, make sure that
your Bluetooth module is plugged in to your computer and properly installed or make sure that
you have run the driver installer for the USB-to-serial cable and have plugged it into your
computer first. Make sure that you have one method of connection ready before starting MAX.
Once MAX is running, you can select the first link in the center window and then rename your
connection method to something more appropriate. For instance, rename COM1 to Bluetooth,
for example. Then, when you run the PQGold App you will see a more descriptive name rather
than the COM port.
Before installing the software on a new computer, you may wish to visit our website at
www.adhesiontesting.com to see if a newer version of the software is available.
Full upgrade installation instructions can be found there as well.
Congratulations!
You are now ready to take full advantage of the features of the
PQGold Software Suite.
For Technical Support, please call (301) 975-9798 from 9am to 5pm EST
or email support@semicro.org.
6
 Loading...