

Patterson Fan Manual
Operating, Installation & Parts Manual (OIPM)
Patterson Fan Company, Inc
Blythewood, SC 29016
www.pattersonfan.com
800.768.3985

Contents Page
Assembly Instructions 3- 10
Maintenance Instructions 12-14
Trouble Shooting 15
Patterson Fan Company, Inc
Blythewood, SC 29016
www.pattersonfan.com
800.768.3985
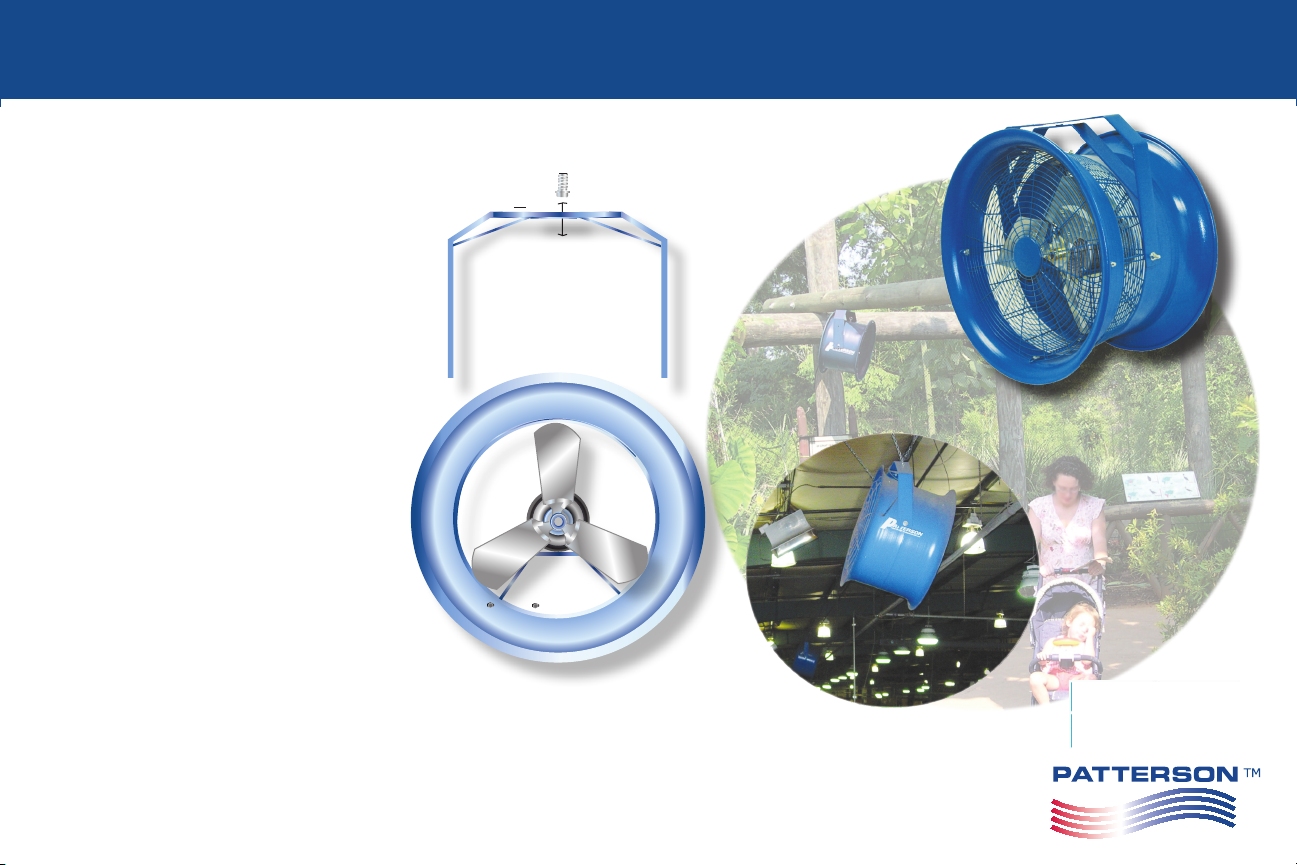
YM Yoke Mount Assembly Instructions
Note: There are many acceptable methods
for hanging a Patterson Yoke Mount fan. The
most important things to remember are that
the yoke must be securely connected to a
solid structure and that all materials used to
hang the yoke and fan must be rated for this
type of rigging and workload. Below is what
we consider to be the simplest method of fan
suspension. Feel free to improvise, but please
use caution and good judgment.
1. Secure the “U” Shaped Yoke to the
object from which you intend to mount
the fan. Use a 5/8” bolt, a 5/8” nut and
(2) 5/8” washers. Tighten the nut onto the
bolt using a 5/16” bolt end wrench and
ratchet with 5/16” socket.
2. The factory assembled fan head ts
inside of the “U” shaped yoke, the
threaded studs on each side of the fan
t through the predrilled holes on the “U”
shaped yoke. Secure the factory assembled fan head to the “U” shaped yoke
with the supplied nuts. Mount the factory
assembled fan head so that the motor
capacitor is in up position.
3. If safety cable installation is desired (rec-
ommended), use a length of chain or
cable to secure the fan to a solid surface
and attach to the fan. Make sure cable
or chain is rated for the weight and purpose of securing the fan.
Patterson Fan Company, Inc
Blythewood, SC 29016
www.pattersonfan.com
800.768.3985
PS Portable Stroller Mount Assembly Instructions
Note: There are many applications for the
Patterson Portable Stroller Fan. Use care
when selecting locations for the fan. Do not
place the fan on a sloped surface. Do not
use if the nger guards are missing or are
damaged or not tting properly. Do not use
if the cord or connector has exposed wires
or is damaged in any way.
1. Place the portable base on a at
surface.
2. Secure the “U” shaped yoke to the
portable base by inserting the 5/8” bolt
through the center hole in the yoke
and through the hole in the pedestal
base arm. Place the 5/8” nut on the
5/8” bolt and tighten securely.
3. Carefully mount the factory assembled
fan with mounting studs through the
holes in the uprights of the “U” shaped
yoke with the motor capacitor is in up
position. Secure the fan to the yoke
with the factory supplied nuts.
Note: Due to continual product improvement,
items are subject to change without notice.
Patterson Fan Company, Inc
Blythewood, SC 29016
www.pattersonfan.com
800.768.3985

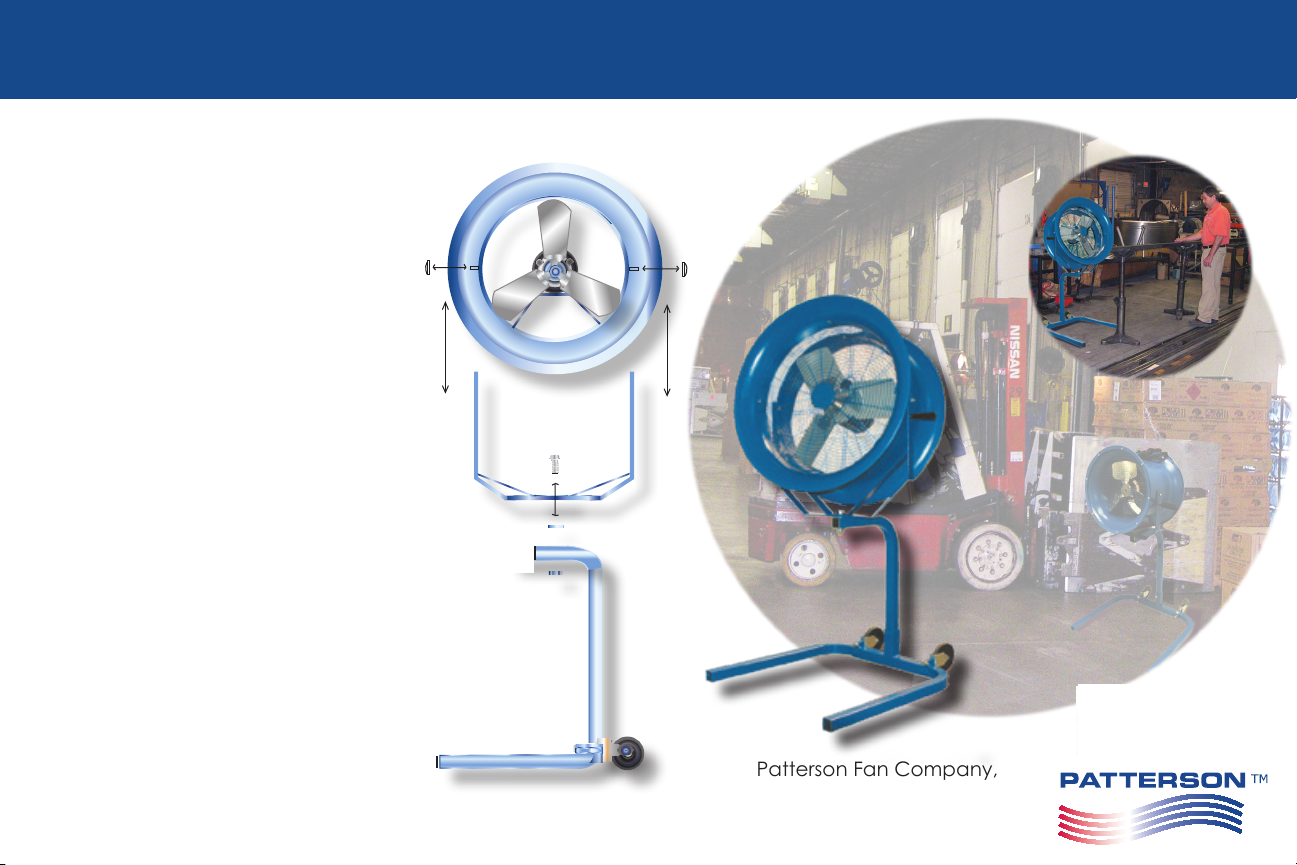
PB Portable Base Mount Assembly Instructions 34” Fan Only
Note: There are many applications for the Patterson
Portable Base 34” fan. Use care when selecting locations for the fan. Do not place the fan on a sloped
surface. Do not use if the nger guards are missing
or damaged or not tted properly. Do not use if the
cord or connector has exposed wires or is damaged
in any way.
1. If you ordered the 6ALG2, fan head and the
6ALG9, portable base together on the same pu
chase order they will be shipped assembled
together from the factory.
2. If you ordered these separately begin mounting
the fan head to the probable base by rst
securing the separate PB telescoping upright
arms to the fan head stud bolt on either side of
the fan housing leaving them loose for free
swinging.
3. After attaching the upright arms to the fan head
(loosely) using a fork lift to pickup the fan head
maneuver the fan head directly over the
portable base and slowly lower until the upright
telescoping arms slip into the xed uprights of the
portable base.
4. Inserted arm should measure 33-34” total height
from oor keeping fan level between the two
uprights some tapping with block of wood and
hammer may be necessary.
5. Tighten nuts on stud bolts connecting the upright
arms to the fan head housing.
Note: Due to continual product improvement,
items are subject to change without notice.
Patterson Fan Company, Inc
Blythewood, SC 29016
www.pattersonfan.com
800.768.3985

TC Truck Cooler Assembly Instructions
Note: Important things to remember are that
the wall mount should be a solid structure
able to support the weight of the fan safely
and that the fan should not be at a height
that will cause employees to bump their
heads. Ideally, the fan should be mounted
to blow into the back of the truck down the
top corner of either side of the trailer.
1. Secure the wall bracket and arm to the solid
surface where you will hang the fan. A structurally secure solid wall or beam is best.
2. Secure the “U” shaped yoke to the arm of the
wall bracket. Use the 5/8” bolt and 5/8” nut
supplied. Tighten the nut onto teh bolt using
a 5/16” box end wrench and ratchet with a
5/16” socket. For clearance reasons, the “U”
shaped yoke must open down.
3. The fan head ts inside the “U” shaped yoke,
the threaded studs on each siide of the fan
ts through the predrilled holes on the “U”
shaped yoke. Secure the fan head to the “U”
shaped yoke with the supplied nuts. Mount
the fan head so that the motor capacitor is
in up position.
Note: Due to continual product improvement,
items are subject to change without notice.
Patterson Fan Company, Inc
Blythewood, SC 29016
www.pattersonfan.com
800.768.3985

CW Column Wall Mount Assembly Instructions
Note: The most important thing to remember is that if
the fan is at a level near people, it should be equipped
with OSHA approved Patterson nger guards. Please
contact your factory sales representative to order.
1. Secure Part A of the wall bracket to the solid
surface from which you will hang the fan. There
is a single mounting hole on the short end of the
part. Secure part A using a wall anchor, etc.
(Wall anchor not included.) Place a level on the
part.
2. Position part B under part A as shown and
situate part B in such a way so that part A
becomes level. Mark part B for the hole. Attach
part B using the appropriate wall anchor, (not
included).
3. Secure the “U” shaped yoke to the wall bracket
using the supplied 5/8” bolt and nut. If you plan
to add an oscillator, mount the yoke so that it
opens up. The bolt must go through all three
pieces. Check for level and stability.
4. The factory assembled fan head ts inside of the
“U” shaped yoke. Secure the fan head to the
yoke with the supplied nuts. Mount the fan head
so the motor capacitor is in up position.
Note: Due to continual product improvement,
items are subject to change without notice.
Patterson Fan Company, Inc
Blythewood, SC 29016
www.pattersonfan.com
800.768.3985

CW Column Wall Mount Assembly Instructions 34” Only
Note: The 6ALG2 fan head is equipped with OSHA
compliant nger guards. Mount the fan at desired
height making sure the fan is not in the headway of
personnel preferably out of reach. These fans are powerful and should not be mounted too close to personnel at work stations.
1. See yoke mount instruction for yoke to fan
assembly.
2. Assemble the column wall bracket as follows.
Secure Part A (horizontal bottom strut) to the
solid surface from which you will hang the fan
either a wall or column using appropriate wall
anchor (not included). This Part A has a wall
mount bracket with a 4 hole pattern for mounting
to surface.
3. Secure Part B to the wall allowing the bolt hole
to lineup where the fan yoke will be bolted to the
column wall bracket. The fan head and yoke are
suspended below the column wall bracket
allowing full 360° rotation left and right.
4. Secure the “U” shaped yoke to the end of the
column wall bracket where Part A and Part B
converge using the bolt supplied. The yoke
allows a 30+- degree tilt toward the oor for
directing air throw as desired.
5. Safety cable is mandatory. Use a length of
chain of cable to secure the fan to a solid
surface and attach the fan. Make sure cable
or chain is rated for the weight and purpose.
Patterson Fan Company, Inc
Blythewood, SC 29016
www.pattersonfan.com
800.768.3985

HV Ceiling Suspended Assembly Instructions
90°
X
2 X
1. Facing outlet of fan, drill 2- 5/16” diameter holes (1/2” for 34” fan) one at 10 and one at 2:00 position in front ange. Facing the inlet side of
fan, drill 1- 5/16” diameter hole (1/2” for 24” fans) at the 6:00 position in rear ange. Holes should be drilled just behind the bead of the fan
housing.
2. Attach two eyebolts to holes in top front of fan. Attach third eyebolt to back rear hole in fan.
3. By means of a mechanical lift (cherry picker, scissor lift, etc.) get the factory assembled fan head to the point where you plan to suspend it.
You will need three lengths of chain, three connectors, hardware for chains and bolt cutters.
4. Secure two lengths of chain to the beam or girder number 1 about two times the distance apart that the fan will hang down (see diagram).
The third length of chain should be centered between the two front lengths of chain and attached to beam number 2. Attach the chains to
the beams using your preferred method.
5. Connect the lengths of chain to the eyebolts on the factory assembled fan head using the chain connectors.
6. Rough focus the fan on your target while on the mechanical lift.
7. Get a co-worker to stand at the target mark. Make sure the power is turned off. Have someone plug the fan in.
Let the fan run for approximately 30 seconds (to get up to speed and settle itself down). With someone on
the oor, someone at the fan, and someone at the power, focus the fan. DO NOT ATTEMPT TO ADJUST THE
FAN WHILE IT IS RUNNING!
8. Remove excess chain with bolt cutters.
30°
Note: Due to continual product improvement,
items are subject to change without notice.

Yoke Yoke Mount Assembly Instructions 34” Only
Note: There are many acceptable methods for hanging a Patterson Yoke Mount 34 fan. The most important
things to remember are that the yoke must be securely
connected to a solid structure and that all materials use
to hang the yoke and fan must be rated for this type of
rigging and workload. Below is what we consider to be
the simplest method of fan suspension. Feel free to improvise, but please use caution and good judgment.
1. Assemble the yoke connecting side A with Side B to
the stud bolts of the fan housing. The factory
assembled fan head ts inside the “U” shapped yoke,
the threaded studs on each side of the fan t through
the predrilled holes on the “U” shaped yoke. Secure
the fan head to the yoke with the supplied nuts.
2. Assemble side A and side B of the yoke and connect
with supplied bolt.
3. Safety cable is mandatory. Use a length of chain of
cable to secure the fan to a solid surface and attach
the fan. Make sure cable or chain is rated for the
weight and purpose.
Note: Due to continual product improvement, items are
subject to change without notice.
Patterson Fan Company, Inc
Blythewood, SC 29016
www.pattersonfan.com
800.768.3985

End of Assembly Instructions

Please read carefully before assemble, install, operate or maintain any Patterson Fan Product.
Protect yourself and others by observing all safety information. Failure to comply with assmebly instructions, national electric codes and OSHA codes, could result in personal injury and/or
property damage. Retain instructions for future reference.

Please read carefully before assemble, install, operate or maintain any Patterson Fan
Product. Protect yourself and others by observing all safety information. Failure to
Caution
comply with instructions could result in personal injury and/or property damage. Retain
instructions for future reference.
Disconnect power source before installing or servicing. Failure to
disconnect power source can result in re, shock or serious injury.
1. Patterson products should be installed and serviced by qualied technicians only.
2. Follow all local electrical and safety codes, as well as the National Electric Code (NEC) and the Occupational Safety and Health Act
(OSHA) in the United States.
3. The unit should be installed, protected and fused in accordance with latest issue of the National Electrical Code, MEMA Standard
Publication No. MG2 and local codes.
4. Motor must be securely and adequately grounded. This can be accomplished by wiring with a ground, metal-clad raceway system,
using a separate ground wire connected to the bare metal of the motor frame, or other suitable means.
5. Always disconnect power source before working on or near a motor or its connected load. Lock open position and tag to prevent
unexpected application of power.
6. In accordance with OSHA requirements. Guarding is required if unit is mounted less than 7 feet above oor or where workers have access.
7. Keep hands and clothing away from moving parts.
8. Be careful when touching the exterior of an operating motor; it may be hot enough to cause injury. This condition is normal if operated
at a rated load and voltage and built to operate at higher temperatures.
9. Protect power cable from coming into contact with sharp objects.
10. Do not tangle power cable and never allow cable to come in contact with oil, grease, hot surfaces or chemicals.
11. Make certain that the power source conrms to requirements of your equipment.
Single Phase Motors
The factory assembled fan head is equipped with a 12 foot long cord and connector. To turn on fan, plut it in; to turn off fan, unplug it.
Three Phase Motors
A cord and connector is not supplied with three phase motors. These fans
will need to be tted with an appropriate cord and connector or hard wired directly to a power source. It the fan is supplied with nger
guards, the rear nger guard will need to be partially removed to access the motors internal wiring. Remove all but one of the self-tap-
ping screws and place them in a safe place. You will use them again. Rotate the guards around on the single self-tapping screw. Wire
the fan. Replace the guard using the saved self tapping screws.
When looking at the front of the fan, the blade should be turning clockwise. It it does not, eth electrical connection wires may need to
be reversed. If reversing the wires does not work, contact your factory representative.

Maintenance & Operating Instructions
All Patterson Fans are designed to be virtually maintenance free, but routine cleaning and inspection should be
performed on a regular basis. Clean the fan of all dust, dirt and grease. Regular cleaning will keep the fan
operating safely at optimal performance levels.
Oh an annual basis, we recommend that you inspect the following:
• Tightness of the blade
• Cracking of the blade around rivets, spider, and hub
• Integrity of motor mounts and welds
• Tightness of the safety ner/hand guards
• Tightness of bolts of mounting brackets
• Security of attachment to wall or other structureal member
• Security of the safety chain
If you nd any problems as a result of routine inspection or have any questions about assemly or operating
instructions, consult the trouble shooting guide in the OIPM manual or call factory sales representative at
800-768-3985.
For all parts contact Patterson Fan Company, Inc. direct at 800-768-3985.
Patterson Fan Company, Inc
www.pattersonfan.com
Blythewood, SC 29016
800.768.3985

Trouble Shooting Instructions
Warning: Electrical shock hazard, serious injury or death may occur, disconnect from electrical supply before
servicing these products.
Fan system: The head consist of four major parts: Housing, Guards, Motor and Blade. See trouble shooting array.
PROBLEM CHECK SOLUTION
Fan won’t run and makes no sound.
Fan motor won’t run and makes
humming sound.
Breaker trips or fuse blows when fan
is started.
Motor overheating and shutting off.
Restarting several minutes later.
Power cord, extension cord, circuit breaker.
Connections in motor junction box.
Connections on motor capacitor.
Connections in motor junction box.
Conrm free rotation of the blade.
Connections on motor capacitor.
Connections on motor capacitor.
Blade rotation.
Motor voltage connections match power
source voltage.
Inspect motor barrel for damage.
Extension cord too small.
Inlet air obstructed.
Motor voltage connections match power
source voltage.
Reconnect power, extension cord or reset
breaker.
Verify connections, match motor data plate.
Reattach any loose connections.
Verify connection with motor data plate.
Shift blade on motor shaft.
Reattach any loose connections.
Replace motor.
Reattach any loose connections.
Shift blade on motor shaft.
Check source voltage.
Replace motor.
Replace with heavier cord.
Provide additional inlet clearance.
Check source voltage.
Replace motor.
Please contact your Patterson Sales Representative for further questions. 800-768-3985
 Loading...