


Patrol
PC
344 John Dietsch Blvd., Unit 1 & 2
North Attleboro, MA 02763
www.patrolpc.com
508.699.0458
[RT-12i USER MANUAL]
An Introduction to Your New RT-12i Ultra-Rugged Tablet Computer

REV 1 [09.24.2012]
RT-12i USER MANUAL
2
Patrol PC
344 John Dietsch Blvd., Units 1 & 2
North Attleboro, MA 02763
www.patrolpc.com
508.699.0458
Installation Guide....................................................................................................................................
3
Overview of RT12-i Bezel........................................................................................................................
6
Using the RTi Control Panel....................................................................................................................
7
"Main Setup" Tab............................................................................................................................
8
"LCD Brightness" Tab......................................................................................................................
10
"Vehicle Control" Tab......................................................................................................................
12
"Speed Buttons" Tab.......................................................................................................................
14
"Hot Keys" Tab................................................................................................................................
16
"Power" Tab....................................................................................................................................
18
"System Info" Tab...........................................................................................................................
20
Troubleshooting......................................................................................................................................
21
Appendix..................................................................................................................................................
22
Setting the Auto On/Off Threshold.................................................................................................
22
Backing Up System Settings............................................................................................................
23
RT-12i Options.................................................................................................................................
24
Hard Drive Access............................................................................................................................
25
Certified Solid State Hard Drives.....................................................................................................
29
Index........................................................................................................................................................
30
[WELCOME]
Thank you for purchasing the Patrol PC RT-12i Ultra-Rugged Tablet.
Proudly designed and manufactured in the USA for use in Police, Fire,
and EMS vehicles, your product was built to perform under a wide
range of punishing field operating conditions. We expect it will
deliver years of reliable service to you. Should you have any questions
about our product, we welcome your inquiries and calls.
TABLE OF CONTENTS
REV 1 [09.24.2012]
RT-12i USER MANUAL
3
[Installation Guide]
POWER REQUIREMENTS
This product is designed to run on 10-15 Volts DC (3 Amps typical, 7 Amps max).
NOTICE FOR UNITS EQUIPPED WITH FANS
If your unit is equipped with a fan, ensure that it is installed in a location where there is sufficient clearance for
air to flow into the fan on the back of the case and out of the air outlet on the top of the computer.
MOUNTING OPTIONS
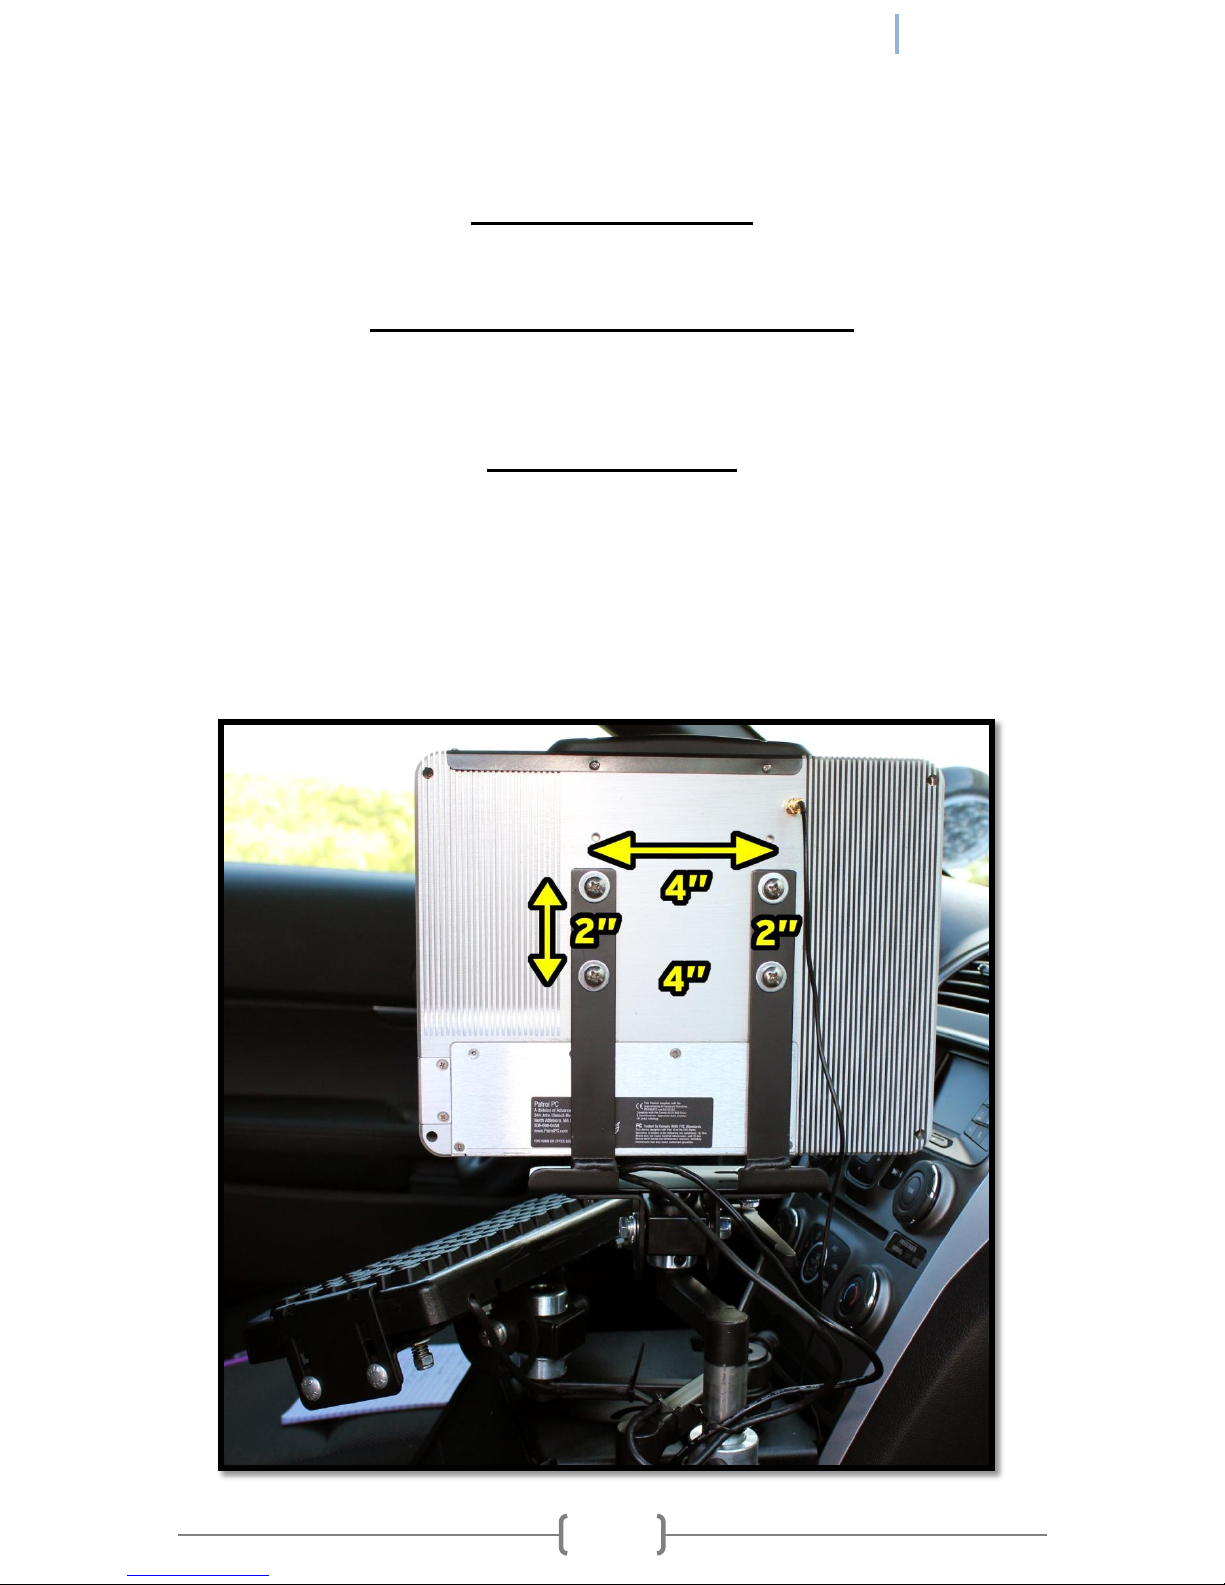
Patrol PC tablets are designed to be easily deployed in any marked and unmarked patrol vehicle, using a wide
variety of vehicle mounting hardware options from HiNT Peripherals, Havis, Gamer-Johnson, Jotto Desk, and
Ram Mounting Systems. Due to our clean all-in-one tablet design, a typical Patrol PC install will take up less
cockpit space, will be more ergonomically friendly and easier to use, will use less mounting hardware and
require less installation labor, saving you both time and money as compared to other multi-piece or docked
solutions. To mount our tablet, all you need is four screws and a mounting bracket with the following hole
spacing:

REV 1 [09.24.2012]
RT-12i USER MANUAL
4
TYPICAL INSTALL
Car installs vary greatly between each car make and model. A general guideline for a typical car install is
provided below.
1. Locate a 12 Volt (DC) always-on power cable. Avoid using the lighter adapter power, since this line is
switched on or off with the ignition.
2. Disconnect the positive power cable from the car battery.
3. Splice the supplied power cable (with 10 amp fuse) with the always-on power cable. Connect the ground
wire to a solid ground point.
4. Re-connect the positive battery terminal. With a multi-meter, check the connector of the RT-12i power
cable for 12 Volts DC and ensure that there are no shorts between the positive cable and ground.
5. Install the computer mount per manufacturer instructions.
6. Plug in the power cable and all USB cables/peripherals, then secure the wires with the tie wraps. Leave
service loops to avoid straining the plugs.
REV 1 [09.24.2012]
RT-12i USER MANUAL
5
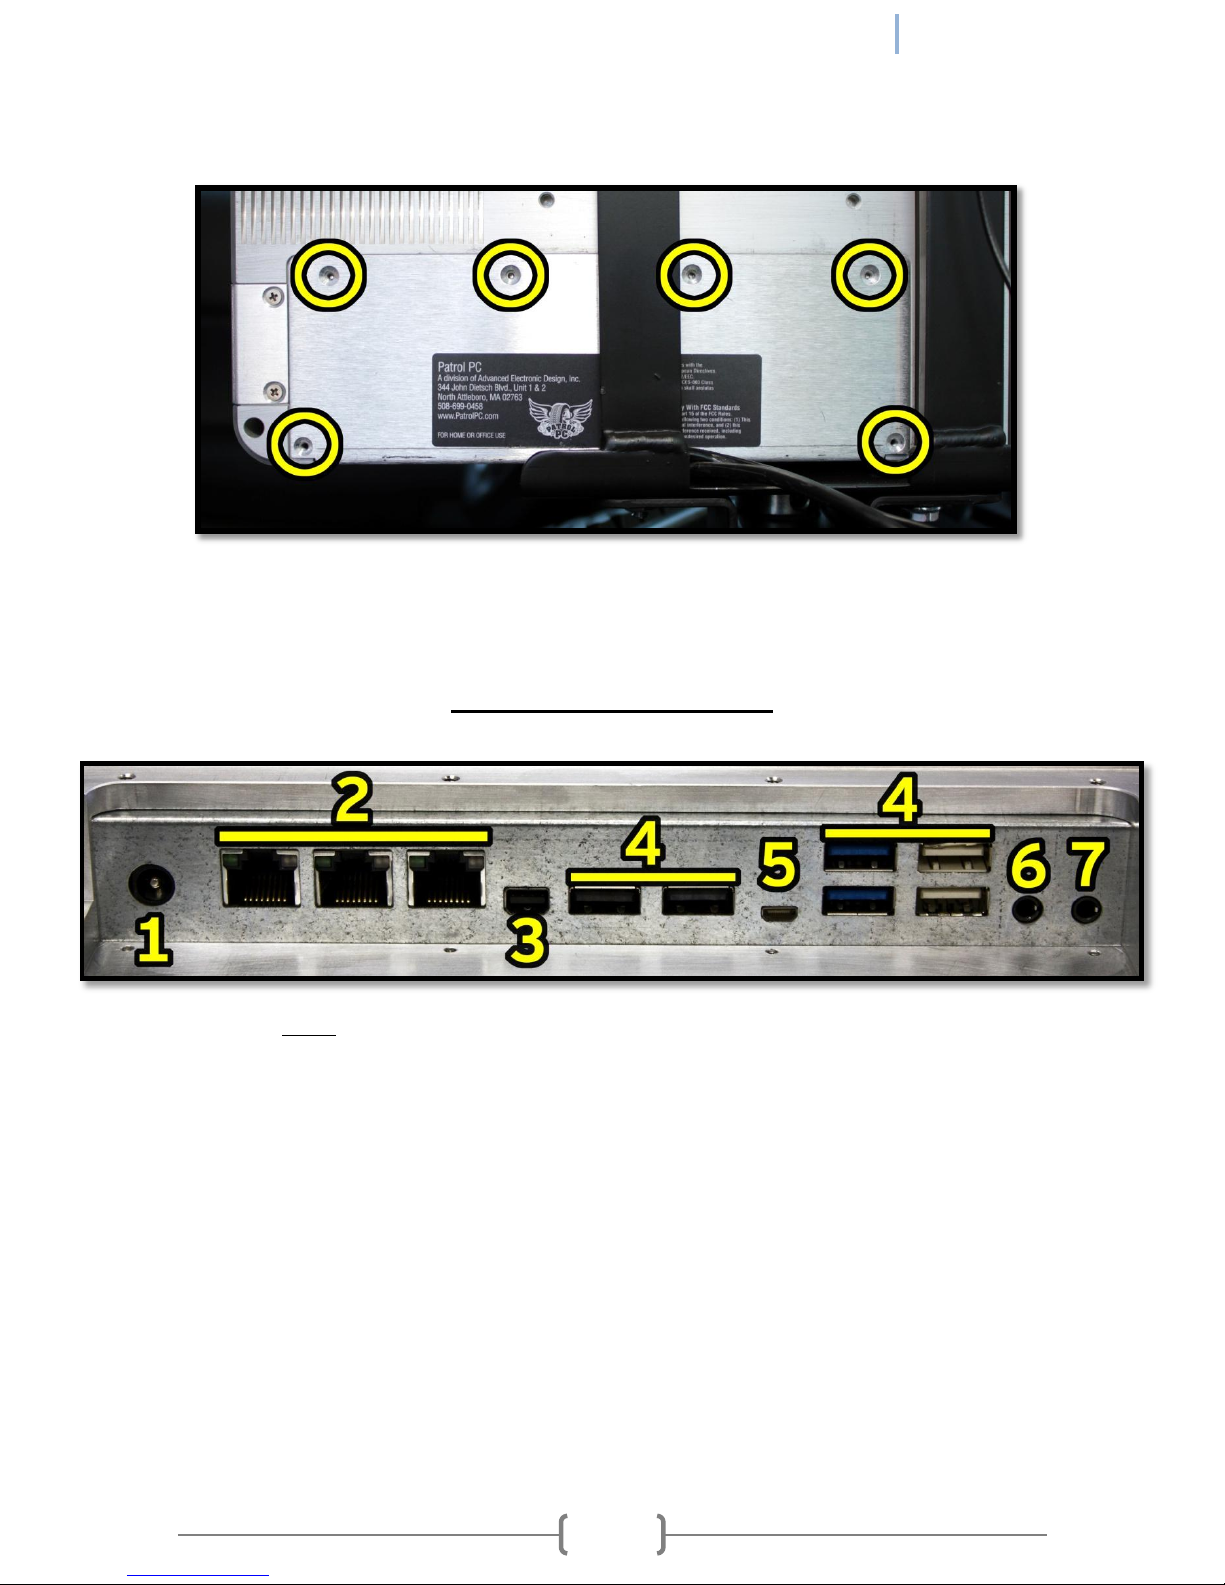
7. Turn on the RT-12i to check functionality. If it boots successfully, shut down computer, then secure the
rear connector cover by screwing in the screws circled below.
8. Mount the tablet and keyboard (if required) to the computer mount per manufacturer instructions. Adjust
the computer and keyboard position as needed.
REAR PANEL CONNECTIONS
NOTE: Some ports are optional and may not be installed in all units.
1. Power Connector - Connect the power cable here.
2. Ethernet Ports - Gigabit Ethernet Ports.
3. Display Port - Display port video output.
4. USB Ports - USB 2.0 ports.
5. Micro HDMI Port - Micro HDMI video output.
6. Microphone In Jack - 1/8" Microphone Input.
7. Headphone Out Jack - 1/8" Headphone Output.
REV 1 [09.24.2012]
RT-12i USER MANUAL
6
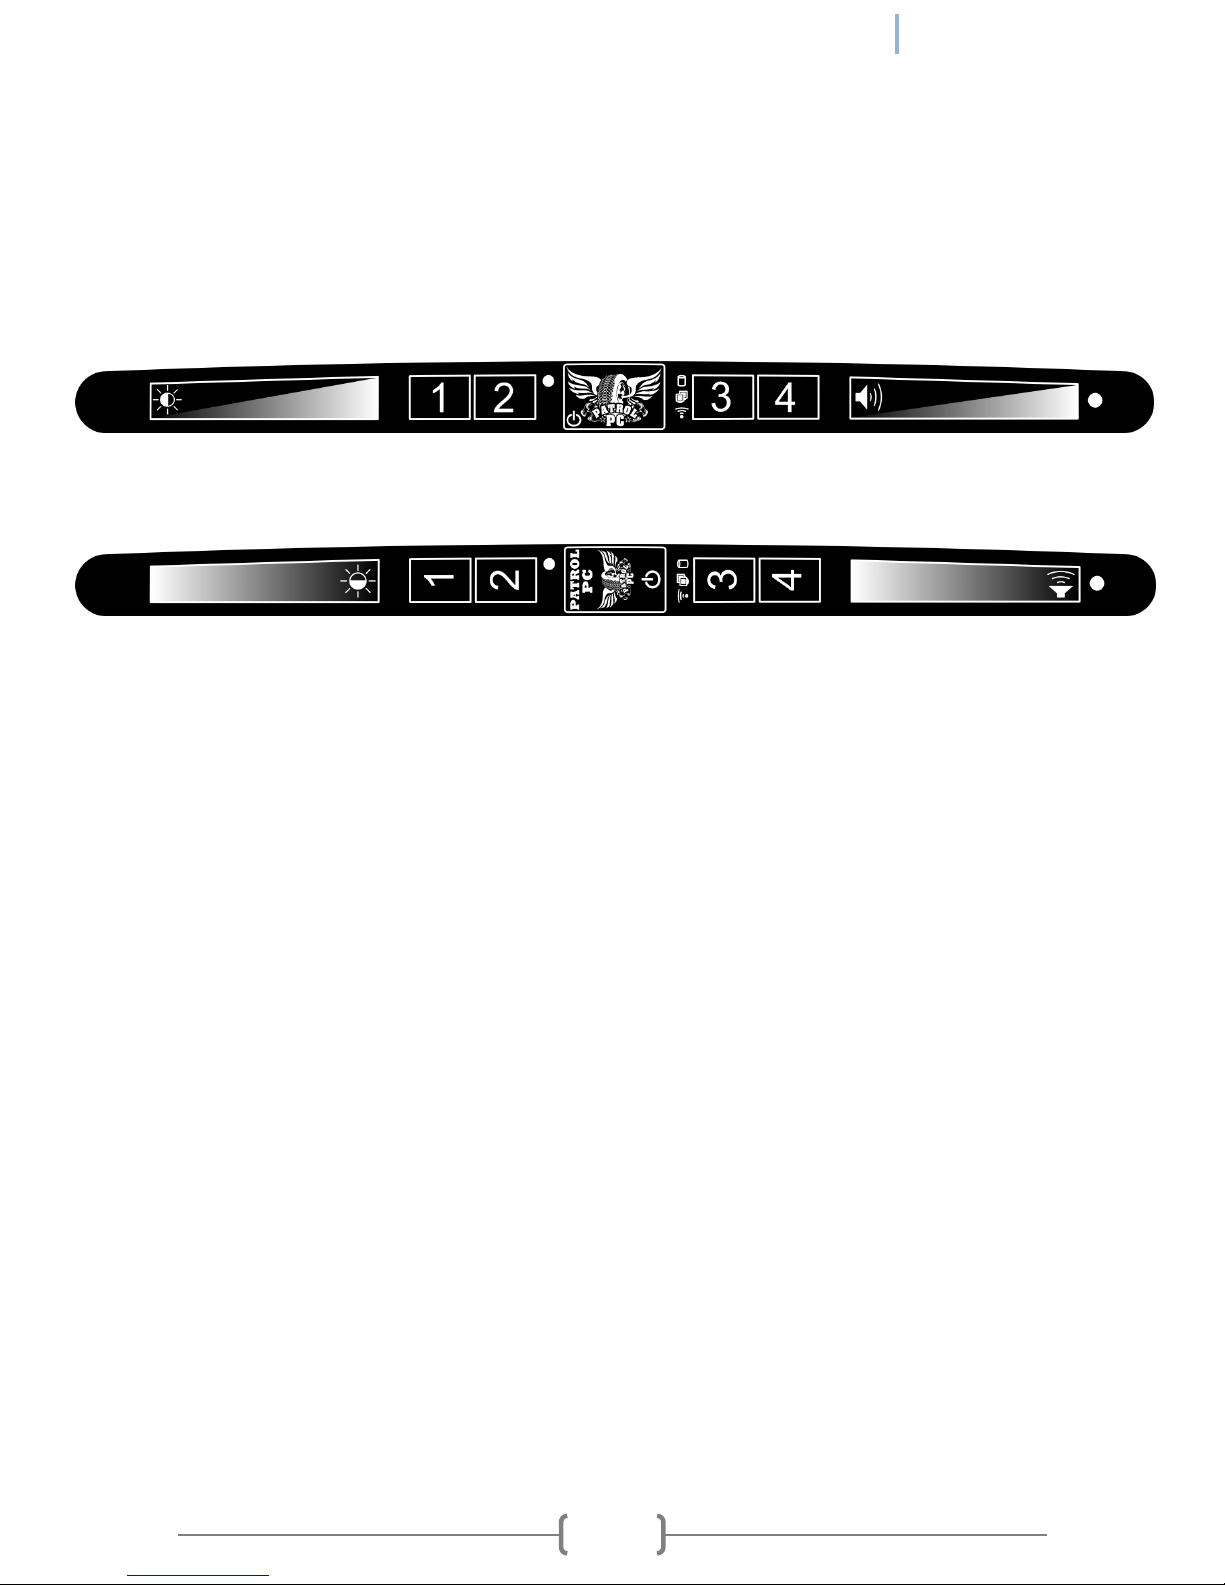
[Overview of the RT-12i Bezel]
The RT-12i bezel has a row of touch-sensitive buttons and one physical power button. There are also 4 status
LEDs, including hard disk and network activity LEDs, which can be turned off if desired. The assignable buttons
(1,2,3,4) are a convenient way to launch applications or perform other tasks.
Normal Orientation Bezel
1 2 3 4 3 2 5 6
Port-scape Orientation Bezel
1 2 3 4 3 2 5 6
1. Brightness Slider: Slide your finger across this area to increase or decrease screen brightness. You may also
touch the slider at any point to quickly set the brightness to the corresponding value.
2. Assignable Buttons 1-4: Buttons can be assigned to various functions (see pages 13-14 for more info).
3. Status LED's: Different LED's light when there is any hard disk, wired network, or wireless network activity,
as well as other functions (see pages 7-8 for more info).
4. Power Button: Press this button to turn on the computer. This can also be used as the sleep or hibernate
button while in Windows.
5. Volume Slider: Slide your finger across this area to increase or decrease speaker volume. You may also
touch the slider at any point to quickly set the volume to the corresponding value.
6. Ambient Light Sensor: Detects the amount of ambient light when the screen is in Auto Bright mode (see
pages 7-8 for more info).

REV 1 [09.24.2012]
RT-12i USER MANUAL
7
[Using the RTi Control Panel]
The RTi Control Panel is a great tool to customize your RT-12i computer to your personal preferences.
Speed Buttons: Assignable shortcuts to various programs (see pages 11-12 for more info).
Speakers: Volume sliders, buttons, and mute function.
Power: Turn off, hibernate, or put your computer to sleep (see pages 5-6 for more info).
LCD Off: Turns off the LCD backlighting until the touch screen, brightness slider, volume slider, mouse, or track
pad is touched.
More Info: Information on the computer battery if it is installed.
Minimize: Minimize the RTi control panel window.
Setup: Change various computer settings (see pages 5-17 for more info).
REV 1 [09.24.2012]
RT-12i USER MANUAL
8
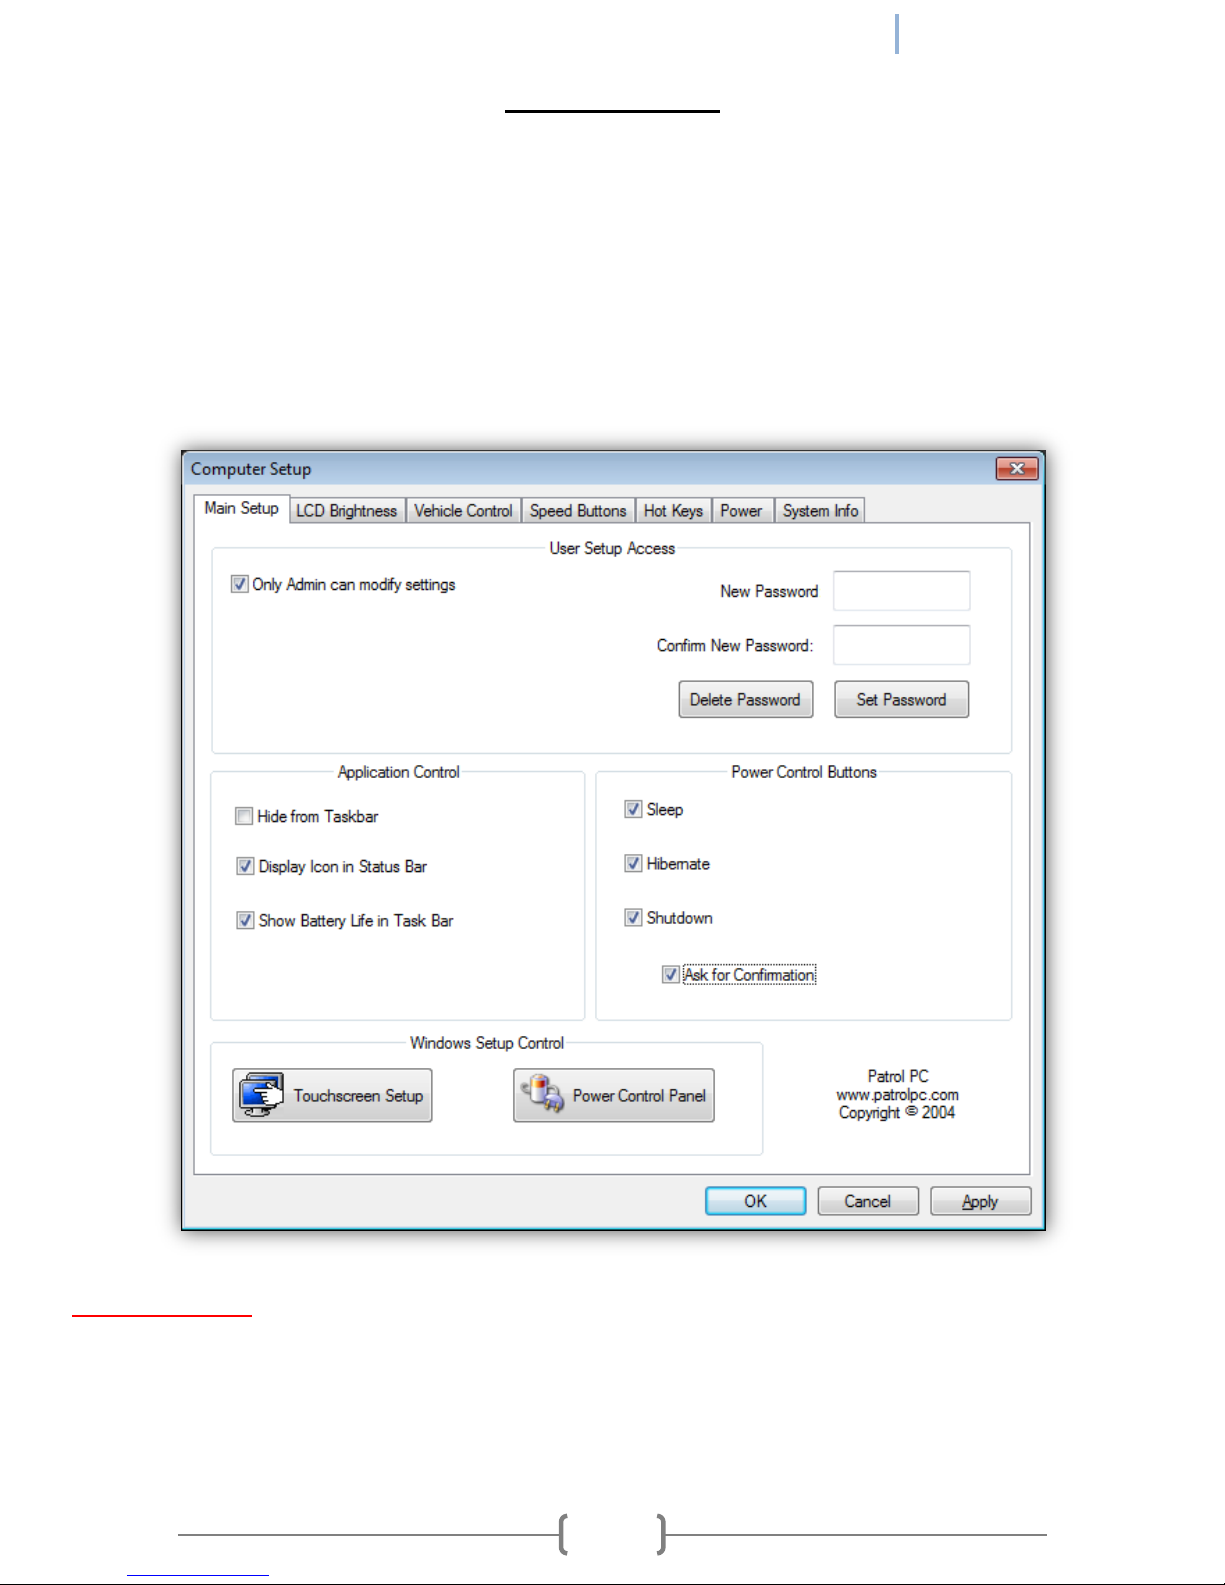
COMPUTER SETUP
Click "Setup" in the RTi Control window to access many of the most important settings of the computer.
NOTE: Make sure to click "Apply" after any setting is changed to ensure the setting is saved into memory.
"Main Setup" Tab
The Main Setup tab has an assortment of top-level control panel settings. You can create a password to get
into the settings. You can also change which buttons are available in the RTi Control Panel window. See below
for more details.
User Setup Access
Only Admin can modify settings - If check-marked, only a Windows account with Administrator credentials
can view or change the RTi Control Panel Settings.

REV 1 [09.24.2012]
RT-12i USER MANUAL
9
Password Section - If a password is desired to view and make changes to the RTi Control Panel settings, type
the desired password in both fields, then press "Set Password". The next time you try to enter the Computer
Setup page, it will require a password to view and make changes to the RTi Control Panel settings. To remove
the password, just click "Delete Password".
Application Control
Hide from Taskbar - If check-marked, the RTi Control Panel program will not show up on the Windows
Taskbar.
Display Icon in Status Bar - If check-marked, an icon for the RTi control panel will be present in the Windows
status bar.
Show Battery Life in Task Bar - If check-marked and if a battery is installed, a battery life meter will be present
in the Windows task bar.
Power Control Buttons
Sleep - If check-marked, a button will be present in the RTi Control Panel window to put the computer into
sleep mode.
Hibernate - If check-marked, a button will be present in the RTi Control Panel window to put the computer
into hibernate mode.
Shutdown - If check-marked, a button will be present in the RTi Control Panel window to shut down the
computer.
Ask for Confirmation - If check-marked, a confirmation message will appear when trying to press the Sleep,
Hibernate, or Shutdown buttons in the RTi Control Panel window.
Windows Setup Control
Touchscreen Setup - A shortcut to the touch screen settings and calibration software. Use this link if your
touch screen is not responding to your touch accurately.
Power Control Panel - A shortcut to the Windows power options.
 Loading...