

SC-DV5_Main.jpg
SC-DV5_Main.jpg
SC-DV5_Main.jpg
SC-DV5
The SC-DV5 body camera is an advanced recording system
with many options and features available. Please review the
manual to familiarize yourself with the functions of this camera.
Troubleshooting: If you are having problems with your
camera, please first fully charge it and power it on, then press
the reset button. Pressing the reset button will force the camera
to shut off. Press the power button to turn the device back on
and your device should now be working properly.
Note: Resetting the device will not delete any files.
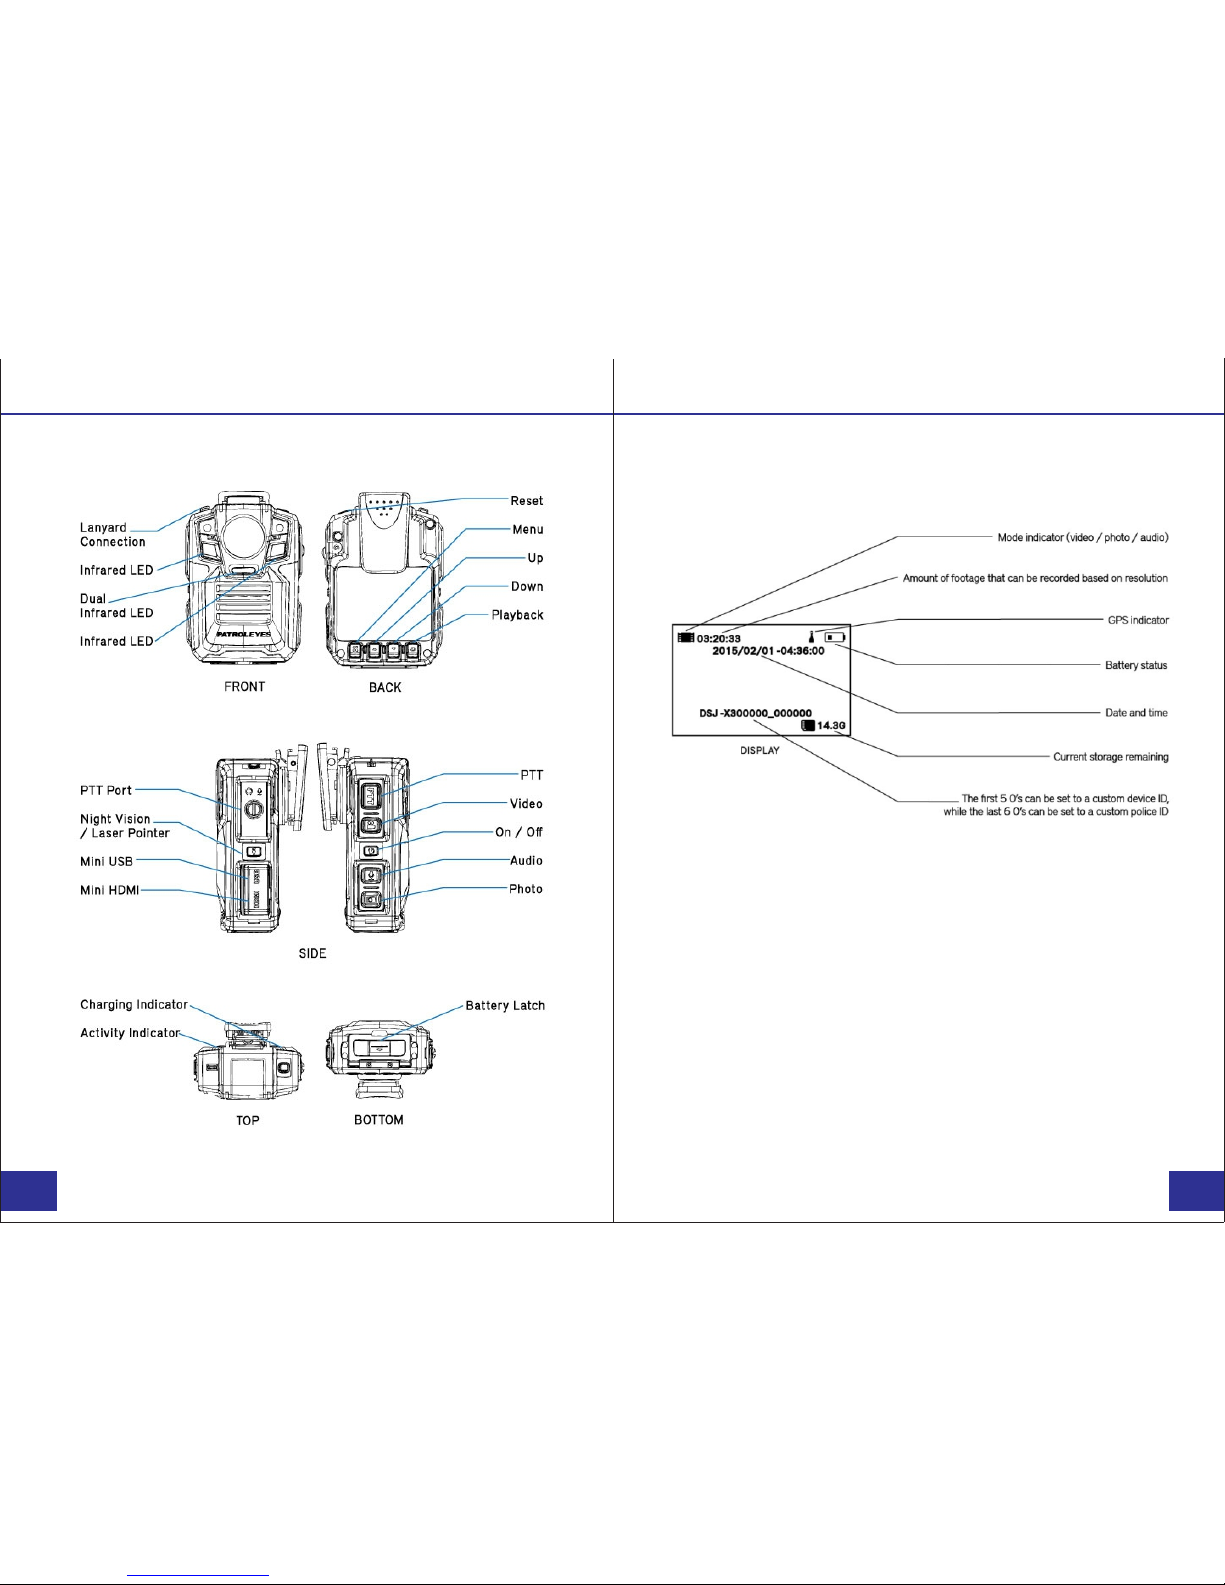
Overview Overview
Camera: On-screen Display:
PAGE PAGE
01/25 02/25

• Fully charge the camera using the included USB cable and
charger for 3-4 hours. The charging indicator will turn red when
charging. When the device is fully charged, the red light will
turn off.
• Confirm that the date and time on your device are correct and
enter your device ID and badge ID through the camera
management software
Note: The LCD screen protectors will help prevent scratches
and do not interfere with the night vision capability. Keep the
camera lens clean and free of debris with a soft cloth.
Wearing your Body Camera Properly:
On your chest (uniform):
• Attach the camera clip to the front of your uniform.
• Rotate the camera clip 45° and clip it to the top of your
uniform.
On your shoulder:
• Using the optional epaulette mount, clip the camera to the
bracket on the mount and attach the mount to your uniform.
On your waist:
• Clip the camera to your belt. To aim the camera’s lens higher,
simply wedge or shim a small piece of foam or other material
between the camera clip and LCD and as close to the base of
the clip’s attachment as possible.
Basic Operation:
1) Press and hold the Power button (located in the middle of
the right side of the camera) for about 2 seconds. You will hear
a chime and the camera will vibrate. A green indicator light on
top of the camera will turn on and remain green while it is
powered on. The camera and LCD monitor will turn on and
enter into standby mode. The video preview will be displayed
on the LCD.
2) The video preview mode displays recording time, battery
indicator, device ID, storage capacity, and camera view.
3) Press and hold the Power button for about 2 seconds and
camera will turn off. You will hear a sound and the camera
will vibrate before it powers off. The green indicator light will
also turn off.
Transfer & manage files on your computer:
(compatible with Windows XP, Vista, 7, 8 & 10, and Apple)
1) Connect the camera to your computer via the USB cable.
2)Open the related Removable Disk drive (usually D: or E:
drive) in “My Computer”.
3) Double click to view the folder contents then click on each
file to view, transfer, or delete the media files.
PAGE PAGE
03/25 04/25
Before Use Getting Started

Video Recording:
a. To record a video, press the Record button (located on the
right side of the device with a recorder symbol on it). The
unit will give two short vibrations. The video camera recorder
symbol on the LCD display will turn red and the red indicator
light will turn on, indicating the camera is now recording.
b. Press the Record button again to stop recording. The unit
will vibrate two times and the video camera recorder symbol
will stop blinking and turn white. The video has now been
saved.
c. When recording during the night or in a dark environment,
press and hold the Night Vision button (located on the
middle of the left side of the device). The infrared (IR) LED
lights will turn on and the device will enter into night mode.
The video recorded in this mode will be in black and white.
One Touch Recording:
When the unit is powered off, press and hold the record button
for 3 seconds. The device will turn on and automatically start
video recording.
Photograph Feature:
a. To take photos, press the Camera button (located under the
Audio button on the lower side of the device). The camera
will start taking pictures similar to a digital camera.
b. To take photos while video recording, press the Camera
button and the camera will capture a photo of the picture
recorded at that time without interrupting the video recording.
PAGE PAGE
05/25 06/25
c. To take photos at night or in the dark, press the Night Vision
button to go into night mode and turn on the IR LED lights.
Photos taken in night mode will be in black and white.
Flashlight LED Lights:
a. Press and hold the photo button for 4 seconds to turn on
white flashlight LED lights. The lights will provide minor
illumination to improve image quality when necessary.
b. To turn the flashlight LED lights off, press and hold the
photo button for 4 seconds.
Audio Recording:
a. To record audio only, press the Microphone button (located
below the Power button, with a microphone symbol on it).
The camera will vibrate once briefly and a recording timer
will appear on the LCD screen display.
b. To stop recording, press the Microphone button again. The
camera will vibrate once briefly and return to the video
preview. The audio recording will end and will be saved as
an audio file.
Recording Recording

Users are able to view previously recorded video files using the
following process.
a. Press the Playback button to go to the Playback Menu.
b. Use the up arrow or the down arrow buttons to select the
desired icon and then press the Confirm/Menu button to
display all of the saved files of the selected type. This is the
same for video, audio, and picture files.
c. Select the video file to view by using the Up/Down buttons.
After selecting the video file, press the Confirm/Menu button
to see the recorded video in full screen.
d. To return to the Playback Menu, press the Playback button.
e. To return to the Video Preview screen display, continue to
press the Playback button.
.
PAGE PAGE
07/25 08/25
To go to the SET UP interface, press the Confirm/Menu button
(located below the LCD monitor display).
1) Resolution
a. In the SET UP Menu, select “Resolution” and press the
Confirm/Menu button.
b. There are five video resolutions to select from:
1. 1920x1080P at 30fps
2. 1440x1080P at 30fps
3. 1280x720P at 30fps
4. 848x480P at 60fps
5. 848x480P at 30fps
c. Select the video resolution you prefer and press the
Confirm/Menu button.
d. Press the Playback button to return to the previous menu.
Video/Photo/Audio Playback Setup - Resolution

Video Quality
a. In the SET UP Menu, select “Bitrate” and press the
Confirm/Menu button.
b. There are three options to select from:
1. High
2. Medium
3. Low
c. Select the video quality you prefer and press the
Confirm/Menu button.
d. Press the Playback button to return to the previous menu.
Note: This refers to the video bitrate. The higher the setting,
the better the video quality and the larger the video size. To
achieve the most battery life, please set to low.
PAGE PAGE
09/25 10/25
Photo Size
a. In the SET UP Menu, select “Photo Size” and press the
Confirm/Menu button.
b. There are four options to select from:
1. 5MP
2. 8MP
3. 12MP
4. 16MP
c. Select the photo resolution you prefer and press the
Confirm/Menu button.
d. Press the Playback button to return to the previous menu.
Setup - Video Quality Setup - Photo Size

Screen Brightness
a. In the SET UP Menu, select “Screen Brightness” and press
the Confirm/Menu button.
b. There are three options to select from:
1. High
2. Medium
3. Low
c. Select the Screen Brightness you prefer and press the
Confirm/Menu button.
d. Press the Playback button to return to the previous menu.
Photo Burst Mode
a. In the SET UP Menu, select “Burst Mode” and press the
Confirm/Menu button.
b. There are three options to select from:
1. Off (only takes one photo each time)
2. 3 Pictures
3. 5 Pictures
c. Select the Burst Mode you prefer and press the
Confirm/Menu button.
d. Press the Playback button to return to the previous menu.
PAGE PAGE
11/25 12/25
Setup - Burst Mode Setup - Screen Brightness

Volume
a. In the SET UP Menu, select “Volume” and press the
Confirm/Menu button.
b. There are four options to select from:
1. High
2. Medium
3. Low
4. Sound off
c. Select the Volume setting you prefer and press the
Confirm/Menu button.
d. Press the Playback button to return to the previous menu.
Device ID
a. In the SET UP Menu, select “ID” and press the
Confirm/Menu button. The first digit will be highlighted.
b. Press Confirm/Menu button a second time and the digit
will be highlighted and blinking :
c. Press Up/Down arrows to change to desired number or
letter then press the Confirm/Menu button.
d. Press the Down arrow to move to the next digit, then
repeat steps b. and c. until the desired device ID is set.
e. Press the Playback button to return to the previous menu.
.
PAGE PAGE
13/25 14/25
Setup -Volume Setup - ID

Date
a. In the SET UP Menu, select “Date” and press the
Confirm/Menu button. The year will be highlighted.
b. Press the Up/Down arrows to scroll to the correct year. Once
selected press the Confirm/Menu button to move to the
to the month.
c. Press the Up/Down arrows to scroll to the correct month.
Once selected press the Confirm/Menu button to move to
the day.
d. Press the Up/Down arrows to scroll to the correct day. Once
selected press the Confirm/Menu button and the date will
be set.
. .
Time
a. In the SET UP Menu, select “Time” and press the
Confirm/Menu button. The hour will be highlighted.
b. Use the Up/Down arrows the select the correct hour.
Press the Confirm/Menu button to move to the minutes.
c. Use the Up/Down arrows to select the correct minute. Press
the Confirm/Menu button and the time is set.
d. Press the Playback button to return to the previous menu.
Note: Set the time using the 24 hour standard.(Military Time).
PAGE PAGE
13/25 14/25
Setup - Date Setup - Time

PAGE PAGE
13/25 14/25
Setup - Night Grade Setup - Video Duration
Night Grade
a. In the SET UP Menu, select “Night Grade” and press the
Confirm/Menu button.
b. There are three options to select from:
1. High
2. Medium
3. Low
c. Select the setting you prefer and press the Confirm/Menu
button.
d. Press the Playback button to return to the previous menu.
Note: Night grade refers to the sensitivity of the night vision
recording while the infrared switch is in auto mode. The higher
the setting the more easily the camera will turn on night vision
recording, and the lower the setting the darker it will become
before night vision recording turns on.
Video Duration
a. In the SET UP Menu, select “Video Duration” and press the
Confirm/Menu button.
b. There are four options to select from:
1. 5 minutes
2. 10 minutes
3. 15 minutes
4. 30 minutes
c. Select the time interval you prefer and press the
Confirm/Menu button.
d. Press the Playback button to return to the previous menu.

Infrared Switch
a. In the SET UP Menu, select “Infrared Switch” and press the
Confirm/Menu button.
b. There are two options to select from:
1. Manual = press and hold the night vision button
to turn infrared recording on and off.
2. Auto = camera will automatically turn on infrared
recording once the amount of light becomes too
low for day time recording.
c. Select the setting you prefer and press the
Confirm/Menu button.
d. Press the Playback button to return to the previous menu.
PAGE PAGE
15/25 16/25
Setup - Infrared Switch Setup - Motion Detection
Motion Detection
a. In the SET UP Menu, select “Motion Detection” and press
the Confirm/Menu button.
b. There are two options to select from:
1. On = camera will record video when it detects
motion.
2. Off = motion detection will be disabled.
c. Select the option you prefer and press the
Confirm/Menu button.
d. Press the Playback button to return to the previous menu.
Note: Just being in motion detection mode will not cause the
camera to automatically record. After turning motion detection
on, press the record button to activate this mode. Now the
camera will record next time motion is detected. Press the
Record button again to deactivate motion detection.

Setup - Pre Recording Setup - Post Recording
Pre-Recording
a. In the SET UP Menu, select “Pre-Recording” and press
the Confirm/Menu button.
b. There are two options to select from:
1. On = camera will pre-record 5-30 seconds prior to
pressing the Record button.
2. Off = pre-recording will be disabled.
c. Select the Pre-Recording option you prefer and press the
Confirm/Menu button.
d. Press the Playback button to return to the previous menu.
Note: The amount of time recorded depends on the video
resolution and bitrate settings. Lowering the resolution and
bitrate will increase the duration of the pre-recorded video.
PAGE PAGE
17/25 18/25
Post Recording
a. In the SET UP Menu, select “Post Recording” and press
the Confirm/Menu button.
b. There are four options to select from:
1. 10 seconds = camera will record for 10 seconds at
the end of each recording.
2. 20 seconds = camera will record for 20 seconds at
the end of each recording.
3. 30 seconds = camera will record for 30 seconds at
the end of each recording.
4. Off = post-recording will be disabled.
c. Select the option you prefer and press the
Confirm/Menu button.
d. Press the Playback button to return to the previous menu.
Note: While the post recording mode is enabled the camera
will not respond with any indication but will automatically stop
recording once the specified interval is complete.

Setup - Auto Screen Off Setup - Auto Power Off
Auto Screen Off
a. In the SET UP Menu, select “Auto Screen Off” and press
the Confirm/Menu button.
b. There are four options to select from:
1. Off
2. 1 minute
3. 3 minutes
4. 5 minutes
c. Select the Auto Screen Off option you prefer and press the
Confirm/Menu button.
d. Press the Playback button to return to the previous menu.
Note: The amount of time determines how long after the last
button press the screen will turn off.
PAGE PAGE
19/25 20/25
Auto Power Off
a. In the SET UP Menu, select “Auto Power Off” and press
the Confirm/Menu button.
b. There are four options to select from:
1. 10 min = camera will automatically turn off after 10
min without operation to prolong battery life.
2. 5 min = camera will turn off after 5 min.
3. 3 min = camera will turn off after 3 min.
4. Off = camera will not turn off automatically.
c. Select the Auto Power Off option you prefer and press the
Confirm/Menu button.
d. Press the Playback button to return to the previous menu.
Note: This mode allows you to save battery life when the
camera is not recording by automatically turning it off when
not in use.

Setup - GPS Setup - Loop Recording
GPS
a. In the SET UP Menu, select “GPS” and press the
Confirm/Menu button.
b. There are two options to select from:
1. On = enables GPS function
2. Off = GPS will be disabled.
c. Select the GPS option you prefer and press the
Confirm/Menu button.
d. Press the Playback button to return to the previous menu.
Note: The GPS signal is locked when the GPS icon turns from
pink to blue. You must wait for your camera to acquire GPS
signal if you wish to record your video with GPS location.
Please view our GPS video player software at:
www.stuntcams.com/sc-dv5
PAGE PAGE
21/25 22/25
Loop Recording
a. In the SET UP Menu, select “Loop Recording” and press
the Confirm/Menu button.
b. There are two options to select from:
1. On = If memory becomes full, camera will save
new video over oldest files.
2. Off = camera will stop recording when memory
becomes full.
c. Select the Loop Recording option you prefer and press the
Confirm/Menu button.
d. Press the Playback button to return to the previous menu.
Note: Loop recording is ideal for when being used as a dash
camera.

Setup - Default Settings Setup - Firmware Version
Default Settings
a. In the SET UP Menu, select “Default Settings” and press
the Confirm/Menu button.
b. There are two options to select from:
1. On = this will restore the camera to default settings.
2. Off = this will leave the camera on selected settings.
c. Select the option you prefer and press the
Confirm/Menu button.
d. Press the Playback button to return to the previous menu.
Note: Resetting the device settings will NOT delete and saved
photo or video files. This will only set the settings back to the
factory default settings.
PAGE PAGE
23/25 24/25
Firmware
a. In the SET UP Menu, select “Firmware Version”.
b. The current firmware version will display on the screen.
c. Press the Playback button to return to the previous menu.
Note: For our FAQ’s page, latest firmware upgrades, and more
please visit: www.stuntcams.com/sc-dv5

Drop-in Charging Station and Accessories
PAGE
25/25
Drop-in Charging Station:
The included drop-in charging station allows you to charge the
camera and additional batteries simultaneously. Simply
connect the USB charger to the dock, and the blue light on the
dock will turn on. Insert the camera by pushing the camera into
the charging station until it clicks into place. The camera will
then power on and begin charging. You can also charge an
additional battery by inserting it into the battery slot, the red
light will turn on while the battery is charging.
Note: The drop-in charging station will not allow you to transfer
data to your PC.
Optional Accessories:
• PTT Cable
• Additional Batteries
• Suction Cup Mount
• Epaulette Mount
• Carrying Case
• Lanyard
• Screen Protectors
• 8 Camera Docking Station
• Camera Management Software
• PatrolEyes Protection Plus Program
For a complete list of accessories and pricing, visit:
For the latest news and firmware upgrades, please follow us at:
www.stuntcams.com/patroleyesone
www.facebook.com/patroleyes
www.twitter.com/patroleyes
 Loading...