

Patroleyes SC-DV10 User Manual

SC-DV5_Main.jpg
SC-DV5_Main.jpg
SC-DV5_Main.jpg
SC-DV10
Overview Before Use
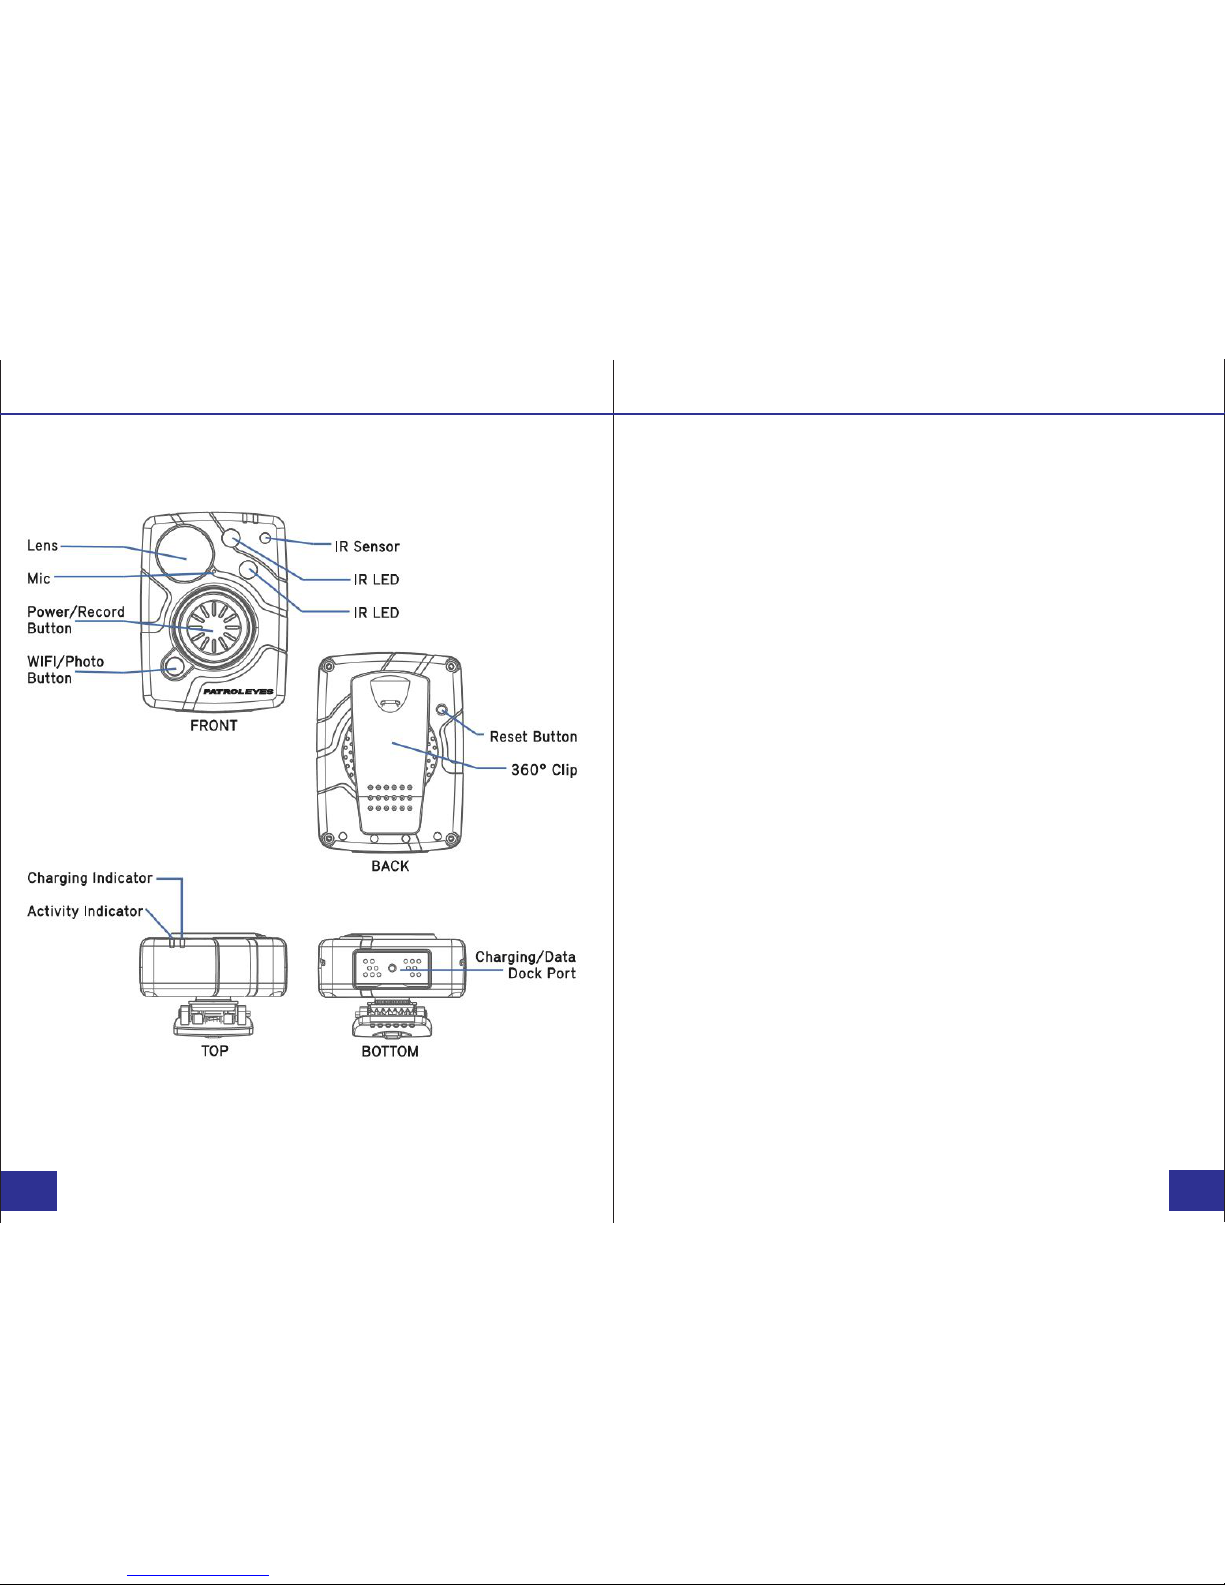
Camera:
PAGE PAGE
01/26 02/26
• Fully charge the camera using the included USB cable and
charging dock for 3-4 hours. The charging indicator will turn blue
when charging. When the device is fully charged, the blue light
will turn off.
• Confirm that the date and time on your device is correct and
enter your device ID and badge ID through the camera
management software.
Wearing your Body Camera Properly:
On your chest (uniform):
• Attach the camera clip to the front of your uniform.
• Rotate the camera clip 45° and clip it to the top of your
uniform.
On your shoulder:
• Using the optional epaulette mount, clip the camera to the
bracket on the mount and attach the mount to your uniform.
Removing the clip:
• Rotate the clip 45° horizontal or until you see a silver tab at
the bottom of the clip. Press that tab down and slide the clip
downwards. To re-attach the clip simply slide the clip back on.
the clip’s attachment as possible.
Troubleshooting: If you are having problems with your camera,
please first fully charge it and power it on, then press the reset
button. Pressing the reset button will force the camera to shut
off. Press the power button to turn the device back on and your
device should now be working properly.
Note: Resetting the device will not delete any files.

Basic Operation:
1) Press and hold the Power button (located in the middle of
the camera) for about 2 seconds. You will hear
a chime and the camera will power on. A green indicator light
on top of the camera will turn on, and the camera will turn on
and enter into standby mode. The green LED indicator will
remain on while the device is in standby mode.
3) Press and hold the Power button for about 2 seconds to
power off the device. You will hear a sound and the camera will
turn off. The green indicator light will also turn off.
Transfer & manage files on your computer:
(compatible with Windows XP, Vista, 7, 8 & 10)
1) Drop the camera into the charging station and connect it to
3) Enter your password to sign in (instructions on page 15)
PAGE PAGE
Getting Started Recording
Video Recording:
a. To record a video, press the Record button (located on the
front of the device). The unit will give five audio chirps and
the red indicator LED will turn on, indicating that the camera
is now recording.
b. Press the Record button twice rapidly to stop recording. The
unit will give seven audio chirps. The LED indicator will turn
back to green, and the video will be ended and saved. The
One Touch Recording:
When the unit is powered off, press and hold the record button
for 4 seconds until you hear an audio chirp. The device will turn
on and automatically start video recording.
Photograph Feature:
a. To take photos, press the WiFi/Photo button (located on the
front of the device under the Recording button). The camera
will give three audio chirps and take a photo similar to a
b. To take pictures while video recording, press the Photo
button and the camera will take a picture without
interrupting the video recording.
digital camera.
03/26 04/26
2) The device settings, battery life, storage space, and saved
media files can be viewed and edited via the Camera
Management Software (starting on page 14) or the smartphone
app (starting on page 5). The smartphone app will also allow for
previewing the camera view before and during recordings.
device will now return to standby mode.
to your computer via the included USB cable.
2) Open the “Camera Management Software”.
4) When the camera’s battery is less than 15%, two audio chirps
will sound every two seconds and when the SD card is full the
the red LED will flash only when the record button is pressed
PAGE PAGE
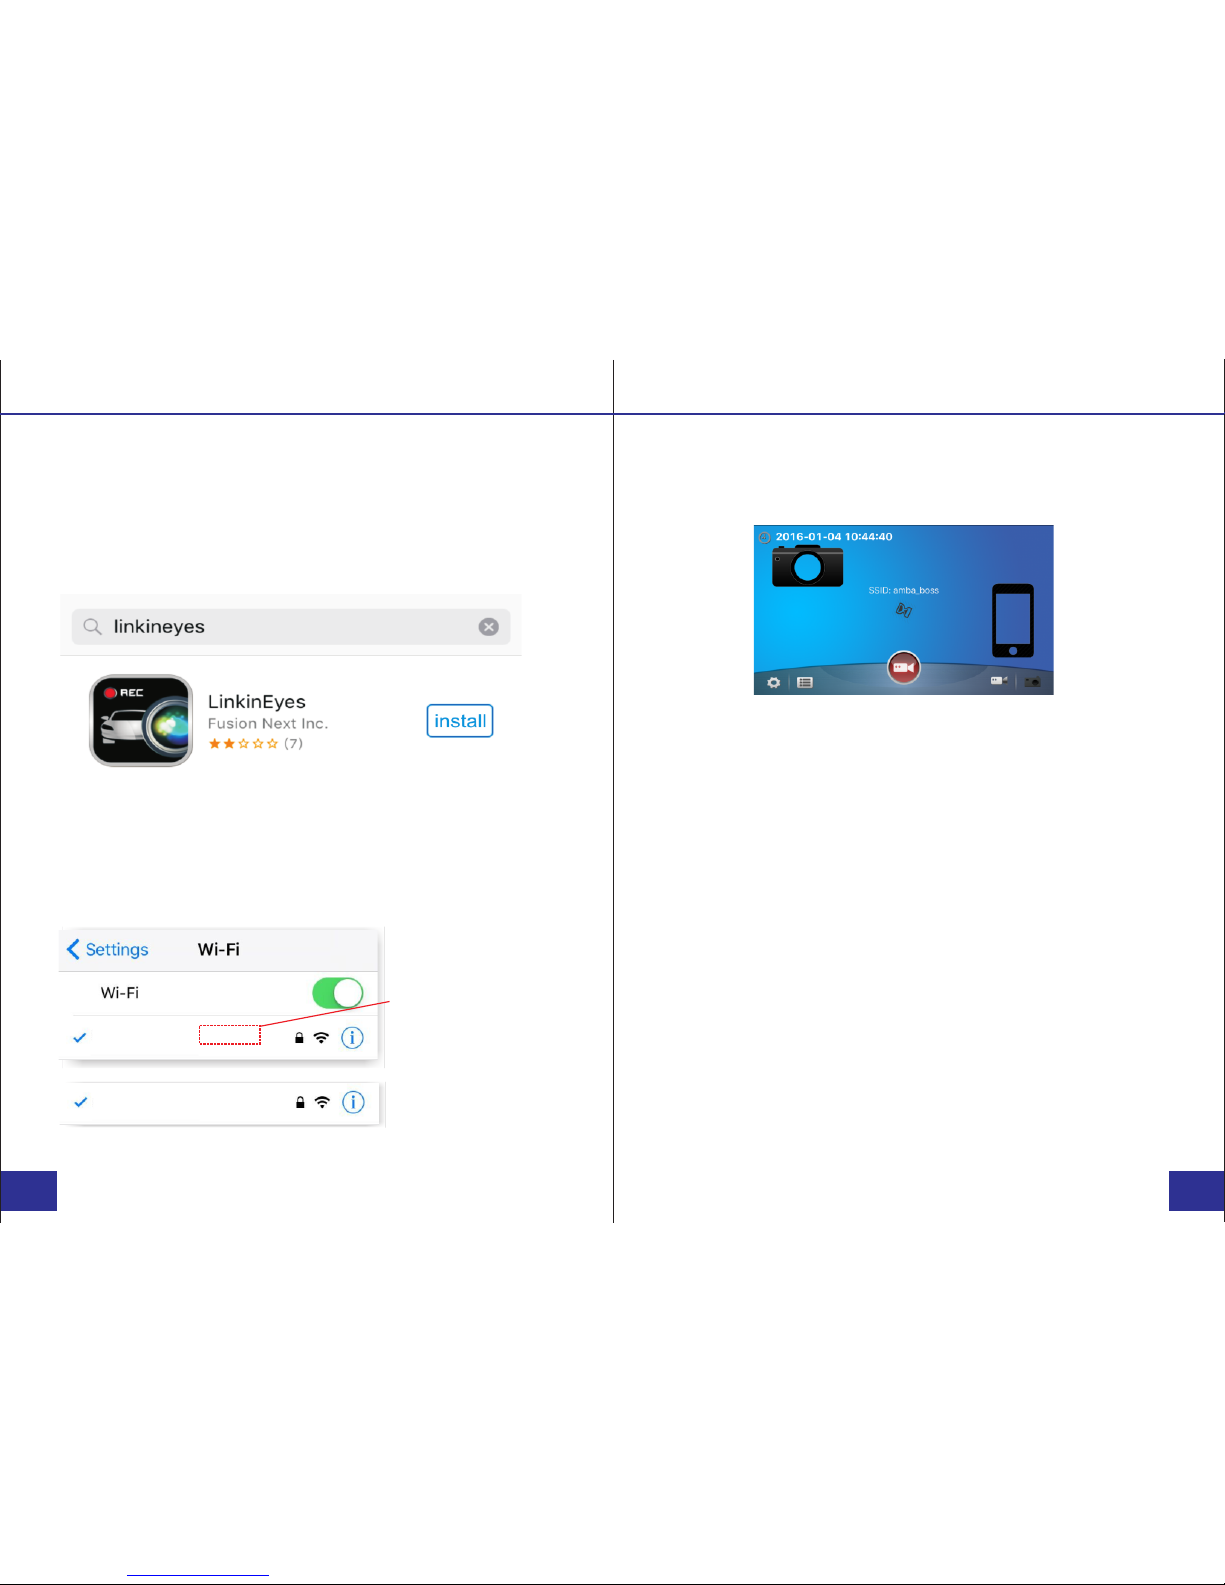
WiFi Phone App WiFi Phone App
Install WiFi App
a. Search “linkineyes” in the App Store, and install it on your
smartphone or tablet.
b. Turn on the camera’s WiFi by pressing and holding the WiFi
button for 3 seconds. The white WiFi indicator light will turn on.
AMBA_BOSS_AAB5B6
DMT_888888_666666
Default SSID.
Device/User ID SSID.
Device Serial Number
c. Connect to the camera through your device’s WiFi. Select
the WiFi network ending in your camera’s serial number, and
enter the password. The default password is 0987654321.
e. Press the Settings icon (located in the bottom left corner of
d. Open the “linkineyes” app to begin viewing on your phone.
Tap the red Recording icon (located in the center of your
screen near the bottom) to enter Preview Mode.
your screen) to enter the settings menu. From here, you can
adjust all of your camera’s settings from your smartphone or
tablet.
f. Press the File Explorer icon (located in the bottom left corner
of your screen, to the right of Settings) to view files saved on
your camera. From here, you can view saved videos and
photos and download them to your smartphone or tablet.
05/26 06/26
The WiFi Phone App displays recording time, battery indicator,
device ID, storage capacity, and camera view.

PAGE PAGE
App Preview Mode - Video Mode App Preview Mode - Photo Mode
The Preview Mode is the main screen while using the WiFi app.
Here you can view the current camera feed and record video.
a. To begin recording video, press the red Recording icon
(located in the center of the screen). The icon will begin
flashing, and the camera will now record video.
b. To end the recording, press the Recording icon. The icon will
stop flashing, and the camera will stop the recording and save
the video.
While in the Photo Preview Mode, the main screen shows the
current camera feed and allows for taking photos.
a. To change to Photo Mode, press the Photo icon (located on
the bottom right corner of the screen). The icon will change to
white and the camera will enter photo mode.
b. Press the red Shutter icon (located in the center of the
screen) to take a photo.
c. Press the plus and minus icons (located on the right side of
the screen) to zoom in and out.
d. To return to Video Mode, press the Video icon (located in the
bottom right corner of the screen, to the left of the Photo icon).
07/26 08/26
 Loading...