

Patrol Eyes DV10-PRO User Manual
USER MANUAL
Specifications
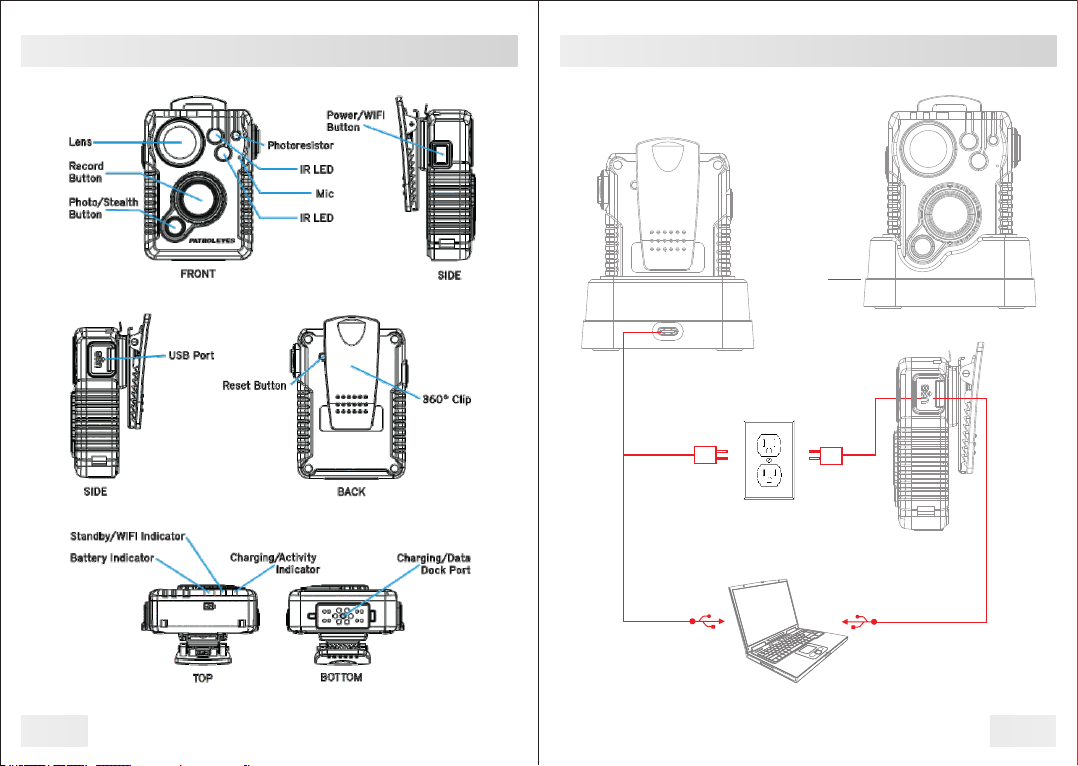
Charging
Charging
Drop-in Dock
Electrical Outlet
01
Charging
Data Transferring
Charging
PC
Data Transferring
0202

Before Use
Ÿ
Fully charge the camera using the included USB cable and charging
dock for 3-4 hours. The charging indicator will turn blue when
charging. When the device is fully charged, the blue light will turn off.
Ÿ Confirm that the date and time on your device is correct and enter
your device lD and badge ID through Cam Manager.
Wearing your Body Camera Properly
On your chest (uniform):
Ÿ Attach the camera clip to the front of your uniform.
Ÿ Rotate the camera clip 45° and clip it to the top of your uniform.
On your shoulder:
Ÿ Using the optional epaulette mount, clip the camera to the bracket on
the mount and attach the mount to your uniform.
Getting Started
3) Once Cam Manager is installed, login and click "Open File Explorer"
to view or delete the camera's files. Your camera will be shown as a
"Removable Disk", usually D: or E: drive in “This PC”. Double click on
the cameras drive and open the VIDEO/PHOTOS folder to view,
transfer, and delete files. See page 23 for folder details.
Audible Notifications
The camera uses audio chirps as a way of notifying you when your
cameras storage is full, low battery levels, and GPS notifications.
1 beep every 10 seconds indicates your storage is now lower than
10% free
1 beep every 2 seconds indicates your storage is now almost full and
the camera will stop recording soon
KlickFast Mounts:
Optional magnet, molle and epaulette mounts now available.
Basic Operation
1) Press and hold the Power button (located on right side of camera)
for about 2 seconds. You will hear a beep and the camera will power
on. The standby indicator LED will turn green and the standby
indicator will remain green while the device is in standby mode.
2) The device settings, battery life, storage space, and saved media
files can now be viewed and edited via Cam Manager (starting on
page 7) or the smartphone app (starting on page 29). The smartphone
app will also allow for previewing the camera before and during
recordings.
03
1 beep every 5 seconds indicates that your battery is lower than 2%
and your camera will shutdown soon
LED Indicators
Battery: Green = 50-100% battery life
Yellow = 2-50% battery life
Red = Less than 2% battery life
Standby/WiFi: Green = Standby mode
Blinking White = Searching for/Establishing WiFi
Solid White = WiFi connected/Active
Charging/Activity: Blue = Charging (will turn off when fully charged)
Purple = Recording + Charging
Solid Red = Recording
Blinking Red = Pre/Post Event recording
04

Recording
Camera Management Software
Video Recording
To record a video from standby, press the record button (located on
the front of the device). The device will beep five times and the activity
indicator LED will turn solid red, indicating that the camera is now
recording.
Press and hold the record button for 2 seconds to stop recording. The
device will beep seven times and the activity indicator will turn off and
the standby indicator will now turn green.
One Touch Recording
When the unit is powered off, press and hold the record button for 2
seconds until you hear a beep. The device will turn on and
automatically start video recording.
Pre and Post Recording
When pre or post event recording is enabled, the activity LED will blink
red. Pre record event recording can be set for up to two minutes while
post event recording can be set for up to one minute. To start normal
recording while in pre event recording mode, press the record button
and the activity LED will go from blinking red to solid red.
Power on Auto-Record
When the "Power on Auto-Record" function is switched on in Cam
Manager, the device will automatically start recording video when the
device is powered on.
Photograph Feature
To take a photo, press the photo button once. The activity indicator
will switch from green to red and the camera will beep 3 times.
To take pictures while video recording, press the Photo button. The
camera will beep one time and the camera will take a picture without
interrupting the video recording.
WiFi Feature
When powered on, you can turn the WiFi on or off without interruption
even while the camera is recording. Press the power button once in
order to turn WiFi on. A flashing white LED will indicate that the device
is searching for or creating a WiFi connection. When the device has
established a connection, the white LED will turn solid. To turn WiFi off,
press the power button once and the white LED will turn off.
Stealth Mode Feature
When powered on, you can turn the stealth mode feature on or off
without interruption even while the camera is recording. To turn stealth
mode on, press and hold the photo button down for 2 seconds. All LED
indicators and vibration sounds will be disabled, however the device
will still be operating. To turn stealth mode off, press and hold the
photo button down for 2 seconds. The camera will beep twice and the
LED indicators and vibration (if enabled in settings) will be re-enabled.
Transfer & Manage Files on Your Computer
(Compatible with Windows 7, 8 and 10)
Drop the camera into the charging station and connect it to your
computer via the included USB cable. You can also connect the cable
to your cameras USB-C port to connect to your PC. Open Cam
Manager and enter your password to sign in (instructions on page 8).
Note: Installing Cam Manager allows for managing saved data
and changing device settings.
05
06
Management Software-Login
Management Software-Camera Info
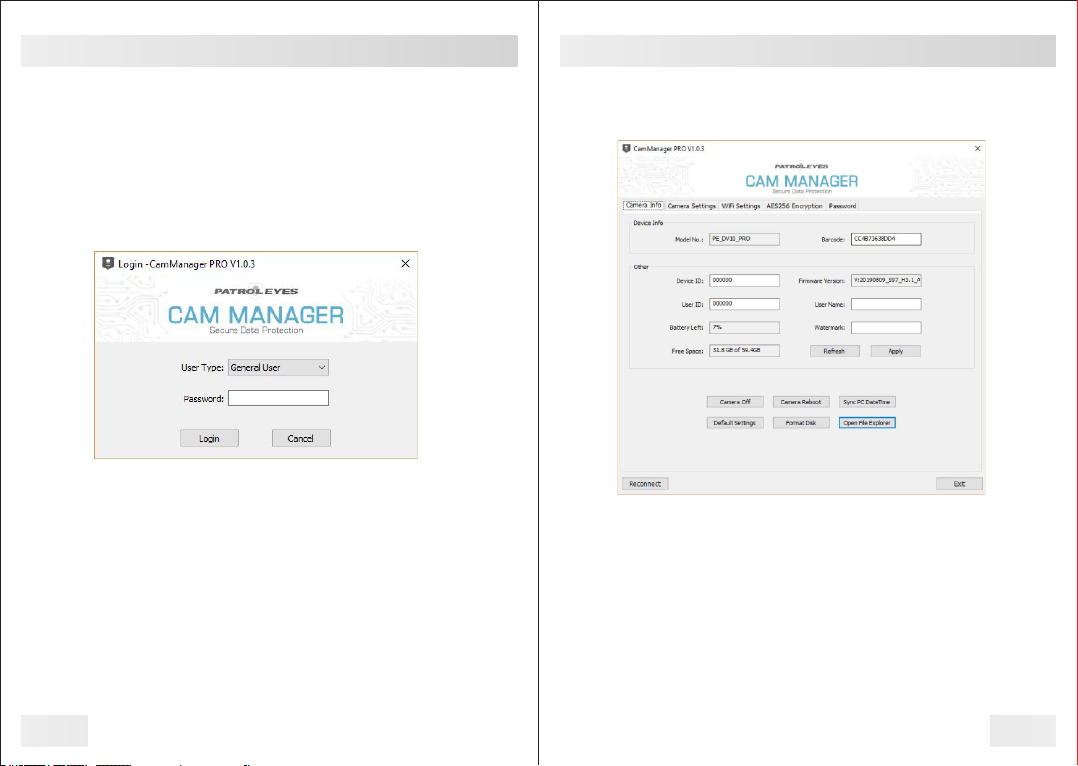
Management Software Login
Visit stuntcams.com/dv10-pro to download the "Cam Manager"
software on your computer and follow the instructions to install.
a. Place your camera into the charging station, and connect it to your
computer via the USB cable. Your camera will automatically power on
once connected. You can also connect your camera to the PC directly
via the USB-C port on the side of the camera.
b. Choose the "User Type" and enter the password. There are two
User Types, each with a different default password.
1. General User: This mode allows for viewing and downloading
media files only. The default password is: 000000
2. Administrator: This mode allows for changing device settings as
well as viewing and downloading media files. The default password is:
888888
Camera Info
a. After login, Cam Manager will open on the “Camera Info” tab.
b. From here you can change Device lD and User ID, as well as view
battery level and free space on the camera. Enter the new settings into
the text boxes, and click “Apply" to save.
c. Click "Refresh" to update battery levels and free space.
07
08
Management Software-Camera Info
Management Software-Camera Settings
d. Click "Open File Explorer" to view the camera's files. Cam Manager
will close and the "Removable Disk" for the camera will appear in File
Explorer. Open the VIDEO/PHOTO folder and from here you can view,
transfer, and delete files.
e. Click "Sync PC Date Time" to update your camera's date and time.
The new settings will be updated to your PC's current date and time.
f. Click "Format Disk" to format the camera’s memory. The files will be
DELETED immediately, and the free space status will be updated.
Barcode
This setting displays the unique ID of your device.
Firmware Version
This setting displays the latest firmware programmed on your device.
Battery Left
This setting displays how much battery life is remaining.
Free Space
This setting displays how much storage is remaining on your camera
before the built in memory is full.
Watermark
Entering text in the watermark setting box will result in a stamped
watermark in the lower right-hand corner of the file on any photo or
video.
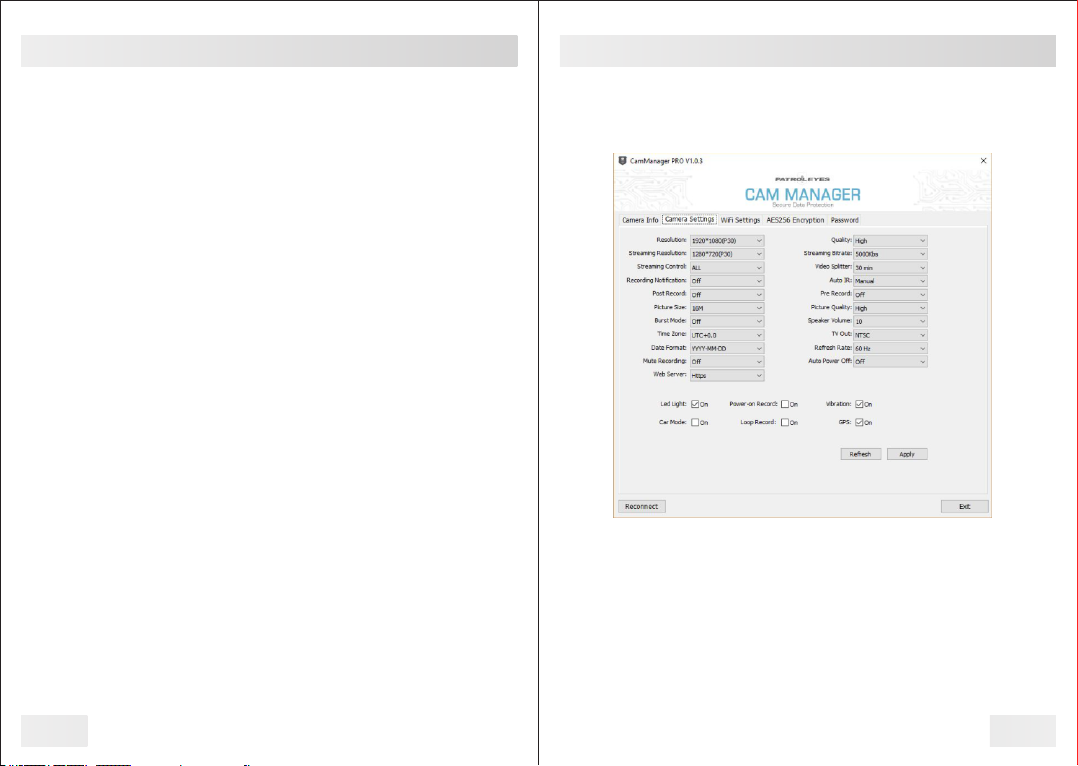
Camera Settings
a. Click the "Camera Settings" tab in Cam Manager.
b. From here you can change device settings. Select the setting you
wish to change, and a drop down will appear with all available options.
c. Click "Apply" to update settings with the new chosen options.
09
10
 Loading...