

Page 1
PA
j
SERVICE MANUAL for UOC TOP model ( Date: 2008-5-1 )
PATRIOT KM-21xx chassis KD-035 / KD-035S
37M10-6/37M10-7/55FM10-4/55FM10-6/55FM10-7/55SM10-4/55SM10-6/55SM10-7
( 1 ) Specifications & feature:
1. AC Power supply : 170~240V, 50/60Hz
2. Remote hand set battery: 3V ( AAA x 2pcs )
3. TV system RF input: PAL SECAM BG/DK , Video input: PAL/SECAM/NTSC 3.58/NTSC 4.43
4. Receiving channels : VHF-L, VHF-H, UHF
5. Program number : 200
6. Intermediate frequency ( Picture ): 38.9MHz
7. Horizontal frequency: 15625/15750 Hz, Vertical frequency : 50/60 Hz
8. Audio output power : 3W/ 8 ohm ( 2pcs 16 ohm speaker in parallel )
9. Side AV x 1 ( RCA socket )
10. Scart x 1 ( rear )
11. OSD language : English , Russian
( 2 ) Ad
1. +B voltage adjustment
a). Receive a color bar pattern , set picture to “Standard Mode”.
b). Use voltage meter to measure the DV voltage on Capacitor location C551 .
c). Adjust rheostat PR551 to get voltage meter reading as:
=108 8+/- 1V ------ 14”
=112 8+/- 1V -------21” PF
=125 8+/- 1V ------ 21” Slim
2. Service menu adjustment:
a) Enter service menu
Step 1. Set your TV set in TV mode.
Step 2. Press MENU key,digit keys 6,4,8,3 & Call key sequent, then Service manual M0 will
appear on the screen. Direct press 0,1,2 keys to go M0,M1,M2 pages.
b) Use Program + / - to select adjust item, use Volume + / - to set the data.
c) Enter M3 to M9 pages, need go to SETUP SELECT item in M2 page and press Volume+ , mute then 3
to 9 digit keys. Normally M3 to M9 pages do not need adjustment in production line.
d) Press STANDBY key to exit Service manual mode.
ustment manual:
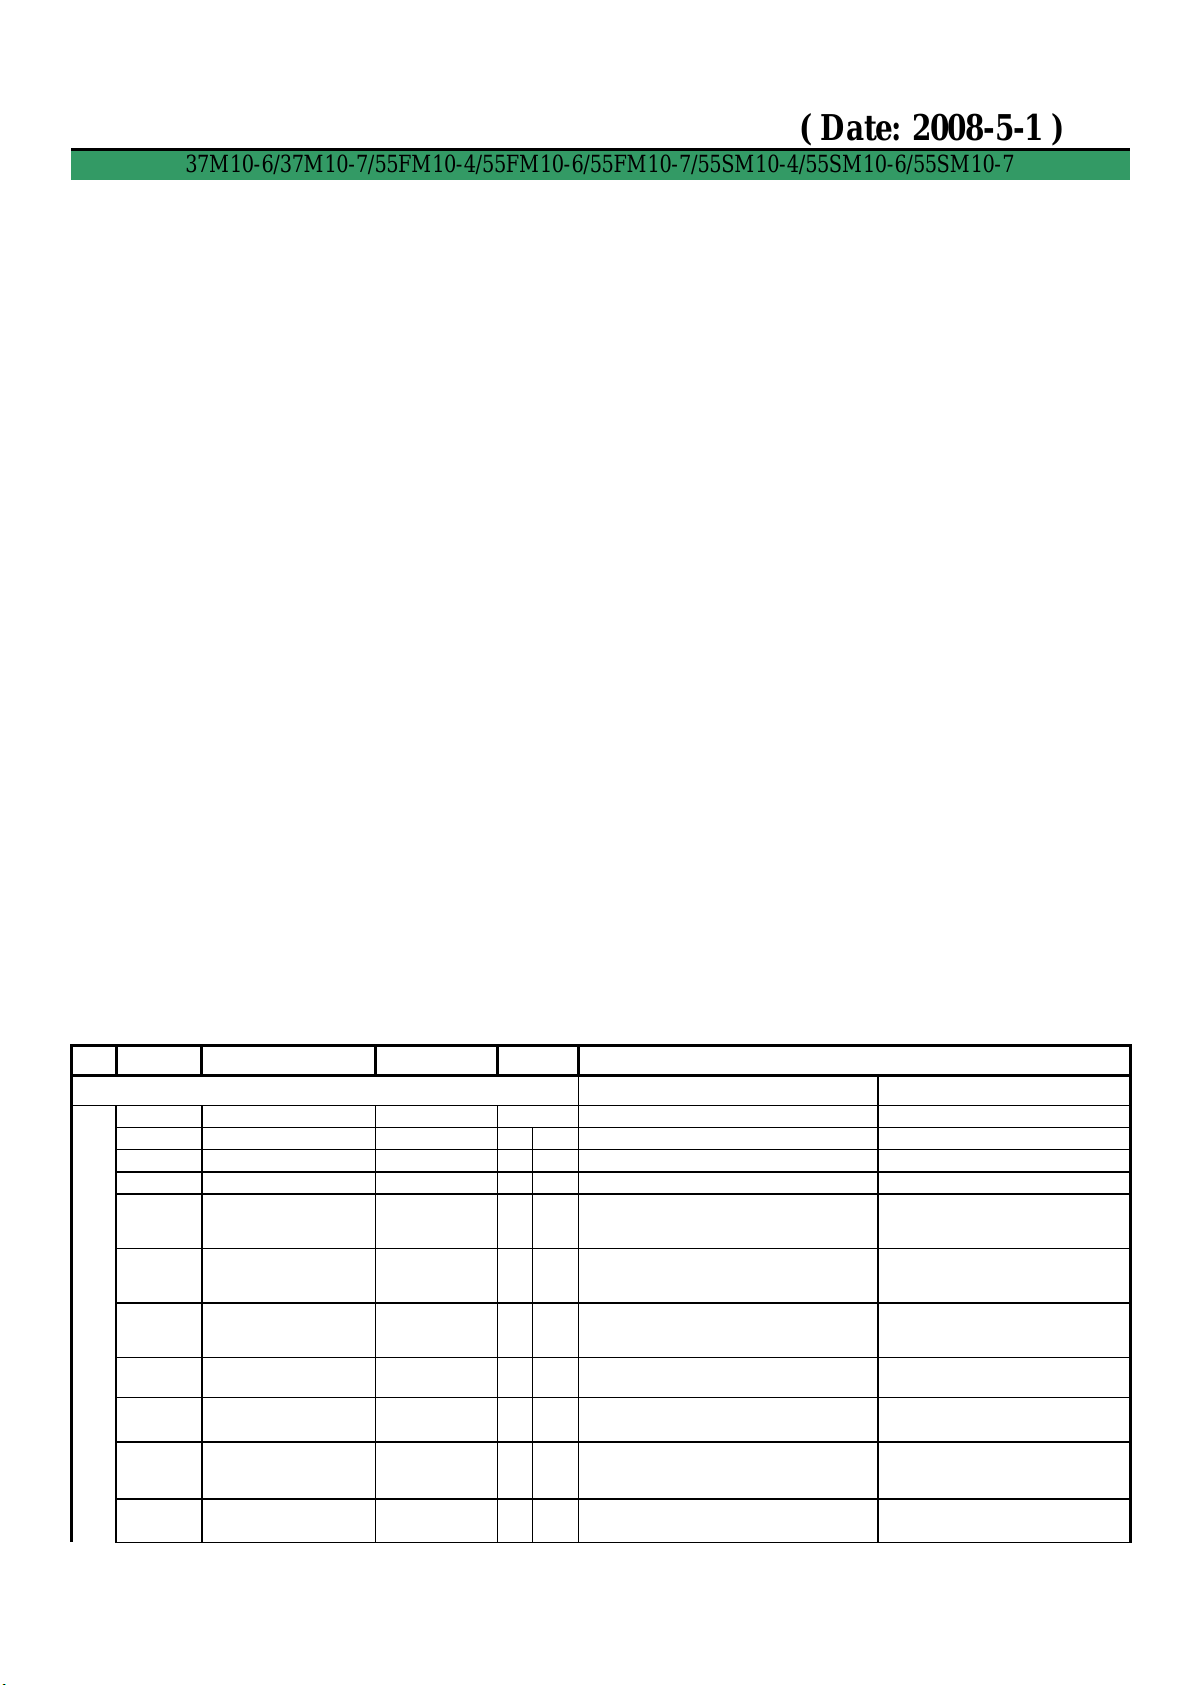
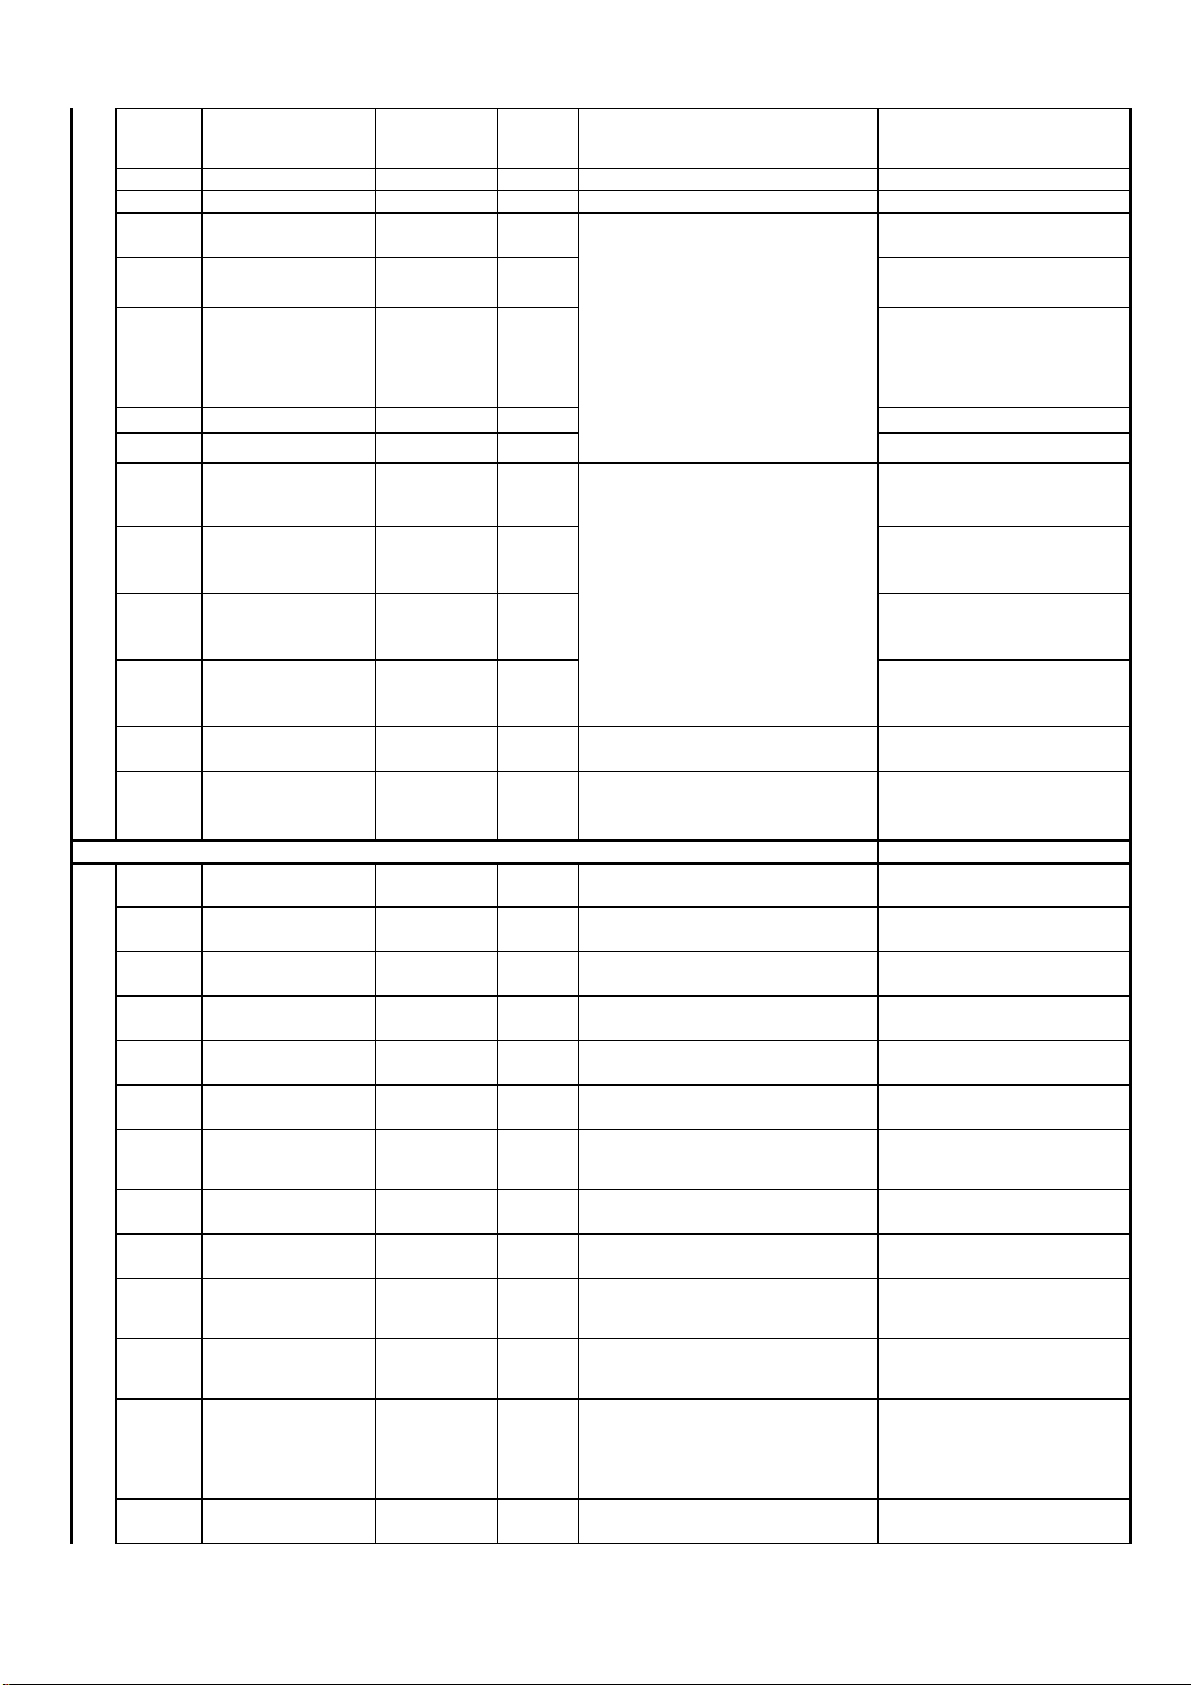
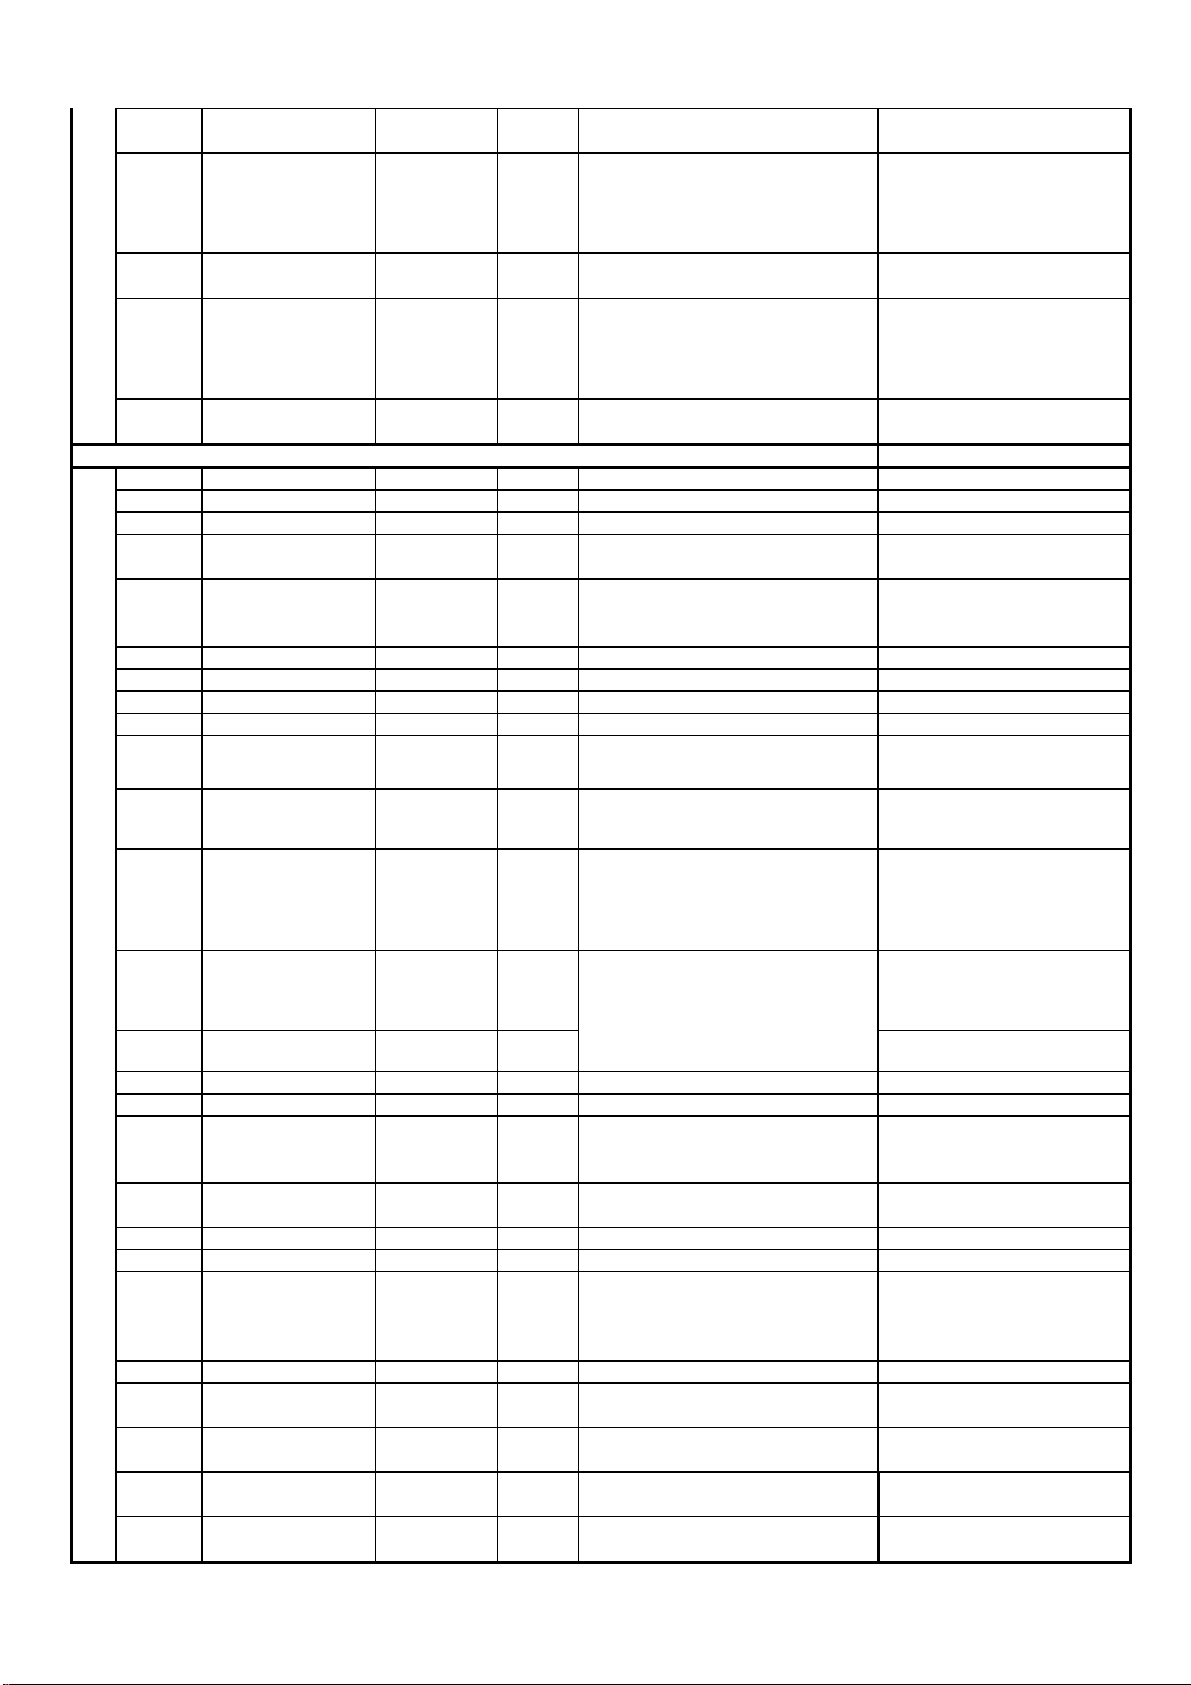
( 3 ) Service menu table:
Page Item Description Range
MO TEST.SW Internal test signal 0~2 0:OFF 1:Central line 2:Checker no adjustment need.
V.SLOPE Vertical linearity 0~63/-31~+32 35 -01 Adjust PAL system first, then NTSC. Need adjust to match with CRT
V.POSI Vertical center 0~63/-31~+32 36 -01 Adjust PAL system first, then NTSC. Need adjust to match with CRT
V.SIZE Vertiacl size 0~63/-31~+32 12 +01 Adjust PAL system first, then NTSC. Need adjust to match with CRT
V.SC
V.LINE
V.SCR
Vertical S curve
adjustment
Vertical linearity
adjustment
Vertical over scan
adjustment
0~63/-31~+32 13 +09 Adjust PAL system first, then NTSC. Need adjust to match with CRT
0~63/-31~+32 33 -04 Adjust PAL system first, then NTSC.
0~63/-31~+32 32 0 Adjust PAL system first, then NTSC.
Default
NTSC
0
Remark
no adjustment need, for Slim model
only
no adjustment need, for Slim model
only
H.PHASE Horizontal phase 0~63/-31~+32 41 +01 Adjust PAL system first, then NTSC. Need adjust to match with CRT
EW.W Horization wide adjust 0~63/-31~+32 53 +02 Adjust PAL system first, then NTSC.
EW.PW
EW.TC Horizontal trapezia adjust 0~63/-31~+32 24 +04 Adjust PAL system first, then NTSC.
Horizontal pincushion
adjust
0~63/-31~+32 21 0 Adjust PAL system first, then NTSC.
Need adjust to match with CRT, for
Slim model only
Need adjust to match with CRT, for
Slim model only
Need adjust to match with CRT, for
Slim model only
Page 2
EW.UCP
OSD.V.PO
OSD vertical position
EW.LCP
H.BOW Horizontal bow adjust 0~63/-31~+32 30 +02 Adjust PAL system first, then NTSC.
H.PAR
H.BLK.SW
H.BLK.L
H.BLK.R
V.X Vertical extention 0~63
RGB HSH
PROG Program setting
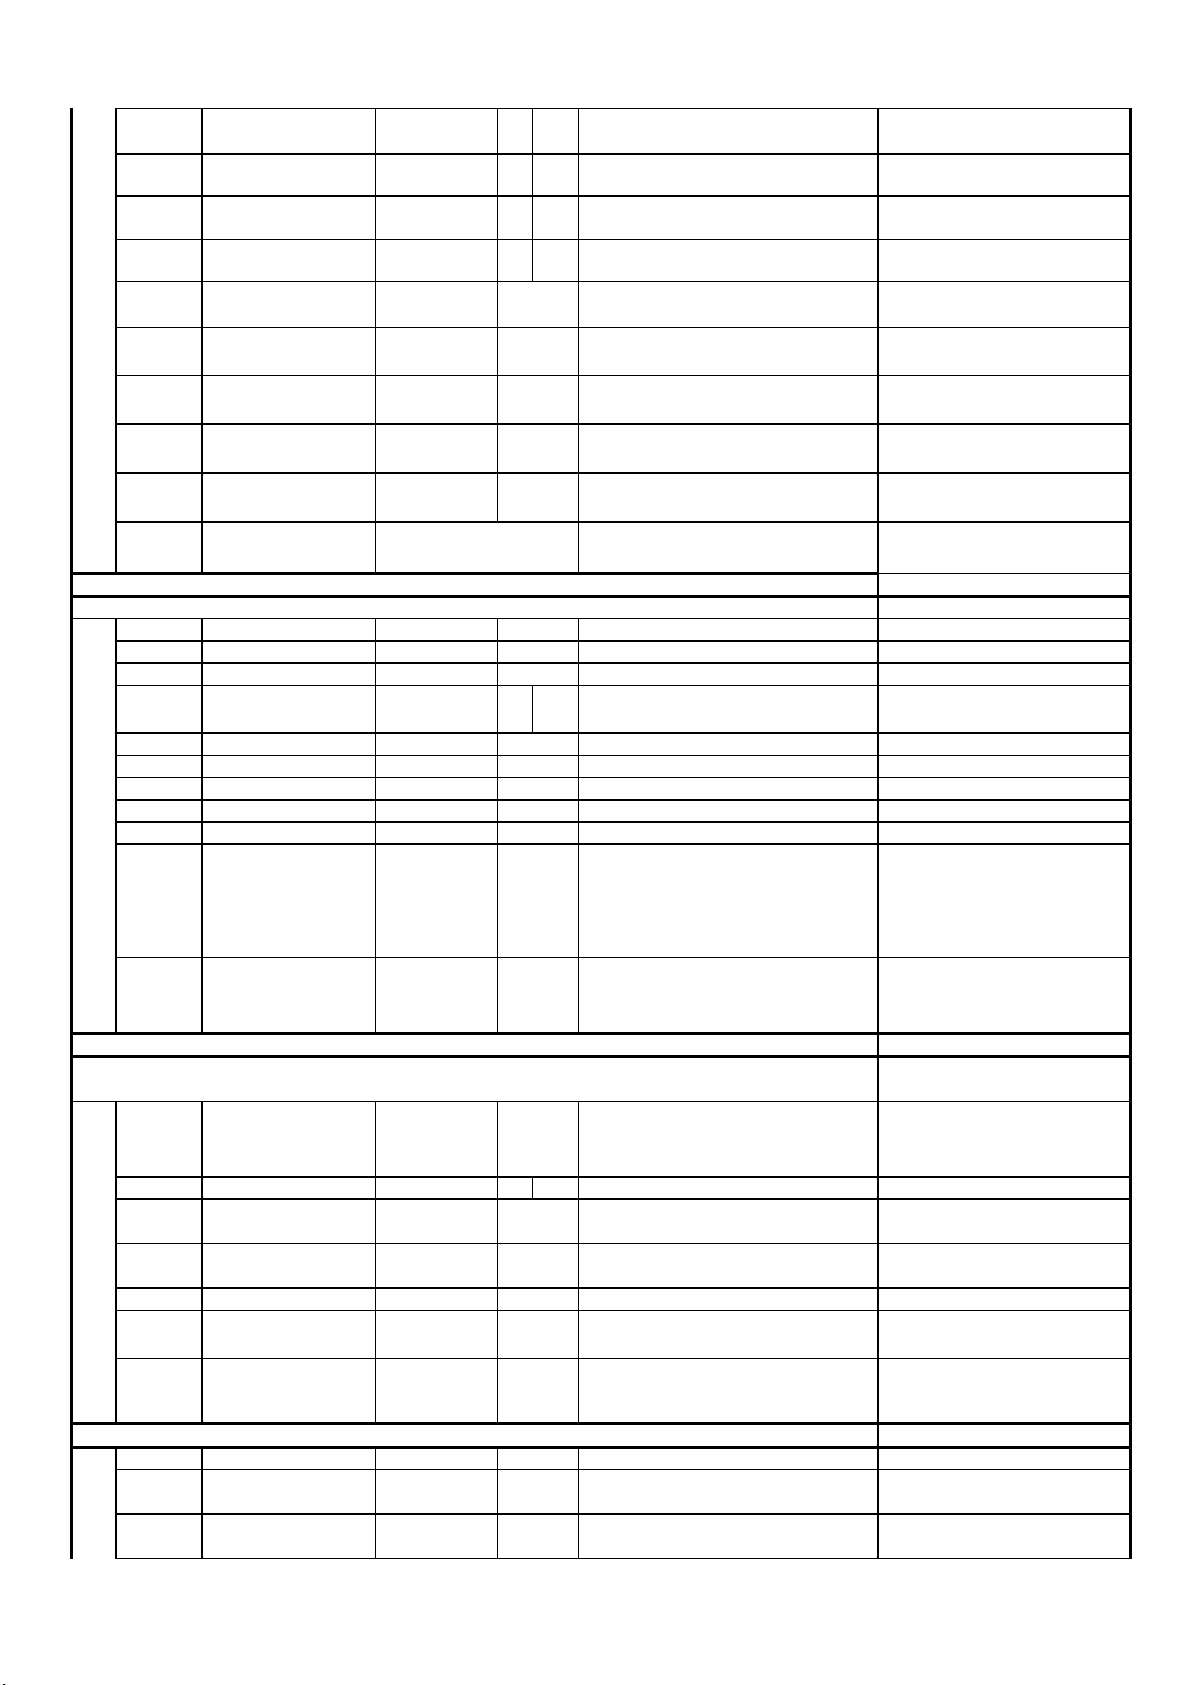
M1 CL RGB gain setting 0~15 0:-3dB 7: NORMAL 15:+3dB no adjustment need.
BLOC Black level offset 0~15 0:-300mv 8: no offset 15:+300mv no adjustment need.
R.BIA Red cut adj. 0~63 White balance adjustment Need adjust to match with CRT
G.BIA Green cut adj. 0~63 32 -32
B.BIA Blue cut adj. 0~63 White balance adjustment Need adjust to match with CRT
R.DRV Red drive adj. 0~63 White balance adjustment Need adjust to match with CRT
G.DRV Green drive adj. 0~63 White balance adjustment Need adjust to match with CRT
B.DRV Blue drive adj. 0~63 White balance adjustment Need adjust to match with CRT
SUB BRT Sub-brightness adj. 0
Horizontal top corner
adjust
Horizontal bottom corner
adjust
Horizontal parallelogram
adjust
Horizontal blanking adj.
On/Off
Left side Hor. Blanking
adj.
Right side Hor. Blanking
adj.
RGB/YUV horizontal
center adjust
TV DVD
0~63/-31~+32 39 0 Adjust PAL system first, then NTSC.
0~63/-31~+32 47 +02 Adjust PAL system first, then NTSC.
0~63/-31~+32 35 +06 Adjust PAL system first, then NTSC.
ON/OFF no adjustment need.
0~15 available when H.BLK.SW = ON no adjustment need.
0~15 available when H.BLK.SW = ON no adjustment need.
0~63
0~199
~63 Need adjust to match with CRT
ON
0
0
24
6
10
10
33
32
32
23
36
20
White balance adjustment ,DVD means
component input
Need adjust to match with CRT, for
Slim model only
Need adjust to match with CRT, for
Slim model only
Need adjust to match with CRT, for
Slim model only
Need adjust to match with CRT, for
Slim model only
no adjustment need, for Slim model
only
no adjustment need, for Slim model
only
no adjustment need, not for Slim
model.
Need adjust to match with CRT
Select this item then press V+ key ,
VSD Stop vertical scran
PA
L
0
NTSC
20
15
0
15
0
63
63
63
TEST.S Test signal selection 0~5
M2 RF.AGC RF AGC adj. 0~63
0~63/0~63 18 16 Adjust PAL system first, then NTSC. no adjustment need.
OSD.H.POSOSD Horizontal position
adj.
CURT.POS
OSD BRT OSD brightness adj. 0~15 no adjustment need.
SHIPPING Factory initialization
SETUP
SELECT
M3 SUB CONT Sub-contrast adj. 0~63 no adjustment need.
SUB
COLOR
SUB
SHARP
Draught screen beginning
position selection
M3 to M9 pages switch 0/1
Sub-color adj. 0~63 no adjustment need.
Sub-sharpness adj. 0~63 no adjustment need.
0~63/0~63 no adjustment need.
0~2 no adjustment need.
horizontal line will appear. Adjust FBT
Screen Voltage knob to get a horizontal line
that is in minimum brightness.
0:External signal 1:Black screen
2:White screen 3:Red screen 4:Gree
screen 5:Blue screen
Receive 62dBv RF signal, adjust RF.AGC to
set the picture noise just disappear.
Select this item and press V+ key for system
initialization
Select this item then press V+,mute keys
sequent. Then press 3-9 keys to go M3 - M9
pages.
Need adjust to match with CRT
no adjustment need.
Need adjustment
no adjustment need.
For change pages
Page 3
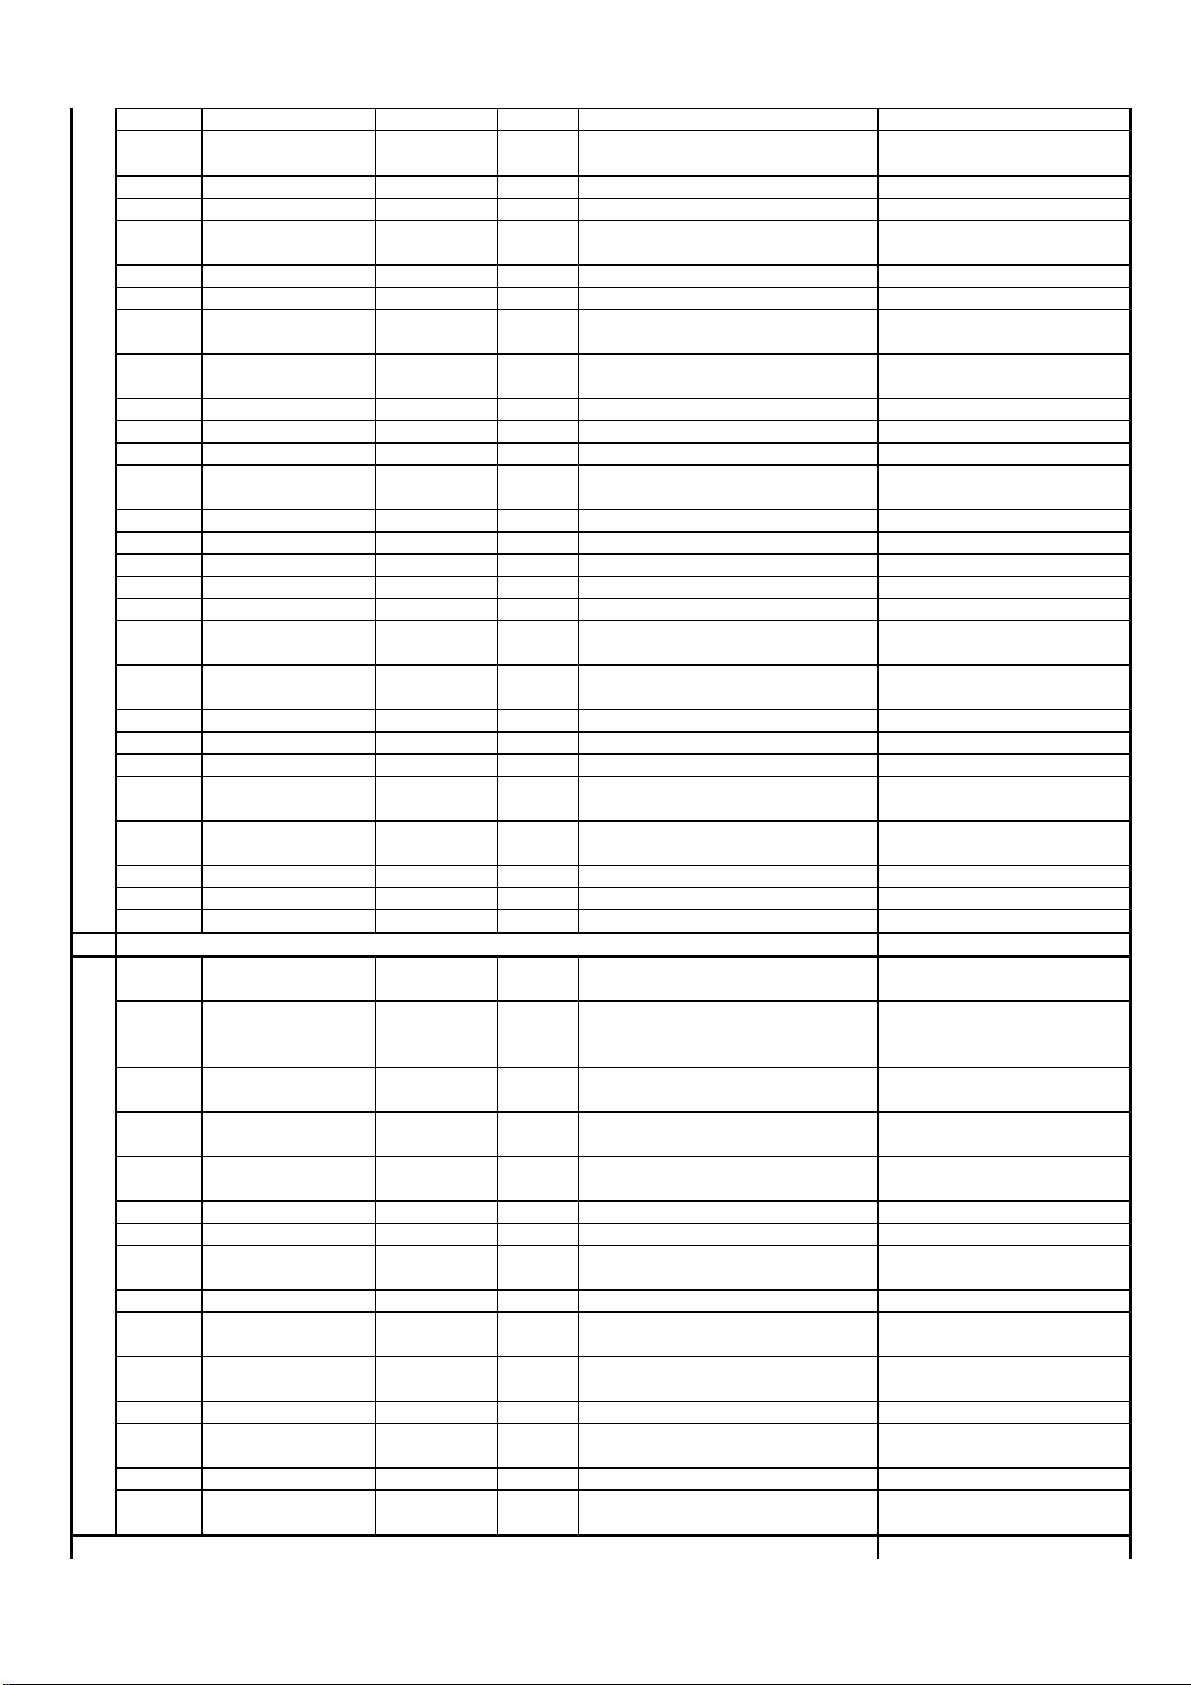
SUB TINT Sub-tint adj. 0~63 no adjustment need.
COF
Cut off voltage range
setting
0/1
THAI Thailand OSD select ON/OFF no adjustment need.
VIETNAM Vietnam OSD select ON/OFF no adjustment need.
INDONESI
AN
Indonesian OSD select ON/OFF no adjustment need.
FRENCH French OSD select ON/OFF no adjustment need.
TURKISH Turkish OSD select ON/OFF no adjustment need.
PORTUGU
ESE
BULGARI
AN
Portuguese OSD select ON/OFF no adjustment need.
Bulgarian OSD select ON/OFF no adjustment need.
RUSSIAN Russian OSD select ON/OFF no adjustment need.
FARSI Farsi OSD select ON/OFF no adjustment need.
ARABIC Arabic OSD select ON/OFF no adjustment need.
RUMANIA
N
Rumanian OSD select ON/OFF no adjustment need.
SPANISH Spanish OSD select ON/OFF no adjustment need.
ITALIAN Italian OSD select ON/OFF no adjustment need.
GERMAN German OSD select ON/OFF no adjustment need.
DUTCH Dutch OSD select ON/OFF no adjustment need.
SWEDISH Swedish OSD select ON/OFF no adjustment need.
NORWEGI
AN
HUNGARI
AN
Norwegian OSD select ON/OFF no adjustment need.
Hungarian OSD select ON/OFF no adjustment need.
POLISH Polish OSD select ON/OFF no adjustment need.
CZECH Czech OSD select ON/OFF no adjustment need.
SLOVENE Slovene OSD select ON/OFF no adjustment need.
CROATIA
N
MACEDO
NIAN
Croatian OSD select ON/OFF no adjustment need.
Macedonian OSD select ON/OFF no adjustment need.
SERBIAN Serbian OSD select ON/OFF no adjustment need.
GREEK Greek OSD select ON/OFF no adjustment need.
KENYA Kenya OSD select ON/OFF no adjustment need.
31
0
OFF
OFF
OFF
OFF
OFF
OFF
OFF
On
OFF
OFF
OFF
OFF
OFF
OFF
OFF
OFF
OFF
OFF
OFF
OFF
OFF
OFF
OFF
OFF
OFF
OFF
0:normal range(+/-270mV) 1:increase
range (+/-450mV)
no adjustment need.
M4 VAI
I system signal output
level adj.
0~1 0:normal 1:increase 12% no adjustment need.
1
0:Contrast action first, then brightness
CBS ABL control method 0~1
1
1:Contrast and brightness control at the
no adjustment need.
same time.
RPA
RPO
TCI2X
Signal pre-shot , over-
shot adj.
Signal pre-shot & over
shot level adjustment
CVBS/Y sync signal
clamping current
0~3 0 1:1 1 1.5:1 2 2:1 no adjustment need.
0~3 0 1:1 1 1:1.3 2 1:1.7 3 1:0.7 no adjustment need.
0~1 0: 80UA 1:160UA no adjustment need.
BKS Black stretch switch ON/OFF no adjustment need.
BSD Black stretch level 0~1 0:15 IRE 1:30 IRE no adjustment need.
AAS
Black area to switch off
the black stretch
0~3 0:12% back ground 1:20% 2:6% 3:8% no adjustment need.
PWL White level peaking limit ON/OFF no adjustment need.
SOC
PWLDAC
Soft clipping & peak
white level difference
Video level of peak white
limitting active
0~3
0~15
CHSE Color sensitivity setting 0~3 0:-34dB 1:-37dB 2:-41dB 3:-46B no adjustment need.
S.IDENT S-VIDEO identify switch ON/OFF
GAME Game selection ON/OFF no adjustment need.
CALENDA
R
Calendar selection ON/OFF no adjustment need.
2
2
0
ON
1
1
OFF
1
5
0:0% above PWL level 1:5% 2:10%
3:OFF
0: 0.4V
BL-WH 15: 0.6VBL-WH
3
Available when S-VHS=ON ,UHF BAND=0
OFF
( M9 )
OFF
OFF
no adjustment need.
no adjustment need.
no adjustment need.
Page 4
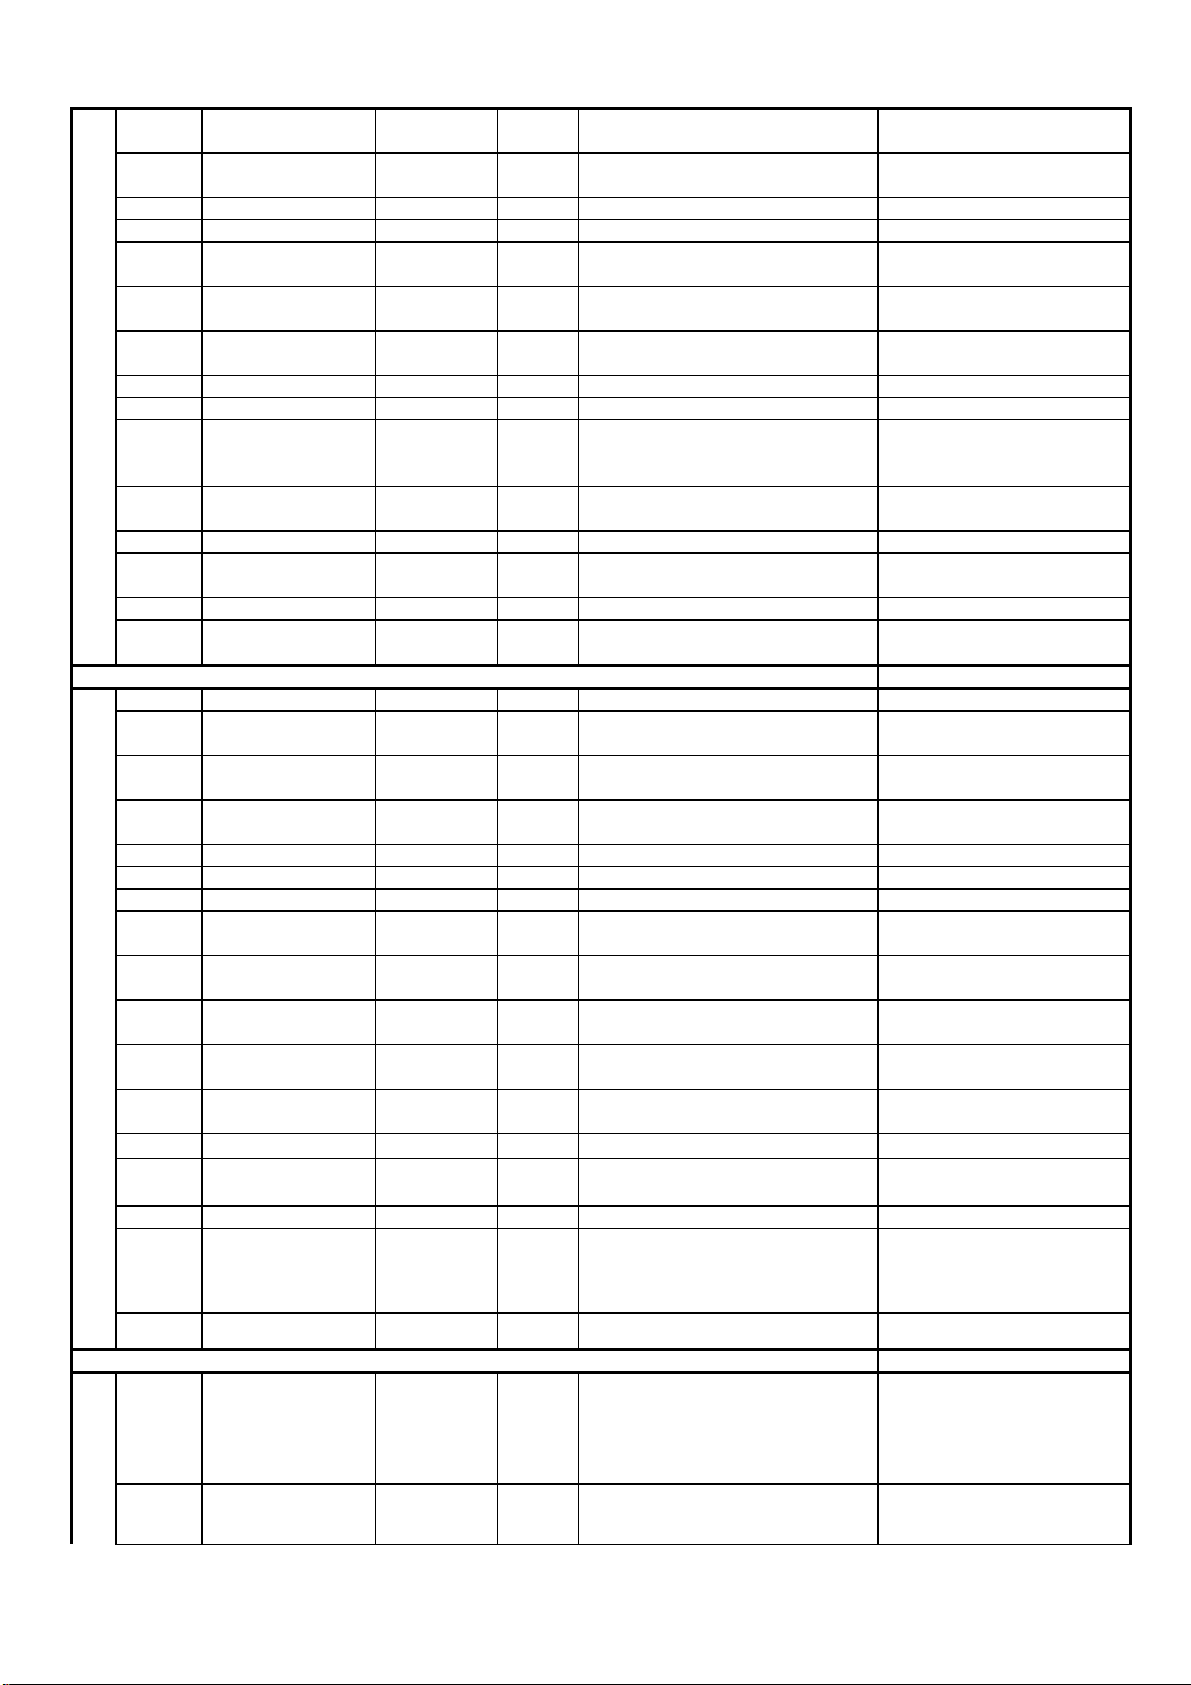
M5 IF
Group delay
FM detection Gain
OIF IF compensation 0~15
FFI IF PLL fast speed filter 0~1 0:Normal 1: Increase no adjustment need.
AGCS AGC SPEED 0~3 0: 0.7X 1:NORMAL 2:3X 3:6X no adjustment need.
DCXO
FSL Vertical sync cut off level 0~1
SSL
GD
AKB AKB selection ON/OFF no adjustment need.
ON V.A
DFL
XDT X-ray protection 0~1 0:Standby mode 1: normal no adjustment need.
FBC
IFS.RED IF sensitivity 0~1 0:normal 1: reduced no adjustment need.
MUTE
MODE
M6 CLF internal clamping speed 0~1 0:Slow 1:fast no adjustment need.
BPB
BPB2
FMWS
AGN FM detection Gain 0~1 0:NORMAL 1:+6dB no adjustment need.
AGNE
AVL Auto Volume limit. ON/OFF no adjustment need.
DSGLS
V.P1
V.P25
V.P50
V.P75
V.MAX Max. Volume setting 0~63 no adjustment need.
ON DL
OFF DL Standby delay setting 0~7 Set to 1 easier for discharge High Voltage no adjustment need.
ONOFF
MODE
Tuner IF frequency
setting
Crystal loading capacitor
compensation
Horizontal sync cut off
level
Increase vertical scan
amplitude in power on
mement
Power reset mode after
protection
Fixed beam current
switch off
Mute method in program
change period
MONO sound band pass
filter setting
2nd audio band pass filter
setting
FM detection bandwidth
setting
LOUDSPEAKER
OUTPUT gain
Volume curve 1(set audio
output level at Vol=1)
Volume curve 2(set audio
output level at Vol=25)
Volume curve 3(set audio
output level at Vol=50)
Volume curve 4(set audio
output level at Vol=75)
AC power on delay
timming
Brightness gradual
change in power on/off
moment
38M/38.9M/45.7
5M
0~3 no adjustment need.
0~1 0: 50% 1:30% no adjustment need.
0~1 0:OFF 1: ON no adjustment need.
0~15 available when AKB was on no adjustment need.
0~1 0:Soft start 1: normal no adjustment need.
0~1
0/1
0~1 0:band pass filter on 1:Bypassed no adjustment need.
0~1 0:band pass filter on 1:Bypassed no adjustment need.
0~3
0~3 0:NORMAL 1:+3.8dB 2:-6dB 3:-3dB no adjustment need.
0~1 0:0dB 1:+6dB no adjustment need.
0~100 no adjustment need.
0~100 no adjustment need.
0~100 no adjustment need.
0~100 no adjustment need.
3~16 no adjustment need.
0~1
38,9
8
0
2
2
1
1
1
ON
0
0
0
0
1
0
0
0
1
2
0
0
OFF
0
10
50
70
85
52
3
0
0
0~7:negative compensation 8:Off 9~15:
positive compensation
0:dependent on noise detector 1:fixed
slicing level of 60%
0: RGB blanking 1:power off with a fix
beam current.
0: mute on in program change period 1:
mute control pin no change.
0: 100KHZ 1:225KHZ 2:450KHZ
3:900KHZ
0: off , 1: on . If set to 1, draught screen
inefficacy.
no adjustment need.
no adjustment need.
no adjustment need.
no adjustment need.
no adjustment need.
no adjustment need.
no adjustment need.
M7 MAT
BGDM BANDGAP mode 0~1 no adjustment need.
N-JPN/PAL;N-
Color decode matrix
setting
ACL Auto color limit 0~1 0:OFF 1:ON no adjustment need.
USA/PAL;PAL
MAT;N-JPN
MAT;N-USA
MAT
0
PAL MAT
0
no adjustment need.
Page 5
Center frequency of color
color base band delay
CB
BPS
FCO force to color decode on 0~1 0:OFF 1:ON no adjustment need.
Y.P
Y.S
Y.N
band pass filter
PAL system Y signal
delay
SECAM system Y signal
delay
NTSC system Y signal
delay
0~1 0:fsc 1: 1.1*fsc no adjustment need.
0~1 0:delay line on 1:Bypassed no adjustment need.
0~15 no adjustment need.
0~15 no adjustment need.
0~15 no adjustment need.
0
0
0
8
8
Delay time =
YD3*160ns+YD2*160ns+YD1*80ns+YD0
8
*40ns
Y.AV AV signal Y delay 0~15 no adjustment need.
Y.SVHS S-VHS signal Y delay 0~15 no adjustment need.
PAL signal PEAKING
PF.P
PF.S
PF.N
PF.AV
RGB HSH
C.PHI.1
M8 S.BRT
S.CONT
S.COLOR
S.SHARP
D.BRT
D.CONT
D.COLOR
D.SHARP
M.BRT
M.CONT
centre frequency & delay
setting
SECAM signal
PEAKING centre
frequency & delay setting
NTSC signal PEAKING
centre frequency & delay
setting
AV signal PEAKING
centre frequency & delay
setting
RGB/YUV signal
Horizontal centre adj.
PHI1 PLL timming
selection in draught
screen mode
Standard mode brightness
setting
Standard mode contrast
setting
Standard mode color
setting
Standard mode sharpness
setting
Dynamic mode
brightness setting
Dynamic mode contrast
setting
Dynamic mode color
setting
Dynamic mode sharpness
setting
Soft mode brightness
setting
Soft mode contrast
setting
0~3 no adjustment need.
0~3 no adjustment need.
0~3 no adjustment need.
0~3 no adjustment need.
0~63 no adjustment need.
0~1 0:Slow 1: NORMAL no adjustment need.
0~100 no adjustment need.
0~100 no adjustment need.
0~100 no adjustment need.
0~100 no adjustment need.
0~100 no adjustment need.
0~100 no adjustment need.
0~100 no adjustment need.
0~100 no adjustment need.
0~100 no adjustment need.
0~100 no adjustment need.
8
8
1
1
0: 2.7MHZ 190ns 1: 3.1MHZ 160ns
2: 3.5MHZ 143ns 3: 4.0MHZ 125ns
1
1
3
0
75
75
60
50
85
90
70
50
50
50
M.COLOR Soft mode color setting 0~100 no adjustment need.
M.SHARP
W.BRT
Soft mode sharpness
setting
Brightness setting in whit
balance adj. mode
50
0~100 no adjustment need.
0~100 no adjustment need.
50
75
Page 6
W.CONT
y
e
Keyboard control
UHF
Contrast setting in whit
balance adj. mode
0~100 no adjustment need.
75
W.COLOR
SC BRT
COOL
WARM
M9 AV2 AV2 selection ON/OFF no adjustment need.
SVHS S-VHS selection ON/OFF no adjustment need.
DVD DVD selection ( YUV ) ON/OFF no adjustment need.
EURO
AUTO
SND
BG BG system selection ON/OFF no adjustment need.
I I system selection ON/OFF no adjustment need.
M M system selection ON/OFF no adjustment need.
DK DK system selection ON/OFF no adjustment need.
SIF PRI Audio system preset DK/M/BG/I
POWER
RESET
BALANCE
HALFTON
E
MENU BG OSD background ON/OFF no adjustment need.
IR OPT Remote code selection SANYO/NEC no adjustment need.
KEY OPT
Color setting in whit
balance adj. mode
Horizontal line
brightness setting
Cool mode white balance
setting
Warm mode white
balance setting
EUROPE mode AV
selection
Auto Audio system
detection
Power on mode selection 0~3
Audio balance control
selection
half tone OSD selection ON/OFF no adjustment need.
0~100 no adjustment need.
0~100 no adjustment need.
0~63 no adjustment need.
0~63 no adjustment need.
ON/OFF no adjustment need.
ON/OFF
ON/OFF
SANYO/MEK no adjustment need.
0
50
8
8
ON
OFF
OFF
ON
ON
ON
OFF
OFF
ON
BG
0
OFF
ON
OFF
SANYO
SANYO
If off, all channel audio system will be set to
the same system as current channel after auto
program process.
Set the first priority ident sound system in
Auto program process.
0:TV mode, if last memory is standby mode,
keep standby mode. 1:Last memory 2:TV
mode 3: Standb
Off: mono mode, pin58 is for AUDIO
MONITOR OUT.
On: AV STEREO mode, pin7 is for TV FM
sound output, through 4052 switch as
MONITOR OUT.
If HALFTONE=ON & MENU BG=ON,
then OSD = halftone.If HALFTONE=ON &
MENU BG=OFF, then OSD = transparency
If HALFTONE=OFF & MENU BG=ON,
then OSD=opacity
mod
no adjustment need.
no adjustment need.
no adjustment need.
no adjustment need.
0:off 1:up/down draught screen 2:left/right
CURTAIN Draught screen setting 0~2
LOGO
TILT Tilt control ON/OFF no adjustment need.
B.BACK Blue back control ON/OFF no adjustment need.
ASM OPT Auto program mode 0~1
VH
UHF
V.MUTE
P.OFF
AV OUT
Display LOGO when
power on
UHF band selection 0~1 0:off 1:on , for 3 band tuner no adjustment need.
FS TUNER VHF
frequence range setting
FS TUNER UHF
freguency range setting
VIDEO MUTE in power
off moment
AV output video signal
select
ON/OFF no adjustment need.
ON/1~7
CVBS/IF no adjustment need.
0
OFF
OFF
ON
1
0
ON
CVBS
draught screen
0:Auto search and memory beginning from
current program number.
1:Auto search and memory beginning from
program number 0
For FS tuner only no adjustment need.
For FS tuner only. no adjustment need.
if set to 1~7, no draught screen in power off
moment.
no adjustment need.
no adjustment need.
no adjustment need.
Page 7
( 4 ) Vertical & Horizontal scanning adjustment:
j
j
g
g
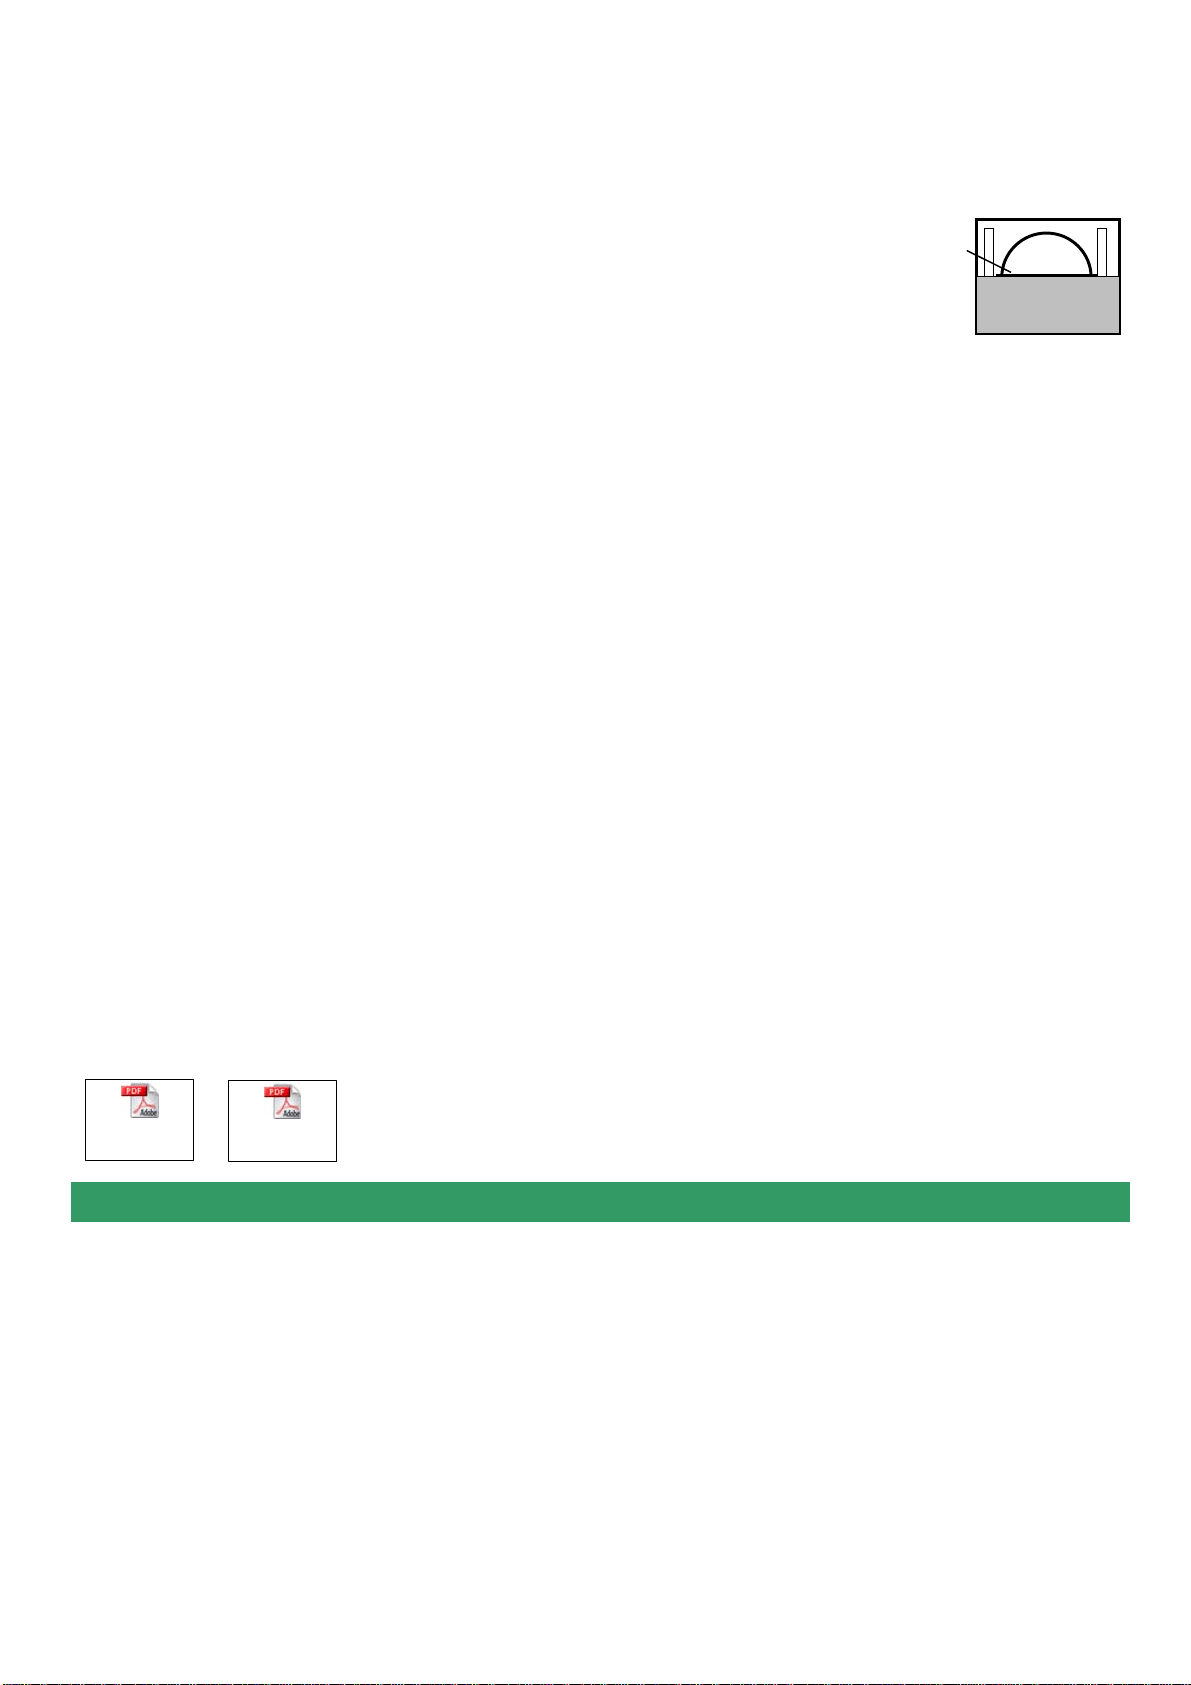
Receive standard Monoscope pattern signal for PAL system . Enter M0 page of service menu.
a) Adjust V.SLOPE value to get the horizontal line just appear from half bottom shadow.
b) Adjust V.POSI value to get the center horizontal line correspond to CRT vertical center.
c) Adjust V.SIZE value to set 90% of vertical picture full scan content.
d) Adjust H.PHASE value to get the picture horizontal center correspond to CRT horizontal center.
e) Adjust EW.PW value to get picture pincushion distortion in minume level.
f) Adjust EW.TC value to get picture trapezia distortion in minume level.
g) Adjust EW.BOW value to get picture bow distortion in minume level.
h) Adjust EW.PAR value to get picture parallelogram distortion in minume level.
i) Adjust EW.UCP value to get picture distortion of top corner in minume level.
j) Adjust EW.LCP value to get picture distortion of bottom corner in minume level.
h) Adjust EW.W vlue to set 94% of horizontal picture full scan content.
i) Receive standard Crosshatch pattern signal for NTSC system, and adjust again for NTSC system.
Remark: step e) to h) are only for Slim CRT.
Horizontal line
Shado
( 5 ) RF AGC ad
Receive 62dBuV +/- 1 dB color bar signal,adjust AGC value(Adjust from low to high)in M2 page to reduce picture noise to be
just disappeared gradually.
( 6 ) Screen volta
a) Receive Philips pattern
b) Go to VSD item of M1, press Volume + key then the vertical scan will be stop.
c) Adjust FBT Screen Voltage knob to get a horizontal line that is in minimum brightness.
d) Press Volume + or - key again to active vertical scan and Screen voltage adjustment completed
( 7 ) White balance ad
a) Receive gray and white 2 steps signal.
b) Enter M1 page of service menu
c) adjust R.BIA, G.BIA, B.BIA, R.DRV, G.DRV, BDRV items to set a suitable color temperature.
( 8 ) Sub-bri
a) Receive a gray scale signal
b) Enter Service menu M1 page, use Program +/- keys to select SUB BRT item.
C) Use Volum +/- keys to set the darkest step to just turn off the light.
ustment:
e adjustment:
ustment:
htness adjustment:
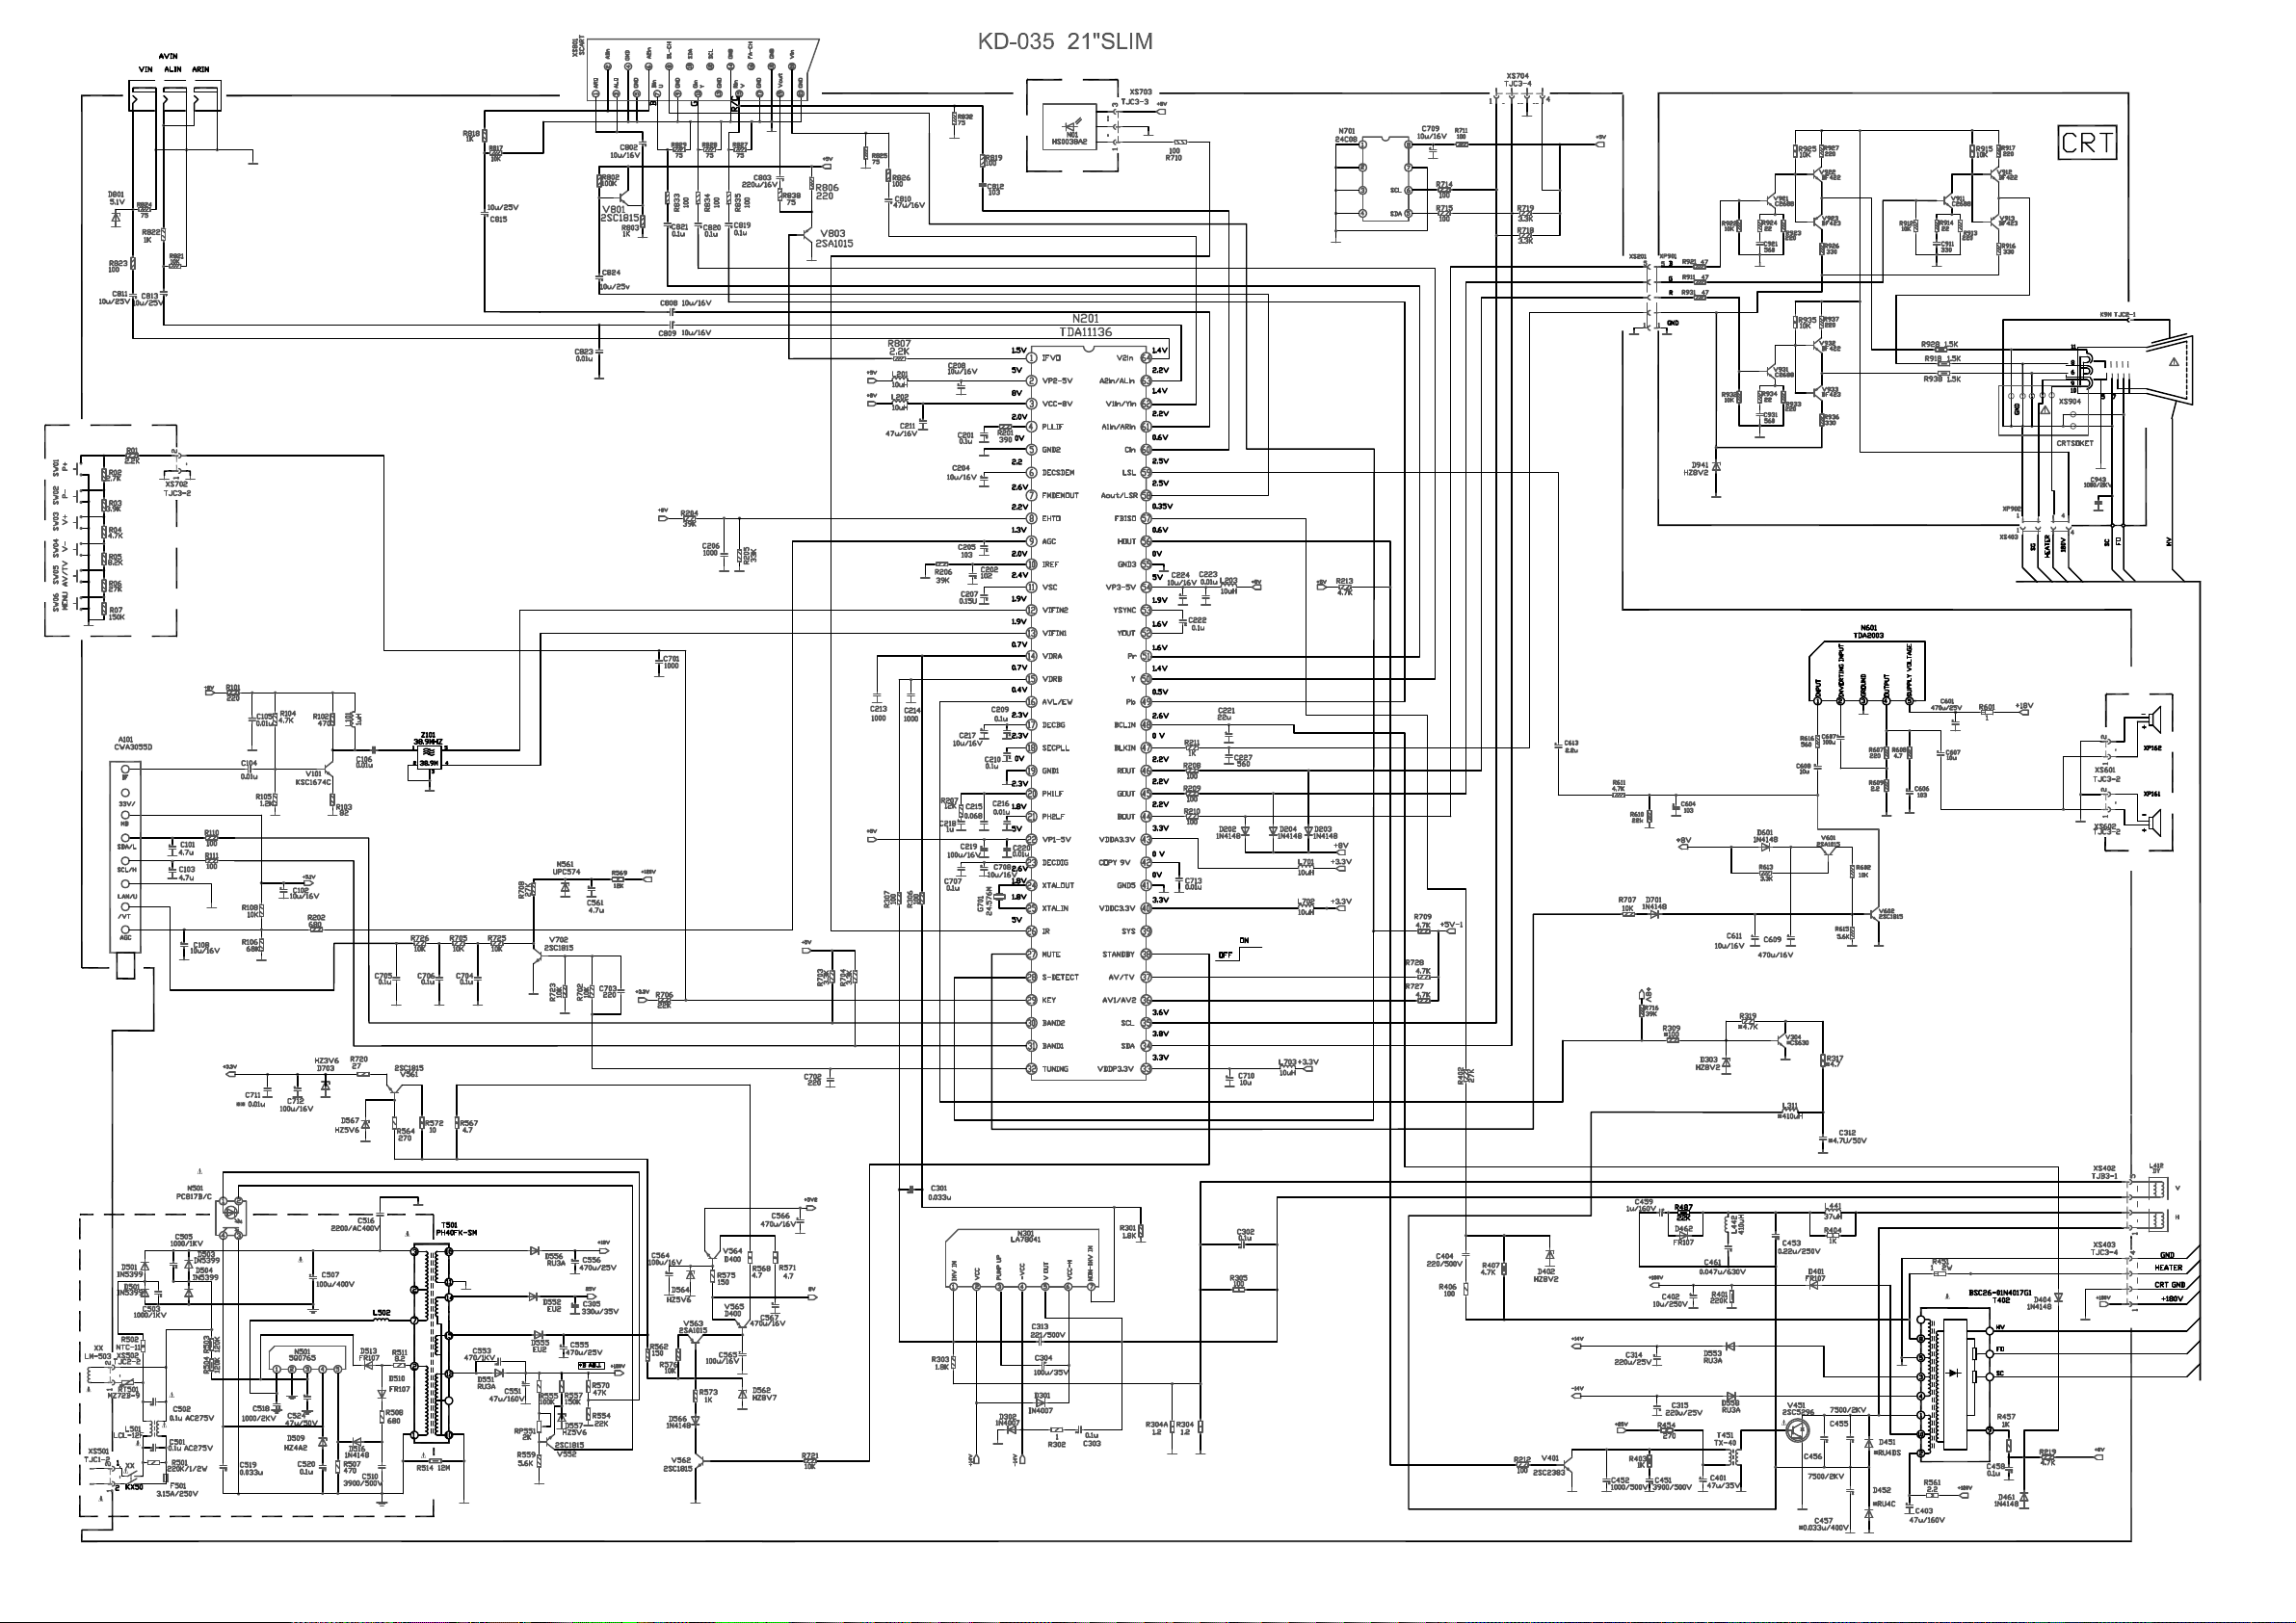
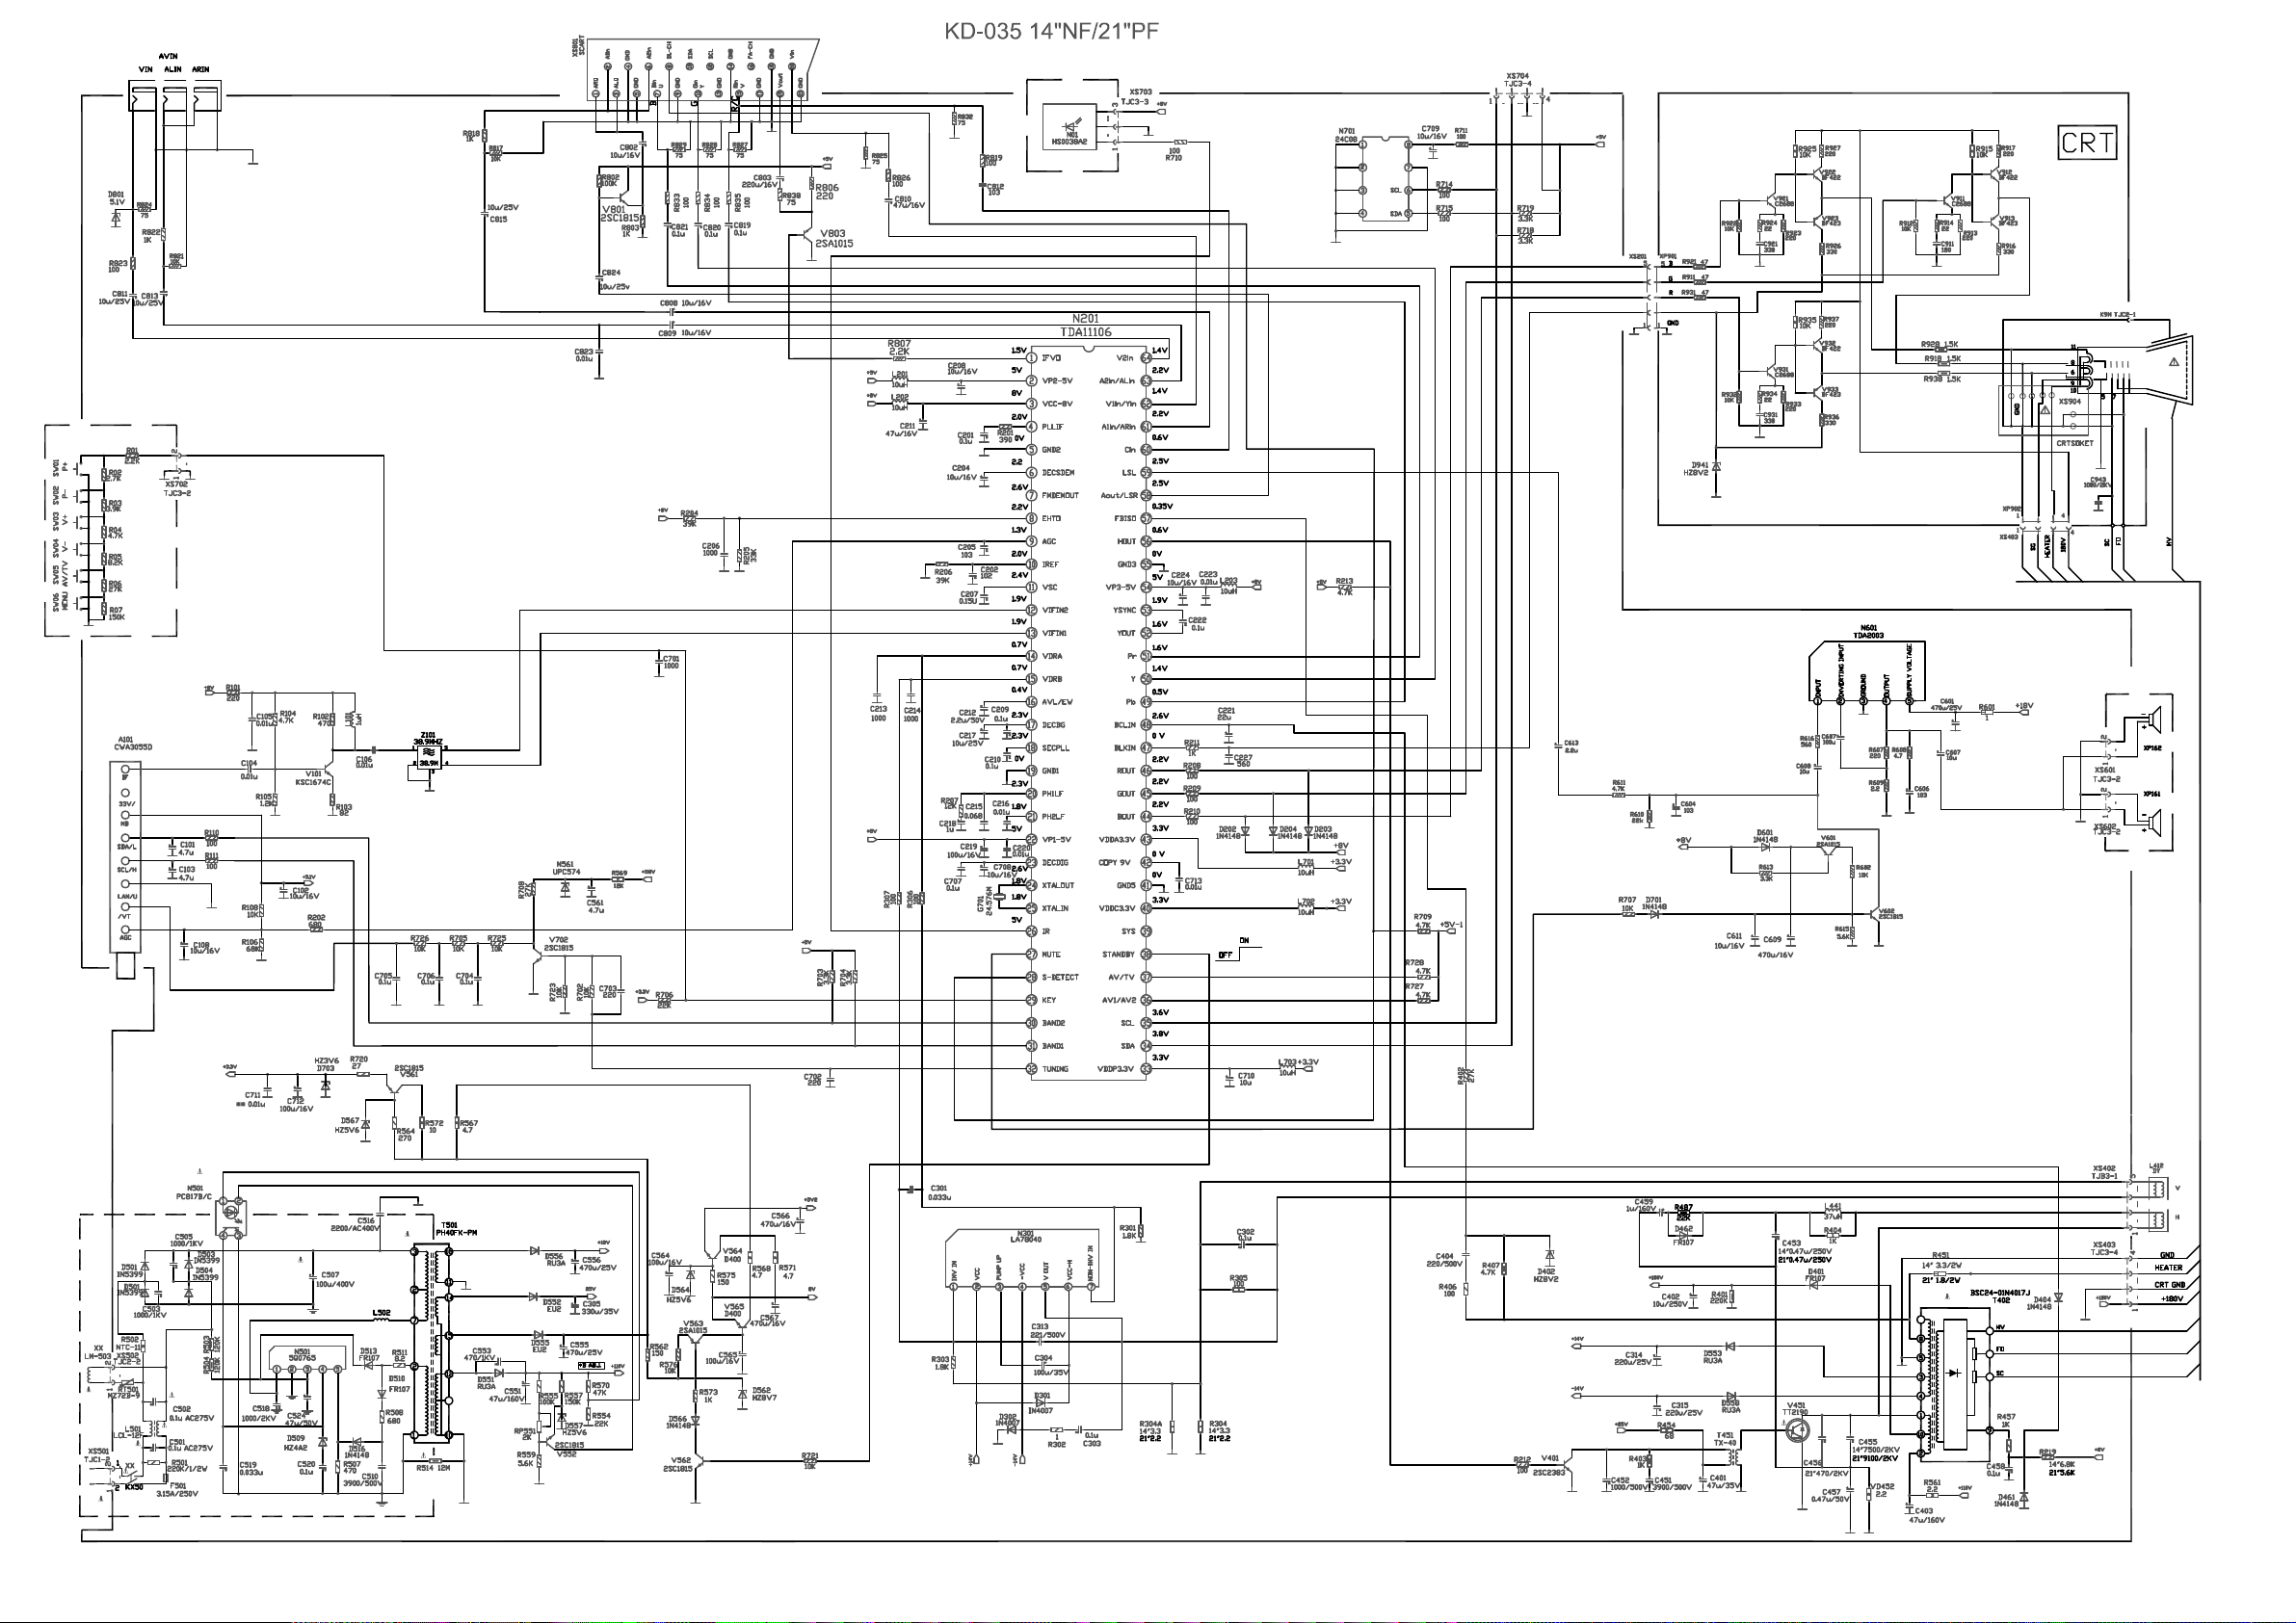
( 3 ) Reference Circuit diagram :
circuit_diagram_
14_21PF.pdf
circuit_diagram_
21slim.pdf
END
Page 8
Page 9
 Loading...