

Patriot SolarGuard 155, SolarGuard 50, Electric Fence Energizer SolarGuard 155, Electric Fence Energizer SolarGuard 50 User Manual

electric fence energizer USER MANUAL
SolarGuardTM 50, SolarGuardTM 155
If you suspect the unit is not working then follow these steps:
1. Disconnect the unit from the fence and check the indicator light is
STOP!
DO NOT RETURN
THIS PRODUCT
TO THE STORE
www.patriotglobal.com
flashing.
2. Check the battery connection and voltage.
3. Check that the voltage between the live and ground terminals is
greater than 7000 V using a fence voltage tester.
4. If these tests are OK you have an installation problem.
Consult your user manual for installation and operating instructions
or contact Tru-Test Group Customer service on 800-874-8494.
2

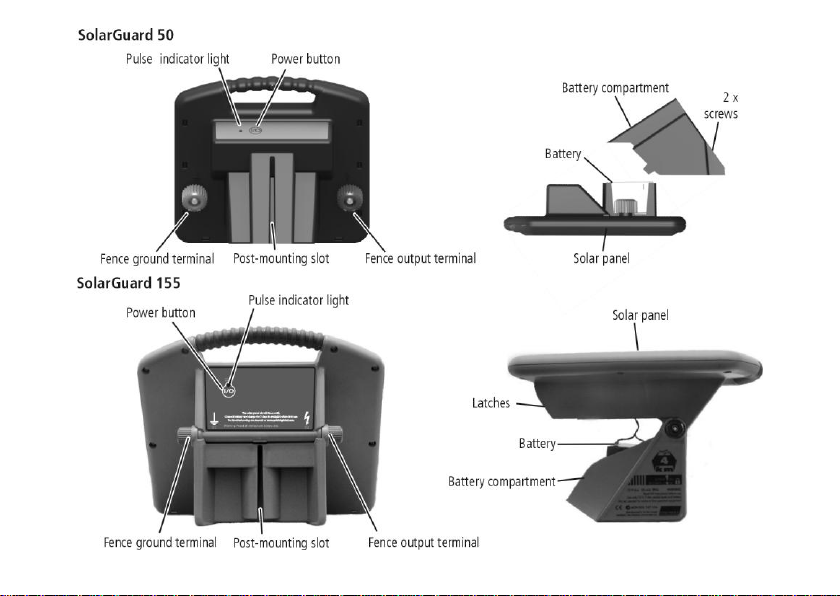
Fence ground terminal (green). Connect the
fence ground terminal to the ground system.
Fence output terminal (red). Connect the
fence output terminal to the fence.
Risk of electric shock! This unit should be
opened or repaired only by qualified
personnel. No user serviceable parts.
Read full instructions before use.
This unit must NOT be disposed of with
other normal waste. Instead, it is your
responsibility to dispose of it correctly by
handing it over to a local authority
responsible for collecting electrical and
electronic equipment waste.
Key to symbols on the unit
Before first use
Before using the unit for the first time, you must:
1 Connect the battery (the positive terminal is
disconnected before shipping).
2 Charge the battery by placing the unit in full
sunlight for three days with the solar panel
facing true south in the northern hemisphere
and true north in the southern hemisphere.
3
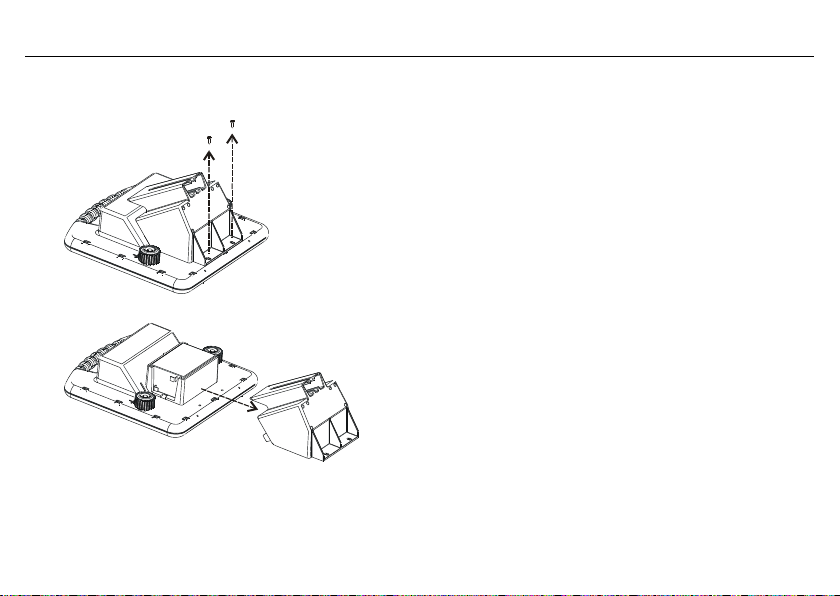
Connecting the positive terminal on the battery – SolarGuard 50
1 Place the unit face-down on a flat surface (solar panel downwards as shown). Undo the two screws securing the
battery compartment.
2 Slide the battery compartment away from the unit to expose the battery.
3 Connect the positive (red) lead to the positive (+) terminal on the battery.
4 Slide the battery compartment back into place and secure it with the two screws.
4
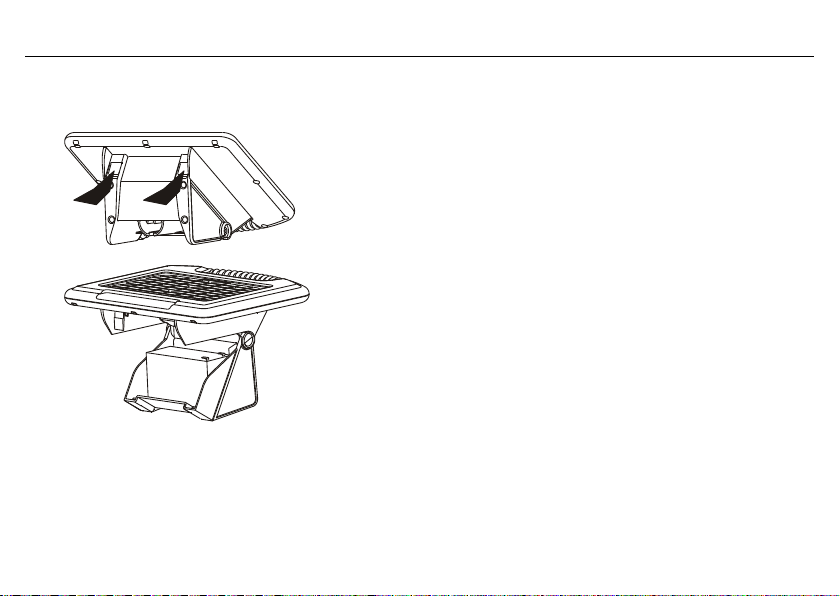
Connecting the positive terminal on the battery – SolarGuard 155
1 Place the unit upside-down on a flat surface (handle downwards as shown). Open the battery compartment by
pressing both latches firmly and pushing upwards.
2 Connect the positive (red) lead to the positive (+) terminal on the battery.
3 Close the battery compartment, ensuring the latches are securely fastened.
5

Installation
Positioning the unit
Install the unit:
adjacent to the electric fence
preferably in the middle of the electric fence
where it will receive the most daily sun throughout the season
where a good ground can be obtained
away from flooding and out of reach of animals and children (inside a protective fence, if required)
with the solar panel facing true south in the northern hemisphere and true north in the southern hemisphere.
6
Mounting the unit
The unit may be placed directly onto a flat surface or mounted directly onto a steel Y-post or T-post using the postmounting slot.
It can also be mounted onto a wooden post.
SolarGuard 50 - you need 2 galvanized washers and 2 x galvanized flat head nails.
SolarGuard 155 - mounting hardware is provided.
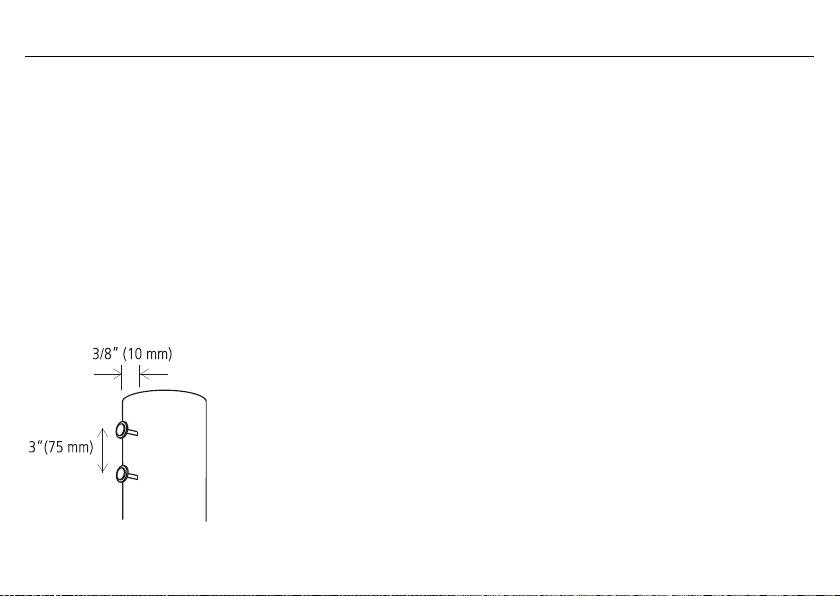
To mount onto a wooden post:
1 Thread a washer onto each nail.
2 Space the nails 3” (75 mm) apart.
3 Hammer in the nails, allowing them to protrude by 3/8” (10 mm).
4 Slide the unit onto the nails with the washers inside the post-mounting slot.
7
Connecting to an electric fence
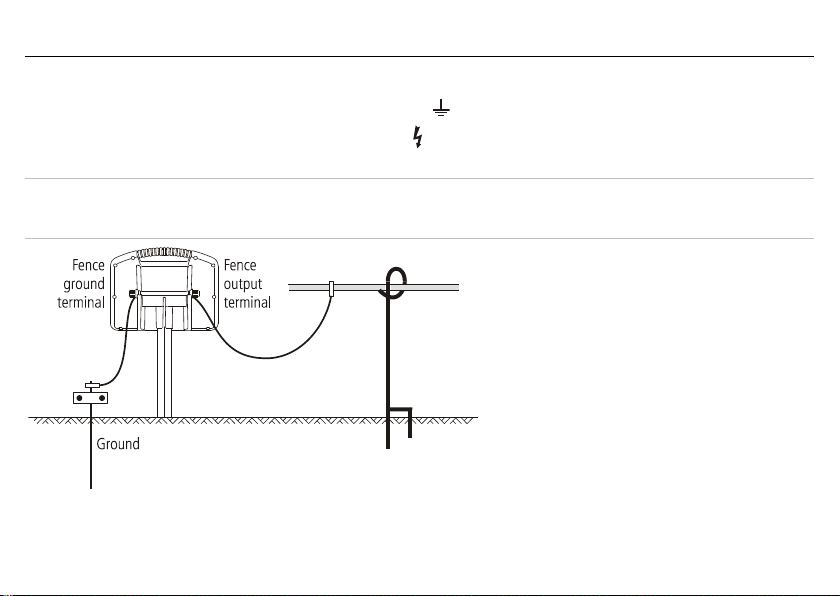
1 Push a 3’ (1 m) ground rod fully into firm soil.
2 Connect the green lead from the Fence ground terminal on the unit to the grounding system.
3 Connect the red lead from the Fence output terminal on the unit to the fence. Make sure there is a good
contact.
Caution!
Make sure the connecting leads drop downwards from the unit to prevent water from collecting at the
terminals.
8

Operation
Battery charge level
Typical pulse speed
Normal
A pulse every 1.5 seconds
Low
A pulse every 3 seconds
Switching on and off
1 To switch on, press and hold until the pulse indicator light gives one long flash (one second).
2 To switch off, press and hold until the pulse indicator light gives five short flashes.
Pulse indicator light
The pulse indicator light indicates the output pulse speed. The pulse speed varies according to the battery charge level:
Standby mode
An intelligent battery management feature puts the unit into Standby mode when battery charge falls below a ‘safe
operating level’. When in Standby mode, the unit is still on, but it will not deliver a pulse to the electric fence.
The unit will resume delivering pulses when the solar panel has charged the battery so that it is above ‘safe operating
level’.
When operation resumes, the battery charge level will still be low, so the unit will deliver one pulse every 3 seconds.
Once the battery reaches normal charge level, the pulse will revert to one pulse every 1.5 seconds.
9
 Loading...