

Path medical Senti, Sentiero, Sentiero SOH100098, Sentiero Advanced SOH100360 User Manual

+
User Manual
Senti & Sentiero

Manufacturer
PATH MEDICAL GmbH
Landsberger Straße 65
82110 Germering
Germany
Email info@pathme.de
Telephone +49 89 800 765 02
Fax +49 89 800 765 03
Manual Information
Article number: 100904-EN
Release date: 2019-01
Revision: 0802_MA_Senti&Sentiero_Manual_EN_08-A1
Valid from: Firmware Rev. 2.5, Mira PC Software Rev. 2.0
All mentioned items, products, brands and trademarks are registered or owned by the mentioned
companies.
All information, illustrations, and specifications provided within this manual are based on the latest
product information available at the time of publication. PATH MEDICAL reserves the right to make
changes at any time without notice.
The latest revision of the user manual is available online at www.pathme.de/support.
Errors and omissions excepted.
Copyright Notice
No part of this manual may be reproduced, translated, stored, or transmitted, in any form or by any
means, electronic, mechanical, photocopying, recording, or otherwise, without the prior written
consent of PATH MEDICAL GmbH.
Copyright © 2019 PATH MEDICAL GmbH

Table of Contents
1 Overview .......................................................................................................................................... 5
1.1 Introduction ............................................................................................................................. 5
1.2 Device Versions ....................................................................................................................... 5
1.3 Intended Use ........................................................................................................................... 6
1.4 Performance Characteristics ................................................................................................... 7
2 Explanation of Symbols ................................................................................................................... 9
3 Operational Concept ..................................................................................................................... 11
3.1 Screen Layout ........................................................................................................................ 11
3.2 Online Help ............................................................................................................................ 12
3.3 Test Result Status Icons ......................................................................................................... 12
3.4 Device Hardware ................................................................................................................... 13
3.4.1 On/Off Switch ................................................................................................................ 13
3.4.2 Device Reset .................................................................................................................. 13
3.4.3 Device Sockets ............................................................................................................... 14
3.4.4 Charging the Device ....................................................................................................... 15
3.5 Device Functions ................................................................................................................... 16
3.5.1 User Management ......................................................................................................... 16
3.5.2 Patient Management ..................................................................................................... 16
3.5.3 Device Settings .............................................................................................................. 16
3.5.4 Hardware Tests .............................................................................................................. 17
3.5.5 License Management .................................................................................................... 18
3.5.6 Demo Mode ................................................................................................................... 18
3.5.7 System Information ....................................................................................................... 18
3.5.8 Test Module Information .............................................................................................. 18
3.5.9 Error Handling ............................................................................................................... 19
3.6 Mira PC Software ................................................................................................................... 20
3.7 PATH Service Tool .................................................................................................................. 21
4 Service and Maintenance .............................................................................................................. 23
4.1 General Service Information ................................................................................................. 23
4.2 Routine Maintenance and Calibration .................................................................................. 23
4.3 Repair .................................................................................................................................... 24
5 Cleaning ......................................................................................................................................... 25
6 Accessories .................................................................................................................................... 27

7 Warranty........................................................................................................................................ 29
8 Notes on Safety ............................................................................................................................. 31
8.1 General Usage ....................................................................................................................... 31
8.2 Handling, Transport, and Storage.......................................................................................... 32
8.3 Electrical Safety ..................................................................................................................... 32
8.4 Electromagnetic Compatibility .............................................................................................. 33
8.5 Accessories ............................................................................................................................ 34
8.6 Waste Disposal ...................................................................................................................... 35
9 Technical Specifications ................................................................................................................. 37
9.1 General Device Information .................................................................................................. 37
9.2 Device Characteristics ........................................................................................................... 37
9.3 Power Supply ......................................................................................................................... 38
9.4 Storage, Transport, and Operating Conditions ..................................................................... 38
10 Electromagnetic Compatibility Information .............................................................................. 41
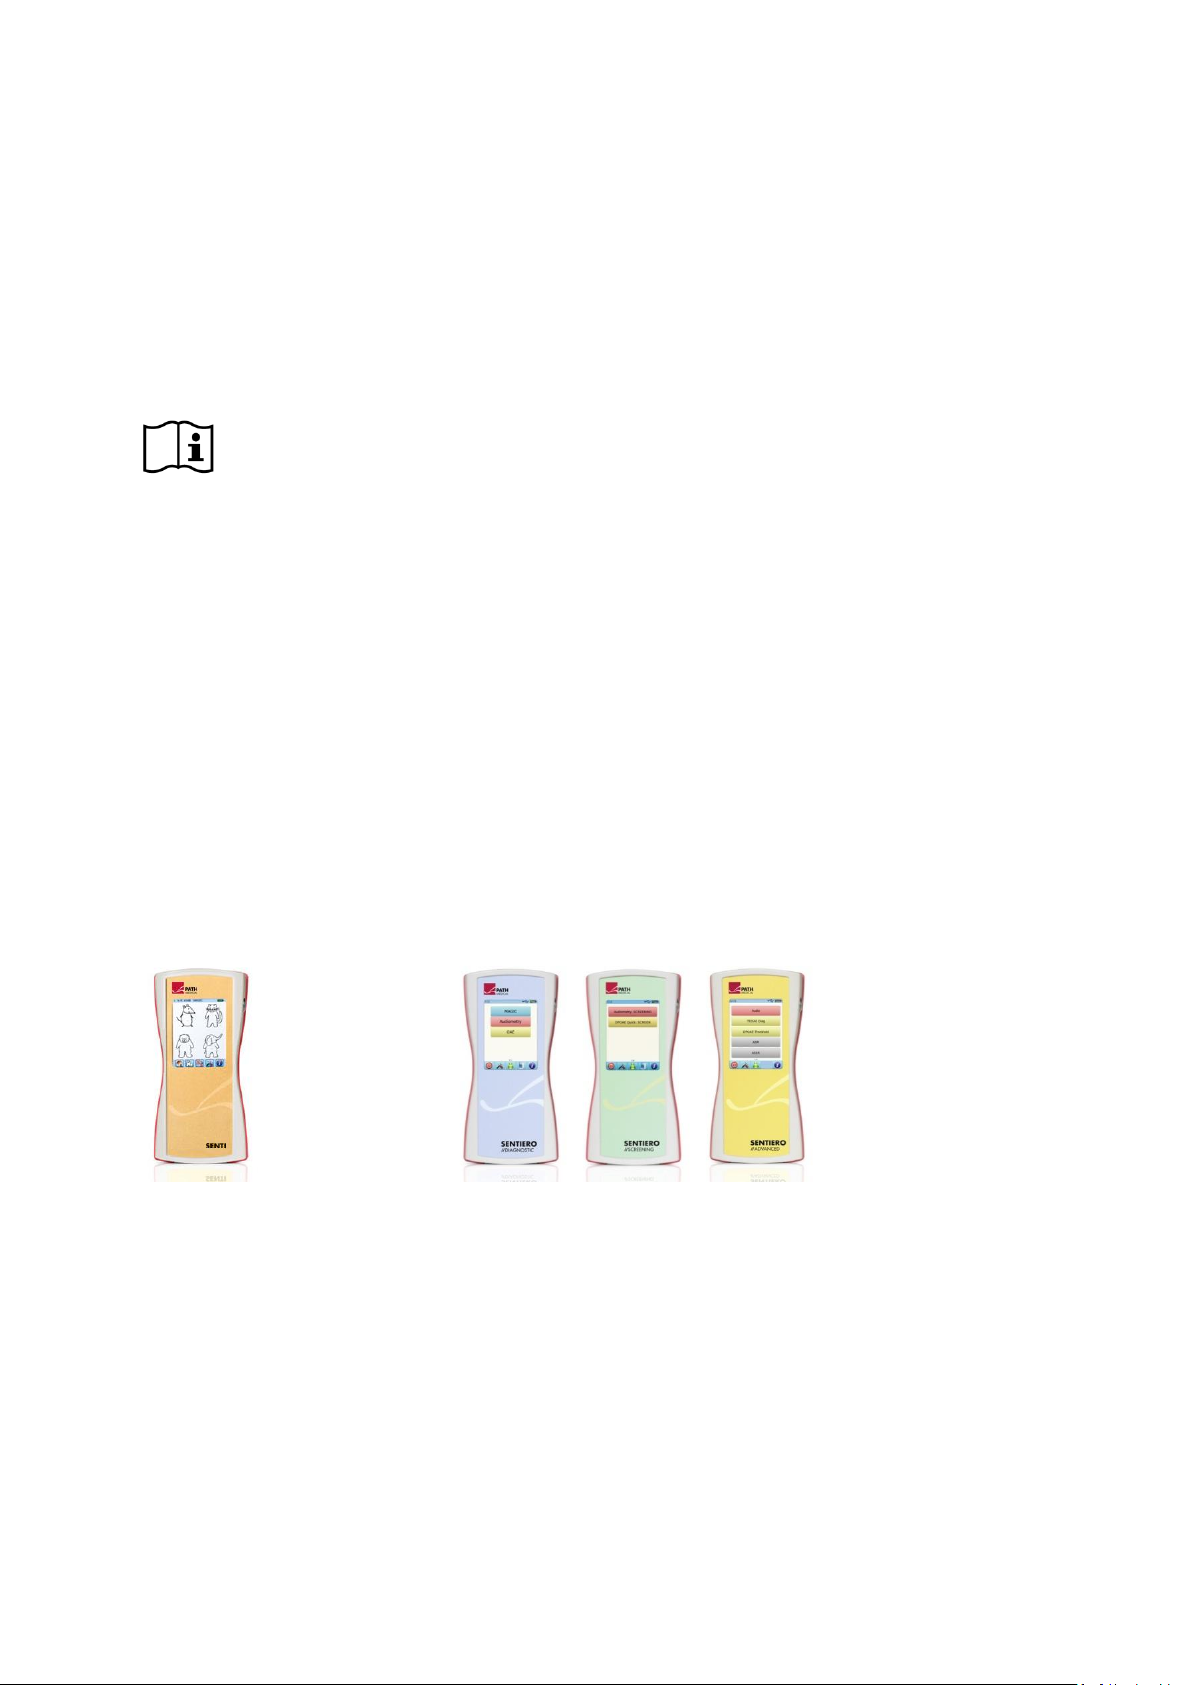
Senti
(Model: SIH100097)
Sentiero
Including:
Sentiero
(Model: SOH100098)
Sentiero Advanced
(Model: SOH100360)
1 Overview
1.1 Introduction
Thank you for purchasing a Senti or Sentiero. This manual is your guide for safely operating and
maintaining your device.
Please read this manual carefully before using Senti or Sentiero the first time. We
recommend taking particular note of the safety (see section 8: Notes on Safety), intended
use (see section 1.3: Intended Use), cleaning (see section 5: Cleaning) and maintenance (see section
4: Service and Maintenance) instructions.
Senti and Sentiero are reliable, easy-to-use, and mobile medical devices. All devices provide easy
navigation via touch-screen and are intended for hearing examinations (see section 1.3: Intended
Use). Some of the mentioned firmware modules in this manual may not be included with your
license. Please contact your distributor if you would like to upgrade your license to include more
modules.
1.2 Device Versions
There are multiple versions available within the Senti and Sentiero device families.
HANDHELD DEVICES:
Senti and Sentiero with PCB revision ≥ 67 differ from Senti and Sentiero with PCB revision <67 in
extended internal memory (e.g. for speech tests). Sentiero Advanced differs from Sentiero in socket
layout and offers the additional ability to conduct acoustically evoked potential (AEP) tests. Sentiero
and Sentiero Advanced with PCB revision ≥ 70 offer the ability to conduct tympanometry and
acoustic reflex measurements when used together with the tympanometry add-on TY-MA (planned
for first quarter 2019).
Page 5 / 44

Senti Desktop
Including:
Senti D. (Model: SID100419)
Senti D. Flex (Model: SID100433)
Sentiero Desktop
(Model: SOD100497)
DESKTOP DEVICES:
Senti Desktop and Senti Desktop Flex differ in sockets. Senti Desktop offers jack plugs and
is calibrated to a specific headphone and/or bone conductor. Senti Desktop Flex offers the
ability to exchange different calibrated transducers. Sentiero Desktop offers the same modules as
Sentiero together with the ability to conduct tympanometry and acoustic reflex measurements.
1.3 Intended Use
Devices of the Senti and Sentiero device families offer different test methods which can be
configured to fit the professional's needs for hearing screening or diagnostics. Devices of the Senti
device family provide multiple psycho-acoustic test procedures including conventional and imagebased pure-tone audiometry (e.g. Audio, MAGIC) and speech tests (e.g. SUN, MATCH). Devices of the
Sentiero device family additionally provide physiological test procedures including transitory evoked
otoacoustic emissions (TEOAE), distortion product otoacoustic emissions (DPOAE), auditory
brainstem responses (ABR; Sentiero Advanced only), auditory steady state responses (ASSR; Sentiero
Advanced only), and auditory impedance and acoustic reflex measurements (Sentiero Desktop,
Sentiero and Sentiero Advanced with tympanometry add-on).
Available psycho-acoustical methods on Senti and Sentiero are especially indicated for use with
cooperative patients starting at the age of two years or adequate development age, which enables
them to do play/interactive audiometry. All other physiological modules are suitable to be used for
all ages elder than infants from 34 weeks (gestational age) that are ready for discharge from the
hospital.
All physiological test methods are especially indicated for use in defining the type and configuration
of hearing loss particularly for individuals whose behavioral audiometric results are deemed
unreliable or to assist in the diagnosis of otologic disorders. Estimation of cochlear hearing thresholds
(DPOAE Threshold) is possible at various frequencies without the need of cooperative interaction
with the patient. Acoustic reflex and tympanometry are featured to evaluate the functional condition
of the middle and outer ear. For each method, several protocols can be configured. The results can
be used to make further recommendations regarding appropriate intervention strategies.
Devices of the Sentiero device family are intended for the following purposes:
Diagnostics, monitoring and follow-up after newborn hearing screening
Pre-school, school, and adult hearing screening
ENT diagnostics based on measurement of
a) Otoacoustic emissions
b) Tympanometry and acoustic reflex (Sentiero Desktop, Sentiero and Sentiero
Advanced with tympanometry add-on)
Page 6 / 44
c) Auditory Brainstem Responses (Sentiero Advanced only)
d) Auditory Steady State Responses (Sentiero Advanced only)
Senti and Sentiero are intended for use by audiologists, ear-nose-throat (ENT) doctors, and
other hearing health care professionals and audiologically trained technicians in a medical
environment. Please consider local regulations regarding the qualification requirements for
performing measurements with a specific test module.
Senti and Sentiero are not intended for operational use by the general public. All test
procedures must be supervised or conducted by qualified personnel. In the United States
of America, Federal law restricts this device to sale by or on the order of a licensed physician.
Senti and Sentiero are intended for indoor-use only and must be operated at defined
environmental conditions. See also operating conditions in section 9: Technical
Specifications and information about environmental conditions regarding electromagnetic
disturbances in section 10: Electromagnetic Compatibility Information. Senti and Sentiero are not
intended for use in oxygen-rich environments.
CONTRAINDICATIONS:
Senti and Sentiero must not be used in cases of external otitis (outer ear canal infection) or
in any case which yields to pain when inserting the ear probe or applying any other
transducer.
SIDE EFFECTS:
There are no known undesirable side effects for devices of the Senti and Sentiero device families.
See also section 8: Notes on Safety.
1.4 Performance Characteristics
All Senti and Sentiero devices are capable of producing acoustic signals which are transmitted to the
patient via an air or bone conduction transducer. All Sentiero devices are capable of recording
acoustic signals from the patient via an ear probe. Sentiero Advanced is capable of recording biopotential signals from the patient via an electrode. Sentiero and Sentiero Advanced with
tympanometry add-on TY-MA and Sentiero Desktop are capable of producing static air pressure. Test
result data is shown on the device display.
Essential performance of Senti/Sentiero devices includes general device operability, correct tone and
pressure presentation, correct signal data recording, and correct result display. Deterioration of
essential performance may result in a device not ready to work properly, in wrong audiological
diagnostics or in acoustic or pressure overexposure.
In order to preserve essential performance, routine maintenance is required (see section 4.2: Routine
Maintenance and Calibration).
Page 7 / 44

Page 8 / 44
Symbol
Explanation
Important notice: please read for important information.
Warning: please read for safety-relevant information, which may cause risk of
danger to persons and/or device if not followed.
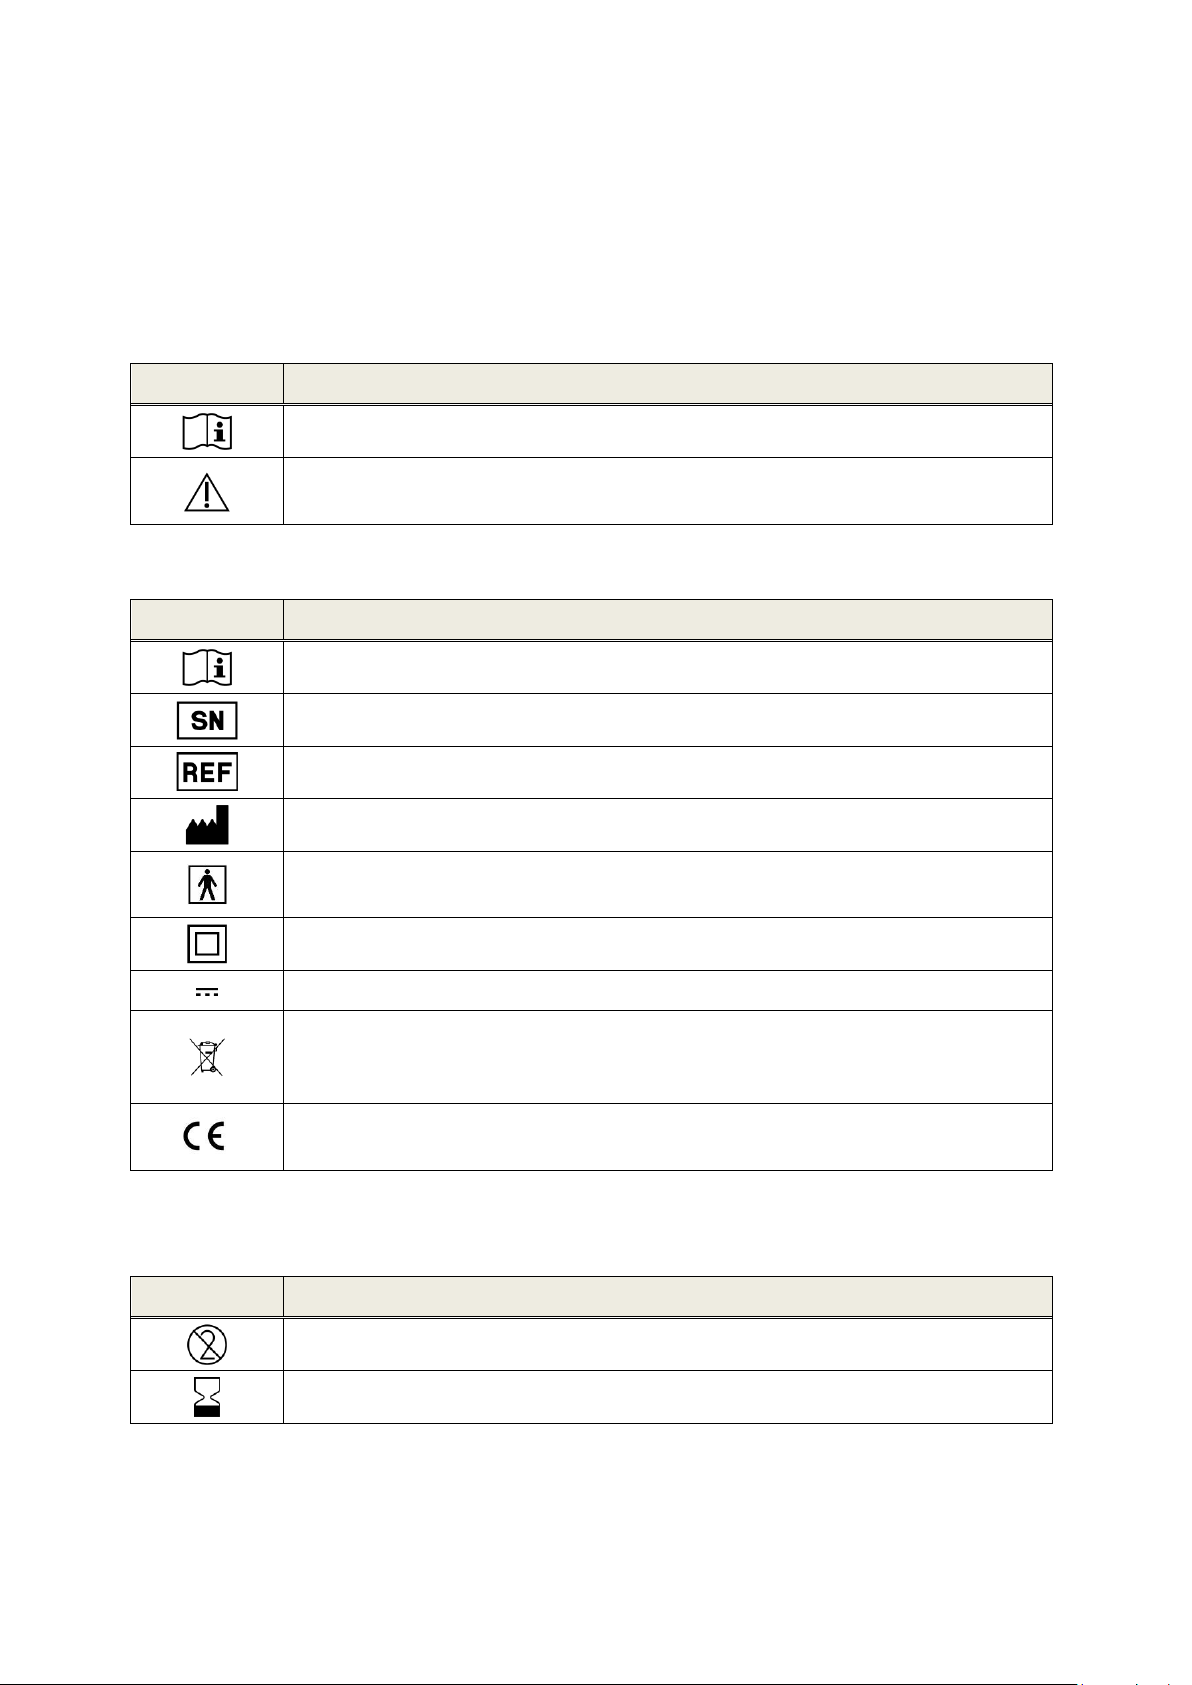
Symbol
Explanation
Consult instruction for use, i.e. this manual.
Serial number
Article number
Manufacturer name and address, production date
Compliance with applied part type BF (body floating) requirements
according to DIN EN 60601-1
Device with safety class II according to DIN EN 60601-1
Direct current input
The device is electronic equipment covered by the directive 2012/19/EC on waste
electrical and electronic equipment (WEEE). When discarded, the item must be
sent to separate collection facilities for recovery and recycling.
CE mark to declare conformity with medical device directive 93/42/EEC. The
number below the CE mark refers to the identifier of the notified body.
Symbol
Explanation
Single use only. Do not reuse the respective item.
Expiration date. Do not use the respective item after the specified date.
2 Explanation of Symbols
This section explains all symbols used within this manual and on the device label.
Symbols within this manual:
Symbols on the device label:
For further symbols, e.g. on accessory labels, please refer to the respective manual or data sheet of
the accessory. Important symbols may include:
Page 9 / 44

Page 10 / 44
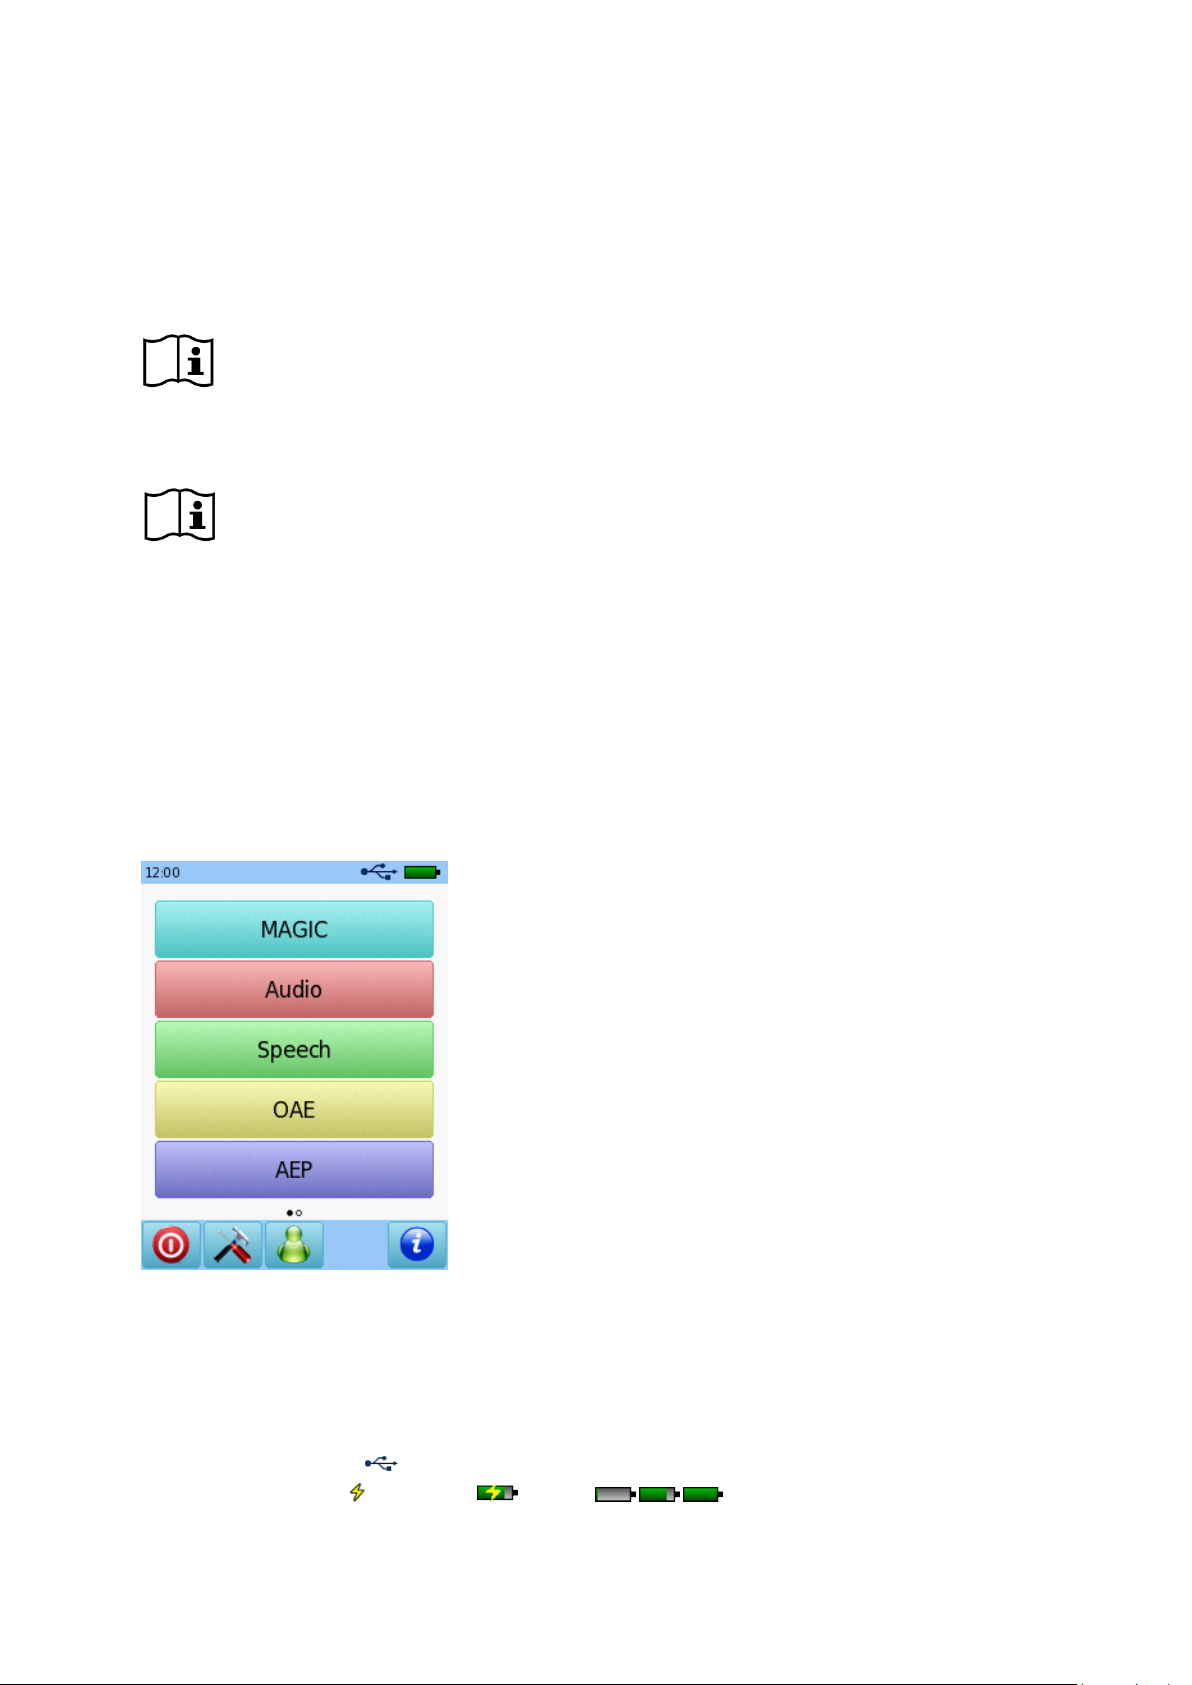
① Header
② Main screen
③ Footer
3 Operational Concept
After switching on the device, the device can be operated via a touch-sensitive display. In the
following the most important device functions and screen elements are explained.
Further information and details about the various test modules, potential clinical
applications and recommendations for combining several test procedures are explained in
the guide for practical application (How-To-Manual). You can download this document from
www.pathme.de/support.
Further technical details as e.g. maximum levels for the various test modules and for all
available transducers and specifications regarding test module parameters are described
in a separate Technical Specification document. You can download this document from
www.pathme.de/support.
Please note that screen shots or references to test modules in this manual may not reflect the actual
test configuration of your device.
3.1 Screen Layout
The device screen is in general split up in three sections (see Figure 1):
Figure 1: Device screen layout
① Header, including the following elements:
- Device time (e.g. 12:00)
- Screen-related information (e.g. selected patient name, selected test module/preset name)
- USB connection ( is shown if USB cable is connected to a PC)
- Battery status ( fully charged charging status indicator from empty to full)
Page 11 / 44
Test result OK
Screening test: valid result
Diagnostic test: result within expected range of normal hearing
Test result incomplete, in-between OK and not OK, further test interpretation needed
Test with hearing threshold result (e.g. Audio, MAGIC Audio, and DPOAE Threshold):
result within expected range of mild hearing loss
Test result not OK
Screening test: invalid result
Diagnostic test: result within expected range of moderate to severe hearing loss
② Main screen, including screen-related elements (e.g. test module list, patient list, test data result view)
③ Footer, including control elements (e.g. for browsing to different screens) and online help (see section
3.2: Online Help)
For explanation of symbols please refer to the device online help (see section 3.2: Online Help).
3.2 Online Help
Context-sensitive help screens allow an intuitive handling of the device. Automatically generated
message boxes may additionally present context-sensitive warnings or information.
The context-sensitive help screens are available via the blue information icon, which is
displayed in the footer. The help screens explain the currently available symbols and their
functions.
At some screens, there is an additional information icon, which will provide further
information for the user (e.g. recommendations for measuring DPOAEs in a noisy environment, explanation
of free-field calibration).
3.3 Test Result Status Icons
In the test history list, test results are shown with an overall test result status icon. The icons
correspond to the following definitions:
The test result status icon is meant as a rough hearing status estimator. It is not to be
interpreted as a binding result. A green status icon is not necessarily an indication that the
full auditory system is normal. A full audiologic evaluation should be administered if concerns about
hearing sensitivity persist. A yellow or red status icon should not be assumed to be an indicator of a
lack of auditory function or the presence of pathology. However, it should be followed with full
audiologic diagnostic testing as appropriate. In all cases, the examiner needs to check and interpret
result data within the context of the patient’s case history, considering results from other
measurements and additional influencing factors as appropriate (e.g. environmental conditions
during the test, patient cooperativeness).
Page 12 / 44
3.4 Device Hardware
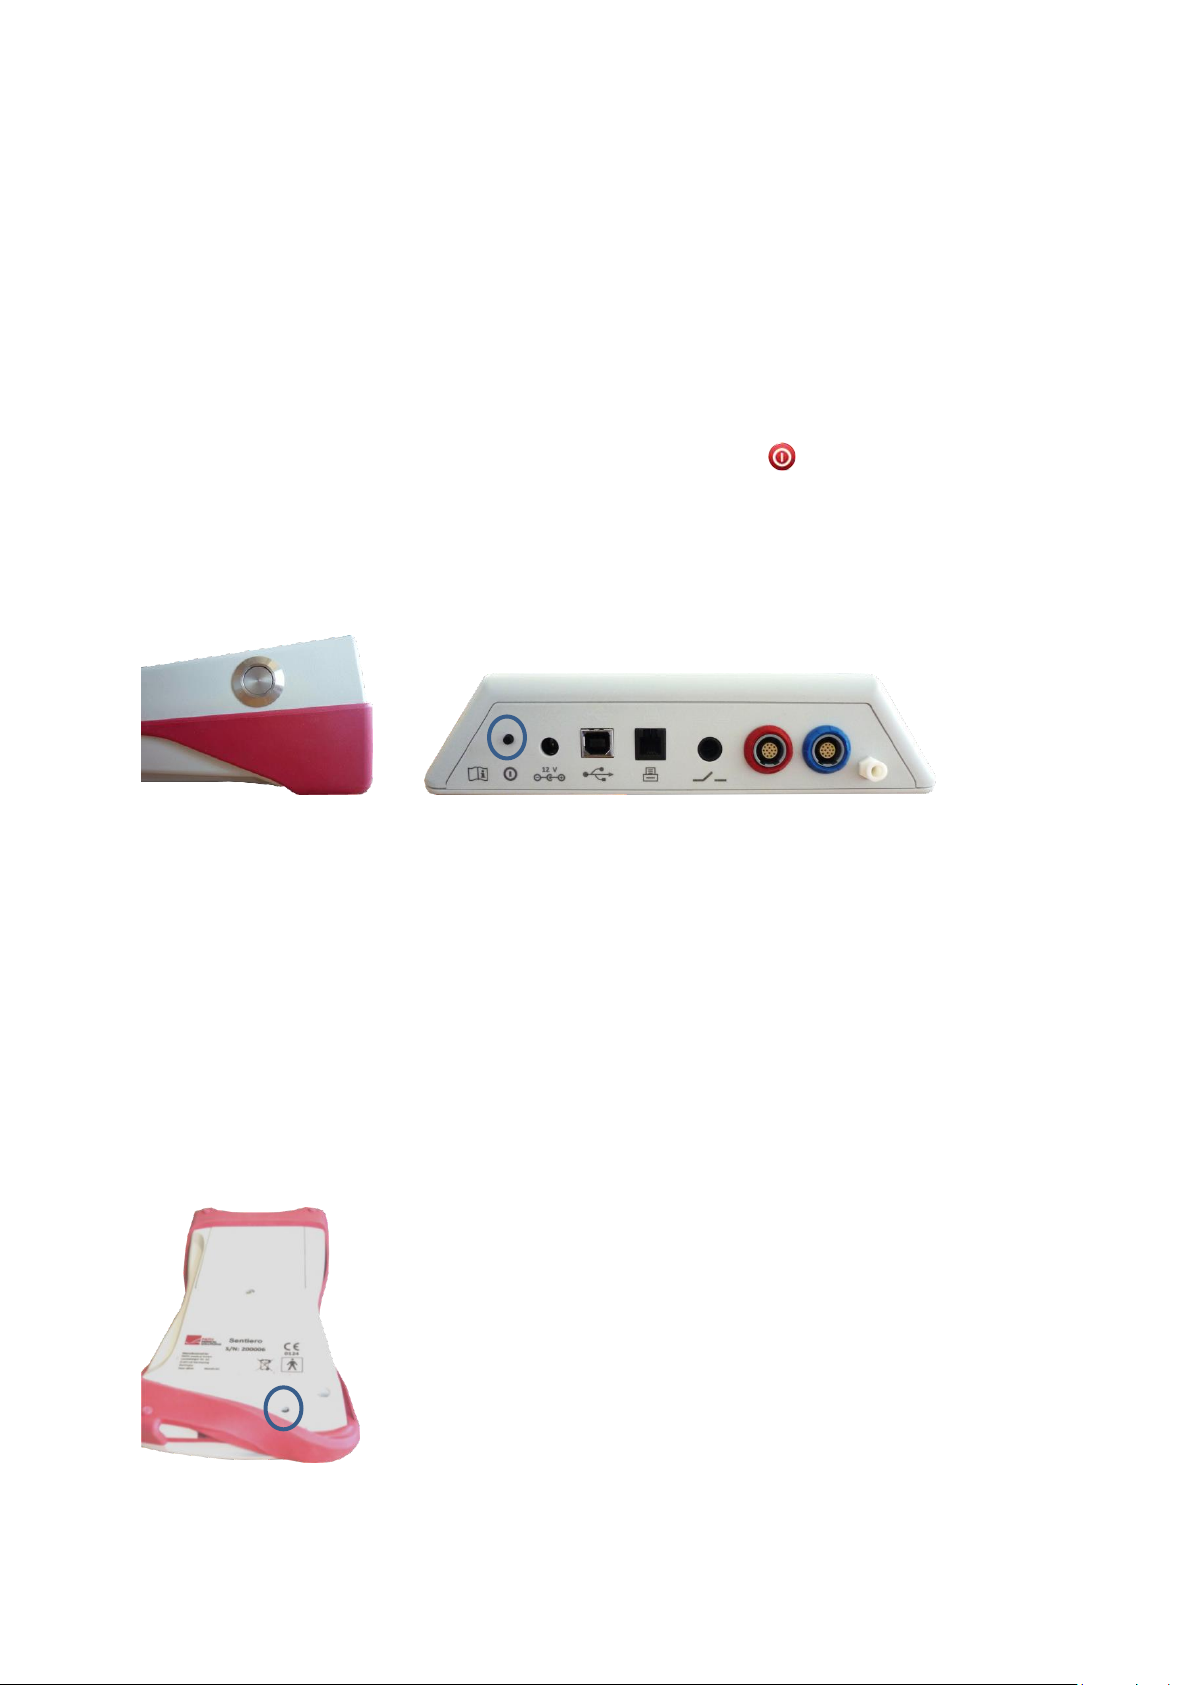
3.4.1 On/Off Switch
The on/off switch is located at the right side of the device housing for handheld devices and at the
rear panel of the device housing for desktop devices (see Figure 2). The on/off switch can be used to
switch on or off the device. For switching on the device, press the switch briefly. The welcome screen
appears. For switching off the device, press the switch for about 10 seconds.
Alternatively the device can be switched off via the off switch icon in the footer of the device
display.
In addition, the on/off switch can be used in some test modules (e.g. MAGIC, SUN) to show the
footer, which may be hidden in these modules during the test.
Figure 2: On/off switch for handheld (left) and desktop device (right, marked with blue circle)
3.4.2 Device Reset
If the device is stalled (i.e., no reaction when pressing the touch screen), the device can be reset.
After reset, the device can be started again with the on/off switch. The reset button does not reset
any device or test module settings or any other data on the device.
In order to reset the device, for handheld devices, press the reset button on the back side of the
device below the rubber casing (see Figure 3). For desktop devices, press the on/off switch for
several seconds.
Figure 3: Device reset button for handheld device
Page 13 / 44

Socket
Connectable accessory
Blue
Headphones, insert earphones, free-field loudspeaker
Sentiero, Sentiero Advanced: 2nd ear probe, ear coupler cable,
tympanometry add-on (PCB revision ≥ 70 only)
Red
Sentiero, Sentiero Advanced: Ear probe, microphone
Sentiero Advanced: Bone conductor, trigger cable
Grey
Senti, Sentiero: Patient response button, label printer, power supply, bone
conductor
Senti: RS232 cable
White
Sentiero Advanced: Electrode cable, patient response button, label printer,
power supply, modem
USB socket
USB cable with type mini B connector
3.4.3 Device Sockets
Multiple accessories can be connected to the device. This includes e.g. transducers (e.g. headphones,
ear probe), electrode cable, patient response button, label printer, communication cable (RS232,
USB), and power supply unit. For further information see section 6: Accessories.
Desktop devices: When printing via label printer, please make sure that both the device
and the label printer are connected to the power supply unit; otherwise no printout will
be possible.
For handheld devices (see Figure 4 and Figure 5) the sockets can be used as described in Table 1.
Table 1: Device socket overview for handheld devices
Figure 4: Socket panel of handheld devices (from left to right: Senti, Sentiero, Sentiero Advanced)
Figure 5: USB socket of handheld device
Page 14 / 44
 Loading...