

Page 1

PATHFINDER
PT10U, PC10U, PR10U
AVAILABLE IN GPS-ONLY SYSTEM: PATHFINDER TRX
Owner's Manual
Please read this manual thoroughly
before operating the Dogtra PATHFINDER.
1
Page 2

IMPORTANT SAFETY AND PRODUCT
INFORMATION
WARNING
Please read all safety and product information below before using your
Dogtra product. Failure to follow these safety instructions could result in
injury to you, your dog and others, or it could result in damage to your
Dogtra product or other property.
DOG SAFETY
Proper Use
Dogtra products should be used to train, educate, monitor, or track dogs. Each
dog may have a different tolerance for and reaction to Dogtra products. Closely
observe your dog when determining the right level of stimulation, receiver fit,
and other settings of your Dogtra product.
Training Methods
Dogtra products may be used with a variety of training methods that provide
clear and consistent messages to your dog.
Fit and Wear
Proper fit and wear of your Dogtra product is important for the comfort of
your dog as well as the functioning of your product. Dogtra receivers should
fit comfortably and not too tightly, so that the receiver stays in place and does
not move around your dog’s neck. Do not leave a receiver on your dog for an
extended time. Although each dog is different, Dogtra recommends that its
receivers be used a maximum of 4 to 6 hours at any one time on your dog. A
receiver that is used for overly long periods or that fits improperly may cause
skin irritation or sores on your dog’s neck. Regularly check the receiver’s contact
area on your dog’s skin. If your dog exhibits skin irritation or sores, stop using
the Dogtra product and consult with a veterinarian.
UNAUTHORIZED USE
Dogtra products should be used only in a safe and responsible manner to train,
educate, monitor, or track dogs. Dogtra products are not intended for use in any
other manner; they are not intended for use with other animals or with humans;
and they are not intended for use in unsafe situations or environments that
could lead to death, injury, loss or damage.
BAT TERY
Your Dogtra product contains batteries. Do not attempt to replace the battery
yourself. Contact Dogtra or your Dogtra retailer to replace your battery. Dispose
of batteries as provided by your local regulations. Do not disassemble, crush,
heat, or otherwise alter the battery as it may cause fire, explosion, injury and/or
property damage.
2
Page 3

OWNER SAFETY
Handling and Repair
Dogtra products can be damaged or malfunction if dropped, especially on
hard surfaces, or otherwise improperly handled. Do not use a damaged or
malfunctioning product as it may cause injury or property damage. If your
product is damaged or malfunctions, contact Dogtra to obtain service before
using the product.
Electrical Product
Your Dogtra product contains electrical components and batteries. Do not use
or keep your product near heat or flammable sources. Such use or storage may
damage your product and/or cause fire, explosion, injury, or property damage.
Charging
Only charge your Dogtra product with its accompanying Dogtra charger. Do
not attempt to charge your product in any other manner or in temperatures
less than 32°F (0°C) or over 113°F (45°C) as it may cause fire, explosion, injury,
and/or property damage. If you notice damage to your product, its charger, or
battery, obtain service from Dogtra before charging the product. Do not use
more than one splitter cable with a single battery charger.
Medical Device Interference
Dogtra products contain electrical and magnetic components that emit low
level electromagnetic waves and radio frequencies. These electromagnetic
waves or radio frequencies may interfere with pacemakers, defibrillators, or
other medical devices. Consult your physician or medical device maker before
using your medical device with a Dogtra product. If you think that your Dogtra
product is interfering with your pacemaker, defibrillator, or other medical
device, stop using the Dogtra product.
Aggressive Dogs
Do not use Dogtra products with aggressive dogs as such dogs may react
adversely and cause injury to people or other dogs. Seek the assistance of a
dog-training specialist or veterinarian when dealing with aggressive dogs.
Children
Dogtra products are not toys. Adult supervision and close attention are
necessary when Dogtra products are used by or near children.
3
Page 4

CONTENTS
PACKAGE CONTENTS
MAIN FEATURES
OVERVIEW
UNDERSTANDING YOUR TRAINING SYSTEM
TURNING THE PATHFINDER ON/OFF
1.
BUTTON FUNCTION
2.
CHARGING THE PATHFINDER
3.
LED INDICATOR
4.
INSTALLING THE PATHFINDER APP
5.
PAIRING
6.
ACQUIRING GPS SIGNAL
7.
ONLINE WEB MANUAL FOR ALL APP FEATURES & Q&A
8.
...............................................................................................................
.............................................................................................................
...........................................................................................
....................................................................................................
......................................................
.......................................................................................
....................................................................
..............................................................................................
.........................................................
..............................................................................
................
6
7
8
1 1
12
13
14
15
16
17
18
CHANGING THE CONTACT POINT LENGTH
RECEIVER FITTING
FINDING THE RIGHT STIMULATION
REPLACING THE ANTENNA
MAXIMIZING THE DISTANCE
ATTACHING THE BELT CLIP
USING THE TEST LIGHT
APPLICATION
1.
MAP TAB
2.
DOG ICONS
3.
DOG ALERTS
4.
MAP FEATURES
5.
MARKER
6.
OPTION MENU
7.
COMPASS TAB
8.
E-COLLAR TAB
DEVICE LIST
1.
LIST OF CONNECTED DEVICES
................................................................................................
.................................................................
..............................................................................
.............................................................................
...............................................................................
......................................................................................
............................................................................................................
.......................................................................................................
....................................................................................................
.............................................................................................
...........................................................................................................
...............................................................................................
.................................................................................................
.............................................................................................
.................................................................
..................................................
19
20
21
22
23
23
24
25
26
27
27
28
30
31
32
35
4
Page 5

2.
DEVICE LIST OPTIONS
3.
DEVICE SHARING AND RECEIVING A DEVICE
4.
DEVICE DETAILS
..................................................................................
.............................................................................................
HISTORY
1.
HISTORY FILES
2.
HISTORY DETAIL
................................................................................................
.............................................................................................
MAP MANAGEMENT
1.
MAP SELECT
2.
OFFLINE MAP
3.
CREATING CUSTOM MAP
4.
UPLOADING MAPS TO YOUR SMARTPHONE
5.
UPLOADING FILES
....................................................................................................
..................................................................................................
.............................................................................
..........................................................................................
......................................
........................................
36
37
39
42
43
44
45
47
59
64
GEO-FENCE
APP SETTINGS
BASIC MAINTENANCE
TROUBLESHOOTING GUIDE
FCC WARNING
.............................................................................................................
........................................................................................................
..........................................................................................
...............................................................................
........................................................................................................
WARRANTY AND REPAIR INFORMATION
.....................................................
73
74
77
78
79
80
5
Page 6
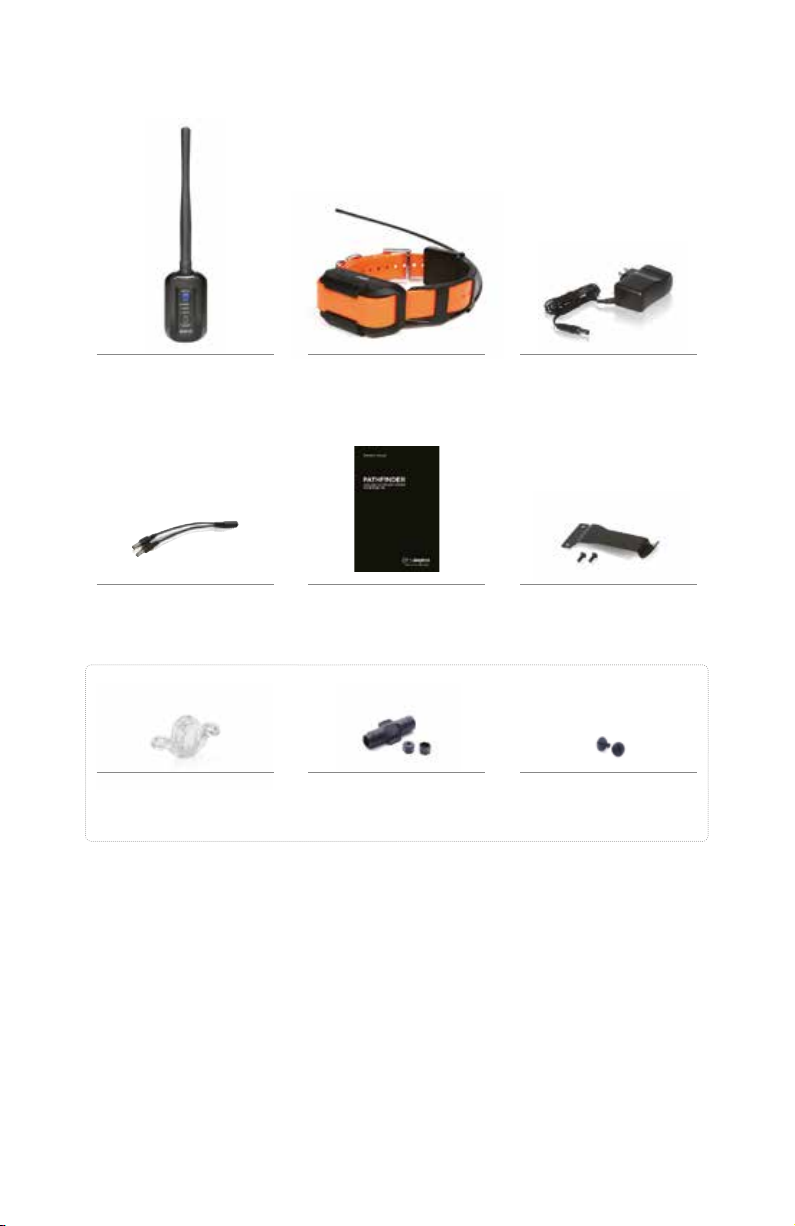
PACKAGE CONTENTS
GPS Connector
(PT10U)
Splitter Cable Owner’s Manual Belt Clip
Not included with TRX
Test Light Contact Point
PATHFINDER: GPS Receiver
PATHFINDER TRX: GPS Receiver
(PC10U, PR10U)
Extension Washer/
Adjustment Tool
Battery Charger
Non-Stimulation
Contacts
6
Page 7
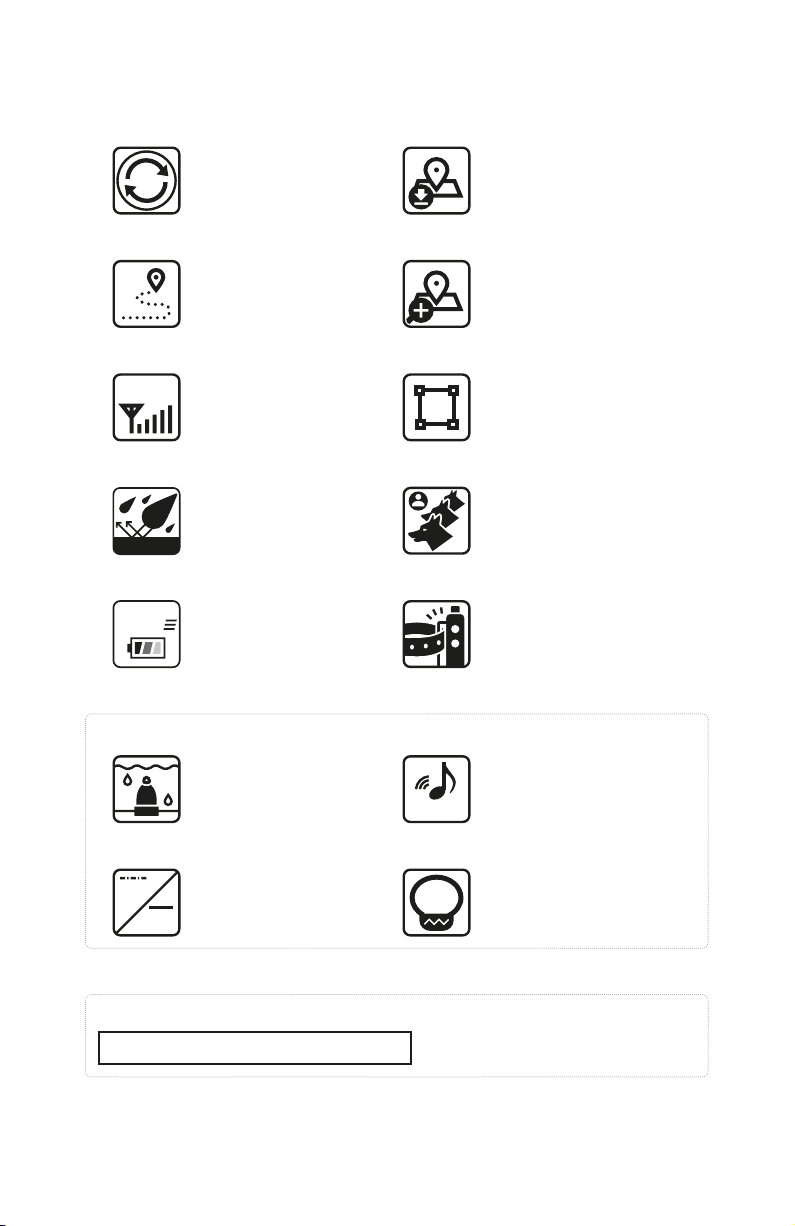
MAIN FEATURES
2s
9-Mile
IPX9K
3.5
Not included with PATHFINDER TRX
2-Second GPS
Update Rate
Tracking Only Mode
IPX9K Waterproof
Certified
3.5-Hour Rapid
hr
Charge Batteries
Offline Maps
Precise and
Up-to-Date Maps
Geo-Fence Option9-Mile Range
Expandable to
21 Dogs
21
Belt Clip
Enhanced
Contact Points
C
Nick/Constant
Stimulation
N
For PATHFINDER TRX Only
UKC, AKC, and PKC Events Approved
TONE
H
Audible Tone
Low-High Output in
1-100 Stimulation Levels
7
Page 8
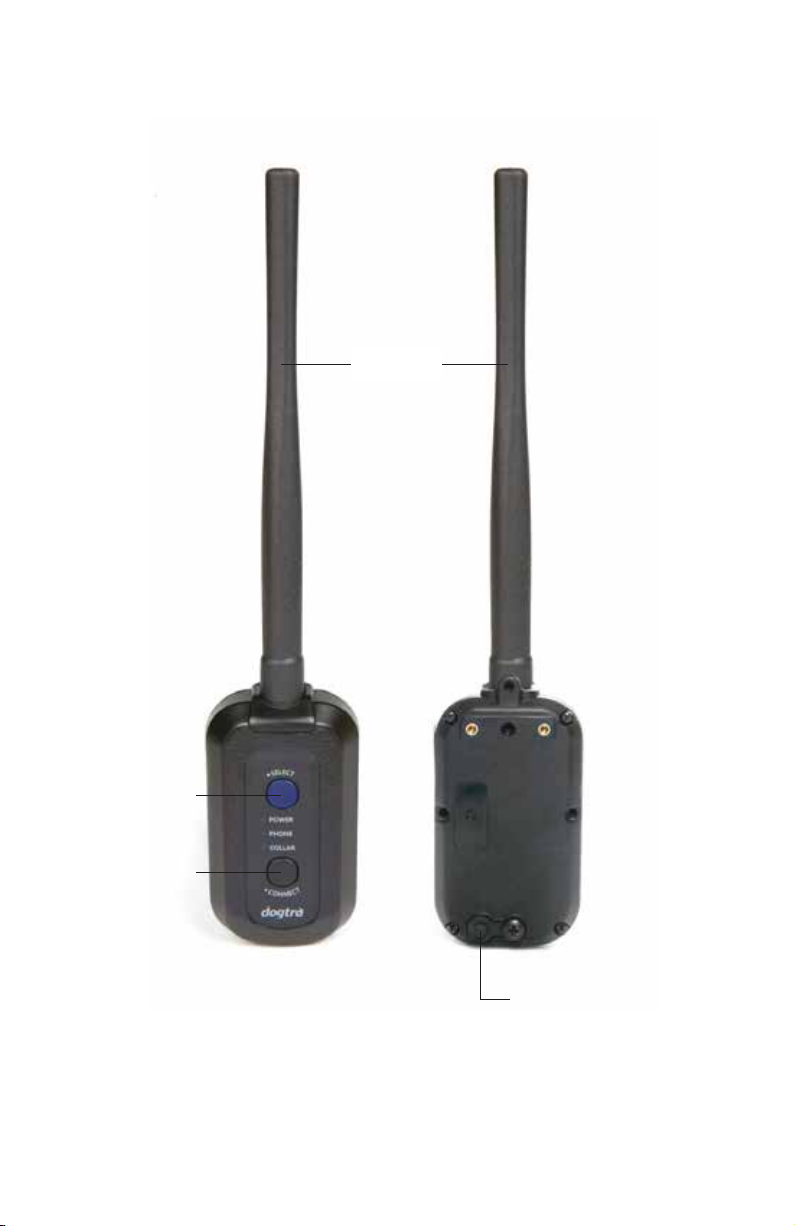
OVERVIEW
MURS Band
Antenna
Power & Select
Connect
8
Button
Button
Battery Charging Receptacle &
Rubber Plug
PATHFINDER
GPS Connector (PT10U)
Page 9
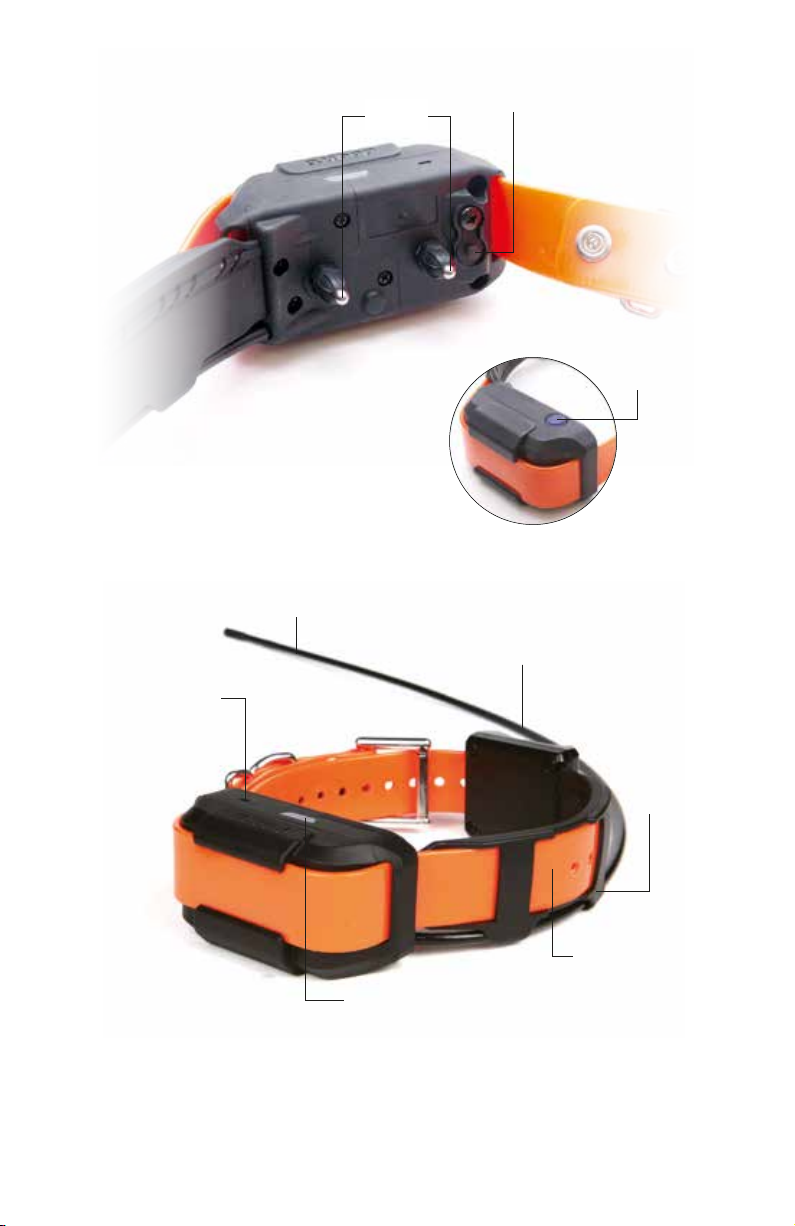
MURS Band
Antenna
Contact
Points
Battery Charging
Receptacle
Power
Button
GPS Antenna
Mic. Sensor
Black
Antenna
Casing
Receiver Strap
LED Indicator Light
PATHFINDER
GPS Receiver (PC10U)
9
Page 10
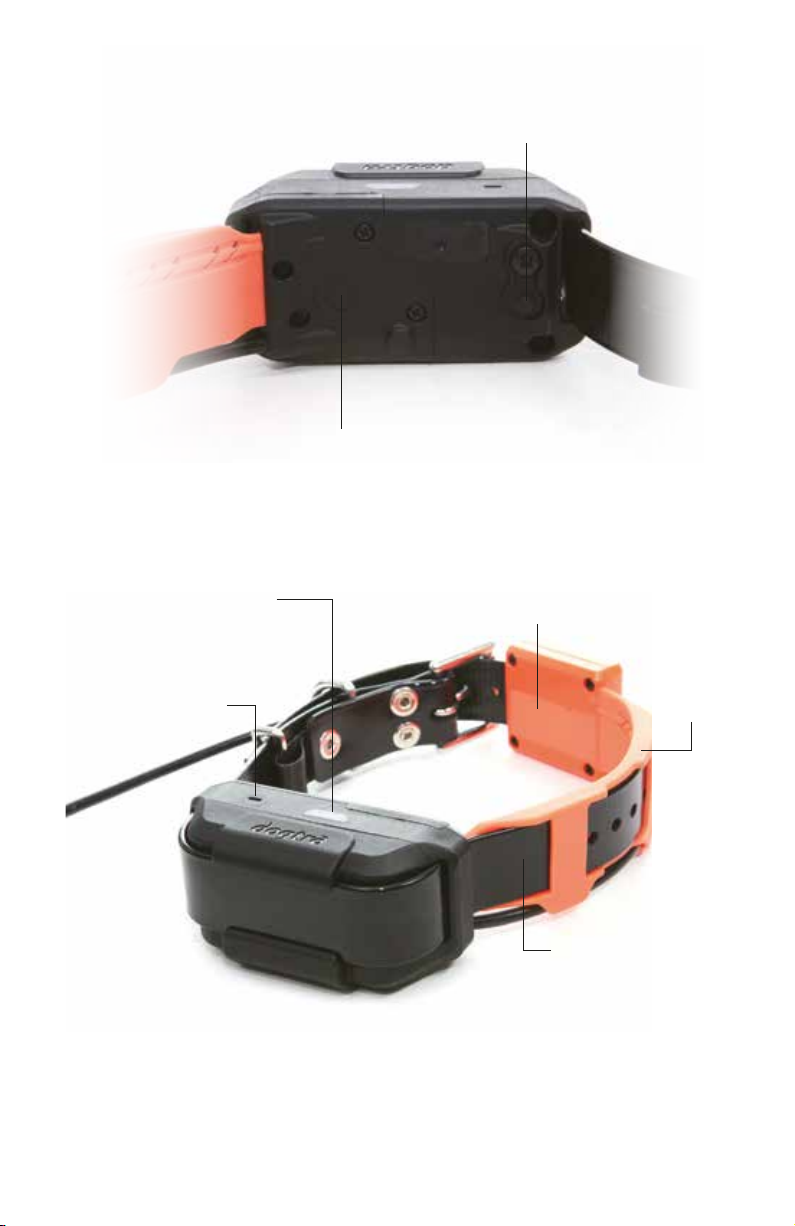
PATHFINDER TRX does not
have contact points
Battery Charging
Receptacle
LED Indicator Light
Mic. Sensor
GPS Antenna
Orange Antenna
Casing
Receiver Strap
PATHFINDER TRX
GPS-Only Receiver (PR10U)
10
Page 11
UNDERSTANDING YOUR TRAINING SYSTEM
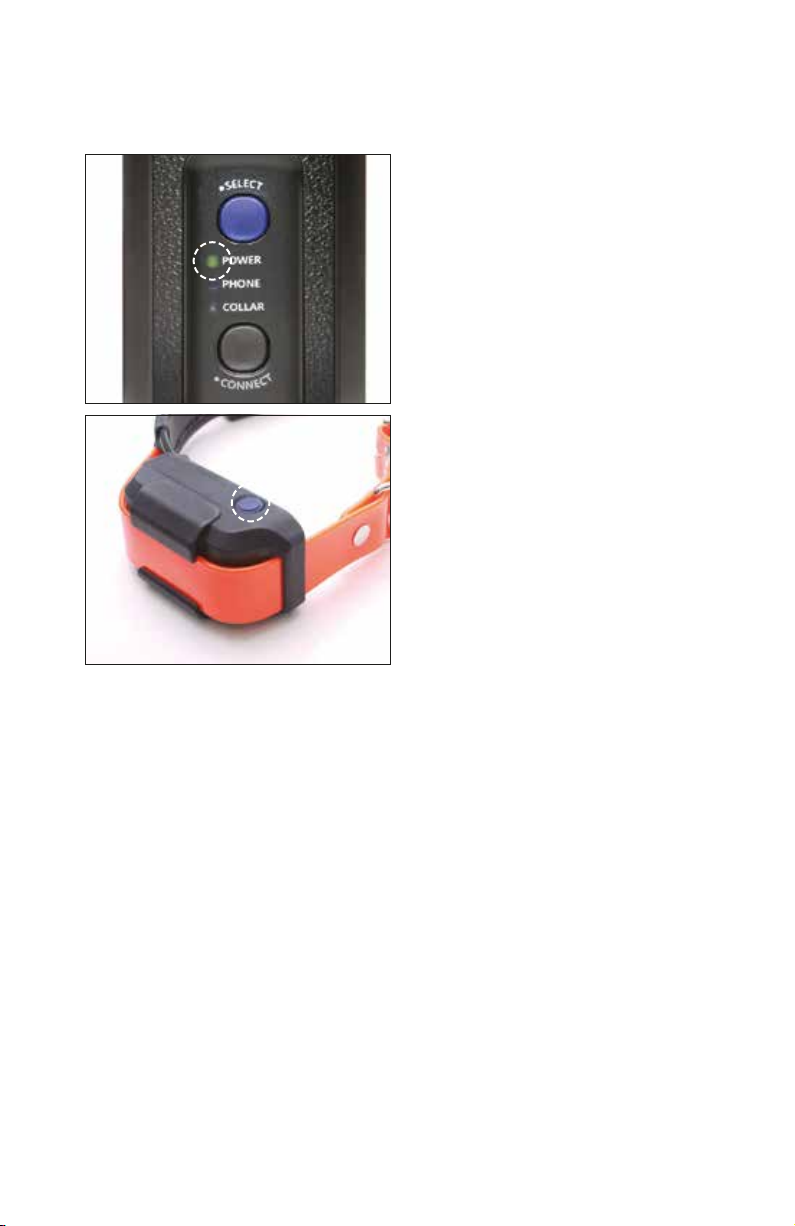
1. TURNING THE PATHFINDER ON/OFF
GPS Connector (PT10U)
• To turn on the GPS connector, press
the blue Select button until the LED
turns on.
• To turn off the GPS connector, press
the blue Select button until the red
LED shows.
GPS Receiver (PC10U, PR10U)
• To turn on the GPS receiver, press the
Power button until the LED turns on.
• To turn off the GPS receiver, press the
Power button until the LED turns red.
• A tone will play to indicate that the
GPS receiver is turning on or shutting
down.
11
Page 12
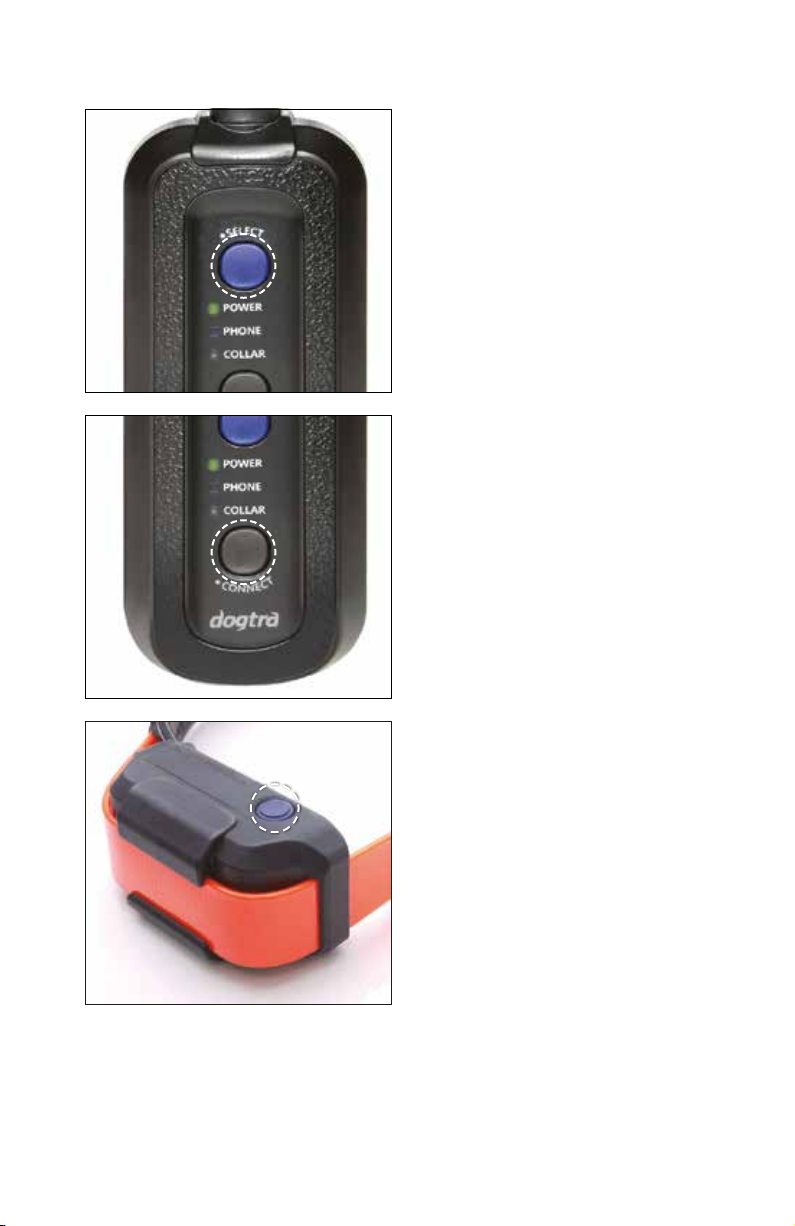
2. BUTTON FUNCTION
GPS Connector (PT10U)
The Select button is used to turn the
connector on/off and select a device to
pair. While turned on, press the Select
button to Phone or Collar to pair the
connector to the respective device.
The Connect button is used to connect
the GPS connector to a smartphone
and GPS receiver.
Pairing: Use the Select button to set
the GPS connector to Collar to pair the
connector with the receiver. Set the
GPS connector to Phone to pair the
connector to a smartphone.
Press and hold down the Connect
button until the LED blinks rapidly.
The GPS connector will now be ready
for pairing.
GPS Receiver (PC10U, PR10U)
Power On: To turn the GPS receiver on,
press the Power button until the green
LED turns on.
Power Off: To turn the GPS receiver off,
press the Power button until the LED
turns off.
Pairing: To place the GPS receiver into
pairing mode, begin with the device
turned off and hold down the Power
button until the LED blinks rapidly.
A melody will play when the GPS
receiver is in pairing mode.
* The GPS Collar pairing mode is used to pair the GPS receiver and the GPS
connector. The PATHFINDER set comes with both parts paired to each
other.
12
Page 13
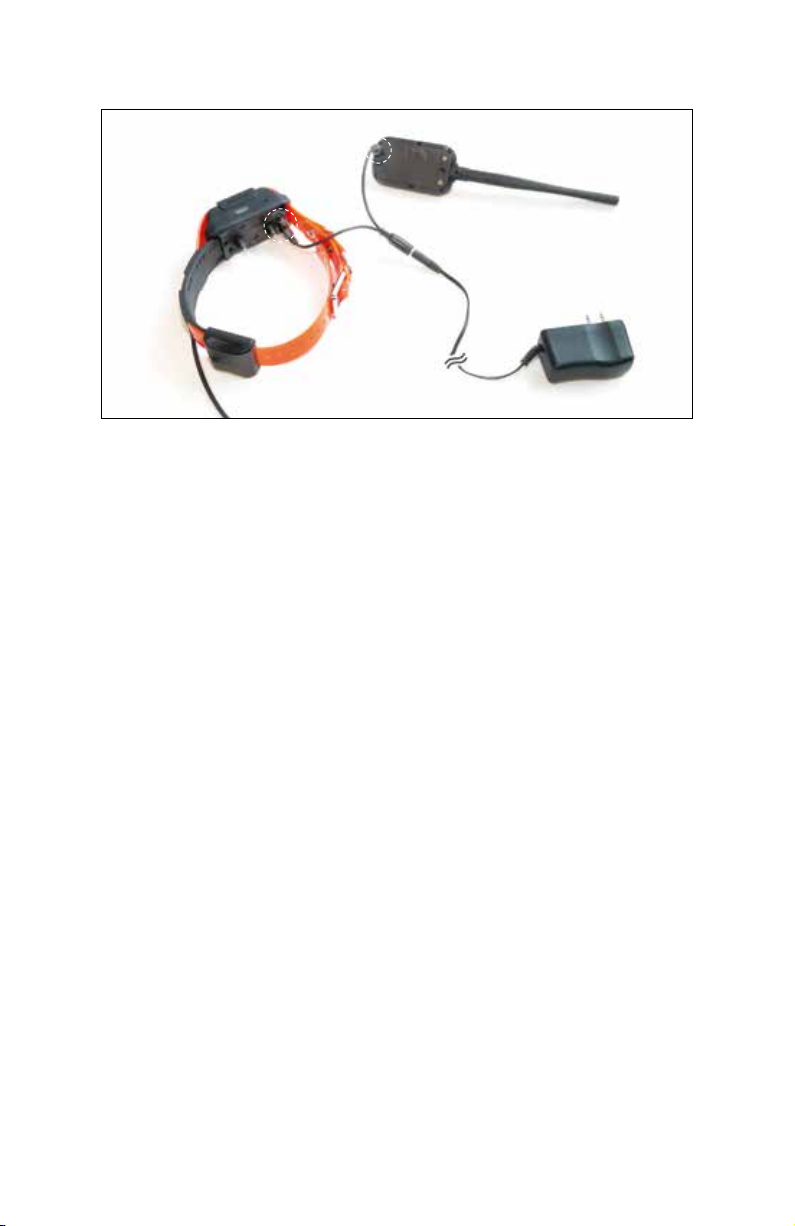
3. CHARGING THE PATHFINDER
Fully charge the PATHFINDER GPS connector and GPS receiver before the first
use. The PATHFINDER uses lithium polymer batteries.
• Only use official Dogtra chargers with the PATHFINDER.
• Do not charge the PATHFINDER near flammable substances.
• Fully charge the PATHFINDER if storing for 1 month or longer.
When to Charge
• When the LED is red on the GPS connector or GPS receiver.
• When the PATHFINDER app displays a low battery percentage for the GPS
connector or GPS receiver.
• When the LED on the transmitter or receiver will not come on.
• When the indicator light turns on momentarily, but will not stay on when the
Constant button is pushed.
How to Charge
1. Connect the charger to the GPS connector and GPS receiver using the splitter
cable.
2. Plug the charger into a 120-volt outlet.
3. When fully charged, detach the cables and plug the rubber caps over the
charging ports on the GPS connector and GPS receiver.
4. The GPS receiver turns off and cannot be used while charging. The GPS
connector functions while being charged. The LED will display red while
charging and green when the unit is fully charged. The GPS Connector LED
will be green when turned on while charging. A depleted battery requires 3.5
hours to fully charge.
13
Page 14
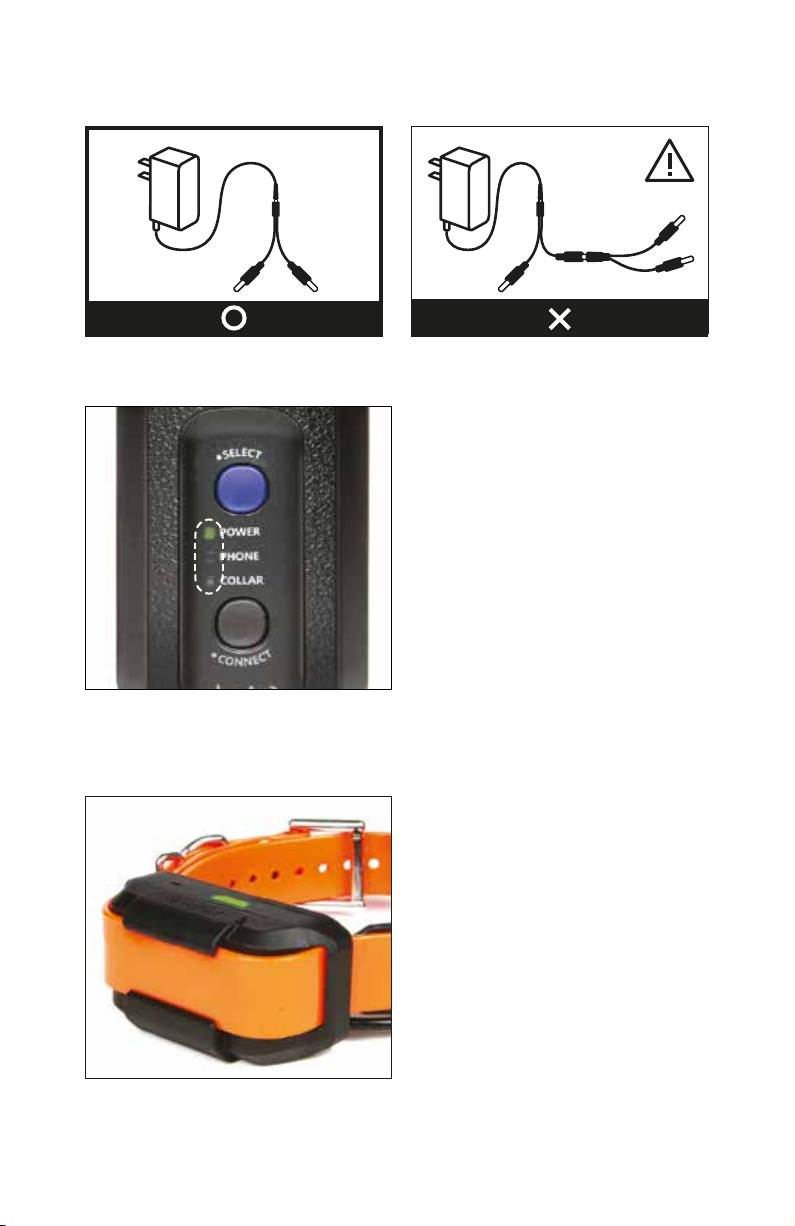
Splitter Cable
Do not use more than one splitter cable with a single battery charger.
4. LED INDICATOR
GPS Connector (PT10U)
Power: The Power LED blinks every 2
seconds while turned on. The LED colors
represents the battery life: Green when
50-100% battery, Orange when 10-50%
battery, Red when 0-10% battery.
Phone: When turned on, press the
Select button to set the GPS connector
to Phone. When set to Phone, a green
LED will stay on. Hold down the
Connect button until the LED blinks
rapidly to place the GPS connector into
pairing mode.
Receiver: When turned on, press the Select button to set the GPS connector
to Collar. When set to Collar, a green LED will stay on. Hold down the Connect
button until the LED blinks rapidly to place the GPS connector into pairing mode.
GPS Receiver (PC10U, PR10U)
The LED on the GPS receiver blinks
while turned on, and the LED colors
represents the battery life: Green when
50-100% battery, Orange when 10-50%
battery, Red when 0-10% battery.
14
Page 15
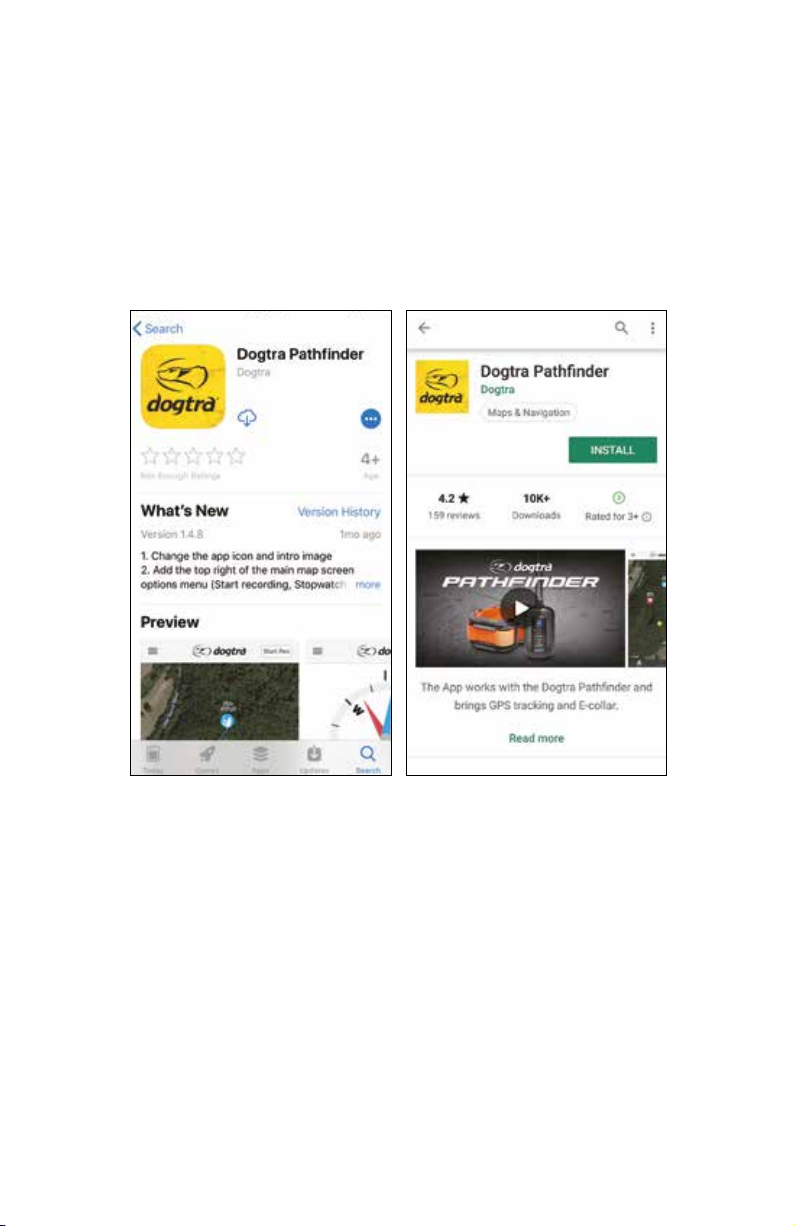
5. INSTALLING THE PATHFINDER APP
Compatible Phones
1) iOS: iOS 9.1 and above
iPhone 5 series and above
iPad Generation 3 and above
2) Android: Android 4.3 and above
Samsung Galaxy S4 and above, Note 2 and above, and LG G3
Downloading the App
Search for Dogtra PATHFINDER in the App Store or in Google Play.
iOS App Store Android Google Play Store
15
Page 16
6. PAIRING
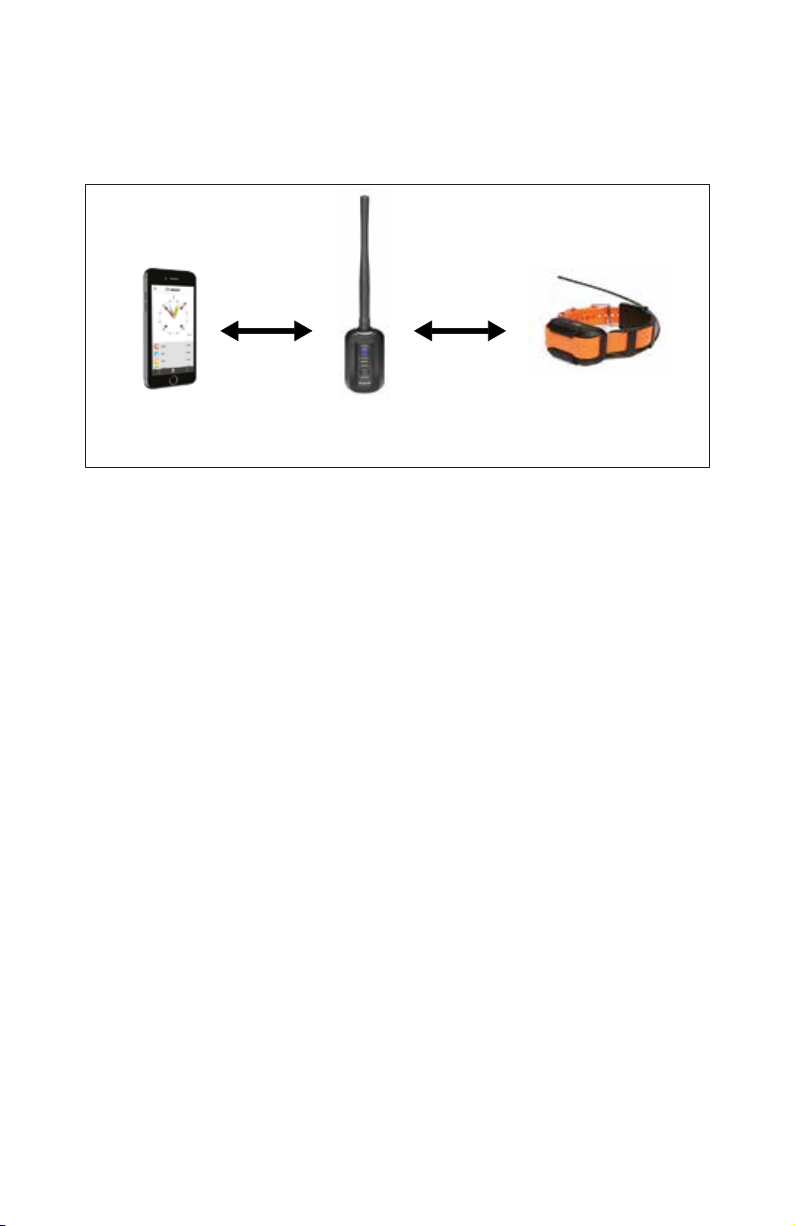
PATHFINDER GPS connector connects between your smartphone and
PATHFINDER GPS receiver. These devices need to be paired for the
PATHFINDER system to work properly.
Smartphone
Bluetooth
Max 33 Ft.
PATHFINDER
GPS Connector
(PT10U)
MURS Band
Max 9 Miles
PATHFINDER
GPS Receiver
(PC10U, PR10U)
Pairing a Smartphone to the GPS Connector
1) Launch the PATHFINDER app
2) Turn on the GPS connector
3) In the PATHFINDER app, navigate to Menu ĺ Settings ĺ Bluetooth Pairing
4) Set the GPS connector to pairing mode and click 'Start Pairing' in the app
• Once paired, launching the app when the GPS connector is on will
automatically connect the phone and connector together.
• The GPS connector should be within Bluetooth range (33 feet) of your phone
to operate.
• The GPS connector will reconnect with the phone when it is within range.
• Reinstalling the app will require pairing with the GPS connector.
• The PATHFINDER app may need to be restarted for compatibility issues.
Pairing Additional GPS Receivers
Pair the GPS connector and GPS receiver in close proximity to each other.
You can use the PATHFINDER app to check if the GPS receiver is properly
paired.
1) Turn the GPS connector on.
2) Check that the GPS receiver is turned off.
3) Use the Select button on the GPS connector to set the LED to Collar.
4) Hold down the Connect button for 5 seconds until the LED blinks rapidly.
Release the button.
5) Hold down the Power button on the GPS receiver until the LED blinks rapidly
and emits three beeps to show it has coded.
6) The GPS connector and receiver will return to blinking in normal intervals
when pairing is complete.
16
Page 17

7. ACQUIRING GPS SIGNAL
The PATHFINDER is meant for use in open outdoor areas. After pairing, take the
GPS receiver outdoors to acquire a GPS signal. Once the signal is acquired, the
GPS receiver icon will appear on the Map tab of the PATHFINDER app.
Operating the PATHFINDER near tall buildings and other steel structures will
reduce the range of the GPS signal. Not acquiring a GPS signal for prolonged
periods of time while outside may indicate issues with the unit.
17
Page 18
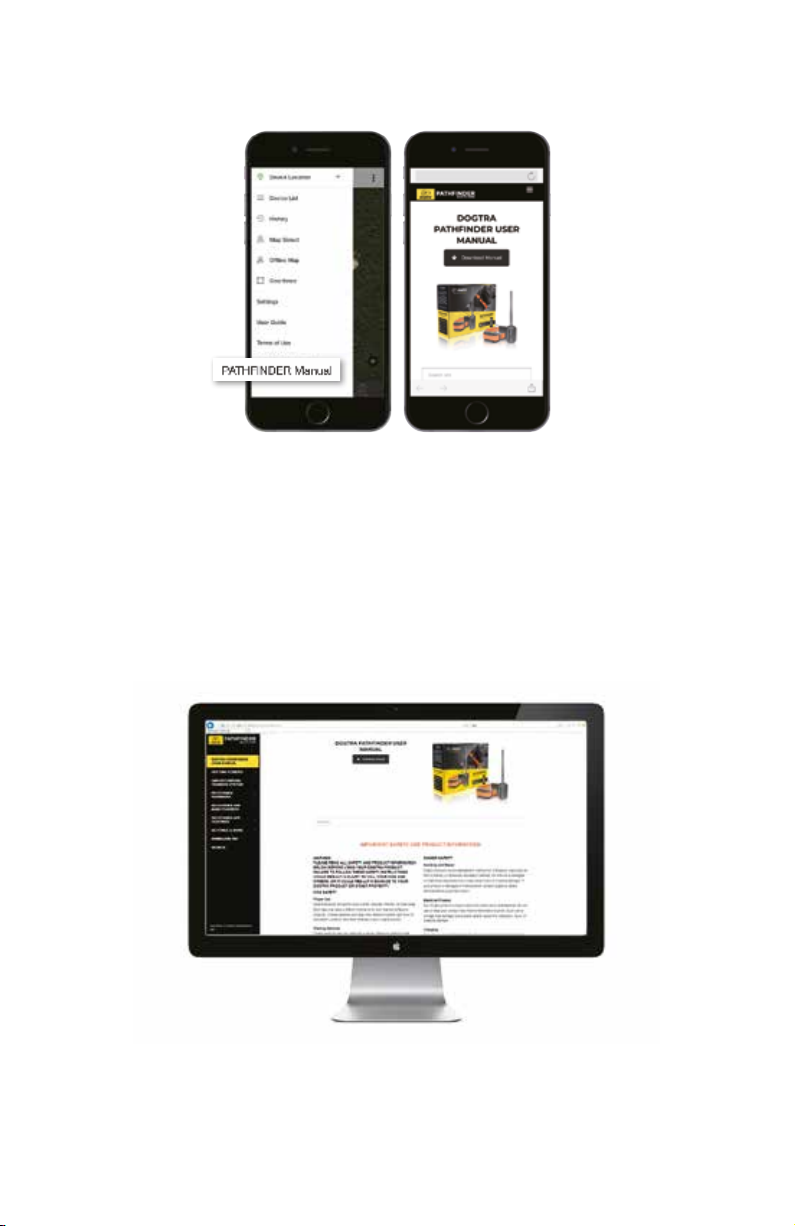
8. ONLINE WEB MANUAL FOR ALL APP FEATURES & Q&A
@
www.DogtraPATHFINDER.com
In the app, check the PATHFINDER Web Manual at the bottom of the Menu to
see all the app features, such as:
• Map Features
• Marker
• History Record, File, Detail
• Device List Options
• Device Sharing & Receiving
• Map Management: Offline & Custom Map
• Geo-fence
• App Setting
From your computer, check out the manual at www.DogtraPATHFINDER.com
for a full version of the PATHFINDER manual, Q&A, and more.
18
Page 19
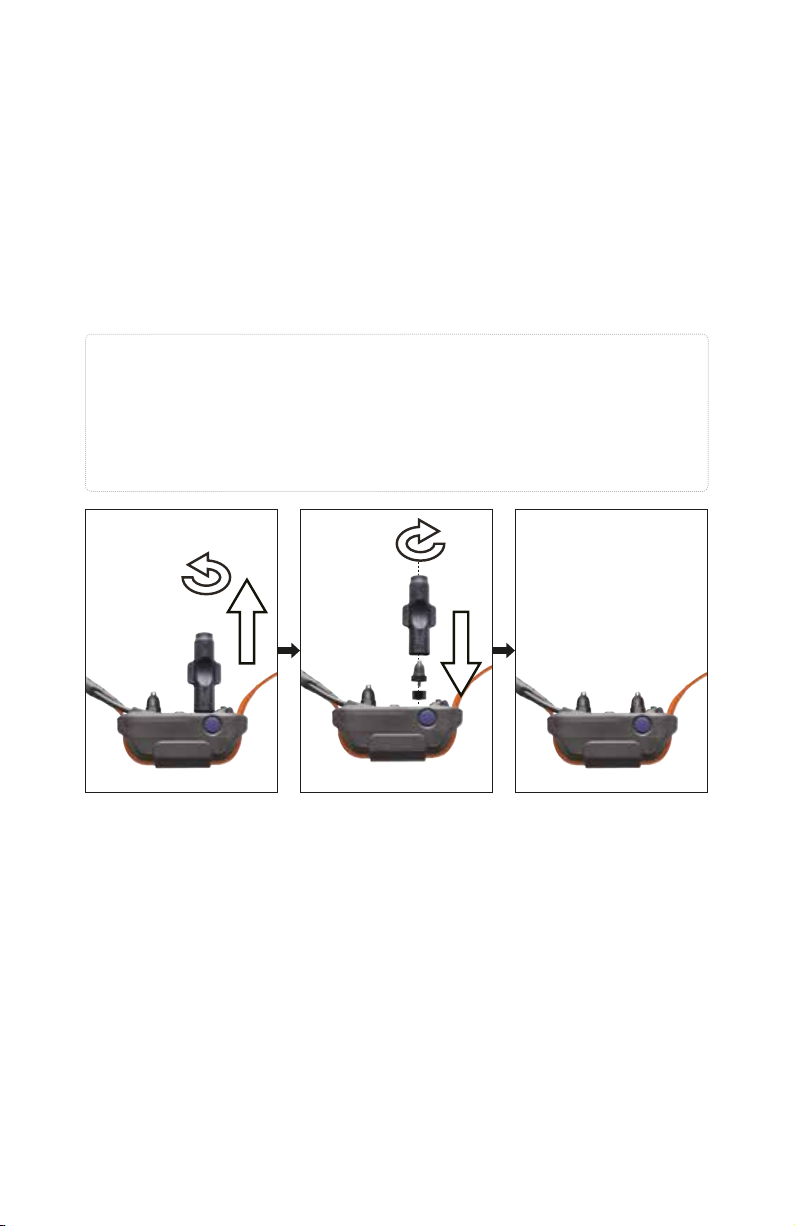
CHANGING THE CONTACT POINT LENGTH
The Dogtra PATHFINDER comes equipped with standard 5/8” contact points
that can be extended to 3/4” contact points, for use on dogs with longer coats.
To increase the contact point length from 5/8” to 3/4”, follow the steps below.
1) Using the included adjustment tool with the side marked 5/8”, unscrew the
contact points counter-clockwise.
2) Place the contact point extension over the exposed threads, flat side down.
3) Place the contact points over the extensions and tighten the contact
points and extensions clockwise using the adjustment tool with the
side marked 3/4”.
Caution!
Tighten until firmly in place. Be careful not to over tighten.
To shorten the contact points back to the standard 5/8”, start with the
adjustment tool with the side marked 3/4”, remove the contact point
extensions, and tighten the contact points with the adjustment tool with the
side marked 5/8”.
19
Page 20
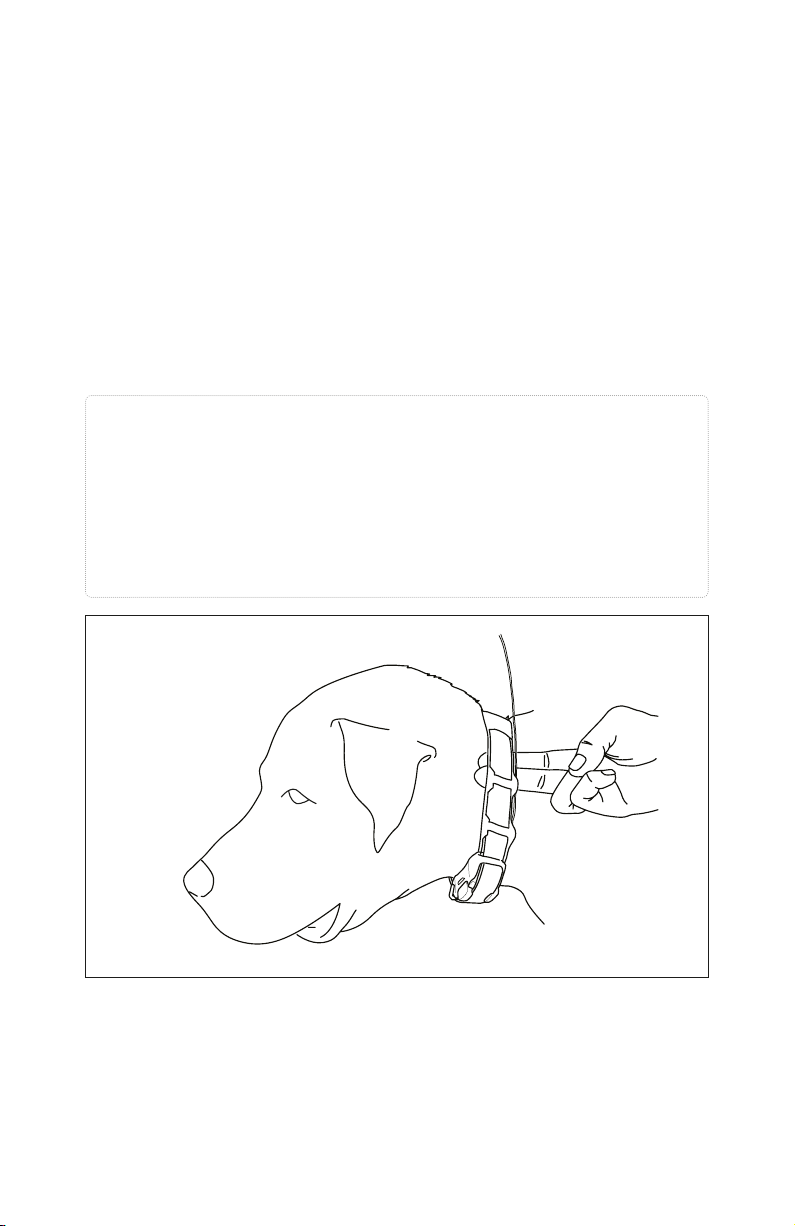
RECEIVER FITTING
Proper Fit
The receiver should be fitted so that the medical grade stainless steel contact
points press firmly against the dog’s skin. You should be able to fit two fingers
underneath the collar strap. The best location is on either side of the dog’s
windpipe.
Improper Fit
A loose fit can allow the receiver to move around on the dog’s neck. When this
happens, the contact points may rub against the skin and cause irritation. If the
receiver is too loose, the contact will not be consistent and cause the corrections
to be inconsistent. Dogtra uses medical grade stainless steel contact points and
anti-microbial plastic to protect the dog’s skin.
Attention!
Leaving the receiver in the same location on the dog’s neck for an extended
period of time can cause skin irritation due to the sensitivity from the contact
points. If the dog is to wear the receiver for long periods, occasionally
reposition the receiver every few hours so that the contact points are moved
to a different location on the dog’s neck and remove the receiver after 8
hours of usage. Make sure you check for skin irritation each time you use the
unit.
20
Page 21

FINDING THE RIGHT STIMULATION
• Open the PATHFINDER app to the E-Collar tab and select your dog and
stimulation level.
• The stimulation levels are from 1 (lowest) to 100 (highest).
• Always start at the lowest level of stimulation and work your way up.
• The appropriate level can be found when your dog responds to the stimulation
with a mild reaction, such as a tensing of the neck muscles.
Note: Every dog has a different tolerance and reaction to the stimulation. Please
look at your dog’s reaction to find the right level of stimulation. The stimulation
level may vary depending on the situation and distractions. A distracted dog will
require a higher level of stimulation compared to when there is no distraction.
21
Page 22
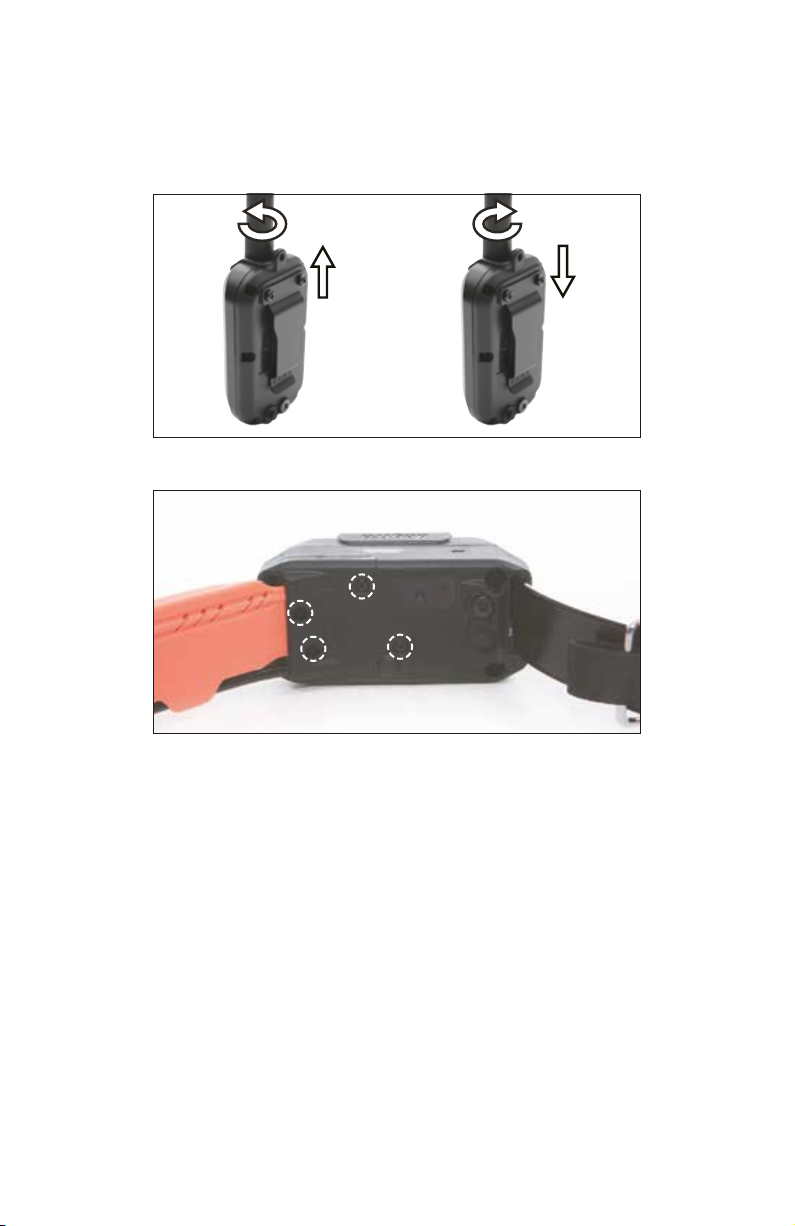
REPLACING THE ANTENNA
For the GPS Connector
1. Twist the antenna counter-clockwise to remove.
2. Place the new antenna on the bolt and turn clockwise to tighten the antenna.
For the Receiver
Open the antenna enclosure by removing the 4 screws and the contact points.
Remove the screw holding the antenna in place to replace the antenna.
22
Page 23
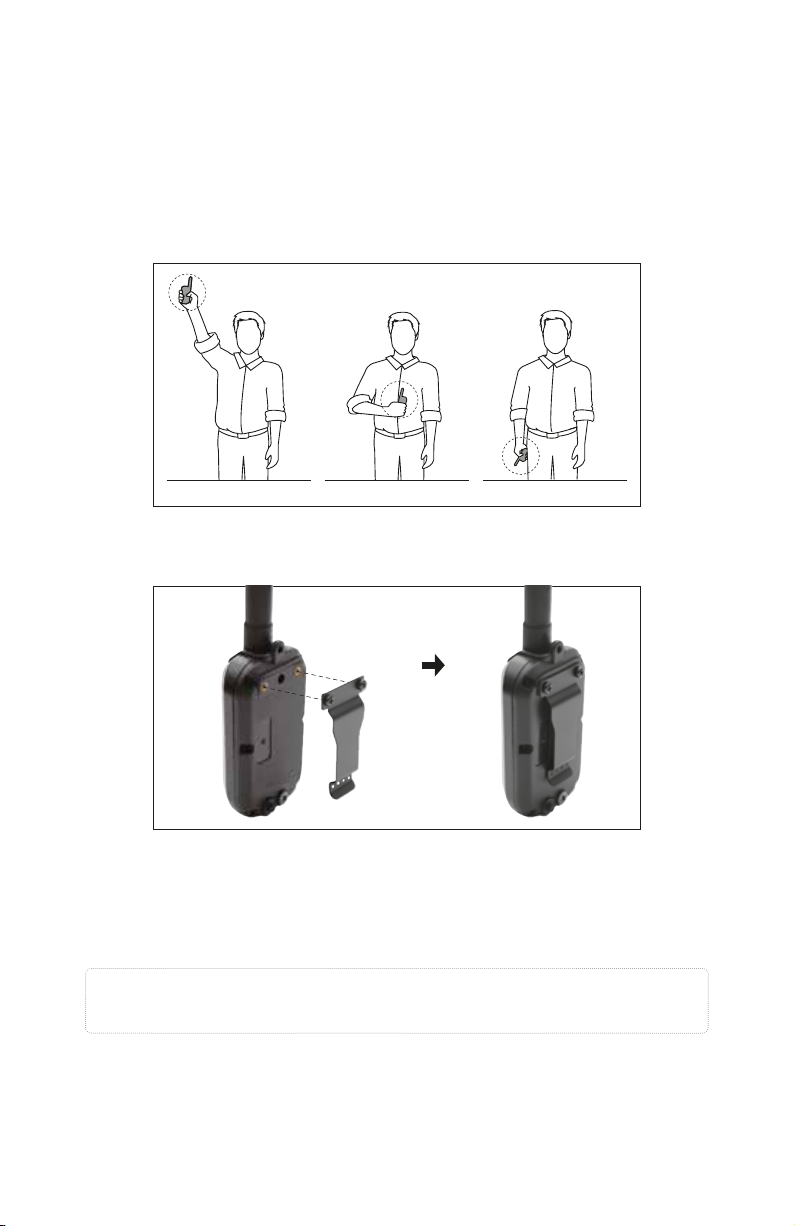
MAXIMIZING THE DISTANCE
• The PATHFINDER has a 9-mile line of sight range.
• To get the greatest range, hold the GPS connector away from your body and
avoid touching the antenna.
• Keep your unit properly charged for maximum signal strength.
• The GPS connector device must be near your phone for proper operation,
preferably less than 33 feet.
Typical range Minimum rangeMaximum range
ATTACHING THE BELT CLIP
Follow the instructions below to attach the included belt clip to the GPS
connector.
1) Align the belt clip to the grooves on the back of the GPS connector.
2) With a firm grip, screw on the belt clip's Phillips head screws with
a screwdriver.
Caution!
Tighten until firmly in place. Be careful not to over tighten.
23
Page 24
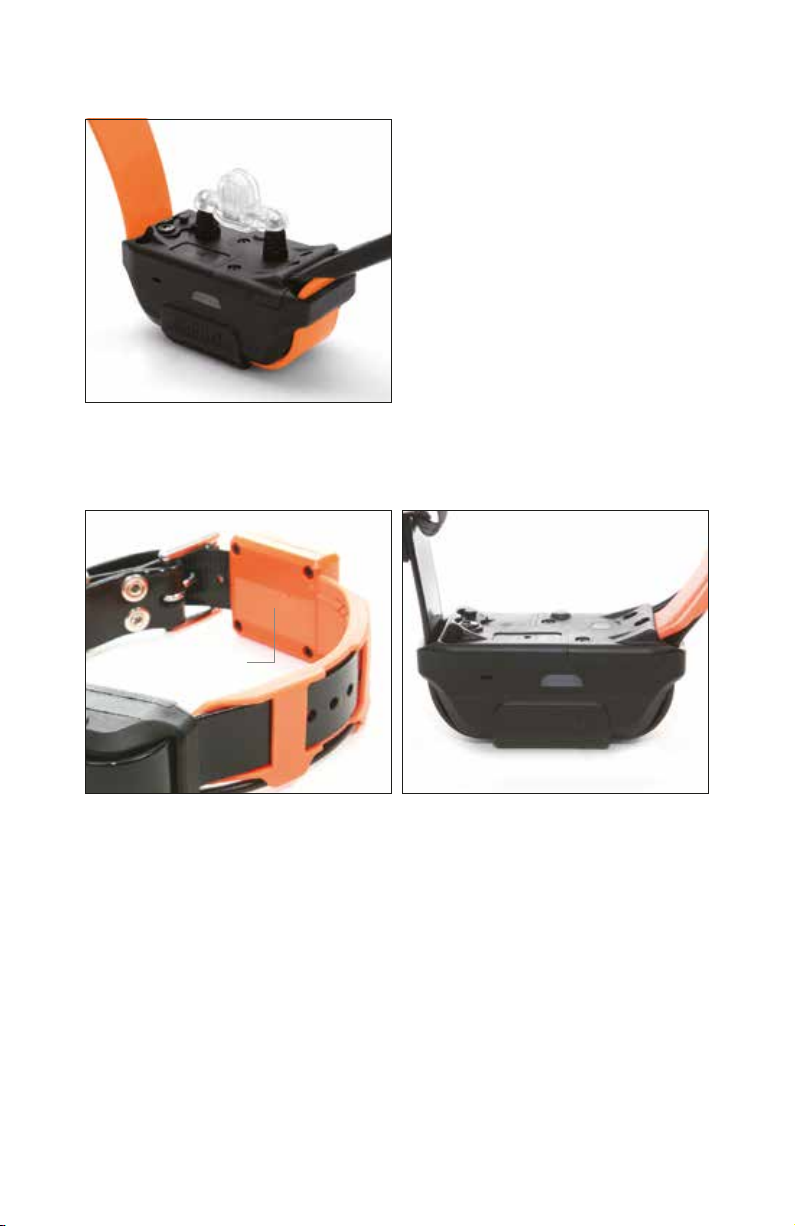
USING THE TEST LIGHT
Note: The test light may not be visible if the intensity level is set below level ten.
1) Turn on the GPS receiver and place the
test light over the contact points.
2) Press the Nick button in the
PATHFINDER app and the test light
will light up momentarily.
3) Press the Constant button in the
PATHFINDER app and the test light
will light up as long as the button is
pressed, for up to 12 seconds.
4) The test light will glow brighter at
higher levels of stimulation and
dimmer with lower levels.
PATHFINDER TRX RECEIVER
Orange Color
The PATHFINDER TRX receiver is distinguishable by the orange GPS antenna
casing. The PATHFINDER TRX receiver does not come with stimulation or tone.
24
Page 25
APPLICATION
1. MAP TAB
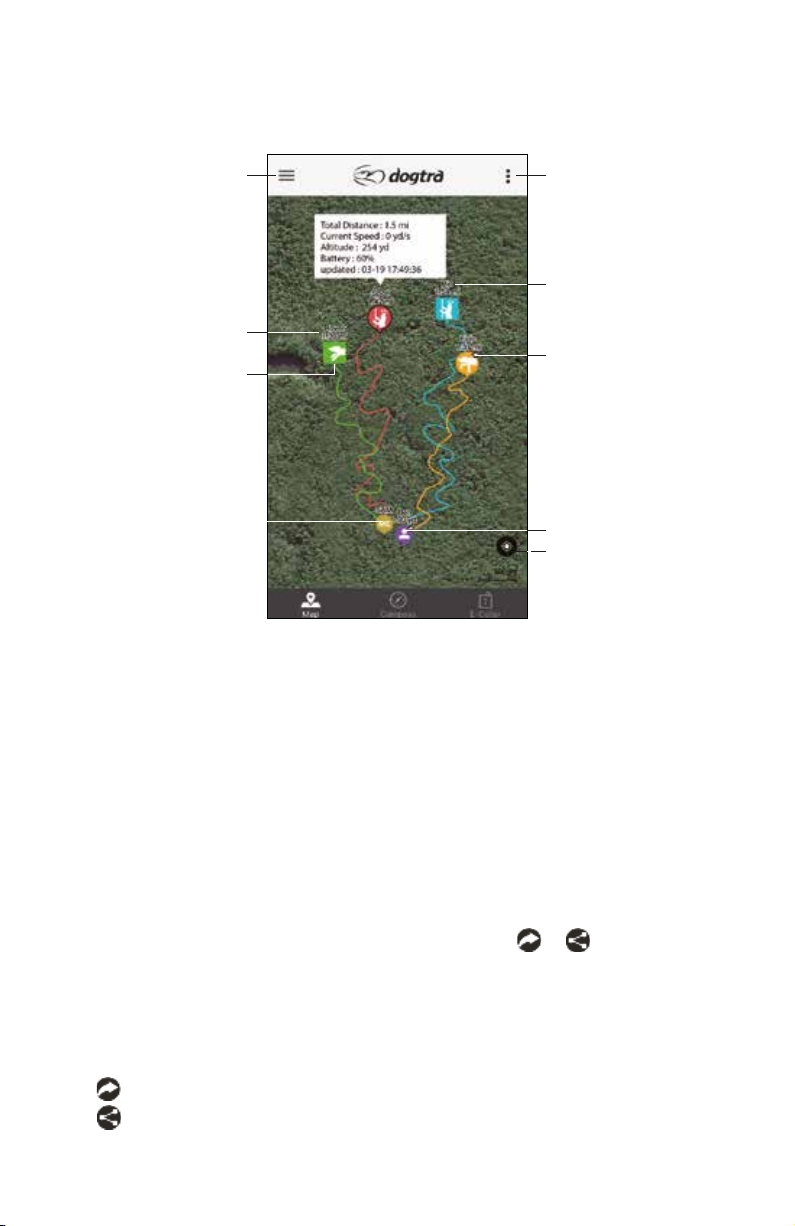
Menu
Dog Name (GPS Receiver -
Distance From You)
Status Icon
My Location
(GPS Connector)
Option Menu
My Dog (GPS Receiver)
Shared Dog
Shared Friend
Location Button
With the GPS connector paired to a GPS receiver and phone or when receiving
shared GPS connector or receiver devices, the positions will be displayed on the
map.
Dog Position Display
Your dog’s location is viewed on the map along with the receiver name and
distance from your position. The dog icon displays your dog’s current action
status.
The real time 'Collar Icon' information has been added to check the Traveled
Distance, Current Speed, Altitude, Battery, Updated Time, and Shared Device.
My Position
When the GPS connector is paired with your phone, your current position and
tracks will be displayed.
When viewing shared GPS connector devices, an icon (
or ) will be
displayed along with the device name and distance from your position.
* Devices that are offline or hidden will not be displayed on the map.
* The GPS receiver name and color can be edited from Menu/Device List/
Device/Edit.
: iOS
*
: Android
25
Page 26
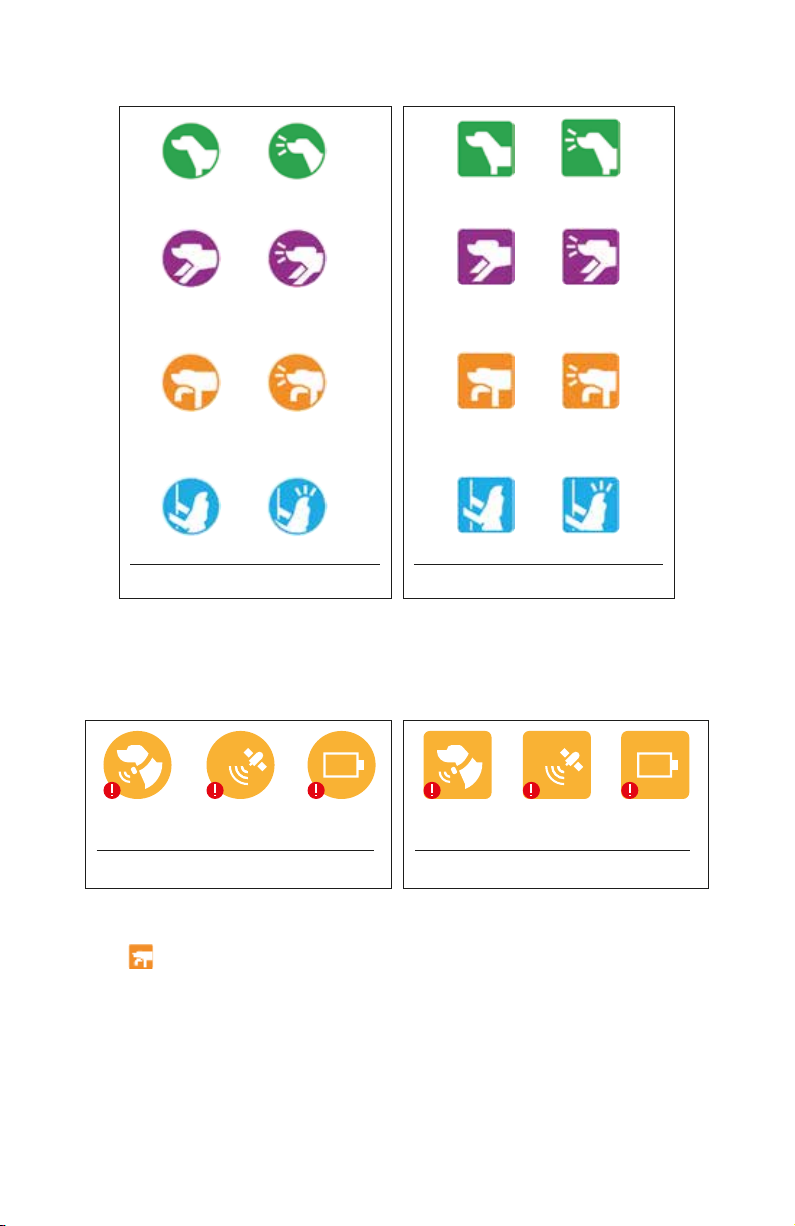
2. DOG ICONS
Resting + BarkResting
Running Running
+Bark
Pointing Pointing
+ Bark
Treed Treed + Bark
PATHFINDER
Resting Resting + Bark
Running
Pointing Pointing
Running
+ Bark
+ Bark
Treed + BarkTreed
PATHFINDER TRX
When your dog’s action changes, the icon action status will change as well.
The dog display icon will change to an icon that represents these issues, such as
poor connection, GPS signal loss, or low battery. Devices shared will display the
shared symbol on the device icon.
GPS GPS
Poor
connection
GPS
signal loss
PATHFINDER
Low
battery
Poor
connection
PATHFINDER TRX
GPS
signal loss
Low
battery
The PATHFINDER TRX receiver is a tracking only receiver that does not have
tone or stimulation. The PATHFINDER TRX receiver is displayed as a square
icon(
) in the Map and Compass tab, Device List, and Dog Status page.
The PATHFINDER TRX receivers will not be displayed in the E-Collar tab. All
other functions are available for the PATHFINDER TRX receiver, since both the
PATHFINDER and PATHFINDER TRX can be used together in a multi-dog set up.
26
Page 27
3. DOG ALERTS
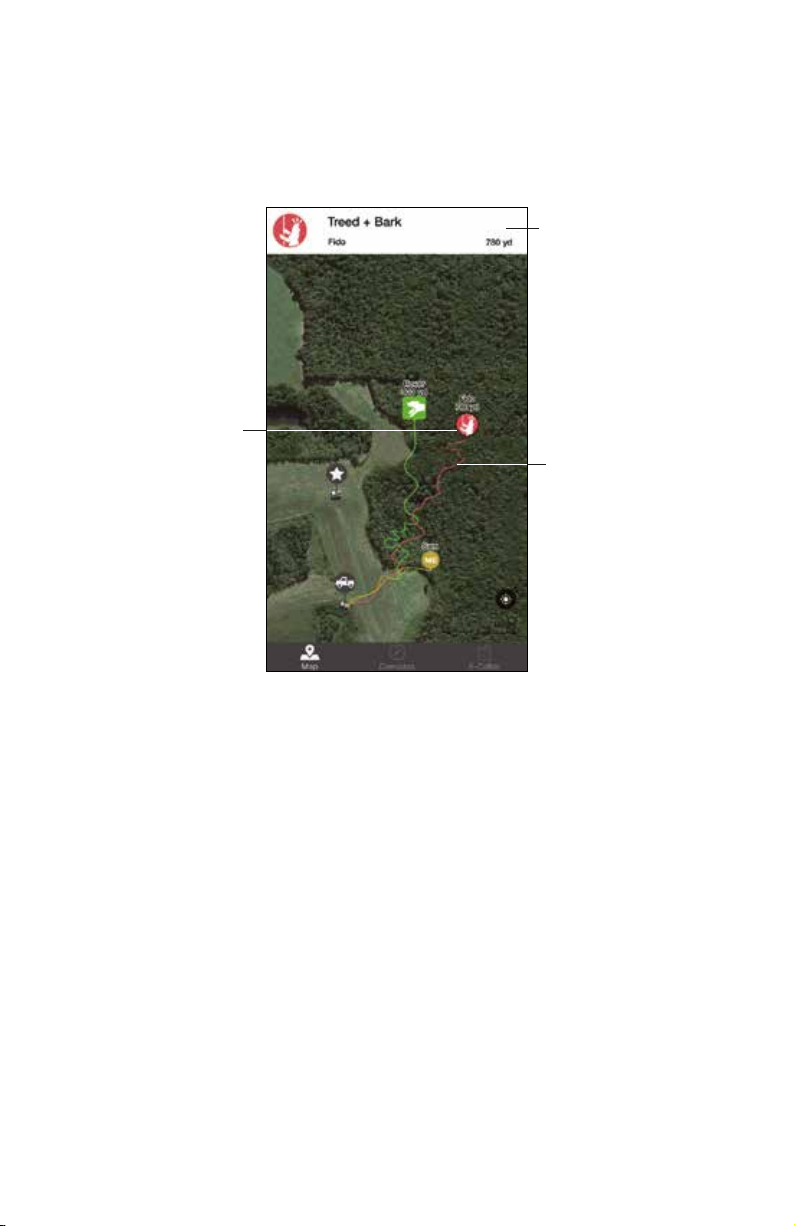
Select a dog on the map to receive notification alerts for that dog.
In the Alarm Settings for Dog Alerts, you can receive notifications for the
Selected Collar or All Collars. The current selected dog is displayed with an
outline around their icon.
Alert Banner
Selected Dog
Dog Tracks
4. MAP FEATURES
The PATHFINDER Map tab has multiple map features to help make finding your
way around easier.
Zoom
• Double tap the map with one finger to zoom in once.
• Single tap the map with two fingers to zoom out once.
• Use two fingers to pinch the screen to zoom in and stretch the screen to
zoom out.
Scroll
• You can scroll by using one finger to drag the map to the area you want
to view.
Tilt
• Tilt the map by using two fingers and dragging the map up or down.
Rotate
• Rotate the map by using two fingers and applying a turning motion.
27
Page 28
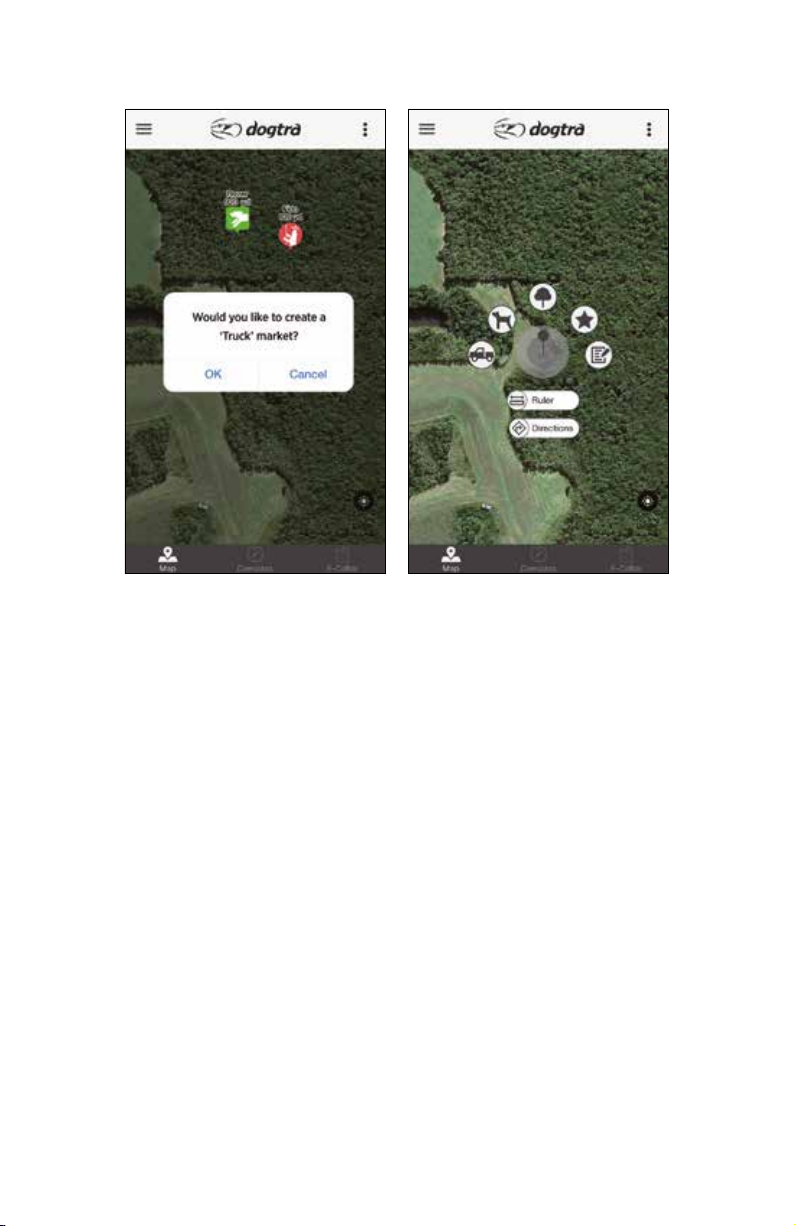
5. MARKER
Marker
Markers
Add a 'Truck' marker to mark your car location when the app launches to draw a
line between the 'Truck' and 'ME' markers. You may also create a 'Truck" marker
at the current location you are at when using the app.
Long press anywhere on the map to open up the Marker Ruler Menu. The
markers can be used to mark important locations.
The marker will be stored in the history file. When starting a new Tracking
History, the previous marker will still be on the map. If you tap on the marker,
you will see the marker delete button and a line from the current location to the
marker.
Text can be saved along with the markers. You can create 20 markers of each
type (except Ruler and Direction).
You can tap the marker to draw a line between the hunter and the marker.
You can see the direction and distance between these two markers on the
Compass tab.
28
Page 29
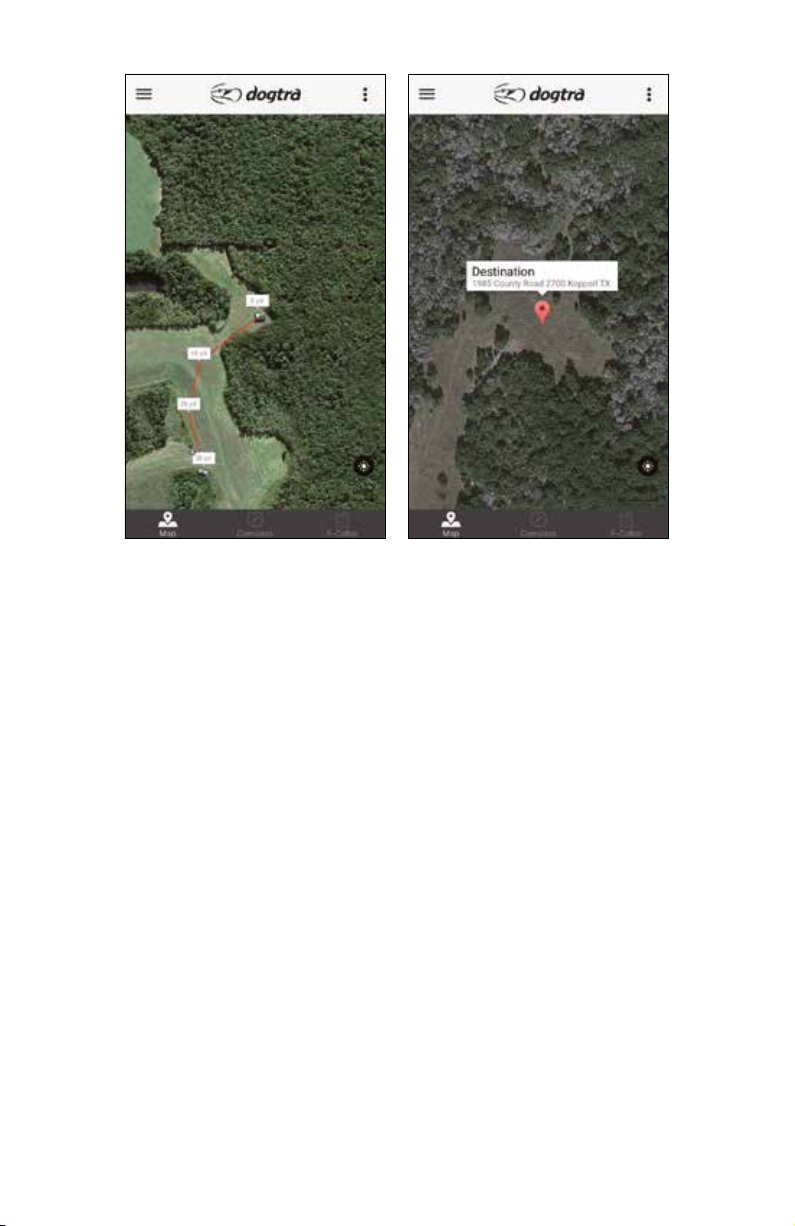
Ruler Directions
Ruler
The distance ruler can measure the distance between multiple points. When
finished, click " x " to exit out of the distance ruler.
Directions
The Directions function is used to find your way back to your desired
destination, which can only be marked with one marker. You must have
the Google Maps application installed in order to see the directions to your
destination. You will also need to use either cellular data or Wi-Fi to use this
function.
29
Page 30
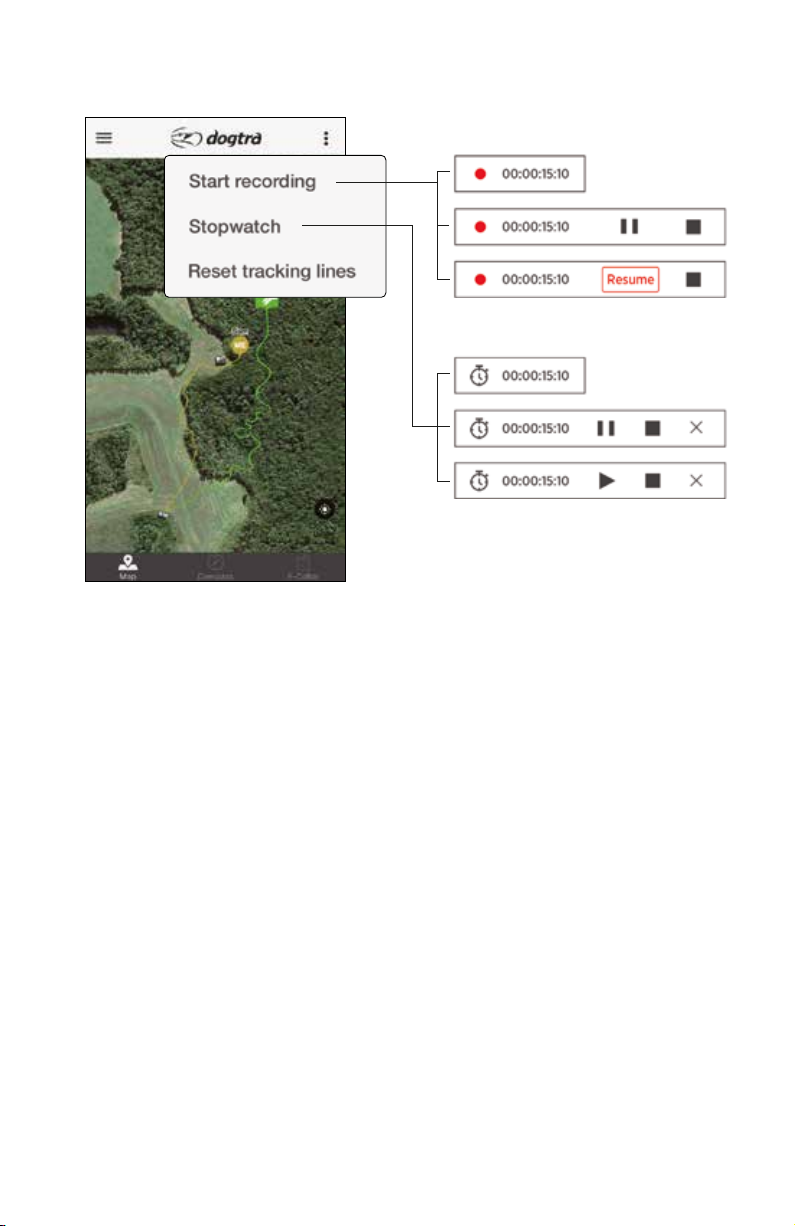
6. OPTION MENU
Start Recording
The recording time box in the lower left corner will show the amount of time
that is being recorded. Press the recording time box to show the pause or stop
button. Press the ‘Stop recording’ in the top right corner menu or press the stop
button in the recording time box to stop recording.
When you press the 'Start recording' button, the 'START' marker will be created.
When you press the 'Stop recording' button, a 'STOP' marker will be created.
The markers cannot be deleted while the recording is in session. You must stop
and save the session in order to delete the 'START' and 'STOP' markers.
Stopwatch
Press the Stopwatch time box in the lower left corner to show the pause or stop
button. Press the ‘Stopwatch OFF’ in the top right corner menu or press the stop
button in the stopwatch time box to stop the Stopwatch. The Stopwatch can be
used during the recording session.
Reset Tracking Lines
Select to remove previous tracking lines.
30
Page 31
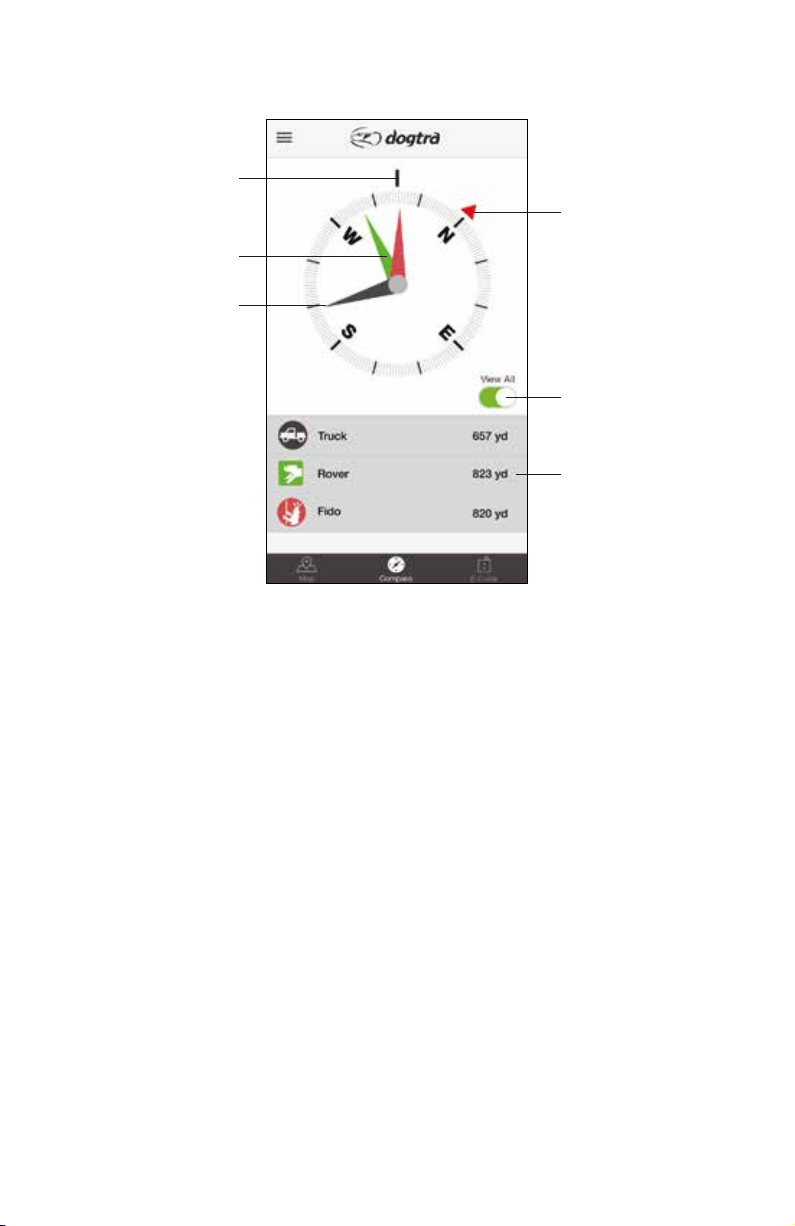
7. COMPASS TAB
Direction Faced
North
Dog Direction
Marker Direction
View All Button
Dog Selected
View the direction and distance of dogs, or a selected marker and hunter at
a glance. Select dogs and hunters from the list to display them on the
compass. You may also tap on a marker on the map to show the information on
the Compass tab. Use the 'View All' button to view all dogs and hunters
at once. Dogs and hunters are not displayed when hidden or offline.
• Metal phone cases or metal objects attached to the phone will interfere with
the compass.
• The phone may need to be calibrated for the compass to work properly.
31
Page 32

8. E-COLLAR TAB
TRAINING FUNCTIONS
The Nick or Constant stimulation, an audible tone, or light can be sent to the
selected dog.
The tone sound level cannot be adjusted and the tone will ring each time the
button is pressed. The Nick and Constant stimulation modes have stimulation
levels from 1 to 100. The stimulation level is controlled by the stimulation slider
and stimulation increase/decrease buttons on the left and right of the slider.
The stimulation level can be set for individual dogs.
** The light button has two functions:
1. Beacon Light: will continuously blink every 3 seconds when the button is
turned on.
2. Locate LED Light: will stay on as long as the button is pressed,
for up to 12 seconds.
** PATHFINDER MINI Only
32
Page 33
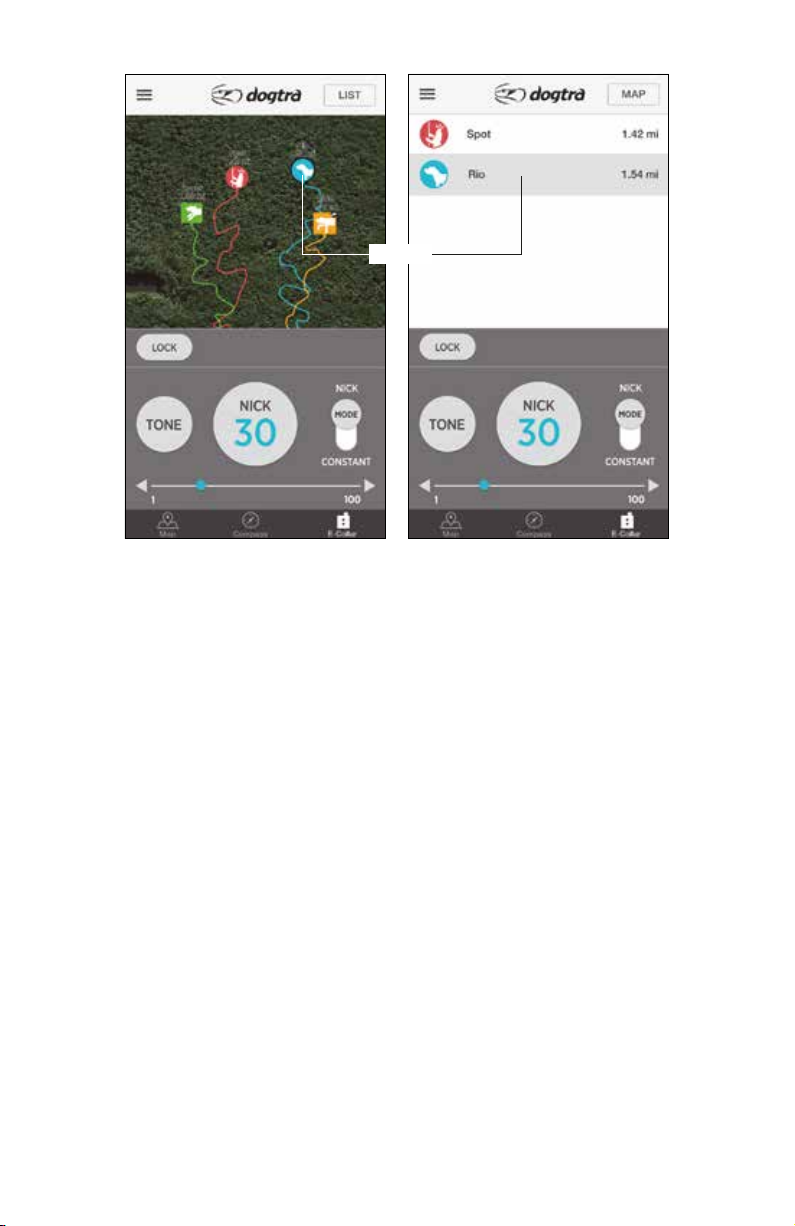
Selected
Map View
List View
List/Map View
Dogs can be selected using the dog list or in Map view.
List view displays dogs in a list along with their distance from you. The List view
is recommended when training multiple dogs.
Map view displays selectable dog icons on a mini map. The Map view is
recommended for long distance recall commands.
Dogs are not displayed when hidden or offline.
*
* The PATHFINDER TRX receivers, Shared receivers, and Shared Friend
receivers will not show on the List view.
33
Page 34
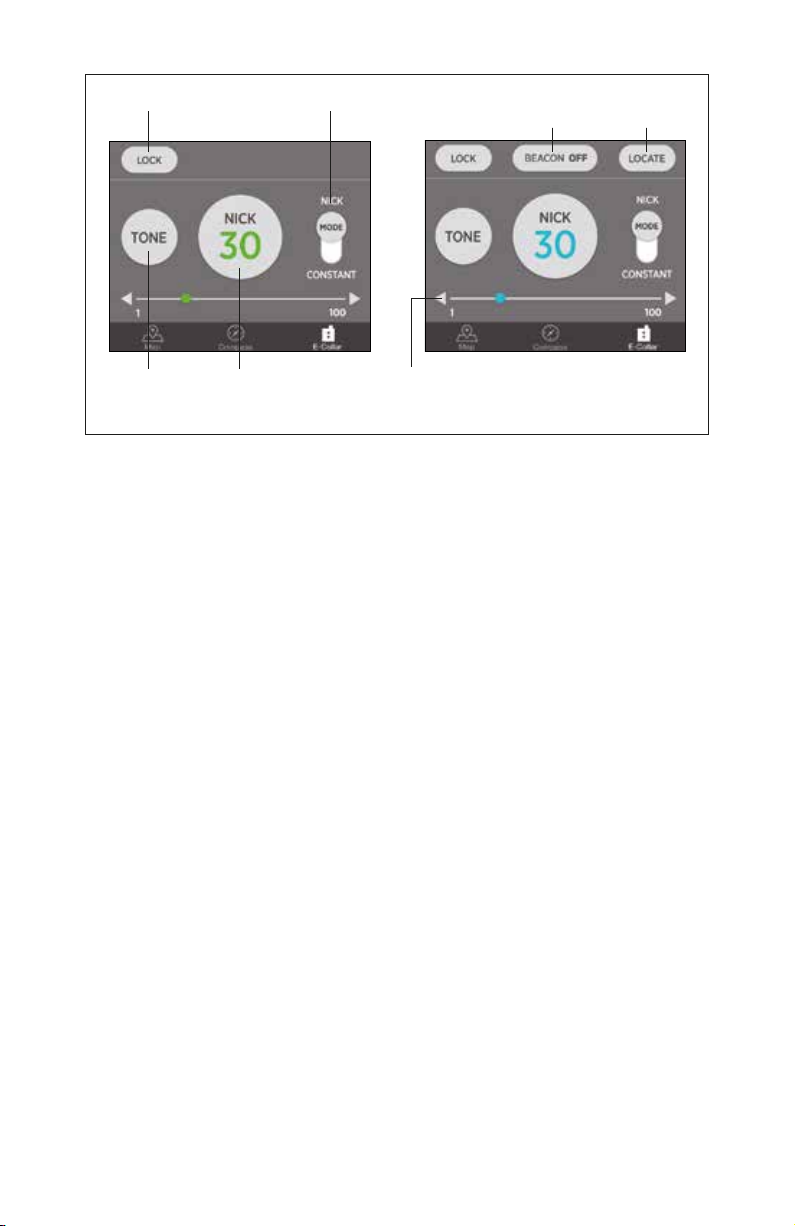
Lock Button Mode Button
Beacon
Button
Locate Light
Button
Tone Button Nick Button
PATHFINDER PATHFINDER MINI
Stimulation Level
Mode Button
Use the Mode button to switch between Nick and Constant stimulation modes.
Lock Button
The Lock button disables training functions until unlocked.
Use the lock feature so that you do not accidentally stimulate your dog.
Sending Stimulation
1) Select a dog from List or Map view.
2) Select the stimulation level using the stimulation slider or stimulation
increase/decrease buttons.
3) Set the stimulation to Nick or Constant using the Mode button.
4) When Nick is selected, the receiver emits a single rapid pulse of electrical
stimulation. When Constant is selected, the stimulation will give continuous
stimulation as long as the button is pushed, for up to 12 seconds.
* The E-Collar tab is disabled when the Tracking Only Mode is turned on in
the Settings menu.
** Beacon Button
The light will blink every 3 seconds when the button is turned on.
** Locate LED Light
The light will stay on as long as the button is pressed, for up to 12 seconds.
** PATHFINDER MINI Only
34
Page 35
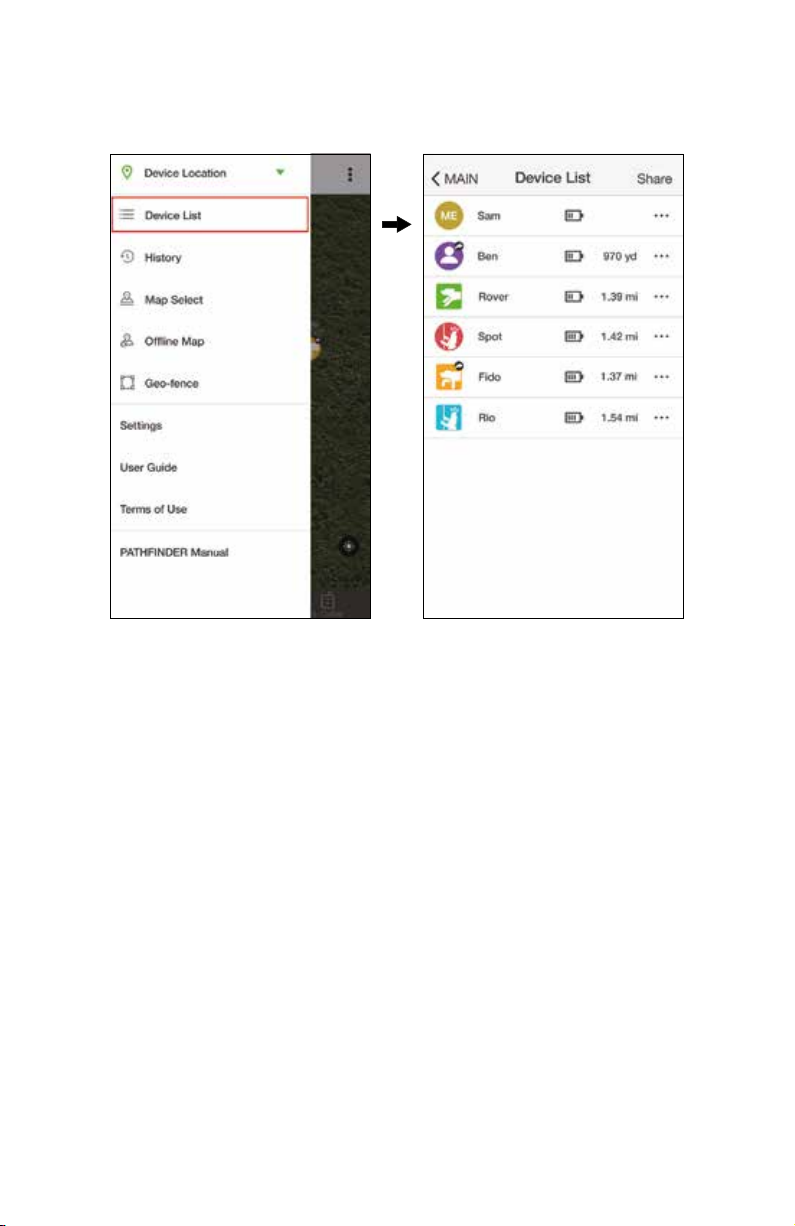
DEVICE LIST
1. LIST OF CONNECTED DEVICES
• Connected devices are displayed on the Device List.
• The dog icons display the dog’s current action.
• Device battery life and distance from your location are displayed.
• Selecting a device will display detailed information.
35
Page 36
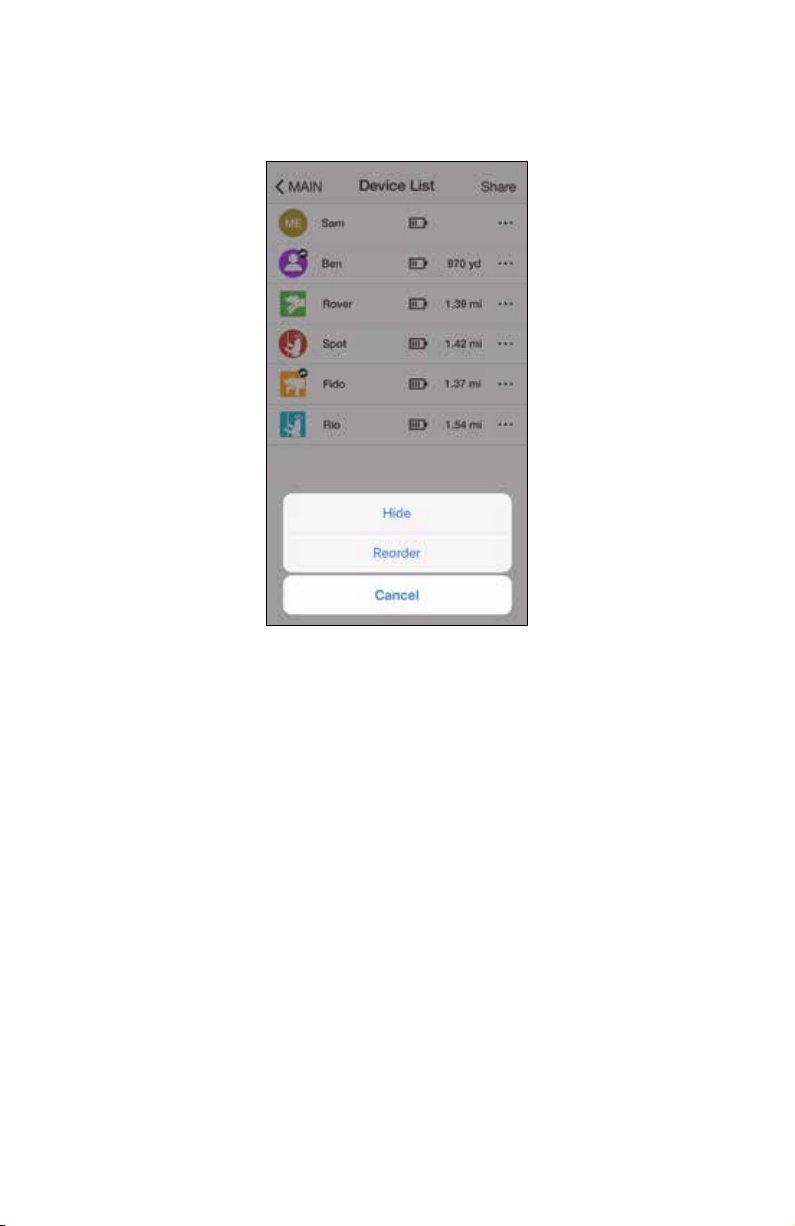
2. DEVICE LIST OPTIONS
Press the more options button (
...
) to bring up the options to hide or reorder
devices.
Hide
Hidden devices do not show up in the Map, Compass, and E-Collar tabs. Use the
more options button in the Device List to unhide a device.
Reorder
Reorder how the devices show in the app. Press reorder to place the device in
sorting mode. Hold down the sort button and place the device in the desired
position. The new order will be used in the Map, Compass, and E-Collar tabs.
36
Page 37
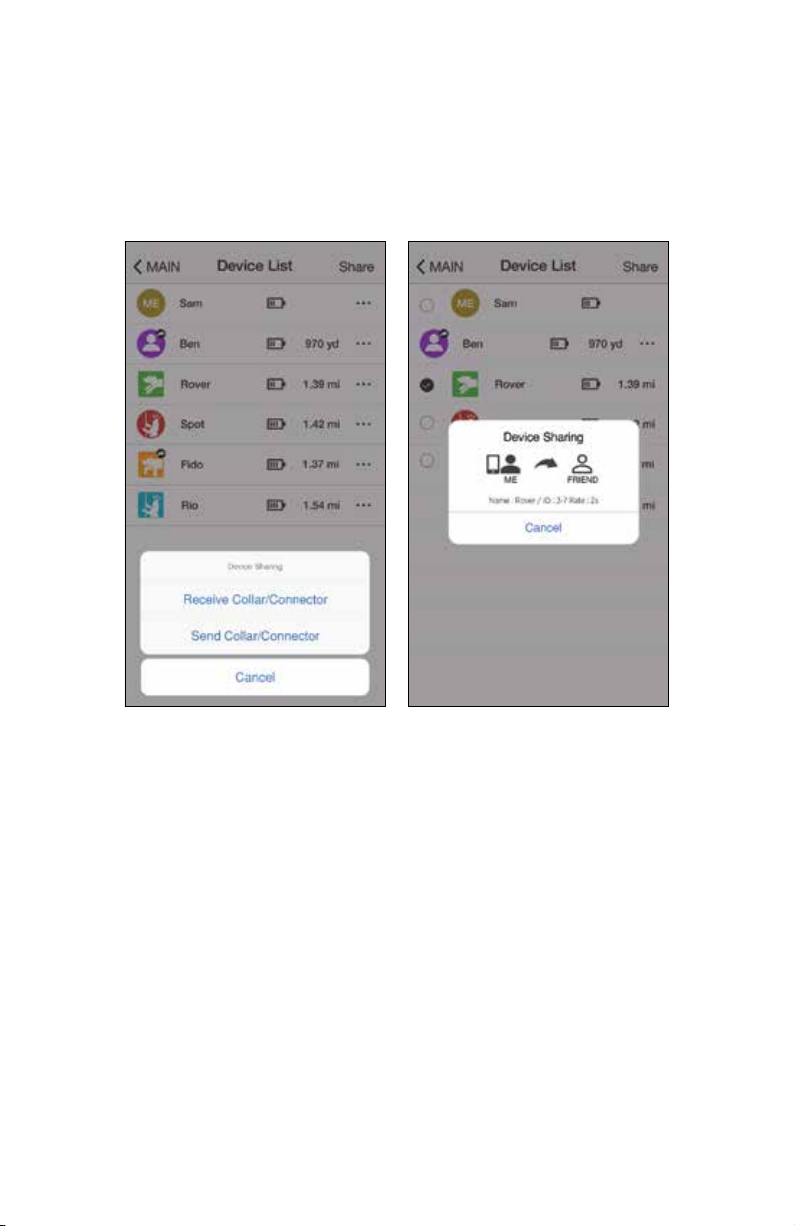
3. DEVICE SHARING AND RECEIVING A DEVICE
Device Sharing
Press the share button to share and receive GPS connector or receiver devices.
Both sharing and receiving PATHFINDER users must use the device sharing
feature within close proximity to each other.
Sharing a Device
• You can share your position or your dog’s position.
• Press the share button and select the device you want to share.
• A pop up will appear when a device has been successfully shared.
37
Page 38
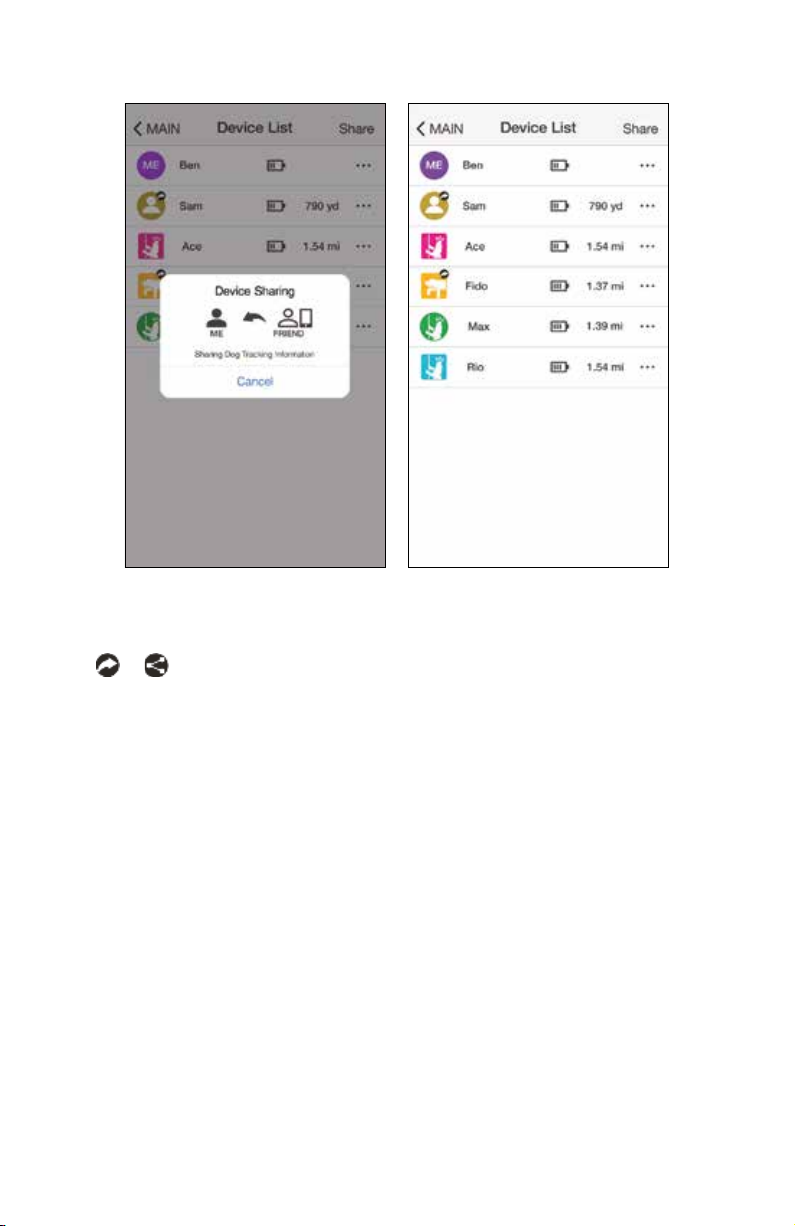
Receiving a Device
As another PATHFINDER user is sending a device, press the share button and
receive from the pop up menu. A pop up will appear when a device has been
successfully received. Shared devices can be identified by the shared symbol
or ) and are displayed on the Map and Compass tabs, along with the
(
tracks and dog statuses as they update.
• E-Collar and updating GPS settings are disabled for received shared devices.
• GPS settings are disabled for offline devices.
• PATHFINDER TRX receivers that are shared are displayed with a square icon
when they are received.
38
Page 39
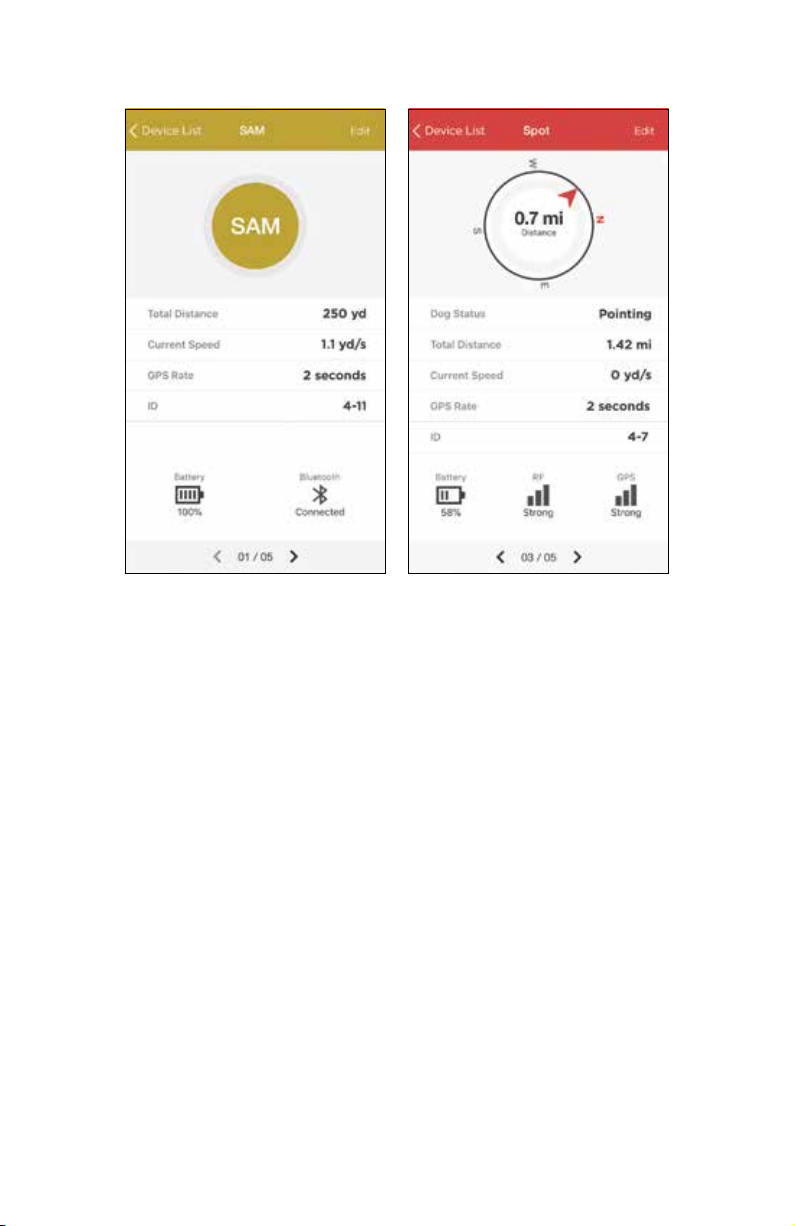
4. DEVICE DETAILS
Press a device from the Device List to go to the device details page.
The device details displays the total distance traveled, current speed, ID, GPS
strength, radio frequency strength, battery level, and shared and hidden
statuses. Slide the device details page to view other devices.
39
Page 40
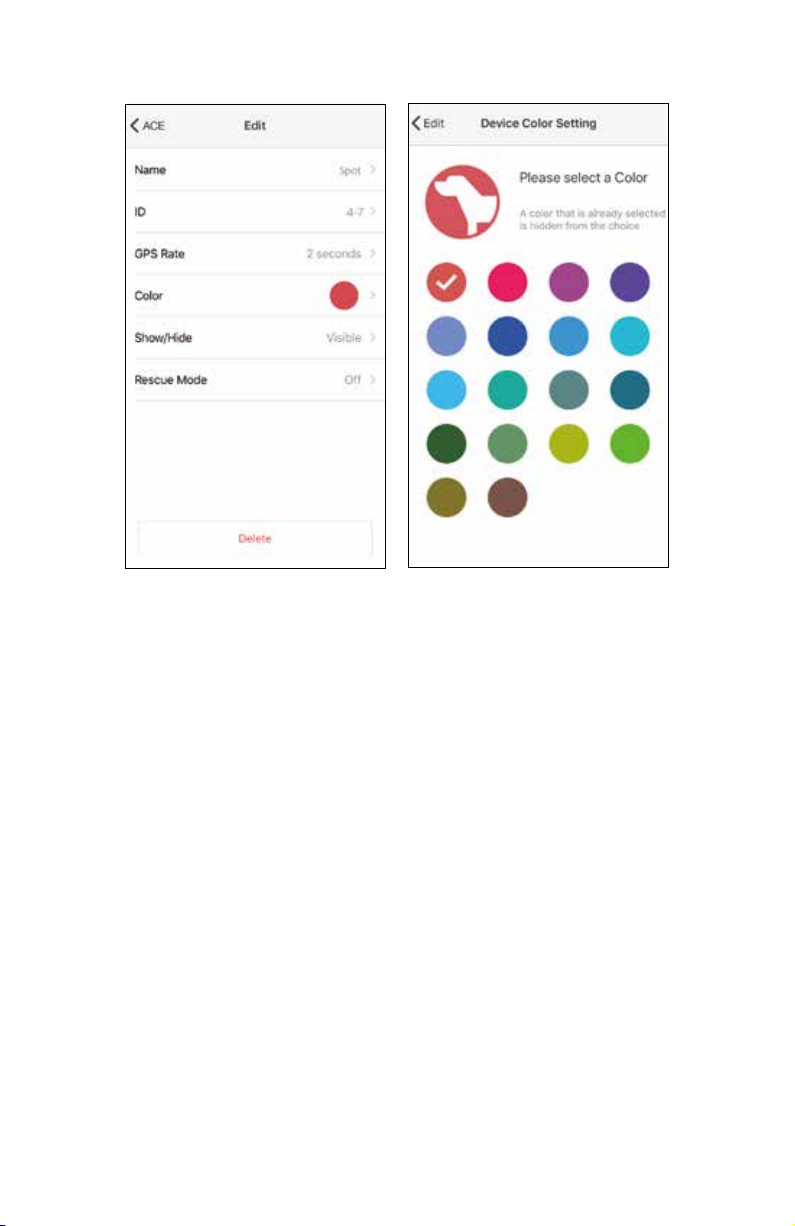
Device Info Edit
Edit
Press the Edit button to change device settings.
Name
Press Name to edit the device name.
ID
The GPS Collar ID can be changed. Change the ID when the signal conflicts
with another GPS receiver. The ID of devices that are shared with you cannot be
changed. The first number in the ID is the channel and the second number is the
order. Do not use the same ID for additional GPS receivers.
GPS Rate
The GPS update rate can be changed for each device with options for
2 seconds, 6 seconds, 10 seconds, 30 seconds, and 120 seconds. The update
rate of devices that are shared with you cannot be changed.
Color
The color associated with the GPS receiver can be changed. The device color is
used in the icon, tracks, compass needle, and in the Device List views.
Collar Show/Hide
Hide or show a hidden device.
40
Page 41

Rescue Mode
Turning on Rescue Mode activates when the GPS receiver battery life is at 25%
or less. The device is placed in sleep mode, and the update rate is changed to
120 seconds to reduce power consumption. The rescue mode setting cannot be
changed for devices that are shared with you.
Delete
Delete removes the pairing between the GPS receiver and GPS connector, or
removes from the app devices shared with you. To add the GPS receiver back,
the GPS receiver and GPS connector will have to be paired. Previously shared
devices will need to be shared again.
41
Page 42
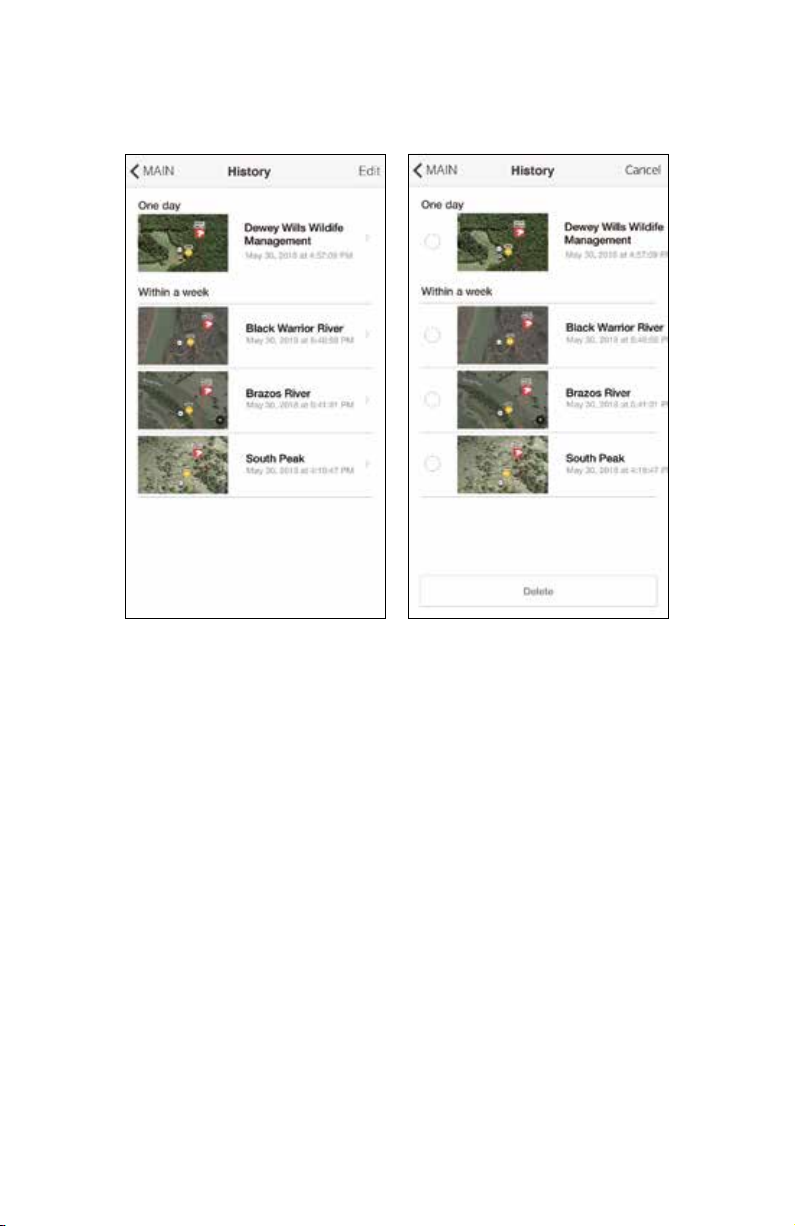
HISTORY
1. HISTORY FILES
View history files and delete using the edit button. History files currently
recording cannot be accessed until completed. Select completed history files
to playback and view details. A history file begins recording when the GPS
connector is connected to the phone and the app is open.
42
Page 43
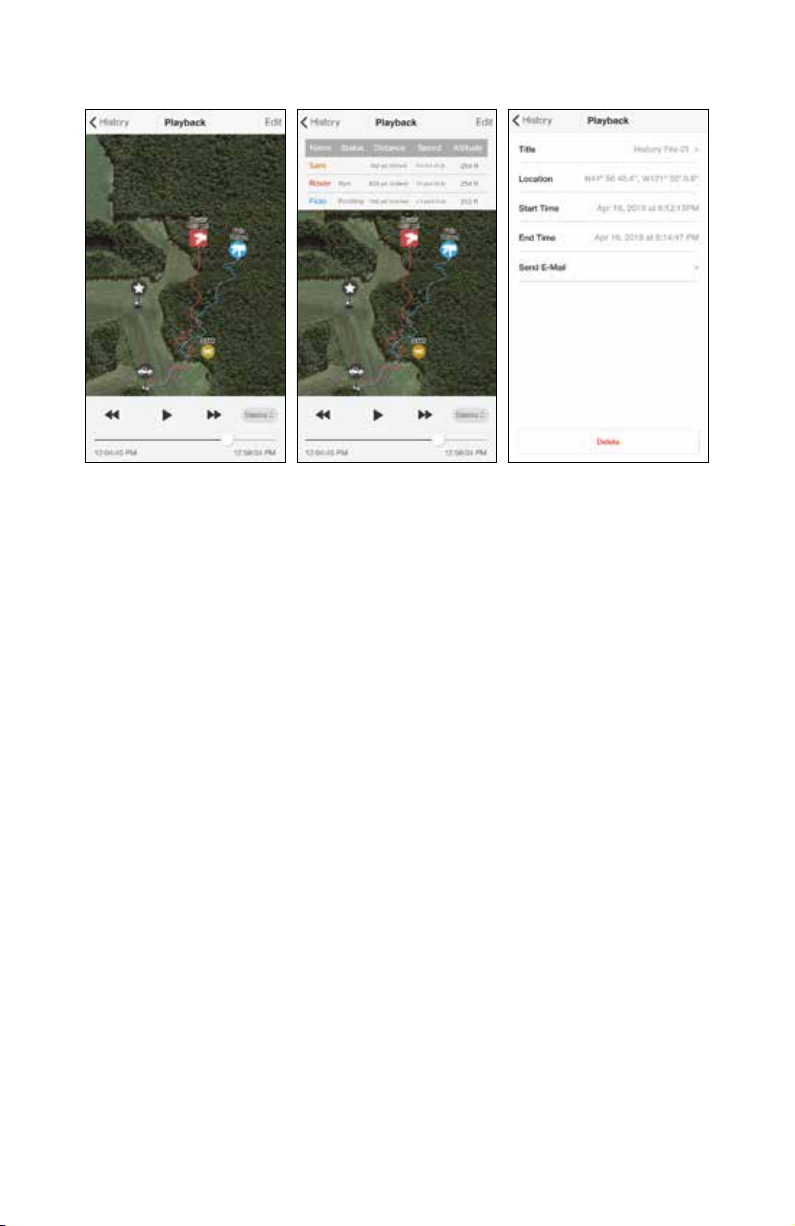
2. HISTORY DETAIL
Play Button
The history file displays the track movement of dogs and people. Use the play
button to view the movement from start to finish, or use the slider to jump to a
specific time.
Show Statistics
If you press the Statistics button, it will show the dog's Status, Distance, Speed,
and Altitude at the time it was recorded. If you select an item on the list, it will
not play on the map.
Send History File
Completed history files can be emailed as a KML file. iPhone users can download
the KML file using iTunes. KML files can be viewed on a desktop computer using
Google Earth.
43
Page 44
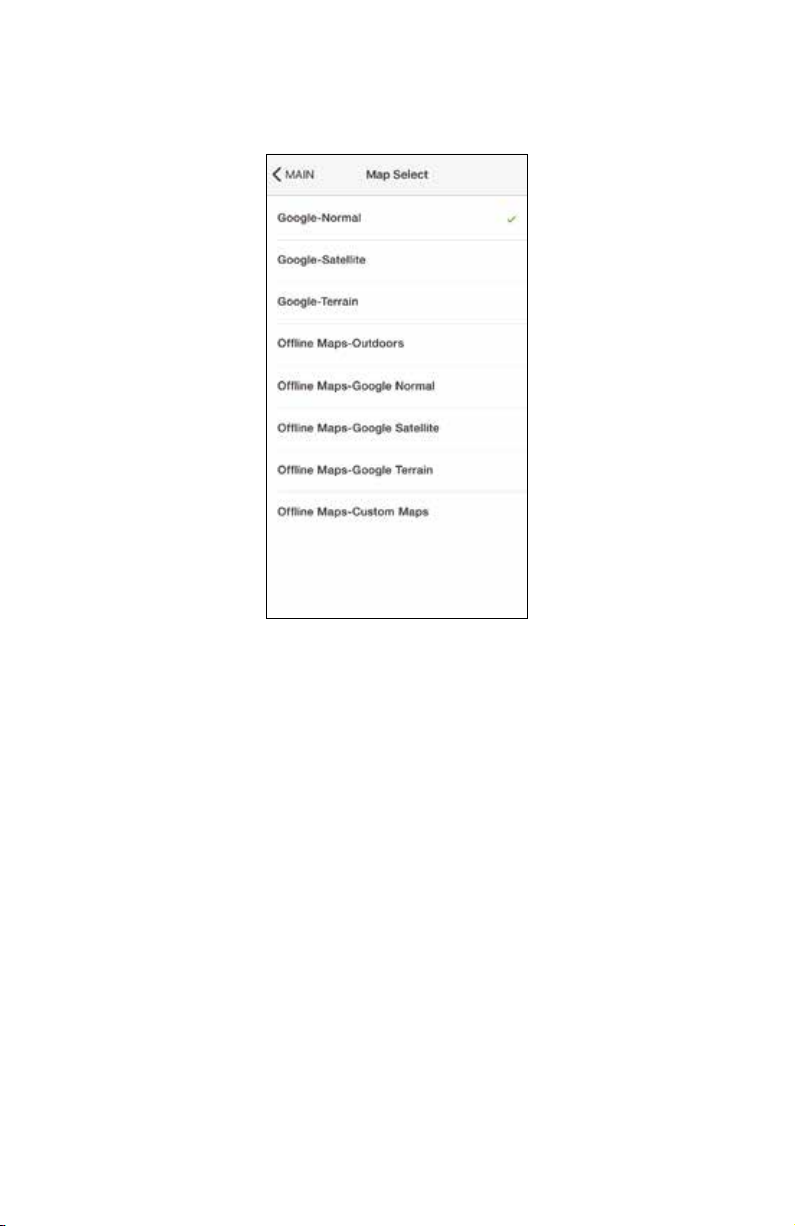
MAP MANAGEMENT
1. MAP SELECT
A preferred map view can be selected. Choose between the following options:
• Google Map – Normal
• Google Map – Satellite
• Google Map – Terrain
• Offline Maps - Outdoors
• Offline Maps – Google Normal
• Offline Maps – Google Satellite
• Offline Maps – Google Terrain
• Offline Maps – Custom Maps
44
Page 45
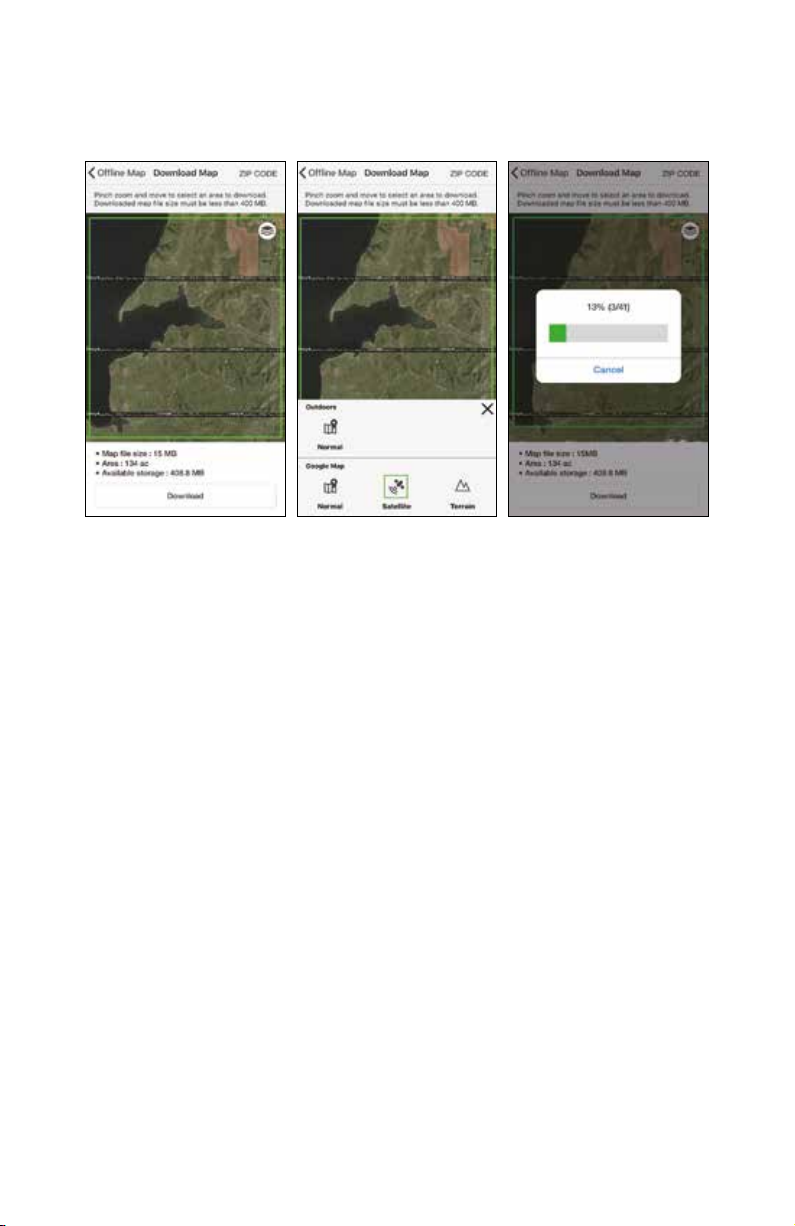
2. OFFLINE MAP
The offline map is displayed when cellular data/Wi-Fi is unavailable. Offline
maps should be downloaded before entering areas with limited data.
Downloading the offline map area
1) Select the type of map you want to download.
2) Navigate to the area you want to download and use the pinch and zoom
functions to specify the area.
3) Select the area to show a green square which is less than 400MB.
* If the file is over 400MB, it will show a red square and cannot be downloaded.
4) You may select the map you downloaded in the Offline Map List.
45
Page 46
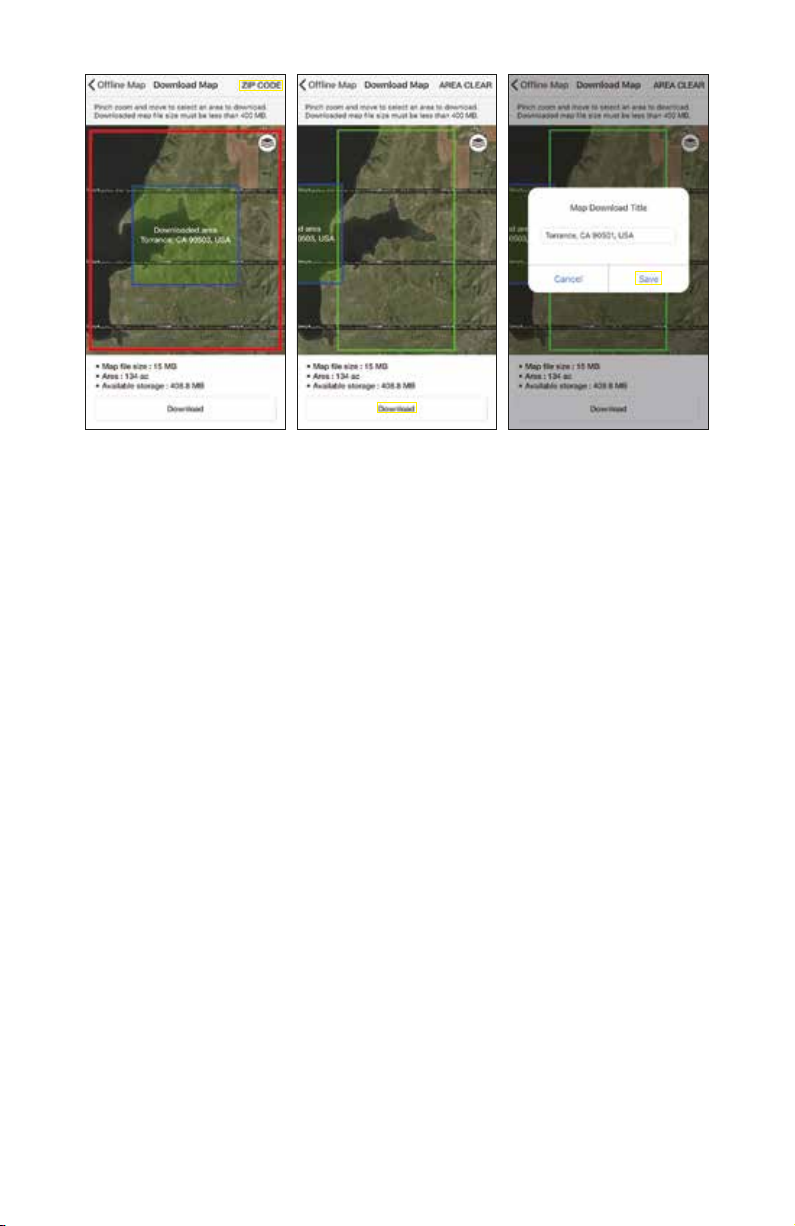
Using zip code to download maps
1) Select the type of map you are going to download.
2) Press the Zip Code button and enter the zip code of the area you
want to download.
3) The map can be downloaded if the map size is less the storage space of your
smartphone. Please note that it may take a longer time to download if the
map area and file size are larger.
4) You may select the map you downloaded in the Offline Map List.
* Zip Code: US, Canada only
46
Page 47
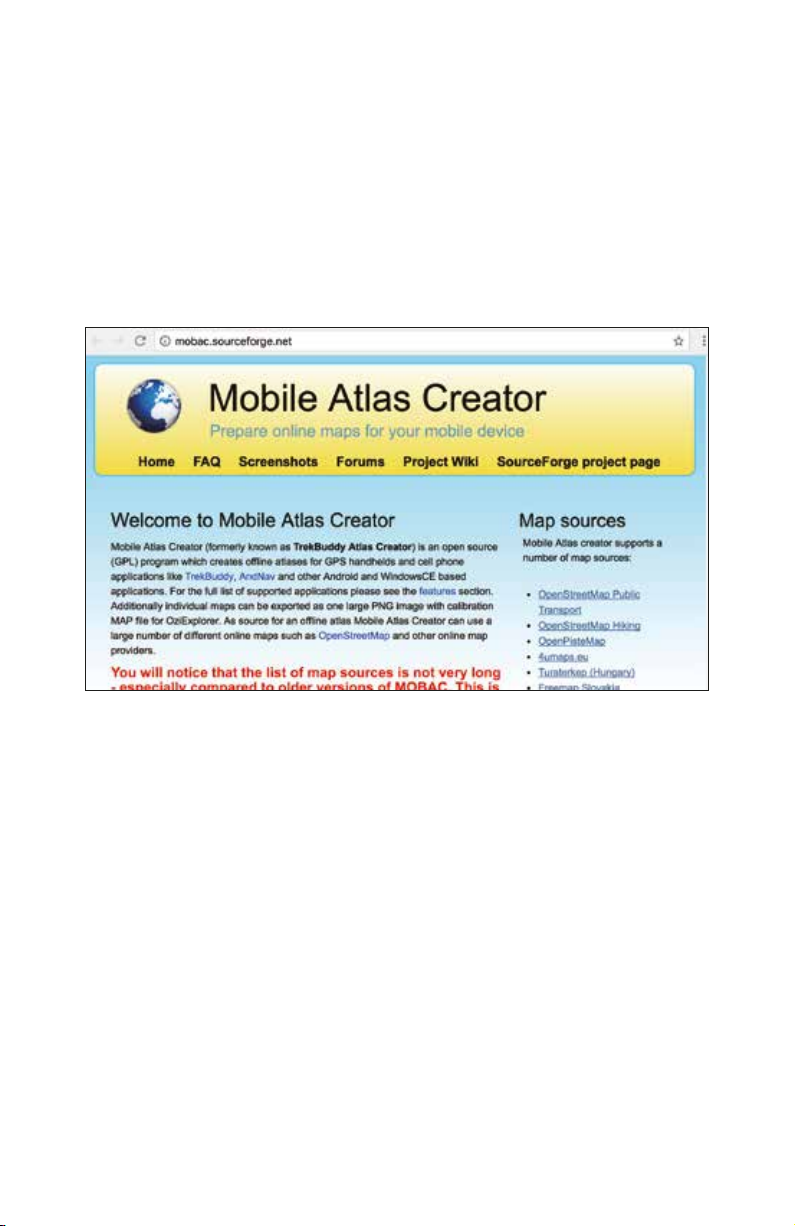
3. CREATING CUSTOM MAP
What is a custom map in the PATHFINDER app?
The PATHFINDER app can display custom maps created in Mbtiles file format.
Users can save and share portions of the map in Mbtiles file format. Here you
can see how to create and upload Mbtiles files for use in the PATHFINDER app.
Creating Mbtiles Files
The introduction to Mobile Atlas Creator and Maperitive will go over the
differences for each program. Use the program that best suits your needs.
Mobile Atlas Creator
Mobile Atlas Creator is free software that converts images used in maps into the
Mbtiles file format.
47
Page 48
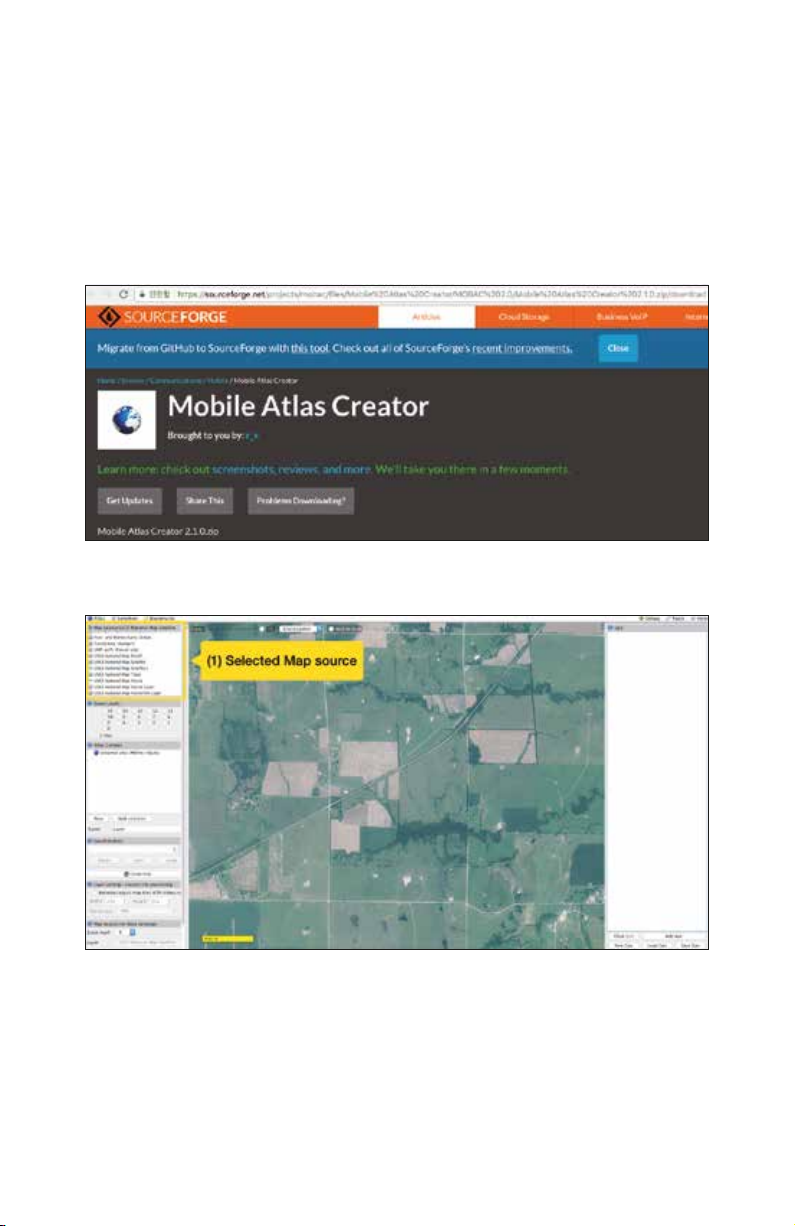
Installing Mobile Atlas Creator on your Computer
1) To create Mbtiles files, you must first install Mobile Atlas Creator on
your computer. The latest version of Mobile Atlas Creator can be downloaded
from https://sourceforge.net/projects/mobac/files/.
2) Unzip the file and run the installation program.
- Window : Execution Mobile_Atlas_Creator.exe
- Mac or linux : Execution Mobile_Atlas_Creator.jar
3) For more information, visit 'http://mobac.sourceforge.net/quickstart/install.
htm'.
Create Mbtiles files
(1) Select the desired Map source
48
Page 49
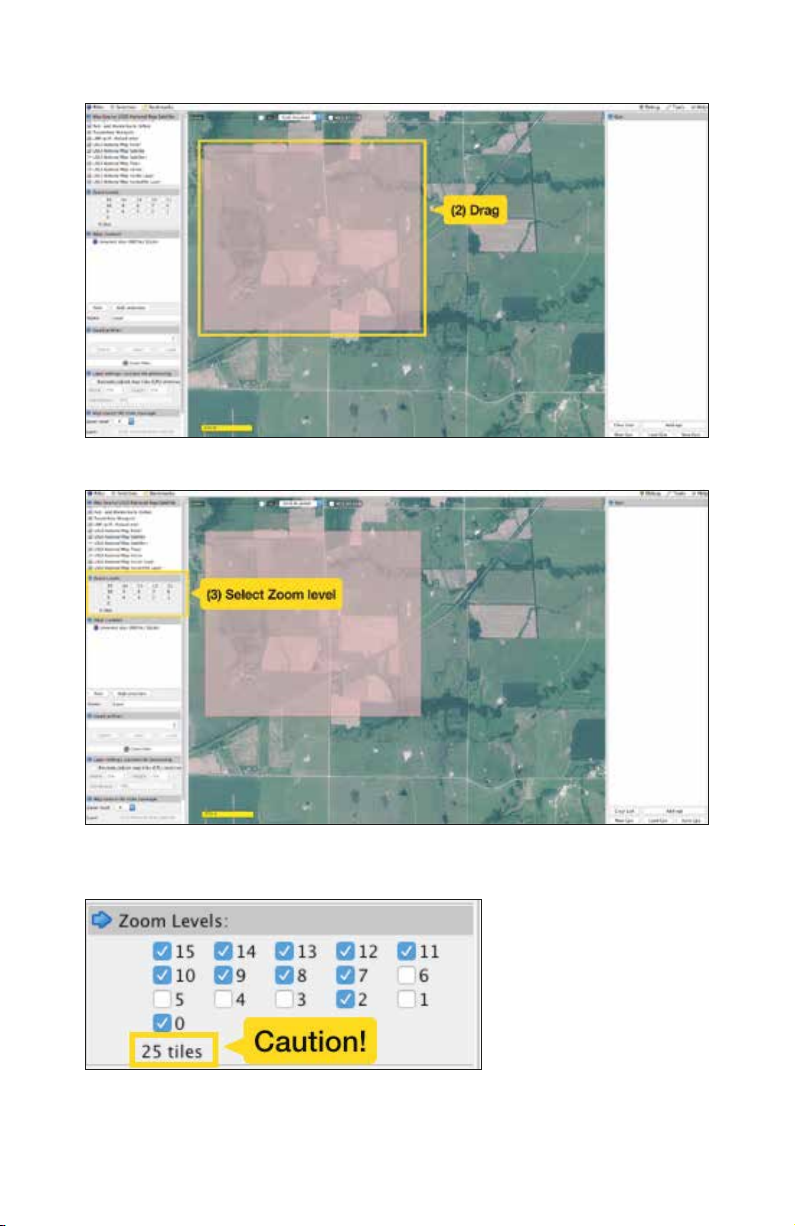
(2) Select the desired area on the map using Drag and Drop.
(3) Select the Zoom level to save.
Note: Please check the number of image tiles downloaded. Downloading more
than 10,000 image tiles is not recommended.
49
Page 50
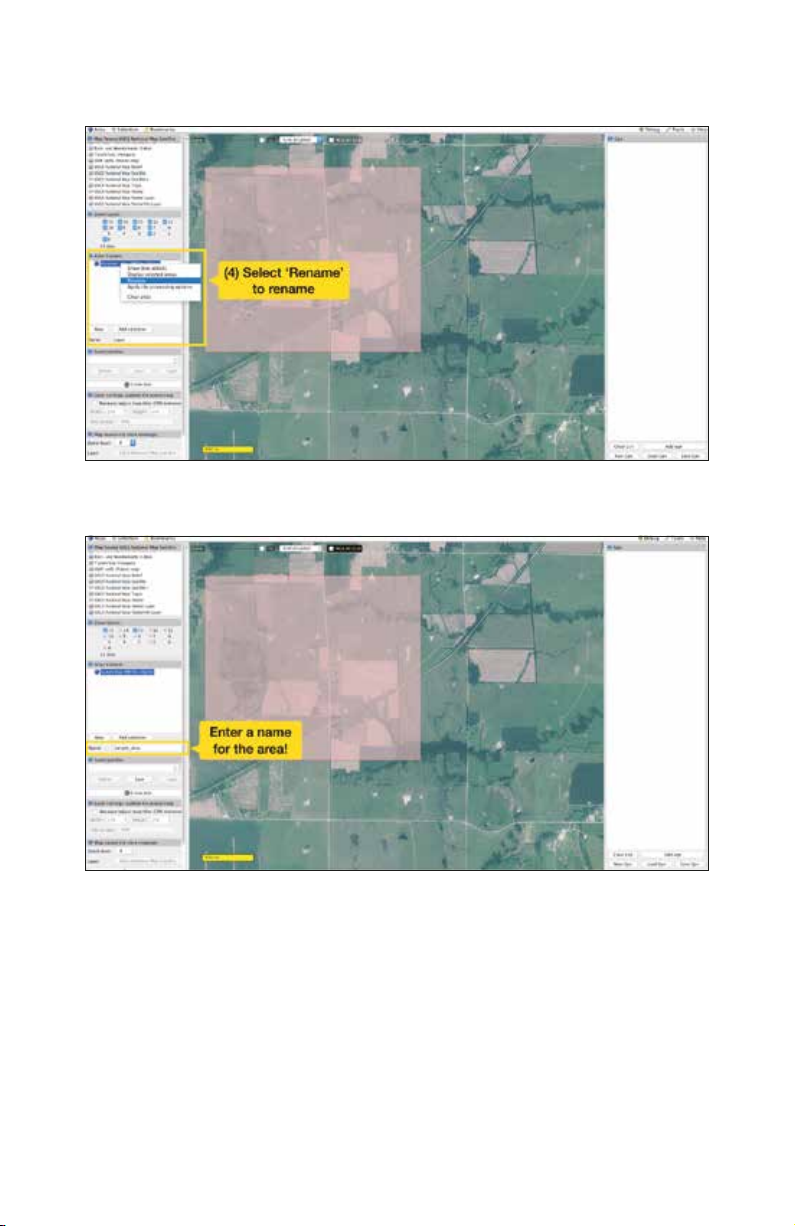
(4) You can change the name of the file in Atlas Content by right-clicking the
title and selecting Rename.
(5) Add the selected area to the map in Atlas Content. First, enter a name in the
Name field.
50
Page 51
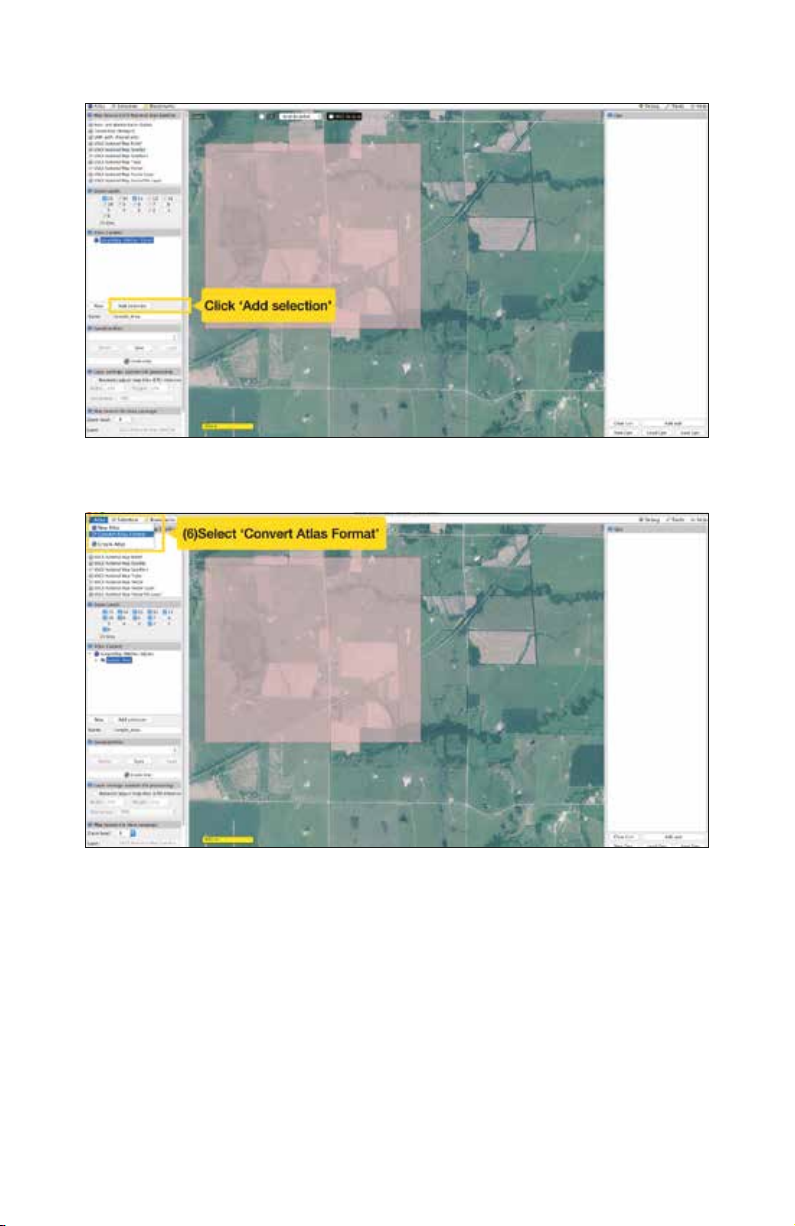
Click the Add Selection button to add the selected region to Atlas Content.
(6) Click on Atlas in the upper left corner to open the menu and select Convert
Atlas format.
51
Page 52
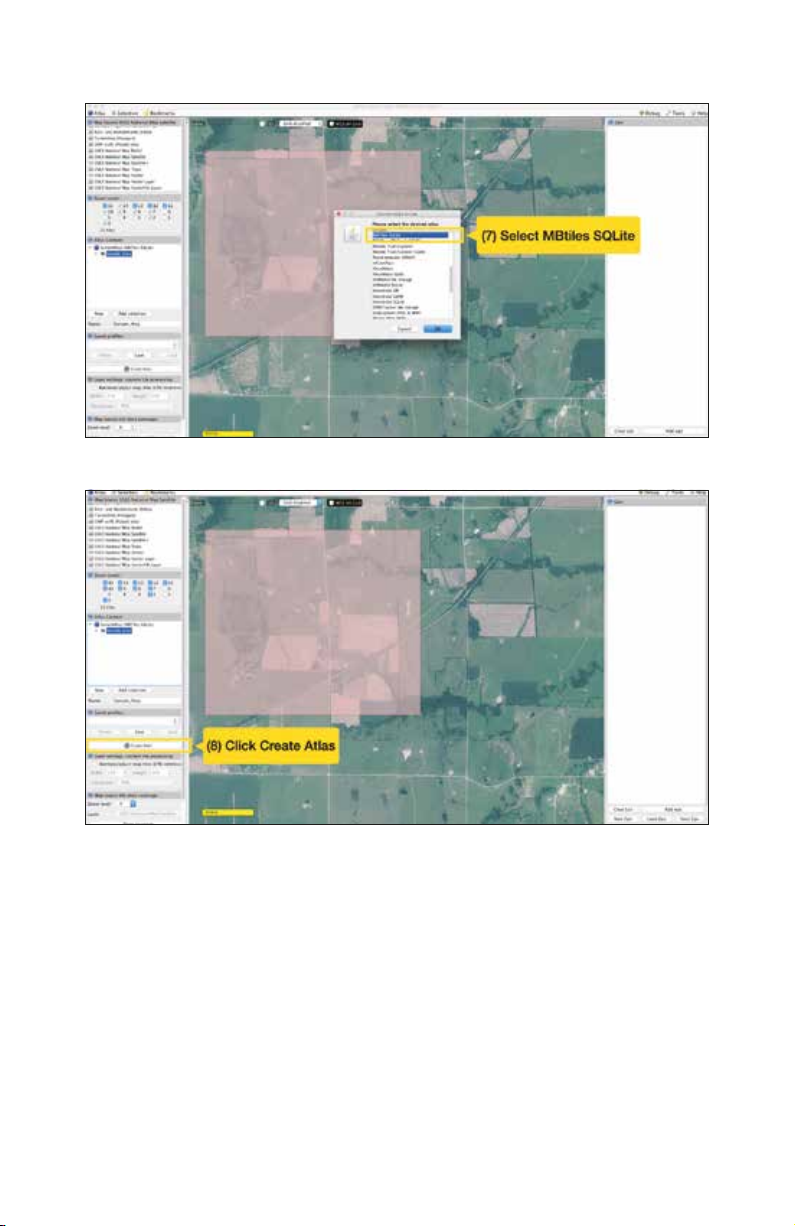
(7) Select the Mbtiles SQLite file format.
(8) Click the Create Atlas button to start creating Mbtiles.
52
Page 53
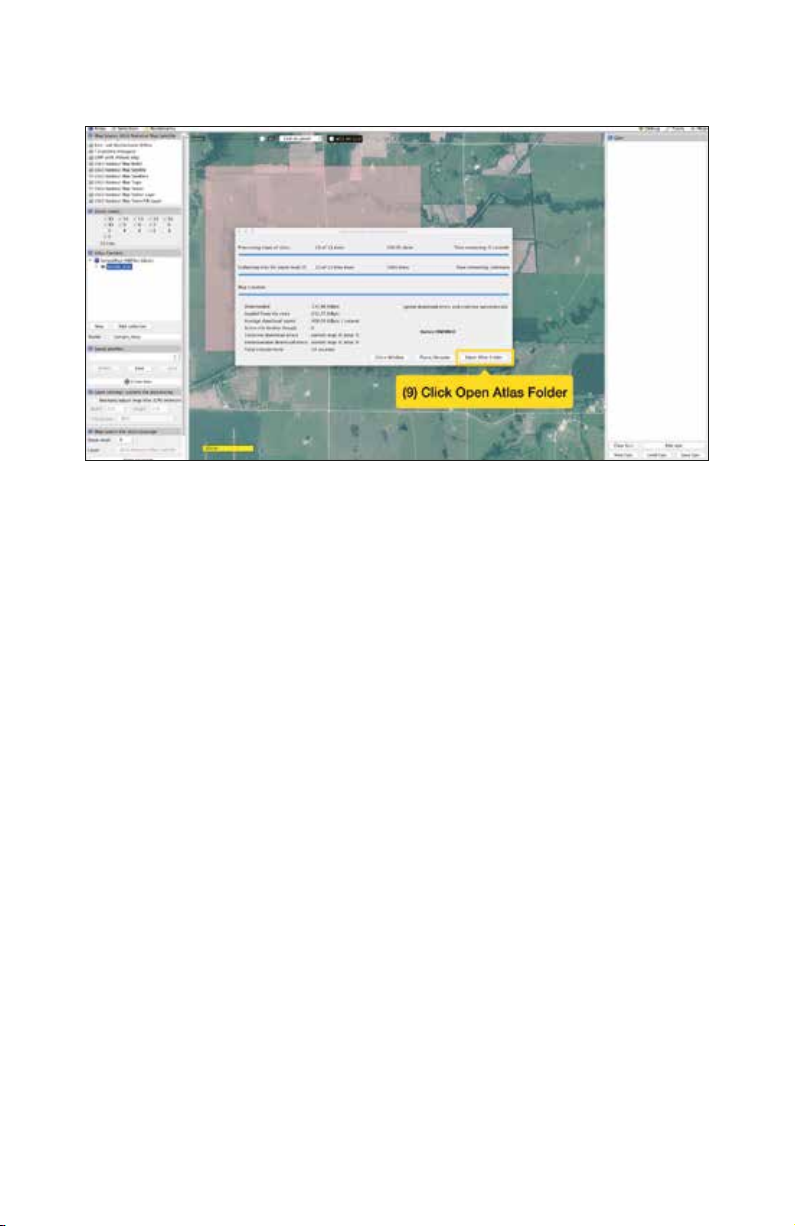
(9) When the creation process is completed, you can check the completed file
by pressing the Open Atlas Folder button.
53
Page 54
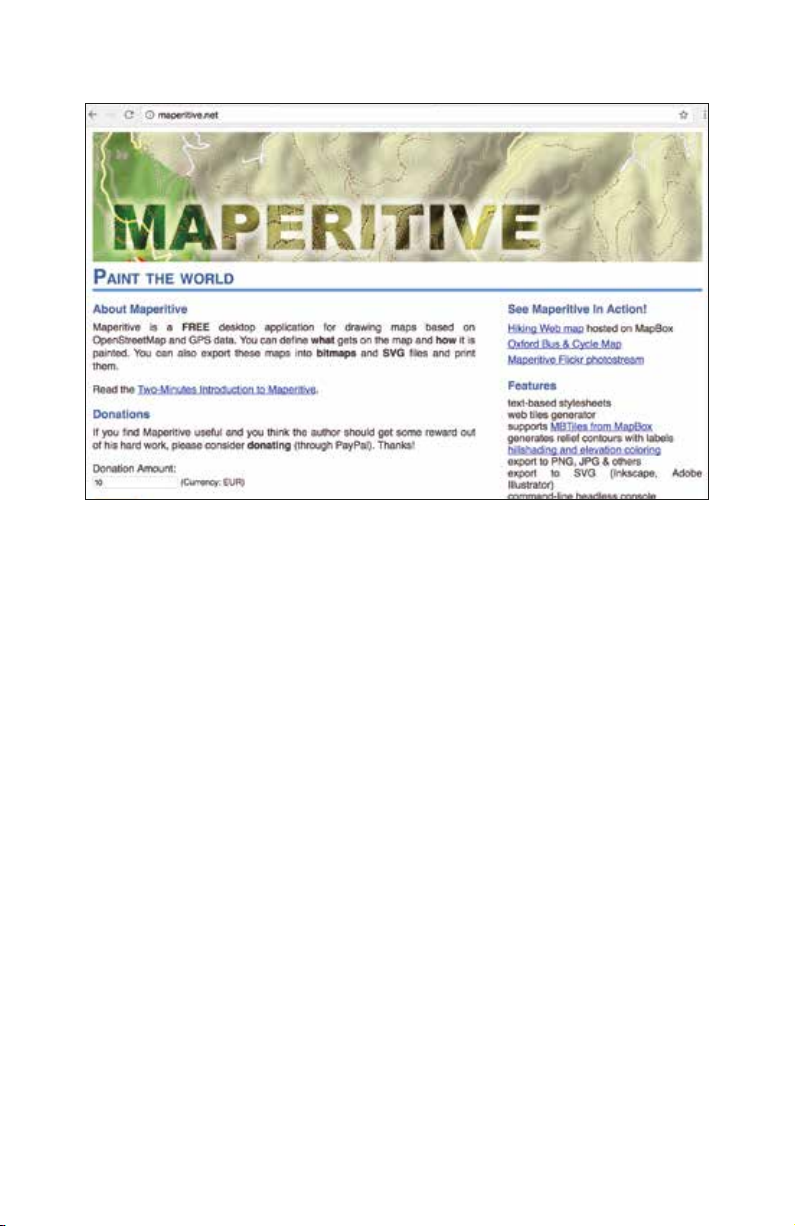
Maperitive
Maperitive can create Mbtiles files from Open Street Maps.
54
Page 55
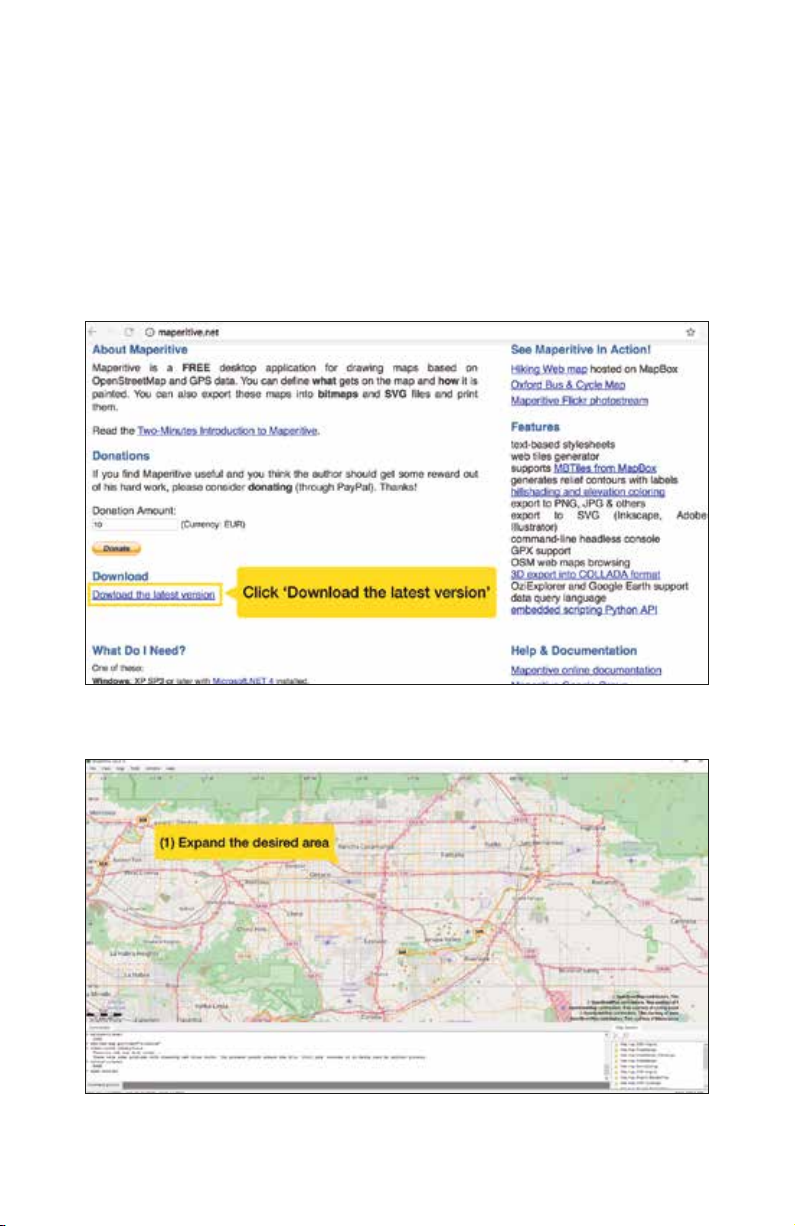
Installing Maperitive on your Computer
Window: Compatible with Windows XP SP3 and newer with Microsoft.NET 4
installed. Download the latest zip file from 'http://maperitive.net/'. Unzip the file
and run maperitive.exe.
OS X: To run Maperitive on OS X, download the latet version of Mono from
'https://www.xquartz.org/' (X11 is already installed on MAC).
Download from 'http://maperitive.net/', and go to the Applications directory
to unzip it. From the terminal, you can go to the Maperitive directory and
run it. Please refer to the Wiki Maperitive Installation for detailed installation
instructions.
Create Mbtiles files
(1) Turn on Maperitive and zoom in on the desired map area.
55
Page 56
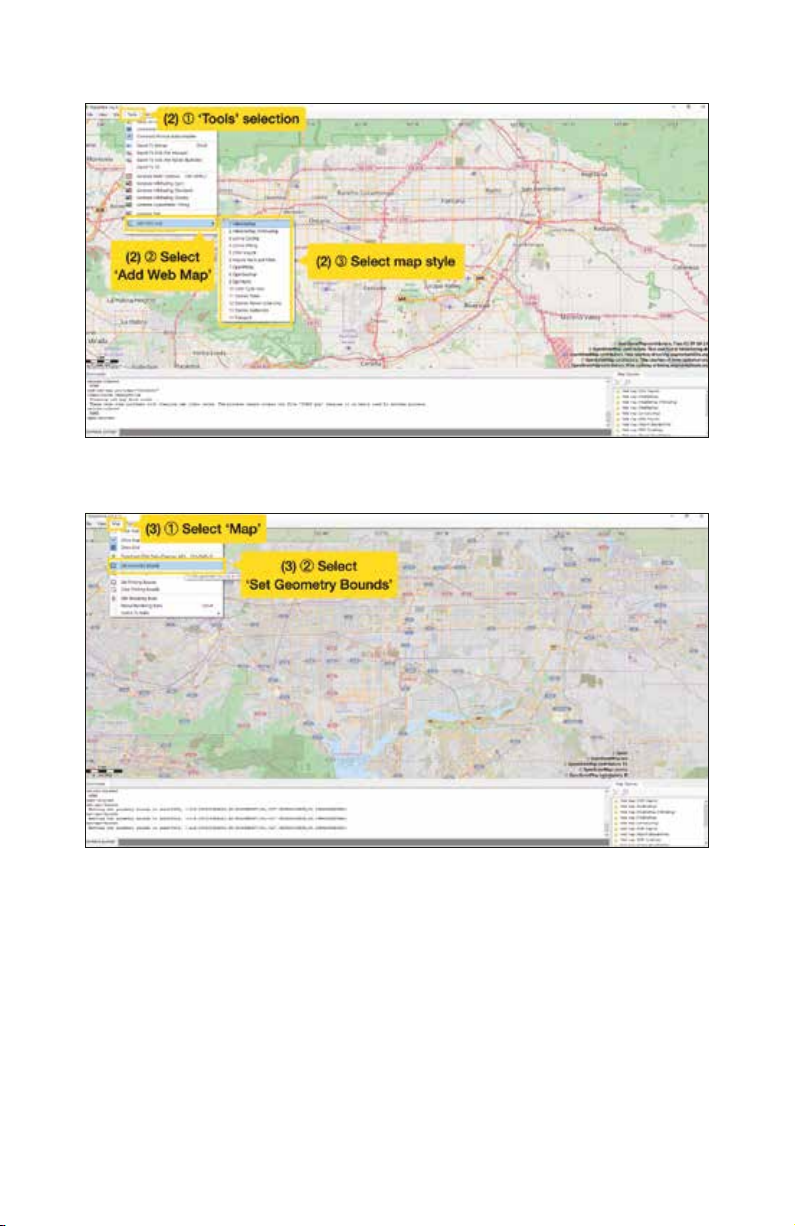
(2) Select the desired map style through Tools -> Add Web Map
(3) Select Map -> Set Geometry Bounds to select the area to save.
* After selecting an area, zoom out to review the selected area.
56
Page 57
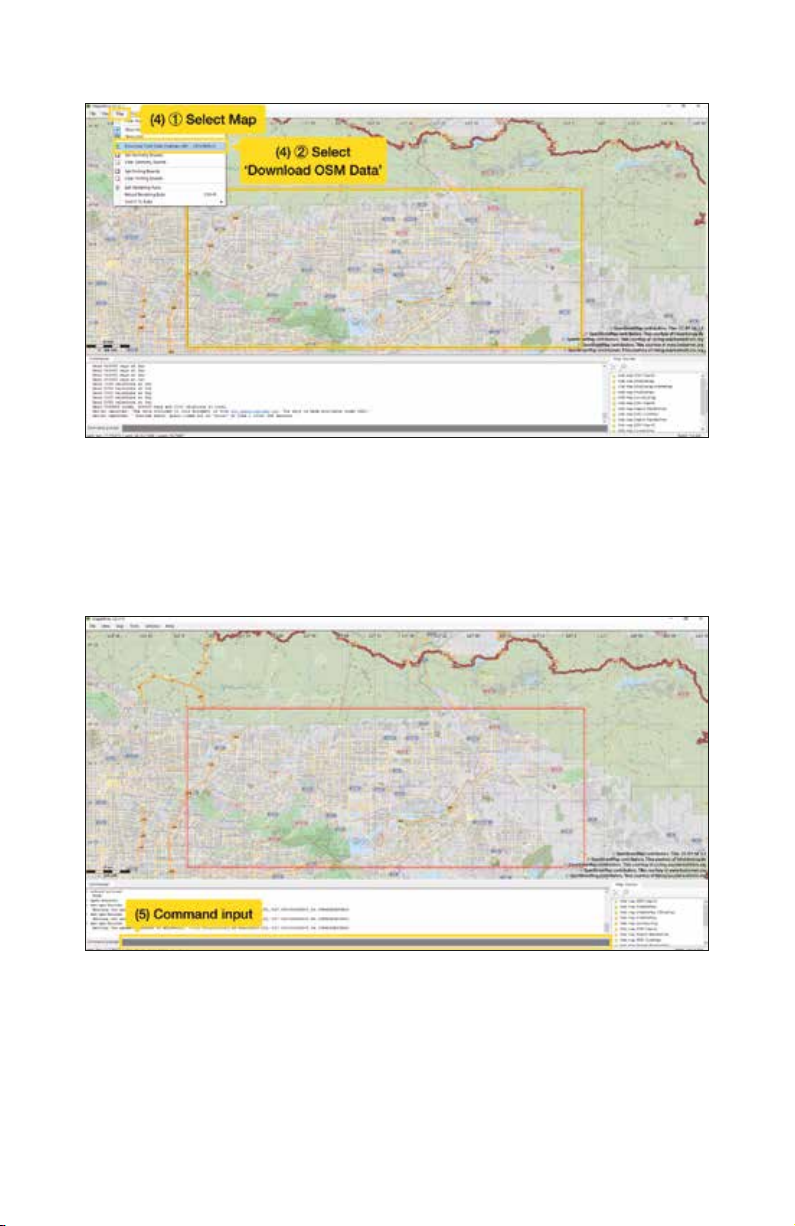
(4) Select Map -> Download OSM Data. Wait for the download to complete.
(5) To create Mbtiles, enter the zoom level range (minimum and maximum)
for the desired area into the Command prompt. For example: if you want
to create Mbtiles with a zoom level between 5 and 18, type into the
Command prompt "generate-mbtiles minzoom = 5 maxzoom = 18".
For more information, please reference: http://maperitive.net/
docs/#Commands
57
Page 58
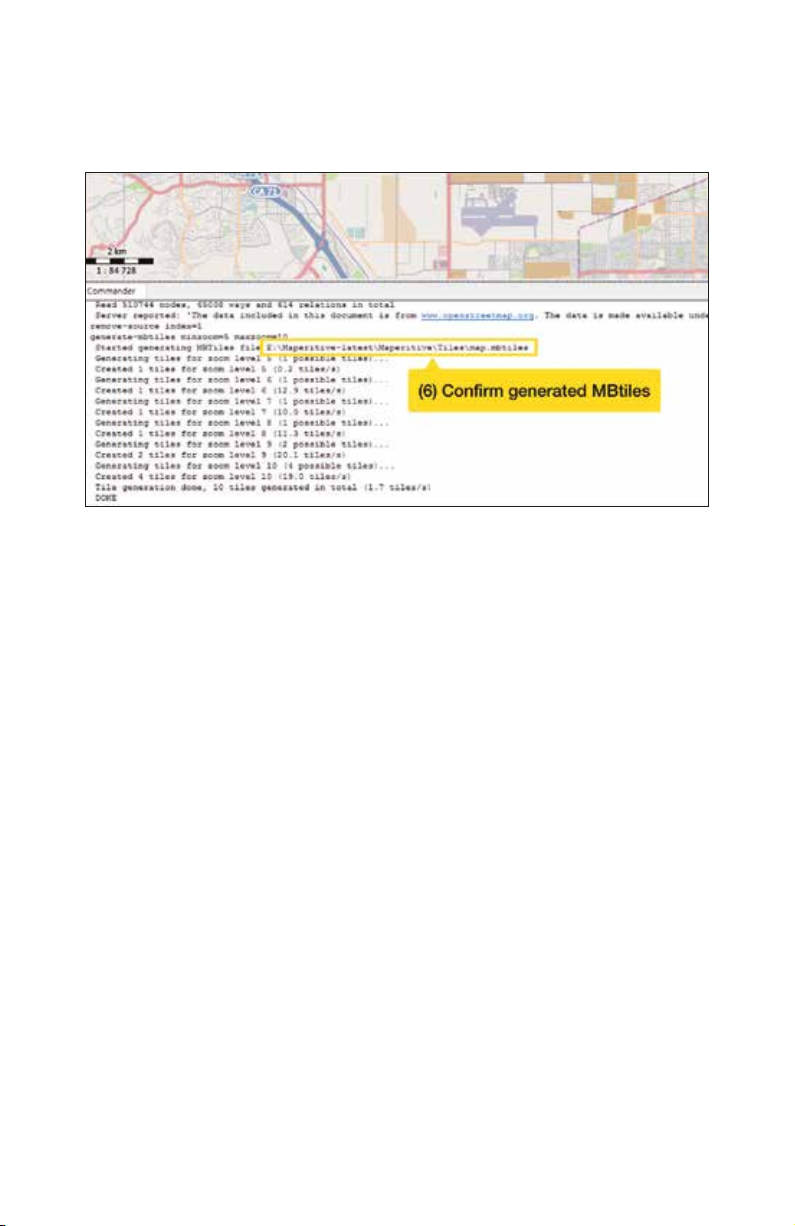
(6) After the download is complete, follow the path displayed in the Command
prompt to see the Mbtiles created.
For detailed explanations please refer to 'http://maperitive.net/docs/
TenMinutesIntro.html#Using%20The%20Map'.
58
Page 59
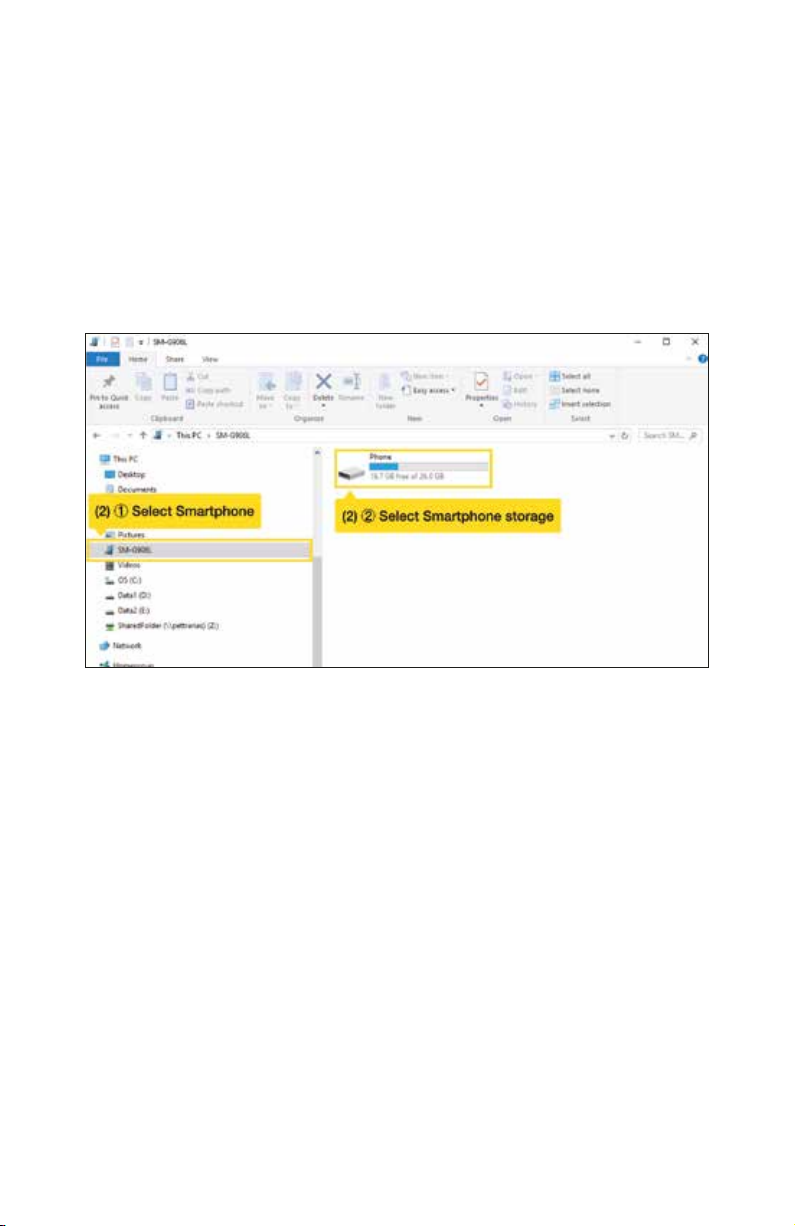
4. UPLOADING MAPS TO YOUR SMARTPHONE (ANDROID, IPHONE)
Uploading Mbtiles files
To use the created Mbtiles files in the PATHFINDER app, they must be placed in
a specific repository on your smartphone.
You can upload it directly to your smartphone or upload it to a cloud service
and download it via the PATHFINDER app.
Uploading directly to your smartphone - Android
(1) Connect your smartphone to a computer using a USB cable.
* This guide is based on a Windows 10 PC and Galaxy S5 smartphone.
(2) Select your smartphone storage from your computer.
59
Page 60
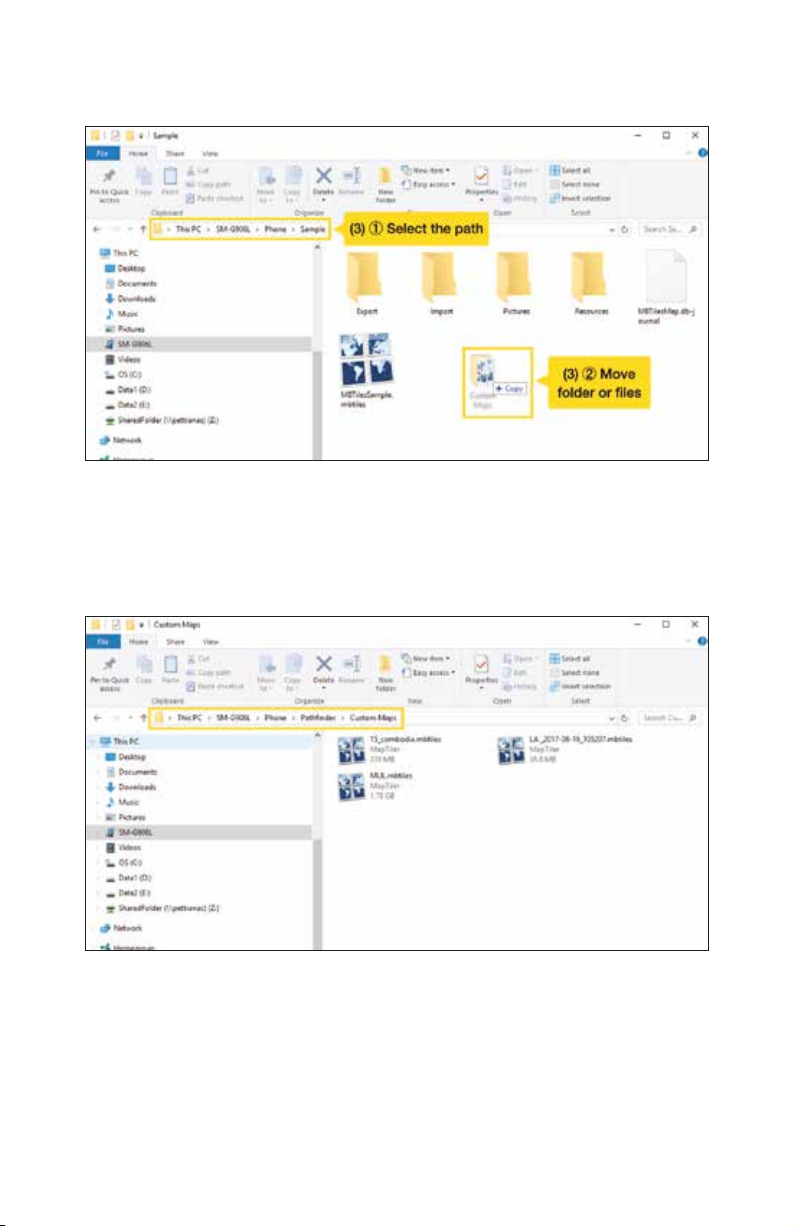
Copy files to a folder
(3) Select the path to save the created Mbtiles file.
Notes: When saving to internal storage, save Mbtiles in the PATHFINDER /
CustomMaps folder to skip importing from the PATHFINDER app.
If the CustomMaps folder is missing, create a new folder directly in the
PATHFINDER folder and rename it to CustomMaps. Mbtiles can be copied to the
newly created CustomMaps folder.
60
Page 61
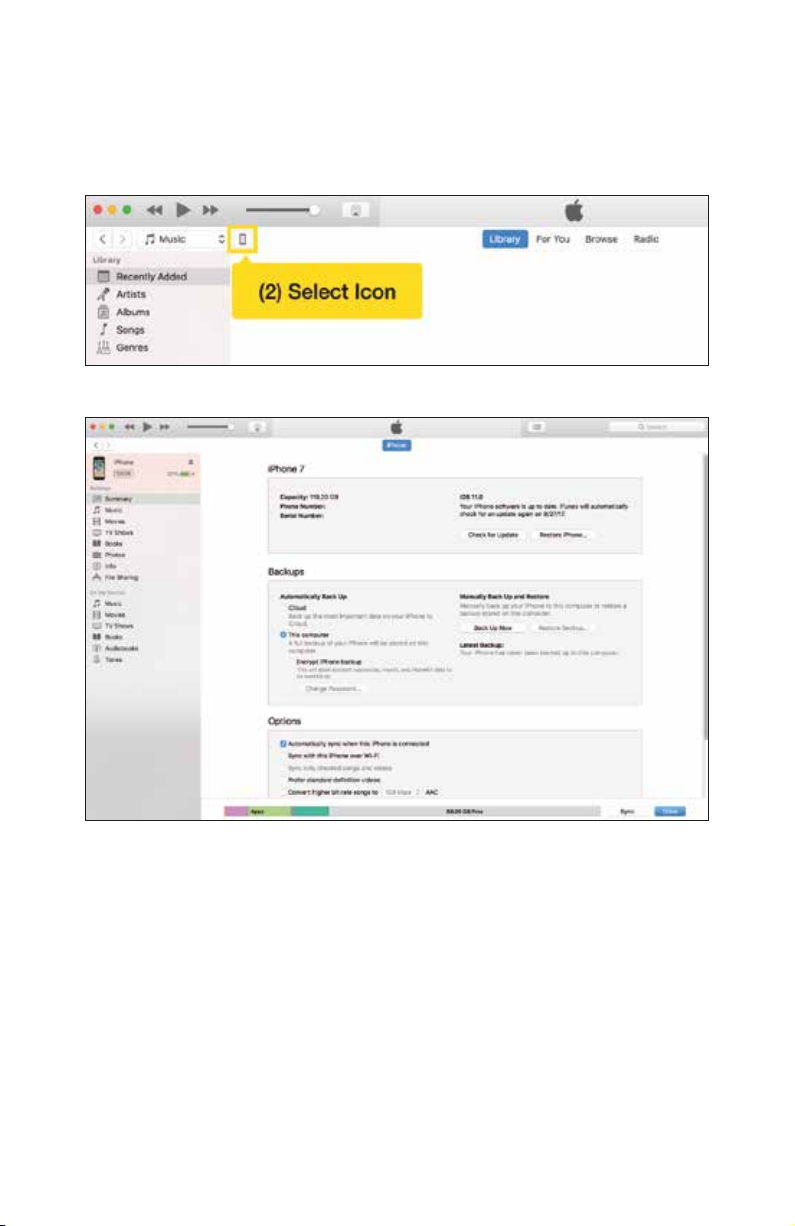
Uploading directly to your smartphone - iPhone
(1) Connect your iPhone to your computer and launch iTunes.
* This guide is based on iTunes version 12.7.0.166.
(2) Go to the iPhone summary page.
* Click the icon to go to the iPhone summary page.
* The iPhone summary page is shown below.
61
Page 62
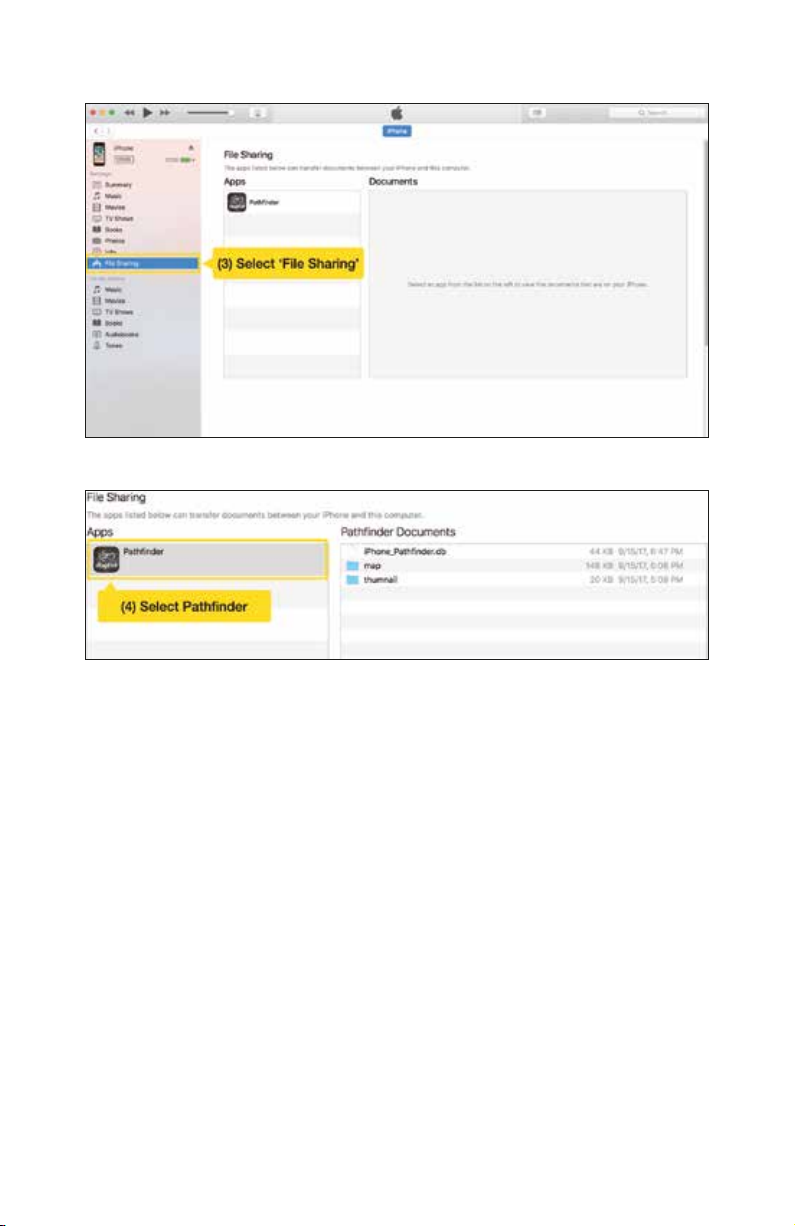
(3) Select File Sharing from the left menu.
(4) Select PATHFINDER from the File Sharing list.
62
Page 63
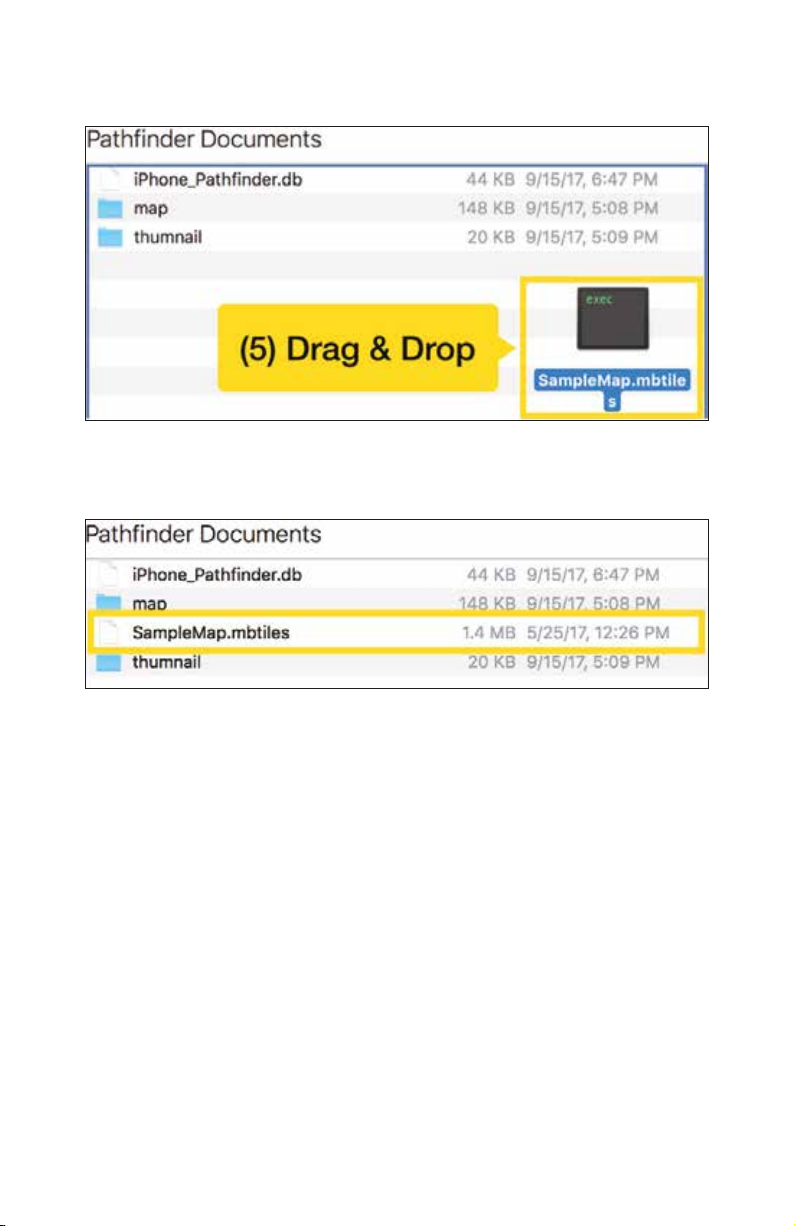
(5) When the Document tab of the PATHFINDER opens, add the Mbtiles by Drag
& Drop or the Add button.
(6) You can see that the Mbtiles files have been added.
* Mbtiles files placed in the PATHFINDER folder via iTunes can be used
without importing from the PATHFINDER app.
63
Page 64
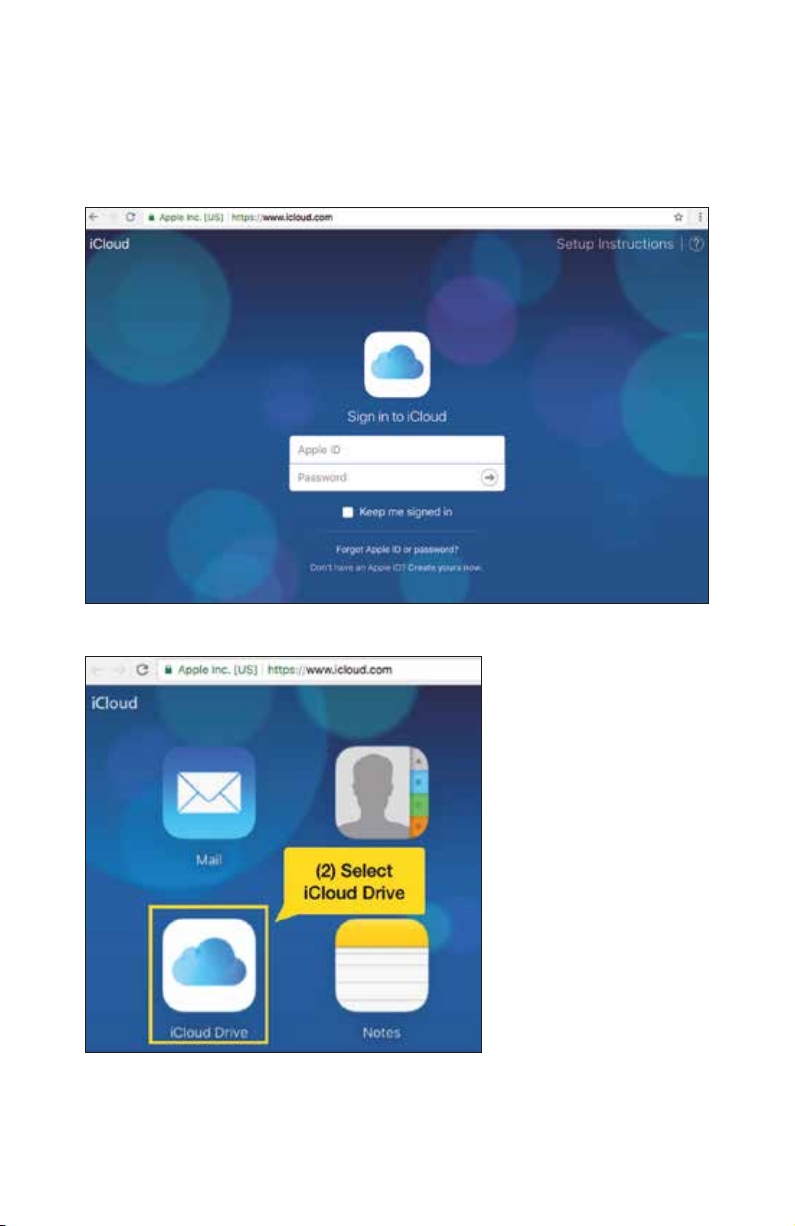
5. UPLOADING FILES
Uploading to iCloud - iPhone
(1) Log in using 'https://www.icloud.com/'.
For detailed login instructions, please visit 'https://support.apple.com/en-us/
HT204174/'.
(2) On the main page, click iCloud Drive.
64
Page 65
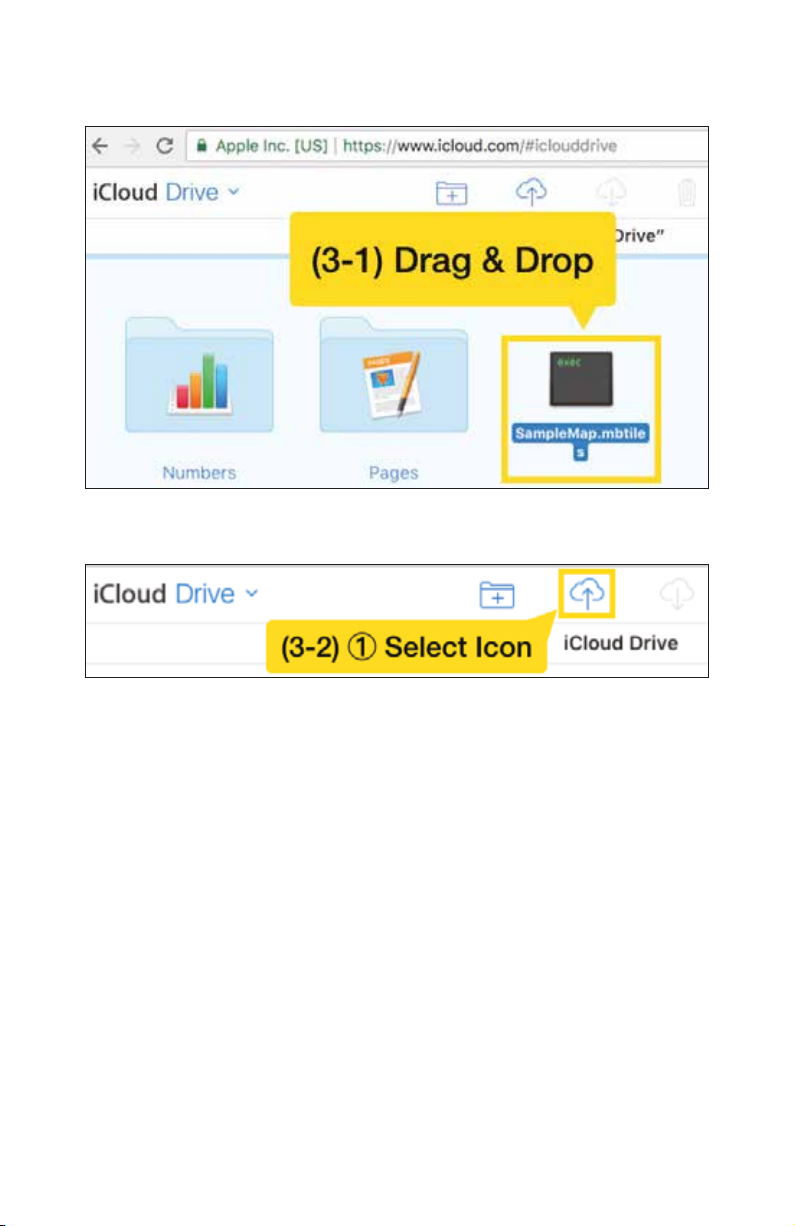
(3) Upload Mbtiles files using one of the following methods.
(3-1) Drag & drop the Mbtiles file to iCloud Drive.
(3-2) Click the upload icon at the top of the iCloud page and select the
Mbtiles file.
65
Page 66
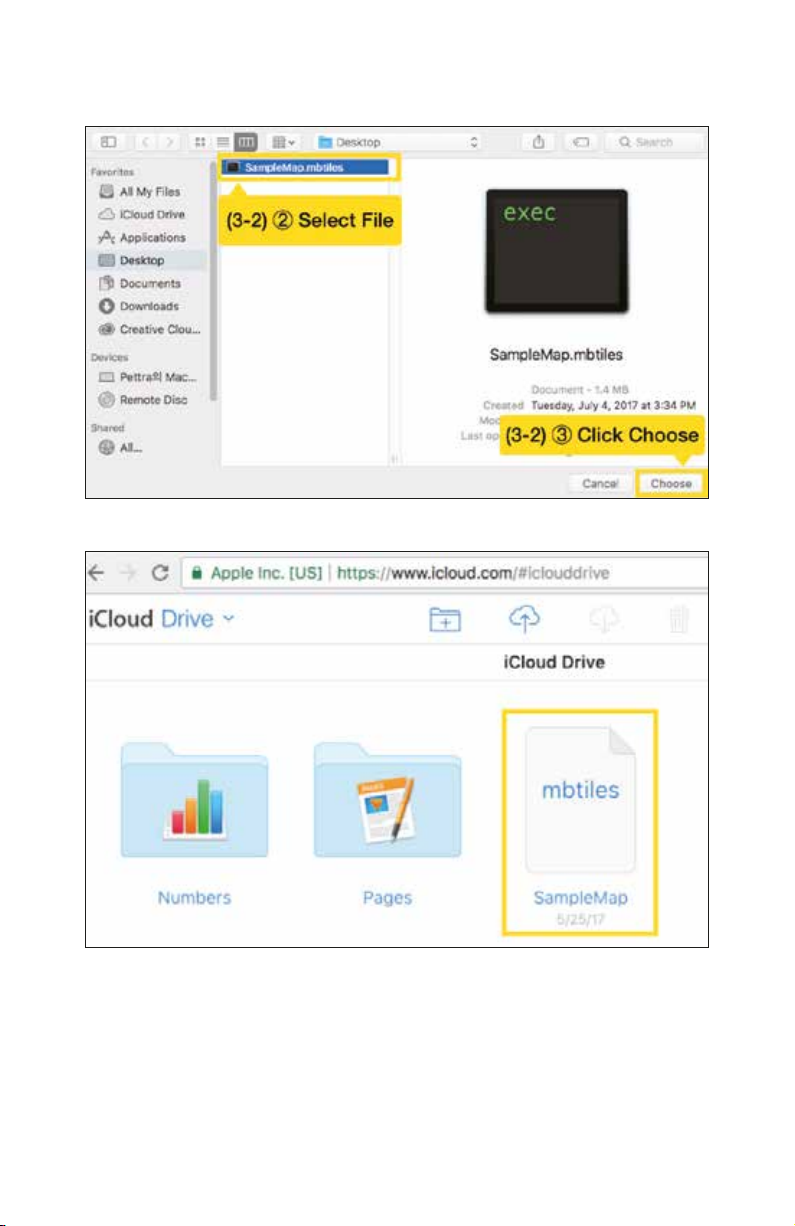
* If you click the icon, the following window appears.
Select the desired Mbtiles file and click [Choose] to add the file to iCloud.
(4) When the upload is complete, you can see that the file has been added.
66
Page 67
Uploading to Dropbox
Add files from the desktop app.
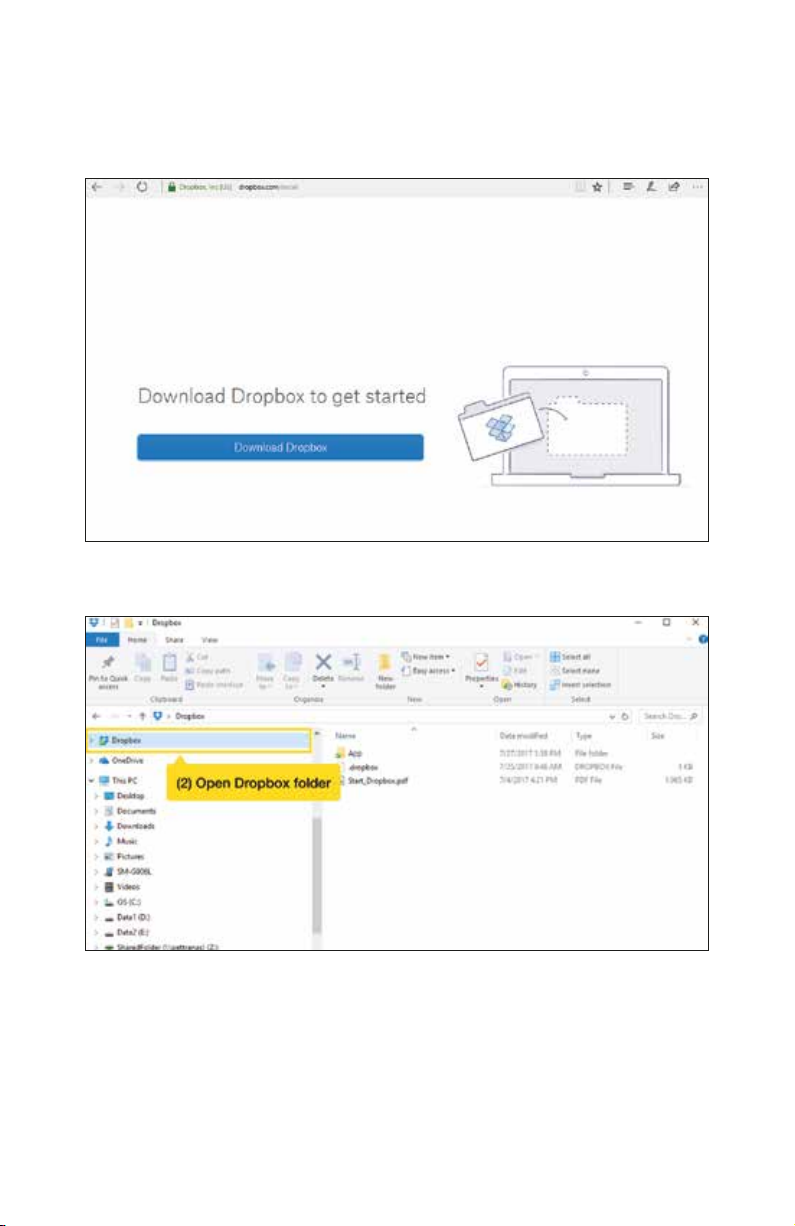
(1) Install the Dropbox desktop app.
The latest version can be downloaded from 'https://www.dropbox.com/install'.
(2) When the installation is finished, open the Dropbox folder from
My Computer.
67
Page 68
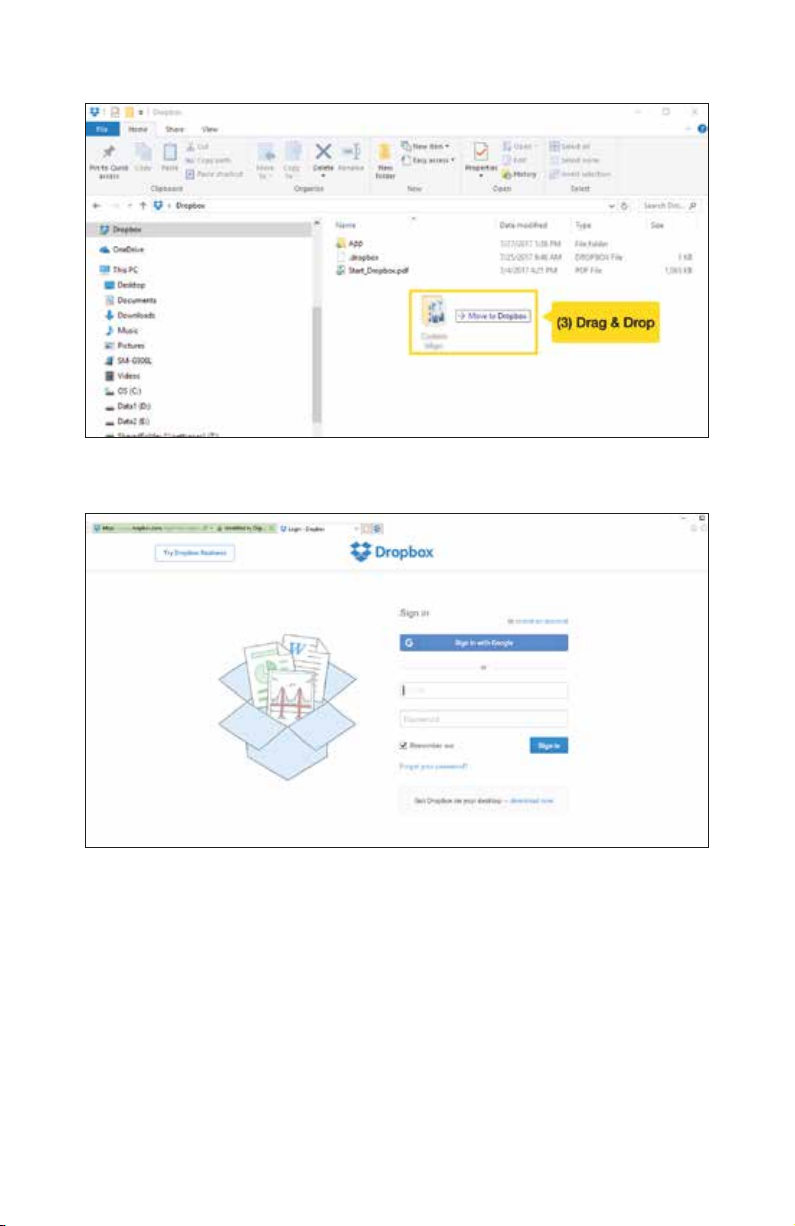
(3) Move the desired Mbtiles file to the Dropbox folder.
Adding files from a web page
(1) Log in to Dropbox.com.
68
Page 69
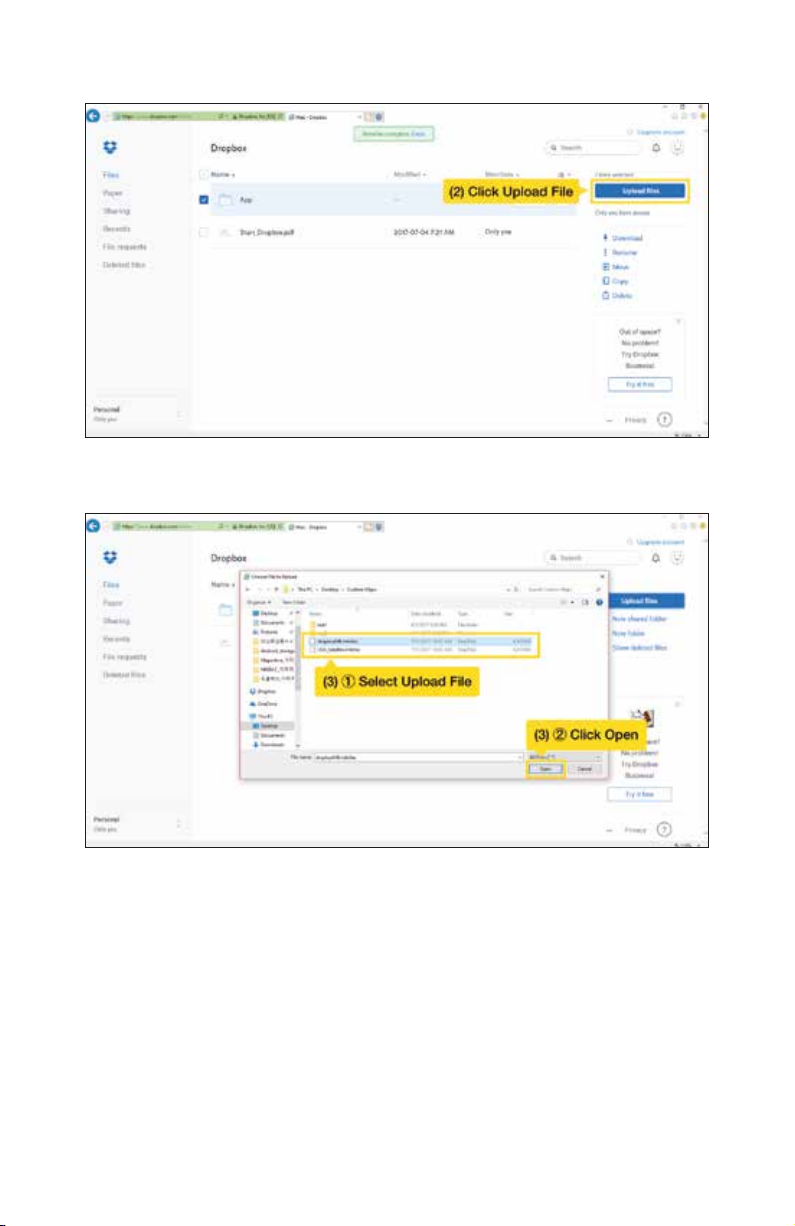
(2) Click the [Upload File] button on the top right corner.
(3) Select the desired Mbtiles file to upload and click [Open] to add them to
Dropbox.
69
Page 70
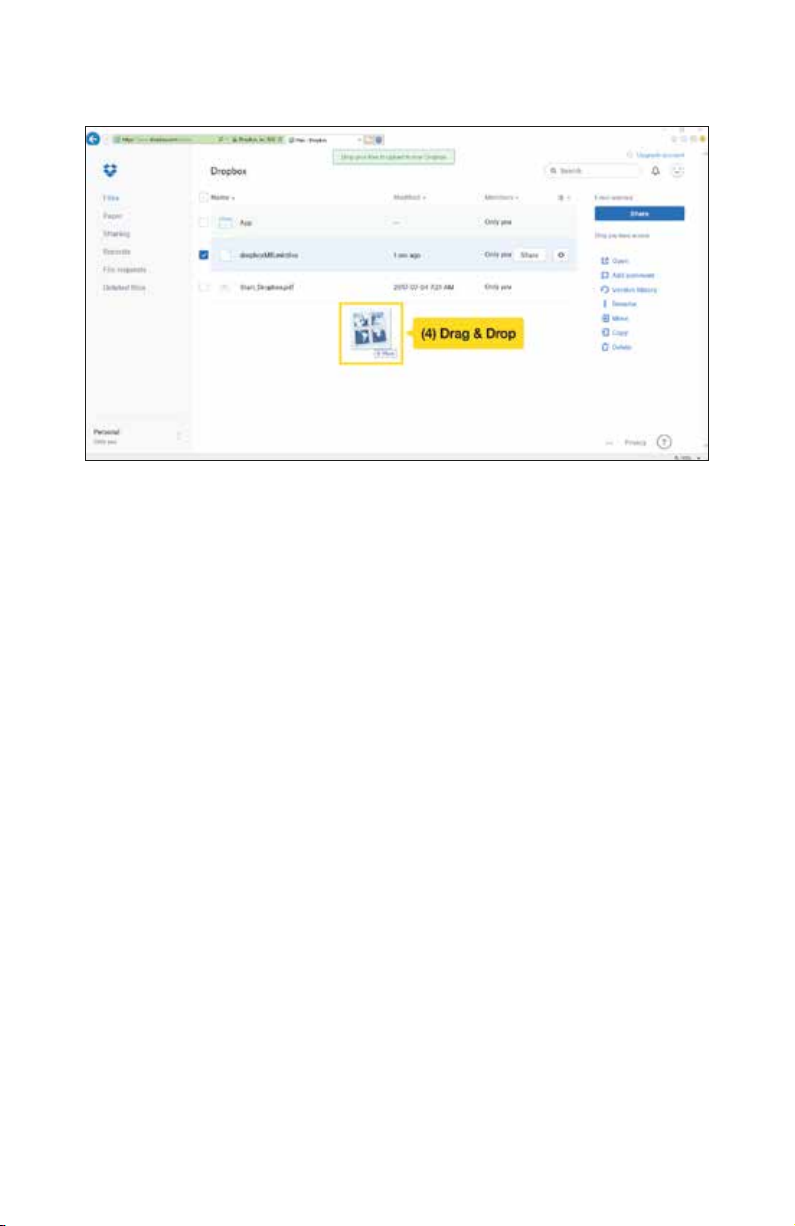
(4) You can also add the files by dragging and dropping them directly into the
web browser.
70
Page 71
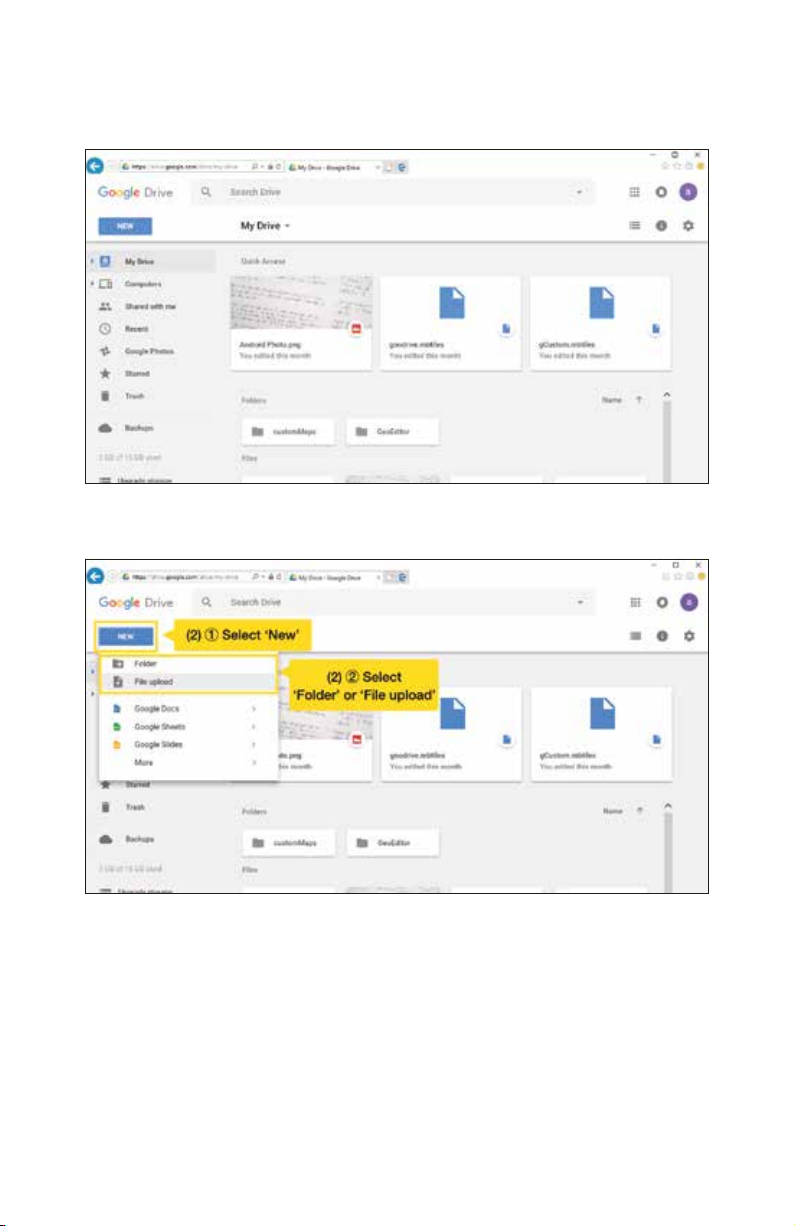
Uploading to Google Drive
(1) Navigate to drive.google.com and sign in with your Google account.
Google accounts can be created at 'https://accounts.google.com/signup'.
(2) Click the [New] button in the top left corner, then select the Upload File or
Folder button.
71
Page 72
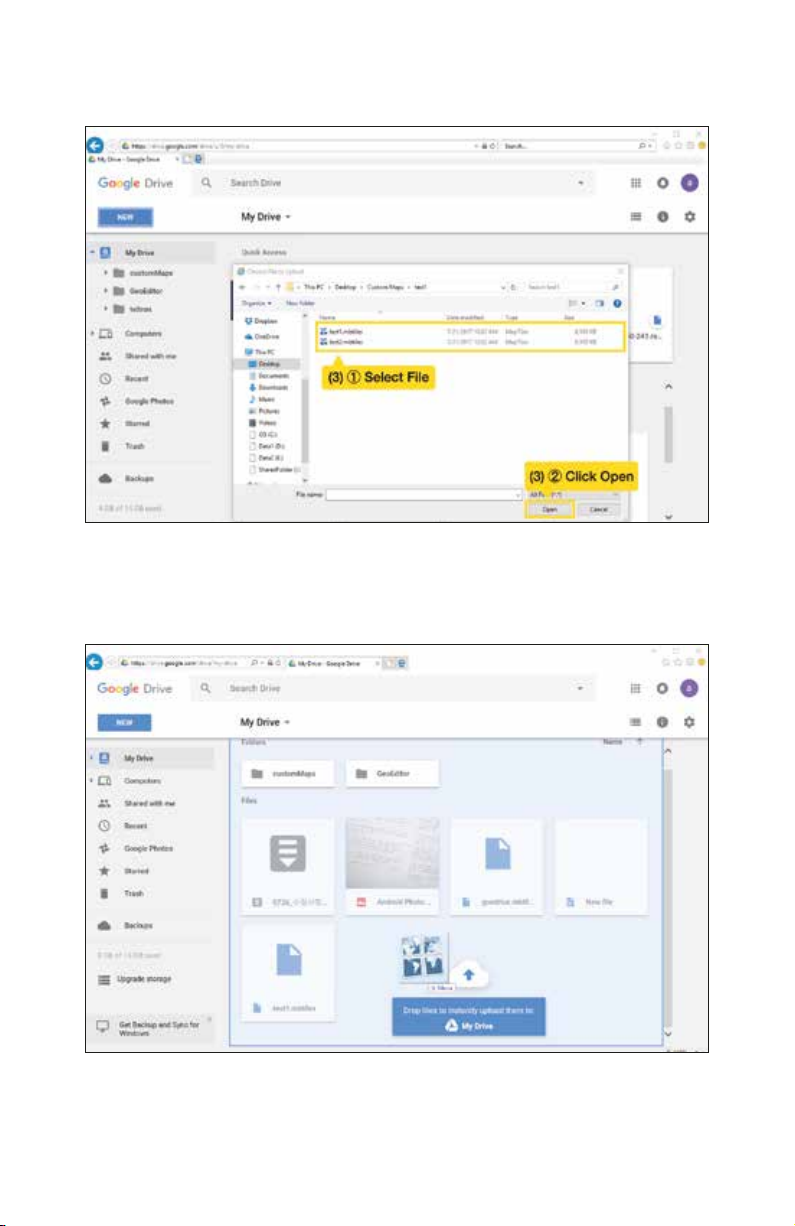
(3) Select the folder containing the Mbtiles file or the Mbtiles file you want to
upload and click [Open] or [OK] to add it to your Google Drive.
(4) You can also add the files by dragging and dropping them directly into the
web browser.
To learn more about using Google Drive, please visit 'https://support.google.
com/drive/answer/2424384?hl=ko&co=GENIE.Platform%3DDesktop&oco=1'.
72
Page 73
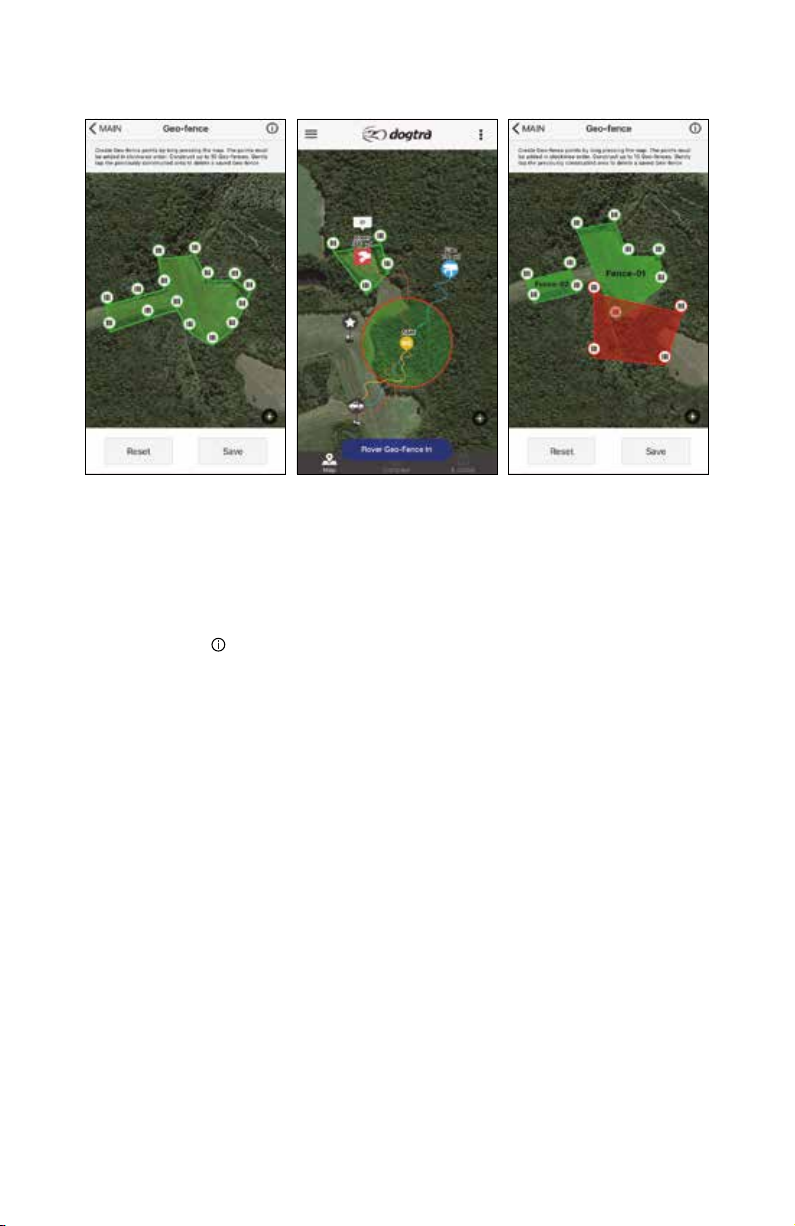
GEO-FENCE
A Geo-fence can be created for a specified area and will be displayed on
the Map tab. The dog alerts for the Geo-fence are turned on by default and
a notification will appear when a dog exits or enters the Geo-fence. The
notification will blink the 'Collar Icon' and app screen, or on the home or lock
screen.
• The Geo-fence alerts can be turned on and off in the Settings.
Geo-fence Info
The info button displays more information on setting up the Geo-fence.
Saving a Geo-fence
Long press the map to create a Geo-fence point. The Geo-fence points must
be created in a clockwise order and cannot intersect. A valid Geo-fence will
be displayed in green, while an invalid Geo-fence will be displayed in red and
cannot be saved.
Once a valid Geo-fence is created, use the save button to save the Geo-fence
on the map. The Geo-fence points can be edited before saving by holding and
dragging the points to edit its location.
Multiplex Geo-fence
You can create up to 10 Geo-fences, but they cannot intersect or overlap each
other. The overlapped Geo-fences will be displayed in red.
You may create a name for each Geo-fence, which will be used for the fence
alarm as well.
Remove a Geo-fence
In the Geo-fence setup window, you may delete the Geo-fence by tapping the
center of the fence.
73
Page 74

APP SETTINGS
Screen Saver
• The phone screen turns off when covered or in a pocket and turns on
when viewed.
• Turn this feature on and off using the on/off button.
• On Android devices, the screen will turn off when the proximity sensor is
covered and turns on when the sensor is exposed.
Shake Control
• Shake your phone to jump between dogs or the main tabs.
• Select between tabs, dogs, and no action.
Volume Button Control
• Use the volume buttons to jump between dogs or zoom in/out on the map.
• Select between zoom, dogs, and no action.
Distance Unit
• The distance is displayed on the main tabs and device list.
• Select between meters and yards.
Speed Unit
• Select between seconds and hours.
GPS Data
• The GPS Data Limit sets how far back the tracks are displayed. If 2 minutes is
selected, only the tracks up to 2 minutes will be displayed.
• Select between intervals in 1 to 10 minutes or unlimited.
Tracking Only Mode
The PATHFINDER comes equipped with standard 5/8” contact points that can
be replaced with the non-stimulation contacts to disable the receiver hardware.
Set the app to Tracking Only Mode while using the non-stimulation contacts to
track only without training features.
• A new history file will begin recording when the Tracking Only Mode is
turned on.
Offline Map Data Usage
Turn Offline Map Data on to use cellular data when available with Offline maps.
Turn Offline Map Data off to restrict data usage and only display downloaded
Offline Maps.
74
Page 75
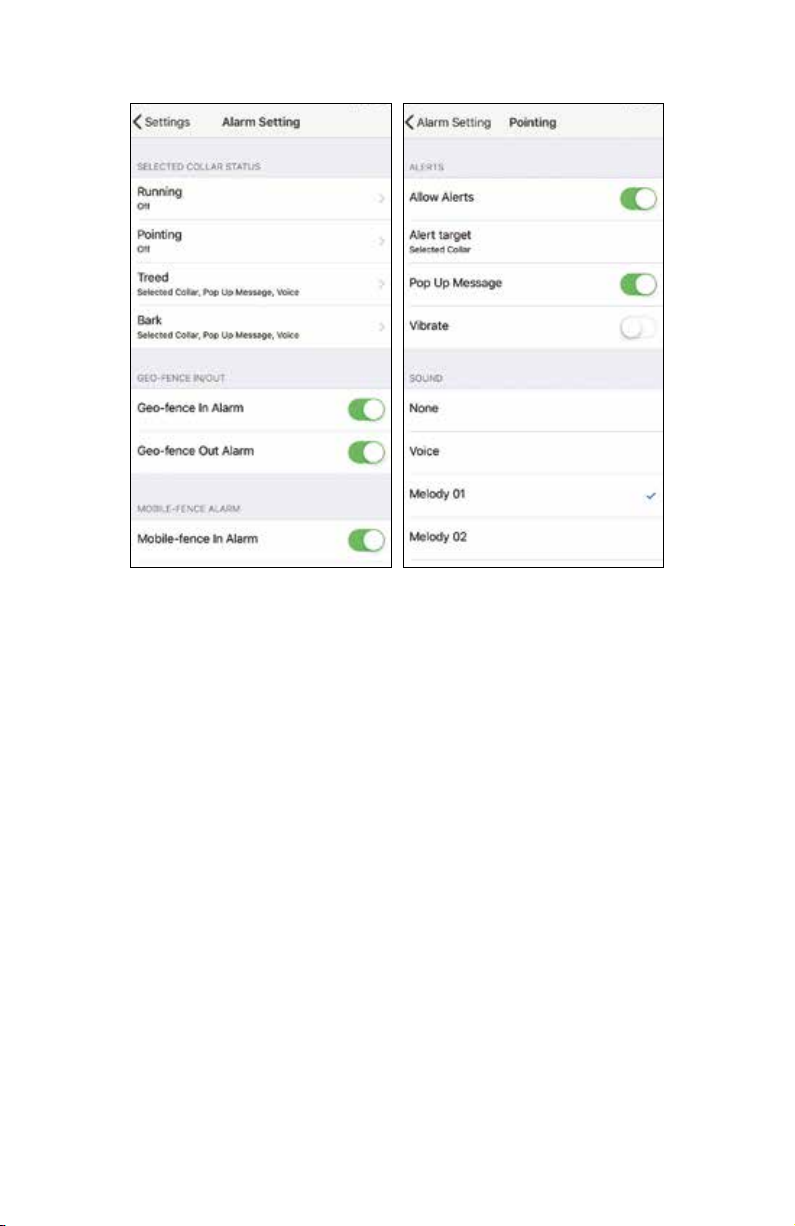
Alarm Setting
Selected Collar Status
• Set the alert type for dog status changes.
• Separate alert types can be set for each dog status.
• Selected Collar: if you select a receiver, the alarm will sound for that receiver.
• All Collars: if you do not select a receiver, the alarm will sound for all receivers.
• The options for alerts are pop up, vibration, and sound, which can be turned
on and off.
• Sound alerts include 5 melody options and voice.
Allow Alerts
• Turning off Allow Alerts disables all alerts for the dog status.
• Pop Up Message displays a pop up notification alert.
• Vibrate is a phone vibration alert.
• Sound alerts include 5 melody options and voice. Turn off sound alerts by
selecting none.
75
Page 76
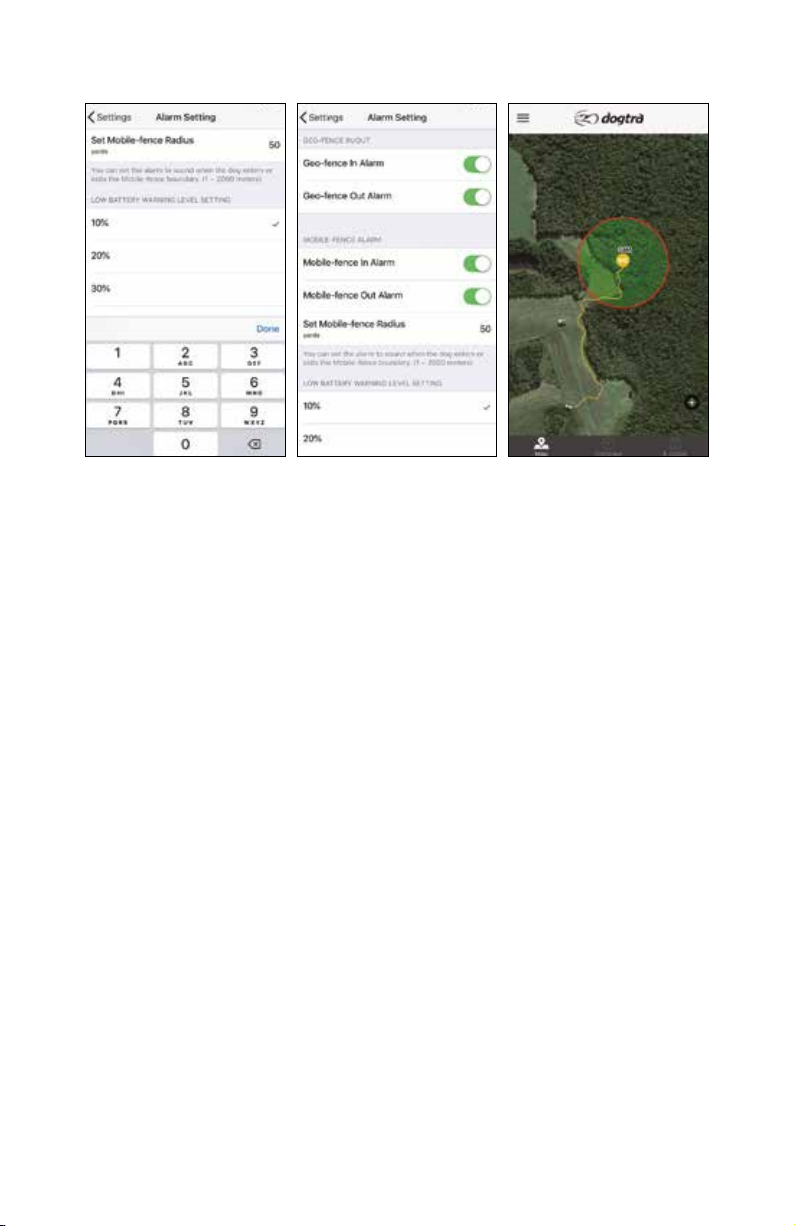
Mobile-Fence Alarm
The Mobile-fence alarm alerts the user when a dog enters or leaves the preset
radius, which can be set to 1 to 2,000 yards or meters. The Mobile-fence alarm
will use the same alarm as the Geo-fence.
Geo-fence In/Out
• Turn on/off alerts used with a saved Geo-fence.
Low Battery Warning Level Setting
• The battery warning changes the device icon and displays a notification when
the device battery reaches the battery percentage selected.
Bluetooth Pairing
• Begin pairing mode on the phone to pair with the GPS connector. Use the
pairing mode to pair with a new or replacement GPS connector.
76
Page 77

BASIC MAINTENANCE
• Make sure the rubber charging cap is securely in place on the GPS connector
or receiver when in use.
• Carefully inspect the unit for any missing parts or damage to the casing after
use. Damaged or broken casing may affect the waterproof guarantee on
the unit.
• The antenna must be securely in place for maximum range.
• Charge the unit for 3.5 hours before storing for extended periods.
• Charge the unit fully once a month while in storage or before use.
• Do not keep the unit exposed to extreme climates.
• Dogtra may include updates and improvements to the PATHFINDER app which
can be downloaded through the App Store and Google Play.
77
Page 78

TROUBLESHOOTING GUIDE
1. The dog does not respond to the stimulation.
- Make sure the system is turned on.
- Make sure the strap is on the dog tight enough so that both contact points are
touching your dog’s skin.
- The contact points may be too short for your dog’s thick or long coat. To place
an order for longer contact points, please contact Dogtra or a Dogtra dealer.
If you are already using longer contact points, you may need to trim the hair
on your dog’s neck so that both contact points are touching your dog’s skin.
- The intensity level may be too low for your dog. Increase the stimulation until
your dog responds, usually by a neck movement, head shaking, or looking
over the shoulders. The response may be very subtle.
2. The LED indicator light comes on, but I do not feel any stimulation.
- Testing the system at various levels using the test light is the best way to test
your system. Your tolerance may be higher than the level you are testing
yourself.
- The battery may be low. Check the LED indicator lights or the app for
battery life.
3. The PATHFINDER has no range or the stimulation is weaker when my dog is
farther away.
- Check to see if your fingers are touching the antenna as the range may
decrease substantially.
- Keep objects away from touching the GPS connector's antenna as the range
may decrease substantially.
- The range indicated is for line-of-sight flat terrain. Heavy brush, trees, hills,
buildings, and/or moisture will affect the range of your unit. For the best
range, hold the GPS connector vertically above your head, and/or try moving
to higher ground.
- Any electrical conductors will affect the range, such as cars, chain-link dog
runs, metal structures, and radio towers. For the best results, operate away
from these structures.
4. The GPS connector or receiver is not holding a charge.
- The charging pin may be damaged. A metal pin inside the charging port
should stand straight up and firm in the center. If the pin is wobbly, broken or
missing, you will need to send the unit in for repair.
- The charging port must be clean prior to charging, clean out any dirt with a
cotton swab and some rubbing alcohol. If your dog was in salt-water, be sure
to rinse the GPS receiver and charging port with clean water.
- For Dogtra units over two years old from the purchase date, the batteries may
need to be replaced. You can replace them yourself by contacting Dogtra
for a replacement battery. Damages incurred to the unit due to improper
battery installations are not covered under the warranty. Dogtra strongly
recommends sending the unit in for inspection and repair.
78
Page 79

5. My dog has skin irritation.
- This may be due to an improper fit or from wearing the receiver too long. If
your dog exhibits signs of skin irritation, consult with a veterinarian. Once
your dog’s skin returns to a normal condition, continue to use the receiver and
check your dog’s neck each time you use the unit.
FCC WARNING
The PATHFINDER complies with part 15 of the FCC Rules. Operation is subject to
the following two conditions:
(1) This device may not cause harmful interference, and
(2) This device must accept any interference received,
including interference that may cause undesired operation.
This is a sensitive radio device. Any unauthorized changes or modifications to
this device that are not expressly approved by Dogtra will void the warranty and
may void the user's authority to operate the equipment.
Please do not tamper or modify the unit.
Radio Frequency Radiation Exposure
This device is a mobile transmitter and receiver that uses an external antenna
to send and receive low levels of radio frequency (RF) energy for data
communications. The device emits RF energy below the published limits
when operating in its maximum output power mode and when used with
Dogtra Co. authorized accessories. To comply with RF exposure compliance
requirements, the device should be installed and operated with a minimum of
0.2m between the device and your body. The device should not be used in other
configurations. This device must not be co-located or operated in conjunction
with any other transmitter or antenna.
It has been tested and found to comply with RCM standards.
79
Page 80

DOGTRA EXTENDED PRODUCT WARRANTY
EXTENDED LIMITED WARRANTY
For Certain Dogtra Products Purchased from Dogtra Authorized Dealers
1+1 Year Extended Warranty
Except as otherwise provided, Dogtra warrants to the original retail purchaser
(“You”) that your Dogtra product shall be free of defects in materials and
workmanship for a period of one (1) year from the date of purchase (“Original
Warranty”). As a special promotion, Dogtra further warrants that your Dogtra
product shall be free of defects in materials and workmanship for an additional
one (1) year from the date that your original warranty expires (“Extended
Warranty”). The Original and Extended Warranties cover the cost of repair
(parts and labor) or replacement (if repair is not feasible) of a defective Dogtra
product during said warranty periods. For such repaired or replaced products,
the remaining portion of the warranty periods, or ninety (90) days, whichever
is longer, shall apply. Dogtra, at its sole discretion, shall determine whether
to repair or replace a product covered by the Original Warranty or Extended
Warranty.
Warranty Conditions
The Original and Extended Warranties are not transferrable and apply to your
Dogtra product only if:
(1) You are the original retail purchaser of the product,
(2) You bought the product from a Dogtra Authorized Dealer, and
(3) You present a receipt or other proof of purchase showing a valid purchase
date, the name and address of the Dogtra Authorized Dealer, and the
purchased product identified by model and/or serial number.
Warranty Exclusions
The Original and Extended Warranties do not cover damage, loss, or
deterioration to your Dogtra product caused: by misuse, neglect, abuse, or other
improper handling of the product; by failure to follow use or care instructions;
by use of the product for other than its intended purpose; by accident or natural
forces such as fire or flooding; or by normal wear and tear such as scratches to
the product surface.
The Original and Extended Warranties also do not cover Dogtra products that:
are purchased from non-authorized dealers; are purchased outside of the United
States or Canada; have been damaged during shipment (even if Dogtra paid or
arranged for shipping); have been modified or tampered with in any manner;
are opened or repaired by anyone other than Dogtra; or have serial numbers
that have been altered or defaced.
80
Page 81

Sole Warranties
The Original and Extended Warranties are the only warranties offered by Dogtra
for your Dogtra product during said warranty periods. Other than the Original
and Extended Warranties, Dogtra makes no other representations or warranties
whatsoever regarding its products, whether oral or in any product manual, on
any packaging, on any website, or in any other written material. No dealer of
Dogtra products, nor any employee or agent of Dogtra, is authorized to make
any additions, changes, or extensions to the Original Warranty or Extended
Warranty. Dogtra, at its sole discretion and at any time, reserves the right to
modify the Original and/or Extended Warranties.
DISCLAIMER OF OTHER WARRANTIES
THE FOREGOING ORIGINAL AND EXTENDED WARRANTIES ARE PROVIDED
IN LIEU OF ALL OTHER WARRANTIES, WHETHER EXPRESS OR IMPLIED.
DOGTRA DISCLAIMS ANY IMPLIED WARRANTIES INCLUDING, BUT NOT
LIMITED TO, THE IMPLIED WARRANTIES OF MERCHANTABILITY AND FITNESS
FOR A PARTICULAR PURPOSE.
Limitation of Remedies
Dogtra’s liability is limited to the cost of repair or replacement of the Dogtra
product under the Original Warranty or Extended Warranty. Any claim or action
to enforce the Original and/or Extended Warranties must be commenced within
thirty (30) days of such warranty’s expiration for your product. Dogtra will not
be liable for any indirect, incidental, special, consequential, or similar damages
based on breach of warranty, breach of contract, negligence, strict tort, or any
other legal theory related to Dogtra and its products. Damages that Dogtra will
not be responsible for include, but are not limited to: loss of income or profits;
loss of revenue or savings; loss of use of the product or associated products;
cost of any substitute products or services; inconvenience, downtime, or any
other time; loss of goodwill; claims of third parties including customers; and
damage to property.
81
Page 82

Legal Rights May Vary By State or Jurisdiction
The Original and Extended Warranties give You specific legal rights, and You
may also have other rights which vary by state or jurisdiction. Some states
or jurisdictions do not allow certain limitations of implied warranties or of
incidental or consequential damages or other remedies, so certain of the
foregoing limitations may not apply to You.
If any portion of the Original Warranty or Extended Warranty is held by a court
to be invalid or unenforceable, the remaining portions of such warranties shall
remain in full force and effect and shall in no way be affected or invalidated,
and the invalid or unenforceable portion shall be modified so as to most nearly
achieve the intent of the Original Warranty or Extended Warranty.
Product Registration
Dogtra recommends that customers register their products as soon as possible
after purchase. Product registration will facilitate any future warranty service.
You may also receive useful information and updates about your existing
and future Dogtra products. To register your product, visit www.dogtra.com/
product-registration. If your product is not registered with Dogtra, You will be
required to provide a receipt or other proof purchase (as provided above) to
qualify for warranty service.
How to Obtain Warranty Service
Should your Dogtra product require warranty service, please contact Customer
Service by phone or email for a warranty evaluation (see below for contact
information). Upon approval of your warranty work, Dogtra will repair or
replace (at Dogtra’s election) your product without charge for labor or parts.
You are responsible for shipping, including cost, of your product to Dogtra for
warranty service. Dogtra will handle shipping, including cost, of the repaired or
replaced product back to customers in the USA. Dogtra will not be responsible
for shipping, including cost and/or applicable taxes or fees, for products sent
outside the USA. Such costs, taxes, or fees will be borne by the customer.
Dogtra Customer Service
12322 Monarch Street, Garden Grove, CA 92841
(888) 811-9111
[email protected]
Mon – Fri, 8:00 AM to 4:30 PM (PST)
© 2020 Dogtra. All rights reserved.
82
 Loading...