

PAS Systems International PAS Vr. Alcohol Screening & Verification System Instruction Manual

PAS Vr.
Alcohol Screening & Verification Unit
INSTRUCTION MANUAL
** Law Enforcement Version **
PAS Systems International, Inc.
215 Southport Dr. Suite 400
Morrisville, NC 27560
www.pasintl.com
(800) 660-SNIF · (540) 372-3431
Copyright© 2010 by PAS Systems International Inc., All Rights Reserved
!!! ATTENTION !!!
PLEASE READ


CONTENTS
Introduction 1
Law Enforcement, Schools, Industry 2
How the PAS Vr. Works 3
Basic Features 4
At A Glance Display 5
Initializing 6
Alcohol Screening & Verification 7
Active Breath Sampling 7
Passive Breath Sampling 9
Alternative Method of Sampling 11
Interpreting the Display 12
Low Temperature Operation 13
Detecting Alcohol in Open Containers 13
Clearing Overloads 14
Other Applications 15
Common Questions 16
Hints and Tips 18
Technical Specifications 19
Accessories 19
Quality Assurance Plan 20
Equipment Required for Checking PAS Vr. 21
Instructions for Using Alcohol/Breath Simulator 22
Readying the PAS Vr. for Testing 23
Sensitivity Checking/Testing 24
Calibration Procedure 25
PAS Vr. Calibration (Active/Direct Mode) 26
PAS Vr. Calibration (Passive Mode) 28
PAS Vr. Calibration (Dry Gas) 29
Record Keeping 32
Return, Service & Warranty 33
Bibliography 34


INTRODUCTION
The PAS Vr. Alcohol Screening and Verification System is an advanced portable breath alcohol tester
(PBT) that features both passive alcohol screening and direct measurements with the flip of a switch.
This hand-held analyzer provides both color coded LED's and numeric readout. Individuals who have
been trained in the administration of alcohol screening devices recommend this product.
The PAS Vr. is used to check breath alcohol levels with or without a subject's direct participation or
cooperation. When used without the subject's direct participation it's known as passive breath sampling,
as opposed to active or direct testing where the subject blows directly into a mouthpiece or the intake
port. The PAS Vr. can also be used to detect alcohol from open containers, or to detect low levels of
alcohol in enclosed spaces such as vehicles, lockers or classrooms. The PAS Vr. functions as an
"extension of the operator's nose."
The operator controlled sampling system with mouthpiece guarantees a precise and tamper proof
measurement of the breath sample. The PAS Vr. is especially suited for quick subsequent
measurements.
Testing for Alcohol
The common testing medium for drugs is urine, but using a urine sample for quantitative analysis to
determine a blood alcohol level is not defensible without rigid adherence to complex test procedures.
Blood and urine sample results are available only after a forensic laboratory analysis has been
completed. This can take hours or weeks at a substantial cost. A breath test offers important advantages
by providing immediate results at a cost of pennies per sample. Whether breath tests are used for
screening or evidential purposes, breath alcohol testing offers an accurate, simple, and non-invasive
testing alternative.
A breath sample is easy to obtain, takes less than a minute to analyze, and with proper instrumentation
and training, produces evidentially acceptable results. The procedure is sanitary and inexpensive using
a disposable mouthpiece. Or, alternatively simply "sniffing" (screening) for the presence of alcohol
initially by passive sampling, followed by a more exacting measurement using a disposable mouthpiece.
The American Medical Association has demonstrated that a blood alcohol concentration (BAC) of .04
percent impairs an individual to some degree. Impairment can occur at even lower levels in some
individuals. As a result, industries that test for alcohol have chosen to use either .04 or zero BrAC as
maximum acceptable levels in the workplace. In Zero Tolerance states, anyone under the age of 21
caught driving with any amount of alcohol is considered illegal. In correctional institutions and prisons no
alcohol is allowed so instrumentation that can quickly and accurately sample inmates, staff, visitors and
enclosed spaces for alcohol can be invaluable.
1

Based on extensive experience with law enforcement agencies, corporations and correctional
institutions, it has been found that no single type of instrument can fill every need. As a result, PAS
Systems has developed alcohol analyzers that meet specific requirements.
Law Enforcement and Corrections
The PAS Vr. is designed specifically for use by law enforcement, correctional officers, security
personnel, and school officials. It can be operated with one hand, leaving the other completely free. The
instrument is easy to use, and has been designed to withstand the physical conditions experienced in
operational situations. It is resistant to adverse weather conditions and mechanical shocks.
Industry
The PAS Vr. has been used very successfully as an alcohol deterrent in industry. When used as a rapid
screening device to detect alcohol in human breath, the PAS Vr. will help you decide whether to use an
evidential breath tester (EBT) in individual employee cases. The PAS Vr. is designed for industry and
transportation agencies and complies with the U.S. Department of Transportation requirements for
workplace testing regulations according to 49 CFR, Part 40.
Individuals who have been trained in the administration of screening devices recommend the PAS Vr.
Careful review of this manual will prepare and qualify you for using the PAS Vr. as a reliable and precise
procedure in the testing of employees for the presence of breath alcohol.
Zero Tolerance
The U. S. Department of Transportation’s National Highway Traffic Safety Administration (NHTSA)
encourages states to enact zero tolerance laws designed to reduce drinking and driving among younger
drivers. Such laws should: (a) establish that any measurable amount (.02 maximum) of alcohol in the
blood, breath, or urine of a driver under the age of 21 would be an “illegal per se” offense; (b) provide for
immediate driver license suspension periods for those under 21 who exceed the applicable breath
alcohol concentration (BrAC) limit.
However, many other situations call for zero tolerance of alcohol. For example, in any correctional
institution alcohol is not allowed, inmate work release programs, in-home incarceration programs,
parolees, and in schools. In drug and alcohol treatment centers and counseling activities, alcohol
consumption must be prohibited and monitored.
The PAS Vr. used in the passive alcohol detection mode is a safe, cost-effective, and reliable method for
all such applications.
Further guidance, training, or questions regarding this precision instrument system, or its use in
screening subjects for the presence of breath alcohol can be obtained by calling 800-660-SNIF.
2

How the PAS Vr. Works
When you use the PAS Vr., a small pump draws a breath sample through an
electrochemical sensor (fuel cell) that generates a small electrical current in the presence
of alcohol vapor. This current is amplified electronically and used to drive a multicolored
bar graph and numeric display. The number of bars lit in the display indicated the
alcohol concentration in the breath sample. The proprietary sensor provides high
precision, short analysis time, and long-term stability. Only true alcohol content is
recorded even when exposed to other breath interfering substances, for example,
acetone.
The PAS Vr. is powered by a 9-volt alkaline battery.
We want you to get the best possible results from your PAS Vr. Please take the time to
study this manual and to practice using the instrument before using it on patrol, in your
company’s U.S. Department of Transportation (DOT) Alcohol Misuse and Prevention
Program, or Zero - Tolerance program.
3
PAS Vr.
BASIC FEATURES
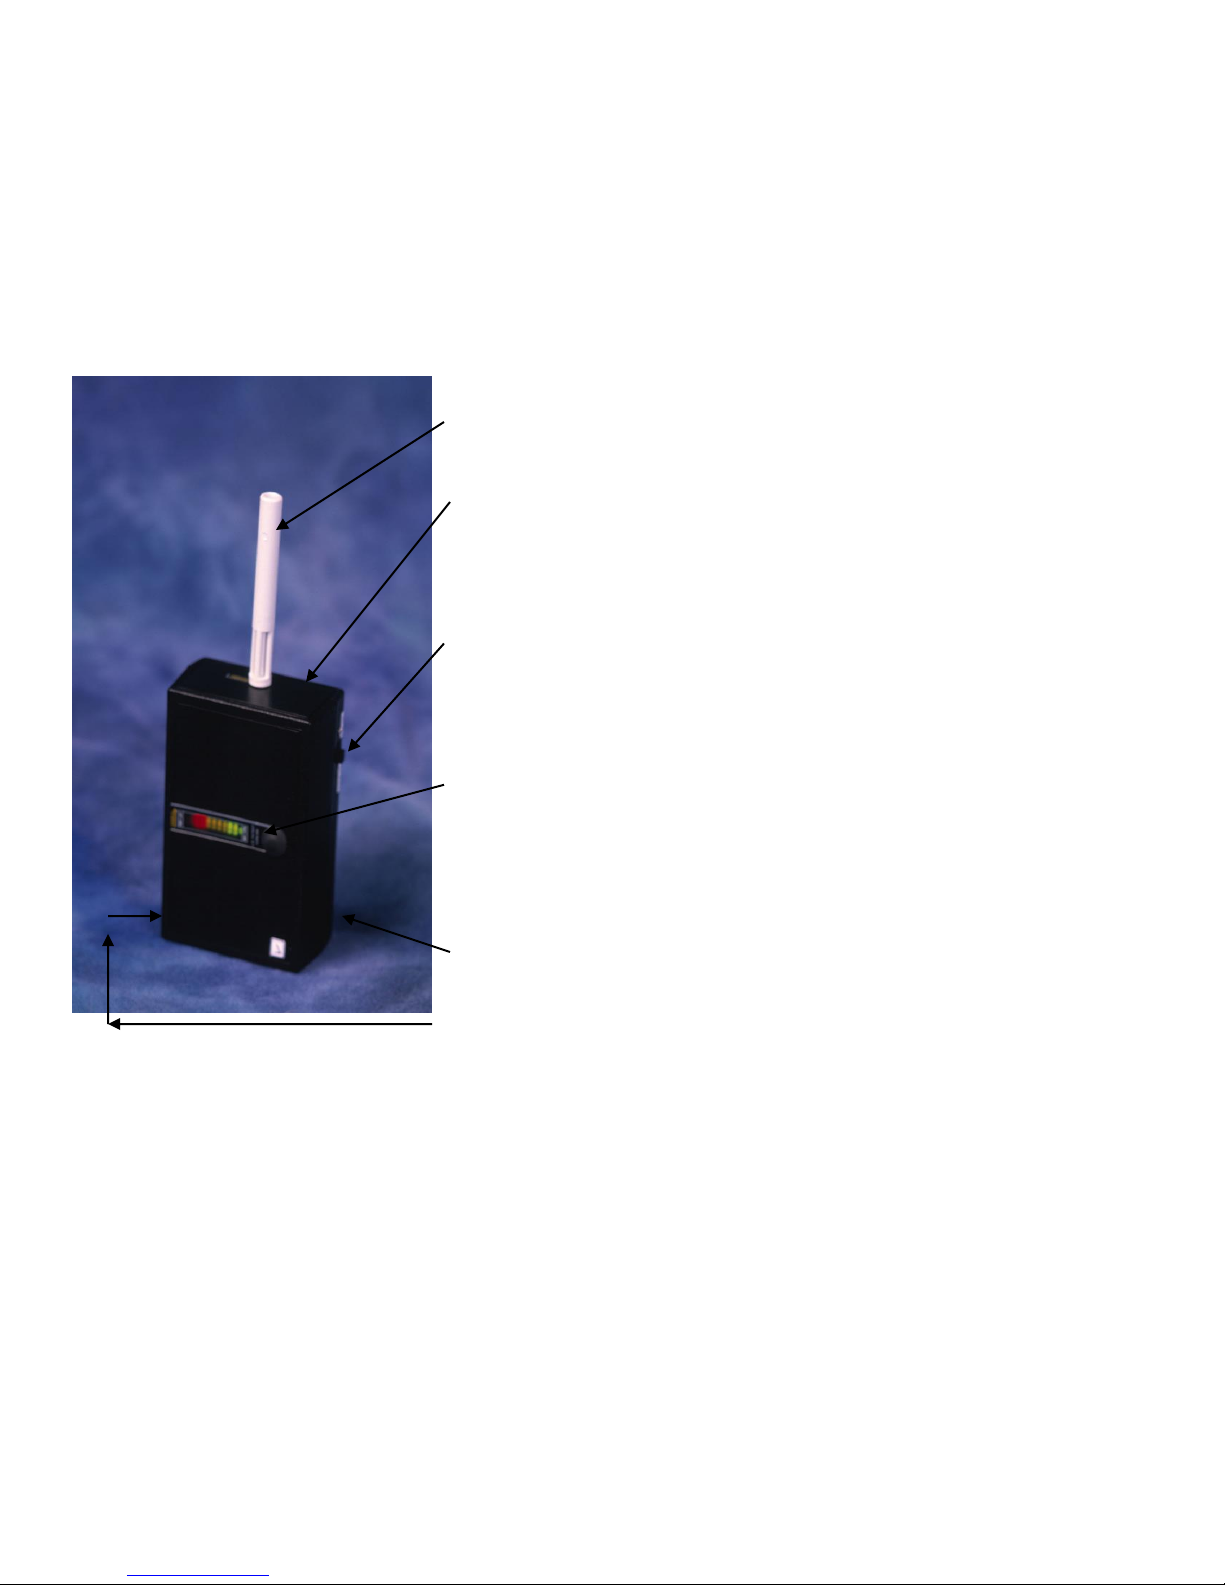
Proceeding from top to bottom in the diagram below, the components of the PAS Vr. are:
Disposable Disposable mouthpieces supplied
Mouthpiece for active breath testing (BrAC).
Sampling Ports Two small holes let the air sample
pass through the PAS Vr. The inlet
port is on the top, and the outlet
port is on the backside of the unit.
Sampling The testing mode switch controls
Mode Switch the passive (PAS ON) testing
function or the active/direct (AS
ON with mouthpiece) settings.
Bar Graph Nine rectangular LED lamps give
with Numeric an indication of the alcohol level in
Display the air sample. The display is color
coded for easy reading at night
(see pg 12) with numeric display.
Control Button The single push button controls the
sensor and sample pump.
Power Switch Switch controls battery power to
the PAS Vr.
Battery The PAS Vr. uses a 9-Volt alkaline
Battery.
4
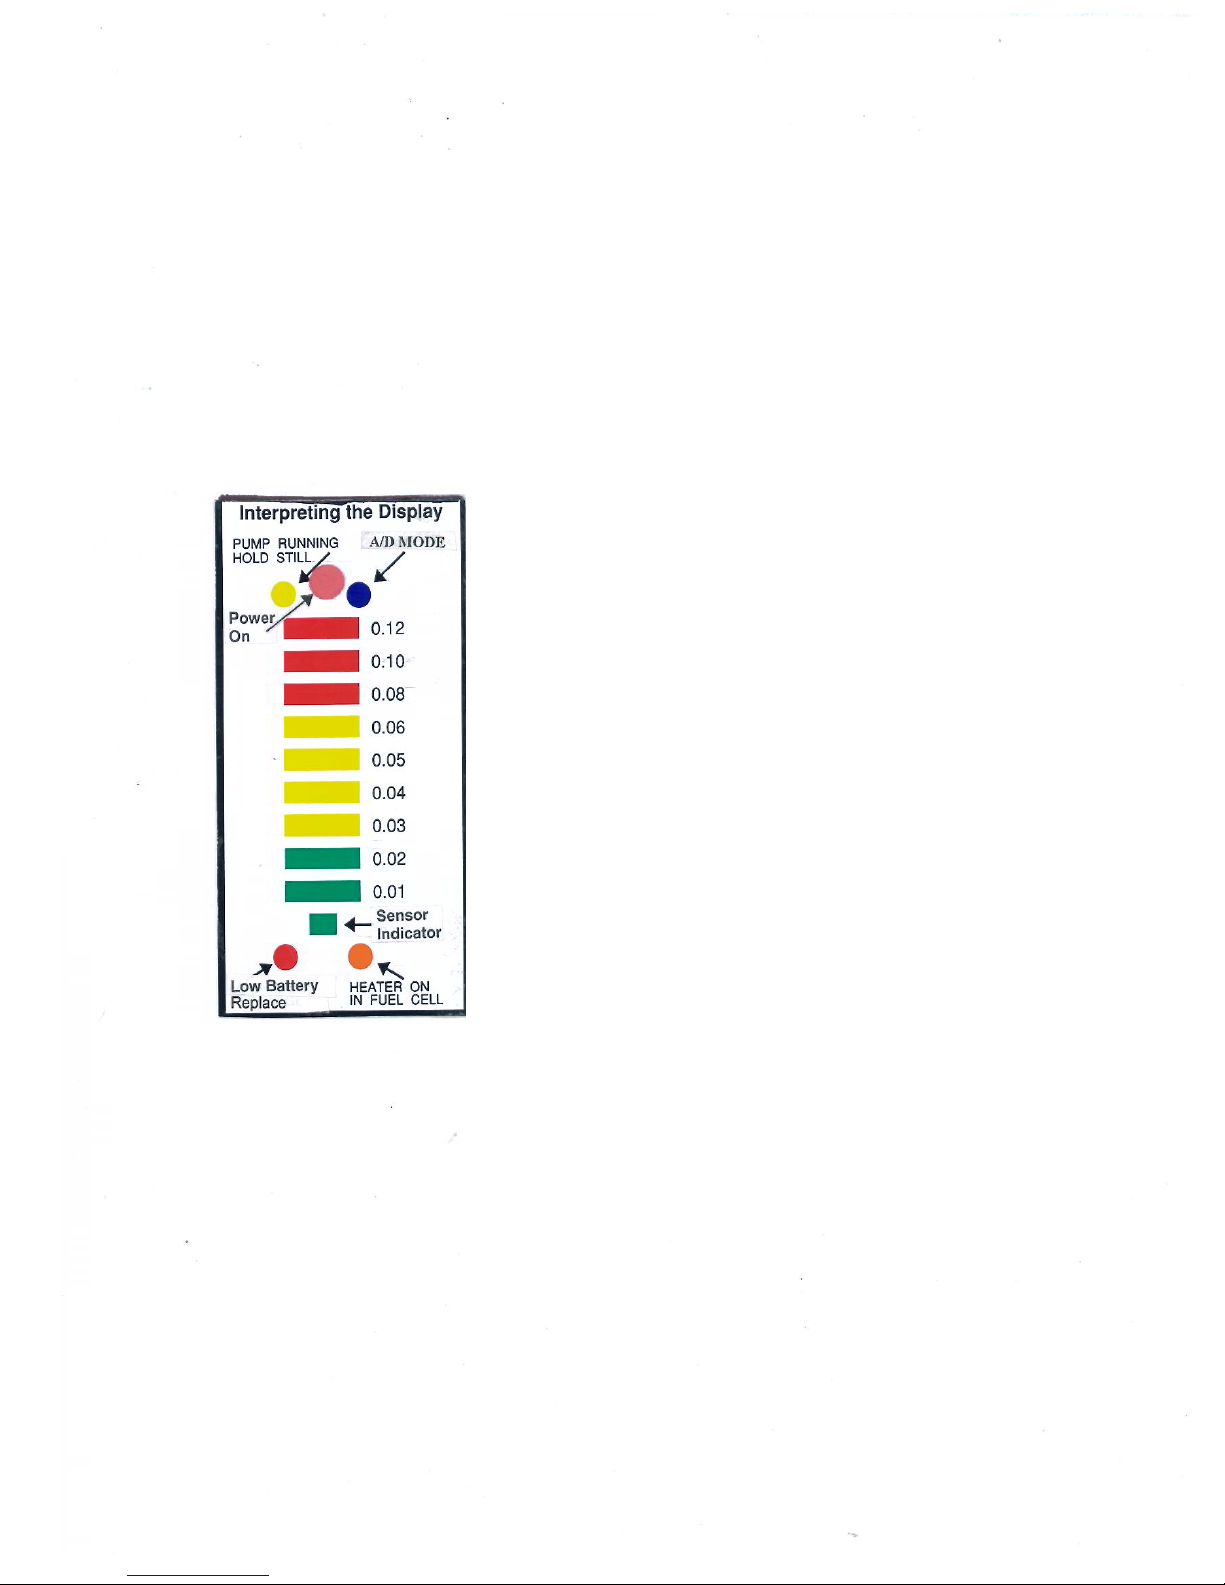
AT-A-GLANCE DISPLAY
The PAS Vr. provides 6 indicator lamps located above and below the bar-graph display
(see diagram below). These lamps provide useful feedback when using the PAS Vr.
Sample Pump Indicator
Power On Indicator
A/D Mode
Sensor Indicator
Low Battery Lamp
Heater Indicator
The yellow PMP lamp indicates
when the PAS is taking an air or
breath sample. It comes on for
a few seconds at the beginning
of each alcohol measurement
cycle.
Controls battery current to the
unit indicated by the red lamp at
the top center of display.
The flashing green ACT lamp
indicates the active/direct-
testing (AS) mode is on. If this
lamp is on, you must use a
disposable mouthpiece.
The green LED Lamp indicates
the power to the PAS Vr. is ON.
The red BAT lamp flashes once
a second when the battery is
almost discharged and ready
for replacement.
The orange HTR lamp comes
on when the fuel cell heater is
on. The heater auto-cycles on
and off to maintain an optimum
fuel cell temperature at 104°F
(40°C) +/- 5°

INITIALIZING
After receiving your PAS Vr. it is important to follow these steps:
[1] Install Battery Unpack all the parts shipped with your PAS Vr. Remove
the battery cover and check for a single 9-volt battery.
Install if needed and replace the battery cover.
[2] Turn System On Slide the power switch to the "on" position (on left side of
device). The red lamp should appear at the top/center of
the display. Wait two (2) minutes for unit to initialize.
[3] Heater The heater automatically comes on whenever the system is
on. The orange heater lamp should appear (lower right
corner of display). Wait about two (2) minutes or until the
heater lamp cycles off. The fuel cell heater cycles on and
off as necessary.
[4] Activate Sensor Press, or tap, the black switch button and release
immediately. A small green bar lamp should appear at the
bottom of the display. No other bars should light. A yellow
pump light will appear at top left of display. After 4-5
seconds the pump light will automatically turn off.
The system check is now complete and you are now ready to practice the procedures
explained in this manual.
CAUTION! : Many hand lotions, body creams, perfumes, and colognes, etc. contain
large amounts of alcohol. Whenever those containers are opened or lotion is used, large
amounts of alcohol may be released into the air. If you take samples of air using the
passive test mode, you may detect this ambient alcohol. To eliminate this problem, you
must clear the air with fresh (alcohol free) air or leave that particular area to get reliable
test results.
6

PAS Vr. ALCOHOL SCREENING & VERIFICATION SYSTEM
INSTRUCTIONS
The PAS Vr. is a hand-held breath alcohol-measuring instrument intended for use as an alcoholscreening device to detect deep lung alcohol in human breath when used with the mouthpiece, and no
mouth alcohol is present. Although the PAS Vr. is simple to operate, it is important that the
following procedure is complied with in the order given each time a breath test is run.
ACTIVE /DIRECT BREATH SAMPLING
(Mouthpiece Required)
Step 1: Power On Power on the PAS Vr. a minute or two before you plan to test. The
power-on switch will automatically activate the fuel cell heater to
ensure the unit responds quickly to alcohol. The orange HTR lamp
will cycle on and off as the thermostat regulates the fuel cell
temperature (see page 13).
Step 2: Battery Check Check that the red low-battery (BAT) lamp is not flashing. If it is, the
battery should be replaced before using the PAS Vr.
Step 3: Zero Check If you are unsure if the fuel cell has recovered from the previous
sample, check a sample of alcohol-free air and verify that no bars
light up in the display. Observe for about 15-20 seconds. If bars do
light up, wait a minute, then try again. In severe cases, refer to the
section on Overload Recovery on page 14.
Step 4: Subject Testing Set sampling mode switch to active mode (AS ON); (green ACT light
will flash). Securely insert a "new" disposable mouthpiece into the
intake port of the PAS Vr. Insert the opposite end into the mouth of
the subject. Have subject take a deep breath - hold - and slowly but
steadily exhale into the mouthpiece. As the subject exhales, tap and
release the black switch button. A green LED will appear at the
bottom of the display and the yellow pump light in the left upper
corner comes on as the breath sample is collected. (SEE NOTE PAGE 8)
Step 5: Peak Reading After the yellow pump light goes out you may remove the PAS Vr.
mouthpiece from the mouth of the subject to observe the display.
The pump draws air through the fuel cell for about 5 seconds. If there
is alcohol present the bars in the main display will start lighting up,
with a peak reading within 15 seconds or less.
7

Step 6: PAS Vr. Off After noting/recording the peak reading, press the control button
again and release it immediately. The main display will turn off, and
the fuel cell will recover. Remove and dispose of the mouthpiece.
Step 7: Power Off Turn power switch to the “off” position to conserve the battery
when the system is not in use for extended periods, e.g.,
overnight, weekends, etc.
Step 8: Record Results Record results into a suitable log; note the number of bars or the
numeric value (express results in terms of weight of alcohol (gm) per
volume of breath (liters)) of the bar-graph that light up, if any. If no
bars light up record "Negative for Detectable Levels of Breath
Alcohol" and have the subject initial the recorded results. If bars
light up indicating the concentration of alcohol, the employee if in the
commercial transportation industry must be given an Evidential
Breath Test (EBT) using a NHTSA/ D.O.T. approved EBT device.
Follow the manufacturer’s instructions and D.O.T approved
procedures (49CFR Part 40) for conducting the EBT.
Note: Give the subject exact instructions as to what he/she is required to do in order to provide a
suitable sample of breath for analysis. Tell the subject that he/she must fill his/her lungs and then blow
slowly but firmly, and continue to blow until you tell him/her to stop. Finally, tell the subject to keep
his/her hands down away from the instrument.
ATTACH MOUTHPIECE
Take a new PAS Vr. mouthpiece and check that the packaging is still intact. IMPORTANT! Use only
the PAS Vr. mouthpieces; these are designed and produced for PAS Systems. Do Not
Substitute! It is important the mouthpiece is attached to the instrument in such a way that your fingers
do not touch the actual blowing end, otherwise the subject may refuse to take it into his or her mouth on
the grounds of alleged lack of hygiene. Hold the mouthpiece, through the wrapper, between the thumb
and forefinger around the blowing end and peel or force the mouthpiece through the wrapper so as to
expose the small tip and about half of the barrel. Insert the tip into the sampling port on the right side of
the PAS Vr. instrument, then firmly seat. The mouthpiece body should fit positively into place and stay.
Having attached the mouthpiece, finally remove the wrapper from the blowing end, and dispose of it
properly. You may wish to retain the wrapper to remove the mouthpiece once the test is complete, and
dispose of the two items together, or you may ask the subject to remove their own mouthpiece by pulling
straight out.

(No Mouthpiece Required)
Step 1: Power On Power on the PAS Vr. a minute or so before you plan to test.
(INITIALIZE) The orange HTR lamp will cycle on and off as the thermostat
regulates the fuel cell temperature.
Step 2: Battery Check Check that the red low-battery (BAT) lamp is not flashing. If it is, the
battery should be replaced before using the PAS Vr.
Step 3: Zero Check If you are unsure if the fuel cell has recovered from the previous
(AIR BLANK) sample, check a sample of alcohol-free air and verify that no bars
light up in the display. Observe for about 15-20 seconds. If bars do
light up, wait a minute, then try again. In severe cases refer to the
section on Overload Recovery on page 14.
Step 4: Set Mode Set sampling mode switch to the Passive setting (PAS ON) (See
switch on right side of instrument).
Step 5: Subject Testing Have subject talk (recite alphabet, recite name, address,
telephone number, etc.) or gently blow. Hold the device about 5-7
inches in front of the subject’s mouth. As subject is talking or
blowing, tap and release the sensor control switch. A green LED will
appear at the bottom of the display and the yellow pump light in the
left upper corner comes on as the breath sample is collected (approx.
4-5 seconds). If alcohol is present the bar-graph display will begin to
light up within a few seconds.
Step 6: Peak Reading After the yellow light goes out you may remove the device from the
breath stream. Observe the bar-graph display for 5-15 seconds. If
there is alcohol present, the bars in the main display will start
lighting up with a peak reading within about 2-10 seconds. If bars
light up record the number of bars that light indicating the
approximate concentration of breath alcohol (BrAC).
Step 7: PAS Vr. Off After noting/recording the peak reading, press the control
button again and release it immediately. The Sensor main display
will turn off, and the fuel cell will recover. Always turn the PAS
Sensor off after recording the reading.
9

PASSIVE BREATH SAMPLING
(Continued)
when the system is not in use for extended periods (overnight,
weekends, etc.).
Step 9: Record Result Record results into a suitable log, record the number of bars that light
up, if any. If no bars on the graph light up record "Negative for
Detectable Levels of Breath Alcohol" and have the subject initial the
recorded results.
alcohol sources may be from hand and body lotions, anti-bacterial lotions and creams,
mouthwashes, perfumes, colognes, etc. Check Labels. Perform testing in areas away
from such materials. Freshly applied hand creams and lotions may emit large amounts of
alcohol into the air. Certain cleaning solutions may also contain alcohol.
Remember 3 Key principals (DDT) for accurate passive sampling:
Distance: 5-7 inches
Direction: Point intake port towards persons mouth
Talking: Have person talk while sampling pump is running
REMEMBER "DDT"
10

ALTERNATIVE METHOD OF SAMPLING
ZERO TOLERANCE TESTING
Using the PAS Vr. for reliable confirmation of the absence of alcohol (no alcohol) may
best be obtained by:
Step 1: Instruct the subject to take a deep breath and exhale slowly
for about 5-10 seconds.
Step 2: As the subject is exhaling place the sample port
approximately 6 inches from the subject's mouth and tap
and release the sensor control switch to activate the sensor
and sampling pump.
Step 3: Hold the PAS Vr. directly in the breath stream until the
yellow sampling pump goes out.
Step 4: Observe the bar-graph display for approximately 15
seconds or less and record the number of bars that light up
indicating the approximate concentration of breath alcohol
(BrAC).
Step 5: If no bars light up, the subject is likely free of breath/lung
alcohol. Further confirmation can be made by using the
active/direct setting with a mouthpiece.
11


Low Temperature Operation
At low temperatures, fuel cells take longer to reach their peak readings of alcohol level. They also take
longer to recover from each positive sample before you can take another. To overcome this problem,
your PAS Vr. includes a thermostatically controlled heater which maintains the fuel cell temperature at
104°F (40°C).
The heater comes on automatically when the power switch is on. The fuel cell reaches its operating
temperature within a few minutes, although the exact time obviously depends on how cold it is to start
with. The orange HTR indicator cycles on and off as the thermostat regulates the fuel cell temperature.
The sensitivity of the fuel cell is not affected much by temperature. A cold unit will work just fine---it's
simply slower to respond and recover. You do not have to wait for the fuel cell to warm up.
Detecting Alcohol in Open Containers
Under suitable conditions, the PAS Vr. will detect alcohol in open containers, in vehicles, lockers and
other enclosed spaces. Please refer to the section on Enclosed Spaces for further details. (page 15).
CAUTION! BEVERAGE SAMPLING: Be aware that certain citrus-based beverages have been
reported to give a positive reaction when sampled with a Passive Alcohol Sensor.
For Example: Citrus-Based beverages such as Mountain Dew, Mello Yello, Code Red, etc., may give
positive readings. It’s not clear if these beverages are in fact fermenting and producing low levels of
alcohol, or if certain ingredients are reacting chemically with the electrochemical fuel cell in some
manner to provide a positive reading.
To minimize confusion, always retest subjects (individuals) about 15 minutes after an initial positive
reading to verify true alcohol presence and not the result of residual mouth alcohol from these types of
beverages. However, individuals may “spike” these drinks to cover up their actual alcohol consumption.
Wait 15 minutes and retest the subject (follow sampling instructions on page 9) to verify if they are
abusing alcohol.
Further, always conduct an “air blank” between samplings to ensure the fuel cell sensor is clear of any
residual alcohol carried over from the prior sample. “Air Blanks” are done by simply activating the pump
and processing a sample of alcohol-free ambient air. Observe the display for approximately 20 seconds
after the sample pump has stopped. If no bars light up you may assume the sensor is free of any carry-
over and you may proceed with sampling the next subject (individual). See the section on “Clearing
Overloads” for additional information.
13

Clearing Overloads
If your PAS Vr. is overloaded, it will take a few minutes to recover. Here is the
procedure for rapid fuel cell recovery:
[1] PAS Sensor Off/Power On Turn off the sensor by tapping and releasing the
black sensor switch button but leave the power
switch “ON” to speed recovery.
[2] Check in 5 Minutes After 5 minutes, turn the sensor back on and check
the PAS Vr. with an alcohol-free air sample. If bars
still light up in the display within approximately 20
seconds, repeat steps 1 and 2 as necessary until the
overload has been completely cleared.
[3] PAS Off Turn off the sensor. Your unit is now cleared and
ready for use.
14

OTHER APPLICATIONS
Passive Mode --- Zero Tolerance
Alcohol in Enclosed Spaces
The PAS Vr. is sensitive enough to detect background levels of alcohol in enclosed spaces
such as vehicles, rooms, lockers, etc. This is useful for detecting drinking by minors in cars or
at social gatherings, without sampling each individual's breath, or in correctional facilities and
treatment centers.
To detect alcohol in any enclosed space, simply run the PAS Vr. to sample still air drawn from
anywhere in the space. Just make sure you don't sample fresh air from an open door or
window.
Under suitable conditions, the PAS Vr. will detect alcohol from open containers in vehicles.
Containers will be easier to detect as you get closer to them if the alcohol content is high, and
if you prevent the vehicle space from getting flushed with fresh air.
Crash Victims
If a crash victim is unconscious, it can be important to know whether he or she has been
drinking. This will often determine the best course of emergency medical treatment.
Even if the victim is conscious, it is important to know whether alcohol might have contributed
to the accident. This will influence the course of any investigation.
Any crash victim who is breathing can be checked with the PAS Vr. An unconscious subject
might be exhaling from the nose instead of the mouth, but the procedure is the same as with
anyone else. You only need a few seconds to take the breath sample, and you can move
away while the PAS Vr. display is reaching its peak level.
Alcoholic Beverages
With open container laws and the problems of alcohol in our schools, the PAS Vr. is invaluable
for determining whether a beverage contains alcohol. This is easily done by sampling the air
above the container.
Warning! The air over an alcoholic drink--even a beer has much more alcohol in it than a drinker's breath.
It is therefore easy to overload the PAS Vr. when checking beverage containers. Overloading should be
avoided whenever possible, because it takes the fuel cell longer to recover, and its performance will gradually
deteriorate.
To check a container for alcohol, angle the inlet port away from the container opening to dilute the sample. If
your first reading is inconclusive, you can always take another one with less dilution.
The PAS Vr. readings should not be taken as an accurate indication of the strength of the drink. However,
with a little experience you should be able to distinguish between beer, wine, and spirits. Take the time to
practice on various drinks and develop an operating style that avoids overloading the instrument.
15

COMMON QUESTIONS
Here are the answers to questions most often asked by PAS Vr. users:
What do I do if…
Q. The unit won't take a sample; the green or yellow indicators do not come on?
A. The sampling pump may be damaged or the indicator lamp may be faulty.
Otherwise, you might have a dead battery.
Q. The PAS Vr. detects alcohol, but seems to be giving low readings in the Active
mode?
Your unit might need recalibrating or the mouthpiece may be incorrectly seated.
Caution: Flow-rate is important. Have subject blow slowly, but steadily for about 5
seconds for best results.
Q. The display lights up several bars with no alcohol present?
A. Improper performance of initialization procedure may cause display bars to light.
This can also be due to background levels of alcohol vapor in the air, but it is more
likely that the fuel cell has not recovered from the previous positive reading. Many
hand lotions contain alcohol that may contaminate the air. (See Caution Page 13).
If the problem persists when you check a sample of fresh air, follow the procedure
for clearing overloads on page 14.
Q The PAS Vr. appears to be too sensitive?
A. You might be using the instrument improperly, or it might need to be recalibrated.
Q. The heater won't come on?
A. The heater may be at optimum temperature, it will continue to cycle on and off.
Otherwise, you might have a low battery or defective thermostat.
Q. The red LED lamp starts flashing?
A. The battery is discharged and could give a false reading. Replace it before using
the unit.
16

Q. The battery discharges too quickly?
A. Remove battery when not in use for extended periods. Be sure the power is off
when not in use for extended periods of time.
Q. The orange HTR indicator is ALWAYS on when the PAS Vr. is on?
A. If the HTR indicator fails to cycle on and off as the thermostat regulates the fuel cell
temperature, you may have a defective thermostat. Please return your PAS Vr. for
service.
Q. I dropped my PAS Vr. on the ground?
A. The instrument is probably just fine. If it doesn't work, the battery connectors in the
battery compartment might have come loose. Check for this before assuming that
the PAS Vr. needs repair.
Q. There seems to be something wrong with my unit?
A. Call PAS Systems International for assistance. Do not attempt to repair the PAS
Vr. yourself. There are no user serviceable parts inside, and you will void the
warranty. (Please refer to Service section on page 30.)
17

HINTS AND TIPS
DO Accurately position the mouthpiece in the inlet port and the subject's
mouth.
DO Have subject blow slowly and steadily.
DO Keep your fingers away from the inlet/outlet ports.
DO Turn off the PAS Vr. when not in use.
DO Treat your PAS Vr. with the respect deserved by any precision instrument.
Protect it from temperature extremes (i.e., don't leave it on your dash in
the midday sun).
DO Remove the battery if the unit is not going to be used for more than a
week.
DO Use only Alkaline batteries. These may be obtained from PAS Systems
International.
DO Have the calibration of your unit checked every 6 months, or whenever it
seems to be losing sensitivity.
DON'T Overload the fuel cell. The fuel cell takes a while to recover, and frequent
overloads will damage it.
DON'T Sample raw cigarette smoke. This rapidly damages the fuel cell.
DON'T Allow subject to blow fast, forcefully or in short bursts.
DON'T Allow liquids to enter the inlet or outlet ports.
DON'T Subject the PAS Vr. to abuse such as excessive shocks.
DON'T Attempt to dismantle the unit. This will void the warranty.
DON'T Clean the case with chemical solvents. You might damage the fuel cell
permanently.
DON'T Leave the battery in the unit for days; remove when not in use.
18

TECHNICAL SPECIFICATIONS
Product Name PAS Vr. Alcohol Screening & Verification System
Function Combines both direct and passive testing for detecting low levels of
alcohol in exhaled breath or the environment.
Alcohol Sensor Electrochemical fuel cell generates an electrical current in response to
alcohol vapor.
Cell Heater Built-in heater regulates fuel cell temperature at 104° (40°C)
Accuracy Meets DOT requirements at 0.020% BrAC ( .005)
Specificity Fuel cell detects only alcohol. It is unaffected by acetone, paint and glue
fumes, foods, confectionery, methane, and practically any other
substance likely to be found in the breath.
Breath Sample Pump runs for 5 seconds and draws in a 1 cu.in. (15ml) air sample
(nominal figures).
Display Color-coded 9-element LED bar-graph and numeric display of alcohol
level.
Peak Reading Within 2-10 secs, longer at low temperatures unless fuel cell heater is on.
Recovery Time A few seconds to minutes after a positive reading or longer if the fuel cell
is overloaded. No recovery time if no alcohol is detected.
Power Supply 9-volt Alkaline Battery.
Battery Capacity Approximately 600 tests.
Environmental Operating temperature range; 0 to 104°F (-18 to +40°C). The PAS Vr.
housing is weather resistant.
Dimensions 2.75" (6.8cm) w x 4.60" (11.5cm) h x 1.50" (3.8cm) d
Weight 6.5oz (0.2kg) with battery
Accessories Various accessories and spare parts are available from PAS Systems
International:
Mouthpieces
Batteries
Wet Calibration Simulator & Certified Ethanol Calibration Fluids
CAL-Pump
19

QUALITY ASSURANCE PLAN
The following section describes the Quality Assurance Plan recommended by the
manufacturer of the PAS Vr. Alcohol Screening & Verification System.
The manufacturer recommends the PAS Vr. System calibration be checked every six (6)
months and sensitivity be checked monthly, or more frequently if the operator feels it is
necessary because of testing schedules. In the experience of the manufacturer a
monthly check of sensitivity using a known source of alcohol is adequate to assure the
instrument is functioning under normal operating conditions (see product specifications).
Additionally, regular visual inspection of the system to confirm the intake port or exit port
is not blocked, and each light (LED) checked to be sure they display properly when
activated. Note all inspections and testing in the logbook by serial number. In the event
of an observed malfunction or failure of the PAS Vr. to test accurately call
1-800-660-SNIF for instructions or guidance.
Compliance with the following procedures will assure reliable testing, calibration, and
operation of the PAS Vr. System.
1. Minimum Intervals for Testing System Performance
2. Tolerance (See Product Specifications)
3. Inspection, maintenance and calibration
4. Record Keeping - Logs
FOR TECHNICAL SERVICE & INFORMATION CALL 1-800-660-SNIF!
20

EQUIPMENT REQUIRED FOR CHECKING PAS Vr. UNIT
The following items are required for checking the sensitivity/calibration
of the PAS Vr.:
1) The PAS Vr. Alcohol Screening & Verification System
2) Mark II A simulator (or similar model). (A Wet Simulator Cal-Pump is available
to provide reliable sampling).
3) 500 milliliters of 0.01% alcohol solution*
4) Calibration Adapter (Passive mode calibration--A modified plastic mouthpiece is
used that connects the outlet of the wet simulator to the intake port of the PAS
Vr.) (Direct mode calibration--A regular Vr. mouthpiece is used to connect the
simulator outlet to the intake port of the PAS Vr.)
5) PAS Vr. 9-volt alkaline battery.
6) A jeweler’s screwdriver to adjust the fuel-cell sensitivity should it be necessary to
adjust the calibration.
*Premixed certified solutions are available from several sources including
PAS Systems International.
Inlet tube
Heater on Light
On/Off Switch
Heater ON Light
Outlet to PAS
Alcotest CU 34 Wet Bath Simulator Calibration Assembly
21

INSTRUCTIONS FOR USING
THE ALCOHOL BREATH SIMULATOR:
The Alcohol Breath Simulator
The Alcohol Breath Simulator shown on the previous page is a bottle with the jar portion filled with a
heated solution of water and alcohol that simulates the blood running through the arteries in the
lungs. The upper portion (the head space) is filled with a mixture of air and alcohol that simulates the
air in the lungs which is in contact with the blood across the cell membranes. Air flowing out of the
outlet pipe simulates the expired air of a person who has been drinking.
For the simulator to work properly it is necessary for the temperature of the water/alcohol solution to
be at 93F (34 C) and for the mixture of alcohol and water to be accurate for the BrAC to be used in
the test (.01 BrAC). Setting up the simulator involves two operations, making up or obtaining the
correct alcohol/water solution and insuring that the simulator has heated the water solution and is
properly attached to the PAS Vr. mouthpiece. These procedures are described on the next page.
Preparing Simulator Tests
1. Remove the glass jar from the Simulator by unscrewing it from the Top
Assembly.
2. Place 500ml of the .01 BrAC solution into the Simulator.
3. Assemble the Simulator by tightly turning the jar back into the Top Assembly.
5. Check the seal on the jar by blowing into the inlet while holding outlet closed.
There should be resistance to the airflow.
6. Plug the Simulator in and turn ON the power. Allow the solution to heat to 93°F
(34°C). This requires approximately 15 minutes. The heater lamp lights when
the heating element is heating. The lamp goes off when the Simulator fluid has
reached the proper temperature. However, it will come on to keep the fluid at
93°F (34°C).
7. After the operating temperature of the Simulator (93°F) is reached, the Simulator
is ready to use. Attach the tube from the Simulator outlet to the PAS Vr.
mouthpiece. The Simulator is now ready for use in checking the sensitivity of
the PAS Vr.
22

READYING THE PAS Vr. FOR TESTING
1. Install a fully charged battery. When the heater light is ON - there should be no
blinking red battery light. Turn the power switch to the “on” position and
wait a minute or two before testing – to initialize.
2. Inspect the inlet and outlet openings of the PAS Vr. to make sure that they are
clean and not clogged.
3. Conduct zero check:
Note: Be sure the room air is alcohol free and that the ambient temperature is above 50°F.
Do not have jars of stock solution or other alcohol open in the room during testing.
a. Turn on instrument.
b. Take an air sample - tap button; green indicator light comes on
c. If only the small green sampling indicator light comes on, (within 15-20
seconds) - zero check is ok
4. Clear overload if necessary: If one or more of the BrAC indicator lights comes
on proceed to clear overloads as follows:
a. Turn off the PAS Vr. sensor. This will speed the recovery of the fuel cell.
b. After five minutes, repeat the zero check making sure that the heater
cycles. If none of the BrAC indicator lights come on, the zero check is
OK.
d. If however, one or more of the indicator lights comes on again, this
clearance process should be repeated. If after two attempts to clear the
unit, the indicator lights are still coming on when the zero check is
performed, there are two possibilities:
1. The unit requires an internal zero adjustment. To have this
adjustment made, the unit has to be returned to the manufacturer.
2. The air in the area may contain a significant amount of alcohol. To
determine if this is the case, zero checks should be made away
from this area to see if the unit gives a zero reading.
5. Once the zero check has been performed with a satisfactory result, the unit is
ready for sensitivity testing.
23
Note that throughout the procedure, the test conductor should check for a flashing battery
light to ensure that the batteries are not run down during testing procedures.

PAS Vr. SENSITIVITY CHECKING/TESTING
To check the sensitivity of the PAS Vr. unit, take the steps described below:
Note: If the low battery lamp starts flashing, replace the batteries before
proceeding.
1. Turn on the instrument. Leave on for 2-3 minutes to heat the fuel cell to design temperature
before starting. The heater will turn on and off as the heater cycles.
2. Check that the inlet and outlet portholes of the PAS Vr. are free of obstruction.
Set the test mode to the active position and the green light on display flashes.
3. Place the PAS Vr. so the mouthpiece fits snugly over the outlet of the simulator. The
bar-graph display will be facing upwards with the mouthpiece connected to the simulator. Be
sure the green lamp at the top of the display is flashing, confirming the active test setting.
4. Check that the Simulator is running at 93°F (34°C). Take a deep breath and blow slowly but
steadily into the Simulator. Hold the Simulator outlet against the mouthpiece opening.
Immediately tap the control button to start a sampling cycle. Continue to blow for another 5
seconds or until the pump light goes out. (PAS Systems has a Calibration Pump available to
make this step more reliable.)
5. Look for the green sensor lamp and the yellow sampling lamp and listen for the sound of the
air pump, which should come on immediately after the control button is activated. Keep
blowing until the PAS Vr. pump stops and the pump lamp goes out, about 5 seconds after
sampling began. Disconnect PAS Vr. from simulator.
6. Observe the bar-graph numeric display. Only the 1st green bar (0.01) should light up. There
should be only one green bar lit after 15-20 seconds from the time the pump stops.
7. Record the number of bars or the numeric value that light up. There should be only one
when using 0.01% alcohol solution. Repeat the sensitivity test two more times noting each
time how many bars light up. If in two out of the three tests, one green bar is illuminated, the
sensitivity of the unit is satisfactory. Note that the number of bars lit may vary by one
because of variations in the rate and strength of blowing through the Simulator. This is the
reason for conducting three tests. If two out of the three tests do not result in the lighting of
green bars (a blinking light counts), then the unit should be recalibrated following the
calibration procedure described below.
Note: A minimum of 5 minutes should pass between each sensitivity test and a zero
check should precede each sensitivity test check.
24

CALIBRATION PROCEDURE
This section provides procedures for calibrating the PAS Vr. for consistent readings of
alcohol levels. Calibration requires a wet simulator of the same type as used to
calibrate evidential breath testers. The simulator must be filled with a special 0.01%
calibration fluid.
Zero Check
Before calibrating the PAS Vr., check a sample of ambient air. If bars light up in the
display, you have one of three problems:
* The fuel cell hasn't recovered from the previous sample. See the procedure for
clearing fuel cell overloads on page 11.
* You did not initialize the system by turning the power switch "on" for 1-2
minutes prior to activating sensor.
* The PAS requires an internal zero adjustment. The unit must be returned to
the manufacturer for this to be done.
Do not proceed with calibrating the unit if it is giving false readings.
Calibration Fluid
Making the 0.01% calibration fluid by diluting a stronger stock solution with distilled
water is a simple process.
*Stock Solution. To mix your stock solution, use a 100-milliliter (ml) graduated
cylinder (Pyrex #20025) for your mixing.
[1] Pour 77 ml of 100 proof vodka into the 100 ml graduated cylinder.
[2] Pour the 77 ml of vodka into a 500 ml flask and fill the flask up with distilled
water. This completes your mixture of stock solution. You may keep your stock
solution in a refrigerator for mixing calibration fluid as necessary. We do not
recommend keeping stock solution for more than 45 days.
Calibration Fluid. Mixing calibration fluid will require a 10 ml pipette calibrated in
1/10 ml (Fisher 13-667m or Pyrex 7077-10N).
[1] Using the 10 ml pipette, draw in 1ml of your premixed stock solution.
[2] Pour the 1 ml of stock solution into a 500 ml flask.
[3] Fill the 500 ml flask up with distilled water.
The result gives you 0.01% calibration fluid for your simulator. For accuracy, if you
have access to a quality evidential unit, run your calibration fluid in the evidential unit
to verify 0.01%.
25

PAS Vr. CALIBRATION
(Active/Direct Mode)
The calibration procedure follows the same steps as the sensitivity check procedure except
that after the sample has been blown into the unit, the signal gain on the back of the instrument is
adjusted to the point where just one green bar lights up.
Note: The test conductor should monitor the red low battery lamp of the PAS Vr. unit to
ensure that it does not start flashing during the calibration procedure. If it does, the batteries
must be replaced before proceeding.
1. Observe the back of the instrument. On the left are two small round openings. Inside you will
see the PAS Vr. passive (top opening) and the active/direct (lower opening) calibration
adjustment screws.
2. Turn on the instrument. Leave it on for 2 - 3 minutes or until the heater indicator cycles "off"
so that the fuel cell comes up to design temperature.
3. Check that the inlet and outlet portholes of the PAS Vr. are free of obstruction. Insert
mouthpiece.
4. Set mode switch to active position (note flashing green light on display). Place the
mouthpiece on the PAS Vr. Place the opposite end over the simulator outlet and hold firmly
into place.
5. Take a deep breath and blow slowly but steadily into the Simulator. Immediately tap
the control button switch to start a sampling cycle.
6. Look for the green sensor lamp and the yellow sampling pump lamp and listen for the sound
of the air pump, which should come on immediately after the switch stud, is tapped. Keep
blowing until the PAS Vr. pump stops (pump lamp goes out). Disconnect or remove the
mouthpiece from the simulator outlet.
7. Pass a small flat blade jeweler's screwdriver through the hole in the back of the instrument
(bottom opening). Turn the calibration adjustment all the way up (clockwise). The
adjustment is free to rotate about 180°. Take care not to use any force. With the calibration
adjustment at maximum, some of the bars will light up.
8. When all bars of the display light up (15-20 seconds after sampling), turn the calibration
adjustment down (counter clockwise) until the second green bar just goes out. You may
need to make several small, soft and easy adjustments as the fuel cell climbs to its peak
reading. If your adjustment is slightly too high, you should see the second green bar flash
on and off. Turn counter clockwise just enough so that the flashing stops. Calibration is now
complete.
9. Turn off the PAS Vr. system. The unit is now ready for operational use once it has been fully
charged or new battery installed.
26

Please Note: The Passive Calibration and the Active/Direct Calibrations are
independent of the other. Adjusting one will not affect the adjustment of the
other. If you have questions call 1-800-660-SNIF.
*Note: Premixed certified alcohol solutions are available from PAS Systems International at
1-800-660-SNIF
Also, a Wet Simulator Cal-Pump is available for more reliable delivery of the ethanol vapor sample to
the instrument.
27

PAS Vr. CALIBRATION
(Passive Mode)
The calibration procedure follows the same steps as the sensitivity check procedure except that
after the sample has been introduced into the unit, the signal gain is adjusted to the point where just
two red bars light up.
Note: The test conductor should monitor the red low battery lamp of the PAS Vr.
unit to ensure that it does not start flashing during the calibration procedure. If it
does, the batteries must be replaced before proceeding.
1. The top opening on the back of the instrument is used to make the passive calibration
adjustments.
2. Turn on the instrument. Leave it on for 2 - 3 minutes or until the heater indicator cycles "off"
so that the fuel cell comes up to design temperature.
3. Check that the inlet and outlet portholes of the PAS Vr. are free of obstruction.
4. Set mode switch to passive position. Place the modified calibrator mouthpiece on the PAS
Vr. Insert calibrator onto the simulator outlet so it can be easily held (or attached) against the
outlet.
5. Take a deep breath and blow slowly but steadily into the Simulator. After 5 seconds, tap the
switch stud to start a sampling cycle. (A Wet Simulator Pump is available from PAS Systems
to provide more reliable sampling.)
6. Look for the green sensor lamp and the yellow sampling pump lamp and listen for the sound
of the air pump, which should come on immediately after the switch stud, is tapped. Keep
blowing for another 5 seconds until the PAS Vr. pump stops (pump lamp goes out).
7. Pass a small flat blade jeweler's screwdriver through the upper hole on the back of the
instrument. Turn the calibration adjustment all the way up (clockwise). The adjustment is
free to rotate about 270°. Take care not to use any force. With the calibration adjustment at
maximum, all of the red bars will light up.
8. When all bars of the display light up (15-20 seconds after sampling), turn the calibration
adjustment down (counter clockwise) until the first red bar just goes out. You may need to
make several small, soft and easy adjustments as the fuel cell climbs to its peak reading. If
your adjustment is slightly too high, you should see the third red bar flash on and off. Turn
counter clockwise just enough so that the flashing stops. Calibration is now complete.
9. Turn off the PAS system. The unit is now ready for operational use once a new battery is
installed.
28

THE PAS VR. PASSIVE ALCOHOL & VERIFICATION
CALIBRATION CHECKLIST – Dry Gas
1. Preliminary
2. Zero Check (Air Blank)
3. Select Mode (Active or Passive)
4. Sample the Dry Gas Standard
5. Adjust the Display to the Value of the Dry Gas Standard
6. Reset & Wait
Please review and understand the WET BATH CALIBRATION PROCEDURE IN THE
INSTRUCTION MANUAL ON PAGES 24-28 before working with the DRY GAS calibration
procedure.
PAS VR. ‘DRY GAS’ CALIBRATION PROCEDURE:
The calibration adjustment process assumes the following conditions:
*The instrument has not analyzed more than three samples containing alcohol within the
previous half-hour or any sample within the previous 5 minutes.
• The instrument is in its normal operating temperature range, and
• The battery does not need replacement.
EQUIPMENT CHECKLIST FOR DRY GAS CALIBRATION OR ACCURACY CHECK:
1. Regulator: 1.5 LPM. A Trigger (see photos below) or Push Button type.
2. Ethanol Breath Dry Gas Standard – 0.01%.*
3. Calibration Connector Tube
!) Preliminary
Inspect the instrument for damage and that the intake port is not blocked/plugged.
Select the appropriate “Calibration Connector Tube” for the Dry Gas procedure.
Dry Gas Standard: 0.01% (used for either PASSIVE or ACTIVE modality calibration)
2) Zero Check (Air Blank)
This insures the instrument is ready to take a sample of the dry gas standard and tests
whether the fuel cell is completely discharged and free of alcohol from a previous sample. It also
insures the battery has sufficient power to drive the electronic circuitry.
Switch the POWER on. Set mode switch to PASSIVE. Wait a minimum of 1-2 minutes for
initialization process to complete.
*NOTE: Dry Gas Ethanol Standards are Available from PAS Systems International, Inc. Call 800-660-7643
29

Activate the sample switch (pump runs 5 seconds) collecting an ambient air alcohol-free
sample.
Observe the display for a minimum of 10 -20 seconds. The display should not indicate any
alcohol present as projected on the bar graph while switched in the “passive” sampling position.
Press sample switch and turn off the sensor (small green bar is out)
3) Set Mode Switch to either the “PASSIVE” or “ACTIVE” Setting Depending on which mode you
want to Calibrate first
Assuming the Air Blank test has been completed, set to the desired mode (PASSIVE OR
ACTIVE) for sampling the dry gas standard. Use 0.01% Dry Gas Concentration for either mode
. For Passive calibration this gas concentration will be set at the 0.10% bar on the display. For
Active/Direct this calibration gas concentration will be set at the 0.01% bar on the display.
Locate the calibration adjustment ports on the back of the instrument: Top port for passive
adjustments; bottom port for active/direct adjustments.
4) Sample the Dry Gas Standard (See Photo of Assembly for Guidance)
Follow the procedure below to sample the standard:
a) Attach the “calibration connector tube” to the outlet on the dry gas canister regulator.
b) Press the “calibration connector tube” nipple into the inlet port of the PAS Vr. Hold tightly in
place.
c) Hold the instrument with your thumb near the sample Control Button at bottom of bar graph
(See Picture).
d) Depress the regulator button so the gas begins flowing through the
“calibration connector tube”
30

e) After about five (5) seconds of continuous gas flow, AND WHILE THE GAS IS STILL
FLOWING, press and release the Control Button which will draw a sample of gas into the
unit.
f) When the sample pump completes its cycle (approx. 5 seconds) and the pump light goes
out, release the regulator button to stop the gas flow. IT IS ESSENTIAL THAT THE GAS IS
STILL FLOWING DURING THE ENTIRE 5 SECONDS THE PUMP IS RUNNING!
5) Adjust the Display to the Value of the Dry Gas Standard
With a small screwdriver adjust the appropriate (either the passive (top port) or active (bottom
port) screw) calibration control screw (potentiometer) by inserting the screwdriver in the
appropriate hole on the back of the instrument and turning the control screw clockwise (all the
way up) as the display rises above the value of the dry gas standard. As the display rises still
further, due to the continued charging of the fuel cell, turn the control screw counter clockwise to
set and maintain the display at the dry gas standard value.
As the fuel cell reaches its peak voltage, the control screw will require no further adjusting.
The instrument is now calibrated. Do not turn the control screw to increase the reading once the
display (fuel cell voltage) has passed its peak reading
If the display reading cannot be brought up to the dry gas standard value, the fuel cell has
reached the end of its life and should be replaced.
6) Reset and Wait
After the final alcohol reading is noted, wait 2-5 minutes then depress the sample Control
Button and sample alcohol free air. This clears the fuel cell itself of alcohol before using the
instrument for more tests.
31

RECORD KEEPING
Each organization/company that employs PAS Vr. units should assign a staff member
to be responsible for care and maintenance. A log should be established to record the
checking, calibration and maintenance activities on each unit. Testers using the units
should be required to report any problems with the units to the proper staff member
who should record the problems in the log. If a unit is dropped or is damaged in some
other way this should be entered in the log so that the information can be forwarded to
the manufacturer along with the unit for repair. The log will record the life history of the
units and should be carefully maintained since it may be subpoenaed if the use of the
PAS Vr. is challenged.
To ensure that there is a record that these sensitivity checks have been conducted on
a monthly basis, it is necessary to establish a log with a record for each of the PAS Vr.
units employed by the Company or Department.
The log also provides a brief description of the action taken to overcome the problem
or to examine the unit for damage as a result of a tester's report. The log will note
instances in which the PAS Vr. has been returned to the manufacturer for service and
when it was received and checked upon its return. The log will also contain a notation
recording each month's sensitivity check and the outcome of that check and also a
calibration adjustment if such an adjustment was necessary.
In addition to monthly sensitivity checks, PAS Vr. units should be checked if they
have received an unusual stress such as being dropped. If a PAS Vr. unit has
been sent to the manufacturer and returned following repair, a check should be
made to ensure that the calibration was not affected by the handling during
shipping. Also, perform periodic functional checks with known sources of alcohol to
be certain all functions (e.g., pump) are performing.
32

RETURN POLICY
If you receive an order that appears to be defective or damaged, please contact PAS Systems at
800-660-7643 within 10 days of receipt of the shipment. PAS Systems will replace the equipment,
file any necessary claims, and correct any shipping errors.
To return an order for any other reason, contact PAS Systems at 800-660-7643 within 10 days of
receipt of the order and explain the reason for the return. A 20% restocking fee will be assessed
and freight charges are non-refundable.
SERVICE
Your PAS Vr. is a self-contained unit. Other than the batteries, there are no user-serviceable parts
inside. If you conclude that your PAS Vr. is not functioning correctly, it must be returned to PAS
Systems International for service.
Carefully package the unit. Place the package in a suitable shipping box and send to the address
below. We suggest shipping UPS or Federal Express, etc., rather than parcel post for tracking
purposes. It would be wise to insure the package for the original purchase price.
If your unit is out of warranty, you will be notified of a nominal service charge before repairs begin.
Ship units requiring service to:
PAS Systems International
Attn: Service Dept.
215 Southport Dr. Suite 400
Morrisville, NC 27560
Tel: (540) 372-3431
(800) 660-SNIF
WARRANTY
PAS Systems International, provides a one (1) year WARRANTY from the date of purchase of the
instrument should the product exhibit a manufacturing defect, or defect in workmanship. Products
showing unusual wear, abuse, alteration, items dropped, or accidentally broken, will not be covered
under the WARRANTY. In addition the warranty does not cover the replacement of batteries. The
Company will provide one (1) free calibration service during the WARRANTY period should such
re-calibration be necessary.
Please call 1-800-660-SNIF anytime you have any questions. Your satisfaction is very important
to us. Thank you!
Extended Warranty Information Available
33

BIBLIOGRAPHY
Ferguson, S.A., Wells, J.K. and Lund, A.K. "The Role of Passive Alcohol Sensors in
Detecting Alcohol-Impaired Drivers at Sobriety Checkpoints", Alcohol Drugs and
Driving, January-March 1995. 11:23-30.
Fields, M. and Hricko, A.R. "Passive Alcohol Sensors - Constitutional Implications",
Insurance Institute for Highway Safety, February 1986.
Foss, R.D., Voas, R.B. and Beirness, D.J. "Using a Passive Alcohol Sensor to Detect
Legally Intoxicated Drivers", American Journal of Public Health, April 1993. 83(4).
Jones, I.S. and Lund, A.K. "Detection of Alcohol-Impaired Drivers Using a Passive Alcohol
Sensor", Journal of Police Science and Administration, 14:153-60.
Lacey, J., et al. Enforcement and public information strategies for DWI general deterrence:
Arrest drunk driving. The Clearwater and Largo, Florida Experience Technical
Report. Washington, DC: National Highway Traffic Safety Administration.
Martin, Peter G. "Air-Borne Alcohol Sensors", US. Patent No.5,055,268, 1991.
Ross, H.L. "Deterring the Drinking Driver: Legal Policy and Social Control", Lexington, Mass.:
Lexington Books.
United States. Department of Transportation. Alcohol Testing Procedure Rule 49CFR Part
40. Washington, DC.
Voas, R.B. and Lacey, H.M. Drunk driving enforcement, adjudication, and sanctions in the
United States. In: R.J. Wilson and R.E. Mann, (Eds). "Drinking and Driving
Advances in Research and Prevention", New York: Guilford Press. 1990
Voas, R.B., Rhodenizer, A.E., and Lynn, C. Evaluation of Charlottesville checkpoint
operations. Final Report. Washington, DC: National Highway Traffic Safety
Administration, 1985.
Voas, Robert B., "PAS III Procedure Manual for Sensitivity Checks and Instrument
Calibration", Prevention Research Center, Berkeley, California, September 1994.
"Why Sobriety Checkpoints Matter and How To Make Them Work Even Better", Status
Report, Insurance Institute for Highway Safety, Arlington: Virginia, 1993. 28: 1-5.
34


PAS Systems International, Inc.
215 Southport Dr. Suite 400
Morrisville, NC 27560
http://www.pasintl.com
Tel: (540) 372-3431
800-660-SNIF
Printed 09/11 $5.00
 Loading...