

Setting the initial time
Delay
1. Pressthe Menu/Raisebutton ONCEto see the current Delay setting.
The factory setting forthe Delayis 5minutes, theminimum setting.
2. Tochange thesetting, press the
Select/Save (middle) button.
3. Pressthe Menu/Raisebutton. Thetime
increases 5 minutes eachtime youpress
the Raise button, until the timereaches
1 hour (100 ). After 1hour, thetime
increases 15 minutes eachtime youpress
the button, until it reaches12 hours
(1200), then it goes back to5 minutes
(5:00). Youcan gobackwards at any point
to reduce thetime, usingthe Lower
button.
4. When thedesired timeshows inthe
display, press theSelect/Save buttonto
save the setting and exitthe programming
mode.
Setting the
Sound
1. Pressthe Menu/Raisebutton TWICEto see the current Sound setting.
2. Tochange thesetting, press the Select/Save (middle)button.
3. Pressthe Menu/Raisebutton to turn ON the warning andkeypress sounds.
Press the Lower buttonto turnOFF the warning and keypress sounds.
4. When thedesired settingshows inthe display, press the Select/Save button
to save the setting andexit theprogramming mode.
Setting the
Flash
1. Pressthe Menu/Raisebutton THREEtimes to see the current Flash
setting. If a fan isconnected tothe switch,Flash should be Off.
2. Tochange thesetting, press the Select/Save (middle)button.
3. Pressthe Menu/Raisebutton to turn ON the warning flash.Press the
Lower button to turn OFFthe warningflash.
4. When thedesired settingshows inthe display, press the Select/Save button
to save the setting andexit theprogramming mode.
5:00
10:00
15:00
... to
55:00
100
115
130
145
200
215
... to
1200
}
minutes
in 5-minute
increments
hours &
minutes
in 15-minute
increments
}
TROUBLESHOOTING
To test the time switch:
The pilot light behind theON/OFF buttonshould beON whenthe switch is OFF
and OFF should appear in thedisplay. Press the ON/OFF button.The connected
light or fan comesON. Thedisplay showsthe amountof time that the switch will
remain ON.
The connected light or fanshould turnOFF inthe numberof minutes indicated
by the display.You can turn it OFF sooner by pressingthe ON/OFFbutton again.
Light or fan will not turn ON (pilot light is visible):
Press ON/OFF button.The connectedlight orfan should turn ON. If not:
• Press andhold the button a second longer.
• Check thelight bulband/or motorswitch on the fan mechanism.
• Turn OFFpower to the circuit then check wireconnections.
Light or fan will not turn ON (no pilot light or display is visible):
• Shade theswitch fromexternal light to make sure thatthe pilotlight and
display are not ON.
• Make certainthat thecircuit breaker is ON and functioning.
• Turn OFFpower to the circuit then check wireconnections.
• Call 800.223.4185for technicalsupport.
Light or fan will not turn OFF:
• Press theON/OFF button. If the connected light or fan doesnot turnOFF,
press the buttonand holdit asecond longer.
• Turn OFFpower to the circuit then check wireconnections.
www.passandseymour.com
RT12
Time Switch
Programmable Countdown
Installation Instructions
SPECIFICATIONS
Voltage . .. .. . . . .. .. . . . .. .. . . . .. .. . . . .. .. .120VAC, 60Hz
Load
Single Pole Circuit . . . .. .. . . . .. .. . . . .. .. . .0–600 Watt
Incandescent or fluorescentlamp or1/6HP fanmotor
Time Delay . . . . .. .. . . . .. .. . . . .. .. .5 minutes to 12 hours
Environment
Operating Temperature . .. .. . . .32° to 104°F (0° to40°C)
Humidity . . .. .. . . . .. .. . . . .. ..95% RH, non-condensing
Tools Needed:
Insulated Screwdriver
Wire Strippers
Please read all instructions beforeinstalling
Alpha-numeric LCD display
ON/OFF button with
pilot light
Call 800.223.4185 for Technical Support
P.O.Box 4822, Syracuse,NY 13221-4822
TechnicalSupport: 800.223.4185• www.passandseymour.com
340804 Rev.B 08105
Limited FIVE YEAR Warranty
Pass& Seymour/Legrandwill remedyany defectin workmanshipor materialin Pass& Seymour/Legrand
productswhich maydevelop underproper andnormal usewithin fiveyears fromthe dateof purchaseby a
consumer:
(1) byrepair orreplacement, or,at Pass& Seymour/Legrand’soption, (2)by returnof anamount equalto the
consumer’spurchase price.Such remedyis INLIEU OFANY ANDALL EXPRESSEDOR IMPLIEDWARRANTIES OF
MERCHANTABILITYOR FITNESSFOR APARTICULAR PURPOSE.Such remedy byPass &Seymour/Legrand does
not includeor covercost oflabor forremoval orreinstallation ofthe product.ALL OTHERFURTHER ELEMENTS
OF DAMAGE(INCIDENTAL ORCONSEQUENTIAL DAMAGES)FOR BREACHOF ANYAND ALLEXPRESSED OR
IMPLIED WARRANTIESINCLUDING WARRANTIESOF MERCHANTABILITYOR FITNESSFOR APARTICULAR
PURPOSE AREEXCLUDED HEREBY. (Somestates donot allowdisclaimer orexclusion orlimitation ofincidental
or consequentialdamages, sothe abovedisclaimers andlimitation orexclusion maynot applyto you.)ANY
IMPLIED WARRANTIESINCLUDING WHEREREQUIRED WARRANTIESOF MERCHANTABILITYOR FITNESSFOR
A PARTICULARPURPOSE SHALLBE LIMITEDTO THEFIVE YEARPERIOD SETFORTH ABOVE.(Some states do
not allowlimitation onhow longan impliedwarranty lasts,so theabove limitationmay notapply toyou.)
Toensure safety,all repairsto Pass &Seymour/Legrand productsmust bemade byPass &Seymour/Legrand or
under itsspecific direction.Procedure toobtain performanceof anywarranty obligationis asfollows: (1)Contact
Pass& Seymour/Legrand,P.O. Box4822, Syracuse,NY 13221for instructionsconcerning return orrepair;
2) returnthe productto Pass& Seymour/Legrand,postage paid,with yourname andaddress anda written
description ofthe installationor useof thePass &Seymour/Legrand product,and theobserved defects orfailure
to operate,or otherclaimed basisfor dissatisfaction.
This warrantygives youspecific legalrights andyou mayalso haveother rightswhich varyfrom stateto state.
http://waterheatertimer.org/Countdown-timer-horsepower-ratings.html#RT
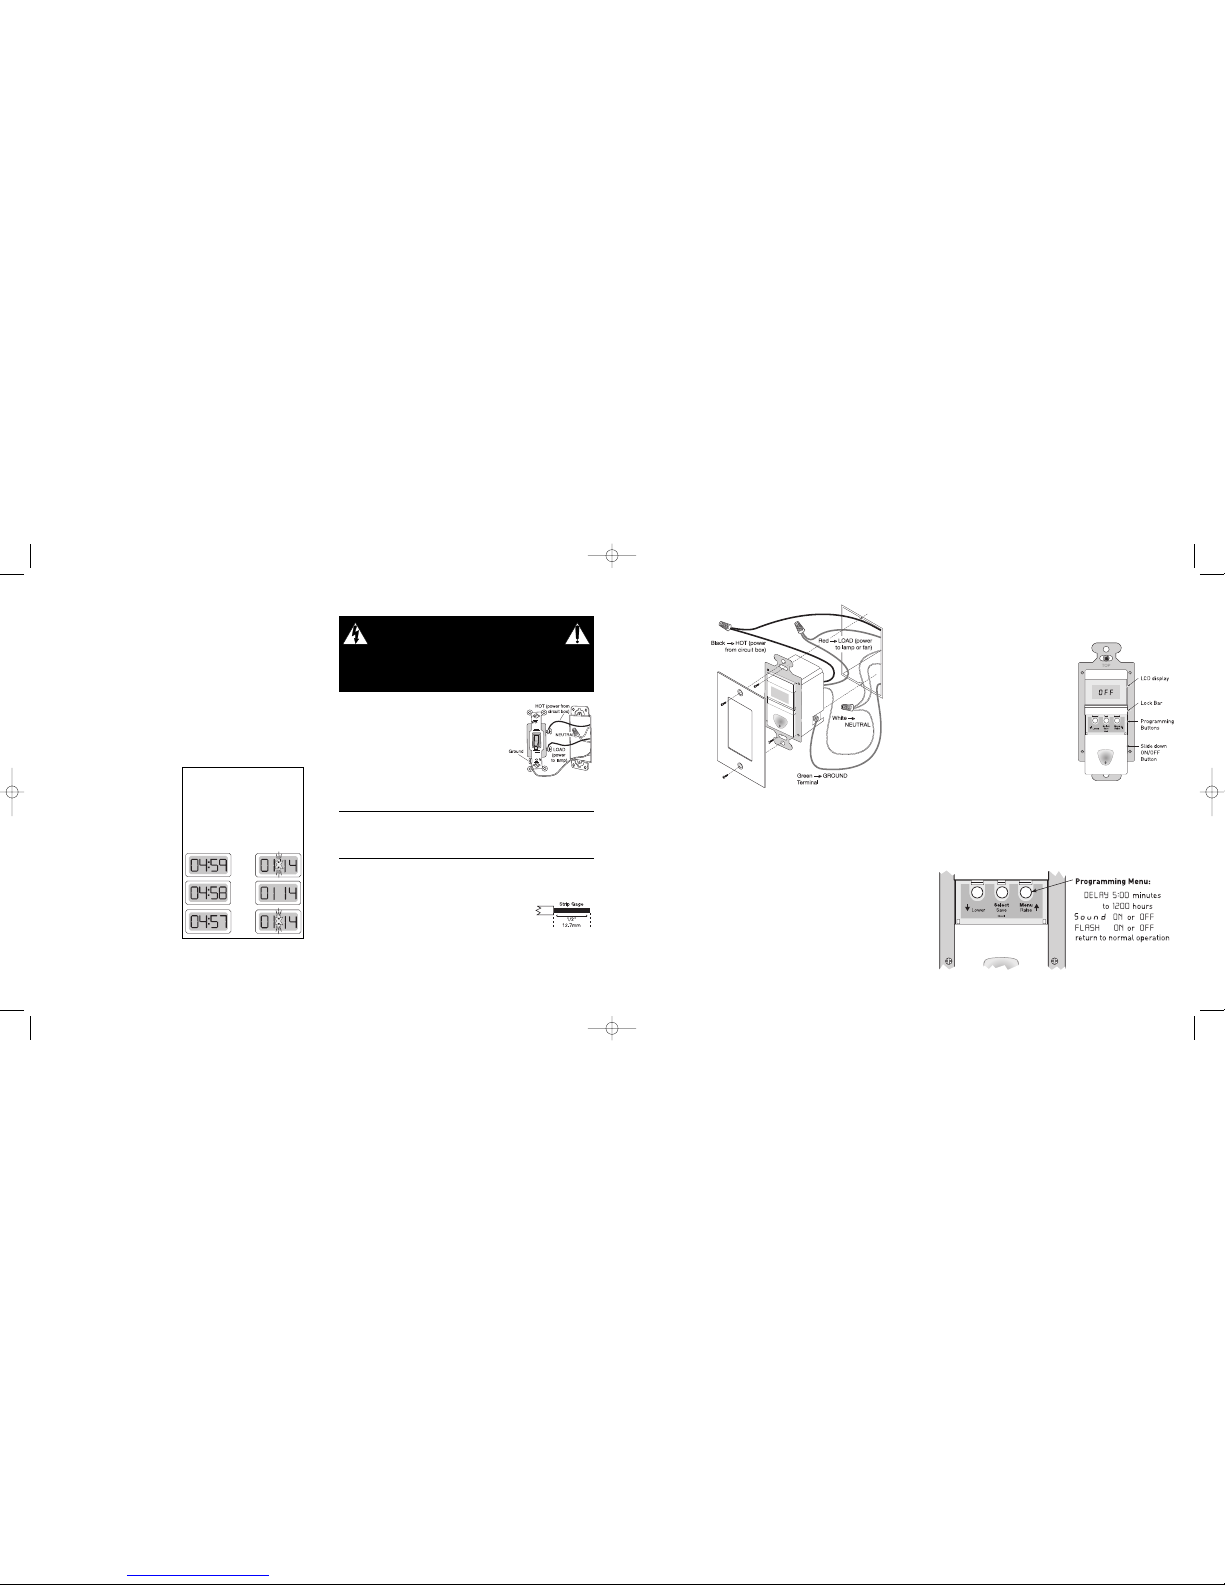
PROGRAMMING
To programthe timeswitch, you must access the programmingbuttons thatare
located under the ON/OFFbutton. Thewall switchcover plate must be removed
to gain accessto theprogramming buttons.
1. Firmlygrasp theside edgesof theLock Bar
and gently pull it awayfrom theswitch face
until it clicks. Do NOTattempt topull the
Lock Bar off of the switch!
2. Push theON/OFF buttondownward so that
it slides down approximately1/2 inchto
expose the multi-function programming
buttons. The buttons arelabeled fromright
to left:
Menu/Raise: provides access tothe
program items andshows theircurrent
settings. With the first pressit shows
Delay time, second shows Sound
setting, third shows Flashsetting.
After an item is Selected,the Raisebutton
can increase the settingor changeit from
Off to On. Forthe Delaysetting, whenyou reach 1200 (12 hours),
pressing Raise bringsthe displayaround to5:00 (5 minutes).
Select/Save: press this whilea programitem is displaying to change the
setting for the item. Whenthe correctsetting is in the display, press this
again to Save the settingfor thatitem.
Lower: After an item isSelected, theLower button can reduce the setting
or change it fromOn to Off.For the Delay setting, when you reach 5:00
(5 minutes), pressingLower bringsthe displayto 1200(12 hours).
4. Wire the time
switch.
Twist the existing
wires together with
the wire leadson
the time switch
as indicated in the
drawing. Cap them
securely using the
wire nuts provided.
See Fig 4.
• Connect thegreen
or non-insulated
(copper) GROUND
wire fromthe circuit
to the GROUND
terminal on the
RT12.
• Connect thepower
wire fromthe circuit
(HOT) to the black
wire on the RT12.
• Connect thewire
to the lamp or fan
(LOAD) to thered
wire on the RT12.
• Connect theNEUTRAL wiresfrom the circuit to the white wireon theRT12.
5. Put the RT12 in the wall box with the display positioned above the
ON/OFF button.
Secure it to thewall boxwith thescrews provided.
6. Restore power to the circuit.
Turn ON thebreaker orreplace the fuse.
7. Make any necessary programming changes.
See the Programming sectionfor information.
8. Attach the new cover plate.
T
O
P
IN
D
O
O
R
U
S
E
O
N
L
Y
Fig 4: Switchorientation,wire connections
and wallbox assembly
WARNING
Disconnect power to the wall switch box by turning OFF the circuit
breaker or removing the fuse forthe circuit before installing the
RT12, replacing lamps, or doing any electrical work.
INSTALLATION& WIRING
1. Prepare the switch box.
After the power is turnedoff atthe circuitbreaker
box, removethe existingwall plateand mounting
screws. Pull the oldswitch outfrom thewall box.
2. Identify the type of circuit.
In a Single PoleCircuit (seeFig. 2), two single
wires connect totwo screwson theexisting
switch. A ground wiremay alsobe present
and connected to a groundterminal onthe old
switch. A neutral wireshould alsobe present
in the wall box.
CAUTION
For yoursafety: Connecting aproper ground to the time switch provides
protection against electricalshock inthe event of certain faultconditions.
If a proper groundis notavailable, consult with a qualified
electrician beforecontinuing installation.
Only connectthe RT12 to a Single Pole Circuit.The RT12is notsuitable for
3-way switching. If the existingwiring doesnot matchthe descriptionfor a
Single Pole Circuit,you shouldconsult with a qualified electrician.
3. Prepare the wires.
Tag thewires currently connected to theexisting switch
so that they can beidentified later. Disconnect thewires.
Make sure theinsulation isstripped offthe wires to expose
their copper coresto thelength indicated by
the “Strip Gage” in Fig. 3(approximately 1/2 inch).
www.passandseymour.com
Fig 2: Typical SinglePole
SwitchWiring
Fig 3: Wire
Stripping
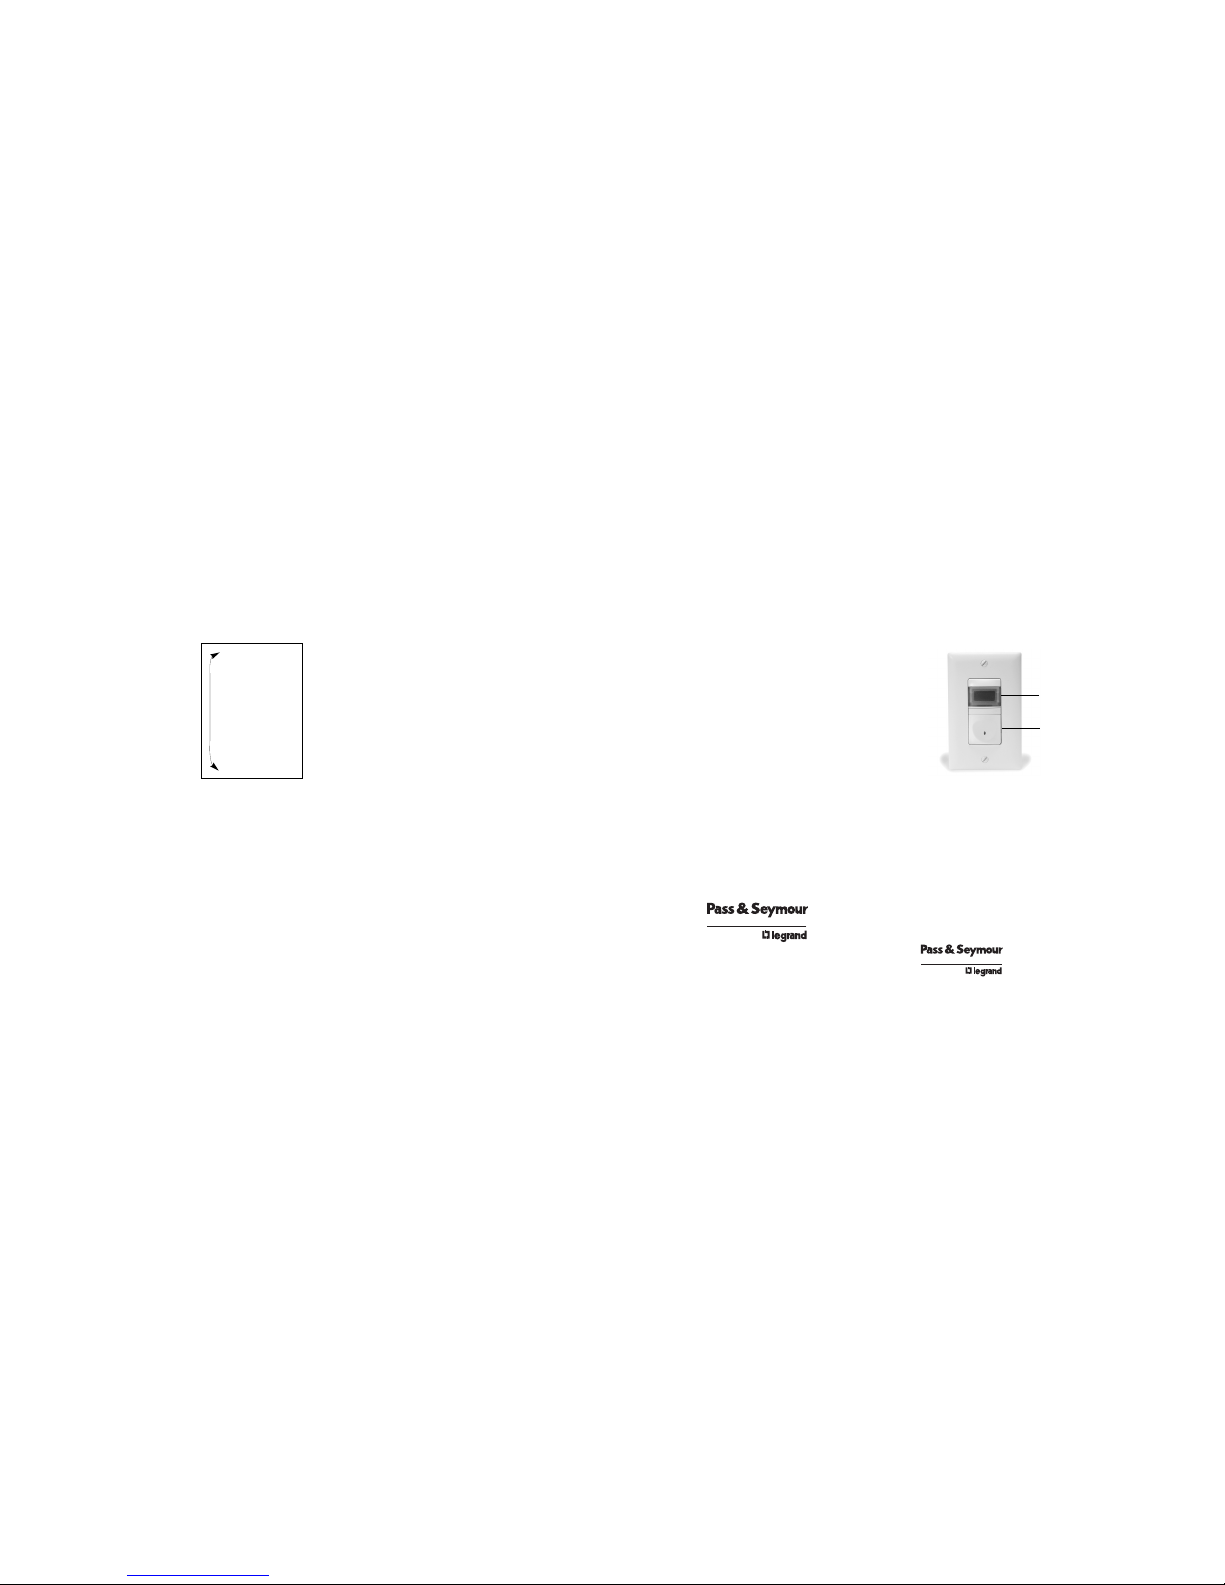
DESCRIPTION AND OPERATION
The RT12 is a time switchthat turnsOFF theconnected light or fan (load) when
the selected time expires.While theswitch is OFF the pilot light behind the
ON/OFF button illuminates and “OFF”appears inthe display. When the switch
is ON, the display shows theamount oftime theload will remain ON.
For times up to59 minutesand 59seconds, the display shows a blinking colon
between the minutes and secondswhile theseconds count down continuously.
For times between 1hour and12 hours,the displayshows a blinking colon
between the hours and minutesand theminutes portionof thedisplay changes
only once a minute.See Fig.1 forexamples.
The RT12’s lightedalpha-numeric displayis alsoused for programming
functions. With the programmingfunctions, youcan decide:
• Delay – theamount oftime theswitch remains ON with the initial pressof
the ON/OFF button
• Sound – whetherthe switchbeeps for each button press and every
5 seconds beginning one minutebefore itturns OFF
• Flash – ifthe lightsflash to warn
you that they aregoing toturn OFF
in one minute
Manual ON
When you pressthe ON/OFF button, it
activates theDelay timer.If youwant to
keep the switchON for a timedifferent
from whatis programmed, simplypress
and hold theON/OFF button until the
display showsthe desired time. Whenyou
let go ofthe button the switchturns ON.
Manual OFF
While the switch isON andthe timeris
running, press theON/OFF buttonto turn
OFF the connected loadwithout delay.
Changing the amount of time
At any time, you canpress andhold the
ON/OFF button for 1 secondto restart the timer.It goesimmediately to the
programmed Delay time; ifyou needa different amount of time, keepholding the
button for at least2 seconds.Hold thebutton until the display shows the desired
time. Releasing the buttonstarts thetimer countdown.
Call 800.223.4185 for Technical Support
Minute
Countdow n
Hour
Countdo wn
Fig. 1:Timer Countdown
The time-out periodcan beset for5 minutes
to 12hours. Thetime isd isplayedin two
different ways.For acountdown ofless than
an hour,the display showsminutes:se conds.
The secondscount downcont inuously.If the
countdown ismore thanan hour,t hedisplay
shows hours:minutes, thecolon flashesevery
second andthe display changesevery minute.
Seconds
Elapse d
:01
:02
:03
www.passandseymour.comCall 800.223.4185 for Technical Support
340804_RevB_RT12_IS_Eng.qxd:340804_RevB_RT12 IS 9/6/07 10:57 AM Page 5

• Print: 2-sided
• Ink Color: Black
• Paper: White 16lb (60g/m sq)
• Final trim size: 16" (Wide) x 6" (High).
• Four (4) fold.
• Final folded size: 4" (Wide) x 6" (High).
TITLE BOX PAGE ONLY.
DO NOT
MAKE FILM • DO NOT PRINT
Pass & Seymour
SYRACUSE, NY
Title:
RT12 Installation Instructions
Drawing #:
06249
Orig. Drawing Date:
22 FEB 06
Rev. #:
1
SOWINSKI
31 Aug 07
12325
340804
HF
Scale: 1:1
Drawn by
Rev. Date
AGI Job No.
Part No.
Proofed By
340804_RevB_RT12_IS_Eng.qxd:340804_RevB_RT12 IS 9/6/07 10:57 AM Page 9
 Loading...