

Passion Veneto, Tuscany, Roma, Sicilia, Amore Owner's Manual
OWNER’S MANUAL
Veneto | Tuscany | Roma | Sicilia | Amore
2
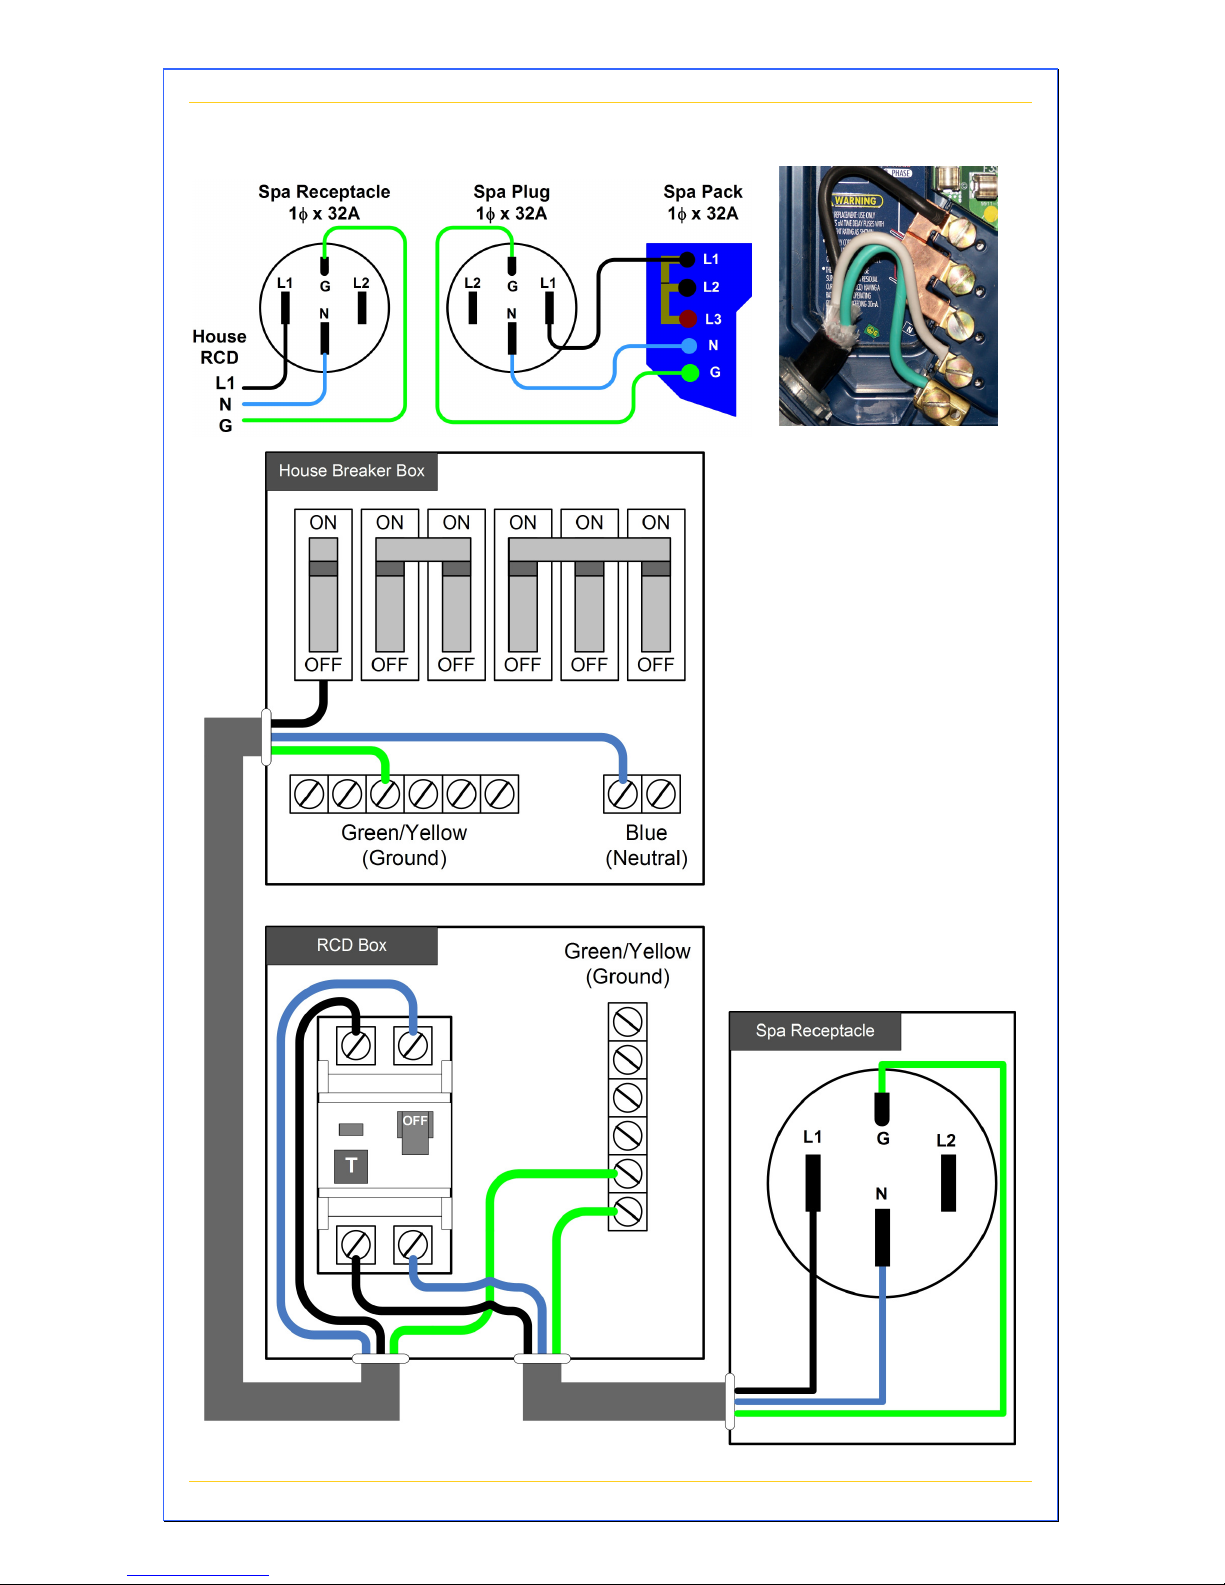
European 1x32A Wiring Diagram
Jumper L1-L2-L3
3
S t a r t u p
Important – Read these step-by-step startup procedures before
starting your spa. Failure to follow any of these steps listed may
result in damage to the equipment and may void your warranty.
Caution: Running the spa pump dry (without water running
through it) can cause IMMEDIATE damage and will
void the warranty! Be sure that the spa is installed
properly in accordance with the instructions in this
manual.
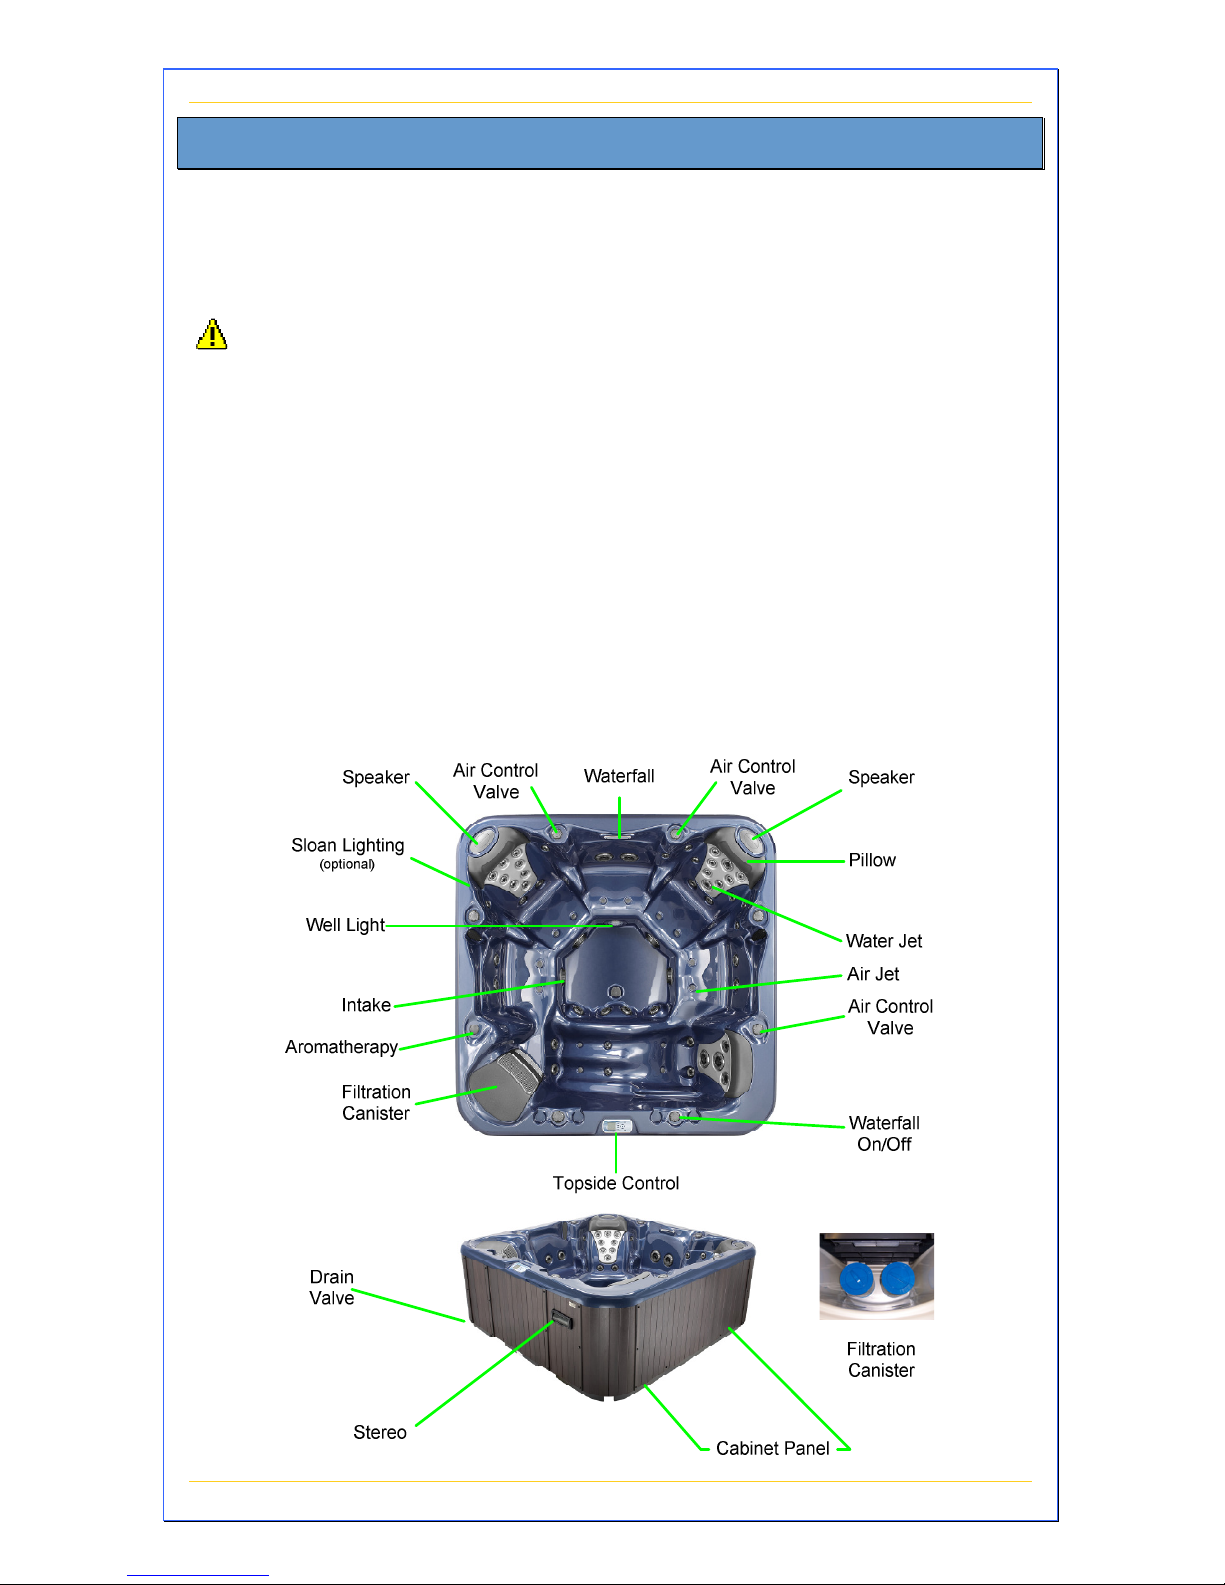
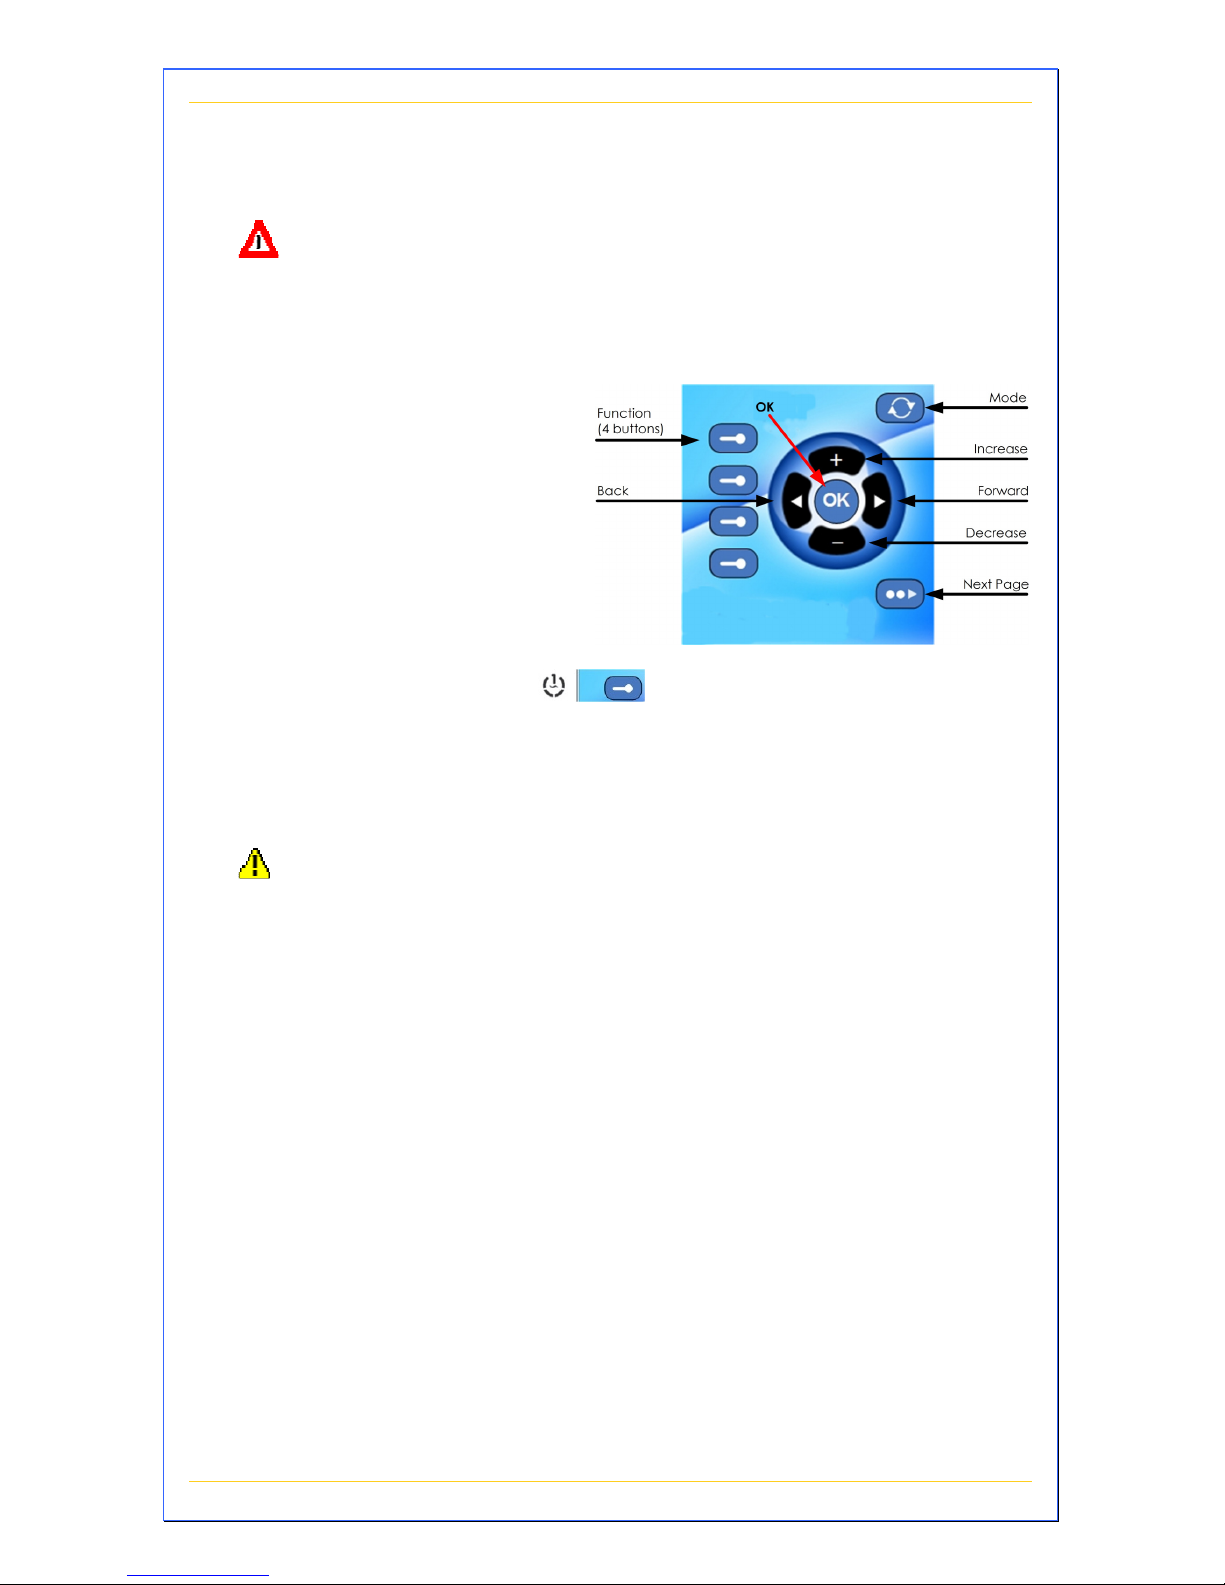
Refer to the following picture for an explanation of your spa’s
controls, components, and technical terms. Note that not all
models have all features and components.
4
Before Adding Water
Before adding water, go through these simple steps now to
prevent common issues when setting up your spa for the first time.
Verify that the following have all been rechecked.
1. Turn off all power to the spa at the main breaker panel.
2. Open the side panels to access the internal components.
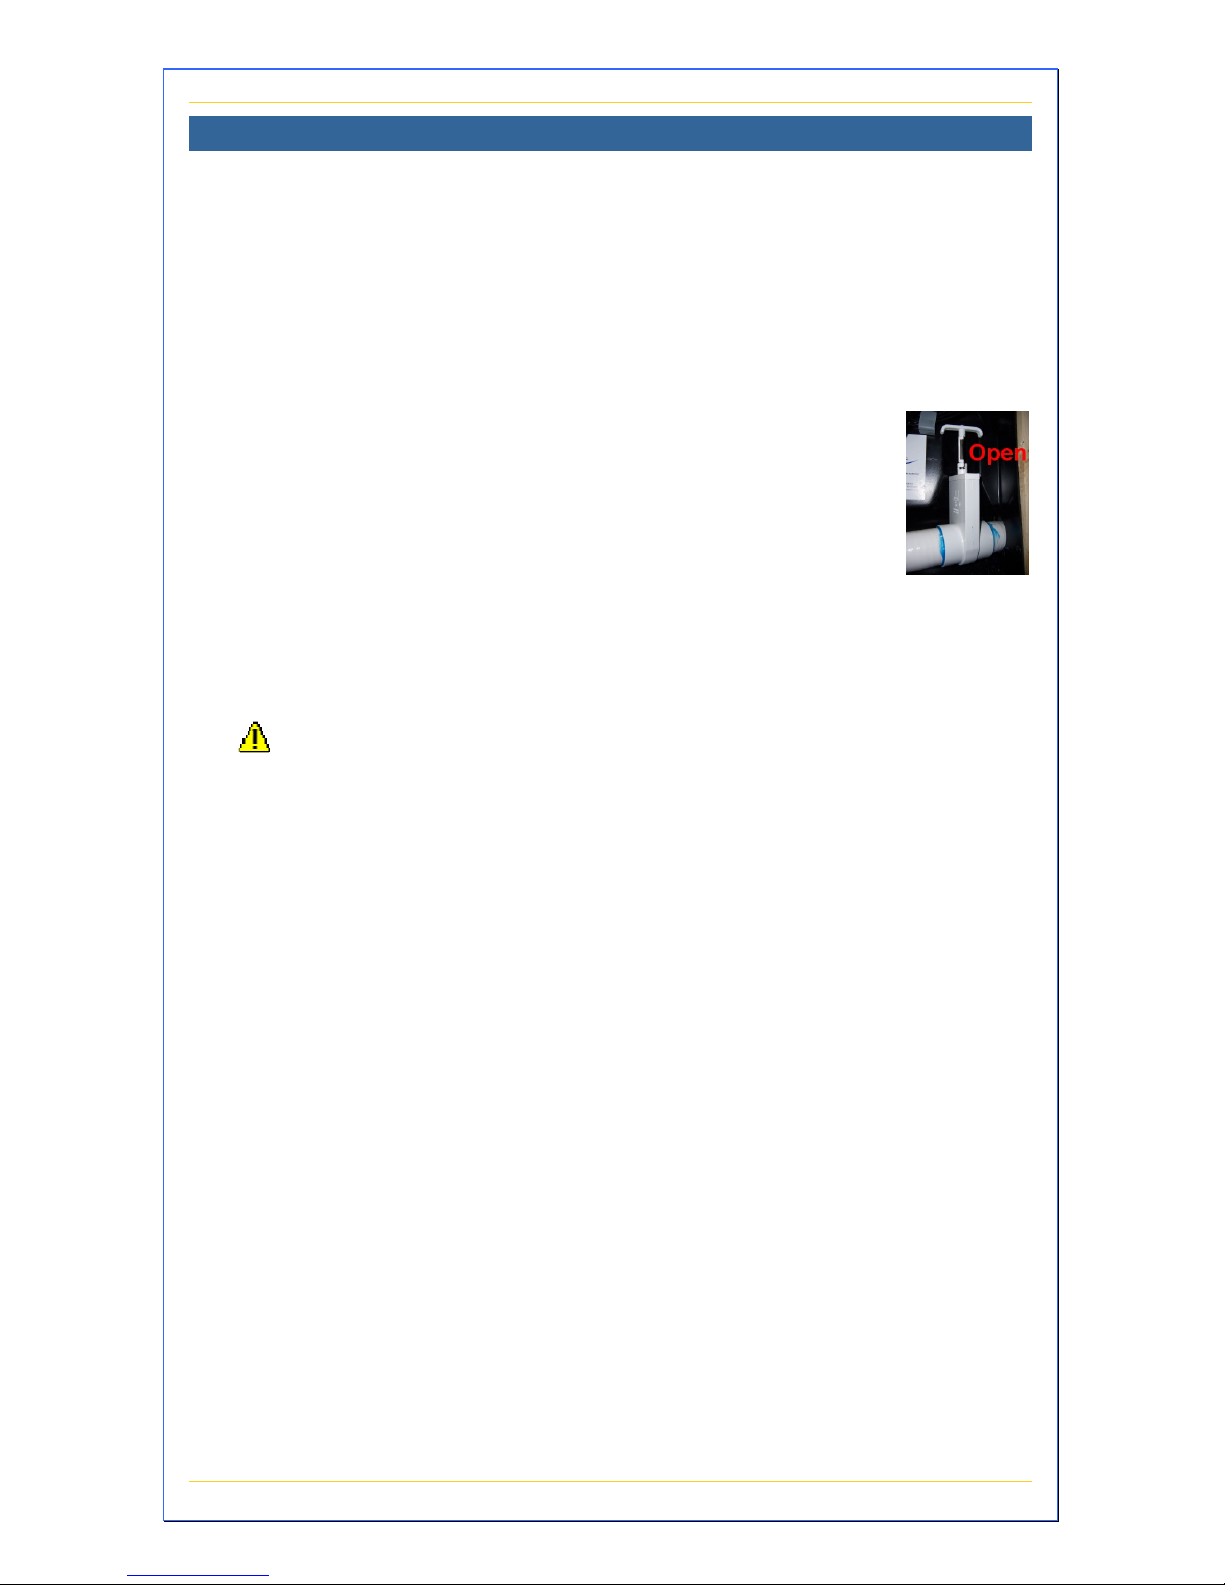
3. Check that all slide valves are opened (T-handles
pulled out) to the heater and all pumps.
4. Check that there are no obvious signs of loose
wires or broken pipes.
5. Check that the two heater unions are tight. These are handtightened and do not need any kind of special tool to tighten
them.
Caution: Do not use a wrench. Over-tightening may cause
damage to unions and gaskets, which will not be
covered under warranty.
6. Check that the unions on all pumps are tight.
7. Clean out any foreign debris from within the service access
area or inside of the spa itself.
8. With the drain open and filters removed, thoroughly rinse out
the spa with warm water until the drained water runs clear. Run
water through the filtration canister and jet lines to remove any
incidental dust, dirt, and debris that may have accumulated
during shipment or installation. Drain all water completely.
9. Make sure that the spa drain valve is closed and the cap is on
tight.
10. Install the filter(s) in the filtration canister.
11. Check that all of the spa jets are open (turned full counterclockwise).
12. Now is the best time to clean and polish the surfaces of your
spa.
5
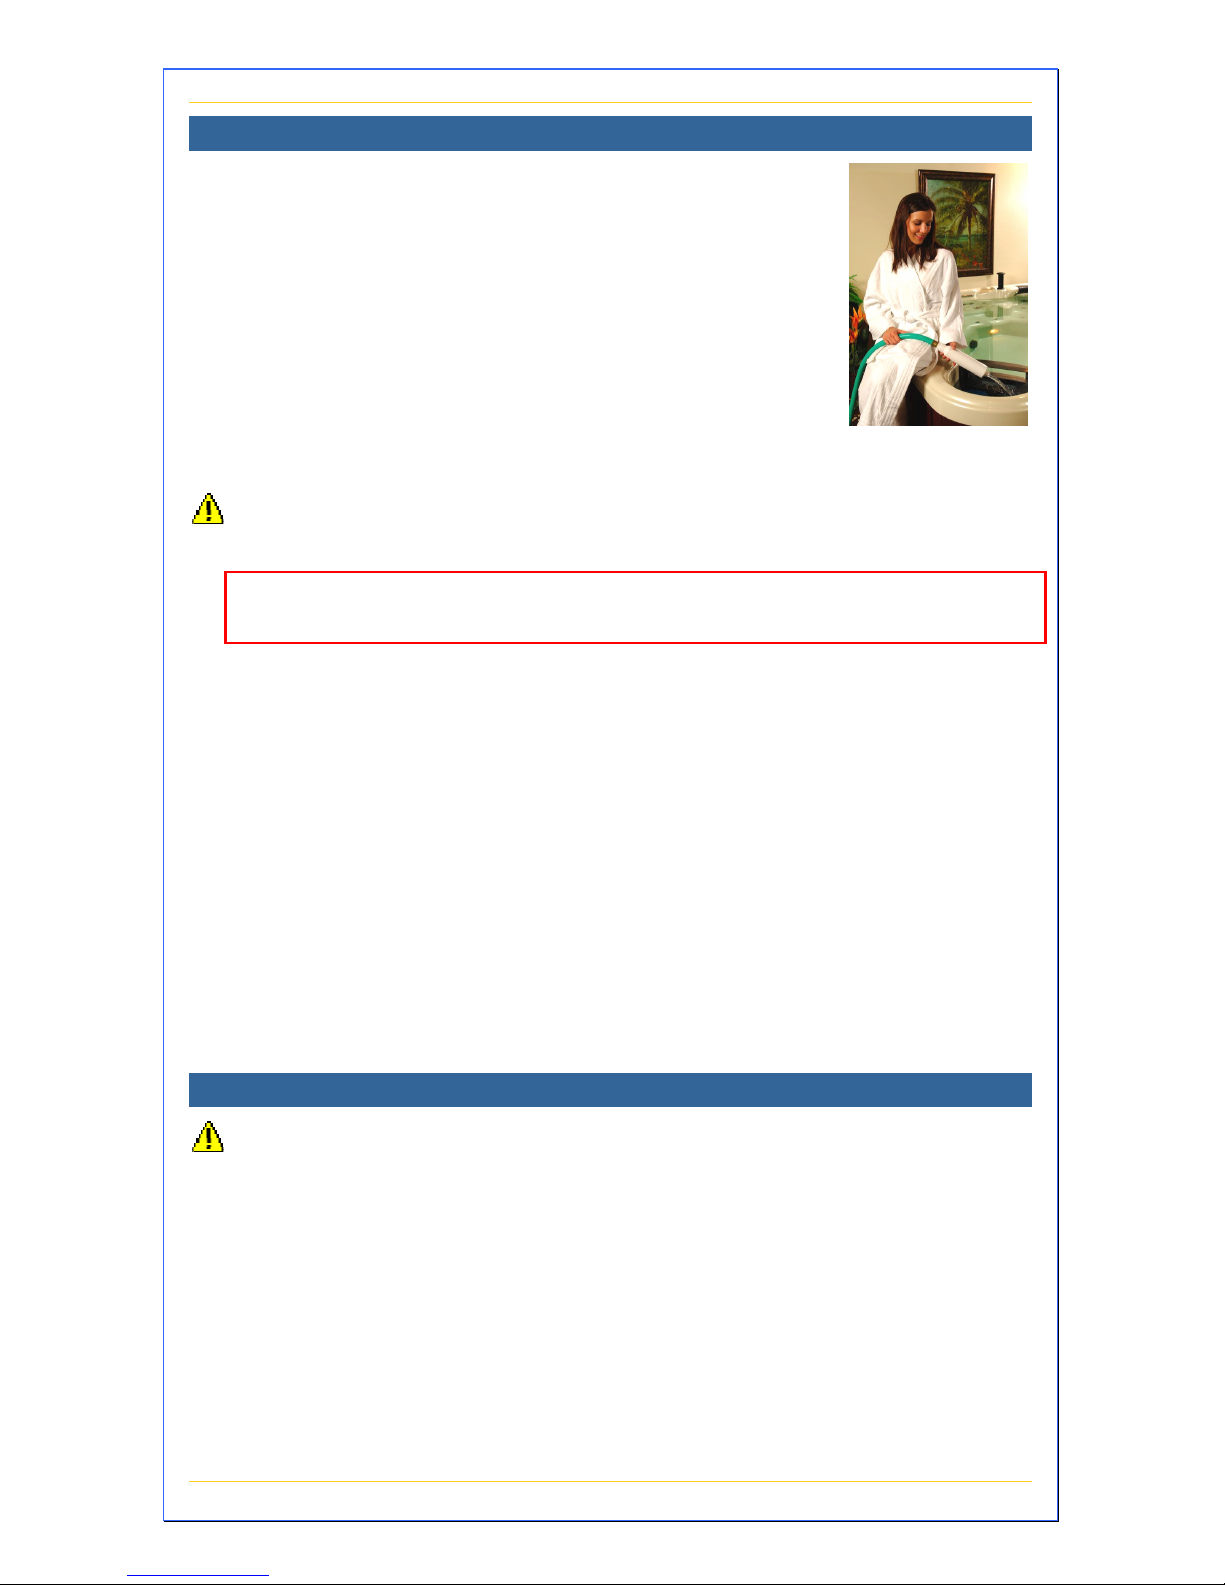
Filling Your Spa
Now it's time to fill your spa with water. Do not turn
on the electricity yet until the spa is completely
filled. To properly fill your spa:
1. Make sure that the filters (in the filtration
canister) are gently screwed into place. Turn
them clockwise until they stop being careful
not to over-tighten them (this avoids cracking
the filter).
2. Connect a standard garden hose to a faucet with regular cold
tap water (not softened water or hot water).
Caution: The water from your hot water tank should not be used
to fill the spa.
Important: To assure that the pump is properly primed, fill the
spa through the filter area only.
5. Fill the spa until the water level is about 2,5cm abov e all jets (or
about 1cm below the pillow). Do not over fill.
Note: Every person entering a spa displaces a given volume of
water, so adjust water level to the number of people regularly
using the spa.
Turn off the hose and check again for any small leaks.
Start-up Instructions
Caution: Do not turn on any pump until your spa is properly
filled with water. Running any pump without water in
your spa can cause IMMEDIATE damage, which is not
covered under warranty!
By now you have rechecked your spa’s mechanical connections
and filled it with water to about 1” above all jets by adding cold
tap water through the pre-filter. Turn on power to the spa at the
main breaker panel and test the operation of the electrical
system. If you encounter a problem, please reference the
troubleshooting guide.
6
1. Turn on the breaker and test the operation of the Ground-Fault
Circuit Interrupter (GFCI) breaker by pushing the small button.
This should automatically trip the spa's circuit breaker.
DANGER: If this breaker does not trip, immediately call your
electrician. Do not use your spa!
Only if pushing this button successfully trips this circuit breaker
should you reset this breaker and proceed to the next step.
2. Go to the topside control
panel and look at the
display. The system goes
through a startup
sequence after which the
circulation pump starts
and the panel displays
the current water
temperature.
3. Press the Pump 1 button . You should hear the first
pump turn on, see water circulating in the spa, and see the
icon swirl on the display.
4. Press the Pump 1 button again. You should hear the first pump
turn on a higher speed and the icon swirl faster.
Caution: If water does not flow from the jets after 2 minutes,
turn power off at the main panel and bleed air
from the system (see page 17). Turn power on
again. Sometimes momentarily turning a pump
off/on will prime it. Only do this four times.
5. If the water is running smoothly through the lines, open the air
control valve and you should see an increase in jet pressure.
Check and adjust the water/airflow of every jet if necessary.
Each jet in your spa can be adjusted for massage intensity and
directional flow. Turn the outer jet dial counterclockwise to
increase the water volume and clockwise to turn it off. Pivot
the angle of a jet to achieve an optimal massage.
Adding an air mixture intensifies the level of your massage. Turn
the air control valve counterclockwise to increase the air
mixture and clockwise to turn it off.
To minimize heat loss, close the air control valve when your spa
is not in use.

7
6. Press the Pump 1 button a third time to turn Pump 1 off. A builtin timer automatically turns Pump 1 off after 20 minutes, unless
the pump manually has been deactivated first.
7. Press the Pump 2 button
. If Pump 2 has not primed
after 3 minutes repeat same priming procedure of step 3
above for Pump 1. Check and adjust the water and airflow of
every jet from Pump 2 if necessary.
8. Press the Pump 2 button again. You should hear the second
pump turn on a higher speed and the icon swirl faster.
9. Press the Pump 2 button a third time to turn off Pump 2. A builtin timer automatically turns Pump 2 off after 20 minutes, unless
the pump manually has been deactivated first.
10. Press the Light button
to turn the spa Light on. Press
this button again to cycle through the five colors (red, blue,
green, white, and yellow). Once a desired color is found,
pressing this button again stays on this color.
11. Press the Light button again to turn the spa Light off. A built-in
timer automatically turns the spa Light off after two hours,
unless the spa Light manually has been deactivated first.
12. Press the Next Page button .
13. Press the Blower button
to turn on the air blower (if
equipped). Check that air goes to the air jets on the bottom of
each seat.
14. Press the Blower button again to turn the Blower off. A built-in
timer automatically turns the Blower off after 20 minutes.
Note: When temperature limits allow, a circulation pump and
ozone generator run continuously to help keep your water clean.
8
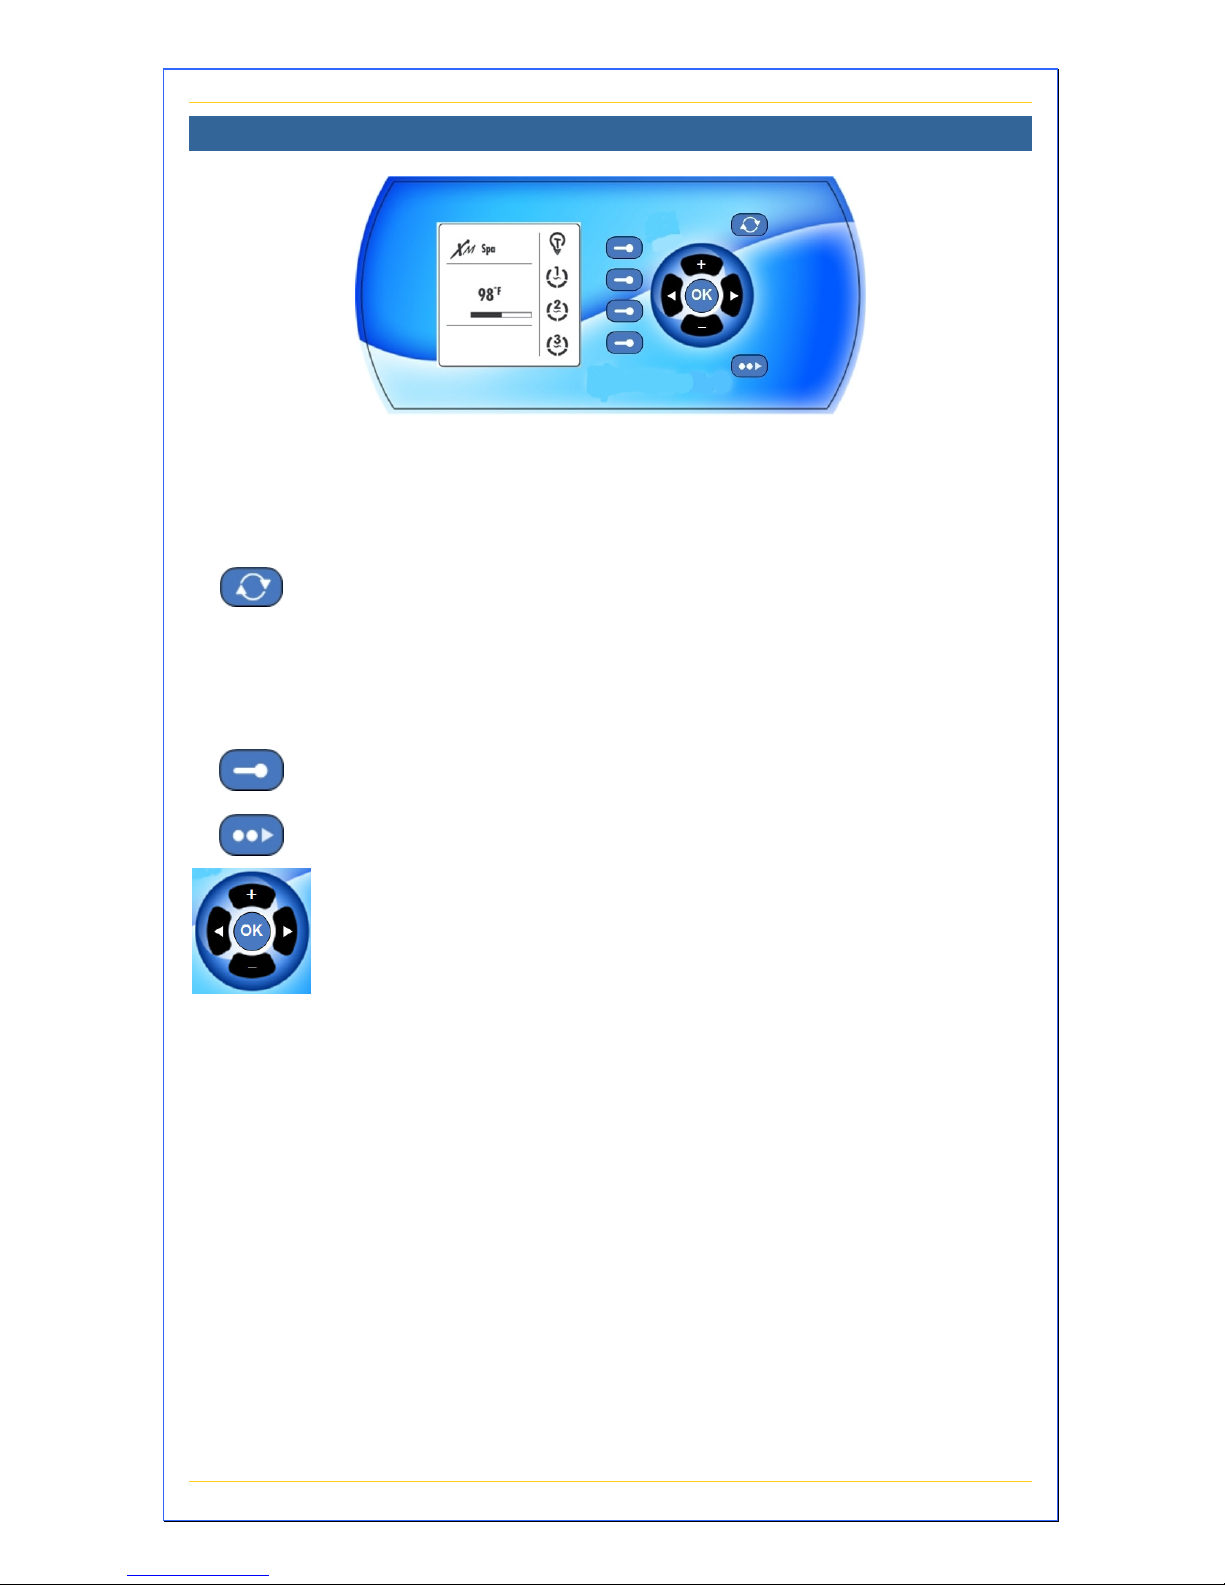
Topside Control Panel
The topside control panel uses a paged-style menu system to
access various features and options. The above display shows the
normal spa mode where you control the most frequently used
devices. Basic button functions are described below.
Press the Mode button to display the three operating
modes (Spa or Options). Pressing the function button
(described below) next to a mode selects that mode.
Pressing Mode in a menu exits the menu without saving
the values.
Press the corresponding function button to select that
mode or operate that device.
Press Next Page for more pages.
Press OK to toggle between the time or water
temperature.
Press the Increase/Decrease (+/-) buttons to raise or
lower values in a menu.
Press the Forward/Backward (</>) buttons to move
between selections.
The system normally displays the current water temperature. Press
the Increase/Decrease (+/-) buttons to set the desired (set) water
temperature.
Note: During programming, the heater is disabled and its icon
flashes.
9
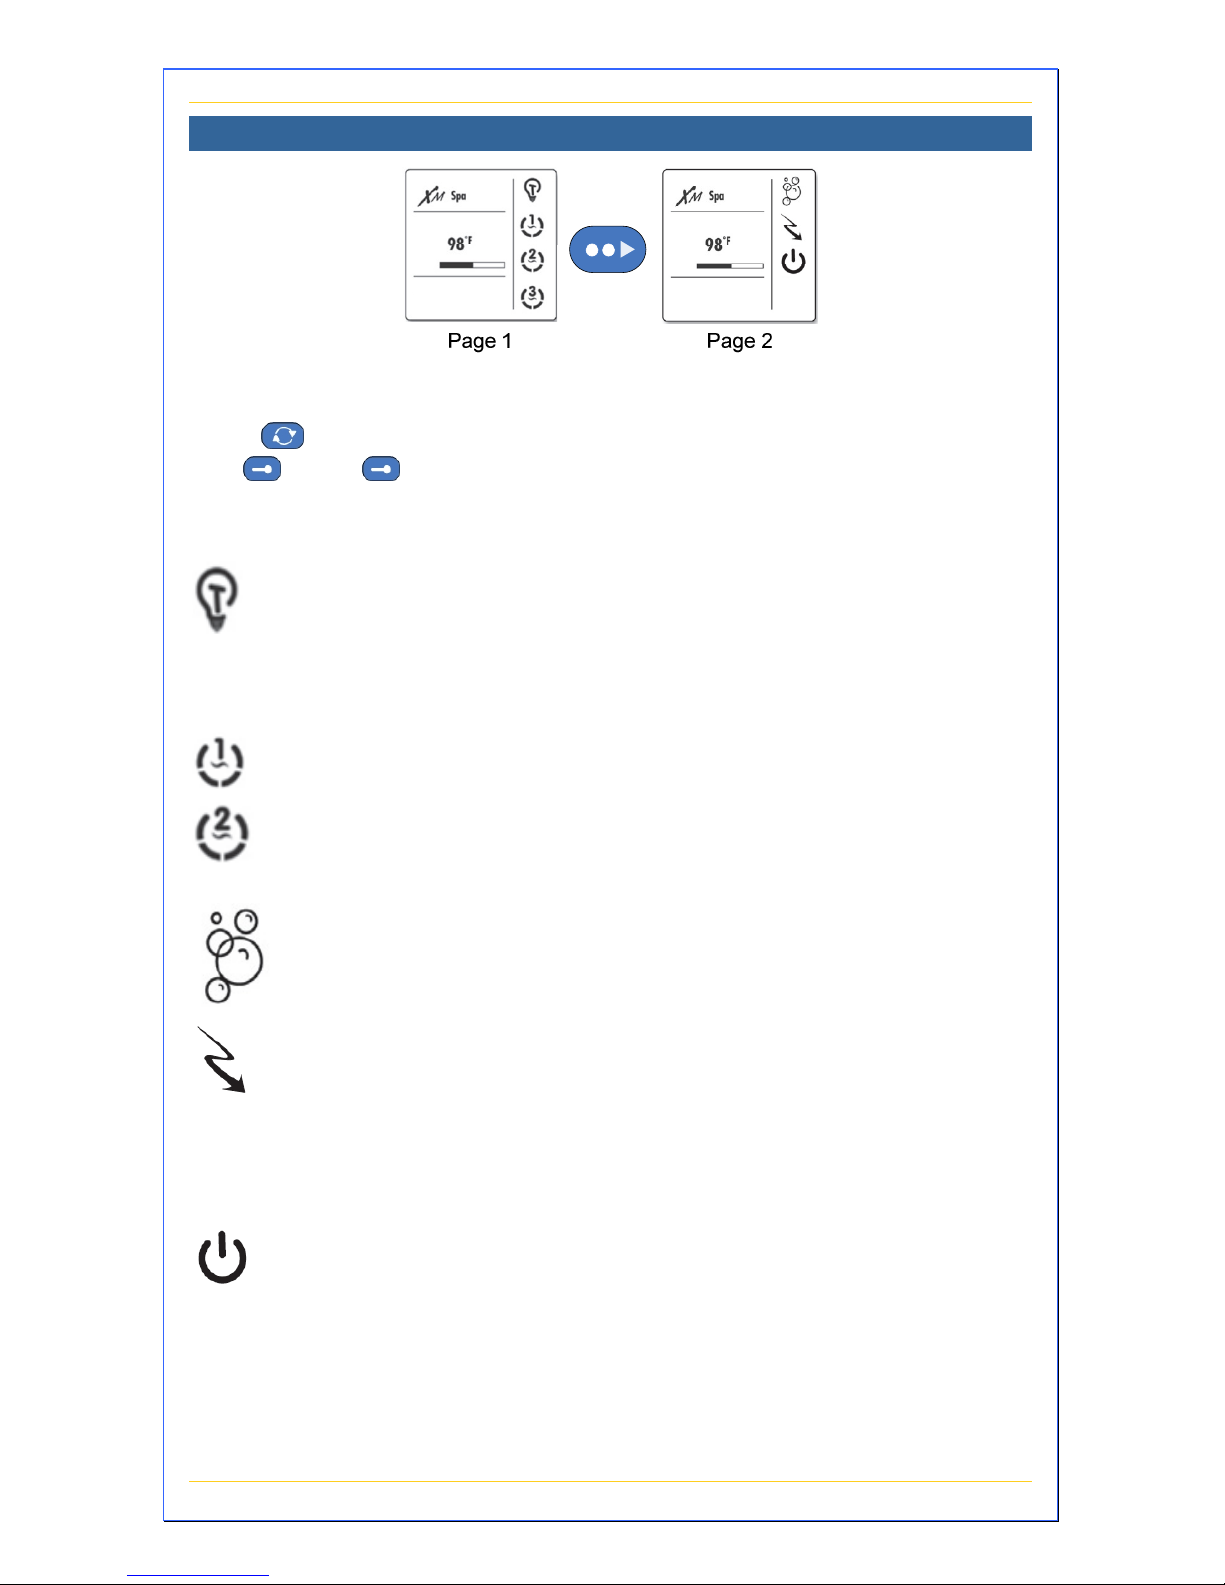
Spa Mode
Spa mode allows you to control the basic devices of your spa plus
access Standby and Economy features. To access Spa mode, first
press to access the main menu and then select the Spa mode
with
. Press next to the feature or device you wish to operate
on that page to turn it on or off. The corresponding display icon
animates indicating its status.
Pressing this button turns the LED system on/off. Press
again to cycle through the five colors (red, blue, green,
white, and yellow). Once a desired color is found, pressing
again to stay on this color. A built-in timer turns it off after
120 minutes, unless you turn it off first.
Pumps 1 and 2 are both 2-speed pumps. Pressing the
corresponding button turns it on low speed, pressing
again turns it on high speed, pressing it a third time to
turns it off. A built-in timer turns this pump off after 20
minutes.
The blower is single-speed. Pressing this button turns it on
and off. A built-in timer turns the blower off after 20
minutes.
Typically used when you are planning to be away from
your spa for long periods of time, Economy mode allows
you to set back your spa’s water temperature by 20ºF
every day to help you lower your operating costs. Pressing
the function button manually turns this mode on/off. See
page 22 for more information on programming this mode.
Standby pauses the current pump settings. If you leave
your spa and want to save the current settings, press
Standby. Pressing Standby again, or when a filter purge
start time is reached, returns your spa to normal.
10
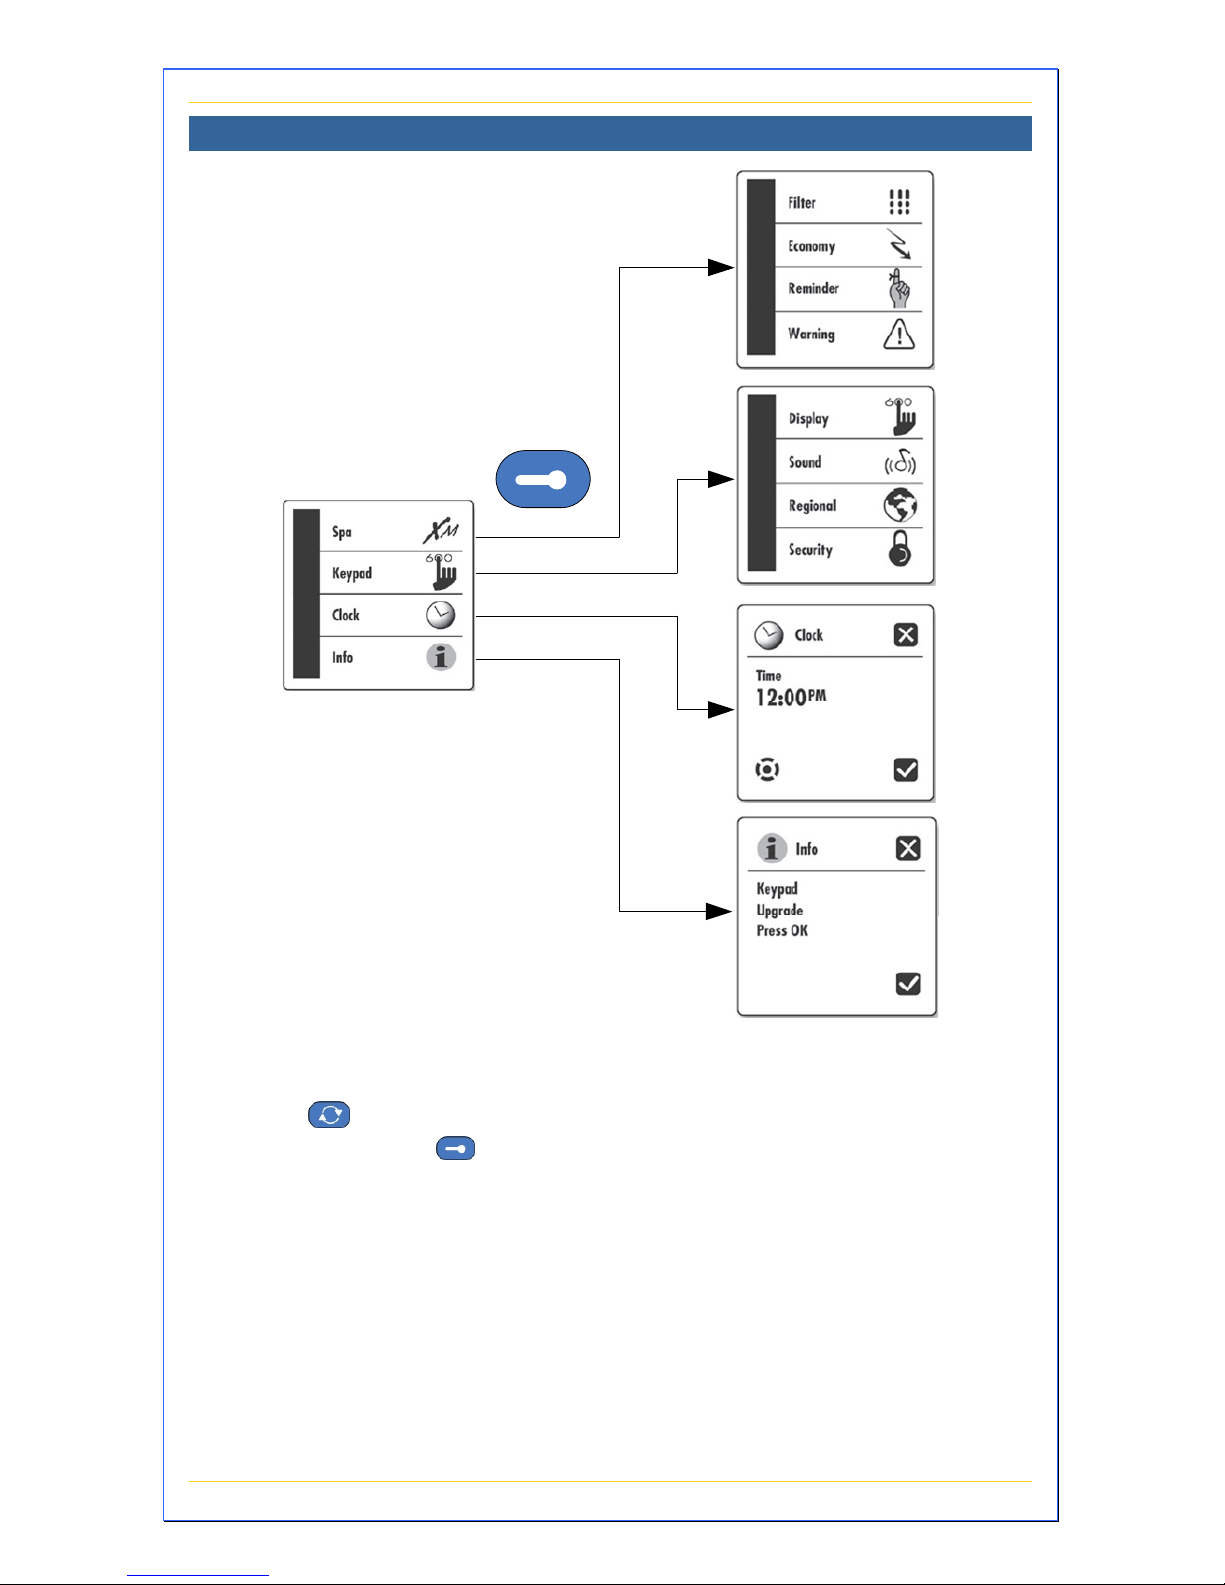
Options Mode
In options mode, the system shows you which option you wish to
program or alter (spa, keypad, or clock). To access Options mode,
first press to access the main menu and then select the
Options mode with
.
 Loading...