

Page 1

Sistema interfonico per sportelli
Intercom system for counters
Système interphonique pour guichets
Istruzioni per l’uso
Instructions for use
Manuel d’utilisation
ITC2000-C
SOMMARIO
DESCRIZIONE DEL SISTEMA
1. Generalità ......................................4
1.1 Dotazione ........................................... 4
1.2 Accessori opzionali .............................. 4
MANUALE INSTALLATORE
1. Posizionamento e connessioni .... 5
1.1 Disposizione del microfono
1.2 Disposizione della base interfonica ...... 6
1.3 Disposizione della scatola di derivazione 6
1.4 Disposizione
2. Impostazioni .................................. 7
2.1 Descrizione generale delle funzionalità . 7
2.2 Impostazione dei volumi ...................... 7
2.3 Impostazione delle
3. Modalità di
3.1 Descrizione delle diverse modalità ....... 9
3.2 Attenuazione dei canali ....................... 9
3.3 Modalità ‘Remote’ ............................. 10
4. Regolazioni .................................. 10
5. Funzioni principali ........................ 11
5.1 Led di segnalazione .......................... 11
5.2 Ghiera luminosa ................................ 11
5.3 Funzionalità ...................................... 11
ISTRUZIONI PER L’USO INSTRUCTIONS FOR USE MANUEL D’UTILISATION
da parete e degli altoparlanti .............. 6
dell’alimentatore esterno ..................... 7
modalità di funzionamento .................. 7
funzionamento ‘automatico’ ........ 8
• Modalità 0 • Full Duplex.................... 9
• Modalità 1 • Half Duplex................. 10
• Modalità 2 • Full Duplex Prioritario .. 10
TABLE OF CONTENTS
DESCRIPTION OF THE SYSTEM
1. General information ...................... 4
1.1 Equipment supplied ............................. 4
1.2 Optional accessories ........................... 4
INSTALLER GUIDE
1. Positioning and connections ....... 5
1.1 Setting up microphone for
wall-mounting and the loudspeakers ... 6
1.2 Setting up the intercom base .............. 6
1.3 Setting up the junction box ................ 6
1.4 Setting up the
external power supply ......................... 7
2. Settings .......................................... 7
2.1 General description of the functions ... 7
2.2 Setting the volumes ............................ 7
2.3 Setting the
operating modes ................................ 7
3. Operating mode
‘automatic’ ..................................... 8
3.1 Description of the different mode ....... 9
3.2 Attenuating the channels ................... 9
• Mode 0 • Full Duplex ........................ 9
• Mode 1 • Half Duplex ..................... 10
• Mode 2 • Full Duplex with Priority ... 10
3.3 ‘Remote’ Mode ................................. 10
4. Adjustments ................................ 10
5. Main functions ............................. 11
5.1 Signalling LEDs ................................. 11
5.2 Lighted ring ...................................... 11
5.3 Functions ......................................... 11
SOMMAIRE
DESCRIPTION DU SYSTÈME
1. Généralités .................................. 20
1.1 Équipement ...................................... 20
1.2 Accessoires en option ....................... 20
MANUEL DE L’INSTALLATEUR
1. Mise en place et connexions ...... 21
1.1 Installation du microphone
mural et des haut-parleurs ............... 22
1.2 Installation de la base interphonique 22
1.3 Installation de la boîte de dérivation . 22
1.4 Installation de
l’alimentation extérieure ................... 23
2. Programmations ......................... 23
2.1 Description générale des fonctions ... 23
2.2 Réglage des volumes ........................ 23
2.3 Réglage des modes
de fonctionnement ........................... 23
3. Modes de
fonctionnement ‘automatique’ .. 24
3.1 Description des différents modes ...... 25
3.2 Atténuation des canaux ................... 25
• Mode 0 • Full Duplex ...................... 25
• Mode 1 • Half Duplex ..................... 26
• Mode 2 • Full Duplex Prioritaire ...... 26
3.3 Mode ‘Remote’ .................................. 26
4. Réglages ...................................... 26
5. Fonctions principales ..................27
5.1 DEL de signalisation .......................... 27
5.2 Bague lumineuse .............................. 27
5.3 Fonctions ......................................... 27
APPENDICE .......................................... 13
MANUALE OPERATORE
1. Descrizione
generale delle parti .................... 16
2. Funzioni principali ........................ 16
2.1 Tasti di scelta diretta ........................ 16
3. Utilizzo dell’Interfonico .............. 17
3.1 Accensione ....................................... 17
3.2 Selezione della modalità desiderata ... 17
3.3 Risposta ad una chiamata remota ..... 18
3.4 Invio di un avviso al pubblico ............ 18
3.5 Spegnimento dell’Interfonico ............. 18
CARATTERISTICHE TECNICHE ............ 19
APPENDIX ............................................ 13
OPERATOR MANUAL
1. General
description of parts .................... 16
2. Main functions ............................. 16
2.1 Selection keys .................................. 16
3. Using the intercom system ........ 17
3.1 Switching on ..................................... 17
3.2 Selecting the desired mode ............... 17
3.3 Answering a remote call .................... 18
3. 4 Sending an announcement to the public . 18
3.5 Switching off the intercom system .... 18
TECHNICAL SPECIFICATIONS ............. 19
APPENDICE .......................................... 29
MANUEL DE L’OPÉRATEUR
1. Description
générale des pièces .................... 32
2. Fonctions principales ..................32
2.1 Touches de choix direct .................... 32
3. Utilisation de l’Interphonique ....33
3.1 Allumage .......................................... 33
3.2 Sélection du mode désiré .................. 33
3.3 Réponse à un appel à distance ......... 34
3.4 Envoi d’un avis au public ................... 34
3.5 Arrêt de l’Interphonique ................... 34
CARACTÉRISTIQUES TECHNIQUES ..... 35
1
Page 2

Interphonsystem für Schalter
Intercomsysteem voor loketten
Sistema de Interfono para ventanillas
Gebrauchsanleitung
Gebruiksaanwijzing
Instrucciones de empleo
ITC2000-C
INHALTSGABE
SYSTEMBESCHREIBUNG
1. Allgemeine Hinweise ................... 20
1.1 Lieferumfang .................................... 20
1.2 Optionales Zubehör .......................... 20
HANDBUCH FÜR DEN INSTALLATEUR
1. Positionierung und Anschlüsse .. 21
1.1 Position von
Wandmikrofon und Lautsprechern .... 22
1.2 Position der Interphonsprechstelle ... 22
1.3 Position der Verteilerdose ................. 22
1.4 Position der externen
Einspeisungsvorrichtung ................... 23
2. Einstellungen ............................... 23
2.1 Allgemeine Beschreibung
der Funktionalitäten ......................... 23
2.2 Einstellung der Lautstärke ................ 23
2.3 Einstellung der Betriebsmodi ............. 23
3. ‘Automatischer’
Betriebsmodus ............................ 24
3.1 Beschreibung der verschiedenen Modi . 25
3.2 Abschwächung der Kanäle ................ 25
• Modus 0 • Full Duplex ..................... 25
• Modus 1 • Half Duplex .................... 26
• Modus 2 • Full Duplex mit Vorrang .. 26
3.3 Modus ‘Remote’ ................................ 26
4. Einstellungen ............................... 26
5. Hauptfunktionen ......................... 27
5.1 Anzeige-Led ..................................... 27
5.2 Leuchtring ........................................ 27
5.3 Funktionalitäten ............................... 27
ANHANG ............................................... 29
BEDIENERHANDBUCH
1. Allgemeine Beschreibung
der Komponenten ....................... 32
2. Hauptfunktionen ......................... 32
2.1 Tasten für die direkte Auswahl.......... 32
3. Verwendung des Interphons ...... 33
3.1 Einschalten ....................................... 33
3.2 Auswahl der gewünschten Modus ...... 33
3.3 Antwort an eine
entfernte Sprechstelle ...................... 34
3.4 Senden einer
Durchsage an das Publikum .............. 34
3.5 Ausschalten des Interphons ............. 34
TECHNISCHE EIGENSCHAFTEN ............ 35
INHOUD
BESCHRIJVING VAN HET SYSTEEM
1. Algemeen ..................................... 36
1.1 Meegeleverde componenten............. 36
1.2 Optionele accessoires ....................... 36
HANDLEIDING VOOR DE INSTALLATEUR
1. Plaatsing en aansluitingen ......... 38
1.1 Opstelling van de
wandmicrofoon en de luidsprekers .... 38
1.2 Opstelling van de intercombasis ........ 38
1.3 Opstelling van de aftakdoos ............. 38
1.4 Opstelling van de
externe voedingsdoos ...................... 39
2. Instellingen .................................. 39
2.1 Algemene beschrijving
van de functies ................................ 39
2.2 Instelling van het volume .................. 39
2.3 Instelling van de werkingswijze ......... 39
3. ‘Automatische’
werkingswijze .............................. 40
3.1 Beschrijving van de werkingen .......... 41
3.2 Verzwakking van de kanalen ............. 41
• Werking 0 • Full Duplex .................. 41
• Werking 1 • Half Duplex ................. 42
• Werking 2 • Full Duplex Prioritair .... 42
3.3 Werking ‘Remote’ ............................. 42
4. Regelingen ................................... 42
5. Belangrijkste functies ................. 43
5.1 Waarschuwingsled............................ 43
5.2 Lichtring ........................................... 43
5.3 Functies ........................................... 43
APPENDIX ............................................ 45
HANDLEIDING VOOR DE OPERATOR
1. Algemene omschrijving
van de componenten .................. 48
2. Belangrijkste functies ................. 48
2.1 Directe-keuzetoetsen ....................... 48
3. Gebruik van de Intercom ........... 49
3.1 Aanschakelen ................................... 49
3.2 Selectie van de gewenste werking .... 49
3.3 Beantwoorden van
een oproep op afstand ..................... 50
3.4 Verzending van een
omroepbericht naar het publiek ........ 50
3.5 Uitschakelen van de Intercom ........... 50
TECHNISCHE KENMERKEN .................... 51
SUMARIO
DESCRIPCIÓN DEL SISTEMA
1. Información General ................... 36
1.1 Equipamiento .................................... 36
1.2 Accesorios en opción ........................ 36
MANUAL DEL INSTALADOR
1. Colocación y conexiones ............. 38
1.1 Colocación del micrófono
de pared y de los altavoces .............. 38
1.2 Colocación de la base interfónica ...... 38
1.3 Colocación de la cajetilla de derivación . 38
1.4 Colocación del
alimentador exterior ......................... 39
2. Configuraciones ........................... 39
2.1 Descripción general
de las funcionalidades....................... 39
2.2 Configuración de los volúmenes ........ 39
2.3 Programación de las modalidades ...... 39
3. Modalidades de
funcionamiento ‘automático’ ..... 40
3.1 Descripción de las modalidades ....... 41
3.2 Atenuación de los canales ................ 41
• Modalidad 0 • Full Duplex ............... 41
• Modalidad 1 • Half Duplex .............. 42
• Modalidad 2 • Full Duplex Prioritario 42
3.3 Modalidad ‘Remote’ ........................... 42
4. Ajustes ......................................... 42
5. Funciones principales .................. 43
5.1 LEDs de señalización ......................... 43
5.2 Anillo luminoso .................................. 43
5.3 Funcionalidades ................................ 43
APÉNDICE ............................................. 45
MANUAL DEL OPERADOR
1. Descripción general
de las partes ................................ 48
2. Funciones principales .................. 48
2.1 Teclas de selección directa ................ 48
3. Uso del Interfono ........................ 49
3.1 Encendido ........................................ 49
3.2 Selección de la modalidad deseada ... 49
3.3 Respuesta a
una llamada remota .......................... 50
3.4 Envío de un
aviso al público ................................. 50
3.5 Apagado del Interfono ..................... 50
CARACTERÍSTICAS TÉCNICAS............ 51
2
Page 3

Questa pagina è stata intenzionalmente lasciata bianca.
This page has been kept on purpose blank.
3
Page 4

Nel ringraziarVi per aver scelto un prodotto PASO, vogliamo ricordarVi
che la nostra azienda opera con sistema di qualità certificato. Tutti i
nostri prodotti vengono pertanto controllati in ogni fase della produzione
per garantirVi la piena soddisfazione del Vostro acquisto. Per ogni
evenienza la garanzia coprirà, nel periodo di validità, eventuali difetti di
fabbricazione. Vi raccomandiamo di leggere attentamente le seguenti
istruzioni d’uso per sfruttare appieno le prestazioni offerte da questo
prodotto e per evitare eventuali problemi.
•••
1. GENERALITÀ
Il sistema Intercom 2000 è stato appositamente studiato per consentire
una conversazione a ‘viva voce’ tra il personale di sportello ed i clienti.
Tramite la gestione a microcontrollore, questo sistema interfonico
permette di definire la modalità di funzionamento più adeguata ai requisiti
dell'ambiente ed alle esigenze di utilizzo. Durante le fasi di installazione,
infatti, è possibile selezionare una tra le tre configurazioni disponibili,
selezionando la più opportuna al tipo di installazione. L'interfonico è
stato predisposto inoltre per il collegamento ad impianti di diffusione
sonora di tipo PA (Public Address). Secondo questa predisposizione,
oltre ad eseguire le operazioni di comunicazione da sportello, l'operatore
può indirizzare l'audio della base interfonica verso l'impianto di diffusione
sonora, utilizzando l'Intercom come una base microfonica per annunci.
Per realizzare questa prestazione è necessario collegare la presa
REMOTE (vedere in Appendice la disposizione dei poli delle prese poste
sul retro della base interfonica) all'ingresso audio dell'impianto di
diffusione sonora. Il collegamento deve essere eseguito tramite cavetto
di tipo telefonico opportunamente terminato sulla connessione con
l'Intercom. L'interfonico è inoltre predisposto per essere collegato ad
una postazione utente remota, costituita da una semplice base
microfonica preamplificata e provvista di un tasto di chiamata. Il
collegamento della base utente remota si effettua tramite la presa
REMOTE RJ45 a 8 poli posta sul retro della base interfonica (vedi
Appendice).
While thanking you for having chosen a PASO product, we would like to
remind you that our company works according to a certified Quality
System. This means that all our products are checked during every
phase of manufacturing in order to ensure that you will be fully satisfied
with your purchase. In any case, the guarantee will cover any
manufacturing flaws during the guarantee period. We recommend that
you read the following instructions for use and follow them carefully in
order to exploit in full the performance of this product and use it correctly.
•••
1. GENERAL INFORMATION
The Intercom 2000 system was designed specifically to enable
‘handsfree’ conversation between front-office personnel and customers.
Thanks to microcontroller-based management, this intercom system
enables the most suitable operating mode for the requisites of the
environment and for the user’s requirements to be chosen. This is done
at the time of installation, when it is possible to select one of the three
available configurations, depending on which type of installation is most
advisable. The intercom system also includes provisions for connection
to PA (Public Address) type sound-broadcasting systems. Thanks to
these provisions, the operator – in addition to communications across
the counter – will be able to address the audio output of the intercom
base towards the sound-broadcasting system, using the Intercom as a
microphone base for announcements. To exploit this function, it is
necessary to connect the REMOTE socket (see the arrangement of the
poles of the sockets on the rear of the intercom base in the Appendix)
to the audio input of the sound-broadcasting system. The connection
has to be made using a telephone type cable terminated on the
connection with the Intercom. The system also has provisions for
connection to a remote user station, consisting of a simple pre-amplified
microphone base equipped with a call key. The connection to the remote
user base is made by means of the 8-pole RJ45 REMOTE socket on the
rear of the intercom base (see Appendix).
1.1 Dotazione
All'interno della confezione del prodotto, potrete trovare questi
componenti:
1. Base interfonica, munita di microfono a stelo fisso con spugna
protettiva antisoffio.
2. Scatoletta di derivazione (di tipo telefonico) dotata di presa
telefonica a 6 poli (femmina).
3. Cavetto di collegamento fra la base interfonica e la scatoletta di
derivazione (lunghezza m.3, con spine telefoniche a 6 poli (maschio).
4. Alimentatore esterno 230 Volt AC / 18 Volt DC da 500 mA.
5. Microfono da parete di tipo elettrete, provvisto di cavetto schermato
(lunghezza 3m).
6. Manuale d'uso e di installazione, corredato di certificato di garanzia Paso.
N.B. Gli altoparlanti non vengono forniti nella dotazione.
1.2 Accessori opzionali
L'interfonico consente di montare un massimo di 2 altoparlanti (collegati
in parallelo tra di loro). Per la scelta degli altoparlanti, proponiamo due
soluzioni, a seconda della modalità di installazione dell'apparecchio:
- per installazioni ove è richiesta l'applicazione esterna
dell'altoparlante è consigliato il modello Paso C401-B (impedenza
16 ohm, potenza max 3 W), particolarmente adatto per quelle
situazioni in cui viene richiesta una certa robustezza.
- nel caso fosse richiesto l'incasso dell'altoparlante, consigliamo gli
altoparlanti della EGi:
EGi G28N/16 altoparlante da 2” (adatto ai controsoffitti).
EGi G13U/16* altoparlante da parete con griglia da 2” (per scatola
da incasso quadrata).
*
L’altoparlante G13U/16 è disponibile in versione idonea per essere
montato con le placche delle serie italiane più diffuse (Bticino® Living
International - GLIT/16 e Light - GL2T/16 e GL3T/16, Gewiss® PlayBus
- GP2G/16 e Vimar® Idea - GI3V/16).
Il microfono è stato concepito per poter essere installato sul vetro dello
sportello grazie allo strato biadesivo anti-vibrazioni di cui è provvisto.
Il cavetto schermato del microfono della lunghezza di 3 metri può essere
nascosto alla vista del pubblico grazie all'uso di canaline in PVC bianco di
formato standard 5 x 10 mm (anch'esse dotate di nastro biadesivo) che
ben si adattano al corpo del microfono: le canaline sono di facile reperibilità
presso un qualunque rivenditore di materiale elettrico.
1.1 Equipment supplied
Inside the package, you will find the following components:
1. Intercom base, equipped with a fixed-stem microphone with a
protective sponge to prevent hissing.
2. Junction box (telephone type) with a 6-pin telephone socket
(female).
3. Cable for connection between the intercom base and the junction
box (length 3 m, fitted with 6-pin telephone plugs (male).
4. External power supply, 230 Volts AC / 18 Volts DC, 500 mA.
5. Electret microphone for wall-mounting fitted with shielded cable (length
3 m).
6. User and installation manual, including Paso certificate of guarantee.
N.B. The loudspeakers are not included in the equipment
supplied.
1.2 Optional accessories
The intercom system enables a maximum of 2 loudspeakers (connected
in parallel to one another) to be installed. For the choice of the
loudspeakers, we propose two solutions, depending on the way in which
the equipment is installed:
- for installations in which external application of the loudspeaker is
required, the Paso C401-B loudspeaker (impedanc 16 ohm, max.
output power 3 W) is recommended and is particularly suitable for
situations in which a tough unit is required.
- if flush-mounting of the loudspeaker is required, we recommend the
loudspeakers by EGi:
EGi G28N/16 2” loudspeaker (for mounting in false ceilings).
EGi G13U/16* 2” loudspeaker for wall-mounting with grille (for
square flush-mounted box).
*
The G13U/16 loudspeaker is available in a version suitable for
mounting with the most commonly used Italian plates (Bticino® Living
International - GLIT/16 and Light - GL2T/16 and GL3T/16, Gewiss
PlayBus - GP2G/16 and Vimar® Idea - GI3V/16).
The microphone has been designed for installation on the glass above
the counter thanks to the vibration-resistant double-adhesive strip with
which it is equipped. The 3-metre long shielded cable of the microphone
can be concealed from the public’s view using standard-format 5 x 10 mm
white PVC conduits (also supplied with double-adhesive tape), which
match well with the body of the microphone. These conduits are easily
obtained from any dealer in electrical material.
®
4
Page 5

MANUALE INSTALLATORE
INSTALLER GUIDE
IMPORTANTE
DEVONO ESSERE ESEGUITE ESCLUSIVAMENTE DA TECNICI SPECIALIZZATI.
La PASO Spa non risponderà di eventuali danni o malfunzionamenti del sistema derivanti da una procedura di installazione non corretta.
SHOULD BE CARRIED OUT ONLY BY SPECIALISED TECHNICAL PERSONNEL.
PASO Spa can accept no liability for any damage or malfunctioning of the system due to an incorrect installation procedure.
Tutte le operazioni descritte in questa sezione
•
IMPORTANT
All the operations described in this section
5
Page 6
1. POSIZIONAMENTO E CONNESSIONI
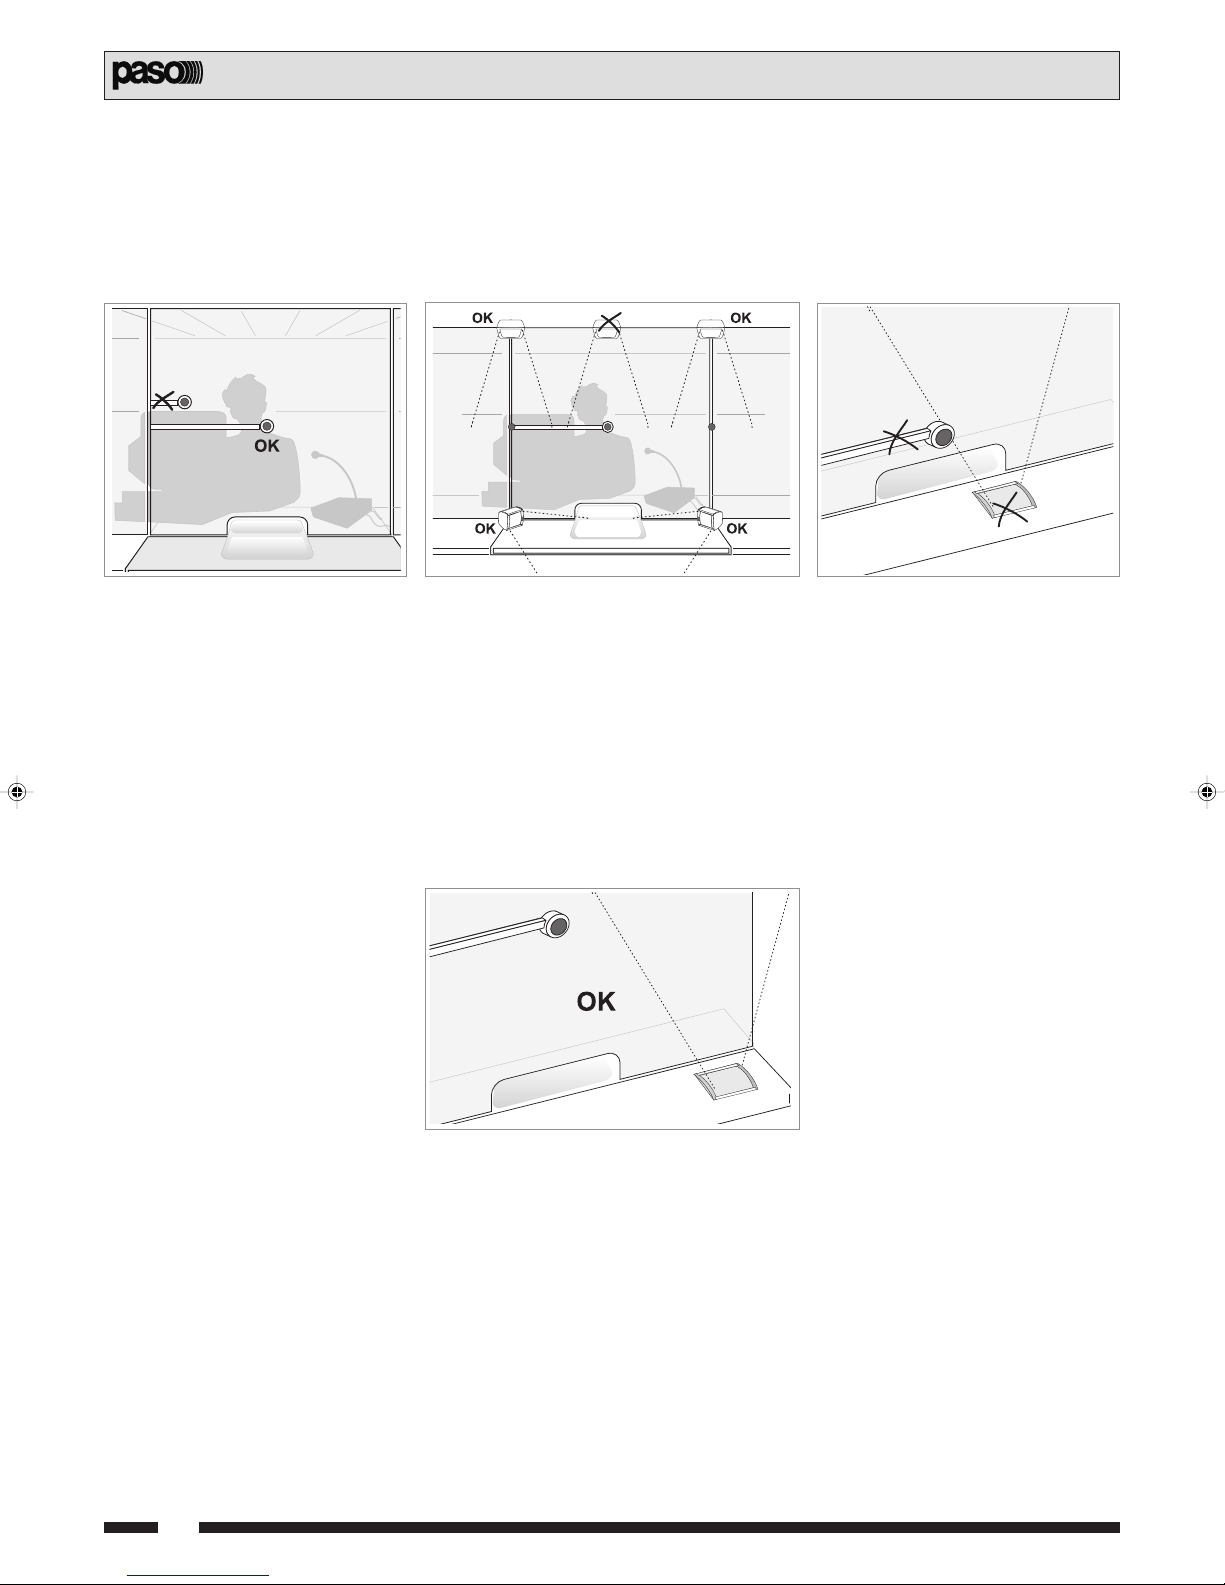
1.1 Disposizione del microfono
da parete e degli altoparlanti
Il microfono elettrete deve essere applicato possibilmente al centro del
vetro dello sportello, in posizione tale da trovarsi di fronte alla bocca del
cliente (figura 1). In questa posizione la ricezione del segnale sonoro
risulta più efficiente. Occorre prestare particolare attenzione anche
alla posizione dell'altoparlante (o degli altoparlanti), onde evitare il
fenomeno del rientro acustico (feed-back, effetto Larsen).
1. POSITIONING AND CONNECTION
1.1 Setting up microphone
for wall-mounting and the loudspeakers
The electret microphone should be applied if possible at the centre of the
glass above the counter, so that it is in front of the mouth of the Customer
(Figure 1). In this position, the reception of the sound signal is more
efficient. Special attention should also be paid to the position of the
loudspeaker (or loudspeakers), so as to avoid acoustic feed-back (Larsen
effect).
Fig. 1
Infatti l'altoparlante NON deve essere posto nelle immediate vicinanze
del microfono e comunque in posizione tale che il microfono NON cada nel
cono di proiezione del segnale audio emesso dall'altoparlante (Figura 2).
L'efficienza audio dell'impianto dipenderà fortemente dalla disposizione
fisica dei singoli componenti (microfono, altoparlanti).
E' inoltre consigliabile che tra la zona esterna (riservata ai clienti) e quella
interna (riservata agli operatori) non via sia alcuna comunicazione, al fine
di garantire un perfetto isolamento acustico dai rumori esterni ed al
contempo un'ottima intelleggibilità del parlato.
Poichè la maggior parte degli sportelli da ufficio è provvista di fori o
aperture per il passaggio di documenti o banconote, si consiglia di
evitare, per quanto possibile, di posizionare il microfono o gli altoparlanti
nelle immediate vicinanze di tali aperture (Fig. 3 e Fig 4).
1.2 Disposizione della base interfonica
La base interfonica deve essere posta sul lato operatore dello sportello,
appoggiata su un piano stabile. È possibile inoltre incassare la base
nello stesso piano: in questo caso, è necessario accertarsi che la base
sia posizionata ad almeno 40 cm dalle eventuali aperture del vetro
dello sportello. Una volta posizionata la base interfonica nella posizione
desiderata, deve essere collegata con la scatoletta di derivazione.
Fig. 2 Fig. 3
For this reason, the loudspeaker should NOT be placed in the immediate
vicinity of the microphone and in any case the position must be such that
the microphone is NOT within the cone of projection of the audio signal
from the loudspeaker (Figure 2). The audio efficiency of the system will
depend to a great extent on the physical arrangement of the single
components (microphone, loudspeakers).
There should be possibly no communication between the outside area
(Customer side) and the inside area (Operator side). This will ensure
perfect soundproofing against outside noise and at the same time
excellent intelligibility of speech.
Since most office counters have slits or openings to allow documents
or banknotes to be passed through, it is advisable, whenever possible,
not to position the microphone or the loudspeakers in the immediate
vicinity of these openings (Fig. 3 and Fig. 4).
Fig. 4
1.2 Setting up the intercom base
The intercom base must be located on the Operator side of the counter,
supported by a firm surface. It is also possible to flush-mount the
base in the surface. In this case, it is necessary to make sure that the
base is positioned at a distance of at least 40 cm from any openings in
the glass above the counter. Once the intercom base has been
positioned as required, it has to be connected to the junction box.
1.3 Disposizione della scatola di derivazione
La scatola di derivazione deve essere posta nelle immediate vicinanze
dello sportello (per esempio sotto il banco dell'operatore) e fissata alla
parete per mezzo di due viti.
Alla scatoletta di derivazione devono pervenire i seguenti collegamenti:
· collegamento con il microfono da parete posto sul lato cliente;
· collegamento con l'altoparlante posto sul lato cliente;
· collegamento con la base interfonica per mezzo dell'apposito cavetto
6 poli di tipo telefonico di cui la confezione è provvista;
· collegamento con l'alimentatore esterno.
6
1.3 Setting up the junction box
The junction box should be located in the immediate vicinity of the
counter (e.g. under the operator’s counter) and secured to the wall by
means of two screws.
The following connections must be made to the junction box:
· connection to the microphone for wall-mounting on the Customer side;
· connection to the loudspeaker on the Customer side;
· connection to the intercom base by means of the 6-wire telephone
cable included in the supply;
· connection to the external power supply.
Page 7

I collegamenti da effettuare all’interno della scatola sono riportati in
Fig. 5. Il cavo deve essere collegato alla presa LOCAL della base
interfonica.
154
Cavo di collegamento con la base interfonica
Cable for connection to the intercom base
The connections to be made inside the box are shown in Fig. 5.
The cable has to be connected to the LOCAL socket on the intercom
base.
6 POLI
6 POLES
Scatoletta di derivazione
1 = Altoparlante (+) • BIANCO
2 = Schermo (polo – del microfono) • NERO
3 = Phantom (polo + del microfono) • ROSSO
4 = Alimentatore (polo –) • VERDE
5 = Alimentatore (polo +) • GIALLO
6 = Altoparlante (–) • BLU
6
1
623
1.4 Disposizione dell’alimentatore esterno
L'alimentatore esterno da parete deve essere opportunamente
collegato ad una presa di rete 16A situata nelle vicinanze dello sportello,
preferibilmente posta sotto un interruttore.
2. IMPOSTAZIONI
2.1 Descrizione generale delle funzionalità
Come già accennato, la gestione a microcontrollore permette
all'installatore di scegliere la modalità di funzionamento più adeguata ai
requisiti dell'ambiente ed alle esigenze d'utilizzo.
Una volta scelta l'opzione desiderata in fase d'installazione, l'operatore
può gestire il funzionamento del sistema direttamente dalla postazione
microfonica. Nei paragrafi seguenti vengono elencate le procedure da
seguire per modificare le impostazioni di funzionamento e le possibili
regolazioni da effettuare all'interno della postazione microfonica.
2.2 Impostazione dei volumi
Sul fondo della base interfonica sono situati i fori di intervento per la
regolazione dei volumi di emissione sonora, sia verso il lato cliente,
sia verso il lato operatore (pag. 10).
E' opportuno agire su questi trimmer (con un cacciavite a testa piatta)
in modo da garantire un livello di volume sufficiente sia per l'operatore
che per il cliente, facendo comunque attenzione a non avvicinarsi
alla condizione critica del rientro acustico (insorgenza di un sibilo per
effetto Larsen), fenomeno comunque comune a tutti i tipi di
interfonico a commutazione o ad attenuazione disponibili in commercio.
La possibilità di aumentare i volumi a discrezione dell'operatore è
pertanto fortemente influenzata dalla disposizione dei componenti
audio (microfono e altoparlanti): se i componenti audio sono stati
posizionati secondo le indicazioni precedentemente riportate, si
dovrebbe ottenere un buon livello di segnale audio in entrambe le
direzioni (sia verso il cliente, sia verso l'operatore).
Junction box
1 = Loudspeaker (+) • WHITE
2 = Shield (– pole of the microphone) • BLACK
3 = Phantom (+ pole of the microphone) • RED
4 = Power supply (- pole) • GREEN
5 = Power supply (+ pole) • YELLOW
6 = Loudspeaker (–) • BLUE
Fig. 5
1.4 Setting up the external power supply
The wall-mounted external power supply has to be suitably connected
to a 16 A mains outlet close to the counter, preferably controlled by a
switch.
2. SETTINGS
2.1 General description of the functions
As already mentioned, management through a microcontroller makes it
possible for the installer to choose the operating mode that meets the
requirements of the environment and the user’s needs best.
Once the appropriate option has been chosen during installation, the
operator can manage operation of the system directly from the
microphone station. The procedures to be followed for altering the
operating settings and the adjustments that can be made inside the
microphone station are described below.
2.2 Setting the volumes
The openings to be used for adjusting the sound-emission volumes
both towards the Customer side and towards the Operator Side are
on the bottom of the intercom base (page 10). These trimmers should
be set (using a flat-bladed screwdriver) to ensure that the volumes
are sufficient both for the Operator and for the Customer, taking
care in any case not to approach the critical condition of acoustic
feedback (occurrence of a hissing sound due to the Larsen effect),
which is in any case common to all switching or attenuation type
intercom systems available on the market. The possibility for the
operator to increase the volumes at his own discretion is therefore
strongly influenced by the arrangement of the audio components
(microphone and loudspeakers): if the audio components have been
positioned in accordance with the indications provided above, it should
be possible to obtain a good sound level in both directions (both
towards the customer and towards the operator).
2.3 Impostazione delle modalità di funzionamento
L'impostazione delle modalità di funzionamento è una operazione che deve
necessariamente essere effettuata da personale esperto e qualificato.
L'interfonico viene fornito con un livello di taratura dei valori di sensibilità
dei microfoni standard (eseguito in sede di produzione) valido per il
tipo di microfono fornito nella confezione.
Poichè non è vietato l'utilizzo di altri tipi di microfono, vengono di
seguito riportate le caratteristiche fondamentali della capsula
microfonica richiesta:
• Capsula elettrete possibilmente di tipo back-elektrete (con i forellini
sul retro).
• Alimentazione phantom ~12V, con resistenza di carico di 2,2 kΩ,
sensibilità -47 dB ± 10% (0 dB = 1V/Pa a 1 kHz).
1. Collegare il positivo della capsula al morsetto della scatoletta di
derivazione dove veniva collegato il polo caldo del cavetto del
microfono da parete fornito nella confezione.
2.3 Setting the operating modes
Setting the operating modes is an operation that has to be carried out
by expert and qualified personnel.
The intercom system is supplied with sensitivity settings suitable for
standard microphones (factory setting), appropriate for the type of
microphone supplied.
Since the use of other types of microphone is not prohibited, the
essential specifications required of the microphone capsules are
indicated below:
• Electret capsule, possibly of the back-electret type (with the holes
on the rear).
• ~12V phantom power supply, with a load resistance of 2,2 kΩ,
sensitivity -47 dB ± 10% (0 dB = 1V/Pa @ 1 kHz).
1. Connect the positive pole of the capsule to the terminal in the
junction box to which the hot pole of the cable of the microphone
for wall-mounting included in the supply was connected.
7
Page 8
2. Collegare il negativo della capsula al
7
+
morsetto della scatoletta di derivazione,
dove veniva collegato lo schermo del cavetto
del microfono da parete fornito nella
confezione.
Per selezionare la modalità di funzionamento è
necessario operare all'interno della base:
3. Togliere la due fiancate laterali (A) della base
interfonica svitando le viti di fissaggio
(vedi fig. 6).
4. Sollevare il pannello frontale e posizionarlo a
lato della base. A questo punto il circuito
stampato fissato sul fondo dell'interfonico è
accessibile.
2. Connect the negative pole of the capsule
to the terminal in the junction box to which
the shield of the cable of the microphone
for wall-mounting included in the supply was
connected.
The operations for selecting the operating mode
are carried out inside the base:
3. Remove the two side panels (A) of the
A
intercom base by unscrewing the fixing screws
(see fig. 6).
4. Lift the front panel and place it to one side of
A
the base. At this point the printed circuit
secured to the bottom of the intercom unit is
accessible.
Fig. 6
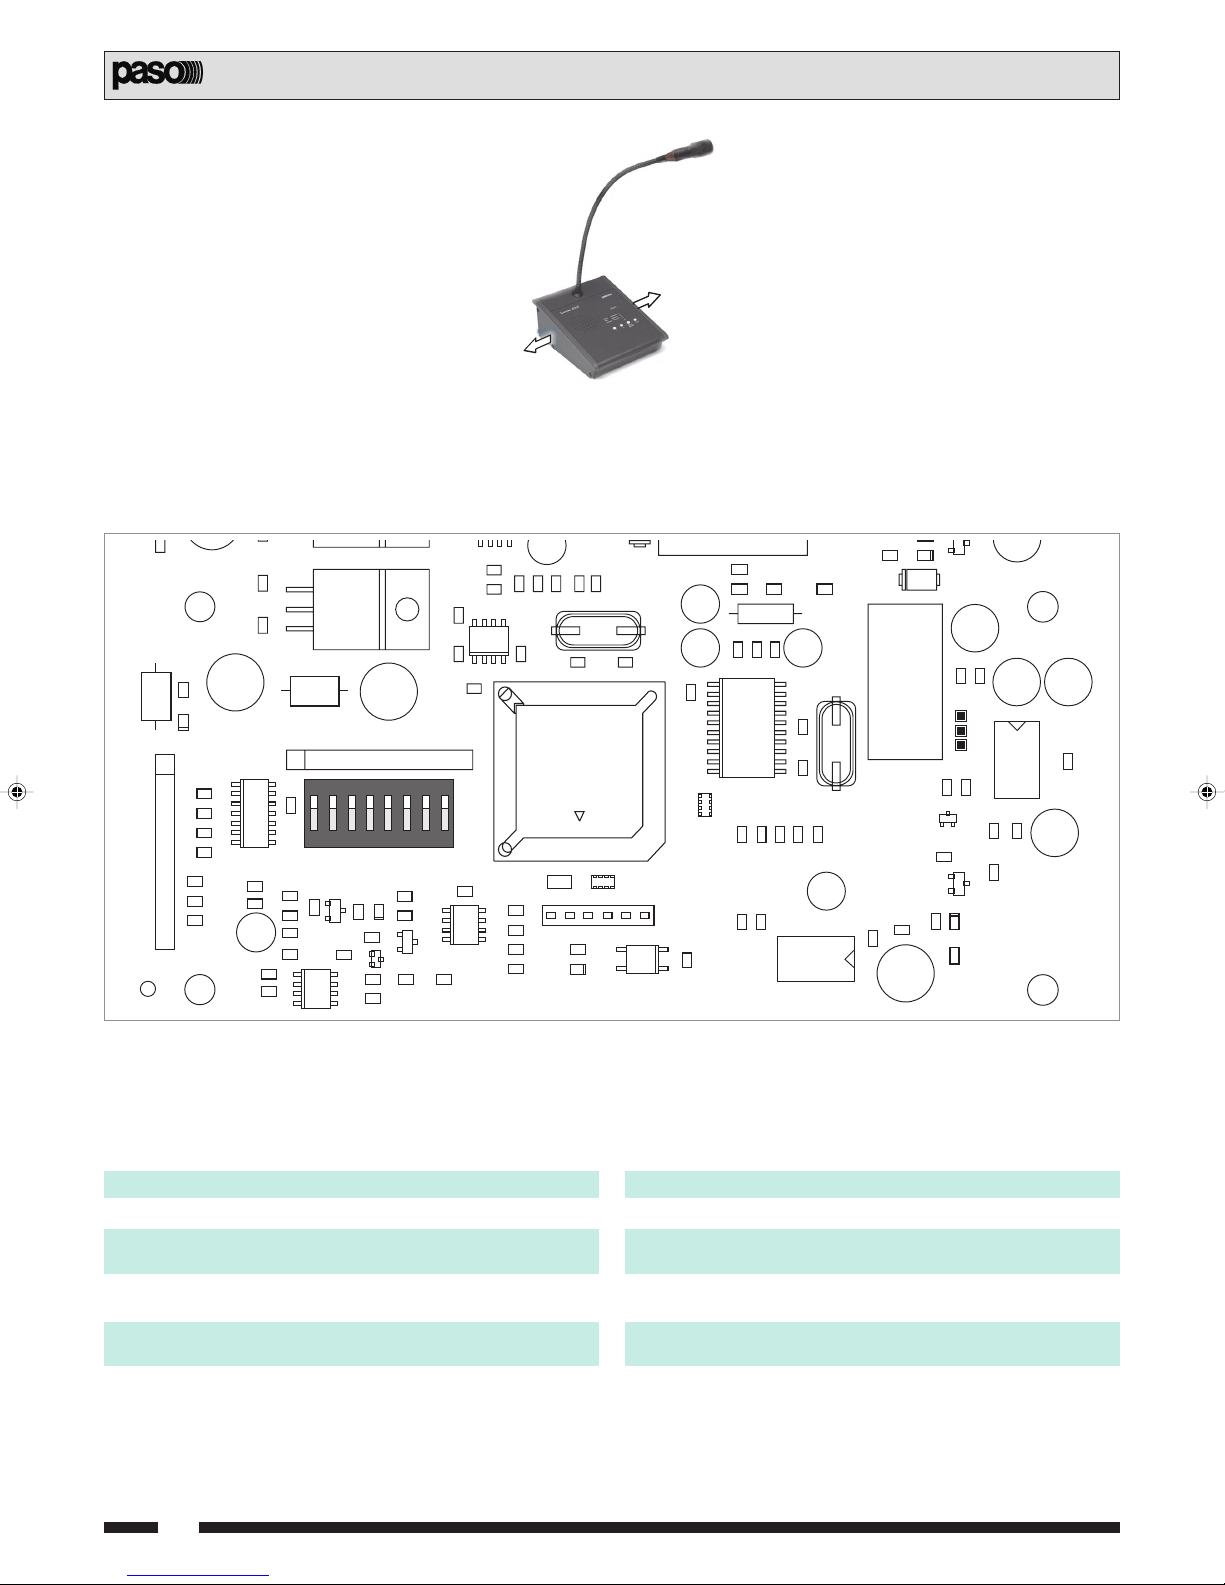
5. Osservando la Fig. 7 sono facilmente individuabili i micro-selettori
SW1 che dovranno essere utilizzati per selezionare la modalità di
funzionamento.
+
R40
R50
R13
R18
C48
R49
C
R14
C14
R43
LD6
FM1
R11
+
C11
C12
+
C29
R21
H2
LD4
R22
SIL2
R23
R24
R25
C39
C40
C41
R44
R45
R34
U5
R33
C42
C38
C43
R35
C44
R41
U2
H3
H3
C30
+
SIL1
SW1
1
R42
R46
R47
R37
LD5
R38
Q4
U10
R36
C45
D4
R39
Q5
C13
R12
C20
U4
R17
R19
8
C47
U9
R48C46
5. The SW1 microswitches can be identified easily in Fig. 7. These have
to be used to select the operating mode.
C15
Y1
U6
C49
C51
+
C35
C36
U11
R30
C57
R10
C19
Y2
+
C58
R15
C22C21
RN2
OP1
R16
C18
C17
C16
+
H1
C25
C23
+
C24
C31
RN1
J5
R51
U7
R28
C55
C26
R29
C56
C27
C50
R52
K2
+
C59
LD3
D3
C28
+
R20
C32
C33
JP1
U8
R27
C37
C53
Q3
C52
R31
R32
Q6
R53
LD7
R54
Fig. 7
+
C54
+
C34
R26
+
3. MODALITÀ DI FUNZIONAMENTO ‘AUTOMATICO’
Stabiliamo innanzitutto alcune convenzioni sulla terminologia che verrà
utilizzata in questo capitolo:
• Canale Aperto la comunicazione è attivata.
• Canale Chiuso la comunicazione NON è attivata.
• Canale Cliente comunicazione dall'esterno (Cliente) verso
l'interno (==> Operatore).
• Canale Operatore comunicazione dall'interno (Operatore) verso
l'esterno (==> Cliente).
• Canale Prioritario è possibile associare una priorità a uno dei
due canali.
• Canale Secondario il canale che non gode di priorità.
Vengono seguito illustrate le tre modalità di funzionamento ‘automatico’
dell’Intercom.
8
3. ‘AUTOMATIC’ OPERATING MODE
It is now necessary to establish some conventional meanings for the
terminology used in this section:
• Channel Open the connection is activated.
• Channel Closed the connection is NOT activated.
• Customer Channel inward communication (==> Operator)
from outside (Customer).
• Operator Channel outward communication (==> Customer)
from inside (Operator).
• Priority Channel it is possible to associate a priority with one
of the two channels.
• Secondary Channel the channel that does not have priority.
The three ‘automatic’ operating modes of the intercom system are
illustrated below.
Page 9
3.1 Descrizione delle diverse modalità
Il sistema interfonico ammette tre differenti modalità di funzionamento
‘automatico’ impostabili al momento dell'installazione per mezzo dei microinterruttori SW1:
Modalità 0 > Full Duplex (a canali aperti).
Modalità 1 > Half Duplex (a canali chiusi, senza priorità).
Modalità 2 > Full Duplex Prioritario (con un canale aperto).
La modalità di funzionamento deve essere selezionata in base
alle esigenze del Cliente.
3.1 Description of the different modes
The intercom system permits three different ‘automatic’ operating modes
that can be set at the time of installation by means of the SW1
microswitches:
Mode 0 > Full Duplex (with channels open).
Mode 1 > Half Duplex (with channels closed, no priority).
Mode 2 > Full Duplex with Priority (with one channel open).
The operating mode has to be selected on the basis of the
Customer’s requirements.
La selezione della modalità si esegue agendo sui micro-interruttori SW1,
operando come segue:
1. accertarsi che il sistema interfonco sia disconnesso dalla rete;
2. togliere le due fiancate della base interfonica ed estrarre il pannellino
comandi, in modo da accedere al circuito stampato principale posto
sul fondo della stessa;
3. individuare i micro-interruttori SW1 (vedi fig. 7, pagina precedente);
4. con i bit 1 e 2 selezionare una delle tre modalità secondo quanto
riportato nella tabella:
Bit 1 Bit 2 Modalità *
0 0 0 - FULL DUPLEX
1 0 1 - HALF DUPLEX
0 1 2 - FULL DUPLEX PRIORITARIO
1 = ON 0 = OFF
*
Impostazione di fabbrica: Modalità 0
3.2 Attenuazione dei canali
Il principio di funzionamento dell’interfonico è basato sull’uso di un circuito
DSP con cancellatore di eco incorporato. Tuttavia, in casi d’installazione
molto critici, il cancellatore può non essere in grado di impedire l’effetto di
retroazione acustica (effetto Larsen); in questo caso è necessario
intervenire con l’attenuazione di guadagno di uno o di entrambi i canali;
questa operazione è compiuta automaticamente dal DSP. Tramite i microinterruttori è possibile assegnare la massima attenuazione che il DSP può
introdurre per ciascun canale. La modalità di impostazione di questi
parametri è di seguito indicata:
The mode is selected by positioning the SW1 microswitches appropriately,
as follows:
1. make sure that the Intercom system has been disconnected from
the mains power supply;
2. remove the two side panels from the intercom base and remove
the small control panel, so as to access the main printed circuit on
the bottom of the panel;
3. identify the SW1 microswitches (see Fig. 7 on previous page);
4. With bits 1 and 2, select one of the three modes as shown in the
following table:
Bit 1 Bit 2 Mode *
0 0 0 - FULL DUPLEX
1 0 1 - HALF DUPLEX
0 1 2 - FULL DUPLEX WITH PRIORITY
1 = ON 0 = OFF
*
Factory setting: Mode 0
3.2 Attenuating the channels
The principle according to which the Intercom operates is based on the
use of a DSP circuit with a built-in echo canceller. However, in some
very critical installations, the echo canceller may not be able to prevent
acoustic feedback (Larsen effect). In this case it is necessary to
attenuate the gain on one channel or on both of them. This is done
automatically by the DSP. It is possible, however, to use the
microswitches to assign the maximum attenuation that the DSP can
apply to each channel. The way in which these parameters are set is
indicated below:
• Modalità 0 - FULL DUPLEX a canali aperti (Cliente/Operatore)
In questo tipo di configurazione, i canali Operatore e Cliente risultano
sempre aperti. É possibile selezionare il massimo livello di attenuazione
individuale per ogni canale, come illustrato nelle seguenti tabelle:
Selezione attenuazione canale Operatore
Bit 3 Bit 4 Attenuazione
0 0 0 dB
1 0 3 dB
0 1 6 dB
1 1 9 dB
Selezione attenuazione canale Cliente
Bit 5 Bit 6 Attenuazione
0 0 0 dB
1 0 3 dB
0 1 6 dB
1 1 9 dB
• Mode 0 - FULL DUPLEX with channels open (Customer/Operator)
In this type of configuration, the Operator and Customer channels are
always open. It is possible to select the highest level of individual
attenuation for each channel, as illustrated in the following tables:
Selection of attenuation of Operator Channel
Bit 3 Bit 4 Attenuation
0 0 0 dB
1 0 3 dB
0 1 6 dB
1 1 9 dB
Selection of attenuation of Customer Channel
Bit 5 Bit 6 Attenuation
0 0 0 dB
1 0 3 dB
0 1 6 dB
1 1 9 dB
9
Page 10

• Modalità 1 - HALF DUPLEX a canali chiusi senza priorità
In questo tipo di configurazione, nella condizione di riposo entrambi i canali
sono chiusi e verrà aperto automaticamente quel canale il cui livello di
segnale superi un valore di soglia pre-impostato. L’altro canale potrà
intervenire nelle pause, ovviamente a condizione che il suo livello superi la
soglia prestabilita. Anche in questo caso è possibile selezionare il massimo
livello di attenuazione individuale per ogni canale come illustrato nelle tabelle:
Selezione attenuazione canale Operatore
Bit 3 Bit 4 Attenuazione
0 0 0 dB
1 0 3 dB
0 1 6 dB
1 1 9 dB
• Mode 1 - HALF DUPLEX with channels closed and no priority
In this type of configuration, in the idle condition both channels are closed.
The channel on which the level of the signal exceeds a pre-set threshold
value will be opened automatically. The other channel will be able to step
in during the breaks, obviously provided its level exceeds the preestablished threshold. Also in this case, it is possible to set the highest
level of individual attenuation for each channel, as illustrated in the tables:
Selection of attenuation of Operator Channel
Bit 3 Bit 4 Attenuation
0 0 0 dB
1 0 3 dB
0 1 6 dB
1 1 9 dB
Selezione attenuazione canale Cliente
Bit 5 Bit 6 Attenuazione
0 0 0 dB
1 0 3 dB
0 1 6 dB
1 1 9 dB
• Modalità 2 - FULL DUPLEX PRIORITARIO ad un canale aperto
In questo tipo di configurazione, nella condizione di riposo, il canale
Prioritario è aperto, mentre quello Secondario risulta chiuso; questa
selezione è riportata nella tabella:
Selezione canale sempre aperto
Bit 7 Canale aperto (prioritario)
0 Cliente
1 Operatore
Questa modalità è consigliata nel caso in cui uno dei due ambienti sia
soggetto ad un rumore piuttosto elevato, per cui può essere conveniente
mantenere chiuso il relativo canale. In questo caso, la soglia d’intervento
del canale chiuso può essere impostata come da tabella, ed è possibile
selezionare il massimo livello d’attenuazione del canale chiuso.
Soglia canale chiuso
Bit 3 Bit 4 Soglia
0 0 6 dB
1 0 9 dB
0 1 12 dB
1 1 15 dB
Threshold of closed channel
Bit 3 Bit 4 THD
0 0 6 dB
1 0 9 dB
0 1 12 dB
1 1 15 dB
Selection of attenuation of Customer Channel
Bit 5 Bit 6 Attenuation
0 0 0 dB
1 0 3 dB
0 1 6 dB
1 1 9 dB
• Mode 2 - FULL DUPLEX WITH PRIORITY with one channel open
In this type of configuration, in the idle condition the channel that has
priority is open while the secondary channel is closed. This selection is
shown in the following table:
Selection of one channel always open
Bit 7 Channel Open (with priority)
0 Customer
1 Operator
This mode is recommended if one of the two environments is subject to a
particularly high noise level. In this case, it may be advisable to keep the
relevant channel closed. If so, the threshold for activating the closed
channel can be set as indicated in the table and it is possible to select the
maximum level of attenuation of the closed channel.
Attenuazione canale chiuso
Bit 5 Bit 6 Att.
0 0 0 dB
1 0 3 dB
0 1 6 dB
1 1 9 dB
Attenuation of closed channel
Bit 5 Bit 6 Att.
0 0 0 dB
1 0 3 dB
0 1 6 dB
1 1 9 dB
3.3 Modalità ‘REMOTE’
É possibile definire, tramite il bit 8 dei dip-switch SW1, la modalità di
funzionamento della connessione remota nel modo seguente:
Bit 8 = 0 La modalità di funzionamento della connessione remota è
identica a quella selezionata dall’Operatore.
Bit 8 = 1 Durante la connessione remota viene forzata la modalità
‘MANUAL1’.
4. REGOLAZIONI
Sul fondo della postazione, sono presenti due fori
attraverso i quali è possibile accedere ai
potenziometri che consentono di regolare il volume
audio dei due altoparlanti, senza dover agire
all’interno della base. Il primo foro (A) permette
di aumentare o diminuire il volume degli altoparlanti
CLIENTE e remoto; il secondo foro (B) regola il
volume dell’altoparlante OPERATORE. Un terzo
foro (C) consente invece la regolazione della
sensibilità microfonica in caso l’operatore stia
utilizzando un microfono esterno collegato al
connettore .
10
3.3 ‘REMOTE’ Mode
It is possible to use bit 8 of the SW1 dip-switches to define the operating
mode of the remote connection, as follows:
Bit 8 = 0 The operating mode of the remote connection will be the
same as the mode selected by the Attendant.
Bit 8 = 1 The ‘MANUAL 1’ mode will be forced during remote
connections.
4. ADJUSTMENTS
There are two holes in the bottom of the station
through which it is possible to access the
potentiometers for adjusting the audio volume of
C
the two loudspeakers without having to carry out
any work inside the base. The first hole (A) enables
the CUSTOMER and remote loudspeaker volume
to be raised or lowered; the second hole (B) is for
A
B
adjusting the volume of the ATTENDANT
loudspeaker. There is also a third hole (C), enabling
the sensitivity of the microphone to be adjusted if
the attendant is using an external microphone
plugged into the connector .
Page 11

5. FUNZIONI PRINCIPALI
5.1 Led di segnalazione
Sul frontale della base interfonica sono presenti due led.
Entrambi svolgono la funzione di segnalazione dello stato del Sistema
interfonico:
• Led VERDE ‘REMOTE’:
Il led verde REMOTE serve per visualizzare la richiesta di comunicazione
da parte di una postazione remota verso il posto operatore (nelle
installazioni ove viene richiesta).
• Led BICOLORE ‘MODE ON/OFF’:
Visualizza il ‘tipo di funzionamento’ selezionato dalla funzione MODE.
All'attivazione, si presenta di colore verde (impostazione di default, tipo
di funzionamento Automatico).
Nella tabella sottostante è indicata la corrispondenza colore/tipo di
funzionamento.
5. MAIN FUNCTIONS
5.1 Signalling LEDs
There are two LEDs on the front panel of the intercom base.
Both are for signalling the status of the intercom system:
• GREEN ‘REMOTE’ LED:
The green REMOTE LED shows that a remote station wishes to
communicate with the operator station (in those installations where this
is required).
• ‘MODE ON/OFF’ TWO-COLOUR LED:
This shows the ‘type of operation’ selected by the MODE function.
On activation this LED is green (default setting, type of operation:
Automatic).
The following table indicates the colours corresponding to the types of
operation.
Colore LED Tipo di funzionamento
VERDE AUTOMATIC
ROSSO MANUAL 1
ARANCIO MANUAL 2
5.2 Ghiera luminosa
Posta sul corpo microfonico all'altezza della giunzione con lo stelo, si
accende, nei diversi tipi di funzionamento, quando il canale Operatore è
aperto.
5.3 Funzionalità
Vengono di seguito elencate le funzionalità della base interfonica.
AZIONE DESCRIZIONE
Funzione delle frecce
à Premendo questo tasto, si attiva l’audio in
uscita (parla l’Operatore).
Ä Premendo questo tasto, si attiva l’audio in
ingresso (parla il Cliente).
Accensione
Tasto ‘MODE ON/OFF’ Con la semplice pressione di questo tasto, si
ottiene l’accensione della postazione
(funzione ON).
Scelta funzione
Tasto ‘MODE ON/OFF’ Premendo brevemente questo tasto, si
effettua la scelta tra i vari tipi di
funzionamento disponibili (funzione MODE).
Colour of LED Type of operation
GREEN AUTOMATIC
RED MANUAL 1
ORANGE MANUAL 2
5.2 Lighted ring
This is on the body of the microphone at the height where it is joined to
the stem. It lights up in the various types of operation, when the
Operator channel is open.
5.3 Function
The functions of the intercom base are listed below.
ACTION DESCRIPTION
Function of the arrows
à On pressing this key, the output audio is
activated (the Operator is speaking).
Ä On pressing this key, the input audio is
activated (the Customer is speaking).
Switching on
‘MODE ON/OFF’ key Simply by pressing this key, the station
switches on (ON function).
Choosing a function
‘MODE ON/OFF’ key Pressing this key briefly, a choice is made
among the various types of operation
available (MODE function).
‘AUTOMATIC’ (LED VERDE ACCESO)
La gestione dell’assegnazione del canale attivo è eseguita secondo la
modalità di funzionamento selezionata al momento dell’installazione
(vedi par. 3.2, pag. 9).
à Premendo questo tasto, viene abilitato
Ä Premendo questo tasto, viene abilitato il
Tasto ‘TALK’ Premendo questo tasto, la comunicazione
‘MANUAL 1’ (LED ROSSO ACCESO)
In assenza di comunicazione, il canale Cliente viene mantenuto attivo.
à Premendo questo tasto, viene abilitato
Ä In questo tipo di funzionamento, il tasto
Tasto ‘TALK’ Premendo questo tasto, la comunicazione
l’Operatore: il led arancio si accende.
Cliente: il led rosso si accende.
in uscita dell’Operatore viene diffusa
nell’impianto PA.
Il led verde rimane acceso.
l’Operatore: il led arancio si accende.
risulta disabilitato.
in uscita dell’Operatore viene diffusa
nell’impianto PA. Il led verde si accende,
ritornando poi rosso al rilascio.
‘AUTOMATIC’ (GREEN LED ILLUMINATED)
Assignment of the active channel is managed according to the operating
mode selected at the time of installation (see point 3.2, page 9).
à On pressing this key, the Operator is
enabled: the orange LED lights up.
Ä On pressing this key, the Customer is
enabled: the red LED lights up.
‘TALK’ key On pressing this key, the outgoing message
from the Operator is broadcast via the PA
system.
The green LED will remain illuminated.
‘MANUAL 1’ (RED LED ILLUMINATED)
When no communications are taking place, the Customer channel is
kept active.
à On pressing this key, the Operator is
enabled: the orange LED lights up.
Ä With this type of operation, the key remains
disabled.
‘TALK’ key On pressing this key, the outgoing message
from the Operator is broadcast via the PA
system. The green LED will light up, returning
to red on release.
11
Page 12

‘MANUAL 2’ (LED ARANCIO ACCESO)
In assenza di comunicazione, il canale Operatore viene mantenuto attivo.
à In questo tipo di funzionamento, il tasto
Ä Premendo questo tasto, viene abilitato il
Tasto ‘TALK’ Premendo questo tasto, la comunicazione
risulta disabilitato.
Cliente
: il led rosso si accende.
in uscita dell’
nell’impianto PA.
Il led verde si accende, ritornando poi
arancio al rilascio.
Operatore
viene diffusa
‘MANUAL 2’ (ORANGE LED ILLUMINATED)
When no communications are taking place, the Operator channel is kept
active.
à With this type of operation, the key is
Ä On pressing this key, the
‘TALK’ key On pressing this key, the outgoing
disabled.
Customer
enabled: the red LED lights up.
message from the
via the PA system.
Green LED will light up, returning to
orange on release.
Operator
is broadcast
is
Spegnimento
Tasto ‘MODE ON/OFF’ Tenendo premuto questo tasto per più di
1,5 sec., si ottiene lo spegnimento della
postazione (funzione OFF).
Switching off
‘MODE ON/OFF’ key When this key is held down for more than
1.5 seconds, the station will switch off
(OFF function).
12
Page 13

APPENDICE • APPENDIX
Nelle pagine seguenti vengono indicate tutte le informazioni relative a
connettori e schemi di collegamento del sistema interfonico.
All the information concerning the connectors and the wiring diagrams
of the Intercom system are indicated on the following pages.
• Schema di collegamento generale del Sistema Interfonico
Altoparlante Cliente
Customer's Loudspeaker
Microfono Cliente
Customer's Microphone
Alimentatore esterno
External power supply
Scatoletta di derivazione 6 POLI
Extension box 6 POLES
Scatoletta di derivazione 8 POLI
Extension box 8 POLES
TE
O
CAL
LO
REM
Intercom 2000
REMOTE
Green
Automatic
Red
Manual 1
Orange
Manual 2
MODE
TALK
ON/OFF
• General wiring diagram of the Intercom System
Amplificatore
Amplificatore
Serie 8000
Amplifier
Postazione remota
Remote station
Altoparlanti linea PA
PA line loudspeakers
Altoparlante remoto
Remote loudspeaker
Microfono remoto
Remote microphone
Base interfonica operatore
Intercom base
Connettore ‘REMOTE’
Term. Descrizione
1 MIC Microfono preamplificato della postazione remota
2 VSS Negativo di alimentazione e negativo segnale
audio verso l’ingresso dell’amplificatore
3 SPK Altoparlante della postazione remota
4 CALL Tasto di chiamata della postazione remota
5 Vcc Positivo di alimentazione
6PR Terminale di precedenza per amplificatori PA
Serie 8000
7C + Terminale comune del relè di precedenza
8 SIGNAL Segnale audio verso l’ingresso audio
dell’amplificatore
Connettore ‘LOCAL’
Term. Descrizione
1A – Uscita per altoparlante (lato Cliente)
2 ALIM + Alimentazione (polo positivo) 15 V
3 ALIM – Alimentazione (polo negativo) 0 V
4M + Positivo del microfono (lato Cliente)
5M – Negativo del microfono (lato Cliente)
6A + Uscita per altoparlante (lato Cliente)
Opzionale / Optional
‘REMOTE’ connector
Description
Pre-amplified microphone of the remote station
Power supply negative and audio signal negative
towards the amplifier input
Loudspeaker of the remote station
Tasto di chiamata della postazione remota
Positivo di alimentazione
Precedence terminal for PA amplifiers of the 8000
range
Common terminal of the precedence relay
Audio signal towards the audio input
of the amplifier
‘LOCAL’ connector
Description
Output for loudspeaker (Customer side)
Power supply (positive pole) 15 V
Power supply (negative pole) 0 V
Microphone positive (Customer side)
Microphone negative (Customer side)
Output for loudspeaker (Customer side)
18
REMOTE
16
LOCAL
13
Page 14

Tasto di chiamata
Call key
Capsula microfonica
Microphone capsule
(#)
16 W
PRE
CALL
Vcc
+12 V
MIC
0V
VSS
SPK
• Schema di collegamento della postazione remota • Wiring diagram of the remote station
Come preamplificatore, è consigliato l’accessorio
PASO cod. AC14, adatto a microfoni elettrete.
Il circuito è dotato di un compressore microfonico
(gamma di alimentazione 0 ÷ 12 V, uscita di segnale
0 dB).
* I conduttori MIC e SPK devono essere
schermati.
(#)
Montare la resistenza di alimentazione per
capsula microfonica elettrete.
*
*
• Collegamenti opzionali
Sul retro della postazione, sono presenti due connettori per prese jack
standard, ai quali è possibile collegare una cuffia stereo e/o un microfono
elettrete esterno utilizzabili dall’Operatore.
The PASO accessory AC14, suitable for electret
microphones, is recommended as a preamplifier.
The circuit has a microphone compressor (powersupply range 0 to 12 V, 0 dB signal output).
* The MIC and SPK leads must be
shielded.
(#)
Mount the power-supply resistor for the
electret microphone capsule.
• Optional connections
There are two connectors on the rear of the station for standard jack
sockets, to which it is possible to connect headphones and/or an
external microphone for use by the Attendant.
REMOTE LOCAL
Connettore jack per cuffia stereo
(se utilizzato, esclude l’altoparlante della postazione).
Connettore jack per microfono elettrete esterno
(se utilizzato, esclude il microfono della postazione).
Jack-type connector for stereo headphones.
(if used, the station loudspeaker is muted).
Jack-type connector for an external electret microphone.
(if used, the station microphone is excluded).
14
Page 15

MANUALE OPERATORE
OPERATOR MANUAL
15
Page 16
1. DESCRIZIONE GENERALE DELLE PARTI
1. GENERAL DESCRIPTION OF PARTS
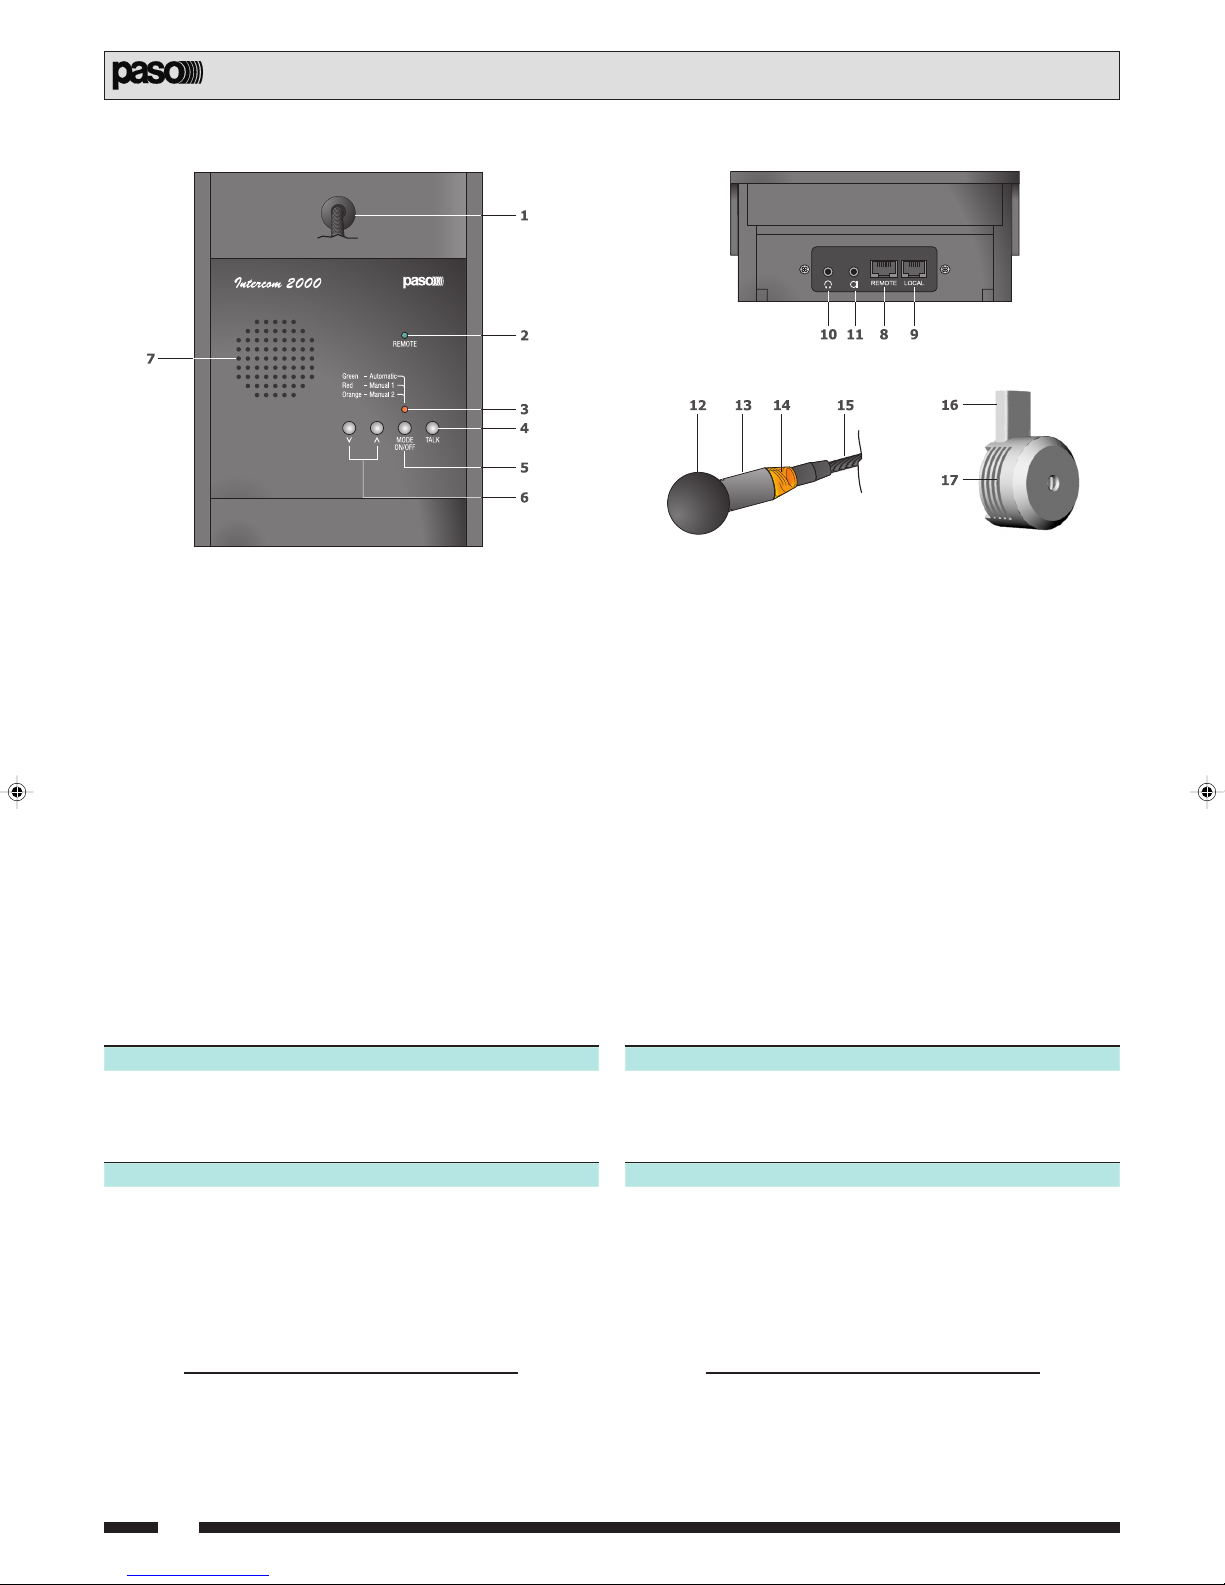
1 • Base microfono a stelo.
2 • Led di segnalazione chiamata da postazione remota.
3 • Led di visualizzazione del tipo di funzionamento.
4 • Tasto attivazione comunicazione verso impianto di diffusione PA.
5 • Tasto di accensione/spegnimento/selezione tipo di funzionamento.
6 • Tasti forzatura canale.
7 • Altoparlante monitor.
8 • Connettore per postazione remota/impianto PA.
9 • Connettore per postazione locale.
10 • Connettore jack per cuffia stereo.
11 • Connettore jack per microfono elettrete esterno.
12 • Cuffietta antisoffio.
13 • Testa del microfono.
14 • Ghiera luminosa.
15 • Stelo flessibile.
16 • Canalina passacavo.
17 • Microfono elettrete.
2. FUNZIONI PRINCIPALI
2.1 Tasti di scelta diretta
Tutti i comandi del sistema interfonico sono riportati sul pannello frontale
della base interfonica. Di seguito vengono elencate le funzioni legate ad
ogni singolo tasto di selezione.
Funzione delle frecce
à Premendo questo tasto, si attiva l’audio in
uscita (parla l’Operatore).
Ä Premendo questo tasto, si attiva l’audio in
ingresso (parla il Cliente).
Tasto ‘MODE ON/OFF’
• Funzione ON/OFF
Tenendo premuto questo tasto per più di 1,5 sec., si ottiene lo
spegnimento della postazione.
L’accensione, al contrario, necessita della semplice pressione del tasto.
1 • Base of stem-mounted microphone.
2 • LED for signalling calls from remote station.
3 • LED indicating the type of operation.
4 • Key for activating communication towards the PA system.
5 • ON/OFF key and for selecting the type of operation.
6 • Channel forcing key.
7 • Monitoring loudspeaker.
8 • Connector for remote station/PA system.
9 • Connector for local station.
10 • Jack-type connector for stereo headphones.
11 • Jack-type connector for an external electret microphone.
12 • Anti-hissing hood.
13 • Head of the microphone.
14 • Lighted ring.
15 • Flexible stem.
16 • Cable conduit.
17 • Electret microphone.
2. MAIN FUNCTIONS
2.1 Selection keys
All the controls of the Intercom system are available on the front panel
of the intercom base. The functions associated with each single selection
key are listed below.
Functions of arrows
à On pressing this key, the output audio is
activated (the Operator is speaking).
Ä On pressing this key, the input audio is
activated (the Customer is speaking).
‘MODE ON/OFF’ key
• ON/OFF function
When this key is held down for more than 1.5 seconds, the station will
switch off. To switch it on, on the other hand, it is sufficient to press the
key.
• Funzione MODE
Tenendo premuto questo tasto per meno di 1,5 sec., vengono indicate
dal led MODE i vari tipi di funzionamento disponibili:
Colore LED Tipo di funzionamento
VERDE AUTOMATIC
ROSSO MANUAL 1
ARANCIO MANUAL 2
Se il led non è acceso, il Sistema Interfonico è spento.
Premere nuovamente il tasto MODE ON/OFF per riaccendere
l’apparecchio.
16
• MODE function
When this key is held down for less than 1.5 seconds, the MODE led will
indicate the various types of operation that are available:
Colour of LED Type of operation
GREEN AUTOMATIC
RED MANUAL 1
ORANGE MANUAL 2
If the LED is not illuminated, the Intercom system is OFF.
Press the MODE ON/OFF key again to switch the equipment back on.
Page 17

Tasto ‘TALK’
Questo tasto permette all’Operatore di deviare il segnale audio della
sua postazione verso un sistema di amplificazione esterno (per esempio,
verso il sistema di diffusione sonora dello stabile, in modo che l’interfonico
possa essere utilizzato come una semplice console di annuncio al
pubblico). Nel caso non fosse previsto il collegamento verso un sistema
di amplificazione esterno, il tasto TALK rimane inutilizzato.
‘TALK’ key
This key enables the Operator to deviate the audio signal from his
station towards an external amplifying system (e.g. towards the soundbroadcasting system of the building, so that the intercom system can
be used simply as a console from which to make announcements for the
public). If there is no connection towards an external amplifying system,
the TALK key will remain unused.
Led verde ‘REMOTE’
Questo led è utilizzato in combinazione alla presenza di una postazione
remota in grado di comunicare con il posto Operatore provvisto di
interfonico.
Il sistema permette, tramite una console o postazione remota, di parlare
con l’Operatore: la base interfonica dell’Operatore emetterà un segnale
acustico di avviso di chiamata ed il led REMOTE si illuminerà ad
intermittenza. L’Operatore dovrà quindi premere il tasto MODE ON/
OFF per attivare la comunicazione con la postazione remota: il led
REMOTE resterà illuminato in modo fisso per tutta la durata della
conversazione.
Al termine, l’Operatore dovrà premere nuovamente il tasto MODE ON/
OFF (una volta per concludere la comunicazione; due volte per
spegnere l’apparecchio).
3. UTILIZZO DELL’INTERFONICO
3.1 Accensione
Per attivare il funzionamento del Sistema Interfonico, è necessario
premere una sola volta il tasto MODE ON/OFF.
3.2 Selezione della modalità desiderata
All’accensione dell’apparecchio, il modo di funzionamento pre-selezionato
è quello
L’Operatore può scegliere il tipo di funzionamento desiderato premendo il
tasto MODE ON/OFF. Di seguito vengono elencate le caratteristiche di
ciascuna modalità.
Funzionamento ‘AUTOMATIC’
Il comportamento del Sistema dipenderà dalla modalità impostata in
fase di installazione:
• se è stata selezionata la Modalità 0 (Full Duplex), i canali audio
• se è stata selezionata la Modalità 1 (Half Duplex), si potrà attivare
• se è stata selezionata la Modalità 2 (Full Duplex Prioritario), uno
AUTOMATIC.
dell’Operatore e del Cliente rimarranno entrambi attivi; il Cliente e
l’Operatore possono parlare contemporaneamente. L’Operatore può
sempre e comunque forzare il senso di comunicazione agendo sui
tasti à e Ä.
In condizione di forzatura: questa situazione si può creare quando
l’ambiente è estremamente rumoroso, oppure se si vuole togliere la
parola al Cliente (tenere premuto il tasto à ), o quando il Cliente è
troppo lontano dal microfono o ha la voce così bassa da non riuscire
ad attivare la sua comunicazione (tenere premuto il tasto Ä ).
un solo canale per volta (il primo ad intervenire); in condizione di riposo,
entrambi i canali sono disabilitati.
dei due canali (Operatore o Cliente, a seconda di quanto selezionato
durante l’installazione) rimane sempre attivo; l’altro, per attivare il
proprio canale, deve superare la soglia impostata.
Green ‘REMOTE’ LED
This LED is used associated with a remote station able to communicate
with the Operator station equipped with the Intercom system.
The system enables the remote station to speak with the Operator via
a console or remote station: the Operator’s intercom base will sound
an acoustic signal to advise that there is an incoming call and the
REMOTE LED will light up intermittently. The Operator will then have to
press the MODE ON/OFF key to activate communications with the
remote station: the REMOTE LED will remain illuminated steadily for
the whole duration of the conversation.
At the end of the conversation, the Operator will have to press the
MODE ON/OFF key again (once to end the connection; twice to switch
off the equipment).
3. USING THE INTERCOM SYSTEM
3.1 Switching on
To activate operation of the Intercom System it is necessary to press the
MODE ON/OFF key once.
3.2 Selecting the desired mode
On switching on the equipment, the pre-selected operating mode is the
AUTOMATIC mode.
The Operator may choose the required type of operation by pressing the
MODE ON/OFF key. The features of each mode are listed below.
‘AUTOMATIC’ operation
The way in which the System behaves will depend on the mode set at
the time of installing it:
• If Mode 0 (Full Duplex) has been selected, the audio channels of
the Operator and of the Customer will both remain active. The
Customer and the Operator will be able to speak at the same time.
The Operator can in any case always force the direction of
communication by means of the à and Ä keys.
In the forced condition: this situation may occur if the room is very
noisy or in order to stop the Customer from speaking (hold the Ã
key down), or if the Customer is too far away from the microphone
or his voice is so low that it is unable to activate communication from
his side (hold the Ä key down).
• If Mode 1 (Half Duplex) has been selected, only one channel may
be activated at a time (the first to intervene). In the idle condition,
both channels are disabled.
• If Mode 2 (Full Duplex with Priority) has been selected, one of
the two channels (Operator or Customer, depending on the selection
made at the time of installation) will always remain active. In order to
activate his own channel, the other party will have to exceed the
threshold that has been set.
Funzionamento ‘MANUAL 1’
In questo caso, il canale del Cliente rimane sempre attivo, mentre quello
dell’Operatore rimane sempre disattivato. Questa è la situazione in cui
per es. non si voglia far udire all’esterno l’eventuale comunicazione tra gli
Operatori. Con la pressione del tasto à si inverte il senso di forzatura del
canale (l’Operatore prende la parola).
Funzionamento ‘MANUAL 2’
In questo caso, il canale dell’Operatore rimane sempre attivo, mentre
quello del Cliente rimane sempre disattivato (può essere il caso in cui
normalmente nella zona adibita alla clientela vi sia una forte presenza di
rumore ambientale, tale da attivare continuamente il microfono del
Cliente, oppure nel caso in cui l’Operatore voglia mantenere a lungo la
parola).
‘MANUAL 1’ operation
In this case, the Customer’s channel will always remain active, while
the Operator’s will always be de-activated. This is the situation in which,
for example, communications between Operators should not be heard by
others. The direction in which the channel is forced can be changed by
pressing the à key (the Operator can speak).
‘MANUAL 2’ operation
In this case, the Operator’s channel will always remain active while
that of the Customer will always remain de-activated (this is normally
the case when there is a high level of ambient noise on the Customer’s
side that activates the Customer’s microphone continuously, or when
the Operator needs to speak for a long time).
17
Page 18

3.3 Risposta ad una chiamata remota
(nel caso fosse presente il collegamento)
Il sistema interfonico è stato concepito prevedendo la connessione ad
una eventuale console o postazione remota in grado di comunicare con
l’Operatore: questa funzione è attiva sia quando la base interfonica è
spenta che quando è accesa.
In corrispondenza di una chiamata da postazione remota, l’Operatore
sarà avvertito da un segnale acustico ed il led REMOTE si illuminerà
lampeggiando. Il tasto MODE ON/OFF in questo caso funge da comando
di abilitazione/disabilitazione della comunicazione: di seguito vengono
elencate le azioni legate a ciascuno stato dell’interfonico.
3.3 Answering a remote call
(if there is a connection for this purpose)
The Intercom system was designed with provisions for connection to a
possible console or remote station capable of communicating with the
Operator: this function is active both when the intercom base is switched
off and when it is switched on.
When a call comes in from the remote station, the Operator will be warned
by an acoustic signal and the REMOTE LED will start to flash. In this case
the MODE ON/OFF key acts as a control for enabling/disabling
communications: the actions associated with each status of the Intercom
System are listed below.
• Chiamata con Intercom spento
Il led REMOTE lampeggia per informare l’Operatore della chiamata in
arrivo.
Premere il tasto MODE ON/OFF > il sistema si accende in ‘AUTOMATIC’
(led verde) e viene abilitato il
dialogo con la postazione remota.
Premendo nuovamente il tasto
MODE ON/OFF, il dialogo viene
disabilitato ed il sistema rimane in
modalità ‘AUTOMATIC’.
• Chiamata con Intercom in modalità ‘AUTOMATIC’
Il led REMOTE lampeggia per informare l’Operatore della chiamata in
arrivo.
Premere il tasto MODE ON/OFF > viene abilitato il dialogo.
Premendo nuovamente il tasto
MODE ON/OFF, il dialogo viene
disabilitato ed il sistema rimane in
modalità ‘AUTOMATIC’.
• Chiamata con Intercom in modalità ‘MANUAL 1’
Il led REMOTE lampeggia per informare l’Operatore della chiamata in
arrivo.
Premere il tasto MODE ON/OFF > viene abilitato il dialogo.
Premendo nuovamente il tasto
MODE ON/OFF, il dialogo viene
disabilitato ed il sistema rimane in
modalità ‘MANUAL 1’.
• Call with Intercom off
The REMOTE LED will flash to inform the Operator that there is an incoming
call.
Press the MODE ON/OFF key > the system switches on in the
‘AUTOMATIC’ mode (green LED)
and the conversation with the
remote station is enabled. When
the MODE ON/OFF key is pressed
again, the conversation will be
disabled and the system will remain
in the ‘AUTOMATIC’ mode.
• Call with Intercom in the ‘AUTOMATIC’ mode
The REMOTE LED flashes to inform the Operator that there is an incoming
call.
Press the MODE ON/OFF key > Conversation is enabled. When
the MODE ON/OFF key is pressed
again, the conversation will be
disabled and the system will
remain in the ‘AUTOMATIC’ mode.
• Call with Intercom in the ‘MANUAL 1’ mode
The REMOTE LED flashes to inform the Operator that there is an incoming
call.
Press the MODE ON/OFF key > Conversation is enabled. When
the MODE ON/OFF key is pressed
again, the conversation will be
disabled and the system will
remain in the ‘MANUAL 1’ mode.
• Chiamata con Intercom in modalità ‘MANUAL 2’
Il led REMOTE lampeggia per informare l’Operatore della chiamata in
arrivo.
Premere il tasto MODE ON/OFF > viene abilitato il dialogo.
Premendo nuovamente il tasto
MODE ON/OFF, il dialogo viene
disabilitato ed il sistema rimane in
modalità ‘MANUAL 2’.
3.4 Invio di un avviso al pubblico
(collegamento ad un impianto di diffusione audio)
Tenendo premuto il tasto TALK, l’operatore può inviare un proprio
annuncio all’impianto audio di diffusione sonora del locale o dell’edificio.
Rilasciando il tasto, il funzionamento dell’interfonico tornerà quello
consueto.
3.5 Spegnimento dell’Interfonico
Tenere premuto il tasto MODE ON/OFF per almeno 1,5 secondi. Il led si
spegnerà ad indicare l’avvenuto spegnimento dell’apparecchio.
18
• Call with Intercom in the ‘MANUAL 2’ mode
The REMOTE LED flashes to inform the Operator that there is an incoming
call.
Press the MODE ON/OFF key > Conversation is enabled. When
the MODE ON/OFF key is pressed
again, the conversation will be
disabled and the system will
remain in the ‘MANUAL 2’ mode.
3.4 Sending an announcement to the public
(connection to a sound-broadcasting system)
By holding the TALK key down, the operator can send an announcement
to the sound-broadcasting audio system of the room or of the building.
As soon as the key is released, operation of the intercom system will
return to the usual condition.
3.5 Switching off the intercom system
Hold the MODE ON/OFF down for at least 1.5 seconds. The LED will
extinguish to show that the equipment has been switched off.
Page 19

CARATTERISTICHE TECNICHE TECHNICAL SPECIFICATIONS
enoizatnemilaidenoisneTcdV51egatlovylppusrewoP
otnemibrossA Am002÷Am06 noitprosbA
ehcinoforcimeluspacelledàtilibisneS
•
seluspacenohporcimehtfoytivitisneS
eterapadonoforciM )zHk1aaP/V1=Bd0(Bd74- gnitnuom-llawrofenohporciM
eno
izatsoponoforciM )zHk1aaP/V1=Bd0(Bd84- enohporcimnoitatS
)Bd3-(azneuqerfniatsopsiR zH0008÷072 )Bd3-(esnops
elanimonaznetoP
8adonretnietnalrapotlanoC Ω W1
8adonretseetnalrapotlanoC Ω W1
61adonretseetnalrapotlanoC Ω W6,0
•
inoisnemiD
•
eziS
rewoptuptuodetaR
tiW
8h Ω
tiWh8
tiWh61
erycneuqerF
Ω txe
Ω txe
acinoforcimenoizatsoP mm18x851x002 noitatsenohporciM
enoizatsopossacnireporoF
)mm27amissamàtidnoforp(
mm5,451x191
ollabmI mm562x281x565 gnigakcaP
tenosePgk1noitatsfothgiewteN
enoizatsopot
)otallabmi(ovisselpmocosePgk2,2)degakcap(thgiewllarevO
rekaepsduollanretni
rekaepsduollanre
rekaepsduollanre
noitatsehtgnitnuom-hsulfrofeloH
)mm27htpedmumixam(
19
Page 20

Vous remerciant d’avoir accordé votre préférence à un produit PASO,
nous tenons à vous rappeler que nous appliquons à notre production un
Système Qualité certifié. Aussi, pour donner entière satisfaction à notre
clientèle, tous nos produits sont contrôlés à chaque étape de la
production. Ils sont en outre garantis contre tout défaut de fabrication
pendant toute la période de validité de la garantie. Nous vous
recommandons de lire attentivement les instructions d’installation et
d’utilisation qui suivent; elles vous permettront d’obtenir le maximum
des prestations offertes par le produit et en outre d’éviter tout problème.
•••
1. GÉNÉRALITÉS
Le système interphonique Intercom 2000 a été spécialement étudié
pour permettre une conversation de ‘vive voix’ entre le personnel du
guichet et les clients. Grâce à une gestion par microcontrôleur, ce
système interphonique permet de définir le mode de fonctionnement le
mieux adapté aux conditions ambiantes et aux exigences d’utilisation.
En effet, lors des opérations d’installation, il est possible de sélectionner
une des trois configurations disponibles, ce qui permet de choisir la
mieux adaptée au type d’installation. En outre, l’interphonique a été
prédisposé pour la connexion à des installations de diffusion sonore du
type PA (Public Address), qui permet à l’opérateur, outre la réalisation
des opérations de communication depuis le guichet, d’orienter l’audio
de la base interphonique vers l’installation de diffusion sonore, en utilisant
l’interphonique comme une base microphonique pour des annonces. A
ces fins, il est nécessaire de connecter la prise REMOTE (voir en
Appendice la disposition des pôles des prises situées sur l’arrière de la
base interphonique) à l’entrée audio de l’installation de diffusion sonore.
La connexion doit être réalisée à l’aide d’un câble du type téléphonique
terminant opportunément sur la connexion avec l’appareil.
L’interphonique est en outre prédisposé pour être relié à un poste
utilisateur à distance, constitué d’une simple base microphonique
préamplifiée et munie d’une touche d’appel. Le branchement de la base
utilisateur à distance s’effectue au moyen de la prise REMOTE RJ45 à
8 pôles située sur l’arrière de la base interphonique (voir Appendice).
Wir danken Ihnen für die Wahl eines PASO-Produkts und möchten Sie
daran erinnern, dass wir mit einem zertifizerten anerkannten
Qualitätssicherungssystem arbeiten. D.h., alle unsere Produkte werden
in jeder Fertigungsphase kontrolliert, um Ihre vollständige Zufriedenheit
zu gewährleisten. Während des Gültigkeitszeitraums deckt die Garantie
auf jeden Fall eventuell vorliegende Produktionsmängel ab. Wir
empfehlen Ihnen, die hier vorliegende Bedienungsanweisung
aufmerksam zu lesen, um das Leistungsangebot des Produkts voll nutzen
zu können und um Probleme beim Gebrauch zu vermeiden.
•••
1. ALLGEMEINES
Das Interphonsystem Intercom 2000 wurde speziell für die
Kommunikation über Raumsprechanlage zwischen dem Schalterpersonal
und den Kunden entwickelt. Mit Hilfe der Mikrokontrollsteuerung ermöglicht
das System die Definition des für die Anwendungsanforderungen am
besten geeigneten Betriebsmodus. So kann während der
Installationsphase eine der drei vorhandenen Konfigurationen eingestellt
werden, indem diejenige ausgewählt wird, die der Art von Installation am
meisten entspricht. Das Interphonsystem wurde außerdem für den
Anschluss an Beschallungsanlagen des Typs PA (Public Address) konzipiert.
Mit Hilfe dieser Voreinstellung kann der Bediener nicht nur am Schalter
kommunizieren, sondern auch den Audio-Betrieb der Interphonsprechstelle
an die Beschallungsanlage lenken, indem er das Gerät als
Mikrofonsprechstelle für Durchsagen verwendet. Zu diesem Zweck muss
die Buchse REMOTE (s. im Anhang die Disposition der Pole der Buchsen
an der Rückseite der Interphonsprechstelle) an den Audio-Eingang der
Beschallungsanlage angeschlossen werden. Der Anschluss muss mit Hilfe
eines Telefonkabels mit entsprechendem Terminal für die Verbindung an
das Gerät hergestellt werden. Das Interphonsystem ist außerdem den
Anschluss an eine entfernte Sprechstelle ausgelegt, die aus einer
einfachen vorverstärkten Mikrofonsprechstelle besteht und eine Ruftaste
besitzt. Die Verbindung mit der entfernten Sprechstelle wird mit Hilfe der
8-poligen Buchse REMOTE RJ45 an der Rückseite der
Interphonsprechstelle hergestellt (siehe Anhang).
1.1 Équipement
Dans l’emballage du produit, vous trouverez les composants suivants:
1. Base interphonique, avec microphone à tige fixe et éponge de
protection anti-souffle.
2. Boîte de dérivation (téléphonique) avec prise téléph. à 6 pôles (femelle).
3. Câble de connexion entre la base interphonique et la boîte de
dérivation (longueur 3 m, avec fiches téléphoniques à 6 pôles (mâle).
4. Alimentation extérieure 230 Volts CA / 18 Volts CC de 500 mA.
5. Microphone mural du type électret, avec câble blindé (longueur 3 m).
6. Manuel d’utilisation et d’installation, avec certificat de garantie Paso.
N.B. Les haut-parleurs ne sont pas fournis.
1.2 Accessoires en option
L’interphonique permet de monter un maximum de 2 haut-parleurs
(reliés en parallèle entre eux). Pour le choix des haut-parleurs, nous
proposons deux solutions, selon le mode d’installation de l’appareil:
- pour les installations requérant l’application extérieure du haut-parleur,
il est conseillé d’utiliser le modèle Paso C401-B (impédance 16 ohm,
puissance max. 3 W), particulièrement adapté aux situations dans
lesquelles une certaine robustesse est requise.
- si le haut-parleur doit être encastré, nous conseillons les hautparleurs EGi:
EGi G28N/16 haut-parleur de 2” (adapté aux faux plafonds).
EGi G13U/16* haut-parleurs muraux avec grille de 2” (pour boîtier
d’encastrement carré).
*
Le haut-parleur G13U/16 est disponible dans la version adaptée au
montage avec les plaques des séries italiennes les plus diffuses (Bticino
Living International - GLIT/16 et Light - GL2T/16 et GL3T/16, Gewiss
PlayBus - GP2G/16 et Vimar® Idea - GI3V/16).
Le microphone a été conçu pour pouvoir être installé sur la vitre du
guichet grâce au bi-adhésif anti-vibrations dont il est muni.
Le câble blindé du microphone, qui a une longueur de 3 m, peut être
dissimulé à la vue du public grâce à l’utilisation de goulottes en PVC blanc
au format standard 5 x 10 mm (elles aussi à ruban bi-adhésif) qui
s’adaptent bien au corps du microphone: les goulottes sont en vente
chez tous les revendeurs de matériel électrique.
1.1 Lieferumfang
In der Verpackung des Produkts finden Sie die folgenden Komponenten:
1. Interphonsprechstelle mit Stabmikrofon und Hauchschutz.
2. Verteilerdose (Telefontyp) mit 6-poliger Telefonbuchse.
3. Verbindungskabel zwischen Interphonsprechstelle und Verteilerdose
(Länge 3 m, ausgerüstet mit 6-poligen Telefonsteckern).
4. Externe Einspeisungseinrichtung 230 Volt WS / 18 Volt GS mit 500 mA.
5. Wand-Elektretmikrofon mit geschirmtem Kabel (Länge 3 m).
6. Installations- und Gebrauchshandbuch mit Paso-Garantiezertifikat.
N.B. Die Lautsprecher sind nicht im Lieferumfang enthalten.
1.2 Optionales Zubehör
Das Interphonsystem bietet die Möglichkeit, bis zu maximal 2 Lautsprecher
(Parallelschaltung) montieren. Für die Auswahl der Lautsprecher bieten
wir je nach Installationsmodalität des Geräts zwei Lösungen an:
- Für Installationen, für die der externe Einsatz von Lautsprechern
gewünscht ist, wird das Modell Paso C401-B (Impedanz 16 ohm,
Leistung max. 3 W) empfohlen, das sich insbesondere für Situationen
eignet, in denen eine bestimmte Widerstandsfähigkeit erforderlich ist.
- Falls der Einbau des Lautsprechers gewünscht wird, empfehlen wir
die Lautsprecher von EGi:
EGi G28N/16 Lautsprecher, 2” (geeignet für Gegendecken).
EGi G13U/16* Wandlautsprecher mit Raster, 2” (für ein
quadratisches Einbaugehäuse).
*
®
®
Der Lautsprecher G13U/16 ist in einer für die Montage mit Signalplatten
der verbreitetesten italienischen Hersteller (Bticino® Living
International - GLIT/16 und Light - GL2T/16 und GL3T/16, Gewiss
PlayBus - GP2G/16 und Vimar® Idea - GI3V/16).
Das Mikrofon ist so konzipiert, dass es mit Hilfe des vorhandenen AntiVibrations-Doppelklebestreifen an der Glasscheibe des Schalters befestigt
werden kann. Das geschirmte Kabel mit einer Länge von 3 m kann dank
der weißen, dem Mikrofongehäuse angepassten PVC-Kabelkanäle im
Standardformat 5 x 10 mm (auch mit Doppelklebestreifen versehen) für
das Schalterpublikum unsichtbar verlegt werden: Die Kabelkanäle sind in
jedem Elektrofachhandel erhältlich.
®
20
Page 21

MANUEL DE L’INSTALLATEUR
INSTALLATEURHANDBUCH
IMPORTANT
doivent être réalisées exclusivement PAR DES TECHNICIENS SPÉCIALISÉS.
PASO Spa ne répondra pas d’éventuels dommages ou mauvais fonctionnements du système dus à une procédure d’installation non correcte.
nur VON SPEZIALISIERTEN FACHPERSONAL vorgenommen werden.
PASO Spa haftet nicht für eventuell durch eine nicht ordnungsgemäße Installation entstandene Schäden oder Betriebsstörungen.
Toutes les opérations décrites dans ce chapitre
•
WICHTIG
Alle in diesem Abschnitt beschriebenen Operationen dürfen
21
Page 22

1. MISE EN PLACE ET CONNEXIONS
1.1 Installation du microphone mural et des haut-parleurs
Le microphone électret doit être appliqué dans la mesure du possible au
centre de la vitre du guichet, dans une position permettant de faire en
sorte qu’il se trouve en face de la bouche du client (figure 1). Dans cette
position, la réception du signal sonore est meilleure. Il est nécessaire
d’accorder une attention particulière également à la position du hautparleur (ou des haut-parleurs), afin d’éviter le phénomène de retour
acoustique (feed-back, effet Larsen).
1. POSITIONIERUNG UND ANSCHLÜSSE
1.1 Position von Wandmikrofon und Lautsprechern
Das Elektretmikrofon muss nach Möglichkeit in der Mitte der
Schalterscheibe in Höhe des Munds des Kunden (Abbildung 1)
angebracht werden. In dieser Position ist der Empfang des Tonsignals
am wirksamsten. Besondere Aufmerksamkeit sollte auch der Position
des Lautsprechers (bzw. der Lautsprecher) gewidmet werden, um das
Rückhallen (Feed-Back, Larsen-Effekt) zu vermeiden.
Fig./Abb. 1
En effet, le haut-parleur NE DOIT PAS être placé à proximité immédiate
du microphone et en tout cas dans une position dans laquelle le
microphone NE SE TROUVERA PAS dans le cône de projection du signal
audio émis par le haut-parleur (Figure 2). L’efficacité audio de
l’installation dépendra fortement de la disposition physique de chacun
des composants (microphone, haut-parleurs). Il est en outre conseillé
de faire en sorte qu’il n’y ait aucune communication entre la zone
extérieure (réservée aux clients) et la zone intérieure (réservée aux
opérateurs), afin de garantir une isolation sonore parfaite contre les
bruits extérieurs et en même temps une excellente intelligibilité de la
voix. Etant donné que la plupart des guichets de bureaux possèdent
des trous ou des ouvertures destinés au passage de documents ou de
billets de banque, il est conseillé d’éviter, dans la mesure du possible,
de placer le microphone ou les haut-parleurs à proximité immédiate de
ces ouvertures (Fig. 3 et Fig. 4).
1.2 Installation de la base interphonique
La base interphonique doit être placée sur le côté opérateur du guichet,
et reposer sur un plan stable. Il est possible en outre d’encastrer la
base dans le même plan: dans ce cas, il est nécessaire de s’assurer
que la base se trouve à au moins 40 cm des éventuelles ouvertures de
la vitre du guichet. Une fois la base interphonique installée dans la
position désirée, la relier à la boîte de dérivation.
Fig./Abb. 2 Fig./Abb. 3
Fig./Abb. 4
Der Lautsprecher darf also NICHT in unmittelbarer Nähe des Mikrofons
installiert werden und auf jeden Fall in einer Position, in der das Mikrofon
NICHT in dem vom Lautsprecher ausgestrahlten Tonkegel liegt (Abb. 2).
Die Audio-Leistungsfähigkeit der Anlage hängt in starkem Maße von der
physischen Position der einzelnen Komponenten ab (Mikrofon,
Lautsprecher).
Außerdem ist es empfehlenswert, dass zwischen dem externen Bereich
(Kunden) und dem internen Bereich (Bediener) keine Kommunikation
möglich ist, um eine absolute akustische Isolierung von externen
Geräuschen und eine optimale Verständlichkeit der Stimme zu
gewährleisten. Da der Großteil der Büroschalter Öffnungen für das
Durchreichen von Unterlagen oder Bargeld besitzt, sollte die Montage
des Mikrofons oder der Lautsprecher in unmittelbarer Nähe dieser
Öffnungen vermieden werden (Abb. 3 und Abb. 4)
1.2 Position der Interphonsprechstelle
Die Interphonsprechstelle muss auf der Seite des Schalterpersonals auf
einer stabilen Ablage installiert werden. Die Sprechstelle kann auch in die
Tischoberfläche eingebaut werden: In diesem Fall muss sichergestellt
werden, dass die Sprechstelle in einem Abstand von mindestens 40 cm
von eventuellen Öffnungen der Schalterscheibe entfernt ist. Nach
Montage der Interphonsprechstelle in der gewünschten Position, muss
die Sprechstelle an die Verteilerdose angeschlossen werden.
1.3 Installation de la boîte de dérivation
La boîte de dérivation doit être installée à proximité immédiate du guichet
(par exemple sous le banc de travail de l’opérateur) et fixée au mur à
l’aide de deux vis.
A la boîte de dérivation doivent parvenir les connexions suivantes:
· connexion avec le microphone depuis le mur situé côté client;
· connexion avec le haut-parleur situé côté client;
· connexion avec la base interphonique au moyen du câble à 6 pôles
du type téléphonique prévu à cet effet, fourni dans l’emballage;
· connexion avec l’alimentation extérieure.
22
1.3 Position der Verteilerdose
Die Verteilerdose muss in unmittelbarer Nähe des Schalters (z. B. unter
der Schalterplatte des Bedieners) positioniert und mit zwei Schrauben
befestigt werden.
Mit Hilfe der Verteilerdose sind die folgenden Verbindungen möglich:
· Verbindung mit dem Wandmikrofon im Kundenbereich;
· Verbindung mit Lautsprecher im Kundenbereich;
· Verbindung mit der Interphonsprechstelle mit Hilfe des entsprechenden
6-poligen Telefonkabels, das im Lieferumfang enthalten ist;
· Anschluss an eine externe Einspeisungseinheit.
Page 23

Les connexions à effectuer dans la boîte sont illustrées à la Fig. 5. Le
câble doit être relié à la prise LOCAL de la base interphonique.
154
Câble de branchement à la base interphonique
Verbindungskabel für die Interphonsprechstelle
Die Innern der Verteilerdose herzustellenden Anschlüsse sind in der
Abbildung 5 dargestellt. Das Kabel muss an die Buche LOCAL der
Interphonsprechstelle angeschlossen werden.
6 POLES
6-POLIG
Boîte de dérivation
1 = Haut-parleur (+) • BLANC
2 = Écran (pôle – du microphone) • NOIR
3 = Phantom (pôle + du microphone) • ROUGE
4 = Alimentation (pôle –) • VERT
5 = Alimentation (pôle +) • JAUNE
6 = Haut-parleur (–) • BLEU
6
1
623
Fig./Abb. 5
1.4 Installation de l’alimentation extérieure
L’alimentation extérieure murale doit être opportunément reliée à une
prise de réseau de 16A se trouvant à proximité du guichet, de
préférence commandée par un interrupteur.
2. PROGRAMMATIONS
2.1 Description générale des fonctions
Comme nous l’avons déjà dit, la gestion par microcontrôleur permet à
l’installateur de choisir le mode de fonctionnement le plus approprié aux
conditions ambiantes et aux exigences d’utilisation.
Après avoir choisi l’option désirée pendant l’installation, l’opérateur peut
gérer le fonctionnement du système directement depuis le poste
microphonique. Aux paragraphes suivants, nous indiquons les procédures
à suivre pour modifier les réglages de fonctionnement et les réglages
qu’il est possible d’effectuer sur le poste microphonique.
2.2 Réglage des volumes
Sur le fond de la base interphonique se trouvent les trous
d’intervention pour le réglage des volumes d’émission sonore, côté
client et côté opérateur (page 26).
Il est opportun d’agir sur ces trimmers (avec un tournevis à tête
plate) afin de garantir un niveau de volume suffisant tant pour
l’opérateur que pour le Client, en veillant en tout cas à ne pas
s’approcher de la condition critique de retour acoustique (émission
d’un sifflement dû à l’effet Larsen), phénomène en tout cas commun
à tous les types d’interphonique à commutation ou à atténuation en
vente dans le commerce.
La possibilité d’augmenter les volumes à la discrétion de l’opérateur
est par conséquent fortement influencée par la disposition des
composants audio (microphone et haut-parleurs) : si les composants
audio ont été installés conformément aux indications fournies cidessus, on devrait obtenir un bon niveau de signal audio dans les
deux directions (côté client et côté opérateur).
Verteilerdose
1 = Lautsprecher (+) • WEISS
2 = Abschirmung (Pol – des Mikrofons) • SCHWARZ
3 = Phantom (Pol + des Mikrofons) • ROT
4 = Einspeisungsvorrichtung (Pol –) • GRÜN
5 = Einspeisungsvorrichtung (Pol +) • GELB
6 = Lautsprecher (–) • BLAU
1.4 Position der externen Einspeisungsvorrichtung
Die externe Einspeisungsvorrichtung für die Wandmontage muss
entsprechend an eine 16A -Netzsteckdose in der Nähe des Schalters
angeschlossen werden, nach Möglichkeit nach dem Schalter.
2. EINSTELLUNGEN
2.1 Allgemeine Beschreibung der Funktionalitäten
Wie bereits erwähnt, ermöglicht die Mikrokontrollsteuerung es dem
Installateur, den für den Raum und die Gebrauchsanforderungen
geeigneten Betriebsmodus auszuwählen. Nach Auswahl der gewünschten
Option in der Installationsphase, kann der Bediener den Betrieb des
Systems direkt von der Mikrofonsprechstelle aus steuern. In den
nachstehenden Abschnitten werden die Verfahren genannt, die bei der
Veränderung der Betriebseinstellungen befolgt werden müssen sowie
die möglichen Einstellungen im Innern der Mikrofonsprechstelle.
2.2 Einstellung der Lautstärke
Am Boden der Interphonsprechstelle befinden sich die Öffnungen
für die Einstellung der Lautstärke sowohl im Kundenbereich als auch
im Bedienerbereich (Seite 26). Diese Trimmer sollten (mit einem
Schraubdreher mit flachem Ansatz) so eingestellt werden, dass
sowohl für den Bediener als auch für die Kunden eine ausreichende
Lautstärke vorhanden ist, wobei darauf geachtet werden muss, sich
nicht allzu sehr der Grenze des Rückhalls (Einsetzen eines durch den
Larsen-Effekt bedingten Pfeiftons) zu nähern, einem Phänomen, das
bei allen Arten von marktüblichen Interphonen mit Umschaltung oder
Abschwächung auftreten kann. Die Möglichkeit der Erhöhung der
Lautstärke seitens des Bedieners ist daher in hohem Maße von der
Positionierung der Audio-Komponenten (Mikrofon und Lautsprecher
)abhängig. Wenn die Komponenten entsprechend den vorstehenden
Anweisungen positioniert wurden, müsste eine zufriedenstellende
Signalstufe in beiden Richtungen vorhanden sein (sowohl in Richtung
Kundenbereich als auch in Richtung Bedienerbereich).
2.3 Réglage des modes de fonctionnement
Le réglage des modes de fonctionnement est une opération qui doit
nécessairement être réalisée par un personnel expert et qualifié.
L’interphonique est fourni avec un niveau de réglage des valeurs de
sensibilité des microphones standard (effectué lors de la production)
valable pour le type de microphone fourni dans l’emballage. Etant
donné qu’il n’est pas interdit d’utiliser d’autres types de microphone,
nous indiquons ci-dessous les caractéristiques fondamentales de la
capsule microphonique nécessaire:
• Capsule électret si possible du type back-elektrete (petits trous sur
l’arrière).
• Alimentation phantom ~12V, résistance de charge de 2,2 kΩ,
sensibilité -47 dB ± 10% (0 dB = 1V/Pa a 1 kHz).
1. Brancher le positif de la capsule à la borne de la boîte de dérivation,
où était branché le pôle chaud du câble du microphone mural fourni
dans l’emballage.
2.3 Einstellung der Betriebsmodi
Die Einstellung der Betriebsmodi ist ein Vorgang, der notwendigerweise
von qualifiziertem Fachpersonal vorgenommen werden muss.
Das Interphon wird mit einer Eichstufe geliefert, die den
Empfindlichkeitswerten von Standardmikrofonen entspricht
(werkseitige Einstellung) und für die Art von Mikrofon gültig ist, das in
der Verpackung beiliegt. Da der Einsatz anderer Arten von Mikrofonen
nicht verboten ist, werden im Folgenden die Grundeigenschaften
aufgeführt, über die die Mikrofonkapsel verfügen muss:
• Elektretkapsel nach Möglichkeit vom Typ Back-Elektret (mit kleinen
Öffnungen an der Rückseite).
• Phantomeinspeisung ~12V, mit einem Lastwiderstand von 2,2 kΩ,
Empfindlichkeit -47 dB ± 10% (0 dB = 1V/Pa a 1 kHz).
1. Schließen Sie die positive Seite der Kapsel an die Klemme der
Verteilerdose an, an die der warme Pol des beiliegenden Kabels
des Wandmikrofons angeschlossen war.
23
Page 24

2. Brancher le négatif de la capsule à la borne
7
+
de la boîte de dérivation, où était branché
l’écran du câble du microphone mural fourni
dans l’emballage.
Pour sélectionner le mode de fonctionnement, il
est nécessaire d’intervenir sur la base:
3. Enlever les deux côtés (A) de la base
interphonique en dévissant les vis de fixation
(voir fig. 6).
4. Soulever le panneau avant et le placer à côté
de la base. Il est maintenant possible
d’accéder au circuit imprimé fixé sur le fond
de l’interphonique.
2. Schließen Sie die negative Seite der Kapsel
an die Klemme der Verteilerdose an, an die
die Abschirmung des beiliegenden Kabels
des Wandmikrofons angeschlossen war.
Zur Auswahl des Betriebsmodus muss im
Innengehäuse der Sprechstelle wie folgt
vorgegangen werden:
3. Entfernen Sie die beiden Seitenteile (A) von der
A
Interphonsprechstelle, indem Sie die beiden
Befestigungsschrauben lösen (s. Abb. 6).
4. Heben Sie das Frontpaneel an und stellen Sie
A
es neben der Sprechstelle ab. Jetzt ist der
Schaltkreis am Boden des Interphons
zugänglich.
Fig./Abb. 6
5. L’observation de la Fig. 7 permet d’identifier aisément les microsélecteurs SW1 qui devront être utilisés pour sélectionner le mode
de fonctionnement.
+
R40
R50
R13
R18
C48
R49
C
R14
C14
R43
LD6
FM1
R11
+
C11
C12
+
C29
R21
H2
LD4
R22
SIL2
R23
R24
R25
C39
C40
C41
R44
R45
R34
U5
R33
C42
C38
C43
R35
C44
R41
U2
H3
H3
C30
+
SIL1
SW1
1
R42
R46
R47
R37
LD5
R38
Q4
U10
R36
C45
D4
R39
Q5
C13
R12
C20
U4
R17
R19
8
C47
U9
R48C46
Fig./Abb. 7
5. Bei Betrachten der Abb. 7 erkennen Sie leicht die Mikro-Wählschalter
SW1, die für die Auswahl des Betriebsmodus verwendet werden
müssen.
C15
Y1
U6
C49
C51
+
C35
C36
U11
R30
C57
R10
C19
Y2
+
C58
R15
C22C21
RN2
OP1
R16
C18
C17
C16
+
H1
C25
C23
+
C24
C31
RN1
J5
R51
U7
R28
C55
C26
R29
C56
C27
C50
R52
K2
+
C59
LD3
D3
C28
+
R20
C32
C33
JP1
U8
R27
C37
C53
Q3
C52
R31
R32
Q6
R53
LD7
R54
+
C54
+
C34
R26
+
3. MODES DE FONCTIONNEMENT ‘AUTOMATIQUE’
Etablissons avant tout quelques conventions relatives à la terminologie
que nous utiliserons dans ce chapitre:
• Canal Ouvert la communication est activée.
• Canal Fermé la communication N’EST PAS activée.
• Canal Client communication de l’extérieur (Client) vers
l’intérieur (==> Opérateur).
• Canal Opérateur communication de l’intérieur (Opérateur) vers
l’extérieur (==> Client).
• Canal Prioritaire il est possible d’associer une priorité à un des
deux canaux.
• Canal Secondaire le canal qui ne jouit pas d’une priorité.
Nous illustrons ci-dessous les trois modes de fonctionnement ‘automatique’.
24
3. AUTOMATISCHER BETRIEBSMODUS
Wir legen hier zunächst einige Vereinbarungen in bezug auf die in diesem
Kapitel verwendeten Begriffe fest:
• Offener Kanal die Kommunikation ist aktiviert.
• Geschlossener Kanal die Kommunikation ist NICHT aktiviert.
• Kanal Kunden Kommunikation aus dem Kundenbereich in
Richtung Innenbereich (==> Bediener).
• Kanal Bediener Kommunikation aus dem Innenbereich (Bediener)
in Richtung Kundenbereich (==> Kunde).
• Vorrangkanal es besteht die Möglich, einem der beiden
Kanäle einen Vorrang zuzuordnen.
• Sekundärer Kanal dieser Kanal besitzt keine Vorrangschaltung.
Im Folgenden werden die drei automatischen Funktionsmodi des Geräts
interphonique erläutert.
Page 25

3.1 Description des différents modes
Le système interphonique admet trois différents modes de
fonctionnement ‘automatique’ réglables au moment de l’installation au
moyen des micro-interrupteurs SW1:
Mode 0 > Full Duplex (à canaux ouverts).
Mode 1 > Half Duplex (à canaux fermés, sans priorité).
Mode 2 > Full Duplex Prioritaire (un canal ouvert).
Le mode de fonctionnement doit être sélectionné en fonction
des exigences du Client.
3.1 Beschreibung der verschiedenen Modi
Das Interphonsystem lässt drei verschiedene automatische Betriebsmodi
zu, die bei der Installation mit Hilfe der Mikro-Wählschalter SW1
eingestellt werden:
Modus 0 > Full Duplex (bei offenen Kanälen).
Modus 1 > Half Duplex (bei geschlossenen Kanälen, ohne Vorrang).
Modus 2 > Full Duplex mit Vorrang (mit einem offenen Kanal).
Der Betriebsmodi muss entsprechend den Anforderungen des
Kunden ausgewählt werden.
La sélection du mode s’effectue en agissant sur les micro-interrupteurs
SW1, de la façon suivante:
1. s’assurer que le Système est débranché du secteur;
2. enlever les deux côtés de la base interphonique et extraire le petit
panneau de commande, de façon à accéder au circuit imprimé
principal qui se trouve sur le fond;
3. identifier les micro-interrupteurs SW1 (voir fig. 7, page précédente);
4. Avec les bits 1 et 2, sélectionner un des trois modes en suivant les
indications du tableau:
Bit 1 Bit 2 Mode *
0 0 0 - FULL DUPLEX
1 0 1 - HALF DUPLEX
0 1 2 - FULL DUPLEX PRIORITAIRE
1 = ON 0 = OFF
*
Réglage effectué à l’usine: Mode 0
3.2 Atténuation des canaux
Le principe de fonctionnement se base sur l’utilisation d’un circuit DSP à
effaceur d’écho incorporé. Cependant, en cas d’installation très critique,
l’effaceur peut ne pas être à même d’empêcher l’effet de rétroaction
sonore (effet Larsen); dans ce cas, il est nécessaire d’intervenir avec
l’atténuation de gain d’un ou des deux canaux; cette opération est
effectuée automatiquement par le DSP. Cependant, à l’aide des microinterrupteurs, il est possible d’attribuer l’atténuation maximale que le
DSP peut introduire pour chaque canal. Le mode de réglage de ces
paramètres est indiqué ci-dessous:
Die Auswahl der Modi erfolgt durch Betätigen der Mikroschalter SW1 auf
die folgende Weise:
1. Stellen Sie sicher, dass das System vom Netz getrennt ist;
2. Entfernen Sie die beiden Seitenteile der Interphonsprechstelle und
nehmen Sie die Befehlsschalttafel heraus, damit Sie Zugang zu
dem Hauptschaltkreis am Boden Sprechstelle bekommen;
3. Suchen Sie die Mikro-Wählschalter SW1 (s. Abb. 7, vorherige Seite);
4. Wählen Sie mit bit 1 und 2 die drei Modi entsprechend den Angaben
in der folgenden Tabelle:
Bit 1 Bit 2 Modus *
0 0 0 - FULL DUPLEX
1 0 1 - HALF DUPLEX
0 1 2 - FULL DUPLEX MIT VORRANG
1 = ON 0 = OFF
*
Werkseitige Einsstellung: Modus 0
3.2 Abschwächung der Kanäle
Das Funktionsprinzip basiert auf der Verwendung eines DSP-Schaltkreises
mit eingebautem Echokompensator. Jedoch könnte der Kompensator bei
besonders kritischen Installationen nicht in der Lage sein, den Rückhall /
Larsen-Effekt) zu vermeiden; in diesem Fall muss die Abschwächung der
Verstärkung an einem oder an beiden Kanälen vorgenommen werden;
dieser Vorgang wird vom DSP automatisch vorgenommen. Jedoch kann
mit Hilfe der Mikroschalter die vom DSP maximal für einen Kanal
zuzuweisende Abschwächung eingestellt werden.
Die Einstellungsmodalität für diese Parameter ist im Folgenden angegeben:
• Mode 0 - FULL DUPLEX à canaux ouverts (Client/Opérateur)
Dans ce type de configuration, les canaux Opérateur et Client sont
toujours ouverts. Il est possible de sélectionner le niveau maximal
d’atténuation individuelle pour chaque canal, comme illustré par les
tableaux suivants:
Sélection atténuation canal Opérateur
Bit 3 Bit 4 Atténuation
0 0 0 dB
1 0 3 dB
0 1 6 dB
1 1 9 dB
Sélection atténuation canal Client
Bit 5 Bit 6 Atténuation
0 0 0 dB
1 0 3 dB
0 1 6 dB
1 1 9 dB
• Modus 0 - FULL DUPLEX mit offenen Kanälen (Kunde/Bediener)
Bei dieser Art von Konfiguration sind die Kanäle Bediener und Kunde
immer geöffnet. Es besteht die Möglichkeit, eine individuelle maximale
Abschwächungsstufe für jeden Kanal einzustellen, wie in der
nachfolgenden Tabelle angegeben:
Auswahl der Abschwächung des Kanals Bediener
Bit 3 Bit 4 Abschwächung
0 0 0 dB
1 0 3 dB
0 1 6 dB
1 1 9 dB
Auswahl der Abschwächung des Kanals Kunde
Bit 5 Bit 6 Abschwächung
0 0 0 dB
1 0 3 dB
0 1 6 dB
1 1 9 dB
25
Page 26

• Mode 1 - HALF DUPLEX à canaux fermés sans priorité
Dans ce type de configuration, dans la condition de repos, les deux
canaux sont fermés et le canal dont le niveau de signal dépassera une
valeur de seuil préréglé sera ouvert automatiquement. L’autre canal
pourra intervenir pendant les pauses, bien entendu à condition que son
niveau dépasse le seuil préréglé. Dans ce cas également, il est possible
de sélectionner le niveau maximal d’atténuation individuelle pour chaque
canal, comme illustré par les tableaux suivants:
Sélection atténuation canal Opérateur
Bit 3 Bit 4 Atténuation
0 0 0 dB
1 0 3 dB
0 1 6 dB
1 1 9 dB
Sélection atténuation canal Client
Bit 5 Bit 6 Atténuation
0 0 0 dB
1 0 3 dB
0 1 6 dB
1 1 9 dB
• Mode 2 - FULL DUPLEX PRIORITAIRE à un canal ouvert
Dans ce type de configuration, en condition de repos, le canal Prioritaire
est ouvert, tandis que le Secondaire est fermé; cette sélection est indiquée
dans le tableau suivant:
Sélection canal toujours ouvert
Bit 7 Canal ouvert (prioritaire)
0 Client
1 Opérateur
• Modus 1 - HALF DUPLEX bei geschlossenen Kanälen ohne Vorrang
Bei dieser Art von Konfiguration sind bei Ruhestellung beide Kanäle
geschlossen und es wird automatisch der Kanal geöffnet, deren
Signalstufe den voreingestellten Schwellenwert überschreitet. Der
andere Kanal wird in den Pausen aktiviert, jedoch nur unter der
Bedingung, dass er die voreingestellte Stufe überschreitet. Auch hier
kann für jeden Kanal die maximale Abschwächung individuell eingestellt
werden, wie in der folgenden Tabelle erläutert:
Auswahl der Abschwächung des Kanals Bediener
Bit 3 Bit 4 Abschwächung
0 0 0 dB
1 0 3 dB
0 1 6 dB
1 1 9 dB
Auswahl der Abschwächung des Kanals Kunde
Bit 5 Bit 6 Abschwächung
0 0 0 dB
1 0 3 dB
0 1 6 dB
1 1 9 dB
• Modus 2 - FULL DUPLEX MIT VORRANG bei einem geöffneten Kanal
Bei dieser Art von Konfiguration ist bei Ruhestellung der Kanal mit Vorrang
geöffnet, während der sekundäre Kanal geschlossen ist; diese Auswahl ist
in der Tabelle angegeben:
Auswahl des stets geöffneten Kanals
Bit 7 geöffneter Kanal (mit Vorrang)
0 Kunde
1 Bediener
Ce mode est conseillé lorsqu’un des deux milieux ambiants est sujet à un
niveau de bruit plutôt élevé, ce qui fait qu’il peut convenir de laisser le
canal relatif fermé. Dans ce cas, le seuil d’intervention du canal fermé
peut être réglé conformément aux indications du tableau, et il est possible
de sélectionner le niveau maximum d’atténuation du canal fermé.
Seuil canal fermé
Bit 3 Bit 4 Seuil
0 0 6 dB
1 0 9 dB
0 1 12 dB
1 1 15 dB
Schwellenwert des
geschlossenen Kanals
Bit 3 Bit 4 Schwelle
0 0 6 dB
1 0 9 dB
0 1 12 dB
1 1 15 dB
3.3 Mode ‘REMOTE’
Il est possible de définir, au moyen du bit 8 des micro-interrupteurs SW1,
le mode de fonctionnement de la connexion à distance de la façon suivante:
Bit 8 = 0 Le mode de fonctionnement de la connexion à distance est
identique à celui sélectionné par l'Opérateur.
Bit 8 = 1 Pendant la connexion à distance le mode ‘MANUAL 1’ est forcé.
4. RÉGLAGES
Les deux trous présents sur le fond de l'appareil
permettent d'accéder aux potentiomètres de
réglage du volume audio des deux hauts-parleurs,
sans devoir agir à l'intérieur de la base. Le premier
C
trou (A) permet d'augmenter ou de diminuer le
volume des hauts-parleurs CLIENT et distant; le
deuxième trou (B) règle le volume du haut-parleur
OPERATEUR. Le troisième trou (C) permet quant
à lui de régler la sensibilité microphonique lorsque
l'opérateur est en train d'utiliser un microphone
externe branché au connecteur .
26
Dieser Modus wird für Fälle empfohlen, bei denen einer der beiden
Bereiche stark von Lärm belastet ist, so dass der entsprechende Kanal
geschlossen bleiben sollte. In diesem Fall kann die Aktivierungsschwelle
des geschlossenen Kanals entsprechend der Tabelle eingestellt werden
und es besteht die Möglichkeit, die maximale Anschwächung des
geschlossenen Kanals einzustellen.
Atténuation canal fermé
Bit 5 Bit 6 Att.
0 0 0 dB
1 0 3 dB
0 1 6 dB
1 1 9 dB
Abschwächung des
geschlossenen Kanals
Bit 5 Bit 6 Abs.
0 0 0 dB
1 0 3 dB
0 1 6 dB
1 1 9 dB
3.3 Modus ‘REMOTE’
Mit Hilfe des Bits 8 der SW1-Mikroschalter kann der Betriebsmodus der
Fernverbindung wie folgt übertragen werden:
Bit 8 = 0 Der Betriebsmodus der Fernverbindung ist identisch mit dem
vom Bediener gewählten Modus.
Bit 8 = 1 Während der Fernverbindung wird der Modus ‘MANUAL 1’
erzwungen.
4. EINSTELLUNGEN
An der Rückseite der Sprechstelle sind zwei Öffnungen
vorhanden, mit Hilfe der man zu den Pontenziometern
gelangt, die zur Regulierung der Lautstärke der beiden
Lautsprechern dienen, ohne auf den Innenrau
zugreifen zu müssen. Mit Hilfe der ersten Öffnung (A)
kann die Lautstärke der beiden Lautsprecher KUNDE
A
B
und Remote vermindert oder verstärkt werden; an
der zweiten Öffnung (B) wird die Lautstärke des
Lautsprechers BEDIENER eingestellt. An einer dritten
Öffnung (C) hingegen kann die Regulierung der
Mikrofonempfindlichkeit vorgenommen werden, wenn
der Bediener ein externes Mikrofon verwendet, das
an das Anschlussstück angeschlossen ist.
Page 27

5. FONCTIONS PRINCIPALES
5.1 DEL de signalisation
Sur la face avant de la base interphonique sont présentes deux DEL.
Toutes deux exercent la fonction de signalisation de l’état du Système:
• DEL VERTE ‘REMOTE’:
La DEL verte REMOTE sert à visualiser la demande de communication d’un
poste à distance vers le poste opérateur (dans les installations pour
lesquelles elle est demandée).
• DEL DEUX-COULERS ‘MODE ON/OFF’:
Elle permet de visualiser le ‘type de fonctionnement’ sélectionné par la
fonction MODE. Lors de l’activation, elle présente une couleur verte
(réglage de défaut, type de fonctionnement Automatique). Le tableau
ci-dessous indique la correspondance couleur/type de fonctionnement.
5. HAUPTFUNKTIONEN
5.1 Anzeige-Led
An der Vorderseite der Interphonsprechstelle befinden sich zwei Led.
Beide haben die Funktion der Zustandsanzeige des Systems:
• GRÜNE Led ‘REMOTE’:
Die grüne Led REMOTE dient zur Anzeige des Sprechantrags einer
entfernten Sprechstelle an den Bedienerplatz (für Installationen, bei denen
dies erforderlich ist).
• ZWEIFARBIGE Led ‘MODE ON/OFF’:
Zeigt den mit der Funktion MODE ausgewählten ‘Betriebsmodus’ an.
Bei Aktivierung leuchtet sie grün (Standardeinstellung, automatischer
Betriebsmodus). In der folgenden Tabelle sind die Entsprechungen Farbe/
Betriebsmodus angegeben.
Couleur DEL Type de fonctionnement
VERTE AUTOMATIC
ROUGE MANUAL 1
ORANGE MANUAL 2
5.2 Bague lumineuse
Située sur le corps du micro, à la hauteur de la jonction avec la tige, elle
s’allume, dans les différents types de fonctionnement, quand le canal
Opérateur est ouvert.
5.3 Fonctions
Nous indiquons ci-dessous les fonctions de la base interphonique.
ACTION DESCRIPTION
Fonction des flèches
à En appuyant sur cette touche, on active
Ä En appuyant sur cette touche, on active
Allumage
Touche ‘MODE ON/OFF’ Une simple pression de cette touche permet
Choix fonction
Touche ‘MODE ON/OFF’ En appuyant brièvement sur cette touche,
‘AUTOMATIC’ (DEL VERTE ALLUMÉE)
l’audio en sortie (c’est l’Opérateur qui parle).
l’audio en entrée (c’est le Client qui parle).
d’obtenir l’allumage du poste (fonction ON).
on choisit parmi les différents types de
fonctionnement disponibles (fonction
MODE).
La gestion de l’attribution du canal actif s’effectue selon le mode de
fonctionnement sélectionné au moment de l’installation (voir par. 3.2,
page 25).
à En appuyant sur cette touche, on habilite
Ä En appuyant sur cette touche, on habilite
Touche ‘TALK’ En appuyant sur cette touche, la
‘MANUAL 1’ (DEL ROUGE ALLUMÉE)
En l’absence de communication, le canal Client reste actif.
l’Opérateur: la DEL orange s’allume.
le Client: la DEL rouge s’allume.
communication en sortie de l’Opérateur est
diffusée dans l’installation PA.
La DEL verte reste allumée.
Farbe LED Betriebmodus
GRÜN AUTOMATIC
ROT MANUAL 1
ORANGE MANUAL 2
5.2 Leuchtring
Der Leuchtring befindet sich am Mikrofonkörper in Höhe der Verbindung
mit dem Mikrofonhals und leuchtet bei den verschiedenen Betriebsmodi
auf, wenn der Kanal Bediener geöffnet ist.
5.3 Funktionalitäten
Im Folgenden werden die Funktionalitäten der Interphonsprechstelle
angegeben.
MASSNAHME BESCHREIBUNG
Funktion der Pfeile
à Bei Betätigen dieser Taste, wird der Ton am
Ä Bei Betätigen dieser Taste, wird der Ton am
Einschalten
Taste ‘MODE ON/OFF’ Durch ein einfaches Drücken dieser Taste,
Funktionsauswahl
Taste ‘MODE ON/OFF’ Durch ein kurzes Drücken dieser Taste, wird
‘AUTOMATIC’ (GRÜNE LED LEUCHTET)
Ausgang aktiviert (der Bediener spricht).
Eingang aktiviert (der Kunde spricht).
wird die Sprechstelle eingeschaltet (Funktion
ON).
eine Auswahl zwischen den unterschiedlichen
vorhandenen Funktionsmodi getroffen
(Funktion MODE).
Die Steuerung der Zuweisung des aktiven Kanals erfolgt gemäß des
bei der Installation ausgewählten Betriebsmodus (s. Abschnitt 3.2,
Seite 25).
à Bei Betätigen dieser Taste wird der
Ä Bei Betätigen dieser Taste wird der
Taste ‘TALK’ Bei Betätigen dieser Taste wird die am
‘MANUAL 1’ (ROTE LED EINGESCHALTET)
Bei Fehlen der Kommunikation bleibt der Kanal Kunde aktiv.
Bedienerkanal aktiviert: die orangefarbene
Led leuchtet.
Kundenkanal aktiviert: die rote Led leuchtet.
Bedienerkanal ausgehende Kommunikation
in der PA-Anlage ausgestrahlt. Die gründe
Led bleibt eingeschaltet.
à En appuyant sur cette touche, on habilite
l’Opérateur : la DEL orange s’allume.
Ä Dans ce type de fonctionnement, la touche
est désactivée.
Touche ‘TALK’ En appuyant sur cette touche, la
communication en sortie de l’Opérateur est
diffusée dans l’installation PA. La DEL verte
s’allume, puis repasse au rouge dès qu’on la
relâche.
à Bei Betätigen dieser Taste wird der
Bedienerkanal aktiviert: die orangefarbene
Led beginnt zu leuchten.
Ä Bei dieser Betriebsart ist die Taste deaktiviert.
Taste ‘TALK’ Bei Betätigen dieser Taste wird die vom
Bedienerkanal ausgehende Kommunikation
durch die PA-Anlage ausgestrahlt. Die
gründe Led beginnt zu leuchten und kehrt
bei Loslassen der Taste auf rot zurück.
27
Page 28

‘MANUAL 2’ (DEL ORANGE ALLUMÉE)
En l’absence de communication, le canal Opérateur reste actif.
‘MANUAL 2’ (ORANGEFARBENE LED EINGESCHALTET)
Bei Fehlen der Kommunikation bleibt der Kanal Bediener aktiv.
à Dans ce type de fonctionnement, la touche
Ä En appuyant sur cette touche, on habilite
Touche ‘TALK’ En appuyant sur cette touche, la
Arrêt
Touche ‘MODE ON/OFF’ Lorsque l’on appuie sur cette touche
est désactivée.
le
Client
: la DEL rouge s’allume.
communication en sortie de l’
diffusée dans l’installation PA.
La DEL verte s’allume, puis repasse à l’orange
dès qu’on la relâche.
pendant plus de 1,5 sec., le poste s’éteint
(fonction OFF).
Opérateur
est
à Bei dieser Betriebart ist die Taste deaktiviert.
Ä Bei Betätigen dieser Taste wird der
Taste ‘TALK’ Bei Betätigen dieser Taste wird die vom
Ausschalten
Taste ‘MODE ON/OFF’ Bei Drücken dieser Taste über eine längere
Kundenkanal
zu leuchten.
Bedienerkanal
durch die PA-Anlage ausgestrahlt. Die
gründe Led beginnt zu leuchten und kehrt
bei Loslassen der Taste auf orange zurück.
Zeit als 1,5 s wird die Sprechstelle
ausgeschaltet (Funktion OFF).
aktiviert: Die rote Led beginnt
ausgehende Kommunikation
28
Page 29

APPENDICE • ANHANG
Nous fournissons aux pages suivantes toutes les informations relatives
aux connecteurs et les schémas de branchement du Système.
In den folgenden Seiten werden alle Informationen über Anschlusstücke
und Verbindungsschemata für das System geliefert.
• Schéma de branchement général du Système Interphonique • Allgemeines Verbindungsschema für das Interphonsystem
Haut-parleur Client
Kundenseitiger Lautsprecher
Microphone Client
Kundenseitiges Mikrofon
Alimentation extérieure
Externe Einspeisung
Boîte de dérivation
POLIGE
66-PÔLES
Verteilerdose
Intercom 2000
Base interphonique Opérateur
Interphonsprechstelle des Bedieners
Connecteur ‘REMOTE’
Terminale Description
1 MIC Microphone préamplifié du poste à distance
2 VSS Négatif d’alimentation et négatif signal audio
vers l’entrée de l’amplificateur
3 SPK Haut-parleur du poste à distance
4 CALL Touche d’appel du poste à distance
5 Vcc Positif d’alimentation
6PR Terminal de priorité pour amplificateurs
PA Série 8000
7C + Terminal commun du relais de priorité
8 SIGNAL Signal audio vers l’entrée audio de
l’amplificateur
Boîte de dérivation
-POLIGE
TE
O
CAL
LO
REM
REMOTE
Green
Automatic
Red
Manual 1
Orange
Manual 2
MODE
TALK
ON/OFF
Anschlussstück ‘REMOTE’
Beschreibung
vorverstärktes Mikrofon der entfernten Sprechstelle
Negativer Pol der Einspeisung und negativer Pol des
Tonsignals in Richtung des Verstärkereingangs
Lautsprecher der entfernten Sprechstelle
Ruftaste der entfernten Sprechstelle
positiver Pol der GS-Einspeisung
Terminal des Vorrangs für PA-Verstärker
der Serie 8000
gemeinsames Terminal des Relais der Vorrangschaltung
Tonsignal in Richtung des Toneingangs
des Verstärkers
88PÔLES
Verteilerdose
Poste à distance
ferngelegene Sprechstelle
Amplificateur
Amplificatore
Serie 8000
Verstärker
Option / Optionales
Haut-parleurs ligne PA
Lautsprecher der PA-Leitung
Haut-parleur à distance
ferngelegener Lautsprecher
Microphone à distance
ferngelegenes Mikrofon
18
REMOTE
Connecteur ‘LOCAL’
Terminal Description
1A – Sortie pour haut-parleur (côté Client)
2 ALIM + Alimentation (pôle positif) 15 V
3 ALIM – Alimentation (pôle négatif) 0 V
4M + Positif du microphone (côté Client)
5M – Négatif du microphone (côté Client)
6A + Sortie pour haut-parleur (côté Client)
Anschlussstück ‘LOCAL’
Beschreibung
Lautsprecherausgang (kundenseitig)
Einspeisung (positiver Pol) 15 V
Einspeisung (negativer Pol) 0 V
Positiver Pol des Mikrofons (kundenseitig)
Negativer Pol des Mikrofons (kundenseitig)
Lautsprecherausgang des Lautsprechers (kundenseitig)
16
LOCAL
29
Page 30

• Schéma de branchement du poste à distance • Anschlussschema für die entfernte Sprechstelle
Touche d’appel
Comme préamplificateur, il est conseillé d’utiliser
l’accessoire PASO code AC14, adapté aux
microphones électret. Le circuit est muni d’un
compresseur microphonique (gamme d’alimentation
0 ÷ 12 V, sortie de signal 0 dB).
* Les conducteurs MIC et SPK doivent
être blindés.
CALL
Vcc
+12 V
*
MIC
VSS
Ruftaste
PRE
0V
Für den Vorverstärker wird das Zubehör PASO Art.
Nr. AC14 empfohlen, das sich für Elektretmikrofone
eignet. Der Schaltkreis ist mit einem Mikrofonkompressor (Einspeisungsbereich 0 ÷ 12 V,
Signalausgang 0 dB) ausgerüstet.
* Die Leiter MIC und SPK müssen
(#)
abgeschirmt sein.
Capsule microphonique
Mikrofonkapsel
(#)
Monter la résistance d’alimentation pour capsule
microphonique électret.
*
SPK
16 W
• Connexions optionnelles
A l'arrière de l'appareil, il est prévu deux connecteurs pour prises jack
standard de 3,5 mm auxquels il est possible de brancher un casque
stéréo et/ou un microphone électret externe utilisables par l'Opérateur.
Connecteur jack pour casque stéréo (lorsqu'il est
utilisé, le haut-parleur de l'appareil est désactivé).
Connecteur jack pour microphone électret externe
(lorsqu'il est utilisé, le microphone de l'appareil est
désactivé).
(#)
Montieren Sie den Einspeisungswiderstand für die
Kapsel des Elektretmikrofons.
• Optionale Anschlüsse
An der Rückseite der Sprechstelle sind zwei 3,5 mm Standard-JackBuchsen vorhanden, an die ein Stereo-Kopfhörer und/oder ein externes
Elektret-Mikrofon angeschlossen werden können, die vom Bediener
verwendet werden.
REMOTE LOCAL
Jack-Anschluss für den Stereo-Kopfhörer (falls verwendet,
schließt er den Lautsprecher der Sprechstelle aus).
Jack-Anschluss für ein externes Elektret-Mikrofon (falls
verwendet, schließt er das Mikrofon der Sprechstelle aus).
30
Page 31

MANUEL DE L’OPÉRATEUR
BEDIENERHANDBUCH
31
Page 32

1. DESCRIPTION GÉNÉRALE DES PIÈCES
1. ALLGEMEINE BESCHREIBUNG DER KOMPONENTEN
1 • Base microphone à tige.
2 • DEL de signalisation appel depuis poste à distance.
3 • DEL de visualisation du type de fonctionnement.
4 • Touche activation communication vers installation de diffusion PA.
5 • Touche d’allumage/arrêt/sélection type de fonctionnement.
6 • Touches forçage canal.
7 • Haut-parleur moniteur.
8 • Connecteur pour poste à distance/installation PA.
9 • Connecteur pour poste local.
10 • Connecteur jack pour casque stéréo.
11 • Connecteur jack pour microphone électret externe.
12 • Casque anti-souffle.
13 • Tête du microphone.
14 • Bague lumineuse.
15 • Tige flexible.
16 • Goulotte de passage du câble.
17 • Microphone électret.
2. FONCTIONS PRINCIPALES
2.1 Touches de choix direct
Toutes les commandes du système interphonique sont placées sur le
panneau avant de la base interphonique. Nous fournissons ci-dessous
une liste des fonctions liées à chaque touche de sélection.
Fonction des flèches
à En appuyant sur cette touche, on active
l’audio en sortie (c’est l’Opérateur qui parle).
Ä En appuyant sur cette touche, on active
l’audio en entrée (c’est le Client qui parle).
Touche ‘MODE ON/OFF’
• Fonction ON/OFF
En appuyant sans relâcher sur cette touche pendant plus de 1,5 sec., on
obtient l’arrêt du poste. Au contraire, pour allumer, il suffit d’une simple
pression sur la touche.
• Fonction MODE
En appuyant sans relâcher sur cette touche pendant moins de 1,5 sec.,
on obtient l’indication, par le DEL MODE, des différents types de
fonctionnement disponibles:
Couleur DEL Type de fonctionnement
VERTE AUTOMATIC
ROUGE MANUAL 1
ORANGE MANUAL 2
Si la DEL n’est pas allumée, le Système Interphonique est éteint.
Appuyer à nouveau sur la touche MODE ON/OFF pour rallumer
l’appareil.
32
1 • Sprechstelle mit Stabmikrofon.
2 • Anzeige-Led für den Ruf von einer entfernten Sprechstelle.
3 • Anzeige-Led Modustyp.
4 • Taste für die Aktivierung der Kommunikation mit PA-Anlagen.
5 • Taste Ein-/Ausschalten/Auswahl der Betriebsart.
6 • Tasten Erzwingung Kanal.
7 • Monitor-Lautsprecher.
8 • Anschlussstück für entfernte Sprechstellen/PA-Anlage.
9 • Anschlussstück für lokale Sprechstellen.
10 • Jack-Anschluss für den Stereo-Kopfhörer.
11 • Jack-Anschluss für ein externes Elektret-Mikrofon.
12 • Hauchschutz.
13 • Mikrofonkopf.
14 • Leuchtring.
15 • Schwanenhals.
16 • Kabeldurchführung.
17 • Elektretmikrofon.
2. HAUPTFUNKTIONEN
2.1 Tasten für die direkte Auswahl
Alle Befehle des Interphonsystems sind auf dem Frontpaneel der
Interphonsprechstelle vorhanden. Nachstehend werden die Funktionen
der einzelnen Auswahltasten erläutert.
Pfeilfunktionen
à Bei Betätigen dieser Taste wird das Tonsignal
am Ausgang aktiviert (bedienerseitig).
Ä Bei Betätigen dieser Taste wird das Tonsignal
am Eingang aktiviert (kundenseitig).
Taste ‘MODE ON/OFF’
• Funktion ON/OFF
Bei Betätigen dieser Taste über länger als 1,5 s bewirkt man das
Ausschalten der Sprechstelle. Zum Zweck des Einschaltens hingegen muss
die Taste lediglich einmal gedrückt werden.
• Funktion MODE
Bei Betätigen dieser Taste über länger als 1,5 s zeigt die Led MODE die
verschiedenen verfügbaren Betriebsmodi an:
Farbe LED Betriebsart
GRÜN AUTOMATIC
ROT MANUAL 1
ORANGE MANUAL 2
Wenn die Led nicht leuchtet, ist das Interphonsystem ausgeschaltet.
Drücken Sie erneut die Taste MODE ON/OFF, um das Gerät wieder
einzuschalten.
Page 33

Touche ‘TALK’
Cette touche permet à l’Opérateur de dévier le signal audio de son poste
vers un système d’amplification extérieur (par exemple, vers le système
de diffusion sonore de l’immeuble, de façon à ce que l’interphonique
puisse être utilisé comme une simple console d’annonce au public). Si la
connexion vers un système d’amplification extérieur n’a pas été prévu, la
touche TALK reste inutilisée.
Taste ‘TALK’
Mit Hilfe dieser Taste kann der Bediener das Audio-Signal seiner
Sprechstelle zu einem externen Verstärkersystem leiten (z. B. zu dem
Beschallungssystem des Gebäudes, so dass das Interphon als einfache
Konsole für Durchsagen an das Publikum verwendet werden kann).
Falls keine Anschluss an ein externes Verstärkersystem vorgesehen
sein sollte, wird die Taste TALK nicht verwendet.
DEL verte ‘REMOTE’
Cette DEL est utilisée en présence d’un poste à distance à même de
communiquer avec le poste Opérateur muni d’un interphonique.
Le système permet, au moyen d’une console ou d’un poste à distance, de
parler avec l’Opérateur : la base interphonique de l’Opérateur émettra
un signal sonore d’avis d’appel et la DEL REMOTE s’éclairera par
intermittence. L’Opérateur devra ensuite appuyer sur la touche MODE
ON/OFF pour activer la communication avec le poste à distance : la DEL
REMOTE restera éclairée, avec une lumière fixe, pendant toute la durée
de la conversation.
Au terme de la communication, l’Opérateur devra appuyer à nouveau sur
la touche MODE ON/OFF (une fois pour mettre fin à la communication;
deux fois pour éteindre l’appareil).
3. UTILISATION DE L’INTERPHONIQUE
3.1 Allumage
Pour activer le fonctionnement du Système Interphonique, il est nécessaire
d’appuyer une seule fois sur la touche MODE ON/OFF.
3.2 Sélection du mode désiré
A l’allumage de l’appareil, le mode de fonctionnement présélectionné est
le mode
L’Opérateur peut choisir le type de fonctionnement qu’il désire en appuyant
sur la touche MODE ON/OFF. Nous indiquons ci-dessous les
caractéristiques de chaque mode.
Fonctionnement ‘AUTOMATIC’
Le comportement du Système dépendra du mode programmé pendant
l’installation:
• si l’on a sélectionné le Mode 0 (Full Duplex), les canaux audio de
• si l’on a sélectionné le Mode 1 (Half Duplex), il ne sera possible
• si l’on a sélectionné le Mode 2 (Full Duplex Prioritaire), un des
AUTOMATIC.
l’Opérateur et du Client resteront tous deux actifs; le Client et
l’Opérateur peuvent parler simultanément. L’Opérateur peut en tout
cas toujours forcer le sens de communication en agissant sur les
touches à et Ä.
En condition de forçage: cette situation peut se présenter quand
l’environnement est extrêmement bruyant, ou si l’on veut couper
la parole au Client (appuyer sans relâcher sur la touche à ), quand
le Client est trop loin du microphone ou quand sa voix est trop
basse pour activer sa communication (appuyer sans relâcher sur la
touche Ä ).
d’activer qu’un canal à la fois (le premier à intervenir); en condition
de repos, les deux canaux sont désactivés.
deux canaux (Opérateur ou Client, selon la sélection effectuée
pendant l’installation) reste toujours actif; l’autre, pour activer son
canal, doit dépasser le seuil programmé.
Grüne Led ‘REMOTE’
Diese Led wird zusammen mit einer eventuell vorhandenen entfernten
Sprechstelle verwendet, die mit der Bedienersprechstelle kommunizieren
kann, die mit einem Interphon ausgerüstet ist. Mit einer Konsole oder
einer entfernten Sprechstelle ermöglicht das System, mit dem Bediener
zu kommunizieren: die Interphonsprechstelle des Bedieners gibt ein
Tonsignal für die Ankündigung des Rufs ab und die Led REMOTE beginnt
blinkend zu leuchten. Der Bediener muss daraufhin auf die Taste MODE
ON/OFF drücken, um die Kommunikation mit der entfernten Sprechstelle
zu aktivieren: die Led REMOTE leuchtet während der gesamten Dauer
des Gesprächs stetig weiter. Am Ende muss der Bediener nochmals die
Taste MODE ON/OFF betätigen (ein Mal, um die Kommunikation zu
beenden; zwei Mal, um das Gerät auszuschalten).
3. VERWENDUNG DES INTERPHONS
3.1 Einschalten
Zur Aktivierung des Betriebs des Interphonsystems muss die Taste MODE
ON/OFF lediglich nur ein Mal gedrückt werden.
3.2 Auswahl des gewünschten Modus
Bei Einschalten des Geräts ist der voreingestellte Modus der Modus
AUTOMATIC.
Der Bediener kann den gewünschten Betriebsmodus auswählen, indem
er die Taste MODE ON/OFF betätigt. Im Folgenden werden die
Eigenschaften der einzelnen Modi angegeben.
Modus ‘AUTOMATIC’
Das Verhalten des Systems hängt von dem in der Installationsphase
eingestellten Modus ab:
• Falls der Modus 0 (Full Duplex) ausgewählt wurde, bleibt sowohl
der Kanal des Bedieners als auch der des Kunden aktiv; Kunde und
Bediener können gleichzeitig sprechen. Der Bediener kann jederzeit
die Richtung der Kommunikation erzwingen, indem er die Tasten Ã
und Ä betätigt.
Bei Erzwingen: Diese Situation kann ergeben, wenn der Raum extrem
geräuschbelastet ist oder wenn die kundenseitige Kommunikation
unterdrückt werden soll (die Taste à gedrückt halten) oder wenn sich
der Kunde in einer zu großen Entfernung vom Mikrofon befindet bzw.
auch dann, wenn seine Stimme so leise ist, dass sie die kundenseitige
Kommunikation nicht aktivieren kann (die Taste Ä gedrückt halten).
• Wenn der Modus 1 (Half Duplex) ausgewählt wurde, kann jeweils
nur ein Kanal aktiviert werden (der zuerst verwendet wird); in der
Ruhestellung sind beide Kanäle nicht sprechberechtigt.
• Wenn der Modus 2 (Full Duplex mit Vorrang) ausgewählt wurde,
bleibt einer der beiden Kanäle (Bediener oder Kunde, je nach während
der Installation getätigten Auswahl) immer aktiv; zum Zweck der
Aktivierung des eigenen Kanals, muss der eingestellte Schwellenwert
überschritten werden.
Fonctionnement ‘MANUAL 1’
Dans ce cas, le canal du Client reste toujours actif, tandis que celui de
l’Opérateur reste toujours désactivé. Cette situation est celle où, par
exemple, on ne veut pas faire entendre à l’extérieur l’éventuelle
communication entre les Opérateurs. En appuyant sur la touche à on
inverse le sens de forçage du canal (l’Opérateur prend la parole).
Fonctionnement ‘MANUAL 2’
Dans ce cas, le canal de l’Opérateur reste toujours actif, tandis que
celui du Client reste toujours désactivé (il peut s’agir du cas où
normalement, la zone destinée à la clientèle est caractérisée par la
présence d’un bruit environnemental important qui active
continuellement le microphone du Client, ou du cas où l’Opérateur veut
garder longtemps la parole).
Betriebsmodus ‘MANUAL 1’
In diesem Fall ist der Kanal Kunde stets aktiv, während der des Bedieners
deaktiviert bleibt. Dies könnte der Fall sein, wenn man z. B. das Mithören
des Kunden von Gesprächen zwischen den Bedienern verhindern will.
Durch Drücken der Taste à wird die erzwungene Richtung des Kanals
umgekehrt (der Bediener ergreift das Wort).
Betriebsmodus ‘MANUAL 2’
In diesem Fall bleibt der Kanal des Bedieners immer aktiv , während
der des Kunden deaktiviert bleibt (dies kann vorkommen, wenn der für
die Kundschaft bestimmte Bereich normalerweise stark geräuschbelastet
ist, so dass das Mikrofon des Kunden ständig aktiviert wird oder auch,
wenn der Bediener sein Wort über einen längeren Zeitraum behalten
will).
33
Page 34

3.3 Réponse à un appel à distance
(en présence de la connexion)
Le Système a été conçu en prévoyant la connexion à une éventuelle
console ou à un poste à distance à même de communiquer avec
l’Opérateur: cette fonction est active aussi bien quand la base
interphonique est éteinte que quand elle est allumée.
Lors d’un appel depuis un poste à distance, l’Opérateur sera averti par un
signal sonore et la DEL REMOTE s’allumera (lumière clignotante). La
touche MODE ON/OFF sert dans ce cas de commande d’activation/
désactivation de la communication : nous indiquons ci-dessous les actions
liées à chacun des états de l’Interphonique.
3.3 Antwort an eine entfernte Sprechstelle
(falls ein Anschluss vorhanden ist)
Das System wurde unter der Voraussicht eines Anschlusses an eine
Konsole oder eine entfernte Sprechstelle, die mit dem Bediener
kommunizieren können, ausgelegt: Diese Funktion ist aktiv, wenn die
Interphonsprechstelle eingeschaltet ist und auch, wenn sie ausgeschaltet
ist. Bei einem Ruf von einer entfernten Sprechstelle wird dies dem Bediener
durch ein Tonsignal angekündigt und die Led REMOTE beginnt blinkend
zu leuchten. Die Taste MODE ON/OFF dient in diesem Fall als Befehl für
die Berechtigung/Nicht-Berechtigung der Kommunikation: Im Folgenden
werden die Maßnahmen im Zusammenhang mit den einzelnen Zuständen
des Interphons angegeben.
• Appel avec Intercom éteint
La DEL REMOTE clignote pour informer l’Opérateur de l’appel en
entrée.
Appuyer sur la touche MODE ON/OFF> le système s’allume en mode
‘AUTOMATIC’ (DEL verte) et le
dialogue avec le poste à
distance est activé. L orsque
l’on appuie à nouveau sur la
touche MODE ON/OFF, le
dialogue est désactivé et le
système reste en mode
‘AUTOMATIC’.
• Appel avec Intercom en mode ‘AUTOMATIC’
La DEL REMOTE clignote pour informer l’Opérateur de l’appel en
entrée.
Appuyer sur la touche MODE ON/OFF> le dialogue est activé.
Lorsque l’on appuie à nouveau
sur la touche MODE ON/OFF,
le dialogue est désactivé et le
système reste en mode
‘AUTOMATIC’.
• Appel avec Intercom en mode ‘MANUAL 1’
La DEL REMOTE clignote pour informer l’Opérateur de l’appel en
entrée.
Appuyer sur la touche MODE ON/OFF> le dialogue est activé.
Lorsque l’on appuie à nouveau
sur la touche MODE ON/OFF,
le dialogue est désactivé et le
système reste en mode
‘MANUAL 1’.
• Ruf bei ausgeschaltetem Intercom
Die Led REMOTE blinkt, um dem Bediener einen eingehenden Ruf
anzuzeigen.
Drücken Sie die Taste MODE ON/OFF > Das System schaltet sich im
Modus ‘AUTOMATIC’ (grüne Led)
ein und wird für die Kommunikation
mit der entfernten Sprechstelle
zugelassen. Bei erneutem
Drücken der Taste MODE ON/
OFF wird die Kommunikationsberechtigung entzogen und
das System bleibt im Modus
‘AUTOMATIC’.
• Ruf mit dem Intercom im Modus ‘AUTOMATIC’
Die Led REMOTE blinkt, um dem Bediener einen eingehenden Ruf
anzuzeigen.
Drücken Sie die Taste MODE ON/OFF > Die Kommunikation wird
zugelassen. Bei erneutem
Drücken der Taste MODE ON/
OFF, wird die Kommunikationsberechtigung entzogen und
das System bleibt im Modus
‘AUTOMATIC’.
• Ruf mit dem Intercom im Modus ‘MANUAL 1’
Die Led REMOTE blinkt, um dem Bediener einen eingehenden Ruf
anzuzeigen.
Drücken Sie die Taste MODE ON/OFF > Die Kommunikation wird
zugelassen. Bei erneutem
Drücken der Taste MODE ON/
OFF, wird die Kommunikationsberechtigung entzogen und
das System bleibt im Modus
‘MANUAL 1’.
• Appel avec Intercom en mode ‘MANUAL 2’
La DEL REMOTE clignote pour informer l’Opérateur de l’appel en
entrée.
Appuyer sur la touche MODE ON/OFF> le dialogue est activé.
Lorsque l’on appuie à nouveau
sur la touche MODE ON/OFF,
le dialogue est désactivé et le
système reste en mode
‘MANUAL 2’.
3.4 Envoi d’un avis au public
(connexion à une installation de diffusion audio)
En appuyant sans relâcher sur la touche TALK, l’Opérateur peut
envoyer une annonce à l’installation audio de diffusion sonore du local
ou du bâtiment. Lorsqu’il relâchera la touche, l’interphonique repassera
au fonctionnement habituel.
3.5 Arrêt de l’Interphonique
Appuyer sans relâcher sur la touche MODE ON/OFF pendant au moins
1,5 sec. La DEL s’éteindra, indiquant ainsi que l’appareil est éteint.
34
• Ruf mit dem Intercom im Modus ‘MANUAL 2’
Die Led REMOTE blinkt, um dem Bediener einen eingehenden Ruf
anzuzeigen.
Drücken Sie die Taste MODE ON/OFF > Die Kommunikation wird
zugelassen. Bei erneutem
Drücken der Taste MODE ON/
OFF, wird die Kommunikationsberechtigung entzogen und das
System bleibt im Modus
‘MANUAL 2’.
3.4 Senden einer Durchsage an das Publikum
(Anschluss an eine Beschallungsanlage)
Bei Gedrückthalten der Taste TALK kann der Bediener eine eigene
Durchsage an die Beschallungsanlage im Raum oder im Gebäude senden.
Bei Loslassen der Taste kehrt das Interphon in seinen Ausgangsmodus
zurück.
3.5 Ausschalten des Interphons
Bei Gedrückthalten der Taste MODE ON/OFF über mindestens 1,5
Sekunden, schaltet sich die Led aus und zeigt damit an, dass das Gerät
ausgeschaltet ist.
Page 35

CARACTÉRISTIQUES TECHNIQUES TECHNISCHE EIGENSCHAFTEN
noitatnemila’dnoisneT cdV51 gnunnapssgnugrosreV
noitprosbA Am002÷Am06 emhanfuasgnutsieL
seuqinohporcimseluspacsedétilibisneS • nlespaknoforkiMredtiekhcildnifpmE
larumenohporciM )zHk1aaP/V1=Bd0(
etsopenohporciM )zHk1aaP/V1=Bd0(Bd84- elletshcerpsnoforkiM
)Bd3-(ecneuqérfneesnopéR zH00
8edrueirétniruelrap-tuahcevA Ω W18menretnitiM Ω rehcerpstuaL-
lrap-tuahcevA Ω W18menretxetiM Ω rehcerpstuaL-
euqinohporcimetsoP
egallabmE
etsoptensdioP
)éllabme(latotsdioP
8edrueirétxerue
61edrueirétxeruelrap-tuahcevA Ω W6,061menretxetiM Ω rehcerpstuaL-
etsoptnemertsacneruopuorT
)mm27elamixamruednoforp(
Bd74- noforkimdnaW
08÷072 )Bd3-(gnagzneuqerF
gnutsielnneN•elanimonecnassiuP
snoisnemiD • negnussembA
mm18x851x002
mm5,451x191
mm562x281x565
gk1
gk2,2
elletshcerpsnoforkiM
elletshcerpSeidrüfgnunfföuabniE
)mm27efeiTelamixam(
gnukcapreV
elletshcerpSredthciwegotteN
)tkcaprev(thciwegotturB
35
Page 36

Wij danken u voor uw keuze van een PASO product en herinneren u
eraan dat de productie van ons bedrijf volgens een certificeerd
kwaliteitssysteem plaatsvindt. Onze producten worden daarom in iedere
productiefase controleerd zodat u zeker tevreden zult zijn met uw
aankoop. Eventuele fabrieksfoutjes zijn in de periode dat de garantie
geldig is, gedekt. Voor een goed gebruik van dit product en voor een
volledige benutting van de prestaties hiervan, raden wij u aan
onderstaande gebruiksvoorschriften met aandacht door te lezen.
•••
1. ALGEMEEN
Het intercomsysteem Intercom 2000 is speciaal ontworpen om een
‘handenvrij’ verkeer tussen loketpersoneel en klanten mogelijk te maken.
Door de besturing via een microcontroller, kan met dit intercomsysteem
de meest geschikte werkingswijze, afgestemd op de omgeving en de
gebruikseisen worden bepaald. In de installatiefasen kan namelijk één
van de drie beschikbare configuraties worden gekozen, door de voor
het type installatie meest geschikte te selecteren. Het intercomsysteem
kan bovendien op omroepinstallaties van het type PA (Public Address)
worden aangesloten. Met deze mogelijkheid kan de operator, naast het
uitvoeren van lokethandelingen, de luisterpost van de intercombasis
naar de omroepinstallatie richten, door de intercomsysteem te gebruiken
als microfoonbasis voor omroepberichten. Hiervoor dient het REMOTE
stopcontact (zie de opstelling van de contactpolen aan de achterzijde
van de intercombasis) te worden verbonden met de geluidsingang van
de omroepinstallatie. Deze verbinding moet met een telefoonkabeltje
worden uitgevoerd dat op correcte wijze worden verbonden met de
Intercom. De intercomsysteem kan tevens op een gebruikerspost op
afstand worden aangesloten, die slechts bestaat uit een
voorversterkte microfoonbasis en voorzien is van een oproeptoets.De
gebruikersbasis op afstand wordt aangesloten via het 8-polige REMOTE
RJ45-stopcontact achterop de intercombasis (zie Appendix).
Les agradecemos que hayan elegido un producto PASO y deseamos
recordarles que nuestra empresa trabaja con sistema de calidad
certificado. Todos nuestros productos son pues controlados en cada
fase de la producción para garantizarles una plena satisfacción en su
adquisición. Para cualquier tipo de eventualidad la garantía cubrirá,
durante el periodo de validez, eventuales defectos de fabricación. Les
aconsejamos que lean detenidamente y se ajusten a las siguientes
instrucciones de uso, para utilizar correctamente este producto y
aprovechar al máximo sus prestaciones.
•••
1. INFORMACIÓN GENERAL
El sistema de interfono Intercom 2000 ha sido expresamente estudiado
para permitir una conversación con ‘manos libres’ entre el personal de
ventanilla y la clientela. Mediante la gestión por microcontrolador, este
sistema de interfono permite definir la modalidad de funcionamiento más
adecuada para los requisitos del ambiente y las exigencias de uso. Durante
las fases de instalación, en efecto, es posible seleccionar una entres las
tres configuraciones disponibles, seleccionando la más adecuada para el
tipo de instalación. El sistema de interfono viene así mismo preparado para
la conexión con instalaciones de difusión sonora de tipo PA (Public Address).
Según esta predisposición, además que efectuar las operaciones de
comunicación desde la ventanilla, el operador puede dirigir el sonido de la
base hacia la instalación de difusión sonora, utilizando el Intercom como
una base microfónica para avisos. Para realizar esta prestación es necesario
conectar la toma REMOTE (ver en el Apéndice la disposición de los polos
de las tomas situadas en la parte trasera de la base de interfono) con la
entrada audio de la instalación de difusión sonora. La conexión debe
efectuarse utilizando un cable de tipo telefónico oportunamente terminado
en la conexión con Intercom. El interfono también está preparado para
conectarlo con un puesto de usuario remoto, formado por una simple base
microfónica preamplificada que disponga de tecla de llamada. La conexión
de la base remota de usuario se efectúa trámite la toma REMOTE RJ45 de
8 polos, situada en la parte trasera de la base de interfono (ver Apéndice).
1.1 Meegeleverde componenten
In de verpakking van het systeem product bevinden zich deze componenten:
1. Intercombasis met vaste standaard en beschermhoesje tegen geruis,
van spons.
2. Aftakdoos (telefoontype) met een 6-polige (vrouwtjes)
telefoonaansluitdoos.
3. Kabeltje voor de verbinding tussen intercombasis en de aftakdoos (3
m. lang), met 6-polige telefoonstekkers (mannetje).
4. Externe voedingsdoos 230 Volt AC / 18 Volt DC van 500 mA.
5. Wandmicrofoon van het elektreet type, met afgeschermd kabeltje
(3 m lang).
6. Handleiding voor gebruik en installatie, met Paso garantieverklaring.
N.B. De luidsprekers behoren niet tot de meegeleverde uitrusting.
1.2 Optionele accessoires
Met het intercomsysteem kunnen maximaal 2 (gekoppelde) luidsprekers
worden geïnstalleerd. Voor de keuze van de luidsprekers bieden we twee
oplossingen, afhankelijk van de wijze waarop het apparaat is geïnstalleerd:
- voor installaties waarbij de luidspreker extern moet worden
aangebracht, wordt het model Paso C401-B (impedantie 16 ohm,
maximumvermogen 3 W) aangeraden, speciaal geschikt voor situaties
waarbij een bepaalde mate van stevigheid is vereist.
- als de luidspreker moet worden ingebouwd, raden wij de EGi-
luidsprekers aan:
EGi G28N/16 2” luidspreker (voor dubbele plafonds).
EGi G13U/16* wandluidspreker met rooster van 2” (voor vierkante
inbouwdoos).
*
De luidspreker G13U/16 is leverbaar in een uitvoering, die gemonteerd
kan worden met de plaatjes van de meest voorkomende Italiaanse
series (Bticino® Living International - GLIT/16 en Light - GL2T/16 en
GL3T/16, Gewiss® PlayBus - GP2G/16 en Vimar® Idea - GI3V/16).
De microfoon is zodanig ontworpen, dat hij op het loketglas kan worden
geïnstalleerd, dankzij de anti-vibratie dubbele kleeflaag. Het afgeschermde,
3 meter lange kabeltje van de microfoon kan aan het gezicht van het
publiek worden onttrokken met behulp van witte PVC kabelgootjes in het
standaardformaat 5 x 10 mm (tevens voorzien van dubbelklevende
hechtstrip), die goed bij het microfoonhuis passen: de gootjes zijn makkelijk
te vinden bij elke willekeurige groothandel in elektriciteit.
1.1 Equipamiento
Dentro del paquete del sistema, encontrarán estos componentes:
1. Base de interfono, con micrófono de varilla fija con esponja
protectora antisoplo.
2. Cajetilla de derivación (de tipo telefónico) con toma telefónica de 6
polos (hembra).
3. Cable de conexión entre la base interfónica y la cajetilla de derivación
(largo 3 m), con clavijas telefónicas de 6 polos (macho).
4. Alimentador exterior 230 Volt AC / 18 Volt DC de 500 mA.
5. Micrófono de pared de tipo electreto, con cable blindado (largo 3m).
6. Manual de uso e instalación, acompañado de certificado de garantía
Paso.
N.B. Los altavoces no están incluidos en el equipamiento.
1.2 Accesorios en opción
El sistema de interfono permite montar a lo sumo 2 altavoces (conectados
en paralelo entre ellos). Para la selección de los altavoces, proponemos
dos soluciones, según la modalidad con que se instala el aparato:
- para instalaciones donde se requiere la aplicación exterior del altavoz
se aconseja el modelo Paso C401-B (impedancia 16 ohm, potencia
máx 3 W), particularmente adecuado para situaciones donde se
requiera una cierta robustez.
- si fuese necesario empotrar el altavoz, aconsejamos los altavoces de
la EGi:
EGi G28N/16 altavoz de 2” (adecuado para los falsos techos).
EGi G13U/16* altavoz de pared con rejilla de 2” (para cajetilla
empotrable cuadrada).
*
El altavoz G13U/16 está disponible en una versión adecuada para el
montaje con las placa de las series italianas más habituales (Bticino
Living International - GLIT/16 y Light - GL2T/16 y GL3T/16, Gewiss
PlayBus - GP2G/16 y Vimar® Idea - GI3V/16).
El micrófono ha sido diseñado para poder instalarlo sobre el vidrio de la
ventanilla, gracias a la capa biadhesiva antivibraciones que tiene.
El cable blindado del micrófono, largo 3 metros, se puede ocultar a la
vista del público utilizando canales de PVC blanco del formato estándar 5
x 10 mm (dotadas también ellos de cinta biadhesiva) que bien se adaptan
al cuerpo del micrófono: los canales se encuentran fácilmente en cualquier
tienda de material eléctrico.
®
®
36
Page 37

HANDLEIDING VOOR DE INSTALLATEUR
MANUAL DEL INSTALADOR
BELANGRIJK
dienen uitsluitend door GESPECIALISEERD PERSONEEL te worden uitgevoerd.
Alle in deze sectie beschreven handelingen
PASO Spa stelt zich niet aansprakelijk voor eventuele schade aan of storingen in het systeem, die voortkomen
uit een onjuiste installatieprocedure.
•
IMPORTANTE
deben ser efectuadas EXCLUSIVAMENTE POR TÉCNICOS ESPECIALIZADOS.
La PASO Spa no responderá de eventuales daños o funcionamientos anómalos del sistema causados
Todas las operaciones descritas en esta sección
por un procedimiento de instalación erróneo.
37
Page 38

1. PLAATSING EN AANSLUITINGEN
1.1 Opstelling van de wandmicrofoon en de luidsprekers
De elektreet-microfoon moet zo mogelijk in het midden van het loketglas
worden bevestigd, zodanig, dat hij zich voor de mond van de klant bevindt
(afbeelding 1). In deze stand wordt het geluidssignaal het best
ontvangen. Bijzondere aandacht dient ook te worden besteed aan de
plaatsing van de luidspreker (of luidsprekers), om het feedbackverschijnsel (Larsen-effect) te vermijden.
1. COLOCACIÓN Y CONEXIONES
1.1 Colocación del micrófono de pared y de los altavoces
El micrófono electreto debe aplicarse a ser posible en el centro del vidrio
de la ventanilla, en posición tal que quede delante de la boca del cliente
(figura 1). En esta posición la recepción de señal sonora resulta más
eficiente. Es preciso prestar particular atención también a la posición del
altavoz (o de los altavoces), para evitar el fenómeno de la retroacción
acústica (feed-back, efecto Larsen).
Afb./Fig. 1
De luidspreker mag namelijk NIET in de directe nabijheid van de microfoon
worden geplaatst en moet in elk geval zo worden opgesteld, dat de
microfoon zich NIET binnen de projectieconus van het geluidssignaal van
de luidspreker bevindt (Afbeelding 2). Een goede werking van het geluid
van de installatie zal zeer afhankelijk zijn van de opstelling van de
afzonderlijke componenten (microfoon, luidsprekers).
Het is verder raadzaam ervoor te zorgen, dat de zone buiten het loket
(voor de klanten) en de zone achter het loket (voor de operatoren) niet
met elkaar communiceren, ter garantie van een perfecte akoestische
isolatie ten aanzien van externe geluiden, waarbij men elkaar tegelijkertijd
uitstekend kan verstaan. Daar het merendeel van de kantoorloketten
is voorzien van openingen voor het doorgeven van documenten of
bankpapieren, wordt aangeraden om te voorkomen, voor zover
mogelijk, dat de microfoon of de luidsprekers zich te dicht bij die
openingen bevinden (Afb. 3 en Afb. 4).
1.2 Opstelling van de intercombasis
De intercombasis dient aan de operatorzijde van het loket te worden
geplaatst, op een stabiel vlak. De basis kan bovendien verzonken in
dat vlak worden aangebracht: in dat geval moet men zich ervan
verzekeren, dat de basis op ten minste 40 cm afstand van mogelijke
aanwezige openingen in het glas van het loket wordt geplaatst. Zodra
de intercom basis in de gewenste stand staat, moet deze op de
aftakdoos worden aangesloten.
Afb./Fig. 2 Afb./Fig. 3
Afb./Fig. 4
En efecto, el altavoz no debe colocarse en las inmediatas cercanías del
micrófono y de todas maneras debe estar en posición tal que el micrófono
NO quede en el cono de proyección de la señal sonora emitida por el
altavoz (figura 2).
La eficiencia audio de la instalación dependerá mucho de la colocación
física de cada componente (micrófono, altavoces).
Además se aconseja que entre la zona exterior (reservada a la clientela)
y la interior (reservada a los operadores) no haya ninguna comunicación,
para garantizar un perfecto aislamiento acústico contra los ruidos
exteriores y al mismo tiempo una excelente claridad del habla.
Puesto que la mayor parte de las ventanillas de oficina tiene agujeros
o aperturas para pasar documentos o billetes, se aconseja evitar, en
lo posible, colocar el micrófono o los altavoces muy cerca de dichas
aperturas (Fig. 3 y Fig 4).
1.2 Colocación de la base interfónica
La base interfónica debe colocarse en el lado operador de la ventanilla,
apoyada sobre una superficie estable. Es posible así mismo empotrar
la base en la misma superficie: en tal caso, es necesario cerciorarse de
que la base esté situada a por lo menos 40 cm de eventuales aperturas
en el vidrio de la ventanilla. Una vez colocada la base interfónica en la
posición deseada, debe conectarse con la cajetilla de derivación.
1.3 Opstelling van de aftakdoos
De aftakdoos moet in de directe nabijheid van het loket worden geplaatst
(bijvoorbeeld onder de balie van de operator) en met twee schroeven
aan de wand worden bevestigd.
De volgende verbindingen moeten hier naartoe worden geleid:
· verbinding met de wandmicrofoon aan de klantzijde;
· verbinding met de luidspreker aan de klantzijde;
· verbinding met de intercombasis door middel van het speciale 6polige kabeltje van het telefoontype, dat in de verpakking zit;
· verbinding met de externe voedingsdoos.
38
1.3 Colocación de la cajetilla de derivación
La cajetilla de derivación debe colocarse en las inmediatas cercanías de
la ventanilla (por ejemplo debajo del mostrador del operador) y fijarse
a la pared con dos tornillos.
A la cajetilla de derivación deben llegar las siguientes conexiones:
· conexión con el micrófono de pared situado en el lado cliente;
· conexión con el altavoz situado en el lado cliente;
· conexión con la base interfónica mediante el cable previsto de 6
polos de tipo telefónico incluido en el suministro;
· conexión con el alimentador exterior.
Page 39

De binnenin de doos uit te voeren verbindingen staan in Afb. 5.
De kabel moet op de contactdoos LOCAL van de microfoonbasis worden
aangesloten.
154
Verbindingskabel met intercombasis
Cable de conexión con la base interfónica
Las conexiones a efectuar dentro de la cajetilla se indican en la Fig.5.
El cable debe conectarse con la toma LOCAL de la base interfónica.
6-POLIG
6 POLOS
Aftakdoos
1 = Luidspreker (+) • WIT
2 = Afscherming (- pool van de microfoon) • ZWART
3 = Phantom (+ pool van de microfoon) • ROOD
4 = Voedingsdoos (- pool) • GROEN
5 = Voedingsdoos (+ pool) • GEEL
6 = Luidspreker (–) • BLAUW
6
1
623
Afb./Fig. 5
1.4 Opstelling van de externe voedingsdoos
De externe wandvoedingsdoos moet op correcte wijze op een 16A
lichtnetstopcontact worden aangesloten, dat zich in de buurt van het
loket bevindt, bij voorkeur onder een schakelaar.
2. INSTELLINGEN
2.1 Algemene beschrijving van de functies
Zoals reeds is aangegeven, kan de installateur dankzij de microcontrollerbesturing de werkingswijze kiezen die het meest geschikt is voor de
omgevingsvereisten en de gebruikseisen.
Zodra in de installatiefase de gewenste optie is gekozen, kan de operator
het systeem rechtstreeks vanaf de microfoonpost bedienen. In de
volgende paragrafen staan de te volgen procedures voor het wijzigen
van de werkingswijze en de mogelijke regelingen die binnenin de
microfoonpost moeten worden uitgevoerd.
2.2 Instelling van het volume
Onderop de intercombasis zitten gaatjes, waardoor het geluidsvolume
kan worden geregeld, zowel naar de klantzijde als naar de operatorzijde
(pag. 42). Met deze trimmers dient het volume te worden afgesteld
(platte schroevendraaier), om een niveau te kunnen garanderen dat
voldoende is voor zowel de operator als de Klant. Hierbij moet in ieder
geval worden opgelet dat de kritieke feedbackdrempel niet te dicht wordt
benaderd (pieptoon door Larsen-effect), een algemeen voorkomend
verschijnsel bij alle soorten intercomsystemen met een omschakel- of
verzwakkingscentrale die in de handel zijn. De mogelijkheid voor de
operator om het volume te verhogen wordt dus sterk beïnvloed door de
opstelling van de geluidscomponenten (microfoon en luidsprekers): als
de geluidscomponenten volgens de eerder gegeven indicaties zijn
geplaatst, zou men een goed geluidsniveau moeten verkrijgen naar beide
richtingen (naar de klant en naar de operator).
Cajetilla de derivación
1 = Altavoz (+) • BLANCO
2 = Blindaje (polo – del micrófono) • NEGRO
3 = Phantom (polo + del micrófono) • ROJO
4 = Alimentador (polo –) • VERDE
5 = Alimentador (polo +) • AMARILLO
6 = Altavoz (–) • AZUL
1.4 Colocación del alimentador exterior
El alimentador exterior de pared debe conectarse oportunamente a
una toma de red 16A situada cerca de la ventanilla, preferentemente
dotada de interruptor.
2. CONFIGURACIONES
2.1 Descripción general de las funcionalidades
Como ya adelantado, la gestión por microcontrolador permite al instalador
seleccionar la modalidad de funcionamiento más adecuada para los
requisitos del ambiente y las exigencias de uso.Una vez seleccionada la
opción deseada en la fase de instalación, el operador puede controlar el
funcionamiento del sistema directamente desde el puesto microfónico.
En los párrafos siguientes se indican los procedimientos a seguir para
modificar las configuraciones de funcionamiento y los posibles ajustes a
efectuar dentro del puesto microfónico.
2.2 Configuración de los volúmenes
En el fondo de la base interfónica hay situados los agujeros para efectuar
el ajuste de los volúmenes de emisión sonora, sea hacia el lado cliente,
como hacia el lado operador (pag. 42). Es oportuno actuar sobre estos
potenciómetros de ajuste (con un destornillador plano) para garantizar
un nivel de volumen suficiente tanto para el operador como para el
cliente, prestando de todas maneras atención en no acercarse a la
condición crítica de la retroacción acústica (silbido por efecto Larsen),
fenómeno que es común en todos los tipos de interfono de conmutación
o de atenuación disponibles en comercio.
La posibilidad de aumentar los volúmenes a discreción del operador
depende pues mucho de la disposición de los componentes audio
(micrófono y altavoces): si los componentes audio han sido colocados
según las indicaciones anteriores, debería conseguirse un buen nivel de
señal audio en ambas direcciones (hacia el cliente y hacia el operador).
2.3 Instelling van de werkingswijze
Het instellen van de werkingswijze dient door ervaren en gekwalificeerd
personeel te worden uitgevoerd.
Wanneer het intercomsysteem wordt geleverd is het afgesteld (in de
fabriek) op het niveau van de gevoeligheidswaarden van
standaardmicrofoons, geldig voor het in de verpakking meegeleverde
type microfoon. Aangezien het gebruik van andere soorten microfoons
niet verboden is, worden hieronder de belangrijkste kenmerken gegeven
van de vereiste microfooncapsule:
• Elektreet capsule, zo mogelijk van het type ‘back-elektret’ (met
gaatjes aan de achterzijde).
• Phantomvoeding ~12V, met een belastingweerstand van 2,2 kΩ,
gevoeligheid -47 dB ± 10% (0 dB = 1V/Pa bij 1 kHz).
1. Sluit de positieve pool van de capsule aan op de klem van de
aftakdoos, waar de warme pool van het kabeltje van de in de
verpakking meegeleverde wandmicrofoon werd aangesloten.
2.3 Programación de las modalidades
La programación de las modalidades de funcionamiento es una
operación que debe ser efectuada necesariamente por personal experto
y cualificado.
El sistema de interfono es suministrado con un ajuste estándar de los
valores de sensibilidad de los micrófonos (ajuste efectuado durante la
producción) que vale para el tipo de micrófono incluido en el suministro.
Dado que no está prohibido utilizar otros tipos de micrófono, a
continuación se indican las características fundamentales de la cápsula
microfónica requerida:
• Cápsula electreto a ser posible de tipo back-elektrete (con los
agujeritos en la parte trasera).
• Alimentación phantom ~12V, con resistencia de carga de 2,2 kΩ,
sensibilidad -47 dB ± 10% (0 dB = 1V/Pa a 1 kHz).
1. Conectar el positivo de la cápsula con el borne de la cajetilla de
derivación donde se conectaba el polo caliente del cable del
micrófono de pared incluido en el suministro.
39
Page 40

2. Sluit de negatieve pool van de capsule aan
7
+
op de klem van de aftakdoos, waar de
afscherming van het kabeltje van de in de
verpakking meegeleverde wandmicrofoon
werd aangesloten.
Voor de selectie van de werkingswijze moet in het
binnenste van de basis worden gewerkt:
3. Verwijder de twee zijkanten (A) van de
intercombasis door de bevestigingsschroeven
los te draaien. (zie afb. 6).
4. Til het frontpaneel op en leg dit naast de basis.
Nu is de gedrukte schakeling op de bodem
van de intercom toegankelijk.
2. Conectar el negativo de la cápsula con el
borne de la cajetilla de derivación, sonde
se conectaba el blindaje del cable del
micrófono de pared incluido en el suministro.
Para seleccionar la modalidad de funcionamiento
es necesario actuar dentro de la base:
3. Quitar los dos laterales (A) de la base
interfónica desenroscando los tornillos de
A
fijación (ver fig. 6).
4. Levantar el panel frontal y colocarlo al lado
de la base. Ahora se puede acceder al circuito
A
impreso fijado en el fondo del interfono.
Afb./Fig. 6
5. Op Afb.7 zijn de micro-schakelaars SW1, die moeten worden
gebruikt voor het selecteren van de werkingswijze, makkelijk te
onderscheiden.
+
R40
R50
R13
R18
C48
R49
C
R14
C14
R43
LD6
FM1
R11
+
C11
C12
+
C29
R21
H2
LD4
R22
SIL2
R23
R24
R25
C39
C40
C41
R44
R45
R34
U5
R33
C42
C38
C43
R35
C44
R41
U2
H3
H3
C30
+
SIL1
SW1
1
R42
R46
R47
R37
LD5
R38
Q4
U10
R36
C45
D4
R39
Q5
C13
R12
C20
U4
R17
R19
8
C47
U9
R48C46
Afb./Fig. 7
5. Observando la Fig. 7 se individúan fácilmente los microinterruptores
SW1 a utilizar para seleccionar la modalidad de funcionamiento.
C15
Y1
U6
C49
C51
+
C35
C36
U11
R30
C57
R10
C19
Y2
+
C58
R15
C22C21
RN2
OP1
R16
C18
C17
C16
+
H1
C25
C23
+
C24
C31
RN1
J5
R51
U7
R28
C55
C26
R29
C56
C27
C50
R52
K2
+
C59
LD3
D3
C28
+
R20
C32
C33
JP1
U8
R27
C37
C53
Q3
C52
R31
R32
Q6
R53
LD7
R54
+
C54
+
C34
R26
+
3. ‘AUTOMATISCHE’ WERKINGSWIJZE
Om te beginnen geven wij een aantal vaste begrippen aan, die in dit
hoofdstuk zullen worden gebruikt:
• Open kanaal het verkeer is geactiveerd.
• Gesloten kanaal het verkeer is NIET geactiveerd.
• Klantkanaal verkeer van buiten (Klant) naar binnen
(==> Operator).
• Operatorkanaal verkeer van binnen (Operator) naar
buiten (==> Klant).
• Prioritair kanaal er kan een prioriteit aan één van de twee
kanalen worden toegekend.
• Secundair Kanaal het kanaal dat geen prioriteit heeft.
Hieronder worden de drie ‘automatische’werkingswijzen van de nader
uitgelegd.
40
3. MODALIDADES DE FUNCIONAMIENTO ‘AUTOMÁTICO’
Antes que nada cabe establecer algunas convenciones sobre la
terminología que se utilizará en este capítulo:
• Canal Abierto la comunicación está activada.
• Canal Cerrado la comunicación NO está activada.
• Canal Cliente comunicación desde el exterior (Cliente) hacia
el interior (==> Operador).
• Canal Operador comunicación desde el interior (Operador)
hacia el exterior (==> Cliente).
• Canal Prioritario es posible asociar una prioridad con cada uno
de los dos canales.
• Canal Secundario El canal que no tiene prioridad.
A continuación se muestran las tres modalidades de funcionamiento
‘automático’ del sistema.
Page 41

3.1 Beschrijving van de werkingen
Het intercomsysteem heeft drie verschillende ‘automatische’
werkingswijzen, die bij het installeren door middel van de SW1
microschakelaars kunnen worden ingesteld:
Werking 0 > Full Duplex (open kanalen).
Werking 1 > Half Duplex (gesloten kanalen, geen prioriteit).
Werking 2 > Full Duplex Prioritair (met een open kanaal).
De werkingswijze moet worden gekozen afhankelijk van de
klanteisen.
De werkingswijze wordt geselecteerd met behulp van de SW1
microschakelaars, waarbij men als volgt dient te handelen:
1. verzeker u ervan dat het systeem van de netvoeding is losgekoppeld;
2. verwijder de twee zijkanten van de intercombasis en haal het
bedieningspaneeltje eruit, om bij de gedrukte hoofdschakeling op
de bodem van de basis te kunnen komen;
3. zoek de SW1 microschakelaars (zie afb. 7, vorige pagina);
4. selecteer met bit 1 en 2 één van de drie werkingswijzen aan de
hand van de onderstaande tabel:
3.1 Descripción de las modalidades
El sistema de interfono acepta tres diferentes modalidades de
funcionamiento ‘automático’ programables en el momento de la
instalación mediante los microinterruptores SW1:
Modalidad 0 > Full Duplex (con canales abiertos).
Modalidad 1 > Half Duplex (con canales cerrados, sin prioridad).
Modalidad 2 > Full Duplex Prioritario (con un canal abierto).
La modalidad de funcionamiento debe seleccionarse según las
exigencias del Cliente.
La selección de la modalidad se efectúa actuando sobre los
microinterruptores SW1, como sigue:
1. cerciorarse de que el sistema esté desconectado de la red;
2. quitar los dos laterales de la base interfónica y sacar el panel de
mandos, para acceder al circuito impreso principal situado en el
fondo de la misma;
3. individuar los microinterruptores SW1 (ver fig. 7, página anterior);
4. con los bitios 1 y 2 seleccionar una de las tres modalidad según lo
indicado en la tabla:
Bit 1 Bit 2 Werkingswijze *
0 0 0 - FULL DUPLEX
1 0 1 - HALF DUPLEX
0 1 2 - FULL DUPLEX PRIORITAIR
1 = ON 0 = OFF
*
Instelling in de fabriek: Werkingswijze 0.
3.2 Verzwakking van de kanalen
Het werkingsprincipe van de systeem is gebaseerd op het gebruik van
een DSP circuit, met een ingebouwde echo-onderdrukker. In zeer kritieke
gevallen van installatie kan het echter zijn, dat deze onderdrukker niet
in staat is om de akoestische terugkoppeling (Larsen-effect) te
voorkomen; in dat geval dienen één of beide kanalen verzwakt te worden;
deze handeling wordt automatisch door de DSP uitgevoerd. Met de
microschakelaars kan echter de sterkste verzwakking worden toegekend,
die door de DSP per kanaal kan worden ingevoerd. Hieronder is de
instelwijze van deze parameters aangegeven:
• Werking 0 - FULL DUPLEX met open kanalen
• (Klant/Operator)
In dit type configuratie blijven het Operatorkanaal en het Klantkanaal
altijd openstaan. Het hoogste verzwakkingsniveau kan afzonderlijk per
kanaal worden geselecteerd, zoals blijkt uit de onderstaande tabellen:
Selectie verzwakking van Operatorkanaal
Bit 3 Bit 4 Verzwakking
0 0 0 dB
1 0 3 dB
0 1 6 dB
1 1 9 dB
Bit 1 Bit 2 Modalidad *
0 0 0 - FULL DUPLEX
1 0 1 - HALF DUPLEX
0 1 2 - FULL DUPLEX PRIORITARIO
1 = ON 0 = OFF
*
Programación de fábrica: Modalidad 0
3.2 Atenuación de los canales
El principio de funcionamiento del sistema se basa en el uso de un circuito
DSP con anulador de eco incorporado. De todas maneras, en los casos
de instalación muy críticos, el anulador puede no lograr impedir el efecto
de retroacción acústica (efecto Larsen); en tal caso es necesario actuar
con la atenuación de ganancia de uno o de ambos canales; esta
operación es efectuada automáticamente por el DSP. De todas maneras,
mediante los microinterruptores es posible asignar la máxima atenuación
que el DSP puede introducir para cada canal. La modalidad de
programación de estos parámetros se indica a continuación:
• Modalidad 0 - FULL DUPLEX CON canales abiertos
• (Cliente/Operador)
En este tipo de configuración, los canales Operador y Cliente están
siempre abiertos. Es posible seleccionar el nivel máximo de atenuación
individual para cada canal, como mostrado en las siguientes tablas:
Selección atenuación canal Operador
Bit 3 Bit 4 Atenuación
0 0 0 dB
1 0 3 dB
0 1 6 dB
1 1 9 dB
Selectie verzwakking van Klantkanaal
Bit 5 Bit 6 Verzwakking
0 0 0 dB
1 0 3 dB
0 1 6 dB
1 1 9 dB
Selección atenuación canal Cliente
Bit 5 Bit 6 Atenuación
0 0 0 dB
1 0 3 dB
0 1 6 dB
1 1 9 dB
41
Page 42

• Werking 1 - HALF DUPLEX met gesloten kanalen zonder prioriteit
In dit type configuratie blijven in de ruststand beide kanalen gesloten en
wordt automatisch het kanaal geopend, waarvan het signaalniveau hoger
is dan een vooraf ingestelde drempelwaarde. Het andere kanaal kan in de
pauzes in werking treden, uiteraard op voorwaarde, dat het niveau van
dat kanaal hoger is dan de vooraf ingestelde drempel. Ook in dat geval kan
het hoogste niveau van verzwakking per afzonderlijk kanaal worden
geselecteerd, zoals aangegeven in de tabellen:
• Modalidad 1 - HALF DUPLEX con canales cerrados sin prioridad
En este tipo de configuración, en la condición de reposo ambos canales
están cerrados y se abrirá automáticamente el canal cuyo nivel de señal
supere un valor de umbral preestablecido. El otro canal podrá intervenir
en las pausas, siempre que su nivel supere el umbral preestablecido.
También en este caso es posible seleccionar el nivel máximo de atenuación
individual para cada canal, como indicado en las tablas:
Selectie verzwakking van Operatorkanaal
Bit 3 Bit 4 Verzwakking
0 0 0 dB
1 0 3 dB
0 1 6 dB
1 1 9 dB
Selectie verzwakking van Klantkanaal
Bit 5 Bit 6 Verzwakking
0 0 0 dB
1 0 3 dB
0 1 6 dB
1 1 9 dB
• Werking 2 - FULL DUPLEX PRIORITAIR met één open kanaal
In dit type configuratie blijft, in de ruststand, het Prioritaire kanaal open
staan, terwijl het Secundaire kanaal gesloten is; deze selectie staat in de
tabel:
Selectie altijd open kanaal
Bit 7 Open kanaal (prioritair)
0 Klant
1 Operator
Deze werking wordt aangeraden in het geval één van de twee
omgevingen aan veel lawaai onderhevig is, zodat het beter is om het
betreffende kanaal gesloten te houden. In dat geval kan de drempel
waarbij het gesloten kanaal in werking treedt aan de hand van de tabel
worden ingesteld, en kan het hoogste verzwakkingsniveau van het
gesloten kanaal worden geselecteerd.
Drempel gesloten kanaal
Bit 3 Bit 4 Drempel
0 0 6 dB
1 0 9 dB
0 1 12 dB
1 1 15 dB
Umbral canal cerrado
Bit 3 Bit 4 Umbral
0 0 6 dB
1 0 9 dB
0 1 12 dB
1 1 15 dB
Selección atenuación canal Operador
Bit 3 Bit 4 Atenuación
0 0 0 dB
1 0 3 dB
0 1 6 dB
1 1 9 dB
Selección atenuación canal Cliente
Bit 5 Bit 6 Atenuación
0 0 0 dB
1 0 3 dB
0 1 6 dB
1 1 9 dB
• Modalidad 2 - FULL DUPLEX PRIORITARIO con un canal abierto
En este tipo de configuración, en la condición de reposo, el canal prioritario
está abierto, mientras que él secundario está cerrado; esta selección se
indica en la tabla:
Selección canal siempre abierto
Bit 7 Canal abierto (prioritario)
0 Cliente
1 Operador
Esta modalidad está aconsejada cuando uno de los dos ambientes tiene un
ruido más bien alto, por lo que puede ser conveniente mantener cerrado el
canal correspondiente. En este caso, el umbral de intervención del canal
cerrado puede configurarse como en la tabla, y es posible seleccionar el
nivel máximo de atenuación del canal cerrado.
Verzwakking gesloten kanaal
Bit 5 Bit 6 Verz.
0 0 0 dB
1 0 3 dB
0 1 6 dB
1 1 9 dB
Atenuación canal cerrado
Bit 5 Bit 6 Aten.
0 0 0 dB
1 0 3 dB
0 1 6 dB
1 1 9 dB
3.3 Werking ‘REMOTE’
Door middel van bit 8 van de microschakelaars SW1 kan de werkingsmodus
van de afstandaansluiting als volgt worden gedefinieerd:
Bit 8 = 0 De werkingsmodus van de afstandaansluiting is zoals
geselecteerd door de operator.
Bit 8 = 1 Gedurende de afstandaansluiting wordt de modus ‘MANUAL
1’ geforceerd.
4. REGELINGEN
Op de bodem van de post bevinden zich twee
gaatjes, die toegang geven tot potentiometers,
waarmee het geluidsvolume van de twee luidsprekers
kan worden geregeld, zonder in het binnenste van
de basis te hoeven komen. Via het eerste gat (A)
kan het volume van de KLANT luidsprekers en dat
van de luidsprekers op afstand hoger of lager worden
gezet, terwijl via het tweede gat (B) het volume van
de OPERATOR luidspreker kan worden geregeld.
Via een derde gat (C) kan daarentegen de
microfoongevoeligheid worden geregeld, voor het
geval de operator een externe, microfoon in gebruik
heeft die op de connector is aangesloten.
42
3.3 Modalidad ‘REMOTE’
Es posible definir, trámite el bitio 8 de los microinterruptores SW1, la
modalidad de funcionamiento de la conexión remota de la siguiente manera:
Bit 8 = 0 La modalidad de funcionamiento de la conexión remota es
igual que la seleccionada por el Operador.
Bit 8 = 1 Durante la conexión remota es forzada la modalidad
‘MANUAL 1’.
4. AJUSTES
En el fondo del puesto hay presentes dos agujeros
a través de los cuales es posible acceder a los
potenciómetros que permiten ajustar el volumen
C
audio de los dos altavoces, sin tener que actuar
dentro de la base. El primer agujero (A) permite
subir o bajar el volumen de los altavoces CLIENTE
y remoto; el segundo agujero (B) ajusta el nivel
A
B
del altavoz OPERADOR.
Un tercer agujero (C) permite al contrario ajustar
la sensibilidad microfónica si el operador está
utilizando un micrófono externo enchufado en el
conector .
Page 43

5. BELANGRIJKSTE FUNCTIES
5.1 Waarschuwingsled
Voorop de intercombasis bevinden zich twee led’s. Beide led’s hebben
de functie om de status van het systeem aan te geven:
• GROENE ‘REMOTE’ Led:
Met de groene REMOTE led wordt aangegeven, dat er een oproep tot
communicatie is gedaan door een op afstand geplaatste microfoonpost
naar de operatorpost (bij installaties waarbij om deze optie is verzocht).
• TWEEKLEURIGE ‘MODE ON/OFF’ Led:
Deze led geeft het door de MODE-functie geselecteerde ‘soort werking’
weer. Zodra deze led wordt geactiveerd, licht hij groen op
(defaultinstelling, soort werking: Automatisch).
In de onderstaande tabel staat de overeenstemming tussen kleur/
werking.
Kleur LED Werking
GROEN AUTOMATIC
ROOD MANUAL 1
ORANJE MANUAL 2
5. FUNCIONES PRINCIPALES
5.1 LEDs de señalización
En el frente de la base interfónica hay dos LEDs.
Ambos tienen la tarea de indicar el estado del sistema:
• Led VERDE ‘REMOTE’:
El LED verde REMOTE sirve para visualizar la solicitud de comunicación
por parte de un puesto remoto hacia el puesto de operador (en las
instalaciones donde se requiera).
• Led BICOLOR ‘MODE ON/OFF’:
Indica el ‘tipo de funcionamiento’ seleccionado por la función MODE.
A la activación se presenta de color verde (configuración por omisión,
tipo de funcionamiento Automático).
En la tabla siguiente se indica la correspondencia color/tipo de
funcionamiento.
Color LED Tipo de funcionamiento
VERDE AUTOMATIC
ROJO MANUAL 1
NARANJA MANUAL 2
5.2 Lichtring
Deze bevindt zich op het microfoonhuis, op het punt waar de microfoon
aan de standaard is gekoppeld. De ring gaat, bij de verschillende
werkingswijzen, branden, wanneer het Operatorkanaal openstaat.
5.3 Functies
Hieronder staan de functies van de intercombasis.
HANDELING BESCHRIJVING
Functie van de pijlen
à Door op deze toets te drukken, wordt het
Ä Door op deze toets te drukken, wordt het
Aanschakelen
Toets ‘MODE ON/OFF’ Door op deze toets te drukken, wordt de
Functiekeuze
Toets ‘MODE ON/OFF’ Door kort op deze toets te drukken, kiest
‘AUTOMATIC’ (GROENE LED BRANDT)
uitgaande geluid ingeschakeld (de
Operator spreekt).
inkomende geluid ingeschakeld (de Klant
spreekt).
microfoonpost aangeschakeld (ON functie).
men tussen verschillende soorten
beschikbare werkingen (MODE-functie).
Het toewijzingsbeheer van het actieve kanaal wordt uitgevoerd
volgens de bij het installeren geselecteerde werkingswijze (zie par.
3.2, pag. 41).
à Door op deze toets te drukken, wordt het
Ä Door op deze toets te drukken, wordt het
Toets ‘TALK’ Door op deze toets te drukken, wordt de
‘MANUAL 1’ (RODE LED BRANDT)
Als er geen verkeer is, blijft het Klantkanaal aan staan.
Operatorkanaal aangeschakeld: de oranje
led gaat branden.
Klantkanaal aangeschakeld: de rode led
gaat branden.
uitgaande mededeling van de Operator in
de PA-installatie verspreid. De groene led
blijft branden.
5.2 Anillo luminoso
Situado en el cuerpo microfónico, a la altura de la conexión con el
soporte, se enciende, en los diferentes tipos de funcionamiento, cuando
el canal Operador está abierto.
5.3 Funcionalidades
A continuación se indican las funcionalidades de la base interfónica.
ACCIÓN DESCRIPCIÓN
Función de las flechas
à Pulsando esta tecla se activa el sonido en
Ä Pulsando esta tecla se activa el sonido en
Encendido
Tecla ‘MODE ON/OFF’ Simplemente pulsando esta tecla se
Selección función
Tecla ‘MODE ON/OFF’ Pulsando brevemente esta tecla se efectúa
‘AUTOMATIC’ (LED VERDE ENCENDIDO)
salida (habla el Operador).
entrada (habla el Cliente).
enciende el puesto (función ON).
la selección entre los diferentes tipos de
funcionamiento disponibles (función MODE).
La gestión de la asignación del canal activo es efectuada según la modalidad
de funcionamiento seleccionada en el momento de efectuar la instalación
(ver apartado 3.2, pág. 41 ).
à Pulsando esta tecla se habilita el Operador:
Ä Pulsando esta tecla se habilita el Cliente:
Tecla ‘TALK’ Pulsando esta tecla, la comunicación que
‘MANUAL 1’ (LED ROJO ENCENDIDO)
Con ausencia de comunicación, el canal Cliente es mantenido activo.
se enciende el LED naranja.
se enciende el LED rojo.
sale del Operador es difundida en la
instalación PA.
El LED verde queda encendido.
à Door op deze toets te drukken, wordt het
Operatorkanaal aangeschakeld: de oranje
led gaat branden.
Ä Bij deze werking is deze toets uitgeschakeld.
Toets ‘TALK’ Door op deze toets te drukken, wordt de
uitgaande mededeling van de Operator in
de PA-installatie verspreid. De groene led
gaat branden, en wordt weer rood zodra hij
wordt losgelaten.
à Pulsando esta tecla se habilita el
Operador: se enciende el LED naranja.
Ä En este tipo de funcionamiento, la tecla
queda inhabilitada.
Tecla ‘TALK’ Pulsando esta tecla, la comunicación que
sale del Operador es difundida en la
instalación PA. Se enciende el LED verde,
poniéndose rojo cuando se suelta la tecla.
43
Page 44

‘MANUAL 2’ (ORANJE LED BRANDT)
Als er geen mededeling is, blijft het Operatorkanaal aan staan.
‘MANUAL 2’ (LED NARANJA ENCENDIDO)
Con ausencia de comunicación, el canal Operador es mantenido activo.
à Bij deze werking is deze toets uitgeschakeld.
Ä Door op deze toets te drukken, wordt
Toets ‘TALK’ Door op deze toets te drukken, wordt de
Uitschakelen
Toets ‘MODE ON/OFF’ Door deze toets langer dan 1,5 sec.
het
Klantkanaal
led gaat branden.
uitgaande mededeling van de
de PA-installatie verspreid.
De groene led gaat branden, en wordt
weer oranje zodra hij wordt losgelaten.
ingedrukt te houden, schakelt de post uit
(OFF-functie).
aangeschakeld: de rode
Operator
à En este tipo de funcionamiento, la tecla
Ä Pulsando esta tecla se habilita el
Tecla ‘TALK’ Pulsando esta tecla, la comunicación que
in
Apagado
Tecla ‘MODE ON/OFF’ Manteniendo pulsada esta tecla por más
queda inhabilitada.
se enciende el LED rojo.
sale del
Operador
instalación PA. Se enciende el LED verde,
poniéndose naranja cuando se suelta la
tecla.
de 1,5 segundos, se apaga el puesto
(función OFF).
es difundida en la
Cliente
:
44
Page 45

APPENDIX • APÉNDICE
In de volgende pagina’s wordt alle informatie met betrekking tot de
connectors en bedradingschema’s van het systeem gegeven.
En las páginas siguientes son presentadas todas las informaciones
referentes a conectores y esquemas de conexión del sistema.
• Algemeen bedradingschema van het Intercomsysteem
Luidspreker Klant
Altavoz Cliente
Microfoon Klant
Micrófono Cliente
Externe voeding
Alimentador exterior
6-POLIGE aftakdoos
Cajetilla de derivación 6 POLOS
8-POLIGE aftakdoos
Cajetilla de derivación 8 POLOS
TE
O
CAL
LO
REM
Intercom 2000
REMOTE
Green
Automatic
Red
Manual 1
Orange
Manual 2
MODE
TALK
ON/OFF
• Esquema de conexión general del Sistema de Interfono
Versterker
Amplificatore
Serie 8000
Amplificador
Op afstand opgestelde post
Puesto remoto
Luidsprekers PA-lijn
Altavoces línea PA
Op afstand opgestelde
luidspreker
Altavoz remoto
Op afstand opgestelde
microfoon
Micrófono remoto
Intercombasis Operator
Base interfónica Operador
‘REMOTE’ connector
Klem/Term. Omschrijving
1 MIC Voorversterkte microfoon van
de op afstand opgestelde post
2 VSS Minpool voeding en minpool geluidssignaal naar
versterkeringang
3 SPK Luidspreker van de op afstand opgestelde post
4 CALL Oproeptoets van de op afstand opgestelde post
5 Vcc Pluspool voeding
6PR Voorrangsklem voor PA Serie 8000 versterkers
7C + Middenklem van voorrangsrelais
8 SIGNAL Geluidssignaal naar de geluidsingang van de
versterker
‘LOCAL’ connector
Klem/Term. Omschrijving
1A – Uitgang voor luidspreker (Klantzijde)
2 ALIM + Voeding (pluspool) 15 V
3 ALIM – Voeding (minpool) 0 V
4M + Pluspool van de microfoon (Klantzijde)
5M – Minpool van de microfoon (Klantzijde)
6A + Uitgang voor de luidspreker (Klantzijde)
Optionele / Opción
Conector ‘REMOTE’
Descripción
Micrófono preamplificado
del puesto remoto
Negativo de alimentación y negativo señal audio hacia la
entrada del amplificador
Altavoz del puesto remoto
Tecla de llamada del puesto remoto
Positivo de alimentación
Terminal de precedencia para amplificadores PA Serie
8000
Terminal común del relé de precedencia
Señal audio hacia la entrada audio del amplificador
Conector ‘LOCAL’
Descripción
Salida para altavoz (lado Cliente)
Alimentación (polo positivo) 15 V
Alimentación (polo negativo) 0 V
Positivo del micrófono (lado Cliente)
Negativo del micrófono (lado Cliente)
Salida para altavoz (lado Cliente)
18
REMOTE
16
LOCAL
45
Page 46

• Bedradingschema van de op afstand opgestelde post • Esquema de conexión del puesto remoto
Oproeptoets
Als voorversterker wordt het PASO
accessoir cod. AC14 aangeraden, geschikt
voor elektreet microfoons. Het circuit is met
een microfooncompressor uitgerust
(voedingsgamma 0 ÷ 12 V, signaaluitgang
0 dB).
* De MIC en SPK geleiders
moeten afgeschermd zijn.
CALL
Vcc
+12 V
*
MIC
VSS
0V
Tecla de llamada
PRE
(#)
Microfooncapsule
Cápsula microfónica
Como preamplificador se aconseja el
accesorio PASO cód. AC14, adecuado para
micrófonos electreto. El circuito tiene un
compresor microfónico (gama de
alimentación 0 ÷ 12 V, salida de señal 0 dB).
* Los conductores MIC y SPK
deben estar blindados.
(#)
Installeer de stroomweerstand voor elektreet
microfooncapsules.
*
SPK
16 W
• Optionele aansluitingen
Aan de achterzijde van de gebruikerspost bevinden zich twee connectors
voor standaard 3,5 mm jackbussen, waarop een stereokoptelefoon en/
of een externe elektretmicrofoon kan worden aangesloten die door de
Operator kan worden gebruikt.
Jack connector voor stereokoptelefoon (sluit indien
gebruikt de luidspreker van de gebruikerspost uit).
Jack connector voor externe elektretmicrofoon (sluit
indien gebruikt de microfoon van de gebruikerspost
uit).
(#)
Montar la resistencia de alimentación para cápsula
microfónica electreto.
• Conexiones opcionales
En la parte trasera del puesto hay presentes dos conectores para
tomas jack standard de 3,5 mm, en las cuales es posible enchufar unos
cascos estéreo y/o un micrófono electreto externo que el Operador
puede utilizar.
REMOTE LOCAL
Conector jack para cascos estéreo (si utilizado, excluye el
altavoz del puesto).
Conector jack para micrófono electreto externo (si
utilizado, excluye el micrófono del puesto).
46
Page 47

HANDLEIDING VOOR DE OPERATOR
MANUAL DEL OPERADOR
47
Page 48

1. ALGEMENE OMSCHRIJVING VAN DE COMPONENTEN
1. DESCRIPCIÓN GENERAL DE LAS PARTES
1 • Microfoonbasis op standaard.
2 • Waarschuwingsled oproep vanaf op afstand opgestelde post.
3 • Led waarmee het type werking wordt weergegeven.
4 • Toets voor het activeren van het verkeer naar een PA omroepinstallatie.
5 • Toets aan/uit/selectie werkingswijze.
6 • Toetsen kanaalforcering.
7 • Luidspreker monitor.
8 • Connector voor op afstand opgestelde post/ PA-installatie.
9 • Connector voor lokale post.
10 • Jack connector voor stereokoptelefoon.
11 • Jack connector voor externe elektretmicrofoon.
12 • Beschermhoesje tegen geruis
13 • Microfoonkop.
14 • Lichtring.
15 • Zwanenhals.
16 • Kabelgoot.
17 • Elektreet microfoon.
2. BELANGRIJKSTE FUNCTIES
2.1 Directe-keuzetoetsen
Alle bedieningstoetsen van het intercomsysteem bevinden zich op het
frontpaneel van de intercombasis. Hieronder volgen de functies met
betrekking tot de afzonderlijke selectietoetsen.
Functies van de pijlen
à Door op deze toets te drukken, wordt het
uitgaande geluid ingeschakeld (de Operator
spreekt).
Ä Door op deze toets te drukken, wordt het
inkomende geluid ingeschakeld (de Klant
spreekt).
Toets ‘MODE ON/OFF’
• Functie ON/OFF
Door deze toets langer dan 1,5 sec. ingedrukt te houden, schakelt de
post uit. Voor het aanschakelen moet daarentegen slechts even op de
toets worden gedrukt.
1 • Base micrófono de varilla.
2 • LED de señalización llamada desde puesto remoto.
3 • LED de visualización del tipo de funcionamiento.
4 • Tecla activación comunicación hacia instalación de difusión PA.
5 • Tecla de encendido/apagado/selección tipo de funcionamiento.
6 • Teclas forzado canal.
7 • Altavoz monitor.
8 • Conector para puesto remoto/instalación PA.
9 • Conector para puesto local.
10 • Conector jack para cascos estéreo.
11 • Conector jack para micrófono electreto externo.
12 • Caperuza antisoplo.
13 • Cabeza del micrófono.
14 • Anillo luminoso.
15 • Varilla flexible.
16 • Canal pasador para cable.
17 • Micrófono electreto.
2. FUNCIONES PRINCIPALES
2.1 Teclas de selección directa
Todos los mandos del sistema interfónico se encuentran en el panel
frontal de la base interfónica. A continuación se indican las funciones
ligadas con cada tecla de selección.
Función de las flechas
à Pulsando esta tecla se activa el sonido en
salida (habla el Operador).
Ä Pulsando esta tecla se activa el sonido en
entrada (habla el Cliente).
Tecla ‘MODE ON/OFF’
• Función ON/OFF
Manteniendo pulsada esta tecla por más de 1,5 segundos, se apaga el
puesto. Para encenderlo, al contrario, basta simplemente pulsar la tecla.
• MODE functie
Door deze toets niet langer dan 1,5 sec. ingedrukt te houden, worden
door de MODE led de verschillende beschikbare werkingen aangegeven:
Kleur LED Soort werking
GROEN AUTOMATIC
ROOD MANUAL 1
ORANJE MANUAL 2
Als de led niet brandt, is het Intercomsysteem uitgeschakeld.
Druk nu opnieuw op de toets MODE ON/OFF, om het toestel weer aan
te schakelen.
48
• Función MODE
Manteniendo pulsada esta tecla por menos de 1,5 segundos, el LED
MODE indica los distintos tipos de funcionamiento disponibles:
Color LED Tipo de funcionamiento
VERDE AUTOMATIC
ROJO MANUAL 1
NARANJA MANUAL 2
Si el LED no está encendido, el Sistema Interfónico está apagado.
Pulsar de nuevo la tecla MODE ON/OFF para encender de nuevo el
aparato.
Page 49

Toets ‘TALK’
Met deze toets kan de Operator het signaal van zijn post naar een
extern versterkingssysteem leiden (bijvoorbeeld naar het
omroepsysteem van het gebouw, zodat de intercom gewoon als
omroepconsole naar het publiek kan worden gebruikt). Indien er geen
verbinding met een extern versterkerssysteem is voorzien, wordt de
toets TALK niet gebruikt.
Tecla ‘TALK’
Esta tecla permite al Operador desviar la señal audio de su puesto hacia
un sistema de amplificación exterior (por ejemplo, hacia el sistema de
difusión sonora del edificio, de forma que el interfono pueda ser utilizado
como una simple consola de avisos al público). Si estuviera prevista la
conexión hacia un sistema de amplificación exterior, la tecla TALK queda
inutilizada.
Groene led ‘REMOTE’
Deze led wordt gebruikt in combinatie met een op afstand opgestelde
post, die met de Operatorpost voorzien van de intercom kan
communiceren.
Met dit systeem kan door middel van een console of een post op
afstand met de Operator worden gesproken: de intercombasis van de
Operator zendt een akoestisch oproepsignaal uit, waarna de REMOTE
led gaat knipperen. De Operator moet vervolgens op de toets MODE
ON/OFF drukken om het verkeer met de op afstand opgestelde post
aan te schakelen: de REMOTE led blijft gedurende de hele conversatie
branden. Aan het eind van de conversatie moet de Operator opnieuw
op de toets MODE ON/OFF drukken (één keer om het gesprek te
beëindigen; twee keer om het toestel uit te schakelen).
3. GEBRUIK VAN DE INTERCOM
3.1 Aanschakelen
Voor het in werking stellen van het Intercom systeem moet slechts één
keer op de toets MODE ON/OFF te worden gedrukt.
3.2 Selectie van de gewenste werking
Wanneer het toestel wordt aangeschakeld is de vooraf ingestelde
werking:
De Operator kan de gewenste werking kiezen, door op de toets MODE
ON/OFF te drukken. Hieronder worden de kenmerken van elke werkwijze
gegeven.
Functie ‘AUTOMATIC’
Hoe het Systeem zich gedraagt, hangt af van de tijdens de installatie
ingestelde werkwijze:
•als Werkwijze 0 (Full Duplex) is geselecteerd, blijven de
• als Werkwijze 1 (Half Duplex) is geselecteerd, kan er slechts één
•als Werkwijze 2 (Full Duplex Prioritair) is geselecteerd, blijft
AUTOMATIC.
geluidskanalen van de Operator en de Klant aan beide kanten actief;
de Klant en de Operator kunnen gelijktijdig spreken. De Operator kan
altijd op elk moment de richting van het verkeer forceren met behulp
van de toetsen à en Ä.
In een geforceerde situatie: deze kan zich voordoen, wanneer de
omgeving uiterst lawaaierig is, of als men het gesprek van de Klant
wil overnemen (toets à ingedrukt houden), of wanneer de Klant te
ver van de microfoon staat, of zo’n zachte stem heeft, dat men er
niet in slaagt de communicatie aan zijn kant te activeren (toets Ä
ingedrukt houden).
kanaal tegelijk worden geactiveerd (het eerste dat in bedrijf treedt);
in de ruststand zijn beide kanalen uitgeschakeld.
één van de twee kanalen (Operator of Klant, afhankelijk van de
tijdens de installatie uitgevoerde selectie) steeds actief; de ander
moet, om het eigen kanaal te kunnen activeren, boven de ingestelde
drempel komen.
LED verde ‘REMOTE’
Este LED es utilizado en combinación con la presencia de un puesto
remoto capaz de comunicar con el puesto Operador dotado de
Intercom.
El sistema permite, mediante una consola o puesto remoto, hablar con
el Operador: la base interfónica del Operador generará una señal
acústica de aviso de llamada y el LED REMOTE se encenderá
intermitente. El Operador deberá pues pulsar la tecla MODE ON/OFF
para activar la comunicación con el puesto remoto: el LED REMOTE
quedará encendido fijo por toda la duración de la conversación.
Al término el Operador deberá pulsar de nuevo la tecla MODE ON/OFF
(una vez para terminar la comunicación; dos veces para apagar el
aparato).
3. USO DEL INTERFONO
3.1 Encendido
Para activar el funcionamiento del Sistema de Interfono, es necesario
pulsar una sola vez la tecla MODE ON/OFF.
3.2 Selección de la modalidad deseada
Al encendido del aparato, el modo de funcionamiento preseleccionado es
él
AUTOMATIC.
El Operador puede elegir el tipo de funcionamiento deseado pulsando la
tecla MODE ON/OFF. A continuación se indican las características de
cada modalidad.
Funcionamiento ‘AUTOMATIC’
El comportamiento del Sistema dependerá de la modalidad programada
en la fase de instalación:
• si se ha seleccionado la Modalidad 0 (Full Duplex), los canales
audio del Operador y del Cliente quedarán ambos activos; el Cliente
y el Operador pueden hablar contemporáneamente. El Operador
puede siempre y de todas maneras forzar el sentido de comunicación
actuando sobre las teclas à y Ä.
En condición de forzado: esta situación se puede crear cuando el
ambiente es muy ruidoso, o si se desea quitar la parola al Cliente
(mantener pulsado la tecla à ), o cuando el Cliente está demasiado
lejos del micrófono o tiene la voz tan baja que no logra activar su
comunicación (mantener pulsada la tecla Ä ).
• si se ha seleccionado la Modalidad 1 (Half Duplex), se podrá
activar un solo canal a la vez (el primero que actúa); en condición de
reposo, ambos canales están inhabilitados.
• si se ha seleccionado la Modalidad 2 (Full Duplex Prioritario),
uno de los dos canales (Operador o Cliente, según cuanto
seleccionado durante la instalación) queda siempre activo; el otro,
para activar su propio canal, debe superar el umbral programado.
Functie ‘MANUAL 1’
In dit geval blijft het kanaal van de Klant steeds aangeschakeld, terwijl
dat van de Operatore steeds uitgeschakeld blijft. Dit is de situatie waarin
men bijvoorbeeld de onderlinge communicatie tussen Operatoren niet
buiten het loket wil laten horen. Door op toets à te drukken, wordt de
geforceerde richting van het kanaal omgekeerd (de Operator neemt het
woord).
Functie ‘MANUAL 2’
In dit geval blijft het kanaal van de Operator steeds aangeschakeld,
terwijl dat van de Klant uitgeschakeld blijft (het kan gebeuren, dat de
zone voor de klanten normaal erg lawaaierig is, zodanig, dat de
microfoon van de Klant steeds aanschakelt, of de Operator wil lang aan
het woord kunnen blijven).
Funcionamiento ‘MANUAL 1’
En este caso, el canal del Cliente queda siempre activo, mientras que él
del Operador queda siempre desactivado. Esta es la situación cuando
por ejemplo no se desea hacer escuchar al exterior la eventual
comunicación entre los Operadores. Pulsando la tecla à se invierte el
sentido de forzado del canal (el Operador toma la palabra).
Funcionamiento ‘MANUAL 2’
En este caso, el canal del Operador queda siempre activo, mientras
que él del Cliente queda siempre desactivado (es el caso en que
normalmente en la zona de la clientela hay mucho ruido ambiental, y
logra activar continuamente el micrófono del Cliente, o el caso en que el
Operador desea mantener la palabra por mucho tiempo).
49
Page 50

3.3 Beantwoorden van een oproep op afstand
(in het geval er een verbinding is)
Het systeem is ontworpen met het oog op een aansluiting op een mogelijk
aanwezige console of post op afstand, die met de Operator kan
communiceren: deze functie is actief niet alleen wanneer de intercombasis
uit staat, maar ook wanneer deze aan staat.
Bij een oproep vanaf een post op afstand, wordt de Operator door een
geluidssignaal gewaarschuwd en de REMOTE led gaat dan knipperen. De
toets MODE ON/OFF fungeert in dit geval als aan-/uit-knop van het
verkeer: hieronder volgen de handelingen voor elke afzonderlijke status
van de Intercom.
3.3 Respuesta a una llamada remota
(su hubiera presente la conexión)
El Sistema ha sido proyectado previendo la conexión con una eventual
consola o puesto remoto capaz de comunicar con el Operador: esta
función está activa tanto cuando la base interfónica está apagada
como cuando está encendida.
Ante una llamada desde puesto remoto, el Operador es avisado por
una señal acústica y el LED REMOTE parpadea. La tecla MODE ON/OFF
en este caso hace de mando de habilitación/inhabilitación de la
comunicación: a continuación se indican las acciones ligadas a cada
estado del Interfono.
• Oproep met uitgeschakelde Intercom
De REMOTE led knippert om de Operator te waarschuwen dat er een
oproep aankomt.
Druk op toets MODE ON/OFF > het systeem schakelt aan in de
‘AUTOMATIC’ functie (groene led) en
het onderlinge verkeer met de post
op afstand wordt aangeschakeld.
Door opnieuw op de toets MODE ON/
OFF te drukken, wordt het verkeer
uitgeschakeld en het systeem blijft op
‘AUTOMATIC’ staan.
• Oproep met Intercom in de functie ‘AUTOMATIC’
De REMOTE led knippert om de Operator te waarschuwen dat er een
oproep aankomt.
Druk op toets MODE ON/OFF > het onderlinge verkeer wordt
aangeschakeld. Door opnieuw op de
toets MODE ON/OFF te drukken,
wordt het verkeer uitgeschakeld en
het systeem blijft op ‘AUTOMATIC’
staan.
• Oproep met Intercom in de functie ‘MANUAL 1’
De REMOTE led knippert om de Operator te waarschuwen dat er een
oproep aankomt.
Druk op toets MODE ON/OFF > het onderlinge verkeer wordt
aangeschakeld. Door opnieuw op de
toets MODE ON/OFF te drukken,
wordt het verkeer uitgeschakeld en
het systeem blijft op ‘MANUAL 1’
staan.
• Llamada con Intercom apagado
El LED REMOTE parpadea para avisar al Operador que hay una llamada
en entrada.
Pulsar la tecla MODE ON/OFF > el sistema se enciende en ‘AUTOMATIC’
(LED verde) y se habilita el diálogo
con el puesto remoto. Pulsando de
nuevo la tecla MODE ON/OFF, se
inhabilita el diálogo y el sistema queda
en la modalidad ‘AUTOMATIC’.
• Llamada con Intercom en modalidad ‘AUTOMATIC’
El LED REMOTE parpadea para avisar al Operador que hay una llamada
en entrada.
Pulsar la tecla MODE ON/OFF > es habilitado el diálogo. Pulsando de
nuevo la tecla MODE ON/OFF, se
inhabilita el diálogo y el sistema queda
en la modalidad ‘AUTOMATIC’.
• Llamada con Intercom en modalidad ‘MANUAL 1’
El LED REMOTE parpadea para avisar al Operador que hay una llamada
en entrada.
Pulsar la tecla MODE ON/OFF > es habilitado el diálogo. Pulsando de
nuevo la tecla MODE ON/OFF, se
inhabilita el diálogo y el sistema queda
en la modalidad ‘MANUAL 1’.
• Oproep met Intercom in de functie ‘MANUAL 2’
De REMOTE led knippert om de Operator te waarschuwen dat er een
oproep aankomt.
Druk op toets MODE ON/OFF > het onderlinge verkeer wordt
aangeschakeld. Door opnieuw op de
toets MODE ON/OFF te drukken,
wordt het verkeer uitgeschakeld en
het systeem blijft op ‘MANUAL 2’
staan.
3.4 Verzending van een omroepbericht naar het publiek
(aansluiting op een omroepinstallatie)
Door op de toets TALK te drukken, kan de operator zelf een
omroepbericht naar de omroepinstallatie van de lokale ruimte of van
het hele gebouw zenden. Zodra de toets wordt losgelaten, keert de
intercom weer terug naar de gebruikelijke werking.
3.5 Uitschakelen van de Intercom
Houd de toets MODE ON/OFF ten minste 1,5 seconden lang ingedrukt.
Het led houdt op met branden, waarmee wordt aangegeven dat het
apparaat is uitgeschakeld.
50
• Llamada con Intercom en modalidad ‘MANUAL 2’
El LED REMOTE parpadea para avisar al Operador que hay una llamada
en entrada.
Pulsar la tecla MODE ON/OFF > es habilitado el diálogo. Pulsando de
nuevo la tecla MODE ON/OFF, se
inhabilita el diálogo y el sistema queda
en la modalidad ‘MANUAL 2’.
3.4 Envío de un aviso al público
(conexión con una instalación de difusión sonora)
Manteniendo pulsada la tecla TALK, el Operador puede enviar su aviso
a la instalación audio de difusión sonora del local o del edificio. Soltando
la tecla, el funcionamiento del interfono vuelve a ser el acostumbrado.
3.5 Apagado del Interfono
Mantener pulsada la tecla MODE ON/OFF durante por lo menos 1,5
segundos. El LED se apaga para indicar el efectivo apagado del aparato.
Page 51

TECHNISCHE KENMERKEN CARACTERÍSTICAS TÉCNICAS
gninnapssgnideoVcdV51nóicatnemilaedejatloV
eitprosbA Am002÷Am06 omusnoC
sacinóforcimsaluspácsaleddadilibisneS•seluspacnooforcimednavdiehgileoveG
nooforcimdnaW )zHk1aaP/V1=Bd0(
Bd74- derapedonofórciM
tsopednavnooforciM )zHk1aaP/V1=Bd0(Bd84- otseuponofórciM
)Bd3-(eisnopsereitneuqerF z
H0008÷072 )Bd3-(aicneucerfneatseupseR
lanimonaicnetoP•negomrevlaanimoN
8navrekerpsdiulenretniteM Ω W18edonretnizovatlanoC Ω
eteM Ω W18edroiretxezovatlanoC Ω
8navrekerpsdiulenretx
61navrekerpsdiulenretxeteM Ω W6,061edroiretxezovatlanoC Ω
sadideM•negnitemfA
tsopnooforciM mm18x851x002 ocinóforcimotseuP
xam(
)mm27etpeidmumi
tsopnooforcimwuobniroovtaG
mm5,451x191
gnikkapreV mm562x281x565 ejalabmE
tsopnoo
forcimthciwegotteNgk1otseupotenoseP
)tkaprev(thciweglaatoTgk2,2)odalabme(latotoseP
otseuplerartopmearaporejugA
)mm27.xámdadidnuforp(
51
Page 52

○○○○○○○○○○○○○○○○○○○○○○○○○○○○○○○○○○○○○○○○○○○○○○○○○○○○○○○○○○○○○○○○○○○○
○○○○○○○○○○○○○○○○○○○○○○○○○○○○○○○○○○○○○○○○○○○○○○○○○○○○○○○○○○○○○○○○○○○○
○○○○○○○○○○○○○○○○○○○○○○○○○○○○○○○○○○○○○○○○○○○○○○○○○○○○○○○○○○○○○○○○○○○○
○○○○○○○○○○○○○○○○○○○○○○○○○○○○○○○○○○○○○○○○○○○○○○○○○○○○○○○○○○○○○○○○○○○○
○○○○○○○○○○○○○○○○○○○○○○○○○○○○○○○○○○○○○○○○○○○○○○○○○○○○○○○○○○○○○○○○○○○○
○○○○○○○○○○○○○○○○○○○○○○○○○○○○○○○○○○○○○○○○○○○○○○○○○○○○○○○○○○○○○○○○○○○○
○○○○○○○○○○○○○○○○○○○○○○○○○○○○○○○○○○○○○○○○○○○○○○○○○○○○○○○○○○○○○○○○○○○○
○○○○○○○○○○○○○○○○○○○○○○○○○○○○○○○○○○○○○○○○○○○○○○○○○○○○○○○○○○○○○○○○○○○○
○○○○○○○○○○○○○○○○○○○○○○○○○○○○○○○○○○○○○○○○○○○○○○○○○○○○○○○○○○○○○○○○○○○○
○○○○○○○○○○○○○○○○○○○○○○○○○○○○○○○○○○○○○○○○○○○○○○○○○○○○○○○○○○○○○○○○○○○○
○○○○○○○○○○○○○○○○○○○○○○○○○○○○○○○○○○○○○○○○○○○○○○○○○○○○○○○○○○○○○○○○○○○○
○○○○○○○○○○○○○○○○○○○○○○○○○○○○○○○○○○○○○○○○○○○○○○○○○○○○○○○○○○○○○○○○○○○○
○○○○○○○○○○○○○○○○○○○○○○○○○○○○○○○○○○○○○○○○○○○○○○○○○○○○○○○○○○○○○○○○○○○○
○○○○○○○○○○○○○○○○○○○○○○○○○○○○○○○○○○○○○○○○○○○○○○○○○○○○○○○○○○○○○○○○○○○○
○○○○○○○○○○○○○○○○○○○○○○○○○○○○○○○○○○○○○○○○○○○○○○○○○○○○○○○○○○○○○○○○○○○○
○○○○○○○○○○○○○○○○○○○○○○○○○○○○○○○○○○○○○○○○○○○○○○○○○○○○○○○○○○○○○○○○○○○○
○○○○○○○○○○○○○○○○○○○○○○○○○○○○○○○○○○○○○○○○○○○○○○○○○○○○○○○○○○○○○○○○○○○○
○○○○○○○○○○○○○○○○○○○○○○○○○○○○○○○○○○○○○○○○○○○○○○○○○○○○○○○○○○○○○○○○○○○○
○○○○○○○○○○○○○○○○○○○○○○○○○○○○○○○○○○○○○○○○○○○○○○○○○○○○○○○○○○○○○○○○○○○○
○○○○○○○○○○○○○○○○○○○○○○○○○○○○○○○○○○○○○○○○○○○○○○○○○○○○○○○○○○○○○○○○○○○○
○○○○○○○○○○○○○○○○○○○○○○○○○○○○○○○○○○○○○○○○○○○○○○○○○○○○○○○○○○○○○○○○○○○○
○○○○○○○○○○○○○○○○○○○○○○○○○○○○○○○○○○○○○○○○○○○○○○○○○○○○○○○○○○○○○○○○○○○○
○○○○○○○○○○○○○○○○○○○○○○○○○○○○○○○○○○○○○○○○○○○○○○○○○○○○○○○○○○○○○○○○○○○○
○○○○○○○○○○○○○○○○○○○○○○○○○○○○○○○○○○○○○○○○○○○○○○○○○○○○○○○○○○○○○○○○○○○○
○○○○○○○○○○○○○○○○○○○○○○○○○○○○○○○○○○○○○○○○○○○○○○○○○○○○○○○○○○○○○○○○○○○○
○○○○○○○○○○○○○○○○○○○○○○○○○○○○○○○○○○○○○○○○○○○○○○○○○○○○○○○○○○○○○○○○○○○○
○○○○○○○○○○○○○○○○○○○○○○○○○○○○○○○○○○○○○○○○○○○○○○○○○○○○○○○○○○○○○○○○○○○○
○○○○○○○○○○○○○○○○○○○○○○○○○○○○○○○○○○○○○○○○○○○○○○○○○○○○○○○○○○○○○○○○○○○○
○○○○○○○○○○○○○○○○○○○○○○○○○○○○○○○○○○○○○○○○○○○○○○○○○○○○○○○○○○○○○○○○○○○○
○○○○○○○○○○○○○○○○○○○○○○○○○○○○○○○○○○○○○○○○○○○○○○○○○○○○○○○○○○○○○○○○○○○○
○○○○○○○○○○○○○○○○○○○○○○○○○○○○○○○○○○○○○○○○○○○○○○○○○○○○○○○○○○○○○○○○○○○○
○○○○○○○○○○○○○○○○○○○○○○○○○○○○○○○○○○○○○○○○○○○○○○○○○○○○○○○○○○○○○○○○○○○○
○○○○○○○○○○○○○○○○○○○○○○○○○○○○○○○○○○○○○○○○○○○○○○○○○○○○○○○○○○○○○○○○○○○○
○○○○○○○○○○○○○○○○○○○○○○○○○○○○○○○○○○○○○○○○○○○○○○○○○○○○○○○○○○○○○○○○○○○○
○○○○○○○○○○○○○○○○○○○○○○○○○○○○○○○○○○○○○○○○○○○○○○○○○○○○○○○○○○○○○○○○○○○○
○○○○○○○○○○○○○○○○○○○○○○○○○○○○○○○○○○○○○○○○○○○○○○○○○○○○○○○○○○○○○○○○○○○○
○○○○○○○○○○○○○○○○○○○○○○○○○○○○○○○○○○○○○○○○○○○○○○○○○○○○○○○○○○○○○○○○○○○○
○○○○○○○○○○○○○○○○○○○○○○○○○○○○○○○○○○○○○○○○○○○○○○○○○○○○○○○○○○○○○○○○○○○○
○○○○○○○○○○○○○○○○○○○○○○○○○○○○○○○○○○○○○○○○○○○○○○○○○○○○○○○○○○○○○○○○○○○○
○○○○○○○○○○○○○○○○○○○○○○○○○○○○○○○○○○○○○○○○○○○○○○○○○○○○○○○○○○○○○○○○○○○○
○○○○○○○○○○○○○○○○○○○○○○○○○○○○○○○○○○○○○○○○○○○○○○○○○○○○○○○○○○○○○○○○○○○○
○○○○○○○○○○○○○○○○○○○○○○○○○○○○○○○○○○○○○○○○○○○○○○○○○○○○○○○○○○○○○○○○○○○○
○○○○○○○○○○○○○○○○○○○○○○○○○○○○○○○○○○○○○○○○○○○○○○○○○○○○○○○○○○○○○○○○○○○○
○○○○○○○○○○○○○○○○○○○○○○○○○○○○○○○○○○○○○○○○○○○○○○○○○○○○○○○○○○○○○○○○○○○○
○○○○○○○○○○○○○○○○○○○○○○○○○○○○○○○○○○○○○○○○○○○○○○○○○○○○○○○○○○○○○○○○○○○○
○○○○○○○○○○○○○○○○○○○○○○○○○○○○○○○○○○○○○○○○○○○○○○○○○○○○○○○○○○○○○○○○○○○○
○○○○○○○○○○○○○○○○○○○○○○○○○○○○○○○○○○○○○○○○○○○○○○○○○○○○○○○○○○○○○○○○○○○○
○○○○○○○○○○○○○○○○○○○○○○○○○○○○○○○○○○○○○○○○○○○○○○○○○○○○○○○○○○○○○○○○○○○○
○○○○○○○○○○○○○○○○○○○○○○○○○○○○○○○○○○○○○○○○○○○○○○○○○○○○○○○○○○○○○○○○○○○○
○○○○○○○○○○○○○○○○○○○○○○○○○○○○○○○○○○○○○○○○○○○○○○○○○○○○○○○○○○○○○○○○○○○○
○○○○○○○○○○○○○○○○○○○○○○○○○○○○○○○○○
○○○○○○○○○○○○○○○○○○○○○○○○○○○○○○○○○○○○○○○○○○○○○○○○○○○○○○○○○○○○○○○○○○○○
○○○○○○○○○○○○○○○○○○○○○○○○○○○○○○○○○○○○○○○○○○○○○○○○○○○○○○○○○○○○○○○○○○○○
○○○○○○○○○○○○○○○○○○○○○○○○○○○○○○○○○○○○○○○○○○○○○○○○○○○○○○○○○○○○○○○○○○○○
○○○○○○○○○○○○○○○○○○○○○○○○○○○○○○○○○○○○○○○○○○○○○○○○○○○○○○○○○○○○○○○○○○○○
○○○○○○○○○○○○○○○○○○○○○○○○○○○○○○○○○○○○○○○○○○○○○○○○○○○○○○○○○○○○○○○○○○○○
○○○○○○○○○○○○○○○○○○○○○○○○○○○○○○○○○○○○○○○○○○○○○○○○○○○○○○○○○○○○○○○○○○○○
○○○○○○○○○○○○○○○○○○○○○○○○○○○○○○○○○○○○○○○○○○○○○○○○○○○○○○○○○○○○○○○○○○○○
○○○○○○○○○○○○○○○○○○○○○○○○○○○○○○○○○○○○○○○○○○○○○○○○○○○○○○○○○○○○○○○○○○○○
○○○○○○○○○○○○○○○○○○○○○○○○○○○○○○○○○○○○○○○○○○○○○○○○○○○○○○○○○○○○○○○○○○○○
○○○○○○○○○○○○○○○○○○○○○○○○○○○○○○○○○○○○○○○○○○○○○○○○○○○○○○○○○○○○○○○○○○○○
○○○○○○○○○○○○○○○○○○○○○○○○○○○○○○○○○○○○○○○○○○○○○○○○○○○○○○○○○○○○○○○○○○○○
○○○○○○○○○○○○○○○○○○○○○○○○○○○○○○○○○○○○○○○○○○○○○○○○○○○○○○○○○○○○○○○○○○○○
○○○○○○○○○○○○○○○○○○○○○○○○○○○○○○○○○○○○○○○○○○○○○○○○○○○○○○○○○○○○○○○○○○○○
○○○○○○○○○○○○○○○○○○○○○○○○○○○○○○○○○○○○○○○○○○○○○○○○○○○○○○○○○○○○○○○○○○○○
○○○○○○○○○○○○○○○○○○○○○○○○○○○○○○○○○○○○○○○○○○○○○○○○○○○○○○○○○○○○○○○○○○○○
○○○○○○○○○○○○○○○○○○○○○○○○○○○○○○○○○○○
52
Page 53

○○○○○○○○○○○○○○○○○○○○○○○○○○○○○○○○○○○○○○○○○○○○○○○○○○○○○○○○○○○○○○○○○○○○
○○○○○○○○○○○○○○○○○○○○○○○○○○○○○○○○○○○○○○○○○○○○○○○○○○○○○○○○○○○○○○○○○○○○
○○○○○○○○○○○○○○○○○○○○○○○○○○○○○○○○○○○○○○○○○○○○○○○○○○○○○○○○○○○○○○○○○○○○
○○○○○○○○○○○○○○○○○○○○○○○○○○○○○○○○○○○○○○○○○○○○○○○○○○○○○○○○○○○○○○○○○○○○
○○○○○○○○○○○○○○○○○○○○○○○○○○○○○○○○○○○○○○○○○○○○○○○○○○○○○○○○○○○○○○○○○○○○
○○○○○○○○○○○○○○○○○○○○○○○○○○○○○○○○○○○○○○○○○○○○○○○○○○○○○○○○○○○○○○○○○○○○
○○○○○○○○○○○○○○○○○○○○○○○○○○○○○○○○○○○○○○○○○○○○○○○○○○○○○○○○○○○○○○○○○○○○
○○○○○○○○○○○○○○○○○○○○○○○○○○○○○○○○○○○○○○○○○○○○○○○○○○○○○○○○○○○○○○○○○○○○
○○○○○○○○○○○○○○○○○○○○○○○○○○○○○○○○○○○○○○○○○○○○○○○○○○○○○○○○○○○○○○○○○○○○
○○○○○○○○○○○○○○○○○○○○○○○○○○○○○○○○○○○○○○○○○○○○○○○○○○○○○○○○○○○○○○○○○○○○
○○○○○○○○○○○○○○○○○○○○○○○○○○○○○○○○○○○○○○○○○○○○○○○○○○○○○○○○○○○○○○○○○○○○
○○○○○○○○○○○○○○○○○○○○○○○○○○○○○○○○○○○○○○○○○○○○○○○○○○○○○○○○○○○○○○○○○○○○
○○○○○○○○○○○○○○○○○○○○○○○○○○○○○○○○○○○○○○○○○○○○○○○○○○○○○○○○○○○○○○○○○○○○
○○○○○○○○○○○○○○○○○○○○○○○○○○○○○○○○○○○○○○○○○○○○○○○○○○○○○○○○○○○○○○○○○○○○
○○○○○○○○○○○○○○○○○○○○○○○○○○○○○○○○○○○○○○○○○○○○○○○○○○○○○○○○○○○○○○○○○○○○
○○○○○○○○○○○○○○○○○○○○○○○○○○○○○○○○○○○○○○○○○○○○○○○○○○○○○○○○○○○○○○○○○○○○
○○○○○○○○○○○○○○○○○○○○○○○○○○○○○○○○○○○○○○○○○○○○○○○○○○○○○○○○○○○○○○○○○○○○
○○○○○○○○○○○○○○○○○○○○○○○○○○○○○○○○○○○○○○○○○○○○○○○○○○○○○○○○○○○○○○○○○○○○
○○○○○○○○○○○○○○○○○○○○○○○○○○○○○○○○○○○○○○○○○○○○○○○○○○○○○○○○○○○○○○○○○○○○
○○○○○○○○○○○○○○○○○○○○○○○○○○○○○○○○○○○○○○○○○○○○○○○○○○○○○○○○○○○○○○○○○○○○
○○○○○○○○○○○○○○○○○○○○○○○○○○○○○○○○○○○○○○○○○○○○○○○○○○○○○○○○○○○○○○○○○○○○
○○○○○○○○○○○○○○○○○○○○○○○○○○○○○○○○○○○○○○○○○○○○○○○○○○○○○○○○○○○○○○○○○○○○
○○○○○○○○○○○○○○○○○○○○○○○○○○○○○○○○○○○○○○○○○○○○○○○○○○○○○○○○○○○○○○○○○○○○
○○○○○○○○○○○○○○○○○○○○○○○○○○○○○○○○○○○○○○○○○○○○○○○○○○○○○○○○○○○○○○○○○○○○
○○○○○○○○○○○○○○○○○○○○○○○○○○○○○○○○○○○○○○○○○○○○○○○○○○○○○○○○○○○○○○○○○○○○
○○○○○○○○○○○○○○○○○○○○○○○○○○○○○○○○○○○○○○○○○○○○○○○○○○○○○○○○○○○○○○○○○○○○
○○○○○○○○○○○○○○○○○○○○○○○○○○○○○○○○○○○○○○○○○○○○○○○○○○○○○○○○○○○○○○○○○○○○
○○○○○○○○○○○○○○○○○○○○○○○○○○○○○○○○○○○○○○○○○○○○○○○○○○○○○○○○○○○○○○○○○○○○
○○○○○○○○○○○○○○○○○○○○○○○○○○○○○○○○○○○○○○○○○○○○○○○○○○○○○○○○○○○○○○○○○○○○
○○○○○○○○○○○○○○○○○○○○○○○○○○○○○○○○○○○○○○○○○○○○○○○○○○○○○○○○○○○○○○○○○○○○
○○○○○○○○○○○○○○○○○○○○○○○○○○○○○○○○○○○○○○○○○○○○○○○○○○○○○○○○○○○○○○○○○○○○
○○○○○○○○○○○○○○○○○○○○○○○○○○○○○○○○○○○○○○○○○○○○○○○○○○○○○○○○○○○○○○○○○○○○
○○○○○○○○○○○○○○○○○○○○○○○○○○○○○○○○○○○○○○○○○○○○○○○○○○○○○○○○○○○○○○○○○○○○
○○○○○○○○○○○○○○○○○○○○○○○○○○○○○○○○○○○○○○○○○○○○○○○○○○○○○○○○○○○○○○○○○○○○
○○○○○○○○○○○○○○○○○○○○○○○○○○○○○○○○○○○○○○○○○○○○○○○○○○○○○○○○○○○○○○○○○○○○
○○○○○○○○○○○○○○○○○○○○○○○○○○○○○○○○○○○○○○○○○○○○○○○○○○○○○○○○○○○○○○○○○○○○
○○○○○○○○○○○○○○○○○○○○○○○○○○○○○○○○○○○○○○○○○○○○○○○○○○○○○○○○○○○○○○○○○○○○
○○○○○○○○○○○○○○○○○○○○○○○○○○○○○○○○○○○○○○○○○○○○○○○○○○○○○○○○○○○○○○○○○○○○
○○○○○○○○○○○○○○○○○○○○○○○○○○○○○○○○○○○○○○○○○○○○○○○○○○○○○○○○○○○○○○○○○○○○
○○○○○○○○○○○○○○○○○○○○○○○○○○○○○○○○○○○○○○○○○○○○○○○○○○○○○○○○○○○○○○○○○○○○
○○○○○○○○○○○○○○○○○○○○○○○○○○○○○○○○○○○○○○○○○○○○○○○○○○○○○○○○○○○○○○○○○○○○
○○○○○○○○○○○○○○○○○○○○○○○○○○○○○○○○○○○○○○○○○○○○○○○○○○○○○○○○○○○○○○○○○○○○
○○○○○○○○○○○○○○○○○○○○○○○○○○○○○○○○○○○○○○○○○○○○○○○○○○○○○○○○○○○○○○○○○○○○
○○○○○○○○○○○○○○○○○○○○○○○○○○○○○○○○○○○○○○○○○○○○○○○○○○○○○○○○○○○○○○○○○○○○
○○○○○○○○○○○○○○○○○○○○○○○○○○○○○○○○○○○○○○○○○○○○○○○○○○○○○○○○○○○○○○○○○○○○
○○○○○○○○○○○○○○○○○○○○○○○○○○○○○○○○○○○○○○○○○○○○○○○○○○○○○○○○○○○○○○○○○○○○
○○○○○○○○○○○○○○○○○○○○○○○○○○○○○○○○○○○○○○○○○○○○○○○○○○○○○○○○○○○○○○○○○○○○
○○○○○○○○○○○○○○○○○○○○○○○○○○○○○○○○○○○○○○○○○○○○○○○○○○○○○○○○○○○○○○○○○○○○
○○○○○○○○○○○○○○○○○○○○○○○○○○○○○○○○○○○○○○○○○○○○○○○○○○○○○○○○○○○○○○○○○○○○
○○○○○○○○○○○○○○○○○○○○○○○○○○○○○○○○○○○○○○○○○○○○○○○○○○○○○○○○○○○○○○○○○○○○
○○○○○○○○○○○○○○○○○○○○○○○○○○○○○○○○○○
○○○○○○○○○○○○○○○○○○○○○○○○○○○○○○○○○○○○○○○○○○○○○○○○○○○○○○○○○○○○○○○○○○○○
○○○○○○○○○○○○○○○○○○○○○○○○○○○○○○○○○○○○○○○○○○○○○○○○○○○○○○○○○○○○○○○○○○○○
○○○○○○○○○○○○○○○○○○○○○○○○○○○○○○○○○○○○○○○○○○○○○○○○○○○○○○○○○○○○○○○○○○○○
○○○○○○○○○○○○○○○○○○○○○○○○○○○○○○○○○○○○○○○○○○○○○○○○○○○○○○○○○○○○○○○○○○○○
○○○○○○○○○○○○○○○○○○○○○○○○○○○○○○○○○○○○○○○○○○○○○○○○○○○○○○○○○○○○○○○○○○○○
○○○○○○○○○○○○○○○○○○○○○○○○○○○○○○○○○○○○○○○○○○○○○○○○○○○○○○○○○○○○○○○○○○○○
○○○○○○○○○○○○○○○○○○○○○○○○○○○○○○○○○○○○○○○○○○○○○○○○○○○○○○○○○○○○○○○○○○○○
○○○○○○○○○○○○○○○○○○○○○○○○○○○○○○○○○○○○○○○○○○○○○○○○○○○○○○○○○○○○○○○○○○○○
○○○○○○○○○○○○○○○○○○○○○○○○○○○○○○○○○○○○○○○○○○○○○○○○○○○○○○○○○○○○○○○○○○○○
○○○○○○○○○○○○○○○○○○○○○○○○○○○○○○○○○○○○○○○○○○○○○○○○○○○○○○○○○○○○○○○○○○○○
○○○○○○○○○○○○○○○○○○○○○○○○○○○○○○○○○○○○○○○○○○○○○○○○○○○○○○○○○○○○○○○○○○○○
○○○○○○○○○○○○○○○○○○○○○○○○○○○○○○○○○○○○○○○○○○○○○○○○○○○○○○○○○○○○○○○○○○○○
○○○○○○○○○○○○○○○○○○○○○○○○○○○○○○○○○○○○○○○○○○○○○○○○○○○○○○○○○○○○○○○○○○○○
○○○○○○○○○○○○○○○○○○○○○○○○○○○○○○○○○○○○○○○○○○○○○○○○○○○○○○○○○○○○○○○○○○○○
○○○○○○○○○○○○○○○○○○○○○○○○○○○○○○○○○○○○○○○○○○○○○○○○○○○○○○○○○○○○○○○○○○○○
○○○○○○○○○○○○○○○○○○○○○○○○○○○○○○○○○○
53
Page 54

La PASO declina ogni responsabilità per danni a cose e/o persone derivanti dall'uso non corretto dell'apparecchio o da procedure non rispondenti a quanto riportato sul presente libretto. Nel continuo intento di migliorare i propri prodotti, la PASO S.p.A. si riserva il diritto di
apportare modifiche ai disegni e alle caratteristiche tecniche in qualsiasi momento e senza alcun preavviso.
PASO will not accept any liability for damage to property and/or persons arising out of incorrect use of the equipment or of procedures
that do not comply with the instructions provided in this booklet. PASO S.p.A. strive to improve their products continuously, and
therefore reserve the right to make changes to the drawings and technical specifications at any time and without notice.
PASO décline toute responsabilité en cas de dommages matériels et/ou physiques provoqués par l'utilisation impropre de l'appareil ou
encore par des opérations ou des interventions ne respectant pas les instructions figurant dans la présente notice. En raison de
l’amélioration constante de ses produits, PASO S.p.A. se réserve le droit d’apporter des modifications aux dessins et caractéristiques
techniques à tout instant et sans préavis aucun.
PASO lehnt jede Haftung für Schäden an Personen und / oder Gegenständen ab, die durch unzweckmäßige Verwendung oder Vorgehen
entstehen, die nicht den Anweisungen dieses Handbuches entsprechen. In der Überzeugung, die eigenen Produkte beständig
verbessern zu wollen, behält sich PASO S.p.A. das Recht vor, jederzeit und ohne Vorankündigung Änderungen an technischen
Zeichnungen und - Merkmalen vorzunehmem.
PASO kan niet aansprakelijk worden gesteld voor schade aan voorwerpen en/of persoonlijk letsel die het gevolg zijn van een onjuist
gebruik van het apparaat of van procedures die niet overeenkomen met de voorschriften uit deze handleiding. Aangezien PASO S.p.A.
voortdurend verbeteringen aanbrengt aan haar producten, behoudt zij zich het recht voor op ieder moment zonder voorbericht de
tekeningen en technische eigenschappen aan wijzigen te onderwerpen.
La PASO rehusa cualquier responsabilidad ante daños a cosas y/o personas causados por una utilización no correcta del aparato o por
operaciones no conformes a cuanto indicado en este folleto. Siempre con la firme intención de mejorar sus productos, Paso S.p.A. se
reserva el derecho de modificar los dibujos y las características técnicas, sin preaviso alguno.
NOTA
NOTE
NOTE
MERKE
OPMERKING
NOTA
54
S.p.A
Via Mecenate, 90 - 20138 MILANO - ITALIA
TEL. +39-02-580 77 1 (15 linee r.a.)
FAX +39-02-580 77 277
http://www.paso.it
Printed in Italy - 04/05 - 0.5K - 11/485-B
 Loading...