

Page 1

Revision 7 of DOCU292
Revised July 27, 2017
Setting up the G2 SatAimer
8
Aiming the Dish
13
Parking the Dish
16
Rig Moves
17
Information Displays
18
Quick Links
G2 SatAimer User Guide
Page 2

Revised: July 27, 2017
Revision 7 of DOCU292, © Copyright
Page 2 of 26
This document contains proprietary information and is not intended for public
distribution. Pason Systems and all other trademarks and trade names used in this
document, unless otherwise specified, are the property of Pason Systems Corp.
No part of this document may be reproduced by any means, nor transmitted, nor
translated, nor translated into computer language, in whole or in part, without written
permission from Pason Systems Corp.
As updates and modifications occur, a new document will be made available as
appropriate. The revision date on the title page determines the most current version of
the document. Documents with the latest date replace any and all previous versions of
the same document. The most current is definitive in case of contradictions, errors,
omissions, or misstatements.
While all reasonable care has been taken in the preparation of this document, no liability
is accepted by the author(s) for any errors, omissions or misstatements it may contain,
or for any loss or damage, howsoever occasioned, to any person relying on any
statement or omission in this document.
Copyright © 2017 Pason Systems Corp.
Any questions regarding this document or others should be forwarded to the following:
Pason Systems Corp.
6130 – 3rd Street S.E.
Calgary, Alberta T2H 1K4
Canada
Phone: 1-403-301-3400
Fax: 1-403-301-3499
Email: info@pason.com
Website: www.pason.com
For 24-hour support, phone Pason Technical Support toll free: 1-877-255-3158
Page 3

Revised: July 27, 2017
Revision 7 of DOCU292, © Copyright
Page 3 of 26
Table of Contents
1 G2 SatAimer Overview ...................................................................... 5
1.1 G2 SatAimer Features ................................................................................... 6
1.2 Target Satellite ............................................................................................... 7
2 Setting Up the G2 SatAimer .............................................................. 8
2.1 Position the Dish Skid .................................................................................... 8
Using an Internet tool to find skid direction .............................................................. 8
2.2 Connect the G2 SatAimer to the Pason System ............................................ 9
2.3 System Warm-Up ......................................................................................... 10
2.4 Electronics Box LEDs ................................................................................... 11
3 Using G2 SatAimer Software .......................................................... 12
3.1 Open the SatAimer User Interface ............................................................... 12
3.2 Aim the Dish ................................................................................................. 13
Aiming from the SatAimer interface ........................................................................13
Aiming from the dish skid ........................................................................................13
The aiming process ................................................................................................14
What to do if aiming fails .........................................................................................14
Re-peaking the dish ................................................................................................15
3.3 Parking the Dish ........................................................................................... 16
Parking from the SatAimer interface .......................................................................16
Parking from the dish skid ......................................................................................16
3.4 Cancelling an Aim or Park Command .......................................................... 16
4 Rig Moves ........................................................................................ 17
5 SatAimer Information Displays ....................................................... 18
5.1 SatAimer and Modem Status Displays ......................................................... 18
SatAimer Status......................................................................................................19
Front Panel Display ................................................................................................20
If you have problems opening the SatAimer home page .........................................20
Simple system checks ............................................................................................21
System Messages ..................................................................................................22
5.2 SatAimer Diagnostics Page ......................................................................... 25
Page 4

Revised: July 27, 2017
Revision 7 of DOCU292, © Copyright
Page 4 of 26
5.3 Speed Test ................................................................................................... 26
Page 5
Revised: July 27, 2017
Revision 7 of DOCU292, © Copyright
Page 5 of 26
1 G2 SatAimer Overview
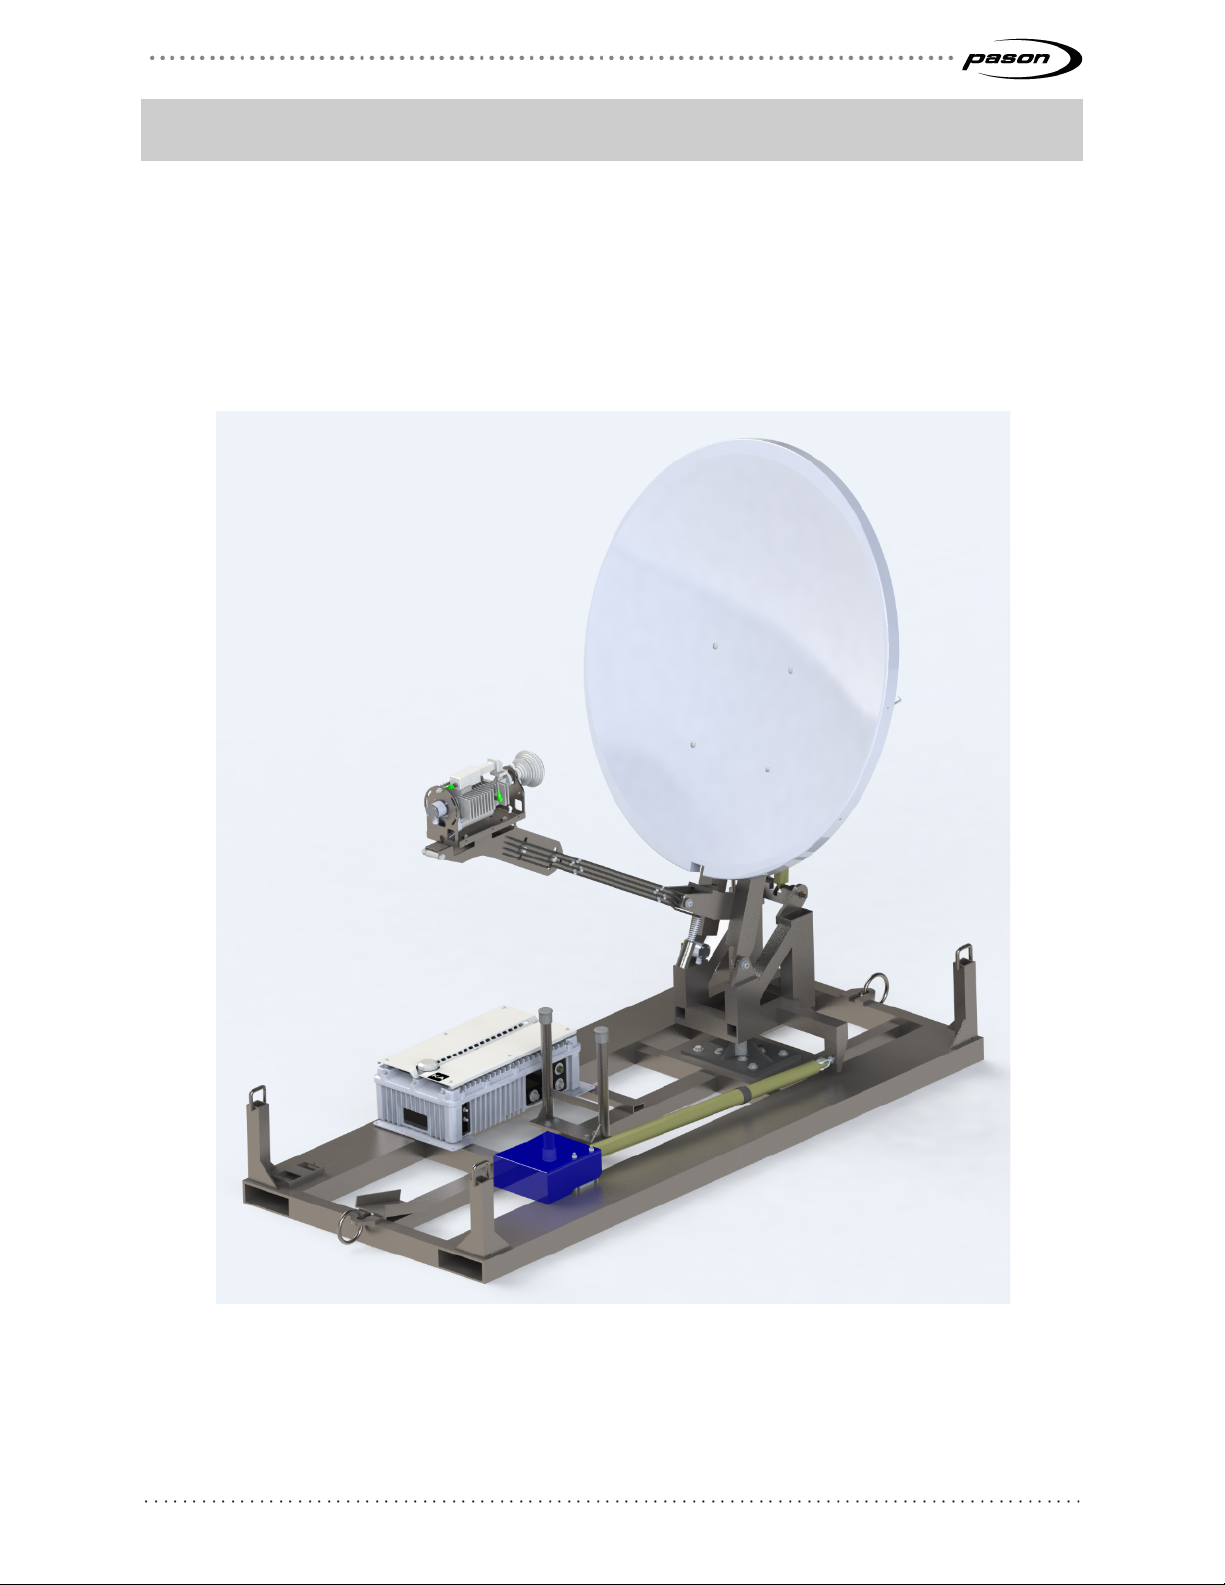
The Pason G2 SatAimer is an automatically aiming satellite system that provides
Internet and network access for the wellsite. The system includes a portable skid with a
1.2 m (4 ft) satellite dish and electronics box, and a web-based user interface you can
access from Pason workstations.
This product is currently on trial on a limited number of rigs.
Figure 1: The G2 SatAimer skid and dish (Pason part number SAT115)
Page 6

Revised: July 27, 2017
Revision 7 of DOCU292, © Copyright
Page 6 of 26
1.1 G2 SatAimer Features
Pason’s automatically aiming satellite system offers a number of advantages over
manually aimed dishes. The system includes these features:
• Simple aiming and parking, using either the SatAimer software on any Pason
workstation on the rig’s network, or the aim/park switch on the electronics box
at the dish. This switch allows you to control the dish manually from the skid
(where you may not be near a computer).
• Automatic satellite signal scanning and peaking
• Easily accessible kill switch on the electronics box, to halt dish movement in
an emergency
• Integrated modem—doesn’t require routers
• Motorized stowing for rig moves
• Two-cable installation: power and data. The system doesn’t use long runs of
coax cable from the dish to the trailer.
• Eight external LEDs to indicate if the product has AC power and if the
electronics are functioning properly.
Page 7
Revised: July 27, 2017
Revision 7 of DOCU292, © Copyright
Page 7 of 26
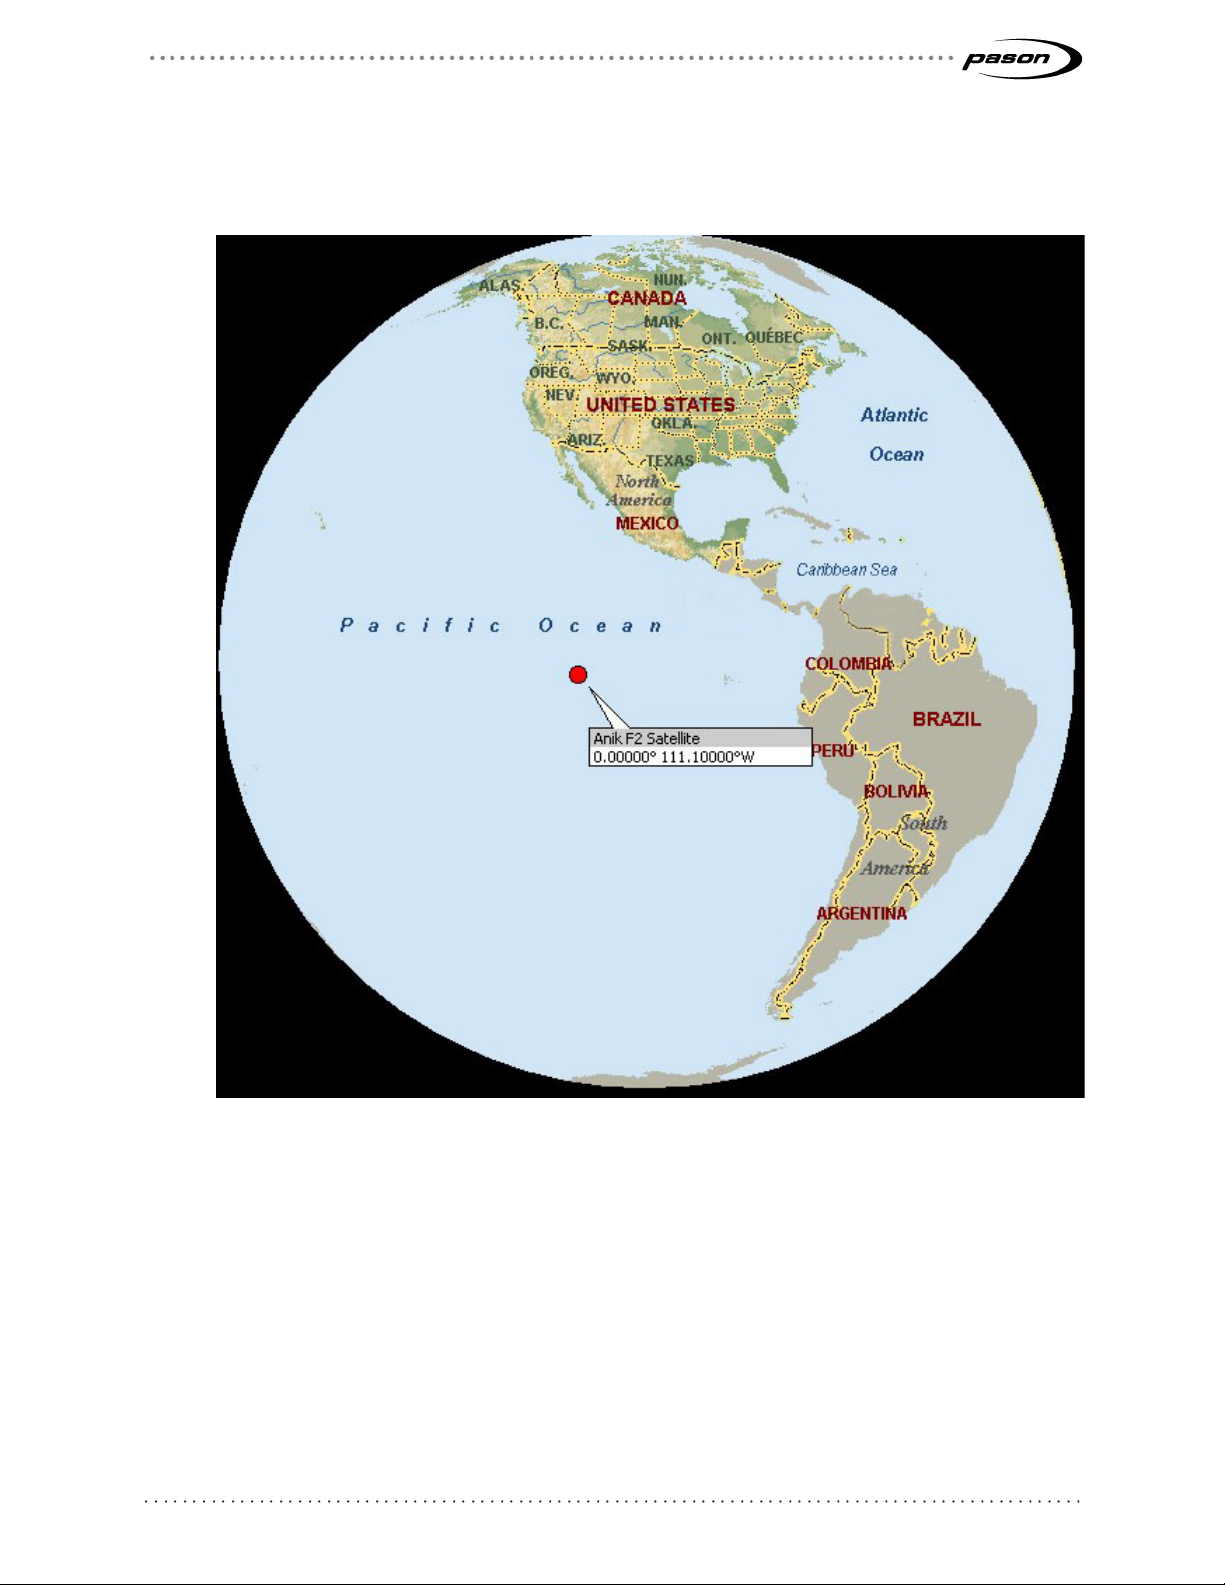
1.2 Target Satellite
The Pason G2 SatAimer uses the Anik F2 satellite and its network. The Anik F2 is
located at 111.1° west longitude.
Figure 2: Anik F2 satellite
Page 8

Revised: July 27, 2017
Revision 7 of DOCU292, © Copyright
Page 8 of 26
2 Setting Up the G2 SatAimer
Setting up the satellite system is straightforward—you position the dish skid and connect
it to the Pason system and to AC power. Once you connect it, you aim and park the dish
from the rig manager’s computer (RMPC) or any other Pason workstation connected to
the electronics box (Using G2 SatAimer on page 12). You also have the option of using
the manual controls on the dish’s electronics box to aim and park it.
2.1 Position the Dish Skid
Follow these steps to properly position the dish skid:
1. Position the skid on a solid, level base so that the centre of the dish faces south
when it lifts up. The exact direction to point the skid depends on your rig’s
location. See Using an Internet tool to find skid direction below.
Note:
After the skid is completely installed and the system started, you can confirm the correct
skid orientation for the location by checking the Point Dish value on the SatAimer
Diagnostics tab.
2. Ensure that the skid is levelled in both the east/west and north/south directions.
Important:
A solid base may not seem important, but even slight movements of the skid can make a
difference when you’re targeting an orbiting satellite. Wobbly skids can negatively affect
your Internet performance. If you need to mount the skid in an elevated location, Pason
can supply skid support rails to help balance the skid.
Using an Internet tool to find skid direction
If you have Internet access, there are several free online positioning tools to help you
find the correct skid direction. These tools ask you to enter your coordinates (or nearest
city) and the target satellite, and will give you the proper pointing direction.
The Telesat Look Angle Calculator is reliable:
1. Go to https://www.telesat.com/tools-resources/look-angle-calculator
2. Select the Anik F2 satellite.
3. Enter your location.
4. Select Calculate.
5. Point the skid along the true azimuth value the calculator provides. Keep in mind
that east, south, and west equal 90°, 180°, and 270°.
Page 9
Revised: July 27, 2017
Revision 7 of DOCU292, © Copyright
Page 9 of 26
2.2 Connect the G2 SatAimer to the Pason System
After you’ve positioned and levelled the dish skid, connect the power and data cables:
1. Connect the power cable to a 120 VAC rig power supply.
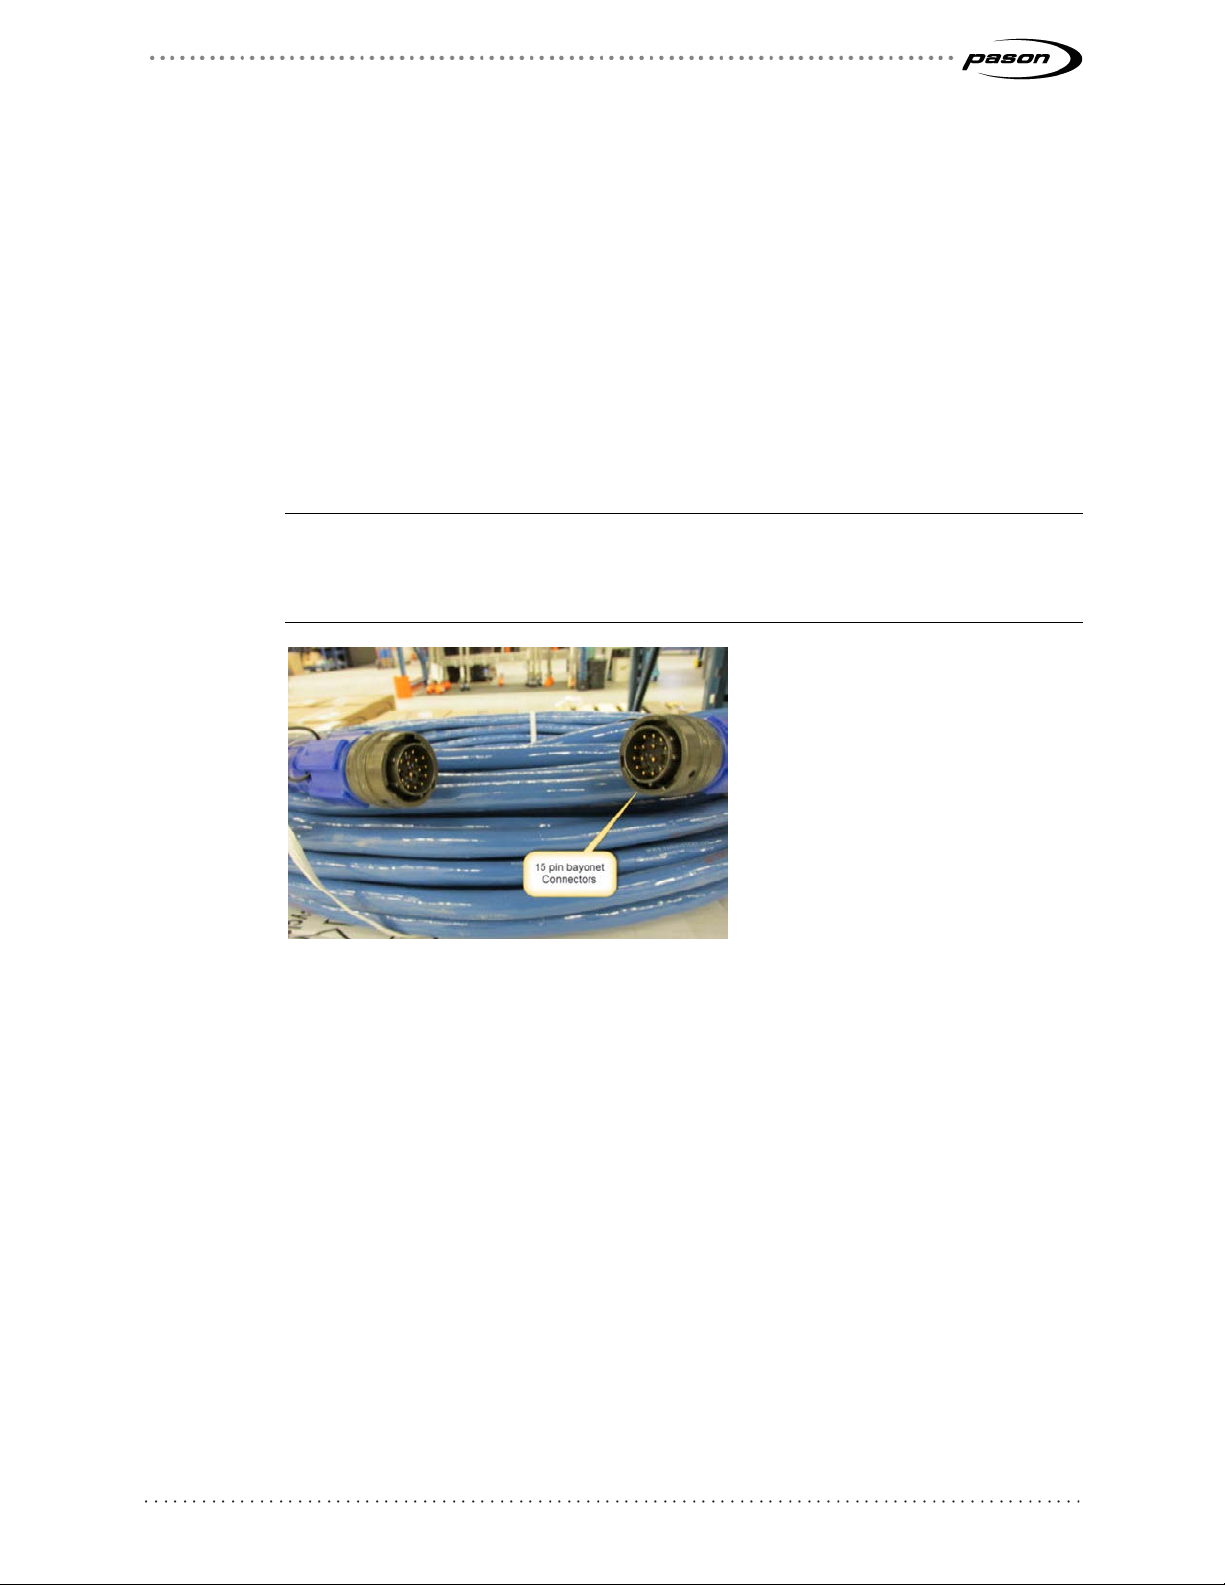
2. Run the Pason-supplied 15-pin Ethernet cable (shown below) from the Network
100 terminal on the dish’s electronics box to the Wide Area Network 2 terminal at
the bottom of the VSP network panel. This 15-pin cable run can’t exceed 60 m
(200 ft) for the trial’s 10/100 Mbps network.
3. After you’ve connected the cables, it can take up to five minutes before the user
interface is ready to open on the RMPC. If the user interface doesn’t open at first,
wait a couple more minutes and try again.
Note:
On earlier model network panels, the Wide Area Network 2 terminal is located at the top
of the panel. If connecting to the Network 2 terminal fails, connect to the Network 1
terminal and try again.
Figure 3: Pason 15-pin Ethernet cable
Page 10
Revised: July 27, 2017
Revision 7 of DOCU292, © Copyright
Page 10 of 26
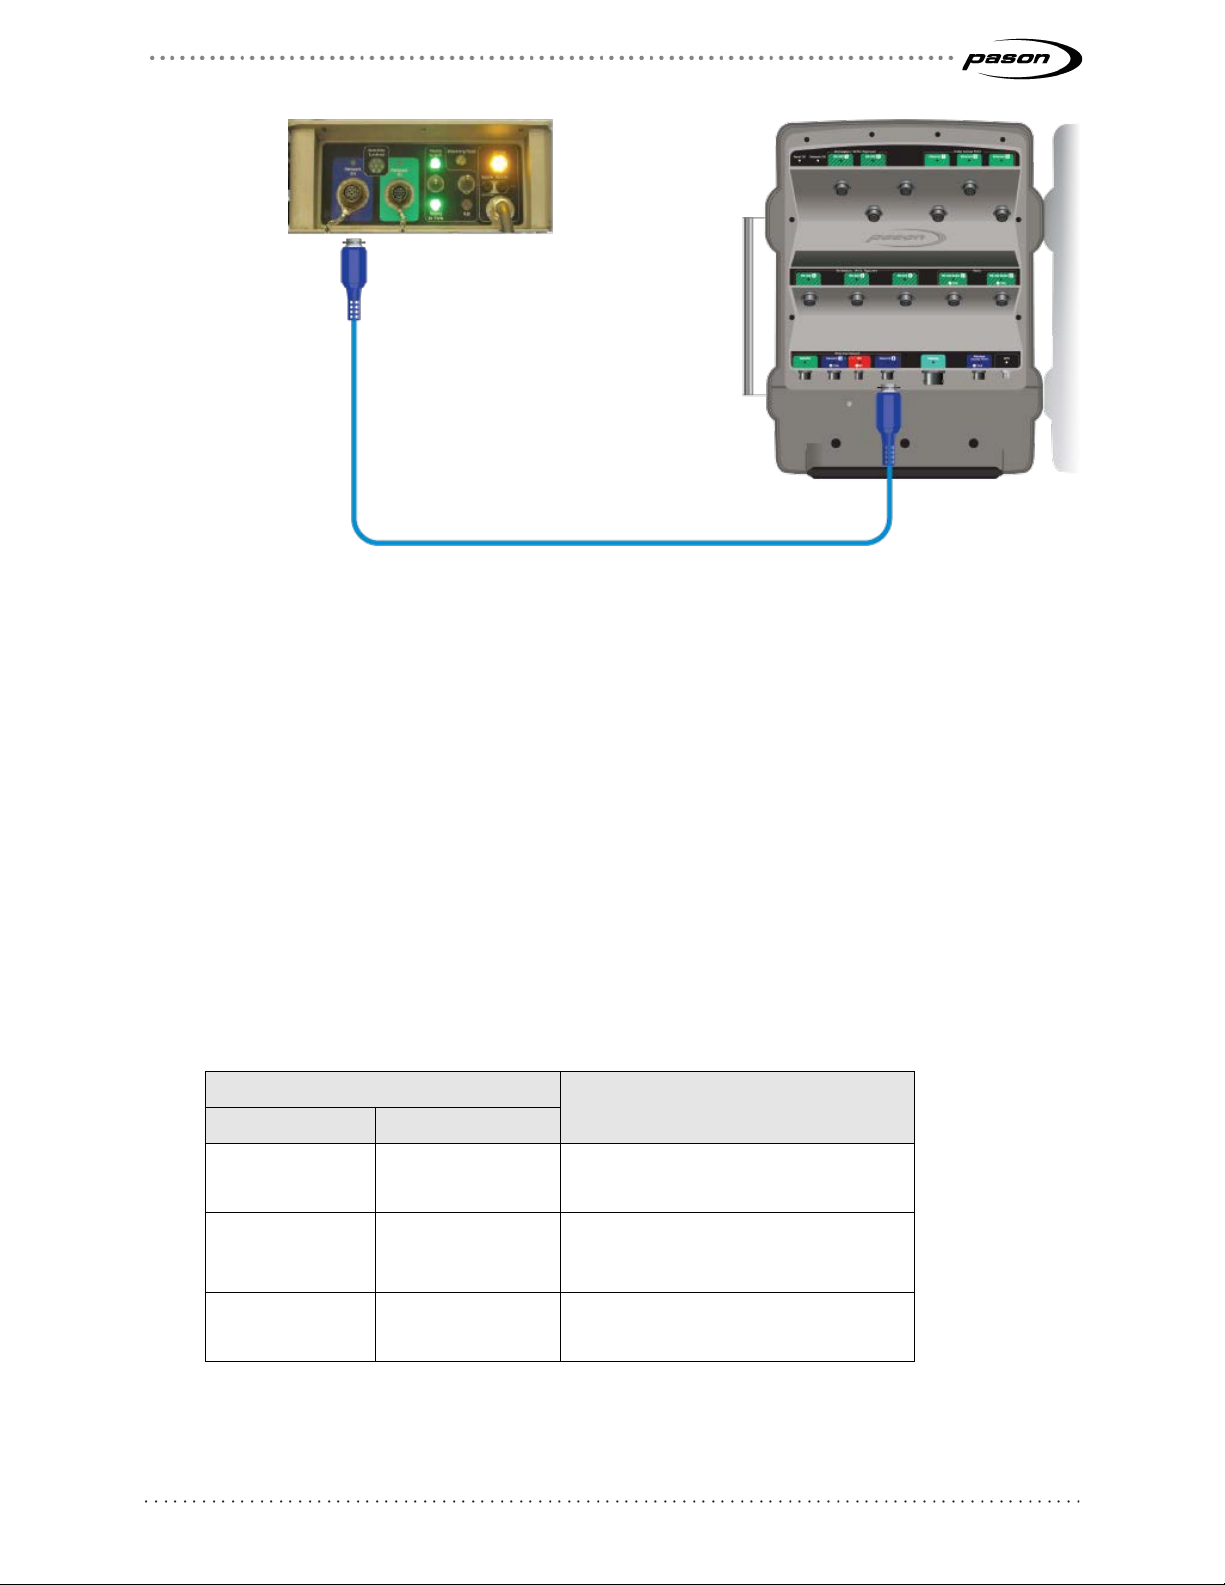
Figure 4: SatAimer electronics box connection to the VSP network panel
2.3 System Warm-Up
The processors that drive the SatAimer user interface don’t need a long warm-up, and start in
under three minutes, regardless of the temperature. However, the modem that enables
communications to come online needs to warm up before you’ll get a satellite network
connection. This is important to keep in mind—you don’t necessary have a network connection
just because you’re able to open the SatAimer interface.
The G2 SatAimer warms up significantly faster than our previous SatAimers. The expected
modem warm-up time depends on the external temperature as follows:
Temperature
ºC ºF
-40º -40º 15 minutes
-20º -5º 5 minutes
Time Required to Power Up
0º and above 32º and above 3 minutes
Table 1: Time required for the electronics box modem to power up at different temperatures
Page 11
Revised: July 27, 2017
Revision 7 of DOCU292, © Copyright
Page 11 of 26
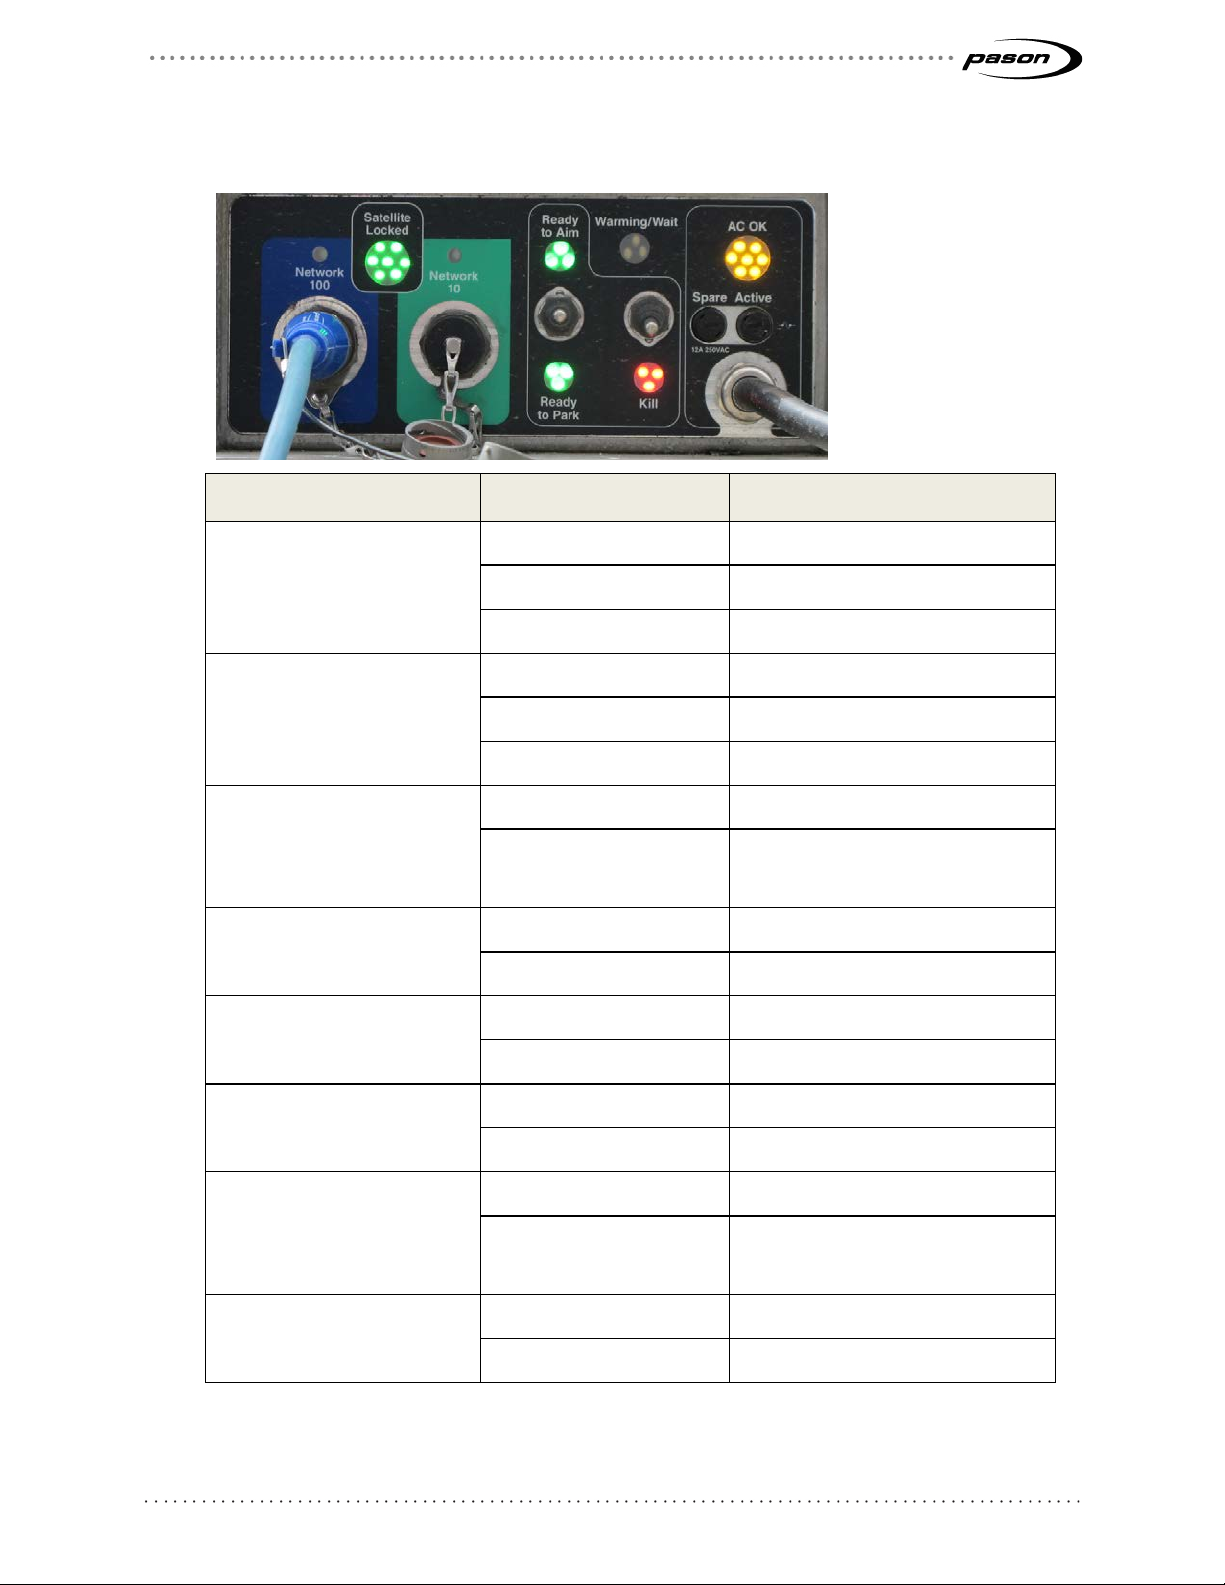
2.4 Electronics Box LEDs
The dish skid’s electronics box has LEDs that provide system information.
LED State Description
Network 100 Off No Ethernet connection
Green Connected to Ethernet
Flashing Data traffic on the connection
Network 10 Off No Ethernet connection
Green Connected to Ethernet
Flashing Data traffic on the connection
Satellite Locked Off Modem is offline
Green Modem is online; Internet
available
Ready to Aim Off Aiming not permitted
Green Aiming permitted
Ready to Park Off Parking not permitted
Green Parking permitted
Warming/Wait Off Operating temperature reached
Amber Warming up
Kill Off Normal activity
Flashing Red Motors disabled. Neither aiming
AC OK Off No AC power
Table 2: Electronics box LED descriptions
nor parking permitted.
Amber AC power okay
Page 12

Revised: July 27, 2017
Revision 7 of DOCU292, © Copyright
Page 12 of 26
3 Using G2 SatAimer Software
The G2 SatAimer includes software you use to control the satellite system. The
SatAimer home page is your portal to the system. Use this screen to:
• Aim and park the satellite dish
• View system information
• Check for messages and warnings
• Access the diagnostics page
3.1 Open the SatAimer User Interface
The SatAimer’s user interface is accessible from the RMPC, or any other Pason
computer connected to the dish’s electronics box. To open the SatAimer interface, use
one of these three methods:
• Double-click the SatAimer icon on the computer’s desktop.
• Start Internet Explorer and select Favorites > SatAimer.
• Start Internet Explorer, type 192.168.11.10 into the address box, and press
the Enter key.
Note:
After you’ve connected the cables, it can take up to five minutes before the user interface is ready
to open on the RMPC. If the user interface doesn’t open at first, wait a couple more minutes and
try again.
Page 13

Revised: July 27, 2017
Revision 7 of DOCU292, © Copyright
Page 13 of 26
Figure 5: SatAimer home page
3.2 Aim the Dish
Whenever you move or reposition the dish skid, or after you’ve parked (lowered) it, you
need to aim it to re-establish a satellite connection. You can aim from the SatAimer
interface, or from the dish skid.
In most cases, it takes about 8-10 minutes to complete aiming and acquire Internet
access.
You can cancel an aim command by clicking Stop, or by moving the electronics box Kill
switch to the down position.
Important:
The motors that move the dish are powerful, and can cause serious injury or damage property.
Before aiming or parking the dish, ensure that it’s not going to come into contact with a building or
a vehicle. Keep others clear of the dish skid when aiming or parking.
When the Kill switch is in the down position, you can’t aim the dish.
Aiming from the SatAimer interface
To aim the dish from the SatAimer interface:
1. Open the SatAimer home page (see Open the SatAimer User Interface on page
12).
2. Make sure that the Front Panel display’s Ready to Aim light is green.
3. Click the Aim button.
The system starts the aiming process.
Figure 6: The Aim button
Aiming from the dish skid
If the Aim light is green, you can also aim the dish from the dish skid: when ready, hold
up the aim/park switch on the dish’s electronics box for 1 second.
Page 14

Revised: July 27, 2017
Revision 7 of DOCU292, © Copyright
Page 14 of 26
The aiming process
An aim operation involves five stages, which the SatAimer displays in the progress bar
shown below. You can also see dish movement in the Elevation vs. Azimuth graph on
the home page.
Figure 7: SatAimer aiming progress bar
The five aiming stages are:
• Raising Dish: raising the dish and acquiring a GPS lock
• Scanning: sweeping the sky searching for a satellite signal
• Fine Tuning: small aim adjustments to achieve the best signal-to-noise ratio
(SNR)
• Adjusting X-Pol: motorized auto-adjustments to the cross-pole (X-Pol)
positioning
• Entering Network: modem restarts and enters the satellite network
What to do if aiming fails
The aim operation can fail if the aimer has trouble moving, or if it can’t find the satellite. It
will give up searching after approximately 20 passes across the sky. If the aiming fails,
try these steps:
1. Make sure that the Kill switch on the dish skid’s electronics box is in the up
position.
2. Make sure that the dish skid is pointed in the right direction for the Anik F2
satellite.
3. Verify that the dish has a clear view of the sky.
4. Check the electronics box cables for loose connections or damage.
5. Try aiming again.
6. If you experience repeated failures, contact a Pason field technician or Pason
Technical Support for assistance.
Page 15

Revised: July 27, 2017
Revision 7 of DOCU292, © Copyright
Page 15 of 26
Re-peaking the dish
The software includes a manual re-peaking feature that makes minor adjustments to the
dish’s aim to “re-peak” the signal. This is useful if you experience a drop in network
performance and you think the dish has moved slightly because of a bump, or because a
trailer or skid has sunk.
Keep these things in mind when re-peaking the dish:
• Re-peaking requires that the dish is already aimed, which is indicated by a
displayed SNR of greater than zero. Re-peaking is an adjustment, not a full
aim.
• Don’t re-peak during bad weather—you could end up with a worse signal
than what you started with.
• You’ll lose satellite network and Internet access for approximately two and a
half minutes during the re-peaking process.
Follow these steps to re-peak the dish:
1. Open the SatAimer home page (see Open the SatAimer User Interface on page
12).
2. Make sure that the Front Panel display’s Ready to Aim light is green.
3. Click the Peak button. The system starts the re-peaking process.
4. When the process is complete, the system displays Re-peaking Succeeded in
the Messages section at the bottom of the page.
Figure 8: The Peak button
Page 16

Revised: July 27, 2017
Revision 7 of DOCU292, © Copyright
Page 16 of 26
3.3 Parking the Dish
You need to park (lower) the dish before you can transport or relocate it. You can park
from the SatAimer interface, or from the dish skid.
You can cancel a park command by clicking Stop, or by moving the electronics box Kill
switch to the down position.
Important:
The motors that move the dish are powerful, and can cause serious injury or damage property.
Before aiming or parking the dish, ensure that it’s not going to come into contact with a building or
a vehicle. Keep others clear of the dish skid when aiming or parking.
When the Kill switch is in the down position, you can’t park the dish.
Parking from the SatAimer interface
To park the dish from the SatAimer interface:
1. Open the SatAimer home page (see Open the SatAimer User Interface on page
12.)
2. Make sure that the Front Panel display’s Ready to Park light is green.
3. Click the Park button. The system starts the parking process.
Figure 9: The Park button
Parking from the dish skid
If the Park light is green, you can also park the dish from the dish skid: when ready, hold
down the aim/park switch on the dish’s electronics box for 1 second.
3.4 Cancelling an Aim or Park Command
To cancel an aim or park command, open the SatAimer program and click the Stop
button on the SatAimer home page.
Figure 10: The Stop button
You can also cancel an aim or park command by clicking Stop, or by moving the
electronics box Kill switch to the down position.
Page 17

Revised: July 27, 2017
Revision 7 of DOCU292, © Copyright
Page 17 of 26
4 Rig Moves
When you want to transport the dish skid for a rig move, follow these steps:
1. Park the dish. See Parking the Dish on page 16.
2. Disconnect the dish from AC power and disconnect and coil the Ethernet cable
as required (you can skip this step if your rig’s dish installation is designed for
permanent cabling, e.g., trailer mounted).
3. Move the equipment.
4. Position the dish at your new location. See Position the Dish Skid on page 8.
5. Reconnect the cables and aim the dish. See Aim the Dish on page 13.
Page 18
Revised: July 27, 2017
Revision 7 of DOCU292, © Copyright
Page 18 of 26
5 SatAimer Information Displays
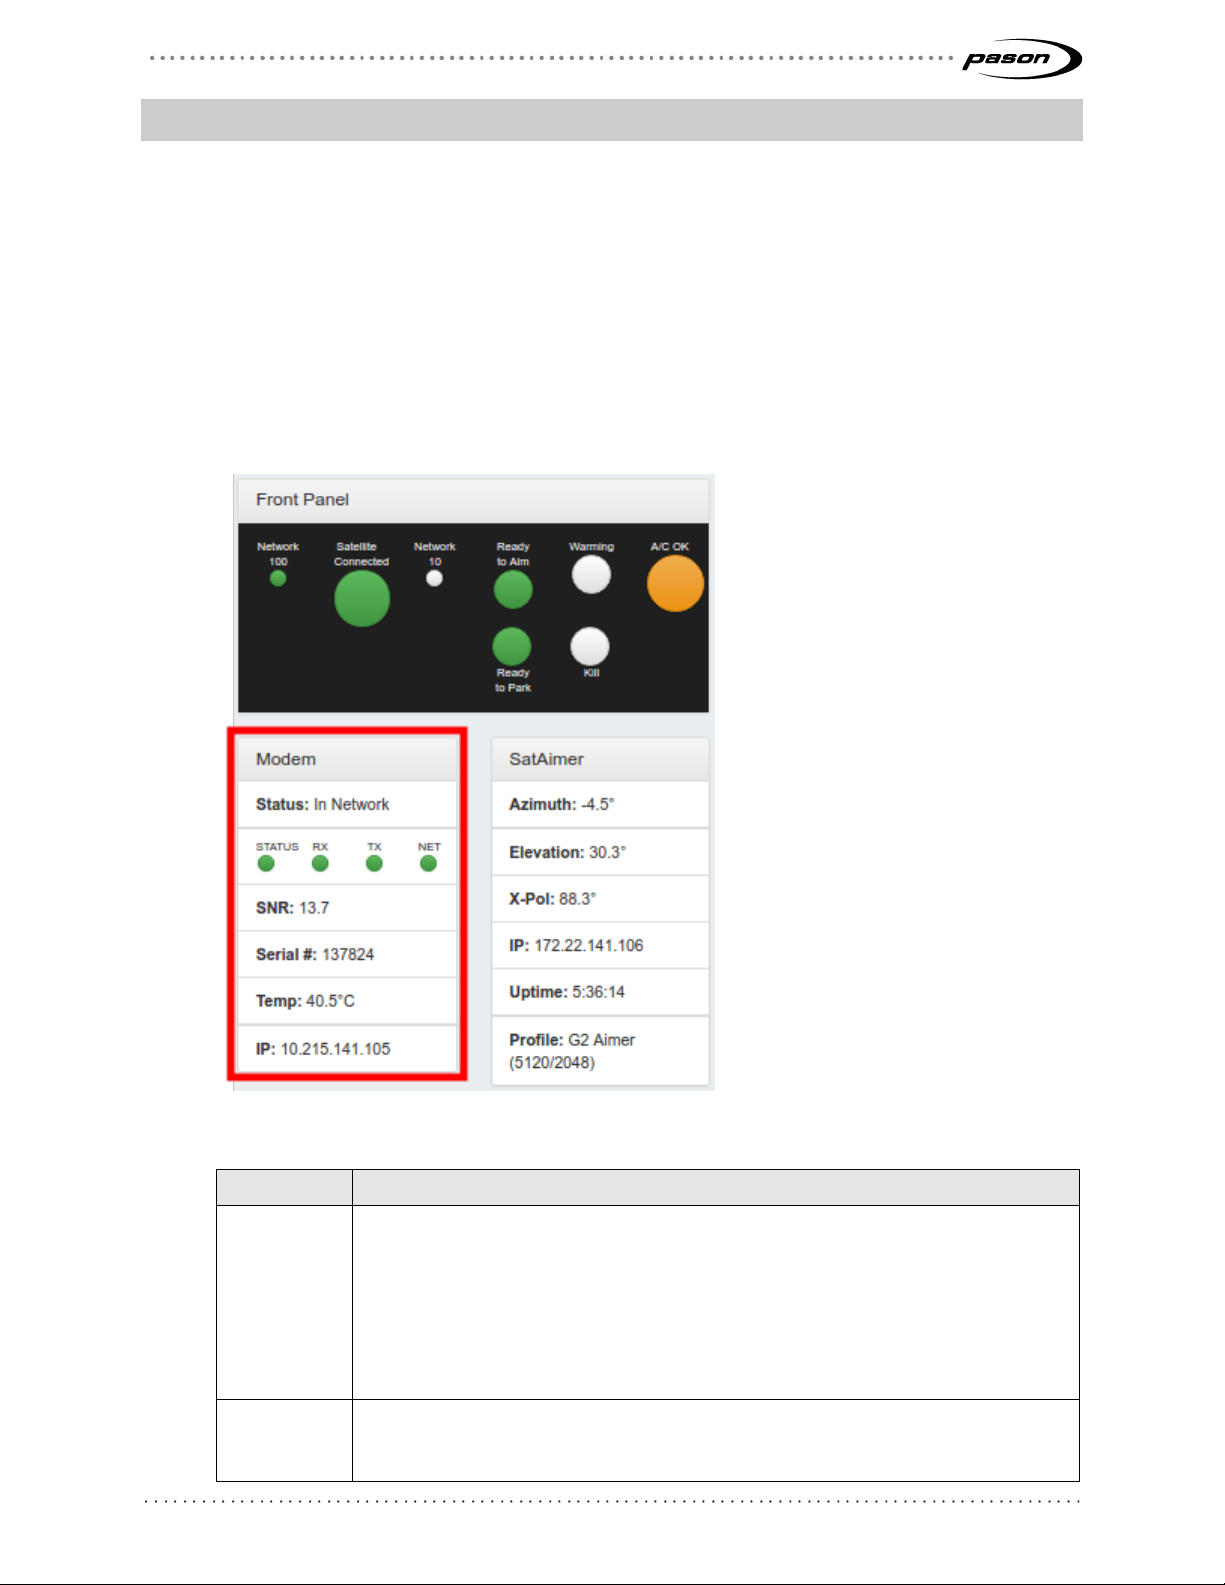
5.1 SatAimer and Modem Status Displays
The SatAimer home page contains several sections that provide information about the
satellite skid, the SatAimer software, and the modem.
Modem Status
The Modem status section provides useful information about system’s modem. The
fields are explained in the table below.
Figure 11: Modem status section
Status A text message indicating the status of the modem, and a lighted display
SNR Signal-to-noise ratio (typically above 9 when aimed, depending on location).
Field Explanation
indicating current status:
Status: Lit green when the modem is communicating with the aimer program
•
• RX: Lit green when ready to receive data
• TX: Lit green when ready to send data
• Net: Lit green when the system is connected to a satellite network
This field switches to signal strength when the dish is scanning for the satellite
signal.
Page 19

Revised: July 27, 2017
Revision 7 of DOCU292, © Copyright
Page 19 of 26
Field Explanation
Serial # The serial number of the modem (also written on the outside of the electronics
box)
Temp The temperature of the modem. The normal operating range is 15º C–70º C.
IP IP address of the modem
Table 3: Modem status fields and descriptions
SatAimer Status
The SatAimer status section provides useful information about the dish and the aiming
program. The fields are explained in the table below.
Figure 12: The SatAimer status section of the home page
Azimuth Measurement, in degrees, of the dish’s east and west movement relative to
Elevation Measurement, in degrees, of the dish’s beam angle elevation
X-Pol The current angle of feed horn rotation, in degrees
IP IP address of the electronics box’s SatAimer single board computer
Uptime How long the electronics box’s SatAimer single board computer has been
Profile The Internet service level approved in PBS for the rig
Table 4: SatAimer status fields and descriptions
Field Explanation
the skid. Zero degrees means the dish is looking straight along the length of
the skid. Note that this is not a true azimuth (compass heading).
running
Page 20

Revised: July 27, 2017
Revision 7 of DOCU292, © Copyright
Page 20 of 26
Front Panel Display
The Front Panel display on the SatAimer home page replicates the LEDs on the
electronics box and indicates their status.
See Table 2 on page 11 for a description of the states.
Figure 13: The SatAimer LEDs section of the home page
If you have problems opening the SatAimer home page
If there is a network problem between your workstation and the G2 satellite system, you
won’t be able to open the SatAimer home page. If this is the case, the first step is to try
to ping the satellite system to test the network connection. To do that, follow the steps
below:
1. Select Start > Run…
2. Type cmd in the Open field, then press Enter. The Command Prompt window
opens.
3. Type: ping 192.168.11.10 to ping the gateway IP address for the SatAimer
software.
4. Press Enter.
Page 21

Revised: July 27, 2017
Revision 7 of DOCU292, © Copyright
Page 21 of 26
If the satellite system replies, you will see a screen similar to Figure 14 below. The
problem may be that the web server has not yet started completely. Wait about 30
seconds, then try again to open the SatAimer home page.
Figure 14: Successful ping command reply
If the ping command doesn’t generate a response (i.e., you receive a “Request timed
out…” message), then the network isn’t functioning properly. Try the following to
troubleshoot the problem:
• Check the Ethernet cable connections—green Ethernet lights on the dish’s
electronics box indicate good connections.
• Ensure that all power cables are properly connected and that the skid’s
electronics box is receiving power.
• Wait for the G2 SatAimer software to complete its startup. This usually takes
under a minute.
If these troubleshooting tips do not help, contact your Pason field technician or Pason
Technical Support at 1-877-255-3158 for assistance.
Simple system checks
To help with troubleshooting, Pason support personnel may ask you the status of certain
LEDs on the dish’s electronics box. These LEDs provide the following system
information:
• If the AC OK light is lit: the system has power.
• If the Network 100 or Network 10 light is lit or flashing: the Ethernet
connection between the dish and the Pason VSP network panel is good.
• If the Kill LED flashes when Kill switch is in the down position: the
SatAimer software is working.
Page 22

Revised: July 27, 2017
Revision 7 of DOCU292, © Copyright
Page 22 of 26
Figure 15: Dish skid electronics box LEDs
System Messages
The Messages section, located across the bottom of the home page, provides status
and activity information for users. If the G2 SatAimer isn’t working, check here for
information.
Figure 16: The system messages section on the home page
There are three types of messages:
• Errors are the most serious of the messages. They are an indication that
something is wrong or that a failure has occurred. The system may not
function as expected. User intervention or repair is likely required.
• Warnings are an indication that something isn’t normal. The system should
still function as expected. The condition may clear automatically.
• Info messages indicate events that might be of interest to the user, but don’t
indicate a problem with the satellite system.
Messages are identified with the system component that generated the message. Most
messages are displayed until the condition is no longer present in the system; others are
Page 23

Revised: July 27, 2017
Revision 7 of DOCU292, © Copyright
Page 23 of 26
cleared when the next aim or park cycle starts. Table 5 provides a summary and
contact a Pason field technician or
required actions for the most common messages.
Message Explanation/Required Action
Electronics Box Messages
Warning Electronics box nearing high
temperature limit.
Information Electronics box warming up.
Please wait.
Aimer Messages
Error
Aiming failed. Latitude and
longitude not available from GPS.
Aiming failed. No signal found. 1. Ensure that the dish skid is pointed
Contact a Pason field technician or
Pason Technical Support for assistance.
No action required.
1. Ensure that the electronics box has
a clear view of the sky, then try
aiming again.
2. If the error continues, contact a
Pason field technician or Pason
Technical Support for assistance.
in the right direction for the Anik F2
satellite.
2. Verify that the dish has a clear view
of the sky.
3. Check the electronics box cables for
loose connections or damage.
4. Try aiming again.
5. If you experience repeated failures,
contact a Pason field technician or
Pason Technical Support for
assistance.
Info Operation cancelled. The most recent aim or park operation
was cancelled.
Satellite signal detected. The modem detected a satellite signal.
Aiming succeeded. The most recent aim operation was
successful.
Motion Controller Messages
Error Motion controller calibration error. Contact a Pason field technician or
Pason Technical Support for assistance.
A motor stalled. Please retry your
operation.
1. Check if snow, ice or something else
is preventing the dish from moving.
2. Retry the operation.
3. If you experience repeated failures,
contact a Pason field technician or
Pason Technical Support for
assistance.
Motion control feedback error.
Please retry your operation.
1. Check the electronics box cables for
loose connections or damage.
2. Retry the operation.
3. If you experience repeated failures,
Page 24

Revised: July 27, 2017
Revision 7 of DOCU292, © Copyright
Page 24 of 26
Message Explanation/Required Action
Pason Technical Support for
assistance.
Warning Motion controller not ready. Displayed briefly at power up. No action
is required. If the message persists,
contact a Pason field technician or
Pason Technical Support for assistance.
GPS Messages
Info System awaiting GPS lock. Aiming delayed until GPS fix obtained.
1. Ensure that the electronics box has
a clear view of the sky.
2. If you experience repeated failures
contact a Pason field technician or
Pason Technical Support for
assistance.
Modem Messages
Error Modem failed to enter pointing
mode.
Warning Modem not responding. Please
wait approx. 3 min.
Modem nearing high temperature
limit.
Table 5: System messages
The modem probably isn’t provisioned.
Contact a Pason field technician or
Pason Technical Support for assistance.
The modem is restarting.
If the message persists, contact a Pason
field technician or Pason Technical
Support for assistance.
Contact a Pason field technician or
Pason Technical Support for assistance.
Page 25

Revised: July 27, 2017
Revision 7 of DOCU292, © Copyright
Page 25 of 26
5.2 SatAimer Diagnostics Page
The SatAimer Diagnostics page provides information that’s useful when you’re
troubleshooting the G2 SatAimer with Pason Technical Support. In addition to
troubleshooting information, this page’s Point Skid value tells you the direction the dish
skid should be pointed. GPS Latitude and Longitude tell you the coordinates of the dish.
To open the SatAimer Diagnostics page, click the Diagnostics tab at the top of the home
page.
Figure 17: SatAimer Diagnostics page
Page 26

Revised: July 27, 2017
Revision 7 of DOCU292, © Copyright
Page 26 of 26
5.3 Speed Test
If you want to confirm that you are receiving the service level expected, you can run a
test to find out the speed the network is running at. You may also be asked to run a
speed test to help with troubleshooting network problems.
To run the SatAimer speed test, click the Speed Test button at the top of the home page.
 Loading...