

Page 1
Wireless Temperature Sensor
®
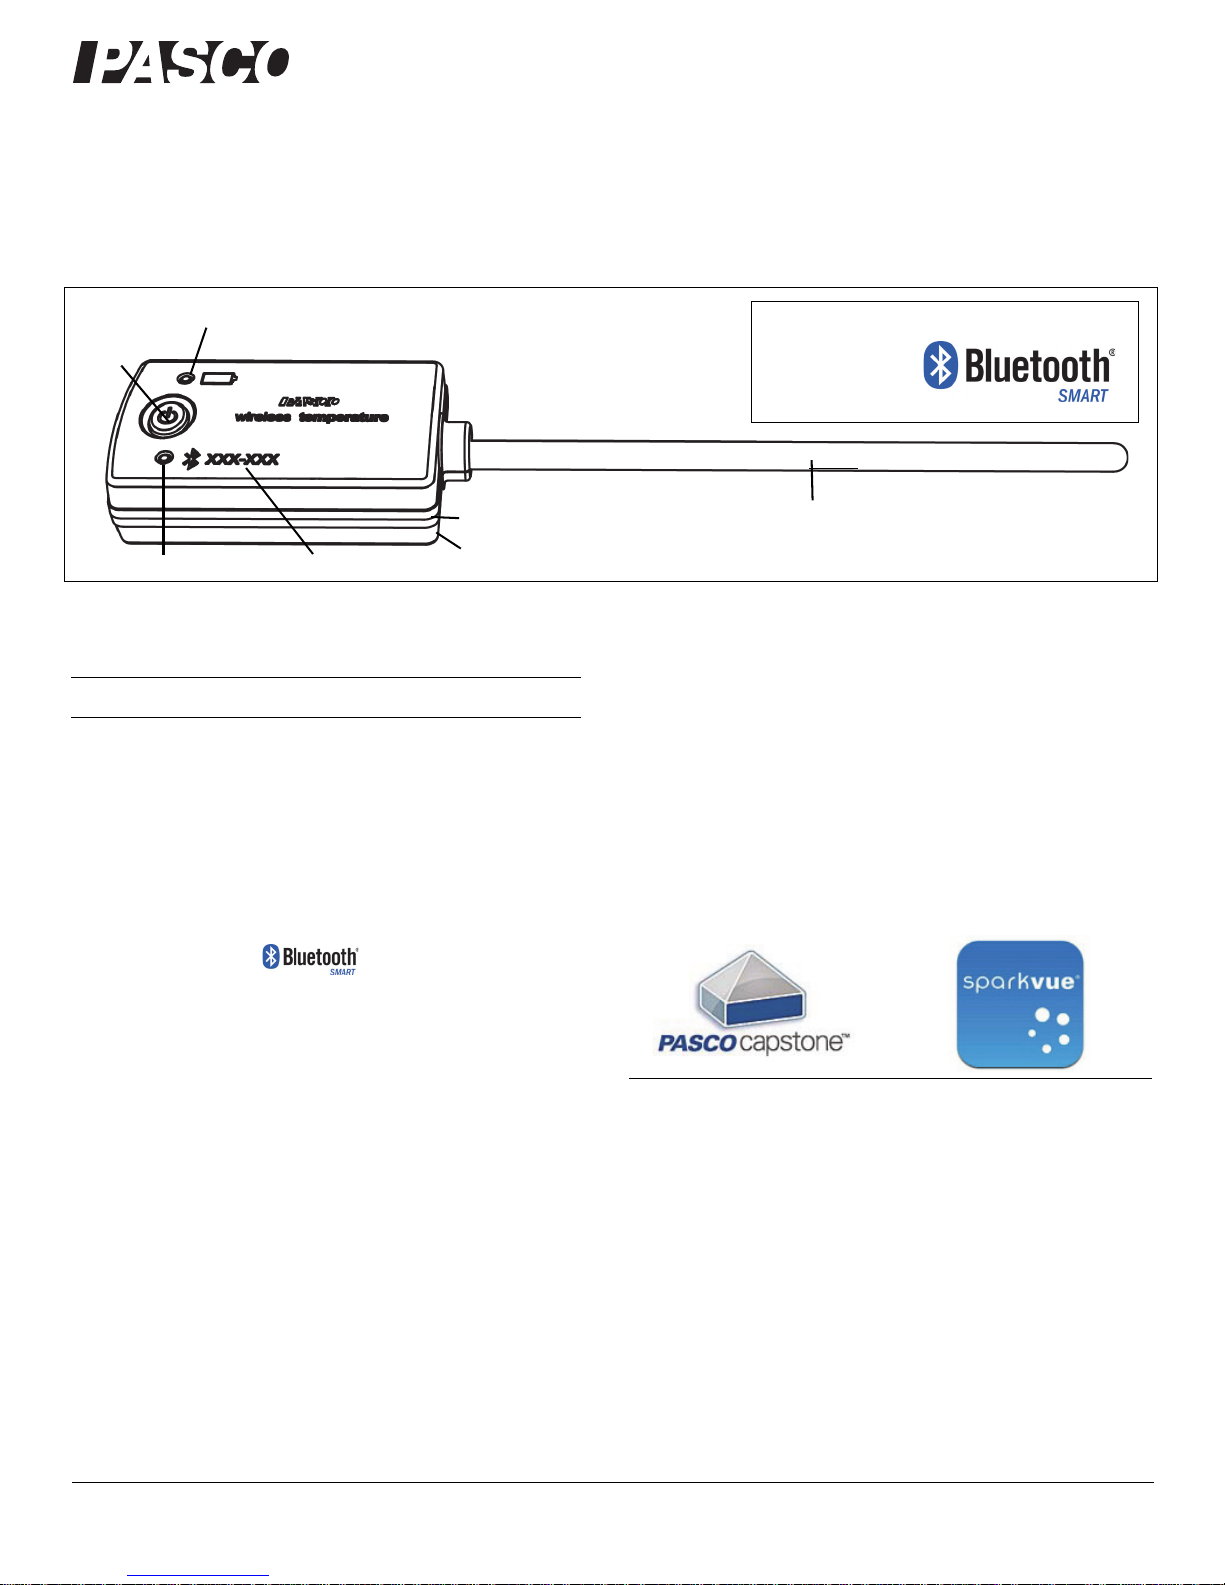
Bluetooth status LED
Battery status LED
ON
button
Temperature Probe (-40°C to +125°C)
Device ID
Power: Replaceable Battery
Connection:
Sensor Housing (-15°C to +50°C)
Gasket (water resistant)
PS-3201
Reference Guide
013-14647C
Hardware
Included Equipment Part Number
Wireless Temperature Sensor PS-3201
Introduction
The Wireless Temperature Sensor measures
temperature over a range from -40° C to +125°C. The
stainless steel temperature probe is more durable than a
glass thermometer and is able to work in a variety of
situations. The temperature measurement is transmitted
wirelessly through and recorded and
displayed by the PASCO software on a connected
wireless device such as a tablet or computer. The
Wireless Temperature Sensor is powered by a
replaceable three volt coin cell battery (included) and is
well-suited for continuous recording and discrete
measurements. The sensor is designed to optimize the
battery usage time.
Since each sensor has a unique Device ID number,
more than one can be connected to a computer or tablet
at the same time.
ON/OFF Information
To turn the sensor on, press and hold the ON button
until the status LEDs start blinking. To turn the sensor
off, press and momentarily hold the ON button until the
status LEDs stop blinking. (See the LED information.)
The sensor puts itself to sleep after several minutes of
inactivity if not connected, and after about one hour of
inactivity if connected.
Data Collection Software
PASCO Capstone SPARKvue
• Mac OS X • Mac OS X
• Windows • Windows
•iOS
•Android
• Chromebook
The sensor housing is water resistant, but immersing it
in water may cause a loss of wireless connection. Do not
immerse the sensor housing in boiling hot water. Put
only the Temperature Probe into the substance being
measured.
See the PASCO web site at www.pasco.com/software for help in
selecting the right PASCO software and to check the latest versions.
Software Help
See the SPARKvue Help or PASCO Capstone Help for
information about collecting, displaying, and analyzing
data.
Page 2
®
Wireless Temperature Sensor PS- 3201
• In SPARKvue, select the HELP button ( ) in any
screen including the Home Screen.
• In PASCO Capstone, select PASCO Capstone Help
from the Help menu, or press F1.
Compatibility
Platform Bluetooth SMART Compatibility
iOS iPad 3 and later
iPhone 4S and later
iPod touch 5 and later
SPARK Element All models
Android Android 4.3 and later
Chromebook Chrome OS (requires PS-3500 Adapter*)
Mac OS X Models introduced July 2011 or later*
Windows Windows 7 and later (requires PS-3500 Adapter*)
See Appendix A for more information about the PS-3500 Adapter and
Mac OS X models.
LED Information
The Bluetooth connection LED (light-emitting diode) and
the battery status LED operate as follows:
Computer via Bluetooth
SPARKvue
Software Help
See the SPARKvue Help for information about
collecting, displaying, and analyzing data.
• In SPARKvue, select the HELP button ( ) in any
screen, including the Home Screen.
Connect the Sensor
• In SPARKvue, select the Bluetooth icon.
In the Wireless Devices list that opens,
select the desired sensor that matches the
XXX-XXX Device ID number on the
sensor. Select Done.
Collect Data
• In SPARKvue, select a measurement from the list
under the sensor in the Home Screen. A graph of
the measurement versus time opens.
• Select the Start button to begin collecting data.
PASCO Capstone
Bluetooth LED Status Battery LED Status
Red blink Ready to pair Red blink Low power
Green blink Connected
Yellow blink Logging*
*Logging: PASCO wireless sensors can either stream
live data to a compatible device or log data (save it to the
sensor’s memory). The data can then be uploaded to the
device for display and analysis at a later time. Logging
capability supports long-term or remote data collection
while not connected to the device.
Note: Versions of SPARKvue and PASCO Capstone
available in 2016 will support logging. Check the PASCO
Web page at:
www.pasco.com/software
for the latest software version.
Set-up
Software Help
See the PASCO Capstone Help for information about
collecting, displaying, and analyzing data.
• In PASCO Capstone, select PASCO Capstone Help
from the Help menu, or press F1.
Connect the Sensor
• In PASCO Capstone, click Hardware Setup in the
Tools palette to confirm that the sensor is
recognized. Select the desired sensor in the
Hardware Setup window that matches the XXX-XXX
Device ID number on the sensor. Close the
Hardware Setup window.
Collect Data
• In PASCO Capstone, select a display in the main
window. In the display, use the <Select
Measurement> menu(s) to set up the desired
measurement in the display.
•Select Record to begin collecting data.
Connecting the Sensor to a Wireless Device or a
2
013-14647C
Page 3
®
Introduction PS - 3201
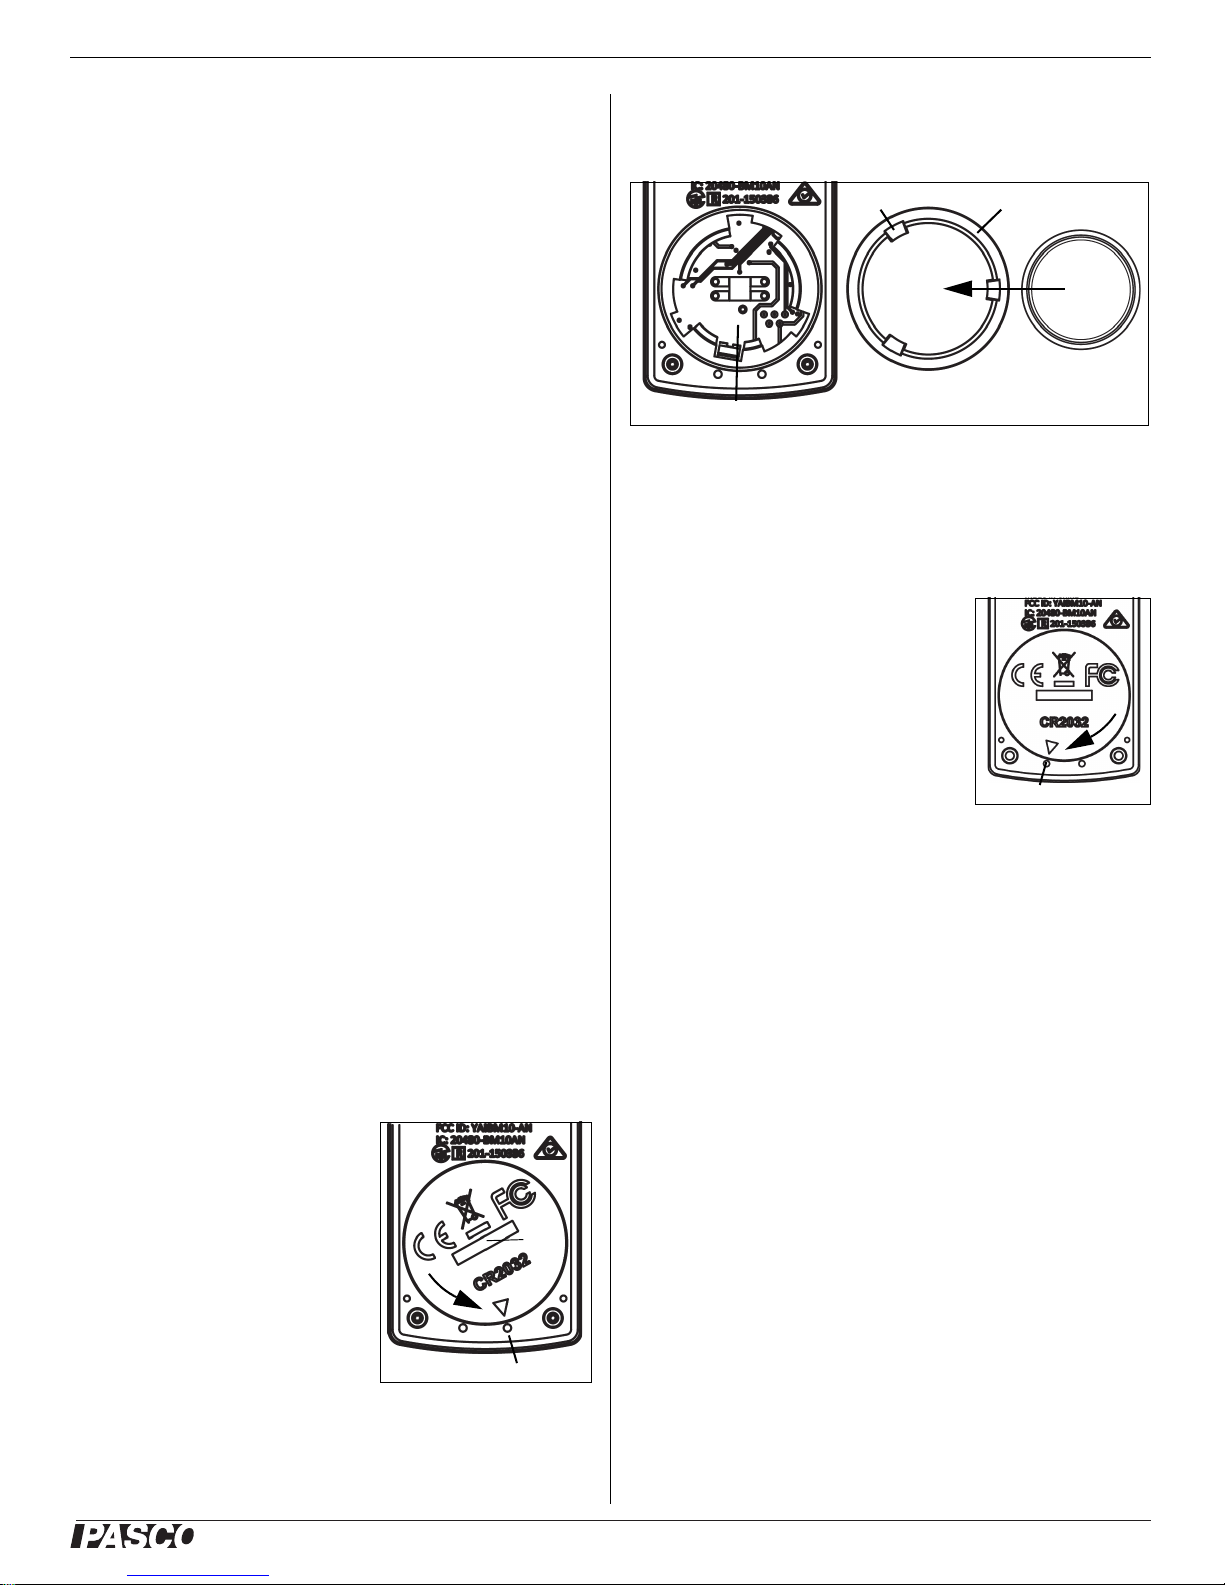
Second mark
Coin slot
Battery
Compartment Door
Gasket (“O”-ring)
Battery (CR2032)
Ta b
PLEASE Do Not Touch
First mark
Calibrating the Sensor
Calibration is not always necessary, especially if you are
measuring a change in temperature rather than absolute
temperature values. However, it is possible to calibrate
the sensor. For detailed information, see Appendix B
Battery Usage
The Wireless Temperature Sensor includes a 3 V coin
cell battery (CR2032). Battery life is very important to
making the sensor simple and always ready to use, so
all of the PASCO wireless products are designed for
long battery life. For example, the sensor turns itself off
after a short time of inactivity.
We expect more than one year of battery life, but the
actual amount depends on factors such as the data
collection sampling rate.
Sensor Storage
If the sensor will be stored for many months, we
recommend that you remove the battery to avoid
damaging the sensor in case of a battery leak.
Battery Removal and Replacement
If the sensor’s battery status LED blinks red, the battery
may need to be replaced. Replacing the small,
disk-shaped battery involves removing the Battery
Compartment Door on the bottom of the sensor,
removing the old battery, installing a new battery of the
same type, and replacing the Battery Compartment
Door. The procedure needs a coin and a CR2032 three
volt battery.
the tabs on the door. Please do not touch the inside of
the battery compartment
.
Remove the used battery from the Battery Compartment
Door and replace it with a new identical type battery.
Note that the battery is held in place by the small tabs on
the door
. The side of the battery with the “+” on it should
be against the door.
Replace the Battery Compartment
Door
Put the Battery Compartment Door
with the new battery back onto the
sensor. Align the indicator on the
door with the second mark, and
use the coin in the slot to turn the
door clockwise (right-to-left) until
the indicator is aligned with the first
mark on the sensor.
(See “Battery Disposal Instructions” under Technical
Support.)
Related Item
(NOTE: This battery is commonly available in electronic
and commercial stores.)
Remove the Battery Compartment Door
Hold the sensor bottom-side
up. Use a coin in the slot to
turn the Battery Compartment
Door counterclockwise
(left-to-right) until the indicator
on the door is aligned with the
second mark on the sensor.
Turn the sensor bottom-side
down so that the Battery
Compartment Door can drop
into the palm of your hand.
Make sure that the battery door gasket stays on the
door. The gasket is an “O-ring” that is held in place by
Troubleshooting the Wireless Temperature
Sensor
013-14647C
• Coin-cell Battery Replacement Pack (10 pack) PS-3504
• If the sensor loses Bluetooth connection and will not
reconnect, try cycling the ON button. Press and
briefly
hold
the button until the status LEDs blink,
and then release the button
• If the sensor stops communicating with the
computer software or tablet application, try
restarting the software or application. If the problem
remains, press and hold the ON button for ten
seconds and then release the button. Turn on the
sensor in the usual way.
• Turn Bluetooth off and then turn it back on. Retry.
3
Page 4
®
Wireless Temperature Sensor PS- 3201
Temperature Probe Maintenance
Rinse and dry the temperature probe before putting the
sensor away for storage. The probe is stainless steel
and the diameter (5 mm or 0.197”) is compatible with
standard stoppers.
Suggested Experiments
Practically any experiment that uses a temperature
measurement can be done with the PS-3201 Wireless
Temperature Sensor. See the PASCO Web site at
www.pasco.com/products/lab-manuals
for more information about experiments
Sensor Specifications
Wireless Temperature Sensor
Range
Accuracy
Resolution
-40°C to +125°C (for the probe)
-15°C to +50°C (for the housing)*
±0.5° C
0.01°C
Limited Warranty
For a description of the product warranty, see the PASCO catalog. For
more information visit www.pasco.com/legal.
Copyright
This PASCO scientific document is copyrighted with all rights reserved.
Permission is granted to non-profit educational institutions for
reproduction of any part of this manual, providing the reproductions are
used only in their laboratories and classrooms, and are not sold for profit.
Reproduction under any other circumstances, without the written consent
of PASCO scientific, is prohibited.
Trademarks
PASCO, PASCO scientific, PASCO Capstone, PASPORT, and
SPARKvue are trademarks or registered trademarks of PASCO scientific,
in the United States and/or in other countries. All other brands, products,
or service names are or may be trademarks or service marks of, and are
used to identify, products or services of their respective owners. For more
information visit www.pasco.com/legal.
FCC Statement
This Class A digital device complies with part 15 of the FCC Rules.
Operation is subject to the following two conditions: (1) This device may
not cause harmful interference, and (2) this device must accept any
interference received, including interference that may cause undesired
operation.
CE Statement
This device has been tested and found to comply with the essential
requirements and other relevant provisions of the applicable EU
Directives.
Sample Rate
*NOTE: Prolonged exposure of the sensor housing to temperatures at the
extreme ends of the range will adversely affect battery life and
performance.
Up to 10 Hz
Technical Support
For assistance with any PASCO product, contact
PASCO at:
Address: PASCO scientific
10101 Foothills Blvd.
Roseville, CA 95747-7100
Phone: +1 916 462 8384 (worldwide)
800-772-8700 (U.S.)
Web:
Email: [email protected]
The Reference Guide will be updated periodically. For
the latest revision of this Reference Guide, visit the
PASCO Web site at
www.pasco.com/support
Product End of Life Disposal Instructions:
This electronic product is subject to disposal and recycling regulations that
vary by country and region. It is your responsibility to recycle your
electronic equipment per your local environmental laws and regulations to
ensure that it will be recycled in a manner that protects human health and
the environment. To find out where you can drop off your waste equipment
for recycling, please contact your local waste recycle/disposal service, or
the place where you purchased the product.
The European Union WEEE (Waste Electronic and
Electrical Equipment) symbol (to the right) and on the
product or its packaging indicates that this product
must not be disposed of in a standard waste
container.
Battery Disposal Instructions:
Batteries contain chemicals that, if released, may affect the environment
and human health. Batteries should be collected separately for recycling,
and recycled at a local hazardous material disposal location adhering to
your country and local government regulations. To find out where you can
drop off your waste battery for recycling, please contact your local waste
disposal service, or the product representative.
The battery used in this product is marked with the
International symbols to indicate the need for the
separate collection and recycling of batteries.
www.pasco.com/manuals
and enter the product number, PS-3201, in the text
window.
4
013-14647C
Page 5
®
Technical Support PS - 3201
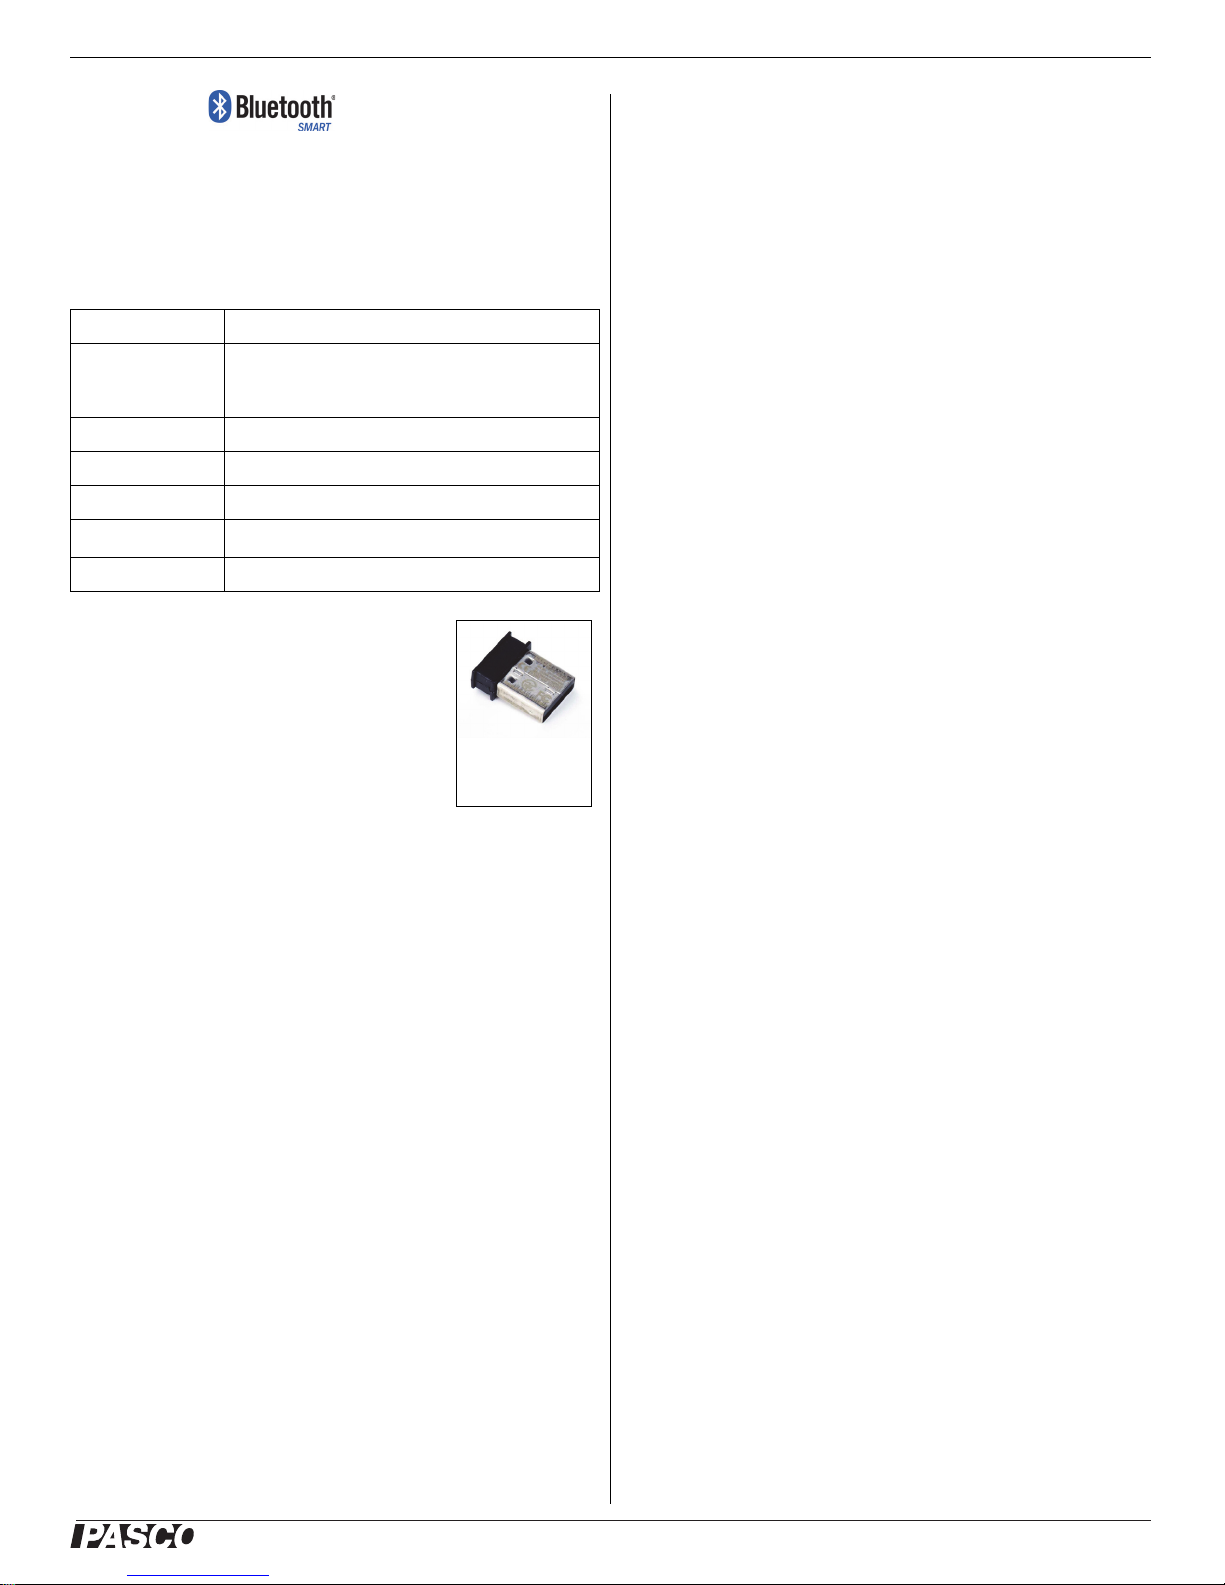
PS-3500 USB
Bluetooth 4.0
Adapter
1
Appendix A: Compatibility
The Mac Mini and MacBook Air were updated with
Bluetooth SMART support in 2011. The MacBook Pro
Check the PASCO Web page at
was updated in 2012. The Mac Pro that debuted in
December 2013 has Bluetooth SMART support.
www.pasco.com/compatibility
for the latest information on Bluetooth SMART
compatibility.
Exception: Before
10.11.x), if you have a Macintosh with LMP version “0x4”
that requires the PS-3500 USB Bluetooth 4.0 Adapter,
you upgrade to El Capitan
(Mac OS X
please contact PASCO Technical Support for further
Platform Bluetooth SMART Compatibility
iOS iPad 3 and later
iPhone 4S and later
iPod touch 5 and later
SPARK Element All models
Android Android 4.3 and later
Chromebook Chrome OS (requires PS-3500 Adapter*)
Mac OS X
Windows Windows 7 and later (requires PS-3500 Adapter*)
1
Models introduced July 2011 or later
instructions.
What is Bluetooth SMART
®
?
Bluetooth SMART (also known as Bluetooth Low Energy
or Version 4.0 of the Bluetooth specification) is the latest
protocol of the proprietary open wireless technology
standard created by telecoms vendor Ericsson in 1994.
It is the power- and application-friendly version of
Bluetooth that was built for the Internet of Things (IoT).
*The PS-3500 USB Bluetooth 4.0
Adapter, when connected to a USB
port, allows up to three Bluetooth
SMART devices, such as this PASCO
wireless device, to connect to Windows
computers, Chromebooks, and older
Macintosh computers.
Note: The PS-3500 USB Bluetooth 4,0
Adapter is the only adapter we can currently
recommend. Many other Bluetooth 4.0 adapters are
available but this adapter has a specific design that
enables in-app pairing of Bluetooth SMART sensors.
1
To check the Mac computer’s Bluetooth compatibility,
do the following:
• Click the
• Select
• Click the
• Click the
(Apple) Menu.
About This Mac
More Info
System Report
... button.
... button.
• Select
underneath
Bluetooth
Hardware
from the sidebar on the left,
.
• Scan down the list of information until you find “LMP
Version”.
• If your Mac is equipped with Bluetooth SMART, the
LMP Version will show 0x6. (Anything lower than
0x6 means an older version of Bluetooth. Your
device will need the PS-3500 USB Bluetooth 4.0
Adapter.)
013-14647C
5
Page 6

®
Wireless Temperature Sensor PS- 3201
Appendix B: Calibration
Calibration is not always necessary, especially if you are
measuring a change in temperature rather than absolute
temperature values. However, it is possible to calibrate
the sensor.
Prepare for Calibration
Calibration will need an ice-water bath, a container of
hot water, and a thermometer. The sensor will need to
be “paired” with a tablet or computer, and the data
collection software (for example, SPARKvue or
Capstone) should be running.
Using SPARKvue Software for Calibration
NOTE: Check the Help System in SPARKvue for the
most up-to-date information.
1. Place the thermometer in the container of hot water.
2. Click (or press) the Experiment Tools button ( ).
•The Experiment Tools screen opens.
11. Wait until the reading on the thermometer stabilizes.
Under Calibration Point 2, click the Standard Value
box and enter the thermometer’s temperature value.
12. Under Calibration Point 2, click the Read From
Sensor box.
• The second value measured by the sensor is
transferred to the Sensor Value box.
13.
Click OK.
Using PASCO Capstone for Calibration
NOTE: Check the Help System in PASCO Capstone for
the most up-to-date information.
1. Place the thermometer in the container of hot water.
2. Click Calibration ( ) in the Tools Palette.
3. Choose the measurement you would like to calibrate
now: Temperature Measurement.
4. Click Next.
3. Click Calibrate Sensor.
•The Calibrate Sensor: Select Measurement screen
opens.
4. Click the Sensor box and click the sensor to be
calibrated.
5. Click the Calibration Type box and click a calibration
type. (For this example, click “2-point”.)
6. Click Next.
•The Calibrate Sensor Enter Values screen opens.
7. Place the temperature probe in the container of hot
water.
8. Read the temperature on the thermometer. Under
Calibration Point 1, click the Standard Value box
and enter the known temperature value.
9. Under Calibration Point 1, click Read From Sensor.
• The value measured by the sensor is transferred to
the Sensor Value box.
5. Choose the type of calibration you would like to
perform: Two Standards (2 point).
6. Click Next.
7. Read the temperature on the thermometer and enter
the value in the Standard Value text box.
8. Place the Temperature Probe in the container of hot
water.
9. After the Current Value stabilizes, lick Set Current
Value to Standard Value.
10. Click Next.
11. Move the thermometer to the ice-water bath. Dry the
end of the temperature probe. Place the probe in the
ice-water bath with the thermometer,
12. Wait until the reading on the thermometer stabilizes.
Enter the second known temperature value in the
Standard Value text box.
13. After the Current Value stabilizes, click Set Current
Value to Standard Value.
10. Move the thermometer to the ice-water bath. Dry the
temperature probe and then put the probe into the
ice-water bath with the thermometer.
6
14. Click Next.
15. Click Finish.
013-14647C
Page 7
®
Technical Support PS - 3201
Theory of Calibration
One of the functions of the PASCO Data Collection
Software is to take the stream of raw data from a sensor
and transform it into the calibrated data that you see in
the Graph, Table, and other displays. If you do not
calibrate a sensor yourself, the software uses a default
calibration that is loaded when the sensor is connected.
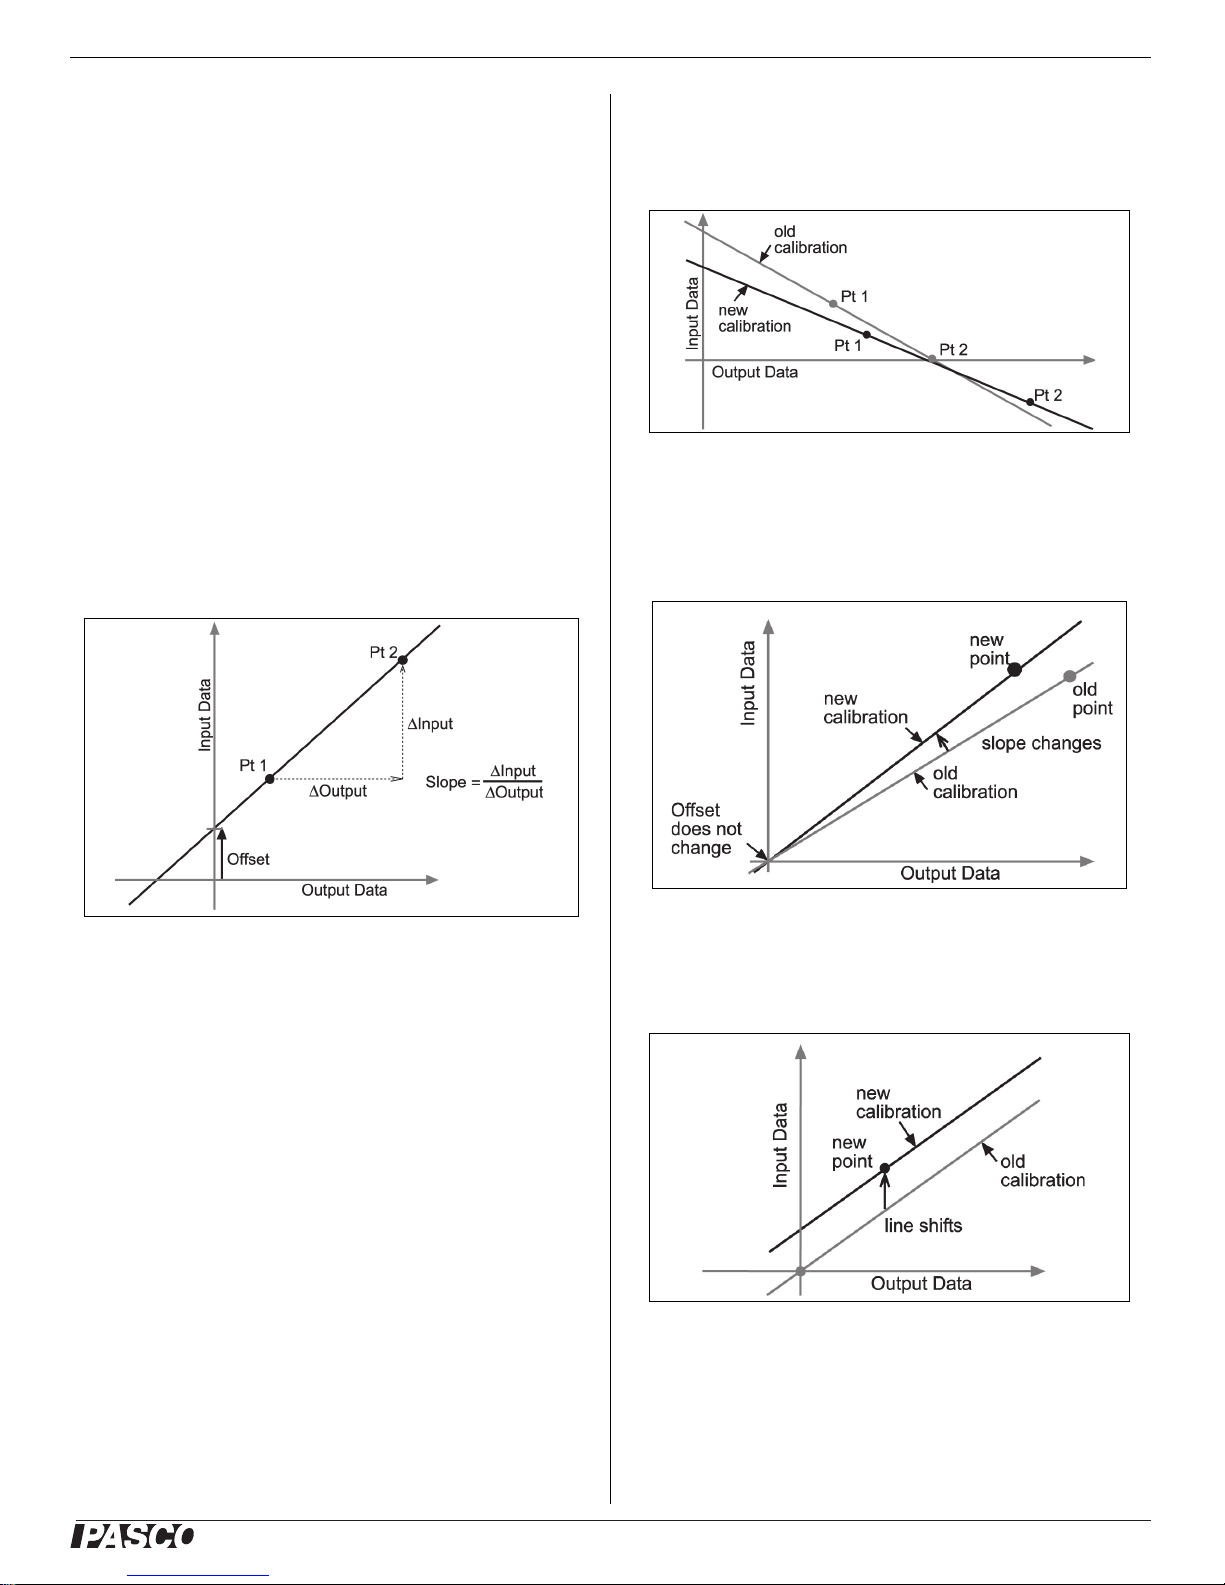
You can think of the software as taking in raw data and
outputing calibrated data. When you perform a
calibration, the software redefines the linear equation
that transforms the raw input data into the calibrated
output data. The linear function is of the form:
Raw Input = Slope x Calibrated Output + Offset
Or:
Calibrated Output = (Raw Input - Offset)/Slope
The function can be represented graphically as a line.
Two-Point
In a two-point calibration, you reset two points to define
a new line. This type of calibration affects both the slope
and the offset.
One-Point Slope
In a one-point slope calibration, you reset only one point.
The slope of the line changes so that the line intersects
the new point, while the offset (or Y-intercept) does not
change.
Two points, Pt 1 and Pt 2, define the line. In the
two-point calibration procedure, each point is reset by
associating a known standard value (for instance, the
temperature of ice water) with a raw input measurement
that the sensor sends out when it is in that standard. In a
one-point calibration, only one of the points is reset by
the user.
Types of Calibration
There are three types of calibration: two-point, one-point
slope, and one-point offset. Any of these calibrations can
be performed on a single sensor, or simultaneously on
multiple similar sensors; however, for any given sensor,
the software will automatically select the most typical
calibration type as the default setting.
One-Point Offset
In a one-point offset calibration, you reset only one point.
The line shifts so that it intersects the new point, but its
slope does not change.
Offset calibration is usually used to make one sensor
agree with another sensor. Due to normal variation
among probes, a second probe might read consistently
higher than the first probe. Normally this difference
would be insignificant; however, an offset calibration can
be used to bring the sensors into closer alignment.
013-14647C
7
Page 8

®
Wireless Temperature Sensor PS- 3201
8
013-14647C
 Loading...