

Page 1
Instruction Sheet
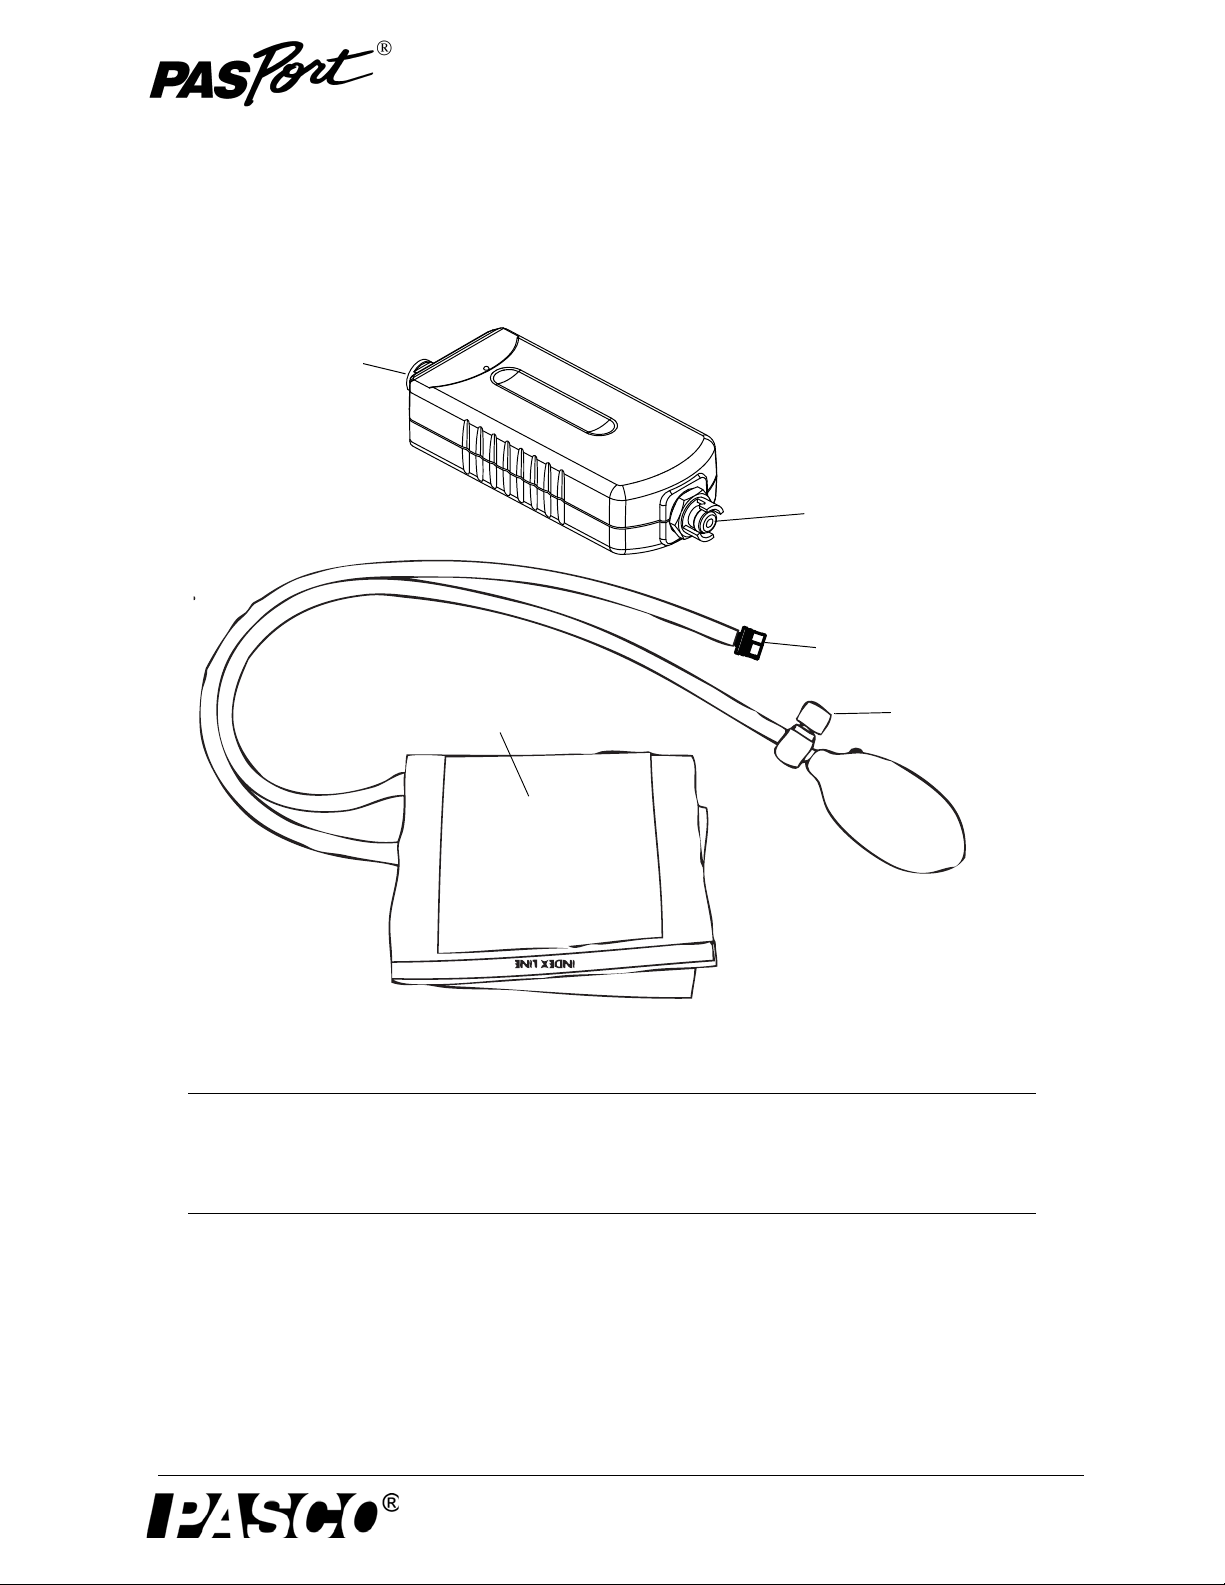
Eight pin
mini-DIN
connector
Quick-connect
port
Blood
Pressure
Sensor
Blood Pressure Cuff
with Bulb and Valve
The illustrations are not to scale.
Quick-connector
Push-button
Release Valve
Bulb
Hook-and-pile
Material
012-10927D
Blood Pressure Sensor with Cuff
PS-2207,PS-2208,PS-2209
\
Included Equipment Part Number
Blood Pressure Sensor with 3 available cuff sizes PS-2207,PS-2208,PS-2209
Blood Pressure Cuff with Bulb & Valve (3 sizes available)** PS-2531,PS-2532,PS-2533**
Recommended Items
PASPORT Extension Cable PS-2500
PASCO Interface Catalog or web site*
Data Acquisition Software Catalog or web site*
*See the PASCO catalog or web site at www.pasco.com for compatible PASPORT interfaces and Data Acquisition Software.
**NOTE: The 3 Blood Pressure Cuff sizes are: PS-2531 (small), PS-2532 (standard/adult) and PS-2533 (large). PS-2207
includes the standard/adult cuff, PS-2208 contains the small cuff and PS-2209 contains the large cuff. See the PASCO catalog
or web site.
800-772-8700 +1 916 786 3800
www.pasco.com support@pasco.com
Page 2

®
Model No.PS-2207,PS-2208,PS-2209 Introduction
Brachial
artery
Palm
Figure 1: Brachial artery
Left
arm
NOTE: The PASPORT
Blood Pressure Sensor
includes a standard size
blood pressure cuff with bulb
and valve (PS-2532).
A smaller size blood pressure cuff (PS-2531), a larger
size blood pressure cuff
(PS-2533), and a standard
size replacement cuff
(PS-2532) are available separately.
See the PASCO catalog or
web site for more information.
www.pasco.com
PS-2500 PASPORT
Extension Cable
Introduction
With the PASPORT Blood Pressure Sensor, students can easily measure heart rate
(beats per minute) and systolic and diastolic arterial blood pressure (millimeters of
mercury). Students gain a greater understanding of the physiology of the circulatory
system when they also learn about the physiology of blood pressure. The systolic and
diastolic pressure provided in the digit display can be used by the student to verify
their own determination of blood pressure from a graph of pressure versus time.
Blood pressure is the force that blood exerts on the walls of blood vessels. This pressure is caused by the contraction of the heart and by muscles that surround blood vessels. Blood pressure is always highest in the two main arteries that leave the heart.
Because the pressure is usually a little higher in the left artery, blood pressure is usually measured in the brachial artery supplying the left arm.
Blood pressure consists of two measurements: systolic and diastolic pressure. It is
represented as a ratio of systolic pressure to diastolic pressure, for example 130/80
(“one-thirty over eighty”).
In most parts of the world, blood pressure is reported in millimeters of mercury
(mmHg).
Systolic pressure is the pressure of the blood on the artery walls when it leaves the
ventricles at peak ventricular contraction, when the heart is emptying its chambers of
blood. It is the "top number" of the blood pressure ratio. Normal systolic pressure for
a male is approximately 120 mmHg and for females is approximately 110 mmHg.
Diastolic pressure is the pressure of the blood on the artery walls when the ventricles
relax and the heart's chambers fill with blood. It is the "bottom number" of the blood
pressure ratio. Normal diastolic pressure for a male is approximately 80 mmHg and
for females is approximately 70 mmHg.
Systolic and diastolic pressures are affected by various biological and environmental
factors. For example, the salt in a person's diet can cause the kidneys to change the
amount of fluid in our blood, resulting in changes in blood pressure. Diet, stress, exercise, body position, drugs, hormonal changes and genetic factors can affect a person's
blood pressure.
About the Sensor
The PASPORT Blood Pressure Sensor consists of a pressure sensor box and a blood
pressure cuff with bulb and valve. The sensor is a digital sphygmomanometer that
measures mean arterial pressure and then calculates systolic and diastolic blood pressure and heart rate (in beats per minute).
The blood pressure cuff consists of an inflatable bladder connected by one hose to a
hand pump bulb with a push-button release valve, and by a second hose to the pressure sensor box.
The Blood Pressure Sensor can be connected to any
PASPORT interface (such as the SPARK Science
Learning System (SLS) or SPARKlink). The sensor
can be used with the P ASPOR T Extension Cable. This
cable is 2 meters in length, extending the distance a
sensor can reach from a computer or portable
datalogger.
2
Page 3
®
Model No.PS-2207,PS-2208,PS-2209 Introduction
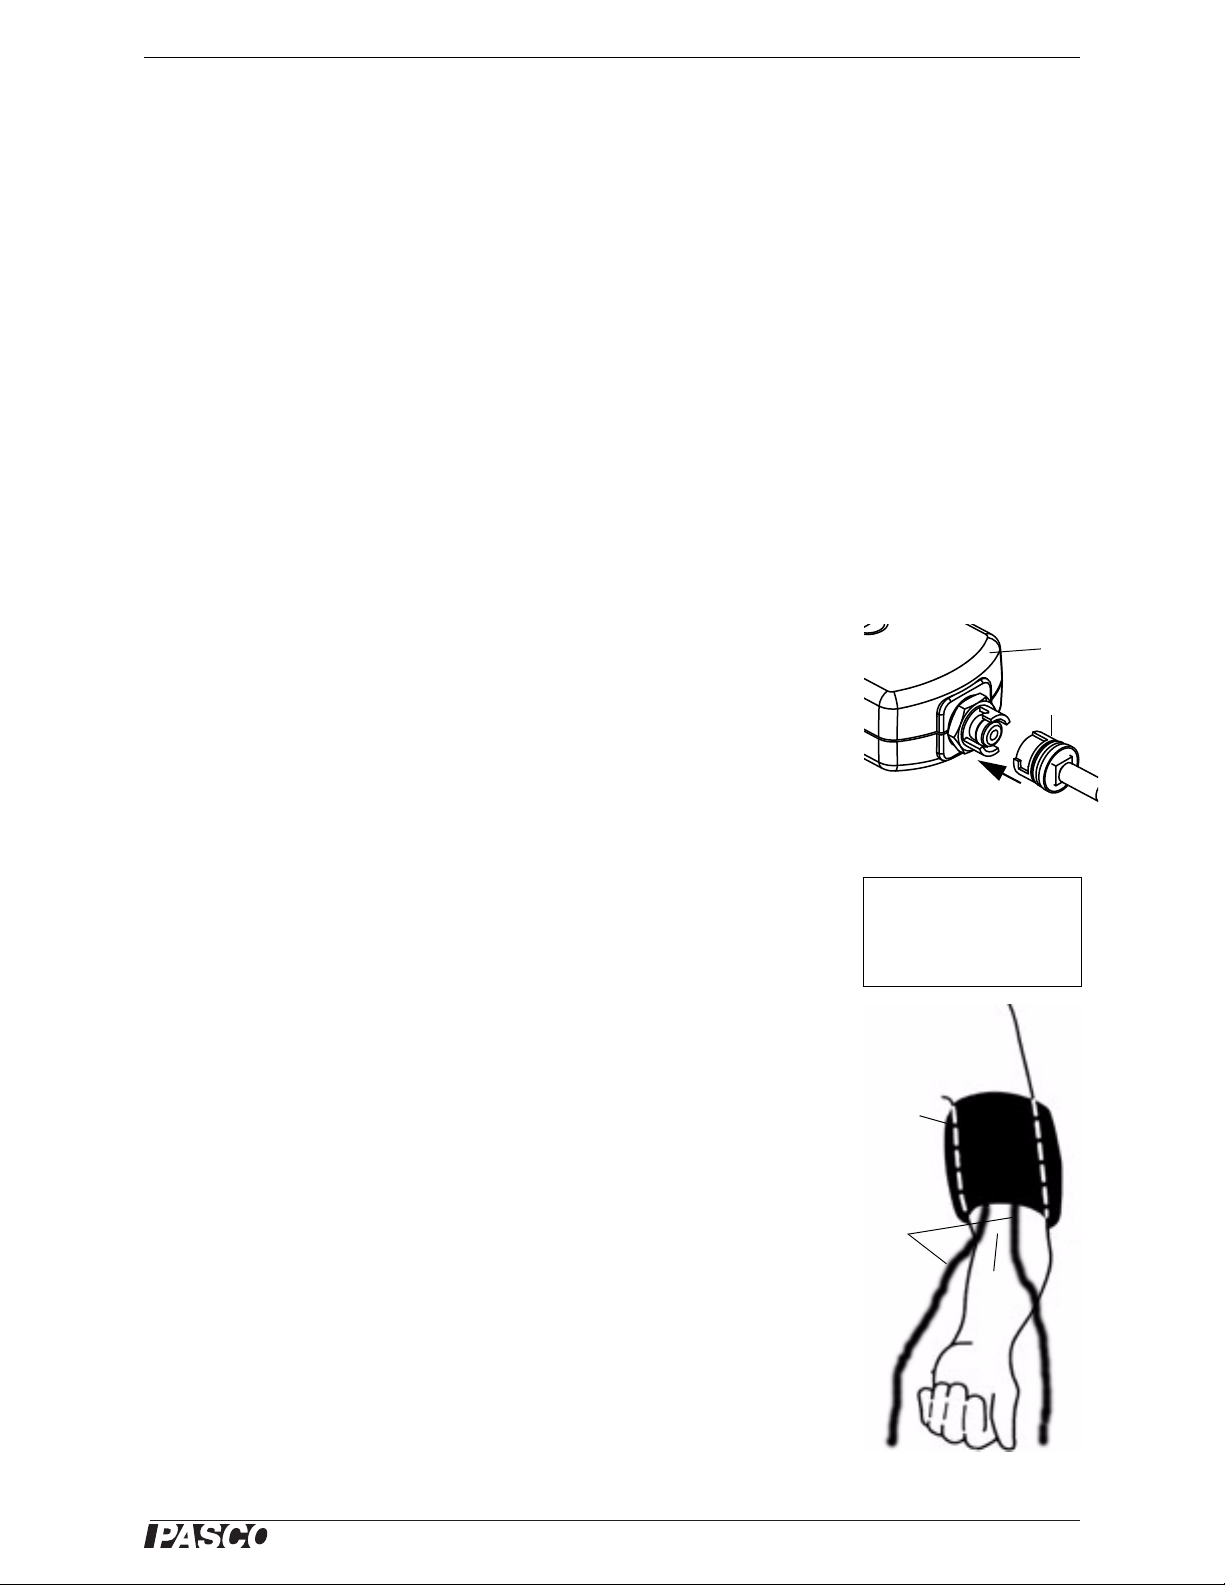
Figure 23: Quick-connector
onto sensor
Sensor
Quick-
connector
NOTE: Refer to your
PASPORT interface users
guide for information about
setting up data displays and
recording data..
Elbow
pit
Cuff
Figure 3: Cuff onto
upper left arm
Upper Left
Arm
Tu b es
Indicator Light Emitting Diodes
The sensor has two light emitting diodes (LEDs) mounted inside the pressure sensor
case. When they are active, the LEDs can be seen through the case. One is orange and
the other is green.
The orange LED begins to flash as the cuff is being inflated (starting when the pressure reaches 50 mmHg). Once the cuff is inflated, the orange LED shines continuously while the sensor is making pressure readings. The orange LED goes out when
the air in the cuff is released and the pressure drops to about 35 mmHg. The green
LED flashes to indicate a heart beat.
Usage
Experiment ideas:
• Determine the effects of exercise on blood pressure and heart rate.
• Explore the effects of body position on blood pressure and heart rate.
• Compare the blood pressure and heart rate of students in the class.
Procedure
Sensor Setup
1. First, find a partner. A student cannot measure his or her own blood pressure.
Partner 1 should be the patient and partner 2 should conduct the measurement.
2. Connect the blood pressure cuff to the Blood Pressure Sensor. Align the quick
connector at the end of the tube from the cuff with the quick connector port on
the sensor. Push the quick connector onto the port and turn the connector clockwise until the connector clicks into place on the port.
3. Connect the Blood Pressure Sensor to a PASPORT interface.
4. If you will be using a computer, connect the PASPORT interface to the com-
puter’s USB port.
5. Create Digits displays of pressure, diastolic pressure, and systolic pressure. Your
may also want to view pressure versus time data in a Graph display.
Cuff and Arm Placement
1. The patient should remove any constrictive clothing or jewelry that may interfere
with the cuff placement.
2. Locate the approximate position of the main artery (brachial artery) on the inside
3. Partner 2 should help the patient wrap the cuff snugly around the upper left arm
4. Use the hook-and-pile material to hold the cuff in place. Position the cuff's bot-
of your upper left arm by pressing with your fingers near the inside edge of your
biceps muscle about five or ten centimeters (cm) above the elbow pit.
above the elbow with the two tubes hanging down (one on each side of the arm).
tom edge at about 2.5 cm (one inch) above the elbow pit.
3
Page 4

®
Blood Pressure Sensor Sample Data
CAUTION: Do not
pump above
200 mmHg.
If there is serious discomfort, deflate the
cuff and remove it.
NOTE: The pressure in the cuff will decrease automatically (at about 3 mmHg per
second) so the cuff will slowly deflate by itself in about a minute or so.
See “Troubleshooting”
on page 6 for information about adjusting the
pressure release rate.
5. Rotate the cuff as needed to position the white index line (labeled ARTERY) on
the cuff over the main artery (brachial artery) on the inside of your left arm.
6. Sit without crossing your legs. Relax. Rest your left elbow and forearm on a solid
surface with your palm facing upward. The cuff should be slightly lower than
your heart.
7. Partner 2 should press and hold the push-button release valve to make sure that
all of the air in the cuff has been released.
Collect Data
1. The patient should stay as still as possible during the blood pressure measure-
ment. Do not talk or move if possible.
2. Partner 2 should press “Start” to begin data collection and then he or she should
use the bulb to pump air into the cuff.
3. Monitor the pressure in the Digits display.
4. When the pressure reaches approximately 170 mmHg, partner 2 should stop
pumping and let go of the bulb.
5. When the cuff is deflated, press “Stop” to end data collection. After the measure-
ment is finished, release the remaining air in the cuff by pressing the push-button
release valve on the bulb and holding it for several seconds. You should be able
to hear air coming out of the cuff.
Sample Data
4
Page 5

®
Model No.PS-2207,PS-2 208,PS-2209 Sample Data
Identify when your data begins
to have ‘blips’ (small bumps).
This is your systolic pressure.
Identify when your data stops
forming ‘blips’ (small bumps).
This is your diastolic pressure.
You may need to change your
sample rate to see the ‘blips’.
How To Find Systolic and Diastolic Blood Pressure Manually
1. Select a single data run. Enlarge an area of the pressure measurement between
120 and 60 mmHg.
2. Identify when your data begins to form ‘blips’ (small bumps). This is your sys-
tolic pressure.
3. Next, identify when your data stops forming ‘blips’ (small bumps). This is your
diastolic pressure.
4. You may need to change your sample rate in order to see the ‘blips’.
5
Page 6

®
Blood Pressure Sensor Troubleshooting
Adjust the
screw on
the
push-button
valve
Mean Arterial Pressure
(MAP)
Ideal MAP is defined as
93 mmHg, which corresponds to 120/80.
SP = Systolic Pressure
DP = Diastolic Pressure
Three formulas are used to
compute MAP. All three produce similar results,
Method #1: MAP =
DP + (1/3 (SP - DP))
Method #2: MAP =
(2/3 DP) + (1/3 SP)
Method #3: MAP =
((2*DP) + SP)/3
Important
The PASCO Blood
Pressure Sensor is
designed for educational use only. It
cannot be used for
diagnosis.
Troubleshooting
Why are the Systolic and/or Diastolic Pressure Not Appearing?
• Perhaps the size of the cuff is incorrect. You may have a cuff that is too small or
too large.
• The pressure in the cuff may be falling too quickly, or not fast enough. The pressure release rate should be between 2 and 5 mmHg per second, and never less
than 2 mmHg per second.
Adjusting the Pressure Release Rate for the Blood Pressure Cuff
The default pressure release rate is 3 mmHg per second. To adjust the rate up or
down, use a small screwdriver to turn the adjustment screw in the center of the top of
the push-button valve. Turn the screwdriver counter-clockwise to slow down the
release rate and turn the screwdriver clockwise to speed up the release rate. The pressure release rate is normally slower if the person’s arm is larger.
Storage
6
Disconnect the blood pressure cuff from the sensor for storage.
Average Blood Pressure Values
Measurement Range
Normal 120/80 or less
Pre-hypertension 120/80 to 140/90
High greater than 140/90
Very high greater than 180/110
Specifications
Heart Rate Blood Pressure Gage Pressure
Units beats per minute
(bpm)
Range 36 to 200 bpm 0 to 375 mmHg 0 to 375 mmHg
Accuracy 1 bpm see gage pressure 3 mmHg
Resolution 1 bpm see gage pressure 0.05 mmHg
millimeters of
mercury (mmHg)
mmHg, N/m
atm, psi
2
, kPa,
Page 7

®
Model No.PS-2207,PS-2208,PS-2209 Technical Support
Technical Support
For assistance with any PASCO product, contact PASCO at:
Address: PASCO scientific
Web: www.pasco.com
10101 Foothills Blvd.
Roseville, CA 95747-7100
Phone: +1 916 786 3800 (worldwide)
Email: support@pasco.com
800-772-8700 (U.S.)
For more information about the Blood Pressure Sensor and the latest revision of this
Instruction Sheet, visit the PASCO web site at www.pasco.com and enter PS-2207 in the
Search window.
Limited Warranty For a description of the product warranty, see the PASCO catalog. Copyright The
PASCO scientific 012-10927D Blood Pressure Sensor Instruction Sheet is copyrighted with all rights
reserved. Permission is granted to non-profit educational institutions for reproduction of any part of this
manual, providing the reproductions are used only in their laboratories and classrooms, and are not
sold for profit. Reproduction under any other circumstances, without the written consent of PASCO scientific, is prohibited. Trademarks PASCO, PASCO scientific, DataStudio, PASPORT, Xplorer, and
Xplorer GLX are trademarks or registered trademarks of PASCO scientific, in the United States and/or
in other countries. For more information visit www.pasco.com/legal. Windows is a registered trademark
of Microsoft Corporation in the United States and/or other countries. Mac is trademark of Apple Computer, Inc., registered in the U.S. and other countries.
Product End of Life Disposal Instructions:
This electronic product is subject to disposal and recycling regulations that vary by
country and region. It is your responsibility to recycle your electronic equipment per
your local environmental laws and regulations to ensure that it will be recycled in a
manner that protects human health and the environment. To find out where you can
drop off your waste equipment for recycling, please contact your local waste recycle/disposal service, or the place where you purchased the product.
The European Union WEEE (Waste Electronic and Electrical Equipment) symbol (to
the right) and on the product or its packaging indicates that this product must not be
disposed of in a standard waste container.
7
 Loading...