

Page 1
®
Instruction Manual
1
2
3
4
5
Cable not
to scale
Data port
cover
012-10689A
*012-10689*
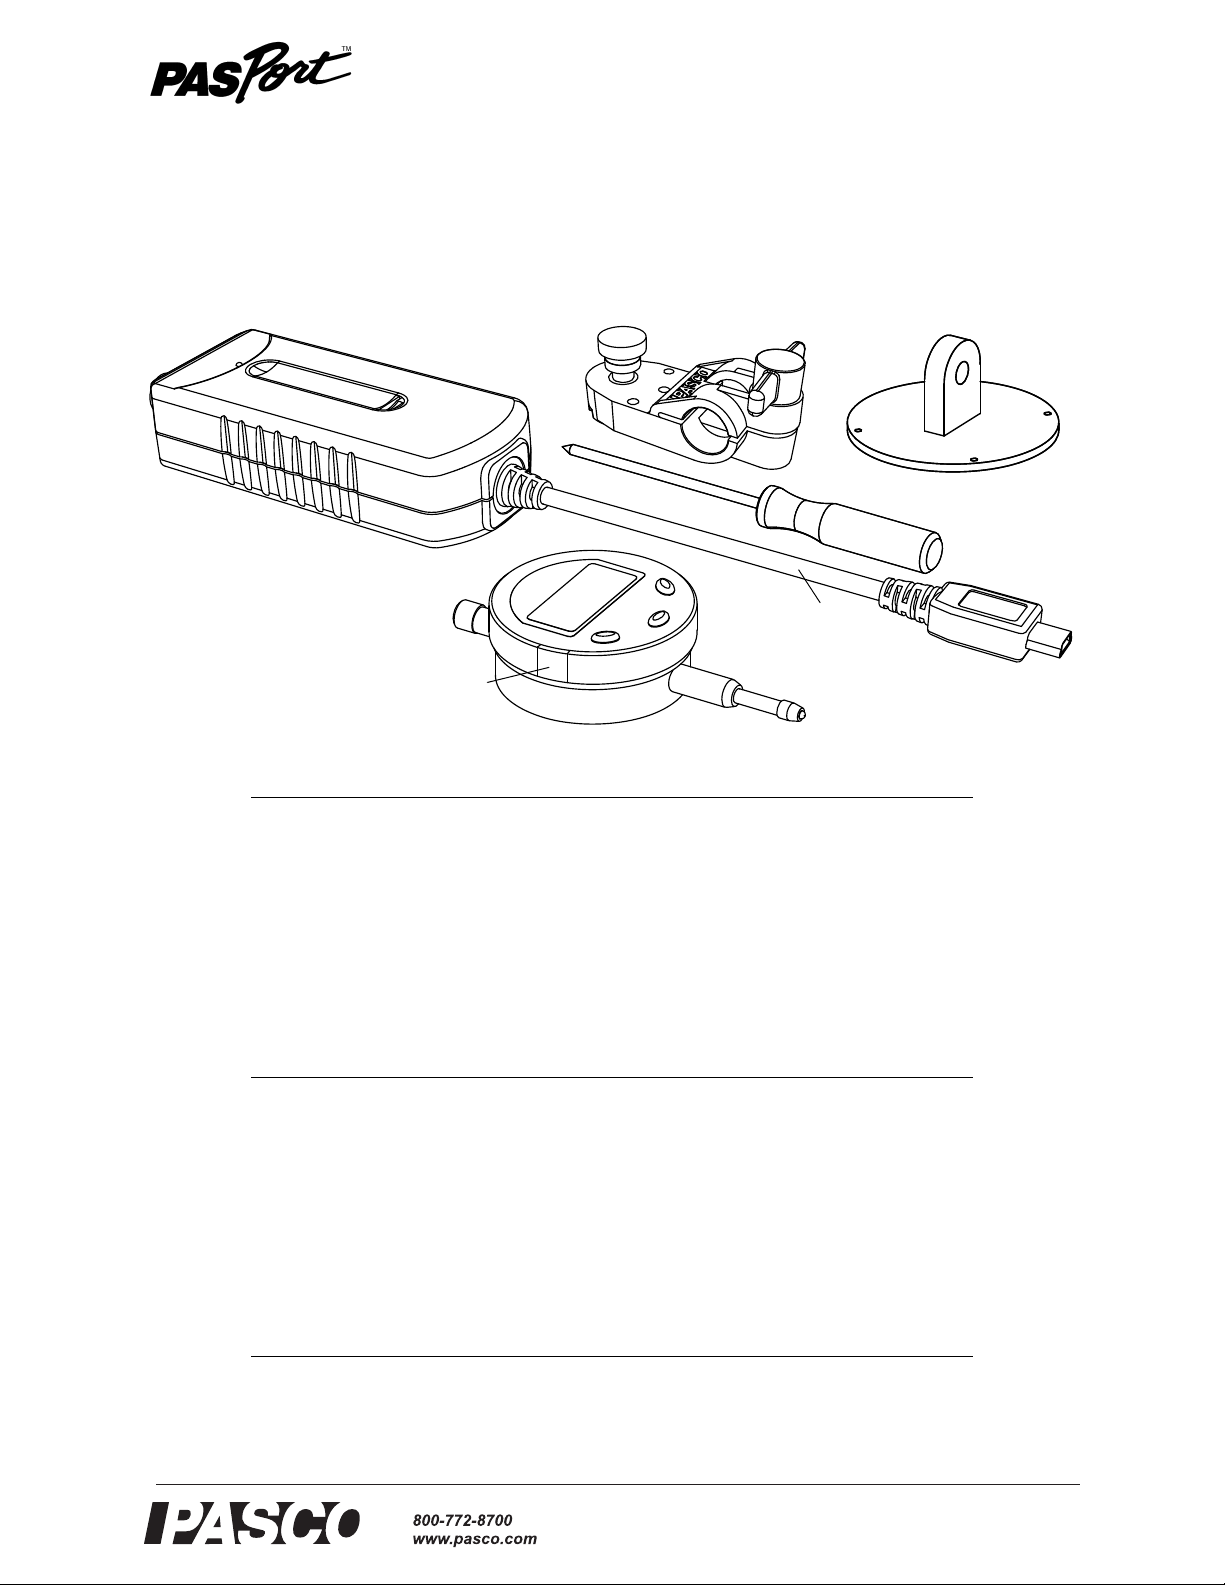
PASPORT Displacement Sensor
PS-2204
Included Equipment Part Number
1. Displacement Sensor
PS-2204
2. Pivot Rod Clamp
3. Back Plug Panel
4. Phillips Screwdriver #0
5. Digital Indicator
ME-8701
Storage Box for items 3, 4, 5, and a spare battery (not shown)
Compatible PASCO Interfaces Part Number
Xplorer GLX
Xplorer
PowerLink
USB Link
SPARK SLS
SPARKlink
Other Part Number
PS-2002
PS-2000
PS-2001
PS-2100
PS-2008
PS-2009
Large Base and Support Rod (optional)
PASCO Structure Set
ME-9355
See PASCO catalog
Page 2
®
PASPORT Displacement Sensor Introduction
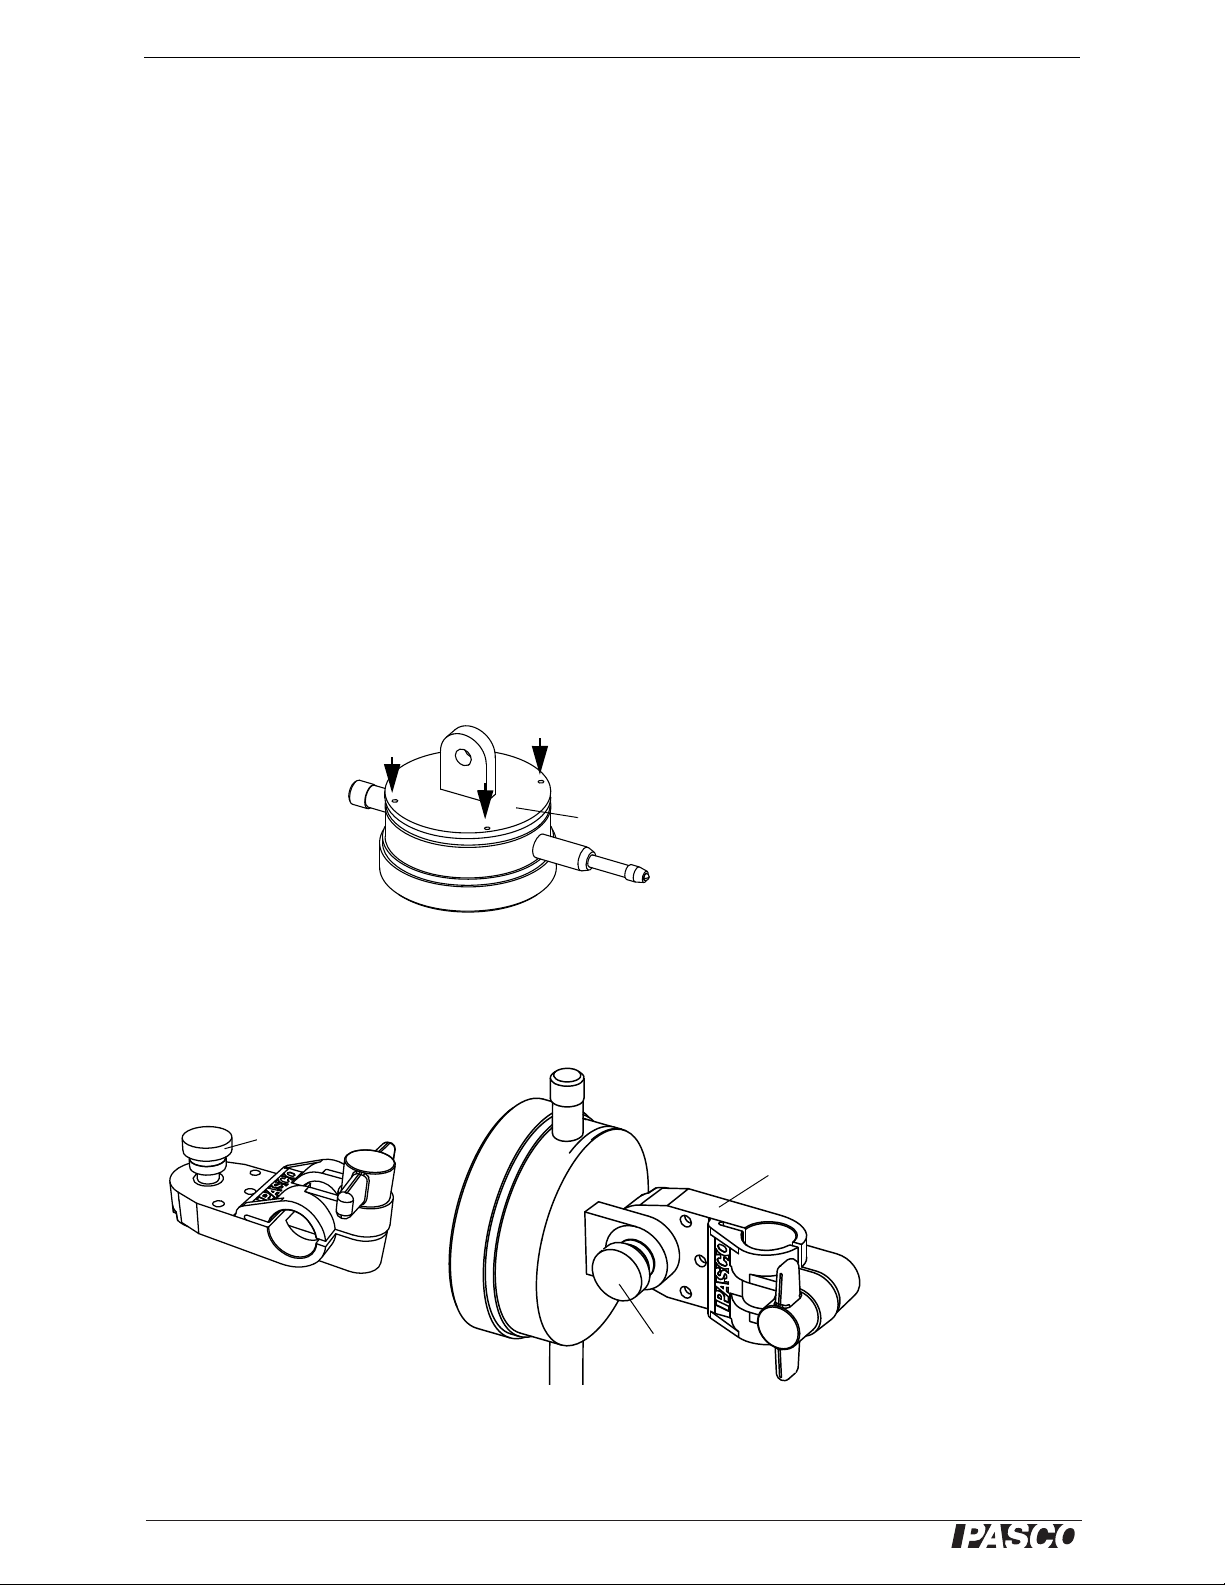
Back Plug Panel
Replace screws
Pivot Rod Clamp
Thumbscrew
Pivot Rod Clamp
Remove
Introduction
The PASPORT Displacement Sensor works with a Digital Indicator to measure displacements to within 0.01 millimeters or 0.5 mils (thousandths of an inch) over a
range of 10.00 millimeters (0.3937 inches or 393.7 mils). The Displacement Sensor
comes with a Digital Indicator, a Pivot Rod Clamp for mounting the indicator on a
support rod (not included), and a screwdriver for removing or replacing the back
panel of the indicator.
The sensor cable from the Displacement Sensor connects to a small data port on the
left side of the indicator. The Displacement Sensor can be connected to any
PASPORT interface.
The Displacement Sensor is ideally suited to measure the small deflections of members of a structure built using one of PASCO’s Structure Sets. For example, the sensor
can dynamically measure the deflection of the road bed of a bridge when a load is
applied to the structure.
Assembly
The Digital Indicator can be mounted on a support rod up to 12 mm in diameter. To
mount the indicator on a support rod, first replace the flat back panel of the indicator
with the back plug panel found in the storage box. Use the small screwdriver from the
storage box to unscrew the flat back panel. (Be careful to keep the screws.) Align the
back plug panel with the back of the indicator and replace the four small screws.
Usage
Unscrew the round thumbscrew from the Pivot Rod Clamp. Align the hole in the back
plug panel on the indicator with the hole in the Pivot Rod Clamp and replace the
round thumbscrew. Mount the Pivot Rod Clamp on a support (12 mm diameter).
2
Page 3

®
Model No.PS-2204 Setup
LCD
Function
buttons
Lower
sleeve
Measuring
head
Data port
Slide cover up
Take out the battery if the
Digital Indicator is not in
use for a long time.
Equilibrium
+ Displacement
- Displacement
Direction of
displacement
About the Digital Indicator
The Digital Indicator has a four and one-half digit liquid crystal display (LCD), a
measuring head, lower sleeve, and three function buttons (ON/O, M, and mm/in).
Zero-setting can be done at any position of the measuring head to allow differential
measurement..
Function Buttons
ON/O: This is the “On-Off” and zero-setting button. If the indicator is off, press and
hold the ON/O button to turn the indicator on. Press and release the ON/O button to
set the zero point. Press and hold the ON/O button for several seconds to turn the indicator off. (Note: The Digital Indicator has an automatic power off feature.)
M: This is the data hold button. Press and release to turn data holding ‘on’ and press
and release again to turn it off. (The interface software will continue to show the current position of the measurement head.)
mm/in: This button toggles between measurements in millimeters and measurements
in inches. The default setting is ‘mm’. Press and release the button to switch to ‘inch’.
Press and release again to switch back to ‘mm’. Note that the DataStudio software
program used with a PASPORT interface is set to show millimeters (mm) or mils
(thousandths of an inch). Open the Experiment Setup window in DataStudio to select
the proper unit of measure.
Data Port
The data port is located on the left side of the Digital Indicator behind a small cover
labeled DATA. Slide the cover up to remove it (but don’t lose it). The data port
accepts the plug on the end of the Displacement Sensor cable.
DATA
Battery
Flashing digits show that the battery is very low. The Digital Indicator uses a 1.55 volt
SR44 silver oxide battery. To replace the battery, use the screwdriver to remove the
four small screws on the back panel and then remove the back panel. The battery is
under a circular cover. Loosen - but do not remove - the small screw that holds the
cover in place. Rotate the cover to the side and replace the battery (+ side facing up).
While holding the battery down, rotate the cover back into place. Tighten the screw,
put the back panel on, and install the four small screws.
Setup
Measurement Setup
Mount the Digital Indicator so that it is in contact with the object whose displacement
will be measured. Arrange the indicator so that the measurement head and lower
sleeve are aligned with the direction of the displacement.
3
Page 4

®
PASPORT Displacement Sensor Setup
NOTE: A green
light-emitting diode
(LED) on the Displacement Sensor
flashes while the
sensor is connected
to a Digital Indicator that is turned on.
If the object will be displaced both positively and negatively from its equilibrium
position, adjust the indicator so that the position of the measurement head when it is
in contact with the object is about halfway between the limits of the measurement
head’s travel. Press and release the ON/O button to zero the indicator when the measurement head is at the equilibrium position.
Hardware Setup
The following three steps can be performed in any order.
1. Connect the cable of the Displacement Sensor (PS-2204) to the data port on the
side of the Digital Indicator. Turn on the indicator.
The connector on the Displacement Sensor cable fits into the Digital Indicator in only one way.
2. Connect the end of the PASPORT Displacement Sensor to a PASPORT interface.
3. If you will be using a computer, connect the PASPORT interface to the com-
puter’s USB port.
DataStudio Setup
If you will be using the PASPORT Displacement Sensor with a computer, install the latest version
of DataStudio first. Check the PASCO web site at www.pasco.com for information.
1. When you connect the PASPORT Displacement Sensor to the computer through
a PASPORT interface, the PASPortal window will launch automatically (if DataStudio is not already running).
2. Select Launch DataStudio in the PASPortal window.
A Digits display for displacement will open automatically.
3. Click to begin data collection.
You do not need to adjust the sample rate.
Xplorer, Xplorer GLX, and SPARK SLS Setup
If you will be using an Xplorer, Xplorer GLX, or SPARK SLS that is not connected to
a computer, connect the PASPORT Displacement Sensor to the interface and press
4
or to begin data collection.
Page 5

®
Model No.PS-2204 Measurements
Measurements
The following are examples of Digits displays for displacement in millimeters (mm)
and thousandths of an inch (mils).
Specifications
Measurement Range 10.00 mm
Hysteresis Error ±0.02 mm
Resolution 0.01 mm
Default Sample Rate 5 Hz
Maximum Speed of Measured Object ± 0.6 m/s
Working Humidity
Storage Temperature -10 to +60 °C
Points of Attention
1. Keep the digital indicator clean. Prevent water and other fluids from getting into
the apparatus.
2. Never clean the indicator with organic solvents. Use alcohol containing no water.
3. Keep the data port cover in place when the data port is not in use. Never touch the
data port with any metal objects except the plug on the cable of the sensor.
4. Do not mark the digital indicator with an electric pen as this might damage its
electronic components.
5
Page 6

®
PASPORT Displacement Sensor Technical Support
Digital Indicator Maintenance
Trouble Possible causes Solutions
Flashing digits Low voltage Replace the battery
No display Low voltage
Poor contact
Fixed digits Accidental trouble in the
circuit
Replace the battery.
Adjust and clean the battery seat.
Take out the battery and put it back
after one minute.
Technical Support
For assistance with any PASCO product, contact PASCO at:
Address: PASCO scientific
10101 Foothills Blvd.
Roseville, CA 95747-7100
Phone: 916-786-3800 (worldwide)
800-772-8700 (U.S.)
Fax: (916) 786-3292
Web: www.pasco.com
Email: support@pasco.com
Limited Warranty For a description of the product warranty, see the PASCO catalog. Copyright The
PASCO scientific 012-10689A PASPORT Displacement Sensor Instruction Manual is copyrighted with
all rights reserved. Permission is granted to non-profit educational institutions for reproduction of any
part of this manual, providing the reproductions are used only in their laboratories and classrooms, and
are not sold for profit. Reproduction under any other circumstances, without the written consent of
PASCO scientific, is prohibited. Trademarks PASCO, PASCO scientific, DataStudio, PASPORT,
Xplorer, Xplorer GLX, and SPARK SLS are trademarks or registered trademarks of PASCO scientific,
in the United States and/or in other countries. For more information visit www.pasco.com/legal. Windows is a registered trademark of Microsoft Corporation in the United States and/or other countries.
Mac is a trademark of Apple Computer, Inc., registered in the U.S. and other countries.
Patents Pending
The following PASCO products have patents pending:
ME-6990 Truss Set PS-2198 Load Cell Amplifier PS-2200 100 N Load Cell
ME-6991 Bridge Set PS-2199 Load Cell and Amplifier Set PS-2201 5 N Load Cell
ME-6992 Advanced Structures Set PS-2205 Dual Load Cell Amplifier ME-6940 Diffusion-Osmosis Apparatus
ME-6995 Road Bed Spares
Product End of Life Disposal Instructions:
This electronic product is subject to disposal and recycling regulations that vary by
country and region. It is your responsibility to recycle your electronic equipment per
your local environmental laws and regulations to ensure that it will be recycled in a
manner that protects human health and the environment. To find out where you can
drop off your waste equipment for recycling, please contact your local waste recycle/disposal service, or the place where you purchased the product.
The European Union WEEE (Waste Electronic and Electrical Equipment) symbol (to
the right) and on the product or its packaging indicates that this product must not be
disposed of in a standard waste container.
6
 Loading...