

Page 1
Instruction Manual
012-09523A
Chemistry MultiMeasure Sensor
PS-2170
pH/ISE/ORP
SENSOR
CHEMISTRY
TEMPERATURE
PRESSURE
1
VOLTAG E
ä
PS-2170
2
3
4
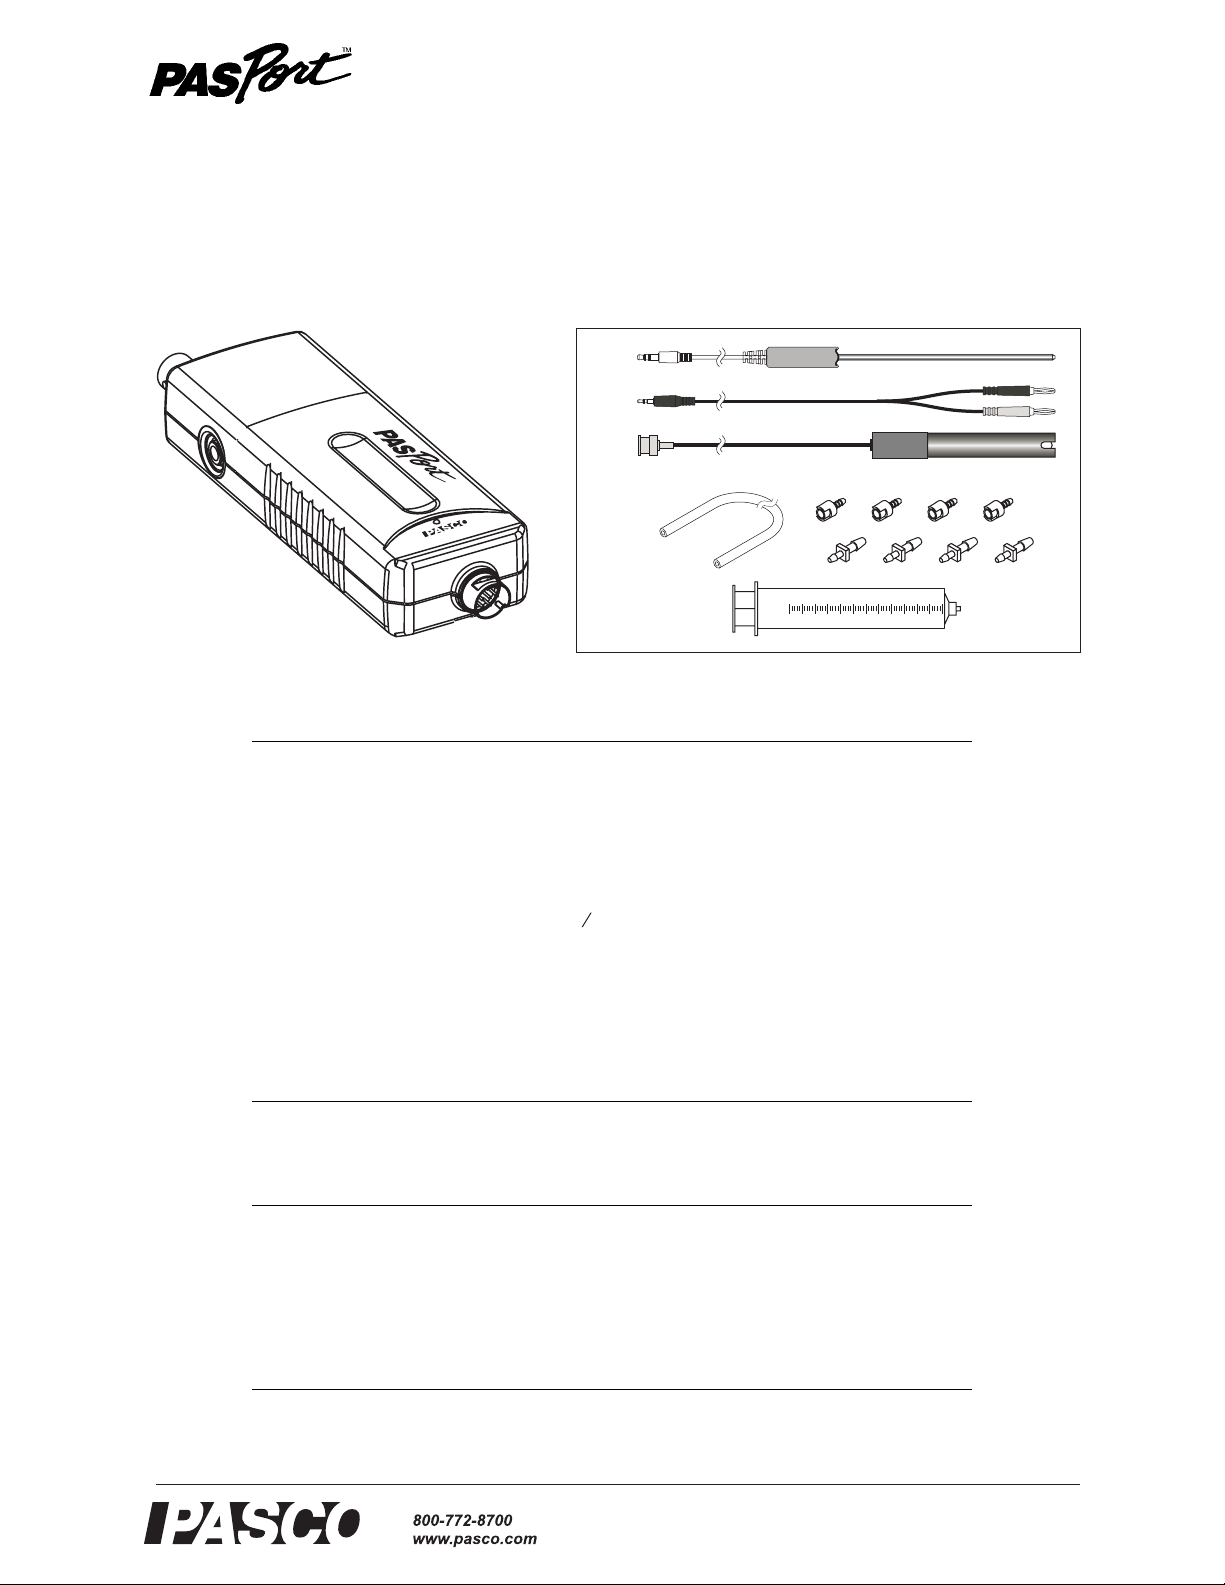
Included Equipment Part Number
1. Chemistry MultiMeasure Sensor PS-2170
2. Stainless Steel Temperature Probe PS-2153
3. Voltage Probe PS-2165
4. pH Electrode 699-195
5. Polyurethane Tubing (60 cm long, inch ID) 640-023
1
8
6
5
cc
1015202530354045505560
8
5
7
6. Quick-release Connectors (qty. 4) 640-021
7. Tubing Connectors (qty. 4) 640-030
8. Syringe (60 cc) 699-166
Required Equipment
PASPORT Interface
1
See PASCO catalog or
www.pasco.com
Optional Equipment
Fast-response Temperature Probe PS-2135 (3-pack)
Skin/surface Temperature Probe PS-2131
Various Ion-selective Electrodes (ISE) See PASCO catalog or
www.pasco.com
Oxidation Reduction Potential (ORP) Electrode CI-6716
1
PASPORT interfaces include the AirLink (IW-4100 or PS-2005), Xplorer GLX (PS-2002), Xplorer
(PS-2000), PowerLink (PS-2001), and USB Link (PS-2100)
®
Page 2
Chemistry MultiMeasure Sensor Introduction
Introduction
The PS-2170 Chemistry MultiMeasure Sensor combines four sensors in a single unit:
• Temperature
• pH, ORP and ion-selective electrode voltage
• Absolute gas pressure
•Voltage
When connected to a PASPORT interface, the multi-sensor collects data at up to 100
samples per second from each component sensor. You can use just one component
sensor at a time or any combination simultaneously . If you have a PASPORT interface
that supports multiple sensors, or if you have more than one interface connected to
your computer, you can use the Chemistry MultiMeasure Sensor in combination with
other PASPORT sensors.
Sensor, Interface, and Software Setup
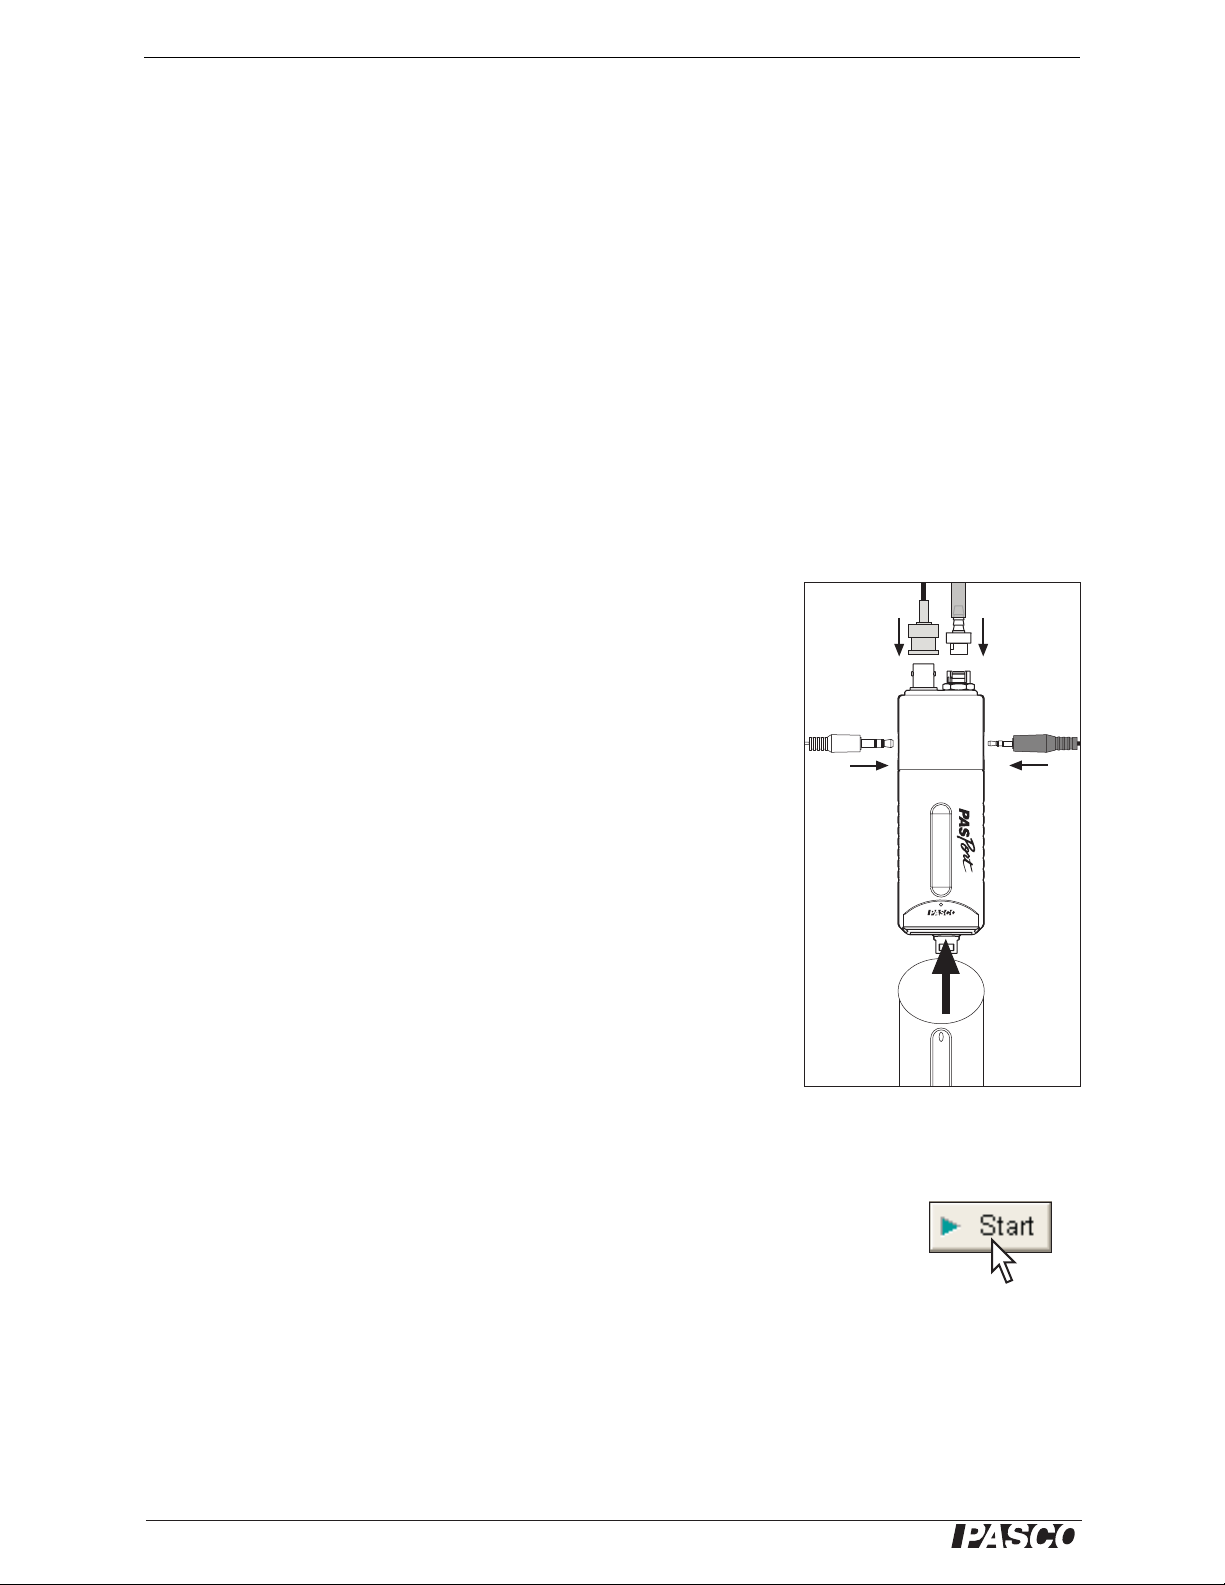
Connect the multi-sensor to your PASPORT interface as pictured (right).
Connect any or all of the included probes to the multi-sensor . (You can leave
any of the probes disconnected if you do not plan to use it.) If you will be
using an ion-selective electrode or oxygen reduction potential electrode,
connect it to the pH/ISE/ORP port. If you plan to measure pressure in an
apparatus or the included syringe, connect it to the sensor’s pressure port
using the included tubing and a quick-release connector.
Follow the instructions below to set up the sensor with DataStudio software
(if you are using a computer) or the Xplorer GLX (if you are using it standalone without a computer).
For detailed information about each of the multi-sensor sensor’s component
sensors see pages 3–5.
DataStudio Setup
If you are using a computer, connect the PASPORT interface to the computer and start DataStudio. (Refer to the documentation that came with your
PASPORT interface for instructions on connecting it to your computer.) In
DataStudio, click the Start button to begin data collection; click the Stop button to
stop data collection.
Temperature
CHEMISTRY
SENSOR
TEMPERATURE
PS-2170
PressurepH/ISE/ORP
PRESSUREpH/ISE/ORP
Voltage
VOLTAGE
ä
PASPORT
Interface
Note that the sensor may collected data for probes that are not connected. Hide or
ignore these measurements. To hide measurements that you do not need, open the
Experiment Setup Window by clicking the Setup button. In the Setup window you
can also change the sampling rate and open the calibration dialog box (see Appendix
A). For more instructions on using DataStudio, press F1 to open DataStudio’s on-line
help.
2
Click to Start
®
Page 3

Model No. PS-2170 Temperature
Xplorer GLX Setup
If you are using an Xplorer GLX in standalone mode, press to start data collection.
Note that the sensor may collected data for probes that are not connected. Hide or
ignore these measurements. To hide measurements that you do not need, open the
Sensors screen (from the Home screen, press ). In the Sensors screen you can
also change the sampling rate and open the calibration dialog box. For more instructions on using the Xplorer GLX, refer to the GLX Users’ Guide.
F4
Temperature
Use this component of the multi-sensor to measure the temperature of a fluid or
object. The measurement can be displayed in units of °C, °F, or K. (In DataStudio,
click the Setup button to change units.) You can use the included stainless steel probe
or a different probe, such as the Fast-response Probe (PS-2135) or Skin/Surface Probe
(PS-2131). PASCO apparatu s containing an embedded 10 kΩ thermistor can also be
connected to the multi-sensor. The multi-sensor automatically detects the presence of
a temperature probe, and it will only collect temperature data if a probe is connected.
Measuring Temperature
To measure temperature, connect the probe and start data collection. Immerse the tip
of the probe in a fluid or place it in contact with an object. The included stainless steel
probe can be used in both dry conditions and in liquids, such as water and other mild
chemicals and solutions.
Tip: For better chemical resistance, use a Teflon® cover (CI-6549).
Temperature Calibration
The temperature measurement can be calibrated; however, for most applications calibration is not necessary. Use a two-point calibration with two standards of known
temperature. For instructions on calibrating in DataStudio, see Appendix A. For
instructions on calibrating on the Xplorer GLX, refer to the Xplorer GLX Users’
Guide.
pH/ISE/ORP
The pH/ISE/ORP input of the multi-sensor is a specialized voltage sensor. Its BNC
connector accepts the included pH electrode, as well as ISE and ORP electrodes. The
sensor measures the voltage produced by any of these electrodes. When used with a
pH probe, the sensor also computes the pH based on the measured voltage.
Connect the pH electrode (or other electrode) to the pH/ISE/ORP port and start data
collection. On your computer or interface, display the ISE V oltage measurement (this
measurement is valid for pH and ORP electrodes as well as ISE) or the pH measurement for the calculated pH (assuming that the pH electrode is connected).
Measuring pH
The pH electrode produces a voltage proportional to the pH of the solution that it is
immersed in. This voltage is measured by the multi-sensor, which computes pH.
®
3
Page 4

Chemistry MultiMeasure Sensor pH/ISE/ORP
Unscrew and remove the storage bottle from the electrode (be careful not to spill the
storage solution). Push the O-ring and bottle cap up the electrode handle. Rinse the
electrode tip with distilled water. If you see bubbles in the electrode bulb, gently
shake the electrode downward (similar to shaking down a thermometer). Start data
collection. Place the tip of the electrode in the solution to be measured and wait for
the reading on your computer or interface to stabilize. Rinse the electrode with distilled water before measuring another solution.
pH Calibration
The pH measurement can be calibrated; however, for most applications calibration is
not necessary. Perform a two-point calibration with two buffer solutions of known
pH. For instructions on calibrating in DataStudio, see Appendix A. For instructions
on calibrating on the Xplorer GLX, refer to the Xplorer GLX Users’ Guid e.
pH Electrode Maintenance and Storage
Cleaning
If the pH electrode becomes contaminated, use one of these methods to clean and
restore it. After any of these procedures, soak the electrode in a pH 7 buffer solution
for 30 minutes.
• General Contamination: Soak the electrode in 0.1 molar hydrochloric acid
(HCl) for 15 minutes.
• Protein Deposits: Soak the electrode in a solution of 1% pepsin in 0.1 molar
HCl.
• Inorganic Deposits: Rinse the electrode with 0.1 molar ethylene dinitric
tetra-acidic acid (EDTA) tetrasodium solution.
• Oil and Grease Film: Wash the electrode carefully in a mild detergent or a sol-
vent known to be effective for the particular film.
• Unknown Contamination: Soak the electrode alternately in 12 molar sodium
hydroxide (NaOH) and 1 molar HCl. Leave it in each solution for one minute.
Rinse completely between soakings. End with HCl. (The NaOH etches the glass
and the HCl reestablishes hydrogen ions on the surface.)
If these steps fail to improve the response of the electrode, replaced it.
Storage
Store the pH electrode in the included electrode storage bottle with one of the following solutions. (Never store the electrode in distilled water.)
• Short-term (up to one week): pH 4 buffer solution or tap water.
• Long-term (over one week): pH 4 buffer solution with 1 g per 100 mL of potas-
sium chloride (KCl) added.
4
®
Page 5

Model No. PS-2170 Pressure
C
Pressure
This component of the multi-sensor measures absolute gas pressure
from 0 kPa to 700 kPa. The measurement can be displayed in units of
kPa, N/m
2
, pounds per square inch (p.s.i.), atmospheres (atm), or torr.
(In DataStudio, click the Setup button to change units.)
With nothing connected to pressure port, the sensor measures atmospheric pressure.
To measure the pressure in an apparatus or the included syringe, connect it to the sensor using the included tubing and connectors. Insert the
barbed end of a quick-release connector into a piece of tubing. Push the
quick-release connector onto the sensor’s pressure port and twist it
clockwise to secure it. If your apparatus has a barbed or tapered connector (such as the included syringe), plug it directly into the other end of
the tubing. If the apparatus has a quick-release pressure port, use
another quick-release connector on the other end of the tubing. Use one
of the included tubing connectors to connect the tubing to larger-diameter tubing or to a rubber stopper with a hole.
Note: Do not allow liquid to enter the pressure port.
PRESSURE
VOLTAGE
R
O
S
N
pH/ISE/ORP
E
S
HEMISTRY
Vol tage
Use the voltage component of the multi-sensor to measure electric potential difference between the terminals of a battery or power supply, or two points on a circuit.
The voltage probe has two connectors: red and black. The sensor measures the voltage of the red connector in reference to the black connector. Its range is ±10 V.
®
5
Page 6

Chemistry MultiMeasure Sensor Specifications
Specifications
General
Component Sensors Temperature, pH/ISE/ORP probe voltage, Absolute Pressure, Voltage
Max. Sampling Rate 100 samples per second (for each component sensor)
Default Sampling Rate 10 samples per second
Temperature
Range −35 °C to +135 °C
Accuracy ±0.5 °C
Resolution 0.01 °C or better
Sensing Element 10 kΩ thermistor located in probe tip
pH/ISE/ORP probe voltage
Electrode Connector standard BNC
Volt a g e Range −2000 mV to +2000 mV
Voltage Resolution 0.1 mV
pH Range 0 to 14
pH Resolution 0.001
Range 0 kPa to 700 kPa
Accuracy 2 kPa
Resolution 0.1 kPa
Repeatability 1 kPa
Range −10 V to + 10 V
Accuracy ± 0.1 V
Resolution ± 0.04 mV
Voltage Protection up to 240 V
Input Resistance 2 MΩ
Absolute Pressure
Volt ag e
6
®
Page 7

Model No. PS-2170 Specifications
Appendix A: DataStudio Calibration
In DataStudio, click the Setup button to open the Experiment Setup window; in that
window, click the Calibrate button to open the Calibrate Sensors dialog box. For a
two-point calibration, you will need two “known standards,” such as two buffer solutions of known pH or two liquids of known temperature.
1. From the Sensor field, select Chemistry.
2. From the Measurement field, select Temperature or pH.
3. Ensure that “Calibrate all similar measurements simulta-
neously” is not selected.
4. From the Calibration Type menu, select 2 Point (Adj ust Slope
and Offset), if it is not already selected.
5. Place the temperature or pH probe in the first known standard.
6. Enter the known temperature or pH of the standard in the
Standard Value field for Point 1.
7. Observe the Present Sensor Measurement and wait until it
has stabilized.
8. Click the Read From Sensor button for Point 1.
9. Place the probe in the second known standard.
10. Enter the known temperature or pH of the standard in the
Standard Value field for Point 2.
11. Observe the Present Sensor Measurement and wait until it
has stabilized.
12. Click th e Read From Sensor button for Point 2.
13. Click OK to accept the new calibration.
Appendix B: EZ Screen
If you are using the Chemistry MultiMeasure Sensor with a PASPORT interface connected to a computer, you can use EZ-Screen software instead of DataStudio. When
the sensor is connected to the computer through the interface (if DataStudio is not
running) a window automatically launches giving you the option of launching
EZ-Screen. In EZ-Screen, click the green arrow button to start data collection. Click
the Chemistry Sensor icon in the lower-right corner to cycle through the measurements and units.
Click to start
data collection
Click to change
measurements
EZ-Screen
®
7
Page 8

Chemistry MultiMeasure Sensor Technical Support
Technical Support
For assistance with any PASCO product, contact PASCO at:
Address: PASCO scientific
10101 Foothills Blvd.
Roseville, CA 95747-7100
Phone: 916-786-3800 (worldwide)
800-772-8700 (U.S.)
Fax: (916) 786-3292
Web: www.pasco.com
Email: support@pasco.com
Limited Warranty
For a description of the product warranty, see the PASCO catalog.
Copyright
The PASCO scientific 012-09456B Chemistry MultiMeasure Sensor Instruction Manual is copyrighted with all rights reserved. Permission is granted to non-profit educational institutions for reproduction of any part of this manual, providing the reproductions are used
only in their laboratories and classrooms, and are not sold for profit. Reproduction under any other circumstances, without the written
consent of PASCO scientific, is prohibited.
Trademarks
PASCO, PASCO scientific, DataStudio, MultiMeasure Sensors, PASPORT, Xplorer and Xplorer GLX are trademarks or registered
trademarks of PASCO scientific, in the United States and/or in other countries. All other brands, products, or service names are or
may be trademarks or service marks of, and are used to identify, products or services of, their respective owners. For more information visit www.pasco.com/legal. Teflon is a registered trademark of DuPont.
8
®
 Loading...