

Page 1
®
Instruction Manual
Temperature Probe
Voltage Probe
012-09456C
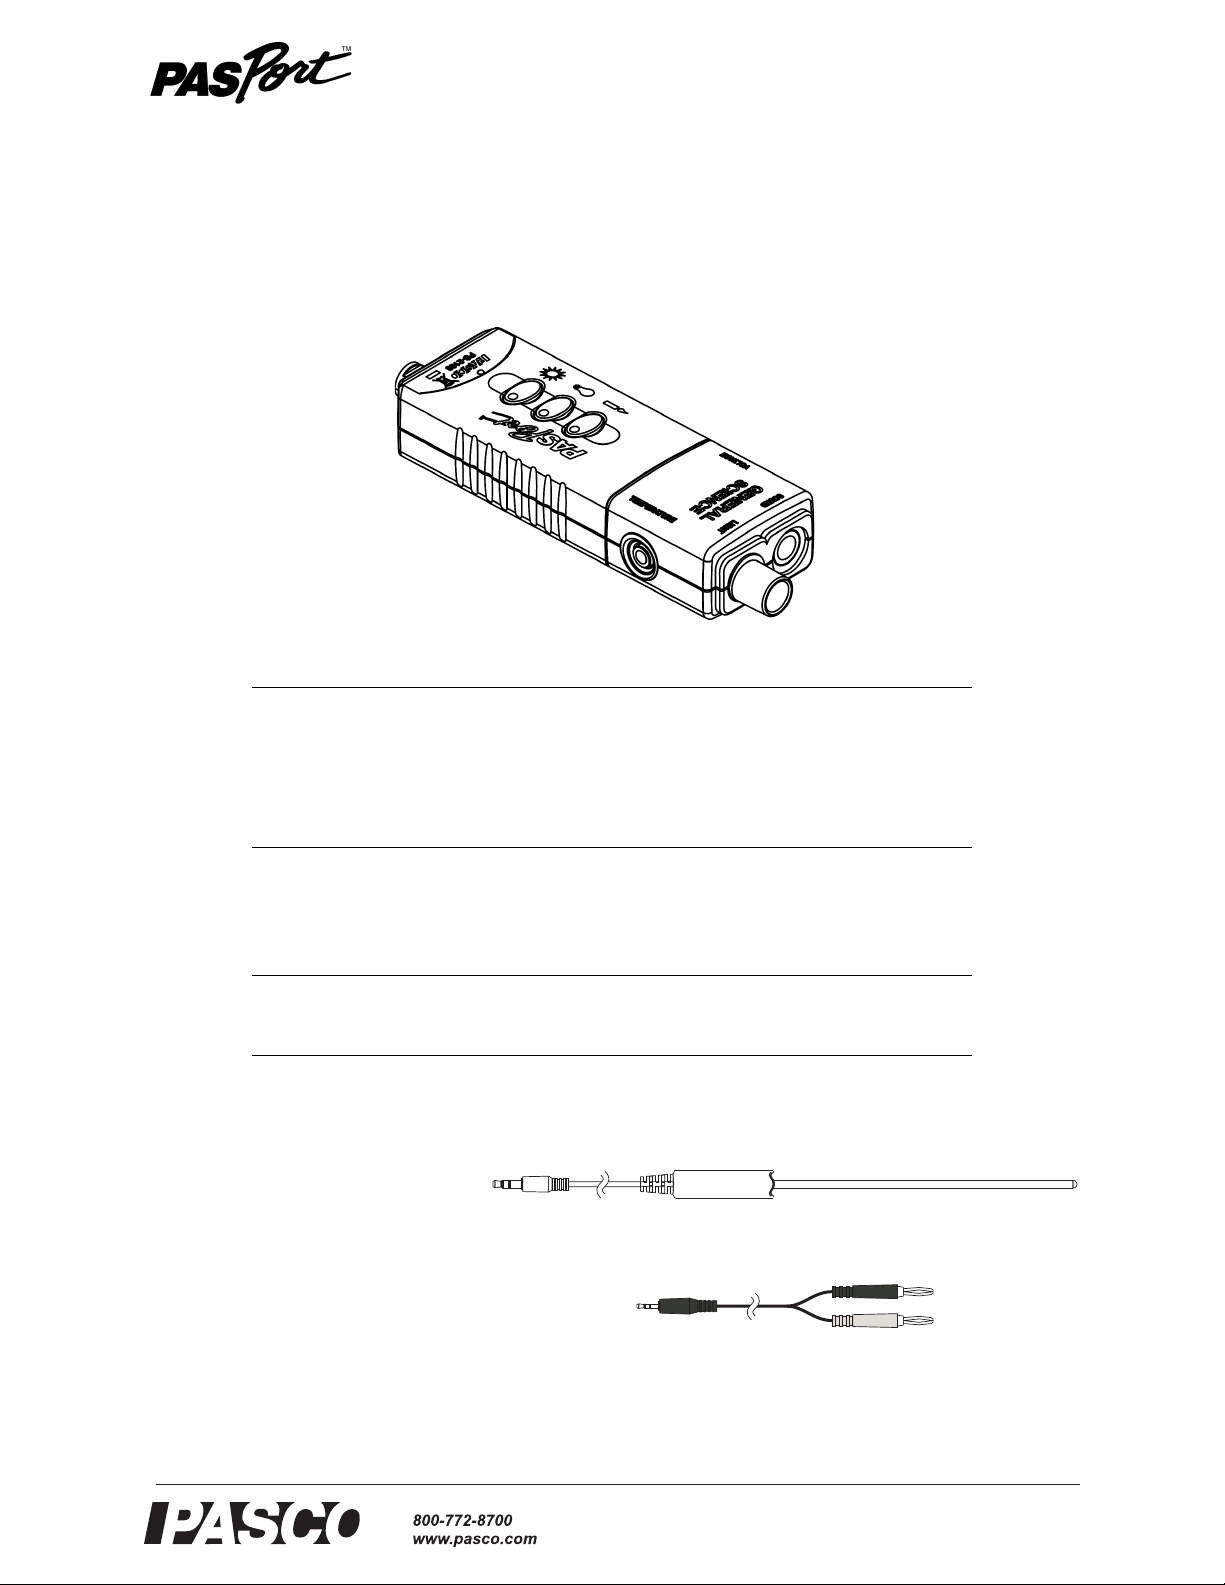
General Science MultiMeasure Sensor
PS-2168
Included Equipment Part Number
General Science MultiMeasure Sensor PS-2168
Stainless Steel Temperature Probe PS-2153 (not shown)
Voltage Probe PS-2165 (not shown)
Required Equipment
PASCO Interface
PASCO Data Acquisition Software
Optional Equipment
Fast-response Temperature Probe PS-2135 (3-pack)
Skin/surface Temperature Probe PS-2131
See PASCO catalog or
www.pasco.com
Introduction
The PS-2168 General Science MultiMeasure Sensor combines four sensors in a single unit:
• Temperature
• Light
• Sound Level
•Voltage
Page 2
®
General Science MultiMeasure Sensor Sensor Setup
Temperature
Probe
Voltage Probe
PAS PORT
Interface
F4
When connected to a PASPORT interface, the multi-sensor collects data at
up to 200 samples per second from each component sensor. You can use
just one component sensor at a time or any combination simultaneously. If
you have a PASPORT interface that supports multiple sensors, or if you
have more than one interface connected to your computer, you can use the
General Science MultiMeasure Sensor in combination with other
PASPORT sensors.
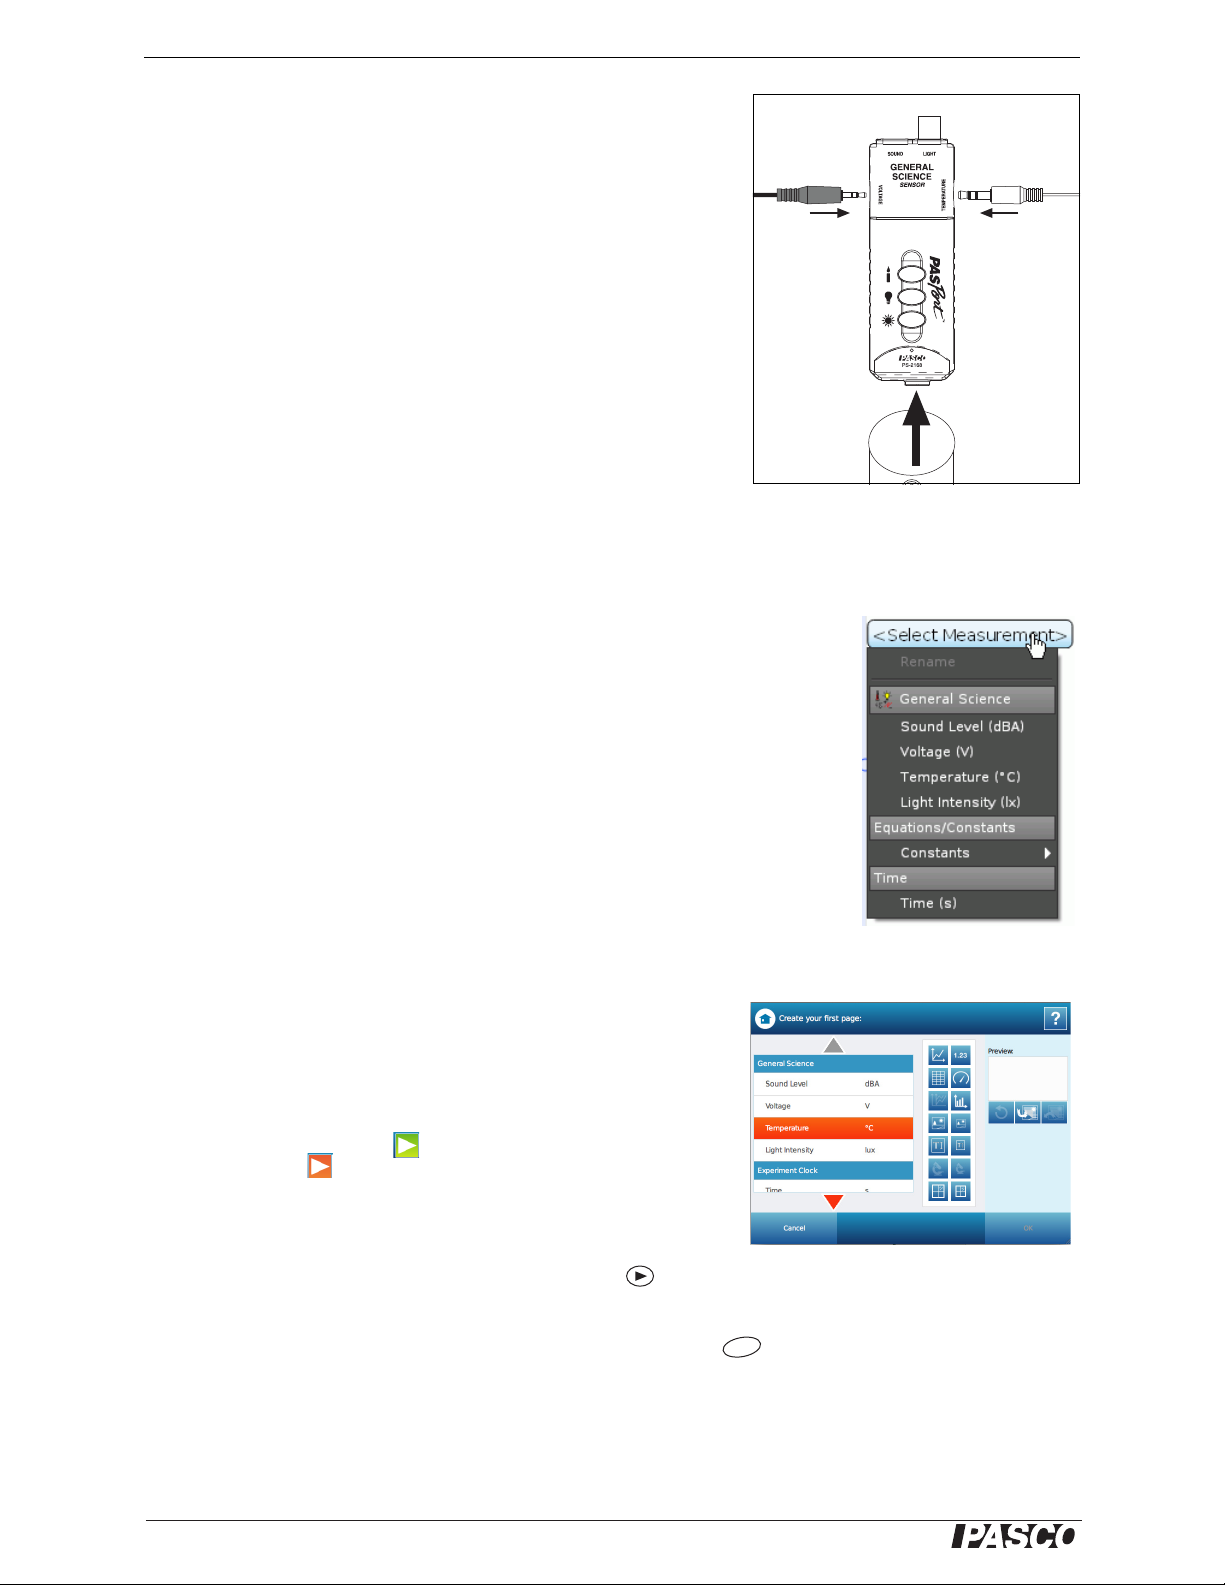
Sensor Setup
Connect the multi-sensor to your PASPORT interface. Connect the
included temperature and voltage probes to the ports on the sides of the
multi-sensor. (You can leave either of the probes disconnected if you do
not plan to use it.)
For detailed information about each of the multi-sensor sensor’s component sensors see below on this page and the next page.
Follow the instructions below to set up the sensor with PASCO Data Acquisition Software (if you are using a computer) or the Xplorer GLX (if you are using the GLX standalone without a computer).
Computer Interface Setup
If you are using a PASCO Interface connected to a computer, turn on the interface (if
needed) and the computer and start the PASCO Data Acquisition Software. (Refer to
the documentation that came with your PASPORT interface for instructions on connecting it to your computer.) Configure the software to begin to collect and display
data. For example, in PASCO Capstone, select one of the display templates, or drag the
icon of a display from the Displays palette. In the display, click “Select Measurement”
to show the menu. Click to choose a measurement. Click the “Record” button in the
Controls palette to begin data collection; click the “Stop” button to stop data collection.
The General Science MultiMeasure Sensor always collects sound-level, light, and voltage data, but collects temperature data only if a temperature probe is connected. The
default sampling rate is 2 Hz. To change the sampling rate, use the Up-or-Down arrows
next to the sampling rate value shown in the Controls palette. For more information on
using PASCO Capstone, refer to the Help System.
SPARKvue Device
Plug the General Science MultiMeasure Sensor into one of the PASPORT
input ports on the SPARKvue device (such as the SPARK SLS or SPARKlink Air), and turn on the device. In the Home Screen or the next screen
that opens, touch “Build” to open the “Create your first page” screen. In
the menu of measurements, touch your choice (such as Temperature).
Then touch one of the display icons (such as the Digits display). Touch
OK. Touch the “Record” icon ( ) to begin collecting and displaying
data. Touch “Stop” ( ) to end data collection. For more information on
using the SPARKvue device, refer to the Help System.
Xplorer GLX Setup
If you are using an Xplorer GLX in standalone mode, press to start data collection. The General Science MultiMeasure Sensor always collects sound-level, light, and voltage data, but collects temperature data only if a temperature probe is connected. The default sampling rate is 2 Hz. To change the sampling rate or hide measurements that
you do not need, open the Sensors screen (from the Home screen, press ). For more instructions on using the
Xplorer GLX, refer to the GLX Users’ Guide.
2
Page 3

®
Model No. PS-2168 Temperature
Light indicates
selected range
100 lux
10000 lux
150000 lux
Range
Source Sound
Level
(dBA)
Rustling
leaves
20
Library 40
Normal
conversation
60
Noisy office 80
Subway train 100
Rock concert 120
Temperature
Use this component of the multi-sensor to measure the temperature of a fluid or object. The measurement can be displayed in units of °C, °F, or K. (In DataStudio, click the Setup button to change units.) You can use the included stainless steel probe or a different probe, such as the Fast-response Probe (PS-2135) or Skin/Surface Probe (PS-2131).
PASCO physics apparatus containing an embedded 10 k thermistor can also be connected to the multi-sensor. The
multi-sensor automatically detects the presence of a temperature probe, and will only collect temperature data if a
probe is connected.
To measure temperature, connect the probe and start data collection. Immerse the tip of the probe in a fluid or place it
in contact with an object. The included probe is suitable for temperatures between 35 °C and 135 °C. It can be used
in both dry conditions and in liquids, such as water and other mild chemicals and solutions.
• Tip: Keep the connector of the probe and the body of the multi-sensor away from liquids. For better chemical resistance, use a Teflon
®
cover (CI-6549).
The temperature measurement can be calibrated; however, for most applications calibration is not necessary. For
instructions on calibrating, see the software Help SYstem. For instructions on calibrating on the Xplorer GLX, refer
to the Xplorer GLX Users’ Guide.
Light
The light component of the multi-sensor measures light intensity, or the power per unit area
of light incident on the light-sensitive element. The element is located behind the black cylinder protruding from the multi-sensor. Though it measures light intensity, the sensor’s output is calibrated to indicate illuminance in units of lux.
Point the sensor in the direction of a light source and start data collection. The light sensor
has three ranges, which you select using the three buttons on the multi-sensor. To select a
range, push one of the buttons: for 0 lux to 100 lux, for 0 lux to 10000 lux, or for 0
to 150000 lux. Lights on the buttons indicate which range is selected. To determine which
range is appropriate, look at the data (on a Graph display, for instance) while it is being collected; if the measurement appears to be “railed” at the top of the selected range (100 lux or
10000 lux), select the next higher range. You can push a button to change the range without stopping data collection.
• Tip: If you anticipate that the measured value will increase during your experiment, select a higher range.
• Tip: Fluorescent lights flicker at a high rate (100 Hz or 120 Hz), which causes aliasing, or the illusion of a
lower-frequency periodic signal, in data collected at relatively low sampling rates. For this reason, it is recommended that the General Science MultiMeasure Sensor be used to measure light from incandescent bulbs
and natural light sources. To measure high-frequency light sources, use the PS-2106 Light Sensor, with a
maximum sampling rate of 1000 Hz.
Sound Level
The sound component sensor measures sound level on the dbA weighting scale. This
weighting scale is designed to match the frequency response of the human ear and is
commonly used to measure environmental sound levels. The table (right) shows some
typical sound levels.
Voltage
Use the voltage component of the multi-sensor to measure electric potential difference
between the terminals of a battery or power supply, or two points on a circuit. The voltage probe has two connectors: red and black. The sensor measures the voltage of the red
connector in reference to the black connector. Its range is 24 V.
3
Page 4

®
General Science MultiMeasure Sensor Specifications
Specifications
General
Component Sensors Temperature, Light, Sound Level, Voltage
Max. Sampling Rate 200 samples per second (for each component sensor)
Default Sampling
Rate
Range 35 °C to 135 °C
Accuracy 0.5 °C
Resolution 0.01 °C or better
Sensing Element 10 k thermistor located in probe tip
Output calibrated to indicate illuminance
Spectral Response 320 nm to 1100 nm
Range 50 dbA to 100 dbA Range 24 V to 24 V
Accuracy 4 dBA Accuracy 0.1 V
Resolution 0.1 dBA Resolution 0.001 V
Repeatability 0.5 dBA Voltage Protection up to 240 V
2 samples per second
Temperature
Light
three user-selectable ranges: 100 lux, 10000 lux, 150000 lux
Sound Level Voltage
Input Resistance 1 M
Technical Support
For assistance with any PASCO product, contact PASCO at:
Address: PASCO scientific
10101 Foothills Blvd.
Roseville, CA 95747-7100
Phone: 916-786-3800 (worldwide)
800-772-8700 (U.S.)
Web: www.pasco.com
Email: support@pasco.com
Product End of Life Disposal Instructions:
This electronic product is subject to disposal and recycling regulations that vary by country and region. It is your responsibility to
recycle your electronic equipment per your local environmental laws
and regulations to ensure that it will be recycled in a manner that
protects human health and the environment. To find out where you
can drop off your waste equipment for recycling, please contact
your local waste recycle/disposal service, or the place where you
purchased the product.
The European Union WEEE (Waste Electronic and Electrical
Equipment) symbol (to the right) and on the product or its packaging indicates that this product must not be disposed of in a standard
waste container.
Limited Warranty
For a description of the product warranty, see the
PASCO catalog.
Copyright
This PASCO scientific Instruction Manual is copyrighted
with all rights reserved. Permission is granted to
non-profit educational institutions for reproduction of any
part of this manual, providing the reproductions are used
only in their laboratories and classrooms, and are not
sold for profit. Reproduction under any other circumstances, without the written consent of PASCO scientific,
is prohibited.
Trademarks
PASCO, PASCO scientific, MultiMeasure Sensors,
PASPORT, SPARKvue and SPARK Science Learning
System are trademarks or registered trademarks of
PASCO scientific, in the United States and/or in other
countries. All other brands, products, or service names
are or may be trademarks or service marks of, and are
used to identify, products or services of, their respective
owners. For more information visit www.pasco.com/legal.
Teflon is a registered trademark of DuPont.
4
 Loading...