

Page 1
Instruction Manual
S
P
I
R
O
M
E
T
E
R
ä
PS-2152
WAIT
READY
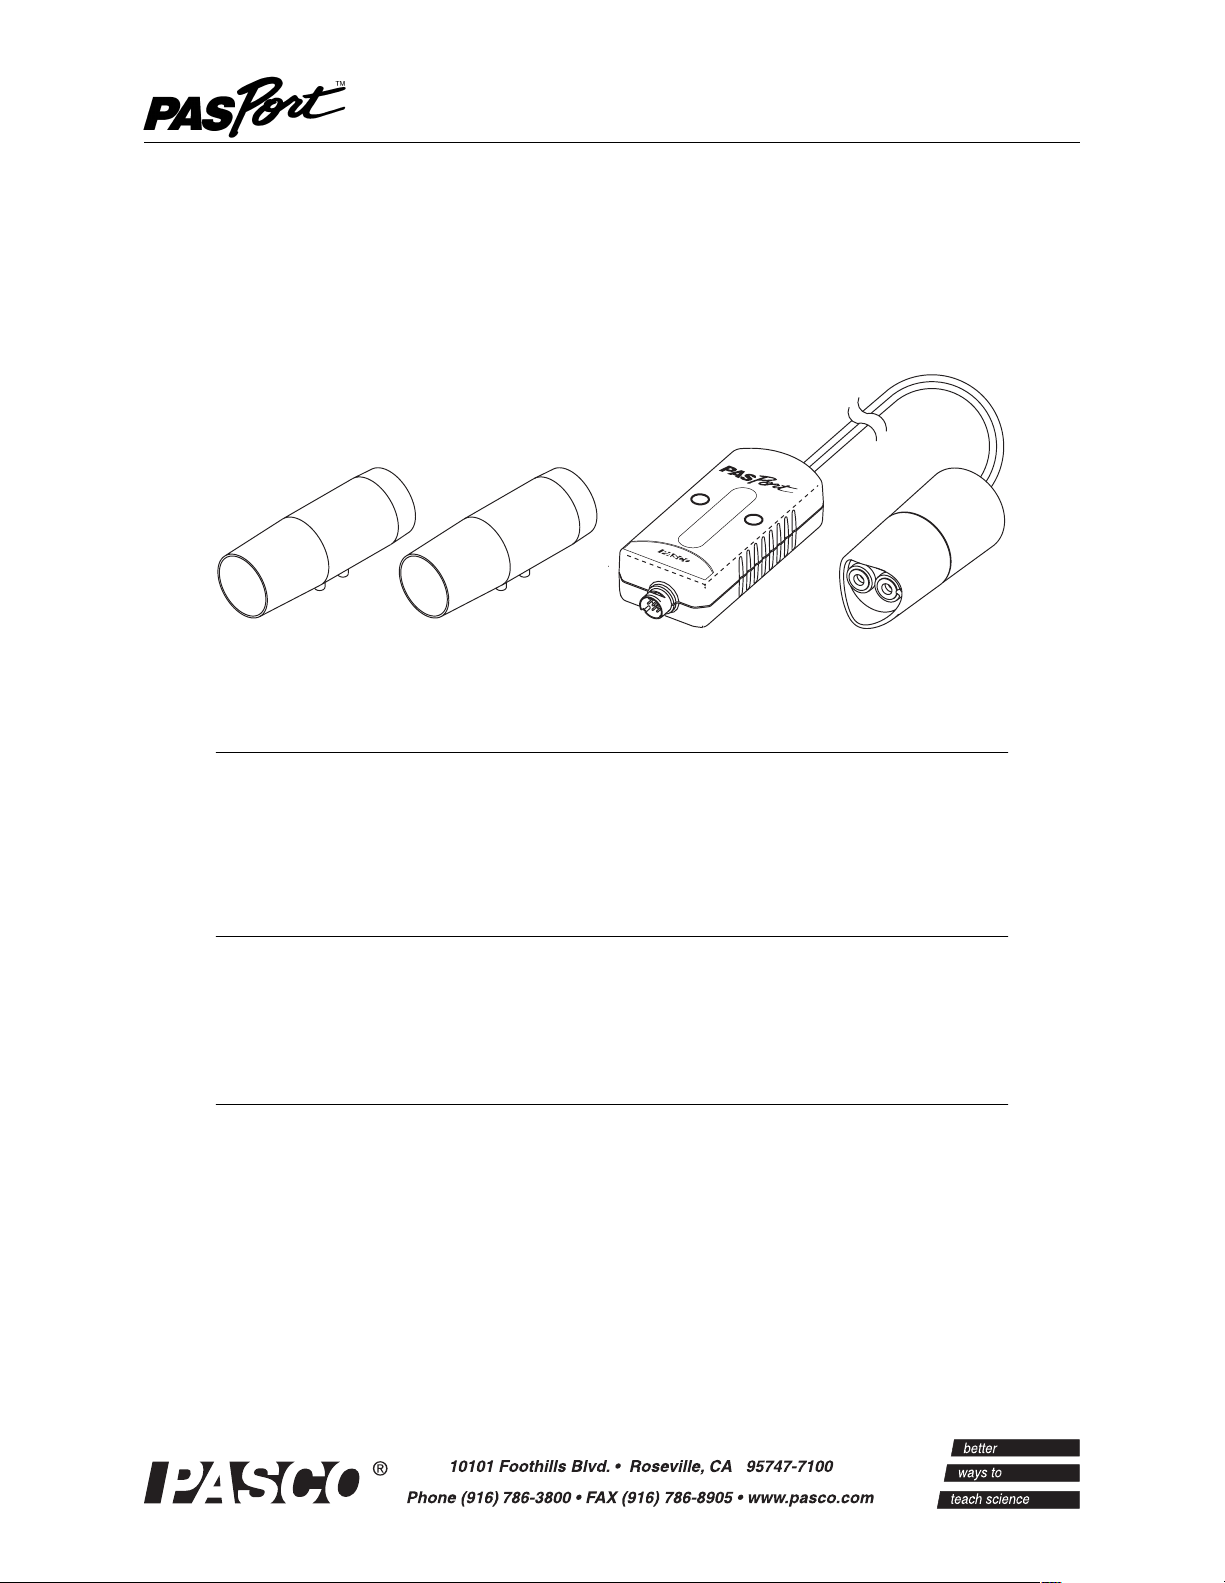
Spirometer
PS-2152
No. 012-08856A
Included Equipment Part Number
Electronics enclosure and handle
Single-use mouthpiece (2 included)
CD-ROM containing DataStudio workbook files
PS-2152
PS-2522 (10-pack)
013-09084
Additional Equipment Required
PASPORT interface
DataStudio or DataStudio Lite
(required for computer-based data collection)
See PASCO catalog or www.pasco.com
See PASCO catalog or www.pasco.com
DS Lite available for free download
Additional Equipment Recommended
Additional single-use mouthpieces
PS-2522 (10-pack)
Introduction
The PASPORT Spirometer allows students to collect accurate air-flow data from a pulmonary
function test (PFT). The subject breathes through a sanitary, single-use mouthpiece as data is
recorded and displayed on your computer or PASPORT interface. From the graphed data
students can measure tidal volume, forced expiratory volume, and other important lung
volumes and capacities.
Page 2
Spirometer How it works
Mouthpiece and
Handle
*The Spirometer
workbook files are
located on the
included CD-ROM.
If you have installed
DataStudio version
1.9.5 or later, the
workbook files have
already been copied
to your computer.
Plug in the
Spirometer (with
DataStudio
not
running) and select
the workbook from
the list that appears.
How it works
When the test subject breathes through the mouthpiece, a screen in the
mouthpiece induces a minute resistance to the air flow. This resistance
leads to a pressure differential across the screen that is measured via two air
lines that lead to a differential pressure transducer in the electronics
enclosure. The Spirometer contains onboard reference data of differential
pressures from known flow rates (a non-linear relationship). It determines
the test subject's flow rate by comparing the measured differential pressure
to the stored reference data. It calculates volume exchanged by integrating
the flow rate over time.
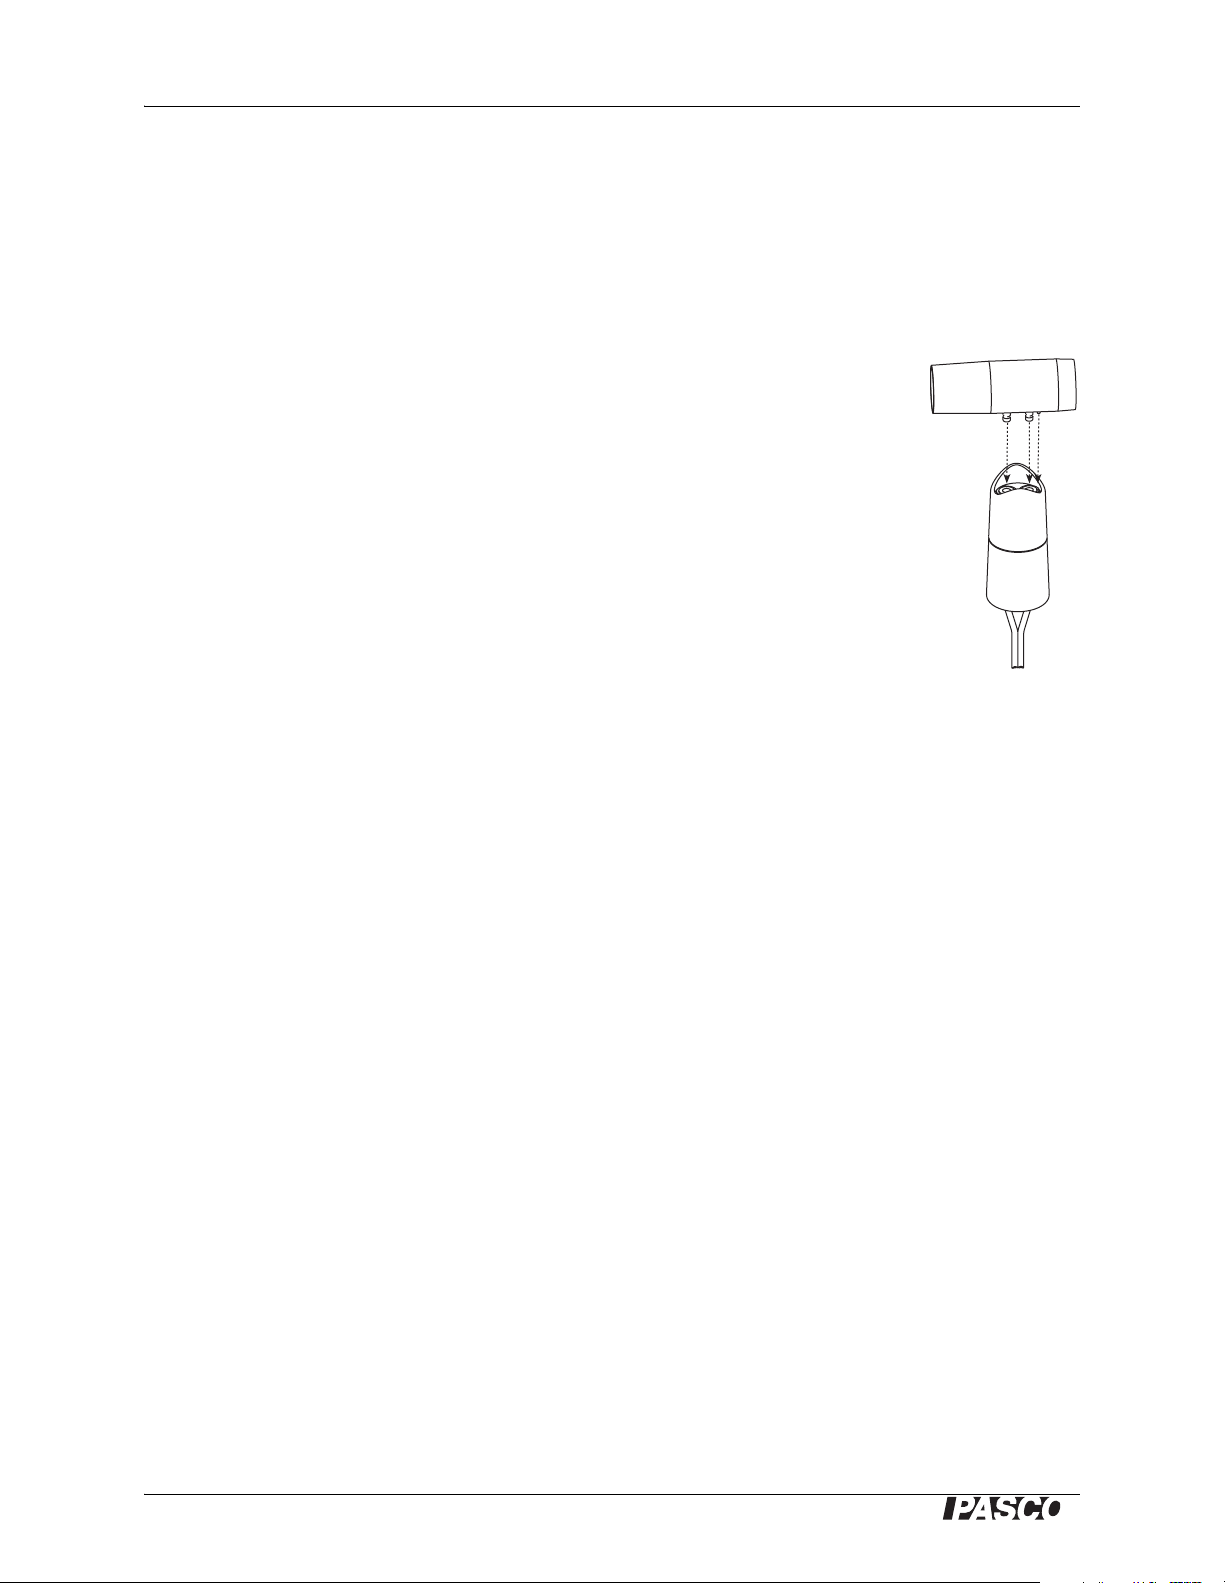
Sensor Setup
Connect a mouthpiece to the handle; note the small pin on the mouthpiece
and the aligning notch on the handle. Connect the electronics enclosure of
the sensor to your PASPORT interface.
Data Collection
Option 1:
Option 2:
2
(When you remove a used mouthpiece, pull it straight out from the handle
without rocking or wiggling it.)
DataStudio Workbook File
On your computer, open the DataStudio file “Spirometer PFT.”* This file is
configured to collect and display data for a pulmonary function test. Onscreen instructions will guide students through data collection and analysis.
Students can review the test procedure and interpretation of PFT data by
completing the workbook, “Spirometer Background” before starting
“Spirometer PFT.”
If you are not using the workbook file
Your PASPORT interface will record Flow Rate and Max Flow Rate (in
liters/second) and Total Flow (in liters), at a sampling rate of 50 Hz.
Flow Rate is the rate at which air flows through the mouthpiece. Air
expired from the lungs is measured as positive flow, inspired air as
negative. Max Flow Rate is the maximum exhaled flow rate measured
during the test. The sensor calculates Flow Volume by integrating Flow
Rate data over time. Flow Volume is the net volume of expired air (total
expired volume minus total inspired volume).
Plug in the sensor and launch DataStudio (if you are using a computer.)
The sensor will automatically be set up to record PFT data.
®
Page 3
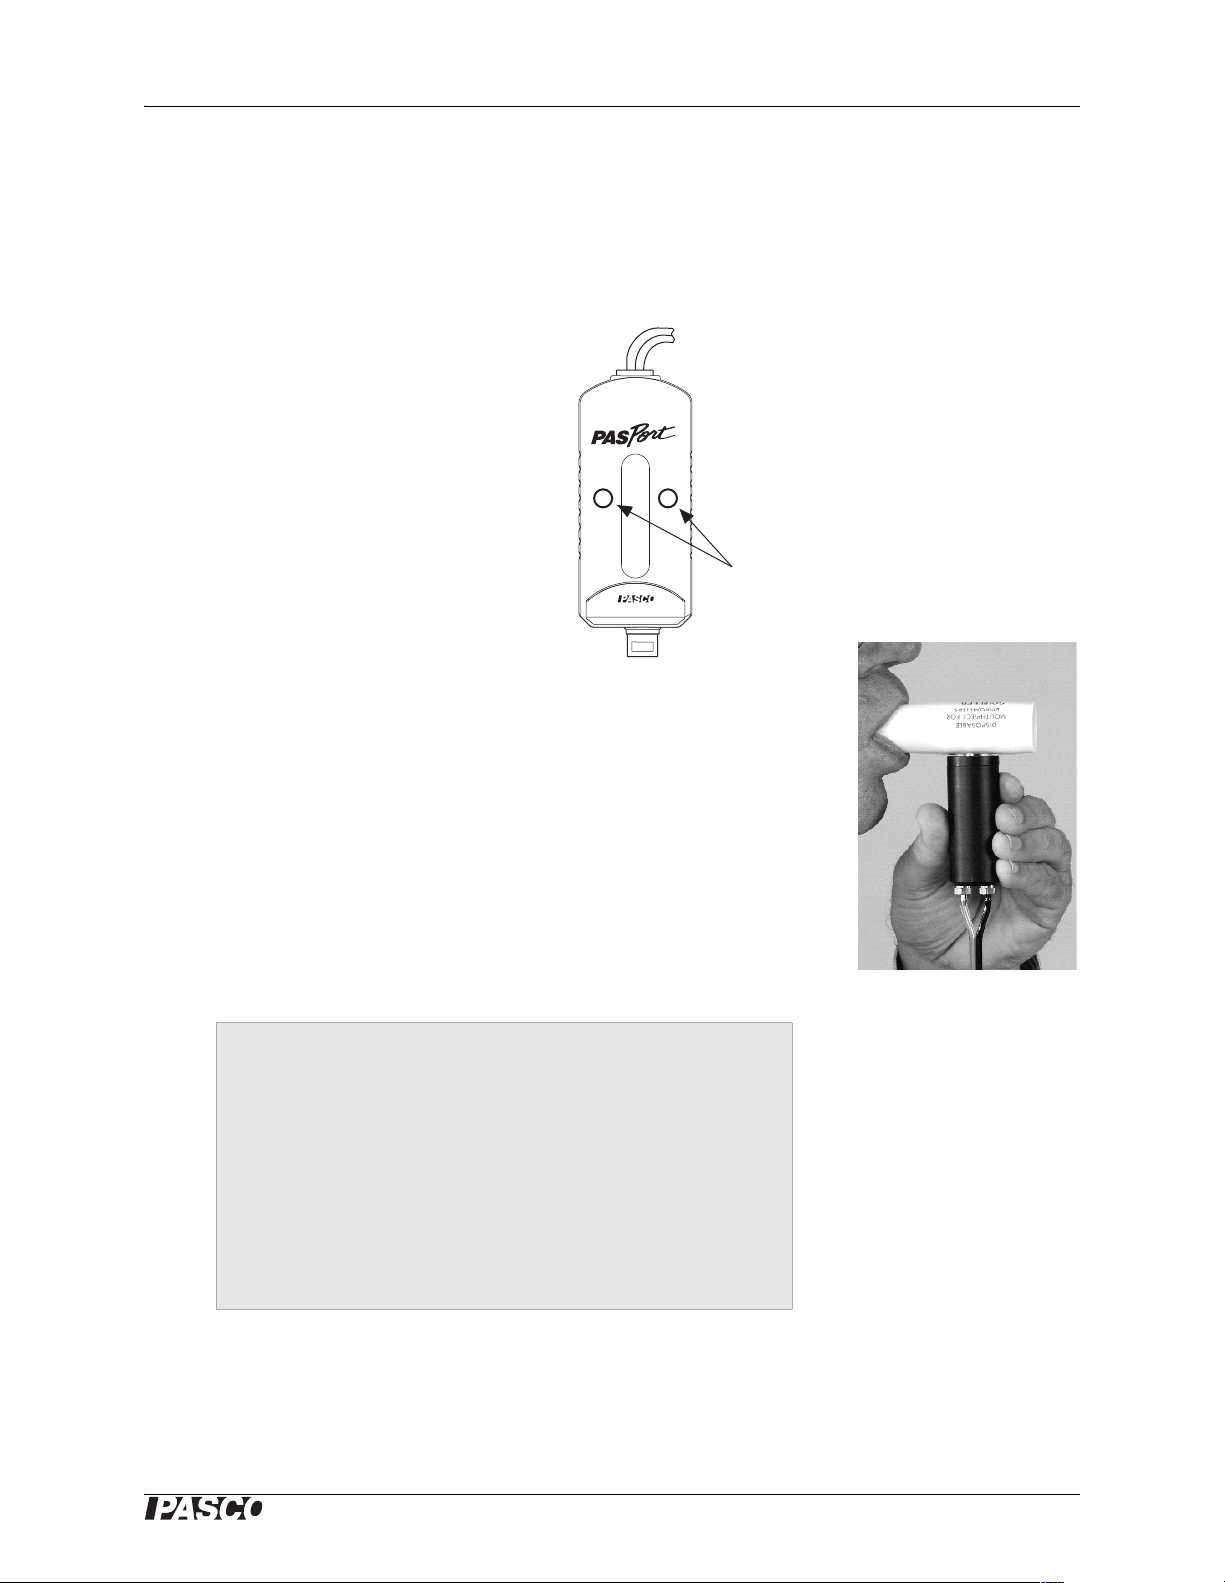
Model No. PS-2152 Data Collection
S
P
I
R
O
M
E
T
E
R
ä
PS-2152
WAIT
READY
Indicator
Lights
*When performing the forced
inspiration and expiration, the
subject should try to fill his or
her lungs to maximum capacity,
then exhale as fast and
completely as possible.
Pulmonary Function Test Procedure
1. Use a nose clip or have the test
subject hold his or her nose to
ensure that all breathing is
done through the mouth.
2. Hold the mouthpiece of the
Spirometer stationary and
away from air currents
(including expired air). Start
data collection; note the
flashing red WAIT indicator on
the sensor. Wait until the green
READY indicator is
illuminated before you move
the mouthpiece or expose it to
air currents.
3. After the green READY
indicator has illuminated, place
the tapered end of the
mouthpiece between the test
subjects’s front teeth with the
lips creating a seal to ensure
that all inspired and expired air
flows through the mouthpiece.
4. Have the test subject perform
the following sequence of
breathing:
• Breathe quietly for about four breaths.
• Perform a forced inspiration followed immediately
by a maximum-effort forced expiration.*
• Breath quietly for two breaths.
5. Stop data collection.
®
3
Page 4

Spirometer Data Collection
Procedure Notes
Observing the following conditions will allow you to collect consistent and
accurate data.
• You may need to run the test a few times in order to get satisfactory
data.
• The subject should sit up or stand comfortably.
• Talk the subject through each inspiration and expiration (this will
prevent the subject from being distracted by counting breathes or
remembering the sequence.)
• Do not allow the test subject to see the data as it is collected.
• Use a nose clip, or have the subject pinch his or her nose during the
test.
• Place the mouthpiece and handle on a table before you start data
collection. Do not pick it up until the red WAIT indicator has stopped
blinking and the green READY indicator is illuminated. While the
WAIT indicator is blinking, the sensor is measuring the ambient
pressure in order to establish a baseline reading. It is important not to
expose the sensor to any pressure change or airflow during the wait
period.
• The electronics enclosure contains a high-resolution differential
pressure sensing element that is sensitive to orientation. The orientation
with respect to vertical or horizontal is not important, but it must
remain constant during the wait period and data collecting.
• Single-use mouthpieces are intended for a single test occasion, which
may include several tests with the same individual. However, with each
test, liquid and particles can accumulate on the screen of the
mouthpiece, which increase the resistance to air flow, leading to
unrealistically high readings of Flow Rate and Total Volume in
subsequent tests. Replace the mouthpiece if you observe evidence of
screen contamination. For the most accurate results, use a new
mouthpiece for every test.
4
®
Page 5

Model No. PS-2152 Interpretation of PFT Data
TV
ERV
IRV
FEV
1.0
IC
VC
1 sec.
*To measure these
quantities from the
graph in DataStudio,
click the Smart Tool
button:
If you are viewing
the data on the
Xplorer GLX
(without a
computer), select
Smart Tool or Delta
Tool from the Tools
menu.
Interpretation of PFT Data
Total Flow vs. Time
Total Flow is the net volume of air that flows out from the lungs through
the Spirometer, equal to the total expired volume minus the total inspired
volume. View the graph of Total Flow vs. Time. Four specific lung
volumes and two lung capacities can be interpreted from this graph.*
Tidal Volume (TV) is the volume of one breath, or the amount of air
moved into and out of the lungs during quiet breathing (breathing without
effort).
Expiratory Reserve Volume (ERV) is the amount of air moved out of the
lungs during a forced expiration, beyond the level of tidal expiration.
Inspiratory Reserve Volume (IRV) is the amount of air moved into the
lungs during a forced inspiration, beyond the level of tidal inspiration.
Forced Expiratory Volume in One Second (FEV
moved out of the lungs in the first second of a forceful expiration following
a maximal inspiration.
Inspiratory Capacity (IC) is the maximum amount of air that can be
inspired after a normal expiration (IC = TV + IRV).
) is the volume of air
1.0
Vital Capacity (VC) is the maximum movable amount of air contained by
the lungs (VC = TV + IRV + ERV).
FEV
% = FEV
1.0
®
÷ VC × 100% is a common comparison of FEV
1.0
to VC.
1.0
5
Page 6

Spirometer Interpretation of PFT Data
TV
ERV
IRV
FEV
1.0
IC
VC
1 sec.
RV
FRC
TLC
*See DataStudio
Online Help, or the
Xplorer GLX manual
for instructions on
entering and
graphing this
calculation.
Lung Volume vs. Time
6
Lung Volume is the constantly-changing amount of air in the lungs. A
spirometer can measure how it changes, but cannot directly measure its
absolute value. Lung volume can be calculated if one of two specific
absolute volumes, residual volume (RV) or functional residual capacity
(FRC), is known or estimated.
Residual volume (RV) is the amount of air remaining in the lungs at the
end of a forced expiration. A typical RV is 1.2 L.
Functional Residual Capacity (FRC) is the amount of air left in the lungs
after a normal expiration (FRC = RV + ERV). A typical FRC is 2.5 liters.
The formula for Lung Volume is:
Lung Volume = V0 - TotalFlow
V0 is the lung volume when the subject first starts to breath through the
Spirometer. Set V
equal to the subject's FRC, or 2.5 L. Once you have
0
acquired data, you may need to adjust V0 so that the graph reflects the
subject's known or estimated FRC or RV.*
®
Page 7

Model No. PS-2152 Factors That May Affect Results
Factors That May Affect Results
In your graphs of Total Flow and Lung Volume, you may notice a slow
drift or slight fluctuation in the baseline. These can be eliminated, in most
cases, as described below. Note that slow baseline changes usually do not
significantly affect the measurements of volumes and capacities that you
take from the graphs.
• Air pressure changes in the environment during the measurement
period can influence the sensor readings. Sources of such pressure
changes include doors opening or closing, heating/cooling/ventilation
systems starting or stopping, and air movement within the testing room.
In most cases environmental pressure variation is tolerably low over
the typical 30-second test period.
• The sensor calculates Total Flow by integrating the measured Flow
Rate over time. Because of this time integration, a very small offset in
the Flow Rate measurement may result in a noticeable upward or
downward trend in the baseline of the Total Flow (or Lung Volume)
data. This trend usually does not have a significant effect on the volume
and capacity measurements taken from the graph, since each
measurement is made between two data points recorded within a few
seconds. In DataStudio you can eliminate the trend with this
calculation:
Total Flow = integral((1 - inrange(0, .03, abs(smooth(10, R)))) * R)
Define R as the Flow Rate. Use the calculated data in place of the data
directly from the sensor. If the trend is still apparent, increase the “.03”
parameter so that it is slightly larger than Flow Rate offset.
Troubleshooting
Problem Solutions
Drift or fluctuation
in the baseline of
Total Flow or Lung
Volume
Large shift in
baseline of Total
Flow or Lung
Volume after forced
expiration
Unrealistically high
Total Flow or Flow
Rate readings
Slow drift (less than 0.3 L in 30 s) is insignificant and can be ignored.
Protect the mouthpiece from movement, air currents and pressure
changes while the WAIT indicator is blinking.
Do not move the electronics enclosure during the entire test.
Use the calculation described above.
Use a nose clip or have the subject pinch his or her nose to prevent
airflow through the nose.
Ensure a good seal of the subject's lips around the mouthpiece.
Replace the mouthpiece with an unused one.
Protect the mouthpiece from movement, air currents and pressure
changes while the WAIT indicator is blinking.
Replace the mouthpiece with an unused one.
®
7
Page 8

Model No. PS-2152 Spirometer
Specifications
The spirometer is an educational instrument.
It is not designed, tested, or intended for
medical use.
Total Flow 5% accuracy when
used as described
above
Default
Sampling Rate
Flexible Air
Lines
50 Hz
90 cm
Safety
Read the instructions before using this
product. Students should be supervised
by their instructors. When using this
product, follow the instructions in this
manual and all local safety guidelines
that apply to you.
Do not share mouthpieces.
In medical settings, pulmonary function
tests are performed under the supervision
of a medical professional. When using a
spirometer without medical supervision,
use extra caution. A person with a
medical condition that may be affected
by a pulmonary function test should not
use the PASCO Spirometer. Discontinue
use if the subject encounters breathing
difficulty or discomfort.
Technical Support
For assistance with any PASCO product,
contact PASCO at:
Address: PASCO scientific
10101 Foothills Blvd.
Roseville, CA 95747-7100
Phone: (916) 786-3800
(800) 772-8700
Fax: (916) 786-3292
Web: www.pasco.com
Email: techsupp@pasco.com
Copyright Notice
The PASCO scientific 012-08856A
Spirometer Instruction Manual is
copyrighted with all rights reserved.
Permission is granted to non-profit
educational institutions for reproduction of
any part of this manual, providing the
reproductions are used only in their
laboratories and classrooms, and are not sold
for profit. Reproduction under any other
circumstances, without the written consent
of PASCO scientific, is prohibited.
Limited Warranty
For a description of the product warranty,
see the PASCO catalog.
Authors: Steve Pon, Alec Ogston
DataStudio workbooks and portions of this manual reviewed
by A. Greenwell and T. Kjos, Sacramento City College,
Biology Department
 Loading...