

Page 1
CARD 1A
High Resolution pH/ORP/ISE Amplifier
with Temperature Sensor
PS-2147
Sensor Specifications:
pH:
Range: 0 to 14
±
Accuracy:
Resolution: 0.001
Temperature:
Range: -35°C to +135°C
Accuracy:
Resolution: 0.0025
0.1
±
0.5°C
°
C
Probe Specifications:
Fast Response Temperature
(PS-2135):
Range: -10°C to +70°C
±
Accuracy:
Resolution: 0.0025
Construction: A 10K thermistor is
housed in a water proof PVC tip. The
thermistor is connected to a 3.5 mm
stereo connector with a 4-foot PVC
insulated wire.
0.5°C
°
C
®
ORP and ISE:
Range: -2000 mV to +2000 mV
±
Accuracy:
Resolution: 0.05 mV
pH electrode (699-085):
Range: 0 to 12
Accuracy: See pH electrode calibration
on card 2A.
Resolution: 0.001
Temperature range: 0
Construction: Double junction, electrode
with three-foot cable and BNC connector.
Reference is gel-filled.
800-772-8700 • 916-786-3800 • techsupp@pasco.com • www.pasco.com
2.0 mV
°
C to +80°C
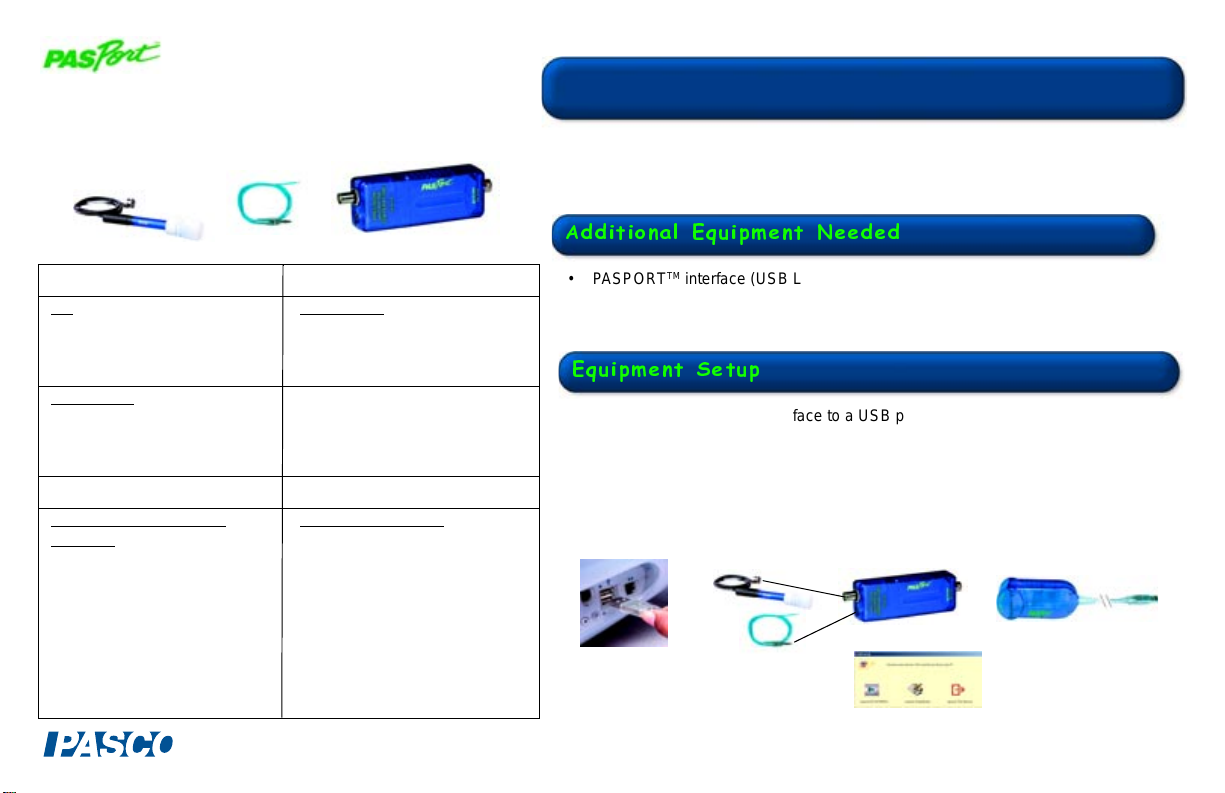
pH/ORP/ISE/Temp Quick Start
The PS-2147 Sensor is a multi-purpose millivolt (mV) meter that accepts standard
BNC connectors and works with both PASCO and industry standard ion selective
electrodes (ISE), including pH and ORP. The sensor is capable of measuring
temperature using PASCO’s thermistor-based temperature probes.
Additional Equipment Needed
• PASPORTTM interface (USB Link, PowerLink, Xplorer, etc.) with USB-compatible
computer or a PS-2000 Xplorer
• EZscreen or DataStudio® software (version 1.8.5 or later)
Equipment Setup
1. Connect the PASPORT interface to a USB port on your computer or to a USB hub.
2. Connect an electrode to the BNC port and a temperature probe to the 3.5 mm plug
input on the sensor box.
3. Connect the PS-2147 sensor to the PASPORT interface. (If using an Xplorer in the
classroom, connect the Xplorer cable to your computer.)
4. The software launches when it detects a PASPORT sensor. Select a point of entry.
1
2
3
4
012-08636B
Page 2
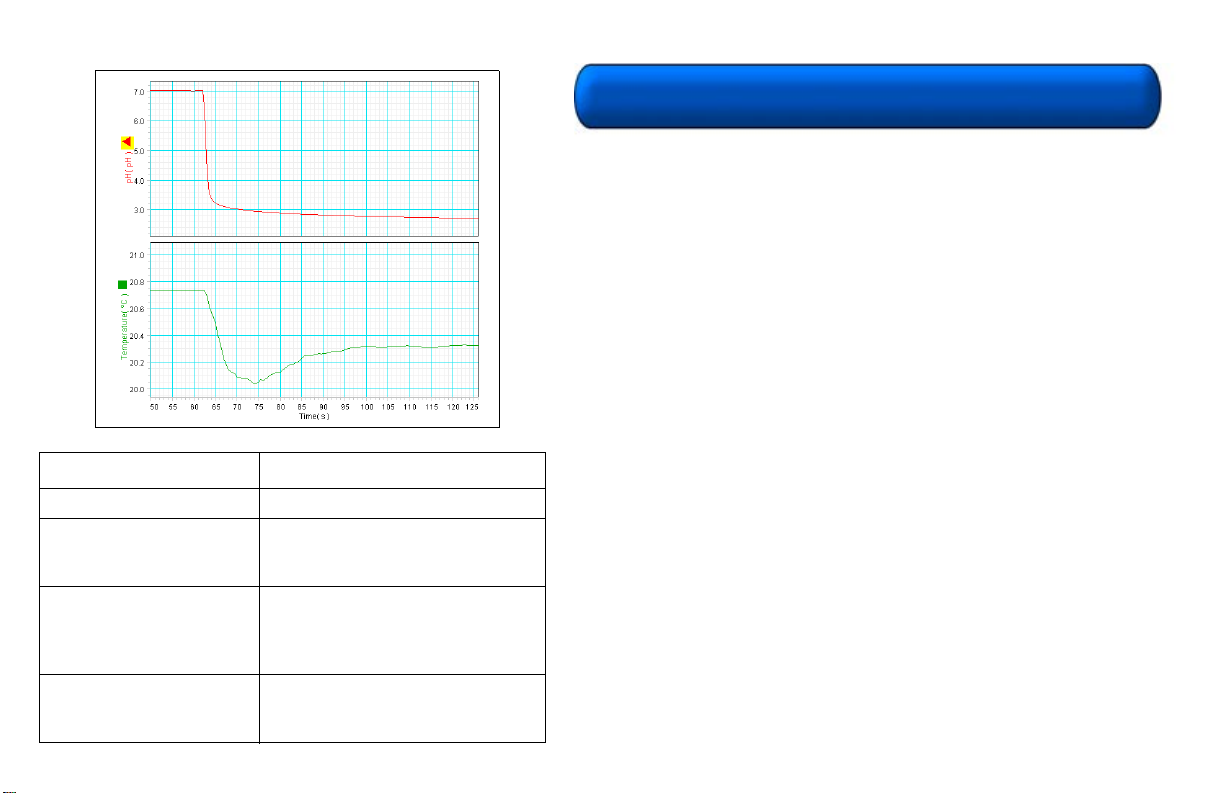
Enthalpy of Neutralization with pH Measurement
DataStudio/DS Lite Tasks: Procedure:
Open the Setup window:
Change measurements:
Change the sample rate:
Measure the temp. change:
On the main toolbar, click the Setup button.
In the Setup window, go to the ISE Sensor box
and click to place a check in the box(es) next to
the desired measurement(s).
In the ISE Sensor box, click on the down-arro w
next to the sample rate and select a ne w unit . Use
the Plus and Minus buttons to increase/decrease
the rate.
Click on the Smart T ool and dr ag the cross hai rs
to a data point. When the delta appears, click and
drag to measure the change.
CARD 1B
Activity: Enthalpy of Neutralization
with pH Measurement
Equipment required : PS-2147 High Resolution pH/ORP/ISE Sensor, pH electrode, Fast
Response Temperature Probe, DataStudio software (ver. 1.8.5 or later), ring stand, clamp for
pH probe, stirring machine, stir bar, calorimeter (part no. 650-02976 or two styrof oam cups
stacked together), 1 mL pipette, citric acid powder , balance to measure +/- 0.01 g, 100 mL
graduated cylinder, deioniz ed water. (Optional): vinegar solution for stable pH, 0.1 M NaOH
solution
Procedure:
1. Set out chemicals a few hours bef ore the e xperiment to allows the chemicals time to
equilibrate to room temperature.
2a. Add 100 mL of deionized water to the calorimeter and stir until the temperature is stable.
(Note: Without buffer , the pH is not stab le or predictable . See the step 2b option. )
OR
2b. Prepare 0.6 mM acetic acid by adding 0.5 mL vinegar to 1.00 L of deionized water and
adjusting to pH 7.0 with drops of 0.1 M NaOH. Add 100 mL of this 0.6 mM acetic acid to
the calorimeter and stir until the temperature is stable.
3. Place the temperature probe and pH probe into the solution. In DataStudio’s Experiment
menu, select “Monitor data.” Stir until the solution comes to a steady temperature.
4. Weigh 10 millimoles (about 1.9 g) of citric acid powder .
5. When the temperature is steady , stop the monitoring run by pressing the Stop b utton.
6. Click the St a rt b utton and w ait one minute to estab lish a baseline . Then add the citric
acid powder to the stirring solution.
7. After about two minutes , the temperature and pH should become le v el, and you can stop
the experiment.
8. (Optional): To find the amount of heat absorbed by the calorimeter, stir bar, and pH
electrode, repeat steps 1-5. I n place of step 6, add a fixed volume of w at er t hat is slightl y
cooled; follow the cooling curve after mixing the known amount of cool water . Combining
this information with the above data can allo w a description of the heat absorbed per mole
citrate.
9. (Optional): Use the DataStudio calculator to convert pH to [H
show the temperature change per mole of acid dissolved.
+
]. Use a graph display to
Page 3

Calibrating the pH Electrode:
A Practical Approach
CARD 2A
pH Calibration (continued)
Typically, pH electrodes are sensitive to t he condition of the surf ace that is in
contact with the solution. Electrode performance depends on the history of
chemical treatment imposed on the critical measuring surfaces.
If the electrodes are kept in the appropriate solutions and not contaminated from
the solution or from evaporative deposit s, the y function well without calibr ation.
Calibration is often not needed for qualitative observations, especially where
concentrations of runs are being compared. If a quantitative result is desired for
calculation, or to compare to later results, then calibration is required.
Factory Calibration (no user intervention required): The sensor is calibr ated at
the factory for a pH slope of -0.059 mV per pH unit and zero at a pH of 7.
Accuracies of 1.0 pH unit or better may be expected. This is the nominal slope for
a new pH electrode at 25 degrees C.
Full-Scale Calibration: pH calibrati on buff ers of 4.0 and 10.0 are required f or this
calibration. Accuracies of 0.1 pH units or better may be expected between 2.0 and
12.0 pH units after the full-scale calibration. (See the procedure on the right side of
this card.)
High Accuracy Calibration Procedure:
Very accurate pH measurements ma y be made with the PS-2147 if two basic
guidelines are followed: a) Select two buff er calibration solutions that closely
bracket the sample to be measured. b) Ensure the temperature of the calibration
solution is the same as the sample to be tested. To calibrate the sensor, f ollo w the
calibration procedures outlined in the “Full-Scale Calibration Procedure”
instructions on this card; Be sure to insert the pH values of the buffers used.
Full-Scale Calibration Procedure:
With the sensor and electrode connected, do the following:
1. In DataStudio, click the Setup button on the main toolbar. The Setup
window will open.
2. Click on the pH Calibrate button in the Setup window. The Calibrate
window will open.
3. Rinse the pH electrode with deionized water and place it in the pH 4.0
buffer solution. Gently stir the electrode in the buffer solution.
4. Ensure the value in the dialogue box for Point 1 is 4.0. If using a different
solution, this value may be changed to the pH of the calibration buffer.
5. Watch the pH reading display in the dialogue box. When the pH reading
stabilizes, click the Set button adjacent to the Point 1 dialogue box.
6. Rinse the pH electrode with deionized water and place it in the pH 10.0
buffer solution. Gently stir the electrode in the buffer solution.
7. Ensure the value in the dialogue box for P oint 2 is 10.0. This value may
be changed to match the pH of the calibration buffer.
8. When the pH reading stabilizes, click the Set button adjacent to the Point
2 dialogue box.
9. To save the calibration values, click the OK button. The calibration is
complete.
Calibrating the ISE/ORP Electrodes
Specific calibration instructions for the ISE and ORP electrodes are included with
the electrodes. You will need to prepare or purchase specific standard solutions for
each ISE probe. Standard solutions can be purchased from any commercial
supplier of probe chemicals.
Page 4

Calibrating the Temperature Probe
CARD 2B
Calibration of the temperature probe is not usually required. The accuracy of the
P A SCO temperature probes is better than 0.5
probe. Howev er, the probe may be calibrated using the following procedure.
1. Plug the PS-2147 Sensor into a PASPORT interface connected to a USBcompatible computer.
2. Insert a temperature probe into the sensor box using the 3.5
the right side of the sensor box.
3. Click the Setup button in the DataStudio toolbar. The Setup window will
open.
4. Click on the Temperature Calibrate button in the Setup window. The
Calibrate window will open.
5. Place the temperature probe in an ice water bath.
6. Ensure the value in the dialogue box for Point 1 is 0. This value may be
changed to the temperature of the controlled temperature bath if it is
different than 0
7. Click the Set button adjacent to the Point 1 dialogue box.
8. Place the temperature probe in boiling water.
9. Ensure the value in the dialogue box for Point 2 is 100. This value may
be changed to the temperature of a controlled temperature bath if it is
different than 100
10.Click the Set button adjacent to the Point 2 dialogue box.
11.To save the calibration values, click the OK button. The calibration is
complete.
°C.
°C.
°C across the entire range of the
mm input on
Sensor Usage Tips
Suggested Activities
• Compare ORP of water from a f aucet, fish tank, and a pond.
• Discover how long chlorinated tap wat er needs to stand before adding to a
fish tank. Analyze the effect of temperature on this process.
• Study the effects of temperature on pH in a buffer
• Observe the heat of neutralization in a titration
• Measure the freezing and boiling point of a solution
• Study the effects of temperature and dilution on buffers
PASCO Equipment used with the
pH/ORP/ISE with Temperature Sensor
Temperature Probes
• PS-2135 Fast Response
Temperature Probe (3-pack)
• PS-2131 Skin/Surface
Temperature Probe
• PS-2153 Stainless Steel
Temperature Probe
Related Sensors
• PS-2117 Drop Counter
Ion Selective Electrodes
• CI-6717 Ammonium
• CI-6727 Calcium
• CI-6726 Carbon Dioxide (aqueous)
• CI-6732 Chloride
• CI-6728 Fluoride
• CI-6736 Lead
• CI-6735 Nitrate
• CI-6716 Oxidation-Reduction Potential (ORP)
• CI-6733 Potassium
• CI-6734 Sodium
CAUTION: Do not place the PS-2147 pH/ORP/ISE Sensor case in liquids
or expose to chemicals. The connectors and internal electronic circuit may be
damaged.
012-08636B
 Loading...