

Page 1
Instruction Sheet
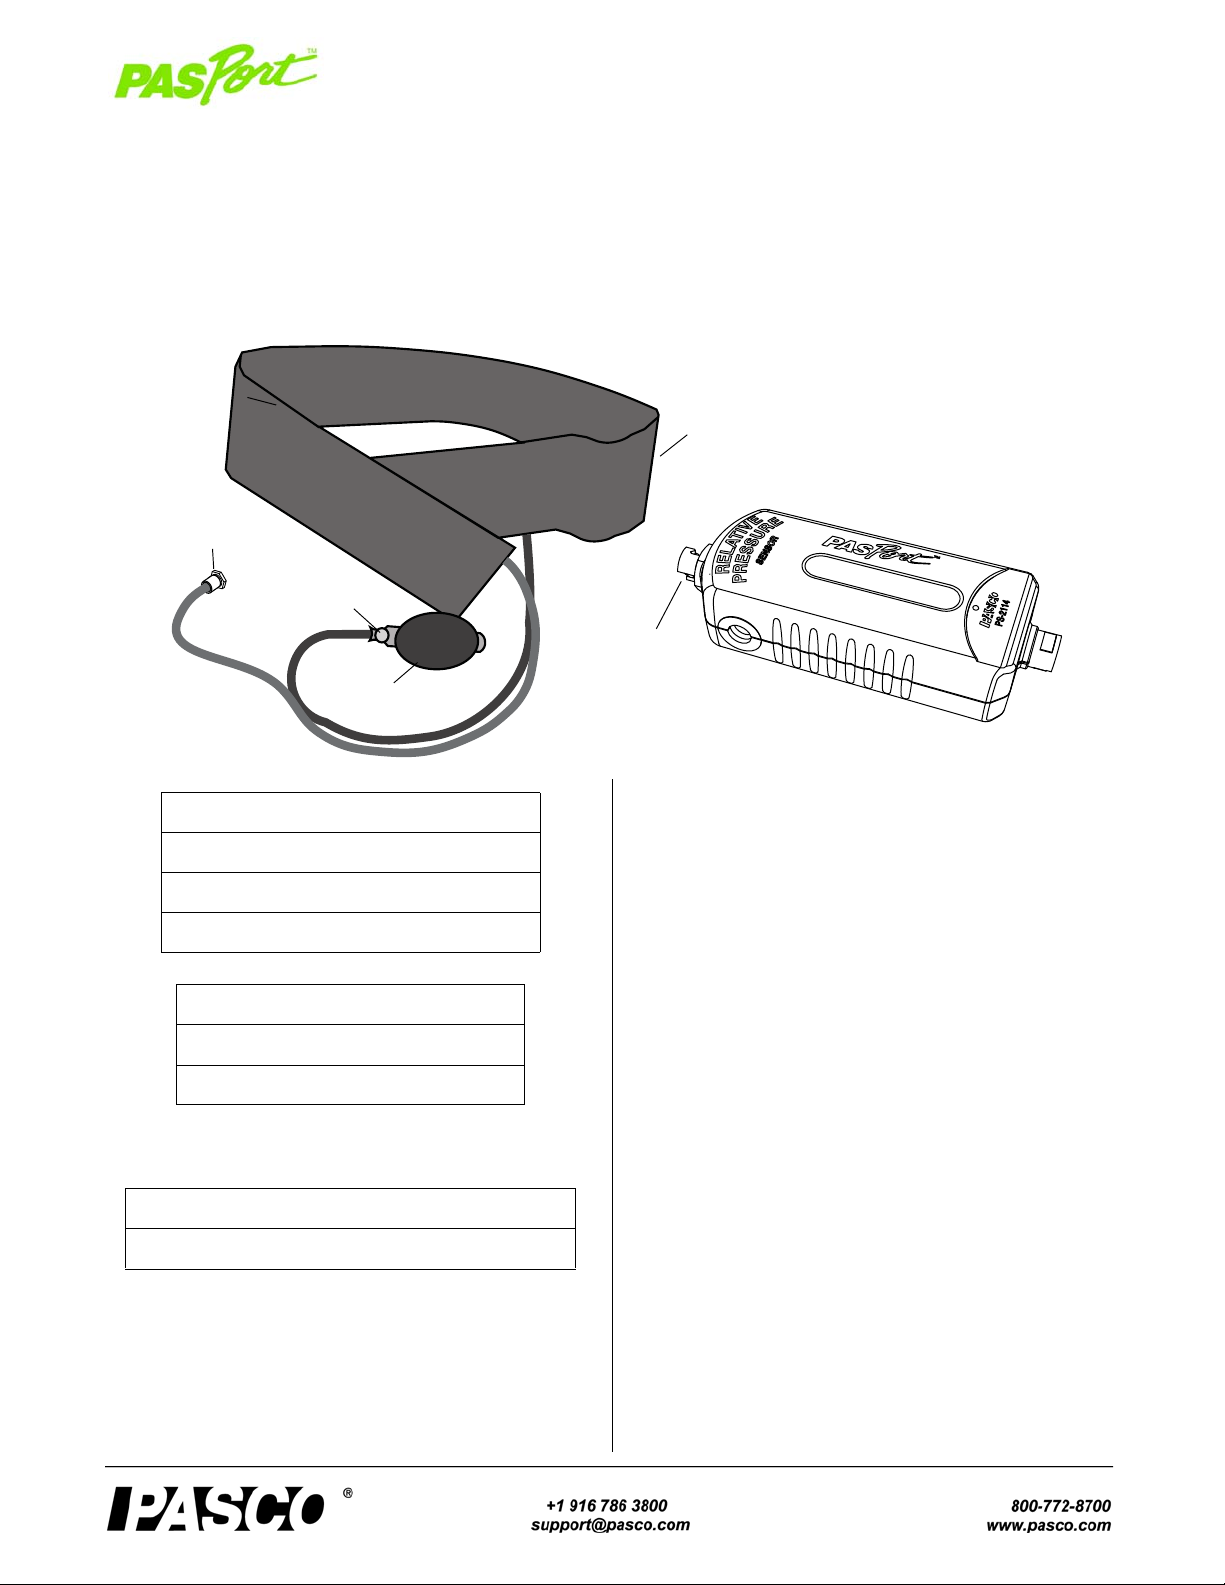
Quick Connector
Pressure Port
Quick
Connector
Relative Pressure Sensor
PS-2114
NOTE: Items are not to scale.
Respiration
Belt
Squeeze
Bulb
Release
Valve
Respiration Rate Sensor
PS-2133
012-08370B
.
Included Items
Respiration Belt (CI-9842)
Relative Pressure Sensor (PS-2133)
Hose and Coupler Kit (not shown)
Required Items*
PASCO Interface
PASCO Data Acquisition Software
*See the PASCO catalog or the PASCO web site at www.pasco.com
for more information.
Other Items*
PASPORT Sensor Extension Cable (PS-2500)
Introduction
The PS-2133 Respiration Rate Sensor consists of an inflatable Respiration Belt and a Relative Pressure Sensor. The
sensor includes a hose and coupler kit (not shown).
The sensor is designed to work with a PASPORT -compatible
interface (such as the UI-5100 850 Universal Interface) and
PASCO data acquisition software (such as PASCO Capstone). With the data acquisition software, the sensor can be
used to measure change in pressure over a period of time.
The pressure changes correspond to the respiration (breathing) rate.
The Respiration Belt has the following features:
• Quick Connector that can be attached to the pressure
• Squeeze bulb with release valve for inflating and deflat-
• Hook-and-pile material sewn onto opposite sides of the
Setup the Respiration Rate Sensor
• Plug the Relative Pressure Sensor into one of the
port on the sensor.
ing the rubber bladder inside the belt.
belt.
PASPORT input ports of a PASCO interface. Or, connect the sensor to a PASPORT Sensor Extension Cable
and plug the cable into an input port.
Page 2

Respiration Rate Sensor Introduction
PASPORT Sensor Extension Cable
PASPORT
Input Port
Interface
This end
first
This end
second
Respiration
Belt
1
2
Squeeze
Bulb
Relative
Pressure
Sensor
To interface
• Start the PASCO data acquisition software. Set up a data
display in the software.
Using the PASCO Capstone Software
• Click the “Hardware Setup” icon in the Tools palette to
open the “Hardware Setup” panel. Confirm that the Relative Pressure Sensor icon appears with the interface’s
icon.
• Click one of the display templates in the workbook
page, or double-click an icon in the “Displays” palette to
open a data display.
Using the SPARKvue Software
• Start the interface and connect the sensor to an input
port on a SPARK Science device.
• In the sensor parameter screen, touch ‘Relative Pressure’ to highlight it, and then touch ‘Show’ to open a
graph display.
Using the Xplorer GLX Datalogger
• Start the GLX datalogger and connect the sensor to one
of the input ports on the top of the GLX.
• The screen will show a graph of Relative Pressure versus Time.
Using the Respiration Belt
• First, deflate the belt. Open the release valve on the
squeeze bulb (turn the knob counter-clockwise) and
press on the belt to push any air out.
• Place the part of the belt that has the tubes against your
chest first. When this part is against your chest, the layer
of ‘pile’ will face away from your chest. Then place the
left side of the belt over the first part so the
hook-and-pile layers match each other. The belt should
be snug around the chest, but not so tight that breathing
is restricted.
• Connect the Quick Connector tube from the Respiration
Belt to the Quick Connector pressure port on the sensor.
• Arrange the belt around the upper part of your chest so
that the part that has the tubes on it is on the right side of
the body with the tubes hanging down from the bottom
edge of the belt (see the diagram).
2
Inflating the Respiration Belt
Close the release valve on the squeeze bulb (turn the knob
clockwise). Make sure that the sensor is connected to the
other tube. Squeeze the bulb several times to inflate the rubber air bladder inside the belt. It may take as many as twenty
squeezes to inflate the bladder . When the bladder is inflated,
the belt will be more snug around your chest.
Page 3

Model No.PS-2133 Introduction
Select ‘Add
New Equation’
Select
‘Relative Pressure’
Insert Data
icon
Highlight and
delete
Warning: Do not over inflate. Over inflation can damage the
air bladder and possibly cause bodily injury.
Deflating the Respiration Belt
Open the release valve on the squeeze bulb (turn the knob
counter-clockwise). Use your hands to push the air out of the
bladder. You can also deflate the belt by disconnecting the
tube from the pressure port on the sensor. Twist the quick
connector counter-clockwise to disconnect it.
Data
• Click “Record” ( ), touch the ‘Start’ button ( ),
or press the “Record” button ( ) to begin recording
data.
• Click “Stop” ( ), touch the ‘Stop’ button ( ) or
press the “Record” button ( ) again to end recording
data.
Calculate Respiration Rate
The ‘peaks’ on a plot of relative pressure versus time can be
counted to determine the respiration rate (breaths per unit of
time). However, you can also create a calculation to automatically measure the respiration rate. The respiration rate or
frequency of breaths is the reciprocal of the period between
breaths.
Using PASCO Capstone to Create a Calculation
• Click ‘Calculator’ in the Tools palette to open the Calculator window.
• Click ‘New’ and select ‘Add New Equation’ from the
list.
The calculation changes to
“Respiration Rate=60/period(10,10,1,|)”
where the vertical line before the last parentheses represents a blinking cursor.
• The period function determines the period of the data
source by detecting peaks and measuring the time
between them. The first term represents the peak%, the
second term is the valley%, the third term is the time
over which the measurement is made, and the fourth
term – to be inserted – will be the source of the data. In
this case, the data source is the Relative Pressure.
• Click the ‘Insert Data’ icon ( ) and select ‘Relative
Pressure (kPa)’ from the list.
• In the calculation, change “10,10,1,” to “30,30,5,” and
then click ‘Accept’. The calculation appears as shown:
• Highlight ‘units’ and delete it.
Using SPARKvue to Create a Calculation
• Touch the Experiment Tools icon ( ) and select ‘Calculated Data’ from the list. The ‘Enter calculations’
screen opens.
“Calc1=” appears in the text area. Rename this to
Respirator Rate=.
• On the right side of the equal sign, enter “60/” (without
the quotation marks).
• In the lower part of the Calculator window, click ‘Special’ and then click ‘period’.
• Touch the ‘abc’ icon to switch to the keyboard layout.
Enter “respirationrate=60/” (without quotation marks).
• Touch the ‘123’ icon to switch to the calcu lator layout.
3
Page 4

Respiration Rate Sensor Introduction
• Touch the icon under “Functions:” until it shows “Special 1”.
• Touch the ‘period’ icon. The calculation changes to
show the following:
respirationrate=60/period(90,10,5,|)
where the vertical line before the last parentheses represents the blinking cursor. The period function has four
items: peak%, valley%, time interval, and data source.
The cursor is in the space where the data source is
placed.
• Touch the ‘Measurements’ icon. Touch ‘Relative Pressure’ in the list. The calculation changes to show the following:
respirationrate=60/period(90,10,5,[Relative Pressure(kPa)])
• T ouch “Done”.
Specifications (PS-2114)
Item Value
Range: 0 to 10 kPa
Accuracy: ±0.05 kPa
Resolution 0.001 kPa
Maximum Sample Rate 20 Hz
Repeatability 0.01 kPa
Operating Temperature 0 to 40 °C
Relative Humidity Range 5 to 95%, non-condensing
Do not use the Relative Pressure Sensor around
liquids. Do not get liquids into the squeeze bulb,
tubing, or bladder.
Technical Support
For assistance with any PASCO product, contact PASCO at:
Address: PASCO scientific
10101 Foothills Blvd.
Roseville, CA 95747-7100
Phone: +1 916-786-3800 (worldwide)
800-772-8700 (U.S.)
E-mail: support@pasco.com
Web www.pasco.com
For the latest information about the Respiration Rate Sensor,
visit the PASCO web site at www.pasco.com and enter
“PS-2133” in the Search window.
Limited Warranty For a description of the product warranty, see the
PASCO catalog. Copyright The PASCO scientific Instruction Sheet
is copyrighted with all rights reserved. Permission is granted to
non-profit educational institutions for reproduction of any part of this
manual, providing the reproductions are used only in their laboratories and classrooms, and are not sold for profit. Reproduction under
any other circumstances, without the written consent of PASCO scientific, is prohibited. Trademarks PASCO, PASCO Capstone,
PASPORT, SPARK Science Learning System, SPARK SLS, and
SPARKvue are trademarks or registered trademarks of PASCO scientific, in the United States and/or in other countries. For more information visit www.pasco.com/legal.
Product End of Life Disposal Instructions:
Suggested Activities
• Respiration Rate and Physical Activity
• Respiration Rate and Heart Rate
• Respiration Rate and Body Temperature
• Respiration Rate and Different Types of Activity
• Respiration Rate and Altitude
Note: When the belt is connected to the Relative Pressure
Sensor, the sensor measures the change in pressure in the air
bladder in the belt as the lungs expand and contract.
Although the pressure of the chest cavity causes pressure
against the belt, the pressure measured in the belt is not the
actual pressure in the lungs.
This electronic product is subject to disposal and recycling
regulations that vary by country and region. It is your
responsibility to recycle your electronic equipment per your
local environmental laws and regulations to ensure that it
will be recycled in a manner that protects human health and
the environment. To find out where you can drop off your
waste equipment for recycling, please contact your local
waste recycle/disposal service, or the place where you purchased the product.
The European Union WEEE (Waste Electronic and Electrical Equipment) symbol
(to the right) and on the product or its
packaging indicates that this product must
not be disposed of in a standard waste container.
4
 Loading...