

Page 1
Flow Rate Quick Start
Flow Rate Sensor
PS-2130
Sensor Specifications:
Sensor Range:
Accuracy:
Pulse frequency:
Unit options:
Probe length:
Minimum depth:
Flow Rate: 0.3 to 13 ft./sec.
Temperature: -3
0.1 ft./sec
8.62 pulses/linear foot
meters/sec; feet/sec; total pulses
3 to 7 ft. with telescoping tube
(Probe is 7 feet when fully
expanded.)
1.5 in. (3.8 cm)
°
to 42°C
The PS-2130 Flow Rate Sensor measures the flow rate and temperature of
moving water.
Additional Equipment Needed
• PASPORT™ interface (Xplorer, Power Link, etc.) with USB-compatible computer
• EZscreen or DataStudio® software (version 1.9 or later)
Equipment Setup
1
Connect the P ASPORT interf ace to a
USB port on your computer or to a USB
hub.
2
Connect the Flow Rate Sensor to the
P ASPORT interf ace. (If using an Xplorer
in the classroom, connect the Xplorer
cable to your computer .)
3
The software launches when it detects
a P ASPOR T sensor. Launch
DataStudio.
1
2
3
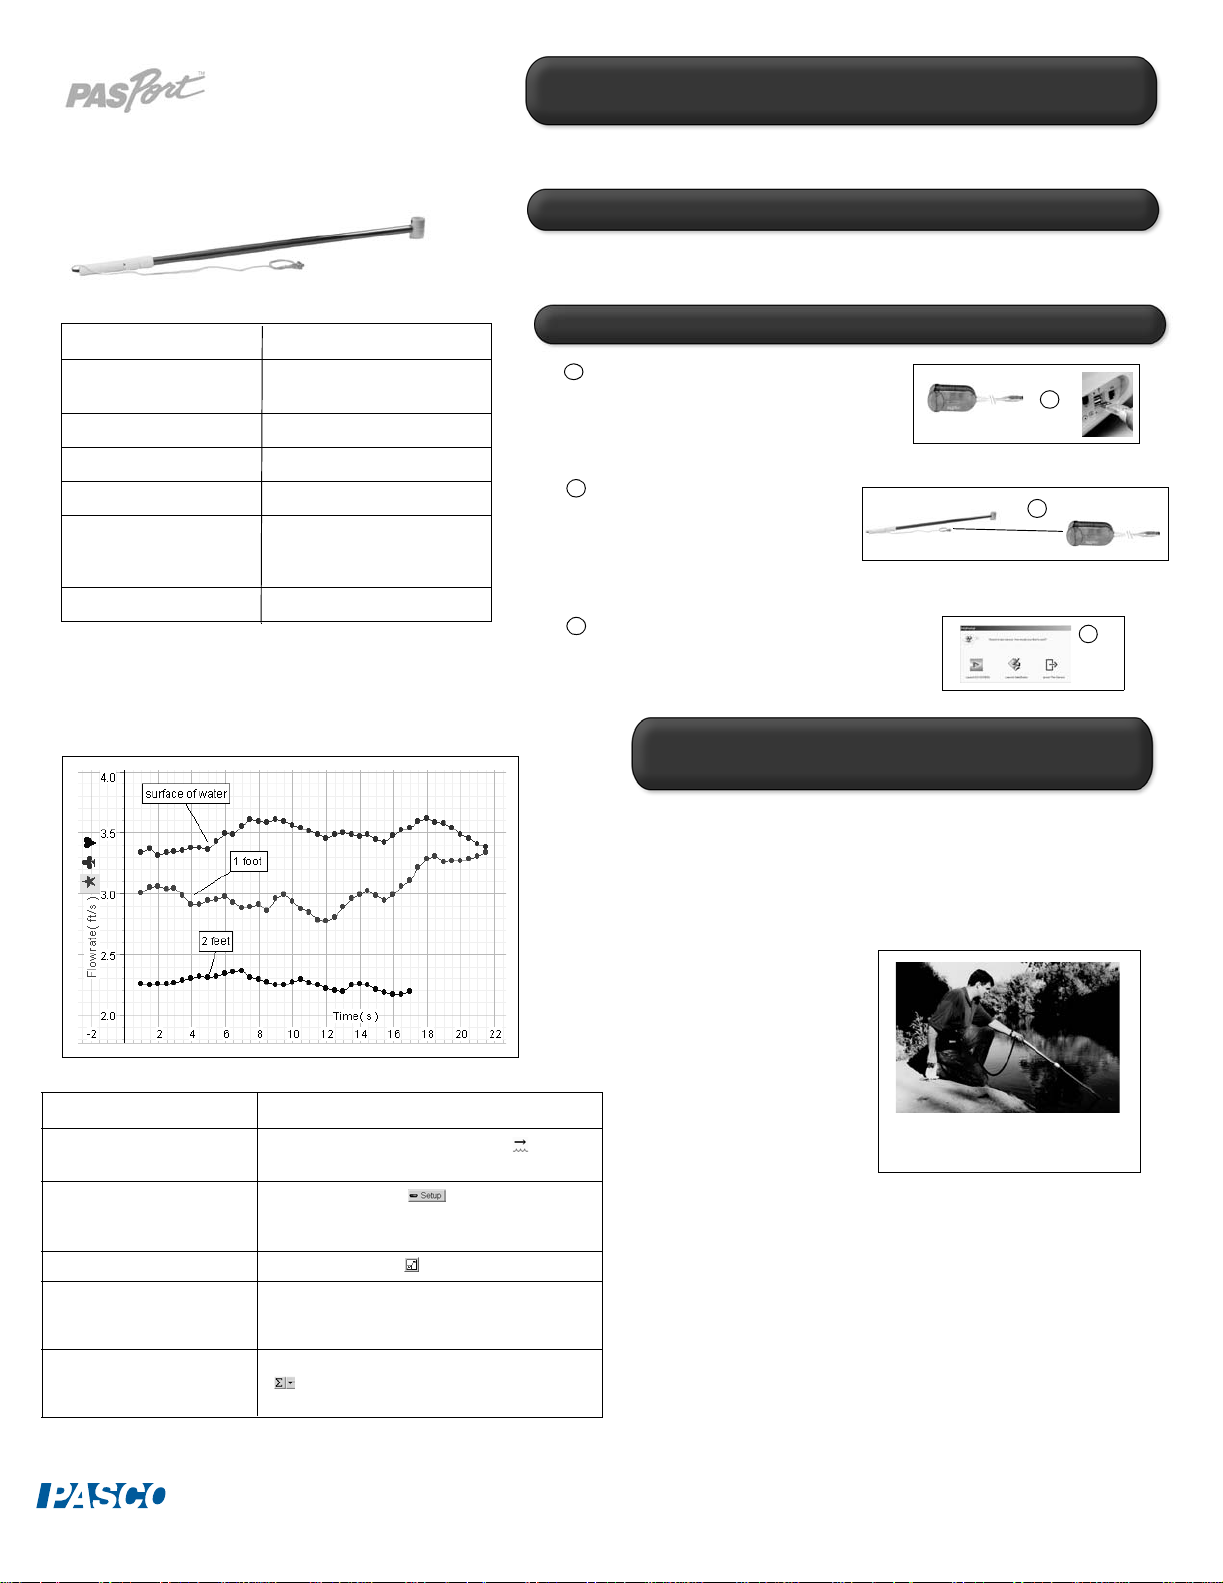
Measuring the Velocity (Flow Rate) of Water in a Stream
DataStudio/DS Lite Tasks: Procedure (Optional):
View the flow rate
measurement:
Change measurement
units:
Scale to fit the data:
Change the sample rate:
View data statistics:
In the Data list, drag the Flow Rate icon ( ) to an open
display.
Click the Setup button ( ) to open the PASPORT
Experiment Setup window. Scroll to the Flow Rate box,
and click in the box of the units you wish to change.
Click the Scale-to-Fit ( ) button on the Graph display.
In the PASPORT Setup window, scroll to the Flo w Rate box.
Click on the down arrow to select the desir ed unit. Cli c k the
Plus/Minus buttons to increase/decrease the value .
On the Graph display toolbar, click the Statistics button
( ) to view the minimum, maximum, and mean. Use the
pull-down menu to turn statistics on or off.
Activity: Measuring Flow Rate
and Temperature in a Stream
Equipment required: Flow Rate Sensor (PS-2130), PS-2000 Xplorer, pad of
paper, pencil
Note: The Flow Rate Sensor is factory calibrated and is not set up for user
calibration. The propeller produces 2 pulses per revolution. In DataStudio,
you can simultaneously view flow rate and temperature.
1. Plug the Flow Rate Sensor
into a PASPOR T Xp lorer.
(Note: Ensure the Xplorer
has functional batteries.)
2. Insert the propeller housing
about 2 inches below the
water of a moving stream.
Hold the propeller housing
steady.
3. On the Xplorer, click the Start
button to take a reading.
4. On a piece of paper, draw a
diagram of the stream and shoreline. On the stream diagram, mark
the point where you took the measurement. Next to the point, record
the flow rate and temperature readings displayed on Xplorer.
5. Repeat steps 2-4 at several locations and/or depths in a stream or
creek: a) near the shore at 0.5 foot b) midstream at 0.5 foot
c) midstream at 1 foot d) midstream at 2 feet e) midstream at 3 feet.
6. Compare the flow rate and temperature at the different locations. Is
the flow rate higher midstream or near the shore? What effect might
depth have on the flow rate and temperature?
Figure 1: Taking Flow Rate Measurements from a Stream
®
800-772-8700 • 916-786-3800 • techsupp@pasco.com • www.pasco.com
012-08622A
Page 2
Flow Rate Sensor Safety Tips
Flow Rate Sensor Usage Tips
WARNING: When using the F low Rate Sensor outdoors, f ol lo w
standard water and outdoor safety precautions. The Flo w Rate
Sensor is recommended for use in streams (avoid rivers or
conditions in the area. Do not use the sensor in high winds, adverse
weather or avalanche conditions, near potential land or mudslides, or when
standing on unstable ground. Before using t he sensor, survey the area.
When inserting the Flow Rate Sensor into water, stand on stable ground.
Keep the Flow Rate Sensor away from water that has lots of debris or
potential obstacles. If the propeller or sensor becomes lodged in a high
velocity current or near a drop off, do not attempt to remov e the sensor. In
high risk situations, only allow a water patrol officer or public safety official to
remove the sensor.
Note: Before taking measurements, please read the “Flow Rate Sensor Safety Tips”
and “Flow Rate Sensor Usage Tips” on this card.”
1. Plug the cable of the Flow Rate Sensor into a PASPORT Xplorer or
2. (Optional): Insert the handle of the Flow Rate Sensor into a body of
3. In Xplorer, select the units (ft./second or meters/second).
4. To begin recording the flow rate and temperature, push the Start
turbulent waters). Always inform students of potential hazardous
Measuring Flow Rate
Measuring Flow Rate
other PASPORT interface (if using the sensor in the classroom).
water. Using the measurement markings on the handle, record the
depth of the water (in meters).
button on the Xplorer (or other PASPORT interface).
• Always hold the pole v ertical and keep the propeller in t he direction of the
current flow, facing upstream.
• For higher water velocities (around 1 m/s), a sample rate of 5 samples/second
is recommended.
• When taking a reading, keep the handle steady.
• If the flow r ate reading suddenly fall to zero midstream, check the propeller for
debris. When sand or other particles become lodged in the propeller, the
propeller stops turning and the reading drops to zero.
• Erratic readings may occur with turbulent water flow . If measuring from a
stream or creek, keep the housing in a stable position, away from rocks and
turbulence. If measuring in low depths, you can rest the housing on the stream
bed for a more stable reading.
• Do not connect the propeller housing to pipes or other tubing.
• Store the sensor in a dry environment to avoid corrosion. If necessary,
periodically lubricate the propeller with silicon oil.
• If using the Flow Rate Sensor from a boat, tether the boat. Boat movement may
interfere with an accurate flow r ate measurement.
Suggested Flow Rate Applications
• Measuring flow rate and temperature at different depths in a stream or
creek
• Comparing the characteristics of different streams
• Determining sediment transport for a stream or other body of water
• Measuring flow rate from a dam
Using the Flow Rate Sensor to
Determine Total Water Output
Use the equation,
water output in a stream bed.
Procedure:
1. With a measuring tape or other device, measure the width of
the stream bed. Record the stream width (in meters) on a
piece of paper.
2. With the Flow Sensor measurement scale, take depth
measurements (in meters) at equally spaced intervals across
the stream. (For an accurate depth measurement, submerge
the sensor until the propeller housing rests on the bottom of
the stream bed.) Keep the pole vertical. Record each depth
measurement on a piece of paper.
3. With the Flow Rate Sensor connected to a PASPORT
interface, take a flow r ate measurement (in m/s) for each of the
intervals. (Be sure to take a separate data run for each
measurement.)
4. Use the results obtained to calculate the total water output.
output = average flow rate x area
to determine the total
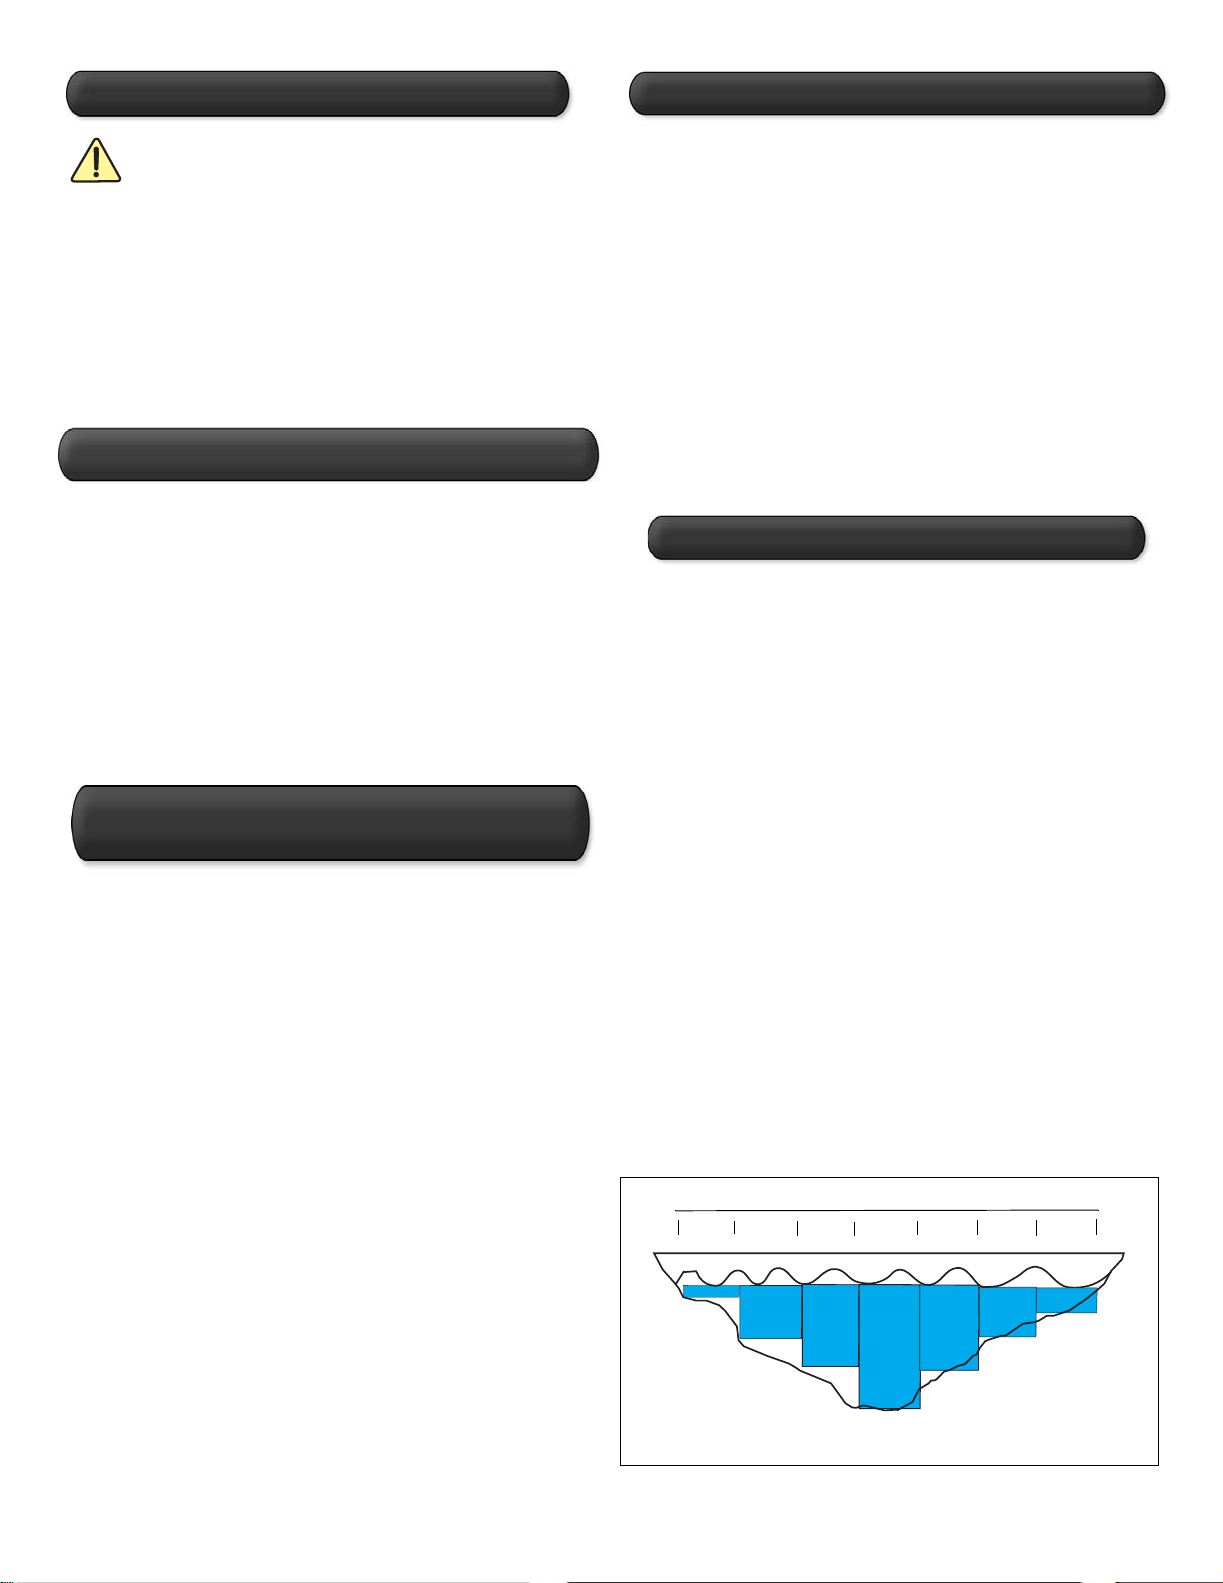
Estimating Total Water Output:
1. Calculate the cross-sectional area of the stream: Multiply each interval
width by each depth you measured to calculate the area for each
interval; then add the areas for each of the intervals to obtain the total
cross-sectional area of the stream. (Note: The more intervals you use,
the closer your approximation of the area will be to the actual area.)
2. Connect the PASPORT Xplorer to your computer. Open DataStudio and
retrieve your flow rate data for each of the intervals. Average the flow
rate recorded for each of the intervals.
3. To determine the total water output for a given flow rate, multiply the
average flow rate by the total cross-sectional area
stream width
interval
of the stream bed.
Figure 2: Measuring the cross-sectional area of a stream bed
 Loading...