

Page 1
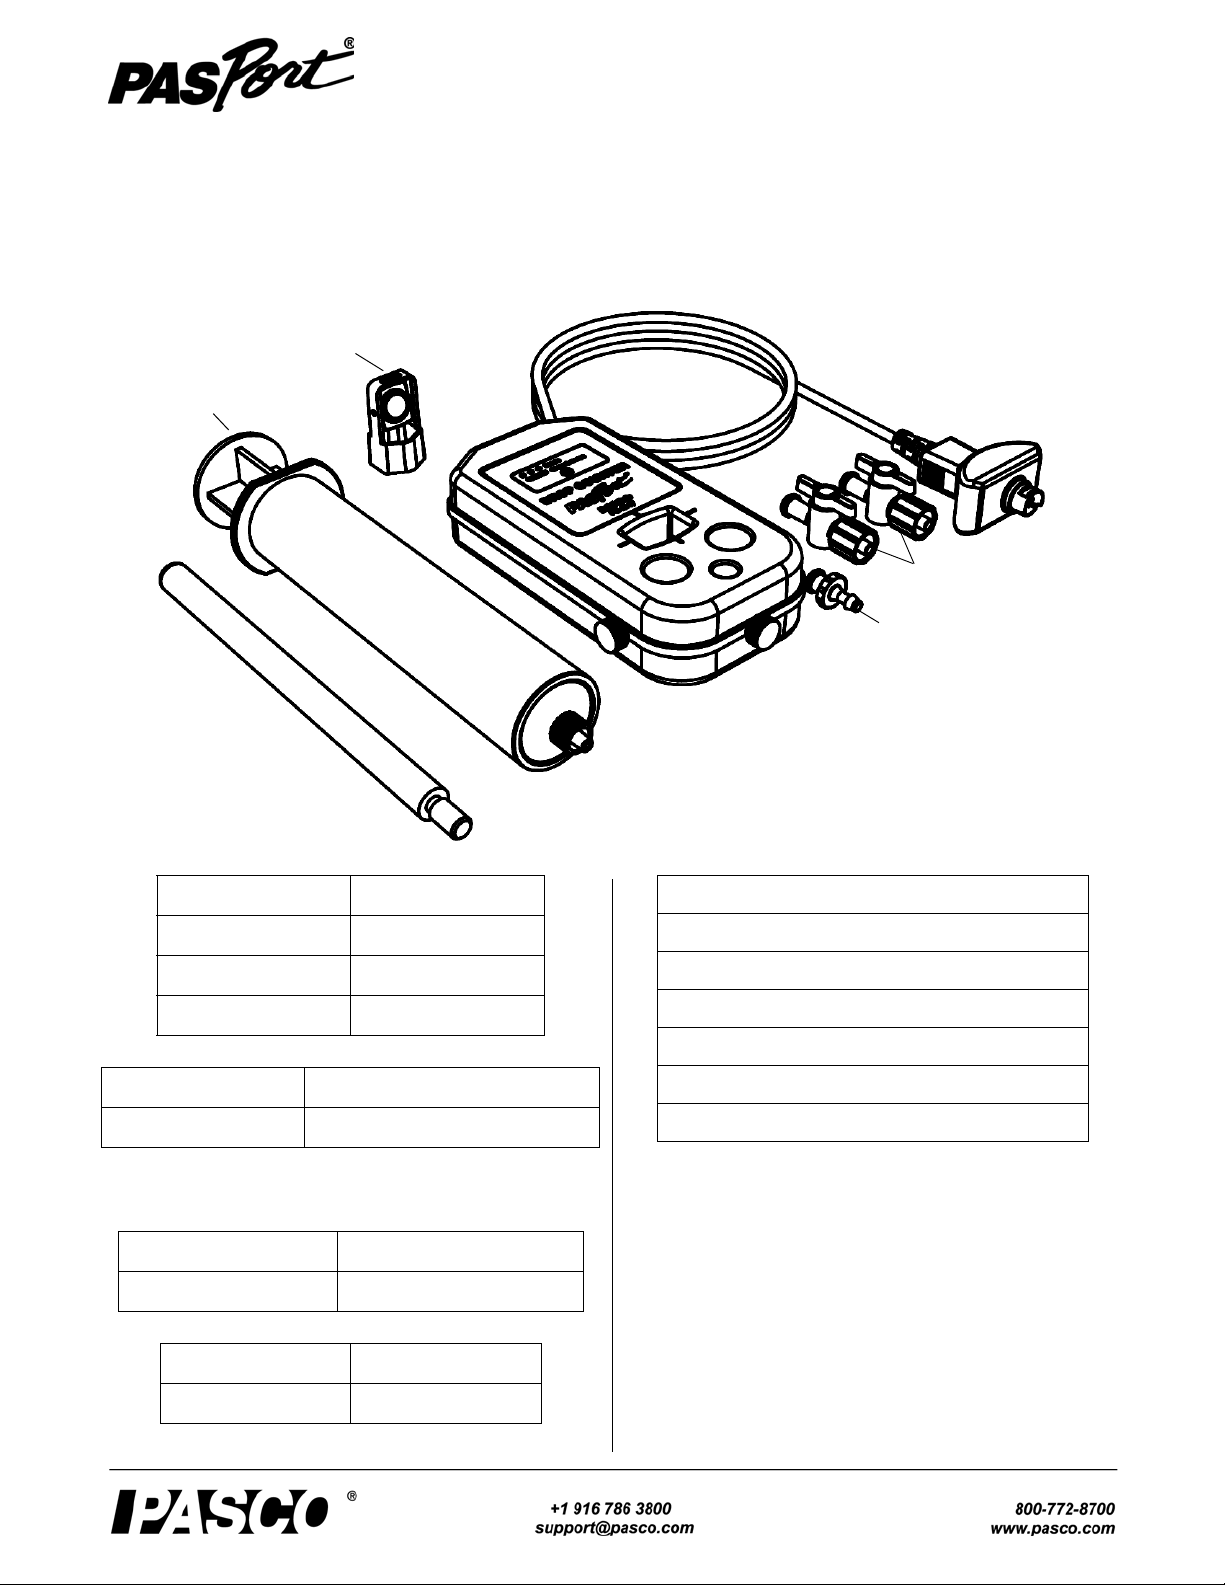
Drop Counter
Stopcock (2)
Micro Stir Bar
Drop Tip
Drop Counter
Syringe
Support Rod
PS-2117
Instruction Sheet
012-08470E
.
Included Items Included Items
Drop Counter Stopcock (2)
Micro Stir Bar Drop Tip
Syringe (60 mL) Support Rod
Required Items Required Items
PASCO Interface* Data Acquisition Software*
*See the PASCO catalog or the PASCO web site at www.pasco.com
for more information
.
Recommended Recommended
pH Sensor* Temperature Senso r*
Consumables Consumables
0.1 M NaOH 0.005 M HCl
Other Needed Items*
Three-finger Clamp (SE-9445)
Support Rod and Stand (SE-9451)
Multi Clamp (ME-9507)
Magnetic Stir Plate (SE-7770)
Beaker, 150 mL
Graduated Cylinder, 10 mL
Quick Start
1. Connect the Drop Counter to your PASPORT compati-
ble PASCO interface.
2. If you are using a computer, connect the interface to it
and start the data acquisition software.
3. Touch, press, or click to begin recording data.
4. Allow drops of liquid to fall through the rectangular
opening.
Page 2
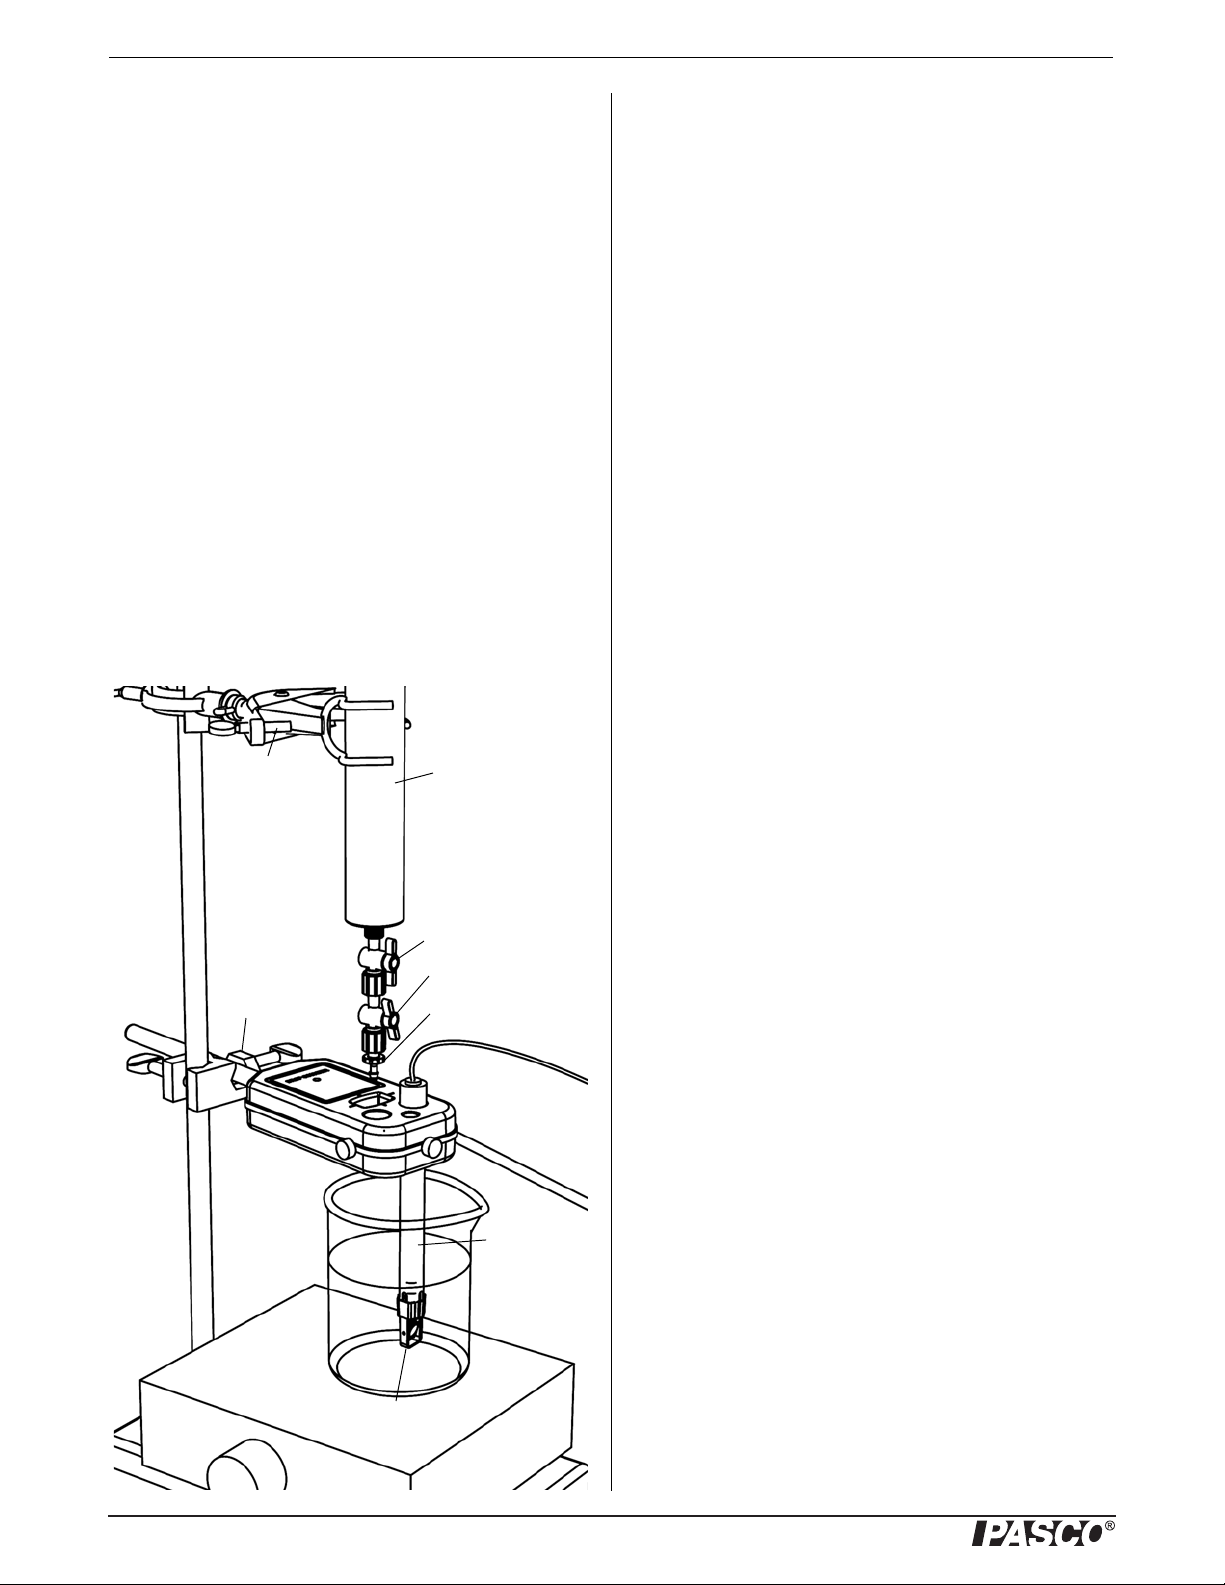
Drop Counter
60 mL syringe
with 50 mL of
0.1 M NaOH
150 mL
beaker with
100 mL of
0.005 M HCl
Three-finger
Clamp
Multi
Clamp
Stopcock
Stopcock
Drop Tip
pH Probe
Micro Stir
Bar
Stir Plate
Introduction
The Drop Counter measures the number of drops of fluid
that fall through the rectangular opening of the sensor. It is
typically used in conjunction with a pH sensor and other
equipment to perform a titration. Data from the Drop
Counter and other sensors are recorded and displayed in software such as SPARKvue, PASCO Capstone, or on a datalogging interface such as the SPARK SLS or Xplorer GLX.
The Drop Counter can be mounted on a support rod and the
support rod can be clamped to a rod stand. The counter is
equipped with three integrated probe holders. The included
Micro Stir Bar fits onto the end of a pH probe or probe of the
same diameter.
Assembling the Drop Dispenser
1. Remove the plunger from the syringe.
2. Connect the two stopcocks together and set the valves at
right angles. Connect the stopcocks to the end of the
syringe.
3. Connect the drop tip to the bottom of the stopcocks.
Acid-Base Titration (Calibration Method)
Calibration
1. Attach the Drop Dispenser (syringe, stopcocks and drop
tip) to a support rod.
2. Fill the syringe with titant and adjust the valves on the
stopcocks so that the drops fall at a rate of about 1 drop
per second. Close the bottom valve after the rate is
achieved.
3. Connect the Drop Counter to a PASPORT-compatible
interface.
4. Align the drop tip with the opening in the Drop Counter.
Put a 10 ml graduated cylinder under the Drop Counter
opening.
5. Open the bottom stopcock valve and monitor the num-
ber of drops per 10 mL of titrant.
6. Open the calibration screen in the data acquisition soft-
ware and input the number of drops and the volume.
Procedure
1. Setup the equipment and consumables as shown.
2. Connect the Drop Counter and pH Sensor to the
PASPORT-compatible interface.
3. Start the data acquisition software.
4. Use the software to create a graph of pH vs. Fluid Vol-
ume.
5. Start the stir plate.
6. Touch, press, or click to begin recording data.
7. Open the valve on the bottom stopcock so the titrant
drops fall at about 1 drop per second.
2
Page 3

Model No.PS-2117
Select fluid volume for
horizontal axis.
equivalence point
final drop count
Select volume calculation
for horizontal axis
8. Observe the data on the pH versus Fluid Volume graph.
After the equivalence point is reached, continue collecting data until the pH curve flattens.
10. Close the stopcocks.
11. Stop data recording.
12. Read the final volume of fluid in the syringe and calcu-
9. Close the stopcock valve and stop data recording.
late the net volume of titrant that was dispensed.
Acid-Base Titration (Alternative Method)
Procedure
1. Set up the equipment and consumables as illustrated.
Attach both stopcocks to the syringe, and attach the drop
tip to the bottom stopcock. Line up the drop tip with the
rectangular opening in the Drop Counter.
2. Start with the valves of the stopcocks turned parallel to
the table top. Add the solutions to the syringe and beaker.
3. Write down the initial volumes of both solutions (in the
syringe and in the beaker), and the molarity of the titrant
(in the syringe).
4. Connect the Drop Counter and pH sensor to your
PASPORT compatible PASCO interface (or interfaces).
5. If you are using a computer, connect the interface to it
and start the data acquisition software. Set up a graph
display of pH versus Drop Count.
6. Start the stir plate.
13. Read the final drop count on the graph.
14. In the calculator window of the software or datalogger,
enter a calculation as shown below, but using your own
values of total volume dispensed and final drop count.
The calculation gives the volume of titrant dispensed
over time based on the number of drops and the average
volume per drop.
volume = [Drop Count (drops)] * 100/3050
In this example, “100” is the total volume dispensed (in
mL) and “3050” is the final drop count.
15. In the graph, change the horizontal axis to the calculated
“volume”.
7. Touch, press, or click to begin recording data.
8. Open the top stopcock. Slowly adjust the bottom stop-
cock to start delivering titrant at about 2 drops per second.
9. Observe the data appearing on the pH versus drop count
graph. After the equivalence point is reached, continue
collecting data until the pH curve flattens.
3
Page 4

Drop Counter Specifications
detector
collimating
lens
focusing
lens
sheet of light
dropinfrared light
source
Tips
• Except for opening and closing the stopcocks, do not
touch the syringe during the titration; otherwise, the
drop size may change significantly.
• The drop rate must remain approximately constant
(about 2 drops per second) in order for the drop size to
remain constant.
• Drop size depends on the exact position of the bottom
stopcock. Therefore, the average drop size will be different for every titration. For each titration, re-enter the
volume used and drop count values in the calculation.
Other Titrations
Titrations with different solutions can be performed using
the same equipment and procedure. Other probes (such as
conductivity or ORP) can be used in place of the pH probe.
Theory of Operation
The Drop Counter
uses an infrared light
source and a photodetector. Lenses
spread the light into a
“sheet” and refocus it
onto the photodetector. When a drop of
fluid passes through the Drop Counter, it partially blocks this
sheet of light, and the photodetector registers a momentary
decrease in light intensity.
The Drop Counter uses infrared light and ignores visible
light. On power up, it automatically adjusts the light level for
the best sensitivity. Use the Drop Counter away from direct
sunlight or other sources of infrared that may interfere with
it.
Troubleshooting
Problem Cause Solution
Indicator light
flashes twice for a
single drop. Drop
Counter registers
more drops than
actually dispensed.
Indicator LED
remains on
constantly. Drop
Counter does not
register drops.
Fluid is splashing
back into the
drop window.
Lenses in drop
window are dirty
or wet.
Adjust the position
of the beaker, Drop
Counter, or syringe
to eliminate splash
back
Clean lenses with
water and dry with a
cotton swab or
tissue.
Specifications
Item Value
Range: -35 to 135°C
Accuracy: ±0.5°C
Resolution: 0.01°C or better
Response TIme Wait 15 seconds for stable readings
in liquids, and wait 30 to 60 seconds
for stable readings in gases.
Technical Support
For assistance with any PASCO product, contact PASCO at:
Address: PASCO scientific
10101 Foothills Blvd.
Roseville, CA 95747-7100
Phone: +1 916-786-3800 (worldwide)
800-772-8700 (U.S.)
E-mail: support@pasco.com
Web www.pasco.com
Limited Warranty For a description of the product warranty, see the
PASCO catalog. Copyright The PASCO scientific Instruction Sheet
is copyrighted with all rights reserved. Permission is granted to
non-profit educational institutions for reproduction of any part of this
manual, providing the reproductions are used only in their laboratories and classrooms, and are not sold for profit. Reproduction under
any other circumstances, without the written consent of PASCO scientific, is prohibited. Trademarks PASCO, PASCO Capstone,
PASPORT, SPARK Science Learning System, SPARK SLS, and
SPARKvue are trademarks or registered trademarks of PASCO scientific, in the United States and/or in other countries. For more information visit www.pasco.com/legal.
Product End of Life Disposal Instructions:
This electronic product is subject to disposal and recycling
regulations that vary by country and region. It is your
responsibility to recycle your electronic equipment per your
local environmental laws and regulations to ensure that it
will be recycled in a manner that protects human health and
the environment. To find out where you can drop off your
waste equipment for recycling, please contact your local
waste recycle/disposal service, or the place where you purchased the product.
The European Union WEEE (Waste Electronic and Electrical Equipment) symbol
(to the right) and on the product or its
packaging indicates that this product must
not be disposed of in a standard waste container.
4
 Loading...