

Page 1
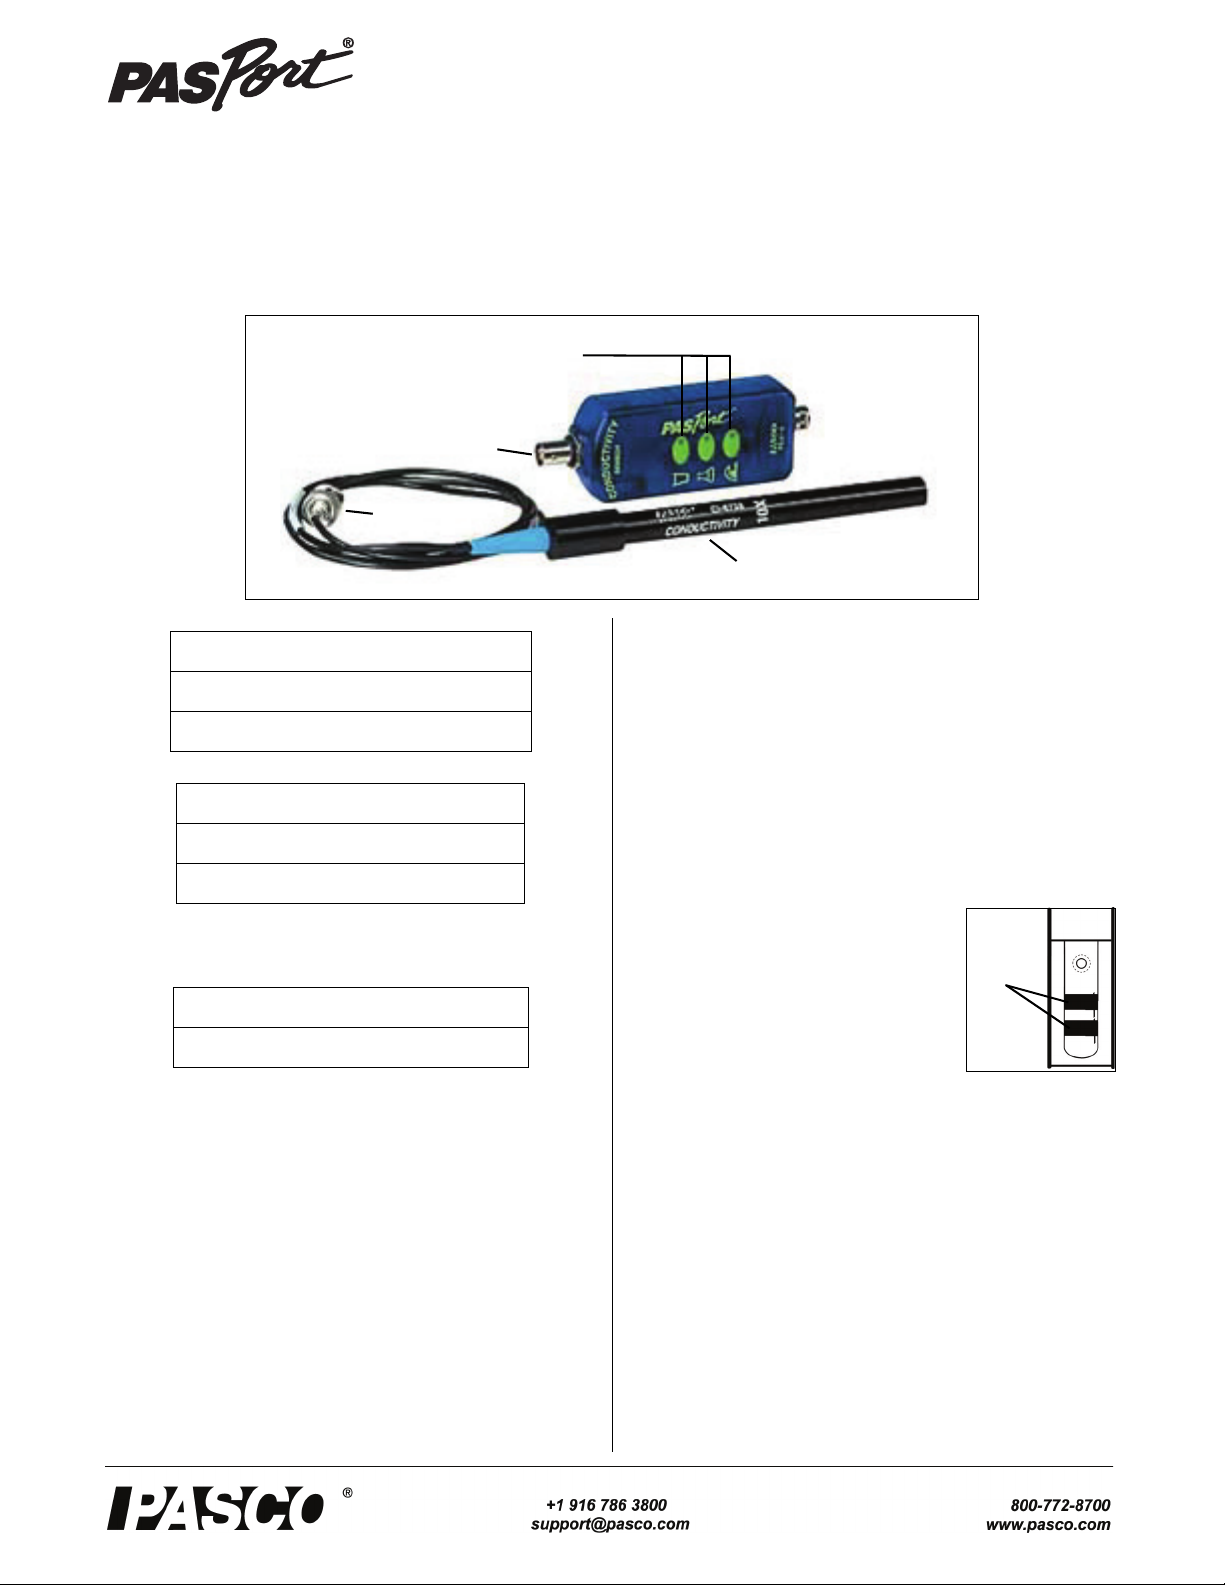
Conductivity Sensor
BNC
Port
Conductivity Probe
Range Select
Buttons
BNC
Connector
Platinum
electrodes
PS-2116A
Instruction Sheet
012-09688B
.
Included Items
Conductivity Sensor
10X Conductivity Probe (PS-2571)
Required Items*
PASCO Interface
PASCO Data Acquisition Software
*See the PASCO catalog or the PASCO web site at www.pasco.com
for more information.
Recommended Item*
Sensor Extension Cable (PS-2500)
Introduction
The PS-2116A Conductivity Sensor measures ionic and
non-ionic molecules in aqueous solutions. These measurements can be used to investigate factors that influence the
electrical conductivity of liquids. This sensor can be used to
explore the effects of temperature and concentration on the
electrical transport properties of aqueous solutions. The Systeme International (SI) unit) for conductivity is the siemen
per centimeter (S/cm). When dealing with a chemical solution ranging from extremely dilute to very concentrated
chemical, use of conductivity units of S/cm and mS/cm are
common. In these applications, conductivity has the advantage of an almost direct relationship with impurities, especially at low concentration.The sensor has three ranges.
The sensor is designed to work with a PASPORT-compatible
interface (such as the UI-5100 850 Universal Interface) and
PASCO data acquisition software (such as PASCO Capstone) to measure electrolytic conductivity.
The 10X Conductivity Probe can be replaced if necessary.
Sensor Theory
Conductance is the reciprocal of resistance. Conductivity is
the specific conductance of a material. The conductivity is
the conductance measured between the opposite faces of a
one centimeter cube of the material.
The electrode cell in the end of the Conductivity Probe is constructed of an
insulating material embedded with
pieces of platinum. These metal contacts
serve as sensing elements and are placed
at a fixed distance apart.
Setup the Sensor
• Soak the end of the probe in deionized or distilled water
for five to ten minutes.
• Connect the BNC Connector of the Conductivity Probe
to the BNC Port on the sensor.
• Plug the sensor into one of the PASPORT input ports of
a PASCO PASPORT-compatible interface.
Page 2
Conductivity Sensor Specifications
Sensor
PASPORT
Input Port
Interface
LED
• Click one of the display templates in the Capstone workbook page, or double-click an icon in the “Displays”
palette to open a specific data display.
• Click “Record” ( ) to begin recording data.
Using SPARKvue Software
• Connect the sensor to a SPARKvue-compatible interface and start the software. The sensor parameter screen
opens and shows the list of measurements for the sensor.
NOTE: If more distance is needed between the sensor and
the interface, plug the sensor into a Sensor Extension Cable
(optional) and then plug the cable into the interface.
• In the sensor parameter screen, touch the measurement,
and then touch ‘Show’ to open a graph display of the
measurement.
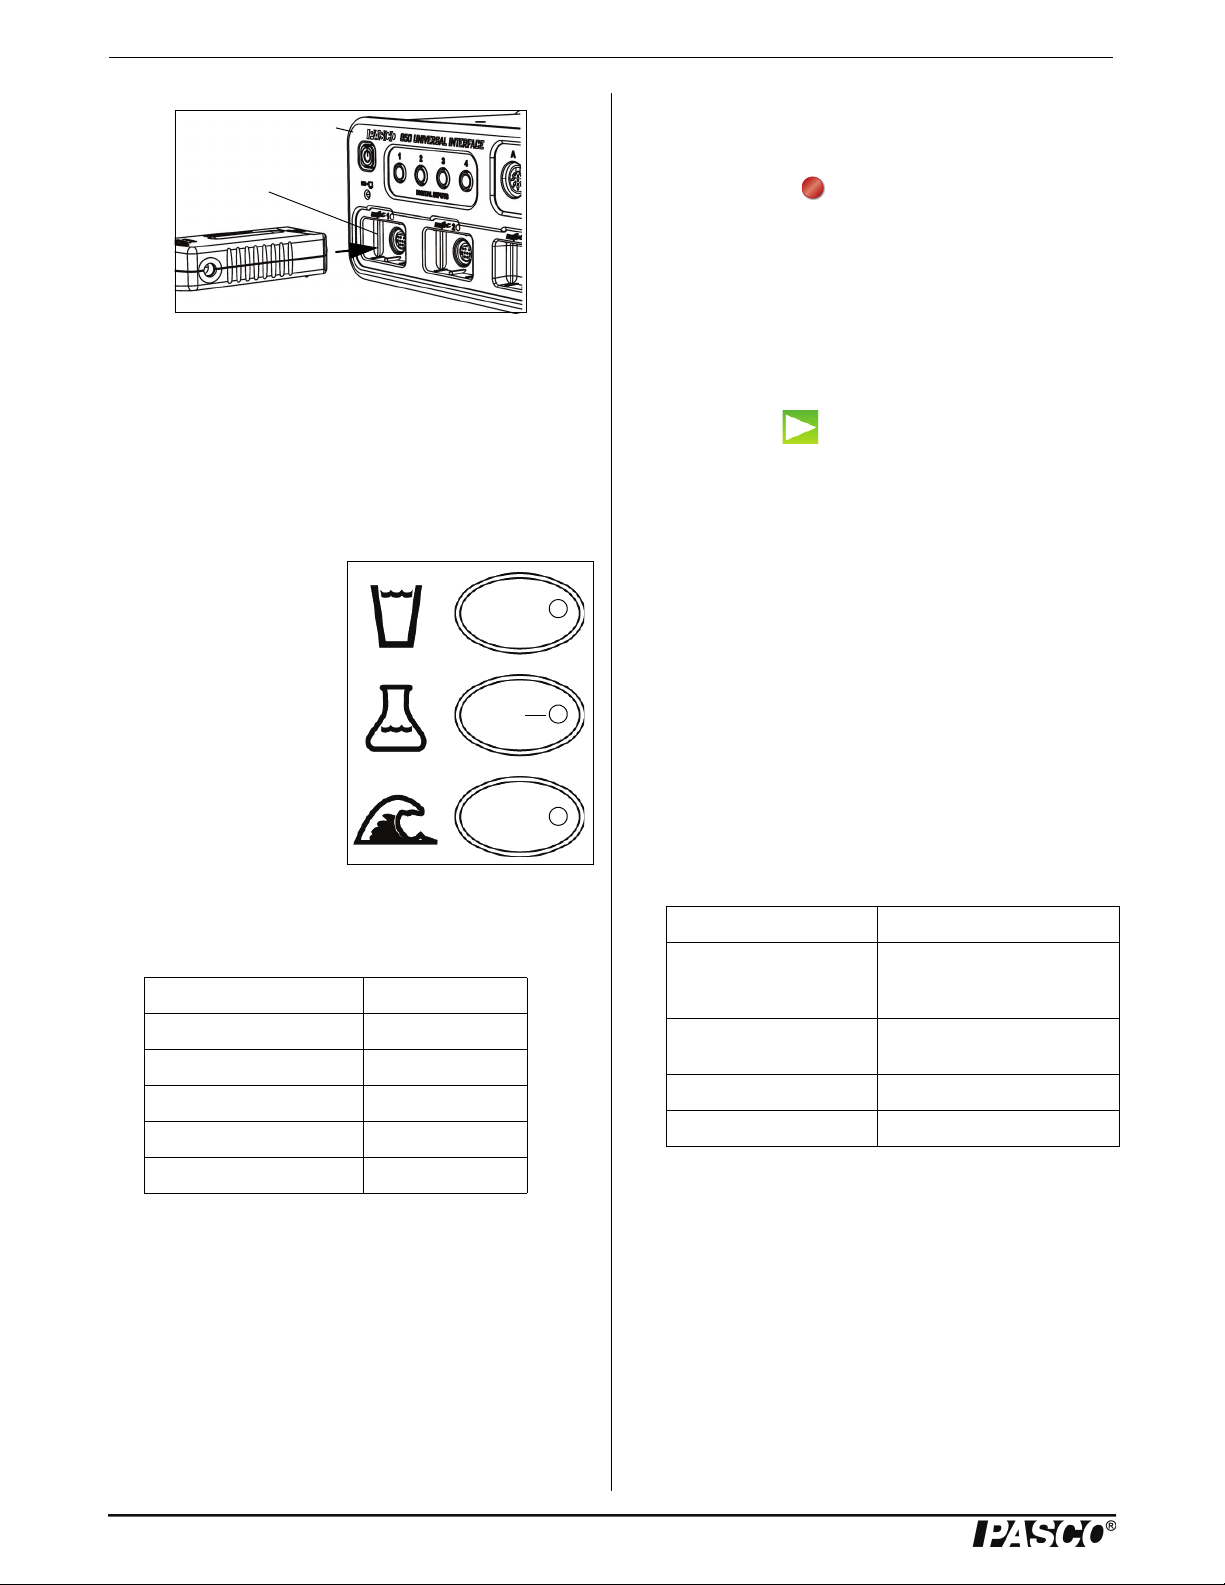
Select a Range
The three ranges are represented by the icons next to the
range select buttons. The water glass range is 0 to 1000
microsiemens per centimeter, the chemistry flask range is
0 to 10,000, and the ocean wave range is 0 to 100,000.
To select a range, press one
of the Range Select Buttons
on the sensor. The green
light emitting diode (LED)
for that button will shine.
The sensor continuously
monitors conductivity, even
if data are not being
recorded. It detects when
the conductivity level is too
high for the selected range.
When this occurs, the LED
for the selected range will
blink, and the LED in the button for the next higher range
flashes. Press the button with the flashing LED to select the
proper range.
Solution Conductivity
Ultra-Pure water 0.05 S/cm
Distilled water 0.5
Drinking water 50 to 1500
Sea water 53,000
• Touch “Start”( ) to begin recording data.
Using the Xplorer GLX
• Turn on the Xplorer GLX and connect the sensor to a
port on the top. A Digits display of conductivity opens
automatically and shows the data being monitored.
• Press the Start/Stop key (s) to begin recording data.
Press the same key again to stop recording.
Calibration Information
See the Appendix for detailed information about calibrating
the Conductivity Sensor.
More Information
For more information about collecting, recording, displaying
and analyzing data, refer to the User’s Guide or Online Help
System for the data acquisition software.
Specifications
Item Value
Ranges: 0 to 100 S/cm
0 to 10,000 S/cm
0 to 100,000 S/cm
Accuracy: ±10% of full range for all
ranges
Resolution: 0.1% or better
Operating Temperature: 0 to 50° C
Brackish water 1000 to 80,000
Safety CAUTION!
Always use eye protection, gloves, and an apron when working with chemicals.
Making Measurements
Using PASCO Capstone Software
• Start the PASCO data acquisition software.
• Click the “Hardware Setup” icon in the Tools palette to
open the “Hardware Setup” panel. Confirm that the sensor’s icon appears with the interface’s icon.
2
Maintenance
Cleaning
The electrode cell in the end of the Conductivity Probe must
be clean for accurate and reproducible results. A dirty electrode cell will contaminate the sample being tested.
The electrode cell can be cleaned with detergent or dilute
nitric acid (1%) by stirring the end of the probe in the cleaning solution for three minutes. Rinse thoroughly.
Storage
The best method for storing the Conductivity Probe is to
immerse the end of the probe in deionized or distilled water.
012-09688B
Page 3

Model No.PS-2116A Technical Support
However, the Conductivity Probe can also be stored dry. If
the probe is stored dry, it should be soaked in deionized or
distilled water for 5 to 10 minutes before use.
Suggested Activities
• Concentration Dependence of Conductivity in Aqueous
Solutions
• Temperature Dependence of Conductivity in Dilute
Aqueous Solutions
• Acid-Base Titration with the Conductivity Sensor
More Information
For the latest information about the Conductivity Sensor,
visit www.pasco.com and enter “PS-2116A” in the Search
window.
Technical Support
For assistance with any PASCO product, contact PASCO at:
Address: PASCO scientific
10101 Foothills Blvd.
Roseville, CA 95747-7100
Phone: +1 916-462-8384 (worldwide)
877-373-0300 (U.S.)
E-mail: support@pasco.com
Web www.pasco.com
Appendix: Calibration
Before calibration, soak the Conductivity Probe in deionized
or distilled water for five to ten minutes.
To make a standard conductivity solution for calibration,
sodium chloride (NaCl), deionized water (1 liter), a 1-liter
flask, a mass balance, and a stir rod are needed.
• Prepare one of the weight percent sodium chloride
(NaCl) solutions given in the table below. Weigh out the
desired mass in milligrams and place the salt in a 1-liter
flask. Add 500 milliliters (ml) of deionized water and
stir the solution to dissolve the salt. Add the remaining
500 ml of deionized water and stir the solution again.
% Weight Mass of NaCl
(mg)
0.001 10 21.4
0.01 100 210
0.1 1,000 1,990
1.0 10,000 17,600
10.0 100,000 140,000
• After preparing the standard conductivity solution, put
the end of the Conductivity Probe into the solution.
Conductivity
(S/cm) at 25°C
Limited Warranty For a description of the product warranty, see the
PASCO catalog. Copyright The PASCO scientific Instruction Sheet
is copyrighted with all rights reserved. Permission is granted to
non-profit educational institutions for reproduction of any part of this
manual, providing the reproductions are used only in their laboratories and classrooms, and are not sold for profit. Reproduction under
any other circumstances, without the written consent of PASCO scientific, is prohibited. Trademarks PASCO, PASCO Capstone,
PASPORT, SPARK Science Learning System, SPARK SLS, and
SPARKvue are trademarks or registered trademarks of PASCO scientific, in the United States and/or in other countries. For more information visit www.pasco.com/legal.
Product End of Life Disposal Instructions:
This electronic product is subject to disposal and recycling regulations that vary by country and region. It is your responsibility to recycle your electronic equipment per your local environmental laws and
regulations to ensure that it will be recycled in a manner that protects
human health and the environment. To find out where you can drop
off your waste equipment for recycling, please contact your local
waste recycle/disposal service, or the place where you purchased
the product.
The European Union WEEE (Waste Electronic
and Electrical Equipment) symbol (to the right)
and on the product or its packaging indicates
that this product must not be disposed of in a
standard waste container.
Calibration: PASCO Capstone
In the PASCO Capstone software, click the “Calibration”
icon in the Tools palette to open the “Calibration” panel.
012-09688B
3
Page 4

Conductivity Sensor Appendix: Calibration
• In Step 1, the measurement of “Conductivity” is automatically selected. Click “Next” to open the second
step.
• In Step 2, chose what to calibrate. Click the check-box
next to “Conductivity Sensor”. Then, click “Next” to
open the third step.
Standard Value. Click “Set Current Value to Standard
Value” and then click “Next” to go to the last step.
• The Calibration panel shows the calibration information. In Step 5, check that the calibration information is
acceptable. Then, click “Finish”.
• The Calibration panel returns to Step 1. Click the “Calibration” icon in the Tools palette to close the panel.
• In Step 3, choose the type of calibration. The default
choice is “One Standard (1 point slope)”. Click “Next”
to open the fourth step.
• In Step 4, enter the conductivity value of the standard
conductivity solution in the “Standard Value” text area.
For example, if the standard conductivity solution has a
value of 210 (see the table above), then enter 210 as the
Calibration: SPARKvue
Turn on the SPARK SLS hand-held datalogger. Connect the
Conductivity Sensor to one of the PASPORT input ports on
the SPARK SLS. The sensor parameters screen for the Conductivity Sensor opens.
4
012-09688B
Page 5

Model No.PS-2116A Appendix: Calibration
First, touch “Conductivity
(10X Probe)” to select it:
Then, touch “Show”:
To uc h
“Experiment Tools”:
First, touch
“Calibrate Sensor”
to select it:
Then, touch “OK”:
• In the Conductivity Sensor screen, touch “Conductivity
(10X Probe) to select that choice, and then touch
“Show”.
• A graph display of Conductivity and Time opens. Touch
the “Experiment Tools” icon in the lower right corner.
Probe) (S/cm)” as the “Measurement” and “1 point
(Adjust Slope Only)” as the “Calibration Type”. Touch
“NEXT”.
• The “Calibrate Sensor: Enter Values” screen shows the
“Calibration Point 2” menu.
• The “Experiment Tools” screen opens. Touch “Calibrate
Sensor” to select that choice and then touch “OK”.
• The “Calibrate Sensor: Select Measurement” screen
opens. and the default selections are “Conductivity (10X
012-09688B
• Touch “Standard Value:” to open the keypad. Use the
keypad to enter the standard value for the conductivity
of the standard conductivity solution.
• When the number is entered, touch “OK” on the keypad
to return to the “Calibrate Sensor” screen. Touch “OK”
to finish the calibration.
5
Page 6

Conductivity Sensor Appendix: Calibration
Calibration: Xplorer GLX
Turn on the Xplorer GLX hand-held datalogger. Connect the
Conductivity Sensor to one of the PASPORT input ports on
the GLX. Press the Home Screen key (h).
• On the keypad, press F4 (I) to open the Sensors
screen for the Conductivity Sensor.
• Use the down arrow (d) to highlight the
“Pt 2 (S/cm)” text area.
• Use the numeric keypad to enter the value of the standard conductivity solution. Press F1 (F) to select
“OK”. Press the Home Screen key (h) to return to
the Home Screen.
Sources of Conductivity Data
Environmental Chemistry: Air and Water Pollution (2nd
ed.), H. Stephen Stover and Spencer L. Seager, Scott Foresman and Company, Glenview, Illinois, 1976.
International Critical Tables, Vol. VI
Hill, 1929.
, pp. 230 - 258, McGraw
• On the keypad, press F4 (I) again to open the Sen-
sors menu. Use the down arrow key (d) to select
“Calibrate” from the menu.
•In the Calibrate Sensors screen, the highlighted selection is “Conductivity Sensor” and the choice for Calibration Type is “1 Point Slope”.
Handbook of Chemistry and Physics
Press, 1997.
Electrolyte Solutions
1959.
, Robinson and Stokes, Butterworths,
, 78th Edition, CRC
6
012-09688B
 Loading...