

Page 1
®
Instruction Manual
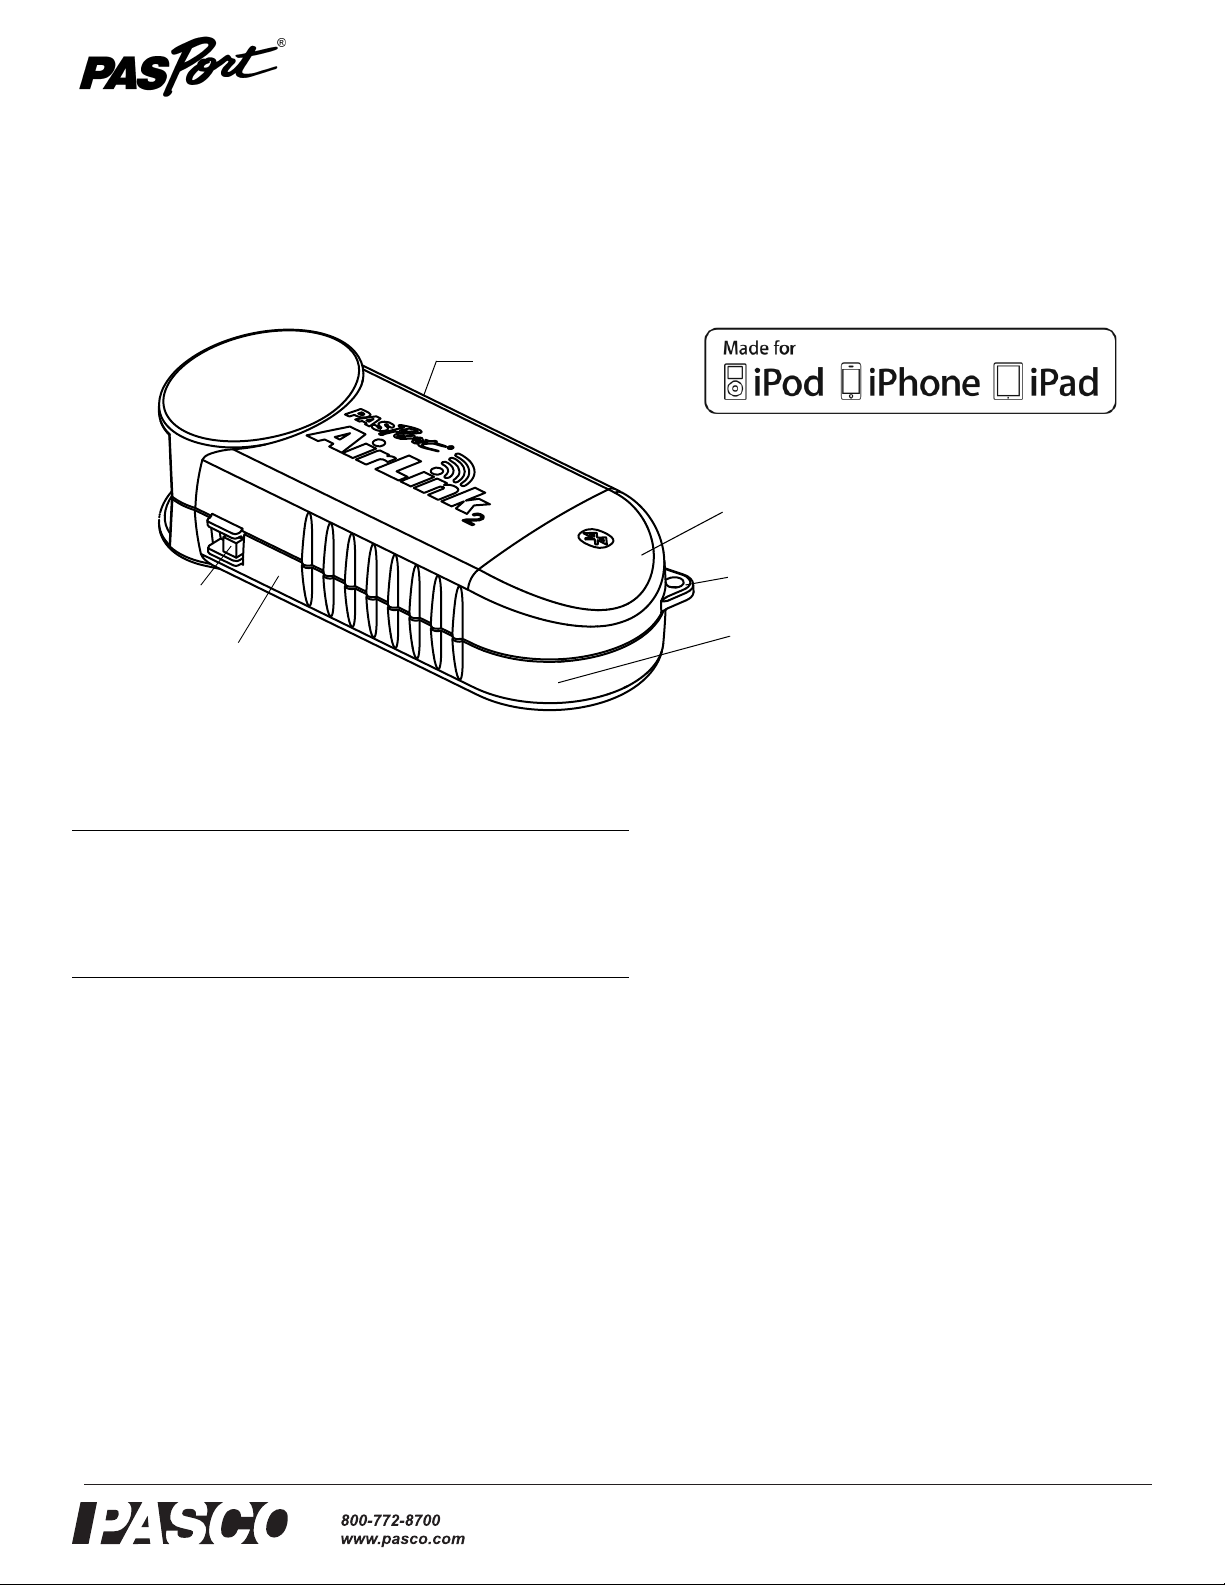
ON/OFF Switch
Lanyard Loop
Green LED
Yellow LED
Red LED
USB Port
(not shown)
012-11114C
*012-11114*
PASPORT AirLink
Equipment and Software
Included Part Number
PASCO AirLink2 Sensor Interface PS-2010
USB Cable* for GLX or SPARK
Science Learning System
PS-2528
* not shown
PS-2010
2
puters through Blueto oth™. The A irLink
lithium polymer (Li-Poly) battery (installed) and comes with a
USB cable that allows the battery to be recharged while the
AirLink
is connected to a computer’s USB port or a USB
2
power supply.
About the Manual
uses a rechargeable
2
Also Required
PASPORT Sensor
iPad or iPhone 3G or iPhone 3GS or
iPod touch (2nd or 3rd generation)
SPARKvue app
DataStudio Software (1.9.8r9 or later)
Bluetooth compatible computer
Introduction
The PASPORT AirLink2 is a sensor interface for PASPORT
sensors that wirelessly connects to iPad™, iPhone® and
iPod touch® devices and Macintosh® and Windows® com-
and
see catalog or web site
Part One of this manual describes how to use the AirLink
with the iPad, iPhone or iPod touch, including how to download and run the SPARKvue application on the iPad, iPhone or
iPod touch. Part Two describes how to use the AirLink
2
sensor
2
interface with a computer and the PASCO DataStudio pro-
see www.apple.com
see www.itunes.com/apps/
or
gram.
Bluetooth Requirements
The iPad, iPhone and iPod touch are Bluetooth compatible.
Consult your computer’s documentation to determine if it is
see catalog or web site
1
Bluetooth-capable. Your Macintosh computer must be running
Mac OS X 10.2.1 or higher and your W indows comput er must
be running Windows XP with Service Pack 2 (SP2) or higher.
1
If your computer is not already Bluetooth capable, you may
be able to add Bluetooth capability by purchasing a Bluetooth
module that connects to a computer’s USB port (such as the
PASCO PS-2553 Bluetooth USB Adapter). When se tti n g up a
Windows computer with Bluetooth, it’s best to try the default
Page 2
®
PASPORT AirLink
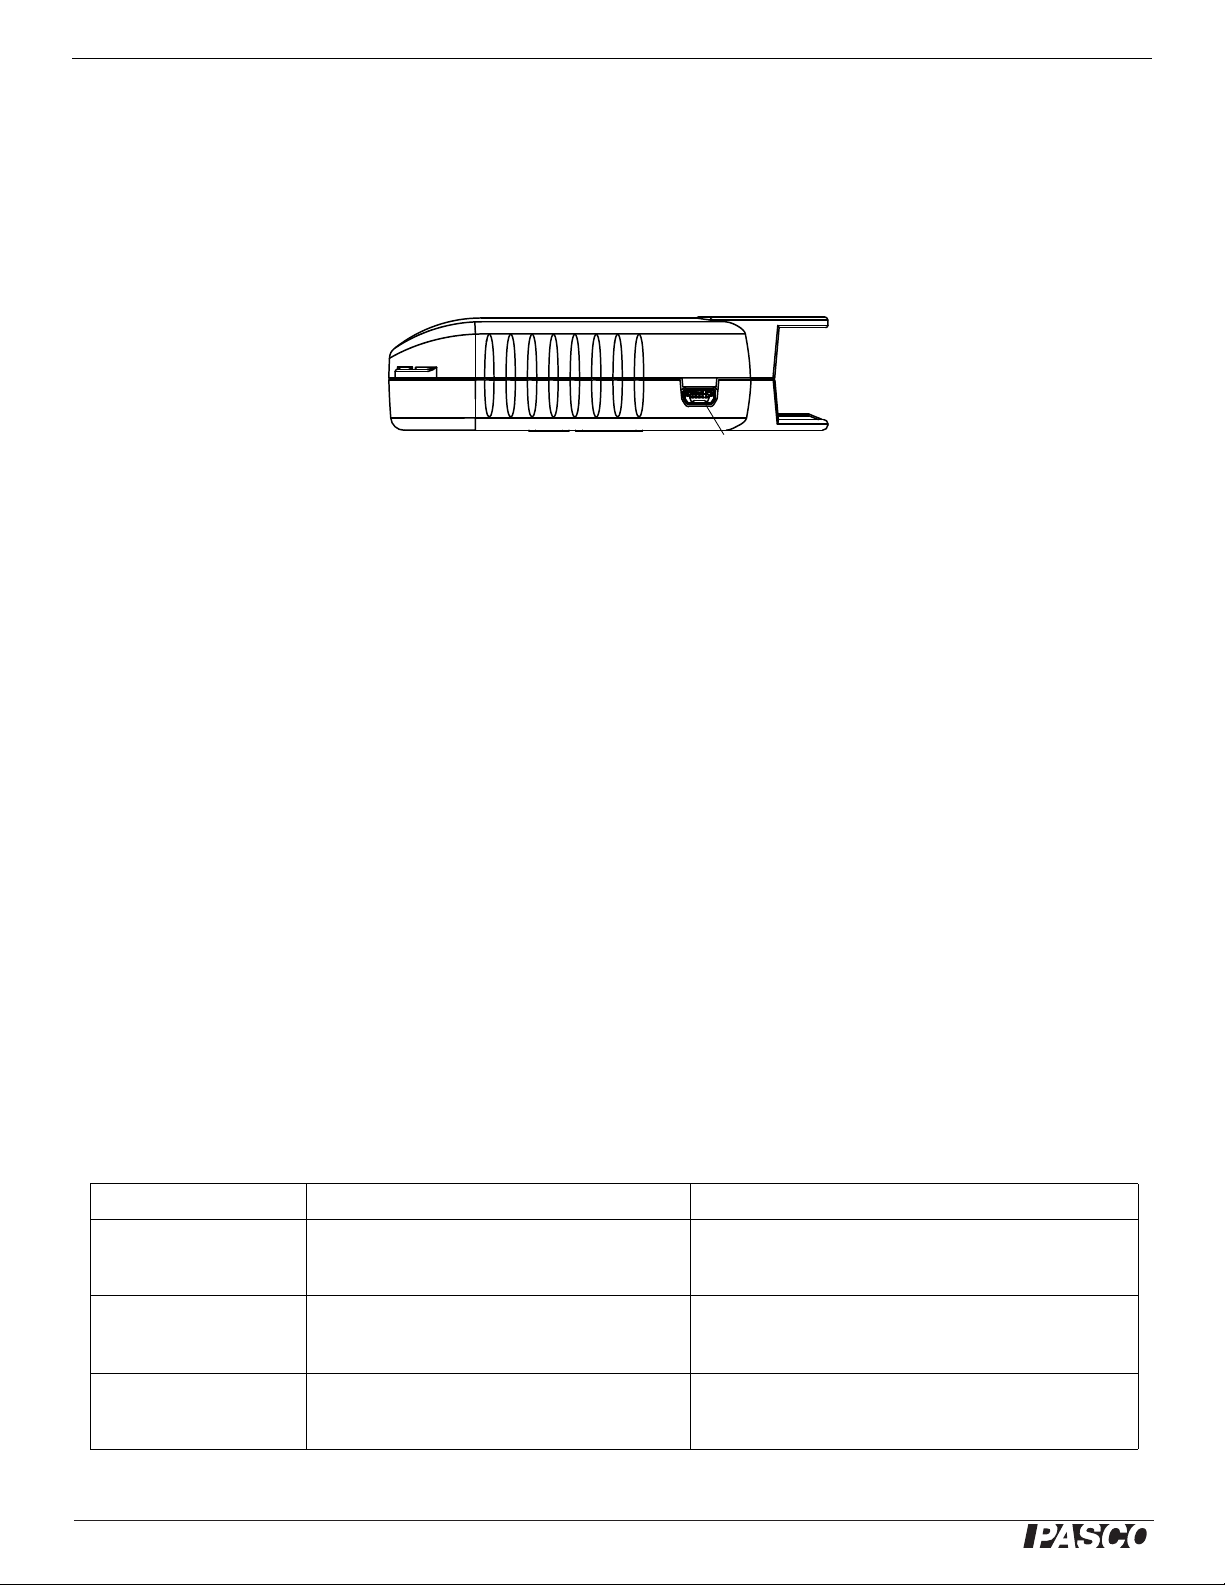
USB PortInsert the USB cable into the USB port.
2
Powering the PASPORT AirLink
drivers included with Windows XP (see the Bluetooth Device Control Panel). As an alternative, follow the installation instructions
supplied with the Bluetooth module.
2
Powering the PASPORT AirLink
2
Use the USB cable to charge the battery in the PASPORT AirLink2. To use the cable, insert the small end of the cable into the USB
port on the side of the AirLink
. Connect the large end of the cable to a USB port on a computer or USB power supply.
2
Note: Charge for at least four hours prior to first use.
The sensor interface will normally provide 4 to 6 hours of continuous data collection between charges depending on the power
demand of the connected sensor and the sampling rate.
Maximizing Battery Life
The following are suggestions for maximizing battery life:
• Unplug the sensor when not making measurements.
• Use slow sample rates for long experiments.
• Turn off the AirLink
when not in use.
2
• Quit the data acquisition software between data collection episodes.
Remember to fully charge the AirLink
before using it for data collection in the field. The AirLink2 may be left connected to its
2
charger for an indefinite period of time without damage. Also, the Li-Poly battery exhibits very low self-discharge so it may be
stored for many months with the AirLink
turned off while retaining most of its charge. If constant charging is not possible, always
2
store the interface fully charged, recharging at least every three months.
Status LEDs for the PASPORT AirLink2
The P ASPORT AirLink2 has internal light-emitting-diodes (LEDs) that are visible though the translucent case. A yellow LED shows
the state of charge. The green LED shows the connection status. These two LEDs are near the front end of the sensor. A red LED
located near the ON/OFF switch indicates battery charger status. Please refer to the table..
LED Color Flashing Solid
Yellow: State of charge. Not applicable. ON: Warning! Charge the battery soon (25% or less charge
Green: Connect status. Slow (about 1 Hz): Searching for a Bluetooth
receiver.
Fast (about 2 Hz): Connected and monitoring data.
remaining).
OFF: Battery is charged (25 to 100% charge remaining).
ON: AirLink
computer.
OFF: Battery is completely discharged.
is on and connected to an iPhone/iPod or
2
Red: Battery charger status. Slow: Battery temperature too high or too low for
charging.
Fast: Bad battery.
ON: Battery is charging.
OFF: Battery is charged (if USB cable is connected to the
computer).
Note: The rechargeable battery cannot be replaced by the end-user. Please contact PASCO if your battery is not charging properly.
2
Page 3
®
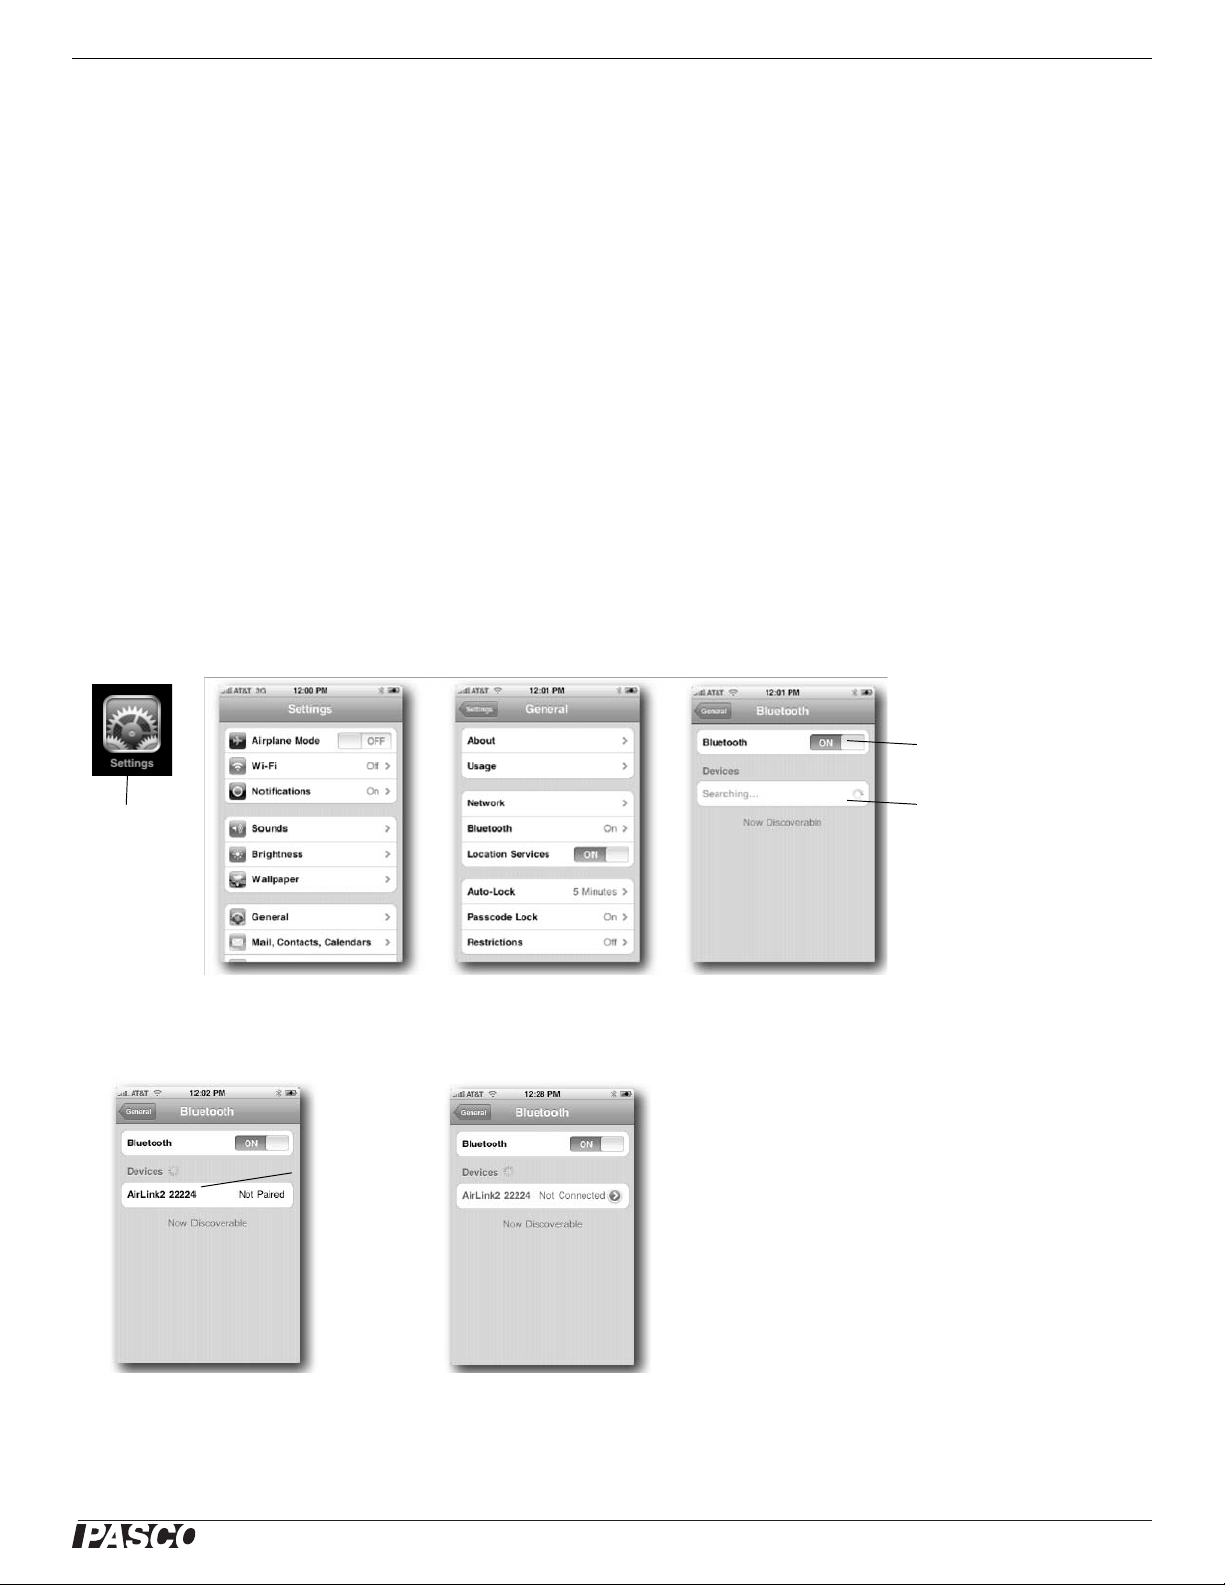
Model No. PS-2010 Part One: Using the AirLink2 with the iPad, iPhone or iPod touch
Make sure that Bluetooth
is turned ON.
Bluetooth searches for
any active devices,
including the PASPORT
AirLink
2
.
Launch the
Settings app
• NOTE: In a classroom situation, there may
be many AirLink
2
devices available for pairing. To make sure that you are pairing with
the right device, check the back of the
AirLink
2
for its identification number.
AirLink2 ID number
Part One: Using the AirLink2 with the iPad, iPhone or iPod touch
Your iPad, iPhone or iPod touch must be running iPhone OS 3.1 Software or later and the latest version of the SPARKvue app. Use
iTunes® to download the SPAR Kv ue app from the App Store (www.itunes.com/apps). See the Apple web site at
www.apple.com/Downloads for the iPad, iPhone and iPod touch OS software and the iTunes application.
Because the AirLink
the device. Instead, you set up a wireless connection from the device to the AirLink
You can connect to only one AirLink
Depending on the environment, the AirLink
sensor interface communicates with the iPad, iPhone or iPod touch wirelessly, it does not physically conn ect to
2
at a time. Once you connect to a specific AirLink2, no one else can access that AirLink2.
2
must remain within 30 feet (10 meters) of the device that you intend to use. Actual
2
using the Settings app.
2
range may vary.
Setting Up the iPad, iPhone or iPod touch
Note: Each PASPORT AirLink2 has an identification number (e.g., AirLink2-12345), that is printed on a label on the bottom of the
AirLink
and connecting.
• Step 1: Turn on the AirLink
• Step 2: In the Home screen, launch the Settings app and, within Settings, go to General>Bluetooth.
. Use this ID number to confirm that your AirLink2 is communicating with the iPad, iPhone or iPod touch when setting up
2
unit (the green LED should flash, which indicates that the AirLink2 is searching for a Bluetooth
2
receiver). Make sure that the iPad, iPhone or iPod touch is on.
• Step 3: In the Bluetooth screen, you should see something very much like one of these two images. In the first case, the device
and AirLink
need to be “paired”. Tap “Not Paired” to establish a pairing. In the second ca se, the device and AirL ink2 have been
2
paired, but are not currently connected. Tap “Not Connected” to establish a connection.
3
Page 4
®
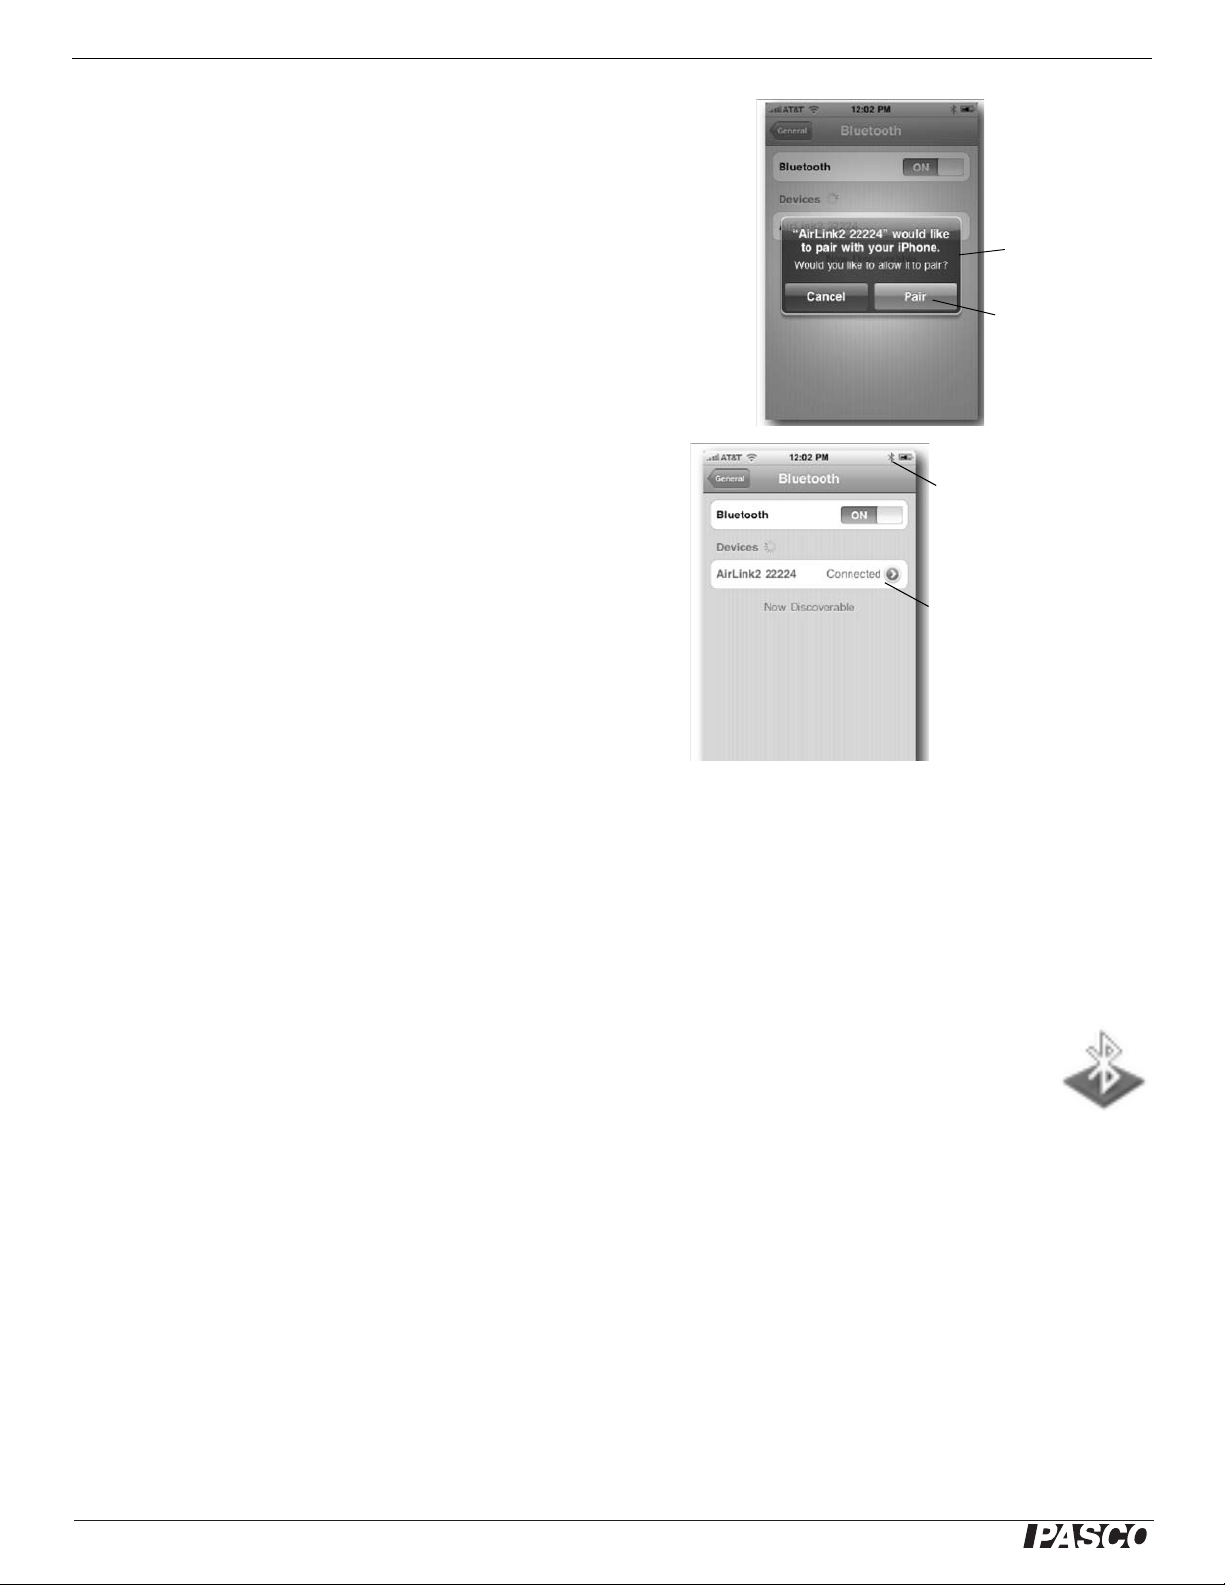
PASPORT AirLink
Alert window
Tap “Pair”
Bluetooth icon is blue.
AirLink2 is connected.
Bluetooth
icon
2
• Step 4 (only if the devices had not already been paired): An alert window
will appear after you tap “Not Paired”. Tap “Pair” to complete pairing and
connect the devices. The iPad, iPhone or iPod device and th e AirLink
only be paired once.
need
2
• Step 5: The screen should show that the AirLink
green LED on the AirLink
should be ON. The Bluetooth icon in
2
is connected. The
2
the upper right corner of the device should be blue, indi cating an
active connection.
• Step 6: Exit the Settings app, return to the SPARKvue app, connect
a PASPORT sensor to the AirLink
, and start collecting data.
2
Part Two: Using the PASPORT AirLink2 with a Computer
Because the AirLink2 communicates with the computer wirelessly , it does not phys ically connect to the computer. Instead, you set up
a wireless connection from the computer to the AirLink
You can connect to only one AirLink
on the environment, the AirLink
at a time. Once you connect to an AirLink2, no one else can access that AirLink2. Depending
2
must remain within 30 feet (10 meters) of the computer you intend to use. Actual range may vary.
2
in software.
2
Setting Up the Computer with Bluetooth.
4
•The AirLink
• Position the AirLink
on.
Note: Each PASPORT AirLink
tom of the AirLink
requires DataStudio version 1.9.8r9 or higher (see the PASCO web site at www.pasco.com).
2
ON/OFF switch to ON. The green LED will blink slowly (about 1 Hz) when the AirLink2 is
2
has an identification number (for example, AirLink2-00056), that is printed on a label on the bot-
. Use this ID number to select the AirLink2 in the DataStudio software when setting up and connecting
2
2
Page 5

®
Model No. PS-2010 Part Two: Using the PASPORT AirLink2 with a Computer
Click “Set Up New Device…”
AirLink2 and its identification number
Paired but not yet
Connected
Macintosh OS X Bluetooth Setup
• Mac OS X 10.6
In System Preferences, click Bluetooth.Make sure that Bluetooth
is “On” and “Discoverable”. In the preference pane, click “Set
Up New Device…”. The Bluetooth Setup Assistant window will
open.
• In the Bluetooth Setup Assistant window, the AirLink
and its
2
identification number should appear in the list of “Devices”.
Click “Conti nue”.
• In the Bluetooth Setup Assistant window that opens, select “Use a specific
passcode” and type in 1234. Click “Continue”.
• The final window should state that the computer and AirLink
are success-
2
fully paired. Click “Quit” to close the Bluetooth Setup Assistant.
• In the Bluetooth preference pane (under System Preferences), the AirLink
will be “Paired”, but it will not be
2
“Connected” until you start DataStudio and choose the
AirLink
necting the PASPORT AirLink
later section of this manual.
as the interface that you want to use. See “Con-
2
with DataStudio” in a
2
Enter 1234 as
the specific
passcode.
5
Page 6

®
PASPORT AirLink
AirLink2 appears as a Bluetooth device
Select the AirLink
2
Select this
pairing option.
Enter 1234 as
the pairing code.
2
Part Two: Using the PASPORT AirLink2 with a Computer
Windows 7
• If your computer is not yet Bluetooth compatible, see your system's
documentation about setting up a Bluetooth transceiver on your
computer
• In the Start Menu under Control Panels, select “Devices and Printers”. The AirLink2 should appear in the “Add a device” window as a
Bluetooth device.
• Select “AirLink
” and then click “Next”.
2
• Select the following pairing option in the next window: “Enter the
device’s pairing code”, and click “Next”.
• Enter the pairing code “1234” and click “Next”.
• The next window should explain that the device (AirLink
been successfully added to the computer. Click “Close”.
6
) has
2
Page 7

®
Model No. PS-2010 Part Two: Using the PASPORT AirLink2 with a Computer
Click the icon for the AirLink
2
Check the COM
port here.
Click ‘Hardware’ tab
Click ‘Add’
• Find the AirLink2’s “COM” port before usin g the AirLink2 with DataStudio.
Go to the Devices and Printers control panel. Click the icon for the AirLink
to open the AirLink
Properties window.
2
2
• In the AirLink
Properties window, click the “Hardware” tab. Under “Device
2
Functions”, check the “COM” port for the “Standard Serial over Bluetooth
link”. In this example, it is COM7. Click “OK” to close the window.
AirLink2 is “paired” but
not yet “connected”.
Make a note of the Outgoing
COM port number. You will need
it when you connect the AirLink2
with the DataStudio software.
•The AirLink
you want to use. See “Connecting the PASPORT AirLink
will be “Paired”, but not yet “Connected” until you start DataStudio and choose the AirLink2 as the interface that
2
with DataStudio” in a later section of this manual.
2
Windows Vista
• See your system's documentation (e.g., “Help->Help and Support Center”) for setting up a Bluetooth connection.
Windows XP (SP2)
• From the Start menu, open the Bluetooth Devices Control Panel to add the PASPORT
AirLink
. In the Bluetooth Devices control panel under the “Devices” tab, click “Add” to
2
open the “Add Bluetooth Device Wizard”.
Click ‘My device is set up
and ready to be found’
• Click the checkbox for ‘My device is set up and ready to be found’, and then click ‘Next’.
7
Page 8

®
PASPORT AirLink
Select the AirLink
2
Select
this
choice
Make a note of the
Outgoing COM port.
2
Part Two: Using the PASPORT AirLink2 with a Computer
• The Add Bluetooth Device Wizard shows the available Bluetooth devices..
Select the AirLink
from the list of Bluetooth devices and click ‘Next’.
2
• When the Device Wizard asks for a passkey, check “Let me choose my own
passkey”, click “Next”, and enter 1234 Once again, click “Next”.
Enter 1234 as the passkey
• When the ‘Add Bluetooth Device Wizard’ is finished, make a note of the Outgoing COM port number f or t he AirLink
shown in the Add Bluetooth Device
2
Wizard. You will need to enter the Outgoing COM port number in the DataStudio ‘Choose Interface’ dialog (see below). Click “Finish”.
8
Page 9

®
Model No. PS-2010 Part Two: Using the PASPORT AirLink2 with a Computer
Machintosh
Windows
Select “AirLink2”
from the menu.
Enter the
Outgoing
COM port
AirLink2 icon
Connecting to the PASPORT AirLink2 with DataStudio
1. Start DataStudio and click the 'Setup button on the DataStudio toolbar. In the Experiment Setup window, select “Choose Interface”. Choose PAS PORT as the interface and select your PASPORT AirLink
• Macintosh
Choose “Ai rLink2” from the drop-d own menu..
• Windows
Enter the Outgoing COM port number (e.g.,
COM8 with no spaces) for the AirLink
to the right of AirLink
.
2
in the field
2
2. Click “OK” to return to the Experiment Setup window.
from the AirLink drop-down list.
2
Automatic PASPORT AirLink
Connection
2
Each time DataStudio is launched, or a new experiment is created, DataStudio will attempt to re-connect to the last selected
PASPORT AirLink
. If a connection is not established when expected, choose File->New Experiment to create a new experiment
2
and re-attempt a connection.
When a AirLink
is connected, its icon will appear in the
2
Experiment Setup window (click the Setup button on t he
DataStudio toolbar). If no AirLink
appears in the Experi-
2
ment Setup window, choose File->New Experiment a couple of times and then check the Experiment Setup window
for a connection. If this does not result in a connection,
check the settings in the Experiment>Choose Interface
dialog and then check the computer's Bluetooth preference
pane or control panel.
Changing PASPORT AirLink
Connections
2
Do one of the following:
• Click the Setup button on the DataStudio toolbar and
select Choose Interface
•From the Experiment menu click Change Interface. Choose a different AirLink
from the popup menu (Macintosh ) or ente r a
2
different COM port number without spaces (Windows).
Disabling PASPORT AirLink
In the Choose Inter f ac e dialog, either choos e a non-PASPORT interface, or choose ‘None’ from the AirLink
connection for future experiments, follow the instructions under Selecting a PASPORT AirLink
Connections
2
menu. To re-en able a
for use with DataStudio in this
2
2
instruction sheet.
Out of Range or Turned Off During Sampling
If the connection is lost during sampling, DataStudio will stop recording data, and an error dialog will be displayed. Get back in
range, or check if the AirLink
be established later by creating a new experiment, or following the instructions under Selecting a PASPORT AirLink
is powered on (see Status LEDs PASPORT AirLink2), and try to re-connect. A conn ection can always
2
.
2
9
Page 10

®
PASPORT AirLink
2
Connecting PASPORT Sensors
Connecting PASPORT Sensors
The DataStudio software and the SPARKvue app for iPhone and iPod touch automatically recognize a PASPORT sensor when it is
plugged into the PASPORT AirLink
Plugging in a Sensor
. The program or app will set the calibration(s) and sampling rate to the sensor’s defaults.
2
Align the alignment bar on the end of the PASPORT AirLink
with the groove on the sensor or sensor
2
plug. Plug the sensor or sensor plug into the mini DIN sensor connector on the end of the sensor interface.
10
Page 11

®
Model No. PS-2010 Specifications
Specifications
Compatibility iPad, iPhone 3G and iPod touch (2nd or 3rd generation) devices and Windows and Macintosh computers with Bluetooth support
Wireless Range 10 meters
Sampling Rate Up to 1,000 hertz (1 kHz) (varies by software application and sensor)
Battery 4 hours to fully charge; 4 to 6 hours continuous collection per charge
Troubleshooting
Problem Solution
AirLink
drops connection 1. You may be out of range. Move the device closer to the AirLink2 and try to reconnect.
2
2. Battery may be low. Recharge.
Software does not see AirLink
Software does not see sensor
attached to AirLink
2
1. Check AirLink2 is powered on;
2
2. Confirm AirLink
3. Make sure AirLink
4. (Windows) Ensure the COM port in the DataStudio Setup window matches the COM port your
computer designated for the AirLink
1. Confirm you are connected to AirLink2;
2. Make sure sensor is firmly connected to AirLink
3. Turn interface off and back on. (You will need to reconnect).
is within range;
2
isn't already connected to another device (see Status LEDs table).
2
.
2
;
2
Technical Support
Before you call PASCO technical support, have the apparatus and this user's guide available. Please note the following:
• DataStudio version;
• Product name and model number;
• Approximate age of the product;
• Detailed description of the problem/sequence of events required to duplicate the problem.
For assistance with any PASCO product, contact PASCO at:
Address: PASCO scientific
10101 Foothills Blvd.
Roseville, CA 95747-7100
Phone: 916-786-3800 (worldwide)
800-772-8700 (U.S)
Fax: (916) 786-7565
Web: www.pasco.com
Email: support@pasco.com
11
Page 12

®
PASPORT AirLink
2
Communications Regulation Information
Communications Regulation
Information
The P ASPOR T Air Link2 (PS-2010) complies with part 15 of the FCC rules.
Operation is subject to the following two conditions: (1) The AirLink
not cause harmful interference, and (2) the AirLink
ference received, including interference that may cause undesired opera-
must accept any inter-
2
tion. See instructions below if interference to radio and television reception
is suspected.
IMPORTANT NOTE:
To comply with FCC RF exposure compliance requirements, the antenna
used for this transmitter must not be co-located or operating in conjunction
with any other antenna or transmitter. .
PASPORT AirLink
2
Tested To
Comply With
FCC Standards
FOR HOME OR OFFICE USE
Radio and Television Interference
The equipment described in this manual generates, uses, and can radiate
radio-frequency energy. If it is not installed and used properly-that is, in
strict accordance with instructions from PASCO scientific, it may cause
interference with radio and television reception.
The AirLink
Class B digital device in accordance with the specifications in Part 15 of
the FCC rules. These specifications are designed to provide reasonable
protection against such interference in a residential installation. However,
there is no guarantee that interference will not occur in a particular installation.
You can determine whether the AirLink
necting it from the computer. If the interference stops, it was probably
caused by the AirLink
If the AirLink
to correct the interference by using one or more of the following remedies:
If these remedies do not correct the problem, consult with an experienced
radio or television technician for additional suggestions.
Important: Changes or modifications to the AirLink
PASCO scientific. could void the FCC Certification and negate your
authority to operate the product. Responsible party (FCC matters only):
David Stogner, PASCO scientific, 10101 Foothills Blvd., Roseville, CA,
USA, 95747-7100.
High Risk Activities Warning
Connect only approved sensors to the AirLink
devices could void your warranty or result in shock or injury. Be sure to follow the sensor usage guidelines.
iPod touch, iPhone and iPad
“Made for iPod”, “Made for iPhone” and “Made for iPad” means that an
electronic accessory has been designed to connect specifically to iPod,
has been tested and found to comply with the limits for a
2
is causing interference by discon-
2
.
2
does cause interference to radio or television reception, try
2
• Turn the television or radio antenna until the interference stops;
• Move the AirLink
• Move the AirLink
to one side or the other of the device;
2
further from the television or radio.
2
not authorized by
2
. Connecting unapproved
2
may
2
PS-2010
iPhone, or iPad, respectively, and has been certified by the developer to
meet Apple performance standards. Apple is not responsible for the operation of this device or its compliance with safety and regulatory standards.
Limited Warranty
PASCO scientific warrants the product to be free from defects in materials
and workmanship for a period of one year from the date of shipment to the
customer. PASCO will repair or replace, at its option, any part of the product, which is deemed to be defective in material or workmanship. The warranty does not cover damage to the product caused by abuse or improper
use. Determination of whether a product failure is the result of a manufacturing defect or improper use by the cu stomer shall be made solely by
PASCO scientific. Responsibility for the return of equipment for warranty
repair belongs to the customer. Equipment must be properly packed to
prevent damage and shipped postage or freight prepaid. (Damaged
caused by improper packing of the equipment for return shipment will not
be covered by the warranty.) Shipping costs for returning the equipment
after repair will be paid by PASCO scientific.
Copyright
The PASCO scientific 012-11114C PASP ORT AirLink
is copyrighted with all rights reserved. Permission is granted to non-profit
Instruction Manual
2
educational institutions for reproduction of any part of this manual, providing the reproductions are used only in their laboratories and classrooms,
and are not sold for profit. Reproduction under any other circumstances,
without the written consent of PASCO scientific, is prohibited.
Trademarks
PASCO, PASCO scientific, DataStudio, ImagiProbe, PASPORT, and ScienceWorkshop are trademarks or registered trademarks of PASCO scientific, in the United States and/or in other countries. iPhone and iPod touch
are trademarks of Apple Inc., registered in the U.S. and other countries.
iPad is a trademark of Apple Inc. All other brands, products, or service
names are or may be trademarks or service marks of, and are used to
identify, product s or services of, their respective owners. For more information visit www.pasco.com/legal.
Product End of Life Disposal Instructions:
This electronic product is subject to disposal and recycling regulations that
vary by country and region. It is your responsibility to recycle your electronic equipment per your local environmental laws and regulations to
ensure that it will be recycled in a manner that protects human health and
the environment. T o find out where you can drop off your waste equipment
for recycling, please contact your local waste recycle/disposal service, or
the place where you purchased the product.
The European Union WEEE (Waste Electronic and Electrical Equipment).symbol (to the right) and on the product or
its packaging indicates that this product must not be disposed of in a standard waste container.
Battery Disposal Instructions:
Battery Disposal - Batteries contain chemicals that, if
released, may affect the environment and human health. Batteries should
be collected separately for recycling, and recycled at a hazardous material
disposal location adhering to your country and local government regulations. To find out where you can drop off your waste battery for recycling,
please contact your local waste disposal service or the product representative.
The battery or batteries included in this product or purchased in the European Union (if batteries not included) are marked with the European Union
symbol for waste batteries (above) to indicate the need for the separate
collection and recycling. For small batteries, the symbol is printed on the
packaging.
12
 Loading...