

Page 1

Instruction Sheet
Rubber
Stopper
Threaded
Hole
Calibration
Button
Sampling
Bottle
Sensor
Extension
Cable
Probe
Carbon Dioxide Gas Sensor
PS-2110
012-14330C
.
Included Items
Carbon Dioxide Gas Sensor
Sampling Bottle, Clear, 250 mL
Sensor Extension Cable (PS-2500)
Rubber Stopper
*See the PASCO catalog or the PASCO web site at www.pasco.com
for more information.
Required Items*
PASCO Interface
PASCO Data Collection Software
Introduction
The PS-2110 Carbon Dioxide Gas Sensor measures carbon
dioxide gas concentration in parts per million in gases such
as air. The sensor is designed only for educational purposes
and is not intended for environmental compliance studies.
The sensor is designed to work with a PASPORT-compatible
interface (such as the PS-2100 USB Link) and PASCO data
collection software (such as PASCO Capstone or
SPARKvue) to measure carbon dioxide gas concentration.
The sensor includes a sensor extension cable, a 250 mL clear
plastic sampling bottle, and a stopper that fits over the sensor’s probe.
Setup the Carbon Dioxide Gas Sensor
• Plug the Carbon Dioxide Gas Sensor into a PASPORT
input port of a PASCO interface.
Page 2

Carbon Dioxide Gas Sensor Introduction
Sensor
Interface
stopper
probe
LED
Calibration
Button
To collect an atmospheric sample
Keep the bottle upright and the neck
open (without the stopper). Wait long
enough to allow atmospheric air to fill
the bottle. Insert the probe with the
stopper into the neck of the bottle. Be
sure that the stopper fits snugly into the
neck of the bottle.
NOTE: If more distance is needed between the sensor and
the interface, plug the sensor into the included Extension
Cable, and then plug the cable into the interface.
• Insert the sensor probe into the gas sample. Allow 90
seconds for the sensor to warm up with the probe temperature between 20° and 30° C.
To collect expired air or other
gas samples
Collect the sample in a plastic bag and
clamp the bag closed. To take a reading, open the bag and immediately
place it over the probe and stopper, holding the bag tightly
• Start the PASCO data collection software.
Using the PASCO Data Collection Software
• Set up a data display (such as a Digits or Graph display)
in the software.
• In PASCO Capstone, click one of the display templates
in the workbook page, or double-click an icon in the
“Displays” palette to open a data display.
• In the SPARKvue sensor parameter screen, touch ‘CO2
Concentration’ to highlight it, and then touch ‘Show’ to
open a Graph display.
• Click “Record” (in Capstone) or touch ‘Start’ in
SPARKvue to begin recording data.
around the stopper.
Sensor Calibration
Because the sensor is
factory calibrated, calibration is not required
for most activities.
However, the sensor’s
characteristics may
change over time. To
restore the sensor to its
factory-calibrated
state, perform the calibration using a fresh air sample.
CAUTION:
The sensor was not designed for use in liquids, dusty or
windy environments, or in direct sunlight. Do not place the
sensor in liquid samples such as water or beverages as this
will permanently damage the sensor. Using the sensor in
dusty or windy environments or in direct sunlight may cause
anomalous readings. The operating temperature range is
between 20° and 30°C.
NOTE: Do not try to remove the probe from the sensor. It is
not removable.
STORAGE:
Always store the sensor in the plastic zip-lock bag to minimize distorted sensor readings due to dust and dirt.
Collecting CO2 Samples
Use the sampling bottle to collect air samples, such as an
atmospheric sample or the carbon dioxide gas produced from
germinating seeds.
(NOTE: Refer to the User’s Guide and On-Line Help for the
data collection software.)
• Collect a sample of fresh air (400 to 450 ppm CO
).
2
• Insert the probe with stopper into the upright sampling
bottle. Be sure that the stopper fits snugly into the neck
of the bottle.
• Connect the sensor to a PASPORT-compatible interface.
Set up a digits displayand start recording data. Wait at
least 90 seconds for the reading to stabilize.
• Press the Calibrate button (CAL) for 3 seconds and then
release it. The green light emitting diode (LED) will
start blinking once per second to indicate that calibration
has begun.
• Wait approximately two minutes. When the green LED
stops blinking, calibration is finished.
• Check that the reading in the data acquisition software is
400 ppm ±50 ppm (parts per million).
Suggested Activities
Cellular Respiration of Peas
• Put 1/4 cup of dry pea seeds in the sampling bottle.
Insert the probe and stopper into the neck of the bottle.
2
• Connect the sensor to a PASPORT-compatible interface
and start the data collection software.
012-14330C
Page 3
Model No.PS-2110 Technical Support
• Record data for about 10 minutes; this is the baseline
reading before germination.
• Disconnect the sensor from the interface and remove the
probe from the sampling bottle.
• Moisten the pea seeds with a few teaspoons of water.
Place a dark cloth over the bottle and allow the peas to
germinate overnight.
• Reconnect the sensor and put the probe and stopper back
into the neck of the bottle. Do not let the probe or sensor
get wet.
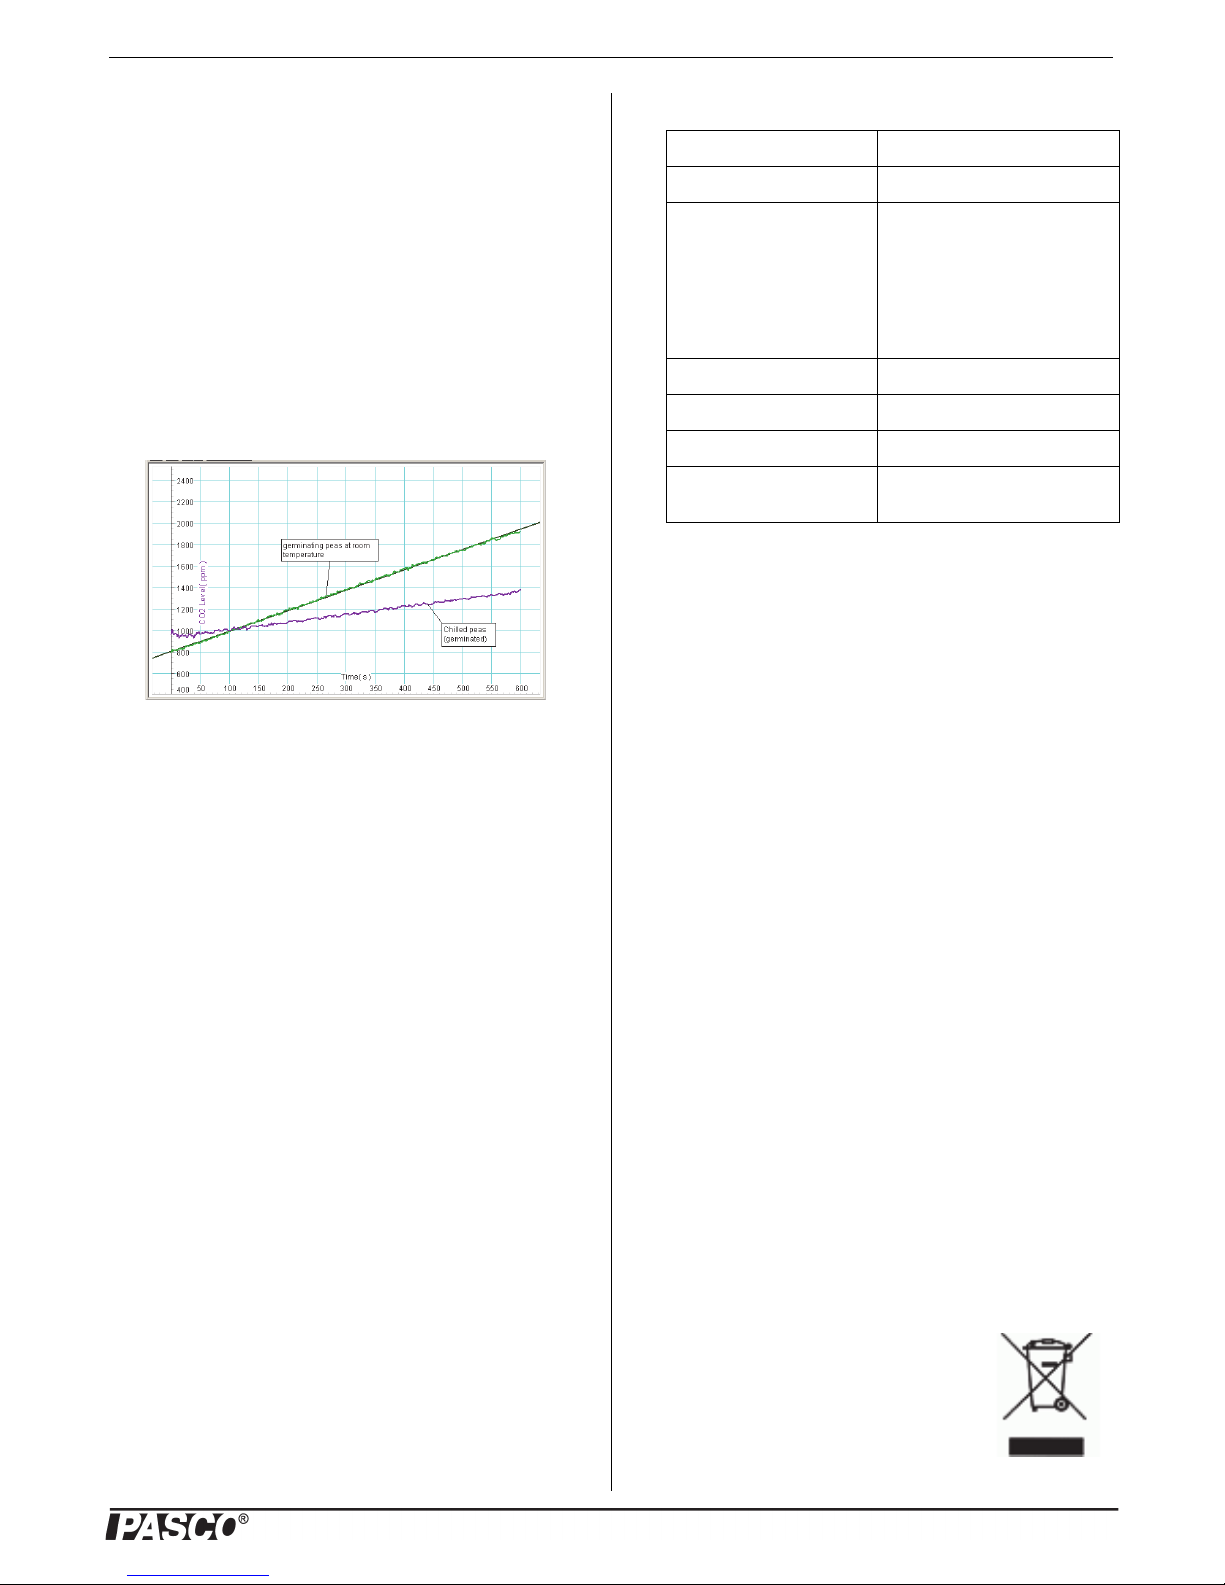
• Record data for about 10 minutes, and compare the carbon dioxide concentration after germination to the concentration before germination.
• Try the experiment with germinated pea seeds at different temperatures.
Other Activities
Specifications
Item Value
Range: ±0 to 300,000 ppm
Accuracy: 0 to 50,000 ppm: 100 ppm or
10% of value, whichever is
greater
10,000 to 50,000 ppm: 20%
of value
Over 50,000 ppm: qualitative
only
Resolution 1 ppm
Operating Temperature +20° to +30°C
Relative Humidity 5 to 95% non-condensing
Repeatability ±50 ppm or 5% of value,
whichever is greater
Technical Support
For assistance with any PASCO product, contact PASCO at:
Address: PASCO scientific
10101 Foothills Blvd.
Roseville, CA 95747-7100
Phone: +1 916-462-8384 (worldwide)
877-373-0300 (U.S.)
E-mail: support@pasco.com
Web www.pasco.com
• Plant Respiration versus Photosynthesis
• Cellular Respiration
• Animal Respiration
• Air Quality Evaluations
• Sublimation of Solid CO
(dry ice)
2
• Rate of CO2 Generation in Chemical Reactions
• Decomposition Rate of Organic Materials in Soils
• Measurement of Carbon Dioxide Concentration from
Various Sources
More Information
For the latest information about the Carbon Dioxide Gas
Sensor, visit the PASCO web site at www.pasco.com and
enter “PS-2110” in the Search window.
Limited Warranty For a description of the product warranty, see the
PASCO catalog. Copyright The PASCO scientific Instruction Sheet
is copyrighted with all rights reserved. Permission is granted to
non-profit educational institutions for reproduction of any part of this
manual, providing the reproductions are used only in their laboratories and classrooms, and are not sold for profit. Reproduction under
any other circumstances, without the written consent of PASCO scientific, is prohibited. Trademarks PASCO, PASCO Capstone,
PASPORT, and SPARKvue are trademarks or registered trademarks
of PASCO scientific, in the United States and/or in other countries.
For more information visit www.pasco.com/legal.
Product End of Life Disposal Instructions:
This electronic product is subject to disposal and recycling
regulations that vary by country and region. It is your
responsibility to recycle your electronic equipment per your
local environmental laws and regulations to ensure that it
will be recycled in a manner that protects human health and
the environment. To find out where you can drop off your
waste equipment for recycling, please contact your local
waste recycle/disposal service, or the place where you purchased the product.
The European Union WEEE (Waste Electronic and Electrical Equipment) symbol
(to the right) and on the product or its
packaging indicates that this product must
not be disposed of in a standard waste container.
3
 Loading...