

Page 1

Instruction Sheet
O
S
-
8
5
2
4
B
A
S
I
C
O
P
T
I
C
S
A
P
E
R
T
U
R
E
A
C
C
E
S
S
O
R
Y
C
E
N
T
R
A
L
M
A
S
K
f/5.6
f/4
f/22
f/16
f/11
f/8
OS-8524
APERTURE
ACCESSORY
BASIC
OPTICS
17.7 mm DIA
25.0 mm DIA
4.4 mm DIA
6.3 mm DIA
8.8 mm DIA
12.5 mm DIA
f STOP FOR
100mm F.L. LENS
f
for the PASCO
Model OS-8524
APERTURE ACCESSORIES
012-05882A
1/96
$1.00
Spherical Aberration
Attachments
B
A
S
O
I
C
S
-
O
8
5
P
2
T
4
I
C
S
C
E
A
N
K
T
P
S
R
A
A
L
M
E
Y
R
R
T
O
U
S
R
S
E
E
C
A
C
Central (center) Mask
Peripheral (outer) Mask
E
R
K
I
P
S
H
A
E
M
R
A
L
Y
R
R
T
O
U
S
R
S
E
E
C
A
C
Introduction
The Pasco OS-8524 Aperture Accessories are designed to
be used with the PASCO OS-8515 Basic Optics System.
The Aperture Disk provides 6 holes, corresponding to ƒ/
4, 5.6, 8, 11, 16, and 22 apertures for a 100 mm lens (included with the PASCO OS-8515 Basic Optics System).
The Spherical Aberration Attachments enables the user to
investigate how the center and outside parts of a lens focus light in different planes.
Equipment
This set includes two different accessories to the Basic
Optics System (OS-8515):
– An Aperture Disk for demonstrating the ƒ-stops
used in cameras.
– Spherical Aberration Attachments for masking the
center and outer areas of a lens to show spherical
aberration.
Aperture Disk
f/16
6.3 mm DIA
f/22
4.4 mm DIA
f/4
25.0 mm DIA
f/5.6
B
A
S
O
I
C
S
-
O
8
5
P
2
T
4
I
C
S
P
A
P
E
100 mm
lens
17.7 mm DIA
ACCESSORY
APERTURE
OS-8524
100mm F.L. LENS
8.8 mm DIA
f STOP FOR
f/11
OPTICS
BASIC
12.5 mm DIA
f/8
Aperture Disk
Central or
Peripheral Mask
optics bench
Figure 1: Aperture Accessories Assembly
Aperture Disk
When the aperture size is reduced by one setting, the intensity of the light transmitted through the smaller aperture is half the intensity through the next larger aperture.
The 6 apertures on this disk correspond to 6 ƒ-stops as
defined in photography. The ƒ-stop is defined as follows:
Assembly
Simply snap the Aperture Disk, Central Mask, or Periph-
value =
focal length of the lens
diameter of the aperture
eral Mask onto a lens from the Basic Optics System. See
Figure 1.
®
10101 Foothills Blvd. • P.O. Box 619011 • Roseville, CA 95678-9011 USA
Phone (916) 786-3800 • FAX (916) 786-8905 • email: techsupp@PASCO.com
© 1996 PASCO scientific
This instruction sheet written/edited by: Ann Hanks
better
ways to
teach science
Page 2
Aperture Accessories 012-05882A
5
6
8
9
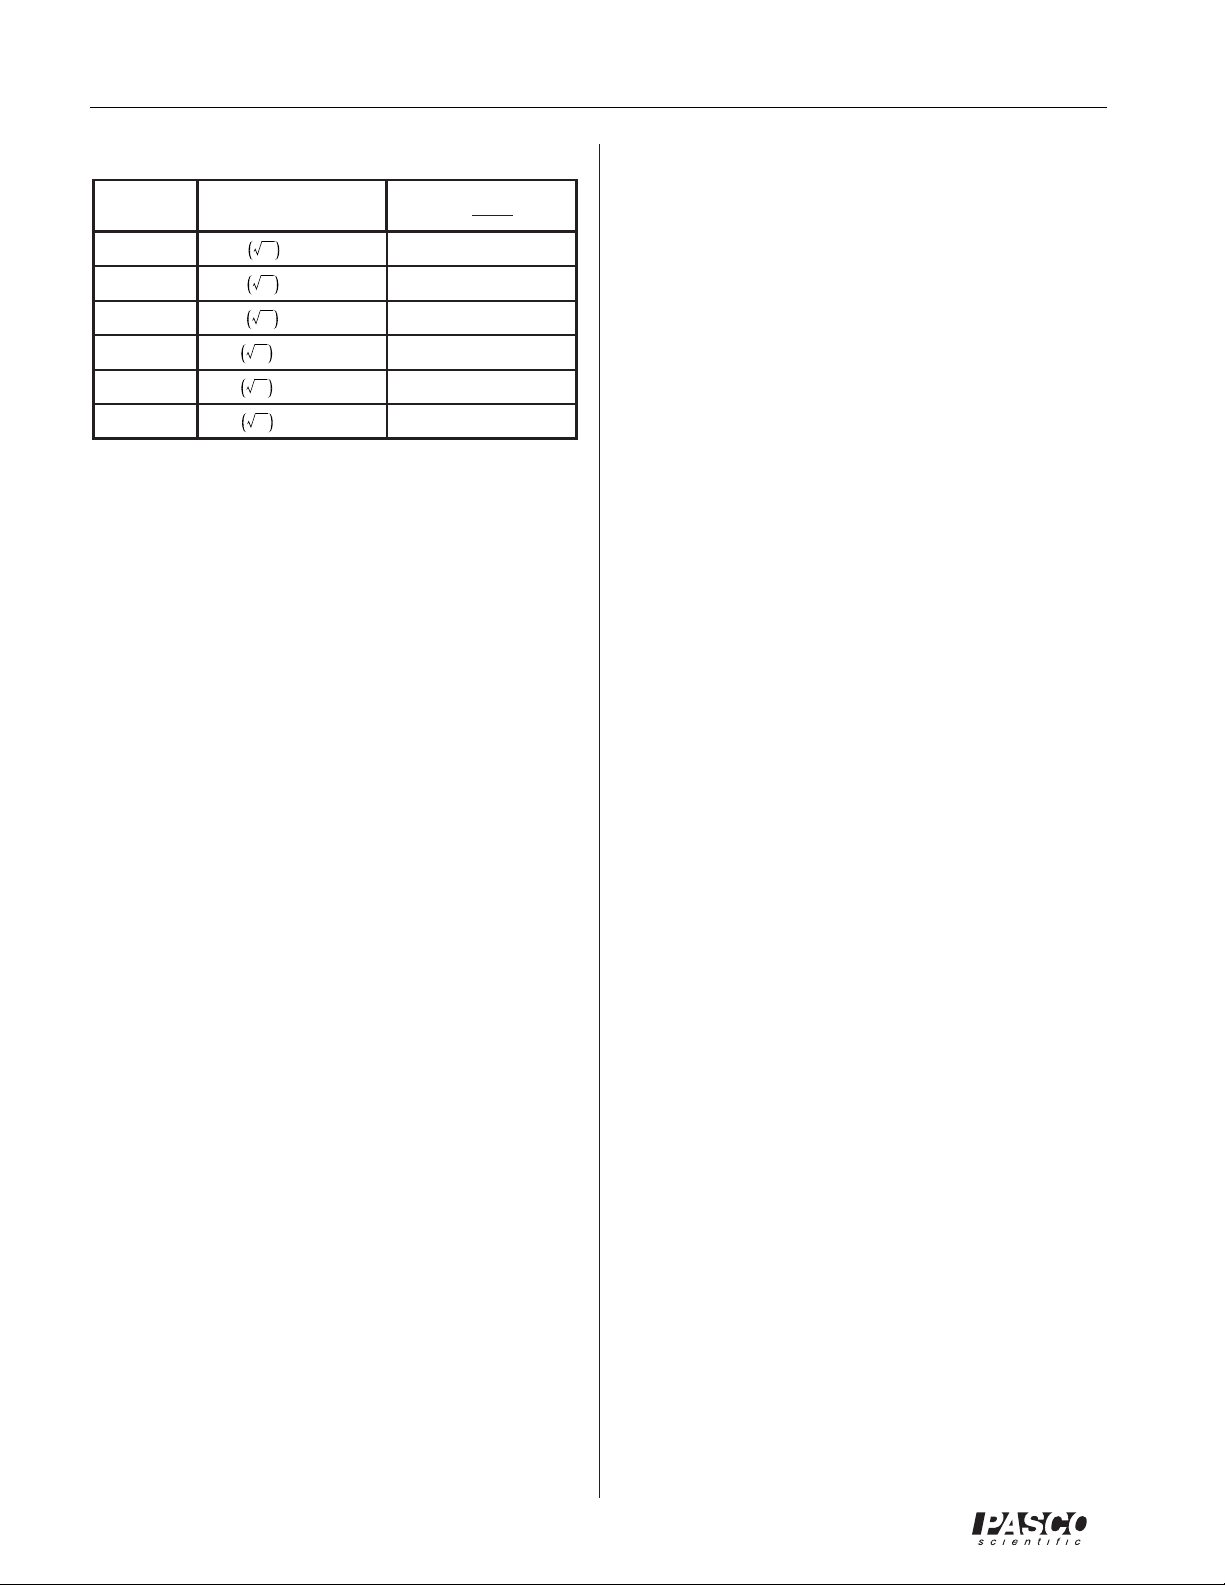
Table 1: Aperture Disk Specifications
ƒ-stop ƒ-stop calculation
ƒ-4
ƒ-5.6
ƒ-8
ƒ-11
ƒ-16
ƒ-22
24= 4.00
2
= 5.66
2
= 8.00
7
2
= 11.31
2
= 16.00
2
= 22.63
aperture diameter
100 mm
=XXX
ƒ-stop
25.0 mm
17.7 mm
12.5 mm
8.8 mm
6.3 mm
4.4 mm
The ƒ values are chosen to be powers of the square root
of 2. This disk is designed to be used with a lens of focal
length 100 mm (10 cm). See Table 1 for the corresponding ƒ-stops and diameters.
Using the Aperture Disk
To mount the aperture disk to the optics bench (OS-
8515), press the mounting ring into the lens holder that
contains the 100 mm focal length lens (see Figure 1). To
select different apertures, the disk is rotated until it clicks
into place with the desired aperture positioned at the center of the lens.
Suggested Experiments for the Aperture Disk:
➁ Repeat this procedure using a smaller aperture to show
that “stopping down” gives a greater depth of field
(i.e., the image will stay in focus over a larger range of
screen positions).
Spherical Aberration Attachments
The spherical aberration attachments press into any lens
holder in the Basic Optics System (OS-8515).
Suggested Experiments:
Show spherical aberration of a lens
➀ Use the 100 mm lens to focus the image of the lighted
object on the screen.
➁ Put the outer-mask spherical aberration attachment on
the lens and refocus the image by moving the screen.
Note which way the screen must be moved to bring
the image into focus.
➂ Put the center-mask spherical aberration attachment
on the lens and refocus the image by moving the
screen. Note which way the screen must be moved to
bring the image into focus. Are the rays that pass
through the outer edge of the lens bent more or less
than those that pass through the center portion of the
lens?
Show that the intensity of an image is halved with each
incremental decrease in aperture size
➀ Using the 100 mm lens with the aperture disk set on
its largest aperture (ƒ-4), focus the image of the
lighted object on the screen.
➁ Use a digital photometer (such as SE-9087) at the po-
sition of the screen to determine the intensity of the
image. Or use a comparative photometer (such as OS-
8520) at the position of the screen (with the screen removed) and find the intensity relative to a second light
source.
➂ Select the next smaller aperture (ƒ-5.6) and measure
the new light intensity to show that the light intensity
is half of the previous value. Repeat this for all the apertures.
Show how the aperture size affects the depth of field
➀ Put the screen 50 cm from the light source. Use the
100 mm lens with the ƒ-4 aperture to focus the object
on the screen. Check how far the screen can be moved
without noticeably changing the sharpness of the image.
Show color aberration
➀ Use the 100 mm lens with the center-mask to focus
the image of the lighted object on the screen.
➁ Move the screen away from the lens until the image is
blurred. What color does the image appear to be?
➂ Move the screen toward the lens passing through the
focused point until the image is blurred again. Now
what color does the image appear to be? Which color
(red or blue) is bent more as it passes through the
outer part of the lens?
2
®
Page 3

012-05882A Aperture Accessories
Limited Warranty
PASCO scientific warrants this product to be free from
defects in materials and workmanship for a period of one
year from the date of shipment to the customer. PASCO
will repair or replace, at its option, any part of the product
which is deemed to be defective in material or workmanship. This warranty does not cover damage to the product
caused by abuse or improper use. Determination of
whether a product failure is the result of a manufacturing
defect or improper use by the customer shall be made
solely by PASCO scientific. Responsibility for the return
of equipment for warranty repair belongs to the customer.
Equipment must be properly packed to prevent damage
and shipped postage or freight prepaid. (Damage caused
by improper packing of the equipment for return shipment will not be covered by the warranty.) Shipping
costs for returning the equipment, after repair, will be
paid by PASCO scientific.
To Reach PASCO
For Technical Support call us at 1-800-772-8700 (tollfree within the U.S.) or (916) 786-3800.
Equipment Return
Should this product have to be returned to PASCO scientific, for whatever reason, notify PASCO scientific by
letter or phone BEFORE returning the product. Upon
notification, the return authorization and shipping instructions will be promptly issued.
➤ NOTE: NO EQUIPMENT WILL BE AC-
CEPTED FOR RETURN WITHOUT AN AUTHORIZATION.
When returning equipment for repair, the units must be
packed properly. Carriers will not accept responsibility
for damage caused by improper packing. To be certain
the unit will not be damaged in shipment, observe the following rules:
➀ The carton must be strong enough for the item
shipped.
➁ Make certain there is at least two inches of packing
material between any point on the apparatus and the
inside walls of the carton.
email: techsupp@PASCO.com
Tech support fax: (916) 786-3292
➂ Make certain that the packing material can not shift in
the box, or become compressed, thus letting the instrument come in contact with the edge of the box.
®
3
Page 4

Aperture Accessories 012-05882A
Notes:
4
®
 Loading...