

Page 1
9
60
0
50
40
30
20
10
0
0
10
20
30
40
50
90
80
70
60
50
40
30
20
10
10
20
30
40
50
60
70
80
NORMALNORMAL
COMPONENTCOMPONENT
Includes
Teachers Notes
and
Typical
Experiment Results
Instruction Manual and
012-02744K
Experiment Guide for
the PASCO scientific
Model OS-8500
INTRODUCTORY OPTICS
SYSTEM
70
80
60
90
50
80
40
30
20
10
0
10
20
30
40
50
COMPONENT
NORMAL
NORMAL
60
COMPONENT
70
80
5
0
70
60
50
40
30
20
10
0
10
20
30
40
Page 2

Introductory Optics System 012-02744K
®
Page 3

012-02744K Introductory Optics System
Table of Contents
Section ..........................................................................................................Page
Copyright, Credits, Warranty, & Equipment Return ....................................... iii
Preface to the Teacher ..................................................................................... iv
Introduction ...................................................................................................... 1
Equipment ........................................................................................................2
Setting Up the Equipment ................................................................................ 3
Copy Ready Experiments ................................................................................ 6
Basic Experiments
Experiment 1: Introduction to Ray Optics ................................................ 7
Experiment 2: The Law of Reflection ...................................................... 9
Experiment 3: Image Formation in a Plane Mirror .................................. 11
Experiment 4: The Law of Refraction ..................................................... 13
Experiment 5: Reversibility ..................................................................... 15
Experiment 6: Dispersion and Total Internal Reflection .......................... 17
Experiment 7: Converging Lens: Image and Object Relationships ......... 19
Experiment 8: Light and Color ................................................................ 21
Experiment 9: Two-Slit Interference ....................................................... 23
Experiment 10: Polarization ..................................................................... 25
Advanced Experiments
Experiment 11: Image Formation with Cylindrical Mirrors ...................... 27
Experiment 12: Image Formation with Spherical Mirrors ........................ 29
Experiment 13: Image Formation with Cylindrical Lenses ...................... 31
Experiment 14: Spherical Lenses—Spherical and Chromatic
Aberration, Aperture Size, and Depth of Field ............................. 33
Experiment 15: The Diffraction Grating .................................................. 35
Experiment 16: Single Slit Diffraction ..................................................... 37
Experiment 17: General Diffraction ......................................................... 39
Optical Instruments
Experiment 18: Introduction ..................................................................... 41
Experiment 19: The Projector .................................................................. 43
Experiment 20: The Magnifier ................................................................. 45
Experiment 21: The Telescope ................................................................. 47
Experiment 22: The Compound Microscope ........................................... 49
Appendix ........................................................................................................ 51
Replacement Parts ........................................................................................... 52
Teacher's Guide ........................................................................................... 52-67
®
i
Page 4
Introductory Optics System 012-02744K
Copyright, Warranty and Equipment Return
Please—Feel free to duplicate this manual
subject to the copyright restrictions below.
Copyright Notice
The PASCO scientific Model OS-8500 Introductory
Optics System manual is copyrighted and all rights
reserved. However, permission is granted to nonprofit educational institutions for reproduction of any
part of this manual providing the reproductions are
used only for their laboratories and are not sold for
profit. Reproduction under any other circumstances,
without the written consent of PASCO scientific, is
prohibited.
Limited Warranty
PASCO scientific warrants this product to be free
from defects in materials and workmanship for a
period of one year from the date of shipment to the
customer. PASCO will repair or replace, at its option,
any part of the product which is deemed to be defective in material or workmanship. This warranty does
not cover damage to the product caused by abuse or
improper use. Determination of whether a product
failure is the result of a manufacturing defect or
improper use by the customer shall be made solely by
PASCO scientific. Responsibility for the return of
equipment for warranty repair belongs to the customer. Equipment must be properly packed to
prevent damage and shipped postage or freight
prepaid. (Damage caused by improper packing of the
equipment for return shipment will not be covered by
the warranty.) Shipping costs for returning the
equipment, after repair, will be paid by PASCO
scientific.
Equipment Return
Should this product have to be returned to PASCO
scientific, for whatever reason, notify PASCO scientific by letter or phone BEFORE returning the product.
Upon notification, the return authorization and
shipping instructions will be promptly issued.
➤➤
➤NOTE: NO EQUIPMENT WILL BE AC-
➤➤
CEPTED FOR RETURN WITHOUT AN
AUTHORIZATION.
When returning equipment for repair, the units must
be packed properly. Carriers will not accept responsibility for damage caused by improper packing. To be
certain the unit will not be damaged in shipment,
observe the following rules:
➀ The carton must be strong enough for the item
shipped.
➁ Make certain there is at least two inches of packing
material between any point on the apparatus and
the inside walls of the carton.
➂ Make certain that the packing material can not shift
in the box, or become compressed, thus letting the
instrument come in contact with the edge of the
box.
Address: PASCO scientific
10101 Foothills Blvd.
P.O. Box 619011
Credits
This manual authored by: Ed Pitkin
This manual edited by: Dave Griffith
Teacher's guide written by: Eric Ayars
Roseville, CA 95678-9011
Phone: (916) 786-3800
FAX: (916) 786-8905
ii
®
Page 5
012-02744K Introductory Optics System
Preface to the Teacher
The PASCO scientific Introductory Optics System is
designed to provide a comprehensive introduction to
laboratory optics. Of course, textbooks and lab books
vary in the areas covered and the degree of complexity taught. To ensure that all essential concepts are
covered, the experiments in this guide are based on
material presented in several of the most comprehensive physics textbooks, including Modern Physics
(Holt, Rinehart, and Winston) and PSSC Physics
(Haber-Schaim, Dodge, and Walter). However, even
if you do not use one of these textbooks, you should
have little problem finding a collection of experiments
in this manual that suits your needs.
The experiments are presented in three groups: Basic
Experiments, Advanced Experiments, and Optical
Instruments. All the experiments are designed as
worksheets, to be copied from the manual for student
use.
➤NOTE: Each experiment includes a series of
questions with blank spaces for students to write
their answers. We encourage students not to
limit themselves to the space provided, but
rather to use as much additional paper as needed
to discuss, argue, prove points, etc.
The Advanced Experiments provide more in-depth
investigations into some of the areas that were introduced in the Basic Experiments. These experiments
are generally longer and more demanding. They
should provide ample material for advanced classes
and for independent study.
The Optical Instruments section provides an opportunity for students to apply some of the optics theory
they have learned. Students can build and investigate
a Projector, a Magnifier, a Microscope, and a Telescope. The optical bench and magnetic mounts make
the setup easy.
In addition to the equipment provided in the PASCO
Optics System, a few common items are needed for
some experiments.
Additional Items Needed:
Items Purpose Expts
Pencil, Straightedge, Ray 1, 3, 5,
Protractor, White Paper Tracing 11, 13
Black Construction Circular 17
Paper, Pin Aperture
The Basic Experiments provide all the essentials for a
solid introduction to optics.These experiments are
designed to give clear presentations of the basic
phenomena. The fill-in-the-blank format (used in all
the experiments in this manual) provides a structured
format and simple evaluation of student progress.
®
All experiments, except where otherwise stated, are
best performed in a semi-darkened room. For optimal
conditions, allow just enough light to enable comfortable reading of the lab book.
iii
Page 6

Introductory Optics System 012-02744K
Notes
iv
®
Page 7

012-02744K Introductory Optics System
Introduction
A vast and complicated amount of information comes to
us through our eyes. Because of this, the nature of light
plays a critical role in our experience. Certainly our view
of the world is colored (pun intended) by the nature of the
medium which brings us so much information about it.
In our day to day life, we rarely concern ourselves with
light, except perhaps when there is too much or not
enough of it. We interact with light that has interacted
with objects to determine such things as the color, shape,
and position of the objects. We use this information to
navigate, and to find what we want and what we wish to
avoid. But our attention is almost always on the objects,
not on the light that brings us the information.
In studying optics we change the focus of our attention.
We still gain our information by interacting with light that
has interacted with objects. But in studying optics we
want to know what our observations tell us, not about the
objects, but about light itself.
Before plunging into your experimental investigations of
optics, its a good idea to become familiar with the equipment you will be using. The Equipment section of this
manual will help you identify each of the components
included with your optics system. The section entitled
Equipment Setup gives some useful tips for aligning the
optical equipment.
®
1
Page 8

Introductory Optics System 012-02744K
Equipment
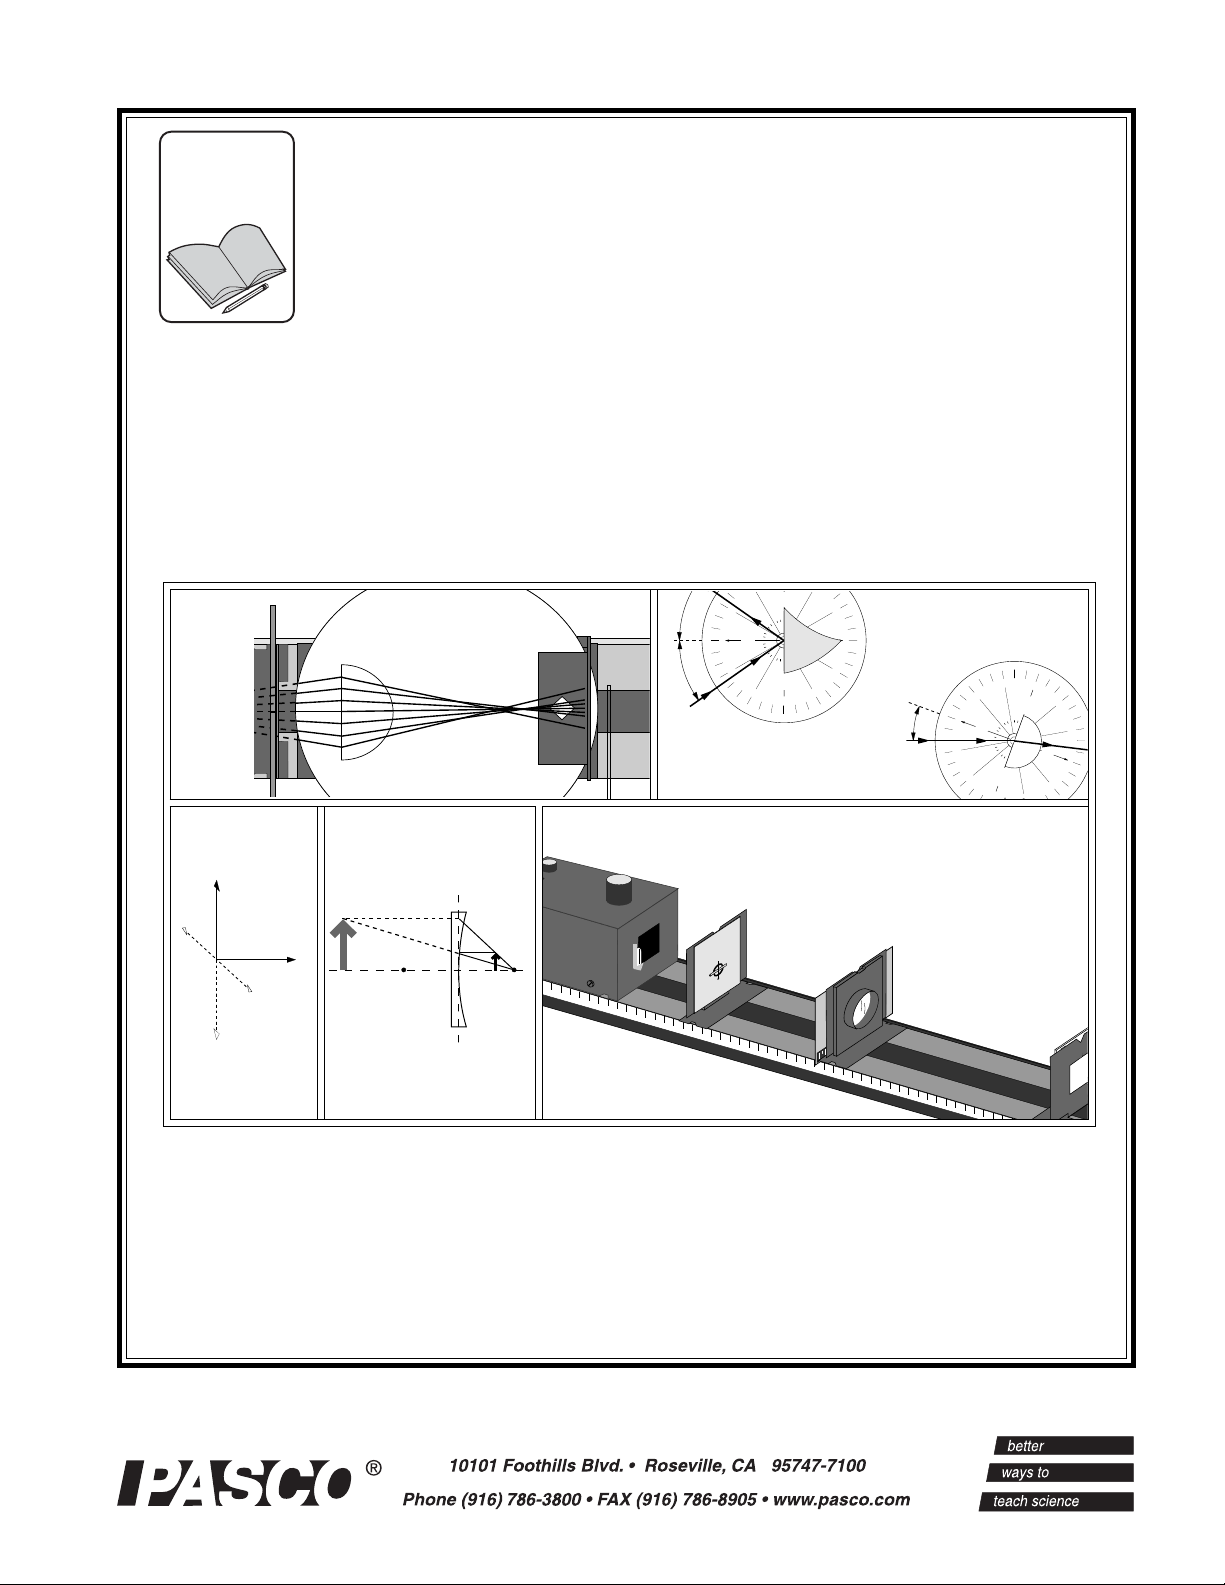
Figure one shows all the equipment that is included with your OS-8500 Introductory Optics System. The system also
includes a fitted box, with cutouts for each component, and of course, this manual. If you wish to order additional
components or replacement parts, please see the information at the end of the manual.
Incandescent Light Source
Optics Bench
Slit
Plate
Ray Optics
Mirror
Mask
Cylindrical
Lens
Slit
Parallel
Ray Lens
Crossed
Viewing
Screen
Arrow
Target
Ray Table Base
Ray Table
Ray Table Component Holder
Component Holders (3)
Lenses (3): 75, 150, and
–150 mm focal lengths
Spherical Mirror:
50 mm focal length
DIFFRACTION GRATING
5276 LINES/cm
Color Filters:
Red
Green
Blue/Green
Virtual
Image
Locators
(2)
Diffraction
Scale
Polarizers
(2)
Variable
Aperture
Figure 1: Equipment Included in the OS-8500 Introductory Optics System
For Replacement Parts See Page 52
DIFFRACTION PLATE
A B C D E
. . . . . . . ..
.....................
. . . . . . . ..
.....................
. . . . .. . .
. . . . .. . .
.....................
. . . . .. . . . .
. . . . . . . ..
.....................
. . . . .. . . . .
. . . . . . . ..
.....................
. . . . .. . .
.....................
. . . . .. . .
. . . . .. . . . .
.....................
. . . . . . . ..
. . . . .. . . . .
.....................
. . . . .. . .
.....................
.....................
. . . . .. . . . .
.....................
.....................
J I H G F
DIFFRACTION PLATE
Diffraction
Grating
Diffraction
Plate
2
®
Page 9
012-02744K Introductory Optics System
Setting Up the Equipment
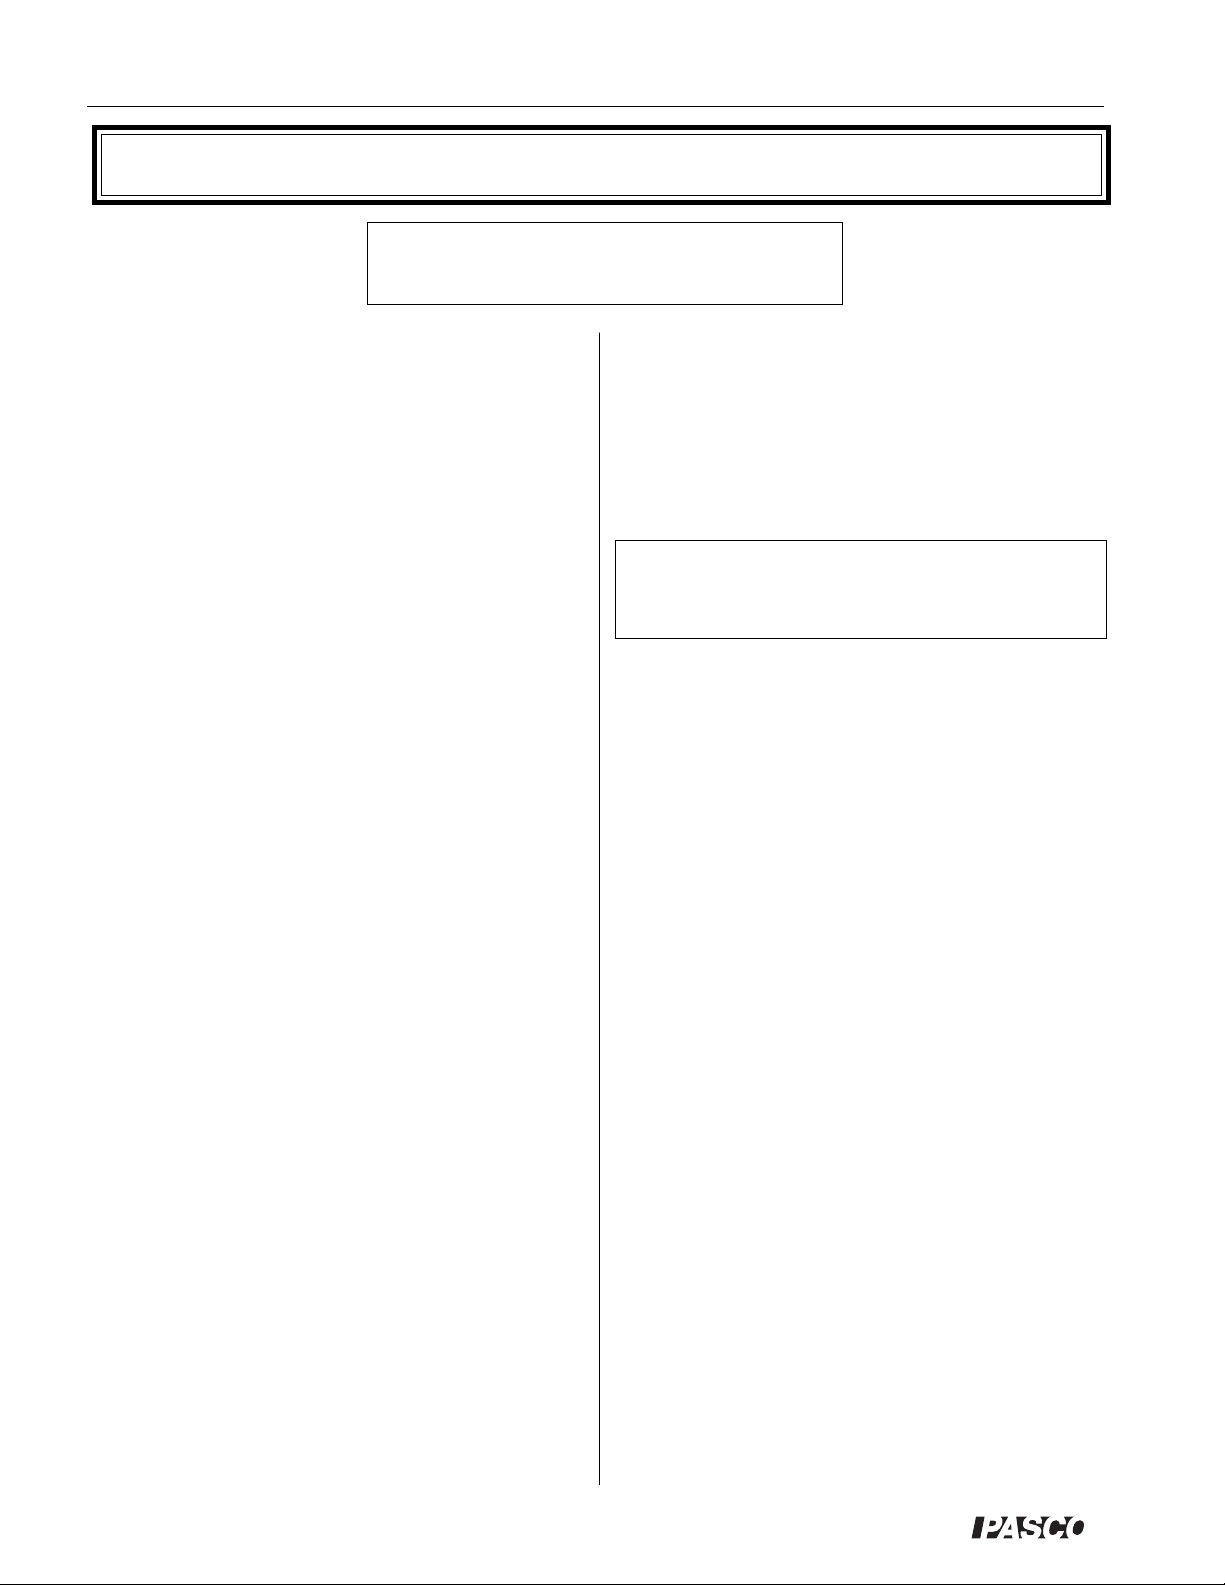
Optics Bench
The Optics Bench is shown in Figure 2. The Light Source,
Component Holders, and Ray Table Base all attach magnetically to the bench as shown. For proper optical alignment, the
edge of each of these components should be mounted flush to
the alignment rail, which is the raised edge that runs along one
side of the bench.
Light Source
Alignment Rail
Ray Table
Component
Holder
Ray Table Base
Figure 2: Bench
NOTE: Avoid scratching or otherwise abusing the surface
of the magnetic pads. If they get dirty, use only soapy
water or rubbing alcohol for cleaning. Other solvents may
dissolve the magnetic surface.
ON
Switch
Notch Showing Location of
Filament
Figure 3: Using the Light Source
Filament Knob
Light Bulb
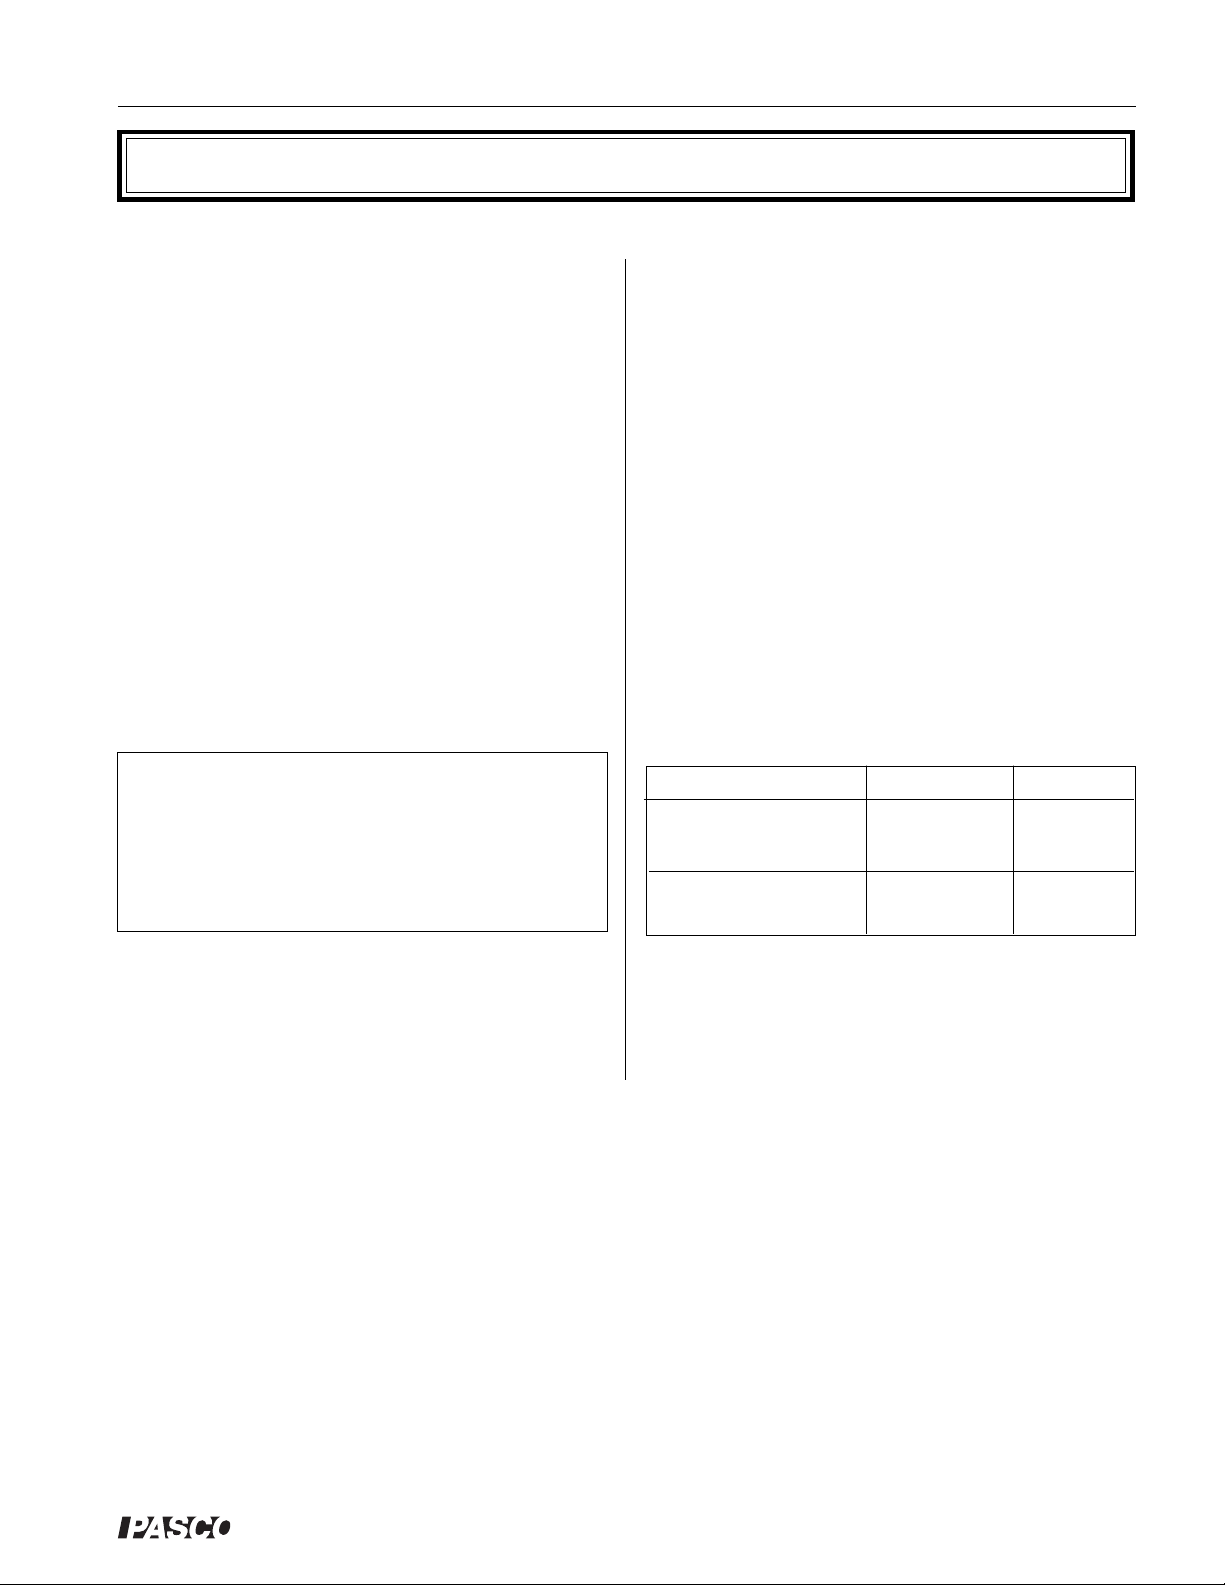
Incandescent Light Source
The Light Source is shown in Figure 3. To turn it on,
connect the power cord to any grounded 105-125 VAC
receptacle, and flip the switch on the top panel to ON. If
at any time the light fails to come on, check with your
instructor.
The Filament Knob on the top of the unit moves the light
bulb from side to side. The notch at the bottom indicates
the position of the light bulb filament, so that accurate
measurements can be made during experiments.
Centering
Notch
Base Notch
Figure 4: Using the Component Holders
Component
Holders and
(Top View)
Components
The Optics set comes
with three regular
Component Holders
and one holder
designed for use with
the Ray Table. The
regular Component
Holders attach
magnetically to the
optics bench, as in
Figure 4. The notch at
the top of each holder
is for centering
components on the
holder. The notches in
the base of the holders
are for accurate
distance measurements on the metric scale of the bench.
These base notches—and also the edge of the component
holder base—are positioned so that they align with the
vertical axis of a mounted lens or mirror. Accurate
measurements of component position can be made as
shown in Figure 5.
0 1 2 3 4 5
Vertical Axes of Lens or Mirror
Figure 5: Component
Alignment
®
3
Page 10
Introductory Optics System 012-02744K
. . . . . . . ..
. . . . .. . .
. . . . .. . . . .
. . . . . . . ..
. . . . .. . .
. . . . .. . . . .
. . . . . . . ..
. . . . .. . .
. . . . .. . . . .
. . . . . . . ..
. . . . .. . .
. . . . .. . . . .
. . . . . . . ..
. . . . .. . .
. . . . .. . . . .
.....................
.....................
.....................
.....................
.....................
.....................
.....................
.....................
.....................
.....................
.....................
.....................
DIFFRACTION PLATE
A B C D E
DIFFRACTION PLATE
J I H G F
Variable Aperture
Polarizer
Lens or Mirror
Figure 6: Using the Component Holders
The Variable Aperture, the
Polarizers, and the Lenses
attach to the component
Concave Side
Convex Side
holders as shown in Figure 6.
Use the centering notch to
align the components along the
optical axis of the bench and, in
the case of the Polarizers, to
measure the angle of polarization.
The Spherical Mirror mounts
onto the component holders in
Figure 7:
The Spherical Mirror
the same manner as the
Lenses. However, the mirror is silvered on both sides, so
that, depending on which side you use, it can be a convex
or a concave mirror (see Figure 7).
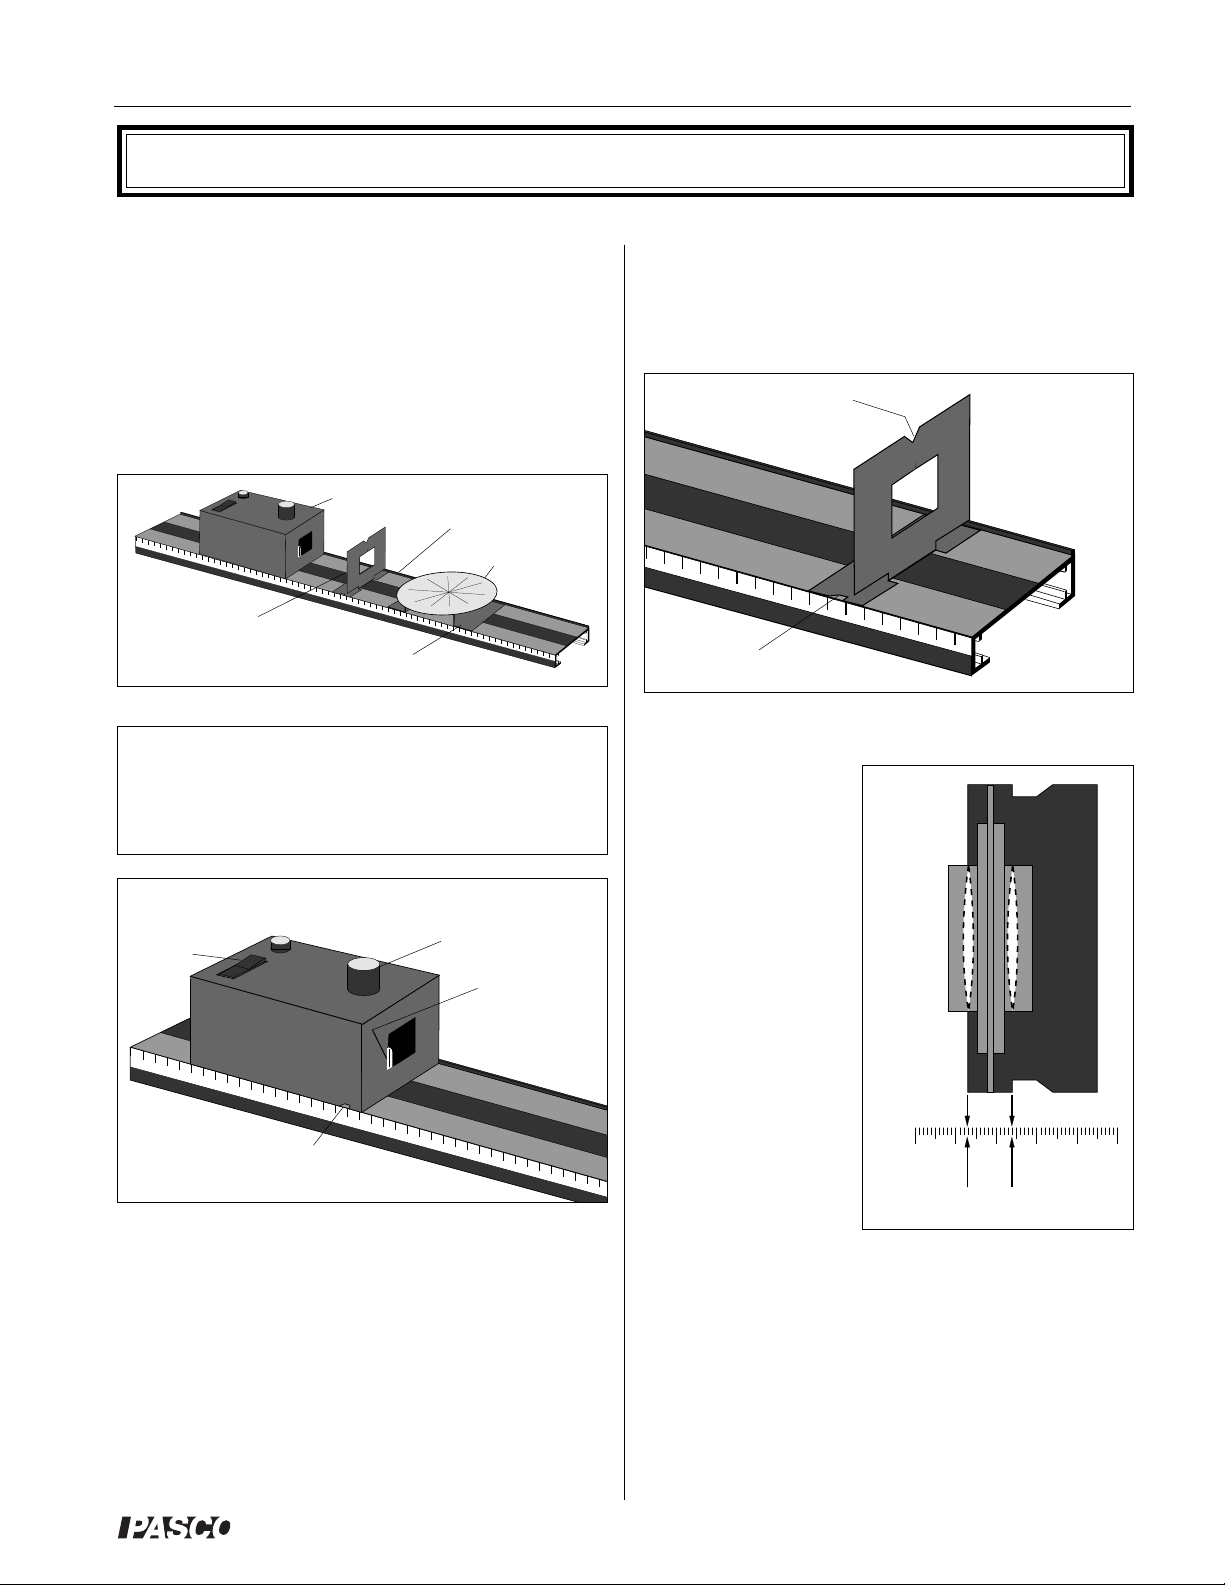
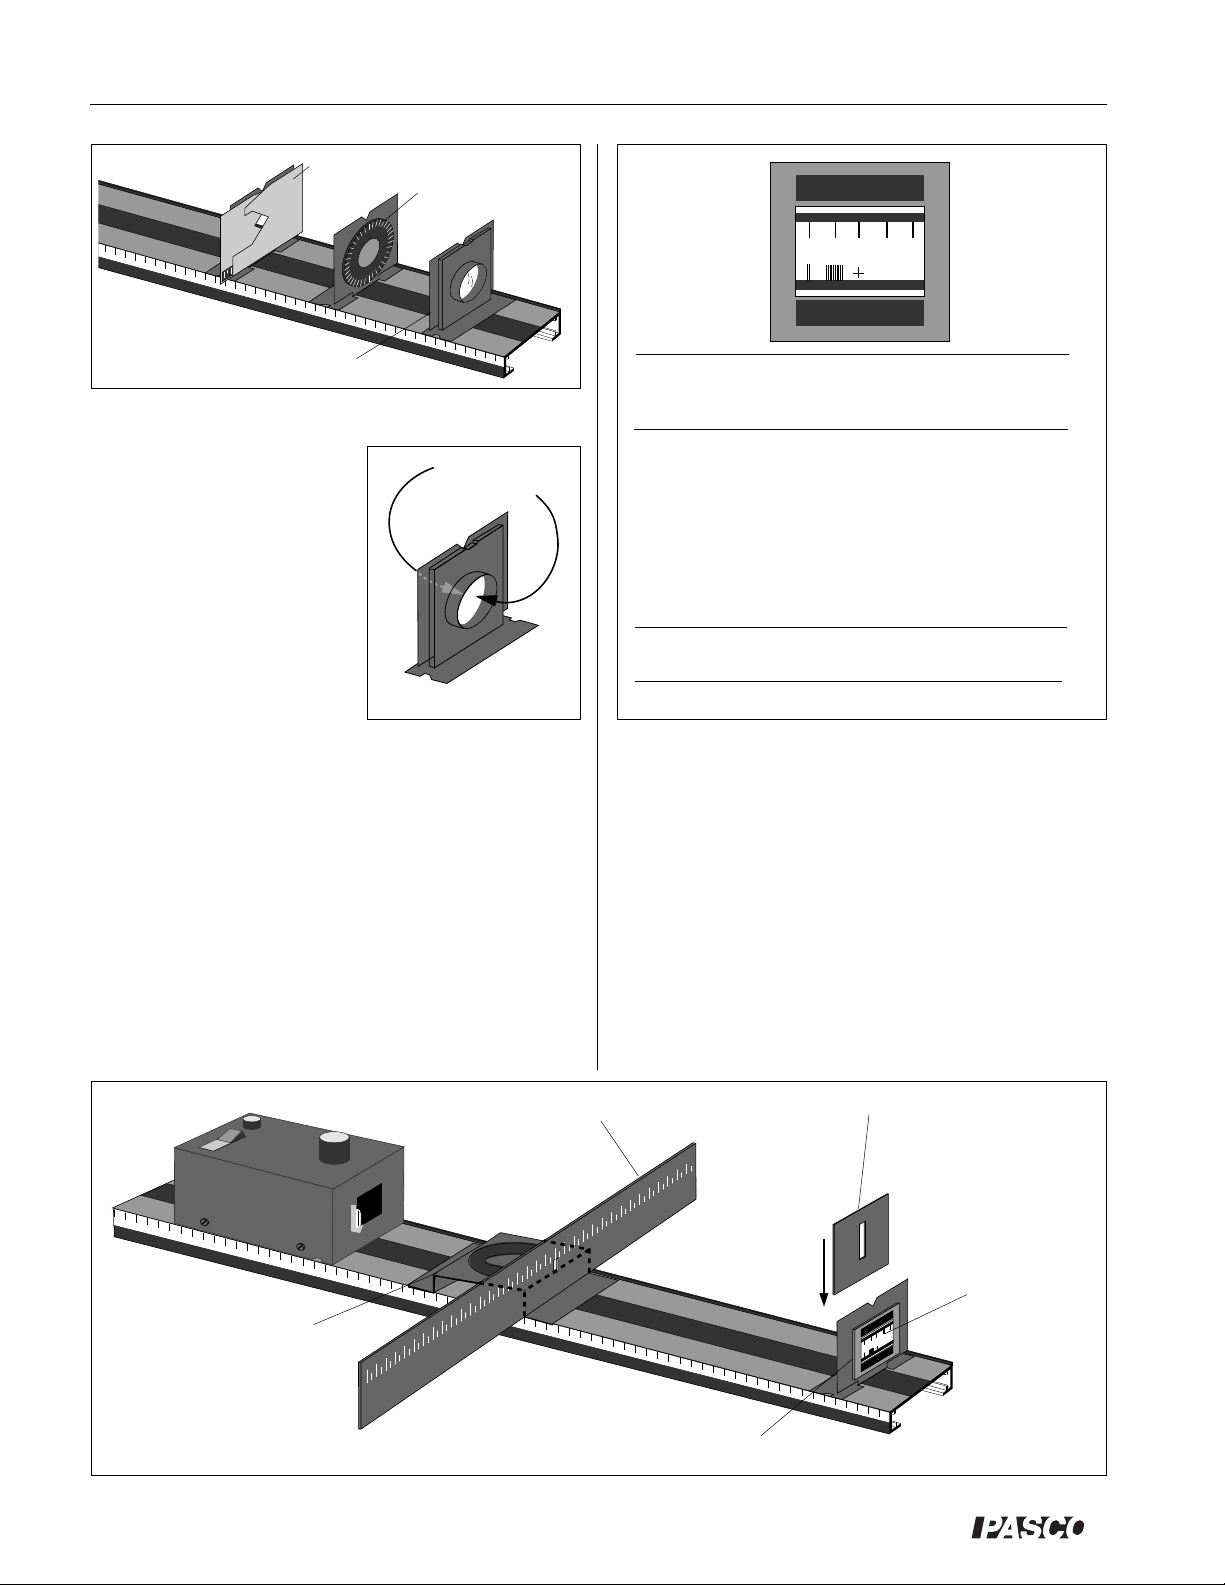
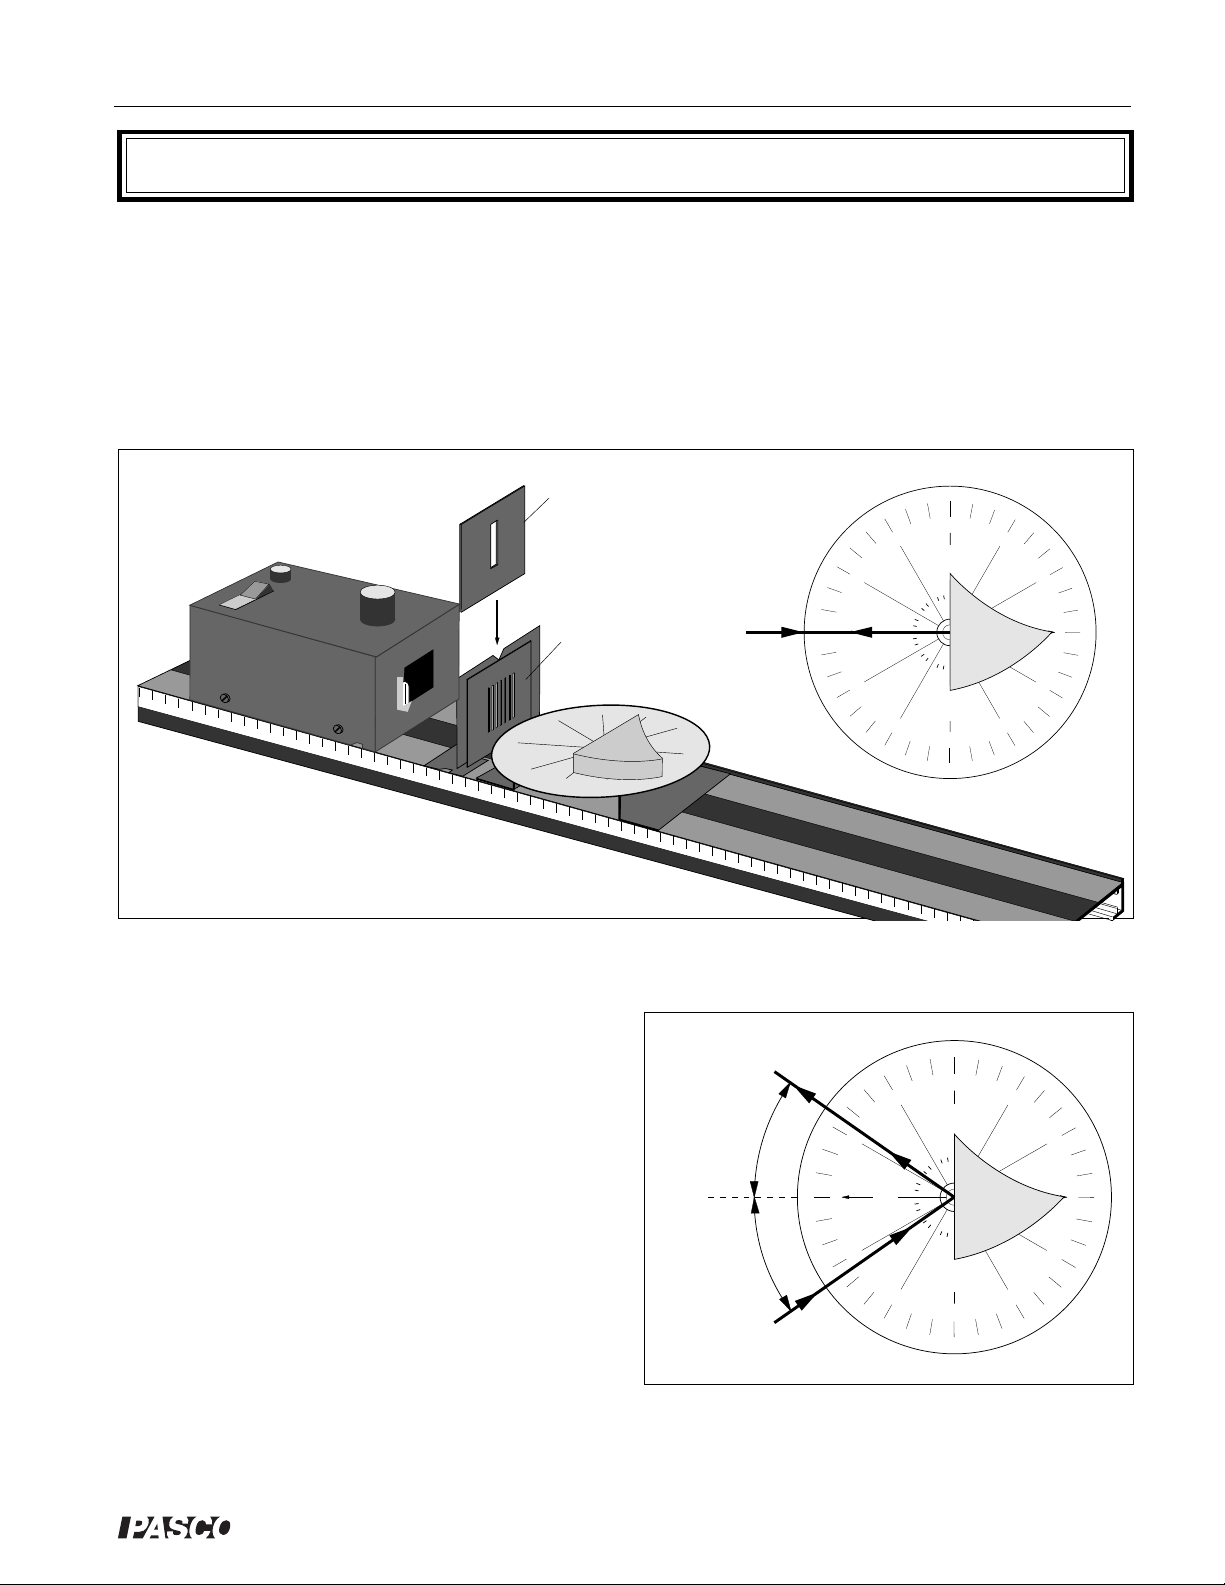
Diffraction Experiments
Set up diffraction experiments as shown in Figure 8. You
can use either the Diffraction Plate, which has ten
different apertures, or the Diffraction Grating, which has a
line spacing of 600 lines/mm. If you are using the Diffraction Plate, place the Slit Mask on the other side of the
Slit Spacing
center-to-center
(mm)
Pattern No. Slits
Slit Width
(mm)
A 1 0.04
B 1 0.08
C 1 0.16
D 2 0.04 0.125
E 2 0.04 0.250
F 2 0.08 0.250
G 10 0.06 0.250
H 2 (crossed) 0.04
I 225 Random Circular Apertures (.06 mm dia.)
J 15 x 15 Array of Circular Apertures (.06 mm dia.)
Figure 9: Diffraction Plate Apertures
component holder and position it so that only a single
diffraction aperture is illuminated by the light from the light
source.
When you look through the aperture or grating toward the
light source, you will see the diffraction pattern superimposed over the Diffraction Scale. You can use the
illuminated scale to accurately measure the geometry of
the diffraction pattern. Information about analyzing the
measurements is provided in experiments 9, 15, 16, and
17. The dimensions of the apertures in the Diffraction
Plate are provided in Figure 9.
Ray Table Base
Diffraction Scale
Diffraction Plate or
Diffraction Grating
Figure 8: Setting Up a Diffraction Experiment
4
Slit Mask: to isolate a
single diffraction aper-
ture (not needed when
using the Diffraction
Grating)
Look through
IFFRACTION PLATE
D
A B C D E
.
.
.
.
.
.
.
.
.
.
.
.
.
.
.
.
.
.
.
.
.
.
.
.
.
.
.
.
.
.
.
.
.
.
.
.
.
.
.
.
.
.
.
.
.
.
.
.
.
.
.
.
.
.
.
.
.
.
.
.
.
.
.
.
.
.
.
.
.
.
.
.
.
.
.
.
.
.
.
.
.
.
.
.
.
.
.
.
.
.
.
.
.
.
.
.
.
.
.
.
.
.
.
.
.
.
.
.
.
.
.
.
.
..
.
.
.
.
.
..
.
.
.
.
.
.
.
.
.
.
.
.
. .
.
.
.
.
.
.
.
.
..
.
.
.
.
..
.
.
.
.
.
.
.
. .
.
..
.
.
.
.
.
.
.
.
.
.
. .
.
.
.
.
.
.
.
.
.
.
.
.
..
.
.
. .
.
.
.
.
.
.
. .
.
. .
.
.
.
.
.
.
.
.
..
.
.
.
.
.
.
.
.
.
.
.
.
.
.
.
.
.
. .
.
. .
.
.
.
. .
.
.
.
.
.
.
.
.
. .
.
.
.
DIFFRACTION PLATE
.
.
.
.
.
.
.
.
.
.
.
.
.
.
.
.
.
.
.
.
.
.
.
.
.
.
.
.
.
.
.
.
.
.
.
.
.
.
.
.
.
.
.
.
.
.
.
.
.
.
.
.
.
.
.
.
.
.
.
.
.
.
.
.
.
.
.
.
.
.
.
.
.
.
.
.
.
.
.
.
.
.
.
.
.
.
.
.
.
.
.
.
.
.
.
.
.
.
.
.
.
.
.
.
.
.
.
.
.
.
.
.
.
.
.
.
.
.
.
.
.
.
.
.
.
.
.
.
.
.
.
.
J I H G F
here toward
Diffraction
Scale to view
(and measure)
the diffraction
pattern.
®
Page 11
012-02744K Introductory Optics System
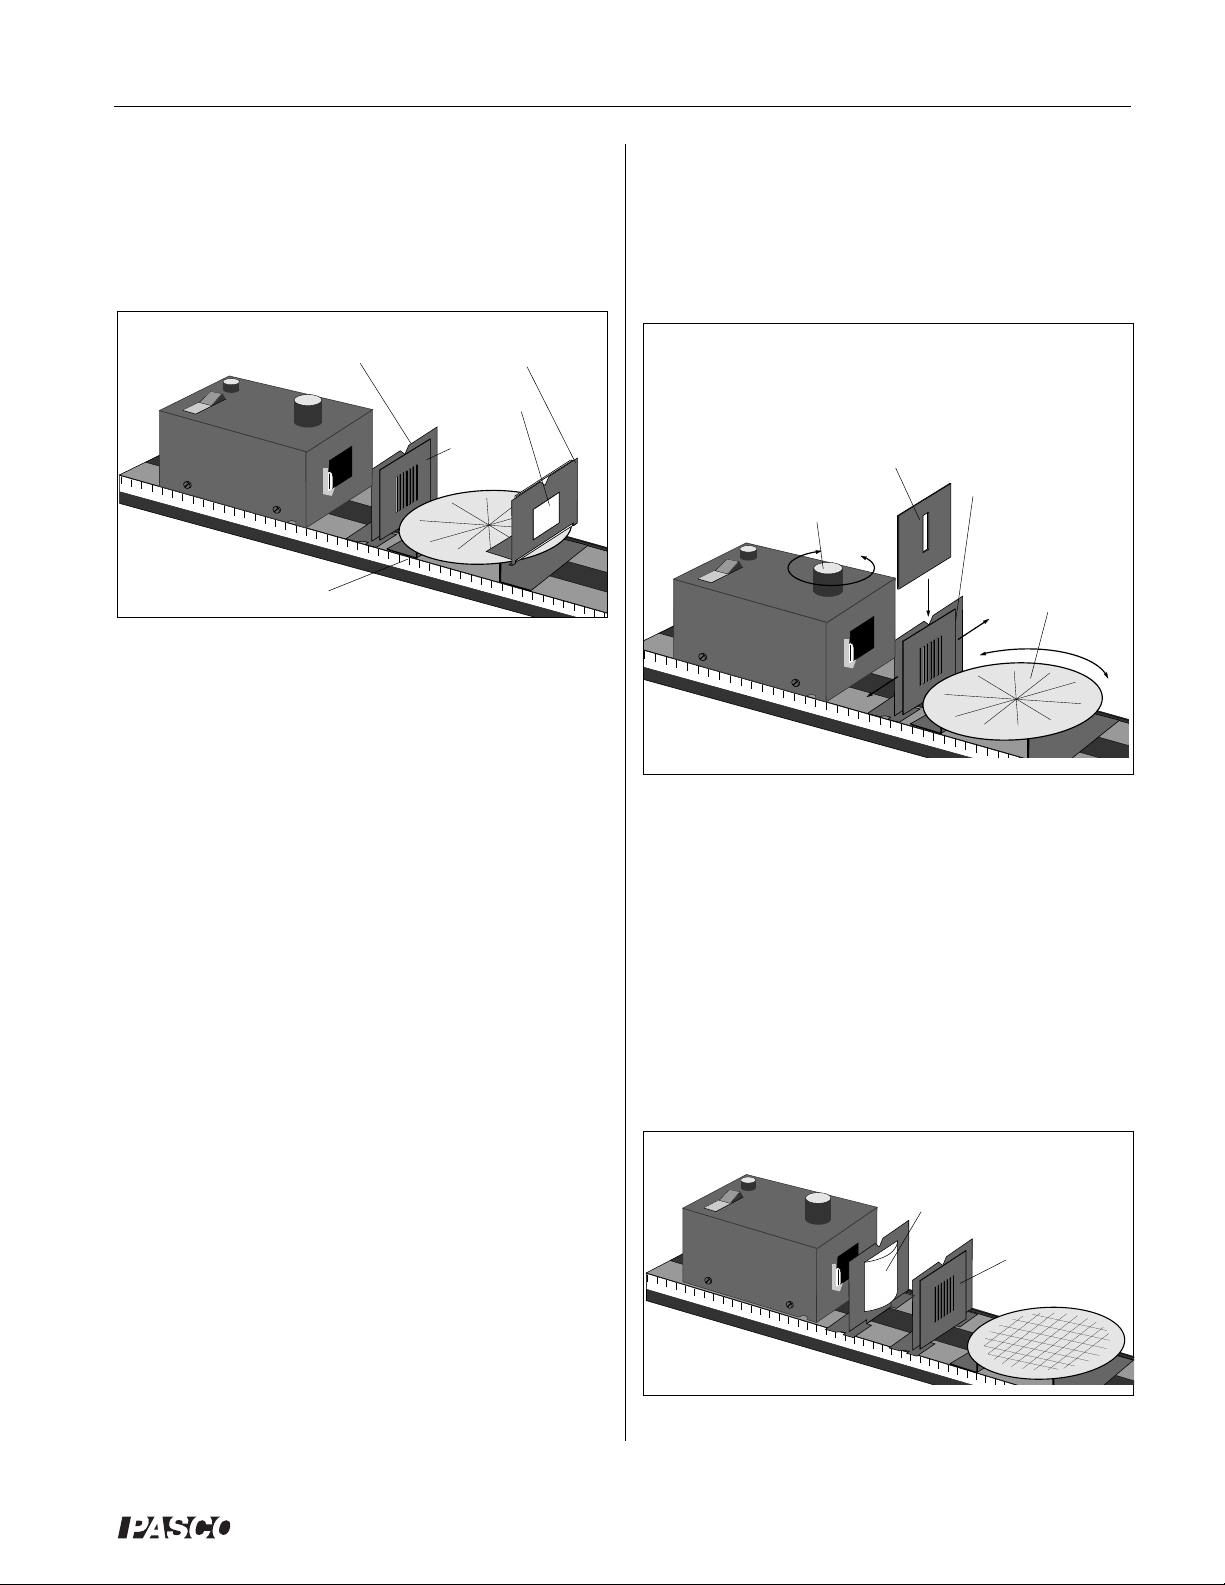
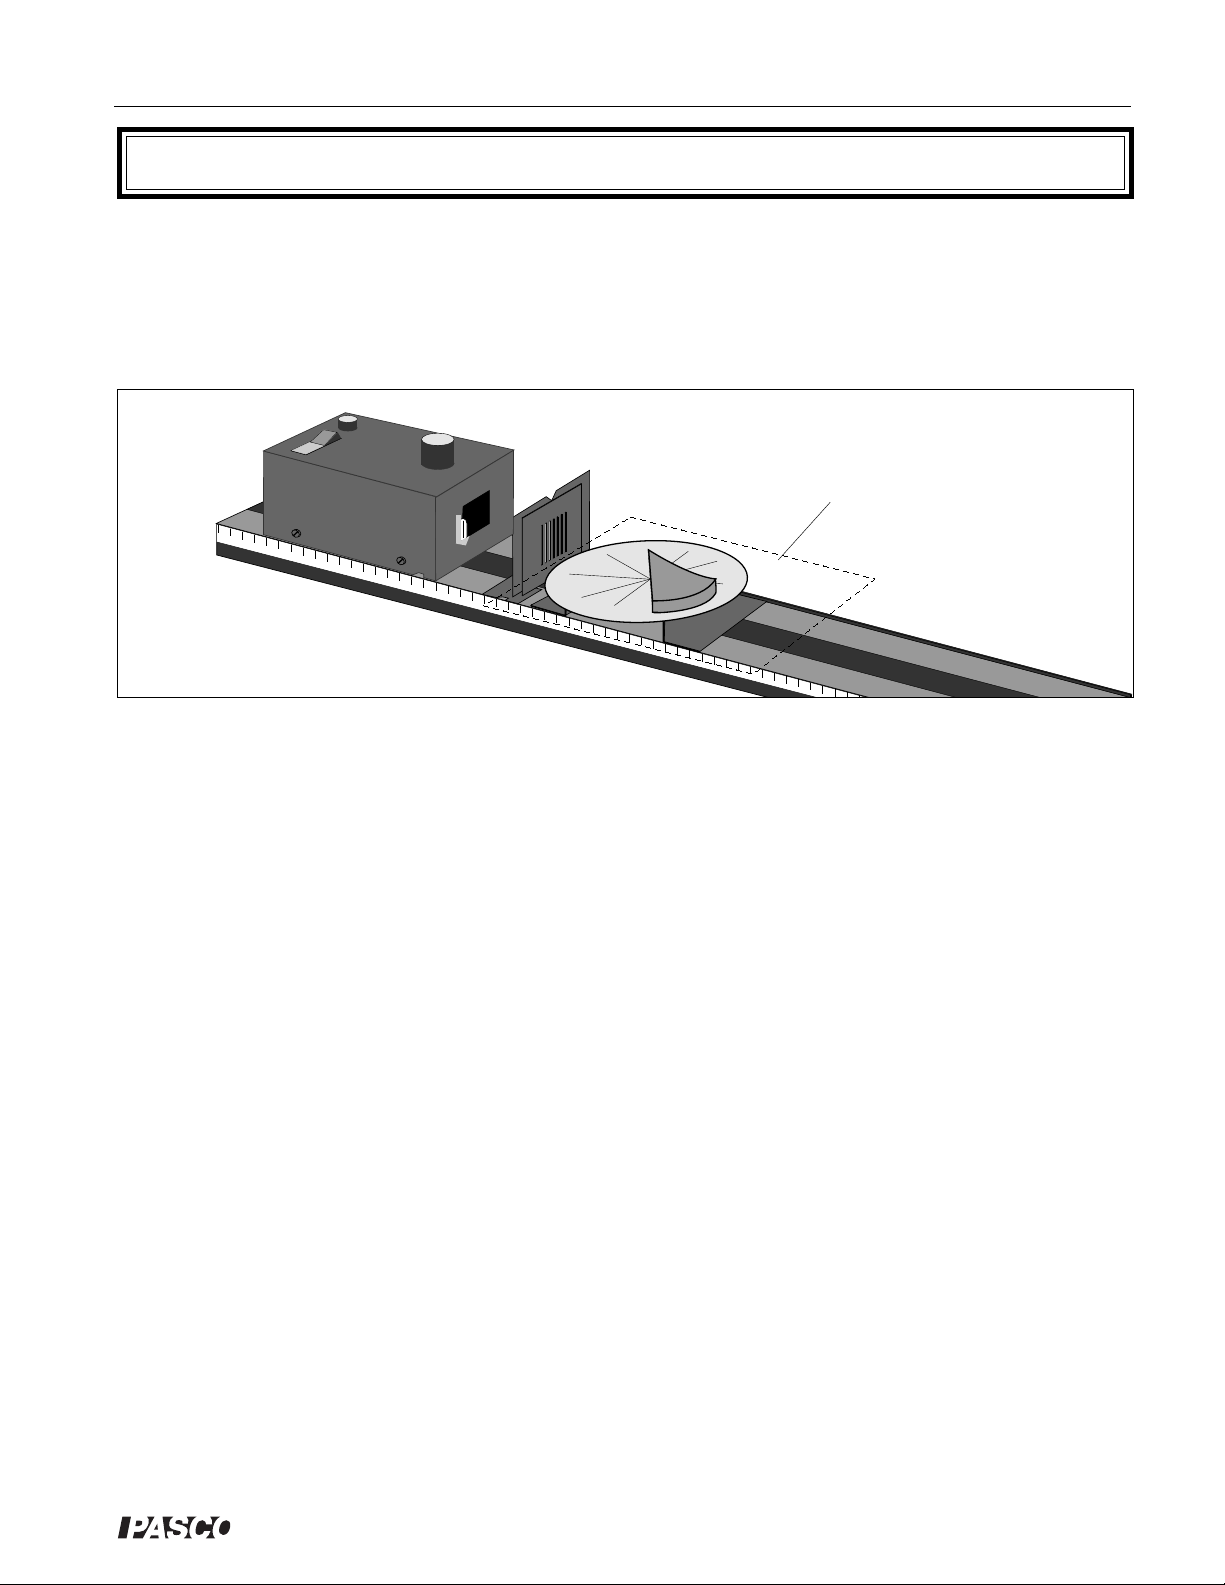
Basic Ray Optics Setup
The basic setup for Ray Optics is shown in Figure 10.
The Ray Table Base should be flush against the alignment
rail. The Ray Table fits over the pin on the top of the
Base.
Component Holder
Ray Table and Base
Figure 10: Basic Ray Optics Setup
Notice that the Ray Table Base is slightly slanted. When
mounting the base on the Optics Bench, be sure the Ray
Table slants down toward the Light Source. This ensures
sharp, bright rays. (In all the experiments described in this
manual, the error introduced by this tilt is negligible.)
Ray Table
Component Holder
Viewing
Screen
Slit Plate
➀ the lateral position of the Slit Plate on its Component
Holder,
➁ the position of the light source filament with respect to
the optical axis, and
➂ the rotation of the Ray Table.
To align a single ray:
4. Use the Slit
Mask to block
all but the
desired ray.
2. Adjust the position
of the filament.
Figure 11: Single Ray Setup
1. Adjust the lateral
position of the Slit
Plate.
3. Adjust the
rotation angle
of the Ray
Table.
Either side of the Ray Table may be used. One side has
a rotational scale, the other has both a rotational scale and
a grid that may be used for linear measurements.
The Slit Plate is attached to a component holder between
the Light Source and the Ray Table. The positioning
shown in the illustration will give clear, sharp rays in a
slightly darkened room. However, the quality of the rays
is easily varied by adjusting the distance between the
Light Source and the Slit Plate. Narrower, less divergent
rays may be obtained by sliding the Light Source farther
away from the slits, but there is a corresponding loss of
brightness.
The Ray Table Component Holder attaches magnetically
to the Ray Table as shown. It may be used to mount the
Viewing Screen, the Polarizer, or another component.
Single Ray Setup
Most quantitative ray optics experiments are most easily
performed using a single ray. This can be obtained by
using the Slit Mask, as shown in Figure 11, to block all but
the desired ray.
For accurate measurements using the rotational scale, the
incident ray must pass directly through the center of the
Ray Table. To accomplish this, alternately adjust:
When one of the rays is aligned in this manner, place the
Slit Mask on the other side of the Component Holder to
block all but the desired ray.
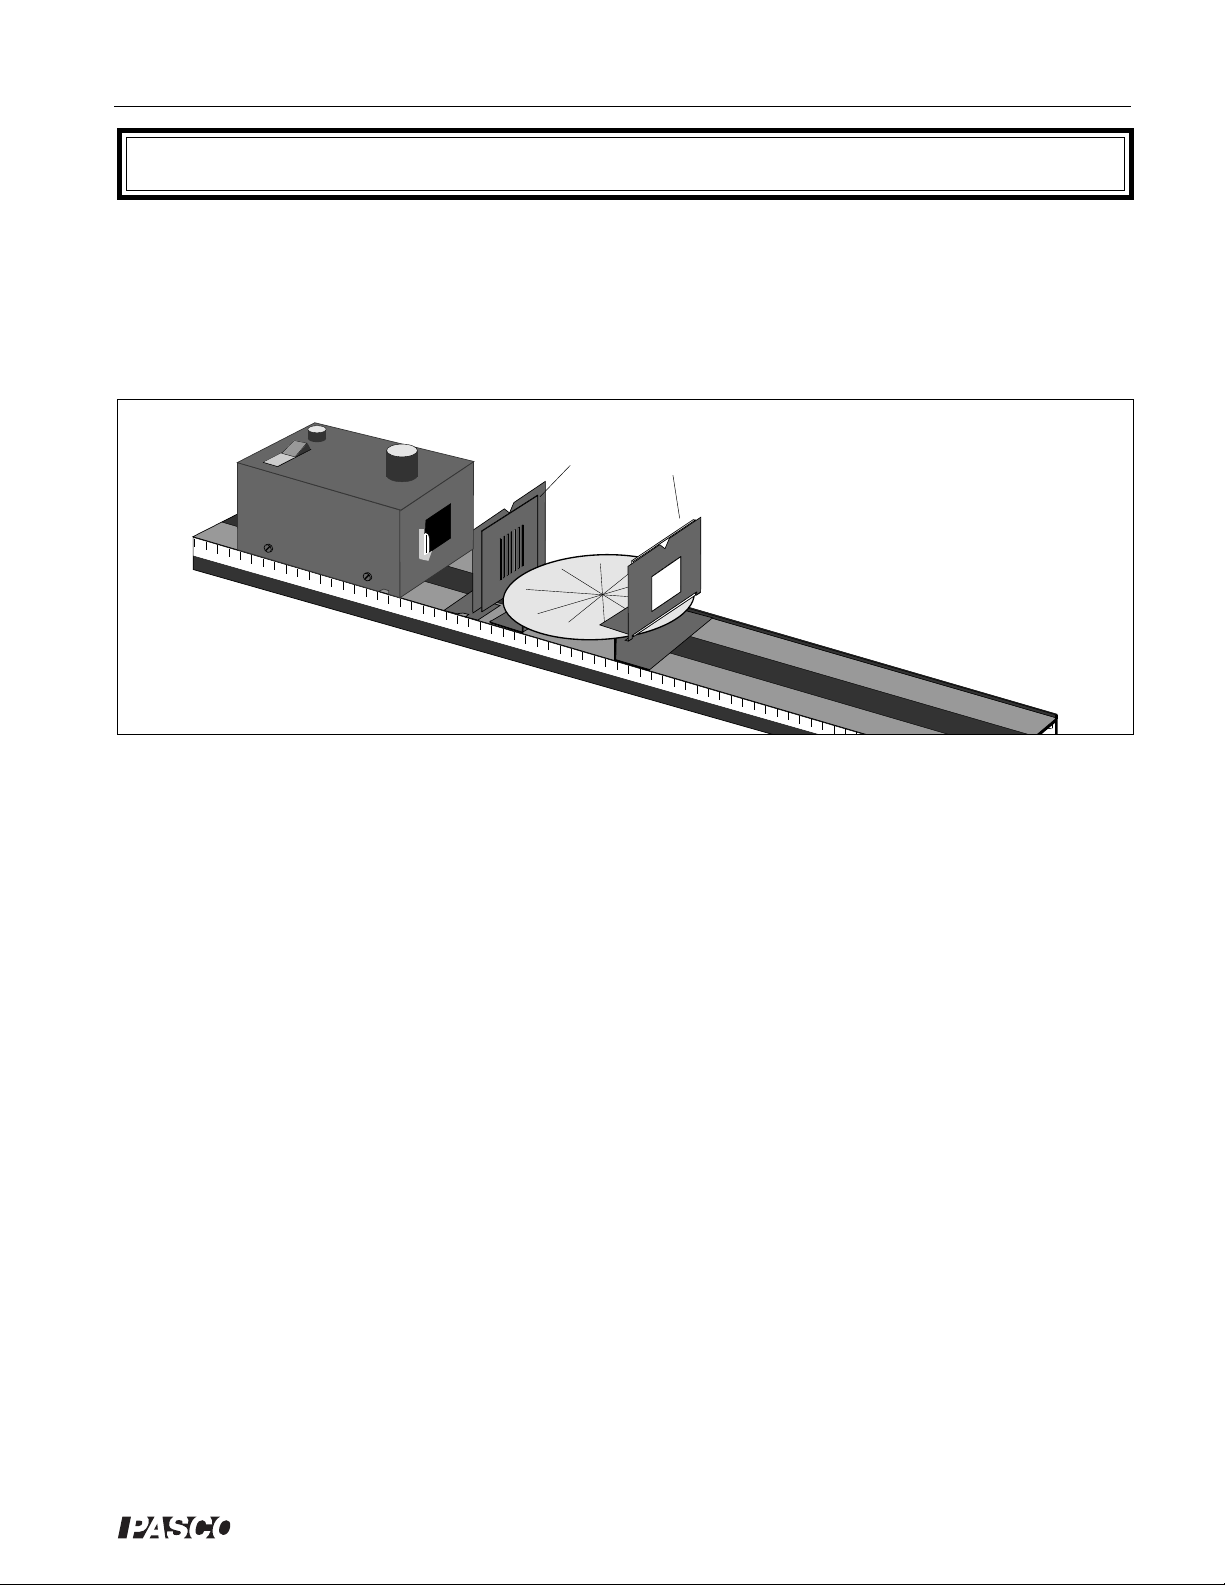
Parallel Ray Setup
Parallel rays are obtained by positioning the Parallel Ray
Lens between the Light Source and the slits, as shown in
Figure 12. Use the parallel lines of the Ray Table grid as
a reference, and adjust the longitudinal position of the lens
until the rays are parallel.
Parallel Ray Lens
Slit Plate
Figure 12: Single Ray Setup
®
5
Page 12

Introductory Optics System 012-02744K
Copy Ready Experiments
The following experiments are written in worksheet form.
Feel free to photocopy them for use in your lab.
➤NOTE: The first paragraph in each experiment lists all the equipment
needed to perform the experiment. Be sure to read this equipment list first, as
the requirements vary with each experiment.
6
®
Page 13
012-02744K Introductory Optics System
Experiment 1: Introduction to Ray Optics
EQUIPMENT NEEDED:
-Optics Bench, -Light Source,
-Ray Table and Base, -Component Holder,
-Slit Plate, -Ray Table Component Holder,
-Viewing Screen.
Purpose
➀ Observe straight line propagation of light.
➁ Use Ray Tracing to locate an object.
Procedure
Set up the equipment as shown in Figure 1.1, and turn on the Light Source. Darken the room
enough so the light rays on the Ray Table are easily visible.
Straight Line Propagation of Light
Observe the light rays on the Ray Table.
Slit Plate
Figure 1.1 Equipment Setup
Viewing Screen
➀ Are the rays straight? _______________________________________________________.
➁ How does the width and distinctness of each ray vary with its distance from the Slit Plate?
_________________________________________________________________________.
Set the Viewing Screen and its holder aside for the next step.
➂ Lower your head until you can look along one of the "Rays" of light on the Ray Table. Where does
the light originate? What path did it take going from there to your eye? Try this for several rays.
_____________________________________________________________________.
Replace the Viewing Screen as shown in Figure 1.1. Rotate the Slit Plate slowly on the component
holder until the slits are horizontal. Observe the slit images on the Viewing Screen.
➃ How does the width and distinctness of the slit images depend on the angle of the Slit Plate?
_________________________________________________________________________.
➄ For what angle of the Slit Plate are the images most distinct? For what angle are the images least
distinct?_________________________________________________________________.
®
7
Page 14
Introductory Optics System 012-02744K
➅ On a separate sheet of paper, explain your observations in terms of the straight line propaga-
tion of light. Include a diagram showing how the width of the slit images depends on the
orientation of the Light Bulb filament with respect to the Slit Plate.
____________________________________________________________________________________________.
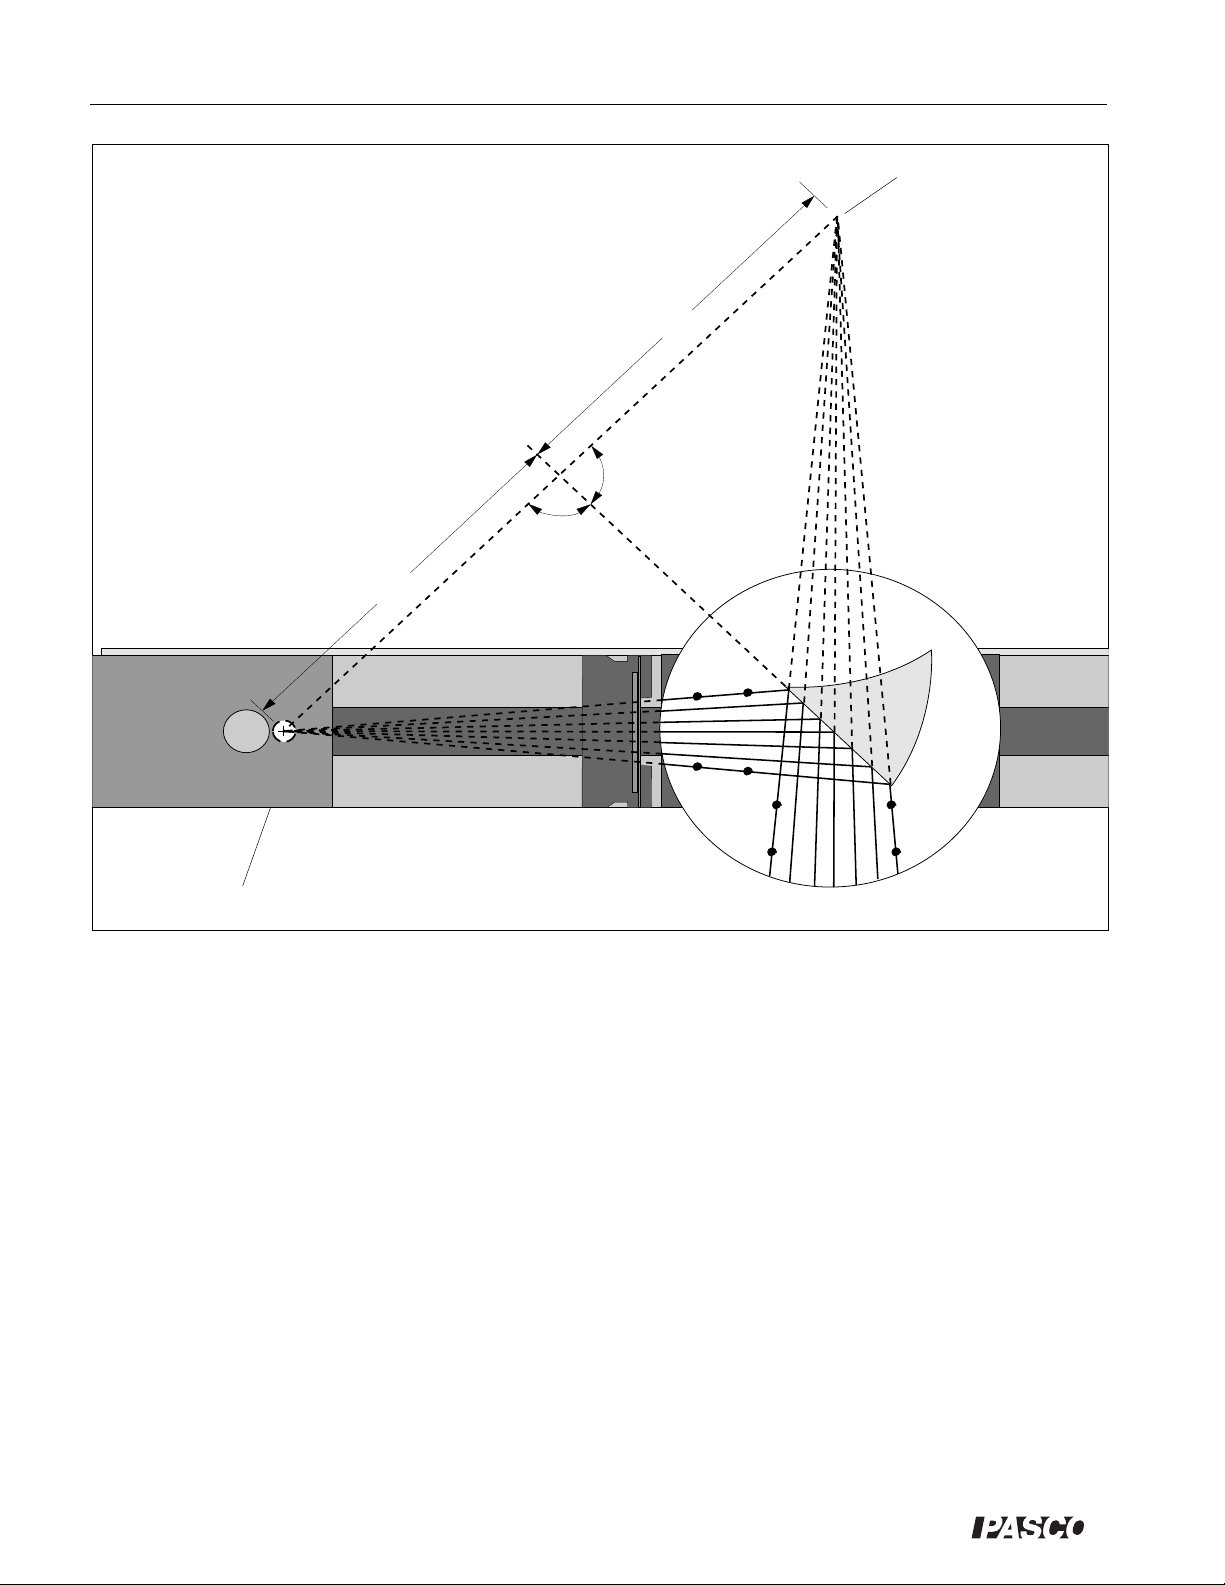
Ray Tracing: Locating the Filament
Filament
Light Source
Note: The vertical edge of the notch
on the side of the Light Source
indicates the position of the filament.
Component
Holder
Figure 1.2: Ray Tracing
Slit Plate
Center
You can use the fact that light propagates in a straight line to measure the distance between
the Light Source filament and the center of the Ray Table. Figure 1.2 shows how. The rays
on the Ray Table all originate from the filament of the Light Source. Since light travels in a
straight line, you need only extend the rays backward to locate the filament. (See Step 3 in the
first part of this experiment.)
Rays on Ray
Table
Paper
Place a piece of blank white paper on top of the Ray Table, holding it there with a piece of
tape. Make a reference mark on the paper at the position of the center of the Ray Table.
Using a pencil and straight edge, trace the edges of several of the rays onto the paper.
Remove the paper. Use the pencil and straightedge to extend each of the rays. Trace them
back to their common point of intersection. (You may need to tape on an additional sheet of
paper.) Label the filament and the center of the Ray Table on your diagram.
➀ Measure the distance between your reference mark and the point of intersection of the rays.
_______________________________________________________________________.
➁ Use the metric scale on the Optics Bench to measure the distance between the filament and
the center of the Ray Table directly (see the note in Figure 1.2).
_____________________________________________________________________________________________.
➂ How well do your measurements in Steps 1 and 2 agree? Comment.
________________________________________________________________________________________.
One of the key ideas that this experiment illustrates is the ability for us to trace light rays to
their origin or apparent origin. This concept will prove most useful in future experiments.
8
®
Page 15
012-02744K Introductory Optics System
90
80
70
60
50
40
30
20
10
0
0
10
2
0
30
40
50
6
0
70
8
0
90
80
70
60
50
40
30
20
10
10
2
0
30
40
50
6
0
70
80
NORMALNORMAL
COMPONENTCOMPONENT
Experiment 2: The Law of Reflection
EQUIPMENT NEEDED:
-Optics Bench -Light Source
-Ray Table and Base -Component Holder
-Slit Plate -Slit Mask
-Ray Optics Mirror.
Slit Mask
90
8
0
80
80
COMPONENTCOMPONENT
90
70
60
50
4
0
30
20
1
0
0
NORMALNORMAL
10
20
3
0
40
50
60
70
80
Slit Plate
70
60
50
40
0
3
20
10
0
0
1
20
30
0
4
50
60
70
Introduction
The shape and location of the image created by
reflection from a mirror of any shape is determined
by just a few simple principles. One of these
principles you already know: light propagates in a
straight line. You will have an opportunity to learn
the remaining principles in this experiment.
To determine the basic principles underlying any
phenomenon, it is best to observe that phenomenon
in its simplest possible form. In this experiment, you
will observe the reflection of a single ray of light
from a plane mirror. The principles you discover
will be applied, in later experiments, to more complicated examples of reflection.
®
Figure 2.1 Equipment Setup
Angle of
Reflection
Angle of
Incidence
9
Figure 2.2 Incident and Reflected Rays
Page 16
Introductory Optics System 012-02744K
Procedure
Set up the equipment as shown in Figure 2.1. Adjust the components so a single ray of light
is aligned with the bold arrow labeled “Normal” on the Ray Table Degree Scale. Carefully
align the flat reflecting surface of the mirror with the bold line labeled “Component” on the
Ray Table. With the mirror properly aligned, the bold arrow on the Ray Table is normal (at
right angles) to the plane of the reflecting surface.
Rotate the Ray Table and observe the light ray. The angles of incidence and reflection are
measured with respect to the normal to the reflecting surface, as shown in Figure 2.2.
By rotating the Ray Table, set the angle of incidence to each of the settings shown in Table
2.1. For each angle of incidence, record the angle of reflection (Reflection
measurements with the incident ray coming from the opposite side of the normal (Reflec-
).
tion
2
➀ Are the results for the two trials the same? If not, to what do you attribute the differences?
________________________________________________________________________
➁ Part of the law of reflection states that the incident ray, the normal and the reflected ray all lie
in the same plane. Discuss how this is shown in your experiment
_____________________________________________________________________________________________.
). Repeat your
1
➂ What relationship holds between the angle of incidence and the angle of reflection?
______________________________________________________________________________
Additional Questions
➀ The Law of Reflection has two parts. State both
parts.
➁ You were asked to measure the angle of reflection
when the ray was incident on either side of the
normal to the surface of the mirror. What advantages does this provide?
➂ Physicists expend a great deal of energy in attempts
to increase the accuracy with which an exact law
can be proven valid. How might you test the Law
of Reflection to a higher level of accuracy than in
the experiment you just performed?
Angle of: Incidence Reflection1 Reflection
Table 2.1 Data
2
0°
10°
20°
30°
40°
50°
60°
10
70°
80°
90°
®
Page 17
012-02744K Introductory Optics System
Experiment 3: Image Formation in a Plane Mirror
EQUIPMENT NEEDED:
-Optics Bench -Light Source
-Ray Table and Base -Component Holder
-Slit Plate -Ray Optics Mirror
Paper
Introduction
Figure 3.1 Equipment Setup
Looking into a mirror and seeing a nearly exact image of yourself hardly seems like the result of simple physical
principles. But it is. The nature of the image you see in a mirror is understandable in terms of the principles you
have already learned: the Law of Reflection and the straight-line propagation of light.
In this experiment you will investigate how the apparent location of an image reflected from a plane mirror
relates to the location of the object, and how this relationship is a direct result of the basic principles you have
already studied.
Procedure
Set up the equipment as shown in Figure 3.1. Adjust the Slit Plate and Light Source positions for sharp, easily
visible rays.
As shown, place a blank, white sheet of paper on top of the Ray Table, and place the Ray Optics Mirror on top
of the paper. Position the mirror so that all of the light rays are reflected from its flat surface. Draw a line on
the paper to mark the position of the flat surface of the mirror.
Look into the mirror along the line of the reflected rays so that you can see the image of the Slit Plate and,
through the slits, the filament of the Light Source. (Rotate the mirror as needed to do this.)
➀ Do the rays seem to follow a straight line into the mirror? ________________________________.
With a pencil, mark two points along one edge of each of the incident and reflected rays. Label the points (r
etc.), so you know which points belong to which ray.
1,r2
,
Remove the paper and reconstruct the rays as shown on the next page (Figure 3.2), using a pencil and straightedge. If you need to, tape on additional pieces of paper. Draw dotted lines to extend the incident and reflected
rays. (If this ray tracing technique is unfamiliar to you, review ray tracing in Experiment 1: Introduction to Ray
Optics.)
On your drawing, label the position of the filament and the apparent position of its reflected image.
®
11
Page 18
Introductory Optics System 012-02744K
Image of the
Filament
d
1
90˚
90˚
d
2
r
r
1
1
r
r
7
7
r
1
r
1
r
7
r
7
Filament
Figure 3.2 Ray Tracing
➁ What is the perpendicular distance from the filament to the plane of the mirror (distance d1, as shown in the
Figure 3.2)? ________________________________________________.
➂ What is the perpendicular distance from the image of the filament to the plane of the mirror (distance d
2
, as
shown in the Figure)? _________________________________________.
Change the position of the mirror and the Light Source and repeat the experiment.
➃ What is the relationship between object and image location for reflection in a plane mirror?
________________________________________________________________________.
Additional Questions
➀ If one wall of a room consists of a large, flat mirror, how much larger does the room appear to be than it
actually is?
➁ Make a diagram illustrating why an image of the letter F, reflected from a plane mirror, is inverted. (Treat
each corner on the F as a source of light. Locate the image for each source to construct the image of the F.)
➂ How does the size of the image reflected from a plane mirror relate to the size of the object?
12
®
Page 19
012-02744K Introductory Optics System
9
0
80
70
6
0
5
0
4
0
3
0
20
10
0
0
10
20
30
40
5
0
60
70
80
9
0
80
70
60
5
0
4
0
3
0
20
10
10
20
30
4
0
5
0
60
70
80
NORM
AL
NORMAL
CO
M
P
O
N
E
NT
CO
M
P
O
N
EN
T
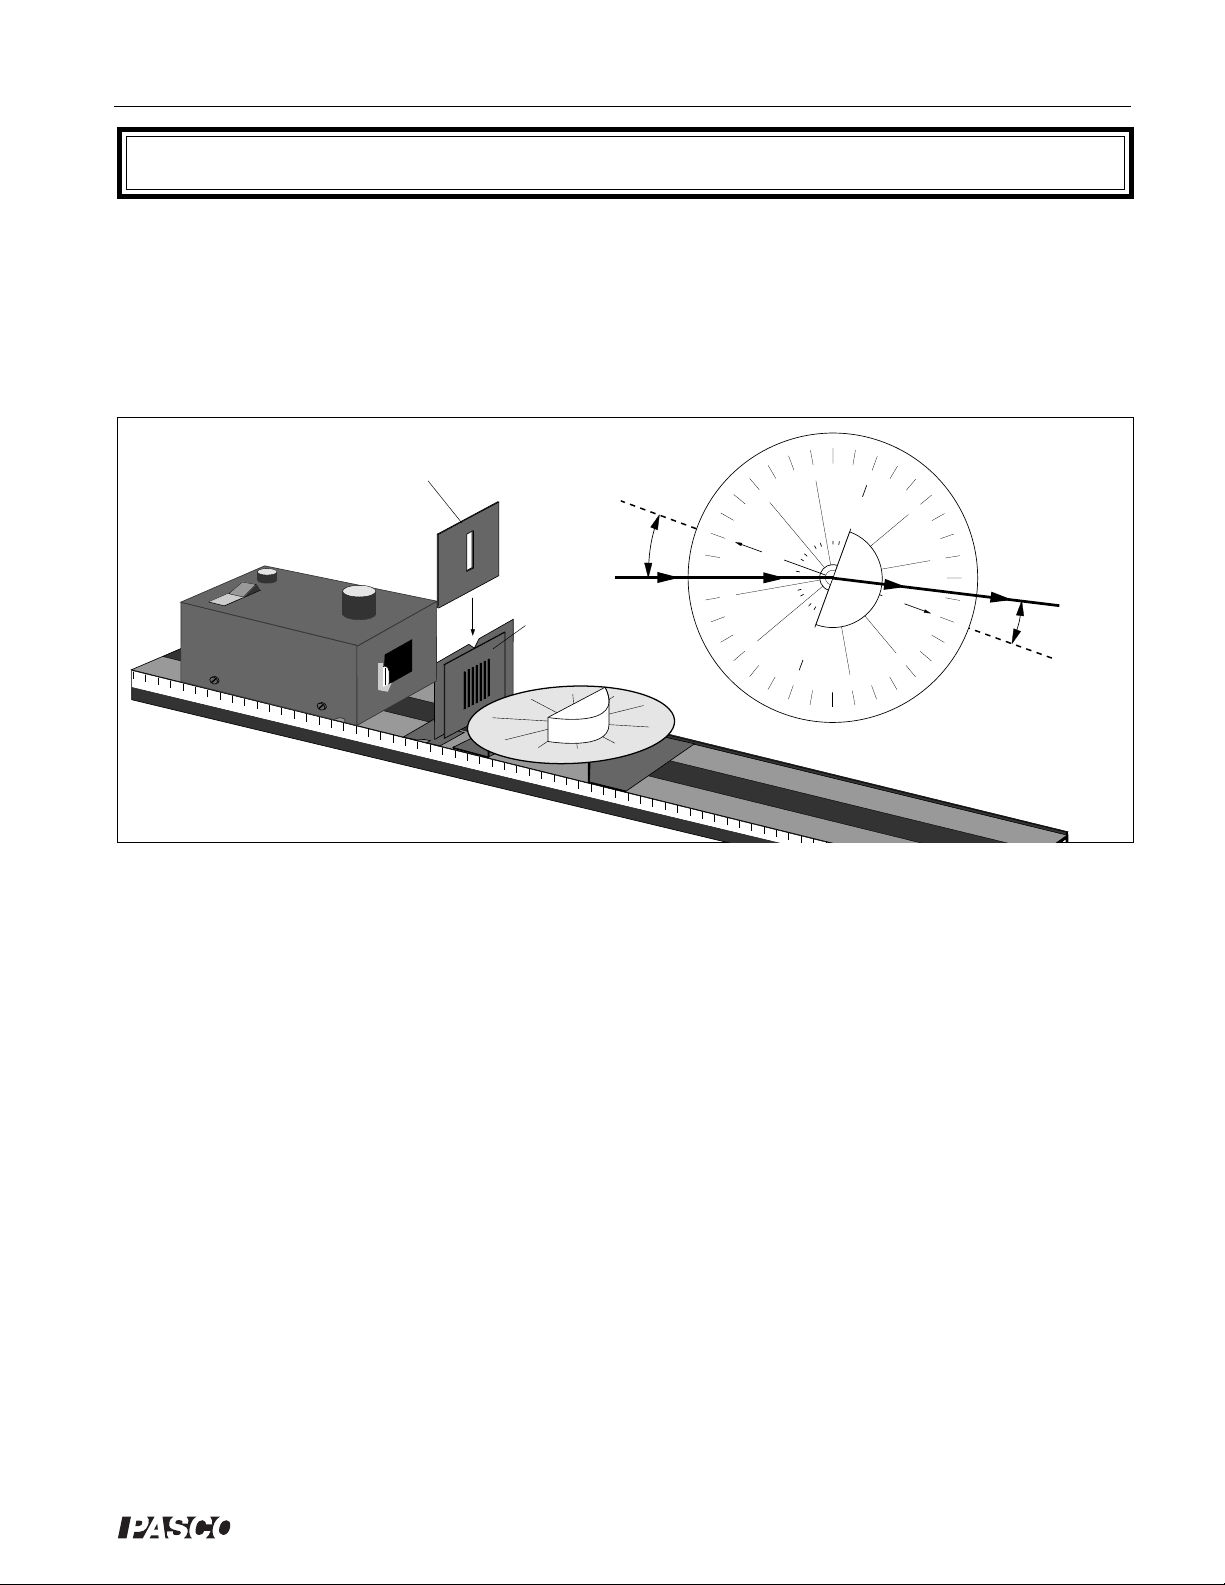
Experiment 4: The Law of Refraction
EQUIPMENT NEEDED:
-Optics Bench -Light Source
-Ray Table and Base -Component Holder
-Slit Plate -Slit Mask
-Cylindrical Lens.
Slit Mask
Angle of
Incidence
Introduction
As you have seen, the direction of light propagation changes abruptly when light encounters a
reflective surface. The direction also changes abruptly when light passes across a boundary
between two different media of propagation, such as between air and acrylic, or between glass and
water. In this case, the change of direction is called Refraction.
As for reflection, a simple law characterizes the behavior of a refracted ray of light. According to
the Law of Refraction, also known as Snell’s Law:
The quantities n1 and n2 are constants, called indices of refraction, that depend on the two media
through which the light is passing. The angles θ1 and θ2 are the angles that the ray of light makes
with the normal to the boundary between the two media (see the inset in Figure 4.1). In this
experiment you will test the validity of this law, and also measure the index of refraction for acrylic.
Slit Plate
Figure 4.1 Equipment Setup
n
sin θ1 = n2 sin θ
1
2
Angle of
Refraction
Procedure
Set up the equipment as shown in Figure 4.1. Adjust the components so a single ray of light
passes directly through the center of the Ray Table Degree Scale. Align the flat surface of the
Cylindrical Lens with the line labeled “Component”. With the lens properly aligned, the radial lines
extending from the center of the Degree Scale will all be perpendicular to the circular surface of
the lens.
®
13
Page 20
Introductory Optics System 012-02744K
Without disturbing the alignment of the Lens, rotate
the Ray Table and observe the refracted ray for
various angles of incidence.
➀ Is the ray bent when it passes into the lens perpen-
dicular to the flat surface of the lens?
_______________________________________
_______________________________________.
➁ Is the ray bent when it passes out of the lens
perpendicular to the curved surface of the lens?
_______________________________________
_______________________________________.
By rotating the Ray Table, set the angle of inci-
dence to each of the settings shown in Table 4.1 on
the following page. For each angle of incidence,
measure the angle of refraction (Refraction
).
1
Repeat the measurement with the incident ray
striking from the opposite side of the normal (Refraction2).
Angle of: Incidence Refraction1Refraction
0°
10°
20°
30°
40°
50°
60°
70°
80°
90°
2
➂ Are your results for the two sets of measurements
Table 4.1 Data
the same? If not, to what do you attribute the
differences?
___________________________________________________________________
_______________________________________________________________________.
On a separate sheet of paper, construct a graph with sin(angle of refraction) on the x-axis
and sin(angle of incidence) on the y-axis. Draw the best fit straight line for each of your two
sets of data.
➃ Is your graph consistent with the Law of Refraction? Explain.
_____________________________________________________________________________________________.
➄ Measure the slope of your best fit lines. Take the average of your results to determine the
index of refraction for acrylic (assume that the index of refraction for air is equal to 1.0).
n = ________________________________________.
Additional Questions
➀ In performing the experiment, what difficulties did you encounter in measuring the angle of
refraction for large angles of incidence?
➁ Was all the light of the ray refracted? Was some reflected? How might you have used the
Law of Reflection to test the alignment of the Cylindrical Lens?
➂ How does averaging the results of measurements taken with the incident ray striking from
either side of the normal improve the accuracy of the results?
14
®
Page 21
012-02744K Introductory Optics System
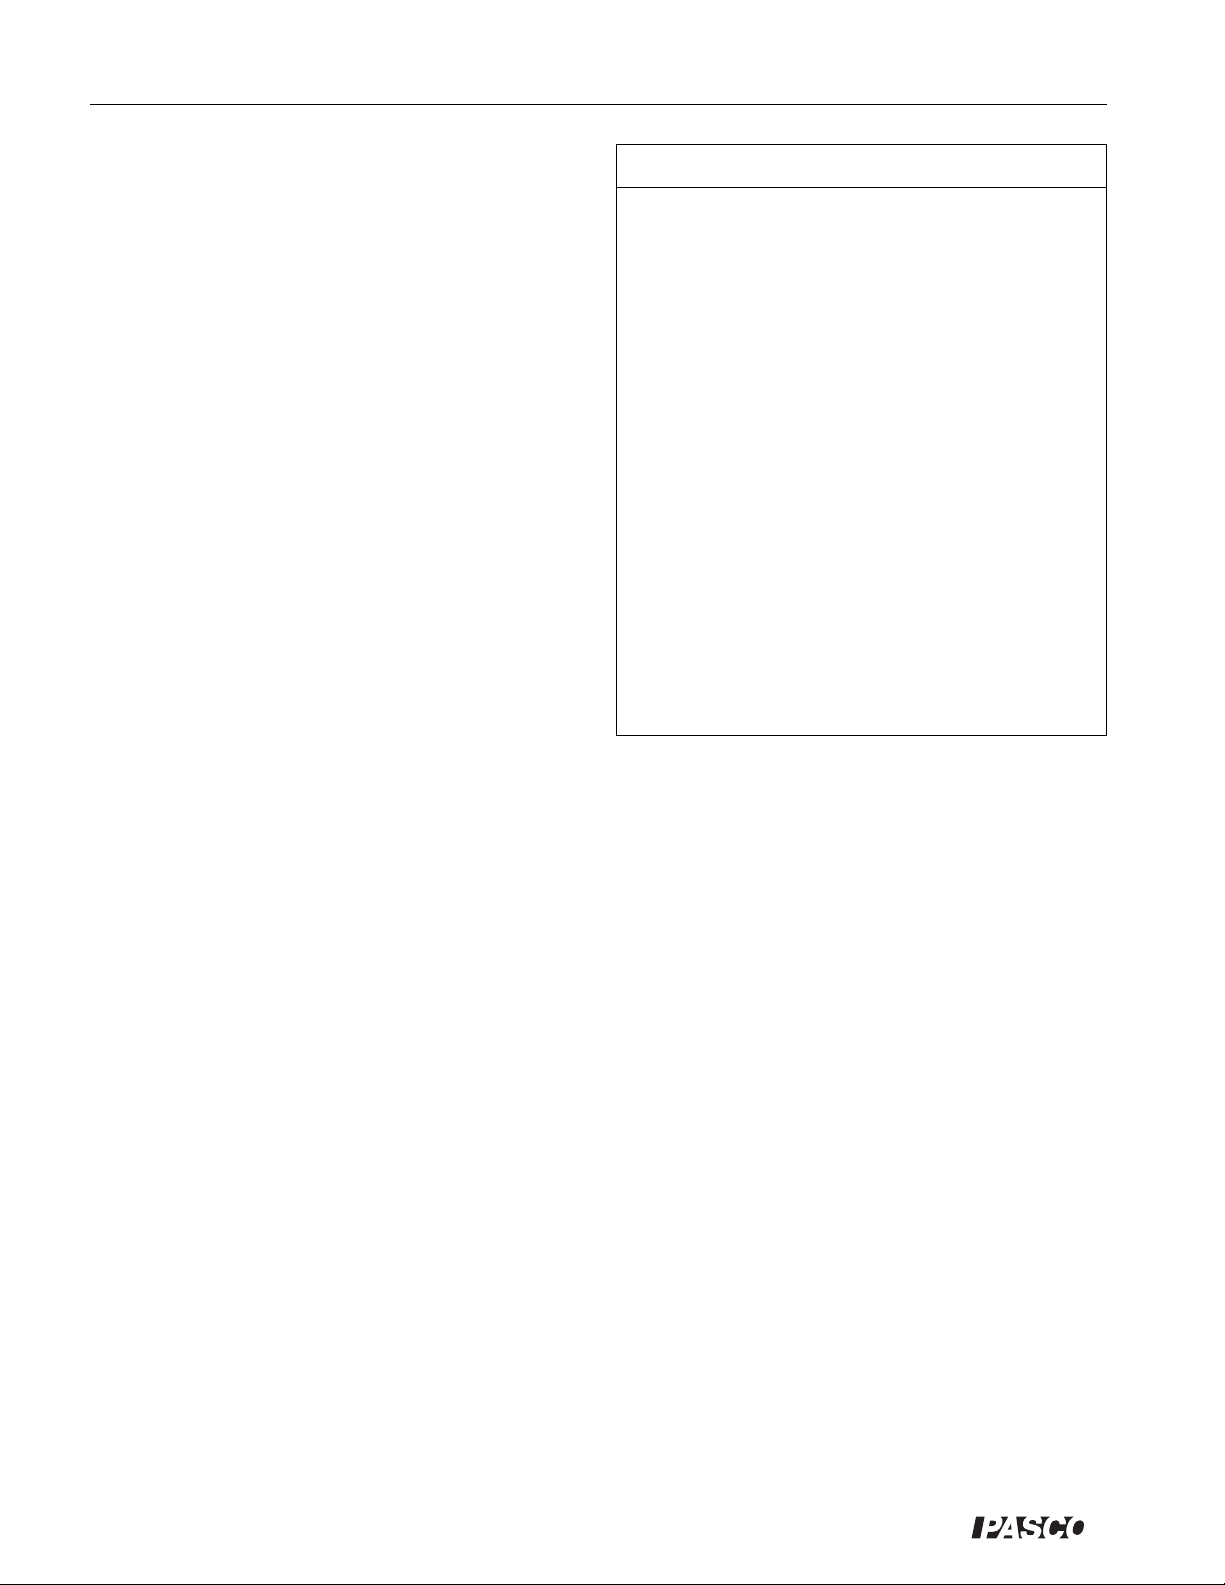
Experiment 5: Reversibility
Equipment Needed:
-Optics Bench -Light Source
-Ray Table and Base -Component Holder
-Slit Plate -Slit Mask
-Cylindrical Lens.
Introduction
In Experiment 4, you determined the relationship
that exists between the angle of incidence and the
angle of refraction for light passing from air into a
more optically dense medium (the Cylindrical Lens).
An important question remains. Does the same
relationship hold between the angles of incidence
and refraction for light passing out of a more
optically dense medium back into air? That is to
say, if the light is traveling in the opposite direction,
is the law of refraction the same or different? In
this experiment, you will find the answer to this
question.
Procedure
Set up the equipment as shown in Figure 5.1.
Adjust the components so a single ray of light
passes directly through the center of the Ray Table
Degree Scale. Align the flat surface of the Cylindrical Lens with the line labeled “Component”. With the lens properly aligned, the radial lines
extending from the center of the Degree Scale will all be perpendicular to the circular surface of the
lens.
Slit Mask
20
0
1
Incidence
Slit Plate
1
0
10
20
0
3
0
4
50
0
6
Figure 5.1 Equipment Setup
Internal Angle
of Incidence
(Incidence
)
2
Figure 5.2 Internal Angle of Incidence
70
8
0
0
6
0
5
0
4
0
3
N
O
R
M
A
L
70
80
10
0
10
20
30
0
4
0
90
80
70
T
N
6
E
0
N
O
P
M
O
C
T
N
E
N
O
P
M
O
C
90
6
0
0
8
70
50
40
30
20
NORMAL
5
0
6
70
80
COMPONENT
90
50
4
0
3
0
20
10
N
O
R
M
A
L
0
1
0
20
3
0
4
0
50
70
80
60
90
80
COMPONENT
NORMAL
40
50
60
80
70
70
30
6
0
5
0
4
0
0
10
20
Refraction
30
20
10
1
(Refraction
)
2
Angle of
Refraction
Without disturbing the alignment of the lens, rotate the Ray Table and set the angle of incidence to
the values listed in Table 5.1 on the following page. Enter the corresponding angles of Refraction in
the table in
two columns: Refraction1 and Incidence2. (Let Incidence2 = Refraction1).
®
15
Page 22

Introductory Optics System 012-02744K
Table 5.1 Data
Ray Incident on: Flat Surface Curved Surface
Angle of: Incidence
1
Refraction
1
Incidence
2
Refraction
2
0°
10°
20°
30°
40°
50°
60°
70°
80°
90°
Now let the incident ray strike the curved surface of the lens. (Just rotate the Ray Table 180°.)
The internal angle of incidence for the flat surface of the Cylindrical Lens is shown in Figure 5.2.
Set this angle of incidence to the values you have already listed in the table (Incidence2). Record
the corresponding angles of refraction (Refraction2).
➀ Using your collected values for Incidence
and Refraction1, determine the index of refraction for
1
the acrylic from which the Cylindrical Lens is made. (As in experiment 4, assume that the index
of refraction for air is equal to 1.0.)
n
=
1
______________________________________________________________________.
➁ Using your collected values for Incidence
and Refraction2, redetermine the index of refraction
2
for the acrylic from which the Cylindrical Lens is made.
n
=
2
______________________________________________________________________.
➂ Is the Law of Refraction the same for light rays going in either direction between the two
media?
____________________________________________________________________.
➃ On a separate sheet of paper, make a diagram showing a light ray passing into and out of the
Cylindrical Lens. Show the correct angles of incidence and refraction at both surfaces traversed
by the ray. Use arrow heads to indicate the direction of propagation of the ray. Now reverse
the arrows on the light ray. Show that the new angles of incidence and refraction are still
consistent with the Law of Refraction. This is the principle of optical reversibility.
➄ Does the principle of optical reversibility hold for Reflection as well as Refraction? Explain.
_________________________________________________________________________.
16
®
Page 23
012-02744K Introductory Optics System
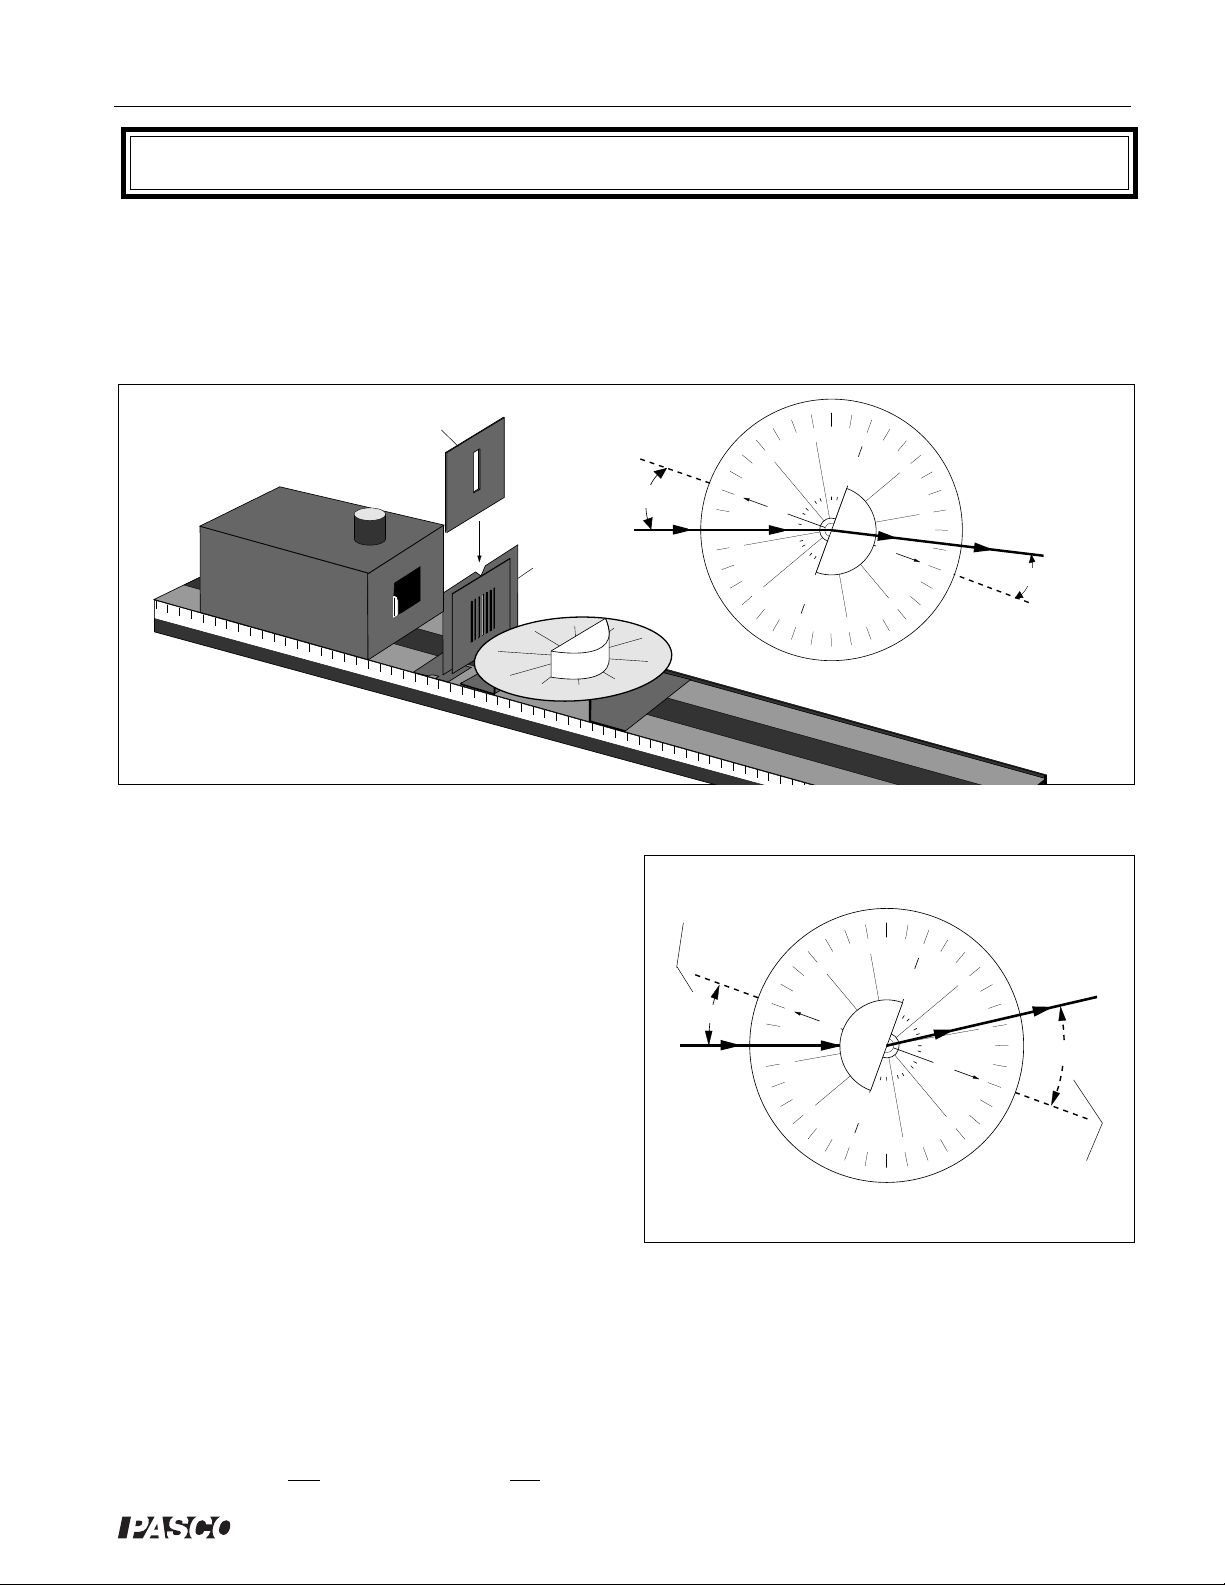
Experiment 6: Dispersion and Total Internal Reflection
EQUIPMENT NEEDED:
-Optics Bench -Light Source
-Ray Plate and Base -Component Holder
-Slit Plate -Slit Mask
-Cylindrical Lens -Ray Table Component Holder
-Viewing Screen.
70
80
60
COMPONENT
80
90
8
0
70
60
COMPONENT
60
70
50
4
0
30
20
10
N
O
R
M
A
L
0
1
0
2
0
3
0
4
0
50
Viewing
Screen
Angle of
Incidence
50
0
4
0
3
0
2
0
1
0
N
O
R
M
A
L
10
20
30
0
4
50
60
70
0
8
90
Figure 6.1 Equipment Setup
Introduction
In this experiment you will look at two phenomena related to refraction: Dispersion and Total
Internal Reflection. Dispersion introduces a complication to the Law of Refraction, which is that
most materials have different indexes of refraction for different colors of light. In Total Internal
Reflection, it is found that in certain circumstances, light striking an interface between two transparent media can not pass through the interface.
Procedure
Set up the equipment as shown in Figure 6.1, so a single light ray is incident on the curved surface
of the Cylindrical Lens.
Dispersion
Set the Ray Table so the angle of incidence of the ray striking the flat surface of the lens (from
inside the lens) is zero-degrees. Adjust the Ray Table Component Holder so the refracted ray is
visible on the Viewing Screen.
Slowly increase the angle of incidence. As you do, watch the refracted ray on the Viewing
Screen.
➀ At what angle of refraction do you begin to notice color separation in the refracted ray?
®
17
Page 24

Introductory Optics System 012-02744K
➁ At what angle of refraction is the color separation a maximum? ____________________
_______________________________________________________________________.
➂ What colors are present in the refracted ray? (Write them in the order of minimum to maxi-
mum angle of refraction.)
__________________________________________________
_______________________________________________________________________.
➃ Measure the index of refraction of acrylic for red and blue light
(n
acrylic
sin θ
acrylic
= n
air
sin θ
).
air
➤NOTE: In Experiment 4 we said that the index of refraction of a given material is a
constant. That statement was almost accurate, but not quite. As you can see, different
colors of light refract to slightly different angles, and therefore have slightly different
indexes of refraction.
= ______________________________________.
n
red
n
= ______________________________________.
blue
Total Internal Reflection
Without moving the Ray Table or the Cylindrical Lens, notice that not all of the light in the
incident ray is refracted. Part of the light is also reflected.
➀ From which surface of the lens does reflection primarily occur? ___________________
________________________________________________________________.
➁ Is there a reflected ray for all angles of incidence? (Use the Viewing Screen to detect faint
rays.)
_________________________________________________________________
________________________________________________________________.
➂ Are the angles for the reflected ray consistent with the Law of Reflection? __________
________________________________________________________________.
➃ Is there a refracted ray for all angles of incidence?____________________________
________________________________________________________________.
➄ How do the intensity of the reflected and refracted rays vary with the angle of incidence?
________________________________________________________________.
➅ At what angle of refraction is all the light reflected (no refracted ray)? ______________
________________________________________________________________.
18
®
Page 25

012-02744K Introductory Optics System
Experiment 7: Converging Lens – Image and Object
Relationships
EQUIPMENT NEEDED:
-Optics Bench -Light Source
-75 mm Focal Length Convex Lens -Crossed Arrow Target
-Component Holders (3) -Viewing Screen.
Introduction
Given a lens of any shape and index of refraction, you could determine the shape and location of
the images it forms based only on the Law of Refraction. You need only apply the law along with
some of the ray tracing techniques you have already used. However, for spherical lenses (and for
spherical mirrors as well), there is a more general equation that can be used to determine the
location and magnification of an image. This equation is called the Fundamental Lens equation:
where f is the focal length of the lens, and d
and object respectively (see Figure 7.1). The magnification of the image is given by the equation:
In this experiment, you will have an opportunity to test and apply these equations.
S
o
Crossed Arrow
Target
Figure 7.1: Equipment Setup
d
o
f f
Lens
1/d
+ 1/di = 1/f
o
and di are the distance from the mirror to the image
o
m = -d
i/do
d
i
S
i
Viewing Screen
➤➤
➤NOTE: Instead of the above equation, you may have learned the Fundamental Lens Equation
➤➤
= f2, where So and Si are the distances between the principle focus of the lens and the
as S
oSi
object and image, respectively. If so, notice that So = do - f, and Si = di - f (see Figure 7.1).
Using these equalities, convince yourself that 1/do + 1/di = 1/f and SoSi = f2 are different
expressions of the same relationship.
Procedure
Set up the equipment as shown in Figure 7.1. Turn on the Light Source and slide the lens toward
or away from the Crossed Arrow Target, as needed to focus the image of the Target onto the
Viewing Screen.
➀ Is the image magnified or reduced? ____________________________________________.
➁ Is the image inverted?______________________________________________________.
➂ Based on the Fundamental Lens Equation, what would happen to d
further?_________________________________________________________________.
®
19
if you increased do even
i
Page 26

Introductory Optics System 012-02744K
Table 7.1: Data and Calculations
Data Calculations
(mm) d
d
o
500
450
400
350
300
250
200
150
100
75
i
h
i
1/di + 1/d
o
1/f hi/h
o
-di/d
o
50
➂ What would happen to di if do were very, very large?
______________________________.
➃ Using your answer to question 4, measure the focal length of the lens.
Focal Length = ___________________________________________.
Now set d
to the values (in millimeters) listed in the table above. At each setting, locate the
o
image and measure di. Also measure hi, the height of the image. (ho is the height of the
arrow on the crossed arrow target.)
Using the data you have collected, perform the calculations shown in the table.
➄ Are your results in complete agreement with the Fundamental Lens Equation? If not, to what
do you attribute the discrepancies?
__________________________________________________________________.
➅ For what values of d
were you unable to focus an image onto the screen? Use the Funda-
o
mental Lens Equation to explain why.
__________________________________________.
Additional Questions
➀ For a lens of focal length f, what value of do would give an image with a magnification of one?
➁ Is it possible to obtain a non-inverted image with a converging spherical lens? Explain.
➂ For a converging lens of focal length f, where would you place the object to obtain an image
as far away from the lens as possible? How large would the image be?
20
®
Page 27

012-02744K Introductory Optics System
Experiment 8: Light and Color
EQUIPMENT NEEDED:
-Optics Bench -Ray Table and Base
-Component Holder -Ray Table Component Holder
-Slit Plate -Slit Mask
-Cylindrical Lens -Viewing Screen
-Colored Filters (3)
70
8
0
0
6
90
80
7
0
T
N
60
E
N
O
P
M
O
C
T
N
E
N
O
P
M
O
C
90
6
0
0
8
70
5
0
40
3
0
20
10
N
O
R
M
A
L
0
10
2
0
3
0
4
0
50
Viewing
Screen
Angle of
Incidence
50
0
4
0
3
0
2
10
0
N
O
R
M
A
L
10
20
0
3
40
0
5
60
0
7
80
Introduction
Early investigators assumed that light, in its purest, simplest form is white; and that refractive
materials alter the characteristics of the white light to create the various colors. Sir Isaac Newton
was the first to show that light, in its simplest form, is colored; and that refractive materials merely
separate the various colors which are the natural constituents of white light. He used this idea to
help explain the colors of objects.
The Colors of Light
Set up the equipment as shown in Figure 8.1, so that a single ray of light passes through the center of
the Ray Table. Slowly rotate the Ray Table to increase the angle of incidence of the light ray.
Examine the refracted ray on the Viewing Screen. Notice the color separation at large angles of
refraction.
Figure 8.1 Equipment Setup
Red Filter
Viewing
Screen
Red
Green
Blue
Blue/Green Filter
®
Figure 8.2 Mixing Colored Light
21
Page 28

Introductory Optics System 012-02744K
Transmitted
Green Filter
(hold in place by hand)
Figure 8.3 Equipment Setup
Rays
Reflected
Rays
➀ Do your observations support Newton’s theory? Explain. __________________________
____________________________________________________________________.
To investigate further, setup the equipment as shown in Figure 8.2. Arrange the Cylindrical Lens so
that the three central light rays (one red, one green, and one blue) intersect at precisely the same
point on the Ray Table. Slowly move the Viewing Screen toward this point of intersection (you'll
have to remove it from its component holder).
➁ What color of light results when red, green, and blue light are mixed? How does this support
Newton’s theory? ______________________________________________________
___________________________________________________________________.
The Colors of Objects
Set up the equipment as shown in Figure 8.3. Observe the light rays that are transmitted and
reflected from the Green Filter.
➀ What color are the transmitted rays? What color are the reflected rays?
___________________________________________________________________.
Place the Red Filter behind the Green Filter (so the light passes first through the Green Filter and
then through the Red Filter). Look into the Green Filter.
➁ What color are the reflected rays now? Which rays are reflected from the front surface of the
Green Filter, and which are reflected from the front surface of the Red Filter?
___________________________________________________________________.
Place the Blue Filter over the Light Source aperture so the incident rays are blue. Let these rays
pass through the Green Filter only.
➂ What colors are the reflected rays now?
___________________________________________________________________.
➃ Based on your observations, what makes the Green Filter appear green?
___________________________________________________________________.
22
®
Page 29

012-02744K Introductory Optics System
Experiment 9: Two-Slit Interference
EQUIPMENT NEEDED:
-Optics Bench -Light Source
-Diffraction Plate -Diffraction Scale
-Ray Table Base -Slit Mask
Introduction
What is light? There may be no complete answer to this question. However, in certain circumstances,
light behaves exactly as if it were a wave. In fact, in this experiment you will measure the wavelength of
light, and see how that wavelength varies with color.
In two-slit interference, light falls on an opaque screen with two closely spaced, narrow slits. As
Huygen’s principle tells us, each slit acts as a new source of light. Since the slits are illuminated by the
same wave front, these sources are in phase. Where the wave fronts from the two sources overlap, an
interference pattern is formed.
Diffraction Scale
Figure 9.1 Equipment Setup
Slot
Slit Mask
Ray Table
Base
A
L
P
E
N
IO
T
C
D
A
R
F
C
IF
D
B
A
. . . ..
. . . . ..
. .
. . . .
. . .
. . . . .. . .
. . . ..
..
.. . . . .
. . . . ..
. . . . .. . . . .
. . . .
. . . .
. . . .
. . . .. . .
. . . .
. .
.. . .
. . . . . ..
. .
.
. . .
. .
. . .
. . . . ..
. . . .
.. . . . .
. . . . ..
. . . . .
. . . .
F
R
A
G
C
T
IO
F
N
P
L
A
T
E
Diffraction
Plate
Window
E
T
.
.
.
.
.
.
.
.
.
.
.
.
.
.
.
.
.
.
.
.
.
.
.
.
.
.
.
.
.
.
.
.
.
.
.
.
.
.
.
.
.
.
.
.
.
.
.
.
.
.
.
.
.
.
.
.
.
.
.
.
.
.
.
.
.
.
.
.
.
.
.
.
.
.
.
.
.
.
.
.
.
.
.
.
.
.
.
.
.
.
.
.
.
.
.
.
.
.
.
.
.
.
.
.
.
.
.
.
.
.
.
.
.
.
.
.
.
.
.
.
.
.
.
.
.
.
.
.
.
.
.
.
.
.
.
.
.
.
.
.
.
.
.
.
.
.
.
.
.
.
.
.
.
.
.
.
.
.
.
.
.
.
.
.
.
.
.
.
.
.
.
.
.
.
.
.
.
.
.
.
..
.
.
.
.
.
.
.
.
.
.
.
.
.
.
.
.
.
.
.
.
.
.
.
.
.
.
.
.
.
.
.
.
.
.
.
.
.
.
.
.
.
.
.
.
.
.
.
.
.
.
.
.
.
..
.
.
.
.
.
.
.
.
.
.
.
.
.
.
.
J
I H
D
IF
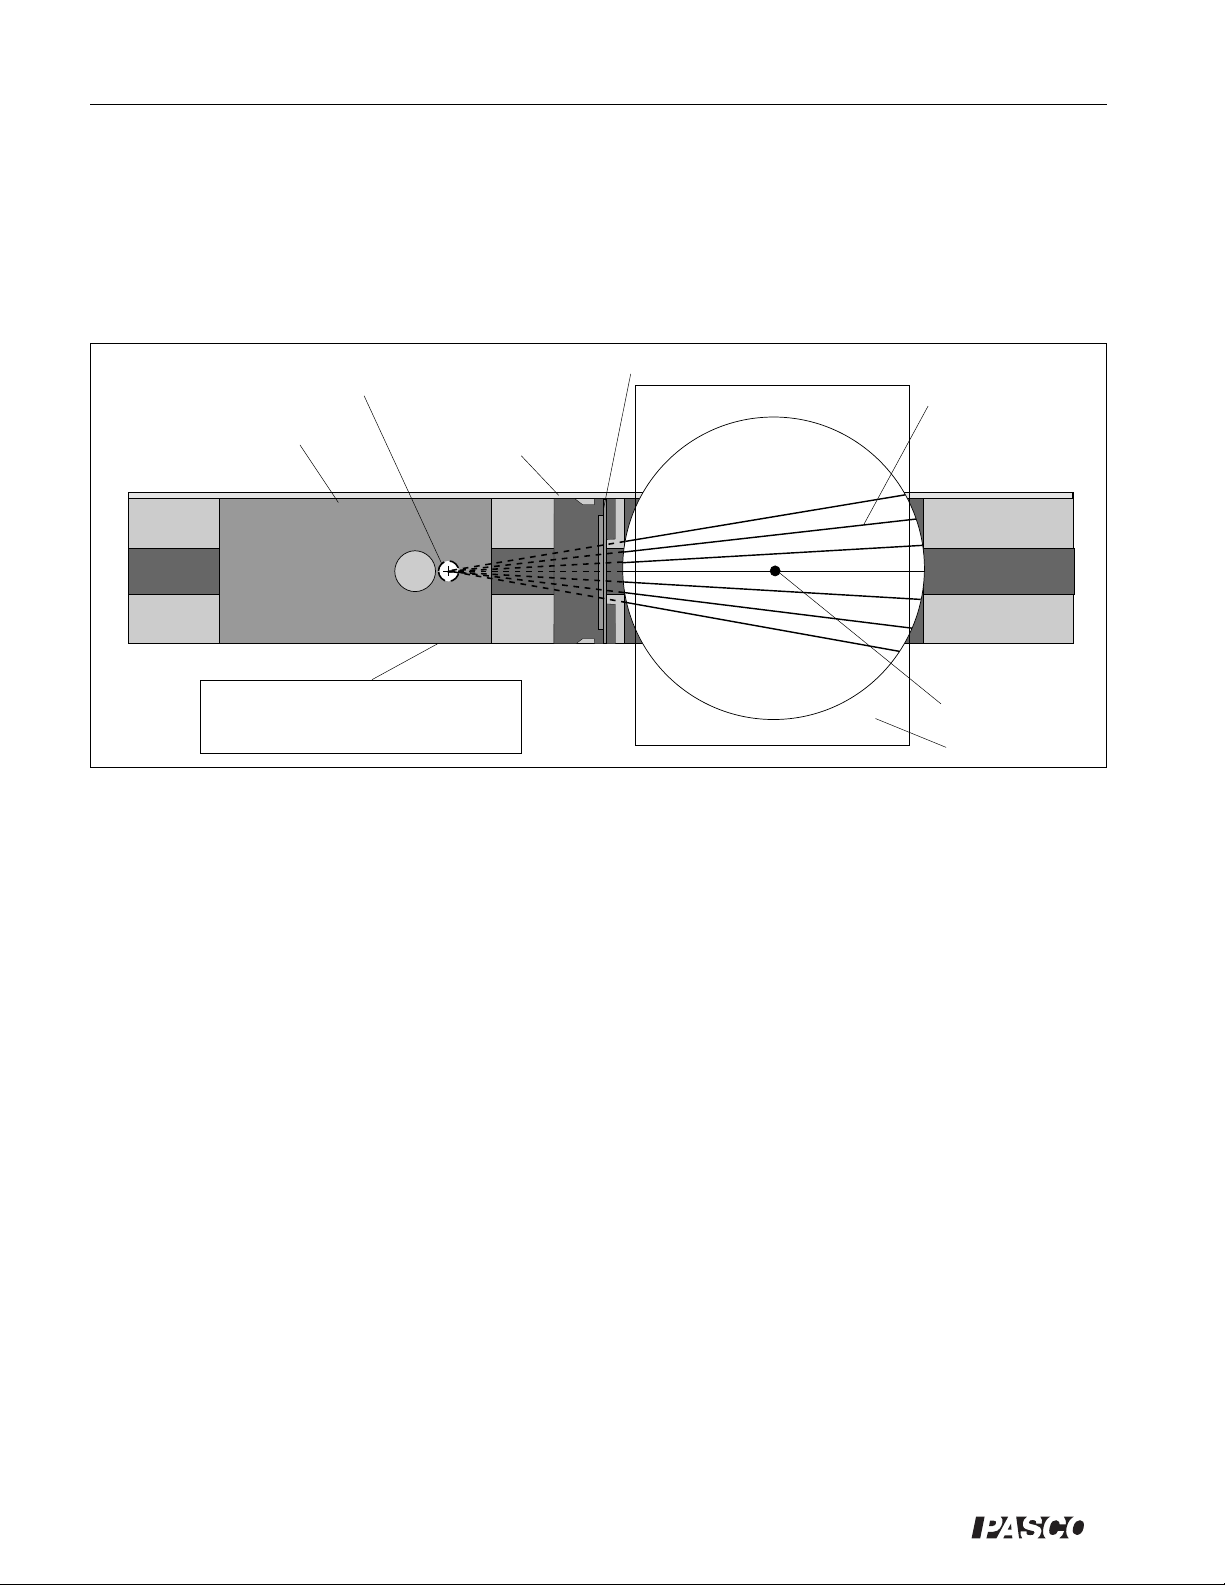
Procedure
Set up the Equipment as shown in Figure 9.1. The Slit Mask should be centered on the Component
Holder. While looking through the Slit Mask, adjust the position of the Diffraction Scale so you can see
the filament of the Light Source through the slot in the Diffraction Scale.
n
2
x
1
0
1
2
n
Diffraction Scale
nλ
B
θ
C
θ
A
L
Retina of your
n
2
1
zeroth
0
maxima
1
2
nth
n
maxima
P
Eye
Diffraction Plate
Figure 9.2 Geometry of Two-Slit Interference
®
23
Page 30

Introductory Optics System 012-02744K
Attach the Diffraction Plate to the other side of the Component Holder, as shown. Center pattern D, with the
slits vertical, in the aperture of the Slit Mask. Look through the slits. By centering your eye so that you look
through both the slits and the window of the Diffraction Plate, you should be able to see clearly both the
interference pattern and the illuminated scale on the Diffraction Scale.
Table 9.1 Data and Calculations
Data Calculations
Color n AB X L sin (arctan X/L) = λ
Red
Green
Blue
➤➤
➤NOTE:
➤➤
In this experiment, you look through the narrow slits at the light source, and the diffraction
split
( )
spacing
AB
()
n
pattern is formed directly on the retina of your eye. You then see this diffraction pattern superimposed
on your view of the illuminated diffraction scale. The geometry is therefore slightly more complicated
than it would be if the pattern were projected onto a screen, as in most textbook examples. (A very
strong light source, such as a laser, is required in order to project a sharp image of a diffraction pattern
onto a screen.)
The essential geometry of the experiment is shown in Figure 9.2. At the zeroth maxima, light rays from
slits A and B have traveled the same distance from the slits to your eye, so they are in phase and interfere
constructively on your retina. At the first order maxima (to the left of the viewer) light from slit B has
traveled one wavelength farther than light from slit A, so the rays are again in phase, and constructive
interference occurs at this position as well.
At the nth order maxima, the light from slit B has traveled n wavelengths farther than the light from slit
A, so again, constructive interference occurs. In the diagram, the line AC is constructed perpendicular to
the line PB. Since the slits are very close together (in the experiment, not the diagram), lines AP and BP
are nearly parallel. Therefore, to a very close approximation, AP = CP. This means that, for constructive
interference to occur at P, it must be true that BC = nλ.
From right triangle ACB, it can be seen that BC = AB sin θ, where A is the distance between the two slits
on the Diffraction Plate. Therefore, AB sin θ = nλ. (The spacing between the slits, AB, is listed in the
Equipment section of this manual.) Therefore, you need only measure the value of θ for a particular
value of n to determine the wavelength of light.
To measure θ, notice that the dotted lines in the illustration show a projection of the interference pattern onto the
Diffraction Scale (as it appears when looking through the slits). Notice that
θ´ = arctan X/L. It can also be shown from the diagram that, if BP is parallel to AP as we have already
assumed, then θ´ = θ. Therefore, θ = arctan X/L; and AB sin (arctan X/L) = nλ.
Looking through the pair of slits (pattern D) at the Light Source filament, make measurements to fill in Table
9.1. Alternately place the Red, Green, and Blue color filters over the Light Source aperture to make the measurements for the different colors of light. If you have time, make measurements with the other two-slit patterns
as well (patterns E and F on the Diffraction Plate). Perform the calculations shown to determine the wavelength
of Red, Green, and Blue Light.
Additional Questions
➀ Assume, in the diagram showing the geometry of the experiment, that AP and BP are parallel.
Show that θ = θ´.
➁ Suppose the space between the slits was smaller than the wavelength of light you were trying to measure.
How many orders of maxima would you expect to see?
24
®
Page 31

012-02744K Introductory Optics System
Experiment 10: Polarization
EQUIPMENT NEEDED:
-Optical Bench -Light Source
-Polarizers (2) -Component Holders (3)
-Ray Table and Base -Ray Table Component Holder
-Cylindrical Lens -Crossed Arrow Target
-Slit Plate -Slit Mask.
_
E (Electric Field)
90˚
(a) (b) (c)
_
n (direction of
propagation)
90˚
90˚
_
B (magnetic Field)
__
E
__
__
__
E
__
E
__
E
n
__
E
__
n
__
E
__
E
__
E
__
E
E
__
E
__
__
E
E
__
n
__
E
(d)
Introduction
Light is a transverse wave; that is, the electromagnetic disturbances that compose light occur in a direction perpendicular to the direction of propagation (see Figure 10.1a). Polarization, for light, refers to the
orientation of the electric field in the electromagnetic disturbance. The magnetic field is always perpendicular to the electric field. Figure 10.1b and 10.1c show vertical and horizontal polarization, respectively. Figure 10.1d depicts random polarization, which occurs when the direction of polarization
changes rapidly with time, as it does in the light from most incandescent light sources.
Your optics equipment includes two Polarizers, which transmit only light that is plane polarized along
the plane defined by the 0 and 180 degree marks on the Polarizer scales. Light that is polarized along
any other plane is absorbed by the polaroid material. Therefore, if randomly polarized light enters the
Polarizer, the light that passes through is plane polarized. In this experiment, you will use the Polarizers
to investigate the phenomena of polarized light.
Figure 10.1 Polarization of Light
Crossed Arrow Target
Polarizer A
Polarizer B
Figure 10.2 Equipment Setup
®
25
Page 32

Introductory Optics System 012-02744K
Figure 10.3 Equipment Setup
Procedure
Set up the equipment as shown in Figure 10.2. Turn the Light Source on and view the Crossed Arrow Target
with both Polarizers removed. Replace Polarizer A on the Component Holder. Rotate the Polarizer while
viewing the target.
➀ Does the target seem as bright when looking through the Polarizer as when looking directly at the target? Why?
_______________________________________________________________________
_______________________________________________________________________.
➁ Is the light from the Light Source plane polarized? How can you tell?__________________
____________________________________________________________________.
Align Polarizer A so it transmits only vertically polarized light. Replace Polarizer B on the other Component
Holder. Looking through both polarizers, rotate Polarizer B.
➂ For what angles of Polarizer B is a maximum of light transmitted? For what angles is a minimum of light
transmitted?_________________________________________________
____________________________________________________________________.
Polarization by Reflection: Brewster’s Angle
Set up the equipment as shown in Figure 10.3. Adjust the components so a single ray of light passes
through the center of the Ray Table. Notice the rays that are produced as the incident ray is reflected and
refracted at the flat surface of the Cylindrical Lens. (The room must be reasonably dark to see the
reflected ray.)
Rotate the Ray Table until the angle between the reflected and refracted rays is 90°. Arrange the Ray
Table Component Holder so it is in line with the reflected ray. Look through the Polarizer at the filament
of the light source (as seen reflected from the Cylindrical Lens), and rotate the Polarizer slowly through
all angles.
➀ Is the reflected light plane polarized? If so, at what angle from the vertical is the plane of polarization?
____________________________________________________________________
____________________________________________________________________.
Observe the reflected image for other angles of reflection.
➁ Is the light plane polarized when the reflected ray is not at an angle of 90° with respect to the refracted
ray? Explain. ____________________________________________________________________
____________________________________________________________________.
26
®
Page 33

012-02744K Introductory Optics System
(a) (b)
Experiment 11: Image Formation from Cylindrical Mirrors
EQUIPMENT NEEDED:
-Optics Bench -Light Source
-Ray Table and Base -Component Holder (2)
-Slit Plate -Ray Optics Mirror
-Parallel Ray Lens.
Parallel Ray
Lens
F.L.
Optical Axis of
Mirror
Figure 11.1 Equipment Setup
Introduction
Ray tracing techniques can be used to locate the image formed by reflection from any mirror of known
shape. Simply think of the object as a collection of point sources of light. For a given point source, light
rays diverging from it are reflected from the mirror according to the Law of Reflection. If the reflected
rays intersect at a point, a real image is formed at that point. If the reflected rays do not intersect, but
would if they were extended back beyond the mirror, a virtual image is formed which appears to be
located at the point where the extended rays cross.
In this experiment, you will use the Ray Table to study the properties of image formation from cylindrical surfaces. The properties you will observe have important analogs in image formation from spherical
mirrors.
Procedure
Set up the equipment as shown in Figure 11.1. Position the Ray Optics Mirror on the Ray Table so the rays are
all reflected from the concave surface of the mirror.
Focal Point
Adjust the position of the Parallel Ray Lens to obtain parallel rays on the Ray Table. Adjust the mirror on the
Ray Table so the incident rays are parallel to the optical axis of the mirror.
➀ Measure F.L., the focal length of the concave cylindrical mirror.
F.L. = _______________________________________.
➁ Use ray tracing techniques to measure the focal length of
the convex cylindrical mirror. (Check your textbook if
you have doubts about the sign conventions.)
F.L. = _______________________________________.
Position the Light Source and the Parallel Ray Lens so the
rays cross at a point on the Ray Table, as shown in Figure
11.2a. (A blank, white sheet of paper placed over the Ray
Table will help to see the rays.) Since rays diverge from
this point of intersection, it can be used as an object.
®
27
Figure 11.2 Virtual Object
Page 34

Introductory Optics System 012-02744K
Place the convex side of the Ray Optics Mirror so that its focal point is coincident with the point where
the rays cross, as in Figure 11.2b. Of course, with the mirror in this position, the rays are reflected and
don’t actually cross. The point where the rays did cross, though, can be used as a virtual object.
➂ Describe the reflected rays when a virtual object is positioned at the focal point of the convex mirror.
Image Location
Remove the Parallel Ray Lens. Slide the Slit Plate, Ray Table, and mirror along the Optics Bench, as far
as possible from the Light Source. Orient the mirror as in Figure 11.1.
➀ Where is the image of the light bulb filament formed? ______________________________.
➁ How is image location affected as you move the mirror closer to the filament? ____________
_________________________________________________________________________.
➂ Is an image still formed when the distance between the filament and mirror is less than the focal length of
the mirror? If so, what kind? _____________________________________.
➃ Using the convex side of the mirror, can you obtain a real image of the Light Source filament? If so,
how? _______________________________________________________________.
Magnification and Inversion
In the plane of the Ray Table, the filament of the Light Source acts as a point source. To observe magnification
and inversion, an extended source is needed. As shown in Figure 11.3, two positions of the Light Source
filament can be used to define an imaginary arrow, of height ho.
Position the filament of the Light Source first at the tail of the imaginary arrow, then at the tip. For each position,
locate the image. The magnification is determined by dividing h
, the height of the image arrow, by ho, the
i
height of the object arrow.
Measure the magnification for several different distances between the light source and the mirror.
➀ Qualitatively, how does the degree of magnification depend on the distance between the object and the mirror?
____________________________________________________________.
➁ Is the image inverted? Does image inversion depend on object location? ____________________.
________________________________________________________________________________.
Cylindrical Aberration
Cylindrical aberration is the distortion of the reflected image caused by imperfect focusing of the reflected rays. Place a blank sheet of paper over the Ray Table. Arrange the equipment so all the light
rays are reflected from the concave surface of the mirror. Block all but two rays and mark the point of
intersection. Do this for several pairs of rays.
➀ Are all the rays focused at precisely the same point?________________________________.
➁ How would you alter the shape of the cylindrical lens to reduce the amount of cylindrical aberra-
tion?________________________________________________________________.
For each position of the light source
Two positions of the light
source filament define an
imaginary arrow.
Slit Plate
filament, an image is formed, defining
the image of the imaginary arrow.
h
i
h
0
Figure 11.3 Magnification and Inversion
28
®
Page 35

012-02744K Introductory Optics System
Experiment 12: Image Formation from Spherical Mirrors
EQUIPMENT NEEDED:
-Optics Bench, Light Source -Component Holder (3)
-50 mm F. L. Spherical Mirror -Viewing Screen
-Crossed Arrow Target.
Spherical Mirror
Introduction
Figure 12.1 Equipment Setup
If you cut a thin strip along any diameter of a spherical mirror, the result is a close approximation to a
thin cylindrical mirror. With this in mind, it's not surprising that images formed with spherical mirrors
exhibit many of the same properties as those formed with cylindrical mirrors. In this experiment, you
will investigate some of these properties.
Procedure
Focal Length
Set up the equipment as shown in Figure 12.1, with the concave side of the mirror facing the Light
Source. The Viewing Screen should cover only half the hole in the Component Holder so that light from
the filament reaches the mirror.
To verify the focal length of the mirror, position the mirror on the optical bench as far from the Crossed
Arrow Target as possible. Vary the position of the Viewing Screen to find where the image of the target
is focused.
➀ What is your measured focal length for the concave spherical mirror?
F.L. = ________________________________________________.
➁ How might you determine the focal length more accurately? _______________________.
Image Location, Magnification, and Inversion
In Experiment 7, you tested the validity of the Fundamental Lens Equation: 1/do + 1/di = 1/f, for which
the magnification of the image is given by the equation: m = -di/do.
In this experiment you will test the validity of this same equation for image formation in a spherical
mirror.
Set the distance between the concave mirror and the Crossed Arrow Target to the values shown in Table
12.1. At each position, place the Viewing Screen so the image of the target is in sharp focus. Use your
data to fill in Table 12.1. Perform the calculations shown in the table to determine if the Fundamental
Lens Equation is also valid for real images formed from a spherical mirror.
➂ Are your results in complete agreement with the Fundamental Lens Equation? If not, to what do you
attribute the discrepancies? _______________________________________.
®
29
Page 36

Introductory Optics System 012-02744K
Virtual Images
In the previous part of this
experiment, you tested the
Fundamental Lens Equation
only for the concave mirror,
and only for those cases in
which a real image was focused
between the object and the
mirror. However, when an
object is placed between a
concave mirror and its focal
point, a virtual image is formed.
Virtual images can also be
formed using a convex spherical mirror.
In the Appendix of this manual,
read the section titled “Locating
Virtual Images”. Construct a
table similar to Table 12.1 and
Data Calculations
(mm) d
d
o
500
450
400
350
300
250
200
150
100
75
50
i
Table 12.1
h
i
1/di + 1/d
1/f hi/ho-di/d
o
use the Image Locators to
collect your data. Remember, for a virtual image, d
is negative.
i
➀ Are your results compatible with the Fundamental Lens Equation? If not, to what do you attribute the
difference? _________________________________________________.
Repeat the procedure with the convex side of the Spherical Mirror.
➁ Does the Fundamental Lens Equation hold for images formed by convex spherical mir-
rors?______________________________________________________________.
o
Spherical Aberration
Adjust the position of the Light Source and Crossed Arrow Target so the image of the target on the screen
is reasonably large and as sharp as possible.
➀ Is the focus of the image sharpest at its center or at its edges? (This is a subtle effect which is easier to
observe in a darkened room.) __________________________________________.
Place the Variable Aperture on the Component Holder as shown in Figure 12.2. The bottom of the V
formed by the Aperture plates should be aligned with the notch in the top of the Component Holder.
➁ Vary the size of the aperture. How does this affect
the focus of the image? ____________________
______________________________________.
➂ Explain your observations in terms of spherical
Variable
Aperture
Spherical
Mirror
aberration. ______________________________
_______________________________________.
➃ What aperture size would give the best possible focus
of the image? Why is this size aperture impractical?
_________________________________________
______________________________________.
30
Figure 12.2 Using the Variable Aperture
®
Page 37

012-02744K Introductory Optics System
Experiment 13: Image Formation with Cylindrical Lenses
EQUIPMENT NEEDED:
-Optics Bench -Light Source
-Ray Table and Base -Component Holder (2)
-Slit Plate -Cylindrical Lens
-Parallel Ray Lens -Slit Mask
Introduction
You have investigated image formation through reflection. The principles at work in image formation
through refraction are analogous. Similar ray tracing techniques can be used to determine the form and
location of the image. The important differences are (1) the Law of Refraction replaces the Law of
Reflection in determining the change in direction of the incident rays; and (2) the bending of the rays
takes place at two surfaces, since the light passes into and then out of the lens.
In this experiment, you will use the Ray Table to study the properties of image formation with cylindrical
lenses. The properties you will observe have important analogs in image formation with spherical
lenses.
Procedure
Set up the equipment as shown in Figure 13.1. Position the Cylindrical Lens on the Ray Table so the rays are
all incident on the flat surface of the lens.
Focal Point
Parallel Ray
Lens
F.L.
Figure 13.1 Equipment Setup
1
f
1
F.L.
2
f
2
Adjust the position of the Parallel Ray Lens to obtain parallel rays on the Ray Table. Adjust the Cylindrical
Lens so its flat surface is perpendicular to the incident rays and so the central ray passes through the lens
undeflected.
➀ Measure F.L.
F.L.
= __________________________________.
1
F.L.
= __________________________________.
2
and F.L.2. (see Figure 13.1).
1
Remove the Parallel Ray Lens and Component Holder. Remove the Slit Mask from its Component Holder. Set
the Holder aside and replace the Slit Mask on the front of the Light Source. Move the Ray Table and Base close
enough to the Light Source so the filament of the Light Source is a distance f
from the curved side of the
1
Cylindrical Lens
➁ Describe the refracted rays.___________________________________________________.
➂ Turn the Cylindrical Lens around and place it on the Ray Table so that its straight side is a distance f
from the
2
filaments (you may need to move the Ray Table and Base closer to the Light Source).
Describe the refracted rays. __________________________________________________.
®
31
Page 38

Introductory Optics System 012-02744K
Why is one focal length shorter than the other? (Hint: consider the refraction of the light rays at both
surfaces of the lens.)____________________________________________________.
Image Location
Remove the Slit Mask from the front of the Light Source. Move the Ray Table and Base so it is as far
from the Light Source as possible. Set the Cylindrical Lens on the Ray Table with the straight side toward
the Light Source.
➀ Where is the image formed? ___________________________________________________.
➁ What happens to the location of the image as you move the Light Source closer?
_____________________________________________________________________.
➂ Is an image still formed when the Light Source is closer than the focal length of the lens? If so, what
kind? ______________________________________________________________.
Magnification and Inversion
In the plane of the Ray Table, the filament of the Light Source acts as a point source. To observe magnification and inversion, an extended source is needed. As shown below, two positions of the Light
Source filament can be used to define an imaginary arrow, of height h
.
o
Position the filament of the Light Source first at the tail of the imaginary arrow, then at the tip. At each
position, locate the image of the filament. The height of the image arrow, h
, divided by the height of the
i
object arrow, ho, is the magnification of the image.
Measure the magnification for several different distances between the Light Source and the lens.
➀ Qualitatively, how does the degree of magnification depend on the distance between the object and the
lens?________________________________________________________________.
➁ Is the image inverted? Is it inverted for all object loca-
tions?______________________________________________________________________.
Cylindrical Aberration
Cylindrical aberration is the distortion of the image caused by imperfect focusing of the refracted rays.
Place a blank sheet of paper over the Ray Table. Arrange the equipment as in Figure 13.1 so all the light
rays are refracted by the Cylindrical Lens. Use the Slit Mask to block all but two rays. Do this for several
pairs of rays.
➀ Are all the rays focused at precisely the same point? ________________________________.
➁ How would you alter the shape of the lens to reduce the amount of cylindrical aberration?
_____________________________________________________________________________.
Two positions of the light
source filament define an
imaginary arrow.
Slit Plate
For each position of the filament,
an image is formed, defining the
image of the imaginary arrow.
h
i
h
o
Figure 13.2 Magnification and Inversion
32
®
Page 39

012-02744K Introductory Optics System
Experiment 14: Spherical Lenses—Spherical and Chro-
matic Aberration, Aperture Size, and Depth of Field
EQUIPMENT NEEDED:
-Optics Bench -Light Source
-75 mm Focal Length Convex Lens -Variable Aperture
-Crossed Arrow Target -Viewing Screen
-Component Holders (3)
Crossed Arrow Target
Variable Aperture
75 mm Lens
Viewing Screen
Introduction
No matter how perfectly a spherical lens is formed, there will always be some degree of image distortion.
One source of distortion, spherical aberration, could be eliminated by changing the shape of the lens
(from spherical to paraboloid). As you will see in this experiment, however, there are simpler ways of
reducing, though not eliminating, spherical aberration.
Chromatic aberration arises because lens materials have slightly different indexes of refraction for
different colors (wavelengths) of light. Because of this, incident white light is separated by a lens into its
constituent colors, and different colored images are formed at slightly different locations. Chromatic
aberration can be corrected only with the use of compound lenses in which two or more lenses of
different material and shape are combined.
Procedure
Set up the equipment as shown in Figure 14.1. Begin with the Variable Aperture fully open. Vary the
distance between the Lens and Viewing Screen until an image of the Crossed Arrow Target is focused on
the screen.
Spherical Aberration
Slowly close the Variable Aperture. Be sure that the V formed by the two aperture plates remains
centered on the notch at the top of the Component Holder. Observe the image of the Crossed Arrow
Target on the screen.
Figure 14.1 Equipment Setup
➀ How is the focus of the image effected by the size of the aperture? ________________________
______________________________________________________________________________.
➁ What size aperture would give the best possible image focus? Why is this aperture size not practical?
_________________________________________________________________________.
®
33
Page 40

Introductory Optics System 012-02744K
Depth of Field
Viewing Screen
Depth of Field
Crossed Arrow
Target
Figure 14.2 Depth of Field
Lens
Variable
Aperture
In addition to spherical aberration, aperture size has an important effect on another variable of image
focusing; depth of field. Depth of field is a measure of how much the distance between the lens and
screen can be varied while still retaining a well focused image (see Figure 14.2).
To investigate this phenomenon, begin with the Variable Aperture fully open. Measure the depth of
field. Now vary the size of the aperture, measuring the depth of field for each size.
➀ How does depth of field depend on aperture size? __________________________________
__________________________________________________________________________.
➁ Why is it not possible to have a depth of field that is infinitely long? ___________________
__________________________________________________________________________.
With the aperture size very small (less than 1 mm), remove the lens from the Component Holder.
➂ Is an image of the Crossed Arrow Target still visible on the screen? ____________________
__________________________________________________________________________.
➃ How do variations in the size of the aperture affect the focus of the image? ______________
__________________________________________________________________________.
➄ How does varying the distance between the Variable Aperture and the Viewing Screen affect the magni-
fication of the image? ________________________________________________.
➅ Why does a very small aperture allow formation of an image without using the lens? (Hint: consider
the role played by the lens in focusing the diverging rays from a point object.)
Chromatic Aberration
Replace the lens and remove the Crossed Arrow Target from the Light Source. Using a small aperture
size (2-3 mm), focus the filament of the Light Source onto the screen. Slide the aperture plates slowly to
one side, away from the optical axis of the lens, as shown below. Do not change the size of the aperture.
Notice the color separation in the image of the filament as the aperture gets sufficiently far from the
optical axis of the lens.
➀ Why is chromatic aberration more apparent when the aperture is far from the optical axis of the lens?
__________________________________________________________________.
Variable Aperture Displaced
From The Optical Axis
Aperture open 2-3 mm
Figure 14.3 Chromatic Aberration
Lens
34
Viewing Screen
®
Page 41

012-02744K Introductory Optics System
.
.
.
.
.
.
.
.
.
.
.
.
.
.
.
.
.
.
.
.
.
.
.
.
.
.
.
.
.
.
.
.
.
.
.
.
.
.
.
.
.
.
.
.
.
.
.
.
..
.
.
.
.
.
.
.
.
.
.
.
..
.
.
.
.
.
.
.
.
.
.
.
.
.
.
.
.
.
.
.
.
.
.
.
.
.
.
.
.
.
.
.
.
.
.
.
.
.
.
.
.
.
.
.
.
.
.
.
.
.
.
.
.
..
.
.
.
.
.
.
.
.
.
.
.
.
..
.
.
.
.
..........
......
....
.
.........
....
.......
.
.........
....
....
....
..........
.......
....
..
........
......
....
.
.........
....
.......
.
..
........
......
....
.
.........
....
....
....
.........
....
.......
.
.........
....
....
....
..........
......
.
....
......
....
......
....
.
D
IF
F
R
A
C
T
I
O
N
P
L
A
T
E
A
B
C
D
E
D
IF
F
R
A
C
T
IO
N
P
L
A
T
E
J
I
H
G
F
Experiment 15: The Diffraction Grating
EQUIPMENT NEEDED:
-Optics Bench -Light Source
-Ray Table Base -Component Holder
-Diffraction Scale -Diffraction Plate
-Diffraction Grating -Slit Mask
-Color Filter (any color). Perform in a well lighted room.
Introduction
Diffraction gratings are used to make very accurate measurements of the wavelength of light. In theory,
they function much the same as two slit apertures (see Experiment 9). However, a diffraction grating has
many slits, rather than two, and the slits are very closely spaced. By using closely spaced slits, the light
is diffracted to large angles, and measurements can be made more accurately. In spreading out the
available light to large angles, however, brightness is lost. By using many slits, many sources of light are
provided, and brightness is preserved.
Diffraction Scale
Figure 15.1 Equipment Setup
Slot
Slit Mask
Ray Table
Base
Diffraction
Plate
Window
In this experiment you will use a diffraction grating to determine the range of wavelengths for each of
the colors in the visible spectrum.
Procedure
Arrange the equipment as shown in Figure 15.1. When looking through the Diffraction Plate window,
the filament of the Light Source must be directly visible through the slot in the Diffraction Plate. Look
through each of the double slit patterns (Patterns D, E, and F) of the Diffraction Plate at the filament of
the Light Source. Qualitatively, compare the spacing of the interference maxima for the different patterns.
➤NOTE: You may find that a blue/green color filter placed behind the Slit Mask will make it easier
to distinguish the details of the diffraction patterns.
➀ How does the spacing of the maxima relate to the spacing of the slits on the Diffraction Plate (compare
patterns of equal slit width, but different slit spacing)?
__________________________________________________________.
➁ Look through the 10-slit pattern (Pattern G) at the filament. What effect does the larger number of slits
have on the diffraction pattern?_________________________________.
®
35
Page 42

Introductory Optics System 012-02744K
Table 15.1
Data Calculations
Color A L X
Violet
Blue
Green
Yellow
Orange
Red
Color Image
seen on
Diffraction Scale
θ
X2 green
(X
yellow)
1
X1 green
blue)
(X
2
Diffraction
Scale
red
orange
yellow
green
blue
violet
violet
blue
green
yellow
orange
red
1
θ
L
Diffraction Grating
λλ
X
2
λ = A sin θ = A sin (arctan )
λ
λλ
1
x
L
λλ
λ
λλ
2
A = Slit spacing = 6000 slits/cm
A
A = 0.00016cm
θ
red
Slits
orange
yellow
green
blue
violet
violet
blue
green
yellow
orange
red
1st
maximum
Zeroth
maximum
1st
maximum
Image on the
Retina of
your eye
Figure 15.2 Measurements with the Diffraction Grating
Remove the Diffraction Plate and the Slit Mask and replace them with the Diffraction Grating. Look through the grating and observe the first order spectrum.
➤NOTE: When looking through the Diffraction Grating avert your eye from looking
straight at the filament. Instead, look at a position on the Diffraction Scale about 4 to 5 cm
to the right or left of the slit in the scale.
Using Figure 15.2 to identify the variables, fill in the data in Table 15.1. Review Experiment
9, if necessary, to determine the calculations needed to calculate λ
and λ2, the range of
1
wavelengths corresponding to each particular color of light.
Compare your results with those of other students, or with textbook values.
➀ Are your results in complete agreement? Can you account for any discrepancies?
➁ What advantages are there in using wavelength rather than color to characterize visible light?
36
®
Page 43

012-02744K Introductory Optics System
.
.
.
.
.
.
.
.
.
.
.
.
.
.
.
.
.
.
.
.
.
.
.
.
.
.
.
.
.
.
.
.
.
.
.
.
.
.
.
.
.
.
.
.
.
.
.
.
.
.
.
.
.
.
.
.
.
.
.
.
.
.
.
.
.
.
.
.
.
.
.
.
.
.
.
.
.
.
.
.
.
.
.
.
.
.
.
.
.
.
.
.
.
.
.
.
.
.
.
.
.
.
.
.
.
.
.
.
.
.
.
.
.
.
.
.
.
.
.
.
.
.
.
.
.
.
.
.
.
.
.
.
.
.
.
.
.
.
.
.
.
.
.
.
.
.
.
.
.
.
.
.
.
.
.
.
.
.
.
.
.
.
.
.
.
.
.
.
.
.
.
.
.
.
.
.
.
.
.
.
.
.
.
.
.
.
.
.
.
.
.
.
.
.
.
.
.
.
.
.
.
.
.
.
.
.
.
.
.
.
.
.
.
.
.
.
.
.
.
.
.
.
.
.
.
.
.
.
.
.
.
.
.
.
.
.
.
.
.
.
.
.
.
.
.
.
.
.
.
.
.
.
.
.
.
.
.
.
.
.
.
.
.
.
.
.
.
.
.
.
.
.
.
.
.
.
.
.
.
.
.
.
.
.
.
.
.
.
.
.
.
.
.
.
.
.
.
.
.
.
.
.
.
.
.
.
.
.
.
.
.
.
.
.
.
.
.
.
.
.
.
.
.
.
.
.
.
.
.
.
.
.
.
.
.
.
.
.
.
.
.
.
.
.
.
.
.
.
.
.
.
.
.
.
.
.
.
.
.
.
.
.
.
.
.
.
.
.
.
.
.
.
.
.
.
.
.
.
.
.
.
.
.
.
.
.
.
D
IF
F
R
A
C
T
IO
N
P
L
A
T
E
A
B
C
D
E
D
IF
F
R
A
C
T
IO
N
P
L
A
T
E
J
I H
G
F
Experiment 16: Single Slit Diffraction
EQUIPMENT NEEDED:
-Optical Bench -Light Source
-Ray Table Base -Diffraction Scale
-Component Holder -Diffraction Plate
-Slit Mask -Color Filters (Red, Green, Blue/Green). Perform in a
well lighted room.
Introduction
If you look closely at a two slit interference pattern, you will notice that the intensity of the fringes varies.
This variation in intensity forms an interference pattern of its own that is independent of the number of
slits or the separation between the slits. In fact, two slits are not required to see this pattern; it can be seen
most clearly when light passes through a single, narrow slit.
Diffraction Scale
Figure 16.1 Equipment Setup
Slot
Slit Mask
Ray Table
Base
Diffraction
Plate
Window
In this experiment you will compare the single slit diffraction pattern with the double slit pattern, and
then use the single slit pattern to measure the wavelengths of red, green, and blue light.
Procedure
Setup the equipment as shown in Figure 16.1. Look through each of the three single slit apertures in the
Diffraction Plate (Patterns A, B, and C). Examine the diffraction patterns with and without color filters
over the aperture of the Light Source.
➀ How does the spacing between fringes vary with the width of the slit?______________________
______________________________________________________________________________.
Compare the single slit patterns with the double slit patterns.
➁ How does a double slit interference pattern differ from a single slit pattern? (Compare patterns of equal
slit widths, such as A
_____________________________________________________________________________.
®
vs D, or B vs E.)__________________________________________
37
Page 44

Introductory Optics System 012-02744K
1st
maximum
P
1st
minimum
x
θ
zeroth
maximum
L
Diffraction
Scale
__
AB = W
Diffraction Grating
λ
A
C
θ
B
θ
P
Retina of
your eye
Figure 16.2 Geometry of Single Slit Diffraction
The single slit pattern can be explained using Huygen’s theory. When a plane wave front
strikes the slit, each point on the slit acts as a point source of light. Figure 16.2 shows a point P,
far from the slit, where the distance AP = BP + λ. Since light from point A travels one wavelength farther than light from point B, the light from these two points is in phase at point P. But
light reaching point P from the points in between A and B will vary in phase through a full
360°. For any point from which light reaches point P at a particular phase, there will be a point
from which light arrives in the exact opposite phase. Because of this, there is complete cancellation at point P, and a minima (dark fringe) will be seen at that point.
1st
maximum
1st
minimum
Zeroth
maximum
1st
minimum
1st
maximum
In the Figure, point P is at an angle q from the center of the slit. We make the assumption that
point P is far enough away such that AP and BP are very nearly parallel (this is true in reality, if
not in the diagram). As shown in the diagram, angle ABC = θ , also. Therefore W sin θ = λ;
where W is the width of the slit (AB). A similar argument can be used to show that a minima
will be found at any angle such that W sin θ = nλ , where n is any integer.
Review the two slit interference experiment. Notice the similarity between the equations for
single and double slit patterns. To measure the wavelength of light, use the same techniques
you used in the two slit experiment (θ = arctan X/L). When measuring the distance to the
minima (x) for each color, place the Color Filter on the front of the Light Source. Use your
data to fill in Table 16.1, then perform the calculations shown to determine the wavelength of
Red, Green, and Blue Light.
➀ If the width of the slit, W, were less than the wavelength of the light being used, how many
maxima would you expect to see in the single slit diffraction pattern? Why?____________
________________________________________________________________________.
Table 16.1
Data Calculations
Color n W X L arctan X/L Wsin (arctan X/L) =
Red
n
λλ
λ
λλ
Green
Blue
38
®
Page 45

012-02744K Introductory Optics System
Experiment 17: General Diffraction
EQUIPMENT NEEDED:
-Optics Bench -Light Source
-Component Holders (2) -Variable Aperture
-Diffraction Plate -Slit Mask
-Color Filter (any color) -Black Construction Paper
-pin.
E
T
A
E
L
P
N
D
O
I
T
C
A
C
R
F
F
I
B
D
A
.
.
.
.
.
.
.
.
.
.
.
.
.
.
.
.
.
.
.
.
.
.
.
.
.
.
.
.
.
.
.
.
.
.
.
.
.
.
.
.
.
.
.
.
.
.
.
.
.
.
.
.
.
.
.
.
.
.
.
.
.
.
.
.
.
.
.
.
.
.
.
.
.
.
.
.
.
.
.
.
.
.
.
.
.
.
.
.
.
.
.
.
.
.
.
.
.
.
.
.
.
.
.
.
.
.
.
.
.
.
.
.
.
.
.
.
.
.
.
.
.
.
.
.
.
.
.
.
.
.
.
.
.
.
.
.
.
.
.
.
.
.
.
.
.
.
.
.
.
.
.
.
.
.
.
.
.
.
.
.
.
.
.
.
.
.
.
.
.
.
.
.
.
.
.
.
.
.
.
.
.
.
.
.
.
.
.
.
.
.
.
.
.
.
.
.
.
.
.
.
.
.
.
.
.
.
.
.
.
.
.
.
.
.
.
.
.
.
.
.
.
.
.
.
.
.
.
.
.
.
.
.
.
.
.
.
.
.
.
.
.
.
.
.
.
.
.
.
.
.
.
.
. . . . ..
. . .
.
. . . . . . . ..
. . . . .. . .
..
. . . . .. . .
. . . . .. . . . .
. . . . ..
. . . . . . . ..
. . . . .. . . .
. . . .. . .
.
.
. . .
. . . . . . .
. . . . .
. . . . .. . . . .
. . . . .. . .
. . . . .. . .
. . . . .
. . . . .. . . .
J
D
I
I
F
F
R
H
A
C
T
IO
G
N
P
L
F
A
T
E
Figure 17.1 Equipment Setup
Introduction
The simplest diffraction patterns are produced by narrow slits. However, any aperture, or collection of
apertures, will produce a diffraction pattern if the dimensions of the apertures are of the same order of
magnitude as the wavelength of visible light.
The diffraction pattern created by a particular aperture can be determined quantitatively using Huygen’s
principle. Simply treat each aperture as a collection of point sources of light (small, closely packed
points will give the best approximation of the diffraction pattern). At any position on your viewing
screen, determine the phase of the light contributed by each point on the aperture. Finally, use the
superposition principle to sum the contributions from all the points on the aperture.
Of course, you must perform this same calculation for each point on your viewing screen to determine
the complete diffraction pattern—a time consuming task. In this experiment the approach will be more
qualitative. You will use your knowledge of diffraction patterns formed by slits to understand the
patterns formed by more complicated apertures.
Procedure
Setup the equipment as shown in Figure 17.1. Begin with the Variable Aperture fully open. Looking
through the Diffraction Plate at the Light Source filament, examine the diffraction patterns formed by
Patterns H, I, and J.
While looking through Pattern H, slowly close the Variable Aperture. Repeat this with Patterns I and J.
➀ What effect does aperture size have on the clarity of the diffraction patterns?
➁ What affect does aperture size have on the brightness of the diffraction patterns?
Adjust the Variable Aperture to maximize the brightness and clarity of the pattern. Place a color filter
over the Light Source Aperture.
➂ In what way does the color filter simplify the diffraction patterns that are formed?
®
39
Page 46

Introductory Optics System 012-02744K
Crossed Slits
Examine the diffraction pattern formed by aperture H, the crossed slits. As you watch the
pattern, slowly rotate the Diffraction Plate so first one slit is vertical, then the other.
➀ Describe the diffraction pattern in terms of the patterns formed by each individual slit.
Random Array of Circular Apertures
Examine the diffraction pattern formed by aperture I, the random array of circular
apertures. The pattern is similar to that formed by diffraction through a single circular
aperture. To verify this, use a pin to poke a small hole in a piece of black construction
paper. Look at the Light Source filament through this hole. In the pattern formed by the
random array, the patterns from all the circular apertures are superposed, so the combined diffraction pattern is brighter.
In the random array, smaller circles are used than you can produce with a pin.
➀ What effect does the smaller diameter of the circles have on the diffraction pattern?
In observing single slit diffraction, you found that the narrower the slit, the greater the
separation between the fringes in the diffraction pattern. This is generally true. For any
aperture, diffraction effects are most pronounced in a direction parallel with the smallest
dimension of the aperture.
➁ Use the above generalization to explain the symmetry of the diffraction pattern formed
by a circular aperture.
Square Array of Circular Apertures
Examine the diffraction pattern formed by aperture J, the square array of circular apertures.
➀ How is this pattern similar to that formed by the random array? How is it different?
Each circular aperture in the array forms a circular diffraction pattern with maxima and
minima appearing at different radii. However, the regularity of the array causes there to
be interference between the patterns formed by the individual circles. This is analogous
to the way in which the double slit interference pattern creates maxima and minima that
are superimposed on the single slit patterns created by the individual slits.
➁ On a separate sheet of paper, draw the diffraction pattern you would expect if there were
no interference between the patterns from the different holes (as in the random array).
Clearly indicate the maxima and the minima.
➂ To understand the interference that takes place, consider the array of points as if it were
actually a collection of parallel slits, such as those shown in Figures 17.2a, b, and c.
Draw the diffraction patterns that would be created by each of these collections of
parallel slits. Clearly label the maxima and
minima.
➃ Your drawing from step 2 shows where the light
is diffracted to from each individual circular
aperture. To approximate the effect of interference between circular apertures, superimpose a
copy of one of your interference patterns from
step 3 over your drawing from step 2. Only
where maxima overlap, will there be maxima in
the combined pattern. Repeat this procedure for
each of your interference drawings.
40
(a) (b) (c)
Figure 17.2 Square Array Interference
®
Page 47

012-02744K Introductory Optics System
Experiment 18: Introduction to Optical Instruments
EQUIPMENT NEEDED:
-none
Introduction
The design of high quality optical instruments can be quite complex, involving compound lenses
and intricate lens coatings. But the complexity arises primarily from the need to reduce the
effects of spherical and chromatic aberration (see Experiment 14). Understanding the basic
principles of standard optical instruments is not complex. It requires only an understanding of
the Fundamental Lens Equation:
1/d
+ 1/di = 1/f;
o
for which the magnification of the image is given by the equation:
m = -d
i/do
.
In Experiments 19-22, you will use the above equations to investigate the workings of a Projector, a Magnifier, a Telescope, and a Compound Microscope. Before beginning, however, it is
useful to understand certain generalities that can be made with regard to these equations.
Procedure
Use the Fundamental Lens Equation to complete Table 18.1, on the following page. Show the
location (di) and magnification (m) of the image, and whether the image is real or virtual, inverted or uninverted. Notice that do is given in units of f. Your calculated value for di will
therefore also be in units of f.
After completing the table, use it to answer the following questions. In each question, assume
that f > 0 (as for a converging lens). A negative value for d
➀ For what range of d
(Remember: d
i
➁ For what range of do values is the image real and magnified?
values is the image virtual and magnified?
o
dof
= )
d
- f
o
indicates that the image is virtual.
i
➂ For what range of d
➃ For what range of d
®
values is the image real and reduced in size?
o
values can the image be focused onto a viewing screen?
o
41
Page 48

Introductory Optics System 012-02744K
Table 18.1: Object/Image Relationships
d
o
d
i
m Real/Virtual Inverted/Uninverted
Example f/16 -f/15 16/15 Virtual Uninverted
f/8
f/4
f/2
3f/4
7f/8
15f/16
f
17f/16
9f/8
5f/4
3f/2
7f/4
15f/8
31f/16
2f
33f/16
17f/8
9f/4
5f/2
11f/4
23f/8
3f
5f
10f
100f
42
®
Page 49

012-02744K Introductory Optics System
Experiment 19: The Projector
EQUIPMENT NEEDED:
-Optics Bench -Light Source
-75 mm Focal Length Convex Lens -150 mm Focal Length Convex Lens
-Variable Aperture -Crossed Arrow Target
-Viewing Screen -Component Holders (3).
Introduction
When an object is located between the focal point (f) and twice the focal point (2f) of a converging lens,
a real, inverted, magnified image is formed as shown in the diagram of Figure 19.1. If a viewing screen
is placed at the location of the image, the image will be focused onto the screen. In this case the lens
functions as a projector.
Crossed Arrow Target
Variable Aperture
Figure 19.1 Equipment Setup
2f
75 mm Lens
d
o
f
Viewing Screen
d
i
f
Procedure
Set up a projector as shown in Figure 19.1. Try both the 75 and 150 mm converging lenses.
➀ What happens to the image if d
Why or why not? _______________________________________________________
_____________________________________________________________________________.
➁ What happens to the image if d
Screen? Why or why not? ____________________________________________________
_____________________________________________________________________________.
➂ Are there practical limits to the degree of magnification of the image? If so, what are they?
_____________________________________________________________________________.
Is it possible, using a single lens, to project an image that is uninverted? ___________________
_____________________________________________________________________________.
➃ Can the image formed by a projector be viewed without using a viewing screen? If so, where must the
observer be? _______________________________________________________________
_____________________________________________________________________________.
®
is less than f? Can the image still be focused onto the Viewing Screen?
o
is greater than 2f? Can the image now be focused onto the Viewing
o
43
Page 50

Introductory Optics System 012-02744K
Notes
44
®
Page 51

012-02744K Introductory Optics System
Experiment 20: The Magnifier
EQUIPMENT NEEDED:
-Optics Bench -75 mm Focal Length Convex Lens
-150 mm Focal Length Convex Lens -Viewing Screen
-Component Holders (2)
d
d
Introduction
When an object is located between a converging lens and its focal point, a virtual, magnified, uninverted
image is formed. Since the image is not real, it can not be focused onto a screen. However, it can be
viewed directly by an observer.
Procedure
Set up a magnifier as shown in Figure 20.1 First try it with the 75 mm focal length lens, and then with
the 150 mm focal length lens. For each lens, adjust the distance between the object (the Viewing Screen)
and the lens so the magnification is a maximum and the image is clearly focused.
f
i
i
d
o
d
d
i
i
d
o
f
Figure 20.1 The Magnifier
Examine Table 18.1 from Experiment 18.
➀ Does the Fundamental Lens Equation place any
limit on the magnification, m, that a lens can
produce? ______________________________
______________________________________
_____________________________________.
➁ Looking through the lenses, which lens seems to
provide the greater magnification? __________
______________________________________
_____________________________________.
®
45
eye of the
observer
h
o
θ
eye
d
o
Figure 20.2 Angular Magnification
Page 52

Introductory Optics System 012-02744K
Using each of the lenses as a magnifier, it should be clear that the magnification provided by a
converging lens is not unlimited. This does not mean that the equation m = -d
is in error. This
i/do
equation does give the correct ratio between the image size and the object size. However, image
size is not the only important variable in determining the magnification of an optical system, such
as a magnifier. Equally important is the distance between the observer and the image he is looking
at. Just as a distant object appears smaller than the same object up close, an image viewed through
an optical system appears larger if the image is close than if it is farther away.
Figure 20.2 shows an object of height h
the retina of the observer is proportional to the angle θ
which the Fundamental Lens Equation holds), θ
There is an important limitation to the magnitude of θ
, a distance do from the observer. The size of the image on
o
eye
. For small angles, (the only angles for
eye
= ho/do.
. To see this, hold an object at arms length
eye
and move it slowly toward your eye (with one eye closed). There is a distance—called the near
point—at which the image begins to blur, because the rays entering your eye from the object are
too divergent for your eye to focus. The near point differs for different people, but the average is
approximately 25 cm. Therefore θ
= ho/25 cm, where θ
eye-max
is the maximum value of θ
eye-max
which the eye can focus an image.
When using a magnifier, or any optical system for that matter, the apparent size of the image
depends on the size and location of the image rather than on the size and location of the object, so
that θ
, the angular magnification for the magnifier, is equal to hi/di. From the Fundamental Lens
mag
Equation hi = mho = (-di/do) ho. Therefore, ignoring the minus sign,
θ
= ho/do, the same as without the magnifier.
mag
This result seems to imply that a magnifier doesn't produce any magnification. However, using a
magnifier, the object can be brought closer to the eye than the near point, and yet still be focused
by the eye. If the object is placed at the focal point of the magnifier for example, the equation θ
= ho/do becomes θ
= ho/f. Therefore, the magnifying power of a magnifier is a function of how
mag
much closer it allows the observer to be to the object. This, in turn, is a function of the focal length
of the magnifying lens.
The magnifying power of a lens (called the angular magnification) is calculated as
θ
mag/θeye-max
= 25 cm/f.
➂ Calculate the angular magnification for the 75 mm and 150 mm focal length lenses. Are your
calculated magnifications consistent with your answer to question 1? ____________
________________________________________________________________________
eye
for
mag
________________________________________________________________________.
➃ Would a converging lens with a 50 cm focal length be useful as a magnifier? Why or why not?
____________________________________________________________________
________________________________________________________________________.
46
®
Page 53

012-02744K Introductory Optics System
Experiment 21: The Telescope
EQUIPMENT NEEDED:
-Optics Bench -75 mm Focal Length Convex Lens
-150 mm Focal Length Convex Lens -Component Holders (2)
f
2
f
L
(150 mm Lens)
1
L
(75 mm Lens)
2
f
1
Line of sight
1
L
1
f
2
L
2
Introduction
Telescopes are used to obtain magnified images of distant objects. As you can see by looking at
Table 18.1 from Experiment 18, the image of a distant object when viewed through a single
converging lens will be focused nearly at the focal point of the lens. This image will be real,
inverted, and reduced in size. In fact, the greater the distance of the object (with respect to f), the
smaller the size of the image.
However, this reduced image is useful. By viewing this image through a second converging
lens—used as a magnifier—an enlarged image can be seen.
f1 + f2 = 225 mm
Figure 21.1 The Telescope
θ
h
0
1
f
1
f1,f
h
2
i
f
2
θ
2
θ
h
0
1
Figure 21.2 Telescope Magnification
®
47
Page 54

Introductory Optics System 012-02744K
Figure 21.1 shows the setup for a simple telescope. The objective lens, L1, creates a real, inverted
image. (You can barely see this image in the diagram. It's very small, just inside the focal point of
lens L
.) If the object is sufficiently far away, this image will be located approximately at f1, the
2
focal point of L1. The eyepiece, L2, then acts as a magnifier, creating a magnified, virtual image
which can be viewed by the observer. For maximum magnification, L
is positioned so the virtual
2
image is just slightly closer than its focal point, f2. Therefore, the distance between the objective
lens and the eyepiece of a telescope, when viewing distant objects, is approximately f
+ f2.
1
The angular magnification (see Experiment 20: The Magnifier) for a telescope can be approximated by assuming the lenses are exactly f
object as seen with the naked eye is proportional to the angle q
distance from the object to the telescope is large—much larger than is shown in the diagram— θ
+ f2 apart, as shown in Figure 21.2. The height of the
1
in the lower diagram. If the
1
1
= θ1´, to a good approximation. The ray shown in the upper diagram passes through the focal
point of the objective lens, comes out parallel to the optical axis of the telescope, and is therefore
refracted by the eyepiece through the focal point of the eyepiece. The angle θ2 is therefore proportional to h
, the height of the image seen by the observer.
i
Procedure
➀ Using Figure 21.2, calculate tan θ1 and tan θ2 as a function of the height of the image, hi, and the
focal lengths of the two lenses, f1 and f2.
tan θ
tan θ
Assume that θ
= tan θ1´ = ______________________________________________.
1
= ________________________________________________.
2
and θ2 are very small, and therefore equal to tan θ1 and tan θ2, respectively.
1
➁ Calculate the angular magnification of the telescope.
Angular Magnification = θ
= _______________________________________ ______.
2/θ1
Set up a telescope using the 75 mm and 150 mm focal length lenses; the distance between the
lenses should be approximately 225 mm. Using the 75 mm lens as the eyepiece, look at some
reasonably distant object. Adjust the distance between the lenses as needed to bring the object into
sharp focus.
To measure the magnification, look with one eye through the telescope, and with the other eye
look directly at the object. Compare the size of the two images. (If a meter stick is used as the
object, fairly accurate measurements of magnification can be made.)
➂ What is the magnification of the telescope when using the 75 mm lens as the eyepiece?
________________________________________________________________________
________________________________________________________________________.
➃ What is the magnification of the telescope when using the 150 mm lens as the eyepiece and the 75
mm lens as the objective lens?
________________________________________________________________________
________________________________________________________________________.
➄ Are your answers to questions 3 and 4 in keeping with your answer to question 2?
________________________________________________________________________
________________________________________________________________________.
48
®
Page 55

012-02744K Introductory Optics System
Experiment 22: The Compound Microscope
EQUIPMENT NEEDED:
-Optics Bench, Light Source -75 mm Focal Length Convex Lens
-150 mm Focal Length Convex Lens -Variable Aperture
-Component Holders (2) -Viewing Screen
do 150 mm
Introduction
A compound microscope uses two lenses to provide greater magnification of near objects than is
possible using a single lens as a magnifier. The setup is shown in Figure 22.1. The objective lens,
L1, functions as a projector. The object is placed just beyond the focal point of L1 so a real, magnified, inverted image is formed. The eyepiece, L2, functions as a magnifier. It forms an enlarged
virtual image of the real image projected by L1.
The real image that is projected by L
Fundamental Lens Equation. That image is in turn magnified by the eyepiece by a factor of 25 cm/f
(see Experiment 20: The Magnifier). The combined magnification is, therefore:
Object
f
L
1
(Objective
Lens)
f
1
d
o
1
L
1
d
i
L2 (Eyepiece)
Figure 22.1 The Compound Microscope
is magnified by an amount m = -di/do, as indicated by the
1
f
2
L
2
f
2
M = (-d
) (25 cm/f).
i/do
Procedure
Set up the microscope as shown in Figure 22.1. Use the 75 mm focal length lens as the objective
lens and the 150 mm focal length lens as the eyepiece. Begin with the objective lens approximately
150 mm away from the object (the Viewing Screen). Adjust the position of the eyepiece until you
see a clearly focused image of the Viewing Screen scale.
➀ Is the image magnified? How does the magnification compare to using the 75 mm focal length lens
alone, as a simple magnifier?
__________________________________________________________________________
__________________________________________________________________________.
While looking through the eyepiece, slowly move the objective lens closer to the Viewing Screen.
Adjust the position of the eyepiece as needed to retain the best possible focus.
®
49
Page 56

Introductory Optics System 012-02744K
➁ Why does the magnification increase as the objective lens is moved closer to the object?
________________________________________________________________________
________________________________________________________________________.
➂ What focusing problems develop as the magnification increases?
_____________________________________________________________________
_____________________________________________________________________.
Use the Variable Aperture to restrict the path of light to the central regions of the objective lens. Vary
the size of the aperture and observe the effects on focusing.
➃ What effect does the aperture have on focusing?
_____________________________________________________________________
_____________________________________________________________________.
➄ What effect does the aperture have on the brightness of the image?
_____________________________________________________________________
_____________________________________________________________________.
➅ What advantage would there be in using a 75 mm focal length lens as the eyepiece?
_____________________________________________________________________
_____________________________________________________________________.
50
®
Page 57

012-02744K Introductory Optics System
0
cm
1 2 3 4
2
0
cm
1 2 3 4
0
cm
1 2 3 4
2
0
cm
1 2 3 4
Appendix
Locating Virtual Images
Virtual images can be located using the Virtual Image
Locators. The following procedure is for locating
virtual images formed by a spherical mirror. The
procedure for lenses is similar though, of course, both
image locators are placed on the far side of the lens
from the observer.
Set up the equipment as shown in Figure A1. Notice
that the object must be between the mirror and its
focal point, f, in order for a virtual image to be
formed. Look through Locator A into the spherical
mirror. Move your head from side to side, and notice
how the image of the locator arrow moves.
Look through Locator A into the mirror, so your line
of sight is at a slight angle from the optical axis of the
mirror. The setup should look approximately as in
Figure A2a. Align a straightedge with the image of
the locator arrow as shown in Figure A2b. Now
adjust the position of Locator B until its arrow is
aligned with the straightedge in your line of sight. Do
this in two steps:
Locator B
50 mm Focal
Length Spherical
Figure A1 Setup for Locating Virtual Images
Mirror
f
d
i
d
o
Locator A
f
➀ Move the Locator laterally (perpendicular to the
optical axis of the bench) to remove half the distance between the straightedge and the arrow as
shown in Figure A2b, then;
➁ Move the Locator longitudinally (sliding the Com-
ponent Holder along the optical axis of the bench)
to complete the alignment as in A2c.
Locator B
Locator A
Check to be sure that the image of the arrow of
Locator A is aligned with the straightedge, and the
straightedge is aligned with the arrow of Locator B.
Now move the straightedge to the other side of the
arrow of Locator A and repeat the process. Continue
changing the straightedge from side to side and
aligning the locator arrows until the image of the
Locator B
Straightedge
Locator A
(a)
(b)
(c)
Figure A2 Locating a Virtual Image
®
51
Page 58

Introductory Optics System 012-02744K
arrow of Locator A and the arrow of Locator B remain
aligned in your line of sight as you move your head
from side to side. When this is the case, the arrow of
Locator B is in the apparent position of the virtual
image of the arrow of Locator A.
Maintenance
➀ If at any time the Light Source fails to come on,
remove the top cover of the Light Source by removing the four screws as shown in Figure A3,
and replace the light bulb. If problems persist,
contact PASCO scientific.
➤➤
➤NOTE: The light bulb should be replaced
➤➤
only with the following replacement part:
Light Bulb: #211-2 (Available at automotive
stores, or from PASCO: part # 526-016.)
➁ To avoid scratching component surfaces, clean
lenses and mirrors only with lens tissue—lens tissue can be purchased at any camera supply store.
Remove screws (4) to lift off cover
Figure A3 Light Source
➂ Care should be taken not to scratch or abuse the
surface of the magnetic pads. Should the surfaces
become dirty, use only soapy water or rubbing alcohol for cleaning. Other solvents may dissolve
the magnetic surface.
Replacement Parts
The following replacement parts can be ordered from PASCO scientific:
Item PASCO Part No.
Optics Bench 003-02694
Incandescent Light Source 003-07236
Light Bulb-#211-2 - All Units 526-016
Cord Set (U.S.) 516-010
Cord Set (European) 516-006
Power Supply, 12 VDC 2.5 A 540-040
Component Holder 648-02696
Ray Table 003-02702
Ray Table Base 003-02700
Ray Table Component Holder 003-02753
Slit Plate 003-02722
Slit Mask 003-02723
Ray Optics Lens 003-02736
Cylindrical Lens 003-02764
Ray Optics Mirror 003-05101
Viewing Screen 003-02730
Item PASCO Part No.
Red Color Filter 003-02746
Green Color Filter 003-02748
Blue/Green Color Filter 003-02750
75 mm F.L. Convex Lens 003-02710
150 mm F.L. Convex Lens 003-02716
– 150 mm F.L. Concave Lens 003-02713
50 mm F.L. Spherical Mirror 003-02714
Crossed Arrow Target 003-02732
Polarizer 003-02709
Variable Aperture 003-02726
Virtual Image Locator 003-02734
Diffraction Plate 003-02742
Diffraction Grating 003-02756
Diffraction Scale 003-02757
Manual and Experiments Guide 012-02744
52
®
Page 59

012-02744K Introductory Optics System
Teacher's Guide
Exp 1: Introduction to Ray Optics
Straight-Line Propagation of Light
The rays are straight, originating from the lamp filament.
Because of this, they widen and become less distinct as
the distance to the filament increases.
As the slit plate is rotated from vertical, the slit images
become wider and less distinct. This is caused by the
greater angle subtended by the filament on the slit.
Slits aligned with filament
Image width
Filament
Slits perpendicular to filament
Filament
Slit
Image width
Slit
Ray Tracing: Locating the Filament
The measurements in steps 1 and 2 should agree very
closely. (within a few millimeters)
Exp 2: The Law of Reflection
Suggestions on – Procedure
Make sure that the mirror is set up exactly on the
“component” line. Any deviation will affect the
accuracy of your results.
angle of: Incidence Reflection 1 Reflection 2
000
10 10 10
20 20 20
30 30 30
40 41 41
50 51 51
60 61 61
70 71 71
80 81 80
90 90 90
➀ The two trials are essentially the same, with a slight
deviation due to improper alignment of the mirror.
➁ The incident ray, reflected ray, and the normal are
all on the ray table, which is a plane.
➂ The two are equal. (This experimental trial shows a
slight deviation due to improper alignment of the
mirror.)
Answers to – Questions
➀ The angle of incidence equals the angle of reflec-
tion.
The incident ray, normal, and reflected ray are all
in the same plane.
➁ It doubles any error, thus allowing us to see any
error more accurately.
➂ (answers may vary)
®
53
Page 60

Introductory Optics System 012-02744K
Exp 3: Image Formation in a Plane Mirror
Suggestions on – Procedure
➀
The rays seem to follow straight lines into and out
of the mirror. The ones coming out of the mirror
seem to be coming from a second filament behind
the mirror plane.
➁ In the test setup used, the distance from the fila-
ment to the mirror plane was 10.8 cm. The distance from the image of the filament to the mirror
plane was 10.3 cm.
➂ The image and object are equidistant from the mir-
ror plane.
Answers to – Questions
➀ The room will appear to be twice its actual size.
➁
➂
The sizes are the same.
mirror
reflection is inverted
Exp 4: The Law of Refraction
Suggestions on – Procedure
➀ The ray is not bent either time it goes through the
surface, as long as it goes through perpendicular to
the surface.
Angle of: Incidence Refraction 1 Refraction 2
0 0.0 0.0
10 7.0 6.5
20 13.5 13.5
30 20.0 20.0
40 25.5 25.5
50 31.0 31.0
60 35.5 35.5
70 39.0 39.5
80 41.0 41.0
90
➁ The results are roughly the same: slight differences
are due to the lens not being centered exactly.
1
0.9
0.8
0.7
0.6
0.5
0.4
0.3
Sine of incident angle
0.2
0.1
G
E
0
0 0.1 0.2 0.3 0.4 0.5 0.6 0.7
Index of Refraction
G
E
G
E
G
E
Sine of refracted angle
G
E
slope = 1.504
G
E
G
E
G
E
G
E
G
E
data set 1
data set 2
54
®
Page 61

012-02744K Introductory Optics System
➂ It is. The graph comes out completely linear, which
means that there is a direct proportionality.
➃ n = 1.50
Answers to – Questions
The beam tends to spread out more on the larger
➀
angles, due to the wider area of incidence on the
flat side of the lens.
➁ Some was reflected. This reflected light could be
used to verify that the lens was aligned correctly
with the ray table by noting whether the angle of
refraction was the same as the angle of incidence
on the ray table.
➂ If there is a systematic error, it is likely to be can-
celled by measurements taken on opposite sides.
Exp 5: Reversibility
Suggestions on – Procedure
For best results, make sure that the cylindrical lens is
aligned exactly with the ray table.
Angle of:
Incidence1 Refraction1 Incidence2 Refraction2
0 0.0 0.0 1.0
10 7.0 7.0 7.5
20 13.5 13.5 19.5
30 20.0 20.0 30.0
40 25.5 25.5 39.0
50 31.0 31.0 49.0
60 35.5 35.5 59.0
70 39.5 39.5 70.0
80 41.0 41.0 77.0
1
0.9
0.8
0.7
slope = 1.498
0.6
0.5
0.4
0.3
0.2
Sin (angle of incidence)
0.1
5
2
0
0 0.1 0.2 0.3 0.4 0.5 0.6 0.7 0.8 0.9 1
5
5
2
5
2
Sin (angle of refraction)
5
5
2
5
5
5
2
slope = 0.6662
1/slope = 1.501
5
Refraction 1
2 Refraction 2
2
2
2
2
➀ The index of refraction is equal to the slope of the
“Refraction 1” graph. n = 1.498
➁ The slope of data set 2 is 1/n. Thus, n = 1.501.
➂ Yes.
➃ Drawings will vary.
➄ Yes. The angle of incidence equals the angle of
reflection regardless of which side the light is coming from.
®
55
Page 62

Introductory Optics System 012-02744K
Exp 6: Dispersion and Total Internal Reflection
Dispersion
Color separation was first noted at about 40°, al-
➀
though it may be noticeable before then depending
on the light in the room.
➁ Maximum separation occurs at about 85°; beyond
that the violet is totally internally reflected.
➂ In order: (although not all colors may be resolvable
depending on the room light) red, orange, yellow,
green, cyan, blue, violet.
➃ With an incident angle of 40°, the violet was at 76°
and the red was at 73°.
n
= 1.488
red
n
= 1.510
violet
Exp 7: Converging Lens: Image and Object Relationships
Total Internal Reflection
➀ The reflection occurs mainly at the internal flat side
of the lens.
➁ There is a reflected ray for all angles.
➂ The reflected ray is consistent with the law of re-
flection.
➃ There is not a refracted ray for all angles of inci-
dence. Beyond 43°, the light is totally internally
reflected.
➄ The intensity of the reflected ray increases with the
angle of incidence; the intensity of the refracted
ray decreases.
➅ All the light is reflected when the angle of refrac-
tion reaches 90°. This occurs for an angle of incidence of about 43°.
Suggestions on – Procedure
➀ The image magnification will depend on the rela-
tive placement of the lens. For any target-to-screen
distance of more than four times the focal length,
there will be two lens positions which will focus
the image. One of these positions will enlarge the
image, one will reduce it.
➁ The image will be inverted regardless of magnifi-
➂ Increasing d
➃ As d
goes to infinity, di goes to the focal length of
o
will decrease di.
o
the lens.
➄ Use the lens to focus an image of a very distant ob-
ject on the screen (d
meters - preferably much longer.) Measure the image distance; it will be approximately equal to the
focal length of the lens.
should be greater than two
o
cation.
do (mm) di hi 1/di + 1/do 1/f hi/ho -di/do % f % m
500 87 -3.5 0.01 0.01 -0.18 -0.17 1.19% 5.54%
450 90 -4.0 0.01 0.01 -0.21 -0.20 0.00% 5.00%
400 93 -4.5 0.01 0.01 -0.24 -0.23 -0.61% 1.83%
350 96 -5.5 0.01 0.01 -0.29 -0.27 -0.45% 5.25%
300 100 -6.5 0.01 0.01 -0.34 -0.33 0.00% 2.56%
250 107 -8.0 0.01 0.01 -0.42 -0.43 0.09% -1.65%
200 120 -11.5 0.01 0.01 -0.61 -0.60 -0.00% 0.87%
150 149 -19.0 0.01 0.01 -1.00 -0.99 0.33% 0.67%
100 300 -58.0 0.01 0.01 -3.05 -3.00 0.00% 1.72%
75
50
56
®
Page 63

012-02744K Introductory Optics System
➃ There is nearly exact agreement. The average error
in focal length is 0.06%, the average error in magnification is 2.5%. Discrepancies are introduced
due to uncertainty in the location of exact focus
and uncertainty in measuring the size of the image.
➄ The final two. If the object is located at the focal
point of the lens, then the image will be located at
infinity. This was the problem with the 75mm measurement: our optics bench was not long enough to
handle this distance. If the object is located inside
the focal length of the lens, then the image will be
a virtual image on the same side of the lens as the
object. Such an image can not be seen on a
viewscreen: this was the problem with the 50mm
measurement.
Exp 8: Light and Color
Answers to – Questions
2f
➀
➁ Yes, but it will be a virtual image instead of a real
image, and it would be on the same side of the lens
as the object.
➂ I would place the object at f. This would give me
an infinitely large image an infinite distance from
the lens.
The colors of light
➀ Yes. As you change the angle of the cylindrical
lens, you can see the white light gradually break
up into its component colors.
➁ The light where the three colors intersect is white.
This supports Newton’s theory by showing that
white light is the combination of the other colors.
The colors of objects
➤➤
➤Note: The best way to verify the colors of the
➤➤
rays is to look directly into the rays, rather than
observing them on the ray table. You may
dispense with the ray table entirely, if you wish.
➀ The transmitted rays are green. There are two sets
of reflected rays: they reflect from the front and
rear surfaces of the filter. The front-surface reflections are white, the rear-surface reflections are
green.
➁ Now there are three sets of reflections: one white
and two green. The white comes from the front of
the green filter, one green reflection comes from
the back of the green filter, and one green reflection comes from the front of the red filter.
➂ The reflected rays are the same color as the inci-
dent light: blue, in this case. (The transmitted rays
are a faint green.)
➃ The green filter appears green because it transmits
green light. It reflects whatever color is incident on
it, but transmits primarily green. When we look at
it, we see mainly the transmitted light.
➤➤
➤Another Note: The second portion of this lab
➤➤
may be slightly misleading. Most objects appear
to be whatever color they are because they
reflect that color, not because they transmit that
color. The filters reflect all colors of incident
light because they are highly polished. If they
had a matte finish, then they would reflect
mainly their own color.
®
57
Page 64

Introductory Optics System 012-02744K
X
Exp 9: Two-Slit Interference
Suggestions on – Procedure
color n AB (mm) X (mm) L (mm) wavelength (m) average (m)
red 1 0.125 3 450 833e—9 725e—9
2 0.125 5 450 694e—9
3 0.125 7 450 648e—9
green 1 0.125 2 450 555e—9 555e—9
2 0.125 4 450 555e—9
3 0.125 6 450 555e—9
blue 1 0.125 2 450 555e—9 501e—9
2 0.125 3.5 450 486e—9
3 0.125 5 450 462e—9
Actual values obtained will vary due to differences in
eyesight, but they should at least be ordered with red
longest and blue shortest.
Answers to – Questions
➀ Here AP and BP are drawn parallel to each other.
B
a'
θ '
θ
a
A
a’ + θ’ = 90°
P
a + θ = 90°
a = a’, since the center line is parallel to AP.
therefore, θ = θ’
P
➁
n
sin tan
–1
X
L
–1
=
λ
L
λ
n
=
AB
(unless n = 0)
AB
sin tan
but if then
λn
>1
AB
However, sin(x) - 1, so the equation is not valid
unless n = 0. Therefore you would expect to see
only the zeroth maxima.
58
®
Page 65

012-02744K Introductory Optics System
Exp 10: Polarization
Suggestions on – Procedure
➀
The target is not as bright when you look through
the polarizer. This is because half of the light is
blocked: the half that is polarized in the wrong direction.
➁ The light source is not polarized. There is no effect
when the polarizer is rotated, so the light source
must be randomly polarized.
➂ With polarizer A set at 0°, there is a maximum
when polarizer B is at 0° or 180°. The minimum
occurs when B is at 90° or 270°. Note that the
minimum is not zero: some light will still be transmitted due to the fact that the polarizers used do
not completely polarize the violet or the deep red
light.
Brewster’s Angle
➀ The reflected light is plane polarized at 90° from
the vertical.
➁ At other angles of reflection, the light is partially
polarized; with the degree of polarization depending on the angle of incidence.
➤➤
➤Notes: It may be interesting to call attention
➤➤
to the effect of polarizers on digital watches.
LCD displays work by having a polarizer just
above a liquid crystal cell. When an electric field
is applied to the liquid crystal, it polarizes light at
90° to the permanent polarizer, and blocks the
light. This is what makes the black numbers seen
on the display. If you look at a digital watch
through a polarizer, it will be completely black at
certain angles.
Another effect that can be tied into the investigation of Brewster’s angle is reflection off water.
Such a reflection will be partially polarized, as in
section 2 of the Brewster’s angle part of the lab.
Polarized sunglasses make use of this; they are
polarized in the opposite direction to cut glare.
Exp 11: Image Formation from Cylindrical Mirrors
Focal Point
➀ 58 mm
➁ 59 mm
➂ The reflected rays will be parallel.
Image Location
➀ 65 mm from the mirror
➁ As the mirror moves closer to the filament, the im-
age distance lengthens.
➂ Yes, it is a virtual image located on the opposite
side of the mirror from the filament.
➃ Only if you use the cylindrical lens as well.
Magnification and Inversion
➤➤
➤Note: There are two ways of moving the
➤➤
filament. One is to just slide the entire lamp
some distance to the side and measure that
distance. Another is to rotate the filament holder
so that the filament is even with one edge of the
lamp window, then rotate it to the other side. In
the second method, ho is just the width of the
window.
➀ The amount of magnification decreases with dis-
tance from the object.
➁ The image is inverted, and the inversion does not
depend on distance.
Cylindrical Aberration
➀ The rays do not all focus to the same point.
➁ Make a parabolic mirror instead of a cylindrical
one.
®
59
Page 66

Introductory Optics System 012-02744K
Exp 12: Image Formation from Spherical Mirrors
Focal Length
60 mm
➀
➁ Remove the viewing screen and focus an image of
the crossed arrow target on itself. In this position,
the focal length will be half of the distance between the target and the mirror. This method gives
a focal length of 49.5 mm
Magnification
f = 50
ho = 19
do (mm) di hi 1/di+1/do 1/f hi/ho -di/do % f % m
500 55 -2.0 0.02 0.02 -0.11 -0.11 0.90% -4.50%
450 56 -2.5 0.02 0.02 -0.13 -0.12 0.40% 5.42%
400 57 -3.0 0.02 0.02 -0.16 -0.14 0.22% 9.75%
350 58 -3.5 0.02 0.02 -0.18 -0.17 0.49% 10.04%
300 60 -4.0 0.02 0.02 -0.21 -0.20 0.00% 5.00%
250 62 -4.5 0.02 0.02 -0.24 -0.25 0.64% -4.71%
200 66 -6.0 0.02 0.02 -0.32 -0.33 0.75% -4.50%
150 76 -10.0 0.02 0.02 -0.53 -0.51 -0.88% 3.73%
100 100 -19.0 0.02 0.02 -1.00 -1.00 0.00% 0.00%
➤➤
➤Note: The final two data points are not
➤➤
available because the image is located on the
opposite side of the target from the mirror. In
other words, the view of the image is blocked by
the object.
➀ The results are in very good agreement with the
fundamental lens equation. The magnifications are
not as accurate, due to the difficulty in measuring
the size of the image accurately.
f = -50
ho = 32
do (mm) di hi 1/di + 1/d 1/f hi/ho -di/do % f % m
Virtual Images
➤➤
➤Note: It is difficult to accurately locate the
➤➤
virtual images. Because of this difficulty, the
accuracy of the second part of this lab does not
compare to the accuracy of the first. In addition,
the image of the virtual image finder is too small
to use at longer distances, so only the shorter
ones should be used.
500 N/A N/A N/A N/A N/A N/A N/A N/A
450 N/A N/A N/A N/A N/A N/A N/A N/A
400 N/A N/A N/A N/A N/A N/A N/A N/A
350 N/A N/A N/A N/A N/A N/A N/A N/A
300 -37 3.0 -0.02 -0.02 0.09 0.12 15.59% -31.56%
250 -52 3.5 -0.02 -0.02 0.11 0.21 -31.31% -90.17%
200 -46 4.5 -0.02 -0.02 0.14 0.23 -19.48% -63.56%
150 -35 5.5 -0.02 -0.02 0.17 0.23 8.70% -35.76%
100 -30 7.0 -0.02 -0.02 0.22 0.30 14.29% -37.14%
75 -23 9.5 -0.03 -0.02 0.30 0.31 33.65% -3.30%
50 -21 12.0 -0.03 -0.02 0.38 0.42 27.59% -12.00%
60
®
Page 67

012-02744K Introductory Optics System
Spherical Aberration
The image will be sharpest at the center.
➀
➁ Smaller apertures make the image sharper, but
dimmer.
Exp 13: Image Formation with Cylindrical Lenses
Focal Point
➀
F.L. 1 = 43 mm
F.L. 2 = 31 mm
➁ The refracted rays are parallel when they go
through the center of the lens, but are not parallel
when they go through the edges.
➂ Same as #2
➃ Because of the shape of the lens, it bends the light
at only one edge - the curved one. When the lens is
rotated 180°, the curved side of the lens is on the
opposite side, so the refraction occurs at a different
place.
Image Location
➂ Smaller apertures limit the light to the central por-
tion of the mirror. Using a smaller part of the
spherical mirror causes smaller amounts of spherical aberration.
➃ The best aperture for maximum sharpness would
be a pinhole. This is not practical, though, because
it limits the amount of light entering the mirror and
causes diffraction.
➂ Yes, but it is a virtual image located on the oppo-
site side of the lamp from the lens.
Magnification & Inversion
➀ The magnification decreases with object distance.
➁ The image is inverted for all object locations
greater than the focal length of the lens.
Cylindrical Aberration
➀ The rays do not all focus at the same point.
➁ Make it thinner, decrease the curvature, limit the
aperture to include only the center of the lens,
change the shape from circular to parabolic. (Answers may vary.)
➀ 57 mm from the lens
➁ As you decrease the object distance, the image dis-
tance increases.
Exp 14: Spherical Lenses-Spherical and Chromatic
Aberration, Aperture Size, and Depth of Field
Spherical Aberration
➀ The focus becomes sharper as the aperture is de-
creased.
➁ The best image focus would be obtained with the
smallest possible aperture. This is not practical,
however, because smaller apertures allow less light
to enter; and at very small apertures, diffraction degrades the image.
®
Depth of Field
➤➤
➤Note: The depth of field measured by students
➤➤
will vary, depending on what they consider
“good focus”.
➀ The depth of field increases as the aperture is de-
creased.
➁ An infinite depth of field would require an aperture
size of zero.
61
Page 68

Introductory Optics System 012-02744K
➂ A slightly blurred image is still visible. (The room
must be fairly dark for this image to be visible.)
➃ The smaller the aperture, the sharper the focus.
➄ The magnification increases with distance.
➅
Aperture
Object
Diverging rays
from object
Light radiates from the object in all directions, but a
small aperture selects only certain rays of that light.
The rays selected by the aperture will be approximately parallel, and form an inverted image as shown.
Image
Chromatic Aberration
Note: This effect is difficult to see unless the
room is dark and the magnification is high.
➀ The light that travels through the edge of the lens is
bent more, thus the difference in the amount of
bend of the different colors is more visible.
➤➤
➤Notes: Everything in this lab applies directly
➤➤
to photography. It may be interesting to do the
experiments described here with a lens from an
SLR camera, and compare the amount of
distortion.
Exp 15: The Diffraction Grating
➀ Narrower spacing makes wider diffraction patterns
➁ The larger number of slits makes the pattern
brighter, and somewhat sharper.
➂ There will not be complete agreement due to dif-
ferences in eyesight and perception of color.
A = 1.89E—4
L = 44.9
Color X1 (cm) X2 (cm) Wavelength 1 Wavelength 2
Violet 9.5 10.7 392.3e—9 439.3e—9
Blue 10.7 12.3 439.3e—9 500.7e—9
Green 12.3 14.0 500.7e—9 564.1e—9
Yellow 14.0 14.5 564.1e—9 582.4e—9
Orange 14.5 15.0 582.4e—9 600.5e—9
Red 15.0 19.0 600.5e—9 738.6e—9
➃ Color is a very subjective measurement; different
people will see the same wavelengths as being different colors. In addition, different people may not
even be able to see some colors. Most people will
not see as far into the violet spectrum as this, for
example, but they will see farther into the red.
62
®
Page 69

012-02744K Introductory Optics System
W sin tan
±1
X
L
= n
λ
sin tan
±1
X
L
=
λ
n
W
Exp 16: Single-Slit Diffraction
Suggestions on – Procedure
➀
The spacing between fringes increases with decreasing slit width.
➁ The double-slit patterns are a superposition of a
single-slit pattern and a “bar” pattern. The singleslit pattern goes like this:
1
0.9
0.8
0.7
0.6
0.5
0.4
Intensity
0.3
0.2
0.1
0
-7-5-3-11357
and the double-slit pattern shows this same intensity
pattern superimposed on a finer pattern.
Single-Slit Intensity
Position
W = 0.04
L = 448
n X wavelength
Red 1 9 803.4E—9
2 18 802.9E—9
3 27 802.1E—9
Green 1 8 714.1E—9
2 16 713.8E—9
3 24 713.2E—9
Blue 1 7 624.9E—9
2 14 624.6E—9
3 22 653.9E—9
The wavelengths obtained by this method are consistently higher than expected. This is due to difficulties
in measuring the exact position of the minimum, due
to the width of that minimum. For a better way of
calculating wavelengths, use experiment 15.
➂ You would only see one maxima.
1
0.9
0.8
0.7
0.6
0.5
0.4
Intensity
0.3
0.2
0.1
X
X
X
X
X
X
0
Double-Slit Intensity
X
X
X
X
X
X
X
X
X
X
X
X
X
X
X
X
X
X
X
X
X
X
X
X
X
X
X
X
X
X
X
X
X
X
X
X
X
X
X
X
X
X
X
X
X
X
X
X
X
X
X
X
X
X
X
X
X
X
X
X
X
X
X
X
X
X
X
X
X
X
X
X
X
X
X
X
X
X
X
X
X
X
X
X
X
X
X
X
X
X
X
X
X
X
XXX
X
X
X
X
X
X
X
X
X
X
X
X
X
X
X
X
X
X
X
X
X
X
X
X
X
X
X
X
X
X
X
X
X
X
X
X
X
X
X
X
X
X
X
X
X
X
X
X
X
X
X
X
X
X
X
X
X
X
X
X
X
X
X
X
X
X
X
X
X
X
X
X
X
X
X
X
X
X
X
X
X
X
X
X
X
X
X
X
X
X
X
X
X
X
X
X
X
X
X
X
X
X
X
X
X
X
X
X
X
X
X
X
X
X
-7 -5 -3 -1 1 3 5 7
Position
W <
λ
but if
λ
n
W
X
X
X
X
X
X
X
X
X
X
X
X
X
X
X
X
X
X
X
X
X
X
X
X
X
X
X
X
X
X
X
X
X
X
X
X
X
X
X
X
X
X
X
X
X
X
X
X
X
X
X
X
X
X
X
X
X
X
X
X
X
X
X
X
However, sin(x) - 1; so the equation is not valid
unless n = 0. Therefore you would expect to see
only the zeroth maxima.
then
>1
(unless n = 0)
®
63
Page 70

Introductory Optics System 012-02744K
Exp 17: General Diffraction
Suggestions on – Procedure
➀ Smaller apertures make the diffraction pattern more
clear.
➁ Smaller apertures make the diffraction pattern less
bright.
➂ White light causes many overlapping diffraction
patterns of different colors and slightly different
sizes. Color filters simplify this pattern by limiting
the pattern to one color.
Crossed Slits
➀ There are really two diffraction patterns at 90° to
each other, caused by the two slits. This is important for the other parts of the lab; each diffraction
pattern is independent of the others.
Random array of Circular Apertures
➀ The diffraction pattern is wider when the holes are
smaller; just as in part 1 of experiment 16.
➁ The diffraction pattern of a point source through a
circular aperture is symmetrical because the aperture itself is symmetrical. Diffraction effects are
most pronounced in a direction parallel with the
smallest dimension of the aperture; but in a circular
aperture, all directions are the same.
Square array of Circular Apertures
➀ This pattern is similar in that there is an overall
“target” pattern. It is different in that the target is
made up of a square grid of points, roughly like so:
➁–➃ Drawings will vary.
Exp 18: Introduction to Optical Instruments
➀ A virtual, magnified image is formed for object
distances of less than the focal length of the lens.
➁ A real, magnified image (also inverted) is formed
for object distances between one and two focal
lengths from the lens.
➂ A real, reduced image (still inverted) is formed for
object distances greater than twice the focal length
of the lens.
➃ Any real image can be focused on the screen, thus
any object distance greater than the focal length of
the lens will work.
64
®
Page 71

012-02744K Introductory Optics System
do di m Real/Virtual Inv/Uninv
f/16 -f/15 16/15 Virtual Uninverted
f/8 -f/7 8/7 Virtual Uninverted
f/4 -f/3 4/3 Virtual Uninverted
f/2 -f 2 Virtual Uninverted
3f/4 -3f 4 Virtual Uninverted
7f/8 -7f 8 Virtual Uninverted
15f/16 -15f 16 Virtual Uninverted
f No image formed (A.K.A. “Image at Infinity”)
17f/16 17f -16 Real Inverted
9f/8 9f -8 Real Inverted
5f/4 5f -4 Real Inverted
3f/2 3f -2 Real Inverted
7f/4 7f/3 -4/3 Real Inverted
15f/8 15f/7 -8/7 Real Inverted
31f/16 31f/15 -16/15 Real Inverted
2f 2f -1 Real Inverted
33f/16 33f/17 -16/17 Real Inverted
17f/8 17f/9 -8/9 Real Inverted
9f/4 9f/5 -4/5 Real Inverted
5f/2 5f/3 -2/3 Real Inverted
11f/4 11f/7 -4/7 Real Inverted
23f/8 23f/15 -8/15 Real Inverted
3f 3f/2 -1/2 Real Inverted
5f 5f/4 -1/4 Real Inverted
10f 10f/9 -1/9 Real Inverted
100f 100f/99 -1/99 Real Inverted
Exp 19: The Projector
➀ If the object distance is less than the focal length of
the lens, then the image formed is a virtual image,
located on the same side of the lens as the object.
This can not be focused on a viewing screen.
➁ If the object distance is greater than 2f, then the im-
age will be reduced in size. It will still be a real image, so it may be focused on the screen.
➂ One practical limit to the magnification is the size
of the lens used, another is the amount of light
available. Magnified images are dimmer than reduced images, because the same amount of light is
spread out over more area. If the image is magnified too much, it may not be visible.
Object Lens Image View from here
®
➃ It is not possible to project an uninverted image
with one lens. (This is why projector slides must be
put in upside down and backwards.)
➄ The image from a projector may be viewed with-
out a screen, but the observer must be looking towards the lens, on the opposite side of the lens
from the object.
The observer will see the image floating in space on
the near side of the lens. (This is easiest to see when
the magnification is about one.) It will be somewhat
difficult to focus both eyes on the image at the same
time, but when it happens, the effect is startling.
65
Page 72

Introductory Optics System 012-02744K
Exp 20: The Magnifier
Suggestions on – Procedure
➀
No. According to the fundamental lens equation
the magnification, and the angular magnification,
are unlimited. The limit of useful magnification is
caused by spherical aberration in the lens.
➁ The 75mm lens provides greater magnification.
➤ Note: As a demonstration that the limit to
useful magnification is caused by spherical
aberration, put the variable aperture in position
just in front of the 75mm lens. Close the aperture
as far as practical without losing the image
completely, and then move the lens/aperture set
as far from the object as possible without losing
focus (about 9-11 cm). While looking through
the lens, widen the aperture. The image will
become almost completely blurred.
Another Note: The actual angular magnification
depends on the distance from the eye to the lens,
as well as from the lens to the object.
θ
'= ±
dedo± fdo+ d
distance to the eye.
= 0, then the angular size is the same as if
if d
e
there were no lens there at all. This is why
contact lenses do not change the apparent size of
things, although they do affect the focus.
fh
o
where de is the
e
➂ Angular magnification = 25 cm/f.
75 mm = 7.5 cm: power = 3.33
150 mm = 15 cm: power = 1.67
➃ Power = 25/50 = 1/2. This would have limited use
as a magnifier; it just wouldn’t be strong enough to
make much difference.
Exp 21: The Telescope
Suggestions on – Procedure
➀ The angular magnification of the telescope is 2.
(150/75) If the telescope is looked through backwards, the lenses are reversed in the equation and
the magnification becomes 1/2.
➁ About 2.1. One of the best ways of measuring this
is to look at a meter stick with both eyes open (one
eye through the telescope). Then you will see both
the unmagnified and magnified images at the same
time, and you may compare their sizes using the
scales on the images. The magnification observed
will generally be slightly larger than the theoretical
value, since the object you are looking at is not an
infinite distance away.
➂ About 1/2, using the same method as in part 2.
➃ Yes.
66
®
Page 73

012-02744K Introductory Optics System
Exp 22: The Compound Microscope
Suggestions on – Procedure
➀
The image is magnified; but at 150mm objective
distance, the magnification is not significantly
more than when the 75mm lens is used as a magnifier.
➁ The magnification increases dramatically as the
objective lens moves closer to the object. This is
because the projected image of the object becomes
larger as the distance between object and objective
gets closer to the focal length of the lens. (The image will be lost entirely when the objective is
75mm from the object.)
➂ Spherical aberration becomes quite a problem, and
chromatic aberration becomes significant at the
very high magnifications.
➃ The smaller the aperture is, the sharper the view
through the microscope. A very small aperture
eliminates both chromatic and spherical distortion,
and allows higher magnification.
➄ Small apertures make the image quite dim. (You
may want to use the lamp to illuminate the
viewscreen.)
➅ The magnification would be higher.
®
67
Page 74

Introductory Optics System 012-02744K
Notes
68
®
Page 75

012-02744J Introductory Optics System
Technical Support
Feed-Back
If you have any comments about this product or this
manual please let us know. If you have any suggestions on alternate experiments or find a problem in the
manual please tell us. PASCO appreciates any
customer feed-back. Your input helps us evaluate and
improve our product.
To Reach PASCO
For Technical Support call us at 1-800-772-8700 (tollfree within the U.S.) or (916) 786-3800.
Email: support@pasco.com
Contacting Technical Support
Before you call the PASCO Technical Support staff it
would be helpful to prepare the following information:
• If your problem is computer/software related, note:
Title and Revision Date of software.
Type of Computer (Make, Model, Speed).
Type of external Cables/Peripherals.
• If your problem is with the PASCO apparatus, note:
Title and Model number (usually listed on the label).
Approximate age of apparatus.
A detailed description of the problem/sequence of
events. (In case you can't call PASCO right away,
you won't lose valuable data.)
If possible, have the apparatus within reach when
calling. This makes descriptions of individual parts
much easier.
• If your problem relates to the instruction manual,
note:
Part number and Revision (listed by month and year
on the front cover).
Have the manual at hand to discuss your questions.
®
 Loading...