

Page 1
Color Mixer
®
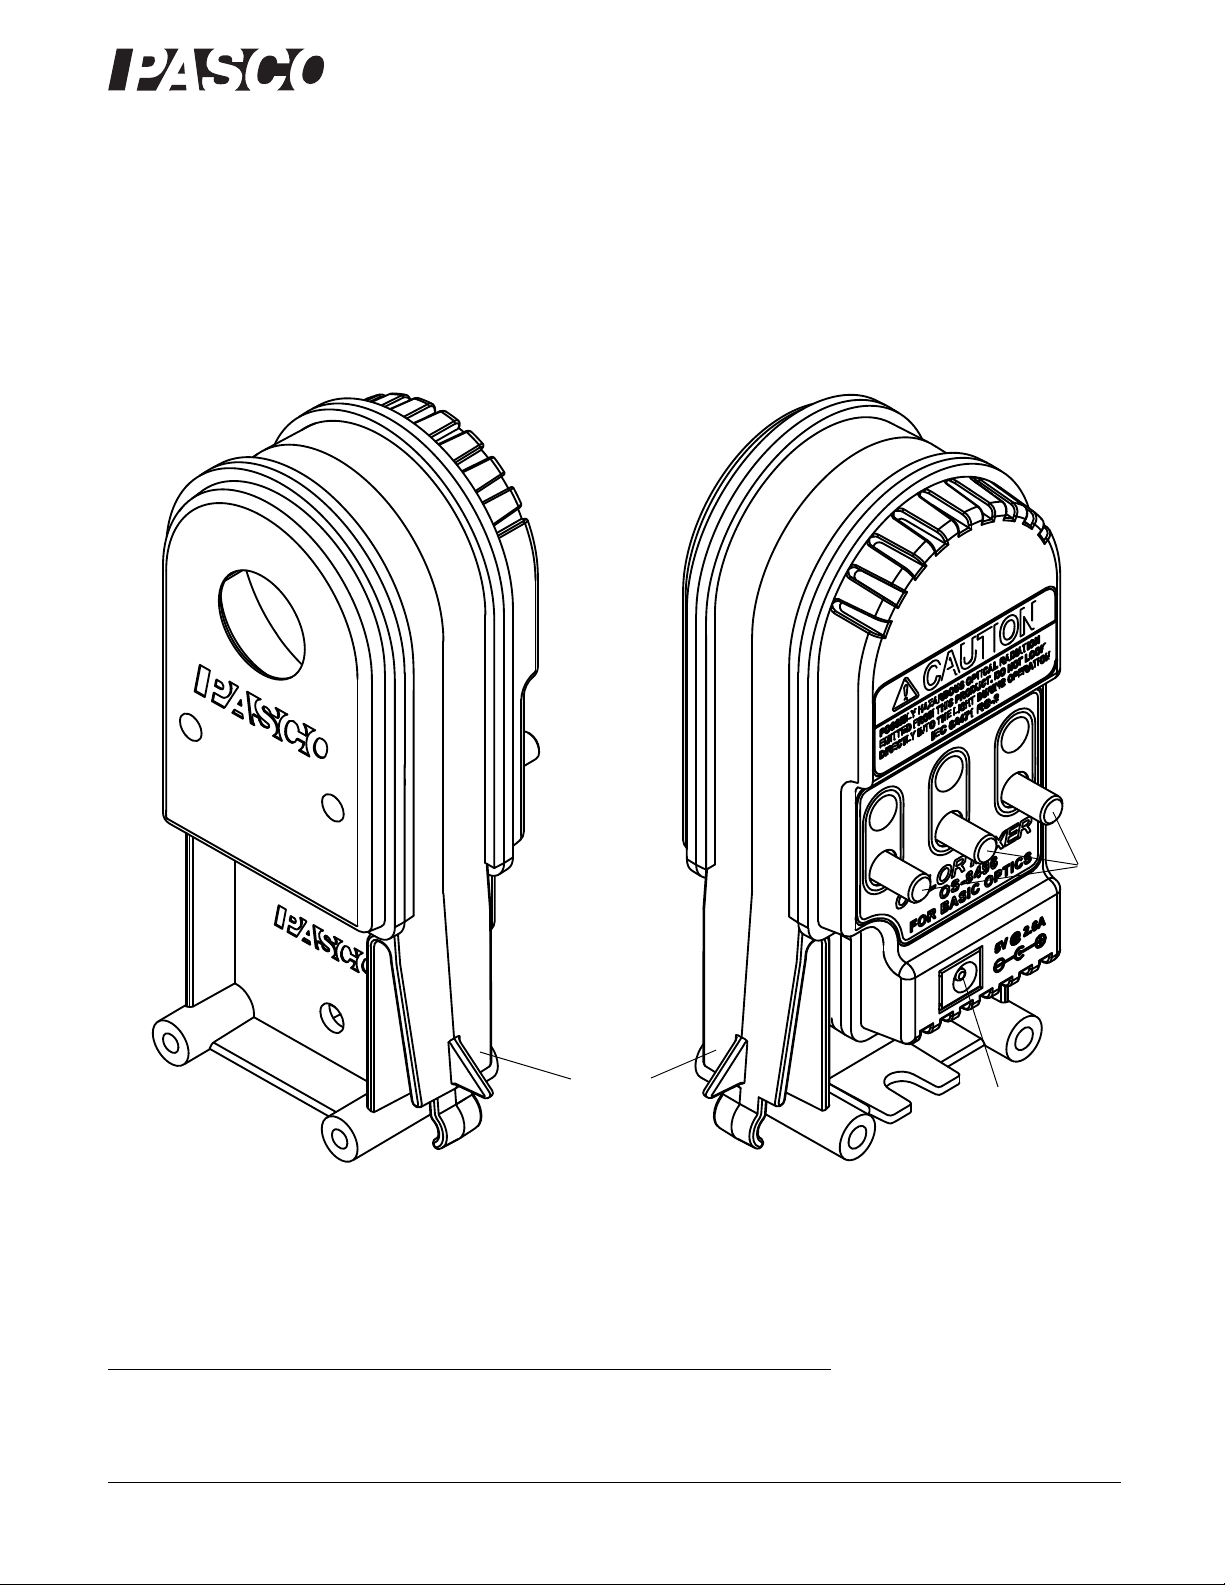
Rear view
Front view
Power
input
jack
Position
adjustment
tab
OS-8496
Instruction Sheet
012-12816A
*012-12816*
Equipment
Included Item Part number
Color Mixer Assembly
003-12392
Brightness
control
knobs
AC Adapter (100 - 240 V AC to 5 V DC at 2.6 A)
800-772-8700 www.pasco.com
540-103
Page 2

®
Color Mixer OS-8496
Recommended Items Part number
Basic Optics Geometric Lens Set
Viewing Screen
Optics Bench
OS-8456
OS-8460
OS-8508 (1.2 m) or OS-8541 (60 cm)
Recommended Systems Part number
Beginning Optics System
Viewing Screen OS-8460
Geometric Lens Set (100 mm, 200 mm, -150 mm) OS-8466A
Light Source OS-8470
Adjustable Lens Holder (2) OS-8474
Optics Bench (1.2 m) OS-8508
Basic Optics System
Basic Optics Geometric Lens Set (100 mm, 200 mm) OS-8456
Concave/Convex Mirror and Half Mirror Accessory OS-8457
Viewing Screen OS-8460
Ray Table with “D” Lens OS-8465
OS-8459
OS-8515C
Light Source OS-8470
Adjustable Lens Holder OS-8474
Optics Bench (1.2 m) OS-8508
Ray Optics OS-8516A
Accessory Lenses (250 mm, -150 mm) OS-8519
Introduction
The OS-8496 Color Mixer is designed to be used with such systems as the OS-8459 Beginning Optics System or the OS-8515C
Basic Optics System. The Color Mixer includes a power adapter (100 to 240 V AC to 5 V DC at 2.6 A). The mixer has three bright
light-emitting diodes (LEDs) that produce red, green and blue light. When the colors of light are mixed with the right intensity, the
combination appears as white light.
The Color Mixer fits on a PASCO Optics Bench such as the OS-8508 1.2 m Optics Bench or the OS-8541 60 cm Optics Bench.
You can also mount the Color Mixer and other PASCO Optics System components on a PASCO Dynamics Track using the
OS-8472 Dynamics Track Optics Carriage (set of three). The Color Mixer works best when used with the OS-8460 Viewing
Screen.
About the Equipment
Color Mixer: The included color mixer can be used on a tabletop or mounted on an optics bench. It functions as a red, green, and
blue (primary-color) light source and comes with a power adapter.
2
Page 3

®
Color Mixer 012-12816A OS-8496
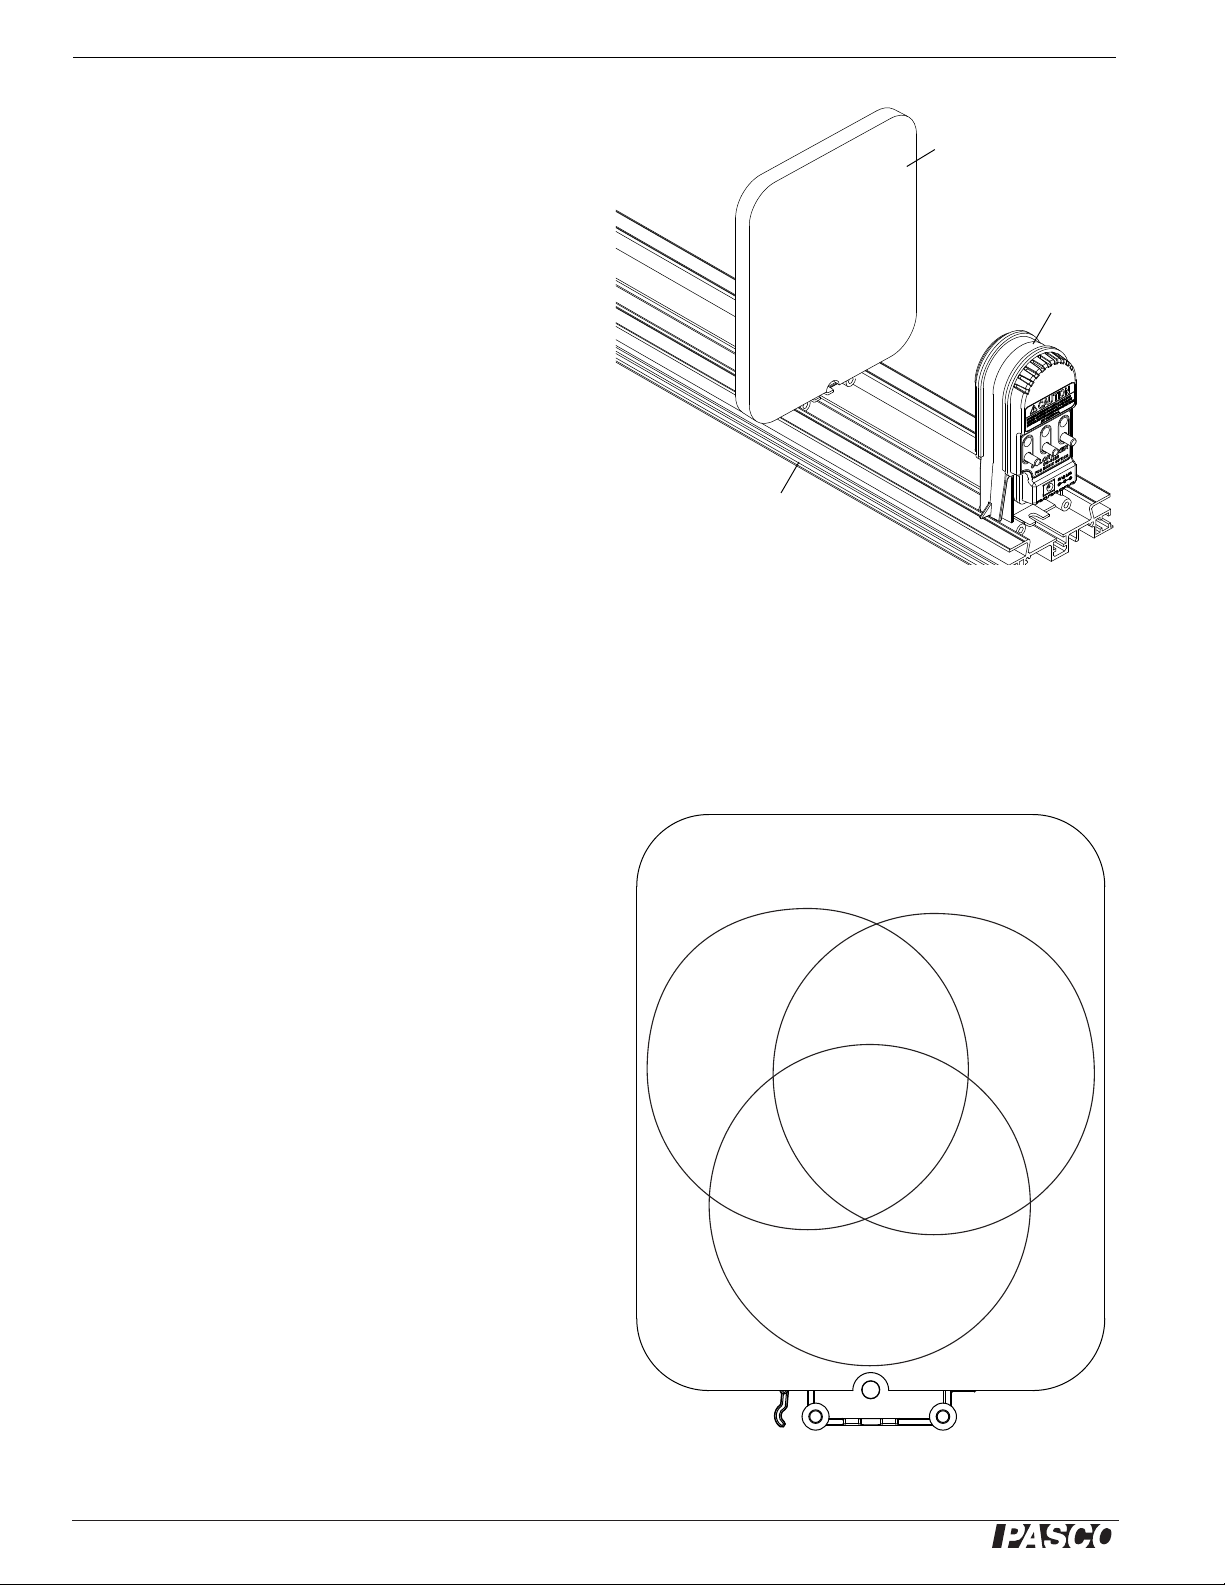
Color
Mixer
View
Screen
Optics
Bench
+200 mm
Convex Lens
Other Equipment
Optics Bench: Beginning and Basic Optics components, such as the color mixer and view screen, snap into the wide central channel of the optics bench. Place the base of the component on the bench and push down firmly to snap it in place. T o move it, squeeze
the tab on the side of the component and slide the component along the bench.
Use the metric scale on the bench to measure the positions of components.
Viewing Screen: Mount the screen on the bench to view the individual and mixed colors of light from the color mixer
Geometric Lens Set: The lens set consists of two double convex lenses, each 50 mm in diameter, with focal lengths of +100 mm
and +200 mm.
Usage .
Optics Bench with Lens
Mount the Color Mixer at one end of a
PASCO Optics Bench. Connect the
power supply to the back of the Color
Mixer and plug the power supply into
an electrical receptacle.
Mount a Viewing Screen near the
other end of the optics bench. Mount a
+200 mm focal length double convex
lens near the Color Mixer.
Adjust the position of the lens and the
viewing screen as needed in order to
see the overlapping circles of red,
green, and blue color as large as possible on the view screen.
Use the knobs on the back of the Color
Mixer to adjust the light intensity for
each color. For example, you may
need to turn down the intensity of the
red LED slightly in order to more
clearly see white as the blended color
in the center of the pattern. Turn the knob fully counter-clockwise (right-to-left) to turn off the color and turn the knob fully clockwise (left-to-right) to make the color as bright as possible.
CAUTION: The Color Mixer light-emitting diodes (LEDs) produce intense light. Do not look directly into the Color Mixer when
it is turned on.
3
Page 4
®
Color Mixer OS-8496
View
Screen
Color
Mixer
Optics
Bench
Blue
Red
Green
Yellow
Cyan
Magenta
White
Figure: Typical Color Pattern
Optics Bench without Lens
Mount the Color Mixer at one end of a PASCO Optics Bench.
Connect the power supply to the back of the Color Mixer and plug
the power supply into an electrical receptacle.
Mount a Viewing Screen near the Color Mixer . Adjust the position
of the viewing screen so that the overlapping circles of red, green,
and blue color are as large as possible on the screen.
Use the knobs on the back of the Color Mixer to adjust the light
intensity for each color. Turn the knob fully counter-clockwise
(right-to-left) to turn off the color and turn the knob fully clockwise (left-to-right) to make the color as bright as possible.
CAUTION: The Color Mixer light-emitting diodes (LEDs) produce intense light. Do not look directly into the Color Mixer when
it is turned on.
Standalone
Connect the power supply to the back of the Color Mixer and plug the power supply into an electrical receptacle.
Point the Color Mixer at a piece of white paper or another white surface so that the front of the Color Mixer is parallel to the white
surface. Use the knobs on the back of the Color Mixer to adjust the light intensity for each color.Turn the knob fully counter-clockwise (right-to-left) to turn off the color and turn the knob fully clockwise (left-to-right) to make the color as bright as possible.
CAUTION: The Color Mixer light-emitting diodes (LEDs) produce intense light. Do not look directly into the Color Mixer when it
is turned on.
Color Mixing
The three primary-color lights produce three “secondary-color”
lights when mixed. The blue and red lights blend to form magenta,
the blue and green lights blend to form cyan, and the red and green
lights blend to form yellow. All three colors blend to form white.
Y ou may need to adjust the intensity of the individual colors in order
to produce the white light.
Note that the blending of primary-color lights and the blending of
primary-color pigments (such as paints) produce different results.
Other
The ventilation slots in the color mixer housing help the LEDs operate at a low temperature, and this extends their useful life. Ty pically,
a light-emitting diode of the type in the color mixer has a life span of
50,000 hours. However, because of the efficiency of the circuitry in
the color mixer, the LEDs may last much longer.
4
Page 5

®
Color Mixer 012-12816A OS-8496
Relative Radiant Power vs. Wavelength
The individual color wavelengths will vary from unit to unit due to minor variations in the LEDs. The peak wavelength ranges are
as follows:
Color Peak Wavelength Range
Red 620 to 630 nanometers (nm)
Green 520 to 535 nm
Blue 450 to 465 nm
Note that the Color Mixer LEDs are adapted to a specific purpose and will probably not match the peak wavelength ranges shown.
Technical Support
For assistance with any PASCO product, contact PASCO at:
Address: PASCO scientific
10101 Foothills Blvd.
Roseville, CA 95747-7100
Phone: 916-786-3800 (worldwide)
800-772-8700 (U.S.)
Fax: (916) 786-7565
Web: www.pasco.com
Email: support@pasco.com
For more information about the Color Mixer and the latest revision of this Instruction Sheet, visit the PASCO web site at
www.pasco.com and enter OS-8496 in the Search window.
Limited Warranty For a description of the product warranty, see the PASCO catalog. Copyright The PASCO scientific 012-12816A Color
Mixer Instruction Sheet is copyrighted with all rights reserved. Permission is granted to non-profit educational institutions for reproduction of any part
of this manual, providing the reproductions are used only in their laboratories and classrooms, and are not sold for profit. Reproduction under any
other circumstances, without the written consent of PASCO scientific, is prohibited. Trademarks PASCO and PASCO scientific are trademarks
or registered trademarks of PASCO scientific, in the United S tates and/or in other countries. All other brands, products, or service names are or may
be trademarks or service marks of, and are used to identify, products or services of, their respective owners. For more information visit
www.pasco.com/legal.
5
 Loading...