

Page 1

Includes
Teacher's Notes
and
Typical
Experiment Results
Instruction Manual and
Experiment Guide for the
PASCO scientific
Model ME-6569
RMS/IDS KIT
012-06408A
6/97
© 1997 PASCO scientific $7.50
®
10101 Foothills Blvd. • P.O. Box 619011 • Roseville, CA 95678-9011 USA
Phone (916) 786-3800 • FAX (916) 786-8905 • web: www.pasco.com
better
ways to
teach science
Page 2

RMS/IDS Kit 012–06408A
Page 3

012–06408A RMS/IDS Kit
Table of Contents
Section Page
Copyright, Warranty, and Equipment Return ................................................................ ii
Introduction ...................................................................................................................1
Equipment .....................................................................................................................1
Assembly .................................................................................................................. 23
Suggested Experiments
Experiment 1: Correlation of velocity and acceleration vectors for a cart
undergoing an elastic collision ....................................................56
Experiment 2: Comparison of momentum and impulse of an inelastic collision .... 79
Experiment 3: Conservation of momentum vs. loss of kinetic energy in an
inelastic collision ................................................................... 1115
Experiment 4: Conservation of momentum kinetic energy in an elastic collision
. 1621
Teachers Notes............................................................ 2329
Technical Support ........................................................................................ Back Cover
i
Page 4

Copyright, Warranty , and Equipment Return
PleaseFeel free to duplicate this manual
subject to the copyright restrictions below.
Copyright Notice
The PASCO scientific 012-06408A manual is
copyrighted and all rights reserved. However,
permission is granted to non-profit educational
institutions for reproduction of any part of the RMS/
IDS Kit manual providing the reproductions are used
only for their laboratories and are not sold for profit.
Reproduction under any other circumstances, without
the written consent of PASCO
scientific, is prohibited.
Limited Warranty
PASCO scientific warrants the product to be free from
defects in materials and workmanship for a period of
one year from the date of shipment to the customer.
PASCO will repair or replace at its option any part of
the product which is deemed to be defective in
material or workmanship. The warranty does not
cover damage to the product caused by abuse or
improper use. Determination of whether a product
failure is the result of a manufacturing defect or
improper use by the customer shall be made solely by
PASCO scientific. Responsibility for the return of
equipment for warranty repair belongs to the
customer. Equipment must be properly packed to
prevent damage and shipped postage or freight
prepaid. (Damage caused by improper packing of the
equipment for return shipment will not be covered by
the warranty.) Shipping costs for returning the
equipment after repair will be paid by PASCO
scientific.
Credits
Author: Sunny Bishop
Equipment Return
Should the product have to be returned to PASCO
scientific for any reason, notify PASCO scientific by
letter, phone, or fax BEFORE returning the product.
Upon notification, the return authorization and
shipping instructions will be promptly issued.
ä
NOTE: NO EQUIPMENT WILL BE
ACCEPTED FOR RETURN WITHOUT AN
AUTHORIZATION FROM PASCO.
When returning equipment for repair, the units must
be packed properly. Carriers will not accept
responsibility for damage caused by improper
packing. To be certain the unit will not be damaged in
shipment, observe the following rules:
➀ The packing carton must be strong enough for the
item shipped.
➁ Make certain there are at least two inches of packing
material between any point on the apparatus and the
inside walls of the carton.
➂ Make certain that the packing material cannot shift in
the box or become compressed, allowing the
instrument come in contact with the packing carton.
Address: PASCO scientific
10101 Foothills Blvd.
P.O. Box 619011
Roseville, CA 95678-9011
Phone: (916) 786-3800
FAX: (916) 786-3292
email: techsupp@pasco.com
web: www.pasco.com
ii
Page 5
012–06408A RMS/IDS Kit
Introduction
The PASCO CI-6569 RMS/IDS Kit allows the PASCO CI-6538
Rotary Motion Sensor (RMS) to function as a Smart Pulley for
measuring the absolute location of a PASCO Dynamics Carts
(ME-9430 or ME-9454) running on PASCO Introductory Dynamics
System Tracks (ME-9429A or ME-9452).
The IDS track pulley bracket and the cartstring bracket included in
the RMS/IDS Kit, together with the required IDS Mount Accessory
(CI-6692), allow the connection of the Dynamics Cart to the large
pulley of the RMS with a sturdy thread. The thread is anchored on the
Dynamics Cart and passed over the large pulley on the RMS, allowing
bidirectional linear motion of the Dynamics Cart to be logged into
Science Workshop
700). Science Workshop can then display the motion data in terms of
absolute location, velocity, and acceleration.
TM
through a PASCO computer interface (500 or
Two sets of Dynamics Carts, Rotary Motion Sensors, and connecting
brackets can be installed on a single Dynamics Track to allow
simultaneous measurement of linear motion of two carts (700
interface only).
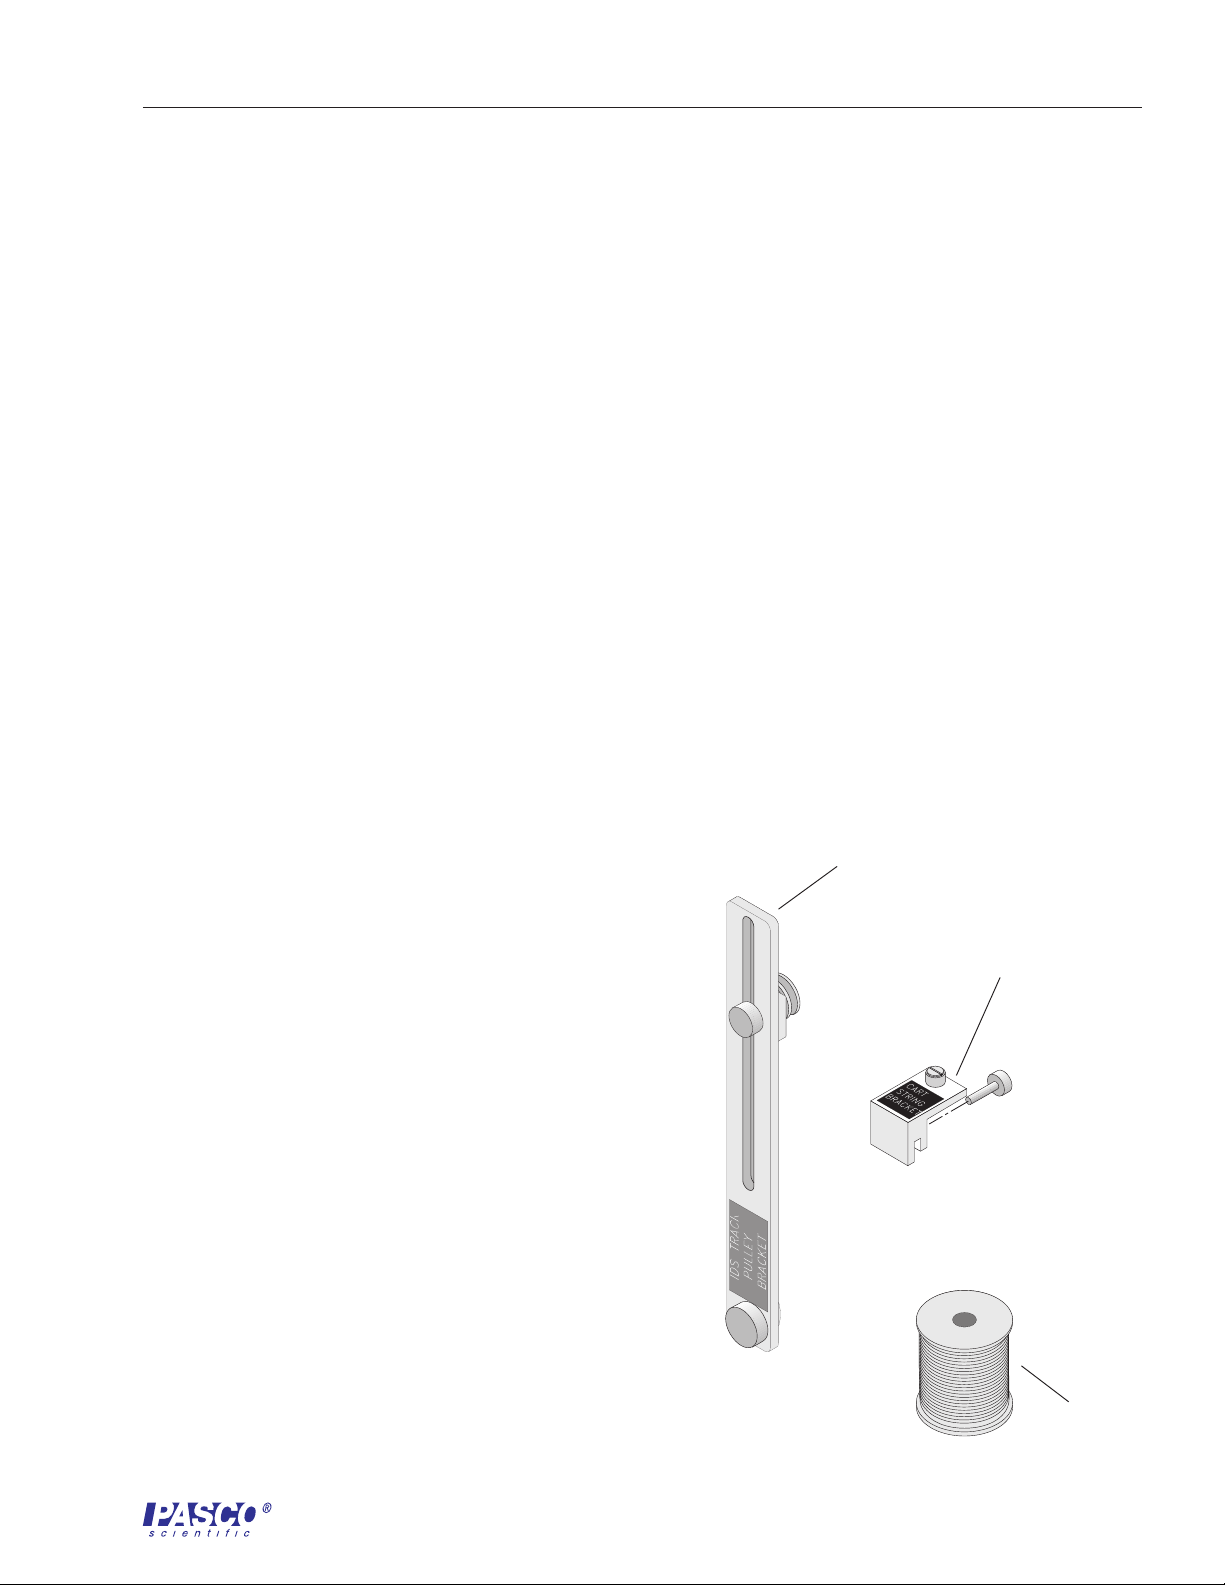
Equipment
Included:
IDS track pulley bracket
cartstring bracket
spool of sturdy thread
Additional Required:
Rotary Motion Sensor (CI-6538)
IDS Mount Accessory (CI-6692)
Dynamics Cart (ME-9430 or ME-9454)
Dynamics Track (ME-9429A or ME-9452)
PASCO computer interface (500 or 700)
Science Workshop version 2.2 or higher
computer
IDS track pulley bracket
cart—string bracket
thread
1
Page 6
RMS/IDS Kit 012–06408A
Setup
Equipment
1. Mount the Rotary Motion Sensor (RMS) on the IDS track with the
IDS Mount Accessory so the RMS can be used like a Smart Pulley
(see IDS Mount Instruction Sheet and Figure 3).
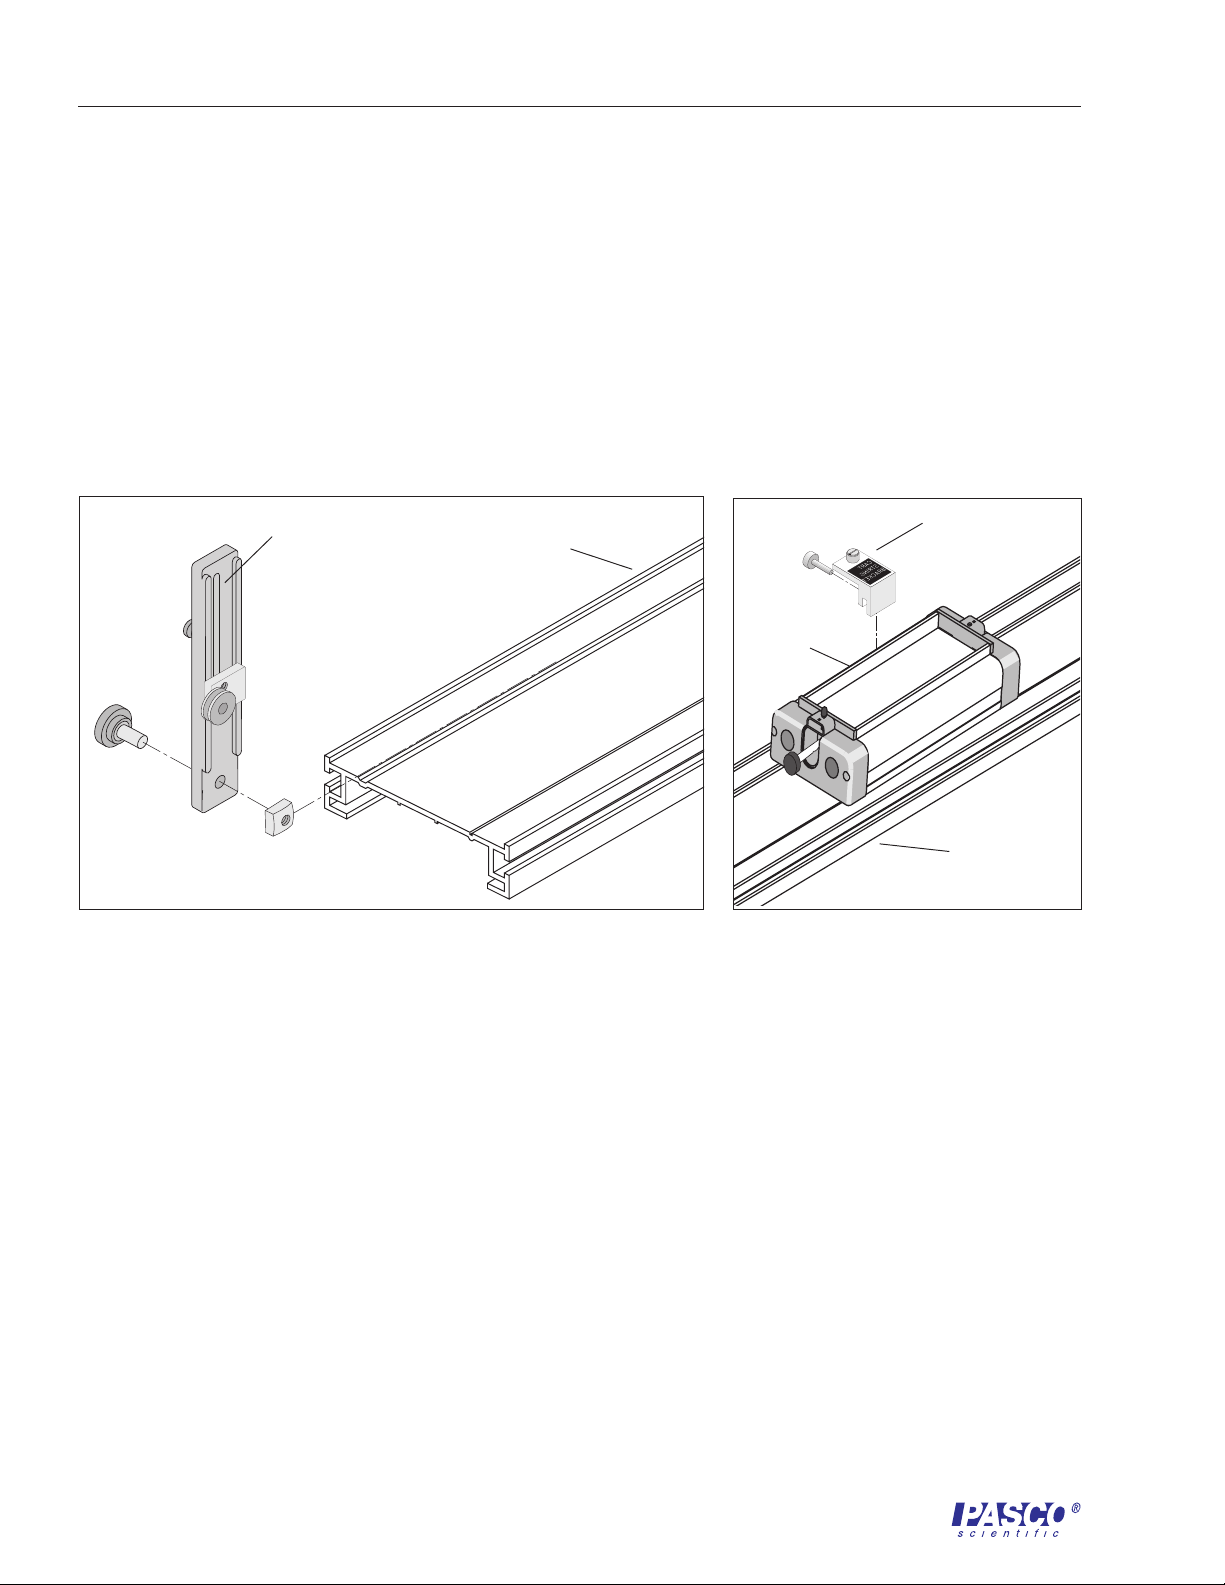
2. Mount the IDS track pulley bracket on the same side of the track
at the other end (Figure 1).
3. Mount the cartstring bracket on the cart (Figure 2).
IDS track pulley
bracket
Figure 1
Mounting the IDS track pulley bracket on the IDS track
IDS track
4.. Cut a length of thread about 2.5 m long (for the 1.2 m track).
cart—string bracket
IDS cart
IDS track
Figure 2
Attaching the cartstring bracket to the
Dynamics Cart
Anchor one end of the thread under the screw of the cartstring
bracket on the cart. Thread the string over and under the large
pulley of the RMS (Figure 3).
5. Pull the thread under and over the top of the small pulley on the
bracket.
6. Pull the thread taunt and secure the end under the thumbscrew of
the cartstring bracket.
7. Adjust the height of the large and small pulleys so the top half of
the string is horizontal and so the bottom half moves without being
obstructed by the track or brackets (Figure 3).
2
Page 7
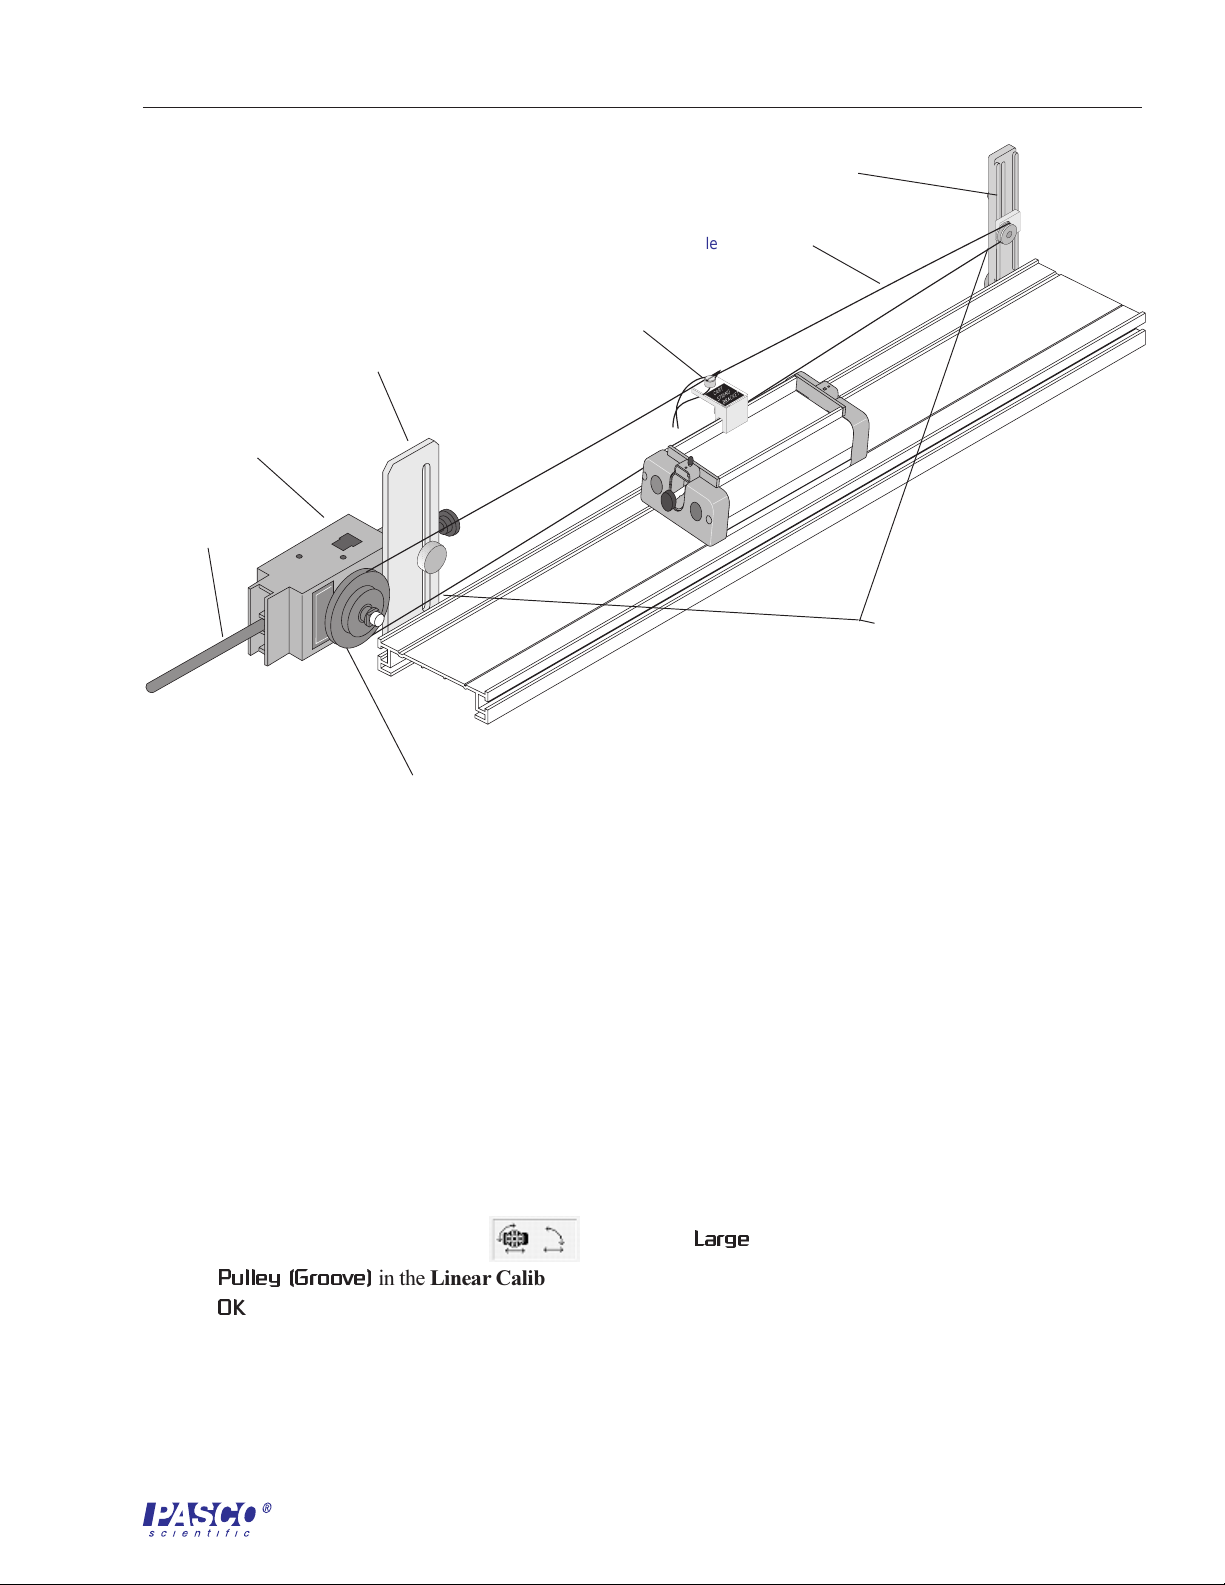
012–06408A RMS/IDS Kit
IDS track pulley
bracket
Top thread is parallel to the table.
cart—string bracket
IDS Mount Accessory
RMS
to computer
interface
Thread is free of obstruction.
large pulley of
3-step pulley
Figure 3
Completed assembly
8. If necessary, adjust the tension of the string by moving the IDS
track pulley bracket along the track.
Science Workshop
1. Insert the digital plugs of the the RMS into digital ports 1 & 2 or
3 & 4 of the computer interface box.
2. Open Science Workshop and set up the RMS in the setup window
(refer to the RMS manual (012-06053A for details).
3. Double-click on the RMS icon (
Pulley (Groove)
OK
.
in the Linear Calibration dialog box. Click
) and choose
Large
3
Page 8

RMS/IDS Kit 012–06408A
➤
Note: The manual has been written with the assumption that
the user has a basic familiarity with Science Workshop and has
access to the Users Guide for Science Workshop. Users can
gain basic skills with Science Workshop by viewing the training
video and by doing the tutorial within Science Workshop. Another
useful resource is the Quick Reference Card for Science
Workshop.
4
Page 9

012–06408A RMS/IDS Kit
Experiment 1: Correlation of velocity and acceleration vectors
for a cart undergoing an elastic collision
Purpose
The purpose of the experiment is to develop a correlated, graphic display of the position,
velocity, and acceleration of a cart during an elastic collision.
Materials and Equipment Required
• Rotary Motion Sensor (RMS) (CI-6538) • Dynamics Track (ME-9435A or ME-9458)
• RMS/IDS Kit • Adjustable End Stop (ME-9448A)
• IDS Mount Accessory (CI-6692) • PASCO computer interface (500 or 700)
• Dynamics Cart (ME-9430 or ME-9454) • Science Workshop version 2.2 or higher
• pages 2 and 3 of this manual • computer
Procedure
Set Up the Equipment
1. Mount on the IDS track the RMS, using the IDS Mount Accessory, and the IDS track
2. Attach the Adjustable End Stop to the end of the track (Figure 1.1). Move the IDS track
IDS Mount Accessory
RMS
to computer
interface
pulley bracket, as directed in the Equipment Setup section (pages 2 & 3) of this manual.
pulley bracket, if necessary.
IDS track pulley bracket
thread
cart—string bracket
Adjustable
End Stop
IDS track
IDS cart
large pulley of the
3-step pulley
Figure 1.1
Equipment setup for experiment 1
5
Page 10

RMS/IDS Kit 012–06408A
3. Place the cart on the track with the magnets facing the Adjustable End Stop, and attach the
cartstring bracket to the cart.
4. Thread the string as directed in the Equipment Setup section of this manual. Check to be
sure the string moves freely without obstruction, is horizontal across the top of the pulleys
and cartstring bracket, and is taunt enough so it does not slip on the pulleys.
Set Up Science Workshop
1. Set up the RMS in Science Workshop as directed in the setup section on page 3 of this
manual.
2. If you are not in the setup window for the RMS, double-click on the RMS icon (
3. Set the Division/Rotation to
4. Double-click on the Sampling Options button and set the sampling rate to 50 Hz. Click
OK
.
5. Drag and drop a Graph display icon to the RMS icon and choose
Velocity (linVel)
pop-up menu.
Collect the data
1. Position the cart at the end of the track with the RMS.
2. Start recording data.
3. Give the cart a gentle push towards the end stop. (Use the amount of force needed for
smooth movement of the cart.)
4. After the cart rebounds from the end stop, stop recording.
, and
1440
. Click OK.
Acceleration (linAcc)
Position (linPos)
from the Choose Calculations to Display
).
,
Questions
6
Analyze the data
1. Sketch the three graphs and label the axis (or print out the graph).
2. Label the graphs for the following: 1) cart moving towards the end stop; 2) the elastic
collision of the cart; 3) cart moving away from the end stop.
1. Just before the collision, what is the velocity and acceleration of the cart?
2. Describe what happens to the carts velocity during the collision. What is happening to the
carts position when it has negative velocity?
3. Describe what happens to the carts acceleration during the collision. What is happening to
the carts position when the acceleration is changing from zero to negative? What is
happening to the carts position when the acceleration is changing from negative to zero?
Page 11

012–06408A RMS/IDS Kit
t
Experiment 2: Comparison of momentum and impulse of an
inelastic collision
Purpose
The purpose of the experiment is to quantitatively compare magnitude of the momentum of a
moving cart with the impulse of its inelastic collision with a stationary object.
Materials and Equipment Required
• Rotary Motion Sensor (RMS) (CI-6538) • ±50 Force Sensor (CI-6537)
• RMS/IDS Kit (CI-6569) • Force Sensor Bracket & Collision Bumpers (CI-6545)
• IDS Mount Accessory (CI-6692) • PASCO computer interface (500 or 700)
• Dynamics Cart (ME-9430 or ME-9454) • Science Workshop version 2.2 or higher
• Dynamics Track (ME-9435A or ME-9458) • computer
• pages 2 & 3 of this manual • block of wood (or similar) about 10 cm in height
Theory
The momentum of a system is determined by the relationship:
P = mv
where P = momentum, m = mass, and v = velocity.
The impulse, or change in momentum, of a collision is determined by the relationship:
t
2
P= Fd
∆
t
1
The area under the curve of a graph of the force versus time, as determined by integrating the
curve, equals the total change in momentum.
In an inelastic collision, where the final velocity is zero, the following relationship exists:
t
2
mv = Fdt
t
1
Procedure
Set Up the Equipment
1. Mount the RMS on the IDS track using the IDS Mount Accessory, and mount the IDS track
pulley bracket on the IDS track (refer to the equipment setup section, pages 2 & 3, of this
manual).
7
Page 12

RMS/IDS Kit 012–06408A
IDS Mount Accessory
IDS track pulley bracket
RMS
cart—string
bracket
IDS cart
Force Sensor
Force Sensor
Bracket
block
IDS track
Figure 2.1
Equipment setup for experiment 2
2. Attach the Force Sensor to the end of the track using the Force Sensor Bracket (Figure 2.1).
Move the IDS track pulley bracket, if necessary.
3. Unscrew the hook from the Force Sensor and replace it with the collision cup that is stored
on the Force Sensor Bracket.
4. Make a cone of clay that is about 1 cm in base diameter and 3 cm in height, and press it onto
the collision cup.
5. Place the cart on the track so the magnets face the Force Sensor.
thread
collision cup
cone of clay
6. Attach the cartstring bracket and connect the string as shown in the equipment setup
section of this manual (page 2). Check to be sure the string moves freely without obstruction,
is horizontal across the top of the pulleys and cartstring bracket, and is taunt enough so it
does not slip on the pulleys.
Set Up Science Workshop
1. Set up the RMS in Science Workshop as directed in the setup section on page 3 of this
manual.
2. If you are not in the setup window for the RMS, double-click on the RMS icon (
3. Set the Division/Rotation to
4. Double-click on the Sampling Options button and set the sampling rate to 50 Hz. Click OK.
5. Drag and drop a Graph display icon to the RMS icon and select Velocity (LinVel) from the
Choose Calculations to Display pop-up menu.
6. Set up the Force Sensor in Science Workshop (refer to the manual for the Force Sensor for
details.
1440
. Click OK.
).
8
Page 13

012–06408A RMS/IDS Kit
7. Drag and drop a Graph display icon to the Force Sensor icon.
Collect the data
1. Hold the cart in place close to the RMS and elevate the track using the wooden block.
2. Begin recording data.
3. Release the cart, allowing gravity to be the sole force of acceleration.
ä
Note: If the impact is not completely inelastic (the cart bumps back
from the clay stopper), repeat using a smaller angle of elevation.
4. Stop recording.
Analyze the Data
1. Use the statistics function of Science Workshop to determine the maximum velocity of the
cart.
2. Determine the mass of the cart
3. Calculate the momentum of the cart.
4. Use the statistics function to integrate the area under the curve.
5. Select the portion of the curve that represents the impact and record the integrated value.
ä
Note: Select by clicking and dragging a box around the desired area.
6. Compare the magnitudes of the momentum of the cart and the impulse of the collision.
Question
1. Does your experimental data show that the momentum of the cart equals the impulse of the
t
2
?)
t
1
collision? (Does
mv = Fdt
9
Page 14

RMS/IDS Kit 012–06408A
Notes:
10
Page 15

012–06408A RMS/IDS Kit
Experiment 3: Conservation of momentum vs. loss of kinetic
energy in an inelastic collision
Purpose
The purpose of the experiment is to quantitatively and graphically demonstrate the conservation
of momentum and the simultaneous loss of kinetic energy as a result of the collision of a cart with
a cart at rest.
Materials and Equipment Required
• (2) Rotary Motion Sensor (RMS) (CI-6538) • Dynamics Track (ME-9435A or ME-9458)
• (2) RMS/IDS Kit (CI-6569) • PASCO computer interface (700)
• (2) IDS Mount Accessory (CI-6692) • Science Workshop version 2.2 or higher
• (2) Plunger or Collision Cart (ME-9430 or ME-9454) • computer
• pages 2 & 3 of this manual
Theory
Before the collision of the two carts, the situation can be represented as follows:
→
v
1
m
1
where m
second cart, and v
= the mass of the first cart, v1 = the velocity of the first cart, m2 = the mass of the
1
= the velocity of the second cart, which is 0.
2
After the collision, the carts stick together and move as one mass, as represented below:
m
1
The momentum of the system at any point in time is expressed as follows:
P=m1v
where m
are the mass and velocity of the first cart and m2v2 are the mass and velocity of the
1v1
second. Since the momentum is conserved after the collision, the following relationship exists:
m1v
+
1
m2v2=m
1
m
2
+
2
v2 (= 0)
v
after
→m
m2v
2
aftervafter
where m
= the mass of the two carts and v
after
= the velocity of the two carts stuck together.
after
The total kinetic energy (KE) of the system at any moment in time is represented by:
KE =
1
m1v1+
2
1
2
m2v
2
11
Page 16

RMS/IDS Kit 012–06408A
In contrast to the case with momentum, KE is not conserved after the collision:
Procedure
RMS
1
2
m1v
1
2
m2v
+
1
2
1
2
≠
2
2
m
aftervafter
2
Part A Inelastic collision of equal masses
Set Up the Equipment
1. Mount the two Rotary Motion Sensors on the IDS track using the IDS Mount Accessories,
and mount the two brackets with small pulley on the IDS track (refer to the page 2 of this
manual and Figure 3.1).
magnetic ends
(Collision Carts)
Velcro tabs
(Plunger Carts)
thread
IDS Mount
Accessory
IDS track
cart 1 cart 2
Figure 3.1
Equipment setup for experiment 3
2. Attach the cartstring brackets to the carts, measure the mass of the carts, and record in
Table 3.1.
3. Place the carts on the track with the Velcro tabs (Plunger Cart) or nonmagnetic ends (Collision
Cart) facing each other.
4. Thread the string as shown in Figure 3.1 and pages 2 & 3 of the manual. Make the necessary
adjustments to the setup to insure that the string is unobstructed and moves freely.
5. Adjust the brackets with small pulley as necessary to insure that the thread is taunt and not
slipping on the pulleys.
Set Up Science Workshop
1. Insert the digital plugs for the RMS connected to cart 1 into digital channels 1 & 2, and the
digital plugs of the RMS connected to cart 2 into digital channels 3 & 4 of the interface
box.
cart—string brackets
IDS track pulley brackets
12
Page 17

012–06408A RMS/IDS Kit
2. Set up the Rotary Motion Sensors in Science Workshop as directed in the setup section on
page 3 of this manual.
3. If you are not in the setup window for the RMS, double-click on the RMS icon (
Set the Divisions/Rotation to 1440. Check to be sure that Large Pulley (Groove) is selected
in the Linear Calibration dialog box. Click OK.
4. Repeat the setup (steps 2 and 3) for the other RMS.
5. Double-click on the Sampling Options button and set the sampling rate to 50 Hz. Click OK.
6. Define the calculation for display for momentum:
Click on the Experimental Calculator icon. Create a new calculation for momentum by
clicking the New button and entering the calculation in the Expression Field using the
, , and keyboard buttons. Type a descriptive calculation name, such as Total
Momenum1, a short abbreviation for the name, and the units of the calculation in the
appropriate fields. Press Enter to accept the calculation entry.
ä
Note: For additional information on entering calculations, refer to
Using Calculations in the Users Guide for Science Workshop and to the
section on the Experiment Calculator Window in the Annotated Windows
section of the Users Guide.
).
7. Define the calculation for display for kinetic energy (refer to step 6 above).
8. Make a Graph display that shows the velocity of cart 1, the velocity of cart 2, the Total
Momentum of the system, and the Total Kinetic Energy of the system plotted vs. time.
Drag and drop a Graph icon to an RMS icon and select four calculations to display,
from the Choose Calculations to Display pop-up menu (these selections will be
modified, so it doesnt matter which calculations are selected). A Graph display with
4 sets of y-axis plots vs. an x-axis plot for time will open.
To set up the y-axis plot of linear velocity for cart 1, click on the Plot Input Menu
button (
) in the top y-axis plot and select
Digital1
and
Velocity (linVel)
from the pop-up menu.
To set up the y-axis plot of linear velocity for cart 2, click on the Plot Input Menu
button in the second y-axis plot and select
Digital3
and
Velocity (linVel)
from the
pop-up menu.
To set up the y-axis plot for Total Momentum, click on the Plot Input Menu button in
the third y-axis plot and select
calculations
and the name for the momentum
calculation from the pop-up menu.
13
Page 18

RMS/IDS Kit 012–06408A
To set up the y-axis plot for Total Kinetic Energy, click on the Plot Input Menu button
in the fourth y-axis plot and select
calculation from the pop-up menu.
calculations
and the name for the kinetic energy
Collect the Data
1. Place the carts as indicated in Figure 3.1.
2. Start recording data.
3. Gently push cart 1 and release it, allowing it to glide to cart 2.
➤
Note: The force of the push should be sufficient to propel both carts
after the collision, but not hard enough to make the carts vibrate or jump
the track. A smooth motion will produce the best results.
4. Stop recording data.
➤
Note: The data can be smoothed, if desired, by using the smooth
function in the Experiment Calculator. To smooth data, modify your
equation in the Experiment Calculator by selecting
(n,x). Set n = 8 at first. If you do not get the desired smoothing result,
experiment with different values of n.
>Special>smooth
Analyze the Data
1. Click the Autoscale Tool on the Graph display.
2. Print the graph or make a sketch of it, and indicate the point at which the carts collided.
3. Explain what is happening in each of the panels before and after the collision.
4. Use the Smart Cursor to measure:
1) the velocity of cart 1 just before the collision.
2) the velocity of the carts just after the collision
3) momentum before and after the collision
4) kinetic energy before and after the collision
Record in Table 3.1.
14
5. Complete Tables 3.1 and 3.2.
Page 19

012–06408A RMS/IDS Kit
Table 3.1
Part A
Part B
Table 3.2
Part A
m
v
1
1
m
v
2
2
m
aftervafter
m1v1 + m2v
m
2
(kg) (m/s) (kg) (m/s) (kg) (m/s) (kg ms/) (kg m/s)
calculated
calculated
½m1v
calculated
calculated
calculated
calculated
2
+½m2v
1
(N s) (N s) %
2
2
measured
½m
calculated
calculated
aftervafter
2
measured
loss of KE
measured
measured
aftervafter
measured
measured
Part B
measured
measured
Part B Inelastic collision of unequal masses
1. Add a mass to cart 2 and repeat the data collection and analysis sections.
➤ Note: You will need to redefine the calculations in the Experimental
Calculator for Total Momentum and Total KE in Graph display with the
new mass values.
Questions
1. How did the inelastic collision effect the total momentum and total kinetic energy in the
system?
2. What effect did friction have on the momentum and kinetic energy of the system?
3. What are other possible contributors to the variation of the experimental data from the
expected (theoretical) values?
15
Page 20

RMS/IDS Kit 012–06408A
16
Page 21

012–06408A RMS/IDS Kit
Experiment 4: Conservation of momentum and kinetic energy
in an elastic collision
Purpose
The purpose of the experiment is to quantitatively and graphically demonstrate the conservation
of momentum and the simultaneous loss of kinetic energy as a result of the collision of a cart with
a cart at rest.
Materials and Equipment Required
• (2) Rotary Motion Sensor (RMS) (CI-6538) • Dynamics Track (ME-9435A or ME-9458)
• (2) Collision Cart (ME-9454) • PASCO computer interface (700)
• (2) RMS/IDS Kit (CI-6569) • Science Workshop version 2.2 or higher
• (2) IDS Mount Accessory (CI-6692) • computer
• pages 2 & 3 of this manual
Theory
Before the collision of the two carts, the situation can be represented as follows:
v
1
m
→
1
where m
second cart, and v
= the mass of the first cart, v1 = the velocity of the first cart, m2 = the mass of the
1
= the velocity of the second cart, which is 0.
2
During an elastic collision, the kinetic energy is converted to potential energy and back into
kinetic energy as the carts bounce off one another. After the collision, the carts accelerate away
from each other, or all the kinetic energy of one cart is transferred to the other cart, which
accelerates away from the first cart has a velocity of zero. When acceleration reaches 0, the
situation can be as represented below:
v
m
1
The momentum of the system at any point in time is expressed as follows:
1
m
after
v2 (= 0)
2
+
m
v
2
after
2
where m
P=m1v
are the mass and velocity of the first cart and m2v2 are the mass and velocity of the
1v1
m2v
+
1
2
second. Since the momentum is conserved after the collision, the following relationship exists:
m1v
+
1
m2v2=m
aftervafter
17
Page 22

RMS/IDS Kit 012–06408A
where m
= the mass of the two carts and v
after
= the velocity of the two carts stuck together.
after
The total kinetic energy (KE) of the system at any moment in time is represented by:
KE =
1
m1v1+
2
1
2
m2v
2
After the elastic collision, kinetic energy and momentum are preserved:
1
2
m1v
1
2
1
+
m2v
2
1
2
=
2
2
2
m
v
1
1
after
after
1
+
2
2
m
v
2
2
after
after
Procedure
Set Up the Equipment
1. Mount the two Rotary Motion Sensors on the IDS track using the IDS Mount Accessories,
and mount the two brackets with small pulley on the IDS track (refer to the page 2 of this
manual and Figure 3.1).
magnetic ends
(Collision Carts)
RMS
IDS Mount
Accessory
Figure 3.1
Equipment setup for experiment 3
2. Attach the cartstring brackets to the carts, measure the mass of the carts, and record in
Table 3.1.
3. Place the carts on the track with the magnetic ends facing each other.
4. Thread the string as shown in Figure 3.1 and pages 2 & 3 of the manual. Make the necessary
adjustments to the setup to insure that the string is unobstructed and moves freely.
IDS track
cart 1
thread
cart 2
cart—string brackets
IDS track pulley brackets
18
5. Adjust the brackets with small pulley as necessary to insure that the thread is taunt and not
slipping on the pulleys.
Page 23

012–06408A RMS/IDS Kit
Set Up Science Workshop
1. Insert the digital plugs for the RMS connected to cart 1 into digital channels 1 & 2, and the
digital plugs of the RMS connected to cart 2 into digital channels 3 & 4 of the interface box.
2. Set up the Rotary Motion Sensors in Science Workshop as directed in the setup section on
page 3 of this manual.
3. If you are not in the setup window for the RMS, double-click on the RMS icon (
Set the Divisions/Rotation to 1440. Check to be sure that
selected in the Linear Calibration dialog box. Click OK.
4. Repeat the setup (steps 2 and 3) for the other RMS.
5. Double-click on the Sampling Options button (
rate to 50 Hz. Click OK.
6. Define the calculation for display for momentum:
Click on the Experimental Calculator icon. Create a new calculation for momentum by
clicking the New button and entering the calculation in the Expression Field using the
, , and keyboard buttons. Type a descriptive calculation name, such as Total
Momenum1, a short abbreviation for the name, and the units of the calculation in the
appropriate fields. Press Enter to accept the calculation entry.
➤
Note: For additional information on entering calculations, refer to
Using Calculations in the Users Guide for Science Workshop and to the
section on the Experiment Calculator Window in the Annotated Windows
section of the Users Guide.
Large Pulley (Groove)
) and set the sampling
).
is
7. Define the calculation for display for kinetic energy (refer to step 6 above).
8. Make a Graph display that shows the velocity of cart 1, the velocity of cart 2, the Total
Momentum of the system, and the Total Kinetic Energy of the system plotted vs. time.
Drag and drop a Graph icon to an RMS icon and select four calculations to display,
from the Choose Calculations to Display pop-up menu (these selections will be
modified, so it doesnt matter which calculations are selected). A Graph display with
4 sets of y-axis plots vs. an x-axis plot for time will open.
To set up the y-axis plot of linear velocity for cart 1, click on the Plot Input Menu
button (
from the pop-up menu.
To set up the y-axis plot of linear velocity for cart 2, click on the Plot Input Menu
button in the second y-axis plot and select
) in the top y-axis plot and select
Digital3
Digital1
and
and
Velocity (linVel)
Velocity (linVel)
from the
19
Page 24

RMS/IDS Kit 012–06408A
To set up the y-axis plot for Total Momenutm, click on the Plot Input Menu button in
the third y-axis plot and select
calculation from the pop-up menu.
To set up the y-axis plot for Total Kinetic Energy, click on the Plot Input Menu button
in the fourth y-axis plot and select
calculation from the pop-up menu.
calculations
calculations
and the name for the momentum
and the name for the kinetic energy
Collect the Data
1. Place the carts as indicated in Figure 3.1.
2. Start recording data.
3. Gently push cart 1 and release it, allowing it to glide to cart 2.
➤
Note: The force of the push should be sufficient to propel both carts
after the collision, but not hard enough to make the carts vibrate or jump
the track. A smooth motion will produce the best results.
4. Stop recording data.
➤
Note: The data can be smoothed, if desired, by using the smooth
function in the Experiment Calculator. To smooth data, modify your
equation in the Experiment Calculator by selecting
(n,x). Set n = 8 at first. If you do not get the desired smoothing result,
experiment with different values of n.
>Special>smooth
Analyze the Data
1. Click the Autoscale Tool on the Graph display.
2. Print the graph or make a sketch of it, and indicate the point at which the carts collided.
3. Explain what is happening in each of the panels before and after the collision.
4. Use the Smart Cursor to measure:
1) the velocity of cart 1 just before the collision.
2) the velocity of the carts just after the collision
3) momentum before and after the collision
4) kinetic energy before and after the collision
Record in Table 4.1.
20
5. Complete Tables 4.1 and 4.2.
Page 25

012–06408A RMS/IDS Kit
Table 4.1
m
(kg) (m/s) (kg) (m/s) (kg) (m/s) (kg) (m/s) (kg m/s) (kg m/s)
v
1
m
1
v
2
2
m
1
after
v
1
after
m
2
after
v
2
after
m1v1 + m2v
calculated
2
measured
m
1
calculated
after
v
Table 4.2
calculated
½m1v
2
+½m2v
1
(N s) (N s)
2
2
measured
½m
calculated
1
after
2
v
+ ½m
1
after
2
after
2
v
1
after
measured
1
after+
m
2
after
v
2
after
measured
Questions
1. How did the elastic collision effect the total momentum and total kinetic energy in the
system?
2. What effect did friction have on the momentum and kinetic energy of the system?
3. What are other possible contributors to the variation of the experimental data from the
expected (theoretical) values?
21
Page 26

RMS/IDS Kit 012–06408A
22
Page 27

012–06408A RMS/IDS Kit
Teachers Notes
Experiment 1
Run #1
P o sition (cm)
-10 0 10 20 30 40 50 60
0 50
Ru n #1
Velo city (cm/ s)
Run #1
Accel eration (cm/s/ s )
-1500 -1000 -500 0
0 0.2 0.4 0.6 0.8 1.0 1.2 1.4 1.6 1.8 2.0 2.2 2.4 2.6
Time (s)
Figure TN-1
Schematic representation of typical experimental results for Experiment 1.
Questions
1. Students can use the Smart Cursor to find the velocity and acceleration of the cart just
before the collision.
2. During the collision, the velocity moves from positive, through zero, to negative. When the
velocity is negative, the cart is moving in the opposite direction.
3. During the collision, the acceleration varies from zero to negative and then back to zero as
the cart rebounds in the opposite direction.
23
Page 28

RMS/IDS Kit 012–06408A
Experiment 2
maximum:
x = 2.5475, y = 53.1248
Run #1
sVel (cm/s)
0 10 20 30 40 50
selected area for
integration value
Run #1
sF orce (N)
0 2.0 4.0 6.0
1.5 1.6 1.7 1.8 1.9 2.0 2.1 2.2 2.3 2.4 2.5 2.6
Time (s )
Figure TN-2
Schematic representation of typical experimental data for Experiment 2 (data smoothed).
Listed below are some typical results for
Experiment 2.
Value for integration under the selected
portion of the Force curve: 0.27 N s
Formula for smoothing data (set in the
Experimental Calculator):
Integr a ti on
area = 0.27073 N s
24
mass of cart = 0.5 kg
V
= 0.54 m/s
max
Force = smooth(8,@A.Force)
Velocity = smooth(8,@1.linVel)
momentum = mv = 0.27 kg m/s (N s)
Question
1. The students data should show that the momentum of the cart equals the impulse of the
t
2
.
t
1
inelastic collision:
mv = Fdt
Page 29

012–06408A RMS/IDS Kit
Experiment 3
Part AInelastic collision of carts with equal mass
collision starts
R un # 3
sVel1 (cm/s)
0 10 20 30 40
Ru n #3
sVel3 (cm/ s)
0 10 20 30 40
R un #3
0 0.10 0.20
sM omentum1 (kg m/s
Run #3
0 0.020 0.040
sTotal Kinetic Energy1
1.0 1.1 1.2 1.3 1.4 1.5 1.6 1.7 1.8 1.9 2.0 2.1 2.2 2.3 2.4 2.5 2.6
Tim e (s )
Figure TN-3
Typical experimental results from Part A of Experiment 3 (smoothed).
Equations entered into the Equation Field of the Experimental Calculator:
Formulae for Momentum and Total Kinetic Energy:
Total Momentum, Part A: .51*@1.linVel*.01+.46*@3.linVel*.01
Total KE, Part A: .51*(.5*(@1.linVel*.01)^2)+.5*(.46*(@3.linVel*.01)^2)
Formulae for smoothing data:
Total Momentum, Part A (smoothed): smooth(8,Momentum1)
Total KE, Part A smoothed: .5*(.51*(smooth(8,@1.linVel)*.01)^2)+.5*(.46*(smooth(8,@3.linVel)*.01)^2)
25
Page 30

RMS/IDS Kit 012–06408A
Part BInelastic collision of carts with unequal mass (m1=½m2)
collision starts
R un #1
sVel1 (cm/s)
0 10 20 30 40
R un #1
sVel3 (cm/s)
0 10 20 30 40
Run #1
0 0.10 0.20
sM omentum2 (kg m/s
Run #1
0 0.020 0.040
sTotal Kinetic Energy2
1.0 1.2 1.4 1.6 1.8 2.0 2.2 2.4 2.6
Time ( s)
Figure TN-3
Typical experimental results from Part B of Experiment 3 (smoothed).
Equations entered into the Equation Field of the Experimental Calculator:
Formulae for Momentum and Total Kinetic Energy:
Total Momentum, Part B (Momentum2): .51*@1.linVel*.01+.96*@3.linVel*.01
Total KE, Part B: .5*(.51*(@1.linVel*.01)^2)+.5*(.96*(@3.linVel*.01)^2)
Formulae for smoothing data:
Total Momentum, smoothed (Part B): smooth(8,Momentum2)
Total KE, smoothed (Part B): .5*(.51*(smooth(8,@1.linVel)*.01)^2)+.5*(.96*(smooth(8,@3.linVel)*.01)^2)
26
Page 31

012–06408A RMS/IDS Kit
Table 3.1
Part A
Part B
Table 3.2
Part A
Part B
m
v
1
1
m
v
2
2
m
aftervafter
m1v1 + m2v
m
2
aftervafter
(kg) (m/s) (kg) (m/s) (kg) (m/s) (kg ms/) (kg m/s)
0.51 0.40 0.46 0 0.96 0.19
0.51 0.37 0.96 0 1.5 0.12
½m1v
calculated
0.041.
calculated
0.035
2
+½m2v
1
(N s) (N s) %
0.041
measured
0.035
measured
2
2
½m
calculated
aftervafter
2
0.017
0.018
measured
calculated
0.011
0.011
measured
calculated
0.20
calculated
0.19
loss of KE
59
69
0.20
measured
0.19
measured
calculated
0.18
calculated
0.18
0.19
measured
0.18
measured
Questions:
1. Total momentum is unchanged after the collision, but the total KE drops significantly after
the collision.
2. Friction gradually reduced both the total momentum and total KE until both reach zero.
Friction reduced the momentum and KE more rapidly in the system with more mass (Part
B).
3. Other variables include vibration in the system and a small amount of elasticity in the
collision.
27
Page 32

RMS/IDS Kit 012–06408A
Experiment 4
collision begins
R un #7
sVel1 (cm/s)
0 10 20 30
R un # 7
sVel3 (cm/s)
0 10 20 30
Ru n #7
0 0.05 0.10 0.15
sM omentum1 (kg m/s
Run #7
0 0.010 0.020
sTotal Kinetic Energy1
0.6 0.7 0.8 0.9 1.0 1.1 1.2 1.3 1.4 1.5 1.6 1.7 1.8 1.9 2.0
Tim e (s)
Figure TN-4.1
Typical results for Experiment 4 (smoothed)
Equations entered into the Equation Field of the Experimental Calculator:
Formulae for Momentum and Total Kinetic Energy:
Total Momentum, Part A: .51*@1.linVel*.01+.46*@3.linVel*.01
Total KE, Part A: .51*(.5*(@1.linVel*.01)^2)+.5*(.46*(@3.linVel*.01)^2)
Formulae for smoothing data:
Total Momentum, Part A (smoothed): smooth(8,Momentum1)
Total KE, Part A smoothed: .5*(.51*(smooth(8,@1.linVel)*.01)^2)+.5*(.46*(smooth(8,@3.linVel)*.01)^2)
28
Page 33

012–06408A RMS/IDS Kit
Table 4.1
m
(kg) (m/s) (kg) (m/s) (kg) (m/s) (kg) (m/s) (kg m/s) (kg m/s)
0.51 0.31 0.46 0 0.51 0 0.46 0.32 0.16
v
1
m
1
v
2
2
m
1
after
v
1
after
m
2
after
v
2
after
m1v1 + m2v
calculated
m
2
1
calculated
after
v
0.15
0.16
measured
Table 4.2
calculated
0.025
2
½m1v
+½m2v
1
(N s) (N s)
0.026
2
2
measured
½m
calculated
1
after
0.024
2
v
+ ½m
1
after
2
after
2
v
1
after
0.023
measured
1
after+
m
2
after
0.15
v
2
after
measured
Questions:
1. Both total momentum and total kinetic energy are conserved after the collision, but the
total KE temporarily drops (having been converted to potential energy during the first half
of the elastic collision) and then rises (as potential energy is converted to kinetic energy in
the second half of the elastic collision.
2. Friction gradually reduced both the total momentum and total KE until both reach zero.
Friction reduced the momentum and KE more rapidly in the system with more mass (Part
B).
3. Other variables include vibration in the system and mechanical effects.
29
Page 34

Page 35

T echnical Support
Feedback
If you have any comments about the product or manual,
please let us know. If you have any suggestions on
alternate experiments or find a problem in the manual,
please tell us. PASCO appreciates any customer
feedback. Your input helps us evaluate and improve our
product.
To Reach PASCO
For technical support, call us at 1-800-772-8700
(toll-free within the U.S.) or (916) 786-3800.
fax: (916) 786-3292
e-mail: techsupp@pasco.com
web: www.pasco.com
Contacting Technical Support
Before you call the PASCO Technical Support staff, it
would be helpful to prepare the following information:
➤ If your problem is with the PASCO apparatus, note:
Title and model number (usually listed on the
label);
Approximate age of apparatus;
A detailed description of the problem/sequence of
events (in case you cant call PASCO right away, you
wont lose valuable data);
If possible, have the apparatus within reach when
calling to facilitate description of individual parts.
➤ If your problem relates to the instruction manual,
note:
Part number and revision (listed by month and year
on the front cover);
Have the manual at hand to discuss your
questions.
Page 36

 Loading...