

Page 1
Instruction Manual
Manual No. 012-08295A
Energy-Transfer
Friction
Model No. ET-8770
Page 2

Page 3

Energy-Transfer Friction Model No. ET-8770
Table of Contents
Equipment List........................................................ 3-4
Introduction ............................................................. 5
Equipment Setup ..................................................... 5-7
Suggested Experiment .................................................. 8
Experiment 1: Using Friction to Heat a Cylinder ...................................................................... 8-9
Sample Data/Results...................................................10
Appendix A: Temperature-to-Resistance Conversion Chart ........ 10
Appendix B: DataStudio Setup Instructions ....................... 11
Appendix C: Creating Equations in DataStudio....................... 12
Appendix D: Technical Support ....................................... 13
Appendix E: Copyright and Warranty Information .................. 13
2
®
Page 4

Model No. ET-8770 Energy Transfer - Friction
Energy Transfer -
Friction
Model No. ET-8770
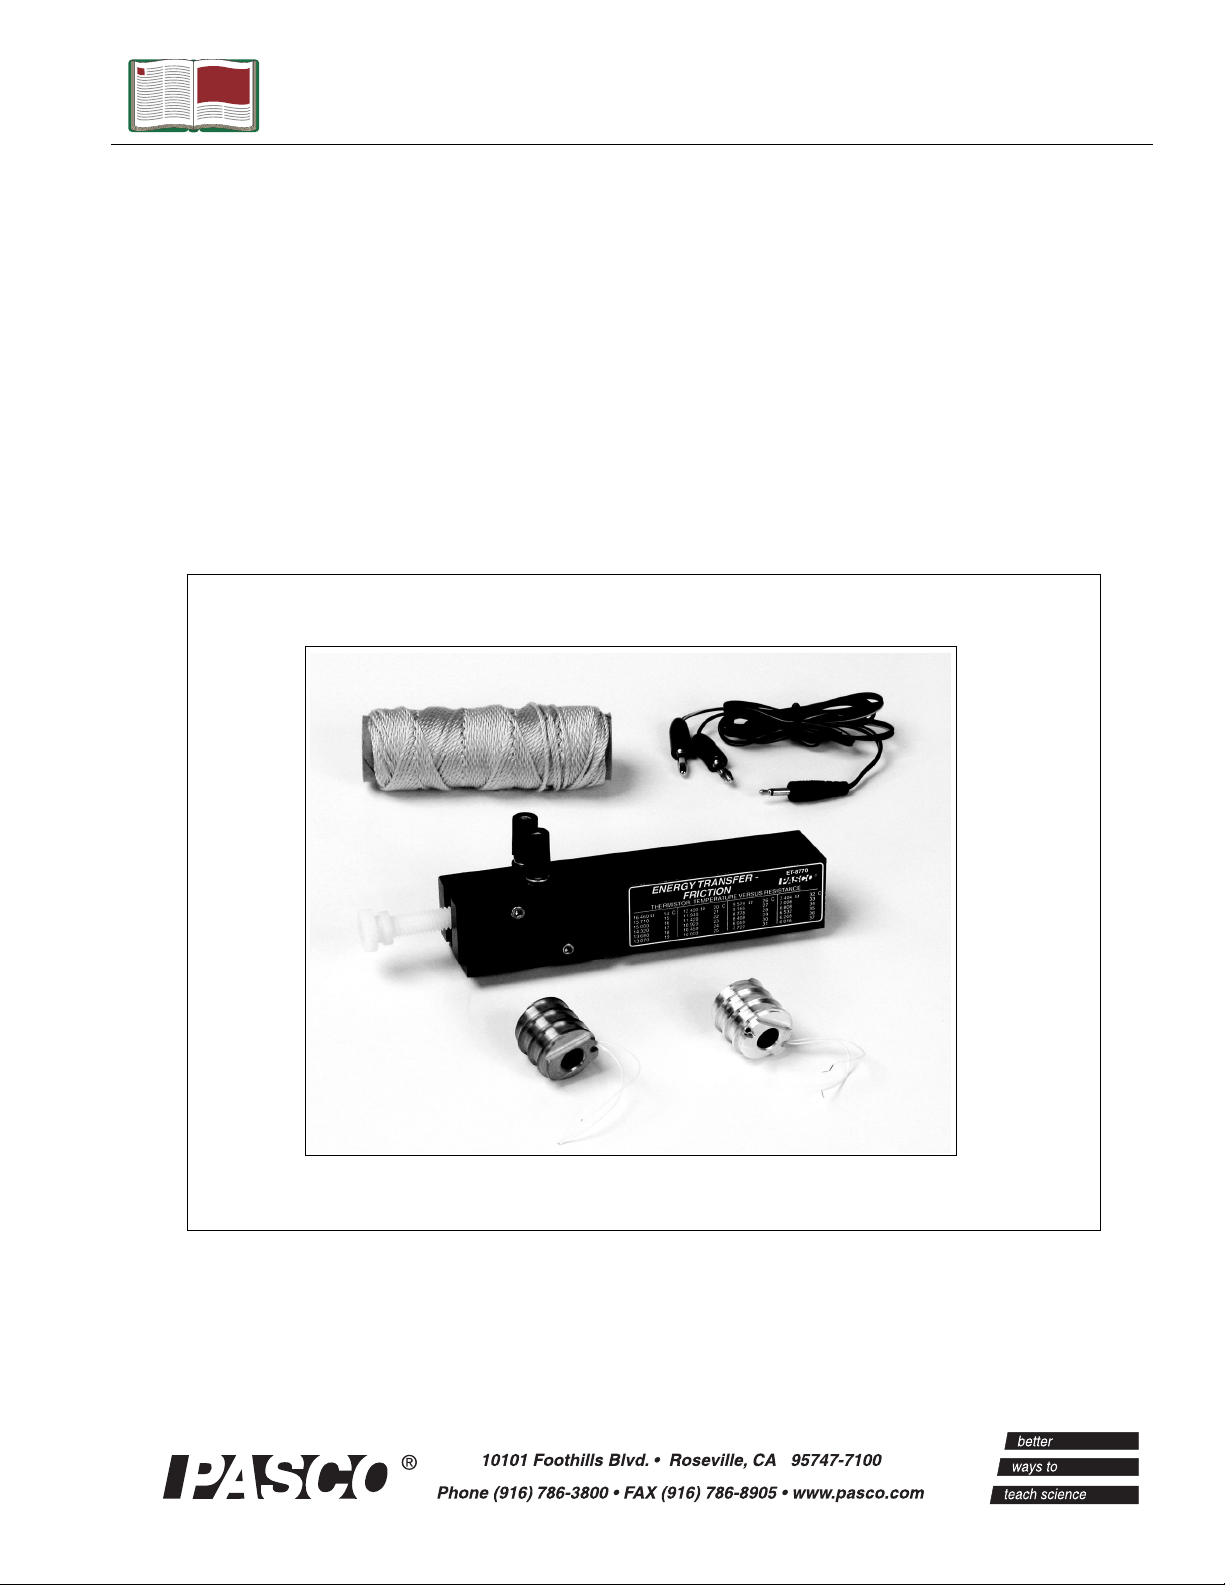
Equipment List
3
1
4
Included Equipment Replacement
1. Base, 29 kg, 15.2 cm
2. Cable Assembly
3. Braided Cord, #18 yellow, 240 feet
4. Brass Thermal Conductor, 10 g
5. Aluminum Thermal Conductor, 4 g
6. Plastic bolt, 1 g
2
5
Model Number*
648-08275
514-08366
699-067
648-08277
648-08276
613-094
*Use Replacement Model Numbers to expedite replacement orders.
Additional Equipment Required
Any PASCO data interface (
DataStudio® software
Hooked Mass Set
Force Sensor or Spring Scales
Rotary Motion Sensor
®
ScienceWorkshop
®
or PASPORT™)
Various
(See PASCO catalog)
Various
(See PASCO catalog)
SE-8759 or SE-8705
PS-2104 or CI-6537 or
SE-8718
PS-2120 or CI-6538
3
Page 5

Energy Transfer - Friction Model No. ET-8770
Additional Equipment Required
Temperature Sensor or Thermistor Sensor or Ohmmeter/Multimeter
C-Clamp
PS-2517*
or PS-2125* or PS-2134*
or CI-6527A**
SE-7285 or SE-7286
A computer
*PASCO’s PASPORT sensors (with PS- prefix) require a PASPORT interface for operation.
**PASCO’s
ScienceWorkshop
sensors (with CI-prefix) require a
ScienceWorkshop
interface for
operation.
NA
4
®
Page 6

Model No. ET-8770 Energy Transfer - Friction
Introduction
The Energy Transfer - Friction (ET-8770) apparatus is for
demonstrating frictional heating. With DataStudio software and a
Force and Rotary Motion Sensor, real-time computer measurement of
this frictional work can be observed.
The apparatus includes a friction base, which was specifically
designed for the attachment of a conductive cylinder, thermistor,
Temperature Sensor or ohmmeter, and a Rotary Motion Sensor.
A conductive cylinder with an embedded 10K thermistor fits into a slot
in the friction base. The cylinder is grooved for the placement of a
braided cord, which wraps around the metal cylinder and pulley of a
PASCO Rotary Motion Sensor.
One aluminum and one brass cylinder, each with a 10K thermistor, are
provided with the apparatus to allow the student to compare the
differences between aluminum and brass with frictional heating.
When the braided cord is attached to a Force Sensor and the student
pulls on the cord, friction is created between the cylinder and the cord.
The frictional work done on the metal cylinder causes an increase in
temperature, which is measured in real-time using a Temperature
Sensor.
Equipment Setup
1. Use a C-clamp to fasten the base to the left-front edge of a table.
2. Weigh the cylinder and record its mass. (If the cylinder is already
installed: Remove the cylinder by turning the plastic bolt
counterclockwise.)
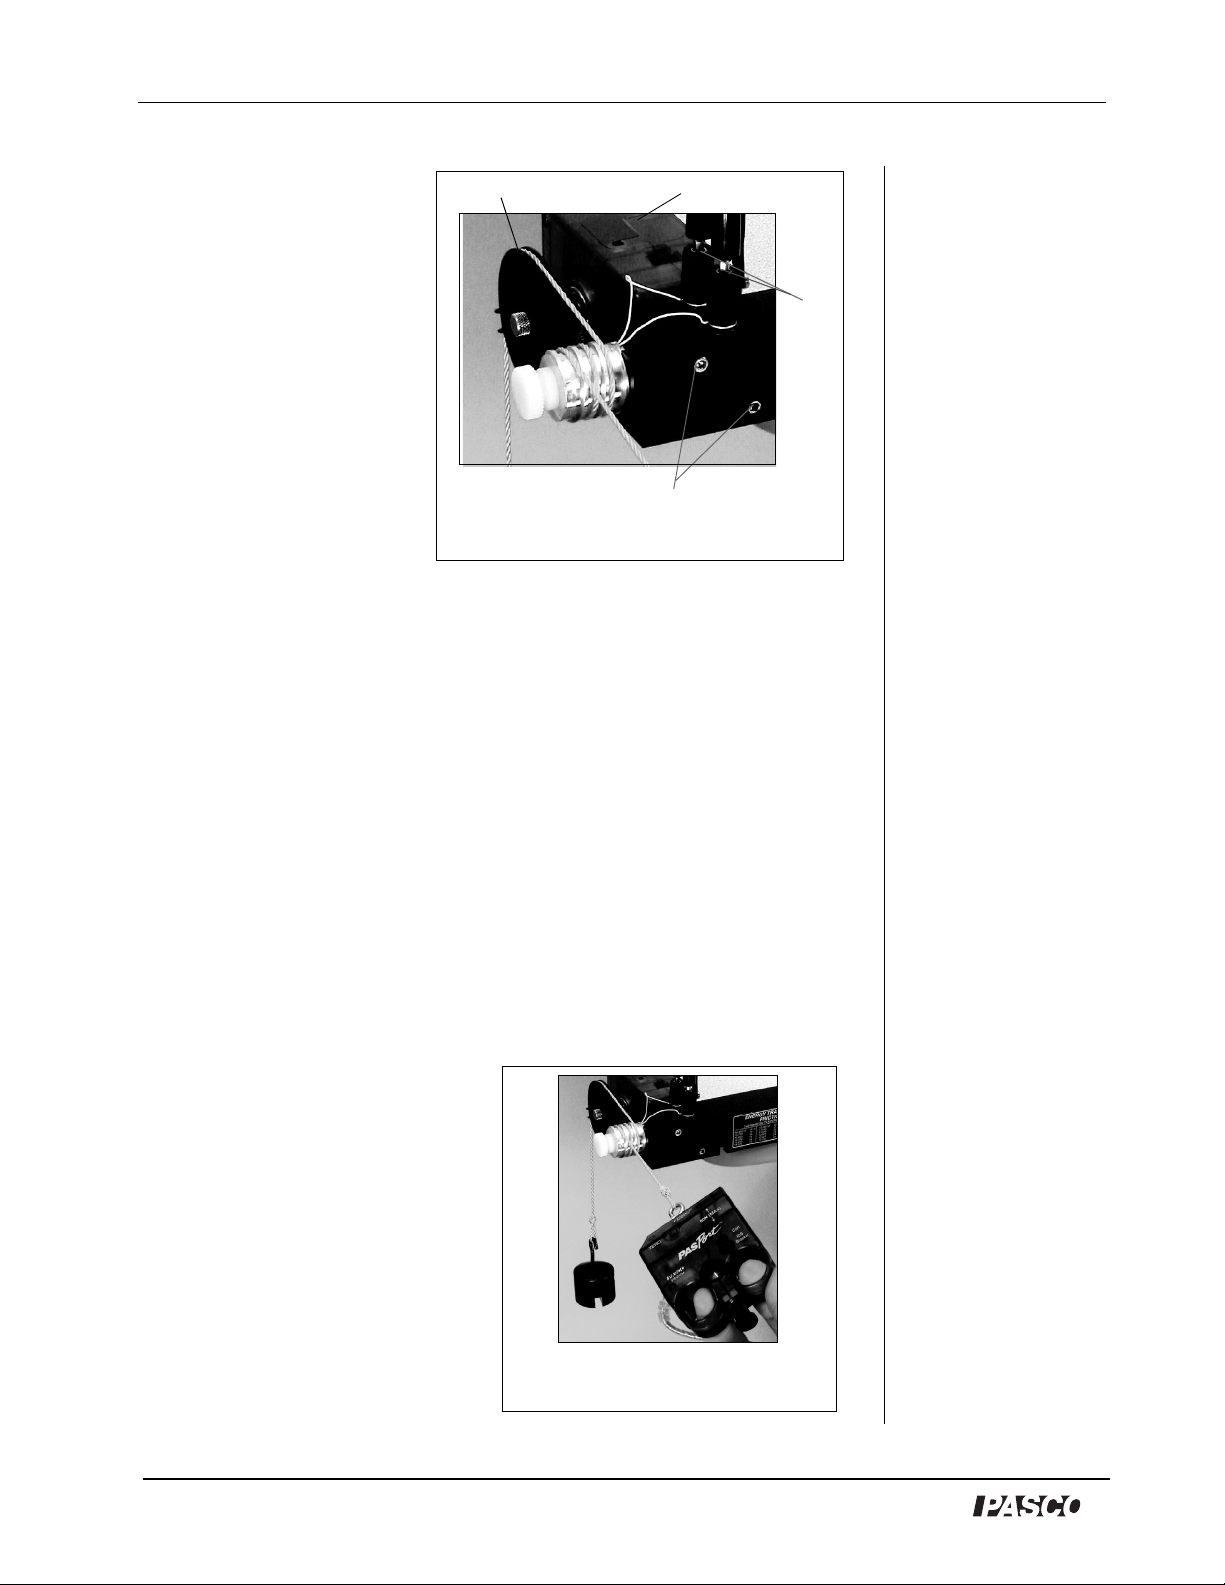
3. Insert the plastic bolt into
the cylinder.
bolt
cylinder
thermistor
banana jacks
wires
4. Place the cylinder next to
the side of the base that
has the hole. Turn the
cylinder, such that the
indented portion is at the
Figure 1: Inserting the cylinder
into the Friction Base
top, with the wires
pointing toward the base of the banana jacks (Figure 1).
5. Turn the bolt clockwise to fasten the cylinder to the apparatus.
®
5
Page 7
Energy Transfer - Friction Model No. ET-8770
6. Loosen the knobs on
the banana jacks and
Pulley
Rotary Motion Sensor
insert the stripped
portion of the wire
in the holes under
the jacks. (Note: Do
jacks
not kink the wires.
(Figure 1).) Screw
the knobs on the
banana jacks to hold
the wires in place.
Do not overtighten.
7. With the cable
Figure 2: Setup with Rotary
Motion Sensor
Attachment Screws
assembly, connect a
Temperature Sensor
(or Thermistor Sensor or ohmmeter) to the thermistor jacks.
(Figure 2).
8. Attach the Rotary Motion Sensor (RMS) to the inside of the base
(using the allen wrench on the cap screw of the RMS). Attach the
RMS, such that the large pulley faces toward the cylinder, but the
away from the table’s edge (Figure 2).
Note: If a Rotary Motion Sensor is not available, an introductory lab
can still be done using a simple average of the work performed, where
the work = average force times distance. Without a Rotary Motion
Sensor, you can measure the distance and manually calculate the work
performed. If a Force Sensor is not available, use a spring scale.
9. Hook a 24” piece of yellow cord to a hanging mass (about 200 g)
and a Force Sensor.
10. With one hand, hold the
hanging mass while you use
the other hand to wrap the
cord over the top groove in
the large pulley and over
each groove in the cylinder
(Figures 2 and 3).
11. Connect the Temperature,
Force and Rotary Motion
Sensors to a computer
interface (ScienceWorkshop
or PASPORT interface).
Figure 3: Wrapping the cord
around the pulley and cylinder
6
®
Page 8

Model No. ET-8770 Energy Transfer - Friction
12. In DataStudio, set up
your experiment. (For
instructions, see
appendices B and C of
this manual).
13. In DataStudio, click the
Start button to begin
collecting data.
Note: If using an
ohmmeter, use the
conversion chart on the
front of the friction base to
find the temperature
Figure 4: Complete Setup
change. (If the resistance
reading is outside the range
on the friction base, see the conversion chart in Appendix A).
®
7
Page 9

Energy Transfer - Friction Model No. ET-8770
Suggested Experiment:
Experiment 1: Using Friction to Heat a Cylinder
Equipment Required
Energy Transfer Friction Apparatus
(ET-8770)
Force Sensor (PS-2104 or CI-6537) Rotary Motion Sensor (PS-2120
Temperature Sensor (PS-2515) or
CI-6505 or CI-6527A
DataStudio software (various, see
PA S C O c at a lo g)
Set of Hanging Masses (SE-8759
or 8705)
or CI-6538)
Computer Interface
(
ScienceWorkshop
C-clamp (SE-7285 or SE-7286)
Introduction:
In this experiment, the student
pulls on a cord wrapped around a
pulley, which in turn does the
work to overcome friction
between the cord and the cylinder.
The energy created from the
friction heats the cylinder. With a
Force Sensor connected to an
interface, the computer accurately
measures the work done by the
student.
Figure 1: Experiment
Setup
or PASPORT)
Procedure:
1. Follow the setup instructions on page 5-7 of this manual.
2. Tare the Force sensor in a horizontal position with no force.
3. Cut a short section (about 2 feet) of yellow cord, and tie a loop in
each end. Hook one end to the Force Sensor and the other end to a
mass hanger.
Note: The cord may wear out after a few trials. Replace the cord
before each lab experiment.
4. In DataStudio, enter the mass and specific heat of the cylinder as
experiment constants in the heat equation.
8
®
Page 10

Model No. ET-8770 Energy Transfer - Friction
5. Hang a large enough mass (around 200g) from the pulley, so that
when the cord is pulled back, the Force Sensor moves back
torwards the cylinder. If the mass is too big, you will overshoot the
sensor’s measurement range when you pull. In DataStudio, watch
the small Force vs. Time graph as you pull. Adjust the hanging
mass so that the force doesn’t exceed 50 N.
Note: When using sensors
6. Connect the Force, Rotary Motion, and Temperature Sensors to a
ScienceWorkshop or PASPORT interface. (For DataStudio setup
instructions, see Appendices B and C.)
7. Set the sample rate for both the Force and Rotary Motion Sensors to
50 Hz. Set the sample rate for the Temperature Sensor to 2 Hz (for
PASPORT sensors) or 50 Hz (for ScienceWorkshop sensors).
8. In DataStudio, create a graph of Force vs. Time.
9. In DataStudio, click the Start button and pull on the Force Sensor
with full, even strokes. (Note: With each pull, let the mass pull the
cord back. Don’t let loose too much on the cord, or the cord will
fall out of the groove.)
10. Let the computer keep running after you stop doing work until the
peak temperature is reached.
11. Find the area (work done by the student) under the power vs. time
graph. Compare the heat energy generated in the cylinder to the
total work done. What percentage is transferred? Use the
equation, percent (%) = (heat)/(work) x 100.
to collect data, all sensors
must be of the same type
(either all PASPORT
sensors or all ScienceWorkshop sensors) and
connect to the same type
of interface as the sensor.
Connect all PASPORT
sensors to a PASPORT
interface(s); connect all
ScienceWorkshop sensors
to a ScienceWorkshop
interface(s). Do not mix
PASPORT and ScienceWorkshop sensors in this
experiment. DataStudio
will not run with both
types of sensors connected
at the same time. For
either PASPORT or
ScienceWorkshop instructions, see appendices B
and C in this manual.
12. (Optional): Repeat the experiment with the brass cylinder and
compare your results with the aluminum cylinder. Which cylinder
heated faster? Why?
Note: The work done to heat the cylinder is from the student
overcoming the friction, not from the change in gravitational potential
energy of the hanging mass. The change in gravitational potential
energy does no net work.
®
9
Page 11

Energy Transfer - Friction Model No. ET-8770
Sample Data/Results
Appendix A: Resistance-to-Temperature Conversion
Table
Resistance
(Ohms)
5,776 38 3,888 48
5,546 39 3,742 49
5,326 40 3,602 50
5,118 41 3,468 51
4,918 42 3,340 52
4,726 43 3,216 53
4,544 44 3,098 54
4,368 45 2,986 55
4,202 46 2,878 56
4,042 47 2,774 57
Note: The front of the friction base includes a printed table of resistance-totemperature conversions (from 15°C to 37°C).
Temperature
(Celsius)
Resistance
(Ohms)
Temperature
(Celsius)
10
®
Page 12

Model No. ET-8770 Energy Transfer - Friction
Appendix B: DataStudio Setup Instructions
The instructions below outline the recommended experiment setup for PASPORT and
ScienceWorkshop sensors. Follow the steps specific for the type of sensor and interface (i.e.
PASPORT or ScienceWorkshop). (For a setup example, see “Sample Data” in this manual.)
Procedure Steps
PART I: Plug the
sensors into the
interface:
PART II: Set up your
experiment
PASPORT: a) Plug the Force, Rotary Motion, and Temperature Sensors
into a PASPORT interface. b) Connect the PASPORT interface (i.e.
USB Link, PowerLink, etc.) to a USB port on your USB-compatible
computer. c) When the PASPORTAL window opens, select “Launch
DataStudio.”
OR
ScienceWorkshop: a) Plug the Force, Rotary Motion, and Temperature
Sensors into a
PASPORT: a ) In the Experiment Setup window, scroll to the Force
Sensor, select “pull, positive” and set the sample rate to 50 Hz. b) Scroll
to the Rotary Motion Sensor, select “large pulley, ” “linear velocity,” and
set the sample rate to 50 Hz. c) Scroll to Temperature Sensor, select
“Celsius” and set the sample rate to 2 Hz.
OR
ScienceWorkshop: a) In the Welcome to DataStudio window, double
click “Create Experiment.” b) In the Sensors list, click and drag the Force
Sensor, Rotary Motion and Temperature Sensor icons to channels on
the picture of the interface (i.e. to the same letters in which you have the
sensors connected.) c) In the Experiment Setup window, double click
on each of sensor icons to set the sample rate and select the
measurement units: i) Force Sensor - In the General tab, set the sample
rate to 50 Hz. In the Measurement tab, select “Force(N).” Click OK.
(Note: If calibrating, use the Calibrate tab to tare the Force Sensor at 0
Newtons.) ii) Rotary Motion Sensor - In the General tab, set the sample
rate to 50 Hz. In the Measurement tab, select “position(m)” and “velocity
(m/s).” In the Rotary Motion Sensor tab, select “1440” and “large pulley
(groove).” Click OK. iii) Temperature Sensor - In the General tab, set the
sample rate to 50 Hz. In the Measurement tab, select “C.” Click OK.
ScienceWorkshop
interface. b) Launch DataStudio.
PART III: Create the
power and heat
equations
a) Power equation: Power=F*v, where F= force in Newtons and
v=velocity in m/s. b) Heat equation: Q=m*c*(max(T) - min(T)), where Q
= heat in joules, c=0.896 J/g
°C for the aluminum cylinder (or 0.377 J/g
°C for the brass cylinder), and T=the temperature in degrees Celsius.
[Select “data measurement” for the “F” and “v” and “T” variables. Create
an experiment constant for “m” (the mass) and “c” (the specific heat).
(For instructions, see Appendix C or the DataStudio online help.)]
PART IV: Collect Data a) From the Data list, drag each of the parameters (i.e force,
temperature, power) over a y-axis in a separate graph display. b) Drag
the heat parameter to a Digits display. c) Click the Start button on the
main toolbar.
®
11
Page 13

Energy Transfer - Friction Model No. ET-8770
Appendix C: Creating Equations in DataStudio
Step 2: Type in and/or
build the equation.
(Use the Scientific,
Statistical, and Special
menus, and the
trigonometric functions
to build the equation.)
Click the Accept button.
Step 3: Define the
dependent variables.
Under “Variables,” use
the down arrow to select
a variable or constant,
etc. and click OK.
(Example: For “T,” select
“Data Measurement.” In
the pop-up, select
“Temperature,” and click
OK. Under Variables, for
“m” and “c”, proceed to
step 4, creating the
experiment constant.)
Step 1: Create a new equation. On the main toolbar,
click the Calculate button to open the Calculator
dialog. In the Calculator dialog, click the New button.
Step 4: Enter any experiment
constants. Use the (+) button to
create an experiment constant. Click
New, then enter the name, value and
units for the constant. Click the
Accept button. Go back to the
Variables menu and select “experiment
constant” (e.g. for “m” and “c”). Click
OK.
Step 6: Save the
equation. Click
the Accept
button.
Step 5: Label the
units. Click on the
Properties button to
open the Data
Properties dialog and
enter the name and
units. (Example: In
the Data Properties
dialog, type “specifc
heat” in the name box
and “J/g
units box.)
°C ” in the
12
Note: Each time you build a new equation, click the New button. To edit a completed
equation, double click on the equation in the Data list, make your changes, and click the
Accept button to save your changes.
®
Page 14

Model No. ET-8770 Energy Transfer - Friction
Appendix D: Technical Support
For assistance with the Energy-Transfer Friction Apparatus (ET-8770) or any other PASCO
products, contact PASCO as follows:
Address: PASCO scientific
10101 Foothills Blvd.
Roseville, CA 95747-7100
Phone: (916) 786-3800
FAX: (916) 786-3292
Web: www.pasco.com
Email: techsupp@pasco.com
Appendix E: Copyright and Warranty Information
Copyright Notice
The PASCO scientific 012-08295A Energy - Transfer Friction Manual is copyrighted and all
rights reserved. However, permission is granted to non-profit educational institutions for
reproduction of any part of the 012-08295A Energy - Transfer Friction Manual, providing
the reproductions are used only for their laboratories and are not sold for profit. Reproduction
under any other circumstances, without the written consent of PASCO scientific, is
prohibited.
Limited Warranty
PASCO scientific warrants the product to be free from defects in materials and workmanship
for a period of one year from the date of shipment to the customer. PASCO will repair or
replace, at its option, any part of the product which is deemed to be defective in material or
workmanship. The warranty does not cover damage to the product caused by abuse or
improper use. Determination of whether a product failure is the result of a manufacturing
defect or improper use by the customer shall be made solely by PASCO scientific.
Responsibility for the return of equipment for warranty repair belongs to the customer.
Equipment must be properly packed to prevent damage and shipped postage or freight
prepaid. (Damage caused by improper packing of the equipment for return shipment will not
be covered by the warranty.) Shipping costs for returning the equipment after repair will be
paid by PASCO scientific.
®
13
 Loading...