

Page 1

Instruction Manual
Installation Instructions .......................... page 1
Experiment Setup Window..................... page 6
Calibration..............................................page 8
No. 012-09316C
DataStudio New Features Guide
Installation
On a computer running Windows XP, Windows Vista, Windows 7, or Mac OS X, you must log in with administrative privileges to install DataStudio and related software, after which they can be used by any user.
Alternatively, on a computer running Windows Vista or Windows 7, visit www.pasco.com, search for “TechNote
583” and follow the instructions found there.
If you have questions, please contact PASCO Technical Support (see last page for contact information).
Complete installation of DataStudio and related software involves the following steps, described in detail in this
document: (I) Software Installation, (II) Software Licensing, and (III) Additional Recommendations.
Materials
• DataStudio CD or downloaded DataStudio installer
You can download the installer from www.pasco.com/software.
• DataStudio Serial Number and License Key (if owned)
DataStudio Lite, the free version of the software, does not require a serial number and licence key. If you have purchased
DataStudio, you will find the license information on the registration card inside the license agreement envelope.
• WavePort Serial Number and License Key (if owned)
WavePort is a separately licensed software plug-in. If you have purchased a WavePort license, you will find the serial number and license key on the registration card inside the WavePort license agreement envelope. (If you own a WavePort CD
without a license key, you do not need a license key, but you must install WavePort from that CD before installing DataStudio.)
Page 2

DataStudio New Features Installation
®
DataStudio Icon
I. Software Installation
1. Log onto the computer with an administrator
account.
2. Insert the DataStudio CD. In Windows, the
Launcher (right) will open automatically. On a
Mac, double click the CD icon on the desktop to
open the Launcher.
Select Install DataStudio from the Launcher
interface.
Alternatively, you can download and run the latest version of DataStudio from www.pasco.com/software.
3. Follow the on-screen installation instructions.
4. Note the point at which you are given the option of installing WavePort. Wave-
Port is an optional software plug-in for analysis and generation of sound through
the computer’s sound card. Even if you have not purchased a WavePort license,
installation of WavePort is recommended in order to take advantage of a free
30-day demonstration.
5. When the installer has finished, click the Finish button to exit. If you are
prompted to restart the computer, restart and log back in with an administrator
account. If you installed from a CD, keep the CD in the drive until all installation
tasks have completed.
The CD is not required to run DataStudio after it has been installed.
After installation, do not move the DataStudio folder, as some external dependencies are set
during installation.
II. Software Licensing
1. Launch DataStudio using one of the following methods.
• On a computer running Windows, double-click the DataStudio icon on the
desktop.
• On a Mac, open the Applications > DataStudio folder and run DataStudio.
2. When DataStudio launches for the first time, the License Manager
(right) opens.
In the Product list, click DataStudio to select it, then do one of the
following.
• If you own a DataStudio license, enter your Serial Number
and 28-letter License Key, then select Apply.
• If you do not own a DataStudio license, click Enter DataStu-
dio Lite Key.
DataStudio Lite will be permanently installed and DataStudio’s
full features will be active for 90 days.
2
Page 3
Model No. CI-6870 Installation
®
3. If you installed WavePort, click WavePort in the Product list to select it, then do
one of the following.
• If you installed WavePort from a separate CD, a WavePort license is
automatically applied for you.
• If you own a WavePort license key, enter your Serial Number and 28-letter
License Key, then click Apply.
• If you do not own a WavePort license, click Enter Demonstration Key. The
WavePort plugs-in will be active for 30 days.
4. Click Close to save the licensing information.
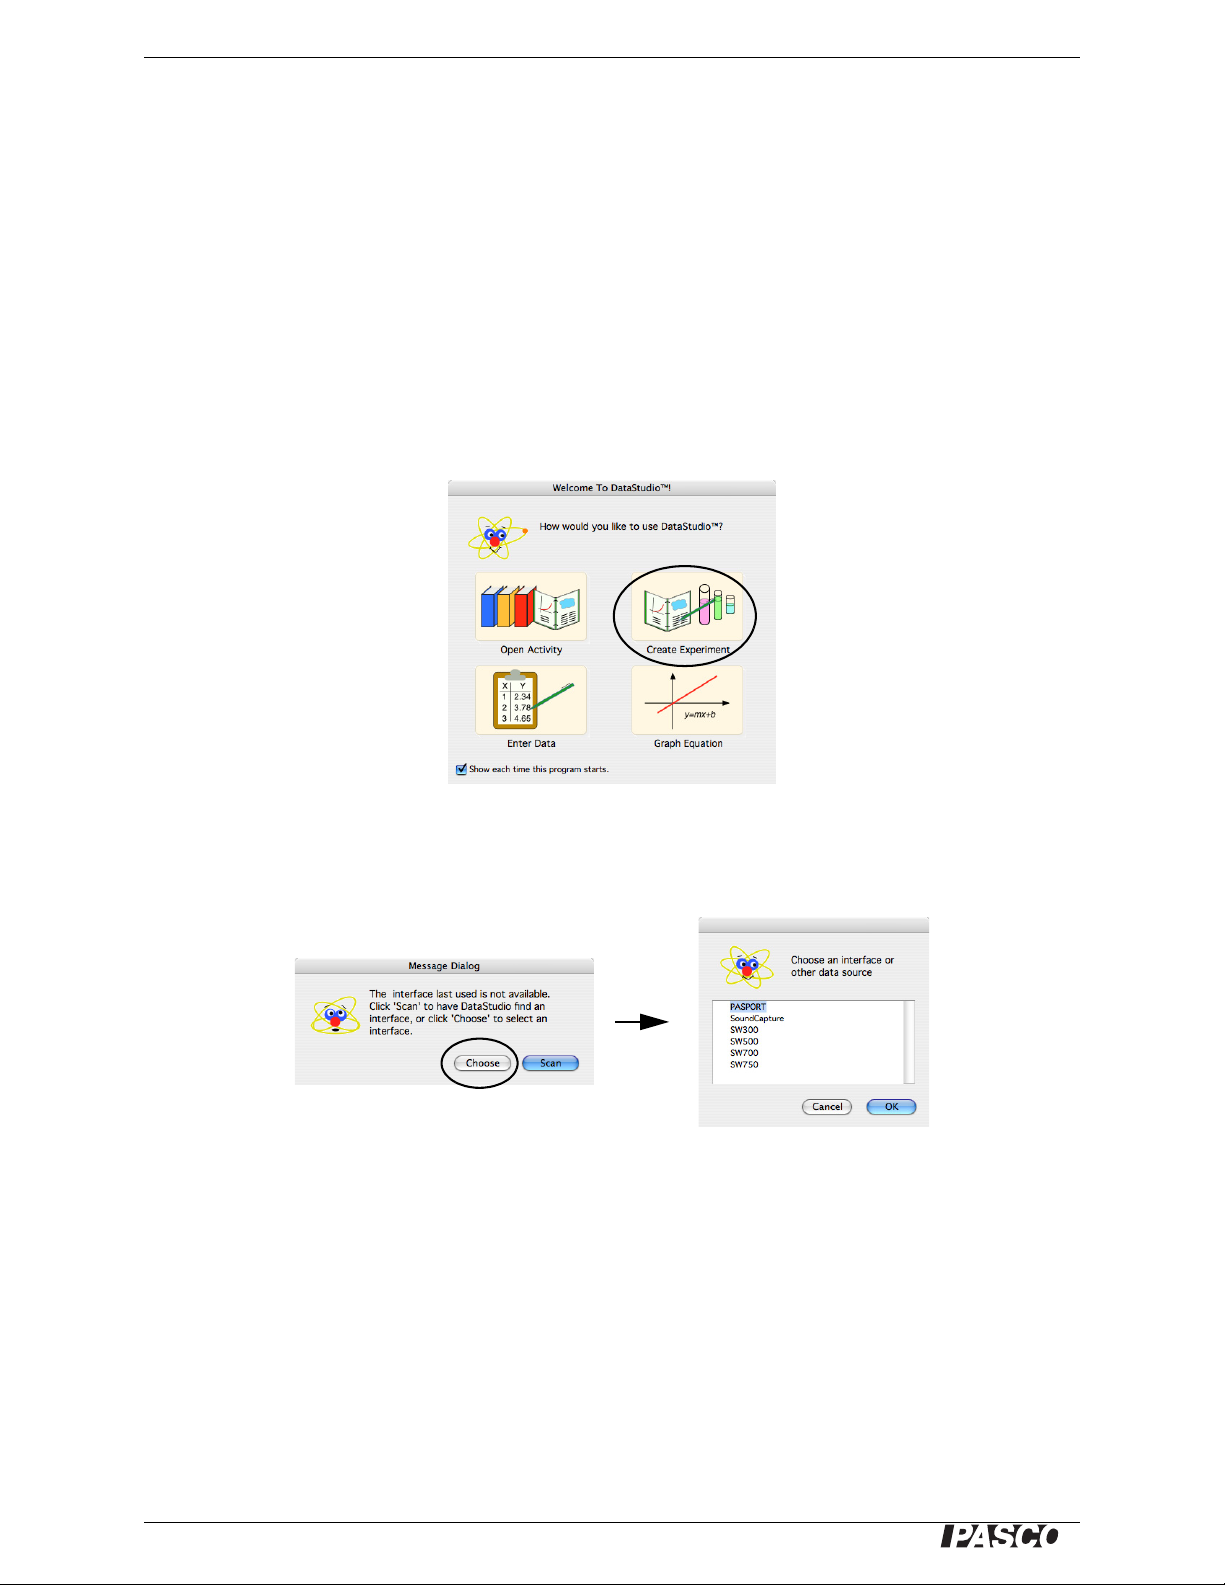
5. The Welcome to DataStudio window will open. Click Create Experiment.
6. If you see the message shown below, click Choose; then select the type of inter-
face you will be using (or select SoundCapture if you will be using WavePort to
analyze sound) and click OK.
To make later changes to DataStudio’s licensing, open the Help menu and select Change
License Key. To switch to a different interface or data source, click the Experiment menu and
select Change Interface.
3
Page 4

DataStudio New Features Installation
®
III. Additional Recommendations
Install QuickTime
DataStudio’s movie playback feature requires the free QuickTime Player version 5 or
later. Many computers already have QuickTime installed, but if you need to install or
upgrade it, do the following.
1. Log in as an administrator and
• insert the DataStudio CD, open the
Launcher (if it does not open automatically)
and select Download QuickTime to open the
QuickTime website;
• or go to www.apple.com/quicktime/down-
load/.
2. Follow the instructions on the QuickTime website to download and install the free version of
QuickTime.
Install PASCO Curriculum
Your school may have purchased curriculum like these from PASCO or
its partners.
PASCO’s curriculum products typically consist of printed experiment
instructions with a CD installer for corresponding DataStudio experiment
configuration files. Run the CD installer to place these files on the hard
drive for easy access by teachers and students.
To install any DataStudio curriculum, log in as an administrator and follow the installation instructions accompanying the curriculum products.
• On computers running Windows, curriculum installers place the DataStudio
experiment configuration files in c:\Program Files\DataStudio\elabs\.
• On Macintosh computers, curriculum installers place the DataStudio experiment
configuration files in the folder Applications:DataStudio:eLabs or
DataStudio™:eLabs.
After the computer restarts, files in the eLabs folder will appear in the
PASPortal window when a related PASPORT sensor is plugged in, as
shown for a Temperature Sensor (right).
To prevent accidental modification of DataStudio experiment configuration files
• on a computer running Windows, use Windows Explorer to turn on
the files’ Read-Only property;
• on a Mac, use the Finder to turn on the files’ Locked property.
4
Page 5

Model No. CI-6870 Installation
®
Run the DataStudio Tutorial
The DataStudio Tutorial included on the DataStudio
installer CD is an interactive multimedia orientation
for teachers who are new to DataStudio. Run the
tutorial from the CD as described below. (An administrator account is not required.)
1. Ensure that DataStudio and QuickTime are
installed.
2. Insert the DataStudio CD, open the Launcher (if
it does not open automatically) and click Launch
Tutorial.
Because of its large multimedia files, the tutorial is designed to be run directly from the DataStudio CD. However, if you have approximately 200MB of free hard-drive space, you can copy the
Tutorial folder from the DataStudio CD to your hard drive and run the tutorial file (Tutorial.exe in
Windows, or Tutorial.apm on a Mac) from there.
Additional copies of the DataStudio Tutorial on CD can be requested at
www.pasco.com/training/tutorialcd/tutorial_order.html.
5
Page 6

DataStudio New Features Experiment Setup Window
®
Setup Buttons
Interfaces, Sensors
and Instruments
Selected Sensor
Name and
Number
Measurements
Sample Rate
Sensor-specific Constants
(click tab to view)
Sensor
Sampling Options
Experiment Setup Window
To support PASCO’s growing range of interfaces and sensors, DataStudio 1.9.6 features a new Experiment Setup window.
In many cases, when you are using PASPORT sensors, it is unnecessary to use the
Setup Window because PASPORT interfaces and sensors are set up automatically
when you connect them to the computer. Open the Setup window if you are using ScienceWorkshop interfaces or sensors, or other instruments for data collecting, or if you
want to change the settings of a PASPORT sensor.
To Open the Setup Window
Click the Setup Button in the main tool bar.
Setup Window Overview
Interfaces, Sensors, and Instruments
The main field of the Setup window displays pictures and icons representing the interfaces, sensors, and other data-collection instruments that are part of the current experiment. Devices that are connected to the computer often appear here automatically.
(You can manually add devices that are not yet connected to the computer or that do
not appear automatically. You can also manually remove sensors or instruments that
appear here. See below for instructions.)
A box appears around one of the sensor (or instrument) icons indicating the sensor
that is selected for configuration. To select different sensor icon, click it.
The name and product number of the selected sensor are displayed below the main
field.
6
Page 7

Model No. CI-6870 Experiment Setup Window
®
*To learn more about the
Data Summary, open the
Help menu and search
for “Summary.”
Click a port on the picture of an interface to manually add a sensor. Press the Backspace or Delete key on the keyboard to remove the selected sensor from the experiment.
Measurements
The Measurements section of the Setup window lists all of the measurements made
by the selected sensor. A check box next to each measurement name controls whether
that measurement appears in the Data Summary.* Where applicable, the Unit of Measure field next to each measurement is active, from which units can be selected.
Sensor-specific Constants
For certain sensors, constants can be defined to control how the sensor makes its measurements. When a sensor with user-definable constants is selected, a special tab
appears next to the measurements tab. Click the tab to view and change the constants.
Sample Rate
The sample rate of each sensor connected to a PASPORT interface is set individually.
All sensors connected to a single ScienceWorkshop interface share a sample rate.
Click the arrow buttons ( ) to adjust the sample rate of the selected sensor. Click the
units field to select Hz, seconds, minutes, or hours. When units of Hz are selected, the
sample rate value indicates the number of samples per second. When units of seconds,
minutes, or hours are selected, the sample rate value indicates the time between samples.
Sensor Sampling Options
The Sensor Sampling Options are available for certain sensors and become active
when one of those sensors is selected.
Setup Buttons
Add Sensor or Instrument
Click the Add Sensor or Instrument button to manually add a sensor or other data-collection instrument. A window will open containing complete lists of PASPORT sensors, ScienceWorkshop analog sensors, ScienceWorkshop digital sensors, and other
data-collection instruments.
When you manually add a PASPORT sensor (that is not physically connected), it is
initially not associated with a port. After you have physically plugged in the sensor,
the manually added sensor icon will automatically associate with the port that the
physical sensor is connected to.
When you click the Add Sensor button to add a ScienceWorkshop sensor, it is associated with the first available port. To select a specific port, click that port on the picture
of the interface instead of the Add Sensor button.
Setup Timers
Click the Setup Timers button to configure photogates, Smart Pulleys and other
switch-type sensors connected to the computer via a Photogate Port (PS-2123A), Digital Adapter (PS-2159), or ScienceWorkshop interface.
7
Page 8

DataStudio New Features Calibration
®
*To skip to step-by-step
instructions on calibrating
a sensor, turn to page 11.
Raw Input Measurement
(from sensor)
Calibrated Output Measurement
(to Graph, Table, etc.)
Calibration
Raw Input Slope Calibrated Output Offset+=
Calibrated Output Raw Input Offset–Slope=
If you are using a ScienceWorkshop interface, the Timer Setup dialog box will open.
For instructions on creating a ScienceWorkshop timer, open the Help menu and
search for “Timer Setup dialog.”
If you are using a PASPORT Photogate Port or Digital Adapter, the PASPORT Timers
list will open when you click Setup Timers. (The Timing list also opens automatically
when you plug in a switch-type digital sensor.) For instructions on selecting and configuring a PASPORT Timer, open the Help menu and search for “Timing Sequences.”
Calibrate Sensors
Click the Calibrate Sensors button to open the calibration dialog box. See page 8 for
information and instructions on calibrating sensors.
Sampling Options
Click the Sampling Options button to set Manual Sampling or Start and Stop conditions. For instructions, open the Help menu and search for “Sampling Options.”
Choose Interface
In most cases, DataStudio will automatically detect and configure itself for the interface (or interfaces) connected to the computer. Click the Choose Interface button to
manually select an interface type, or to enable sound capture through the computer’s
sound card with the optional WavePort software plug-in.
Calibration
The new calibration window in DataStudio 1.9.6 features three different types of calibration and the ability to calibrate multiple measurements simultaneously.
Though calibration is usually unnecessary, most analog ScienceWorkshop sensors
and certain PASPORT sensors can be calibrated. Calibration can make a measurement
more accurate or adjust multiple measurements so that they agree with each other.
Theory of Calibration*
One of the functions of DataStudio is to take the stream of raw data from a sensor and
transform it into the calibrated data that you see in the Graph, Table, and other displays. If you do not calibrate a sensor yourself, DataStudio uses a default calibration
for that sensor.
You can think of DataStudio as containing a device that takes in raw data and outputs
calibrated data.
8
When you perform a calibration, DataStudio redefines the linear equation that transforms the raw input into the calibrated output. The linear function is of the form:
Or:
Page 9

Model No. CI-6870 Calibration
®
Input Data
Output Data
Offset
Point 1
Point 2
DOutput
DInput
Slope
=
DInput
DOutput
One-point slope calibration; the line changes its slope to
intersect the new point
Two-point calibration; two points are set to
redefine the line
old
calibration
new
calibration
Offset does
not change
Input Data
Output Data
new
point
old
point
slope changes
Point 2
Point 2
old
calibration
new
calibration
Point 1
Point 1
Input Data
Output Data
This function can be graphically represented
as a line (right). Two points, Point 1 and
Point 2, define the line.
In the two-point calibration procedure, each
point is reset by associating a known standard value (for instance, the pH of a buffer
solution) with the raw input measurement
that the sensor sends to DataStudio when it
is in that standard.
In a one-point calibration, only one of the
points is reset by the user; the other point is
set automatically by DataStudio.
Types of Calibration
There are three types of calibration: 2 Point (Adjust Slope and Offset), 1 Point (Adjust
Slope Only), and 1 Point (Adjust Offset Only). Any of these calibrations can be performed on a single sensor, or simultaneously on multiple similar sensors; however,
for any given sensor, DataStudio will automatically select the most typical calibration
type as the default setting.
Two-point (Adjust Slope and Offset)
In a two-point calibration (below left), you reset two points to define a new line. This
type of calibration affects both the slope and the offset. For step-by-step instructions
on the two-point calibration procedure, see page 11.
One-point (Adjust Slope Only)
In a one-point slope calibration (above right), you reset only one point. The slope of
the line changes so that the line intersects the new point, while the offset (or Y-intercept) does not change. For step-by-step instructions on the one-point slope calibration
procedure, see page 12.
9
Page 10

DataStudio New Features Calibration
®
new
point
old
calibration
new
calibration
Input Data
Output Data
line shifts
One-point slope calibration; the line shifts to
intersect the new point
Before offset calibration After offset calibration
One measurement
is shifted to align
with other
measurement
Raw measurements made by the
sensor for each standard (usually
these values are automatically
entered)
Click to automatically enter the
raw input measurement for each
standard
Calibration type options
Present raw measurement from
the sensor
When this option is selected, all
measurements of the selected
type will be calibrated together
Sensor selected for calibration
Measurement to be calibrated
Slope and offset of the previous
or default calibration
Present calibrated measurement
according to the calibration in
progress
User-entered known values of
standard solutions or objects
Slope and offset of the calibration
in progress
One-point (Adjust Offset Only)
In a one-point offset calibration, you reset only one point. The
line shifts so that it intersects the new point, but its slope does
not change.
Offset calibration is usually used to make one sensor agree
with another sensor. The graph below on the left shows the
measurements from two temperature probes in the same container of water. Due to normal variation among probes, the
second probe consistently reads about 0.3 °C higher than the
first probe. Normally this difference would be insignificant;
however, an offset calibration can be used to bring the sensors
into closer alignment. See page 12 for step-by-step instructions.
Calibrate Sensors Dialog Box
Click the Calibrate Sensors button in the Setup window to open the calibration dialog
box.
The raw (uncalibrated) measurement from an analog ScienceWorkshop sensor is the
voltage produced by the sensor and input to the interface. In the case of PASPORT
sensors, the value and units of the raw measurement data do not necessarily have an
10
Page 11

Model No. CI-6870 Calibration
®
Enter known
values here
RawCalibrated
*If you don’t know
whether a two-point or
one-point slope calibration is best suited for a
particular sensor, follow
steps 1–3 of either procedure and observe the
Calibration Type that is
automatically selected.
obvious meaning. Depending on which sensor you are using, the raw measurement
may represent the default calibration, the voltage produced by an electrode in the sensor, or the digital output of the sensor’s analog-to-digital converter. Keep in mind that
it does not matter what the value is or what its units are. It is only important that the
raw measurement varies in direct proportion to the quantity being measured.
Calibration Procedures*
Two-Point (Adjust Slope and Offset) Calibration Procedure
A two-point calibration requires two known standards. For instance, if you are calibrating a pH sensor, you might use two buffer solutions: one of pH 4 and the other of
pH 7.
1. From the Sensor field, select the desired sensor.
2. From the Measurement field, select the desired
measurement.
3. Ensure that “Calibrate all similar measurements
simultaneously” is not selected.
4. From the Calibration Type menu, select 2 Point
(Adjust Slope and Offset), if it is not already
selected.
5. Place the probe in the first known standard.
6. Enter the known value of the standard in the Stan-
dard Value field for Point 1.
7. Observe the raw Present Sensor Measurement and
wait until it has stabilized.
8. Click the Read From Sensor button for Point 1.
Note that the raw Present Sensor Measurement has been automatically
entered into the Point 1 Sensor Value field, and the standard value (which
you entered) is now displayed as the calibrated Present Sensor Measurement.
9. Place the probe in the second known standard.
10. Enter the known value of the standard in the Standard Value field for Point 2.
11. Observe the raw Present Sensor Measurement and wait until it has stabilized.
12. Click the Read From Sensor button for Point 2.
Note that the raw Present Sensor Measurement has been automatically
entered into the Point 2 Sensor Value field, and the standard value (which
you entered) is now displayed as the calibrated Present Sensor Measurement.
13. Click OK to accept the new calibration and return to the Setup window, or click
Cancel to revert to the previous or default calibration.
11
Page 12
DataStudio New Features Calibration
®
Enter known
value here
RawCalibrated
*In this case, the calibration of the selected measurement will not change.
Rather, the calibrations of
all other similar measurements will be changed to
match the selected measurement.
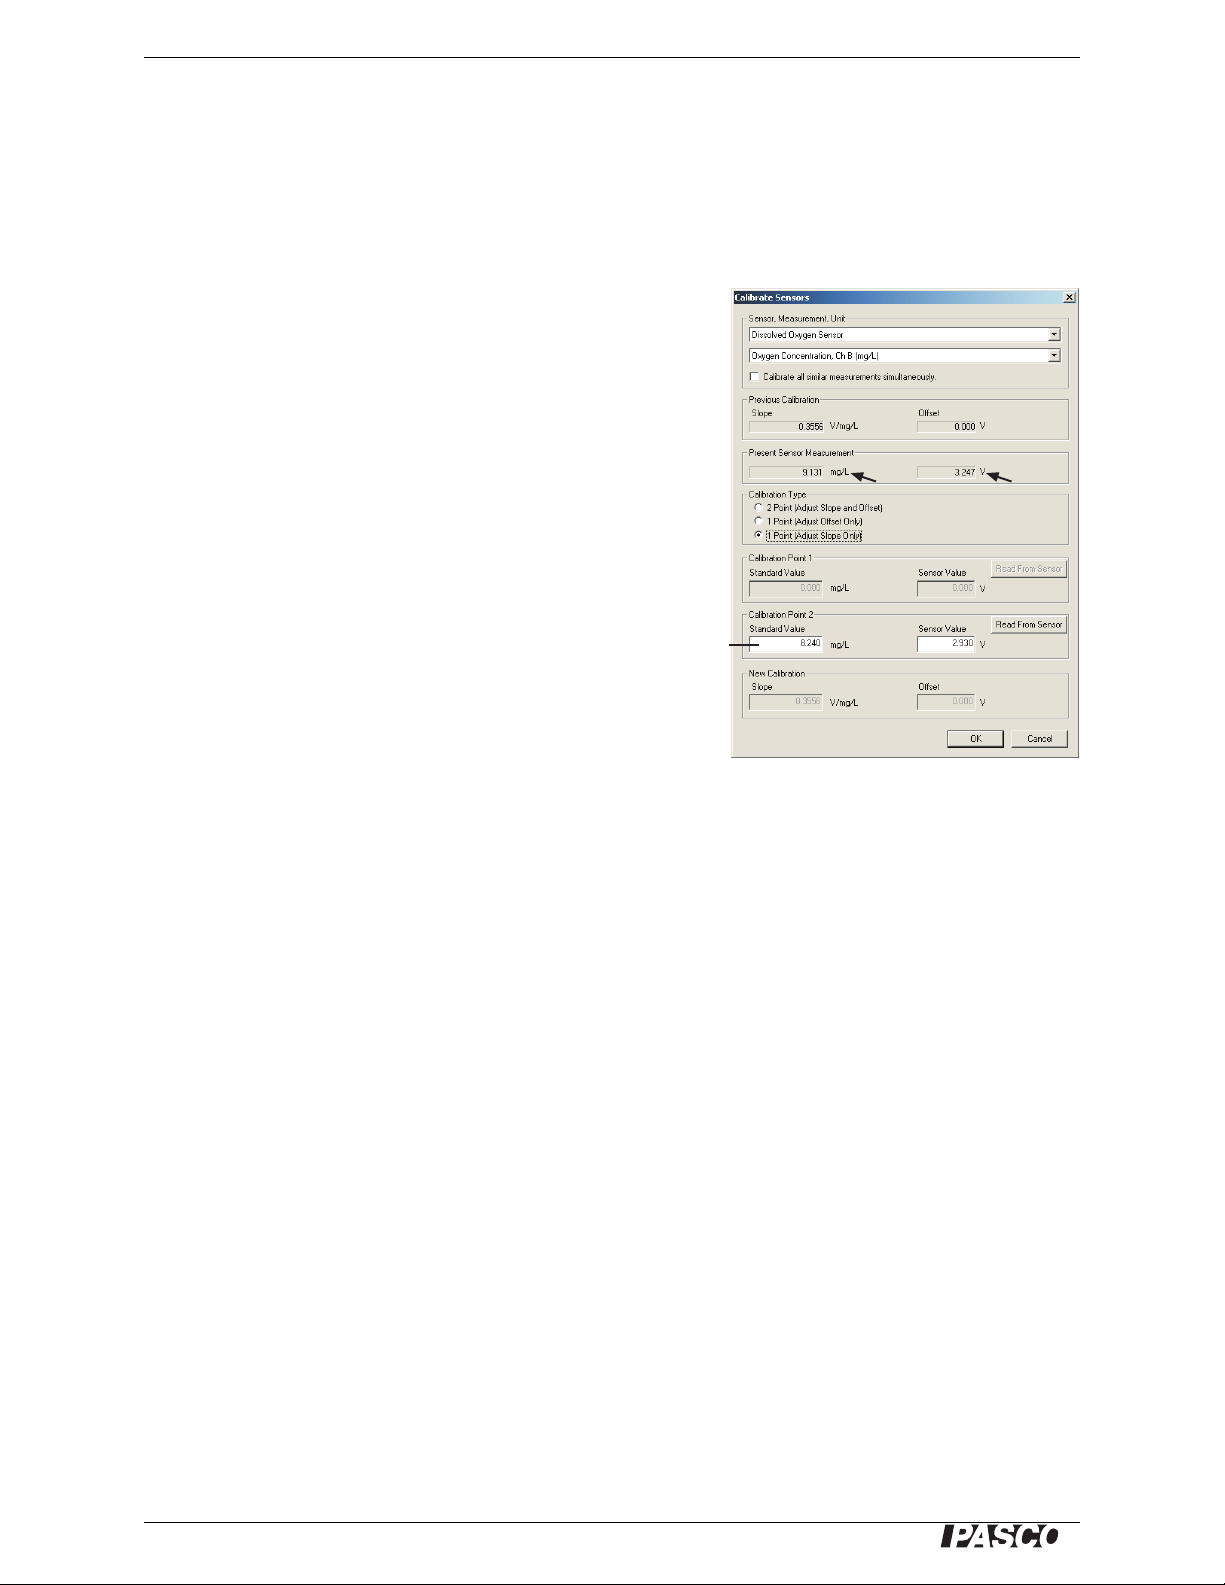
One-Point (Adjust Slope Only) Calibration Procedure
A one-point slope calibration requires one known standard. For instance, if you are
calibrating a dissolved oxygen sensor, you might use 100% saturated water, for which
you can look up the oxygen concentration based on temperature and pressure.
You will set only Point 2; Point 1 will remain unchanged or be set automatically.
1. From the Sensor field, select the desired sensor.
2. From the Measurement field, select the desired
measurement.
3. Ensure that “Calibrate all similar measurements
simultaneously” is not selected.
4. From the Calibration Type menu, select 1 Point
(Adjust Slope Only), if it is not already selected.
5. Place the probe in the known standard.
6. Enter the known value of the standard in the Stan-
dard Value field for Point 2.
7. Observe the raw Present Sensor Measurement and
wait until it has stabilized.
8. Click the Read From Sensor button for Point 2.
Note that the raw Present Sensor Measurement has been automatically
entered into the Point 2 Sensor Value field, and the standard value (which
you entered) is now displayed as the calibrated Present Sensor Measurement.
9. Click OK to accept the new calibration and return to the Setup window, or click
Cancel to revert to the previous or default calibration.
One-point (Adjust Offset Only) Calibration
or Multiple-measurement Alignment Procedure
If you are making two or more simultaneous measurements of the same type, it is
sometimes desirable to slightly adjust the calibrations so that all of the measurements
agree. For instance, if you are using several temperature probes, you may find that
they have slightly different readings when immersed in the same container of liquid; a
multiple-measurement alignment will make all of the probes read the same temperature.
This procedure is a one-point offset calibration performed on two or more similar
measurements simultaneously. You will set only Point 1; Point 2 will be set automatically.
1. From the Sensor field, select the desired sensor.
2. From the Measurement field, select the desired measurement.*
3. Select the “Calibrate all similar measurements simultaneously” option.
4. From the Calibration Type menu, select 1 Point (Adjust Offset Only).
12
Page 13

Model No. CI-6870 Other Information
®
Click to
automatically
enter
Standard
Value and
Sensor Value
RawCalibrated
5. Place all of the probes so that they are measuring
the same thing. It is not necessary to know the
value of what they are measuring. (For instance,
place all of the temperature probes into the same
container of water.)
6. Observe the raw Present Sensor Measurement and
wait until it has stabilized.
7. Click the Read From Sensor button for Point 1.
Note that the calibrated Present Sensor
Measurement has been automatically entered
into the Point 1 Standard Value field, and the
raw Present Sensor Measurement has been
automatically entered into the Point 1 Sensor
Value field.
8. Click OK to accept the new calibration and return
to the Setup window, or click Cancel to revert to
the previous or default calibration.
To confirm that the measurements are aligned, open the Digits display and view two
or more of the measurements simultaneously while recording data. They should be
identical or very close.
Other Information
Technical Support
For assistance with any PASCO product, contact PASCO at:
Address: PASCO scientific
10101 Foothills Blvd.
Roseville, CA 95747-7100
Phone: (916) 786-3800
(800) 772-8700
Fax: (916) 786-3292
Web: www.pasco.com
Email: techsupp@pasco.com
Copyright
The PASCO scientific 012-09316C DataStudio New Features Instruction Manual is copyrighted with all rights reserved. Permis-
sion is granted to non-profit educational institutions for reproduction of any part of this manual, providing the reproductions are
used only in their laboratories and classrooms, and are not sold for profit. Reproduction under any other circumstances, without
the written consent of PASCO scientific, is prohibited.
Trademarks
PASCO, PASCO scientific, DataStudio, PASPORT, ScienceWorkshop, and WAVEPORT are trademarks or registered trademarks of PASCO scientific, in the United States and/or in other countries. All other brands, products, or service names are or
may be trademarks or service marks of, and are used to identify, products or services of, their respective owners. For more information visit www.pasco.com/legal.
Windows is a registered trademark of Microsoft Corporation in the United States and/or other countries.
Macintosh, Mac, Mac OS, and QuickTime are trademarks of Apple Computer, Inc., registered in the U.S. and other countries.
13
 Loading...