

Page 1
Instruction Manual
Sensor Phonon
Plugs
Rod clamp
O-ring for
Three-step
Pulley
Three-step
pulley
Hex Key
(Allen wrench)
Thumbscrew
T-Slot
Additional
mounting
position for
rod clamp
(1 of 2)
Yellow Plug
Black Plug
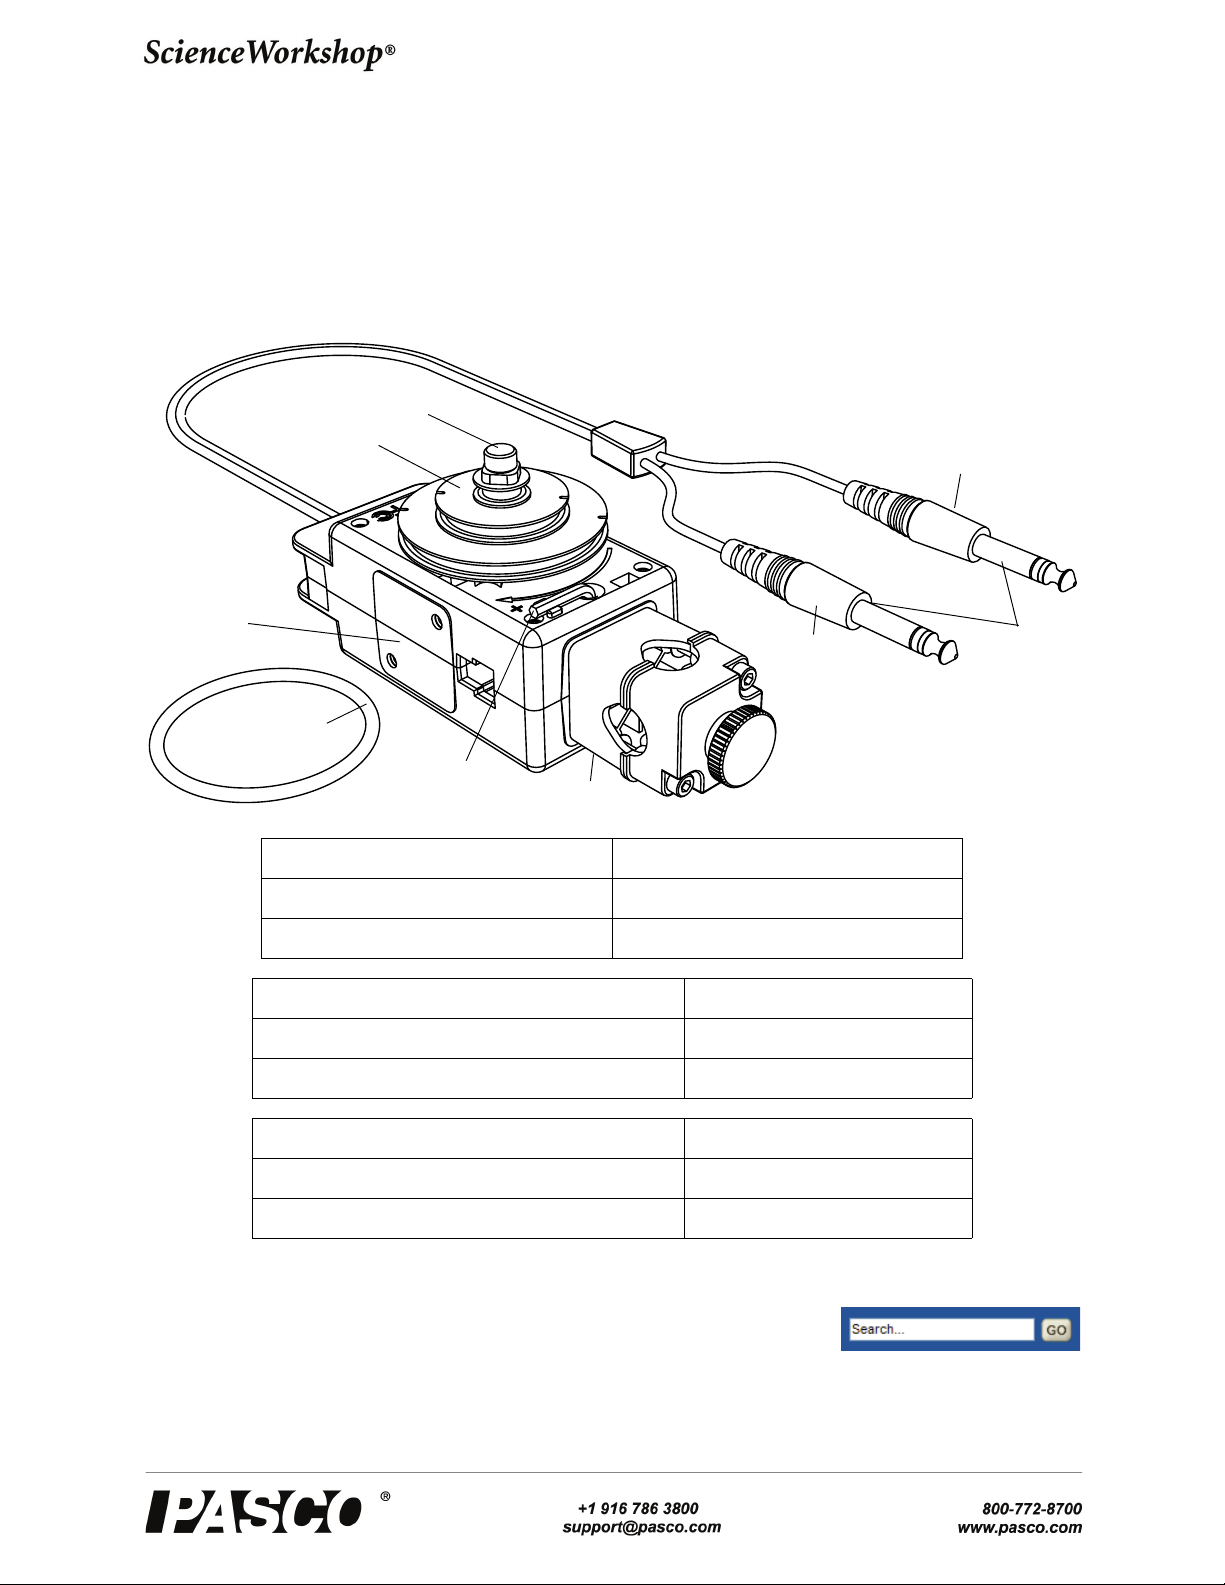
Rotary Motion Sensor
CI-6538
012-13990A
Equipment Included Equipment Included
Rotary Motion Sensor (CI-6538) Three-step Pulley and O-ring
Rod Clamp Hex Key (Allen wrench)
Required Items* Information
PASCO Interface see www.pasco.com
PASCO Data Acquisition Software see www.pasco.com
Items to Consider* Information
*See the PASCO catalog or the PASCO web site at www.pasco.com for more information.
Experiments for the Rotary Motion Sensor in electronic format are available to download
from the PASCO web site at www.pasco.com. For downloadable experiments, go to
www.pasco.com and enter CI-6538 in the Search window. Check the User Resources tab.
PASPORT Digital Adapter PS-2159
Phone Jack Extender Cable (2) PI-8117
Page 2
®
Model No.CI-6538 Quick Start
Sensor Pho-
non Plugs
DIGITAL
INPUT ports
Black Plug
Yellow Plug
• SETUP: For more information on setting up the software and recording data, refer to the
Online Help System and the User’s Guide for the data acquisition software.
Equipment used with the sensor Equipment used with the sensor
Mini-Rotational Accessory (CI-6691) Physical Pendulum Set (ME-9833)
Linear Motion Accessory (CI-6888) Torsion Pendulum Accessory (ME-6894)
Chaos/Driven Harmonic Accessory (CI-6689A) Track String Adapter (ME-6569)
“A” Base Rotational Adapter (CI-6690 Centripetal Force Pendulum (ME-9821)
Gyroscope Mounting Bracket (ME-8963) Linear Translator (OS-8535)
Dynamics Track Mount Accessory (CI-6692) Polarization Analyzer (OS-8533A)
Three-Step Pulley Accessory (CI-6693) Computer-Based Thermal Expansion (TD-8579)
Rotating Platform (ME-8951) Three-Axis Gyroscope (ME-8960)
Quick Start
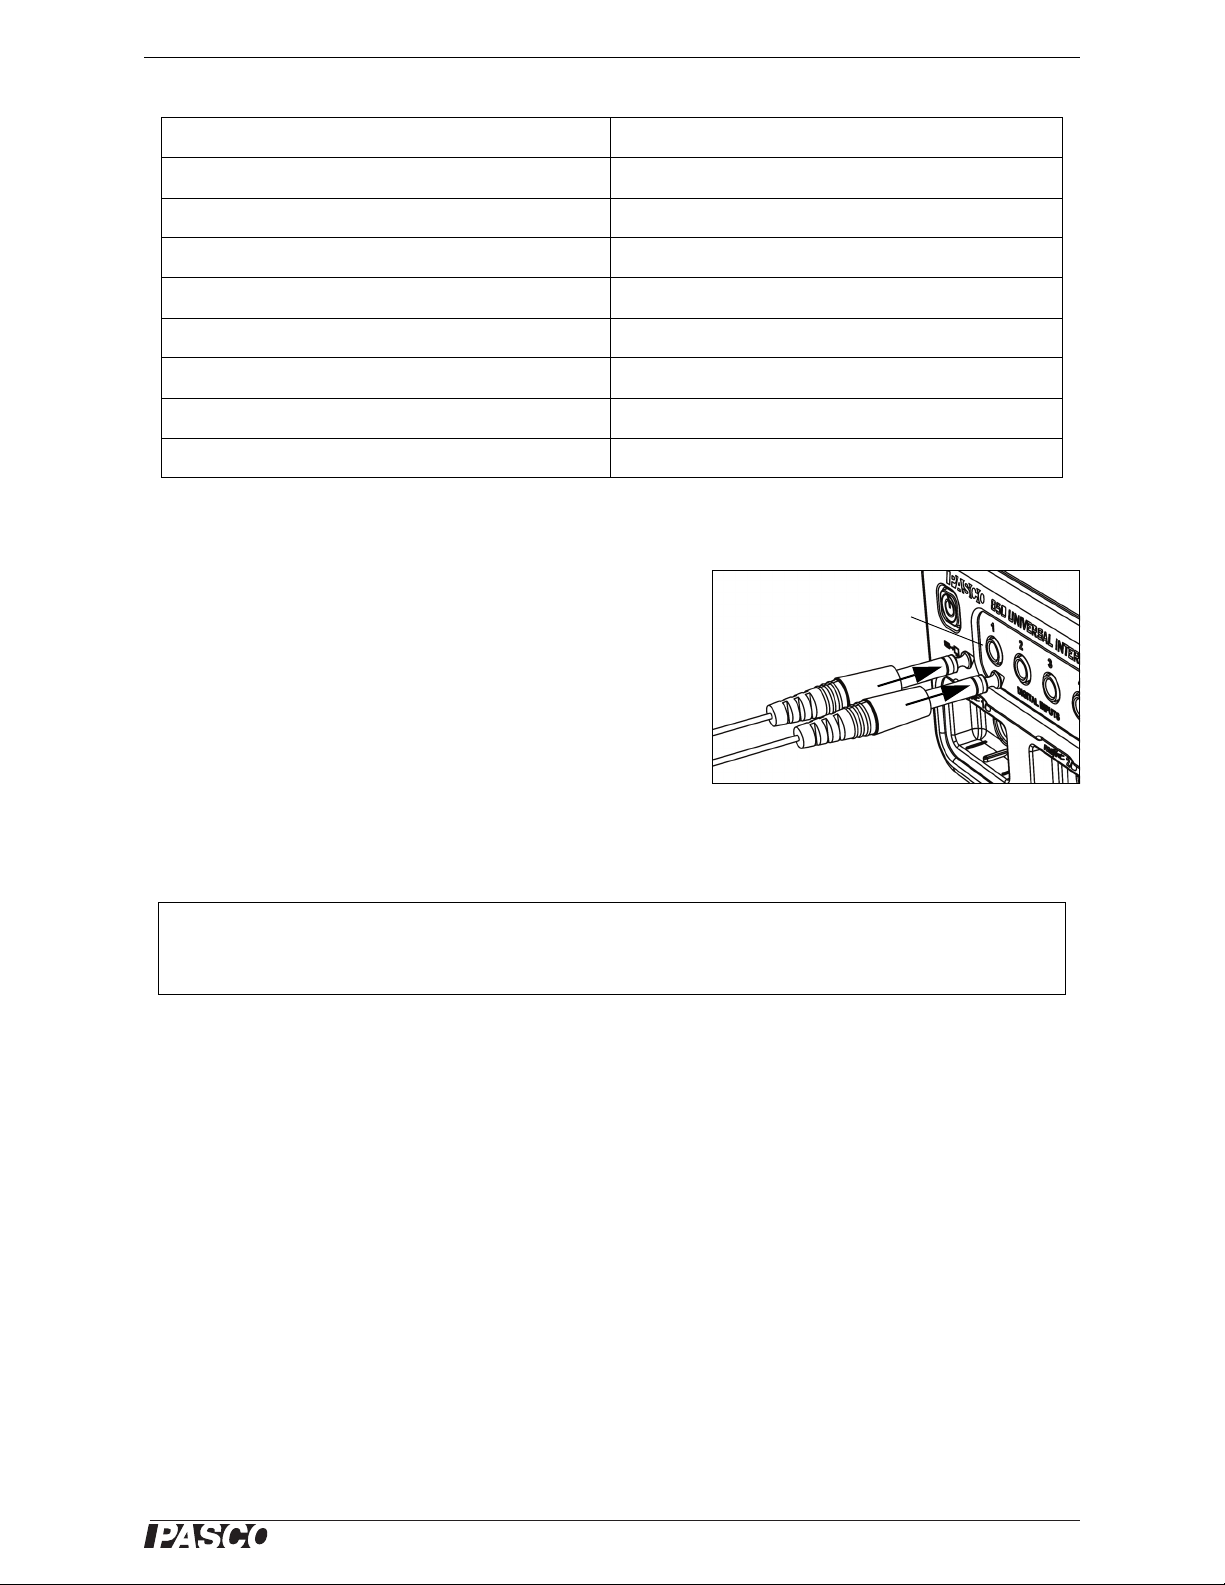
• Plug the Sensor Phone Plugs into two adjacent DIGITAL
INPUT ports of a PASCO interface (such as the 850 Universal Interface). For example, plug the yellow plug into DIGITAL INPUT 1 and the black plug into DIGITAL INPUT 2.
• NOTE: If you are using a PASPORT-only PASCO interface,
connect the Sensor Phone Plugs to the PS-2159 PASPORT
Digital Adapter and then plug the adapter into the interface.
• Start the PASCO data acquisition software (such as PASCO
Capstone). Set up a data display in the software.
• Click “Record” or touch ‘Start’ to begin recording data. Turn the shaft of the Rotary Motion Sensor.
Introduction
The ScienceWorkshop CI-6538 Rotary Motion Sensor is a versatile position and motion measuring device. It
measures angles to a resolution of 0.09°, and detects the direction of motion. Markings on the outside of the case
indicate which is the default positive direction. The optical code wheel inside the sensor has 4000 divisions per
revolution (360°), and the maximum speed is 30 revolutions per second.
The sensor comes with a removable three-step pulley (10 millimeter (mm), 29 mm, and 48 mm diameters), and a
rubber “O”-ring that fits into the largest diameter step. The three-step pulley can be attached to either end of the
shaft, and can be placed large-diameter down or large-diameter up on the shaft. A tab on the inside of the pulley
matches a notch on the outside of the shaft. The pulley has a notch and a small hole in the outer edge of the largest and second largest steps for attaching a string. The thumbscrew hex key tool can be used to remove the rod
clamp from the end of the sensor so it can be mounted on either the right-hand or left-hand side.
The end of the sensor where the cord exits the case has a platform for mounting a Super Pulley with Table Clamp
(not included). The T-slot through the sensor is for inserting the optional Linear Motion Accessory rack
(CI-6888). The gear teeth on the rack mesh with the gear teeth on the optical code wheel inside the sensor.
012-13990A
2
Page 3
®
Model No.CI-6538 Introduction
Rod clamp
Case
Rod clamp
mounting
positions
Dynamics
Track Mount
Accessory
PAS CO t r ac k
Support rod
Dynamics
Track Mount
Accessory
Square
nut into
T-slot
Mounting rod
Hanging
mass
PASCO
Cart
PASCO
Track
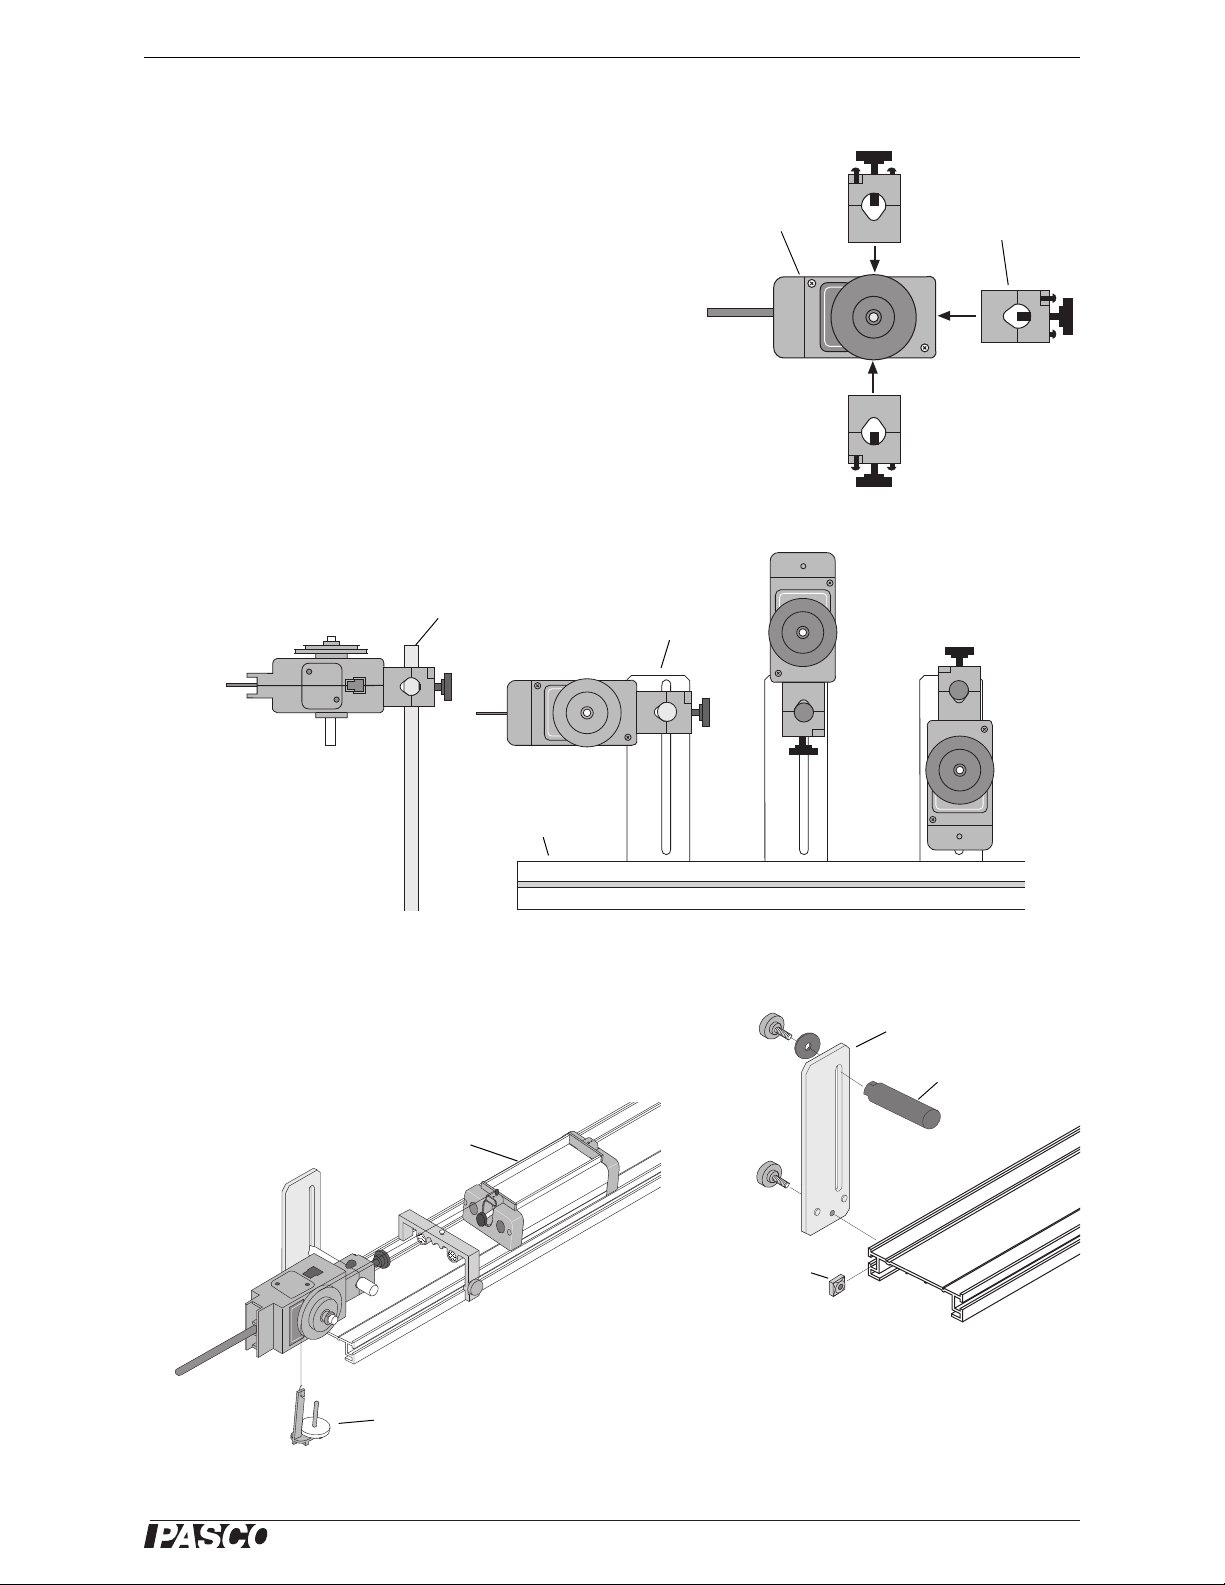
Mounting the Rotary Motion Sensor
The rod clamp fits rods up to 12.7 mm in diameter, such as the
ME-8736 45 cm Stainless Steel Rod, and the rod clamp can be
attached to the sensor in three different locations: at the end opposite to the cable and on either side of the case.
Use the included hex key to loosen the two screws that hold the
rod clamp on the Rotary Motion Sensor case. The two screws do
not need to come out all the way; they are held inside the rod
clamp by small O-rings. Move the rod clamp to one of the additional mounting positions on either side of the case and use the
hex key to tighten the screws in place.
It is possible to mount the Rotary Motion Sensor horizontally on
a support rod with the Three-step Pulley facing up or facing sideways. You can mount the sensor vertically with the pulley facing
forward. The sensor can also be mounted on the short rod that is part of the Dynamics Track Mount Accessory
(CI-6692).
Mounting the Rotary Motion Sensor on a PASCO Track
Use the Dynamics Track Mount Accessory (CI-6692) to mount the
Rotary Motion Sensor on a PASCO track. Slide the square nut of the
Dynamics Track Mount Accessory into the T-slot on the side of the
track. Adjust the position of the mounting rod.on the Dynamics Track
Mount Accessory.
012-13990A
When mounted on a track as shown, a
Rotary Motion Sensor could be used to
measure the motion of a PASCO Cart as it
is pulled by a string suspended over the
Three-step Pulley of the sensor and
attached to a hanging mass.
3
Page 4

®
Rotary Motion Sensor Introduction
Adapter
Bracket
Rotary
Motion
Sensor
3-step
Pulley
3-step
Pulley
Shoulder
Screw
Rotating
Shaft
Rotary
Motion
Sensor
Adapter
Bracket
Top View Bottom View
“O” Ring
3-step
Pulley
Gyroscope
Mounting
Bracket
Slotted
guide
arm
Mini-Rotational
Accessory Rod
Rod
guides
Cylindrical
mass
Shaft
Screw
Mounting the Rotary Motion Sensor to a Large “A” Base
The Rotary Motion Sensor can be mounted on the base of the Rotating
Platform (ME-8951) using the “A” Base Rotational Adapter (CI-6690,
available separately).
The “A” Base Rotational Adapter includes an adapter bracket, a
three-step pulley, a drive belt (“O” ring), and a shoulder screw.
See the PASCO web site at www.pasco.com for more information.
Mounting the Rotary Motion Sensor to a Gyroscope
Use the Gyroscope Mounting Bracket (ME-8963, available separately)
to mount the Rotary Motion Sensor to the Three-Axis Gyroscope
(ME-8960). Remove the gyroscope assembly from the vertical shaft of
the large “A” base. Mount the Gyroscope Mounting Bracket onto the
vertical shaft. Remove the rod clamp and the three-step pulley from the
Rotary Motion Sensor, and mount the sensor on the Gyroscope Mounting Bracket with the thumbscrews included with the bracket. Mount
the slotted guide arm onto the shaft of the Rotary Motion Sensor.
Replace the gyroscope assembly on the vertical shaft.
See the PASCO web site at www.pasco.com for more information.
Attaching Accessories to the Rotary Motion Sensor
Attaching the Mini-Rotational Accessory to the Rotary Motion Sensor
To mount the rod of the Mini-Rotational Accessory to the Rotary Motion
Sensor, orient the 3-step Pulley so that the large diameter step is away
from the sensor case. The large diameter step has two pair of rod guides
opposite each other on the top edge. Align the rod with the rod guides
and use the captive screw in the center of the rod to attach the rod and
pulley onto the sensor’s shaft.
Attach the center of the rod to the 3-step Pulley and shaft and mount the
cylindrical masses at the ends of the rod to investigate the rotational inertia (moment of inertia) of point masses.
Attach the end of the rod to the 3-step Pulley and shaft. Mount a cylindrical mass on the rod to use the rod as a pendulum. Investigate the period
of oscillation of the pendulum when the amount of mass or the position
of the mass is changed. Investigate the period of oscillation as the amplitude of the swing is changed.
4
Page 5

®
Model No.CI-6538 Introduction
Pendulum Setup
Point Mass Setup
Disk
Mass
Magnet
Disk (phantom
image)
Magnet Damping
Attachment
String
Spring (2)
Dynamics Track
Mount Accessory
String
Mechanical
Oscillator/Driver
PASCO Track
Chaos/Harmonic Motion Accessory Setup
Super Pulley
with Table
Clamp
String to
hanging mass
Disk
Rotary Motion
Sensor with
3-step Pulley
Attaching the Chaos/Harmonic Motion Accessory to the Rotary Motion Sensor
The Chaos/Harmonic Motion Accessory (CI-6689A) is a driven damped physical pendulum. Various types of
phase plots can be made as the driving frequency, driving amplitude, initial conditions, and amount of damping
are varied.
The Magnetic Damping Attachment attaches to either side of the Rotary Motion
Sensor in the same way as the rod clamp is attached. A small cylindrical mass
attaches to the threaded hole in the edge of the disk to form the physical pendulum. Mount the disk with the small mass to the 3-step Pulley and shaft.
One way to drive the Chaos/Harmonic Motion Accessory is with the Mechanical Oscillator/Driver (ME-8750) and a power supply. Any PASCO track can be
used to mount and align all the components.
Using the Mini-Rotational Disk
For other rotational inertia experiments, mount
the Rotary Motion Sensor with the disk horizontal. Mount a Super Pulley with Clamp
(ME-9448B) on the platform at the cable end of
the sensor. To provide a known torque, wrap a
string around one of the steps of the 3-step Pulley. Arrange the end of the string over the Super
Pulley and attach a hanging mass.
Perform a conservation of angular momentum
experiment by dropping the ring onto the disk as
it is rotating.
012-13990A
5
Page 6

®
Rotary Motion Sensor Introduction
Downloadable Experiments
Experiments for the Rotary Motion Sensor in electronic format are available to download from the PASCO web
site at www.pasco.com. For downloadable experiments, go to www.pasco.com and enter CI-6538 in the Search
window.
Check the “User Resources” tab and then download the experiments..
Three suggested experiments are:
• Rotational Inertia of a Point Mass
• Rotational Inertia of Disk and Ring
• Conservation of Angular Momentum.
Please see the next page for information about using the Rotary Motion Sensor with data acquisition software.
6
Page 7

®
Model No.CI-6538 Introduction
Sensor
Phone Plugs
DIGITAL
INPUT ports
Black Plug
Yellow Plug
PASCO Capstone Hardware Setup panel
850 Universal
Interface
Click the
“Add Sensor/Instrument” button
Select “ScienceWorkshop Digital Sensors”
Add Sensor or Instrument Window
Using the Rotary Motion Sensor with Data Acquisition Software
• Plug the Rotary Motion Sensor Phonon Plugs into two DIGITAL INPUT ports of a compatible PASCO interface (such
as the 850 Universal Interface, ScienceWorkshop 750 USB
Interface, or the ScienceWorkshop 500 Interface with
USB/Serial Adapter). For example, plug the yellow plug
into DIGITAL INPUT 1 and the black plug into DIGITAL
INPUT 2.
• NOTE: If you are using a PASPORT-only PASCO interface
(such as the SPARK SLS), connect the Sensor Phonon Plugs
to a PS-2159 PASPORT Digital Adapter and then plug the adapter into the interface.
• Turn on the compatible interface and start the PASCO data acquisition software.
PASCO Capstone Sensor Setup
• In PASCO Capstone, click “Hardware Setup” in the Tools
palette to open the Hardware Setup panel.
• Confirm that the Hardware Setup panel shows the interface you are using.
• NOTE: If the interface you are using does not appear in the
Hardware Setup panel, click the “Choose Interface” button
and select your interface from the list of choices.
• In the Hardware Setup window, click the “Add Sensor/Instrument” button to open the “Add Sensor or Instrument” window.
• In the Add Sensor or Instrument window, click the “Sensor
or Instrument Type” menu and select “ScienceWorkshop
Digital Sensors” from the list of choices.
012-13990A
7
Page 8

®
Rotary Motion Sensor Introduction
Select “Rotary Motion Sensor” and click OK
Rotary Motion
Sensor icon
Confirm the Rotary Motion Sensor
Sensor Properties
icon
Selected Sensor
Click the Sensor Properties icon
Rotary Motion Sensor Properties window
• In the list of ScienceWorkshop Digital Sensors, select
“Rotary Motion Sensor” and then click “OK”.
• In the Hardware Setup panel, confirm that the icon of the
Rotary Motion Sensor appears with the icon of the interface you
are using.
• At the lower right corner of the Hardware Setup panel is the Sensor Properties icon. Click the Sensor Properties icon to open the
Properties window
.
• In the Properties window, select the sensor’s “Resolution”. The choices for the resolution are “Low: 360 counts
per revolution” and “High: 1440 counts per revolution”.
• NOTE: The required resolution depends on the rate at
which the Rotary Motion Sensor will rotate during the
experiment. In general, if the sensor is connected to a
PASCO 850 Universal Interface, choose “High: 1440
counts per revolution”. Otherwise, if the sensor will rotate
quickly during the experiment, select “Low: 360 counts
per revolution”. If the sensor will rotate slowly and a finer
resolution is required, choose “High: 1440 counts per revolution”.
8
Page 9

®
Model No.CI-6538 Introduction
Select “Linear Accessory”
Create a Graph display
Graph display
icon
Click the “Select
Measurement”
menu button
Select “Angular Velocity”
Click “Record”
Click “Stop”
• SETUP: For more information on setting up the data acquisition software and recording data,
refer to the Online Help System and the User’s Guide for the data acquisition software.
• Select the “Linear Accessory” you are using from the list
of choices in the menu, and click “OK”. NOTE: See the
experiment for information about which choice to select.
PASCO Capstone Display Setup
• Set up a data display. For example, drag the Graph icon
from the Displays palette onto the workbook page, or double-click the icon to create a Graph display..
• Set up the Graph display to show Angular Velocity (rad/s) on the vertical
axis. Click the “Select Measurement” menu button on the vertical axis
and pick Angular Velocity (rad/s) from the menu. Time (s) automatically
shows on the horizontal axis.
PASCO Capstone Data Collection
• Click ‘Record’ in the lower left corner of the PASCO Capstone window
• Turn the shaft of the Rotary Motion Sensor back-and-forth. View the data
• Click “Stop” to end data recording.
.
to begin recording data. (The “Record” button changes to “Stop”.)
in the Graph display.
012-13990A
9
Page 10

®
Rotary Motion Sensor Introduction
SPARK SLS screen for the
Rotary Motion Sensor
Touch
“OK”
Touch “Rotary
Motion Sensor”
Touch “Rotary Motion
Sensor” and then touch “OK”
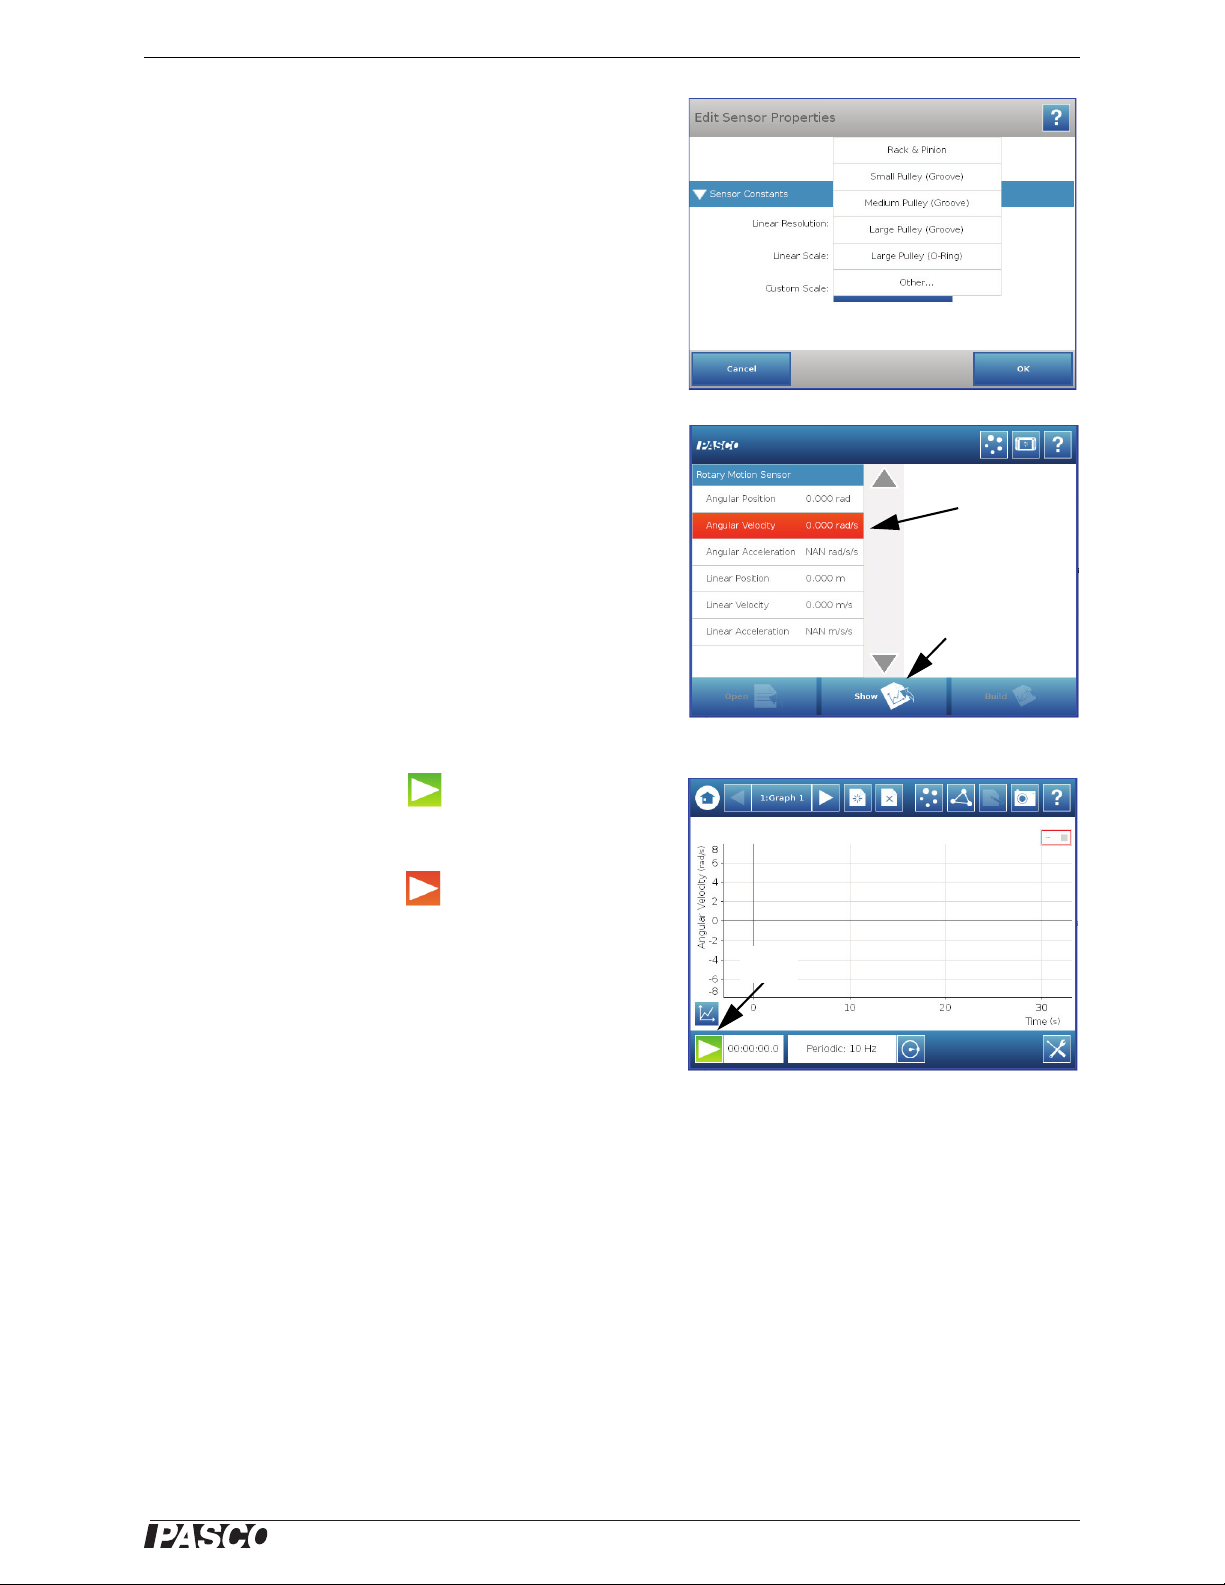
Edit Sensor Properties window
Select the Linear Resolution
SPARKvue Setup
• When the SPARKvue compatible device starts up, it
shows the Home Screen for a moment, and then shows a
screen that lists various digital sensors, including the
Rotary Motion Sensor.
• Touch “Rotary Motion Sensor” and then touch “OK. The
“Edit Sensor Properties” screen opens.
• In the Edit Sensor Properties screen, touch “Linear Resolution” and touch a choice (360 or 1440) from the
menu.
• NOTE: The required resolution depends on the rate at
which the Rotary Motion Sensor will rotate during the
experiment. In general, if the sensor will rotate quickly
during the experiment, select “360”. If the sensor will
rotate slowly and a finer resolution is required, choose
“1440”.
10
Page 11
®
Model No.CI-6538 Introduction
Touch “Linear Scale” and tap a choice
Touch
“Show”
Touch “Angu-
lar Velocity”
Touch “Angular Velocity” and
then tap “Show”
Tou ch “ Star t ”
Tap
“Start”
• Touch “Linear Scale” and touch a choice from the menu
(such as “Large Pulley (Groove)). Tap “OK”. The screen
shows the Rotary Motion Sensor’s list of parameters.
• Touch “Angular Velocity” in the list of parameters and
then touch the “Show” button to open a graph display of
Angular Velocity versus Time.
• Touch the Start button ( ) to begin recording data.
Turn the shaft of the sensor and view the data in the display.
• Touch the Stop button ( ) to end data recording.
• SETUP: For detailed information on setting up the data acquisition software and recording data,
refer to the User’s Guide and the online help for the data acquisition software.
012-13990A
11
Page 12

®
Rotary Motion Sensor Introduction
Technical Support
For assistance with any PASCO product, contact PASCO at:
Address: PASCO scientific
Web: www.pasco.com
10101 Foothills Blvd.
Roseville, CA 95747-7100
Phone: +1 916-786-3800 (worldwide)
Email support@pasco.com
800-772-8700 (U.S.)
Limited Warranty For a description of the product warranty, see the PASCO catalog. Copyright The PASCO scientific Instruction
Manual is copyrighted with all rights reserved. Permission is granted to non-profit educational institutions for reproduction of any part
of this manual, providing the reproductions are used only in their laboratories and classrooms, and are not sold for profit. Reproduction under any other circumstances, without the written consent of PASCO scientific, is prohibited. Trademarks PASCO, PASCO
Capstone, and ScienceWorkshop are trademarks or registered trademarks of PASCO scientific, in the United States and/or in other
countries. For more information visit www.pasco.com/legal.
Product End of Life Disposal Instructions:
This electronic product is subject to disposal and recycling regulations that vary by country and region. It is your
responsibility to recycle your electronic equipment per your local environmental laws and regulations to ensure that it
will be recycled in a manner that protects human health and the environment. To find out where you can drop off your
waste equipment for recycling, please contact your local waste recycle/disposal service, or the place where you purchased the product.
The European Union WEEE (Waste Electronic and Electrical Equipment) symbol (to the right) and on the product or its packaging indicates that this product must not be disposed of in a standard waste container.
12
 Loading...