

Page 1
Instruction Sheet
for the PASCO
Model CI-6507A
pH electrode
012-06832A
06/98
$1.00
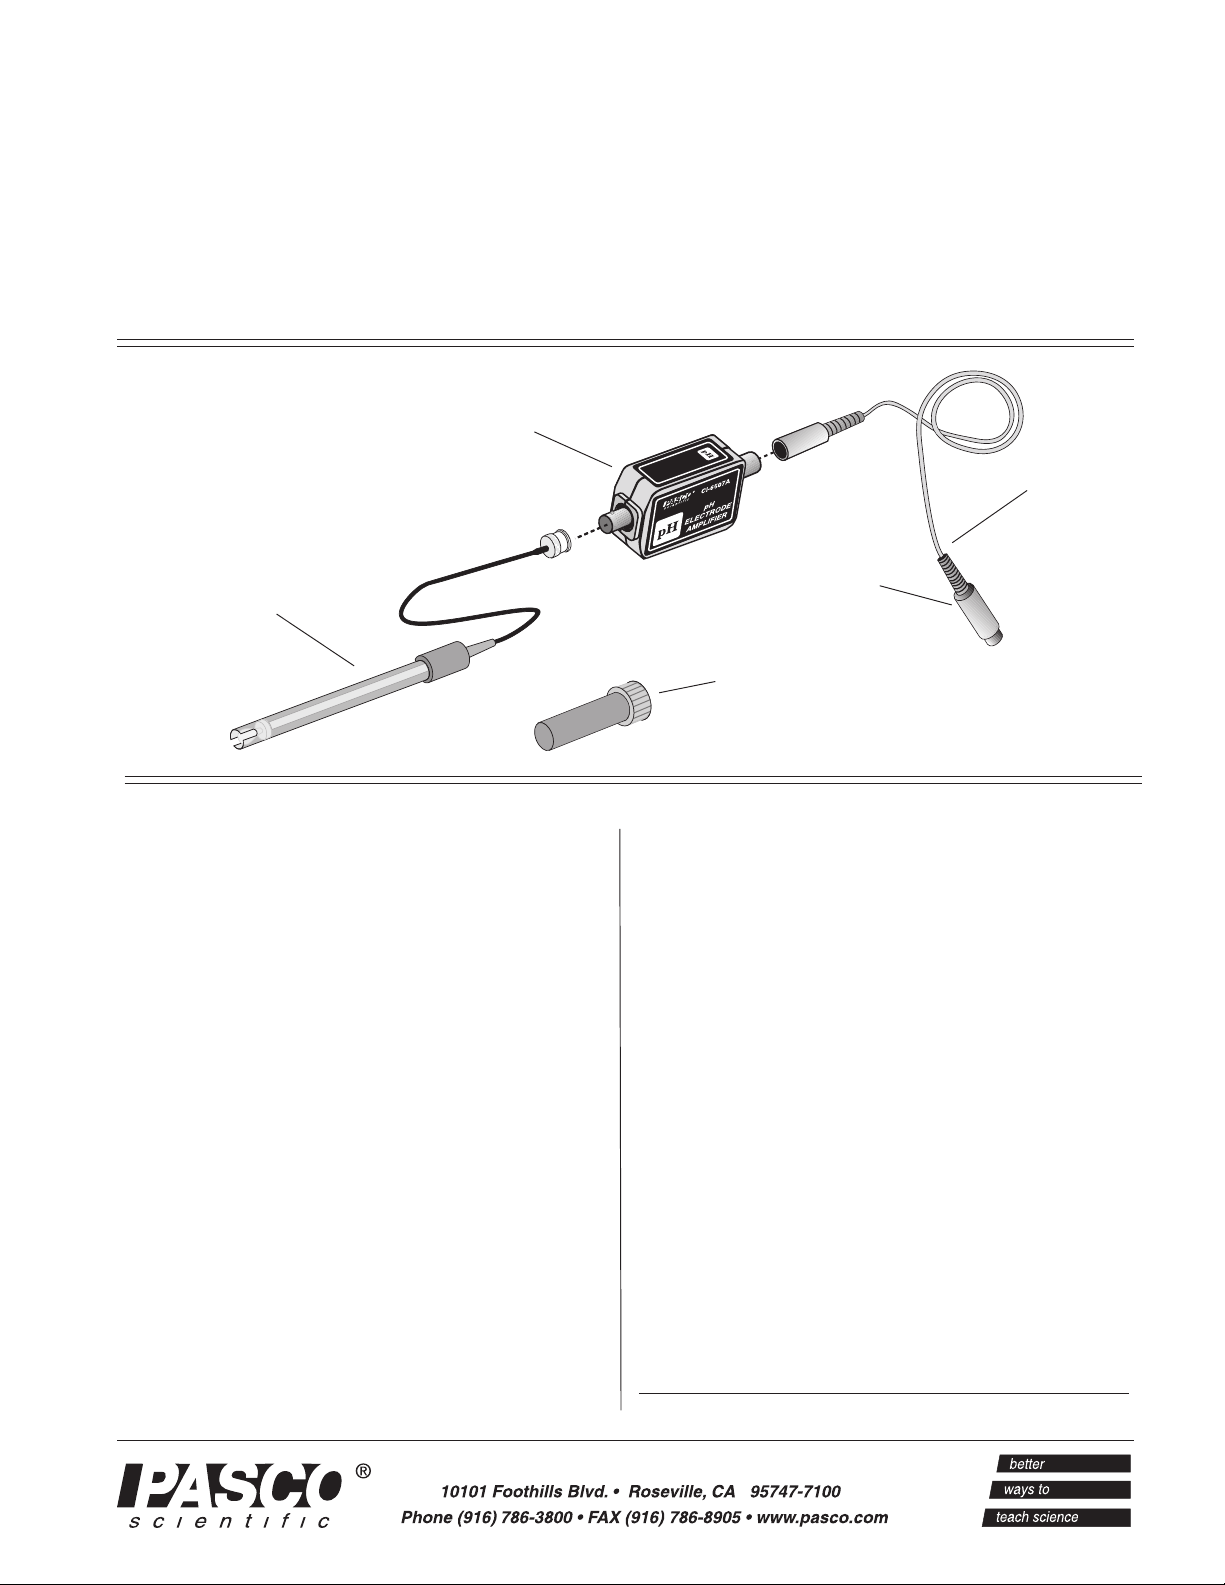
pH Sensor
pH electrode amplifier
cable with DIN
connectors
Connect to a
ScienceWorkshop
interface box
soaker bottle with
buffer solution
Introduction
The PASCO CI-6507A pH Sensor (pH electrode and
amplifier) is designed to be used with PASCO
ScienceWorkshop computer interface systems (300,
500, 700, and 750).
The pH electrode connects to the amplifier box with a
BNC connector, and the amplifier plugs into the
interface box directly or via a connecting cable.
The pH electrode is a standard type, producing an
electrical potential difference depending on the
hydrogen ion concentration (potential of hydrogen) in
a solution. The pH electrode is stored in a small plastic
container that contains a pH 4 buffer solution.
The pH amplifier translates the potential differences
measured by the pH electrode into the voltages
required by the Science Workshop interface. The
amplifier allows any standard pH electrode to be used
with ScienceWorkshop.
Equipment
Included:
PASCO CI-6507A pH amplifier
pH electrode with soaker bottle
connecting cable
soaker bottle containing KCl buffer solution (pH 4)
Additional Equipment Required:
ScienceWorkshop 300, 500, 700, or 750 Interface
Additional Material Required
distilled water (for rinsing the pH electrode)
buffer solutions, such as pH 4 and pH 7 (for
calibration of the electrode)
© 1998 PASCO scientific
Page 2

pH Sensor 012-06832A
Using the pH Sensor
Calibrating the pH Sensor
Connecting the pH Sensor to the interface box
1. Connect the 8-pin DIN plug of the pH Sensor
amplifier box into analog channel A, B or C of
the computer interface (Figure 1a).
or
Use the supplied cable to connect the pH
electrode amplifier box to the analog channel of
the interface box (Figure 1b).
ab
ISE
Plug into analog
channel A, B, or C
to analog channel
on the computer
interface
Figure 1
Connecting the pH electrode amplifier to the computer
interface (two methods)
2. Unscrew and remove the protective soaker bottle
from the end of the pH electrode, leaving the Oring and cap in place on the shaft of the pH
electrode.
3. Rinse the electrode tip in distilled water. If
bubbles are seen in the pH electrode bulb, gently
shake the electrode downward (similar to
shaking down a thermometer) until the bubbles
disappear.
4. Connect the pH electrode to the BNC connector
of the pH electrode amplifier (Figure 2). Insert
the plug at the end of the electrode cable over the
BNC connector, and twist the plug one quarter
turn clockwise to lock it onto the BNC
connector.
Two Buffer Method:
One Buffer Method:
➤ Note: Use buffer solutions that are at a
temperature similar to the temperature of the
sample to be measured.
1. Run the ScienceWorkshop program. In the
Experiment Setup window, set up the
ScienceWorkshop interface and sensor so the pH
Sensor is connected into the correct analog
channel of the interface.
2. In the Experiment Setup window, double-click
the pH Sensor icon to open the sensors setup
window. (Note: In ScienceWorkshop version 3,
click the Calibration tab located near the top of
the sensors setup window.
3. Place the pH electrode in a high pH buffer
solution and wait about 30 seconds for the
voltage readings to stabilize.
4. Once the readings have stabilized, click the Take
Reading button. Enter the pH value of the high
pH buffer solution in the High Value box.
5. Rinse the pH electrode with distilled water and
then place the pH electrode in a second solution,
such as a low pH buffer solution. Wait about 30
seconds for the voltage readings to stabilize.
Again, after the readings have stabilized, click
the Take Reading button. Enter the pH value of
the low pH buffer solution in the Low Value
box. Click OK to return to the Experiment Setup
window.
1. Choose a buffer of known pH that is close to the
pH of the unknown.
2. Place the electrode in the buffer solution and
wait about 30 seconds for the voltage readings
stabilize.
Figure 2
Connecting the pH electrode to the amplifier
3. Type the pH of the buffer solution in the High
Value box, and click Take Reading.
4. Type 0 in the Low Value box, and type 0 in the
Volts box next to the Low Value box.
2
Page 3

012-06832A pH Sensor
Taking a pH Measurement
1. Rinse the pH electrode in distilled water and
place it in the sample to be measured.
2. In the Experiment Setup window, set up a data
display (such as the Graph display) and begin
recording data.
Electrode Maintenance
Restoring the Electrode
Mechanically intact electrodes can often be restored
by one of the following procedures:
General: Soak the electrode in 0.1 Molar
Hydrochloric Acid (HCl) for 15 minutes.
Proteins: Soak the electrode in 1% Pepsin in 0.1
Molar Hydrochloric Acid (HCl).
Inorganic Deposits: Rinse the electrode with 0.1
Molar Ethylene Dinitric Tetra-acidic Acid (EDTA)
Tetrasodium solution.
Oil and Grease Film: Wash the electrode carefully
in a mild detergent or solvent known to be effective
for the particular film.
If the electrode is not working well, try soaking the
electrode alternately in 12 Molar NaOH (sodium
hydroxide) and 1 Molar HCl (hydrogen chloride), as
recommended in recent article from the Institute for
Chemical Education (ICE). Leave it in each solution
for one minute. Rinse completely between soakings,
and end with HCl. Apparently, the NaOH etches the
glass and the HCl reestablishes hydrogen ions on the
surface.
Electrode Storage
The pH Electrode should not be stored dry and should
be stored as follows:
Short Term Storage (up to one week): store in a pH
4 buffer solution or tap water.
Long Term Storage (over one week): store in a pH
4 buffer solution with 1 gram per 100 milliliter of
potassium chloride (KCl) added.
➤ Note: The electrode should be rinsed but never
stored in distilled water.
Replacement Part
The pH electrode can be purchased separately as part
number 699-085.
Specifications
(pH electrode)
pH range = 0 to 14
electrode type = gel-filled (nonrefillable), Ag/AgCl
output: 0.413V to -0.413V, corresponding to a pH
range 0 to 14 (0 V at pH 7)
potential difference change/pH unit = 0.059 V
Specifications (pH amplifier)
output: 0 to 1.4 V DC (.7 V corresponds to a pH of
7)
pH-to-voltage ratio: 1 pH = 0.1 V
➤ Note: After any of these procedures, soak the
electrode in a pH 7 buffer solution for 30
minutes. If these steps fail to improve the
response of the electrode, it should be replaced.
Contact PASCO scientific about replacement
of the pH electrode.
CAUTION: The electrode should not be
used in percholate, silver, sulfide, or
hydrofluoric solutions, or in solutions
containing acids or bases that are more
than 1 Molar or at temperatures above
50 ºC. Use of the electrode at high
temperatures can shorten the electrode
life.
3
Page 4

pH Sensor 012-06832A
Contacting Technical Support
Before you call the PASCO Technical Support staff,
it would be helpful to prepare the following
information:
➤ If your problem is with the PASCO apparatus,
note:
Title and model number (usually listed on the
label);
Approximate age of apparatus;
A detailed description of the problem/sequence of
events (in case you cant call PASCO right away,
you wont lose valuable data);
If possible, have the apparatus within reach when
calling to facilitate description of individual parts.
➤ If your problem relates to the instruction manual,
note:
Part number and revision (listed by month and year
on the front cover);
Have the manual at hand to discuss your
questions.
Limited Warranty
PASCO scientific warrants the product to be free from
defects in materials and workmanship for a period of
one year from the date of shipment to the customer.
PASCO will repair or replace, at its option, any part of
the product which is deemed to be defective in
material or workmanship. The warranty does not
cover damage to the product caused by abuse or
improper use. Determination of whether a product
failure is the result of a manufacturing defect or
improper use by the customer shall be made solely by
PASCO scientific. Responsibility for the return of
equipment for warranty repair belongs to the
customer. Equipment must be properly packed to
prevent damage and shipped postage or freight
prepaid. (Damage caused by improper packing of the
equipment for return shipment will not be covered by
the warranty.) Shipping costs for returning the
equipment after repair will be paid by PASCO
scientific.
Address: PASCO scientific
10101 Foothills Blvd.
Roseville, CA 95747-7100
For technical support, call us at 1-800-772-8700
(toll-free within the U.S.) or (916) 786-3800.
fax: (916) 786-3292
e-mail: techsupp@pasco.com
web: www.pasco.com
The exclamation point within an equilateral
triangle is intended to alert the user of the
presence of important operating and
maintenance (servicing) instructions in the
literature accompanying the device.
Phone: (916) 786-3800
FAX: (916) 786-8905
e-mail: techsupp@pasco.com
web: www.pasco.com
ä
Note: This instruction sheet was written
assuming that the user has a basic familiarity
with ScienceWorkshop. Users can gain basic
skills by working through the tutorial within
the ScienceWorkshop program.
4
 Loading...