

Page 1
Instruction Sheet
for the PASCO
Model CI-6499
012-08549A
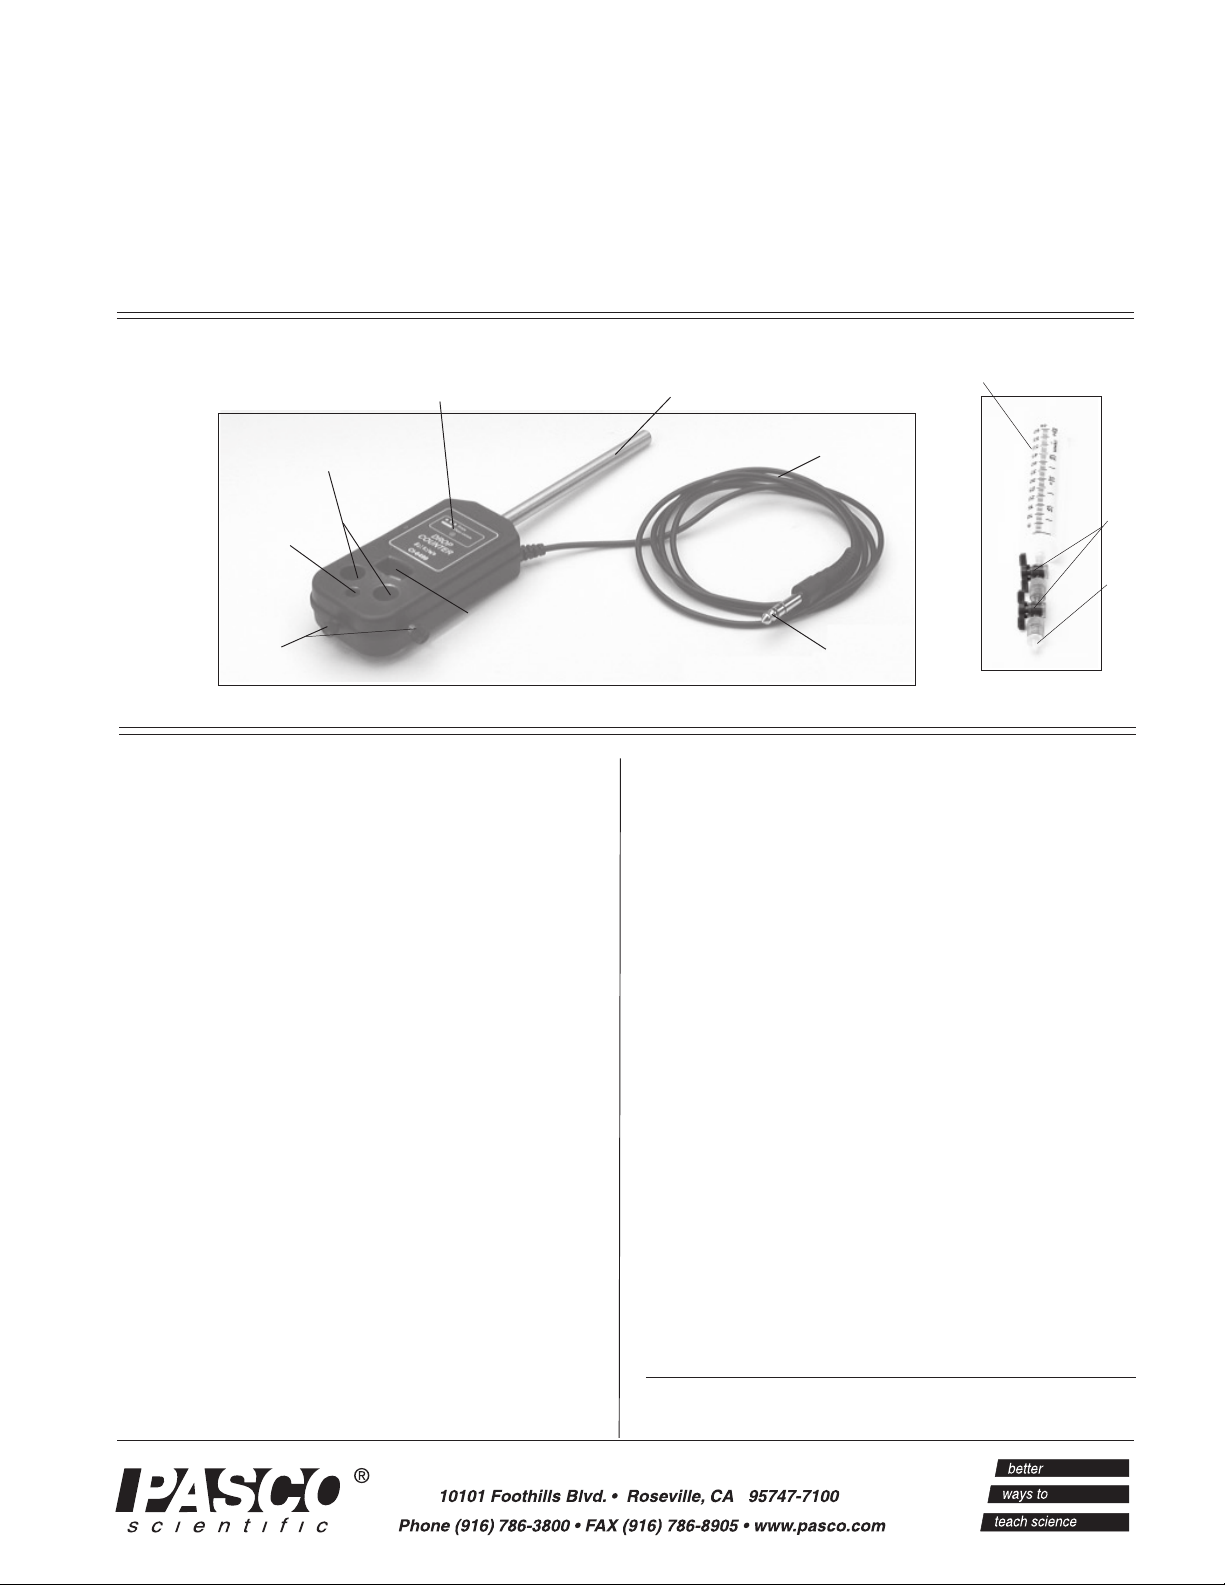
Drop Counter
Label with light-emitting
(LED) indicators
1/2” Probe Holders
1/4” Probe
Holder
Drop
Set screws
detection opening
Introduction
The PASCO CI-6499 Drop Counter counts drops/
sample and displays the drop count (drops) and fluid
volume (mL) of liquids and fine particles.
When the Drop Counter is used with a
ScienceWorkshop® interface and DataStudio software,
drop count and fluid volume can be viewed in
real-time in a graph display.
Typical applications for the Drop Counter include
measuring drop count and fluid volume, titration
experiments, and particle counts.
Equipment Included:
• CI-6499 Drop Counter
• Syringe Assembly with two stopcocks
• Plastic tips for buret (1 small, 1 medium)
Stainless steel rod
5’6” cable
Stereo plug
Plastic syringe
Additional Equipment Required:
• ScienceWorkshop® interface (500 or 750)
• DataStudio® software (version 1.8.5 or later)
Specifications:
Sensor range: 0 to 40 drops/second
Default sample rate: 5 samples/second
Maximum sample rate: 10 samples/second
Object detection size: 0.64 mm diameter (liquid drop
or fine particle)
Plastic enclosure: polypropylene, water resistant,
chemically resistant to mild acids and bases
Detector: Infrared photodetector with collimating lens
Probe holders: 2 x 1/2”, 1 x 1/4”
stopcocks
plastic tip
© 2003 PASCO scientific
Page 2

Drop Counter 012-08549A
Drop Counter Detector Operation
The Drop Counter includes a photodetector, which
records the change in infrared light emitting from the
aperture. As the drop falls between the lenses, it
penetrates a thin sheet of light. Light emitted from the
infrared light source enters the aperture, travels
through a collimating lens, and exits another aperture
before reaching the photodetector. In Figure 1, the
arrows indicate the direction of light travel.
infrared light source
drop
collimating
lens
sheet of light
Figure 1: Detector Operation
When the detector recognizes a drop, the green light
flashes. The light remains on when something is
blocking its path. The Drop Counter blocks all
visible light and works off of infrared light. On
power up, the detector automatically adjusts the light
level for the best sensitivity.
detector
focusing lens
thumbscrews for mounting up to three sensor probes. Typical
sensors used are the pH Sensor (CI-6507A) and the
Temperature Sensor (CI-6505B). A Teflon
®
sleeve is
recommended for use with these probes (part no. 669-075).
Drop Rate and Drop Size
For best results, use the included syringe with the Drop Counter.
The syringe has two stopcocks. Use the top stopcock to select a
flow rate during calibration and adjust the rate during the run.
Use the bottom stopcock to start and stop the liquid flow. The
tip provided with the Drop Counter helps to ensure a consistent
drop size. The drops from a glass tip are commonly twice the
size of drops from plastic tips, and the volume per drop for a
glass tip is not as consistent.
Shaking the syringe during the titration can affect the drop size
and the flow rate by causing small drops to fall. Avoid making
unnecessary adjustments during the run. Exceptions include the
following: the system needs to be refilled or the drop rate falls
below 1 drop/second. If the drop rate is below 1 drop per
second, the drop size increases (up to 2 - 3 times larger) and this
causes inaccurate volumes. If the flow rate falls below 1 drop
per second, and a large volume of liquid remains in the syringe,
adjust the stopcock to increase the flow. If the liquid level is
low, turn off the stopcock and refill the syringe before turning it
on at the higher drop rate.
Sensor Usage Tips
• Avoid operating the Drop Counter in direct sunlight.
• The green LED will flash once per drop. Two flashes
per drop indicates that a splash caused a count. If the
LED stays lit, then the lenses need to be cleaned.
• If the lenses become dirty or wet, clean or dry with
a cotton swab or tissue. The lenses are located in the
slits in the rectangular opening. WARNING: Do not
use chemicals to clean the lenses. Abrasive
chemicals may damage the lenses!
• To avoid miscount errors from splashing and/or
potential lens damage, use a magnetic stirrer.
• The Drop Counter has two different size holes with
It can take several seconds for each drop to mix, but the pH
probe detects more concentrated fractions as often as less
concentrated fractions. Therefore, the mixing tends to occur
without systematic error.
CAUTION: If you use a buret, slowly turn the stopcock to
allow drops of liquid to drip and avoid streams of liquid bursting
from the valve early on in the count. Bursts of liquid will distort
the actual count or volume dispensed.
The common 25 or 50 mL buret is long enough that the pressure
variation from the bottom to the top of the buret will change the
flow rate. With some burets, the rate can drop below 1 drop per
second, which may cause drops to become larger and
unpredictable. If using a glass buret, start at a rate of 3 to 4
drops/second. When the rate slows, stop, take a volume reading,
refill the buret, and start again at the faster rate.
2
Page 3

012-08549A Drop Counter
Drop Counter Setup
1. Using a right-angle clamp to horizontally mount the
Drop Counter to a rod stand (Figure 2).
2. Use a three-fingered clamp to mount an empty buret
or the included syringe apparatus above the
rectangular hole in the Drop Counter.
3. Connect the Drop Counter to a ScienceWorkshop
interface.
4. Place a 150 mL (or larger) beaker on the stirring
apparatus, but underneath the Drop Counter. Insert
a magnetic stirrer into the solution.
5. Insert the probes of any other sensors (i.e. pH
Sensor or Temperature Sensor) into the holes; hold
in place with the set screws on the Drop Counter.
Experiment Setup with DataStudio Software
1. Plug the Drop Counter into a digital channel on a
ScienceWorkshop interface.
2. Open DataStudio and double click “Create
Experiment.”
3. In the Experiment Setup window, scroll to the
Sensors list. Click and drag the Drop Counter icon
to a digital channel on the picture of the interface
(the same digital channel to which you have your
sensor connected.)
4. In the Setup window, double click on the Drop
Counter icon.
5. In the Measurement tab, place checks (or verify
that checks exist) in the boxes next to the drop
count and fluid volume. Click the OK button to
accept the changes.
6. Follow the calibration procedure instructions.
Note: When using the Drop Counter with DataStudio,
DataStudio must be in automatic sampling mode (the
default mode). The Drop Counter does not operate in
manual sampling mode. To set DataStudio to
automatic sampling, open the Sampling Options dialog
(under Experiment>Set Sampling Options) and
deselect all options checked in the Manual Sampling
tab.
Figure 2: Drop Counter Setup
3
Page 4

Drop Counter 012-08549A
Calibration Procedure
Note: DataStudio provides an indirect calibration
procedure for calibrating the fluid volume per drop.
1. Follow the apparatus setup instructions under
“Drop Counter Setup.”
2. Fill the buret/syringe with deionized water. Place a
waste beaker under the Drop Counter to catch any
liquid from the buret.
3. Flush bubbles out of the area below the stopcocks by
opening the stopcock valves completely (handles
parallel for the syringe) or tapping below the
stopcock. When the bubbles disappear, close the
stopcock and refill the syringe/buret.
4. If using the syringe: The top stopcock regulates flow
and the bottom stopcock turns the flow on or off.
With the bottom stopcock completely open, adjust
the top stopcock so that the flow rate is 2-4 drops/
second. To stop the flow, turn off the bottom
stopcock (on/off valve).
Calibration Tips
To calibrate the Drop Counter with DataStudio, you need to
measure the dropped fluid volume (from a syringe or buret)
and enter the volume per drop in the Constant tab of the Drop
Counter window.
-If using a 2-stopcock syringe, measure the fluid volume:
a) Take the mass of an empty, light cup. Record the mass to
0.01 precision. b) Start DataStudio and allow the drops to fall
into a cup. c) At some point, stop the flow of drops and take the
cup with fluid back and weigh it again to the same precision.
d) Use the difference in mass to calculate the volume difference.
If you liquid comes close to the density of water, which is 1 g/
mL, you can convert from grams to mL volume.
-If using a glass buret, record the volume change:
a) Take the volume before and after the calibration (using the
buret scale or a graduated cylinder).
b) Subtract the difference (mL) to determine the
actual volume.
If using a buret: Adjust the flow rate to 3-4 drops/
second. Important: Open the valve slowly to avoid
rapid fluid bursts, which will affect your reading.
(Please read “Drop Rate and Drop Size” on page 2.)
5. If you have not set up the experiment, follow the
“Experiment Setup with DataStudio Software” on
page 3 of this manual.
6. From the Data list, drag the Drop Count icon to a
Digits display.
7. Follow the directions under “Calibration Tips” to
collect drops and measure fluid volume.
8. The Digits display shows the number of drops
collected during the volume determination procedure.
Divide the actual volume measured by the number of
drops to find the volume per drop.
9. In the Setup window, double click on the Drop
Counter icon. Click the Constant tab. Enter the
volume per drop and click the OK button.
Collecting Data with the Drop Counter
Note: Before collecting data, please read the “Sensor Usage Tips”
on page 2 of this manual.
1. Open DataStudio and double click “Create Experiment.”
Note: When using the Drop Counter with DataStudio, DataStudio
must be in automatic sampling mode (the default mode). The Drop
Counter does not operate in manual sampling mode. To set
DataStudio to automatic sampling, open the Sampling Options
dialog (under Experiment>Set Sampling Options) and deselect all
options checked in the Manual Sampling tab.
2. Calibrate the Drop Counter.
3. In DataStudio, create a display of Drop Count and a display of
pH vs. fluid volume.
4. Click the Start button to prepare the Drop Counter
for data collection.
4
Page 5

012-08549A Drop Counter
5. If using a syringe: With the top control valve at the
same set position as in the calibration, turn the bottom
On/Off valve to allow fluid to drip into the beaker.
Watch the drop count and/or fluid volume display in
real-time in DataStudio.
OR
If using a glass buret with one stopcock: Start very slowly
to avoid liquid surges. After the drops begin flowing,
slowly increase the rate to 3 to 4 drops per second.
Suggested Experiment
Equipment required: CI-6499 Drop Counter, buret
or syringe with 2 stopcocks, ScienceWorkshop interface,
DataStudio software (version 1.8.5 or later), 0.1 M
NaOH, 0.1 M HCI, beaker (150 mL), pH Sensor,
buffered solution of pH 4.0 and 7.0, magnetic stirring
rod, rod stand, rod, right-angle clamp, three-fingered
clamp, mass balance (0.1 g resolution)
1. Set up the Drop Counter Apparatus (See page 3 for
instructions.)
6. Insert the pH electrode through one of the holes on the
Drop Counter. Ensure that the tip of the pH electrode is
fully immersed in the solution. The drops from the
buret/syringe should fall through the Drop Counter and
into the beaker.
7. In DataStudio, create a graph of pH vs. Fluid Volume.
Click the Start button to prepare the Drop Counter to
read drops.
8. If using a syringe: Turn the bottom valve to the full “on”
position and release the titrant.
Or
If using a buret: Slowly open the stopcock to avoid liquid
surges. After drops begin flowing, slowly increase the
rate to 3 or 4 drops per second. Observe the titration
curve in DataStudio.
9. Watch the pH change. After the equivalence point, allow
about 5 mL of titrant to drop until the curve flattens, then
click the Stop button to end the data collection.
2. Open DataStudio and setup and calibrate the pH
Sensor. (See the instructions provided with the
sensor.)
3. Calibrate the Drop Counter in mL fluid/drop (See
page 4) or open the saved DataStudio calibration file.
4. Fill the buret (or syringe) with 0.1M NaOH. Place
a waste beaker under the Drop Counter. Turn the
stopcock and release a few mL of NaOH to flush
other liquid or bubbles from the stopcock.
5. Fill a 150 ml beaker with 100 ml of deionized water.
Add 5 ml of 0.1M HCl to the beaker. (Optional: Add
a few drops of phenophthalein indicator to the
beaker.) Add a spin bar to the beaker and place the
beaker on a stir plate (set the stir plate to medium
speed).
Sample Data
The following is sample data from a titration experiment
performed with the Drop Counter.
equivalence point
Figure 3
5
Page 6

Drop Counter 012-08549A
Limited Warranty
PASCO scientific warrants the product to be free from
defects in materials and workmanship for a period of
one year from the date of shipment to the customer.
PASCO will repair or replace, at its option, any part of
the product which is deemed to be defective in
material or workmanship. The warranty does not cover
damage to the product caused by abuse or improper
use. Determination of whether a product failure is the
result of a manufacturing defect or improper use by
the customer shall be made solely by PASCO
scientific. Responsibility for the return of equipment
for warranty repair belongs to the customer.
Equipment must be properly packed to prevent
damage and shipped postage or freight prepaid.
(Damage caused by improper packing of the
equipment for return shipment will not be covered by
the warranty.) Shipping costs for returning the
equipment after repair will be paid by PASCO
scientific.
Address: PASCO scientific
10101 Foothills Blvd.
Roseville, CA 95747-7100
Phone: (916) 786-3800
FAX: (916) 786-8905
E-mail: techsupp@pasco.com
Web site: www.pasco.com
6
 Loading...