

Page 1

Page 2
SAFETY INFORMATION
WARNING – LISTENING AT HIGH VOLUME FOR A LONG TIME MAY DAMAGE YOUR HEARING
The exclamation point within an equilateral triangle is intended to inform the user to the
presence of important operating and maintenance (servicing) instructions in the literature
accompanying the appliance.
SAFETY INSTRUCTIONS – PLEASE READ BEFORE USE
• Never disassemble or attempt to modify the product in any way.
• Do not attempt to submerge the product in water or expose it moisture, water or liquids of any kind.
• Do not drop the product or place the product on its curved side in a location above ground where it may roll and fall.
• Do not cover or restrict ventilation and use only in areas of adequate ventilation with at least 15cm of separation.
• Avoid hot and/or humid environments such as bathrooms, conservatories, cars or in direct sunlight.
• Do not place or install the product near to sources of heat such as radiators or stoves.
• Do not expose the product directly to naked flames, hot surfaces or other apparatus that produce heat.
• The safe operating temperature range of this product is +5°C to +40°C.
• Do not expose the product to objects or forces which may pierce or damage the enclosure.
• For charging, this product requires 0.5A (500mA) at 5V DC. Check USB port power supply specifications before use.
• CAUTION: AC-DC USB power supplies may carry electric shock hazard. Read power supply safety information before use.
• Do not short circuit or connect loads in excess of 1.5A (1500mA) to the power cable USB socket (marked “out”) while the cable is connected to the product.
• Do not daisy chain or connect multiple power cables to any single USB socket or USB power supply.
• Do not connect any other load or device to the power cable USB socket (marked “out”) while the power cable USB plug (marked “in”) is connected to a USB port power supply.
• Do not stress, bend, pinch or force cables in such a way as to incur damage.
• Do not store the product with a low/flat battery or leave the unit unused for a long period of time.
• Do not leave the product permanently on charge.
• Do not use this product near medical devices or on an airplane.
• Refer all servicing and repair to original manufacturer. Servicing is required when the product is damaged in any way such as power-supply cord is damaged, liquid has been spilled or objects
have fallen onto the unit, the unit has been exposed to rain or moisture, does not operate normally or has been dropped.
NOTE: The manufacturer is not responsible for any radio or TV interference caused by unauthorized modifications or changes to this equipment. Such modifications or changes could void the user’s
authority to operate the equipment.
NOTE: This equipment has been tested and found to comply with the limits for a Class B digital device, pursuant to part 15 of the FCC Rules. These limits are designed to provide reasonable protection
against harmful interference in a residential installation. This equipment generates uses and can radiate radio frequency energy and, if not installed and used in accordance with the instructions, may
cause harmful interference to radio communications. However, there is no guarantee that interference will not occur in a particular installation. If this equipment does cause harmful interference to radio
or television reception, which can be determined by turning the equipment o and on, the user is encouraged to try to correct the interference by one or more of the following measures:
• Reorient or relocate the receiving antenna.
• Increase the separation between the equipment and receiver.
• Connect the equipment into an outlet on a circuit dierent from that to which the receiver is connected.
• Consult the dealer or an experienced radio/TV technician for help.
Page 3
BATTERY
This product contains a non-serviceable rechargeable lithium ion battery. DO NOT attempt to open or disassemble the unit to replace
or remove the battery yourself. Please refer to original manufacturer for battery servicing and replacement. Follow safety instructions
above carefully. If fluid should leak from the unit or rechargeable battery, do not touch. If fluid comes in contact with eyes, wash
thoroughly with water and seek medical advice. Do not rub eyes. If you suspect that the battery is faulty through unexpected behaviour
such as not holding charge, please turn o and do not attempt to charge or use the product. Contact the original product manufacturer
immediately.
ENVIRONMENTAL
All packaging materials are recyclable, please dispose of in accordance with your local recycling regulations. The
product may contain batteries and harmful substances so should not be treated as household waste. Where possible
we will repair any faulty units to keep the product operational for as long as possible. If you wish to dispose of the
product, please contact the original manufacturer to return it for recycling or for advice on suitable recycling methods.
REGULATORY COMPLIANCE STATEMENTS
This product contains a 2.4Ghz radio transmitter and should be used in such a manner that human contact is minimised during
normal product operation.
US (FCC) FCC ID: 2AD65MRBT3 MODEL NUMBER: MRBT3
This equipment complies with FCC radiation exposure limits set forth for portable use conditions.
This device complies with Part 15 of the FCC Rules. Operation is subject to the following two conditions: (1) this device may not cause
harmful interference, and (2) this device must accept any interference received, including interference that may cause undesired
operation. No changes shall be made to the equipment without the manufacturer’s permission as this may void the user’s authority to
operate the equipment.
CANADA (ISED) IC: 12731A-MRBT3 MODEL NUMBER: MRBT3
This equipment complies with the safety requirements for RF exposure in accordance with RSS-102, issue 5, Annex VII for portable
use conditions. This Class B digital apparatus complies with Canadian ICES-003. Operation is subject to the following two conditions:
(1) this device may not cause interference, and (2) this device must accept any interference, including interference that may cause
undesired operation of the device.
Cet appareil est conforme aux exigences de sécurité concernant l’exposition aux RF selon la norme RSS-102, 5ème édition, pour des
conditions d’utilisation portable. Cet appareil numérique de la classe B est conforme à la norme ICES-003 du Canada.
L’utilisation de ce dispositif est autorisée seulement aux conditions suivantes : (1) il ne doit pas produire de brouillage et (2)
l’utilisateur du dispositif doit être prêt à accepter tout brouillage radioélectrique reçu, même si ce brouillage est susceptible de
compromettre le fonctionnement du dispositif.
EU (CE)
Hereby, Pasce Ltd. declares that the radio equipment Minirig is in compliance with Directive 2014/53/EU. The full text of the EU
declaration of conformity is available at the following internet address: www.minirigs.co.uk/compliance
OTHER INFORMATION
WARRANTY INFORMATION WWW.MINIRIGS.CO.UK/TERMS-AND-CONDITIONS
SUPPORT/CONTACT INFORMATION WWW.MINIRIGS.CO.UK/SUPPORT
MANUFACTURER MINIRIGS LTD, 10 BACKFIELDS LANE, BS28QW, UK
©minirigs Ltd 2018
Page 4

INDEX
press link to skip to page
Page 5
A WORD FROM US
First of all we want to oer you a big thank you from everyone here at Minirigs for purchasing a Minirig Bluetooth speaker. We have
spent years developing this product, building on the success of our wired Minirig and bringing it up-to-date with the latest Bluetooth
features and improvements.
UNPACKING
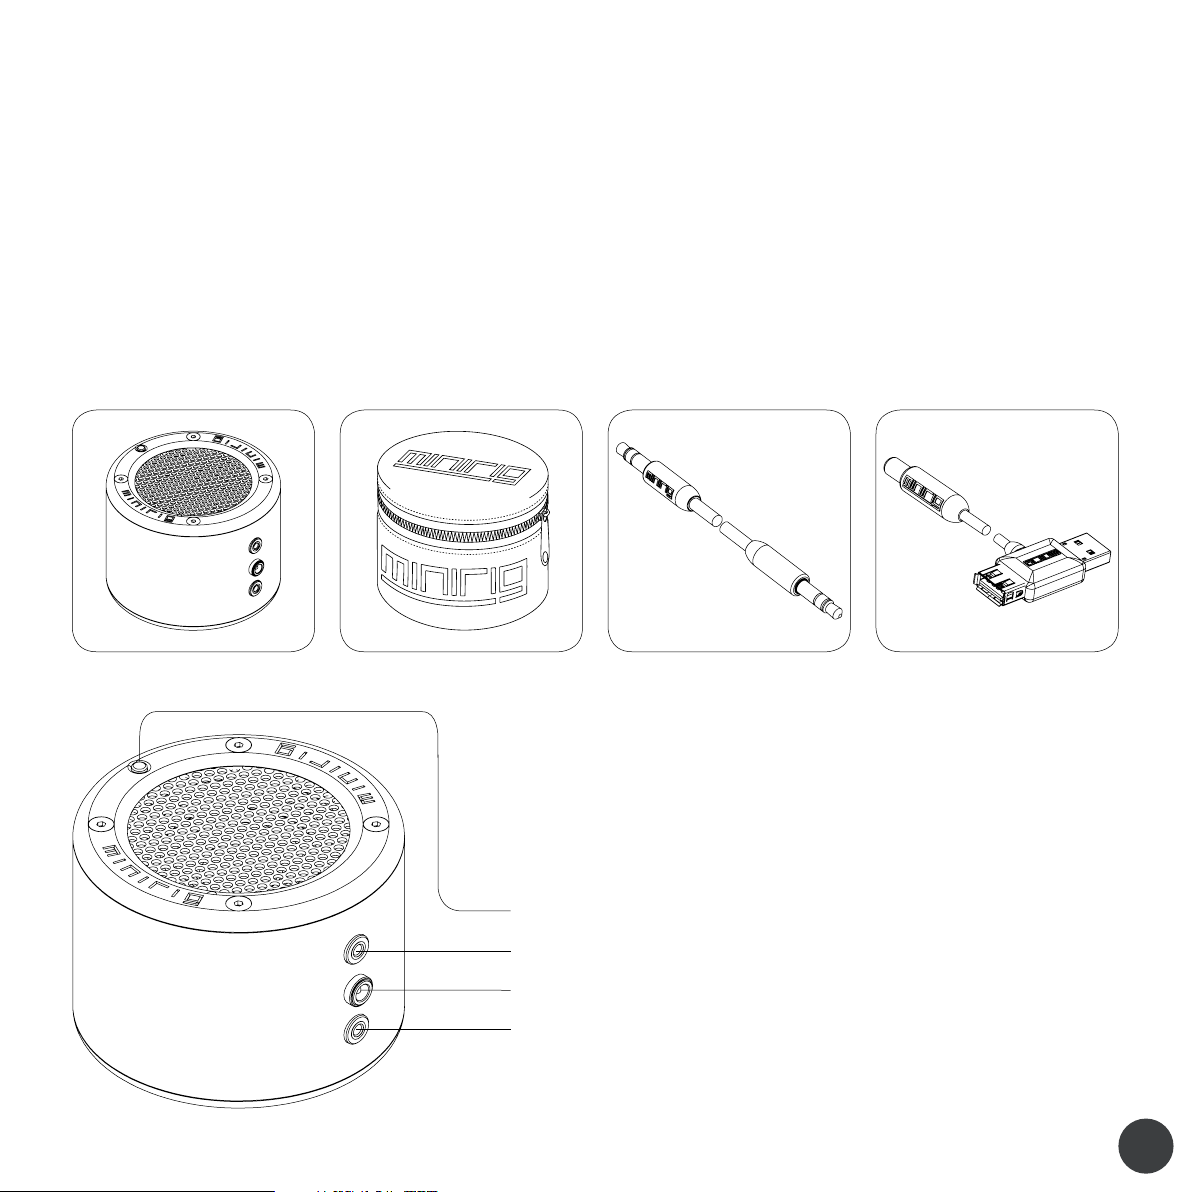
Before you begin, open up the box and check the contents. You should have:
1. MINIRIG SPEAKER
2. ZIP CASE FOR THE MINIRIG 3. AUX AUDIO CABLE 3.5MM
GETTING TO KNOW YOUR MINIRIG
BUTTON / STATUS LED Lights up to show status. Multifunction button to operate the Minirig
4. BARREL TO USB POWER
AUX SOCKET (HIGH GAIN) Audio input from audio player or output to another Minirig or subwoofer
POWER SOCKET Plug supplied, insert power cable in here to charge the Minirig or take power out
AUX SOCKET (LOW GAIN) Audio input from audio player or output to another Minirig or subwoofer
home
Page 6
TURN ON/OFF
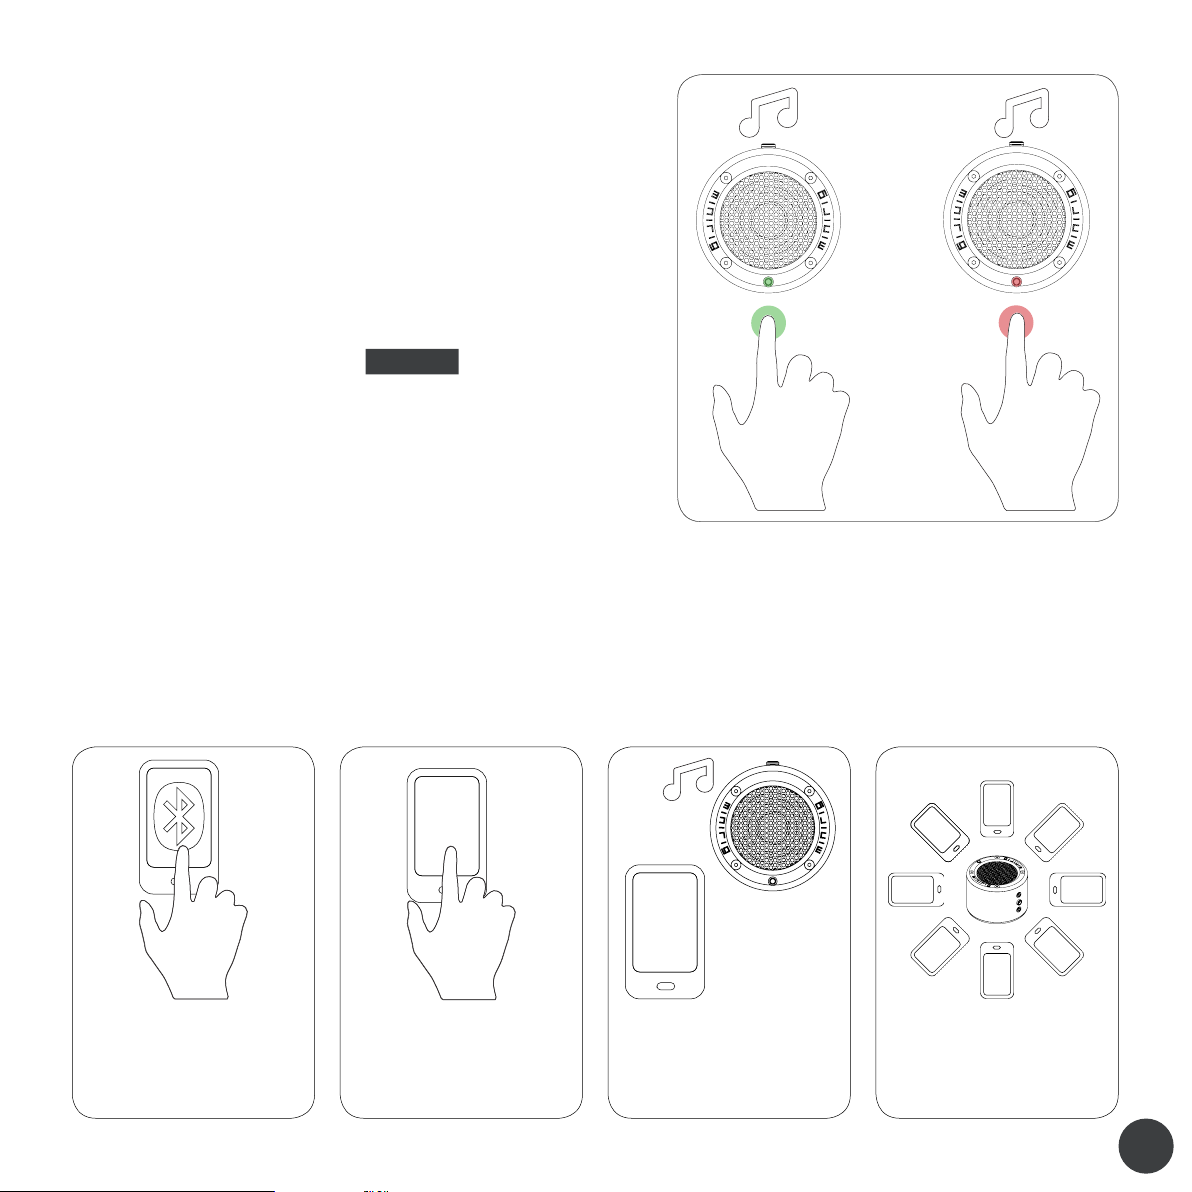
Press and hold the button for 2 seconds to turn the Minirig on, you will
see the LED turn green and hear a tone momentarily. Finally the LED will
settle showing your battery status.
Press and hold the button for 2 seconds to turn the minirig o, you will
see the led turn red and hear a tone momentarily.
For more information regarding the battery status see:
‘CHARGING’ or PRESS HERE
CONNECT TO BLUETOOTH
Please remove any audio cables before turning your minirig on.
To connect your audio device with the Minirig, they have to be “paired” first.
The Minirig will always be available for pairing as long as it is on, in Bluetooth mode, and doesn’t have two devices already connected
to it. There is no pairing “mode” unlike other Bluetooth speakers, which makes pairing simpler and easier.
TURN ON BLUETOOTH
Locate the Bluetooth settings on
your device (E.g. smartphone). Turn
Bluetooth ON and search for device
FIND YOUR MINIRIG PLAY SOME MUSIC
MINIRIG
CONNECTED
Find and select the “MINIRIG”. Your
device will indicate that they are
“pairing”
Your device will confirm when they
have paired and you can begin
playing music.
SHARE WITH FRIENDS
The Minirig can remember up to 8
paired devices.
home
Page 7
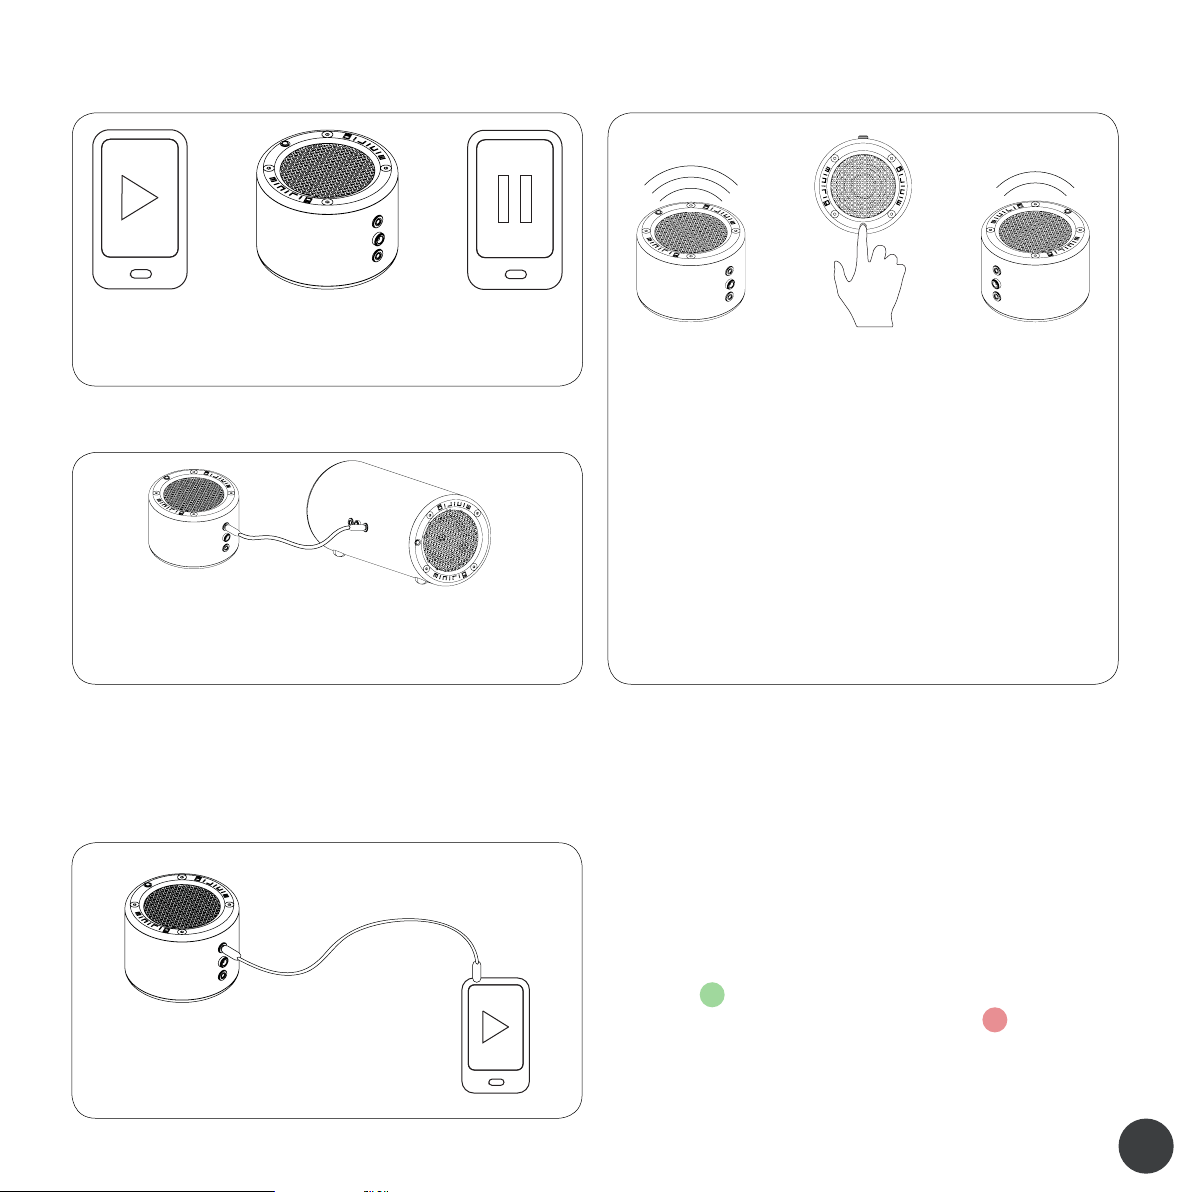
CONNECT TWO DEVICES TO SHARE MUSIC HIGH AND LOW GAIN SETTINGS
You can pair and connect two devices to a Minirig at the same time.
To switch between them you need to stop the music on the device
playing, then start playing music on the second device.
PLUG IN A SUBWOOFER WHEN USING BLUETOOTH
In Bluetooth mode, the Minirig will output audio from both AUX
sockets. This allows you to connect to another Minirig, Minirig
subwoofer or Hi-Fi system.
high gain low gain
The Minirig has two gain (volume) settings – LOW and HIGH. In
Bluetooth mode it will always start in HIGH gain. In AUX mode it
will start in LOW or HIGH gain depending on which AUX socket
you plug in to.
TO CHANGE GAIN AT ANY TIME:
• Check that the Minirig is ON and audio is playing
• Press the button once, do not hold it down
• In high gain the LED will be brighter than in low gain
We recommend that you use LOW gain at normal listening
levels for the best sound quality
CONNECT AUDIO CABLE
If your device does not have Bluetooth or you would like to use a wired connection instead, you can connect to the Minirig using the
supplied AUX cable. ensure your minirig is o and remove any audio cables before using cable mode.
• Plug one end of the AUX cable into the headphone socket on
your audio device.
• Plug the other end into one of the AUX sockets on the Minirig.
The Minirig will turn on when you insert the cable displaying the
green LED There will be no tone. when you unplug the cable
the minirig will turn o displaying the red LED there will be
no tone.
Please ensure the cable is pushed all the way in when turning on!
home
Page 8
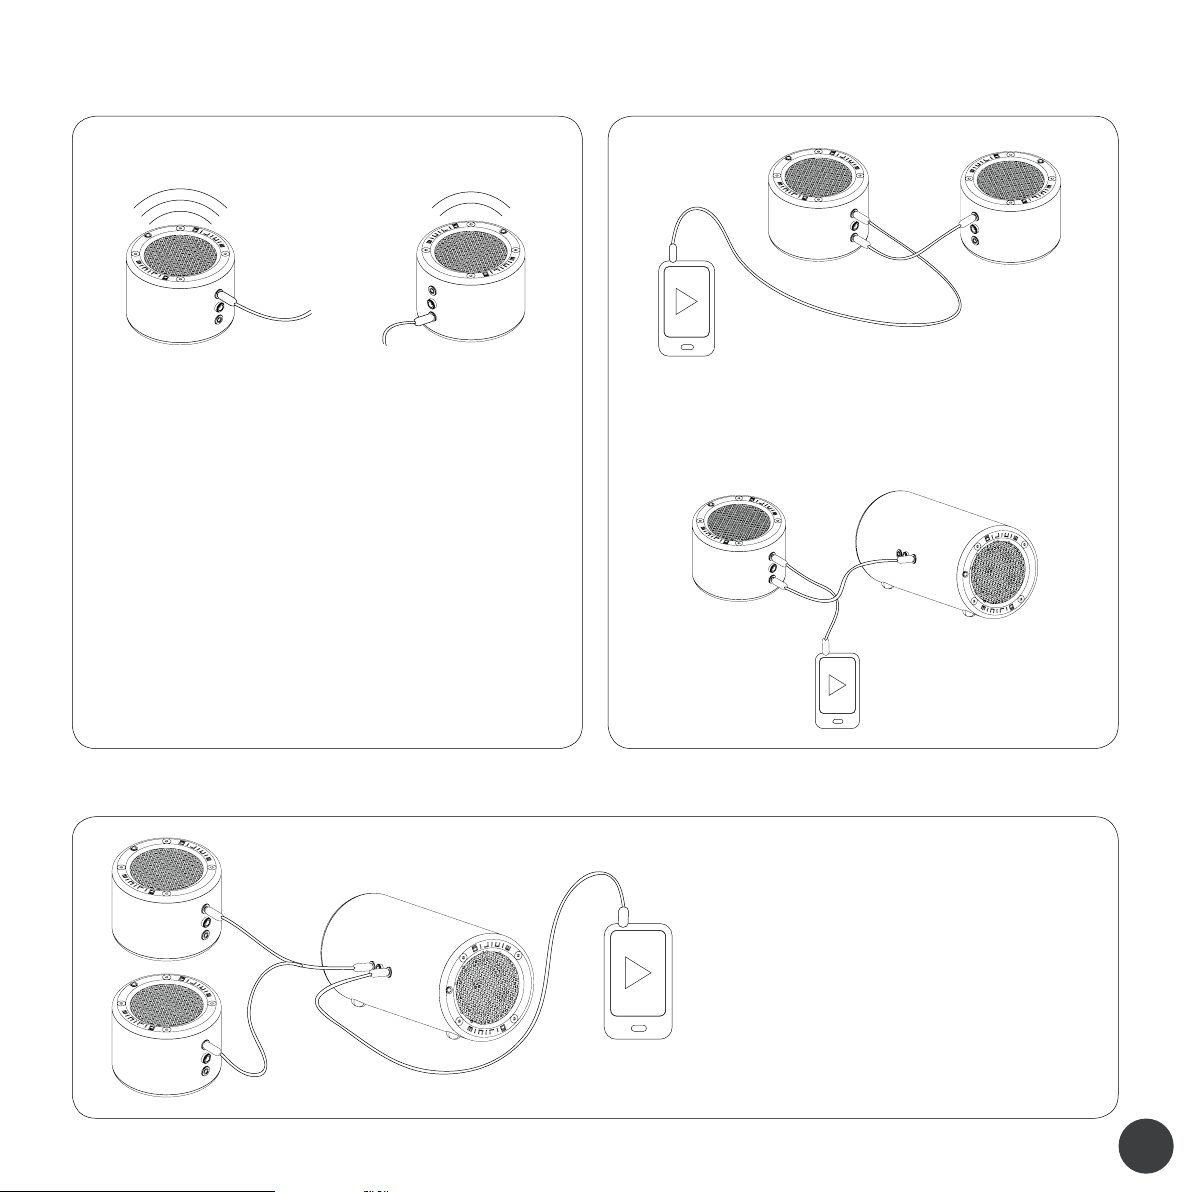
HIGH AND LOW GAIN IN WHEN USING A CABLE LINKING UP MINIRIGS
high gain low gain
The top socket will put the Minirig in high gain, the bottom
socket low gain. push it in firmly to make the connection. You can
still change gain using the button as in Bluetooth mode.
You can turn the Minirig OFF and ON by pressing and holding the
button. However, it will stay in AUX mode until you remove all the
audio cables
In AUX mode, removing the audio cables will also turn the Minirig
OFF. Again there will be no tone in AUX mode.
You must do this before you can use the Minirig in Bluetooth
mode.
linking-up with subwoofer and Minirigs
In AUX mode you can use the spare audio socket to link out
to another Minirig or Minirig subwoofer. If using a subwoofer,
please feed the audio into the Bluetooth Minirig FIRST as shown
below. Ensure that you match the gain levels.
In aux mode you can use the minirig splitter cable to
give you stereo sound, splitter cable can be purchased
here http://minirigs.co.uk/shop/accessories.
when using a subwoofer ensure you plug your audio
device into the sub first, then use the splitter cable to
link out of the sub to the minirigs.
This method also works for minirig V1 & MRBT
home
Page 9
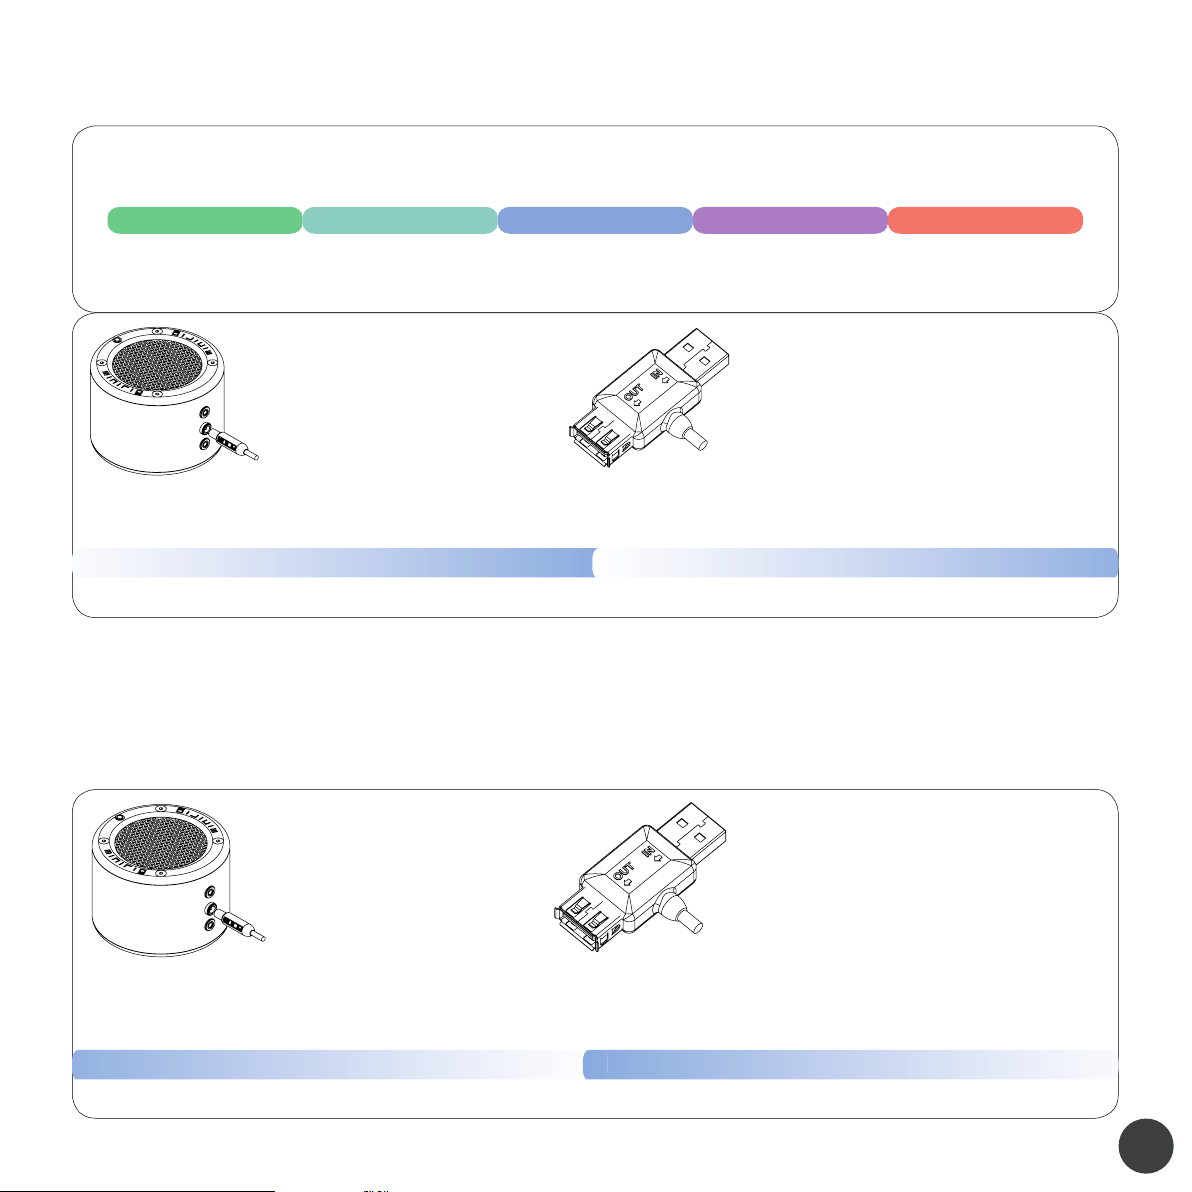
CHARGING
When the Minirig is ON, the colour of the LED will indicate the battery level.
green: 75-100% cyan: 50-75% blue: 25-50% purple: 5-25% red: 0%
When the Minirig is OFF you can check the battery status by pressing the button once (do not press and hold). At any time
you can charge the Minirig using the supplied power cable
Plug the round end into the Minirig
power socket. Ensure you push it
in firmly to make the connection.
WARNING: only one Minirig or Sub per USB plug
Next insert the USB plug end marked
“IN” into any powered USB socket.
USB sockets can be found on most
computers and mobile phone chargers.
When on charge, the LED will fade ON in a repeating 2 second cycle. The colour represents the battery level.
A full charge will take around 6 hours. Once the battery is charged, the LED will stop this repeating cycle.
CHARGE YOUR DEVICES – POWER OUT
Using the supplied power cable, you can take power out of the Minirig to charge or power any device which uses 5V USB power.
The Minirig automatically detects when a device is trying to draw power and activates the power output.
Plug the round end into the minirig
power socket. Ensure you push it
in firmly to make the connection.
Plug your device’s USB charging cable
into the Minirig power cable USB socket
marked “OUT” Plug your USB charging
cable into your device.
If the Minirig is o, press the button once to activate the power without turning it on, after a few seconds the power will begin to flow
When on charge, the LED will fade ON in a repeating 2 second cycle. The colour represents the battery level.
A full charge will take around 6-8 hours. Once the battery is charged, the LED will stop this repeating cycle.
home
Page 10
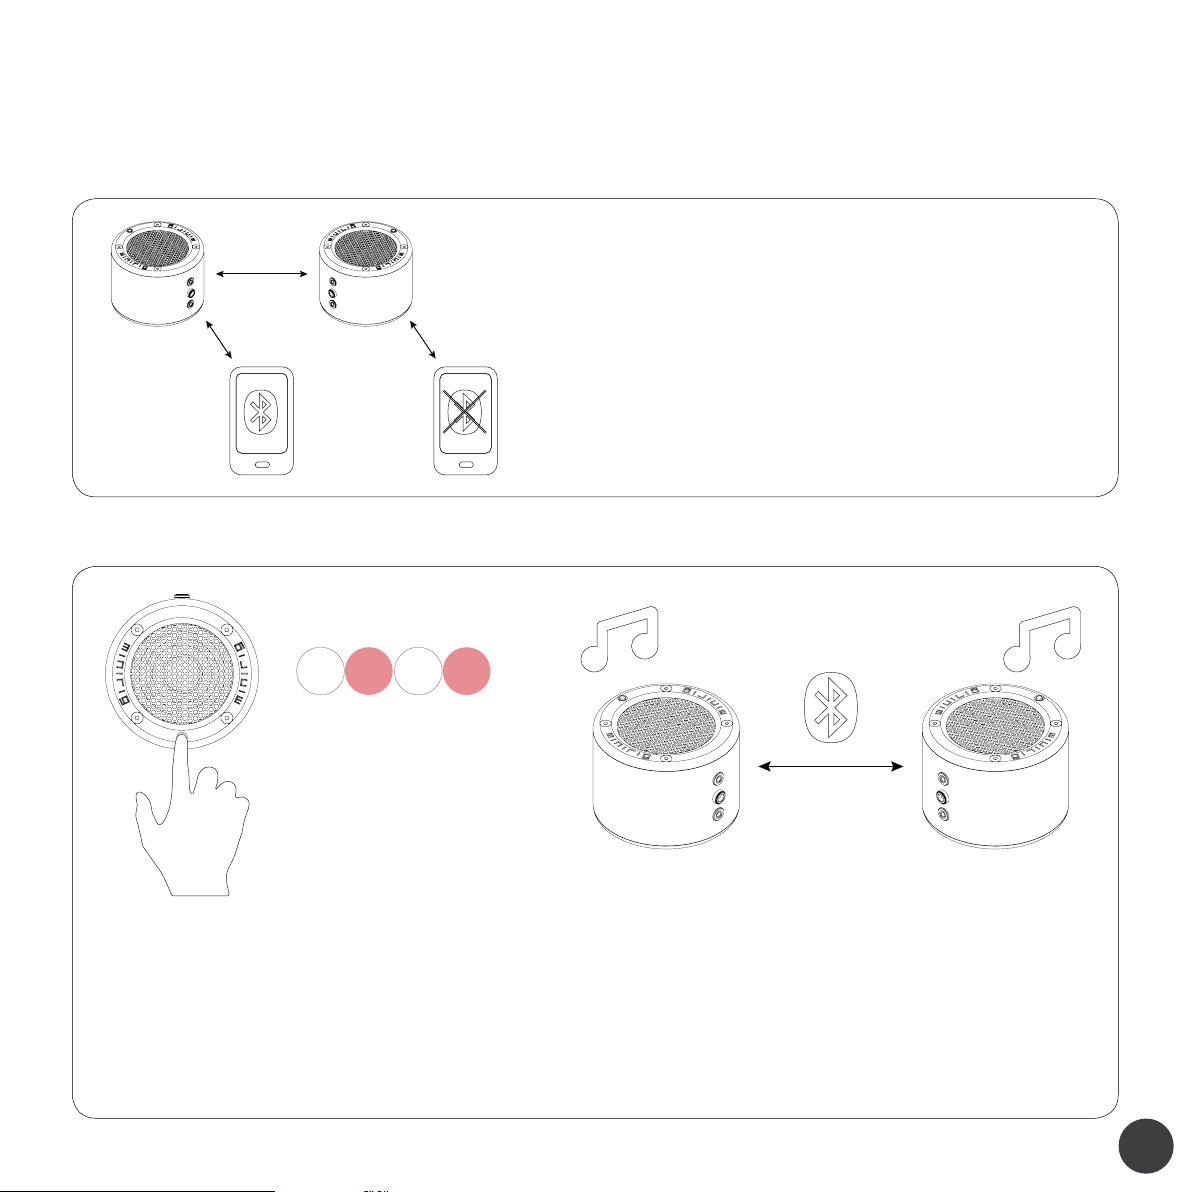
WIRELESS STEREO PAIRING
Two Minirigs can link up together using the wireless Bluetooth connection. This allows you to create an immersive stereo soundstage
or to double up the sound in dierent areas without any cables.
1 meter
l
r
• Turn both Minirigs ON in Bluetooth mode and place them
around 1 meter or less apart – they only need to be close for
this pairing process.
• Select which one you want to use as the LEFT (master)
speaker. You may already be connected and playing music
through this Minirig.
It is vital that that the other RIGHT (slave) Minirig does not have an
audio device connected to it. If it does they will not pair.
pressing the button to pair for tws
• Press the button TWICE on
the LEFT (master) Minirig. Just
press and release both times,
don’t hold the button. You will
x2
hear a “beep beep” tone.
• The Minirig will disconnect from your audio device and
start searching for other Minirigs in the area. The LED
will flash white and red.
• At any time you can stop the process by pressing the
button.
• When it has found another Minirig, that minirig will also
start flashing white and red
• After around 10 seconds they should pair. You will hear a “confirmation”
tone from both Minirigs and the LEDs will stop flashing.
• If the pairing is unsuccessful or if the search times out, you will hear a
dierent lower “failed” tone. Please try again or see FAQ for assistance.
• Once the Minirigs are paired, go ahead and connect your Bluetooth
audio device to the LEFT (master) speaker as usual. If you were
previously paired and connected, it should automatically reconnect.
In wireless stereo you can only connect one Bluetooth audio device.
home
Page 11
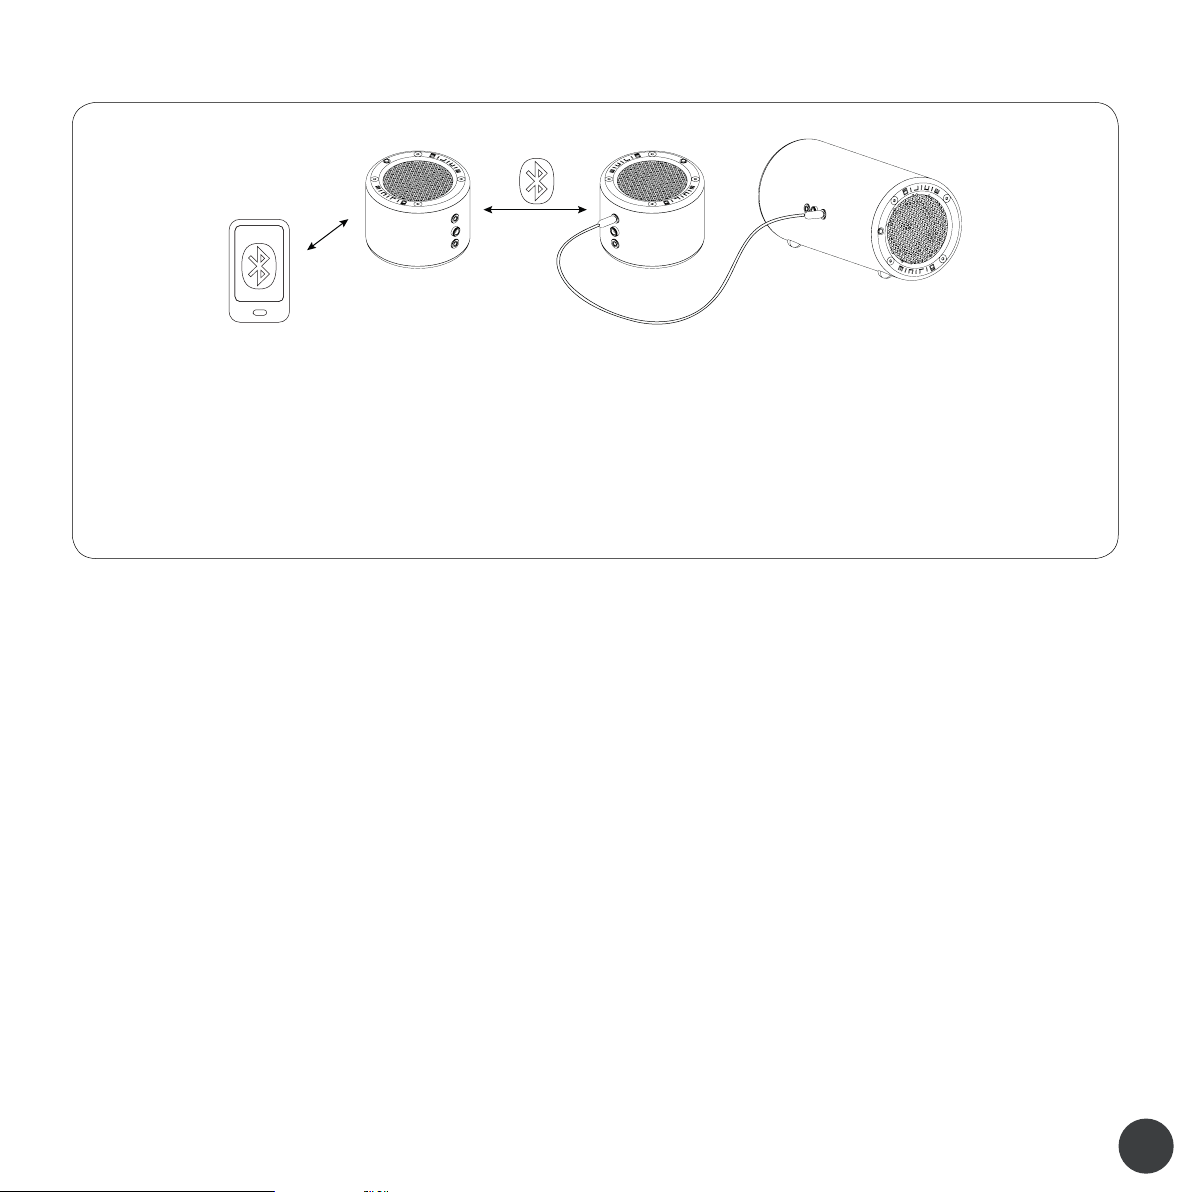
• Go ahead and connect a Minirig subwoofer to either Minirig if you have one. It will receive both LEFT and RIGHT signals. This
can be re-configured using the Minirig APP. See demo videos for more information.
• When you turn one of the paired Minirigs OFF, they will both turn OFF. They will automatically un-pair and return back to normal.
• You can lock them together using the Minirig APP, so next time you turn them on, they reconnect automatically in wireless
stereo. See APP instructions for more details.
• At anytime you can also un-pair the Minirigs by pressing the button TWICE on either Minirig. You will hear a tone to confirm they
are un-paired.
POWER SAVING FEATURES
To save power, the amplifier circuit will automatically turn o while there is no music playing, even though the Minirig remains ON.
In this “standby” mode, a full battery can last up to 14 days in Bluetooth mode or 40 days in AUX mode.
If you are listening to the Minirig at low volumes in AUX mode, please use the low gain setting to ensure the Minirig does not turn o
unexpectedly. Alternatively, you can turn this mode OFF using the Minirig App.
In Bluetooth mode, the Minirig will turn OFF completely if there are no devices connected for 30 minutes.
TROUBLESHOOTING
We hope that you find the Minirig easy and problem-free to use. However, if you are having any trouble here are a few things you can
try which may help:
• Pause/stop the music for 5 seconds and press play again. This can resolve some audio issues.
• Turn the Minirig(s) OFF and ON again. This will re-establish the Minirig connection.
• Try a dierent AUX audio cable or Minirig power cable if you have one.
• Move the Minirig closer to the Bluetooth audio device.
• Turn Bluetooth OFF and ON again on your Bluetooth audio device.
home home
Page 12
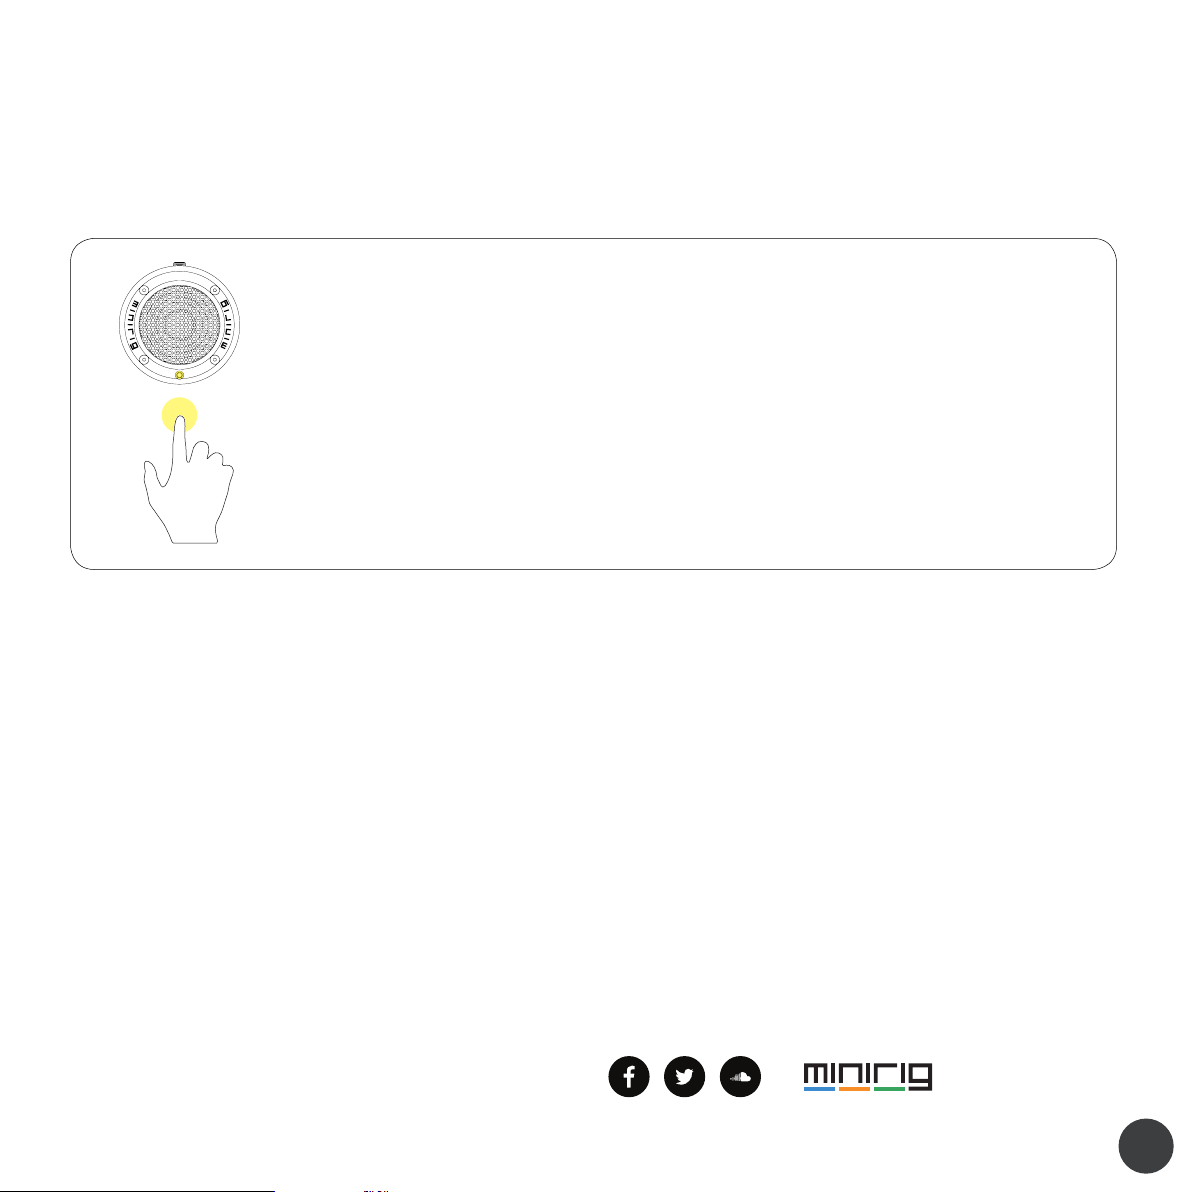
If you are still having trouble, try a full reset of the Minirig – this will restore it to default and un-pair all devices.
• To reset your Minirig, start with the Minirig OFF and no cables plugged in.
• Press and hold the button. Keep holding it for at least 16 seconds.
• Eventually the Minirig will reset and the LED will turn o. You can release the button now.
• Wait for the LED to illuminate yellow. Press the button once.
• After around 3 seconds the Minirig and LED will turn o and be ready to use again as normal.
• You will have to re-pair your devices after a reset.
• The Bluetooth name will also be reset to default - “MINIRIG”
If you are still having problem you can visit our support page. Please read our FAQ section and view
our demo videos before contacting us.
WARRANTY AND REPAIRS
We hope that the Minirig will never let you down, however if you believe that there is a fault with your Minirig we have a simple and
fair warranty and repair service.
If you have been through our FAQ and troubleshooting section and still believe your Minirig is faulty, please contact us through our
support page.
Where possible we prefer to repair any faulty products. Our products are made in the UK, so we are in the unique position of being
able to fix and repair any of our products quickly ourselves. This also benefits the environment by re-using as many parts as possible,
minimising any harmful or non-recyclable waste going to land-fill.
The Minirig is covered by a full 1 year warranty service. Please see our terms and conditions for full details. If your Minirig product is
faulty outside of this warranty period please still contact us as usual. We can still repair your product quickly and easily through our
fair non-profit repair service.
FOLLOW US BY HITTING THE ICONS
home
 Loading...