

Page 1
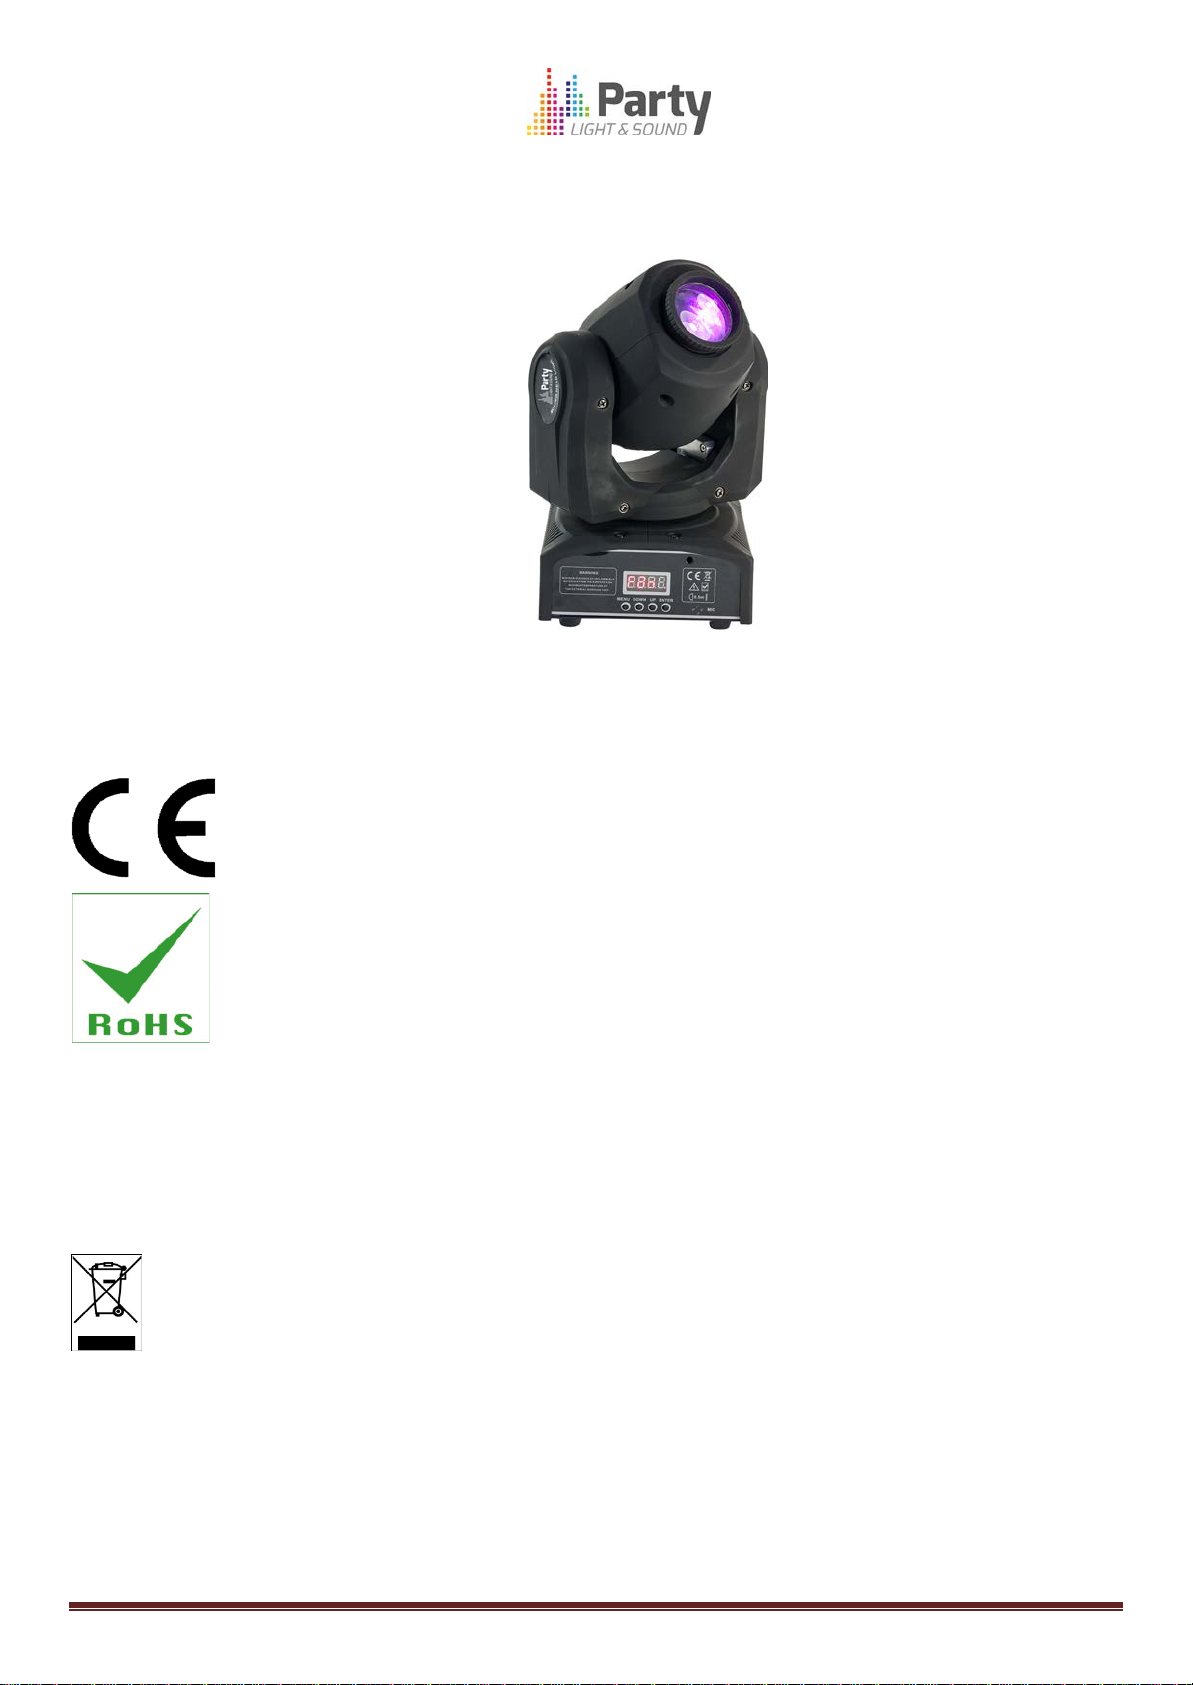
MOOVVIINNGG HHEEAADD
M
Ref.: PARTY-SPOT7 (15-1242PLS)
USER
MANUAL
MANUEL D’UTILISATION
BEDIENUNGSANLEITUNG
MANUAL DE INSTRUÇÕES
MANUAL DE UTILIZARE
NAVODILA ZA UPORABO
HANDLEIDING
MANUAL DE INSTRUCCIONES
IMPORTANT NOTE: Electric products must not be put into household waste. Please bring them to a recycling centre. Ask your local authorities or
your dealer about the way to proceed.
NOTE IMPORTANTE : Les produits électriques ne doivent pas être mis au rebut avec les ordures ménagères. Veuillez les faire recycler là où il existe
des centres pour cela. Consultez les autorités locales ou votre revendeur sur la façon de les recycler.
WICHTIGER HINWEIS: Elektrogeräte gehören nicht in den Hausmüll. Sie müssen in speziellen Betrieben recycelt werden. Bringen Sie sie zu einer
BELANGRIJK: De elektrische producten mogen niet naast het huisvuil geplaatst worden. Gelieve deze te laten recycleren daar waar er centra’s hiervoor voorzien
is. Raadpleeg de plaatselijke autoriteiten of uw verkoper ivm de manier van recycleren.
NOTA IMPORTANTE: Produtos eléctricos não deverão ser postos em contentores de lixo caseiros. Por favor, deposite-os em contentores para reciclagem.
Questione as autoridades locais ou onde adquiriu o produto sobre como deverá proceder.
NOTA IMPORTANTA: Deseurile care provin de la produsele electrice si electronice nu se vor pune la gunoiul menajer. Dezafectarea acestora trebuie sa se faca la
centrele de colectare special amenajate. Contactati autoritatile locale pentru informatii privind procedura de dezafectare a deseurilor electrice si electronice.
speziellen Entsorgungsstelle für Elektrokleingeräte (Wertstoffhof)!
©Copyright LOTRONIC 2017 PARTY-SPOT7 Page 1
Page 2

GB
1. BEFORE YOU BEGIN
Contents of the carton:
• 1 x Moving Head
• 1x User Manual
• 1x XLR lead
• 1x omega clamp
Unpacking Instructions
Immediately upon receiving a fixture, carefully unpack the carton, check the contents to ensure that all parts are
present and have been received in good condition. Notify the freight company immediately and retain packing
material for inspection if any parts appear to be damaged from shipping or the carton itself shows signs of
mishandling. Keep the carton and all packing materials. In the event that a fixture must be returned to the factory, it
is important that the fixture be returned in the original factory box and packing.
Safety Instructions
Please read these instructions carefully, they include important information about the installation, usage and
maintenance of this product.
• Please keep this User Guide for future reference. If you sell the unit to another user, be sure that he also receives
this instruction booklet.
• Always make sure that you are connecting to the proper voltage, and that the line voltage you are connecting to is
not higher than that stated on the decal or rear panel of the fixture.
• This product is intended for indoor use only!
• To prevent risk of fire or shock, do not expose fixture to rain or moisture. Make sure there are no flammable
materials close to the unit while operating.
• The unit must be installed in a location with adequate ventilation, at least 20in (50cm) from adjacent surfaces. Be
sure that no ventilation slots are blocked.
• Always disconnect from power source before servicing or replacing fuse and be sure to replace with same fuse size
and type.
• Secure fixture to fastening device using a safety chain. Never carry the fixture solely by its head. Use its carrying
handles.
• Maximum ambient temperature (Ta) is 104° F (40°C). Do not operate the fixture at temperatures higher than this.
• In the event of a serious operating problem, stop using the unit immediately. Never try to repair the unit by
yourself. Repairs carried out by unskilled people can lead to damage or malfunction. Please contact the nearest
authorized technical assistance center. Always use the same type of spare parts.
• Don’t connect the device to a dimmer pack.
• Make sure the power cord is never crimped or damaged.
• Never disconnect the power cord by pulling or tugging on the cord.
• Avoid direct eye exposure to the light source while it is on.
3. SETUP
Disconnect the power cord before replacing a fuse and always replace with the same type fuse.
©Copyright LOTRONIC 2017 PARTY-SPOT7 Page 2
Page 3
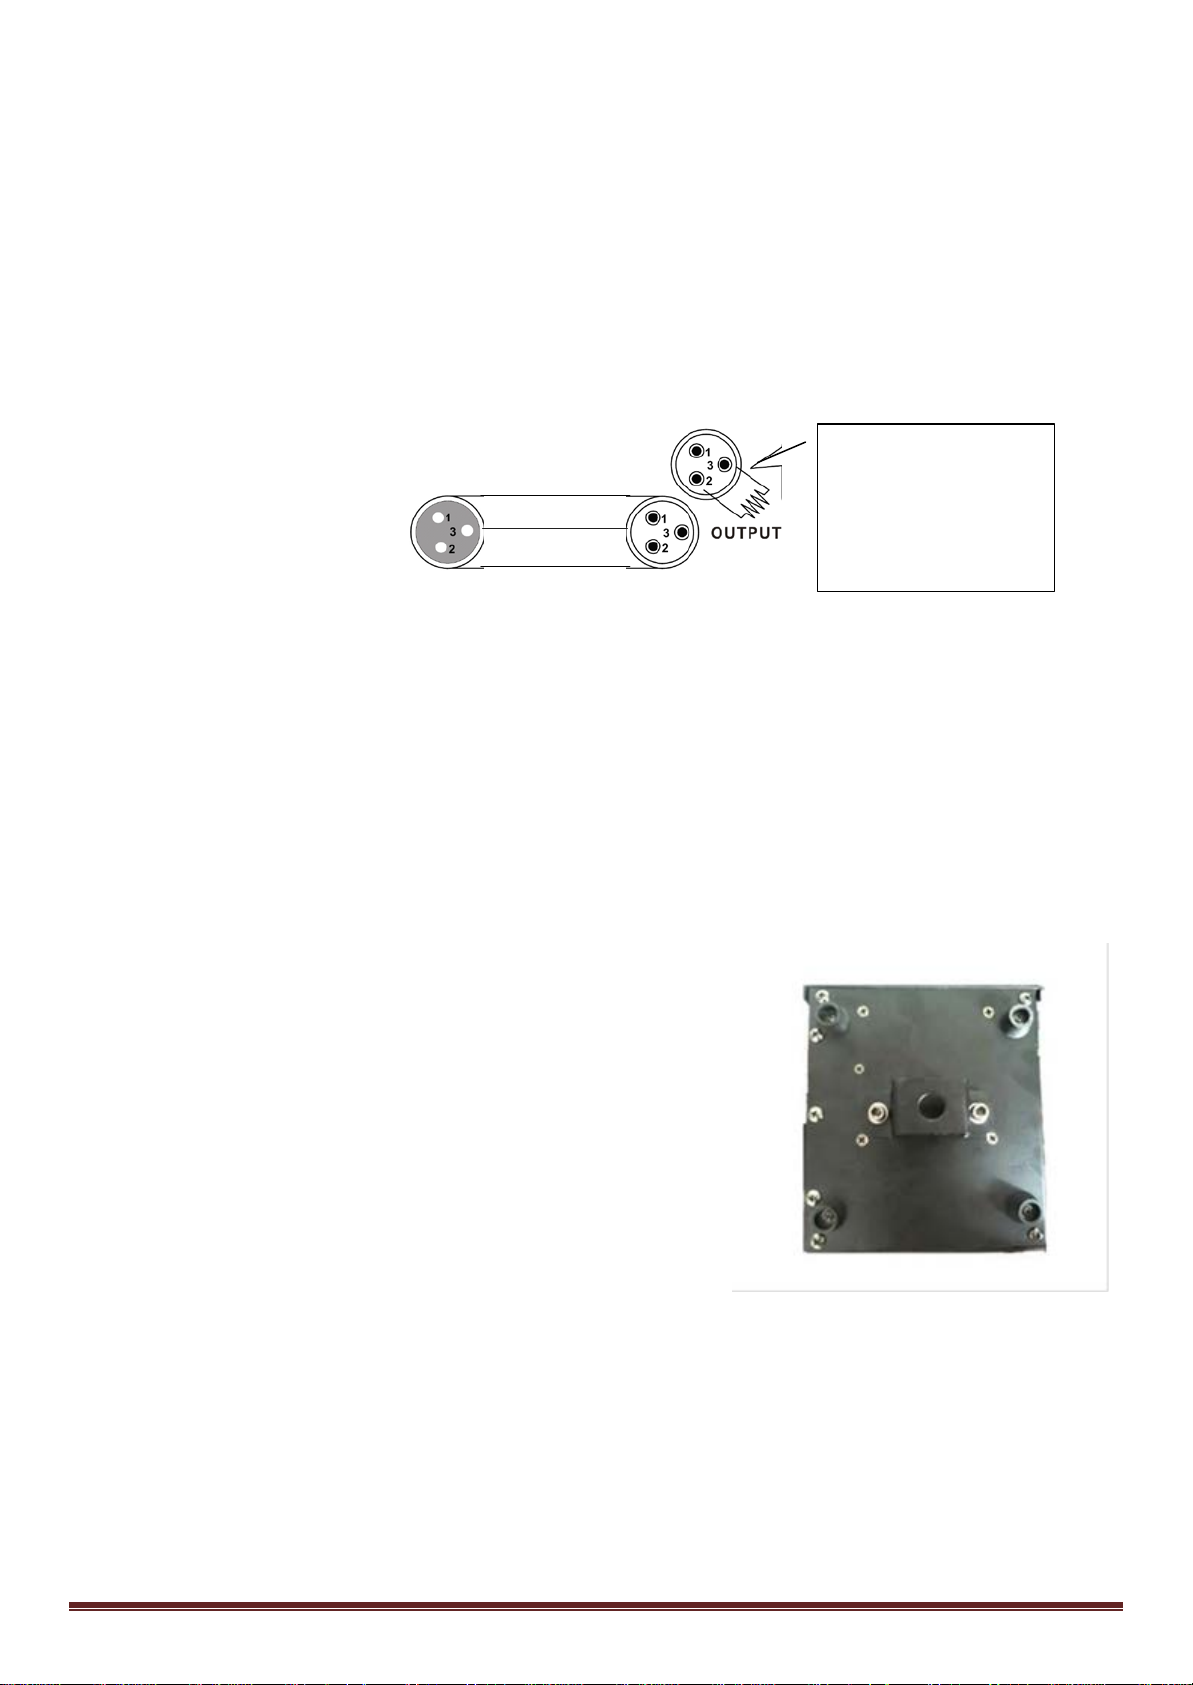
Fixture Linking
INPUT
COMMON
DMX +
DMX-
Resistance 120 ohm
fixture.
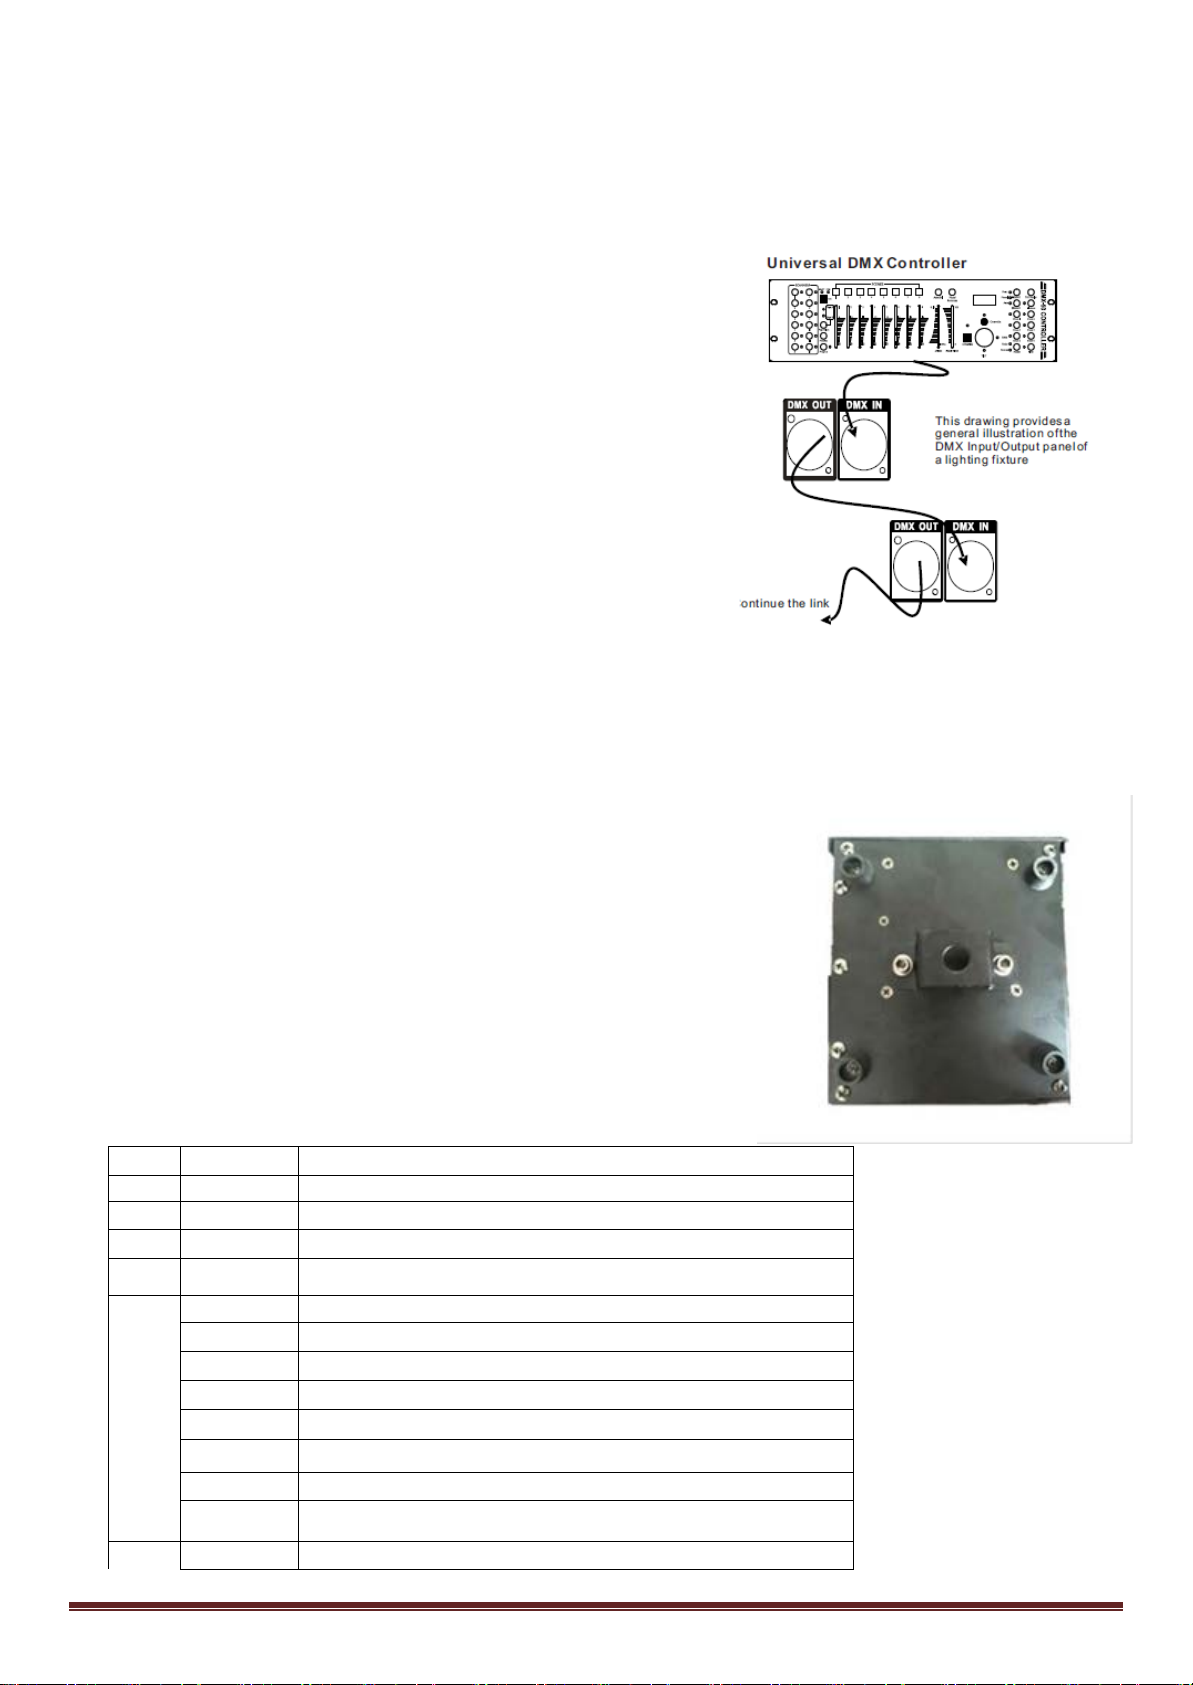
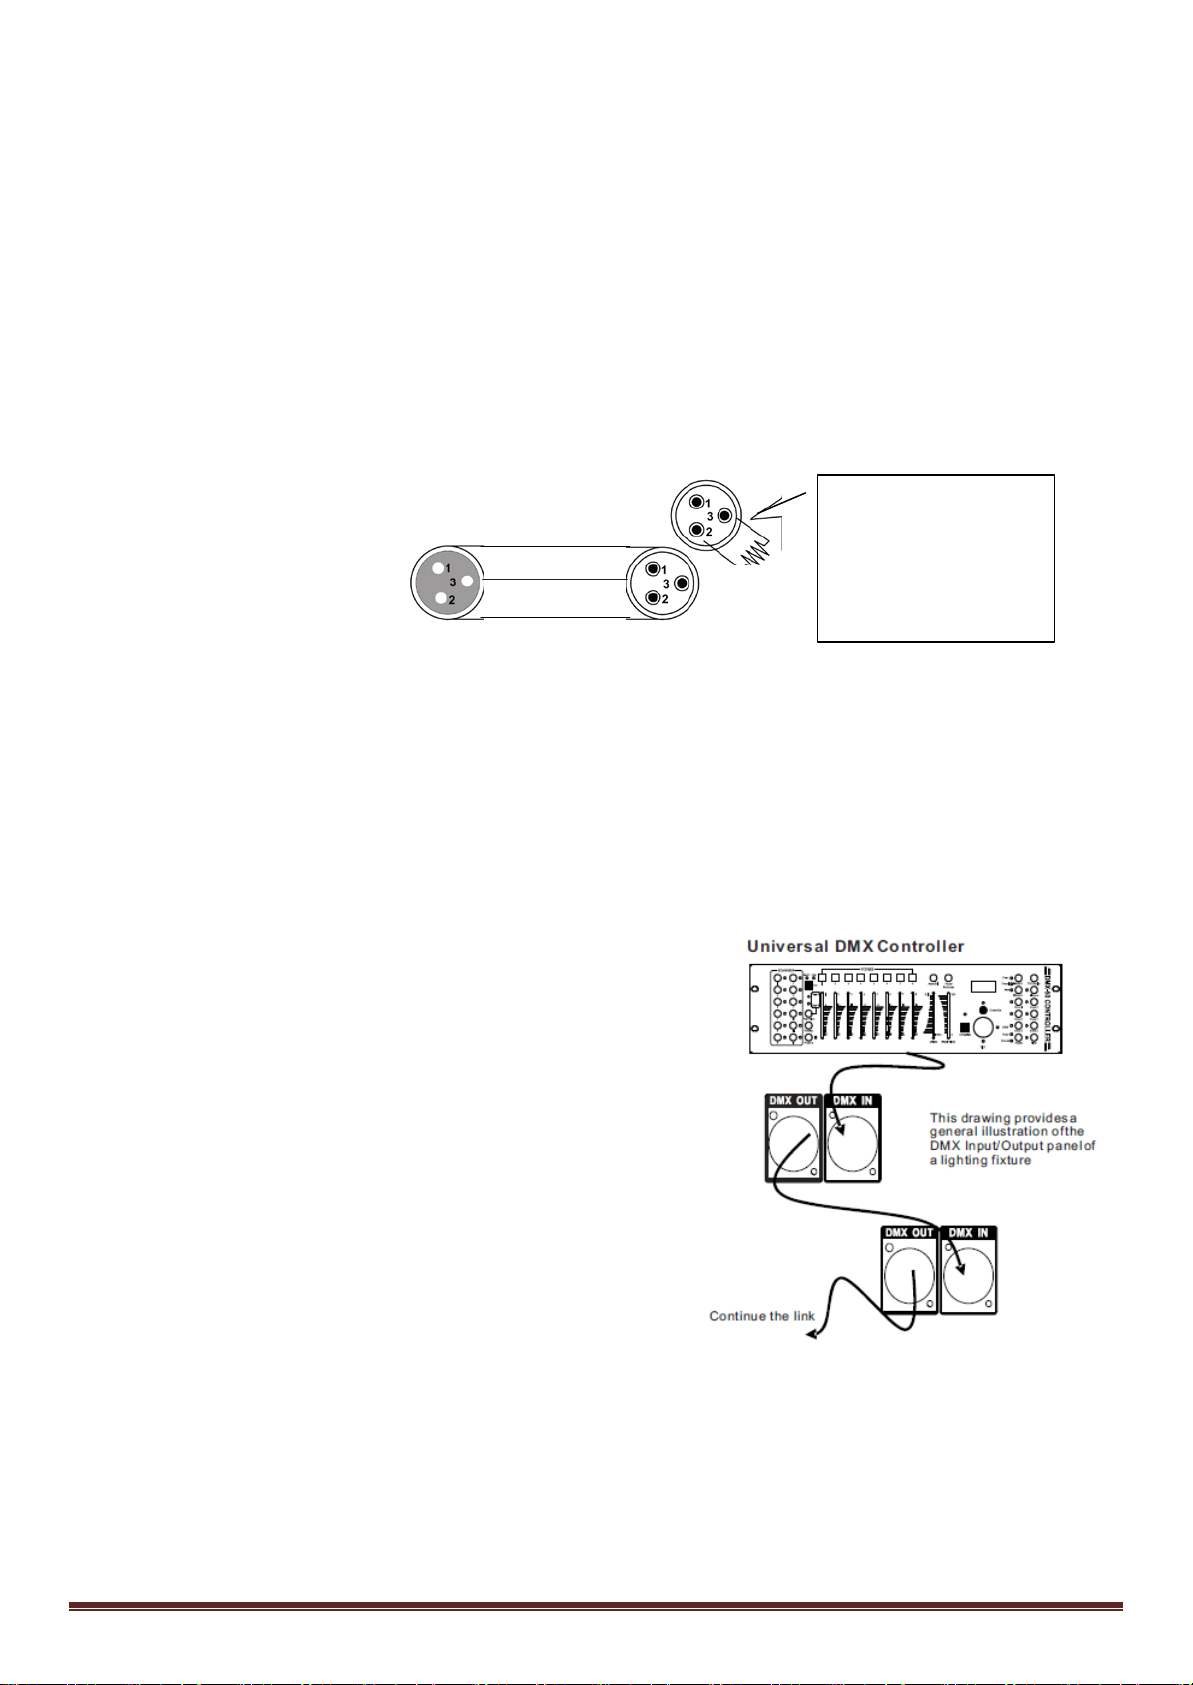
You will need a serial data link to run light shows of one or more fixtures using a DMX-512 controller or to run
synchronized shows on two or more fixtures set to a master/slave operating mode. The combined number of
channels required by all fixtures on a serial data link determines the number of fixtures that the data link can
support.
Data Cabling
To link fixtures together you must use data cables. If you choose to create your own cable, please use data-grade
cables that can carry a high quality signal and are less prone to electromagnetic interference.
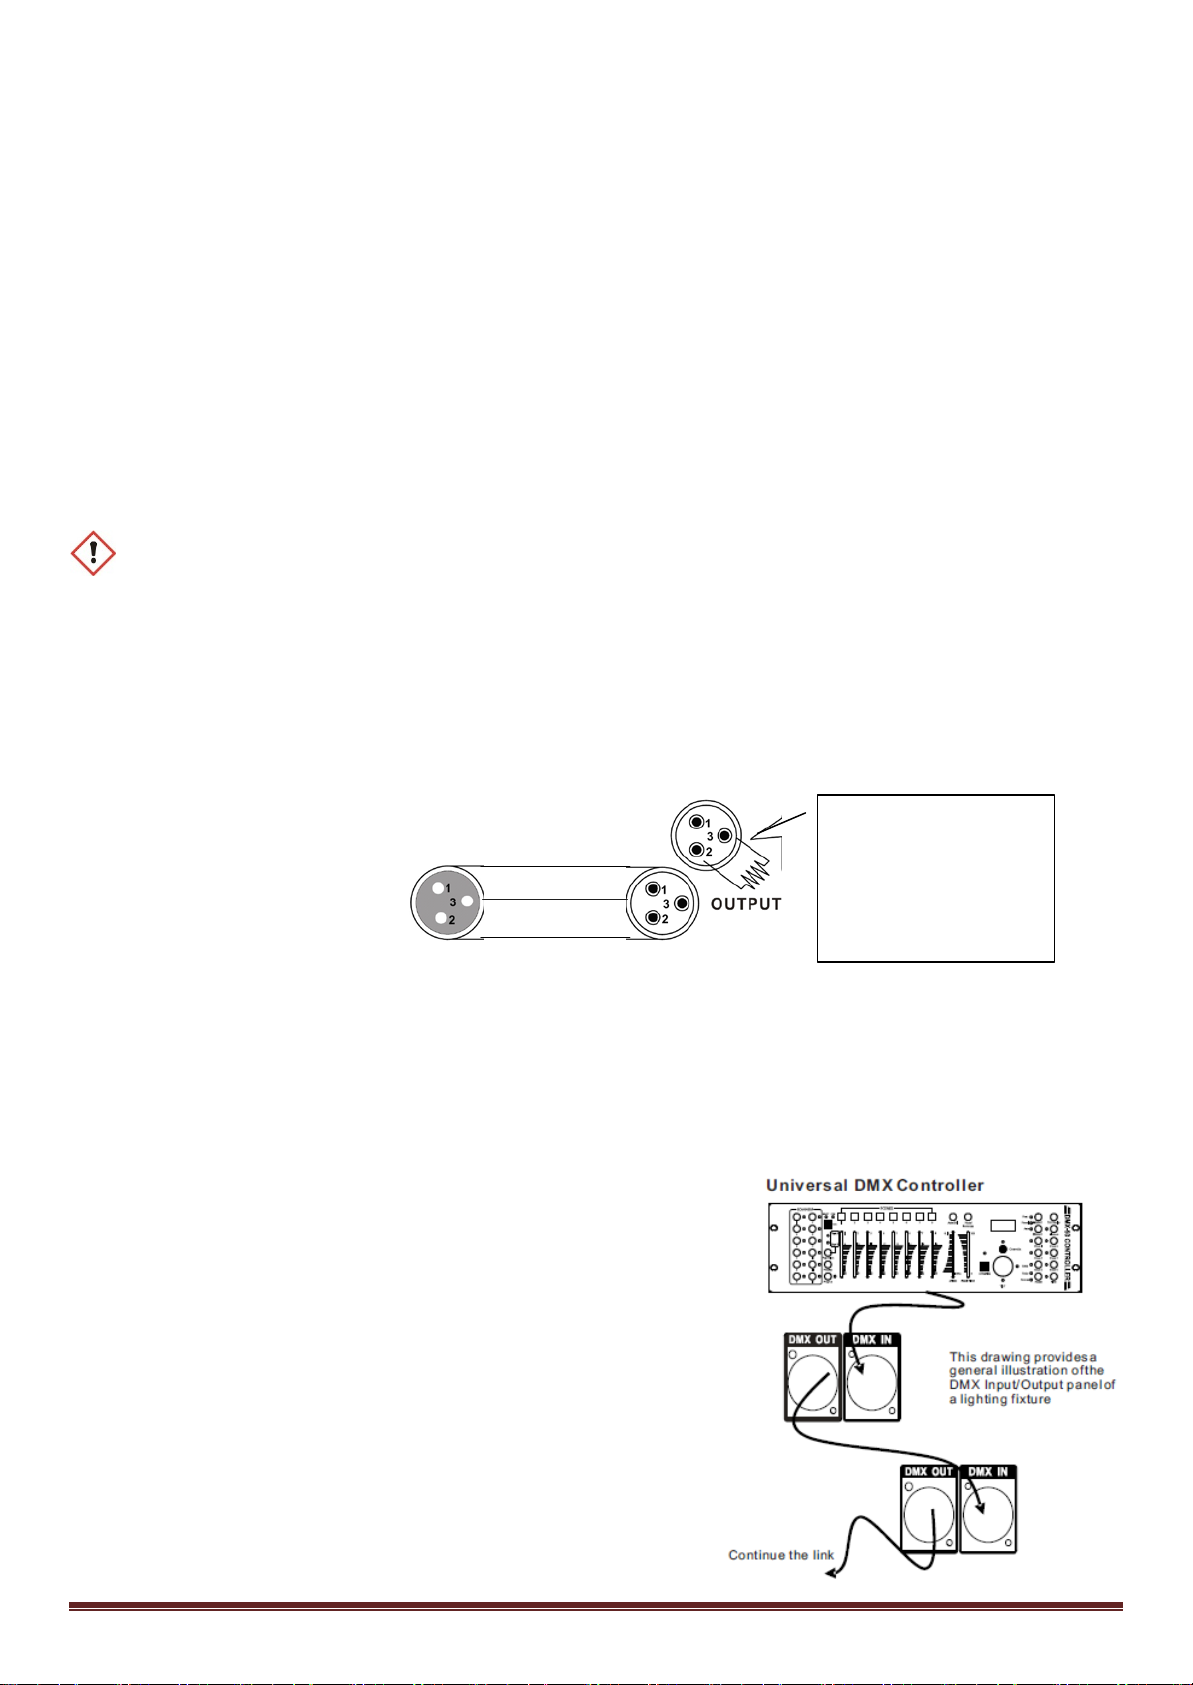
CABLE CONNECTORS
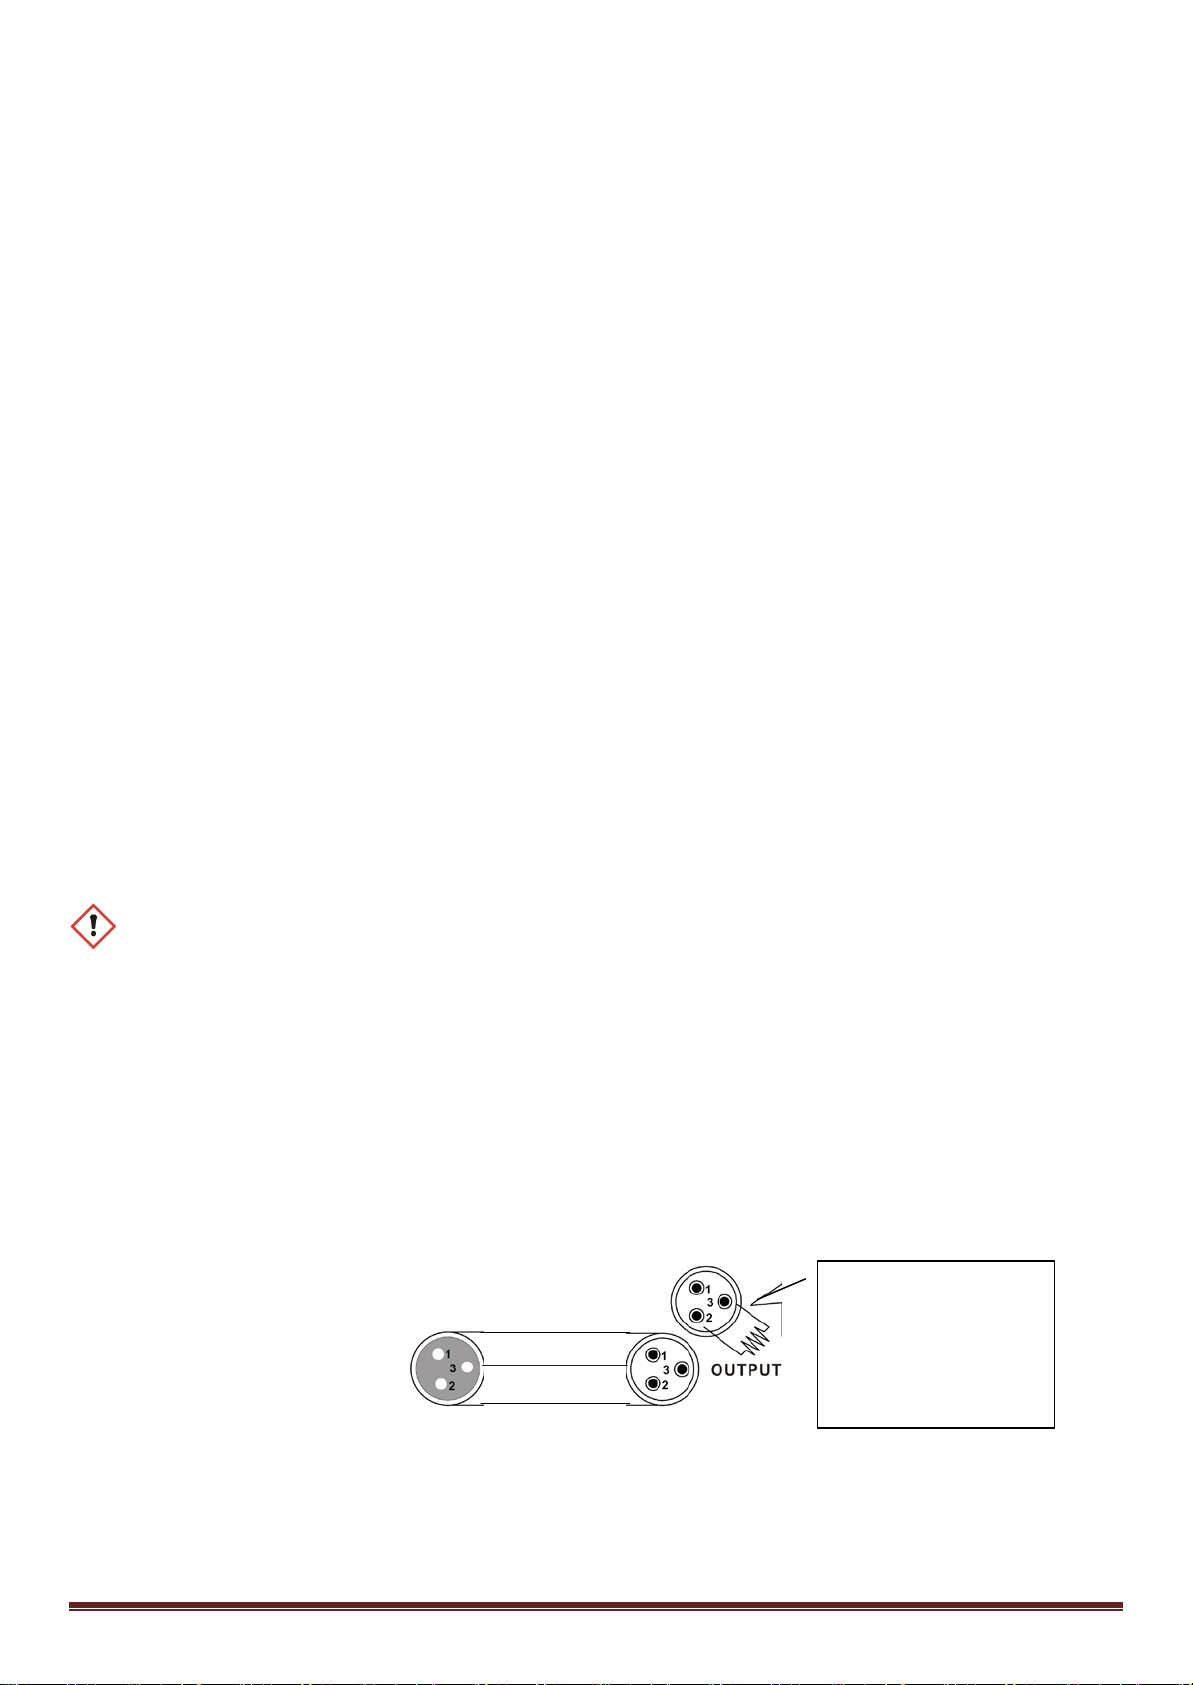
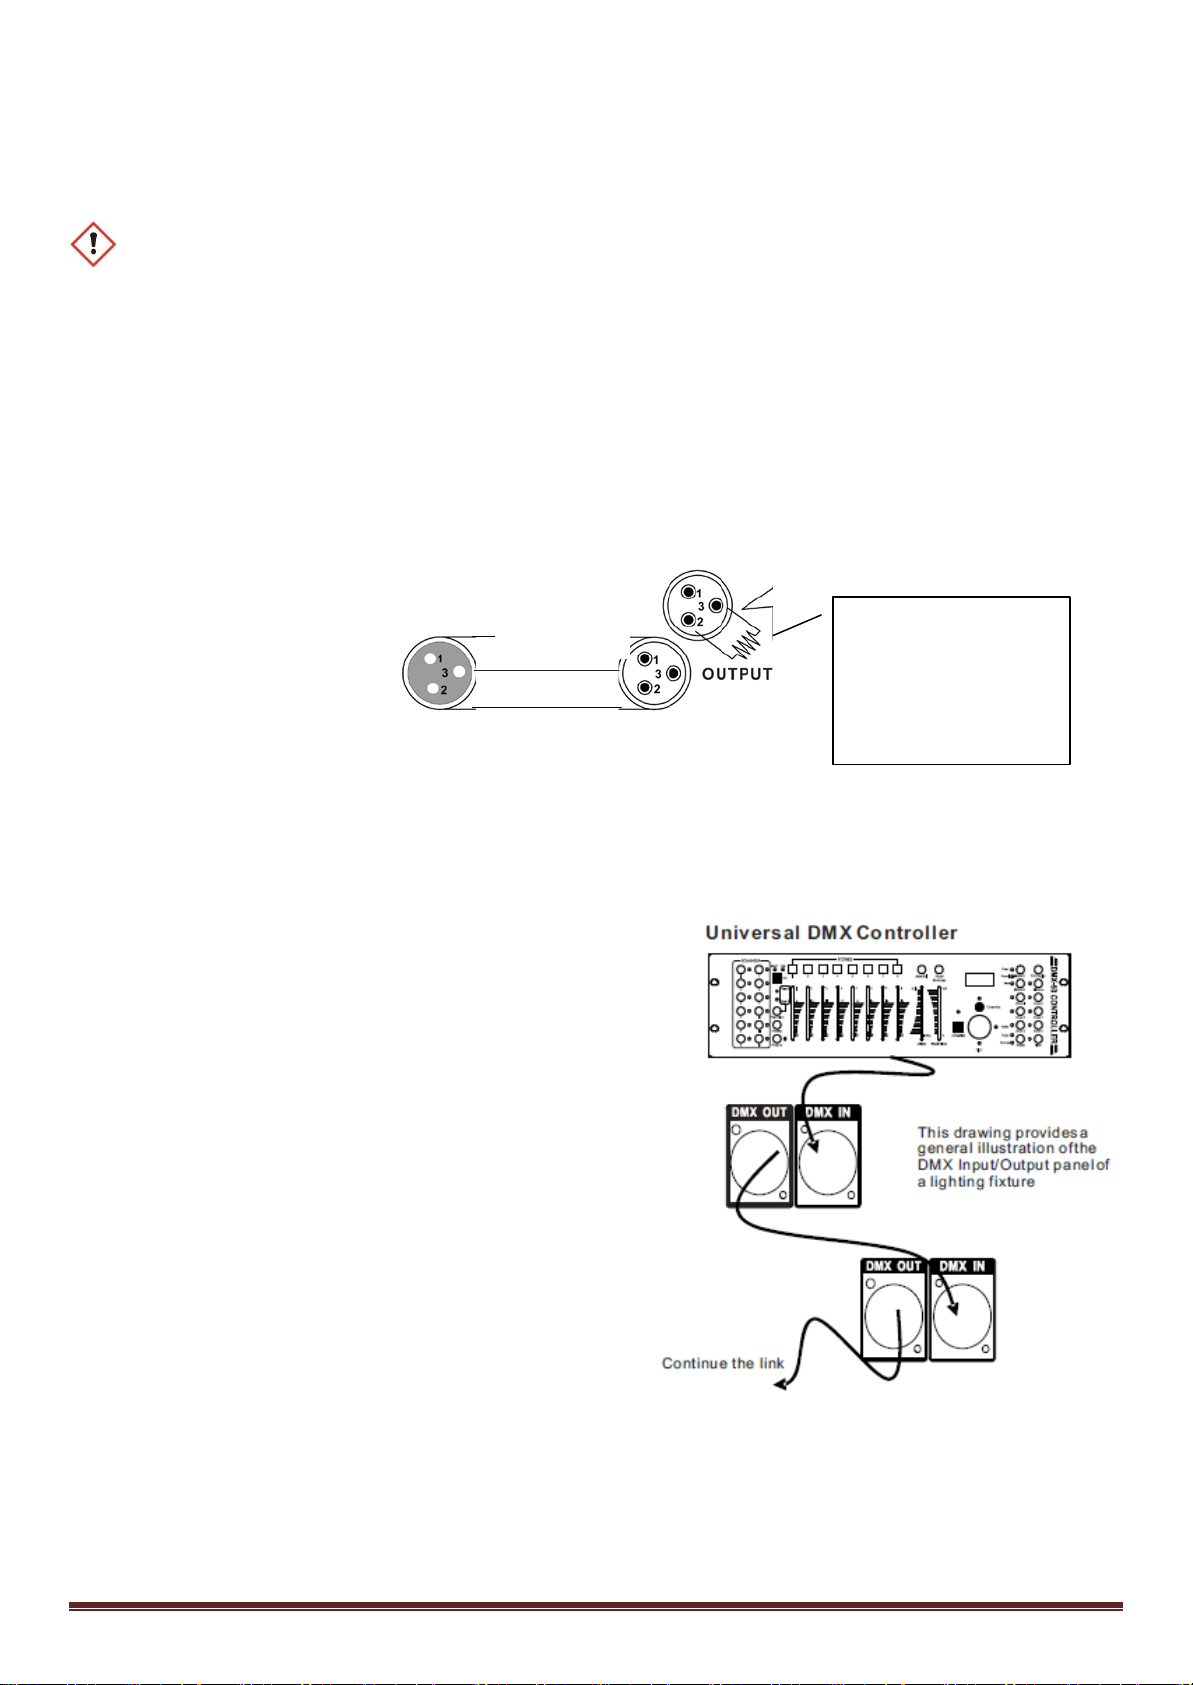
Cabling must have a male XLR connector on one end and a female XLR connector on the other end.
DMX connector configuration
1/ 4w between pin 2
(DMX-) and pin 3
(DMX+) of the last
Termination reduces signal errors. To avoid signal transmission problems and interference, it is always advisable to
connect a DMX signal terminator.
CAUTION
Do not allow contact between the common and the fixture’s chassis ground. Grounding the common can cause a
ground loop, and your fixture may perform erratically. Test cables with an ohm meter to check correct polarity and
to make sure the pins are not grounded or shorted to the shield or each other.
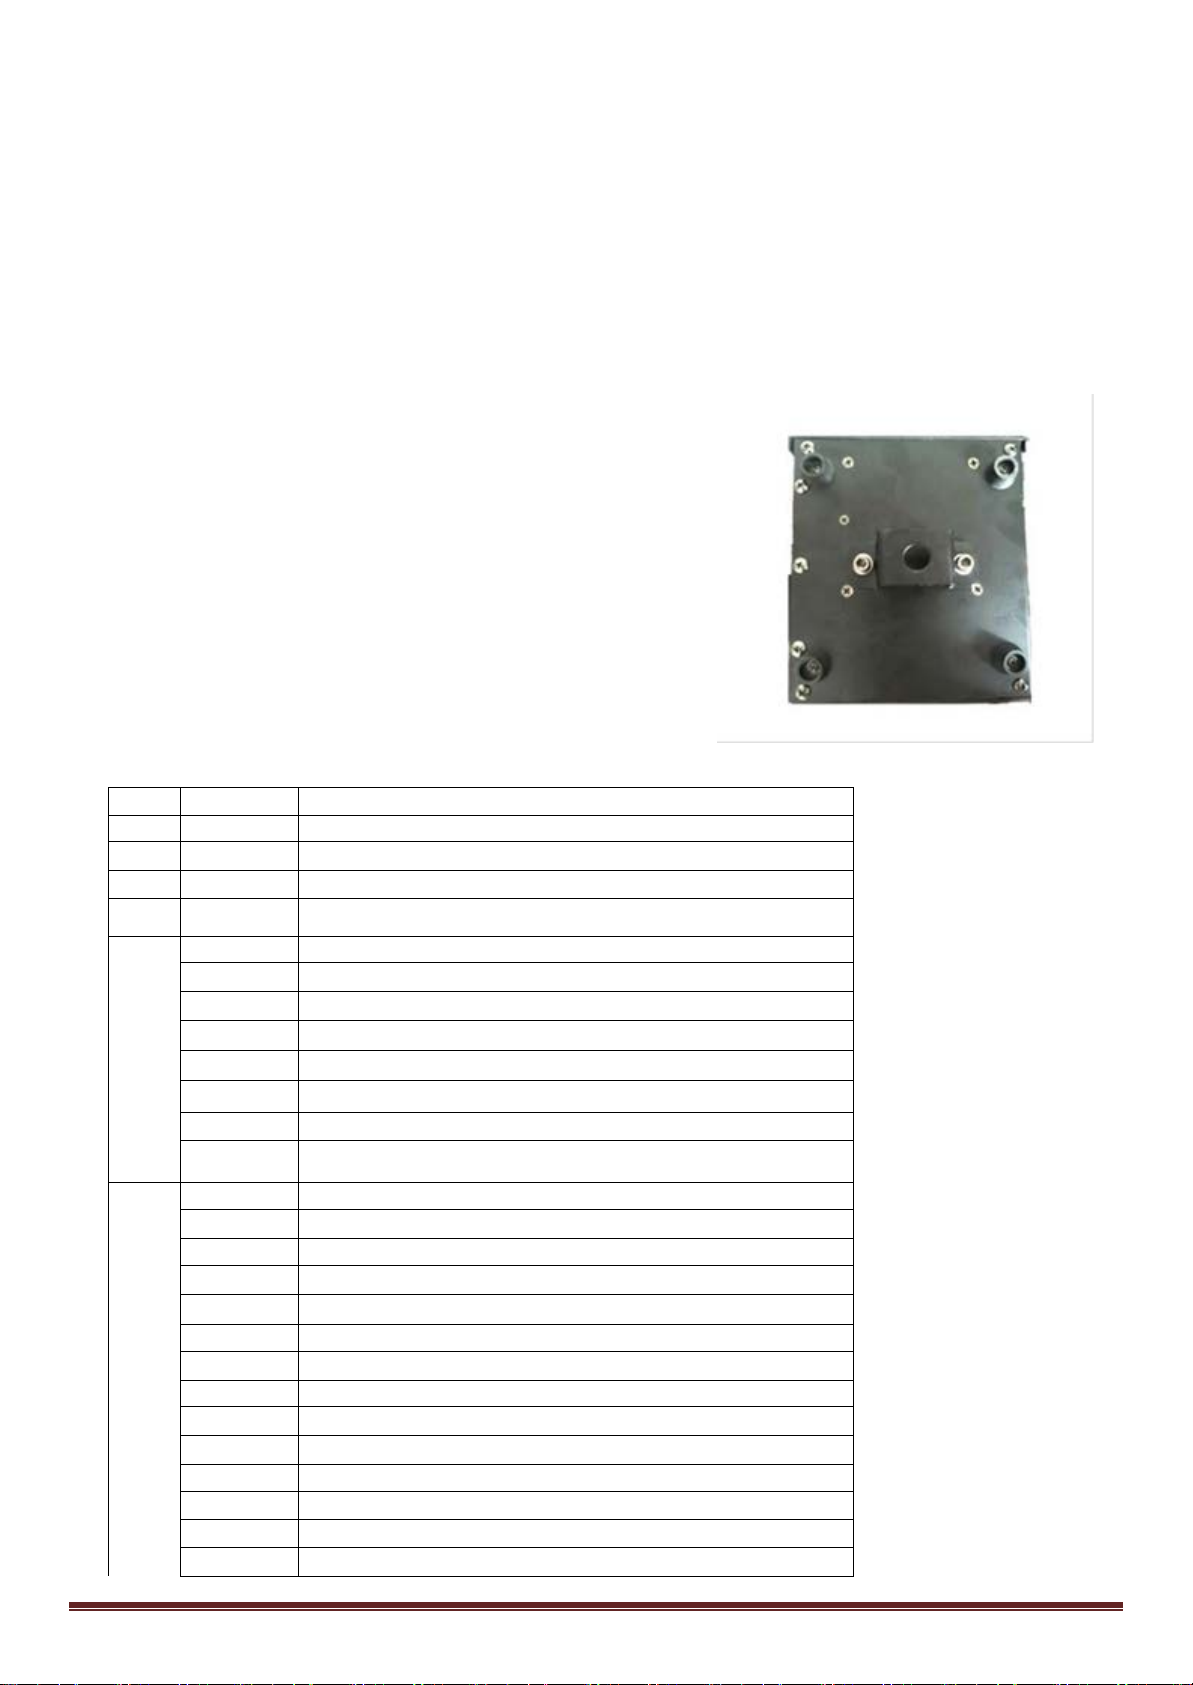
Mounting
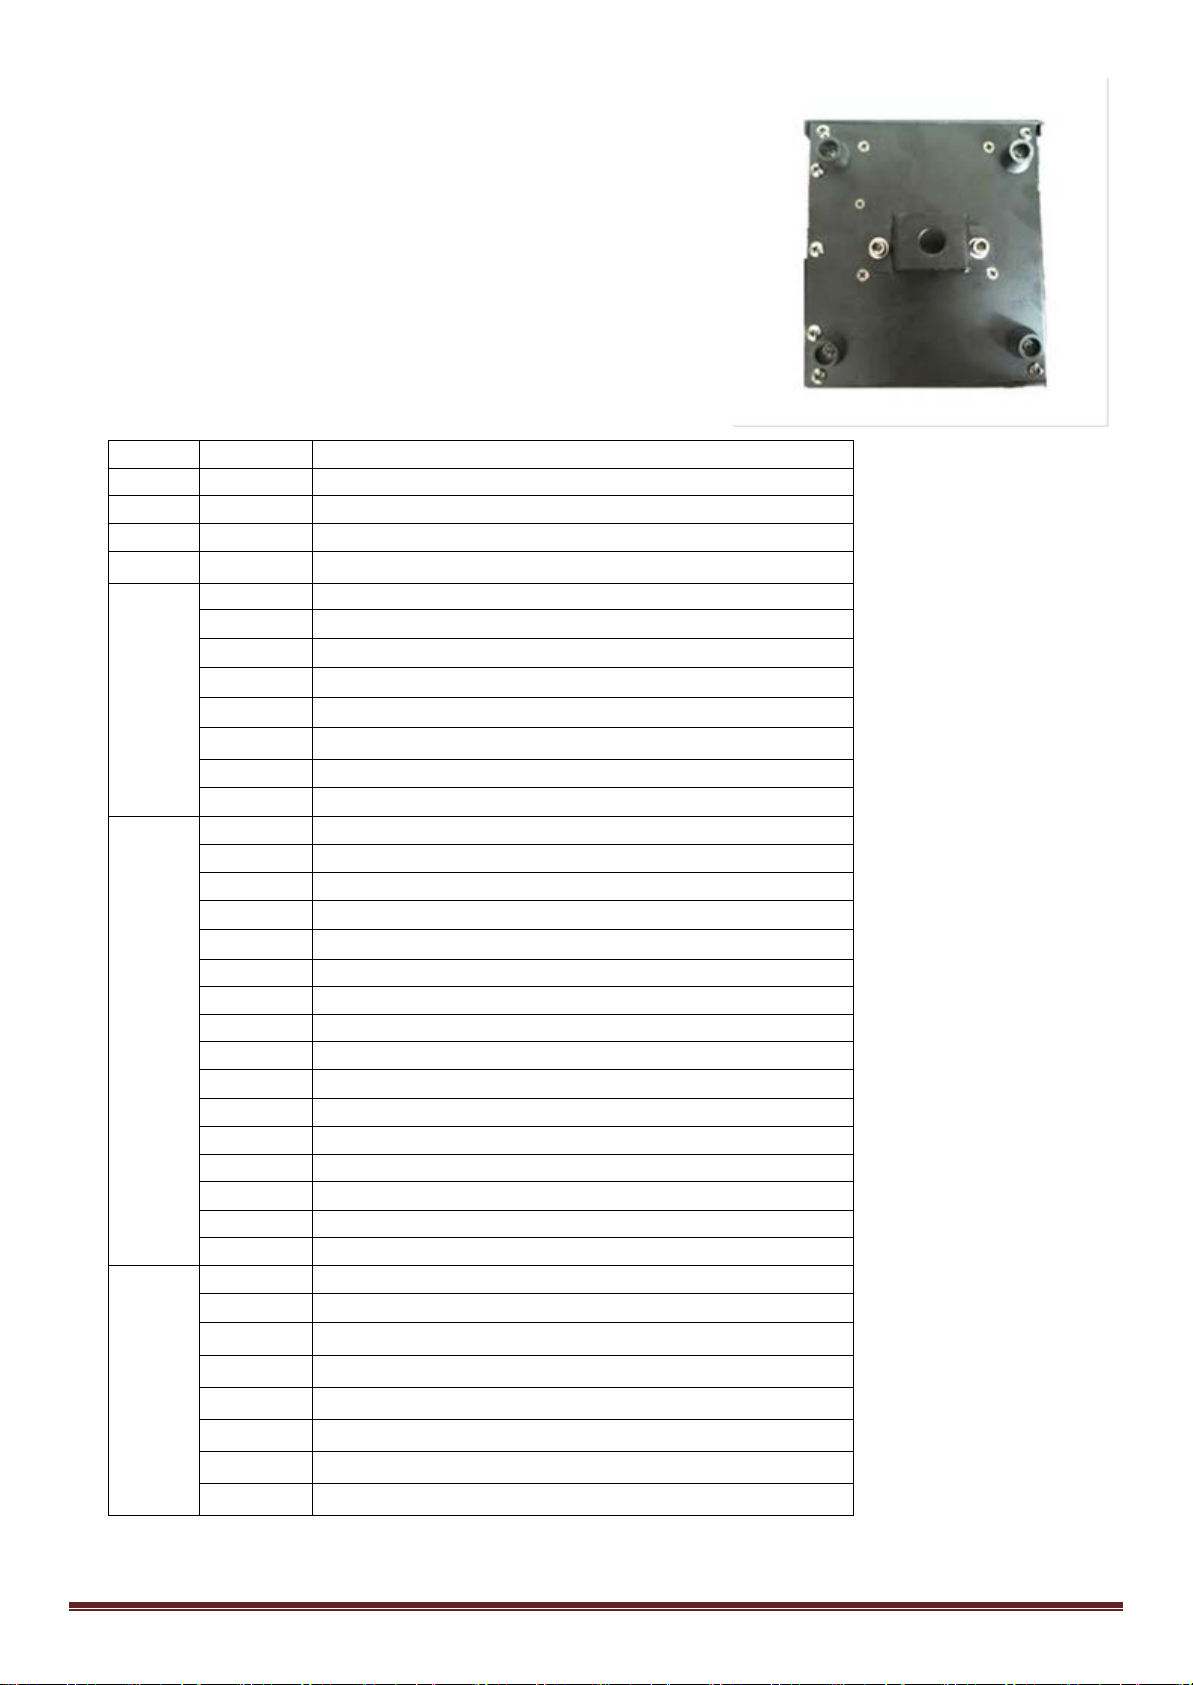
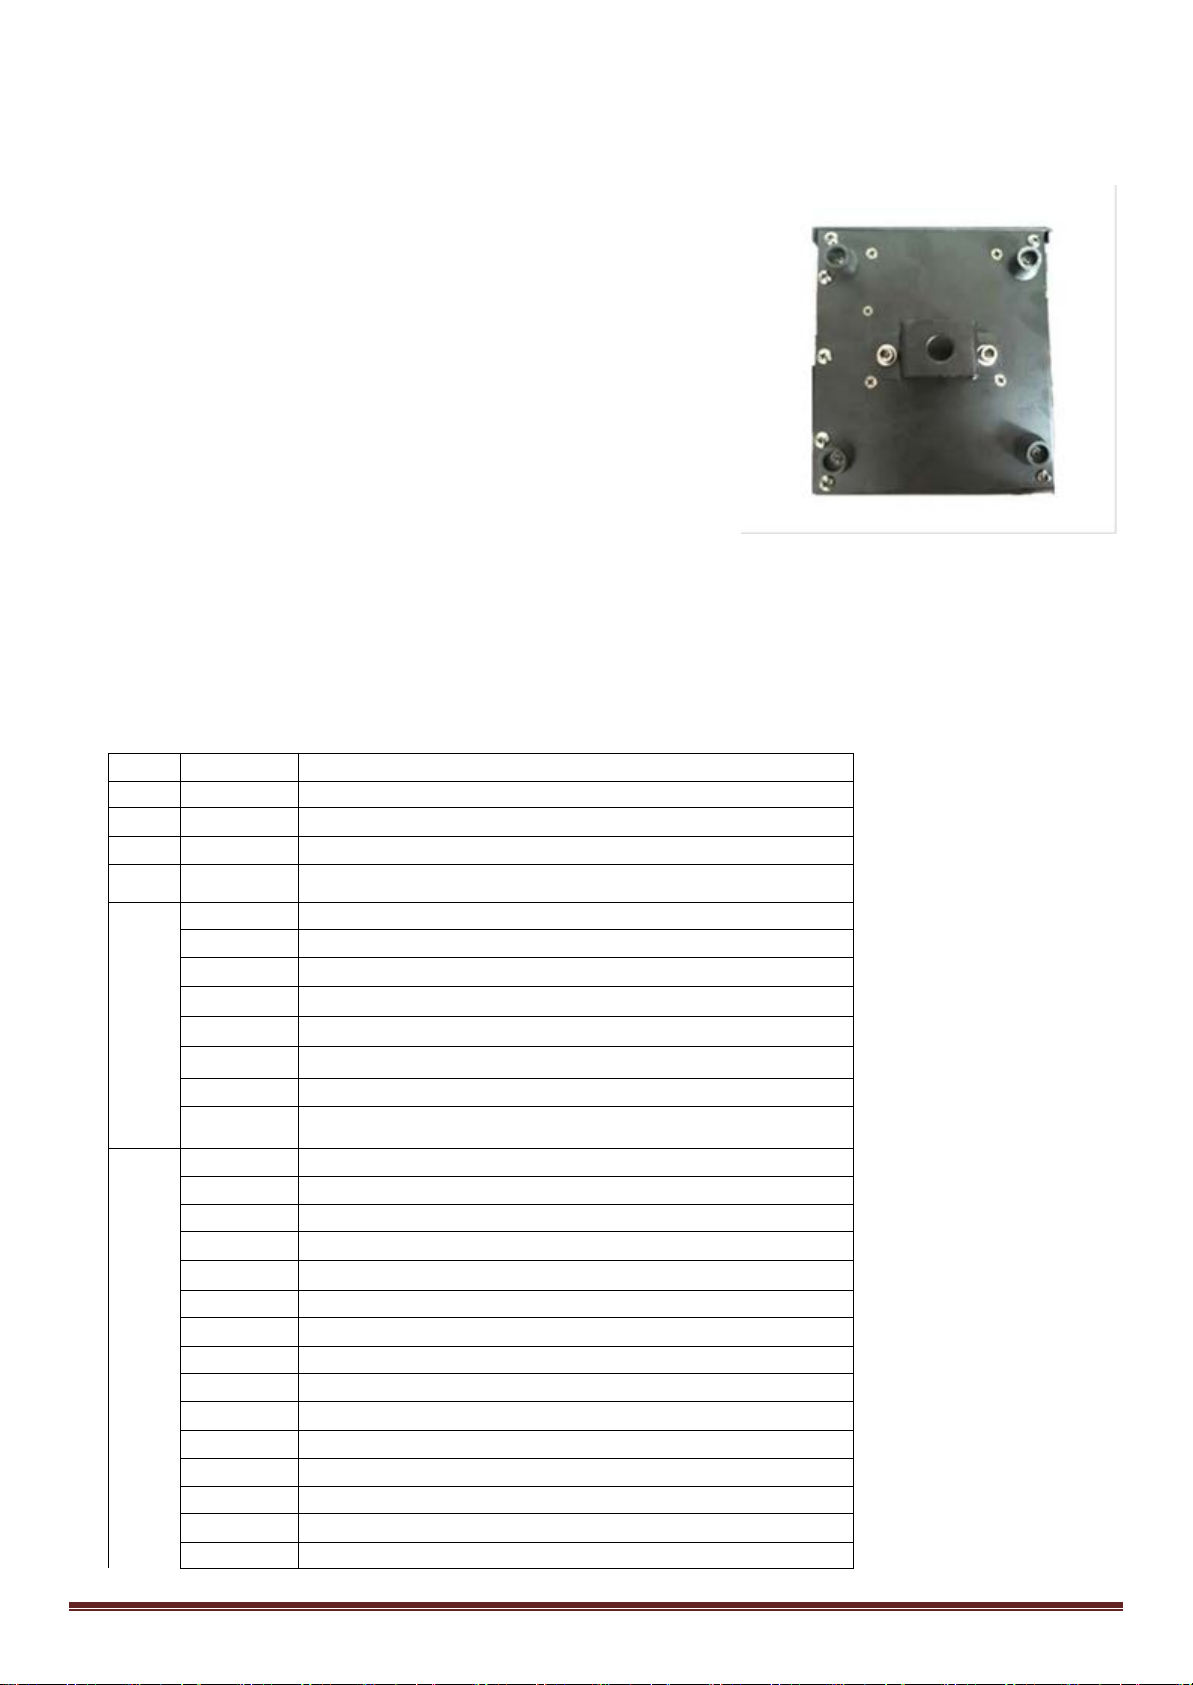
The LED moving head provides a unique mounting bracket assembly
that integrates the bottom of the base, the included ‘omega bracket’
and the safety cable rigging point in one unit (see the illustration on the
right).When mounting this fixture on a truss, be sure to use an
appropriate clamp with the included omega bracket using a M10 screw
fitted through the center hole of the ‘omega bracket’. As an added
safety measure, be sure to attach at least one properly rated safety
cable to the fixture using one of the safety cable rigging points
integrated in the base assembly.
When selecting installation location, take into consideration lamp
replacement access and routine maintenance.
Safety cables must always be used. Never mount in places where the
fixture will be exposed to rain, high humidity, extreme temperature
changes or restricted ventilation.
©Copyright LOTRONIC 2017 PARTY-SPOT7 Page 3
Page 4
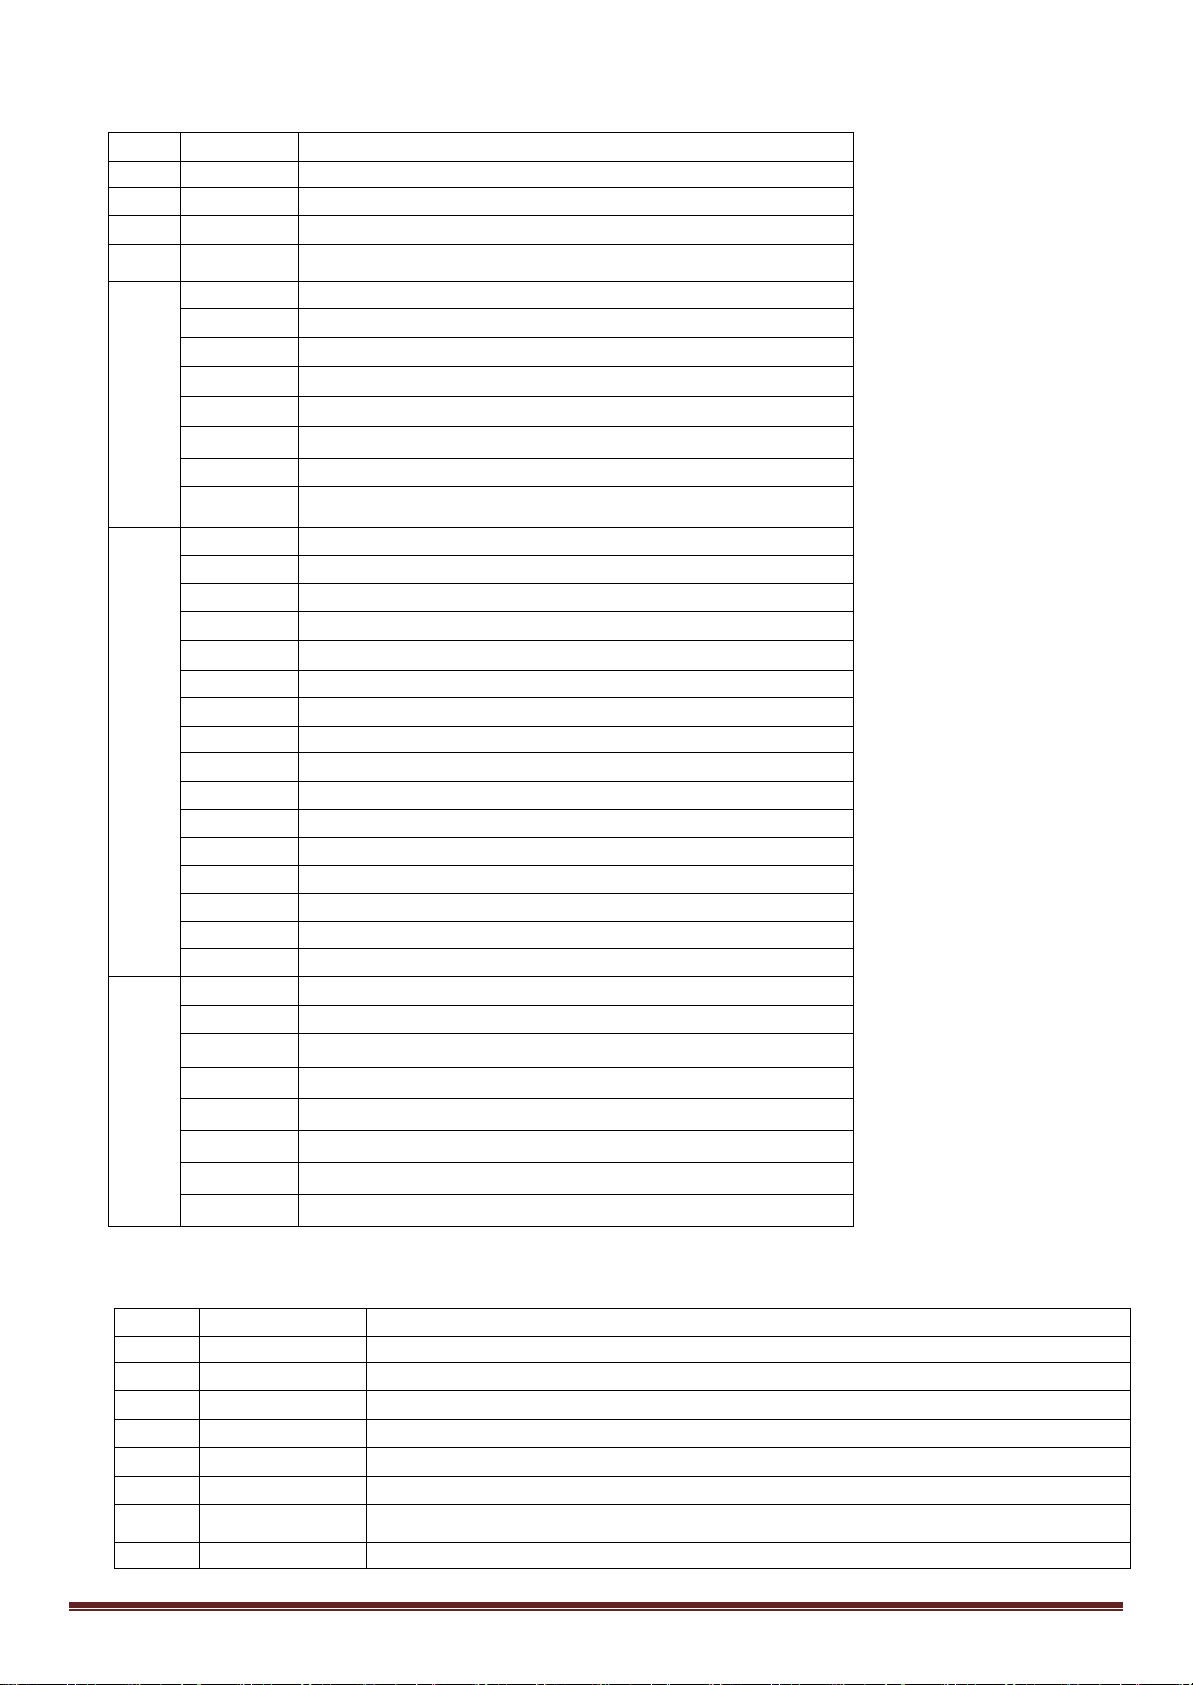
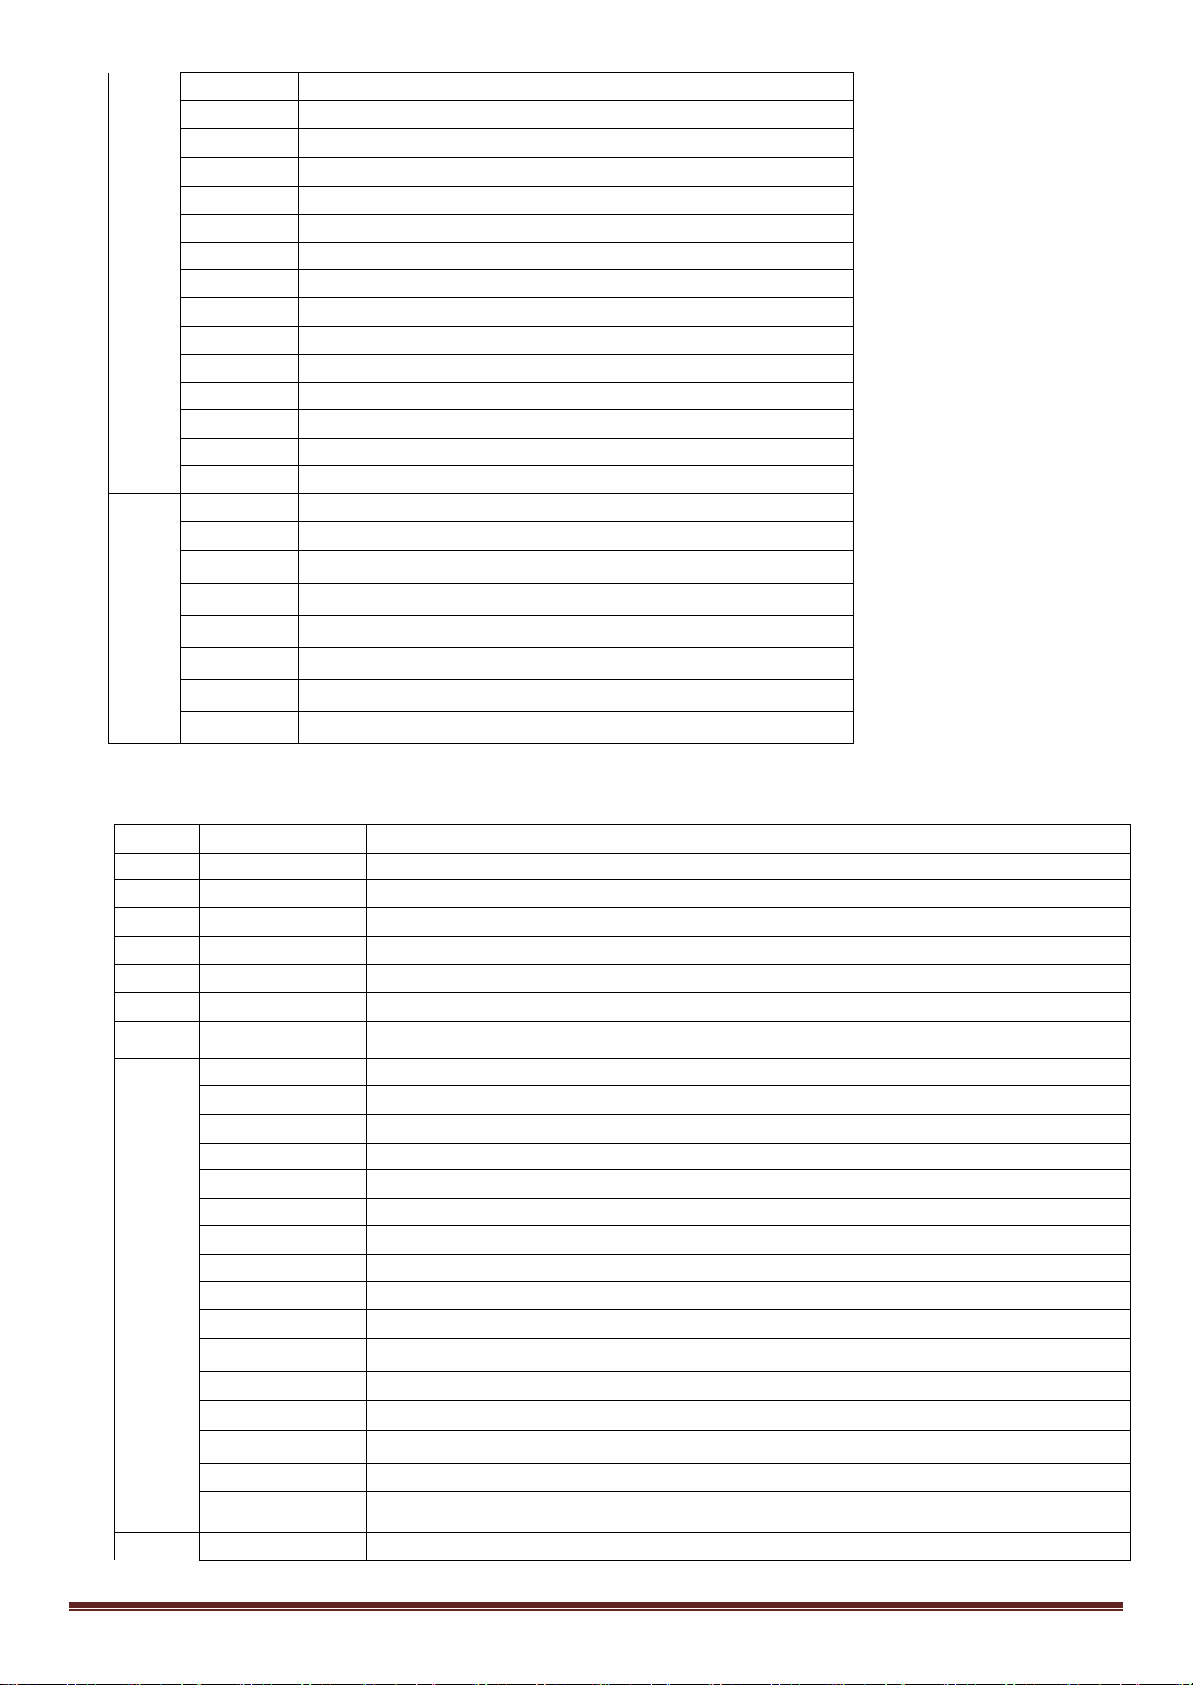
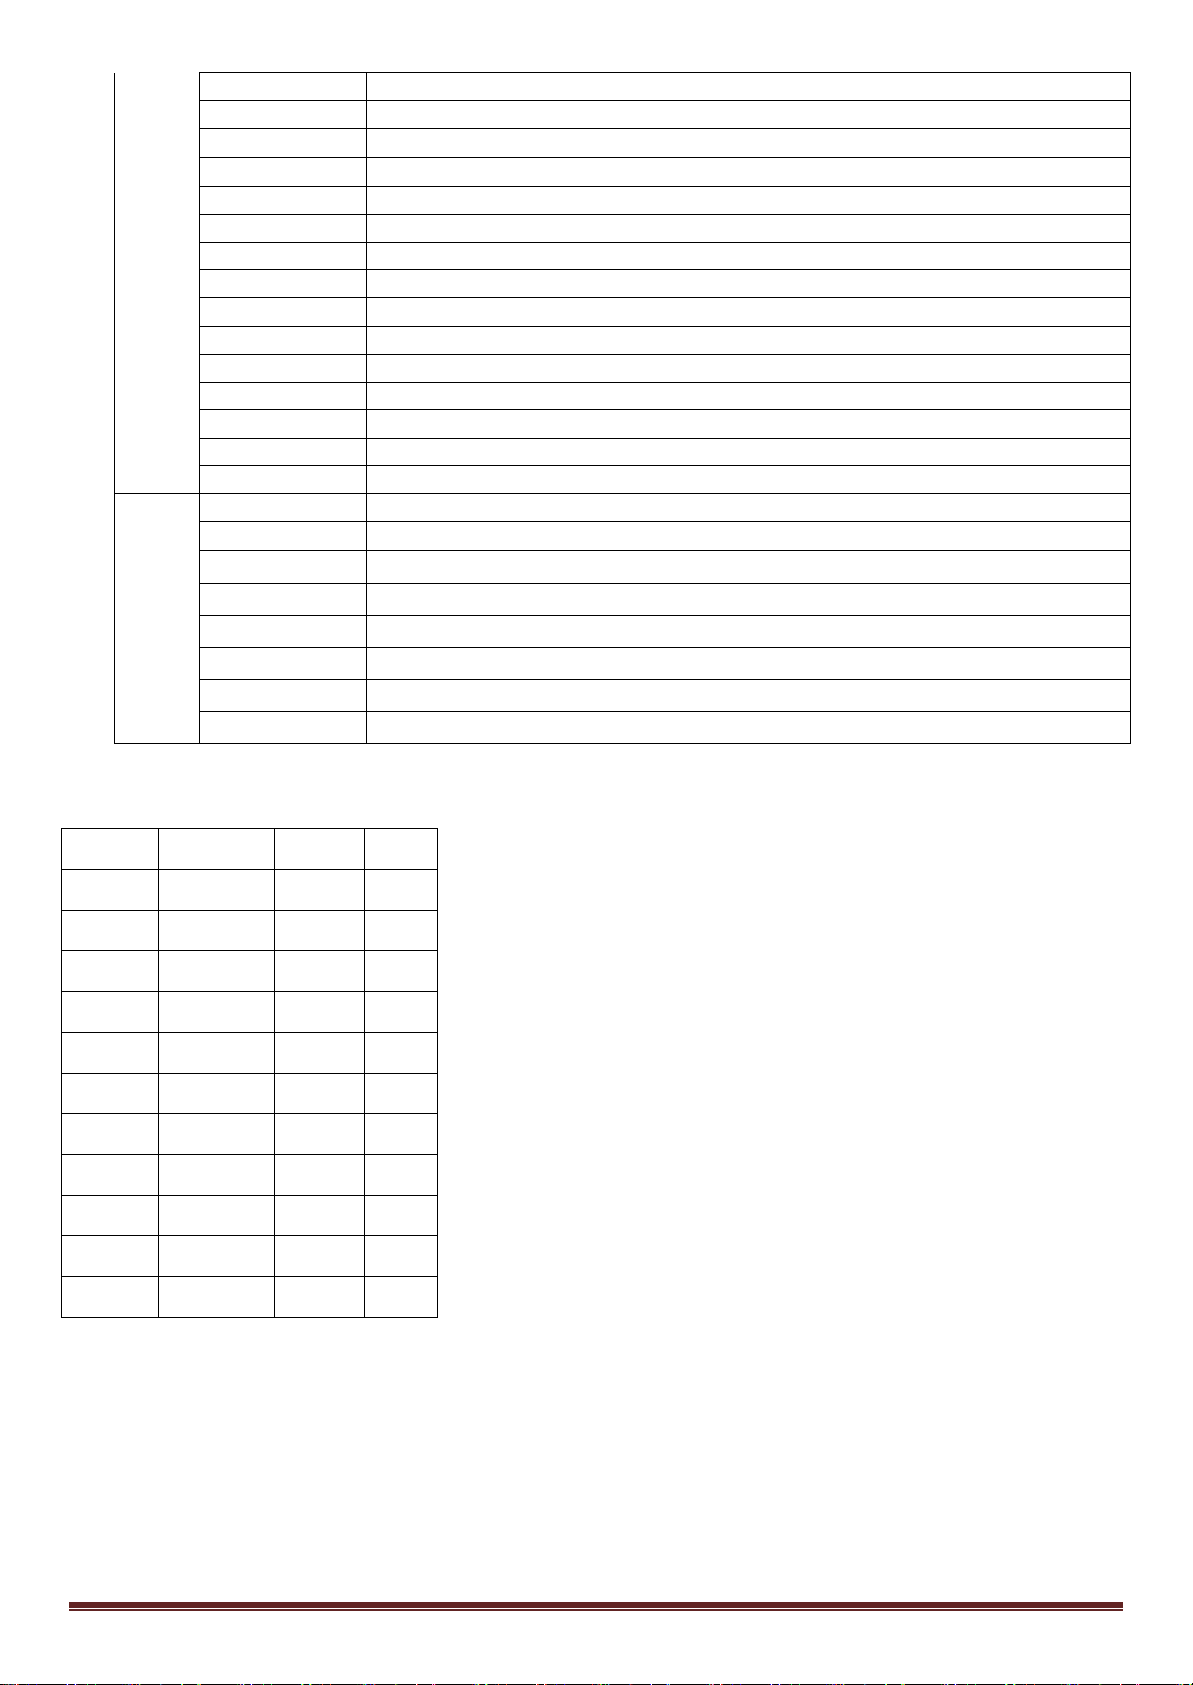
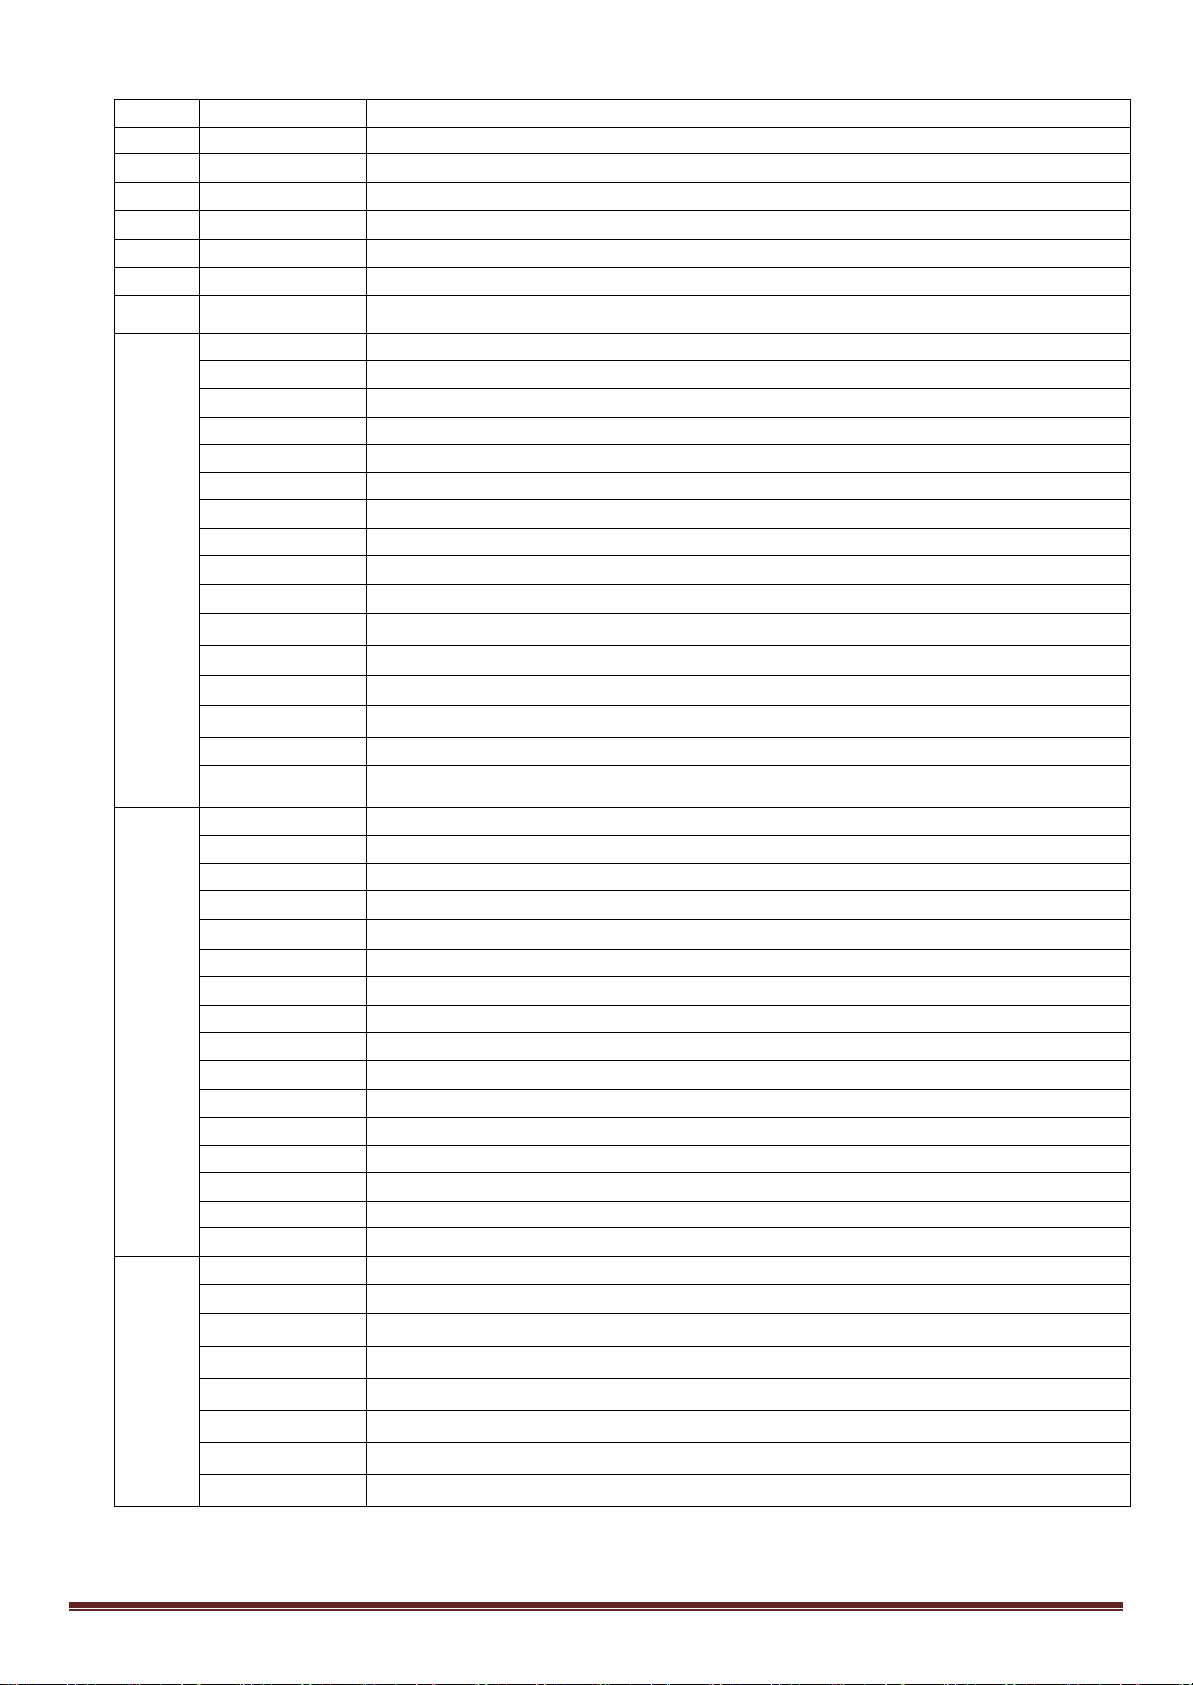
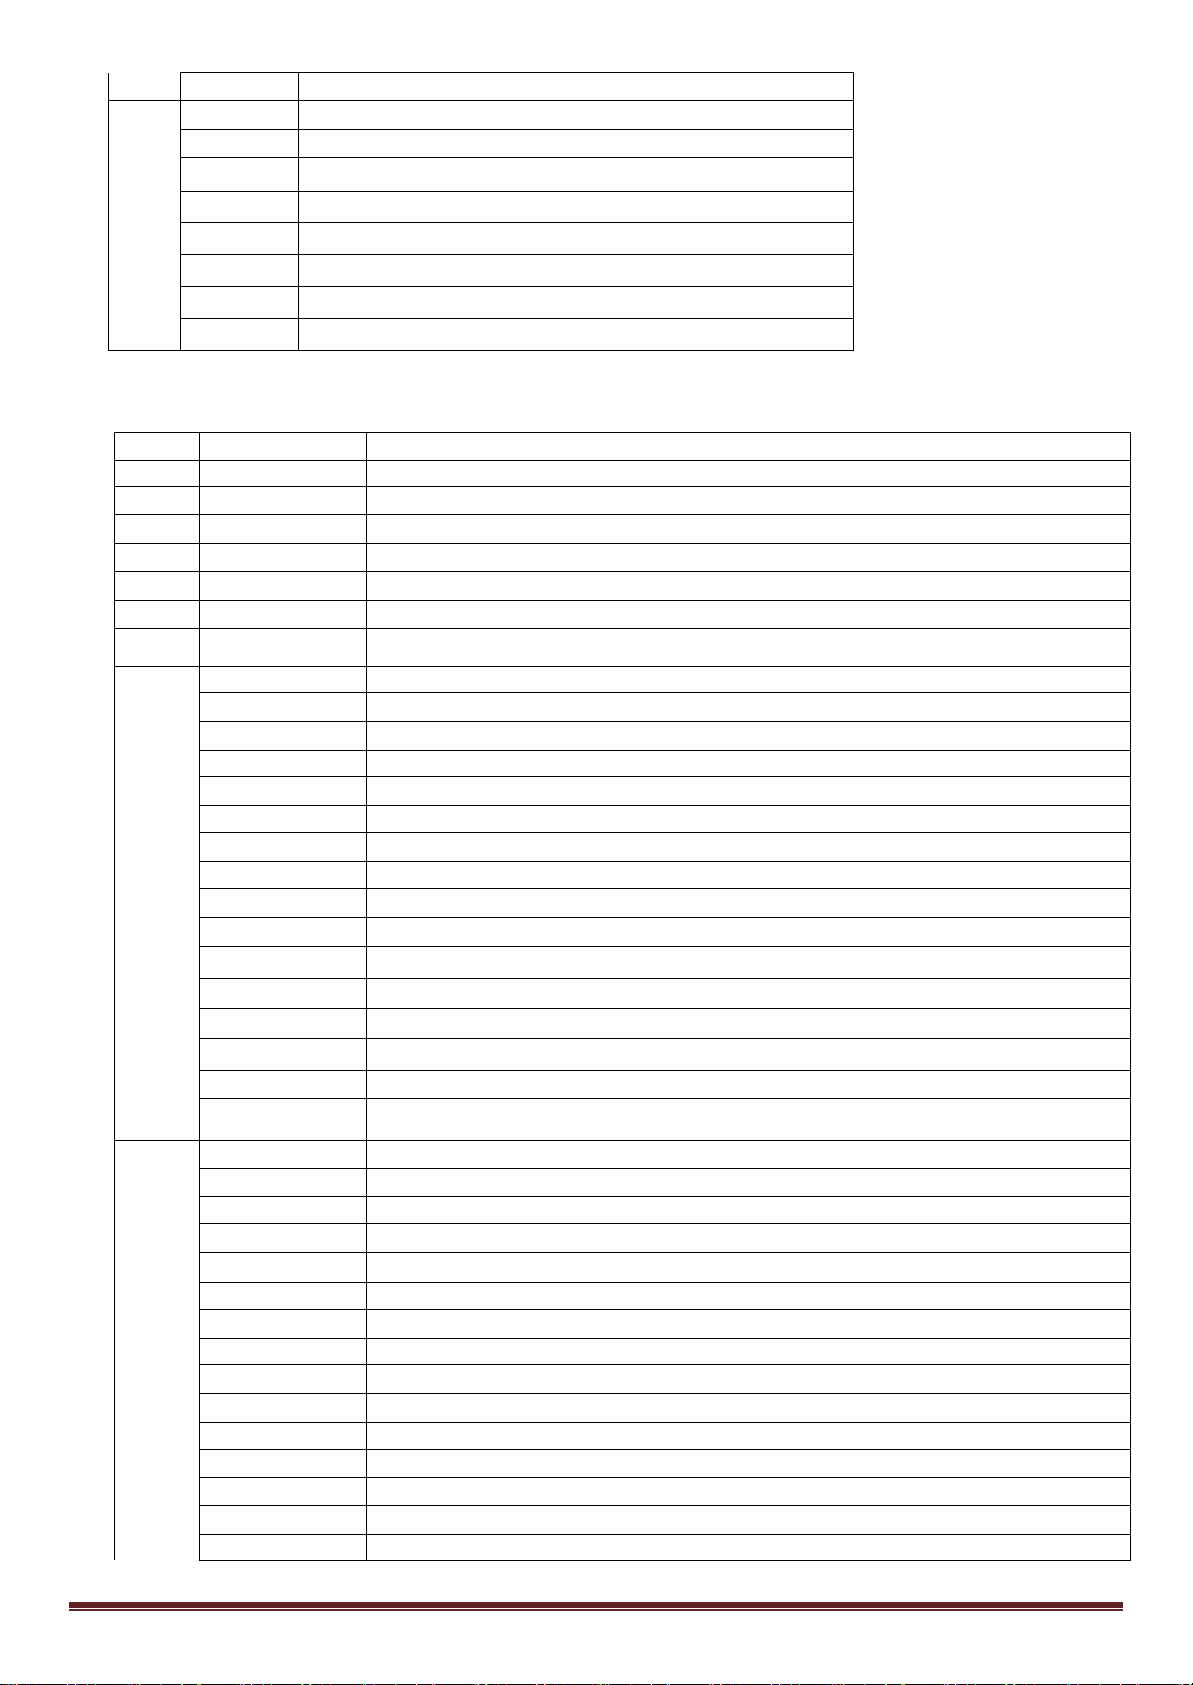
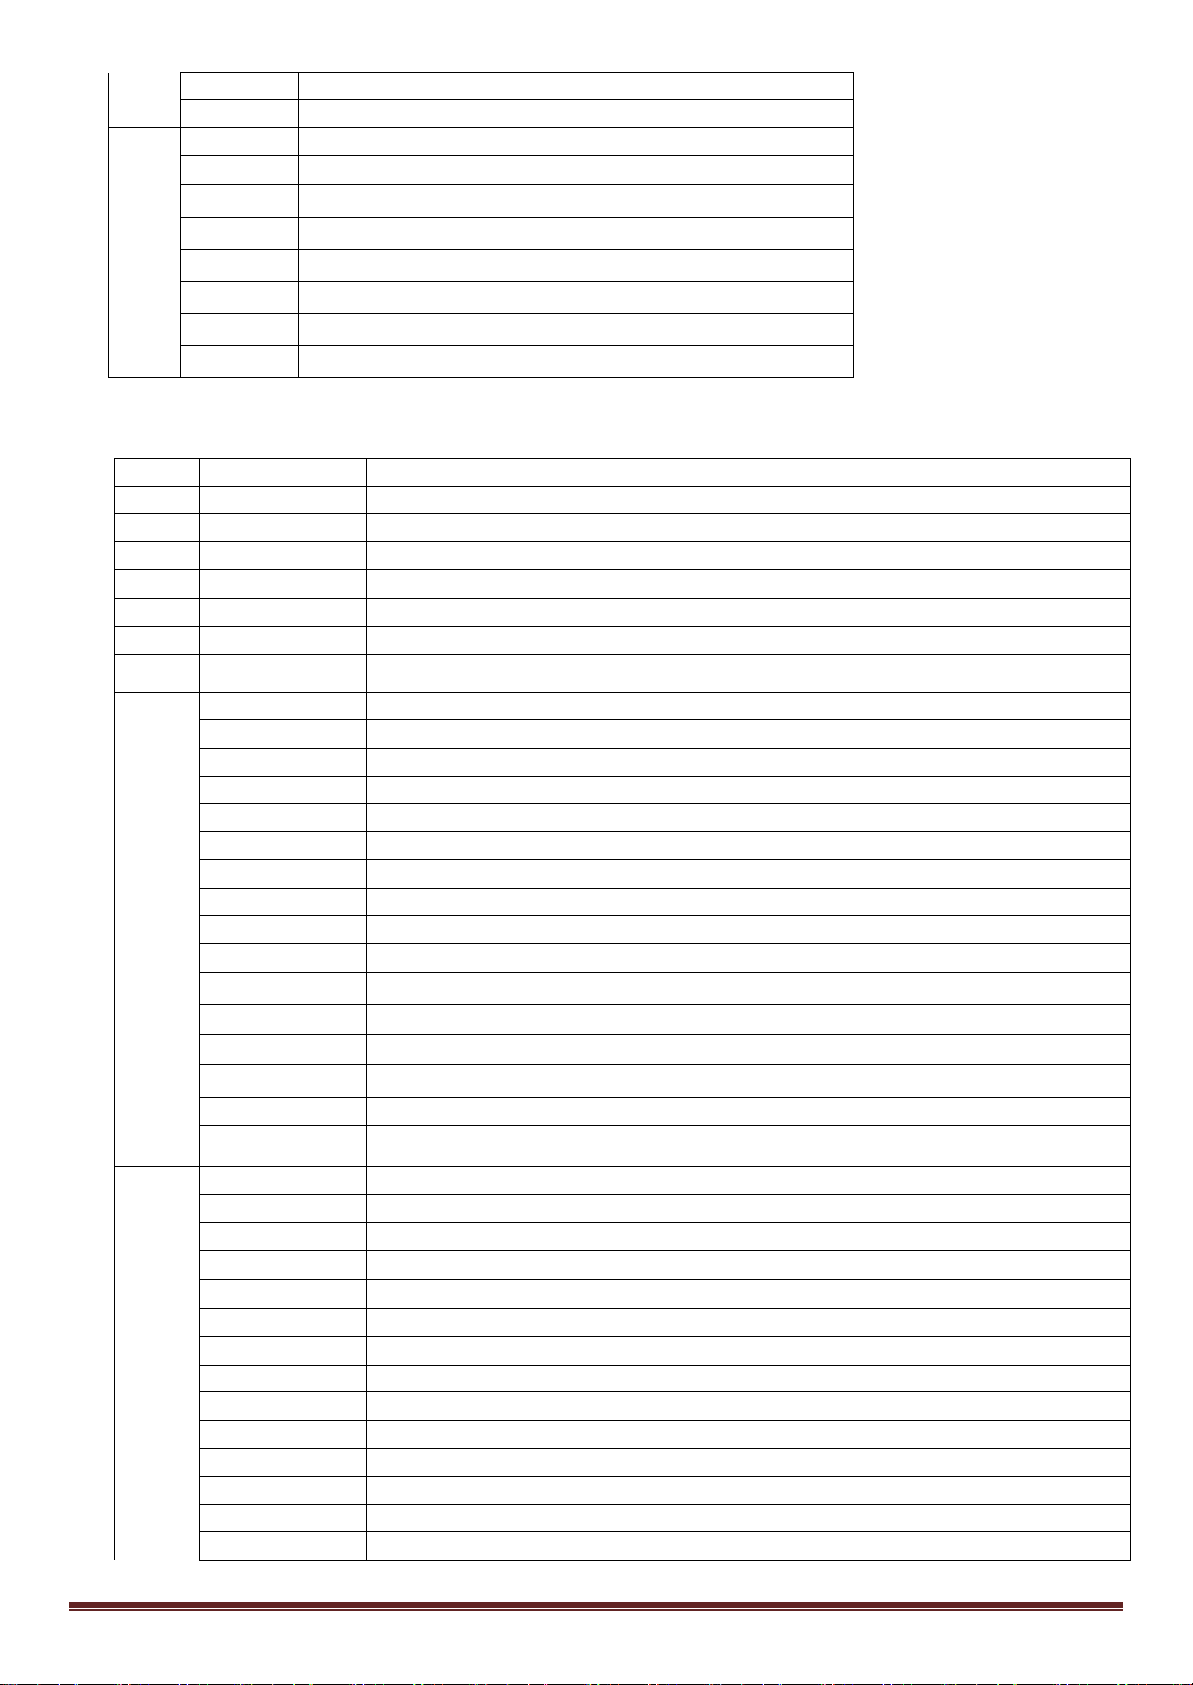
DMX Channel Table
CH
Value
Function
1
0-255
PAN 0-540º
2
0-255
Tilt 0-220º
3
0-255
Dimmer 0-100%
4
0-255
Strobe in the line (from slow to fast)
0-9
White
10-19
Color1
20-29
Color2
110-119
Color11
120-129
Color12
130-139
Color13
140-149
Color14
0-9
White
10-19
Gobo1
20-29
Gobo2
30-39
Gobo3
6
40-49
Gobo4
50-59
Gobo5
60-69
Gobo6
70-79
Gobo7
80-89
Gobo7 shake
90-99
Gobo6 shake
100-109
Gobo5 shake
110-119
Gobo4 shake
120-129
Gobo3 shake
130-139
Gobo2 shake
140-149
Gobo1 shake
150-255
Gobo Auto (From slow to fast)
0-30
No function
31-60
Auto1 Speed (from slow to fast)
61-90
Auto2 Speed (from slow to fast)
91-120
Auto3 Speed (from slow to fast)
121-150
Auto4 Speed (from slow to fast)
151-180
Sound1 Sensitivity (from low to high)
181-210
Sound2 Sensitivity (from low to high)
211-255
Keep 5 seconds ,the system reset
CH
Value
Function
1
0-255
PAN 0-540º
2
0-255
PAN 16 bit
3
0-255
Tilt 0-220º
4
0-255
Tilt 16 bit
5
0-255
Pan &Tilt Speed (from fast to slow)
6
0-255
Dimmer 0-100%
7
0-255
Strobe in the line (from slow to fast)
8
0-9
White
7CH
5
150-255 Color Auto (From slow to fast)
7
10CH
©Copyright LOTRONIC 2017 PARTY-SPOT7 Page 4
Page 5
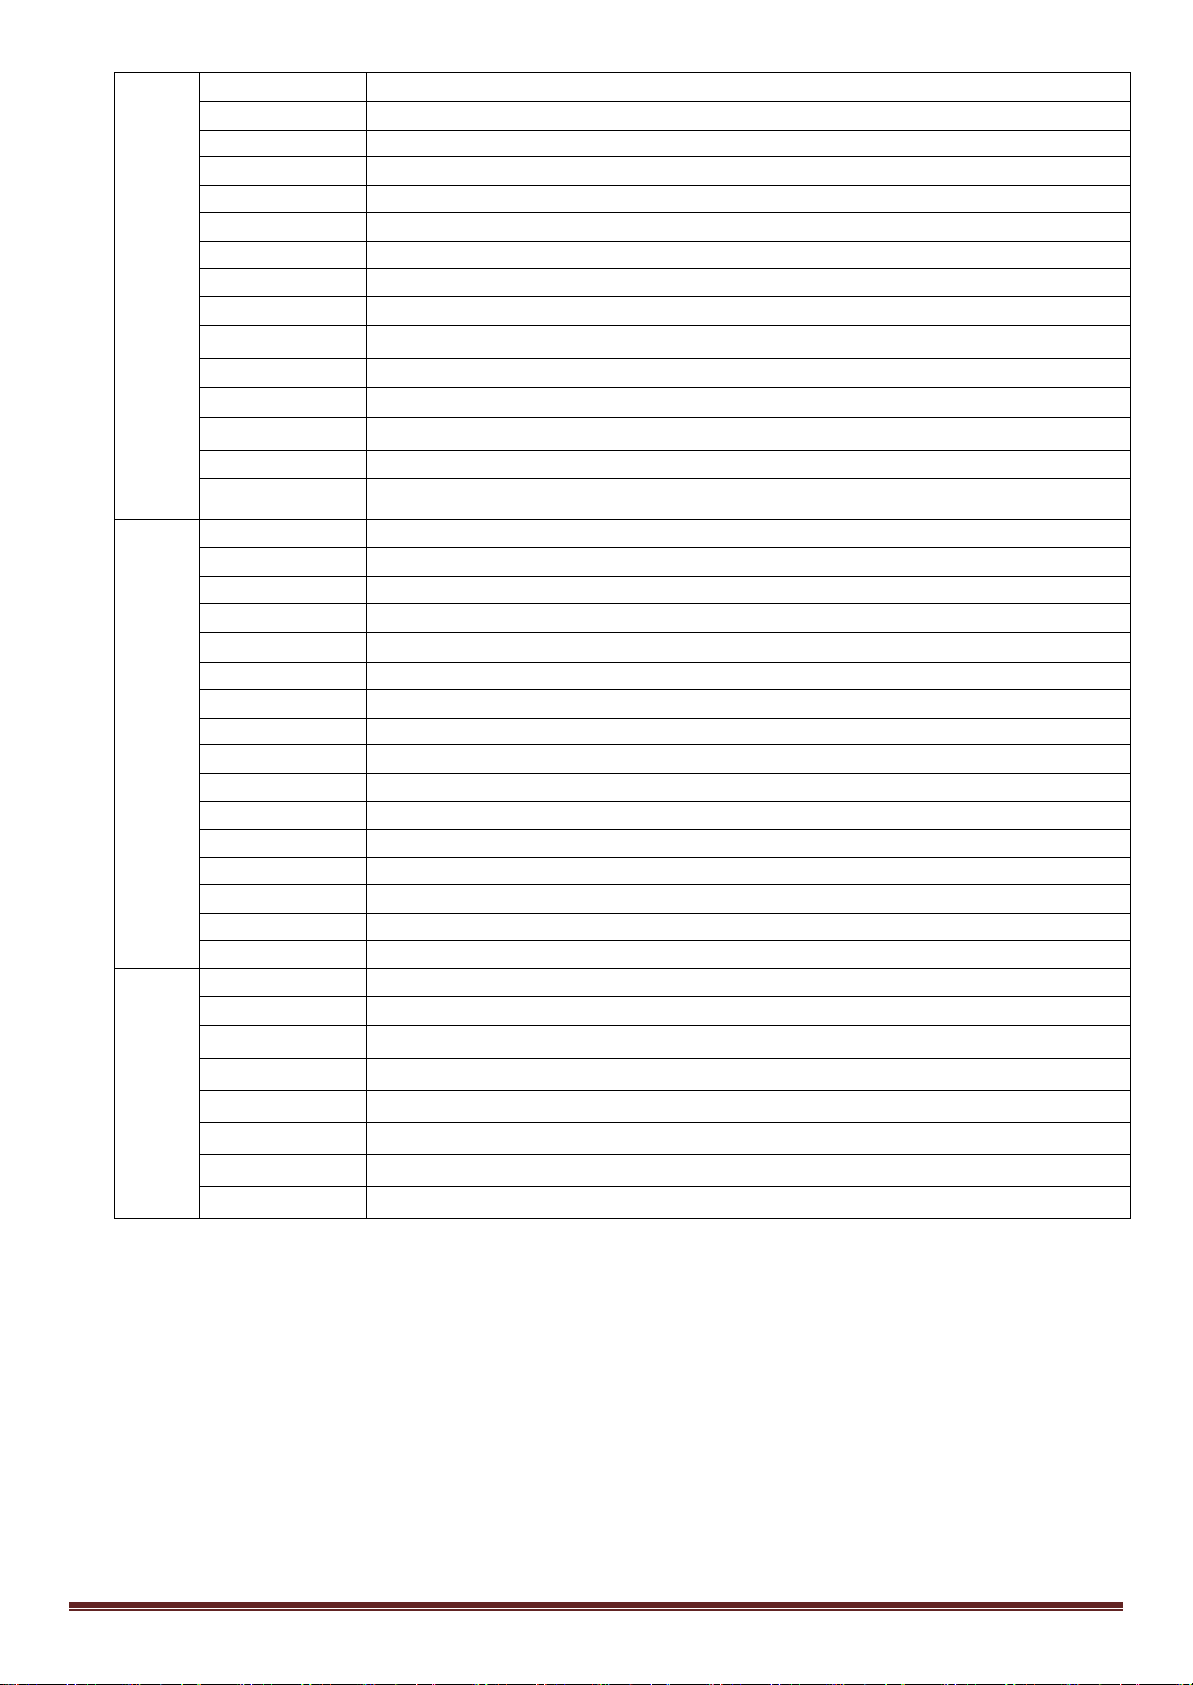
10-19
Color1
20-29
Color2
30-39
Color3
40-49
Color4
50-59
Color5
60-69
Color6
70-79
Color7
80-89
Color8
90-99
Color9
100-109
Color10
110-119
Color11
120-129
Color12
130-139
Color13
140-149
Color14
150-255 Color Auto (From slow to fast)
0-9
White
10-19
Gobo1
20-29
Gobo2
30-39
Gobo3
9
40-49
Gobo4
50-59
Gobo5
60-69
Gobo6
70-79
Gobo7
80-89
Gobo7 shake
90-99
Gobo6 shake
100-109
Gobo5 shake
110-119
Gobo4 shake
120-129
Gobo3 shake
130-139
Gobo2 shake
140-149
Gobo1 shake
150-255
Gobo Auto (From slow to fast)
0-30
No function
31-60
Auto1 Speed (from slow to fast)
61-90
Auto2 Speed (from slow to fast)
91-120
Auto3 Speed (from slow to fast)
121-150
Auto4 Speed (from slow to fast)
151-180
Sound1 Sensitivity (from low to high)
181-210
Sound2 Sensitivity (from low to high)
211-255
Keep 5 seconds,the system reset
10
©Copyright LOTRONIC 2017 PARTY-SPOT7 Page 5
Page 6
4 : MENU FUNCTION
F
ADDR 1-512
CHAN 10CH/7CH
AUTO AUT1
AUT2 SPED 0-255
…
AUT4
SOUN SUN1 SENS 0-255
SUN2
PAN YES/NO
TILT YES/NO
DEFA YES/NO
RST YES
Specifications
Voltage: ...................................................................................................... 100-240V∼ 50/60Hz
Power consumption: ........................................................................................................... 25W
Light source: .................................................................................... 10W high power white LED
DMX channels ....................................................................................................... 7/10 channels
Built-in programs........................................................................................................................ 8
Pan / Tilt: .............................................................................................. X axis: 540°, Y axis: 190°
Data input.................................................................................... Locking 3-pin XLR male socket
Data output ............................................................................ Locking 3-pin DMX female socket
Data pin configuration ................................................................. Pin1 shield, pin 2 (-), pin 3 (+)
Dimensions .................................................................................................. 155 x 145 x 240 mm
N.W: .................................................................................................................................. 2.88kg
1. PREPARATIFS
Contenu de l’emballage:
• 1 effet de lumière PARTY-SPOT7
• Mode d’emploi
• Cordon XLR
• Attache Oméga
Déballage
Dès réception de l’appareil, ouvrez le carton et vérifiez que le contenu est complet et en bon état. Sinon, prévenez
immédiatement le transporteur et conservez l’emballage s’il montre des signes de mauvais traitements. Conservez le
carton et tous les matériaux d’emballage afin de pouvoir transporter l’appareil en toute sécurité.
©Copyright LOTRONIC 2017 PARTY-SPOT7 Page 6
Page 7
Consignes de sécurité
ENTREE
COMMUN
DMX +
DMX-
Résistance de 120 Ω
appareil
Lisez attentivement ce manuel qui contient des informations importantes sur l’installation, l’utilisation et l’entretien
de cet appareil.
• Conservez le manuel pour référence ultérieure. Si l’appareil change un jour de propriétaire, assurez-vous que le
nouvel utilisateur est en possession du manuel.
• Assurez-vous que la tension secteur convient à cet appareil et qu’elle ne dépasse pas la tension d’alimentation
indiqué sur la plaque signalétique de l’appareil.
• Uniquement pour utilisation à l’intérieur!
• Afin d’éviter tout risque d’incendie ou de choc électrique, ne pas exposer cet appareil à la pluie ou à l’humidité.
Assurez-vous qu’aucun objet inflammable ne se trouve à proximité de l’appareil pendant son fonctionnement.
• Installez l’appareil à un endroit bien ventilé à une distance minimum de 50cm de toute surface. Assurez-vous que
les fentes de ventilation ne sont pas bloquées.
• Débranchez l’appareil du secteur avant toute manipulation ou entretien. Lorsque vous remplacez le fusible, utilisez
uniquement un fusible qui présente exactement les mêmes caractéristiques que l’ancien.
• Sécurisez l’appareil sur le dispositif de fixation au moyen d’une chaîne. Ne portez jamais l’appareil en le tenant par
le boîtier. Tenez-le par l’étrier.
• La température ambiante ne doit pas dépasser 40°C. Ne pas faire fonctionner l’appareil à des températures
supérieures.
• En cas de dysfonctionnement, arrêtez immédiatement l’appareil. N’essayez jamais de réparer l’appareil par vousmême. Une réparation mal faite peut entraîner des dommages et des dysfonctionnements. Contactez un service
technique agréé. Utilisez uniquement des pièces détachées identiques aux pièces d’origine.
• Ne pas brancher l’appareil sur un variateur.
• Assurez-vous que le cordon d’alimentation n’est jamais écrasé ni endommagé.
• Ne jamais débrancher l’appareil en tirant sur le cordon.
• Ne pas exposer vos yeux à la source lumineuse.
2. INSTALLATION
Débranchez le cordon d’alimentation avant de remplacer le fusible et utilisez toujours un fusible ayant les
mêmes caractéristiques que l’ancien.
Câblage
Pour relier des appareils ensemble, vous devez utiliser des câbles de transmission de données. Vous pouvez acheter
des câbles DMX certifiés directement chez un revendeur/distributeur ou construire vos propres câbles. Si vous
souhaitez fabriquer le câble vous-même, utilisez des câbles de données faible capacitance de haute qualité qui sont
moins sujets à des interférences électromagnétiques.
CONNECTEURS DE CABLE
Le câble doit posséder une fiche XLR mâle d’un côté et XLR femelle de l’autre. .
Configuration des connecteurs DMX
1/ 4w entre pin 2
La résistance de fin de ligne réduit les erreurs de signal. Pour éviter des problèmes de transmission des signaux, il est
toujours conseillé de brancher une résistance de fin de ligne DMX.
(DMX-) et pin 3
(DMX+) sur le dernier
©Copyright LOTRONIC 2017 PARTY-SPOT7 Page 7
Page 8
ATTENTION
CH
Valeur
Fonction
1
0-255
PAN 0-540º
2
0-255
Tilt 0-220º
3
0-255
Dimmer 0-100%
4
0-255
Strobe in the line(from slow to fast)
0-9
White
10-19
Color1
20-29
Color2
110-119
Color11
120-129
Color12
130-139
Color13
140-149
Color14
0-9
White
Il ne doit y avoir aucun contact entre le commun et la masse du châssis de l’appareil. La mise à la masse du commun
peut provoquer une boucle de masse et votre appareil fonctionne d’une façon étrange. Testez les câbles à l’aide d’un
ohm-mètre afin de vérifier la polarité et de vous assurer que les broches ne sont pas connectées à la masse ni courtcircuitées sur le blindage ou mutuellement.
Mise en place d’une ligne de données DMX en série
1. Connectez le côté (mâle) à 3 broches du câble DMX sur la sortie
(femelle) à 3 broches de la commande.
2. Connectez l’extrémité du câble provenant du contrôleur qui aura une
fiche femelle à 3 broches, sur la fiche d’entrée de l’appareil suivant qui
est un connecteur mâle à 3 broches
3. Ensuite, branchez la sortie comme indiqué ci-dessus sur l’entrée de
l’appareil suivant, etc.
Montage
Vous pouvez installer cet appareil dans n’importe quelle position pourvu
qu’il y ait une ventilation suffisante. Lors du choix d’un emplacement,
tenez compte de la facilité d’accès à l’appareil pour des travaux de maintenance et de nettoyage.
Utilisez toujours de câbles de sécurité
Ne jamais installer l’appareil à un endroit exposé à la pluie, l’humidité, aux changements de température importants
et présentant une ventilation limitée.
RIGGING
La lyre à led comporte un dispositif de fixation unique qui se trouve endessous de la base. C’est la combinaison de l’attache omega fourni et du
point de fixation du cable de sécurité (voir ci-contre). Lorsque vous
installez cet appareil sur une traverse, utilisez un crochet compatible avec
l’attache omega et fixez-le à travers le trou au moyen d’une vis M10. Pour
une sécurité supplémentaire, attachez un cable d’acier sur l’un des points
de fixation presents sur la base.
Tableau des canaux DMX
7CH
5
150-255 Color Auto (From slow to fast)
©Copyright LOTRONIC 2017 PARTY-SPOT7 Page 8
Page 9
10-19
Gobo1
20-29
Gobo2
30-39
Gobo3
6
40-49
Gobo4
50-59
Gobo5
60-69
Gobo6
70-79
Gobo7
80-89
Gobo7 shake
90-99
Gobo6 shake
100-109
Gobo5 shake
110-119
Gobo4 shake
120-129
Gobo3 shake
130-139
Gobo2 shake
140-149
Gobo1 shake
150-255
Gobo Auto (From slow to fast)
7
0-30
No function
31-60
Auto1 Speed (from slow to fast)
61-90
Auto2 Speed (from slow to fast)
91-120
Auto3 Speed (from slow to fast)
121-150
Auto4 Speed (from slow to fast)
151-180
Sound1 Sensitivity (from low to high)
181-210
Sound2 Sensitivity (from low to high)
211-255
Keep 5 seconds ,the system reset
CH
Value
Function
1
0-255
PAN 0-540º
2
0-255
PAN 16 bit
3
0-255
Tilt 0-220º
4
0-255
Tilt 16 bit
5
0-255
Pan &Tilt Speed (from fast to slow)
6
0-255
Dimmer 0-100%
Strobe in the line(from slow to fast)
0-9
While
10-19
Color1
20-29
Color2
30-39
Color3
40-49
Color4
50-59
Color5
60-69
Color6
70-79
Color7
80-89
Color8
90-99
Color9
100-109
Color10
110-119
Color11
120-129
Color12
130-139
Color13
140-149
Color14
0-9
While
10CH
7 0-255
8
150-255 Color Auto (From slow to fast)
©Copyright LOTRONIC 2017 PARTY-SPOT7 Page 9
Page 10
10-19
Gobo1
20-29
Gobo2
30-39
Gobo3
9
40-49
Gobo4
50-59
Gobo5
60-69
Gobo6
70-79
Gobo7
80-89
Gobo7 shake
90-99
Gobo6 shake
100-109
Gobo5 shake
110-119
Gobo4 shake
120-129
Gobo3 shake
130-139
Gobo2 shake
140-149
Gobo1 shake
150-255
Gobo Auto (From slow to fast)
10
0-30
No function
31-60
Auto1 Speed (from slow to fast)
61-90
Auto2 Speed (from slow to fast)
91-120
Auto3 Speed (from slow to fast)
121-150
Auto4 Speed (from slow to fast)
151-180
Sound1 Sensitivity (from low to high)
181-210
Sound2 Sensitivity (from low to high)
211-255
Keep 5 seconds,the system reset
4 : MENU FUNCTION
ADDR 1-512
CHAN 10CH/7CH
AUTO AUT1
AUT2 SPED 0-255
…
AUT4
SOUN SUN1 SENS 0-255
SUN2
PAN YES/NO
TILT YES/NO
DEFA YES/NO
RST YES
©Copyright LOTRONIC 2017 PARTY-SPOT7 Page 10
Page 11

Caractéristiques techniques
D
Alimentation: .............................................................................................. 100-240V∼ 50/60Hz
Consommation: .................................................................................................................................................... 25W
Source de lumière: ....................................................................... LED blanche 10W haute puissance
Canaux DMX ......................................................................................................................... 7/10
Programmes intégrés ................................................................................................................. 8
Pan / Tilt: .................................................................................. Abscisse: 540°, Ordonnée: 190°
Entrée DMX .................................................................................. Fiche XLR mâle à verrouillage
Sortie DMX ............................................................................... Fiche XLR femelle à verrouillage
Configuration des broches XLR ............................ Broche 1 blindage, broche 2 (-), broche 3 (+)
Dimensions .................................................................................................. 155 x 145 x 240 mm
Poids net: .......................................................................................................................... 2,88kg
1. VORBEREITUNGEN
Verpackungsinhalt:
• 1 x PARTY-SPOT7 Lichteffekt
• Bedienungsanleitung
• XLR Kabel
• Omega Halterung
Auspacken
Sofort nach Empfang vorsichtig den Karton auspacken und den Inhalt überprüfen. Alle Teile müssen vollzählig und in
einwandfreiem Zustand sein. Sofort die Transportfirma benachrichtigen und das Verpackungsmaterial aufbewahren,
wenn Teile Transportschäden aufweisen. Verpackungsmaterial auch für späteren Transport des Geräts aufbewahren.
Sicherheitshinweise
Diese Anleitung sorgfältig vor der ersten Inbetriebnahme lesen. Sie enthält wichtige Informationen über Installation,
Gebrauch und Instandhaltung des Geräts.
• Die Anleitung für spätere Bezugnahme aufbewahren und an den nächsten Bediener weitergeben.
• Stets die Netzspannung vor Anschluss des Geräts überprüfen Sie muss mit der auf der Rückseite des Geräts
angegebenen Spannung übereinstimmen und darf auf keinen Fall höher sein.
• Dieses Gerät ist nur für Innengebrauch!
• Um Brand und Stromschlag zu vermeiden, das Gerät vor Regen und Feuchtigkeit schützen. Keine brennbaren
Materialien während des Betriebs in der Nähe des Geräts lassen.
• Das Gerät muss an einem gut belüfteten Ort und in mindestens 50cm Entfernung zur nächsten Fläche angebracht
werden. Darauf achten, dass die Belüftungsschlitze nicht blockiert oder verstopft sind.
• Immer erst das Gerät vom Netz trennen, bevor es gewartet oder die Sicherung ersetzt wird. Die Sicherung nur
durch eine identische ersetzen.
• Das Gerät mit einer Sicherheitskette befestigen. Das Gerät niemals nur am Kopf tragen, sondern auch am Sockel.
• Die Raumtemperatur darf 40°C nicht überschreiten. Das Gerät niemals bei höheren Temperaturen betreiben.
• Bei Betriebsstörungen das Gerät sofort ausschalten. Das Gerät niemals selbst reparieren. Reparaturen dürfen nur
von einem Fachmann vorgenommen werden. Alle verwendeten Ersatzteile müssen mit den Originalteilen identisch
sein.
• Das Gerät nicht an ein Dimmerpack anschließen.
©Copyright LOTRONIC 2017 PARTY-SPOT7 Page 11
Page 12
• Das Netzkabel niemals quetschen oder beschädigen.
EINGANG
NEUTRAL
DMX +
DMX-
120 Ohm 1/4W
Gerät
• Beim Abziehen des Netzsteckers nur am Stecker ziehen, niemals am Kabel.
• Niemals direkt in die Lichtquelle blicken.
2. AUFBAU
Vor Auswechseln der Sicherung Gerät vom Netz trennen. Nur eine identische Sicherung benutzen.
Verkabelung
Für den Anschluss der Geräte muss spezielles Datenkabel verwendet werden. Sie können solche DMX Kabel direkt im
Fachhandel erwerben oder selbst ein Kabel fertigen. Wenn Sie Ihr Kabel selbst herstellen möchten, benutzen Sie
bitte Datenkabel, dass eine hochwertige Signalübertragung gewährleistet und weniger anfällig für
elektromagnetische Störfelder ist.
KABELVERBINDER
Die Kabel müssen einen XLR Stecker auf der einen und eine XLR Buchse auf der anderen Seite besitzen.
DMX Steckerbelegung
Widerstand zwischen
Pin2 (DMX-) und Pin 3
(DMX+) am letzten
Der Endwiderstand verringert Signalfehler. Um Signalübertragungsprobleme und Störungen zu vermeiden, ist es
ratsam, einen DMX Signalwiderstand zwischenzuschalten.
Einrichten einer seriellen DMX Datenverbindung
1. Den 3-pol. Stecker des DMX Kabels in die 3-pol.
Eingangsbuchse des Controllers stecken.
2. Das vom Controller kommende Kabel mit der 3-pol. Buchse
an den 3-pol. Eingangsstecker des folgenden Geräts stecken.
3. Dann den Ausgang des Geräts an den Eingang des
folgenden Geräts anschließen usw.
Montage
Das Gerät kann in jeder beliebigen Stellung montiert werden,
solange für ausreichende Belüftung gesorgt ist.
Der Ventilator und die Belüftungsschlitze dürfen auf keinen
Fall verstopft werden. Bei der Wahl des Anbringungsortes
darauf achten, dass das Gerät leicht zugänglich für Wartungsund Reinigungsarbeiten bleibt.
Benutzen Sie immer Sicherheitskabel.
Das Gerät vor Regen, Feuchtigkeit, extremen Temperaturschwankungen schützen. Die Montagestelle muss gut
belüftet sein.
©Copyright LOTRONIC 2017 PARTY-SPOT7 Page 12
Page 13
RIGGING
Kanal
Wert
Funktion
1
0-255
PAN 0-540º
2
0-255
Tilt 0-220º
3
0-255
Dimmer 0-100%
4
0-255
Stroboskop (langsam ->schnell)
0-9
Weiss
10-19
Farbe1
20-29
Farbe 2
110-119
Farbe 11
120-129
Farbe 12
130-139
Farbe 13
140-149
Farbe 14
150-255
Farbe Automatisch (langsam ->schnell)
0-9
Weiss
10-19
Gobo1
20-29
Gobo2
30-39
Gobo3
6
40-49
Gobo4
50-59
Gobo5
60-69
Gobo6
70-79
Gobo7
80-89
Gobo7 shake
90-99
Gobo6 shake
100-109
Gobo5 shake
110-119
Gobo4 shake
120-129
Gobo3 shake
130-139
Gobo2 shake
140-149
Gobo1 shake
150-255
Gobo Auto (langsam ->schnell)
0-30
Keine Funktion
31-60
Auto1 Geschwindigkeit (langsam ->schnell)
61-90
Auto2 Geschwindigkeit (langsam ->schnell)
91-120
Auto3 Geschwindigkeit (langsam ->schnell)
121-150
Auto4 Geschwindigkeit (langsam ->schnell)
151-180
Sound1 Empfindlichkeit (wenig ->hoch)
181-210
Sound2 Empfindlichkeit (wenig ->hoch)
211-255
5 Sekunden lang gedrückt halten, System Reset
Das Gerät besitzt eine Spezialbefestigung auf der Unterseite, die aus
dem Omega-Halter und Aufhängestellen für das Sicherheitskabel
besteht. (s. Abb. rechts). Wenn Sie das Gerät an einem
Traversensystem befestigen, benutzen Sie einen passenden Haken, den
Siemit einer M10 Schraube am Omega-Halter befestigen. Als
zusätzliche Sicherheitsmassnahme müssen Sie ein Stahlkabel an einer
der Aufhängestellen befestigen.
DMX Kanaltabelle
7CH
5
7
©Copyright LOTRONIC 2017 PARTY-SPOT7 Page 13
Page 14
10CH
Kanal
Wert
Funktion
1
0-255
PAN 0-540º
2
0-255
PAN 16 bit
3
0-255
Tilt 0-220º
4
0-255
Tilt 16 bit
5
0-255
Pan &Tilt Geschwindigkeit (langsam ->schnell)
6
0-255
Dimmer 0-100%
7
0-255
Stroboskop (langsam ->schnell)
0-9
Weiss
10-19
Farbe1
20-29
Farbe2
30-39
Farbe3
40-49
Farbe4
50-59
Farbe5
60-69
Farbe6
70-79
Farbe7
80-89
Farbe8
90-99
Farbe9
100-109
Farbe10
110-119
Farbe11
120-129
Farbe12
130-139
Farbe13
140-149
Farbe14
0-9
Weiss
10-19
Gobo1
20-29
Gobo2
30-39
Gobo3
9
40-49
Gobo4
50-59
Gobo5
60-69
Gobo6
70-79
Gobo7
80-89
Gobo7 shake
90-99
Gobo6 shake
100-109
Gobo5 shake
110-119
Gobo4 shake
120-129
Gobo3 shake
130-139
Gobo2 shake
140-149
Gobo1 shake
150-255
Gobo Auto (langsam ->schnell)
0-30
Keine Funktion
31-60
Auto1 Geschwindigkeit (langsam ->schnell)
61-90
Auto2 Geschwindigkeit (langsam ->schnell)
91-120
Auto3 Geschwindigkeit (langsam ->schnell)
121-150
Auto4 Geschwindigkeit (langsam ->schnell)
151-180
Sound1 Empfindlichkeit (wenig->hoch)
181-210
Sound2 Empfindlichkeit (wenig->hoch)
211-255
5 Sekunden lang gedrückt halten, System Reset
8
150-255 Farbe Auto (langsam ->schnell)
10
©Copyright LOTRONIC 2017 PARTY-SPOT7 Page 14
Page 15
4 : MENU FUNKTION
ADDR 1-512
CHAN 10CH/7CH
AUTO AUT1
AUT2 SPED 0-255
…
AUT4
SOUN SUN1 SENS 0-255
SUN2
PAN YES/NO
TILT YES/NO
DEFA YES/NO
RST YES
Technische Daten
Versorgung: ................................................................................................ 100-240V∼ 50/60Hz
Verbrauch: .............................................................................................................................................................. 25W
Lichtquelle: ........................................................................................... weisse 10W Hochleistungs-LED
DMX Kanäle .............................................................................................................. 7/10 Kanäle
Eingebaute Programme ............................................................................................................. 8
Pan / Tilt: ....................................................................................... X Achse: 540°, Y Achse: 190°
Dateneingang ....................................................................... 3-pin XLR Stecker mit Verriegelung
Datenausgang .................................................................... 3-pin DMX Buchse mit Verriegelung
Stiftbelegung ..................................................................... Pin1 Abschirmung, Pin 2 (-), Pin 3 (+)
Abmessungen .............................................................................................. 155 x 145 x 240 mm
Nettogewicht .................................................................................................................... 2,88kg
©Copyright LOTRONIC 2017 PARTY-SPOT7 Page 15
Page 16

P
1. ANTES DE INICIAR
Conteúdos:
• 1 x PARTY-SPOT7
• Manual de Instruções
• 1x Cabo XLR
• 1x Suporte Omega
Instruções para desembalar
Imediatamente após receber o dispositivo, desembalar cuidadosamente e verifique o conteúdo de modo a garantir
que todas as partes estão presentes e foram recebidas em bom estado. Notifique a empresa de transporte
imediatamente e guarde o material da embalagem para inspecção caso as partes pareçam estar danificadas devido
ao transporte ou a embalagem em si mostre sinais de mau uso. Guarde a caixa e todos os materiais da embalagem.
Caso a unidade seja devolvida à fábrica, é importante que o dispositivo seja devolvido na caixa de fábrica original e
embalagem.
Instruções de Segurança
Leia cuidadosamente estas instruções que incluem informações importantes sobre a instalação, utilização e
manutenção deste produto.
• Guarde este manual para referência futura. Se vender o equipamento a outro utilizador, certifique-se de que o
mesmo também recebe este manual de instruções.
• Certifique-se sempre que está ligado a uma voltagem adequada, e que a voltagem da linha a que está a ligar não é
maior do que a indicada no painel traseiro do dispositivo.
• Este produto é destinado apenas para uso interno!
• Para evitar risco de incêndio ou choque, não exponha equipamento à chuva ou humidade. Certifique-se de que não
existem materiais inflamáveis próximos à unidade durante a operação.
• A unidade deve ser instalada num local com ventilação adequada, pelo menos 50cm de superfícies adjacentes.
Certifique-se de que nenhumas das aberturas de ventilação estão bloqueadas.
• Desligue sempre da fonte de energia antes de reparar ou substituir o fusível e certifique-se de que substitui por um
fusível mesmo tipo.
• Deverá ter uma fixação segura para fixação do dispositivo usando uma corrente de segurança. Use as pegas para
transportar o equipamento.
• A temperatura ambiente máxima é de 40° C. Não opere o equipamento em temperaturas superiores a esta.
• No caso de um problema operacional grave, desligue o equipamento imediatamente. Nunca tente reparar a
unidade. As reparações devem ser efectuadas por pessoas qualificadas pois caso contrario poderá levar a danos
causados ao equipamento. Entre em contacto com a assistência técnica. Use sempre o mesmo tipo de peças de
substituição.
• Não ligue o dispositivo a um dimmer.
• Verifique se o cabo de alimentação está danificado.
• Nunca desligue o cabo de energia puxando pelo cabo.
• Evite a exposição directa dos olhos à fonte de luz enquanto a mesma estiver ligada.
2. SETUP
Desligue o cabo de alimentação antes de substituir um fusível e substitua sempre com o fusível do mesmo
tipo
©Copyright LOTRONIC 2017 PARTY-SPOT7 Page 16
Page 17
Ligação em serie
ENTRADA
SAIDA
DMX +
DMX-
Resistência 120 ohm
Irá precisar de uma ligação de dados em serie para instalar mais de um ou mais dispositivos eléctricos usando um
controlador DMX-512 ou para executar programas sincronizados em duas ou mais unidades ajustadas a um modo de
operação Master / Slave. O número combinado de canais necessários por todos os equipamentos numa ligação de
dados em série determina o número de jogos que a ligação de dados pode suportar.
Cabos
Para ligar as posições deve usar cabos de dados. Pode adquirir cabos DMX certificados-CHAUVET directamente do
seu vendedor/distribuidor.
LIGAÇÃO DE CABOS
A ligação dos cabos deve ter uma ligação macho XLR e na outra ponta uma ligação fêmea XLR.
Configuração de ligação DMX
1/ 4w entre pin 2
(DMX-) e pin 3 (DMX+)
da ultima posição.
As terminações reduzem erros no sinal. De modo a evitar problemas e interferências na transmissão de sinal é
sempre aconselhável ligar a um terminal de sinal DMX.
AVISO
Não permitir o contacto entre o comum e a ligação terra do dispositivo eléctrico do chassis. A ligação terra do
comum pode causar um loop de ligação terra e o dispositivo pode funcionar de forma irregular. Teste os cabos com
um medidor de ohm para verificar a polaridade e para garantir que os pinos não estão aterrados ou em curtocircuito com o escudo ou outro.
Configurar DMX Serial Data Link
1. Ligar o (macho) de 3 pinos do cabo DMX à saída (fêmea) de 3
pinos do controlador.
2. Ligue a ponta do final do cabo que vem do controlador que terá
uma ligação (fêmea) de 3 pinos para a ligação de entrada na
seguinte ligação que consiste numa ligação (macho) de 3 pinos.
3. De seguida ligue a saída com mostra acima à entrada da seguinte
ligação e assim sucessivamente.
Montagem
ORIENTAÇÃO
Este equipamento pode ser montado em qualquer posição desde que existe uma ventilação adequada.
©Copyright LOTRONIC 2017 PARTY-SPOT7 Page 17
Page 18
VENTILAÇÃO
CH
Value
Function
1
0-255
PAN 0-540º
2
0-255
Tilt 0-220º
3
0-255
Dimmer 0-100%
Strobe in the line (from slow to fast)
0-9
White
10-19
Color1
20-29
Color2
110-119
Color11
120-129
Color12
130-139
Color13
140-149
Color14
0-9
White
10-19
Gobo1
20-29
Gobo2
30-39
Gobo3
6
40-49
Gobo4
50-59
Gobo5
60-69
Gobo6
70-79
Gobo7
80-89
Gobo7 shake
90-99
Gobo6 shake
100-109
Gobo5 shake
110-119
Gobo4 shake
120-129
Gobo3 shake
130-139
Gobo2 shake
140-149
Gobo1 shake
É importante que nunca obstrua a ventoinha ou aberturas de ventilação. Ao seleccionar o local de instalação, deverá
ter em consideração o acesso à lâmpada para reposição e manutenção de rotina.
Cabos de segurança devem ser sempre usados.
Este equipamento proporciona um conjunto de suporte de montagem
único que integra a parte inferior da base, o suporte omega incluído e o
ponto de cabo equipamento de segurança em uma unidade (veja a
ilustração à direita) Quando a montagem deste dispositivo elétrico em
uma treliça, não se esqueça de usar uma pinça adequada com o suporte
omega incluído usando um parafuso M10 montado através do orifício
central do suporte de omega. Como medida de segurança adicional,
certifique-se de anexar pelo menos um cabo de segurança devidamente
classificado para o equipamento usando um dos pontos de suspensão
de cabos de segurança integrados no conjunto da base.
Ao selecionar o local de instalação, leve em consideração o acesso a
substituição da lâmpada e manutenção de rotina.
Cabos de segurança devem ser sempre utilizados. Nunca monte em locais onde o equipamento será exposto à
chuva, humidade elevada, mudanças extremas de temperatura ou ventilação restrita.
TABELA DE CANAIS DMX
7CH
4 0-255
5
150-255 Color Auto (From slow to fast)
©Copyright LOTRONIC 2017 PARTY-SPOT7 Page 18
Page 19
150-255
Gobo Auto (From slow to fast)
7
0-30
No function
31-60
Auto1 Speed (from slow to fast)
61-90
Auto2 Speed (from slow to fast)
91-120
Auto3 Speed (from slow to fast)
121-150
Auto4 Speed (from slow to fast)
151-180
Sound1 Sensitivity (from low to high)
181-210
Sound2 Sensitivity (from low to high)
211-255
Keep 5 seconds ,the system reset
CH
Value
Function
1
0-255
PAN 0-540º
2
0-255
PAN 16 bit
3
0-255
Tilt 0-220º
4
0-255
Tilt 16 bit
5
0-255
Pan &Tilt Speed (from fast to slow)
6
0-255
Dimmer 0-100%
Strobe in the line (from slow to fast)
0-9
White
10-19
Color1
20-29
Color2
30-39
Color3
40-49
Color4
50-59
Color5
60-69
Color6
70-79
Color7
80-89
Color8
90-99
Color9
100-109
Color10
110-119
Color11
120-129
Color12
130-139
Color13
140-149
Color14
0-9
White
10-19
Gobo1
20-29
Gobo2
30-39
Gobo3
9
40-49
Gobo4
50-59
Gobo5
60-69
Gobo6
70-79
Gobo7
80-89
Gobo7 shake
90-99
Gobo6 shake
100-109
Gobo5 shake
110-119
Gobo4 shake
120-129
Gobo3 shake
130-139
Gobo2 shake
140-149
Gobo1 shake
10CH
7 0-255
8
150-255 Color Auto (From slow to fast)
©Copyright LOTRONIC 2017 PARTY-SPOT7 Page 19
Page 20
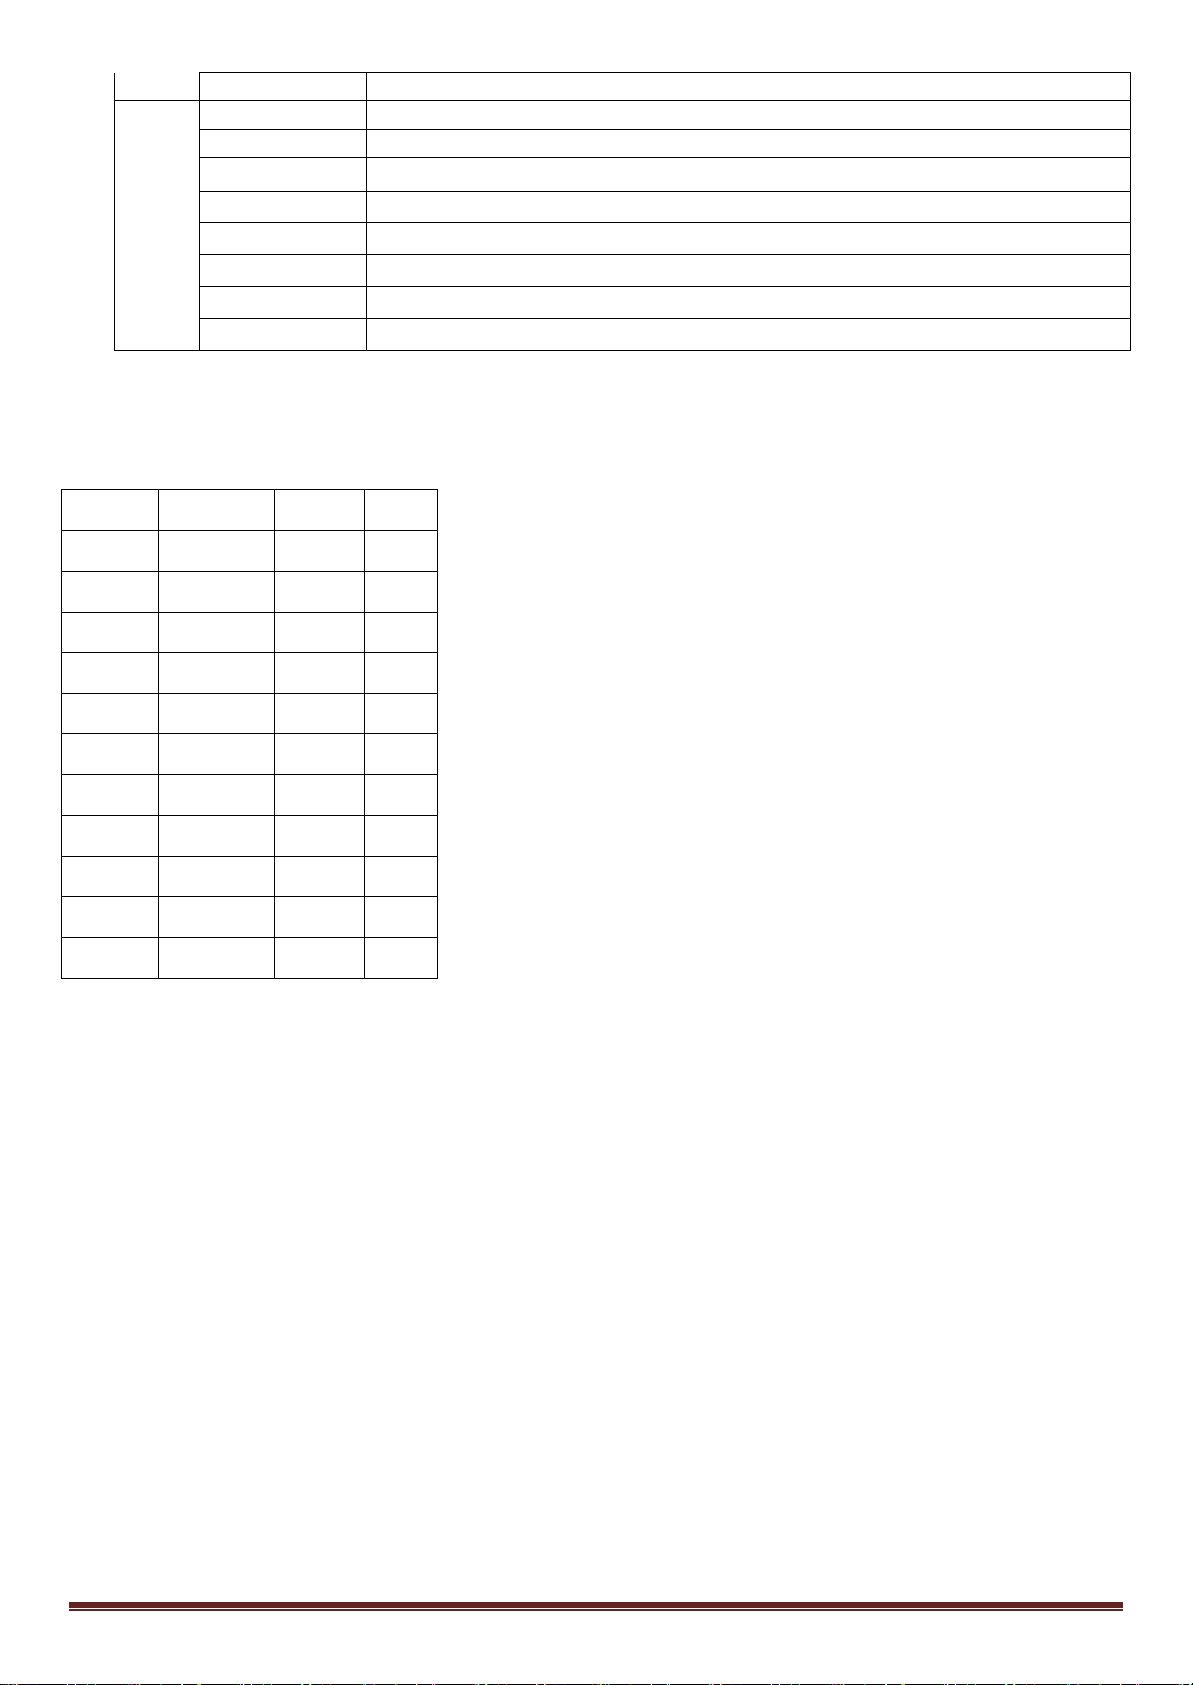
150-255
Gobo Auto (From slow to fast)
10
0-30
No function
31-60
Auto1 Speed (from slow to fast)
61-90
Auto2 Speed (from slow to fast)
91-120
Auto3 Speed (from slow to fast)
121-150
Auto4 Speed (from slow to fast)
151-180
Sound1 Sensitivity (from low to high)
181-210
Sound2 Sensitivity (from low to high)
211-255
Keep 5 seconds,the system reset
4 : MENU DE FUNÇÕES
ADDR 1-512
CHAN 10CH/7CH
AUTO AUT1
AUT2 SPED 0-255
…
AUT4
SOUN SUN1 SENS 0-255
SUN2
PAN YES/NO
TILT YES/NO
DEFA YES/NO
RST YES
Especificações:
Voltagem: ............................................................................................................. 100-240V∼ 50/60Hz
Potência de consumo: ........................................................................................................................................ 25W
Fonte de iluminação: ......................................................................... LEDs 10W alta potência branco
Canais DMX ............................................................................................................... 7/10 canais
Programas embutidos ................................................................................................................ 8
Pan / Tilt: ...................................................................................Ângulo X : 540°, Ângulo Y: 190°
Entrada de dados .......................................................... Conector DMX 3-pin macho com trinco
Saída de dados .............................................................. Conector DMX 3-pin fêmea com trinco
Configuração de pinagem de dados ..................................... Pin1 com malha, pin 2 (-), pin 3 (+)
Dimensões ................................................................................................... 155 x 145 x 240 mm
Peso: .................................................................................................................................. 2,88kg
©Copyright LOTRONIC 2017 PARTY-SPOT7 Page 20
Page 21

RO
1. INTRODUCERE
Continutul coletului:
• 1 x dispozitiv Spot
• Manual de utilizare
• 1x cablu XLR
• 1x clema tip Omega
Despachetarea produsului
Imediat ce ati primit aparatul, despachetati cu grija cutia si verificati continutul pentru a va asigura ca toate
componentele sunt prezente si se afla in stare buna. Anuntati de indata curierul si pastrati ambalajul pentru
inspectie in cazul in care vreuna din componente este deteriorata in urma transportului sau in cazul in care cutia
prezinta semne de manipulare necorespunzatoare. Pastrati cutia si ambalajele originale. In cazul in care un dispozitiv
trebuie returnat, este foarte important ca acesta sa se returneze in cutia originala.
Instructiuni privind siguranta
Va rugam cititi cu atentie aceste instructiuni, deoarece includ informatii importante cu privire la instalarea, modul de
intrebuintare si intretinerea produsului.
• Va rugam sa pastrati acest manual de utilizare pentru referinte ulterioare. In cazul in care doriti sa vindeti produsul
unui alt utilizator, asigurati-va ca acesta primeste de asemenea si acest manual.
• Asigurati-va intotdeauna ca ati conectat aparatul la tensiunea corespunzatoare si ca reteaua de tensiune la care
conectati aparatul nu este mai mare decat cea indicata pe ilustratie sau pe panoul din spate al dispozitivului.
• Acest aparat a fost conceput doar pentru utilizare in interior!
• Pentru a preveni riscul unui incendiu sau soc electric, feriti dispozitivul de ploaie sau umezeala. Asigurati-va ca in
timpul functionarii in apropierea aparatului nu se afla materiale inflamabile.
• Aparatul trebui instalat intr-un loc ventilat corespunzator, la cel putin 50cm de suprafete vecine. Verificati ca
orificiile de ventilatie sa nu fie blocate.
• Deconectati intotdeauna de la sursa de alimentare inainte de efectuarea intretinerii sau inlocuirea sigurantei si
asigurati-va ca ati inlocuit cu o siguranta de aceeasi dimensiune si acelasi tip cu siguranta originala.
• Asigurati suplimentar aparatul folosind un lant de siguranta. Nu prindeti dispozitivul de varf. Folositi manerele.
• Temperatura ambientala maxima (Ta) este 40°C (104° F). Nu puneti aparatul in functiune la temperaturi mai mari.
• In cazul unei probleme grave de functionare, opriti aparatul si deconectati-l de la alimentare. Nu incercati sa
reparati singuri aparatul. Reparatiile efectuate de persoane necalificate pot provoca deteriorarea sau functionarea
defectuoasa a aparatului. Va rugam sa contactati cel mai apropiat centru autorizat de asistenta tehnica. Folositi
intotdeauna piese de schimb recomandate de producator, cu aceleasi caracteristici ca si cele originale.
• Nu conectati aparatul la un variator de tensiune (regulator intensitate sau dimmer).
• Asigurati-va ca, cablul de alimentare nu prezinta nici o urma de deteriorare.
• Nu deconectati cablul de alimentare prin tragere sau smucire.
• Evitati expunerea directa la sursa de lumina in timp ce aparatul este inca pornit.
2. SETARE
Deconectati cablul de alimentare inainte de inlocuirea unei sigurante si inlocuiti mereu cu o siguranta de
acelasi tip.
Conectarea dispozitivului
Veti avea nevoie de conectarea unor dispozitive in serie pentru functionarea jocurilor de lumini comandate de la
unul sau mai multe dispozitive folosind un dispozitiv de control DMX-512 sau pentru a realiza spectacole sincronizate
©Copyright LOTRONIC 2017 PARTY-SPOT7 Page 21
Page 22
cu doua sau mai multe dispozitive de control setate pe modul de functionare master /slave.
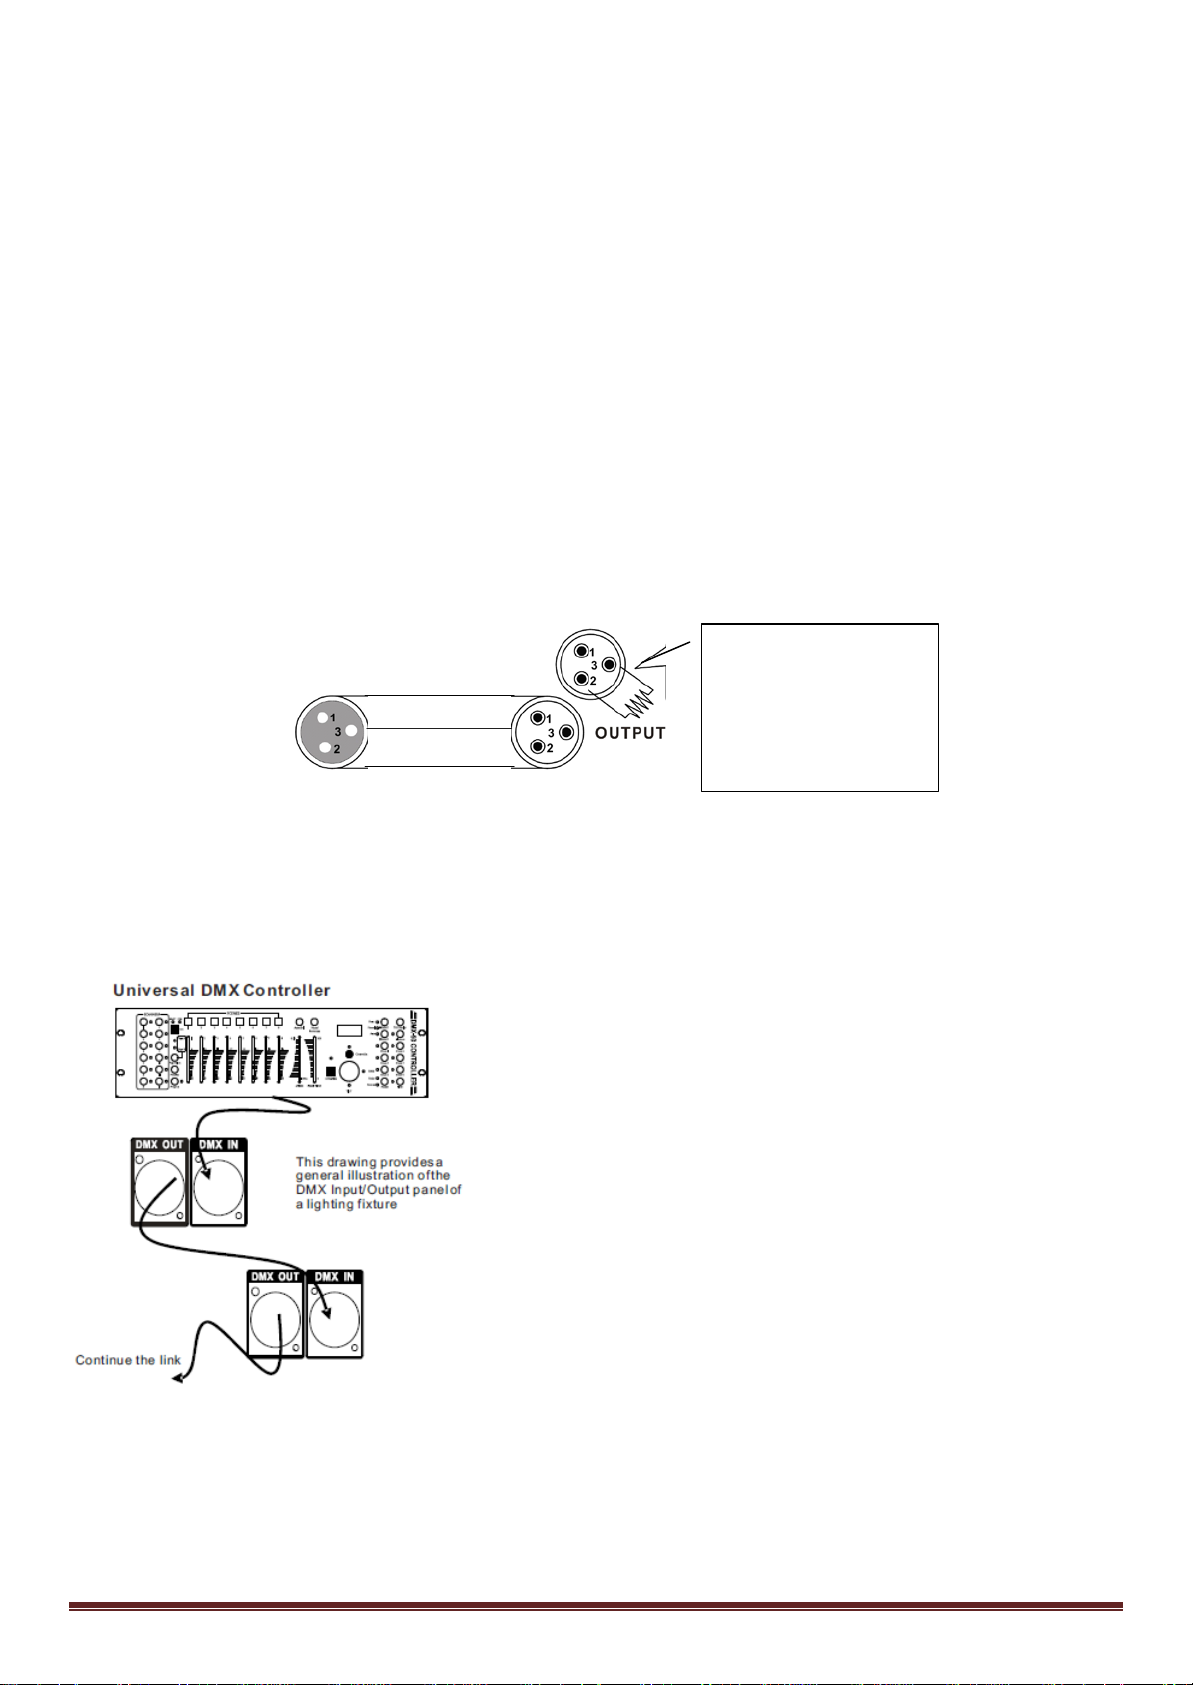
INPUT
COMMON
DMX +
DMX-
Rezistenta 120 ohmi
Important: Dispozitivele trebuie sa fie legate in serie.
Distanta maxima recomandata pentru conexiuni de date in serie: 500 de metri (1640 ft).
Numarul maxim de dispozitive pe o conexiune de date in serie: 32.
Cabluri de date
Pentru a lega dispozitivele impreuna, trebuie sa utilizati cabluri de date. Daca alegeti varianta de a va construi
dumneavoastra cablul, va rugam sa folositi cabluri de date de calitate care pot transmite semnalul si sunt mai putin
predispuse la interferente electromagnetice.
CONECTORI CABLU
Cablul trebuia sa aiba un conector XLR tata la un capat si un conector XLR mama la celalalt capat.
Configurare conector DMX
Pentru a evita problemele de transmisie a semnalului si interferentele, este recomandabil sa conectati un dispozitiv
final pentru semnal DMX (terminator), pentru reducerea erorilor de conexiune.
1/ 4w intre pin 2
(DMX-) si pin 3 (DMX+)
al ultimului dispozitiv .
ATENTIE
Nu permiteti contactul intre nul si pamantarea dispozitivului, deoarece poate provoca o bucla de curent si
dispozitivul poate functiona haotic. Testati cablurile cu un multimetru pentru a verifica polaritatea corecta si pentru
a va asigura ca pinii de alimentare de la cablul de la retea (faza si nul) nu sunt in scurt fata de carcasa aparatului.
Setarea unei conexiuni de date in serie, DMX
1. Conectati conectorul cu 3 pini (tata)a cablului DMX la iesirea
conectorului de 3 pini (mama) a dispozitivului de control.
2. Conectati capatul cablului ce vine de la dispozitivul de control si
care are un conector de 3 pini (mama) la conectorul de intrare al
urmatorului dispozitiv format dintr-un conector de 3 pini (tata).
3. Continuati, apoi, sa conectati asa cum este mentionat mai sus la
intrarea urmatorului dispozitiv , s.a.m.d. Ultimul cablu va fi conectat
la un terminator DMX.
Instalare
ORIENTARE
Acest dispozitiv de fixare poate fi montat in orice pozitie cu conditia sa fie loc suficient pentru ventilatie.
©Copyright LOTRONIC 2017 PARTY-SPOT7 Page 22
Page 23
MONTARE
CH
Value
Function
1
0-255
PAN 0-540º
2
0-255
Tilt 0-220º
3
0-255
Dimmer 0-100%
4
0-255
Strobe in the line (from slow to fast)
0-9
White
10-19
Color1
20-29
Color2
110-119
Color11
120-129
Color12
130-139
Color13
140-149
Color14
0-9
White
10-19
Gobo1
20-29
Gobo2
30-39
Gobo3
6
40-49
Gobo4
50-59
Gobo5
60-69
Gobo6
70-79
Gobo7
80-89
Gobo7 shake
90-99
Gobo6 shake
100-109
Gobo5 shake
110-119
Gobo4 shake
120-129
Gobo3 shake
130-139
Gobo2 shake
140-149
Gobo1 shake
150-255
Gobo Auto (From slow to fast)
0-30
No function
31-60
Auto1 Speed (from slow to fast)
Este important sa nu obstructionati ventilatorul sau orificiile de ventilatie. La selectarea locatiei de instalare, luați in
considerare accesul la inlocuirea becului si efectuarea intreținerii de rutina.
Trebuie sa utilizati intotdeauna cabluri de siguranta.
Nu montati in locuri unde dispozitivul de fixare va fi expus la ploaie,
umezeala, schimbari extreme de temperatura sau de ventilație
limitata.
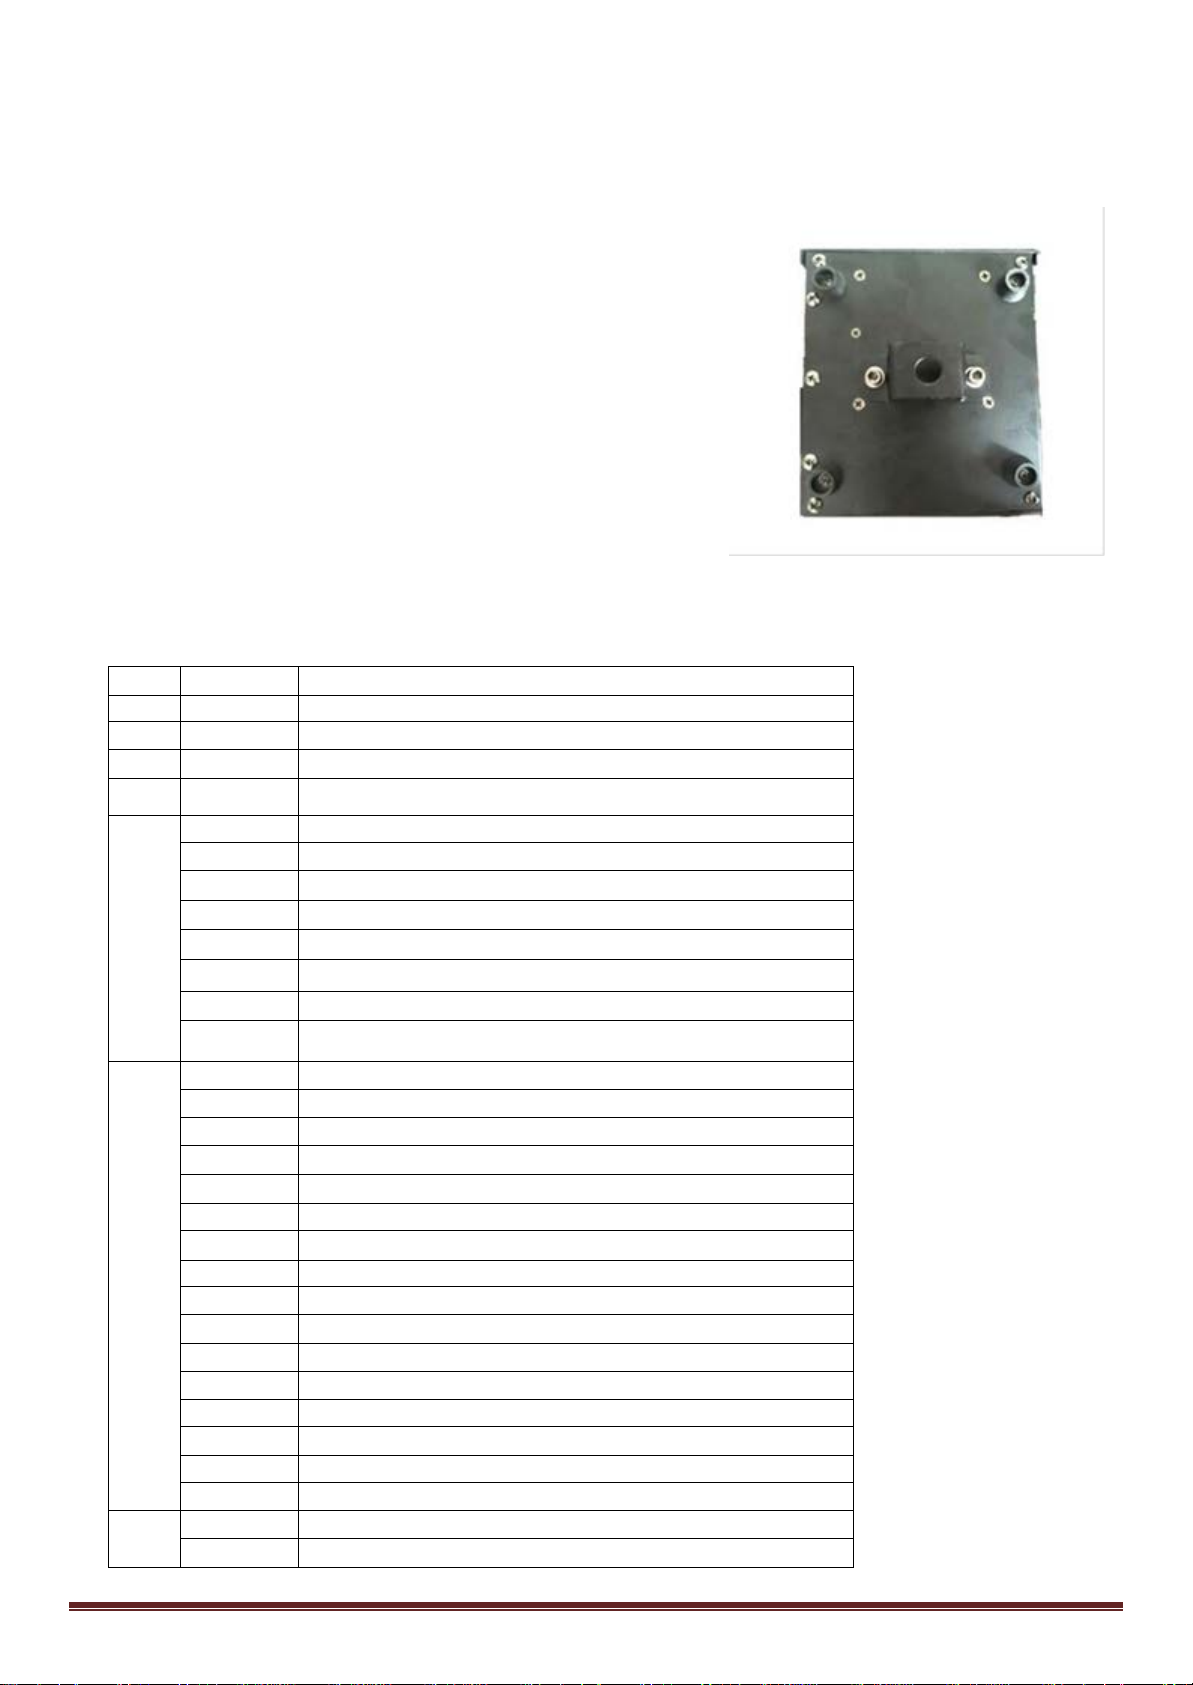
Dispozitivul are o montare de siguranta unica care include partea de
jos a aparatului, un support “omega” si un cablu de siguranta ( vezi
figura din dreapta). La montarea pe grinda, asigurați-vă că utilizati o
clemă corespunzătoare cu suportul tip omega inclus folosind un șurub
M10 montat prin gaura centrală a consolei omega. Ca o măsură de
siguranță, atașati cel puțin un cablu de siguranță la dispozitivul de
fixare, folosind unul dintre punctele de suspendare pentru cablul de
siguranță integrat în ansamblul de bază.
Tabel Canale DMX
7CH
5
150-255 Color Auto (From slow to fast)
7
©Copyright LOTRONIC 2017 PARTY-SPOT7 Page 23
Page 24
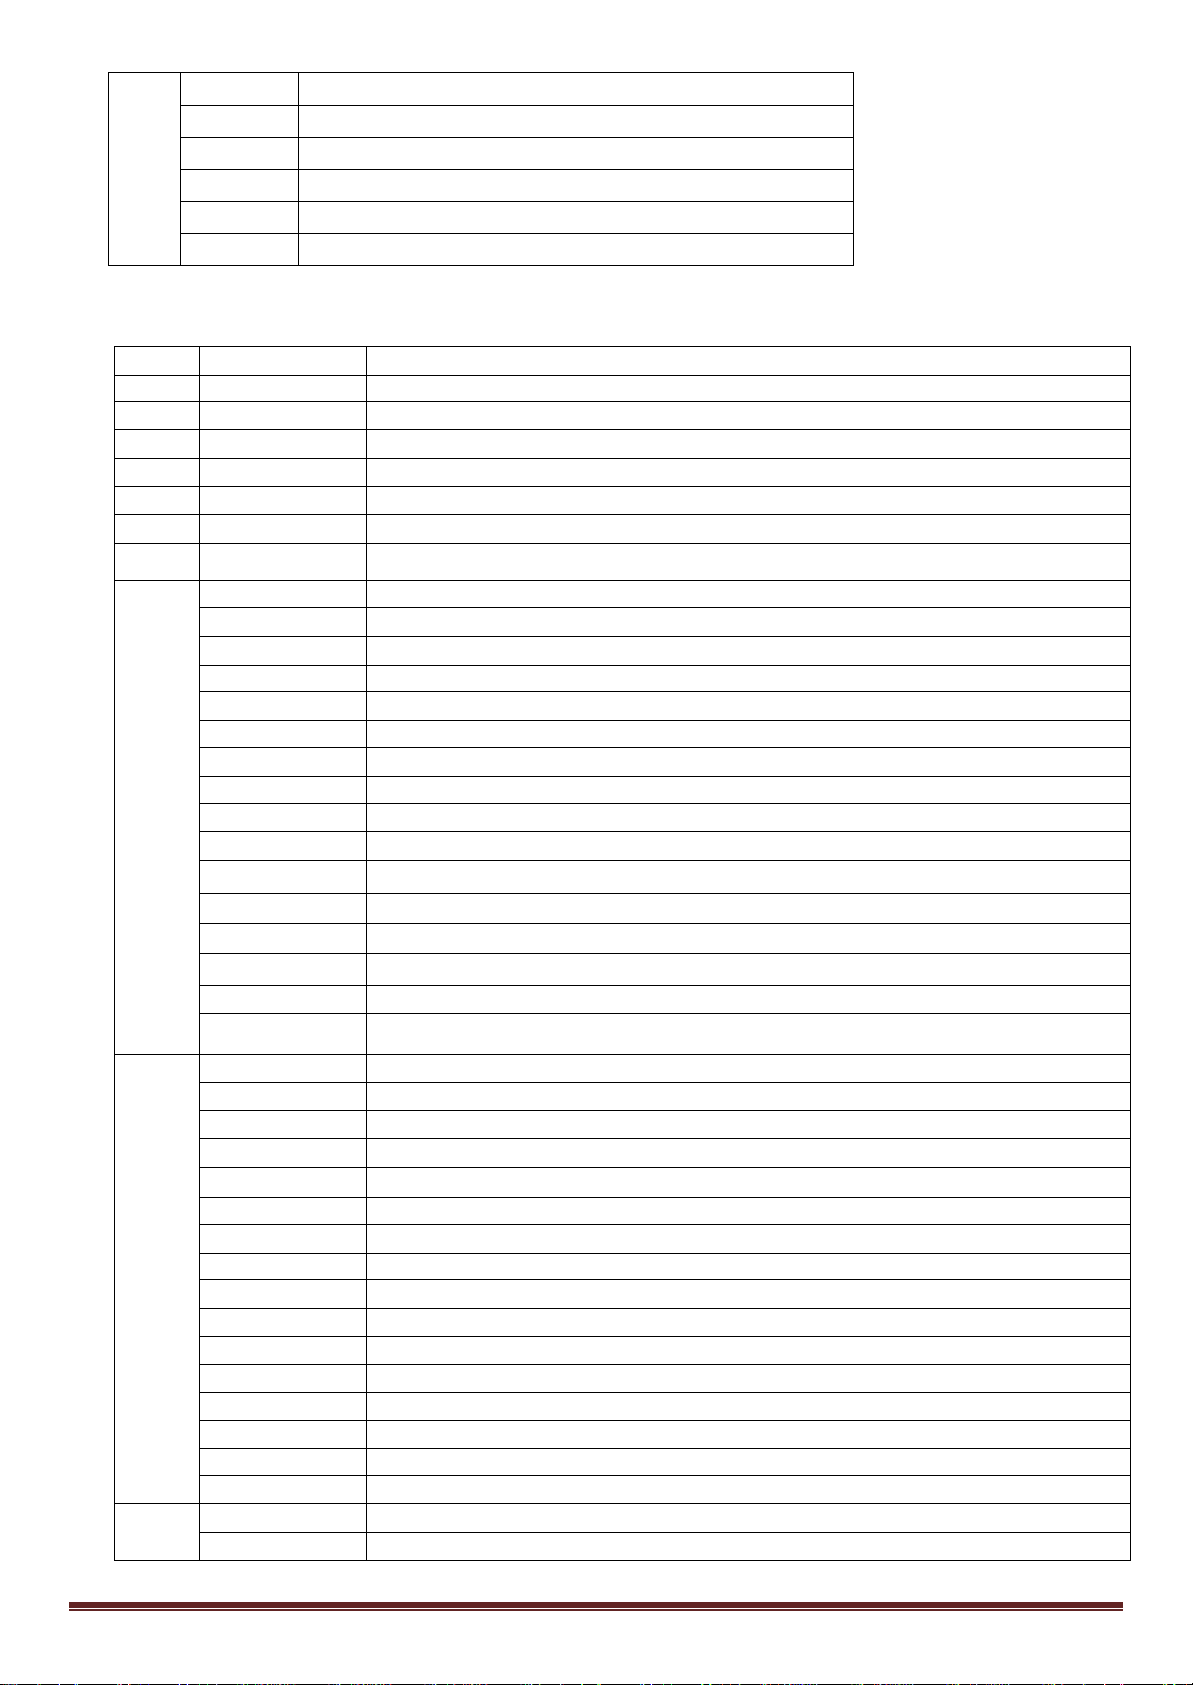
61-90
Auto2 Speed (from slow to fast)
91-120
Auto3 Speed (from slow to fast)
121-150
Auto4 Speed (from slow to fast)
151-180
Sound1 Sensitivity (from low to high)
181-210
Sound2 Sensitivity (from low to high)
211-255
Keep 5 seconds ,the system reset
CH
Value
Function
1
0-255
PAN 0-540º
2
0-255
PAN 16 bit
3
0-255
Tilt 0-220º
4
0-255
Tilt 16 bit
5
0-255
Pan &Tilt Speed (from fast to slow)
6
0-255
Dimmer 0-100%
7
0-255
Strobe in the line (from slow to fast)
0-9
White
10-19
Color1
20-29
Color2
30-39
Color3
40-49
Color4
50-59
Color5
60-69
Color6
70-79
Color7
80-89
Color8
90-99
Color9
100-109
Color10
110-119
Color11
120-129
Color12
130-139
Color13
140-149
Color14
0-9
White
10-19
Gobo1
20-29
Gobo2
30-39
Gobo3
9
40-49
Gobo4
50-59
Gobo5
60-69
Gobo6
70-79
Gobo7
80-89
Gobo7 shake
90-99
Gobo6 shake
100-109
Gobo5 shake
110-119
Gobo4 shake
120-129
Gobo3 shake
130-139
Gobo2 shake
140-149
Gobo1 shake
150-255
Gobo Auto (From slow to fast)
0-30
No function
31-60
Auto1 Speed (from slow to fast)
10CH
8
10
150-255 Color Auto (From slow to fast)
©Copyright LOTRONIC 2017 PARTY-SPOT7 Page 24
Page 25
61-90
Auto2 Speed (from slow to fast)
91-120
Auto3 Speed (from slow to fast)
121-150
Auto4 Speed (from slow to fast)
151-180
Sound1 Sensitivity (from low to high)
181-210
Sound2 Sensitivity (from low to high)
211-255
Keep 5 seconds,the system reset
4 : FUNCTII MENIU
ADDR 1-512
CHAN 10CH/7CH
AUTO AUT1
AUT2 SPED 0-255
…
AUT4
SOUN SUN1 SENS 0-255
SUN2
PAN YES/NO
TILT YES/NO
DEFA YES/NO
RST YES
Specificatii
Alimentare: ....................................................................................................... 100-240VAC, 50/60Hz
Consum: .................................................................................................................................................................. 25 W
Sursa de lumina: ................................................................................ Alb 10W Led-uri de putere mare
Canale DMX .............................................................................................................. 7/10 canale
Programe incorporate ............................................................................................................... 8
Miscare Pan / Tilt: ................................................................................. axa X: 540°, axa Y: 190°
Conector intrare ...................................................................................................XLR tata 3 pini
Conector iesire ............................................................................... Conector DMX mama 3 pini
Configuratie pini ...................................................................... Pin1=masa, pin 2 = (-), pin 3 = (+)
Dimensiuni .................................................................................................. 155 x 145 x 240 mm
Greutate neta: ................................................................................................................ 2,88 kg
©Copyright LOTRONIC 2017 PARTY-SPOT7 Page 25
Page 26

SLO
1. PREDEN ZAČNETE
Vsebina škatle:
• 1 x PARTY-SPOT7
• 1x Navodila za uporabo
• 1x XLR kabel
• 1x omega nosilec
Navodila za razpakiranje
Takoj po prejemu paketa, pazljivo razpakirajte škatlo, preverite vsebino, da seprepričate, da je vsebina kompletna in
da je naprava v dobrem stanju.V primeru če ugotovite poškodbena škatli, ali pomanjkljivosti glede vsebine
škatle,takoj obvestite dostavitelja. Hranite škatlo za primer da se naprava mora vrniti proizvajalcu, pomembno je da
se vrne v originalni embalaži.
Varnostna navodila
Prosimo, da skrbno preberete ta navodila, ki vsebujejo pomembne informacije o namestitvi, uporabi in vzdrževanju
tega izdelka.
• Prosimo, hranite navodila za nadaljnjo uporabo. Če prodajate napravo drugemu uporabniku, se prepričajte, da
prejme tudi navodila za uporabo.
• Pred prvo uporabo se prepričajte, da napetost in frekvenca oskrbe z električno energijo ustrezajo porabi energije
enote.
• Naprava je samo za notranjo uporabo v suhem prostoru.
• Da bi preprečili nevarnost požara ali električnega udara, ne izpostavljajte naprave dežju ali vlagi. Prepričajte se,
da ni nobenih vnetljivih snovi v bližini enote, medtem ko deluje.
• Naprava mora biti postavljena v prostor z ustreznim prezračevanjem, vsaj 50 cm od sosednjih površin.
Prepričajte se da niso blokirani zračniki.
• Vedno izključite iz električnega omrežja pred servisiranjem ali zamenjavo varovalke in se prepričajte, da
nadomestite z varovalko enake velikosti in tip.
• Zaradi varnosti napravepritrdite z varnostno vrvjo. Nikoli ne nosite naprave samo glavo. Uporabite ročaje
• Maksimalna temperatura (Ta) je 104 ° F (40 ° C). Ne uporabljajte naprave pri temperaturah, višjih od tega.
• V primeru resnega problema delovanja, prenehajte z uporabo naprave takoj. Nikoli ne poskušajte popravljati
sami. Popravila, ki jih izvajajo nekvalificiranih ljudi, lahko povzroči poškodbe ali okvare. Prosimo, da se
obrnite na najbližji pooblaščeni tehnični center za pomoč. Vedno uporabite isto vrsto rezervnih delov.
• Ne priključite napravo na ojačevalec za luči (dimmer pack).
• Prepričajte se, da je napajalni kabel nikoli zavihnjen ali poškodovan.
• Pri izklopu napajalnega kabla nikoli ne vlecite za kabel, ampak za vtikač.
• Izogibajte se neposrednemu izpostavljanju oči svetlobnega vira, medtem ko je vklopljen.
2. NASTAVITEV
Odklopite napajalni kabel, preden zamenjate varovalko in vedno zamenjajte z varovalko istega tipa.
Signalni kabli
Če želite povezati naprave skupaj morate uporabljati podatkovne kable. Če se odločite, da naredite svoj kabel,
uporabite kakovostne kable, ki lahko opravljajo visoko kakovost signala in so manj nagnjeni k elektromagnetnim
motnjam.
©Copyright LOTRONIC 2017 PARTY-SPOT7 Page 26
Page 27
PRIKLJUČKI
INPUT
COMMON
DMX +
DMX-
Resistance 120 ohm
fixture.
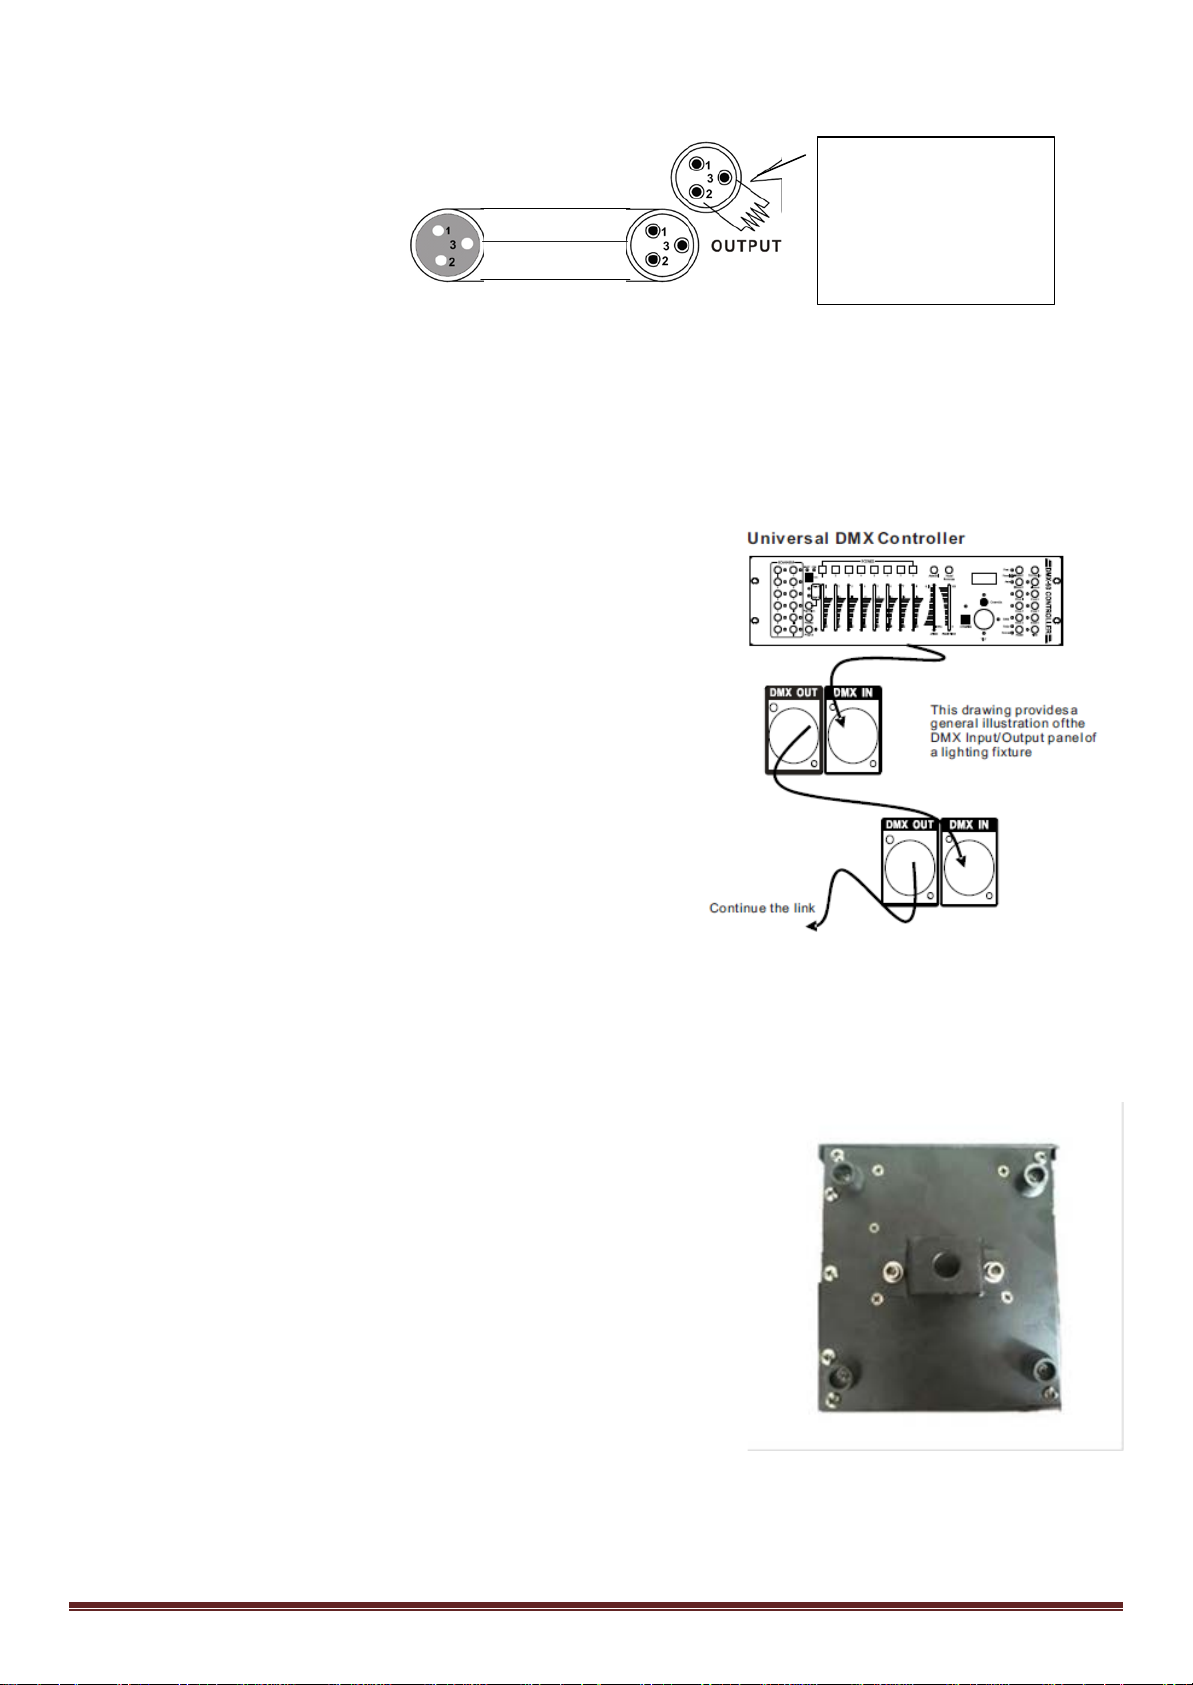
Kabli morajo imeti XLR vtikač (moški) na enem koncu in XLR vtičnico (ženski) na drugem koncu.
DMX konektor konfiguracija
1/ 4w between pin 2
(DMX-) and pin 3
(DMX+) of the last
Terminator zmanjšuje napako signala. Da bi se izognili težavam prenosa signala in motnje, je vedno priporočljivo, da
se poveže DMX terminator signala.
PREVIDNO
Skupna ozemljitev lahko povzroči zanke in vaša naprava lahko dela napačno.Kable preizkušajte z ohm metrom ali
preizkuševalcem za kable, za preverjanje polaritete in se prepričajte da ni kratkega stika med polovima.
Nastavitev DMX povezave
1. Povežite 3 pol vtikač DMX kabla DMX na izhod vtičnice 3 pol DMX
priključka krmilnika.
2. Povežite konec kabla, ki prihaja iz krmilnika, (ženski) 3 pol vtičnica
na vhodni priključek naslednje naprave (moški) 3 pol vtikač.
3. Nato nadaljujte s povezavo iz naprave, kot je navedeno zgoraj,
vhod naslednje naprave in tako naprej
MONTAŽA
Usmeritev
Ta naprava se lahko namesti v vsakem položaju pod pogojem, da je
dovolj prostora za prezračevanje.
Pomembno je, da nikoli ne ovirajte ventilatorja ali zračnika. Pri izbiri
lokacije namestitve, upoštevajte tudi žarnico.
Dostop za zamenjavo in redno vzdrževanje.
Obvezna je uporaba varnostne vrvi.
Nikoli ne namestite na mestih, kjer bo naprava izpostavljene dežju, visoki
vlagi, ekstremnim temperaturnim spremembam ali omejenem prezračevanju.
NAMESTITEV
LED Moving head zagotavlja edinstveno montažno konzolo, vključujoč
"omega nosilec" in varnostno vrv v eni enoti. Pri montaži enote na Alu
konstrukcijo, se prepričajte, da uporabite ustrezno sponko z vključeno
omega nosilcem uporabite M10 vijak opremljen s sredinsko luknjo za
"omega nosilec". Kot dodaten varnostni ukrep, uporabite saj eno
varnostno vrv na enoto.
Pri izbiri lokacije namestitve, potrebno upoštevati tudi dostop zaradi
rednega vzdrževanja.
Vedno je treba uporabljati varnostno vrv. Nikoli ne nameščajte na
mestih, kjer bo enota izpostavljena dežju, vlagi, ekstremnih
temperaturnih spremembam ali pa je omejeno prezračevanje.
©Copyright LOTRONIC 2017 PARTY-SPOT7 Page 27
Page 28
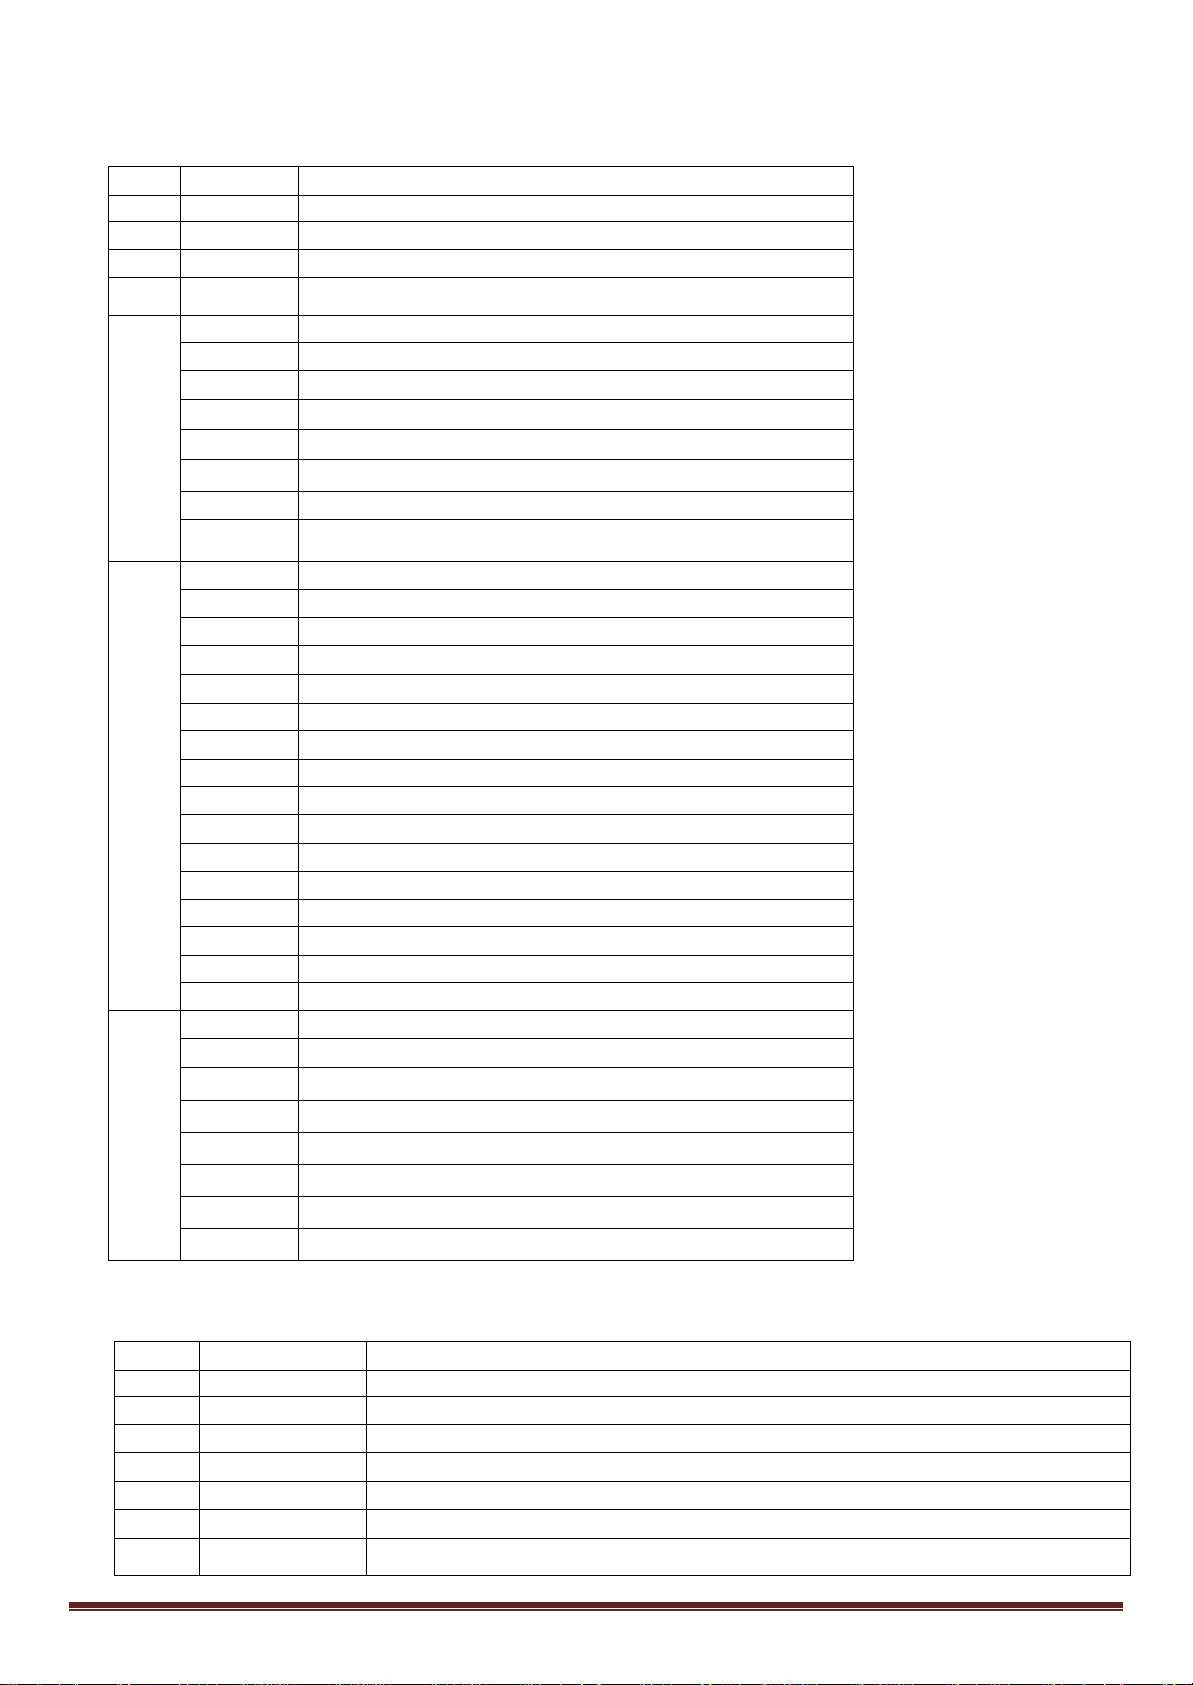
DMX Protokol
CH
Value
Function
1
0-255
PAN 0-540º
2
0-255
Tilt 0-220º
3
0-255
Dimmer 0-100%
4
0-255
Strobe in the line (from slow to fast)
0-9
White
10-19
Color1
20-29
Color2
110-119
Color11
120-129
Color12
130-139
Color13
140-149
Color14
0-9
White
10-19
Gobo1
20-29
Gobo2
30-39
Gobo3
6
40-49
Gobo4
50-59
Gobo5
60-69
Gobo6
70-79
Gobo7
80-89
Gobo7 shake
90-99
Gobo6 shake
100-109
Gobo5 shake
110-119
Gobo4 shake
120-129
Gobo3 shake
130-139
Gobo2 shake
140-149
Gobo1 shake
150-255
Gobo Auto (From slow to fast)
0-30
No function
31-60
Auto1 Speed (from slow to fast)
61-90
Auto2 Speed (from slow to fast)
91-120
Auto3 Speed (from slow to fast)
121-150
Auto4 Speed (from slow to fast)
151-180
Sound1 Sensitivity (from low to high)
181-210
Sound2 Sensitivity (from low to high)
211-255
Keep 5 seconds ,the system reset
CH
Value
Function
1
0-255
PAN 0-540º
2
0-255
PAN 16 bit
3
0-255
Tilt 0-220º
4
0-255
Tilt 16 bit
5
0-255
Pan &Tilt Speed (from fast to slow)
6
0-255
Dimmer 0-100%
7
0-255
Strobe in the line (from slow to fast)
7CH
5
150-255 Color Auto (From slow to fast)
7
10CH
©Copyright LOTRONIC 2017 PARTY-SPOT7 Page 28
Page 29
8
0-9
White
10-19
Color1
20-29
Color2
30-39
Color3
40-49
Color4
50-59
Color5
60-69
Color6
70-79
Color7
80-89
Color8
90-99
Color9
100-109
Color10
110-119
Color11
120-129
Color12
130-139
Color13
140-149
Color14
0-9
White
10-19
Gobo1
20-29
Gobo2
30-39
Gobo3
9
40-49
Gobo4
50-59
Gobo5
60-69
Gobo6
70-79
Gobo7
80-89
Gobo7 shake
90-99
Gobo6 shake
100-109
Gobo5 shake
110-119
Gobo4 shake
120-129
Gobo3 shake
130-139
Gobo2 shake
140-149
Gobo1 shake
150-255
Gobo Auto (From slow to fast)
0-30
No function
31-60
Auto1 Speed (from slow to fast)
61-90
Auto2 Speed (from slow to fast)
91-120
Auto3 Speed (from slow to fast)
121-150
Auto4 Speed (from slow to fast)
151-180
Sound1 Sensitivity (from low to high)
181-210
Sound2 Sensitivity (from low to high)
211-255
Keep 5 seconds,the system reset
150-255 Color Auto (From slow to fast)
10
4 :FUNKCIJE MENIJA
ADDR 1-512
CHAN 10CH/7CH
AUTO AUT1
AUT2 SPED 0-255
…
©Copyright LOTRONIC 2017 PARTY-SPOT7 Page 29
Page 30
AUT4
NL
SOUN SUN1 SENS 0-255
SUN2
PAN YES/NO
TILT YES/NO
DEFA YES/NO
RST YES
Tehnični podatki
Napajanje: ............................................................................................ 100-240V AC, 50/60Hz~
Poraba: ................................................................................................................................ 25W
Vir svetlobe: ............................................................................. 10W beli LED, visoke svetilnosti
DMX kanali .............................................................................................................. 7/10 kanalov
Vgrajeni programi ...................................................................................................................... 8
PAN / TILT: ................................................................................................. X os: 540°, Y os: 190°
Vhod ............................................................................................................................. 3-pin XLR
Izhod ............................................................................................................................. 3-pin XLR
Konfiguracija pinov...................................................................... Pin1 zemlja, pin 2 (-), pin 3 (+)
Dimenzije..................................................................................................... 155 x 145 x 240 mm
Neto teža : ........................................................................................................................ 2,88 kg
1. ALVORENS U BEGINT
Verpakkingsinhoud:
• 1 x PARTY-SPOT7
• 1x Handleiding
• 1x XLR kabel
• 1x omega clamp
Uitpakken
Onmiddellijk naar de aankoop van het toestel, verwijder voorzichtig de verpakking en wees zeker dat het toestel in
geode toestand is. Breng direct uw dealer op de hoogte en bewaar het verpakkingsmateriaal indien onderdelen of
het karton door het transport beschadigd zijn. Bewaar het karton en alle verpakkingsmaterialen. Indien het toestel
moet gerepareerd worden is het belangrijk het toestel in zijn originele verpakking te versturen.
Veiligheidsinstructies
Lees de handleiding aandachtig door. Ze bevat belangrijke informaties voor de installatie, gebruik en onderhoud van
dit toestel.
• Bewaar deze handleiding.
• Wees zeker dat u het toestel op de juiste spanning aansluit en dat de lichtnetspanning niet hoger dan de op de
zijde van het toestel aangegeven spanning is.
• Alleen voor gebruik binnenshuis!
• Om vuur en elektrische schokken te verhinderen bescherm het toestel tegen regen en vochtigheid. Wees zeker dat
©Copyright LOTRONIC 2017 PARTY-SPOT7 Page 30
Page 31
geen ontvlambare materialen in de buurt van het toestel zijn tijdens de werking.
INGANG
COMMON
DMX +
DMX-
120 ohm 1/ 4W
unit.
• Plaats het toestel in een ruimte met voldoende ventilatie en in tenminste 50cm afstand van oppervlakken. Wees
zeker dat de ventilatie openingen niet geblokkeerd zijn.
• Verwijder het stopcontact alvorens u het toestel onderhoud of de zekering vervangt. Gebruik alleen een zekering
met dezelfde specificaties.
• Gebruik het toestel niet in ruimtes met een temperatuur van meer dan 40°C.
• In geval van een ernstig probleem stop het toestel direct. Verzoek nooit het toestel zelfs te repareren. Alle
reparaties moeten van een ervarene technicus doorgevoerd worden. Gebruik alleen onderdelen met dezelfde
specificaties.
• Sluit het toestel niet op een dimmer pack aan.
• Nooit het netsnoer beschadigen of platdrukken.
• Nooit aan de kabel trekken.
• Nooit in de lichtbron kijken.
2. INSTALLATIE
Trek de voedingskabel uit het stopcontact alvorens U de zekering vervangt. Gebruik alleen een zekering met
dezelfde specificaties
Data aansluiting
Gebruik data kabels om toestellen met elkaar te verbinden. Indien U uw eigen kabel bouwen wilt gebruik
hoogwaardige kabels die het signaal goed overdragen en niet gevoelig zijn voor elektromagnetische interferenties.
KABELCONNECTOREN
De kabel moet een XLR stekker op één eind en een XLR contra op het andere eind hebben.
DMX connector configuratie
weerstand tussen pin
2 (DMX-) en pin 3
(DMX+) van de laatste
De eindweerstand vermindert signaalfouten. Om transmissie problemen en storingen te voorkomen is het
aanbevolen een DMX signaal eindweerstand aan te sluiten.
LET OP
Geen contact maken tussen common en chassis massa. Indien de common op de massa aangesloten is kan een
aardlus ontstaan en het toestel werkt willekeurig. Controleer de kabels d.m.v. een ohmmeter om de polariteit te
controleren en te waarborgen dat de pins niet op aarde aangesloten of
met elkaar kortgesloten zijn.
Installatie van een DMX seriële data link
1. Sluit het 3-pin stekkereind van de DMX kabel op de uitgang (3-pin
contra) van de controller.
2. Sluit het contra eind van de kabel dat van de controller komt op de
ingang (3-pin stekker) van het naaste toestel aan.
3. Sluit de uitgang van het naaste toestel op de ingang van het
volgende toestel aan enz.
©Copyright LOTRONIC 2017 PARTY-SPOT7 Page 31
Page 32
Installatie
CH
Value
Function
1
0-255
PAN 0-540º
2
0-255
Tilt 0-220º
3
0-255
Dimmer 0-100%
4
0-255
Strobe in the line (from slow to fast)
0-9
White
10-19
Color1
20-29
Color2
110-119
Color11
120-129
Color12
130-139
Color13
140-149
Color14
0-9
White
10-19
Gobo1
20-29
Gobo2
30-39
Gobo3
6
40-49
Gobo4
50-59
Gobo5
60-69
Gobo6
70-79
Gobo7
80-89
Gobo7 shake
90-99
Gobo6 shake
100-109
Gobo5 shake
110-119
Gobo4 shake
120-129
Gobo3 shake
130-139
Gobo2 shake
UITRICHTING
De unit kan in iedere positie geïnstalleert worden mits voor voldoende koeling gezorgt is.
Het is belangrijjk nooit de ventilator of de koelingsopeningen te verstoppen. Bij de keuze van d’installatie plaats denk
eraan dat de plaats gemakkelijk bereikbaar is voor onderhouds en reinigingsdoeleinden.
Gebruik altijd veiligheidskabels.
Bescherm het toestel tegen regern, vochtigheid en extreme temperatuurveranderingen. Kies een plaats met
voldoende ventilatie.
RIGGING
De LED moving head bezit een uniek bevestigingssysteem op de
onderzijde. Het is een omega houder met bevestigingspunten voor
een veiligheidskabel in ééns (zie afbeelding rechts). Als u het toestel
op een truss systeem monteert, gebruik een geschikte klem voor de
omega houder en bevestig de klem d.m.v. een M10 moer in de
centergat van de omega houder. Voor een betere veiligheid, bevestig
tenminste één geschikte staalkabel op één van de bevestigingspunten
op de onderzijde van het toestel.
DMX Kanaal tabel
7CH
5
150-255 Color Auto (From slow to fast)
©Copyright LOTRONIC 2017 PARTY-SPOT7 Page 32
Page 33
140-149
Gobo1 shake
150-255
Gobo Auto (From slow to fast)
7
0-30
No function
31-60
Auto1 Speed (from slow to fast)
61-90
Auto2 Speed (from slow to fast)
91-120
Auto3 Speed (from slow to fast)
121-150
Auto4 Speed (from slow to fast)
151-180
Sound1 Sensitivity (from low to high)
181-210
Sound2 Sensitivity (from low to high)
211-255
Keep 5 seconds ,the system reset
CH
Value
Function
1
0-255
PAN 0-540º
2
0-255
PAN 16 bit
3
0-255
Tilt 0-220º
4
0-255
Tilt 16 bit
5
0-255
Pan &Tilt Speed (from fast to slow)
6
0-255
Dimmer 0-100%
Strobe in the line (from slow to fast)
0-9
White
10-19
Color1
20-29
Color2
30-39
Color3
40-49
Color4
50-59
Color5
60-69
Color6
70-79
Color7
80-89
Color8
90-99
Color9
100-109
Color10
110-119
Color11
120-129
Color12
130-139
Color13
140-149
Color14
0-9
White
10-19
Gobo1
20-29
Gobo2
30-39
Gobo3
9
40-49
Gobo4
50-59
Gobo5
60-69
Gobo6
70-79
Gobo7
80-89
Gobo7 shake
90-99
Gobo6 shake
100-109
Gobo5 shake
110-119
Gobo4 shake
120-129
Gobo3 shake
130-139
Gobo2 shake
10CH
7 0-255
8
150-255 Color Auto (From slow to fast)
©Copyright LOTRONIC 2017 PARTY-SPOT7 Page 33
Page 34
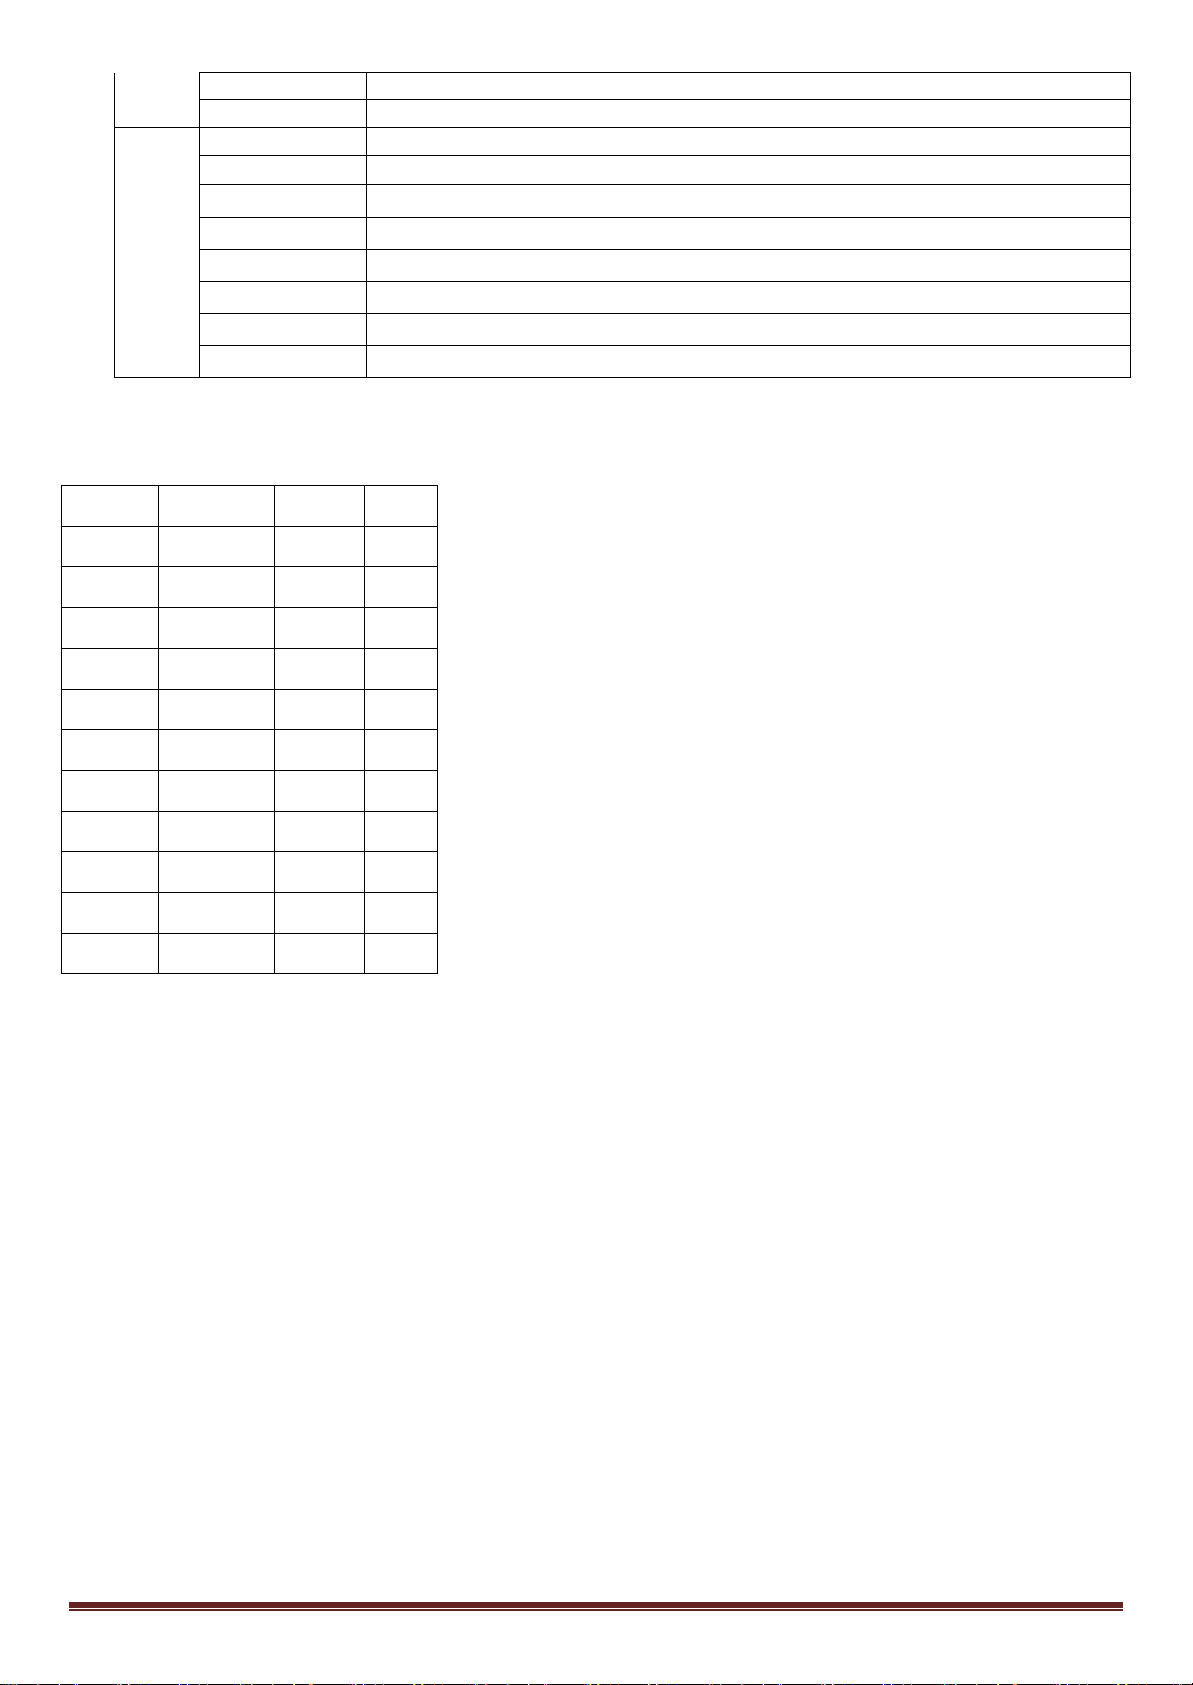
140-149
Gobo1 shake
150-255
Gobo Auto (From slow to fast)
10
0-30
No function
31-60
Auto1 Speed (from slow to fast)
61-90
Auto2 Speed (from slow to fast)
91-120
Auto3 Speed (from slow to fast)
121-150
Auto4 Speed (from slow to fast)
151-180
Sound1 Sensitivity (from low to high)
181-210
Sound2 Sensitivity (from low to high)
211-255
Keep 5 seconds,the system reset
4 :MENU FUNCTIE
ADDR 1-512
CHAN 10CH/7CH
AUTO AUT1
AUT2 SPED 0-255
…
AUT4
SOUN SUN1 SENS 0-255
SUN2
PAN YES/NO
TILT YES/NO
DEFA YES/NO
RST YES
Specificaties
Voeding: ..................................................................................................... 100-240V∼ 50/60Hz
Opgenomen vermogen: ...................................................................................................... 25W
Lichtbron: ......................................................................................... 10W high power witte LED
DMX kanalen .......................................................................................................... 7/10 kanalen
Ingebouwd programma’s ........................................................................................................... 8
Pan / Tilt: ................................................................................................... X as: 540°, Y as: 190°
Data ingang ................................................................................. Locking 3-pin XLR male socket
Data uitgang ........................................................................... Locking 3-pin DMX female socket
Data pin configuratie.................................................................... Pin1 shield, pin 2 (-), pin 3 (+)
Afmetingen .................................................................................................. 155 x 145 x 240 mm
Nettogewicht .................................................................................................................... 2,88kg
©Copyright LOTRONIC 2017 PARTY-SPOT7 Page 34
Page 35

ES
1. PREPARATIVOS
Contenido del embalaje:
• 1 Efecto de iluminación PARTY-SPOT7
• Manual de instrucciones
• Conexión XLR
• Clip Oméga
Desembalaje
A la recepción del equipo, abra el embalaje y compruebe que está todo el contenido y en buenas condiciones.
Conserve el embalaje si presenta golpes, para una posible reclamación al transportista. Conserve el embalaje para
trasladar el equipo con toda seguridad.
Instrucciones de seguridad
Lea atentamente este manual que contiene informaciones importantes de uso y mantenimiento del equipo.
• Conserve este manual para futuras consultas. Si el equipo cambia de propietario, haga llegar este manual al
comprador.
• Asegurese de que la corriente del enchufe corresponde con los requisitos técnicos del equipo indicados en el
mismo.
• Unicamente para su uso en interiores!
• El equipo ha de se4r obligatoriamente conectado a tierra.
• Con el fin de evitar cualquier riesgo de incendio o descarga eléctrica, no exponga el equipo a la lluvia o humedad.
Asegurese que ningún objeto inflamable se encuentra en las proximidades del equipo durante su funcionamiento.
• Instale el equipo en un lugar bien ventilado a una distancia mínima de 50 Cm de cualquier superficie. Asegurese de
qu las rejillas de ventilación, no quedan bloqueadas.
• Desenchufe el equipo de la corriente antes de cualquier manipulación, limpieza o mantenimiento. Cuando cambie
el fusible, hágalo por uno de idénticas características al original.
• Asegure el equipo en un dispositoivo de sujección mediante una cadena, sujeta a un punto diferente del lugar de
fijación del soporte del equipo. NO traslade el equipo cojiendolo por la carcasa, hágalo cojido por el soporte.
• La temperatura ambiente no puede pasar de los 40°C. No hagafuncionar el equipo a temperaturas superiores.
• En caso de mal funcionamieto, desenchufe inmediatamente el equipo y llevelo a un servicio técnico cualificado.
No intente reparar el equipo por usted mismo, puede producir daños al equipo. Exiga siempre que le reparaen el
equipo con piezas originales.
• No enchufe el equipo a un regulador.
• Asegurese que el cable de corriente no está dañado.
• Jamás desenchufe el equipo, tirando del cable.
• No exponga sus ojos a la fuente luminosa.
2. INSTALACION
Desenchufe el cable de corriente antes de cambiar el fúsible y utilice siempre un fusible de identicas
caracteristicas al original.
Cableado
Para conectar equipos juntos, debe de utilizar cables de transmisión de datos. Puede comprar cables DMX
certificados directamente en un revendedor/Distribuidor o bien construir sus propios cables. Si prefiere construir
usted mismo los cables, utilice cable de datos de baja capacidad y de alta calidad que están menos sujetos a
©Copyright LOTRONIC 2017 PARTY-SPOT7 Page 35
Page 36
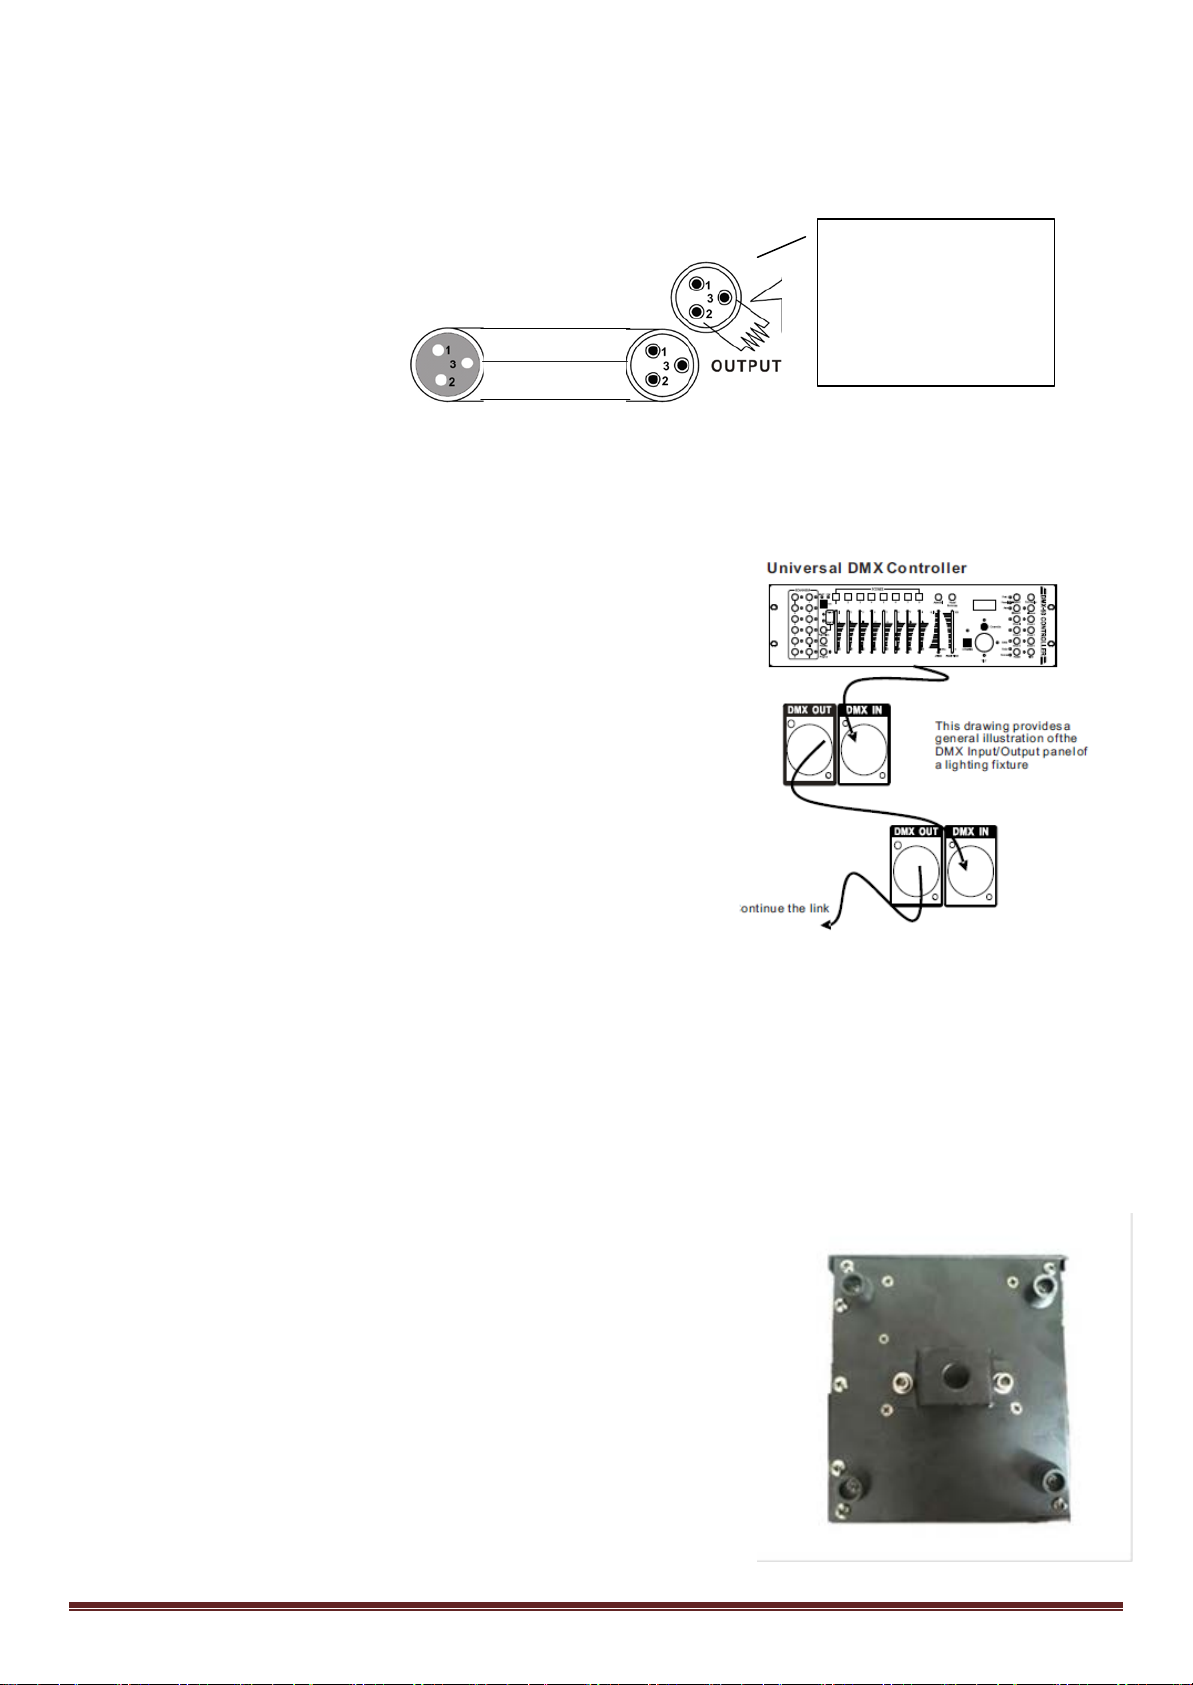
interferencias electromagneticas.
ENTRADA
COMMUN
DMX +
DMX-
Resistencia de 120 Ω
equipo de la cadena
CONECTORES DE CABLE
El cable, debe poseer una clavija XLR macho en uno de los extremos y una clavija XLR hembra en el otro
Configuración de los conectores DMX
1/ 4w entre pin 2
(DMX-) et pin 3
(DMX+) en el último
La resistencia de fin de línea reduce los errores de señal. Para evitar los problemas de transmisión de señal, siempre
es recomendable conectar una resistencia al final de la línea DMX.
ATENCION
No debe de haber ningún contacto entre el comun y la masa de chasis
del equipo, esto puede provocar que su equipo se comporte de una
manera extraña. Asegúrese con un tester que la polaridad de los cables
es la correcta.
Puesta en marcha de una línea de datos DMX en série
1. Conecte el lado macho de 3 pin del cable DMX a salida (Hembra) de 3
pin del controlador.
2. Conecte el otro lado del cable al primer equipo con el conector XLR
Hembra del cable al XLR macho del equipo.
3. Y siga conectando cada salida del equipo a cada entrada del siguiente
equipo de la cadena DMX y así sucesivamente.
Montaje
Puede instalr este equipo en cualquier lugar estable, interior y seco siempre y cuándo haya una ventilación
suficiente. Cuándo seleccione el emplazamiento, tenga en cuenta l facilidad de acdceso al equipo para los trabajos
de limpieza y mantenimiento.
Utilice siempre un cable de seguridad lo suficientemente robusto, anclado a un lugar seguro y rsistente
Jamás instale el equipo en un lugar expuesto la lluvia, húmedad, cambios de temperatura importantes o que
presenten una ventilación limitada.
RIGGING
El equipo viene con un dispositivo de fijación único que se encuentra en la
base del equipo. Esta combinación de la fijación omega incluida y el punto
de fijación del cable de seguridad (ver contras). Cuando instale este
equipo en un travesero, utilice un gancho compatible con la fijación
omega y fíjelo a través del orificio de tornillo M10. Para segurida
suplementaria, asegure el equipo con un cable de seguridad de acero en
uno de los puntos de fijación presentes en la base del equipo y a su vez en
un lugar distinto al de fijación del equipo, lo suficientemente resistente.
©Copyright LOTRONIC 2017 PARTY-SPOT7 Page 36
Page 37
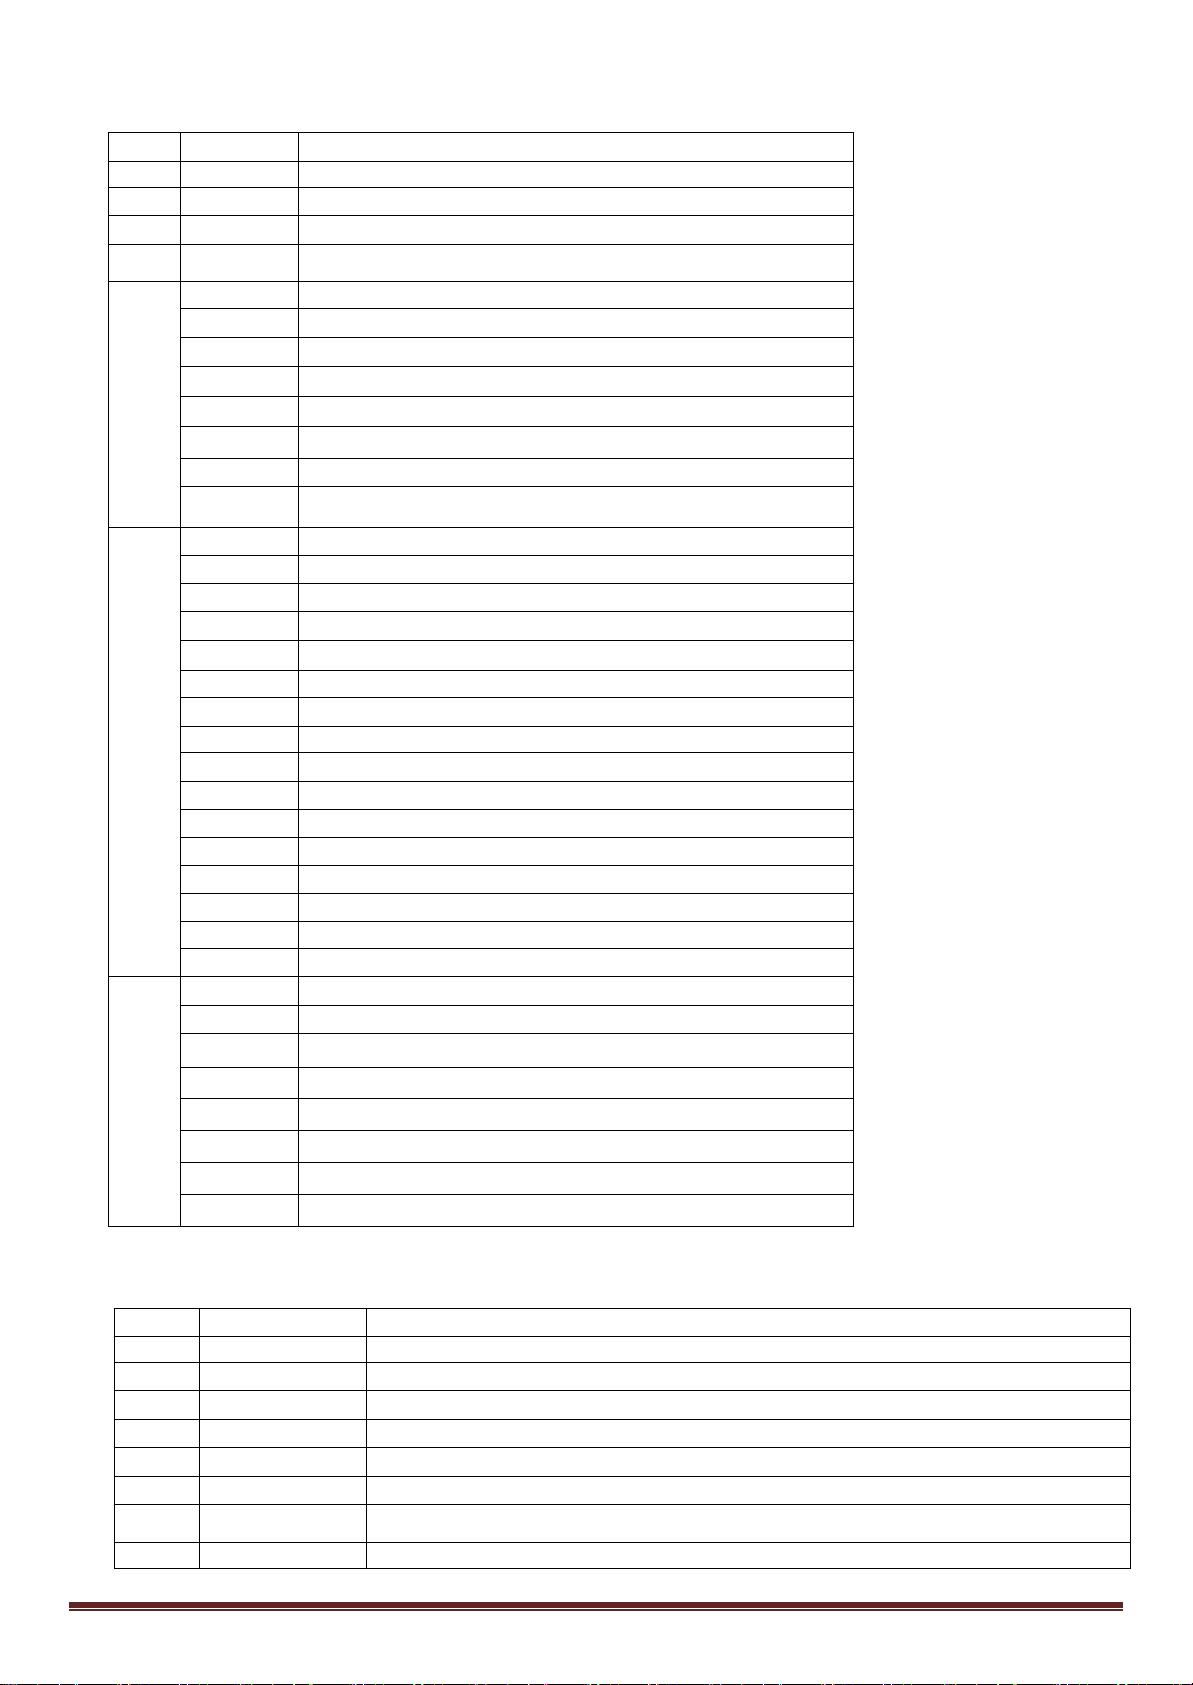
Tabla de canales DMX
CH
Valor
Función
1
0-255
PAN 0-540º
2
0-255
Tilt 0-220º
3
0-255
Dimmer 0-100%
4
0-255
Estrobo lineal(De lento a rápido)
0-9
Blanco
10-19
Color1
20-29
Color2
110-119
Color11
120-129
Color12
130-139
Color13
140-149
Color14
0-9
Blanco
10-19
Gobo1
20-29
Gobo2
30-39
Gobo3
6
40-49
Gobo4
50-59
Gobo5
60-69
Gobo6
70-79
Gobo7
80-89
Gobo7 shake
90-99
Gobo6 shake
100-109
Gobo5 shake
110-119
Gobo4 shake
120-129
Gobo3 shake
130-139
Gobo2 shake
140-149
Gobo1 shake
150-255
Gobo Automático (De lento a rápido)
0-30
Sin función
31-60
Auto1 Velocidad (De lento a rápido)
61-90
Auto2 Velocidad (De lento a rápido)
91-120
Auto3 Velocidad (De lento a rápido)
121-150
Auto4 Velocidad (De lento a rápido)
151-180
Sound1 Sensibilidad (De poca a más)
181-210
Sound2 Sensibilidad (De poca a más)
211-255
Guardar 5 segundos ,El equipo se resetea
CH
Valor
Función
1
0-255
PAN 0-540º
2
0-255
PAN 16 bit
3
0-255
Tilt 0-220º
4
0-255
Tilt 16 bit
5
0-255
Pan &Tilt Velocidad (De lento a rápido)
6
0-255
Dimmer 0-100%
7
0-255
Estrobo lineal(De lento a rápido)
8
0-9
Blanco
7CH
5
150-255 Color Automático (De lento a rápido)
7
10CH
©Copyright LOTRONIC 2017 PARTY-SPOT7 Page 37
Page 38
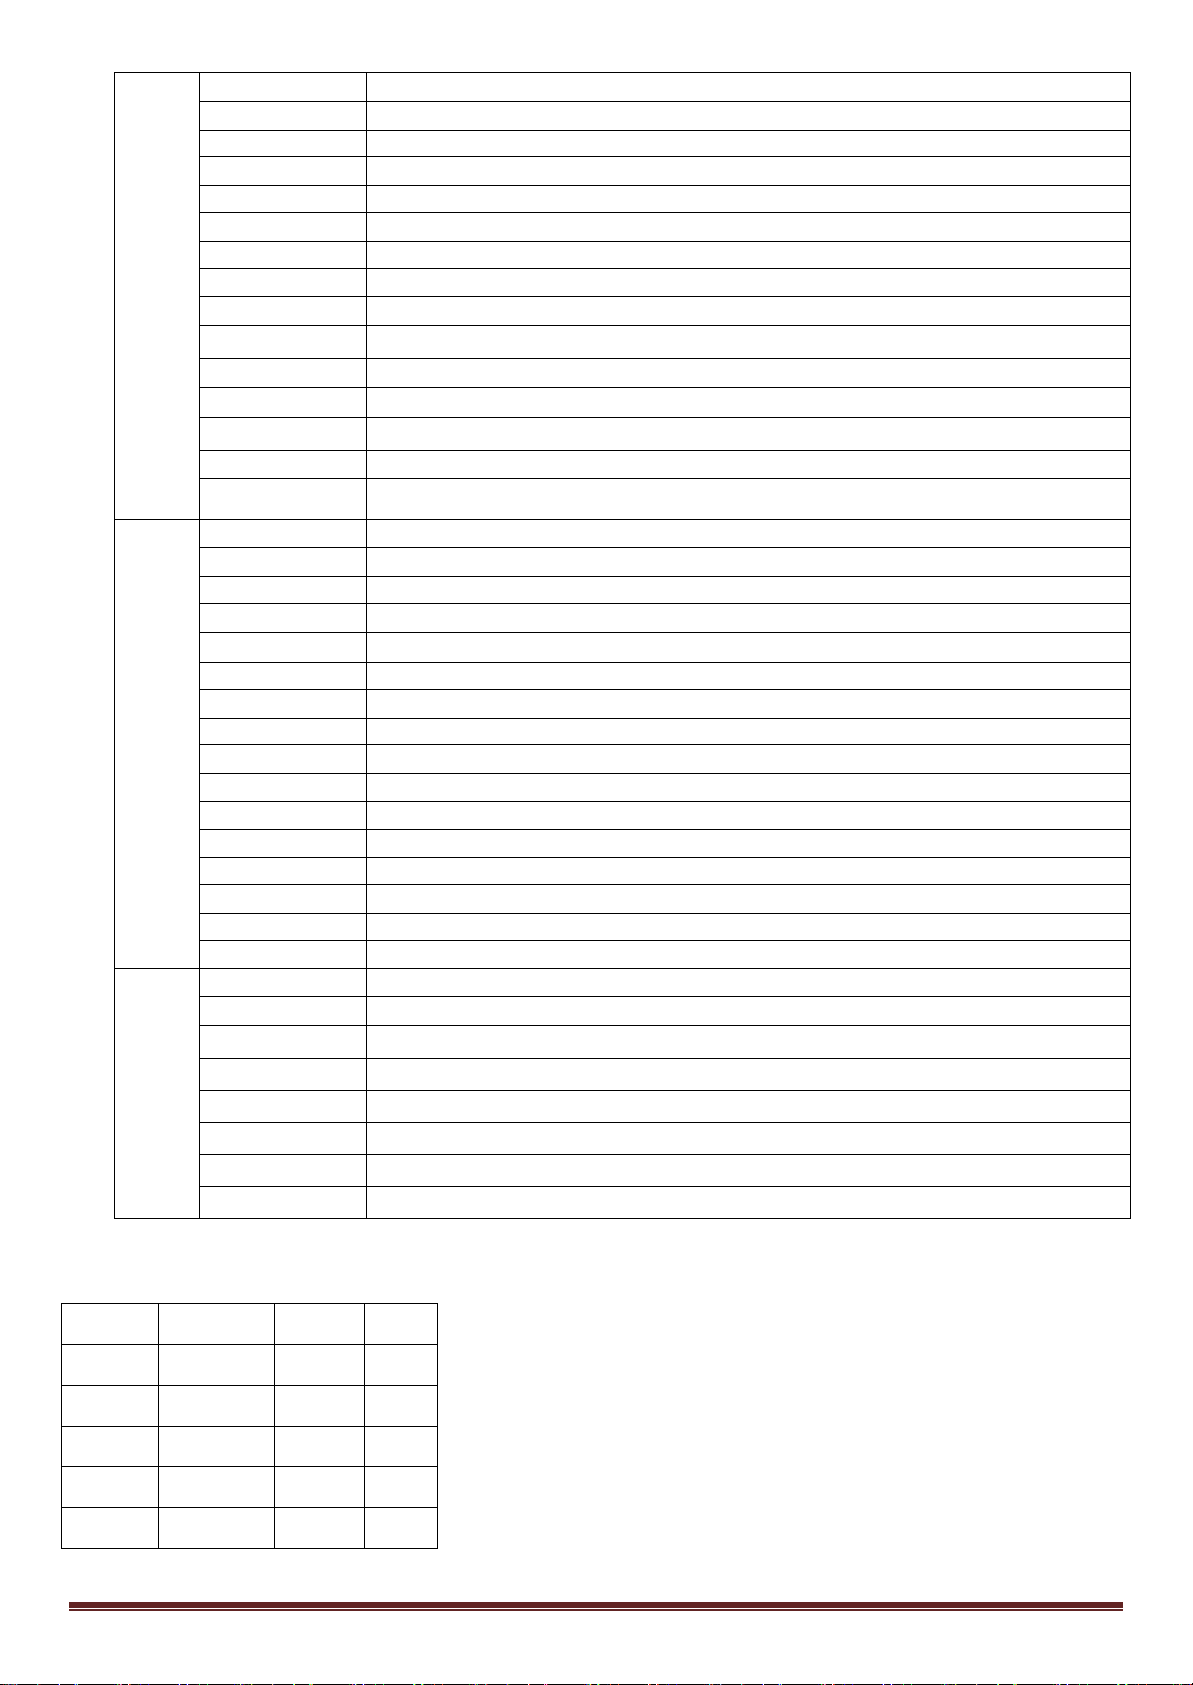
10-19
Color1
20-29
Color2
30-39
Color3
40-49
Color4
50-59
Color5
60-69
Color6
70-79
Color7
80-89
Color8
90-99
Color9
100-109
Color10
110-119
Color11
120-129
Color12
130-139
Color13
140-149
Color14
150-255 Color Automático (De lento a rápido)
0-9
While
10-19
Gobo1
20-29
Gobo2
30-39
Gobo3
9
40-49
Gobo4
50-59
Gobo5
60-69
Gobo6
70-79
Gobo7
80-89
Gobo7 shake
90-99
Gobo6 shake
100-109
Gobo5 shake
110-119
Gobo4 shake
120-129
Gobo3 shake
130-139
Gobo2 shake
140-149
Gobo1 shake
150-255
Gobo Automático (De lento a rápido)
0-30
Sin función
31-60
Auto1 Velocidad (De lento a rápido)
61-90
Auto2 Velocidad (De lento a rápido)
91-120
Auto3 Velocidad (De lento a rápido)
121-150
Auto4 Velocidad (De lento a rápido)
151-180
Sound1 Sensibilidad (De poca a más)
181-210
Sound2 Sensibilidad (De poca a más)
211-255
Guardar 5 segundos ,El equipo se resetea
10
4: MENU FUNCION
ADDR 1-512
CHAN 10CH/7CH
AUTO AUT1
AUT2 SPED 0-255
…
AUT4
©Copyright LOTRONIC 2017 PARTY-SPOT7 Page 38
Page 39

SOUN SUN1 SENS 0-255
SUN2
PAN YES/NO
TILT YES/NO
DEFA YES/NO
RST YES
Caractéristicas tecnicas
Alimentación: ............................................................................................. 100-240V∼ 50/60Hz
Consumo: ................................................................................................................................................................ 25W
Fuente luminosa: ............................................................................... 1 LED Blanco 10W Alta potencia
Canles DMX .......................................................................................................................... 7/10
Programas integrados ................................................................................................................ 8
Pan / Tilt: ................................................................................................................ : 540°, : 190°
Entrada DMX ................................................................................ Fiche XLR mâle à verrouillage
Salida DMX ............................................................................... Fiche XLR femelle à verrouillage
Configuración de los pin XLR ........................................................ Pin 1 Tierra, Pin 2 (-), Pin 3 (+)
Dimensiones ................................................................................................ 155 x 145 x 240 mm
Peso neto: ......................................................................................................................... 2,88kg
Imported from China by
LOTRONIC SA – Avenue Zénobe Gramme 9 – 1480 Saintes - Belgium
©Copyright LOTRONIC 2017 PARTY-SPOT7 Page 39
 Loading...