

Page 1
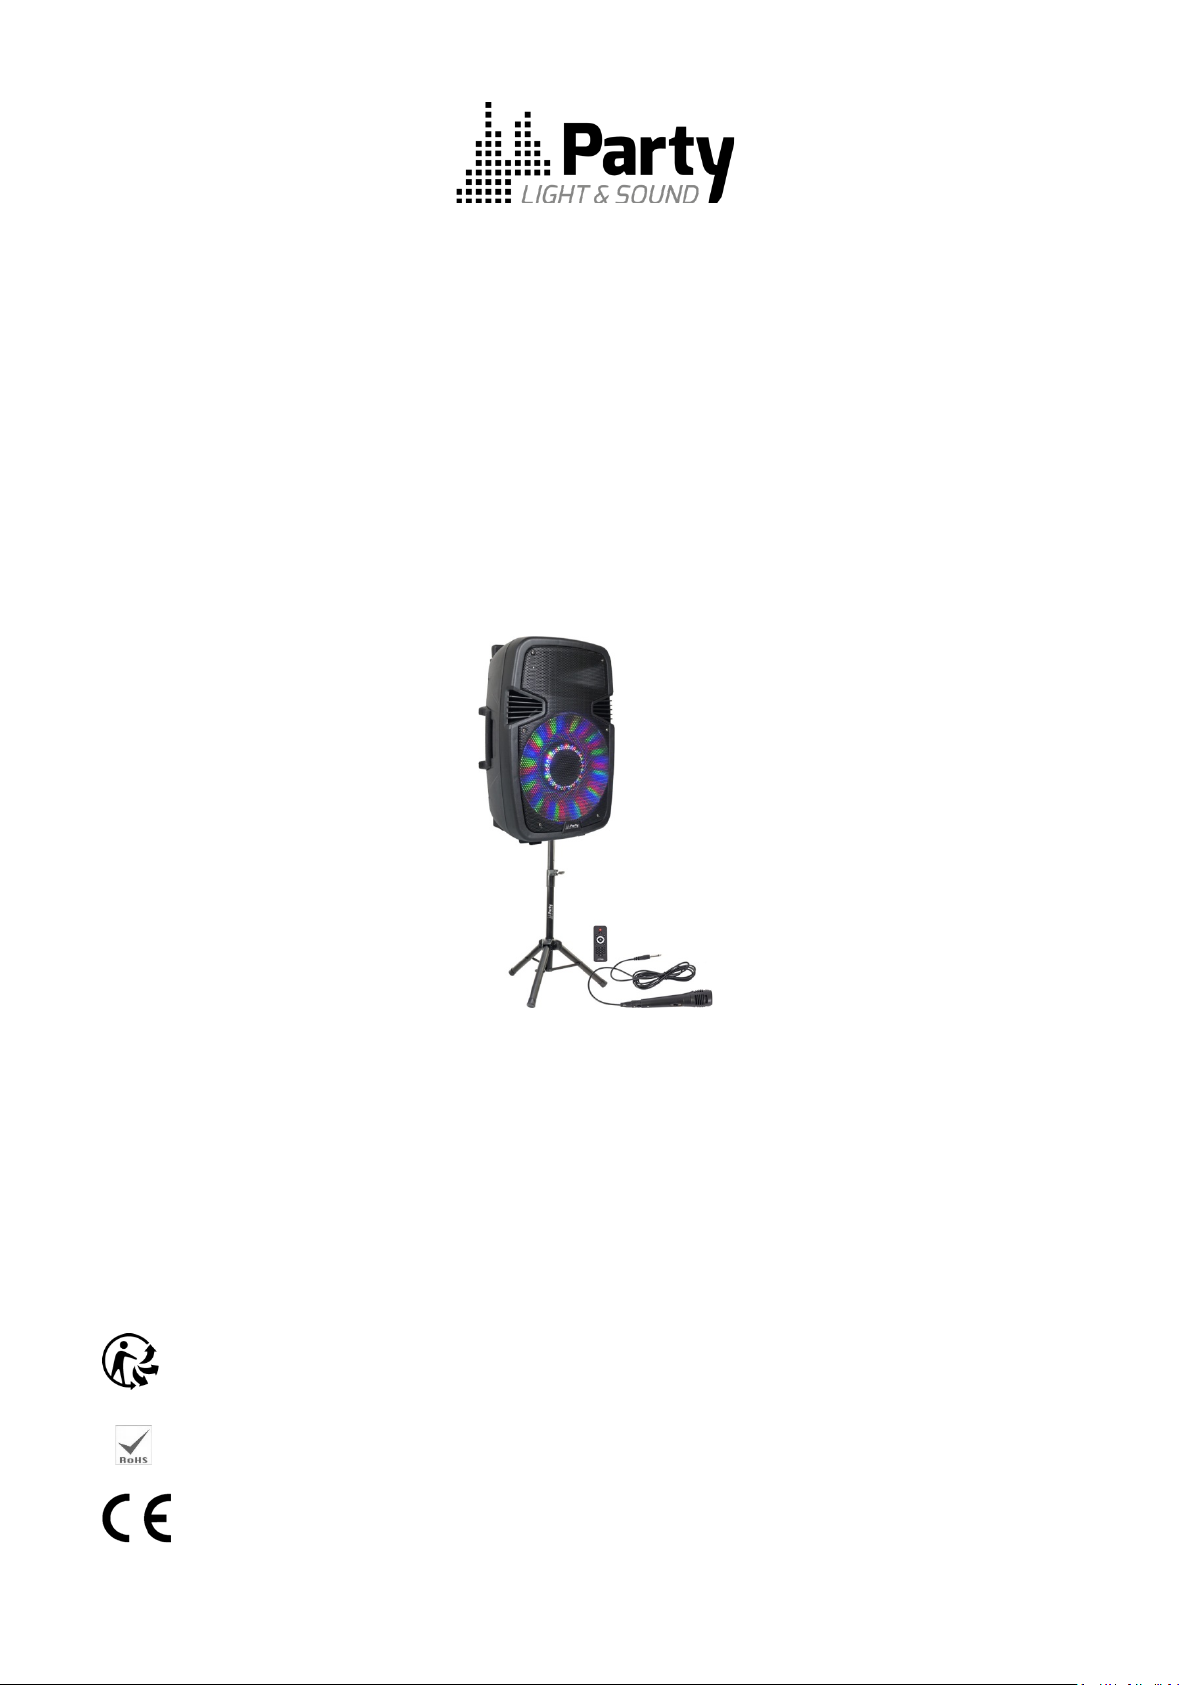
STAND-ALONE ACTIVE SPEAKER WITH BLUETOOTH, USB, SD & LED ILLUMINATION
ENCEINTE ACTIVE AUTONOME AVEC BLUETOOTH, USB, SD & ANIMATION LUMINEUSE
BATTERIEBETRIEBENER AKTIV-LAUTSPRECHER MIT BLUETOOTH, USB, SD & LED LEUCHTFLÄCHE
STAND-ALONE ACTIEFLUIDSPREKER MET BLUETOOTH, USB, SD & LED PANEEL
SAMOSTOJNI AKTIVNI ZVOČNIK Z BLUETOOTH, USB, SD IN LED OSVETLITVIJO
COLUNA AMPLIFICADA AUTÓNOMA COM USB, SD E ILUMINAÇÃO LED
ALTAVOZ ACTIVO AUTONOMO CON BLUETOOTH, USB, SD Y ANIMACION LUMINOSA
Imported from China by LOTRONIC SA – Av. Z. Gramme 9 – B-1480 Saintes
PARTY-15PACK
GB - INSTRUCTION MANUAL
F - MODE D’EMPLOI
D - BEDIENUNGSANLEITUNG
NL – HANDLEIDING
SL – NAVODILA ZA UPORABO
PT - MANUAL DE INSTRUÇÕES
ES – MANUAL DE INSTRUCCIONES
©Copyright LOTRONIC 2017 PARTY-15PACK 1
Page 2
©Copyright LOTRONIC 2017 PARTY-15PACK 2
Page 3

GB
Please read the manual carefully and keep it for future reference.
The lightning flash with arrowhead symbol, within an equilateral Triangle, is intended to alert the user to the
presence of not insulated dangerous voltages within the product’s enclosure that may be of sufficient
magnitude to constitute a risk of electric shock to persons.
The exclamation point within an equilateral triangle is intended to alert the user to the presence of important
operating and maintenance (servicing) instructions in the literature accompanying the appliance.
CAUTION:
1. Do not place any recipients filled with liquids, such as glasses or vases, on top of or directly next to the
appliance. They could fall over, causing water to enter the appliance. Never pour out liquids over the
appliance. Do not place small objects, such as coins or paper clips, on the appliance since they could
fall inside the appliance and cause fire or a shock hazard! If any liquid or objects enter the appliance,
pull immediately the mains plug out of the socket and contact a specialist.
2. Only pull the mains plug out of the socket by the intended gripping surface. Do not pull it by the cable.
3. Never plug the mains plug in or out with damp or wet hands
4. Electrical appliances must be kept out of the reach of children. Be particularly careful if children are
present. Children are not aware of the hazards involved in handing electrical appliances improperly.
Children could attempt to poke objects into the appliance. There is a life-threatening danger of
electrocution.
5. Never place the appliance on an unstable or mobile surface. Persons could be injured or the appliance
damaged by it falling down.
6. AII persons involved in operating, installing and servicing the appliance and putting it into service must be
trained and qualified accordingly and observe these operating instructions.
7. Defective mains cables may only be replaced by specialists. Danger of shock hazard!
8. If you are not sure about the correct connection or if questions arise which are not answered by the
operating instructions, please do not hesitate to contact support or a specialist of your choice. Consult a
specialist if you are in doubt about the operating principle or the safety of the product.
9. Please unplug the adaptor and switch the unit off if you don’t use it for a long time, to avoid damage due
to voltage surges.
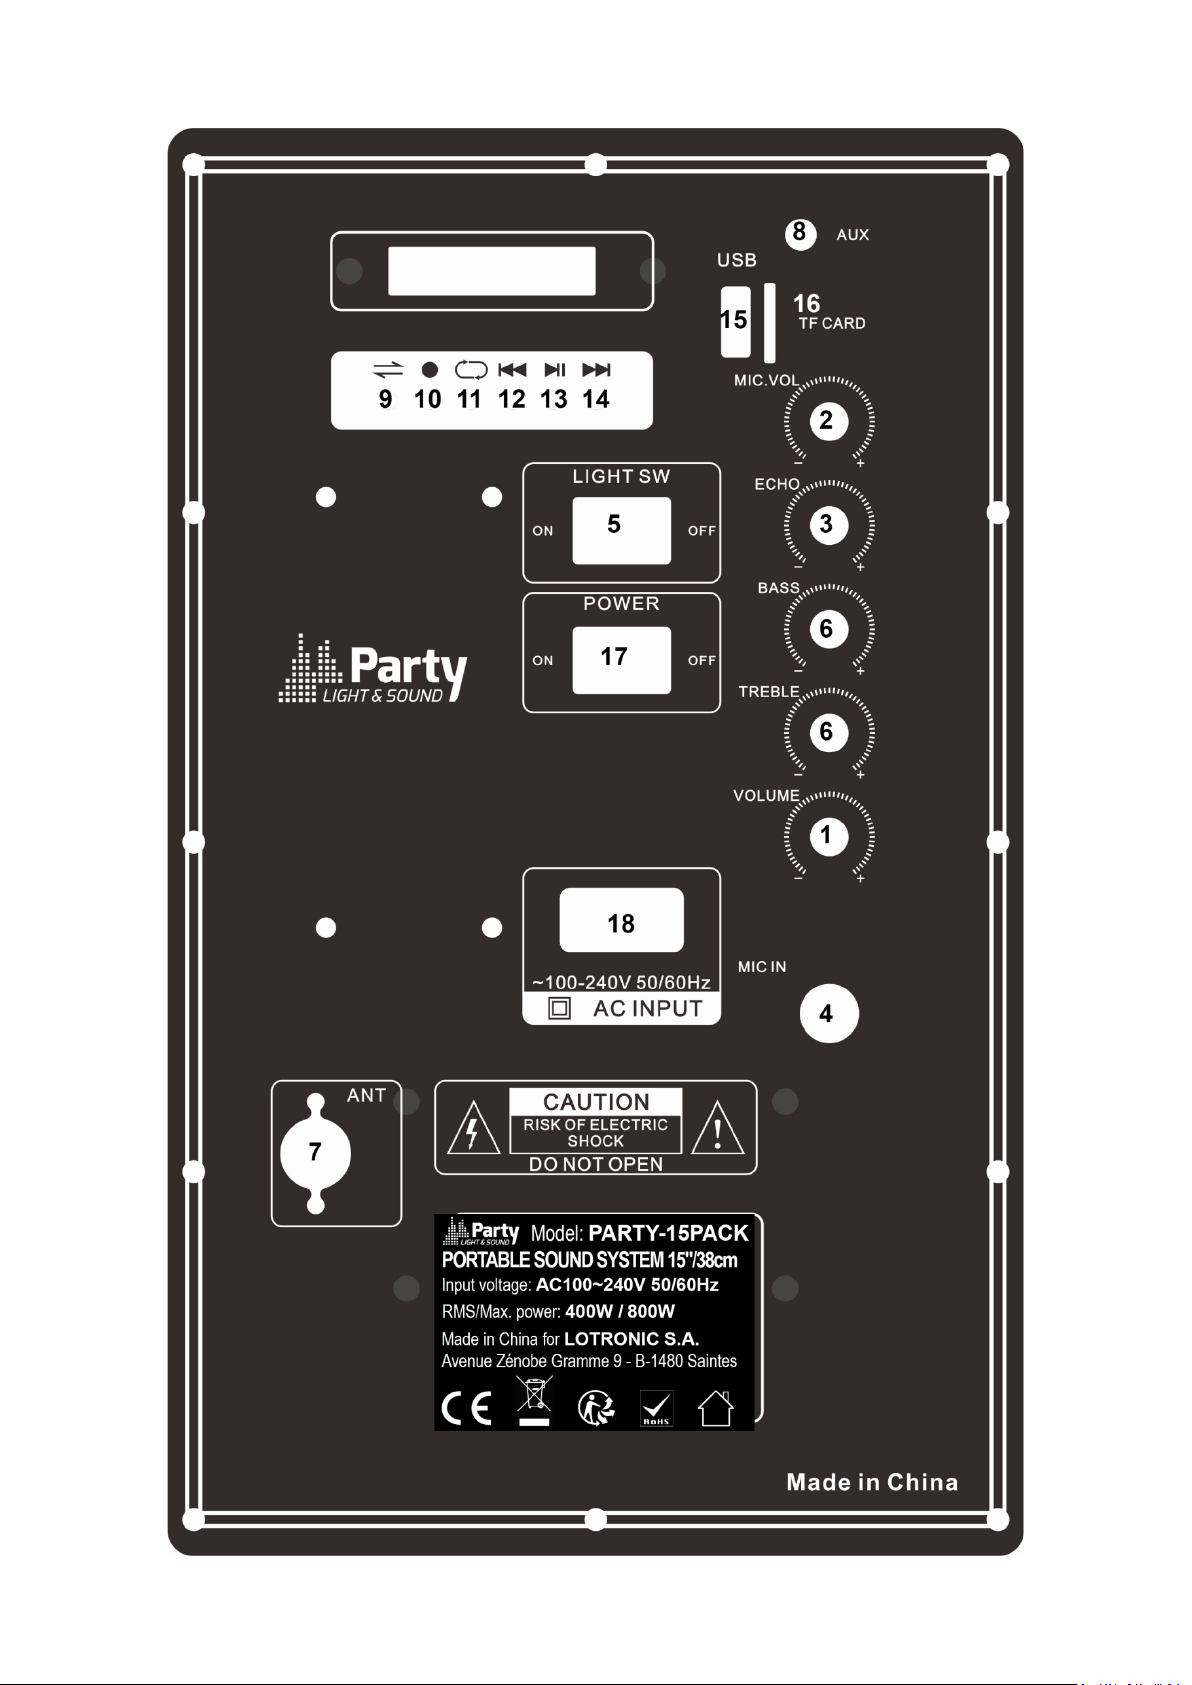
Description of the rear panel
1. Master volume control
2. Microphone volume control
3. Echo control for the microphone
4. Microphone input
5. Switches the LED on the woofer on /off
6. Bass & Treble controls
7. FM antenna: Extend to its full length for optimal reception
8. AUX input via 3.5mm mini stereo jack
9. Input selector: Press this button to switch between the various inputs (AUX, USB, SD, Bluetooth, FM)
10. REC button: Press this button to record the sound of the wired or wireless mic on the USB or SD.
11. REPEAT: Press to toggle between repeating the current track or repeating all tracks.
12. In USB/SD/Bluetooth mode: press to go back to the previous track. In FM mode: press to go to the
previously stored FM station.
©Copyright LOTRONIC 2017 PARTY-15PACK 3
Page 4

13. Play/pause in USB/SD/Bluetooth mode. In FM mode, press and hold this button to start searching for
radio stations and store them automatically in the memory
14. In USB/SD/Bluetooth mode: press to go to the next track. In FM mode: press to go to the next stored
FM station.
15. USB stick input
16. Mini SD card input
17. ON/OFF switch of the system
18. AC input connector
CONNECTION OF THE WIRED MICROPHONE
Connect the microphone to the MIC IN socket and switch it on. Note: If you are playing music from any
other input, connecting the microphone will not mute the sound output.
KARAOKE Function
This feature is available with any input. Play a track through AUX/USB/SD/FM/Bluetooth, connect a
microphone and sing along.
Built-in REC function
1. Plug a microphone into the MIC IN input.
2. Insert a USB/SD card into the corresponding port. Press Input selector button and select USB/SD mode.
3. If the USB/SD card is plugged into the speaker for the first time, the system will automatically create a
folder named ‘record’ to save the recorded files.
4. When you are ready to record, press REC button to record the sound of the wireless or wired
microphone.
USB/SD Operation
Keep the speaker away from high temperatures, strong magnetic fields and any equipment that could
generate interference. If the speaker stops working, switch it off and on again, or unplug USB/SD/MMC
card and re-plug it. The speaker should be back to normal status.
The maximum size of USB/SD device that can be connected is 32 GB.
Supported music formats: MP3, WMA
FM RADIO FUNCTION
1. Turn on the unit and press repeatedly the input selector key on unit and select FM function (the display
will show the frequency).
2. Press the PLAY/PAUSE button on the unit or the key on remote control to activate the auto
memory (the radio starts an automatic search for available radio stations and saves them automatically).
The station's number stored depends on the radio signal in your area.
During the search, press PLAY button on the remote control to stop searching.
3. Use the and keys to listen to the various radio stations saved in memory.
4. To change to a preset station, use the number keys on the remote control.
For example, to call up the station number 12, first press 1 and then 2.
BLUETOOTH OPERATION
1. Turn on the unit and press the input selector button on unit to select the Bluetooth function.
2. Activate the Bluetooth feature on the external device to be paired.
3. Initiate a search for devices. The device shows up as "BT SPEAKER".
4. Press the to start playing and the buttons and for the selection of songs.
©Copyright LOTRONIC 2017 PARTY-15PACK 4
Page 5
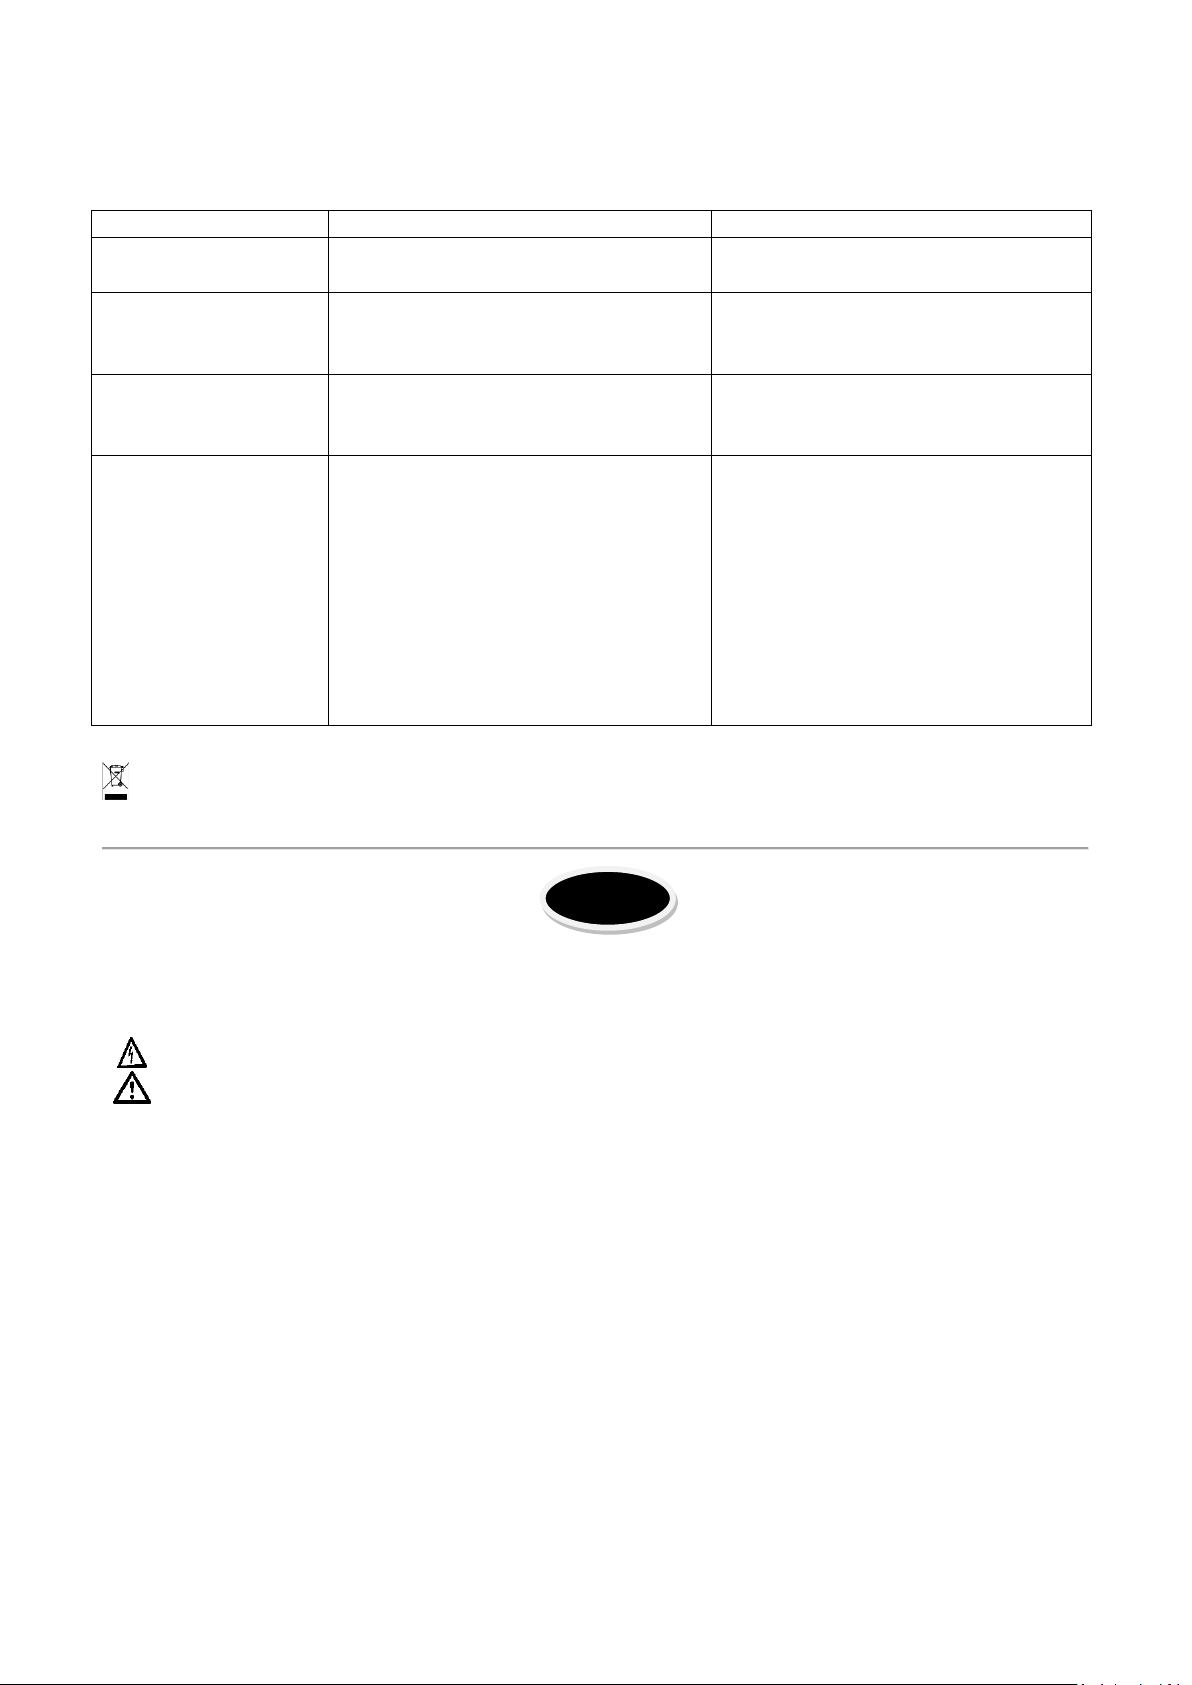
Trouble shooting
Problem
Possible cause
Solution
No sound when
power on
1. No input source
2. Volume down
1. Connect an AUX signal
2. Adjust volume
No sound from the
1. Bad mic connection
3. Mic volume down
1. Plug in the mic properly
3. Increase mic volume
No sound after
card
1. Incorrect file format
1. File format should be MP3
If Speaker makes
1. Microphone switched on but
placed very close to the speaker.
1. Keep the microphone 2
F
If a problem occurs, follow the steps in the table below. If problem still can’t be solved, please contact your
retailer.
microphone
inserting USB/SD
loud noises
Electric products must not be put into household waste. Please bring them to a recycling centre. Ask your local
authorities or your dealer about the way to proceed.
2. Mic not switched on
2. Bad connection of USB/SD card
may be too close to the speaker
2. Microphone switched on but is not
being used.
3. Microphone volume may be too
loud
4. Mobile phone is being used too
close to the speaker
5. Other wireless equipment may be
2. Switch mic on
2. Plug in USB/SD card properly
meters away from the speaker
2. Turn off microphone if not in use.
3. Adjust microphone
volume to lower mode
4. Keep mobile away from the
speaker whilst attending a call.
5. Keep the speaker away from
other wireless equipment
Lire attentivement le manuel et le conserver pour référence ultérieure.
L’éclair dans le triangle attire l’attention sur un danger physique (due à une électrocution p.ex.).
Le point d’exclamation dans le triangle indique un risque dans la manipulation ou l’utilisation de
l’appareil
ATTENTION:
1. Ne pas placer de petits objets tels que des pièces ou des trombones sur l’appareil car ils risquent de
tomber à l’intérieur de l’appareil. Vous risquez de provoquer un incendie ou une électrocution. Si un
liquide ou un objet pénètre dans l’appareil, débranchez immédiatement la prise secteur et contactez
votre revendeur.
2. Pour débrancher la fiche secteur, tirez toujours sur la fiche, jamais sur le cordon.
3. Ne jamais brancher ou débrancher la fiche secteur avec des mains mouillées.
4. Tenir des appareils électriques hors de la portée des enfants. Soyez particulièrement vigilants en
présence d’enfants. Les enfants ne sont pas conscients du danger d’un appareil électrique. Ils pourraient
essayer d’insérer un objet à l’intérieur de l’appareil ce qui représente un grave danger d’électrocution.
5. Ne jamais placer l’appareil sur une surface instable ou mobile. L’appareil risque de blesser une personne
ou de s’abîmer en tombant.
6. Toutes les personnes impliquées dans l’utilisation, l’installation et la maintenance de cet appareil
doivent être formées et qualifiées et respecter ces consignes
©Copyright LOTRONIC 2017 PARTY-15PACK 5
Page 6

7. Remplacer les câbles secteur défectueux uniquement par un spécialiste. Risque d’électrocution!
8. Si vous n’êtes pas sûr de la bonne connexion ou si vous avez des questions auxquelles le mode d’emploi
ne répond pas, n’hésitez pas à demander conseil à un spécialiste ou votre revendeur.
9. Débranchez l’adaptateur et éteignez l’appareil en cas d’une non-utilisation prolongée afin d’éviter des
dommages causés par des surtensions.
Description des contrôles à l’arrière
1. Contrôle de volume général
2. Contrôle de volume micro
3. Contrôle Echo du microphone
4. Entrée micro
5. M/A des LED du boomer
6. Contrôle des graves & aigus
7. Antenne FM: Etirez complètement l’antenne pour optimiser la réception
8. Entrée AUX par mini Jack 3,5mm
9. Sélecteur d’entrée: Appuyez pour sélectionner une des sources d’entrée (AUX, USB, SD, Bluetooth, FM)
10. REC: Appuyez pour enregistrer le son du micro filaire ou sans fil sur une clé USB ou une carte SD.
11. Appuyer pour répéter le titre en cours ou tous les titres.
12. En mode USB/SD/Bluetooth: retour vers le titre précédent. En mode FM: retour à la station
précédente.
13. Lecture/pause en mode USB/SD/Bluetooth. En mode FM, maintenir appuyé pour commencer la
recherché et l’enregistrement automatique des stations de radio trouvées.
14. En mode USB/SD/Bluetooth: aller au titre suivant. En mode FM: aller à la prochaine station mémorisée
15. Branchement d’une clé USB
16. Branchement d’une carte mini-SD
17. M/A du système
18. Connecteur d’alimentation AC
BRANCHEMENT DU MICROPHONE
Branchez le microphone sur la fiche MIC IN et mettez-le sous tension.
Note: Le fait de brancher un microphone ne coupe pas le son de la source en cours de lecture.
Fonction KARAOKE
Cette fonction est utilisable avec toutes les sources d’entrées. Branchez un microphone et chantez sur la
musique qui est en cours de lecture de l’entrée AUX/USB/SD/FM/Bluetooth.
Enregistrement
1. Branchez un microphone sur l’entrée MIC IN.
2. Branchez une clé USB/carte SD sur l’entrée appropriée. Appuyez sur la touche 9 et sélectionnez
USB/SD.
3. Si vous branchez la clé USB/carte SD pour la première fois sur cette enceinte, le système va créer un
dossier nommé RECORD. Tous les enregistrements seront automatiquement sauvegardés dans ce
dossier.
4. Lorsque vous êtes prêt à l’enregistrement, appuyez sur la touche REC.
Utilisation de l’entrée USB/mini-SD
Tenir à l’abri de la chaleur, des champs magnétiques puissants et d’appareils qui peuvent provoquer des
interférences. Si l’enceinte ne fonctionne pas, éteignez et rallumez-la ou débranchez et rebranchez la clé
©Copyright LOTRONIC 2017 PARTY-15PACK 6
Page 7
USB/carte SD. L’enceinte devrait refonctionner normalement.
Problème
Cause possible
Solution
Pas de son lorsque le
tension
1. Absence de source d’entrée
1. Branchez une source d’entrée
approprié
Pas de son du
1. Le microphone est mal branché
3. Volume micro réglé au minimum
1. Branchez fermement le micro
3. Augmentez le volume du micro
Pas de son de la
source USB/SD
1. Mauvais format de fichier
2. Source USB/SD mal branchée
1. Transformez les fichiers en MP3
2. Branchez correctement la source USB/SD
Le haut-parleur
1. Le microphone est trop près du
placé trop près du haut-parleur
1. Gardez le micro à une distance de 2m
La taille maximale admise des sources USB et SD est de 32 Go.
Fichiers de musique compatibles: MP3, WMA
RADIO FM
1. Mettez l’appareil sous tension et appuyez à plusieurs reprises sur la touche 9 pour sélectionner la
fonction FM (la fréquence s’affiche sur l’écran).
2. Appuyez sur la touche lecture pour activer la mémorisation automatique (le tuner recherche des
stations disponibles et les mémorise automatiquement). Le nombre de stations mémorisées dépend de la
réception dans votre secteur.
Pour arrêter la recherche, appuyez sur la touche de lecture.
3. Utilisez les touches et pour écouter les stations mémorisées.
4. Pour sélectionner directement une station mémorisée, appuyez sur la touche numérique
correspondante sur la télécommande. P.ex. pour sélectionner la station 12, appuyez d’abord sur 1 et
ensuite sur 2.
SYNCHRONISATION BLUETOOTH
1. Mettez l’appareil sous tension et appuyez sur la touche 14 pour sélectionner la fonction BLUETOOTH.
2. Activez la fonction Bluetooth sur l’appareil externe à synchroniser.
3. Lancez la recherche d’appareil. L’enceinte s’affiche sous le nom "BT-SPEAKER".
4. Appuyez sur la touche pour commencer la lecture. Sélectionnez les titres avec les touches et .
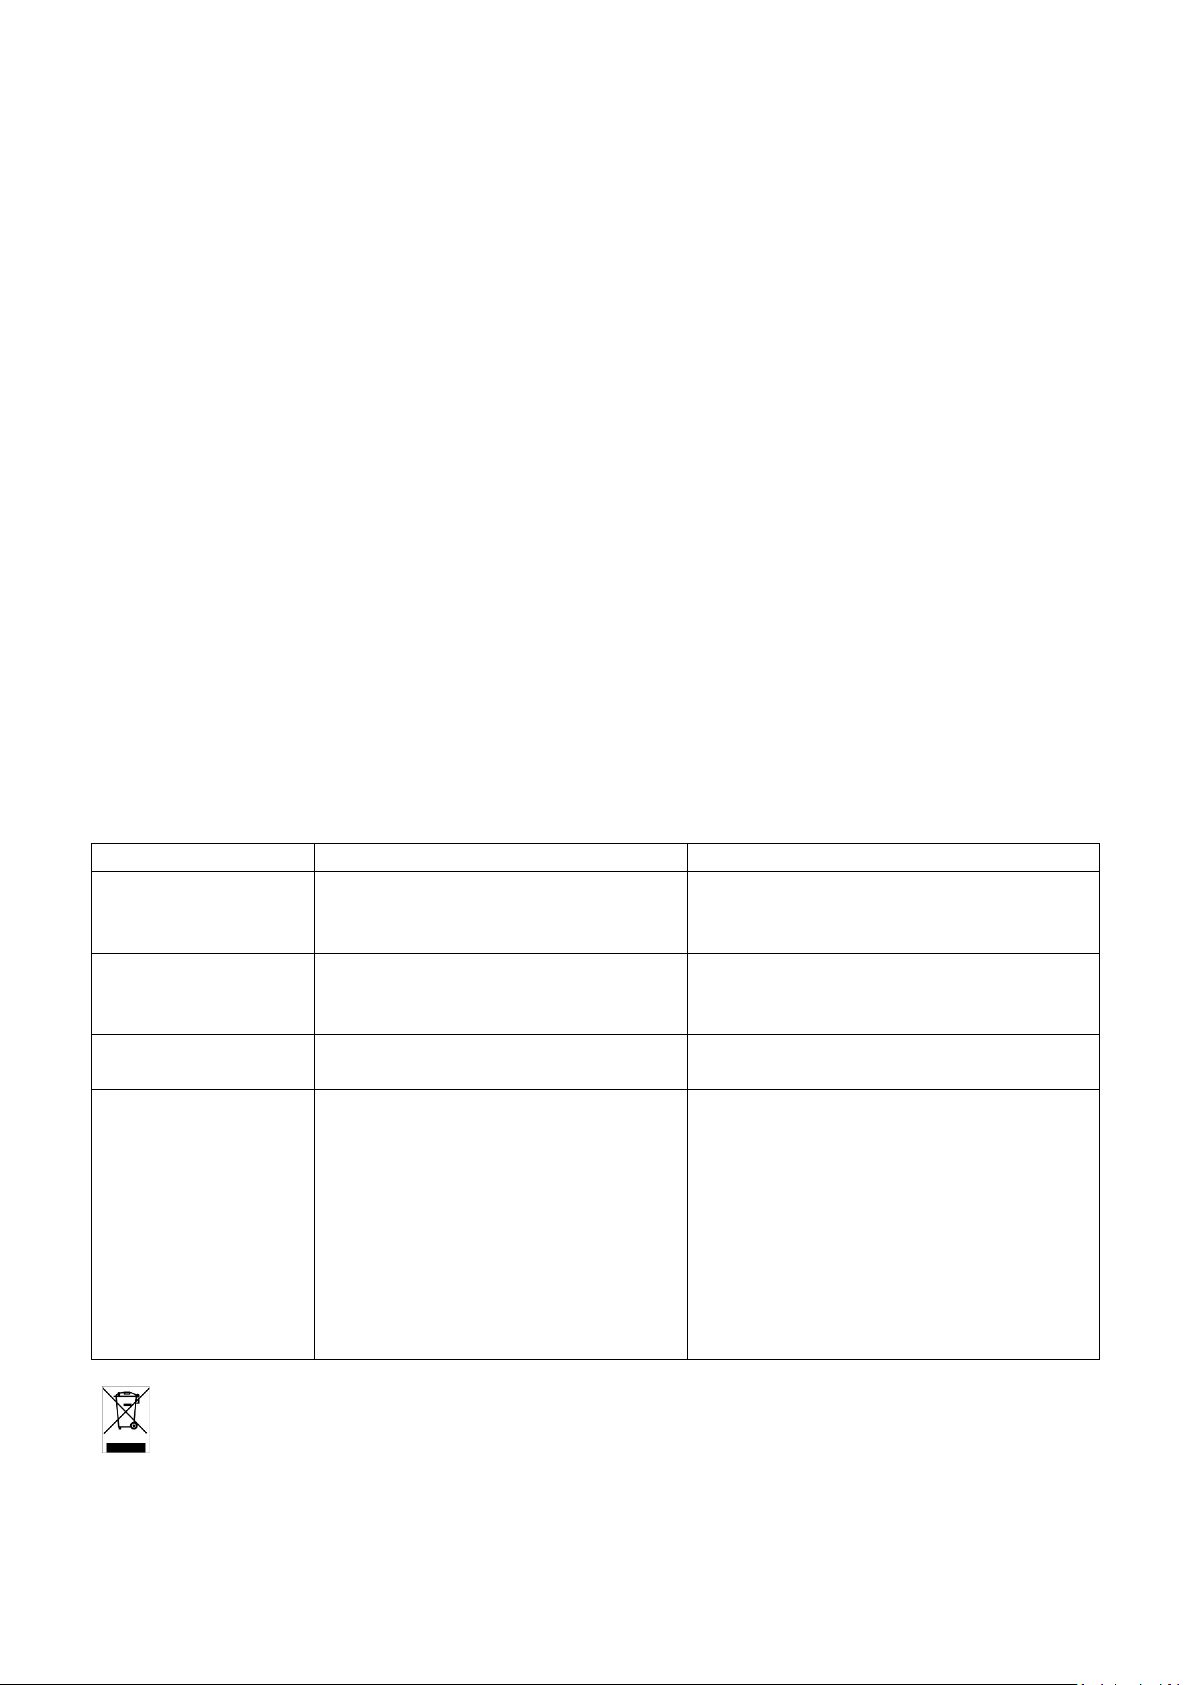
Diagnostic de défaillance
En cas de problème, suivez les instructions ci-dessous. Si le problème persiste, contactez votre revendeur.
système est mis sous
microphone
émet des bruits
2. Volume réglé au minimum
2. Le micro n’est pas allumé
haut-parleur
2. Le microphone est sous tension
mais pas utilisé
3. Le volume du microphone est
trop fort
4. Un téléphone mobile est utilisé à
proximité du haut-parleur
5. Un autre appareil sans fil est
NOTE IMPORTANTE : Les produits électriques ne doivent pas être mis au rebut avec les ordures ménagères.
Veuillez les faire recycler là où il existe des centres pour cela. Consultez les autorités locales ou votre revendeur
sur la façon de les recycler.
2. Réglez le volume sur un niveau
2. Allumez le micro
du haut-parleur
2. Eteignez le micro lorsqu’il n’est pas
utilisé
3. Baissez le volume du micro
4. Eloignez le téléphone mobile du hautparleur pendant un appel
5. Eloignez le haut-parleur de tout autre
appareil sans fil.
©Copyright LOTRONIC 2017 PARTY-15PACK 7
Page 8

D
Anleitung vor Inbetriebnahme genau durchlesen und für spätere Bezugnahme aufbewahren.
Der Blitz im Dreieck weist den Bediener auf gefährliche, nicht isolierte Spannungen im
Gehäuseinneren hin, die stark genug sind, um einen elektrischen Schlag zu verursachen.
Das Ausrufezeichen im Dreieck weist den Benutzer auf wichtige Hinweise in der Betriebsanleitung hin.
SICHERHEITSHINWEISE
1. Keine mit Flüssigkeit gefüllten Behälter wie Gläser oder Vasen auf oder direkt neben das Gerät stellen.
Sie können umfallen und Wasser kann ins Gerät dringen. Niemals Flüssigkeiten über dem Gerät
einschenken. Keine Kleinteile wie Münzen oder Briefklammern aufs Gerät legen. Sie können ins
Gehäuse dringen. Es besteht Feuer- und Stromschlaggefahr! Falls doch einmal Flüssigkeiten oder
Gegenstände ins Gerät dringen sollten, ziehen Sie sofort den Netzstecker ab und benachrichtigen Sie
einen Fachmann.
2. Beim Abziehen des Netzsteckers immer an der dafür vorgesehenen Stelle anfassen. Niemals am Kabel
ziehen.
3. Niemals den Netzstecker mit nassen oder feuchten Händen anfassen
4. Elektrogeräte außerhalb der Reichweite von Kindern aufbewahren. In Anwesenheit von Kindern
besonders vorsichtig sein. Kinder sind sich der Gefahren bei falscher Handhabung von Elektrogeräten
nicht bewusst. Sie könnten versuchen, Gegenstände ins Gerät zu stecken und einen Stromschlag
erleiden
5. Niemals auf eine unstabile oder bewegliche Fläche stellen. Das Gerät kann beim Fallen Personen
verletzen und schweren Schaden nehmen.
6. Alle Personen, die mit der Bedienung, Installation und Wartung des Geräts zu tun haben, müssen
ausgebildet und qualifiziert sein und diese Bedienungshinweise beachten.
7. Defekte Kabel nur von einem Fachmann ersetzen lassen. Stromschlaggefahr!
8. Wenn Sie sich über den richtigen Anschluss nicht im Klaren sind oder wenn Fragen auftreten, die nicht
von der Anleitung beantwortet wurden, wenden Sie sich bitte an einen Fachmann.
9. Das Netzteil vom Netz trennen und das Gerät ausschalten, wenn es längere Zeit nicht benutzt wird, um
Schäden durch Überspannungen zu vermeiden
Beschreibung der Bedienelemente auf der Rückseite
1. Hauptlautstärkeregler
2. Mikrofonlautstärkeregler
3. Echo Regler vom Mikrofon
4. Mikrofonbuchse
5. Ein/Ausschalten der LED Beleuchtung des Woofers
6. Bass & Treble Regler
7. FM Antenne: für besten Empfang muss die Antenne zur vollen Länge ausgezogen werden.
8. AUX Eingang über 3,5mm Stereo Klinkenverbinder
9. Eingangswahlschalter: Drücken, um die gewünschte Eingangsquelle zu wählen (AUX, USB, SD,
Bluetooth, FM)
10. Nimmt das Signal vom Mikrofon auf einem USB Stick oder einer Mini-SD Karte auf.
11. Wiederholung eines oder aller Titel.
12. Im USB/SD/Bluetooth Betrieb: zurück zum vorigen Titel. Im FM Betrieb: zurück zum letzten
gespeicherten Sender.
©Copyright LOTRONIC 2017 PARTY-15PACK 8
Page 9

13. Play/pause im USB/SD/Bluetooth Betrieb. Im FM Betrieb Taste gedrückt halten, um nach Radiosendern
zu suchen und diese automatisch zu speichern.
14. Im USB/SD/Bluetooth Betrieb: weiter zum nächsten Titel. Im FM Betrieb: weiter zum nächsten
gespeicherten Sender.
15. Anschluss für einen USB Stick
16. Anschluss für eine Mini-SD Karte
17. Ein/Aus Schalter der Anlage
18. AC Netzanschlussbuchse
ANSCHLUSS DES MIKROFONS
Mikrofon an die MIC IN Buchse anschließen und einschalten.
Hinweis: Die Musik wird weiter abgespielt, wenn ein Mikrofon angeschlossen wird.
KARAOKE Funktion
Diese Funktion ist mit jeder Eingangsquelle kompatibel. Spielen Sie einen Song ab, schließen Sie das
Mikrofon an und singen Sie zur Musik.
Eingebaute Aufnahmefunktion
1. Mikrofon an die MIC IN Buchse anschließen.
2. Die USB/SD Karte einstecken und die Taste 9 drücken, um USB oder SD Betrieb zu wählen.
3. Wenn die USB/Mini-SD Karte zum ersten Mal an dieses Gerät angeschlossen wird, wird ein Ordner mit
dem Namen RECORD erstellt und die Aufnahmen werden automatisch in diesem Ordner gespeichert.
4. REC Taste drücken, um die Aufnahme zu starten. Auf dem Display erscheint 00:01. Das bedeutet, dass
die Aufnahme angefangen hat.
USB/SD Betrieb
Die Box vor Hitze, starken Magnetfeldern und Geräten schützen, die Störungen verursachen können. Wenn
das Gerät nicht funktioniert, schalten Sie es aus und wieder ein, oder ziehen Sie den USB Stick/SD Karte ab
und stecken Sie sie wieder ein. Das Gerät sollte nun wieder normal arbeiten.
Die maximal unterstützte Kapazität des USB/SD Mediums beträgt 32Gb.
Unterstützte Musikformate: MP3, WMA
FM RADIO
1. Gerät einschalten und die Taste 9 drücken, um FM zu wählen (auf dem Display erscheint die Frequenz).
2. Die Taste drücken, um die automatische Speicherung zu aktivieren. Das bedeutet, dass alle
gefundenen Sender automatisch gespeichert werden. Die Anzahl Sender hängt von dem Empfang in Ihrer
Gegend ab.
Während der Suche die PLAY Taste drücken, um die Suche zu stoppen.
3. Mit den Tasten und den Sender wählen, den Sie hören möchten.
4. Mit den Nummerntasten auf der Fernbedienung direkt einen der gespeicherten Sender wählen. Z.B. zur
Wahl des Senders auf Speicherplatz 12 erst die 1 und dann die 2 drücken.
BLUETOOTH VERBINDUNG
1. Gerät einschalten und die Taste 9 drücken, um die Bluetooth Funktion zu wählen.
2. Die Bluetooth Funktion auf dem Smartphone aktivieren. Die Box erscheint unter dem Namen
"BT SPEAKER".
3. Die Taste drücken, um den Titel abzuspielen. Zur Titelwahl die Tasten und drücken.
Fehlerdiagnose
©Copyright LOTRONIC 2017 PARTY-15PACK 9
Page 10
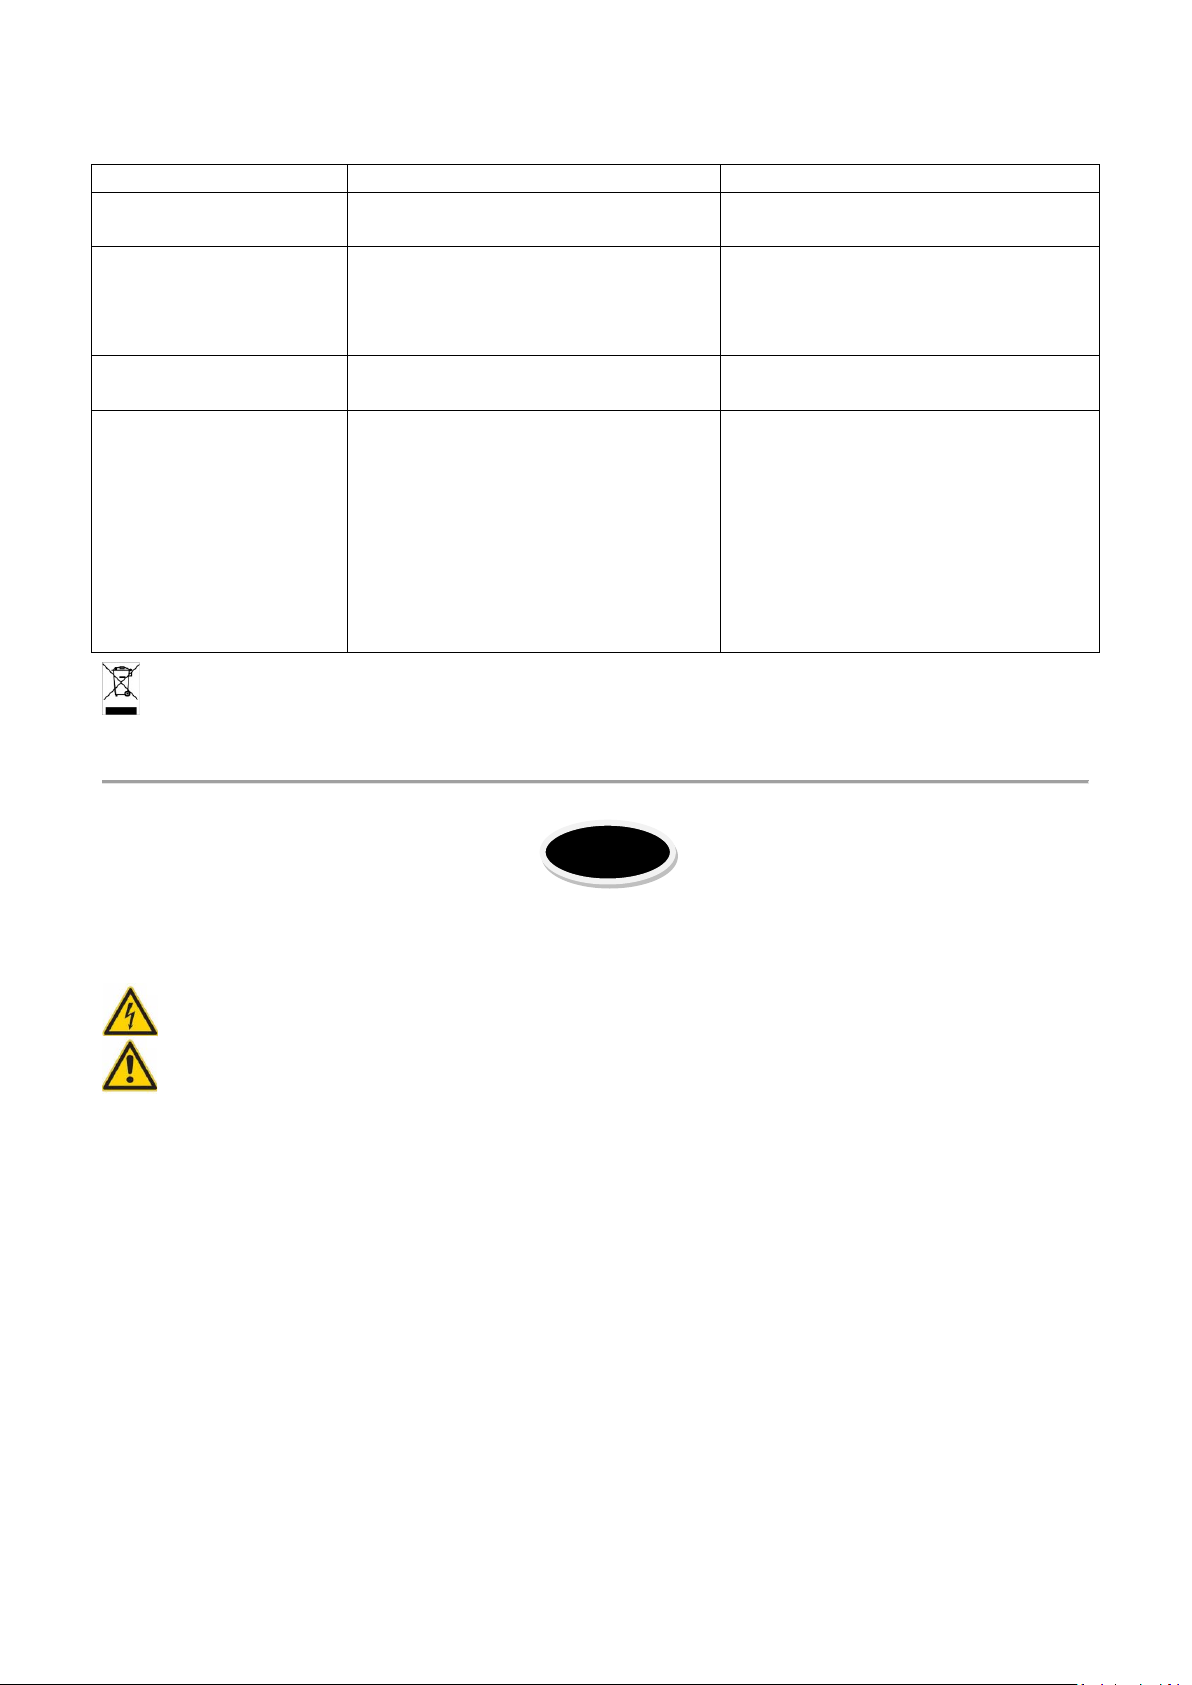
Im Problemfall die Anweisungen in der nachstehenden Tabelle befolgen. Wenn das Problem weiterhin
Problem
Mögliche Ursache
Lösung
Kein Ton nach dem
Einschalten
1. Keine Eingangsquelle
2. Lautstärke aufs Minimum eingestellt
1. Eingangsquelle anschließen
2. Lautstärke einstellen
Kein Ton vom Mikrofon
1. Loser Anschluss
Minimum eingestellt
1. Mikrofon fest einstecken
Kein Ton von der MP3
Datei
1. Falsches Dateiformat
2. USB/SD Medium nicht eingesteckt
1. In MP3 Format umwandeln
2. USB/SD Medium fest einstecken
Lautsprecher macht
1. Mikrofon ist zu dicht am
Nähe des Geräts benutzt.
1. Mikrofon mindestens 2m vom
entfernen
NL
besteht, nehmen Sie Verbindung mit Ihrem Fachhändler auf.
2. Mikrofon ist ausgeschaltet
3. Mikrofonlautstärke ist aufs
Geräusche
WICHTIGER HINWEIS: Elektrogeräte gehören nicht in den Hausmüll. Sie müssen in speziellen Betrieben recycelt
werden. Bringen Sie sie zu einer speziellen Entsorgungsstelle für Elektrokleingeräte (Wertstoffhof)!
Lautsprecher.
2. Mikrofon ist eingeschaltet, wird
aber nicht benutzt.
3. Mikrofonlautstärke zu hoch
4. Handy wird in Lautsprechernähe
benutzt
5. Andere Funkgeräte werden in der
2. Mikrofon einschalten
3. Mikrofonlautstärke erhöhen
Gerät entfernen
2. Bei Nichtgebrauch Mikrofon
ausschalten
3. Mikrofonlautstärke verringern
4. Handy bei Anrufen vom Gerät
entfernen
5. Gerät von drahtlosen Geräten
Aandachtig de handleiding lezen en bewaren.
De bliksem in de driehoek vestigt de aandacht van de gebruiker op een elektrische schokrisico.
De driehoek met het uitroepteken vestigt de aandacht van de gebruiker op belangrijke gebruik- of
onderhoudsinstructies.
Belangrijke veiligheids- en risicowaarschuwingen:
1. Plaats geen ontvangers gevuld met vloeistoffen, zoals glazen of vazen, op of direct naast het apparaat.
Ze kunnen omvallen, waardoor water in het apparaat binnendringt. Giet nooit vloeistoffen uit boven
het toestel. Plaats geen kleine voorwerpen, zoals munten of paperclips, op het toestel, aangezien zij
zou kunnen vallen in het apparaat. Zij kunnen brand of stroomslag veroorzaken! Als er vloeistof of
voorwerpen in het apparaat dringen, trek dan onmiddellijk de stekker uit het stopcontact en raadpleeg
een deskundige.
2. Trek de stekker alleen uit het stopcontact via de ervoor bepaalde oppervlak. Niet aan het kabel trekken.
3. Nooit de stekker met vochtige of natte handen aanraken.
4. Elektrische apparaten buiten het bereik van kinderen houden. Wees vooral voorzichtig wanneer er
kinderen aanwezig zijn. Kinderen zijn zich niet bewust van de gevaren die betrokken zijn bij elektrische
apparaten. Kinderen kunnen proberen voorwerpen in het apparaat te stekken. Er is een
levensbedreigend gevaar van stroomslag.
5. Plaats het apparaat nooit op een instabiele of beweegbare ondergrond. Mensen kunnen gewond raken
of het apparaat wordt beschadigd door het vallen.
©Copyright LOTRONIC 2017 PARTY-15PACK 10
Page 11

6. Alle personen die dit apparaat gebruiken, installeren of onderhouden moeten gekwalificeerd zijn en deze
gebruiksaanwijzing naleven.
7. Defecte stroomkabels mogen enkel vervangen worden door specialisten. Gevaar van elektrische schok!
8. Als u niet zeker bent over de correcte aansluiting of als er vragen zijn die niet worden beantwoord door
de gebruiksaanwijzing, contacteer een specialist. Raadpleeg een specialist indien u twijfel heeft aan het
werkingsprincipe of de veiligheid van het product.
9. Adapter afkoppelen en toestel uitschakelen als het voor langere tijd niet wordt gebruikt om beschadiging
door overspanningen te vermijden.
Omschrijving van des controles en connectoren op de achterzijde
1. Master volume controle
2. Microfoon volume controle
3. Echo controle van de microfoon
4. Microfoon connector
5. Aan/uit schakelen van de led verlichting van de woofer
6. Bas & treble regelaars
7. FM Antenne: voor beste ontvang de antenne tot de volle lengte uittrekken.
8. AUX ingang via 3,5mm mini jack
9. Ingangskeuzeschakelaar: Druk om één van de ingangsbronnen te kiezen (AUX, USB, SD, Bluetooth, FM)
10. Drukken om het geluid van de microfoon op een USB stick of een mini SD kaartje op te nemen.
11. Herhaling van één of alle tracks
12. In USB/SD/Bluetooth mode: terug naar de vorige track. In FM mode: terug naar de laatste opgeslagen
FM zender.
13. Play/pauze in USB/SD/Bluetooth mode. In FM mode, ingedrukt houden om naar zenders te zoeken en
deze automatisch in het geheugen op te slaan.
14. In USB/SD/Bluetooth mode: verder naar de naaste track. In FM mode: verder naar de naaste
opgeslagen FM zender.
15. USB stick ingang
16. Mini SD kaartje ingang
17. Aan/uit schakelen van het systeem
18. AC ingangsconnector
AANSLUITING VAN DE MICROFOON
Sluit een microfoon op de MIC IN connector aan en schakel de microfoon aan.
Opmerking: Het geluid wordt niet door de aansluiting van een microfoon onderbroken.
KARAOKE Functie
Deze functie werkt met alle ingangsbronnen. Speel een song via AUX/USB/SD/FM/Bluetooth af, sluit een
microfoon aan en zing mee.
Opname functie
1. Sluit een microfoon op MIC IN aan of schakel de draadloze microfoon aan.
2. Sluit een USB-stick/SD-kaart aan en druk de toets 9 om USB/SD te kiezen
3. Als de USB-stick/SD-kaart voor de eerste maal worden gebruikt met deze speaker maakt het systeem
een bestand aan met de naam RECORD.
4. Als u voor de opname klaar bent druk de opnametoets. Nu kunt u spreken of zingen in de microfoon.
©Copyright LOTRONIC 2017 PARTY-15PACK 11
Page 12

USB-/SD-poorten
Probleem
Mogelijke oorzaak
Oplossing
1. Geen bron aangesloten.
2. Het volume staat op het laagste niveau
1. Aansluiten op een audiobron
2. Het volume verhogen
1. Microfoon is niet vast aangesloten
ingesteld
1. Microfoon vast aansluiten
4. Batterijen wisselen
Geen geluid van de
USB-stick/SD-kaart
1. Bestanden in een niet-compatibel formaat.
2. Kaart of stick verkeerd aangesloten.
1. Het formaat moet MP3 zijn
2. De kaart/stick correct aansluiten
1. Microfoon is te nabij de luidspreker
1. Houd 2m afstand tussen de
toestellen
Tegen hitte, sterke magneetvelden en storingen beschermen. Als de luidspreker niet werkt, schakel hem
uit en aan of ontkoppel de USB/SD kaartje en sluit ze weer aan. De luidspreker zou normaal werken.
De speaker is geschikt voor MP3, WMA. De maximale capaciteit van een USB/SD medium is 32Gb.
FM RADIO FUNCTIE
1. Toestel aanschakelen en op toets (14) drukken om FM te kiezen (de frequentie toont op de display).
2. PLAY toets drukken om het automatische zoeken en opslaan te activeren. De aantal van zender is
afhankelijk van de ontvangst in uw gebied.
Tijdens het zoeken PLAY toets drukken om het zoeken te stoppen.
3. D.m.v. de en toetsen de verschillende opgeslagen zenders kiezen.
4. Om onmiddelijk een zender te kiezen, gebruik de nummertoetsen op de afstandsbediening. Bijv. voor
zender nr. 12 de 1 en de 2 drukken.
BLUETOOTH VERBINDING
1. Schakel het apparaat in en druk op de knop (14) om de Bluetooth-functie te selecteren.
2. Activeer de Bluetooth-functie op het externe apparaat.
3. Starten een zoekopdracht naar apparaten. Het apparaat verschijnt als "BT SPEAKER".
4. Druk op de toets om te beginnen met spelen, en de toetsen en voor de selectie van songs.
FOUTDIAGNOSE
In het geval van een probleem, de richtlijnen in onderstaande tabel volgen. Als het probleem aanhoudt, uw
verkoper contacteren.
Geen geluid
Geen geluid van de
microfoon
2. Microfoon is uitgeschakeld
3. Microfoon volume is op het minimum
2. Microfoon is aangeschakeld maar wordt
niet gebruikt.
3. Microfoon volume is te hoog
Luidspreker
maakt lawaai
4. Een GSM wordt nabij de luidspreker
gebruikt
5. Andere draadloze toestellen worden nabij
de luidspreker gebruikt
BELANGRIJKE OPMERKING: Elektrische producten mogen niet samen met het huishoudelijk afval worden verwijderd. Lever ze
a.u.b. in bij een gespecialiseerd inzamelpunt. Raadpleeg de plaatselijke autoriteiten of uw verkoper over hoe de producten te
recycleren.
2. Microfoon aanschakelen
3. Microfoon volume verhogen
microfoon en de luidspreker
2. Microfoon na gebruik
uitschakelen.
3. Microfoon volume verminderen
4. GSM uit de buurt van de
luidspreker houden tijden een
omroep
5. Houd de luidspreker uit de
buurt van andere draadloze
©Copyright LOTRONIC 2017 PARTY-15PACK 12
Page 13

RO
Cititi cu atentie manualul si pastrati-l pentru consultari ulterioare.
Semnul fulgerului in interiorul unui triunghi semnifica prezenta unei tensiuni neizolate a carei valoare este
suficient de mare incat sa prezinte risc de electrocutare.
Semnaul de exclamare in interiorul unui triunghi alerteaza utilizatorul cu privire la existenta unor instructiuni
importante in manual privind utilizarea produsului.
PRECAUTII:
1. Nu amplasati recipiente cu lichide cum ar fi vaze cu flori deasupra aparatului sau in vecinatatea
aparatului. Acestea pot cadea, cauzand scurgerea apei in interiorul aparatului, ceea ce distruge
aparatul si duce la pierderea garantiei. Nu aruncati obiecte mici sau monede in interiorul aparatului –
risc de incendiu! In cazul in care se intampla acest lucru, opriti imediat aparatul si scoateti-l din priza si
contactati un specialist.
2. Cand deconectati de la retea, trageti de stecher, nu de cablu.
3. Nu conectati/deconectati la/de la priza de perete aparatul daca aveti mainile umede.
4. Aparatele electrice nu trebuie lasate la indemana copiilor. Aveti mare grija cand sunt prezenti copiii in
jurul aparatului. Copiii nu sunt constienti de riscurile implpicate de utilizarea necorespunzatoare a
aparatelor electrice. Nu lasati copii sa introduca obiecte straine in aparat – risc de electrocutare.
5. NU amplasati aparatul pe suprafete instabile sau mobile. Persoanele din jur pot fi ranite in cazul in care
aparatil cade.
6. Toate persoanele implicate in operarea, instalarea sau depanarea aparatului trebuie pregatite si calificate
corespunzator.
7. Cablurile defecte trebuie reparate doar de catre personal calificat. Pericol de electrocutare!
8. Daca nu sunteti sigur de corectitudinea conectarii aparatului, apelati la un specialist.
9. Daca nu utilizati aparatul o perioada mai lunge de timp, deconectati-l de la reteaua de alimentare.
Descrierea panoului din spate
1. Control volum Master
2. Contro volu microfon
3. Control ecou microfon
4. Intrare microfon
5. Comutare LED woofer on/off
6. Controale Bass & Treble
7. Antena FM: extindeti antena la maxim pentru o receptie optima
8. Intrare AUX via jack stereo 3.5mm
9. Selector intrare: apasati acest buton pentru a comuta intre diverse intrari (AUX, USB, SD, Bluetooth,
FM)
10. Buton inregistrare REC: apasati acest buton pentru a inregistra sunetul microfonului pe USB sau SD.
11. REPEAT: apasati pentru a comuta modul de repetare intre repetare piesa curenta sau repetare toate
piesele.
12. In modul USB/SD/Bluetooth: apasati pentru a merge la piesa anterioara. In modul FM: apasati pentru a
merge la postul de radio anterior (dintre posturile memorate).
13. Redare/pauza in modul USB/SD/Bluetooth. In modul FM apasati si tineti apasat pentru a incepe
cautarea si memorarea posturilor radio in memorie
14. In modul USB/SD/Bluetooth: apasati pentru a merge la piesa urmatoare. In modul FM: apasati pentru a
merge la postul de radio urmator (dintre posturile memorate).
©Copyright LOTRONIC 2017 PARTY-15PACK 13
Page 14

15. Intrare USB
16. Intrare Mini SD
17. Buton pornire/oprire ON/OFF
18. Conector AC de intrare
CONECTARE MICROFON CU FIR
Conectati microfonul la intrarea MIC IN si porniti-l. Nota: daca redati muzica de la o alta intrare, conectarea
microfonului nu va intrerupe sursa de muzica.
Functie KARAOKE
Aceasta functie este disponibila pentru oricare intrare. Redati o piesa prin intermediul
AUX/USB/SD/FM/Bluetooth, conectati un microfon si cantati.
Functia de inregistrare
1. Introduceti un microfon in intrarea MIC IN.
2. Introduceti un dispozitiv USB/SD in portul corespunzator. Apasati selectorul de intrare pentru a alege
modul USB/SD.
3. Daca introducetui un dispozitiv USB/SD pentru prima data, sistemul va crea automat un fisier numit
‘record’ pentru a salva fisierele.
4. Cand sunteti gata de inregistrare, apasati butonul REC pentru a incepe inregistrarea.
Operare USB/SD
Feriti difuzorul de temperaturi extreme, campuri magnetice puternice sau alte echpamente care pot
genera interferente. Daca difuzorul se opreste din functionare, opriti-l si porniti-l din nou sau deconectati
si coenctati din nou dispozitivul USB/SD. Difuzorul ar trebuie sa revina la starea normala de functionare.
Capacitatea maxima a dispozitivului USB/SD este de 32 GB.
Formate suportate: MP3, WMA
FUNCTIA RADIO FM
1. Porniti unitatea si apasati in mod repetat pe selectorul de intrare pentru a selecta functia radio FM.
(afisajul va arata frecventa).
2. Apasati butonul PLAY/PAUSE de pe unitate sau tasta de pe telecomanda pentru a activa functia de
cautare si memorare automata a posturilor radio. Numarul de posturi radio depinde de semnalul radio
receptionat.
Pe durata cautarii apasati butonul PLAY de pe unitate sau de pe telecomanda pentru a opri cautarea.
3. Utilizati tastele si pentru a asculta posturile radio memorate.
4. Pentru a accesa un post radio presetat, utilizati tastele numerice de pe telecomanda.
De exemplu, pentru a asculta postul radio nr. 12 tastati de la telecomanda 1 apoi 2.
OPERARE BLUETOOTH
1. Porniti unitatea si apasati succesiv selectorul de intrare pentru a selecta modul Bluetooth.
2. Activati functia Bluetooth la dispozitivul cu care doriti asocierea.
3. Initiati o cautare a dispozitivelor Bluetooth. Dintre dispozitivele gasite asociati cu "BT SPEAKER".
4. APasati pentru a incepe redarea si utilizati butoanele si pentri selectarea melodiei.
Depanare
Daca interviine o problema, urmariti in tabelul de mai jos o cale de depanare. Daca problema nu se rezolva,
apelati la un service autorizat penru remedierea problemei.
©Copyright LOTRONIC 2017 PARTY-15PACK 14
Page 15
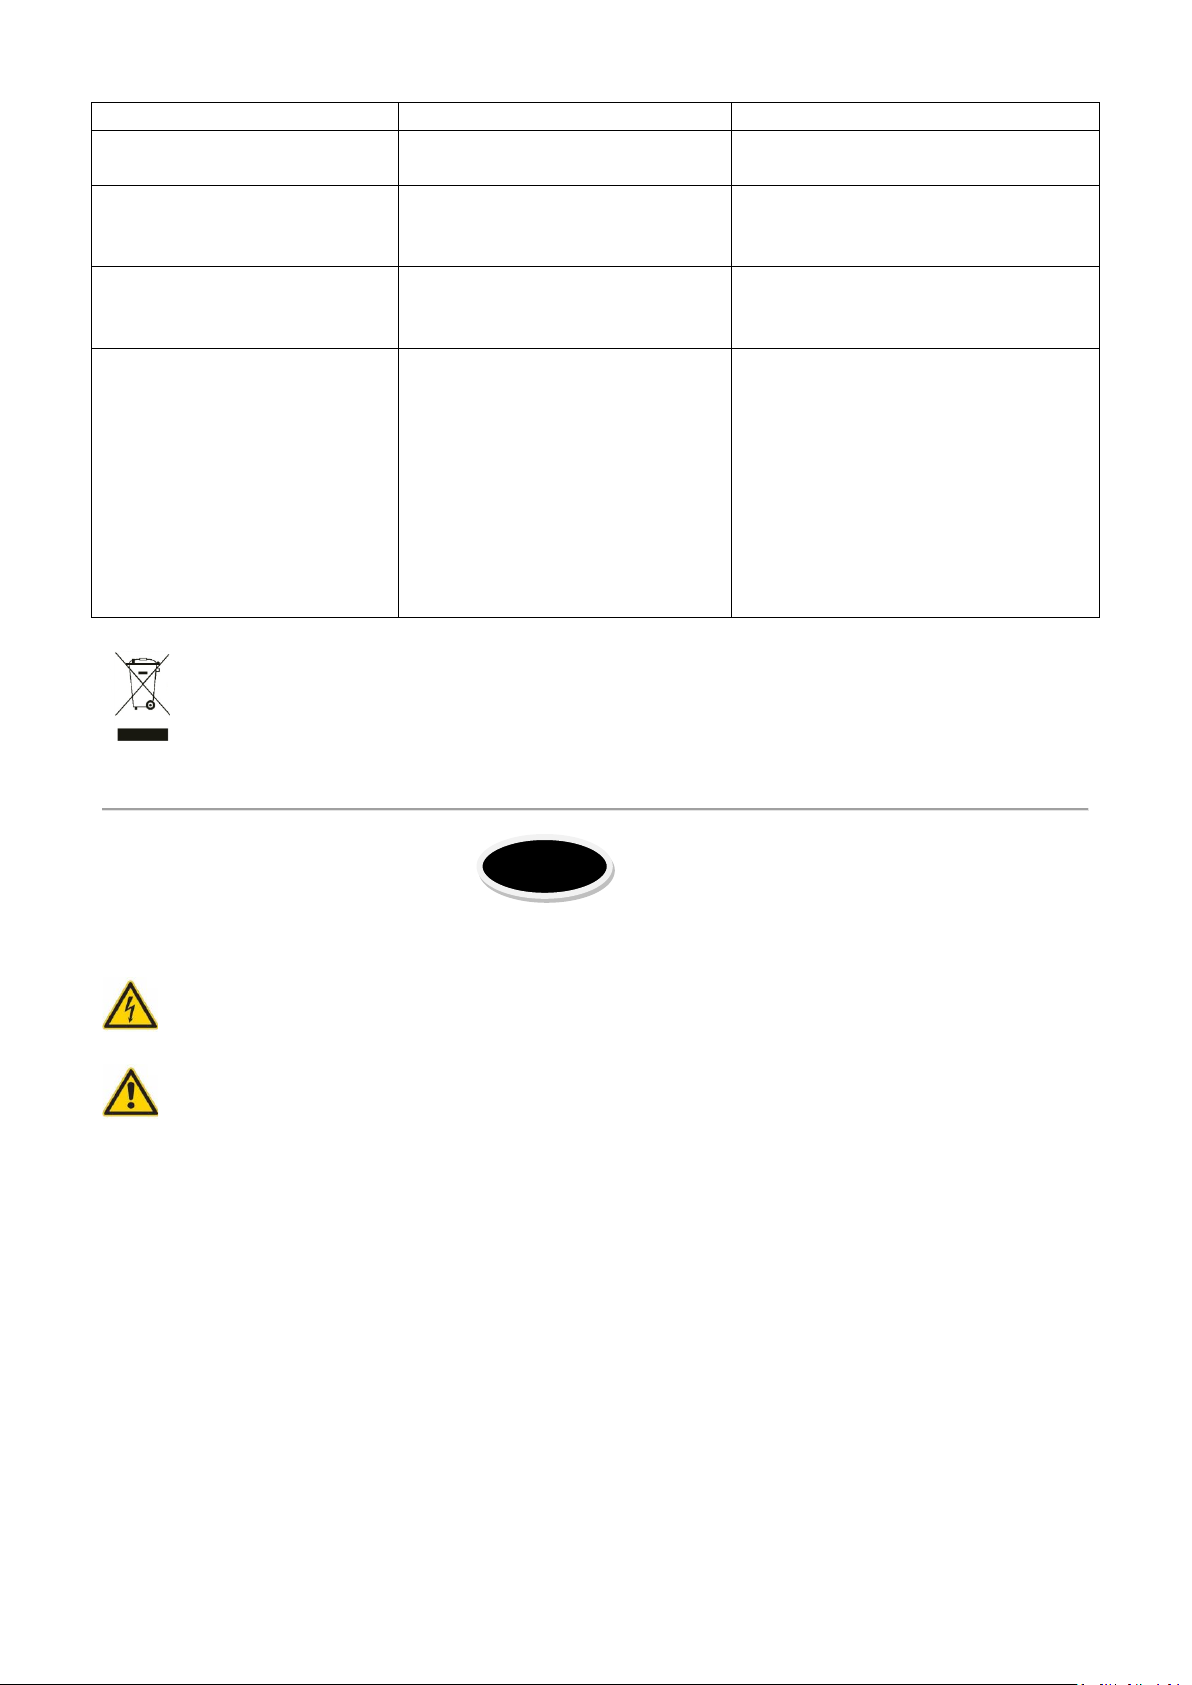
Problem
Possible cause
Solution
Aparatul este pornit, nu are
sunet
1. Nu are sursa de intarre
2. Volumul la minim
1. Conectati semnal la intrarea AUX
2. Reglati volumul
Microfonul nu are sunet
1. Conexiune gresita microfon
2. Microfonul nu este pornit
3. Volum redus microfon
1. Refaceti conexiunea
3. Cresteti volumul microfonului
Fara sunet dupa
USB/SD
1. Format fisier incorect
USB/SD
1. Formatul trebuie sa fie MP3
USB/SD
Zgomote in difuzor
1. Microfonul este pornit dar
sunt prea aproape de difuzor.
1. Pastrati microfonul la o distanta
de alte echipamente wireless
SL
2. Porniti microfonul
introducerea dispozitivului
2. Conexiune defectuoasa
este prea aproape de difuzor.
2. Microfonul este pornit dar
nu este utilizat
3. Volumul microfonului este
prea mare
4. Telefonul mobil este utilizat
prea aproape de difuzor.
5. Alte echipamente wireless
2. Introduceti corect dispozitivul
de 2 m fata de difozor
2. Opriti microfonul daca nu-l
utilizati.
3. Reduceti volumul microfonului.
4. Pe durata utilizarii telefonului,
pastrati-l la distanta fata de difuzor
5. Pastrati difuzorul la distanta fata
RECICLAREA CORECTA A ACESTUI PRODUS
Simbolul alăturat indică faptul că deșeurile de echipamente electrice și electronice nu se reciclează împreună
cu deșeurile menajere. Pentru a preveni un posibil pericol față de mediul inconjurător sau față de sănătatea
dumneavoastră din cauza reciclarii necontrolate a deșeurilor, vă rugăm să separați acest produs de alte tipuri
de deșeuri și să-l reciclați în mod responsabil. Reciclarea controlată a aparatelor de uz casnic joacă un rol vital în
refolosirea, recuperarea și reciclarea echipamentelor electrice și electronice.
Pozorno preberite navodila in jih shranite za poznejšo uporabo.
Strela s simbolom puščice v enakostraničnem trikotniku je namenjena opozarjanju uporabnika na prisotnost ne
izoliranih nevarnih napetosti v ohišju, ki utegnejo biti dovolj visoke, da predstavljajo nevarnost električnega
šoka.
Klicaj znotraj enakostraničnega trikotnika je namenjen opozarjanju uporabnika na pomembna navodila za
delovanje in vzdrževanje (servisiranje) aparata.
POZOR:
1. Ne postavljajte predmetov, napolnjenih z vodo, kot so kozarci ali vaze, na vrhu ali neposredno zraven
aparata. So lahko prevrne, kar povzroči da voda vstopi v aparat. Nikoli ne izlivajte tekočin nad
aparatom. Ne postavljajte majhnih predmetov, kot so kovanci ali sponke za papir, na aparatu, saj bi
lahko padejo v notranjosti aparata. S tem zaženete visoko tveganje za nastanek požara ali življenjsko
nevarne električnega toka! Če tekočina ali predmeti vstope kljub temu v aparat, izvlecite omrežni vtič
iz vtičnice takoj in se obrnite na strokovnjaka.
2. Pri odklopu potegnite samo omrežni vtikač iz vtičnice. Ne vlecite za kabel.
3. Nikoli ne priključujte ali izključujte vtikač z vlažnimi ali mokrimi rokami.
4. Električne naprave morajo biti izven dosega otrok. Bodite še posebej previdni, če so otroci prisotni.
Otroci se ne zavedajo nevarnosti, ki sodelujejo pri predaji električnih aparatov nepravilno. Otroci bi
poskušali suniti predmetov v aparat. Tam je smrtno nevarna nevarnost električnega udara.
5. Aparata ne postavljajte na nestabilno ali premično površino. Osebe se lahko poškodujejo ali se aparat
pri padcu.
©Copyright LOTRONIC 2017 PARTY-15PACK 15
Page 16

6. Vse osebe, ki sodelujejo pri delovanju, montažo in servisiranje aparata in ga dajo v promet, morajo biti
ustrezno usposobljeni in upoštevajte morajo ta navodila za uporabo.
7. Poškodovani omrežni kabel sme zamenjati samo strokovnjak. Nevarnost električnega udara!
8. Če niste prepričani o pravilni povezavi, ali če se porajajo vprašanja, ki niso navedena v navodilih za
uporabo, prosimo, ne oklevajte in se obrnite na podporo ali strokovnjaka po vaši izbiri. Posvetujte se s
strokovnjakom, če ste v dvomih načina delovanja ali varnosti izdelka..
9. Izklopite napravo, če jo ne uporabljate za nekaj časa.
Opis zadnje plošče
1. Glasnost Master-ja
2. Glasnost mikrofona
3. ECHO kontrola za mikrofon
4. Vhod za mikrofon
5. Stikalo za LED na woofer-ju ON/OFF
6. Kontrole za nizke in visoke tone
7. FM antena: Raztegnite na celotno dolžino za optimalno sprejemanje
8. AUX vhod preko 3.5mm mini stereo Jack
9. Izbirnik vhodov: Pritisnite ta gumb za preklop med različnimi vhodi (AUX, USB, SD, Bluetooth, FM)
10. REC gumb: Pritisnite ta gumb za snemanje zvoka žičnega ali brezžičnega mikrofona na USB ali SD.
11. REPEAT: Pritisnite za preklop med ponavljanjem trenutne skladbe ali ponovitev vseh skladb.
12. V USB/SD/Bluetooth načinu: pritisnite, da se vrnete na prejšnjo skladbo. V FM načinu: pritisnite, da
greste na prej shranjeno FM postajo.
13. Predvajanje/pavza v USB/SD/Bluetooth načinu. V FM načinu, pritisnite in držite ta gumb, da začnete
iskanje radijskih postaj in jih samodejno shranite v pomnilnik.
14. V USB/SD/Bluetooth načinu: pritisnite, da greste na naslednjo skladbo. V FM načinu: pritisnite, da
greste na naslednjo shranjeno FM postajo.
15. USB vhod
16. Mini SD card vhod
17. ON/OFF stikalo za vklop sistema
18. AC vhodni priključek
PRIKLOP ŽIČNEGA MIKROFONA
Priključite mikrofon v MIC vtičnico in ga vklopite. Opomba: Če se predvaja glasba iz katerega koli drugega
vhoda, ko je povezan mikrofon ne bo utišal zvoka.
KARAOKE Funkcija
Ta funkcija je na voljo pri vsakem vhodu. Predvajajte skladbe z AUX / USB / SD / FM / Bluetooth, priključite
mikrofon in pojte skupaj.
Vgrajena REC funkcija
1. Priključite mikrofon v MIC IN vhod.
2. Vstavite USB/SD kartico v ustrezno vtičnico. Pritisnite gumb za izbiro vhoda in izberite USB / SD način.
3. Če je kartica USB / SD priključen na zvočnik prvič, bo sistem samodejno ustvari mapo z imenom
"record" za shranjevanje posnetih datotek.
4. Ko ste pripravljeni za snemanje, pritisnite tipko REC za snemanje zvoka z žičnega ali brezžičnega
mikrofona.
©Copyright LOTRONIC 2017 PARTY-15PACK 16
Page 17
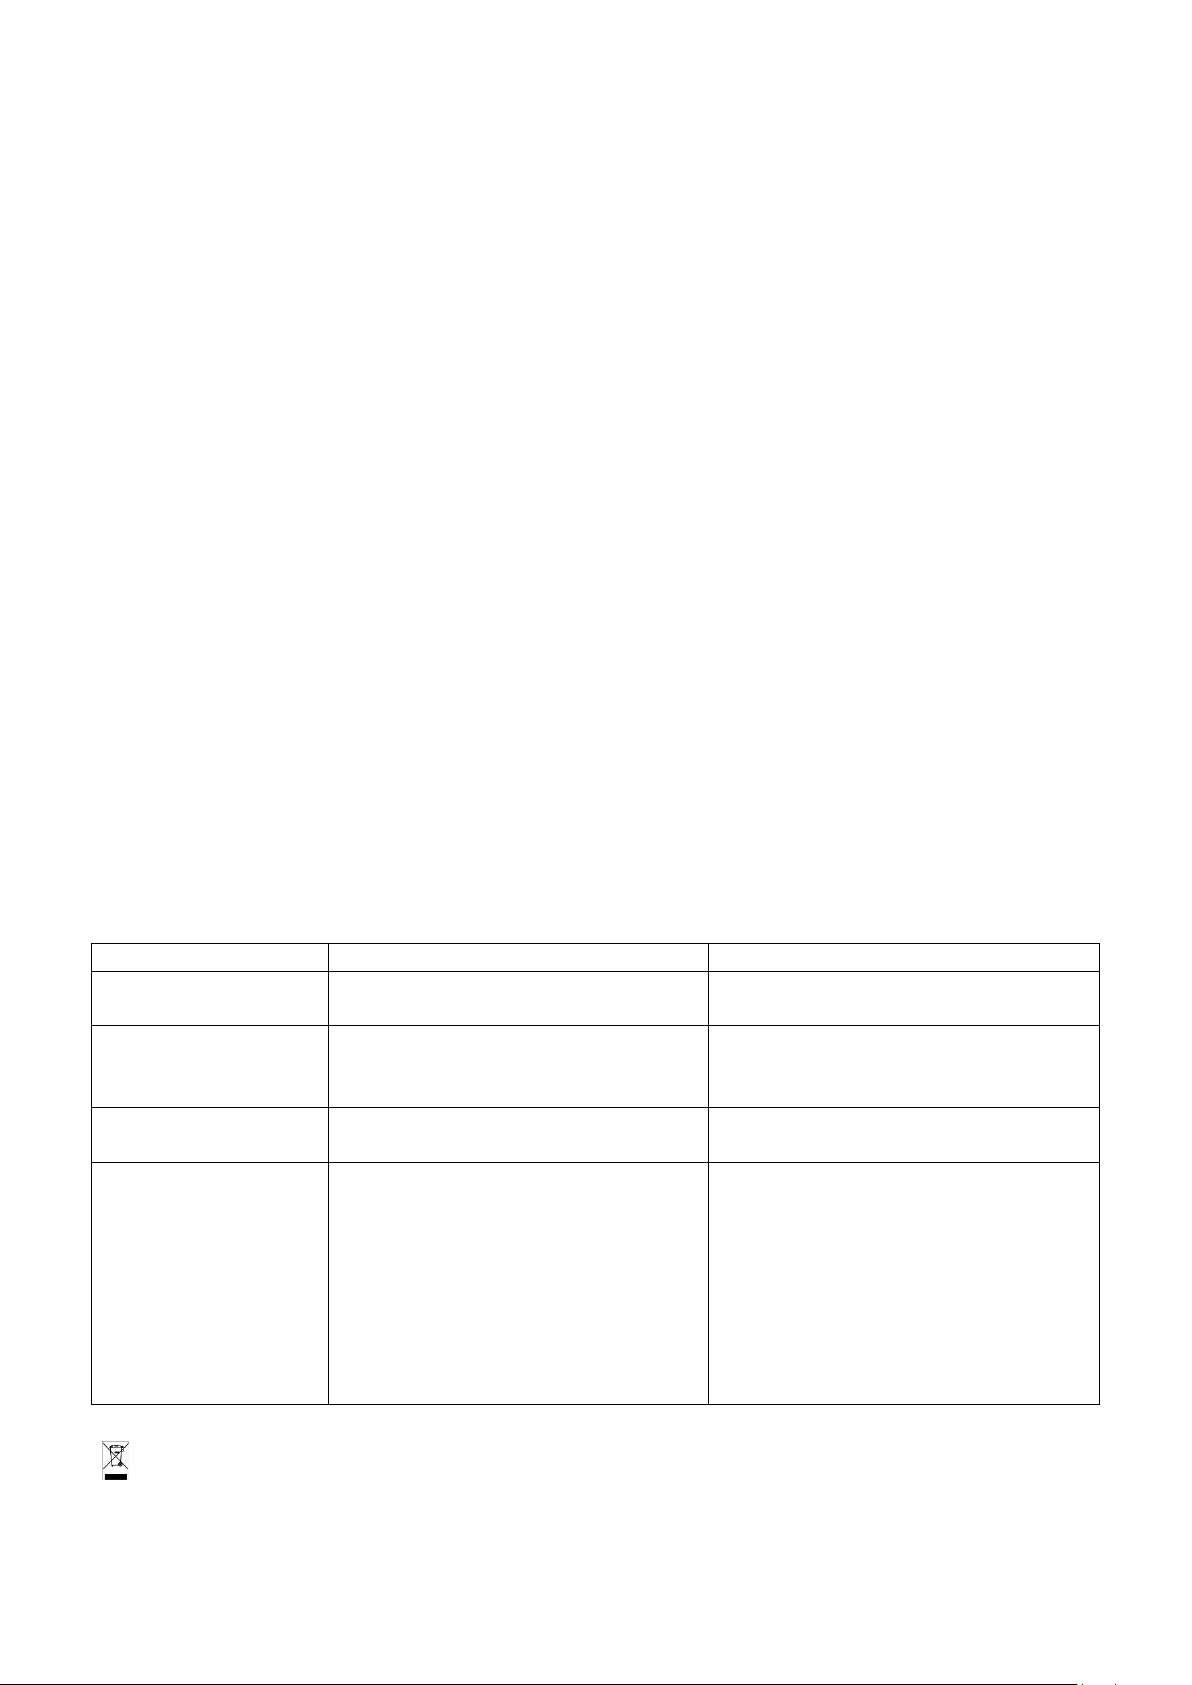
USB/SD Delovanje
Težava
Možen vzrok
Rešitev
Ni zvoka, zvočnik je
vklopljen
1. Ni vhodnega vira
2. Prenizka glasnost
1. Priključite AUX signal
2. Prilagodite glasnost
Ni zvoka iz
1. Slabo priključen mikrofon
3. Glasnost mikrofona prenizka
1. Priključite mikrofon pravilno
3. Povečajte glasnost mikrofona
Ni zvoka po vstavitvi
USB/SD kartice
1. Nepravilna oblika datoteke
2. Slabo priključen USB/SD kartica
1. Format datoteke mora biti MP3
2. Priključite USB/SD kartico pravilno
Zvočnik naredi
1. Mikrofon vklopljen, vendar
zelo blizu zvočnika.
1. Naj bo mikrofon 2m stran od
drugih brezžičnih naprav
Hranite zvočnik stran od visokih temperaturah, močnih magnetnih polj in opreme, ki bi lahko imele motnje.
Če zvočnik preneha z delom, ga izklopite in ponovno vklopite ali izklopite USB / SD / MMC kartico in jo
ponovno priključite. Zvočnik se mora postaviti nazaj v normalno stanje.
Največja velikost USB / SD naprave, ki je lahko povezana je 32 GB.
Podprti glasbeni formati: MP3, WMA
FM RADIO FUNKCIJA
1. Vklopite napravo in pritisnite večkrat izbirnik vhoda na napravi in izberite FM funkcijo (na zaslonu se bo
prikazala frekvenca).
2. Pritisnite gumb PREDVAJANJE/PAVZA na napravi ali tipko na daljinskem upravljalniku da aktivirate
samodejni pomnilnik (radio začne samodejno iskanje razpoložljivih radijskih postaj in jih samodejno shrani).
številka postaje je shranjena odvisna od radijskega signala na vašem območju.
Med iskanjem, pritisnite gumb PREDVAJANJE na daljinskem upravljalniku, da zaustavite iskanje.
3. Uporabite tipke in za poslušanje različnih radijskih postaj, ki so shranjene v pomnilniku.
4. Za spremembo nastavljeni postaj uporabite številčnico na daljinskem upravljalniku.
Na primer, da poiščete postajo na številki 12, najprej pritisnite 1 in nato 2.
BLUETOOTH DELOVANJE
1. Vklopite napravo in pritisnite tipko za izbiro vhoda na enoti in izberite funkcijo Bluetooth.
2. Aktivirajte Bluetooth funkcijo na zunanji napravi, ki je v paru.
3. Začnite iskanje naprav. Naprava prikaže kot "BT SPEAKER".
4. Pritisnite za začetek predvajanja in gumbe in za izbor skladb.
Odpravljanje težav
Če pride do težave, sledite navodilom v spodnji tabeli. Če se težava še vedno ni mogoče odpraviti, se
obrnite na prodajalca.
mikrofona
glasne zvoke
Električni izdelki se ne smejo odlagati v gospodinjske odpadke. Prosimo, da jih pripeljete do centra za recikliranje.
Vprašajte svoje lokalne oblasti ali svojega prodajalca o tem kako se nadaljuje.
©Copyright LOTRONIC 2017 PARTY-15PACK 17
2. Mikrofon izklopljen
lahko preblizu zvočnika
2. Mikrofon vklopljen, vendar se ne
uporablja.
3. Glasnost mikrofona previsoka
4. Mobilni telefon se uporablja
preblizu zvočnika
5. Druge brezžične naprave so lahko
2. Vklopite mikrofon
zvočnika
2. Izklopite mikrofon če ni v uporabi.
3. Prilagodite glasnost mikrofona na
nižjo
4. Imejte mobilni telefon stran od
zvočnika, medtem ko kličete.
5. Imejte zvočnik stran od
Page 18

PT
Leia atentamente o manual de instruções e conserve-o para referência futura.
O símbolo do relâmpago com a seta dentro de um triângulo equilátero destina-se a alertar o utilizador para a
presença de tensões perigosas não isoladas no interior do invólucro do produto que podem ser de magnitude
suficiente para constituir um risco de choque eléctrico para as pessoas.
O ponto de exclamação dentro de um triângulo equilátero destina-se a alertar o usuário para a presença de
instruções importantes de operação e manutenção na literatura que acompanha o aparelho.
ATENÇÃO:
1. Não coloque recipientes com líquidos, como copos ou vasos, sobre ou diretamente ao lado do
aparelho. Podem cair, fazendo com que a água entre no aparelho. Nunca derrame líquidos sobre o
aparelho. Não coloque objetos pequenos, como moedas ou clipes de papel, no aparelho, pois podem
causar riscos de incêndio ou choque elétrico! Se algum líquido ou objeto entrar no aparelho, puxe
imediatamente a ficha da tomada e contacte um técnico qualificado ou o seu distribuidor.
2. Retire a ficha da tomada manuseando pela ficha. Não puxe pelo cabo.
3. Nunca ligue ou desligue a ficha de alimentação com as mãos húmidas ou molhadas.
4. Os aparelhos elétricos devem ser mantidos fora do alcance das crianças. Tenha especial cuidado se as
crianças estiverem presentes. As crianças não estão conscientes dos perigos envolvidos no
manuseamento dos aparelhos elétricos. As crianças podem tentar picar objetos no aparelho. Existe o
perigo de eletrocussão.
5. Nunca coloque o aparelho sobre uma superfície instável ou móvel. O aparelho pode sofrer o risco de
queda e aleijar alguém que esteja na proximidade.
6. Todas as pessoas envolvidas na operação, instalação, manutenção do aparelho e no seu funcionamento
devem ser formadas e qualificadas de acordo com estas instruções de operação.
7. Se o cabo de alimentação apresentar danos, deve ser substituído antes de ser utilizado. Perigo de choque!
8. Se não tiver a certeza sobre a ligação correta ou se surgem questões que não estão presentes no
manual de instruções, não hesite em contactar o suporte ou um especialista técnico. Consulte um
especialista se tiver dúvidas sobre o princípio de funcionamento ou a segurança do produto.
9. Desligue a coluna da alimentação caso não a utilize por um longo período de tempo.
DESCRIÇÃO DO PAINEL TRASEIRO
1. Volume geral
2. Volume do microfone
3. Controlo de eco do microfone
4. Entrada para o microfone
5. Botão ON/OFF para ligar e desligar a iluminação LED da coluna
6. Controlo de graves e agudos
7. Antena FM: estenda a antena para obter uma melhor receção de sinal
8. Entrada AUX via ficha Jack 3.5mm Stereo
9. Selector de entrada: Press this button to switch between the various inputs (AUX, USB, SD, Bluetooth,
FM)
10. REC: prima este botão para gravar o som do microfone com ou sem fios a partir das entradas USB ou
SD.
11. REPEAT: prima para alternar entre a repetição de todas as faixas e a repetição de apenas uma faixa.
12. Nos modos USB/SD/Bluetooth: prima para regressar à faixa anterior. No modo FM: prima este botão
para regressar à estação anterior.
©Copyright LOTRONIC 2017 PARTY-15PACK 18
Page 19

13. Play/pause in USB/SD/Bluetooth mode. In FM mode, press and hold this button to start searching for
radio stations and store them automatically in the memory
14. In USB/SD/Bluetooth mode: press to go to the next track. In FM mode: press to go to the next stored
FM station.
15. Entrada para dispositivos USB
16. Entrada para cartões Mini SD
17. Botão ON/OFF para ligar e desligar o sistema
18. Entrada para conector AC
LIGAÇÃO DO MICROFONE SEM FIOS
Ligue o microfone à tomada MIC IN.
NOTA: se ligar o microfone durante a reprodução musical não silenciará a saída de som.
KARAOKE
Este recurso está disponível com qualquer entrada. Reproduzir uma faixa através das entradas
AUX/USB/SD/FM/Bluetooth. Ligue um microfone para cantar juntamente.
GRAVAR (REC)
1. Ligue um microfone à entrada MIC IN.
2. Insira um dispositivo USB/SD. Prima o seletor de entrada para alternar entre os modos USB/SD.
3. Na primeira ligação do dispositivo USB/SD o Sistema cria automaticamente uma pasta na raiz com o
nome “RECORD” onde serão armazenados os ficheiros gravados.
4. Prima REC para gravar o som captado dos microfones.
USB/SD
Mantenha o equipamento afastado de temperaturas excessivas, campos magnéticos fortes e qualquer
equipamento que possa gerar interferência. Se o altifalante parar de funcionar, desligue-o e ligue-o
novamente, ou desligue o cartão USB/SD/MMC e volte a ligá-lo. O altifalante deve retomar o estado
normal de funcionamento.
A capacidade máxima do dispositivo USB/SD que pode ser conectado é de 32GB.
Formatos de música suportados: MP3, WMA
RÁDIO FM
1. Ligue o sistema e prima repetidamente a tecla de seleção de entrada para escolher a função FM (o visor
mostrará a frequência).
2. Prima PLAY/PAUSE no aparelho ou no comando para ativar a busca automática (o rádio inicia
automaticamente a pesquisa de estações e armazena-as na memória). O número da estação armazenada
depende do sinal de rádio na sua área.
Durante a pesquisa, prima PLAY para interromper a operação.
3. Utilize os botões e para alternar entre as estações de rádio.
4. Para aceder a uma estação na memória, utilize o teclado numérico do comando para escolher a estação.
Exemplo: para escolher a estação 12, prima 1 seguido de 2.
BLUETOOTH
1. Ligue a colune e prima o seletor de entrada para escolher a opção Bluetooth.
2. Active o Bluetooth do seu dispositivo externo para iniciar o emparelhamento.
3. Inicie a pesquisa por dispositivos. O aparelho é identificado como "BT SPEAKER".
4. Prima para iniciar a reprodução e os botões / para selecionar as faixas.
©Copyright LOTRONIC 2017 PARTY-15PACK 19
Page 20
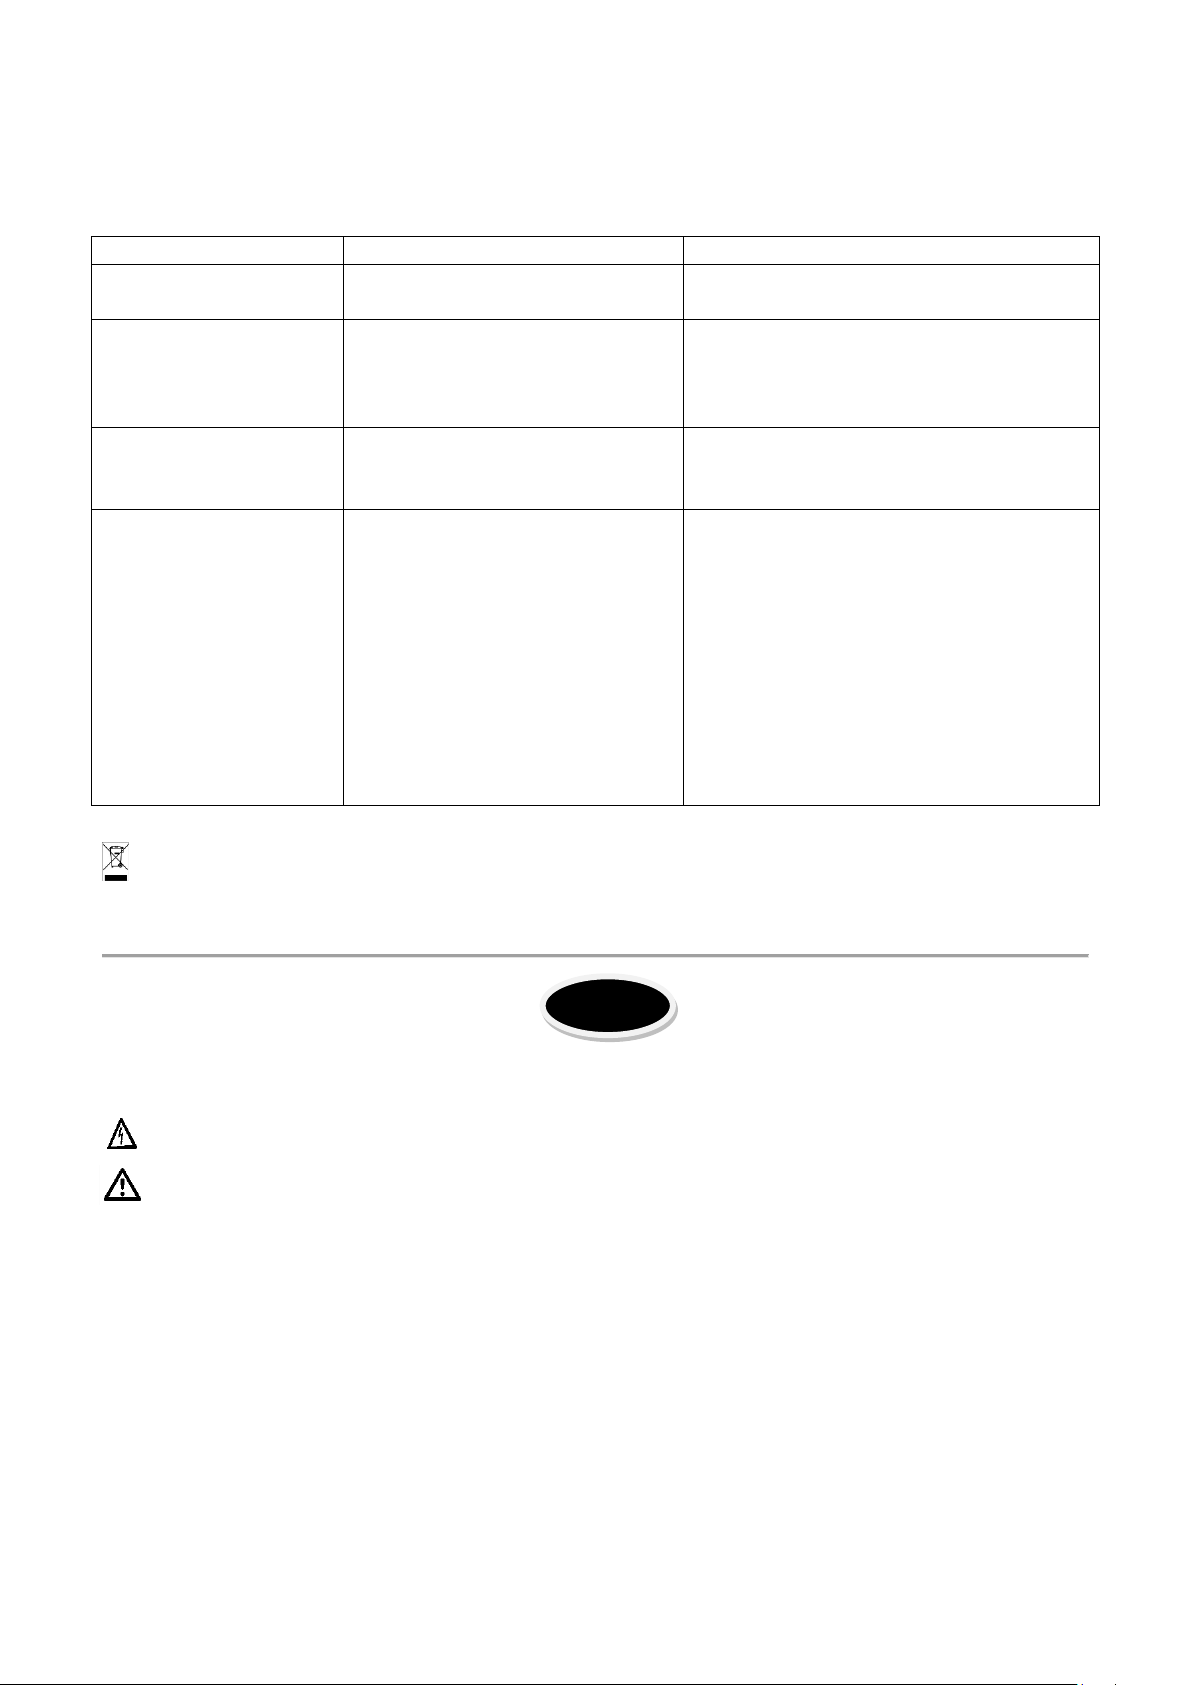
Problema
Possível causa
Solução
Sem som quando liga
1. Sem sinal de entrada
2. Volume baixo
1. Ligue um sinal auxiliar AUX
2. Ajuste o volume
Sem som do
1. Microfone mal ligado
baixo
1. Ligue o microfone corretamente
Sem som após inserir
dispositivo USB
1. Formato incompatível
USB/SD
1. O formato do ficheiro deve ser MP3
corretamente
A coluna faz ruídos
1. O microfone está ligado, mas
sem fios nas proximidades.
1. Mantenha o microfone a 2 metros da
ES
SOLUÇÃO DE PROBLEMAS
Se ocorrer um problema, siga as etapas na tabela abaixo. Se o problema não ficar resolvido, entre em
contato com o revendedor.
microfone
um cartão SD ou um
elevados
Os produtos elétricos não devem ser colocados no lixo doméstico. Por favor, traga-os para um centro de
reciclagem. Questione as autoridades locais ou o revendedor sobre os procedimentos.
2. Microfone desligado
3. O volume do microfone está
2. Má ligação nos dispositivos
pode estar muito perto da
coluna
2. O microfone ligado, mas não
está a ser utilizado.
3. O volume do microfone pode
estar muito alto
4. O telefone está muito perto
da coluna
5. Poderão haver equipamentos
2. Ligue o microfone
3. Aumente o volume do microfone
2. Ligue os dispositivos USB/SD
coluna
2. Desligue o microfone se não estiver a
ser utilizado.
3. Ajuste o volume do microfone para
um nível mais baixo
4. Mantenha o telemóvel afastado da
coluna enquanto durante uma chamada.
5. Mantenha a coluna longe de outros
equipamentos sem fios
Lea atentamente el manual y conserverlo para futuras consultas.
El rayo dentro del triángulo, llama la atención sobre un daño físico (Como una electrocución, por
ejemplo).
El signo de exclamación dentro del triángulo, indica un riesgo en la manipulación o utilización del
equipo.
ATENCION:
1. No coloque pequeños objetos encima o cerca del equipo. Corre el riesgo de que se introduzcan
dentro del equipo y puede producir daños al equipo y riego de descarga eléctrica a personas.
2. Para desconectar el enchufe, estire siempre de la clavija, jamás del cable.
3. Jamás enchufe o desenchufe el conector de corriente con las manos húmedas.
4. Mantener los equipos eléctricos como este fuera del alcance de los niños. Sea particularmente atento
©Copyright LOTRONIC 2017 PARTY-15PACK 20
en presencia de niños, ya que estos no son conscientes de los peligros de un aparato eléctrico y puede
intentar introducir objetos en el interior con el consecuente peligro de electrocución, por ejemplo.
5. Jamás coloque el equipo en una superficie inestable o móvil. El equipo sufre riego de caerse y dañar a
una persona o/y al propio equipo.
6. Todo usuario del equipo ha de conocer todas estas normas de seguridad del equipo y respetarlas.
7. Para cambiar los cables de corriente defectuoso, solo lo puede hacer un especialista ya que tiene
Page 21

riesgo de electrocución.
8. Si usted no sabe conectarlo o hacerlo funcionar, pida ayuda a un profesional.
Desenchufe el adaptador y apague el equipo en caso de no utilización prolongada con el fin de evitar
averías por sobretensión.
Descripción de los controles traseros
1. Control de volumen general
2. Control de volumen micro
3. Control Eco del Micrófono
4. Entrada micro
5. ON/OFF de los LEDS del Woofer
6. Control de graves y agudos
7. Antena FM: Estire completamente la antena para optimizar la recepción
8. Entrada AUX por mini Jack 3,5mm
9. Selector de entrada: Apriete para seleccionar una de las fuentes de entrada (AUX, USB, SD, Bluetooth,
FM)
10. REC: Apriete para grabar el sonido del micro de cable o inalámbrico en un Pen USB o tarjeta de SD.
11. Apriete para repetir el título en curso o todos los títulos.
12. En modo USB/SD/Bluetooth: volver al título anterior. En modo FM: vuelta a la emisora anterior.
13. Lectura/pausa en moda USB/SD/Bluetooth. En moda FM, mantener apretado para comenzar la
búsqueda y grabación automática de las emisoras de radio encontradas.
14. En modo USB/SD/Bluetooth: ir al título siguiente. En modo FM: ir a la emisora memorizada siguiente
15. Conexionado de un Pen USB
16. Conexionado de una tarjeta mini-SD
17. ON/OFF del equipo
18. Entrada de alimentación externa de 12Vdc
19. Conector de alimentación AC
CONEXION DE UN MICROFONO
Conecte el micrófono en la clavija MIC IN y enciéndalo.
Nota: El hecho de conectar un micrófono no corta el sonido de la fuente en curso de lectura.
Función KARAOKE
Esta función se puede utilizar con todas las fuentes de entrada. Conecte un micrófono y cante sobre la música
que se esté reproduciendo en cualquiera de las fuentes de entrada AUX/USB/SD/FM/Bluetooth.
Grabación
1. Conecte un micrófono en la entrada MIC IN.
2. Conecte un pen USB/tarjeta SD en la entrada correcta. Apriete en la tecla 9 y seleccione USB/SD.
3. Si conecta el pen USB/Tarjeta SD por primera vez en este bafle, el equipo creará una carpeta llamada
RECORD. Todas las grabaciones serán automáticamente guardadas en esta carpeta.
4. Cuándo esté listo para la grabación, apriete en la tecla REC.
Utilización de la entrada USB/mini-SD
Mantenga el equipo protegido del calor, de los campos magnéticos potentes y de equipos que puedan
provocar interferencias. Si el altavoz no funciona, apáguelo y vuelva a encenderlo o bien desenchufe y
vuelva a enchufar el pen USB/Tarjeta SD. El altavoz deberá volver a funcionar normalmente.
©Copyright LOTRONIC 2017 PARTY-15PACK 21
Page 22

El tamaño máximo admitido de fuentes USB y SD es de 32 Gb.
Problema
Causa posible
Solución
Con el equipo
sonido
1. Ausencia de fuente de entrada
1. Conecte una fuente de entrada
No hay sonido de
1. El micrófono está mal conectado
mínimo
1. Conecte bien el micro
No hay sonido en las
1. Formato de fichero no correcto
1. Transforme los ficheros a MP3
USB/SD
Los altavoces
1. El micrófono está muy cerca del
situado cerca del altavoz
1.Mantenga el micro a una distancia de
Ficheros de música compatibles: MP3, WMA
RADIO FM
1. Encienda el equipo y apriete repetidamente la tecla 9 para seleccionar la función FM (la frecuencia se
mostrará en la pantalla).
2. Apriete en la tecla de lectura para activar la memorización automática (El sintonizador buscará las
emisoras disponibles y las memorizará automáticamente). El número de emisoras memorizadas depende
de la recepción dentro de su zona.
Para parar la búsqueda, apriete la tecla de lectura.
3. Utilice las teclas y para escuchar las emisoras memorizadas.
4. Para seleccionar directamente una emisora memorizada, apriete en la tecla numérica correspondiente
en el mando a distancia. P.ej. para seleccionar la emisora 12, apriete primero en 1 y seguidamente en 2.
SINCRONIZACION BLUETOOTH
1. Encienda el equipo y apriete la tecla 14 para poder seleccionar la función BLUETOOTH.
2. Active la función Bluetooth de su dispositivo móvil.
3. Comience la búsqueda de dispositivos en el móvil. El altavoz se muestra con el nombre "BT-SPEAKER".
4. Apriete en la tecla para iniciar la lectura. Seleccione los títulos con las teclas y .
Diagnóstico de fallos
En caso de problemas, siga las instrucciones de más abajo. Si el problema persiste, consulte con su
vendedor.
encendido, no hay
micrófono
2. Volumen ajustado al mínimo
2. El micro no está encendido
3. Volumen de micro está ajustado al
fuente USB/SD
emiten ruidos
2. Fuente USB/SD mal conectada
altavoz
2. El micrófono está encendido y no
usado
3. El volumen del micrófono está
muy fuerte
4. Un teléfono móvil está siendo
utilizado cerca del altavoz
5. Otro equipo inalámbrico está
NOTA IMPORTANTE: Los productos eléctricos no deben desecharse con la basura doméstica. Recíclelas en
centros destinados a ello. Consulte a las autoridades locales o distribuidor sobre cómo reciclar.
2. Reajuste el volumen al nivel apropiado
2. Encienda el micro
3. Aumente el volumen del micro
2. Conecte correctamente la fuente
2 Metros del altavoz
2. Apague el micro cuándo no se utilice
3. Baje el volumen del micro
4. Apártese del altavoz con el teléfono
durante una llamada telefónica
5. Aparte el altavoz de cualquier otro
equipo inalámbrico.
©Copyright LOTRONIC 2017 PARTY-15PACK 22
Page 23
EC Declaration of Conformity
We, LOTRONIC SA
Avenue Zénobe Gramme, 9
1480 SAINTES
Belgium
+32.2.390.91.91
certify and declare under our sole responsibility that the following product:
Trade name: PARTY LIGHT & SOUND
Product name: Portable PA led speaker with microphone
Type or model: PARTY-15PACK
conforms with the essential requirements of:
RED directive 2014/53/EU – LVD directive 2014/35/EU – EMC directive 2014/30/EU
based on the following standards applied:
EN60065: 2014
EN62479 :2010
EN 301 489-1 V1.9.2
EN 301 489-17 V2.2.1
EN 300 328 V1.9.1
EN55013:2013
EN61000-3-2:2014
EN61000-3-3:2013
EN55020:2007+A11:2011
Place and date of issue: Saintes (Belgium), on 10/03/2017
Guive Akbar
Technical manager
Page 24
Déclaration CE de Conformité
Nous, LOTRONIC SA
Avenue Zénobe Gramme, 9
1480 SAINTES
Belgique
+32.2.390.91.91
Certifions et déclarons sous notre seule responsabilité que les produits suivants:
Marque: PARTY LIGHT & SOUND
Désignation commerciale: Enceinte portable à leds avec micro
Type ou modèle: PARTY-15-PACK
Auxquels se réfère cette déclaration sont conformes aux exigences essentielles et de :
Directive RED 2014/53/EU – Directive LVD 2014/35/EU – Directive EMC 2014/30/EU
Basés sur les standards appliqués
EN60065: 2014
EN62479 :2010
EN 301 489-1 V1.9.2
EN 301 489-17 V2.2.1
EN 300 328 V1.9.1
EN55013:2013
EN61000-3-2:2014
EN61000-3-3:2013
EN55020:2007+A11:2011
Fait à Saintes (Belgique), le 10/03/2017
Guive Akbar
Responsable technique
 Loading...