

Partybag 6 - v212_EN
USER MANUAL
2
GENERAL INFORMATION
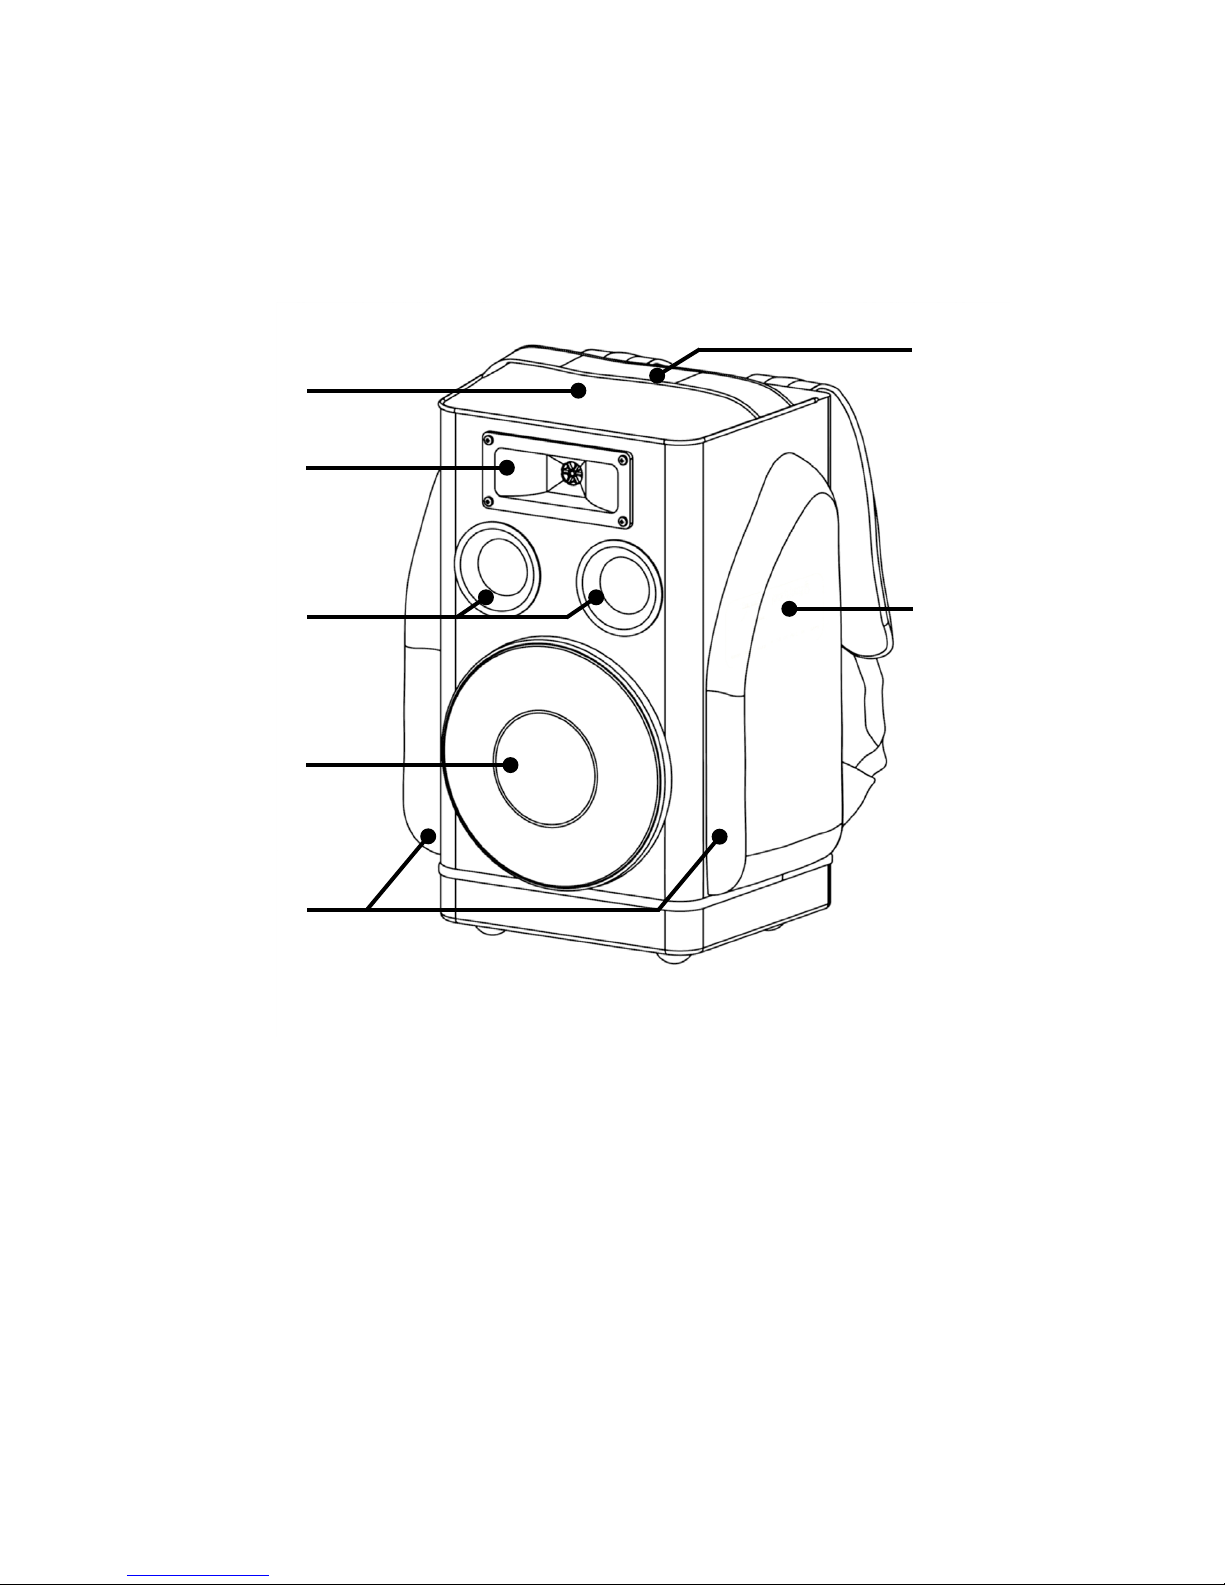
Partybag 6 is a portable active loudspeaker, powered by rechargeable battery and driven by a DSPcontrolled Class D amplifier, integrated in an easy to carry backpack.
Every Partybag 6 features: a woofer (1), a tweeter (2), 2 bass reflex ports (3), a control and I/O panel
(4), two side pockets (5), an upper pocket (6) and a carrying handle (7).
Partybag 6 is equipped with the following accessories/parts:
• 3.5 mm Jack – 2 x RCA audio cable
• Rain cover
• 29.4 V external power supply
• User manual
• Warranty certificate and safety information
Partybag 6 can be used in combination with microphones, musical instruments, and any kind of line
level audio source such as mixers, computers with sound cards, MP3 players, smartphones and
tablets.
Partybag 6 is also a Bluetooth® audio receiver and can play MP3 files from USB memory devices.
Multiple Partybag can be connected in daisy-chain to form a larger sound system.
❼
❹
❻
❷
❸
❶
❺
3
CONTROL AND INPUT/OUTPUT PANEL
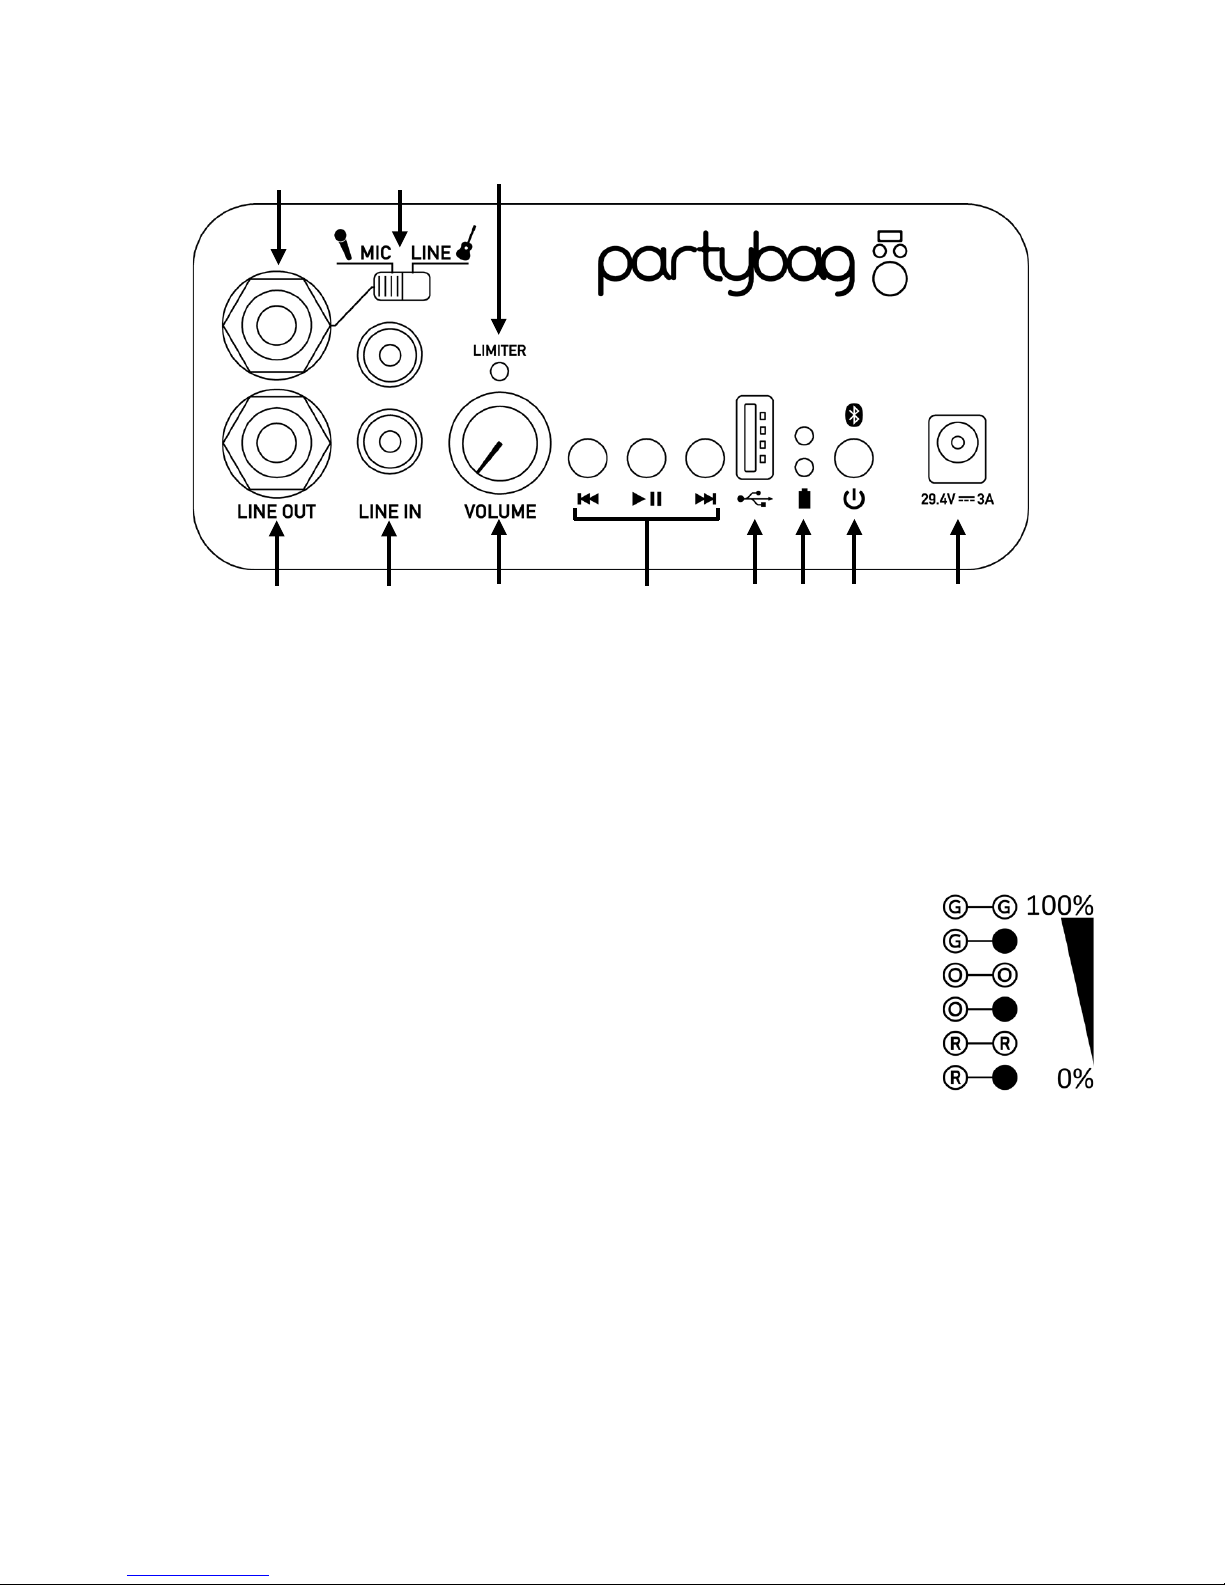
1. Jack 6.3 mm line out: provides an amplified and mixed audio output from the Partybag input
stage to connect another Partybag or external audio devices.
2. RCA stereo input: line level input to connect generic audio devices.
3. Master volume: sets the volume of Partybag.
4. Back/Play-Pause/Forward buttons: goes back 1 track / play-resume / goes forward 1 track in
the reproduction of MP3 files from USB memory stick or Bluetooth®.
5. USB Socket (5V 500 mA): using this port it’s possible to connect USB memory devices and play
MP3 files from them, or to recharge USB devices such as MP3 players, smartphones etc.
6. Battery level indicator: indicates when the device is turned on and shows
the current battery charge level. The combination of colors shows the
charge level as shown in the scheme (G=green, O=orange, R=red, Black=off).
A single blinking red LED indicates that the device is turning off.
7. Power on button/Bluetooth®: press and hold the button for 3 seconds to
turn the device on or off. A single press of the button reactivates the
Bluetooth® for 60 seconds.
8. 29.4 V power supply input: to be used to recharge Partybag with the supplied power supply.
The LED on the battery charger indicates the charging status.
9. Limiter indicator: shows when the internal limiter is active. The digital limiter protects
Partybag from distortion and possible malfunctioning; it’s active in two cases: if the input signal
level is too high or if the master volume is too high. In case the indicator is turned on for a long
time it is recommended to reduce the volume of the input source and/or of the master volume
to preserve an optimal sound quality. If reducing the master volume the indicator remains
active, then the input signal is too high and it is suggested to lower it.
10. MIC/Line selector for Jack 6.3 mm input: sets the Jack 6.3 mm input in “MIC” mode to connect
microphones or instruments without preamp, or “LINE” to connect line level audio sources.
11. Jack 6.3 mm input: universal input for MIC/Line level signals.
❶
❷
❾
❸
❹
❺
❻
❿
⓫
❽
❼

4
AUDIO SOURCES CONNECTION
SINGLE PARTYBAG
It is possible to connect several devices to Partybag at the same time using different inputs. The
only exceptions are the Bluetooth® and the MP3 player that cannot work at the same time.
It is recommended to use the cable supplied with Partybag, or other robust and reliable audio
cables, to avoid connection problems.
1. Generic line level audio source (MP3 players, PC, smartphone, DJ console, etc.)
• Connect the audio source to the Partybag RCA input using the bundled Jack 3.5 mm/RCA cable
or another cable
• Turn Partybag on
• Start playback from the audio source in use
NOTE: it is suggested to set the volume high enough on the audio source in use before intervening
on the Partybag master volume, while still avoiding the limiter LED to turn on. If the limiter LED turns
on the audio source volume may be too high.
2. USB Memory device (USB pen drive)
• Turn Partybag on
• Connect the USB memory device to the Partybag USB port
• Playback will start automatically from the first track or from the point where playback was
previously stopped
• Use the “Play-Pause”, “Forward” and “Back” to control the playback of MP3 files

5
3. Bluetooth® Player (smartphone, tablet, Bluetooth® transmitters)
• Turn Partybag on
• Use the Bluetooth® device search function on your smartphone or Bluetooth® device
• Select the device named “PARTYBAG-####” (where #### indicates a 4-digit number)
• Play music from your Bluetooth® device
• Use the “Play-Pause”, “Forward” and “Back” buttons to manage playback via Bluetooth®
NOTE: if no device is connected to Partybag's Bluetooth® for 60 seconds, it will turn off to save
battery power. To switch the Bluetooth® on again press the corresponding button, the battery level
indication LEDs will flash to indicate that the Bluetooth® receiver is switched on again for a further
60 seconds.
NOTE: it is suggested to set the volume high enough on your smartphone or Bluetooth® source before
intervening on the Partybag volume.
NOTE: inserting a USB memory device in the Partybag USB port will stop the Bluetooth® function,
that will be re-enabled after removing the USB device.
4. Microphone or musical instruments requiring preamp (electric guitars etc.)
• Connect the microphone or the musical instrument to the Partybag Jack 6.3 mm input using
an XLR-Jack or Jack-Jack cable (mono)
• Set the input to “MIC” mode using the “MIC/LINE” selector
• Turn Partybag on
NOTE: by setting the input in “MIC” mode the natural background noise level may increase.

6
5. Music instruments with preamp (keyboards, effect processors…), mixers or other Partybag
• Connect the musical instrument or audio source to the Partybag Jack 6.3 mm input using an
XLR-Jack or Jack-Jack cable (mono)
• Set the input in “LINE” mode using the “MIC/LINE” selector
• Turn Partybag on
DAISY-CHAIN CONNECTION
To connect several Partybag in daisy-chain it is necessary, after connecting the first of them to an
audio source as described above, to use a Jack 6.3 mm mono cable to connect the LINE OUT of the
first Partybag to the Jack 6.3 mm input of the second Partybag.
In the same way, it’s possible to connect the second Partybag to a third and so on.
NOTE: by increasing the number of Partybag connected in daisy-chain the natural background noise
level may increase.
NOTE: to avoid unwanted noises, it’s suggested to turn on the Partybag in sequence from the first in
the chain (the one connected to the audio sources) to the last, following the order. To turn them off,
follow a reverse order from the last Partybag to the first.
NOTE: the volume of each Partybag is independent, so adjusting the volume in the first or any other
Partybag in the chain has no effect on the others. To have a global volume adjustment act on the
volume of the audio source in use.

7
BATTERY RECHARGE
Partybag includes an internal Lithium battery, rechargeable and non-removable.
When the battery charge indicator shows a single red LED blinking, it is necessary to recharge
Partybag because the battery is almost fully discharged.
If you continue to use Partybag in this condition, the device will automatically turn off after a few
seconds to avoid damages to the battery and sound quality loss.
To recharge the battery, connect the bundled battery charger to the mains and to the 29.4 V input
on the side panel of Partybag.
The LED on the battery charger will show the recharge status (red = charging, green = fully charged).
NOTE: while charging, the battery level indicator doesn’t show the current charge level. Use the LED
on the battery charger to check when the charging is complete.
Full battery recharge requires about 3 hours, the required time could increase if Partybag is in use
while recharging.
To increase battery life, it is recommendable to keep the product at a temperature between 5°C and
25°C.
Extreme temperatures reduce capacity and duration of the battery.
WARNING: to preserve the battery range, it is recommended to perform a full recharge at least once
every 6 months, even if the Partybag is not used. Do not leave the battery fully discharged for long
periods of time, it may be damaged permanently.
NOTE: battery duration data are indicative only and heavily depends on volume and usage
conditions, on the age of the battery, on temperature and other environmental factors.
POWER SUPPLY FROM MAINS
It is possible to use the device connected to the mains using the same power supply used for battery
recharge, avoiding battery discharge and allowing for an unlimited duration.

8
⎓
⎓
TECHNICAL SPECIFICATIONS
ACOUSTICAL:
Frequency response (-3dB): 70 Hz ÷ 20000 Hz
Max SPL: 120 dB
Tweeter: 1” piezo (Power handling 50 W RMS)
Woofer: 8” by FaitalPRO® (Power handling 130 W RMS)
Amplifier: Class D 2x50 W RMS, DSP controlled
Enclosure: Plywood, with bass-reflex
INPUT/OUTPUT:
Analog inputs: Jack 6.3 mm (unbalanced) with selectable MIC/LINE level,
2xRCA
Digital inputs: MP3/USB Player, Bluetooth® receiver
Analog outputs: Jack 6.3 mm (unbalanced)
Jack MIC/LINE sensitivity: 30 mV/300 mV (-32 dBv/- 10 dBv)
RCA sensitivity: 300 mV (-10 dBv)
Maximum input level: 1 V (0 dBv)
Maximum output level: 1 V (0 dBv)
ELECTRICAL:
USB charging port: 5 V 500 mA
Battery: 7 cell (25.9 V) Li-Ion 5000 mAh (130 Wh)
Battery range at full volume: 8 hours
Battery range at mid volume: 32 hours
External power supply: Input 100-240 V ∼ 50/60 Hz 1 A, Output 29.4 V 3A
MECHANICAL:
Height: 48 cm
Width: 31 cm
Depth: 25 cm
Net weight: 6.2 Kg
Woofer protection: Metallic grid, black
Backpack internal volume: 7 liters (divided into 3 pockets)
Backpack fabric: CORDURA®, handcrafted in Italy
 Loading...