

Partner Tech International EM-100 User Manual

EM-100
User Manual


i
Copyright
This publication, including all photographs, illustrations and software, is protected under international
copyright laws, with all rights reserved. Neither this manual, nor any of the material contained herein, may be
reproduced without written consent of PARTNER Tech Corp.
Disclaimer
The information in this document is subject to change without notice. The manufacturer makes no representa-
tions or warranties with respect to the contents hereof and specically disclaims any implied warranties of
merchantability or tness for any particular purpose. The manufacturer reserves the right to revise this publi-
cation and to make changes from time to time in the content hereof without obligation of the manufacturer to
notify any person of such revision or changes.
Trademark recognition
All product names used in this manual are the properties of their respective owners and are acknowledged.
Federal Communications Commission (FCC)
This equipment has been tested and found to comply with the limits for a Class A digital device, pursuant to
Part 15 of the FCC Rules. These limits are designed to provide reasonable protection against harmful interference in a residential installation. This equipment generates, uses, and can radiate radio frequency energy
and, if not installed and used in accordance with the instructions, may cause harmful interference to radio
communications. However, there is no guarantee that interference will not occur in a particular installation. If
this equipment does cause harmful interference to radio or television reception, which can be determined by
turning the equipment off and on, the user is encouraged to try to correct the interference by one or more of
the following measures:
Reorient or relocate the receiving antenna.
Increase the separation between the equipment and the receiver.
Connect the equipment onto an outlet on a circuit different from that to which the receiver is connected.
Consult the dealer or an experienced radio/TV technician for help.
Shielded interconnect cables and a shielded AC power cable must be employed with this equipment to ensure
compliance with the pertinent RF emission limits governing this device. Changes or modications not expressly approved by the system’s manufacturer could void the user’s authority to operate the equipment.
Declaration of conformity
This device complies with part 15 of the FCC rules. Operation is subject to the following conditions:
This device may not cause harmful interference, and
This device must accept any interference received, including interference that may cause undesired operation.

ii
About this manual
This manual is intended for system administrators who are familiar with setting up a new system and installing programs.
The manual consists of the following sections:
Chapter 1 Getting Started: This section covers unpacking and checking the
package contents, identifying components, charge the
battery, install the SD card and power it on..
Chapter 2 Learning The Basics: The chapter provides information how to use the basic
features.
Chapter 3 Using The Accessories: This section provides information how to use the
accessories.
Appendix: The appendix covers troubleshooting, information
on having the EM-100 serviced, and technical
specications.
Safety information
Before installing and using the EM-100, take note of the following precautions:
Request service for damaged products: » Turn off the product, unplug it from the electrical outlet, and
request service from a service partner under the following conditions:
The power cord or plug is damaged.•
Liquid has been spilled into the product.•
An object has fallen into the product.•
The product has been exposed to rain or water.•
The product has been dropped or damaged.•
The product does not operate normally when you follow the operating instructions.•
Avoid hot areas: » The product should be placed away from heat sources such as radiators, heat registers,
stoves, and other products (such as ampliers) that produce heat.
Allow the product to cool: » Allow the product to cool before removing covers and touching internal
components.
Avoid wet areas: » Never use the product in a wet location (more than 90% humidity).
Avoid inserting objects into product: » Never insert objects of any kind into slots or other openings in the
product.
Clean the product properly: » Unplug the product from the wall outlet before cleaning it. Do not use liquid
cleaners or aerosol cleaners. Use a soft cloth dampened with water for cleaning exterior components, but
NEVER apply water directly to the product or to an LCD screen.
Use recommended mounting accessories: » Do not use the product on an unstable table, cart, stand, tripod,
or bracket. Mount the product according to the manufacturer’s instructions, and use a mounting accessory
recommended by the manufacturer.
Use the product with approved equipment: » Use your product only with the computers and accessories
identied as suitable for use with your product.
Adjust the volume: » Turn down the volume before using headphones or other audio devices.
Use only an approved adapter. »
iii
This device has a built-in Li-polymer battery. To reduce the risk of re or burns, do not disassemble, »
crush, puncture a battery pack. If expose the battery in re, the battery will crack, explode or release
dangerous chemicals.
There is a danger of explosion if a battery pack is incorrectly replaced. Replace it only with an »
approved battery pack for this product.
Replace the battery with the same type as the product’s battery we recommend in the product »
specication list. Use of another battery may present a risk of re or explosion
When a battery pack has reached the end of its useful life, do not dispose of the battery pack in »
general household waste. Follow the local laws and regulations in your area for battery pack disposal.
The provided battery is only for this device. »
Store the battery pack in a cool, dry place. »
When not in use this product for a long period, remove the battery pack and store it in a cool, dry »
place. If you want to store it for long time, please place this product in a dry box.
WARNING
Warning! Batteries may explode if not handled properly. Do not
disassemble or dispose of them in re. Keep them away from children.
Follow local regulations when disposing of used batteries.
警告
不正確地更換電池會有爆炸的危險。僅可更換為廠商建議的相同電池或相同型
式電池。請依據廠商說明書棄置電池。
注意
用错误型号电池更换会有爆炸危险务必按照说明处置用完的电池。
Revision history
Version 1.0, April 2009

iv
TABLE OF CONTENTS
CHAPTER 1 GETTING STARTED ................................................ 1
Unpacking the EM-100 ..................................................................................1
Checking the package contents ....................................................................2
Identifying components .................................................................................3
Setup the EM-100 ..........................................................................................7
Using SD cards ............................................................................................10
Install a SD card ...........................................................................................10
Viewing content of a SD card .......................................................................13
CHAPTER 2 LEARNING THE BASICS ...................................... 15
Entering text .................................................................................................15
Shortcut menus ............................................................................................15
Performing a reset........................................................................................16
Opening and closing programs ....................................................................16
Program switch ............................................................................................16
Windows CE help .........................................................................................16
Adjusting the volume ....................................................................................17
Changing the device name ..........................................................................18
Entering owner information ..........................................................................19
Recalibrating the screen ..............................................................................20
Setting the date and time .............................................................................22
Turning on / off the WLAN ............................................................................23
Turning on / off the Bluetooth .......................................................................24
Setting the screen rotation ...........................................................................25
Install and remove programs........................................................................26
Connecting to a WLAN network ...................................................................27
Automatically connect to a WLAN network ..............................................27
Manually connect to a WLAN network .....................................................27
Find an IP address ...................................................................................28
Specify the IP address and Name Servers ..............................................29
Upgrading OS Image or Bootloader .............................................................30
CHAPTER 3 USING THE ACCESSORIES ............................... 33
Attaching the leather cover .........................................................................33

v
APPENDIX .................................................................................. 35
Troubleshooting ...........................................................................................35
Tips for Troubleshooting ...............................................................................35
General Problems .......................................................................................35
Having the EM-100 Serviced ......................................................................36
Guidelines for care and maintenance ..........................................................37
Using the device ......................................................................................37
Cleaning the device .................................................................................37
Carrying or storing the device ..................................................................37
Specications ...............................................................................................38

vi
1
CHAPTER 1
GETTING STARTED
This chapter describes the procedures from unpacking the EM-100, to powering it on. The following topics
are described.
Unpacking the EM-100 on page • 1
Checking the package contents on page • 2
Identifying components on page • 3
Setup the EM-100 on page • 7
Using SD cards on page 1• 0
Install a SD card on page 1• 0
Viewing content of a SD card on page 1• 3
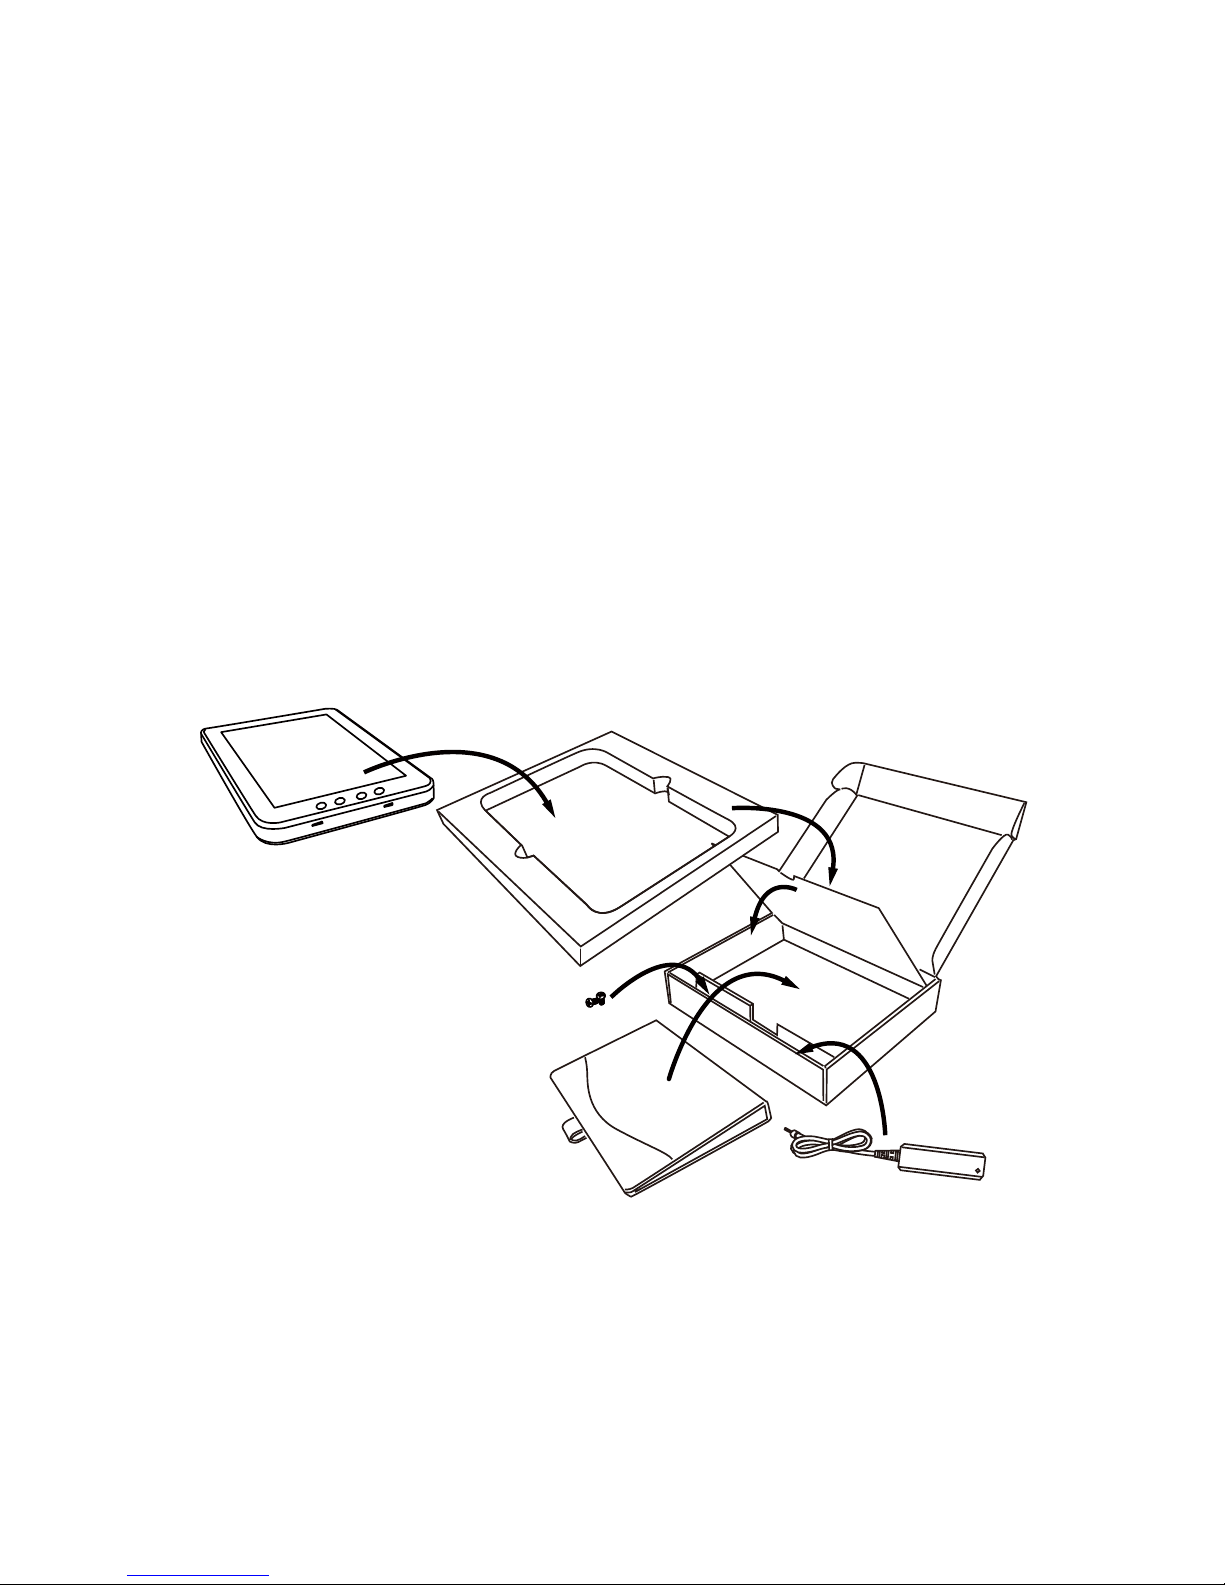
Unpacking the EM-100
The device and accessories are packed in a cardboard carton with foam padding for protection during shipping.
Figure 1.1 Unpacking the EM-100
Carefully unpack the machine and keep the packing materials. If you need to ship it in the future, repack it as
shown in Figure 1.1.
EM-100
Screws
Leather cover
Adapter

2 C H A P T E R 1 G E T T I N G S T A R T E D
Checking the package contents
After you unpack the device check that the following items are included.
If any item is missing or appears damaged, contact your dealer immediately.
EM-100
Stylus
Battery
2 screws
Leather cover
AC adapter
CD-ROM
Quick start guide
QSG
3
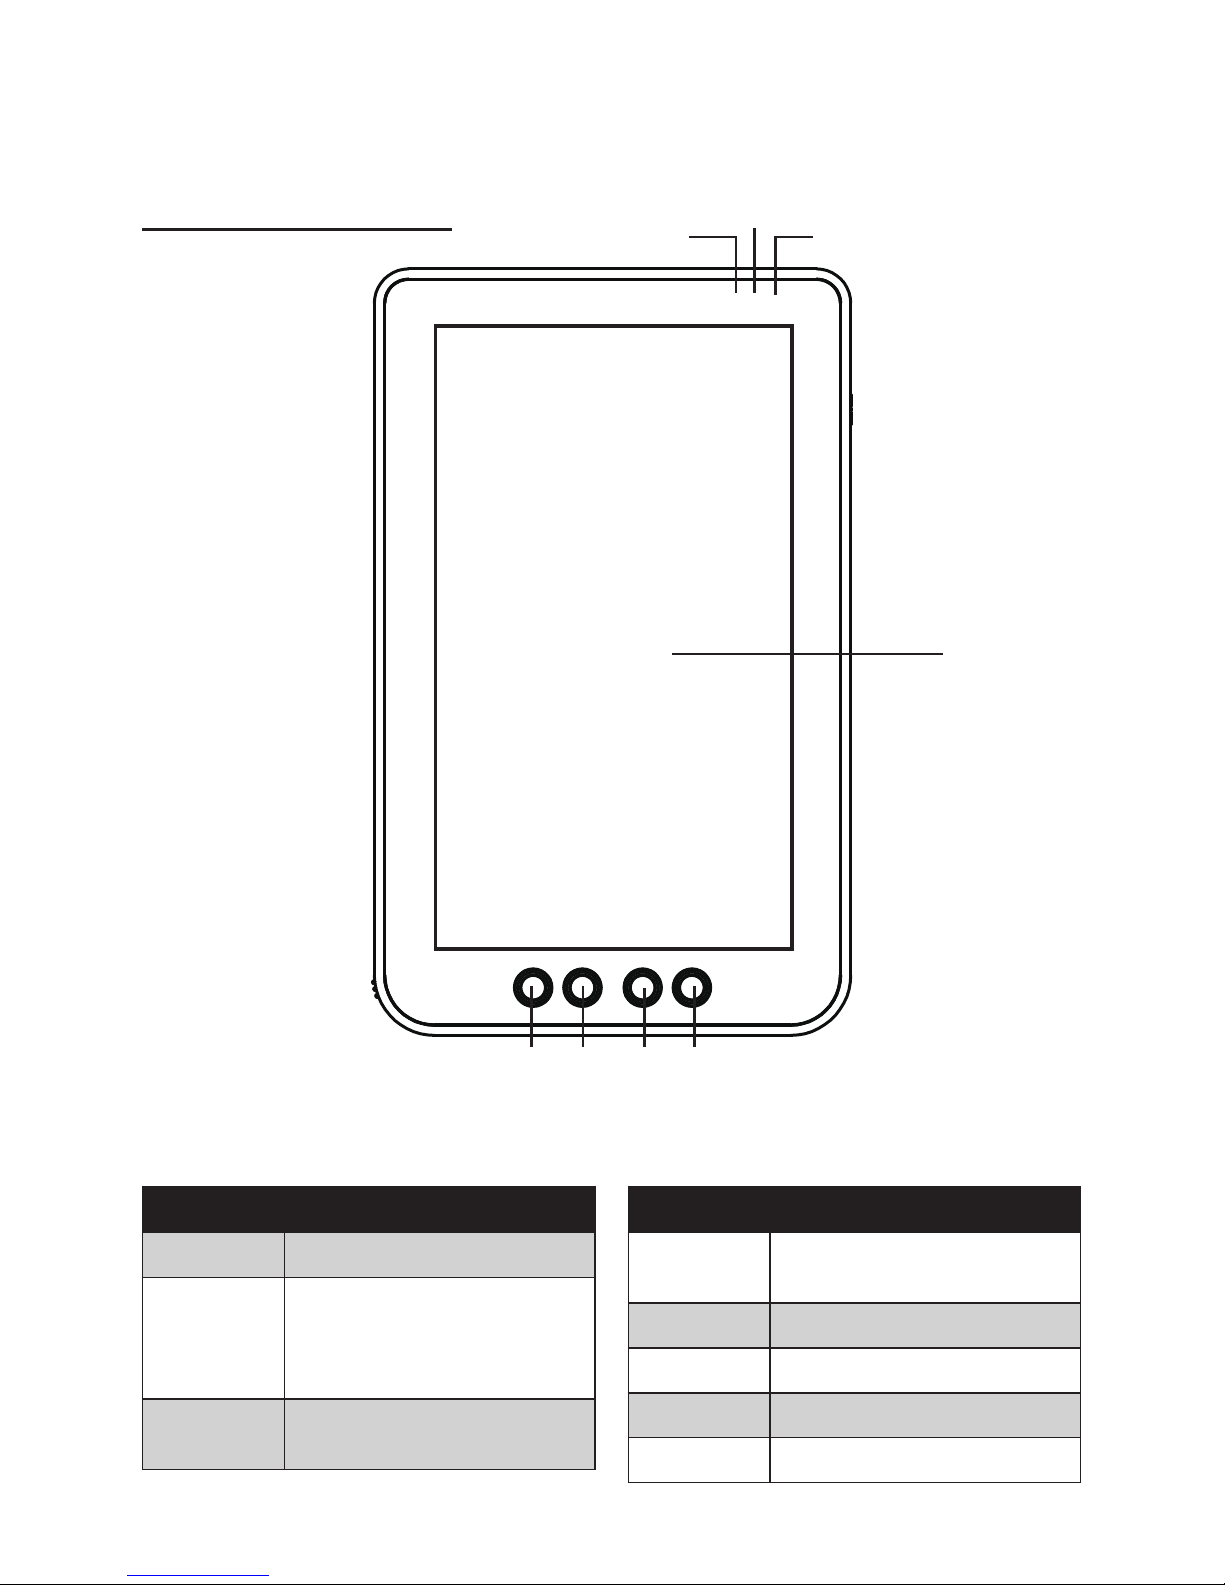
Identifying components
This section describes the parts and connectors on the EM-100.
Front panel components
1
5 6 7
Figure 1.2 Front view
Component Description
1 10.1-inch touch screen
2 Power indicator (Solid green:
power on, Solid red: battery
charging, Flashing red: low
battery)
3 Bluetooch indicator (Light:
Bluetooth is functional)
Component Description
4 WiFi indicator (Light: WiFi is
functional)
5 Up selection key
6 Down selection key
7 Left selection key
8 Right selection key
8
2
3
4
4 C H A P T E R 1 G E T T I N G S T A R T E D
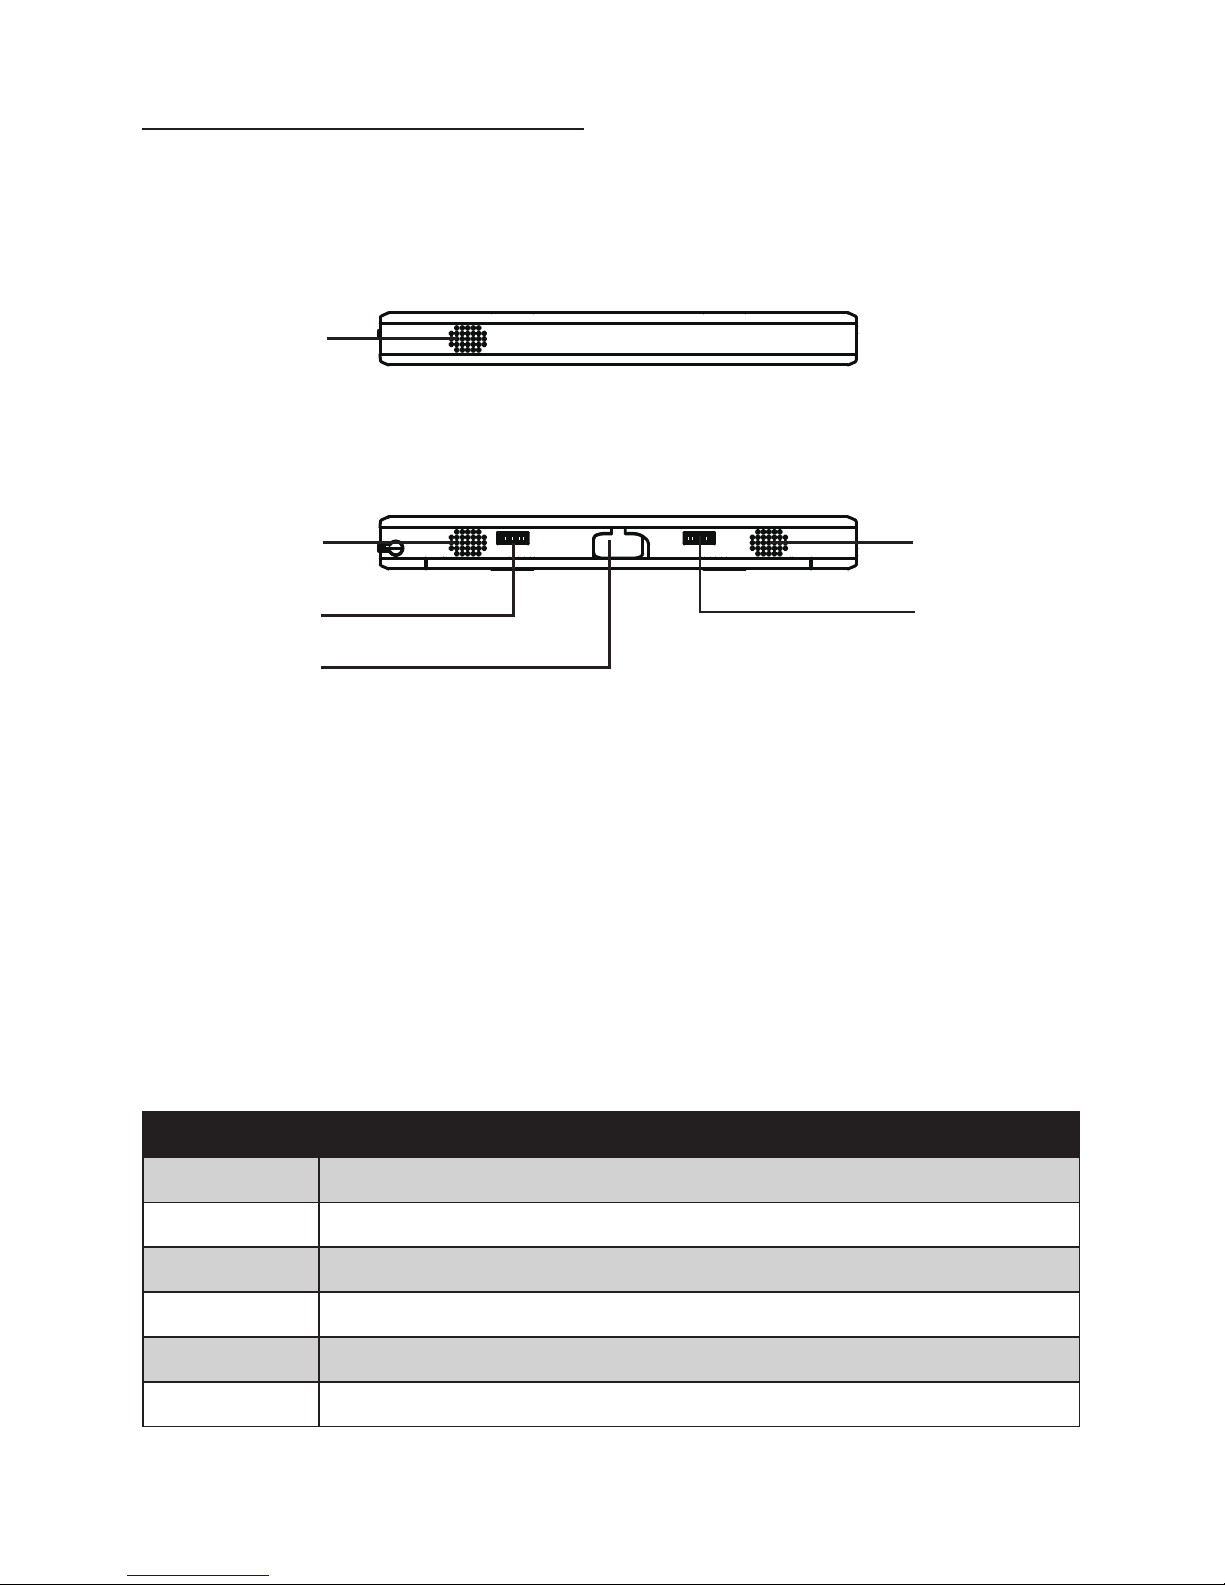
Top and bottom panel components
1
Figure 1.3 Top and bottom view
Component Description
1 Microphone
2 Left channel speaker
3 Right channel speaker
4 connector
5 connector
6 USB connector (Master mode)
3
2
4
6
5
5
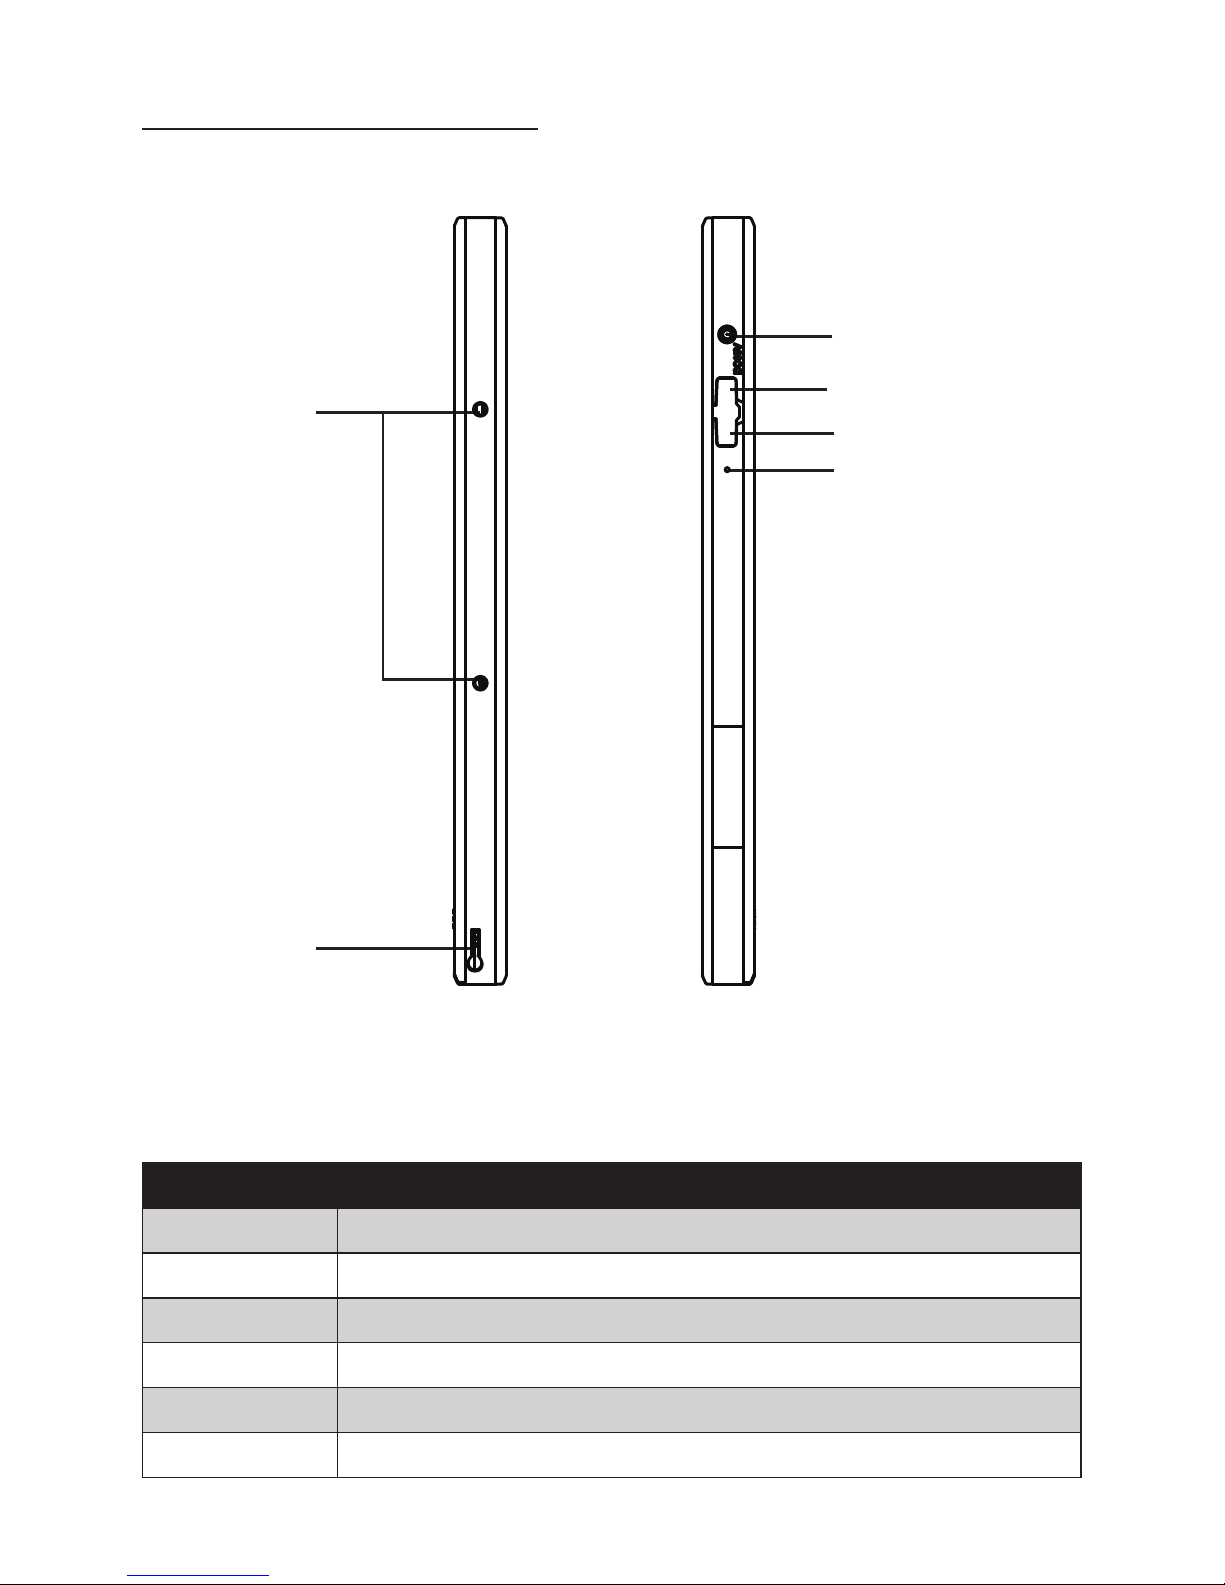
Left and right side components
Figure 1.4 Left and right side view
5
6
4
1
2
3
Connector Description
1 Mounting holes
2 Stylus dock
3 Suspend button
4 DC power jack
5 Mini-USB connector (Slave)
6 Reset button

6 C H A P T E R 1 G E T T I N G S T A R T E D
Back panel components
1
1
2
3
Connector Description
1 Wall mount attaching holes
2 Power switch
3 Battery cover
Figure 1.5 Back view
 Loading...