

Page 1
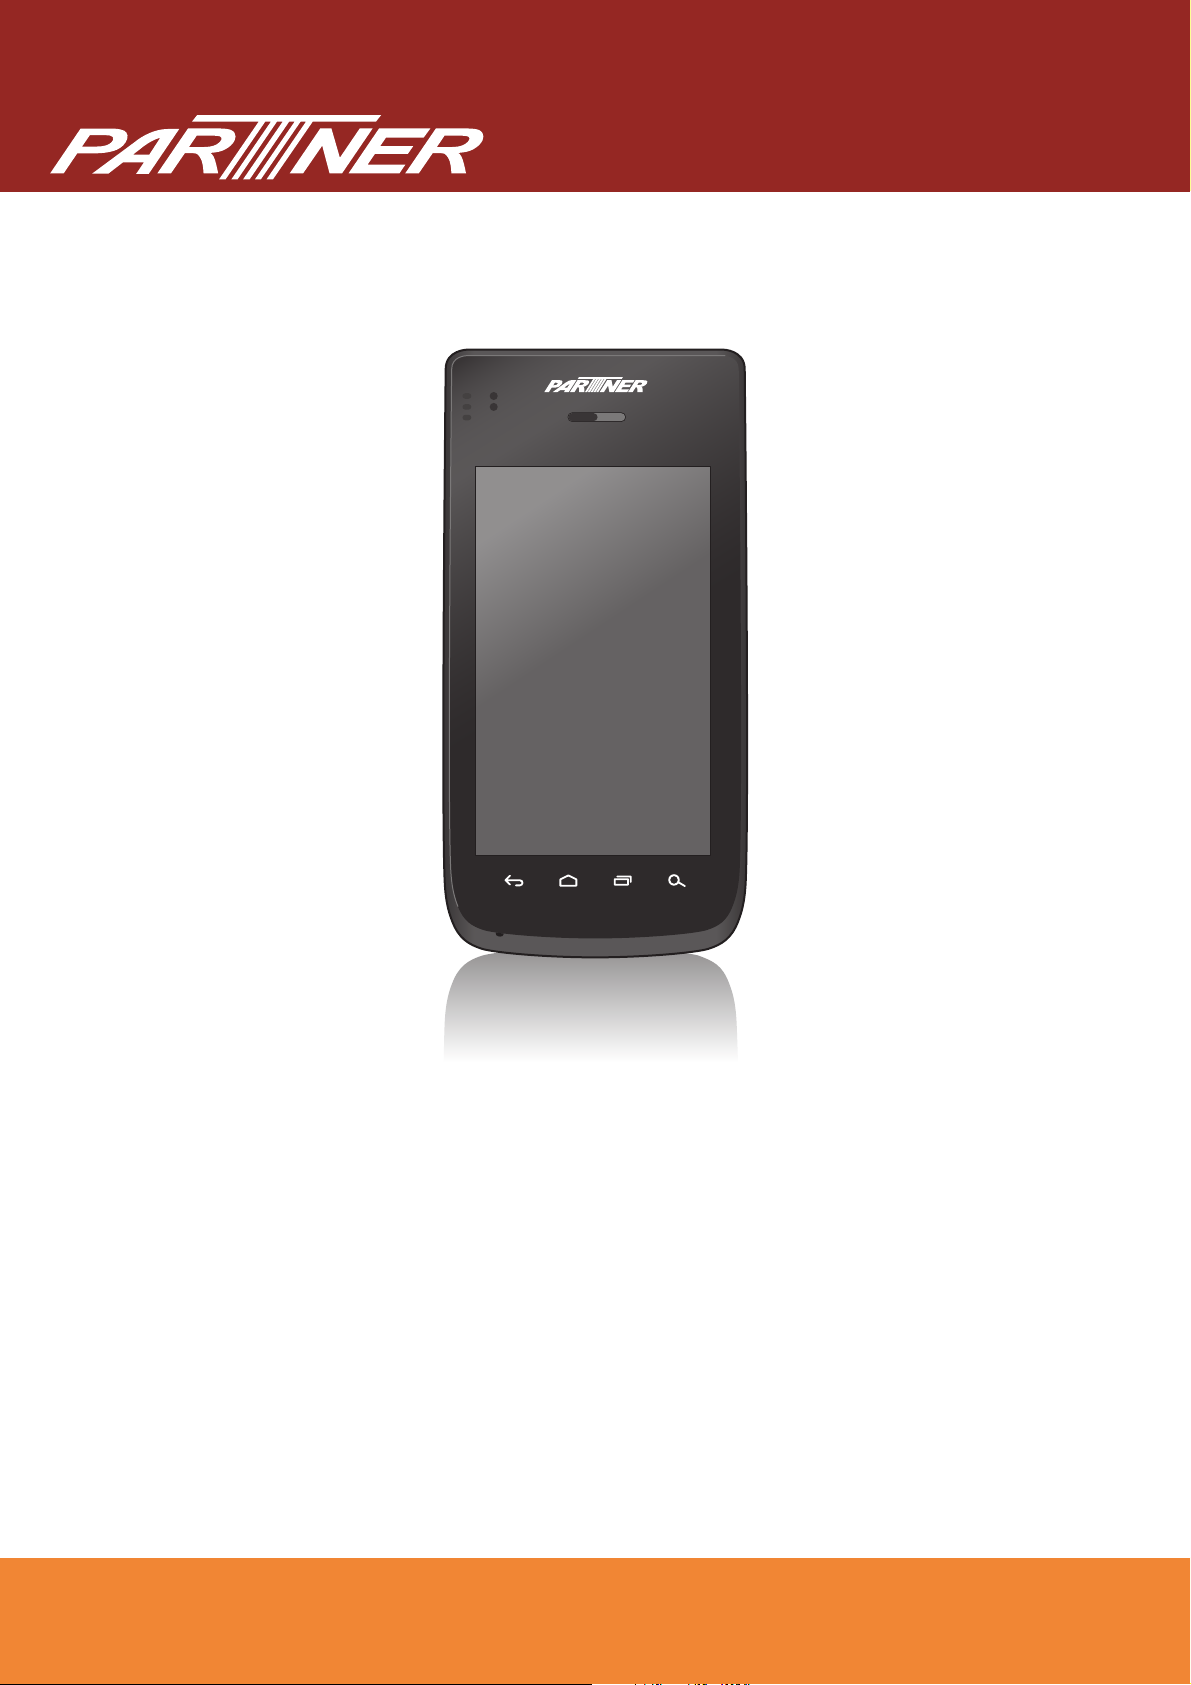
OT-310
Handheld POS Terminal
User's Manual
Page 2

ENGLISH
Table of Contents
Introduction .......................................................................................1
Features ........................................................................................................1
Package Contents ........................................................................................1
Product Overview .........................................................................................2
Front and Back .....................................................................................2
Left and Right ....................................................................................... 3
Top and Bottom .................................................................................... 3
LED Indicators .............................................................................................. 4
Getting Started ..................................................................................5
Installing the Battery ..................................................................................... 5
Charging the Battery ..................................................................................... 6
Installing the Memory Card ........................................................................... 7
Installing the SIM Card ................................................................................. 7
Powering the Device On/Off ......................................................................... 8
Sleep Mode .......................................................................................... 8
Unlocking the Screen ....................................................................................9
Using the Handheld POS Terminal ..................................................10
Understanding the Interface .........................................................................10
Home Screen Overview .......................................................................10
Status and Notifications .......................................................................11
Using the Touch Screen ....................................................................... 12
Managing the Home Screen ................................................................ 13
Opening Applications ........................................................................... 14
Changing Basic Settings ...............................................................................15
Setting the Date and Time ................................................................... 15
Configuring Display Settings ................................................................ 16
Configuring Sound Settings ................................................................. 17
Managing Wireless and Network Settings .................................................... 18
Connecting to Wireless Networks ........................................................18
Connecting to Bluetooth Devices .........................................................18
Configuring Language and Keyboard Settings .............................................19
Changing the System Language ..........................................................19
Changing the Input Settings .................................................................19
Using the User Dictionary .................................................................... 20
Advanced Settings ........................................................................................ 21
Configuring Location Services ............................................................. 21
Configuring Security Settings ...............................................................21
Managing Accounts .............................................................................. 22
Managing Storage Space ..................................................................... 25
i
Page 3

Application and Operation ...............................................................26
Browser .........................................................................................................2 6
Launching a Web Page ........................................................................26
Viewing the Current Web Page ............................................................26
Managing Web Pages ..........................................................................27
Camera .........................................................................................................28
Capturing Photos ................................................................................. 28
Reviewing Photos ................................................................................ 28
Configuring Camera Settings ............................................................... 29
Recording Videos .................................................................................30
Reviewing Videos ................................................................................. 30
Configuring Video Settings ...................................................................31
Capturing Panorama Shots .................................................................. 32
Email .............................................................................................................33
Setting up an Email Account ................................................................ 33
Viewing Emails ..................................................................................... 34
Composing and Sending an Email ....................................................... 35
Reading and Replying an Email ........................................................... 35
Deleting Emails .................................................................................... 36
Adding Other Email Accounts .............................................................. 37
Customizing Email Settings ................................................................. 37
File Manager .................................................................................................38
Browsing Files ...................................................................................... 38
Managing Files and Folders .................................................................38
Gallery ..........................................................................................................39
Viewing Photos .................................................................................... 39
Playing Videos ..................................................................................... 40
Playing Slideshow ................................................................................ 40
Messaging ....................................................................................................41
Creating and Sending a Text Message ................................................ 41
Adding an Attachment to a Message ................................................... 41
Configuring Messaging Settings ..........................................................42
Music ............................................................................................................43
Playing a Song ..................................................................................... 43
Creating a Playlist ................................................................................ 44
Assigning a Song as Ringtone ............................................................. 44
Deleting a Song .................................................................................... 45
Configuring the Sound Effect ...............................................................45
People ...........................................................................................................46
Adding a New Contact ......................................................................... 46
Importing Contacts ............................................................................... 47
Backing Up Contacts ............................................................................ 48
Managing Contacts .............................................................................. 49
Phone ...........................................................................................................51
Making a Call ....................................................................................... 51
Answering a Call .................................................................................. 52
ENGLISH
ii
Page 4

ENGLISH
Viewing Call Log .................................................................................. 52
Barcode Scanner Module .............................................................................53
Configuring Barcode Reader Settings .................................................. 53
Reading a Barcode .............................................................................. 54
MSR Module .................................................................................................55
Configuring MSR Settings .................................................................... 55
Testing the MSR Module ...................................................................... 56
Appendix ............................................................................................57
Specifications ................................................................................................57
Troubleshooting ............................................................................................59
iii
Page 5
INTRODUCTION: Features
QSG
Introduction
Meet the industry’s first revolutionary handheld POS terminal. OT -310 is one of a kind
mobile computer powered by Qualcomm’s dual core processor. The design is sleek
and light weight. It also passed IP54 sealing protection and is 1.5m drop resistant.
Optional features for OT-310 are 1D or 2D barcode scanner and MSR or IC card.
These modular features are combined in various ways to satisfy transportation and
logistics, public sector and hospitality related application settings.
Features
Standard features:
ENGLISH
• Dual core 1.5GHz CPU
•Android 4.2 OS
• WLAN 802.11 a/b/g/n
• WWAN GPRS/Edge/UMTS/HSDPA+
• Built-in GPS (accelerometer/
e-compass/gyroscope/ambient light/
vibrator)
Optional features:
• 1D barcode scanner (laser) or 2D barcode scanner (image)
• RFID device 13.56MHz, built-in standard, ISO 14443 A/B, FeliCa R/W
• IC card reader ISO7816 or MSR ISO7811-Track 1, 2, 3
• 5.0 Megapixels camera AF with LED
flash
• Replaceable battery
• Support sunlight readable
• Gorilla class II touch screen
• 1.5m drop resistance and IP54
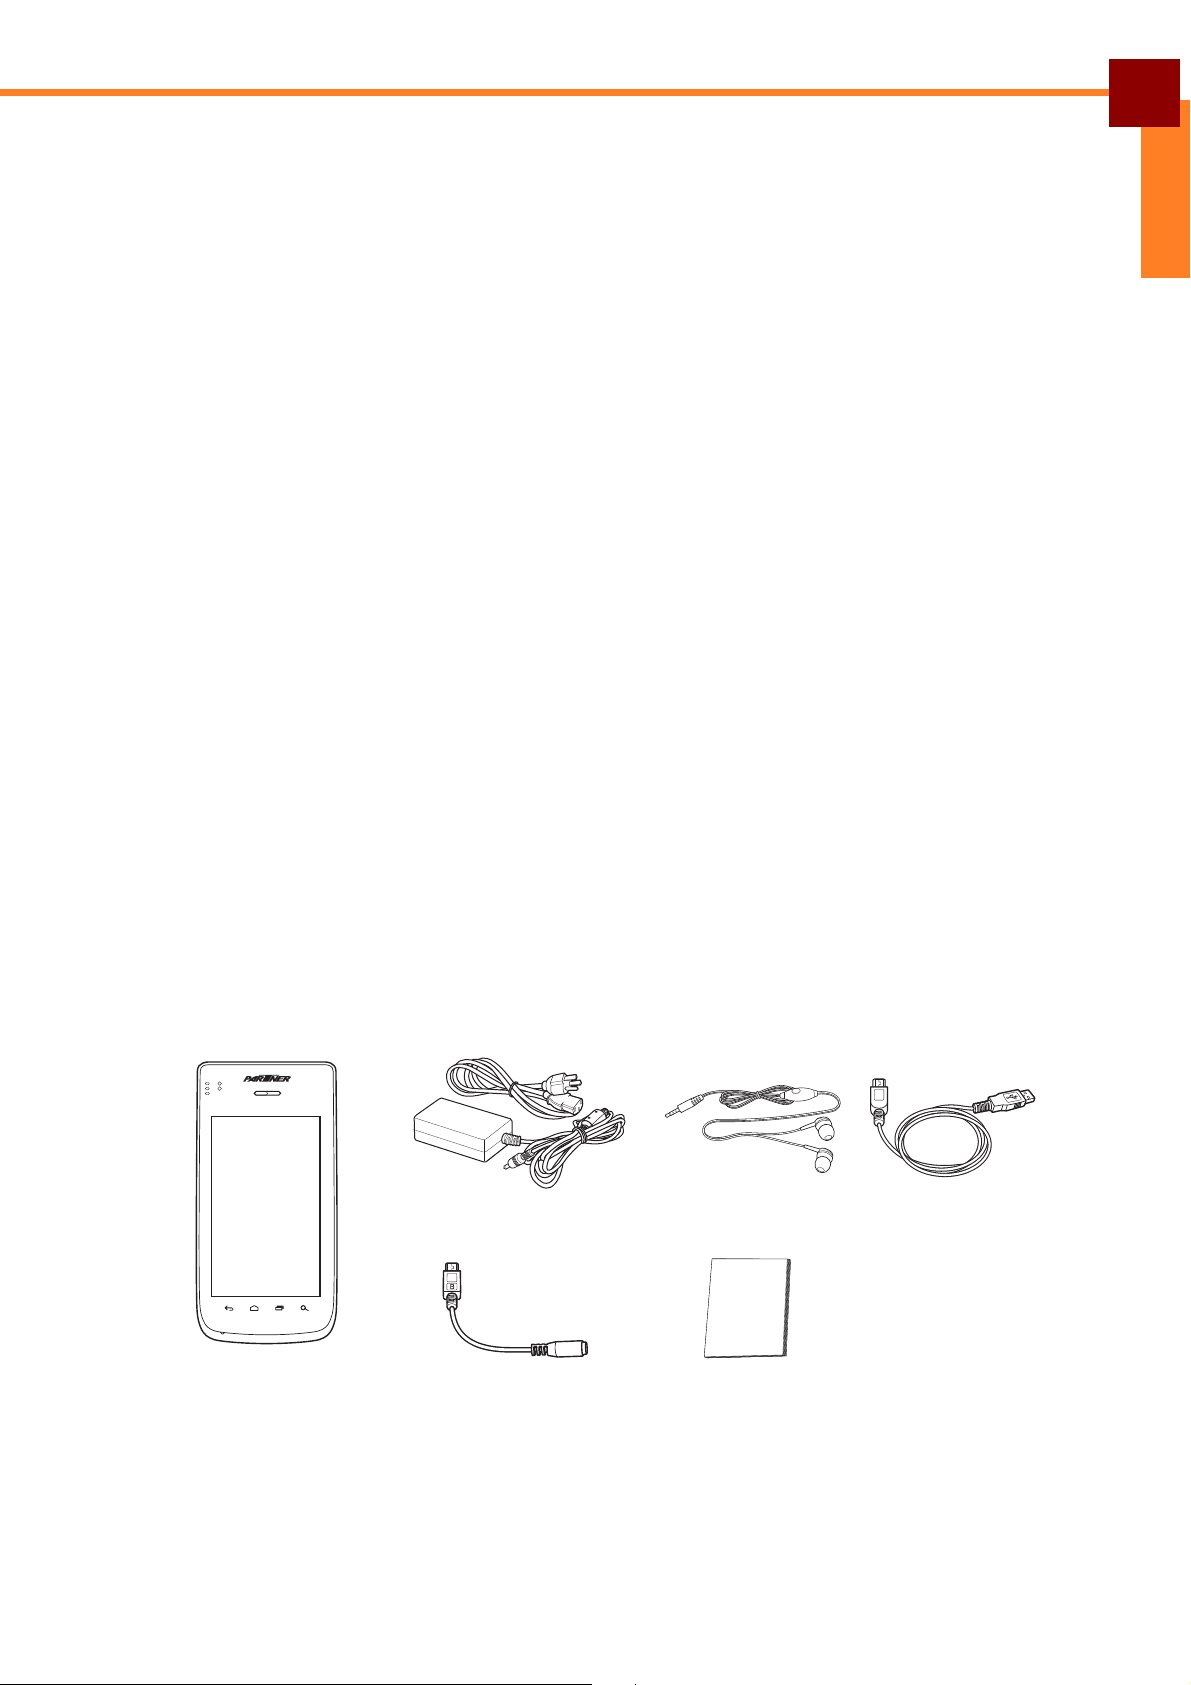
Package Contents
Handheld POS
Terminal
Power adaptor & cord Headset USB cable
USB to DC cable Quick Start
Guide
1
Page 6
INTRODUCTION: Product Overview
4
1
2
10
12
13
811765
9
3
ENGLISH
Product Overview
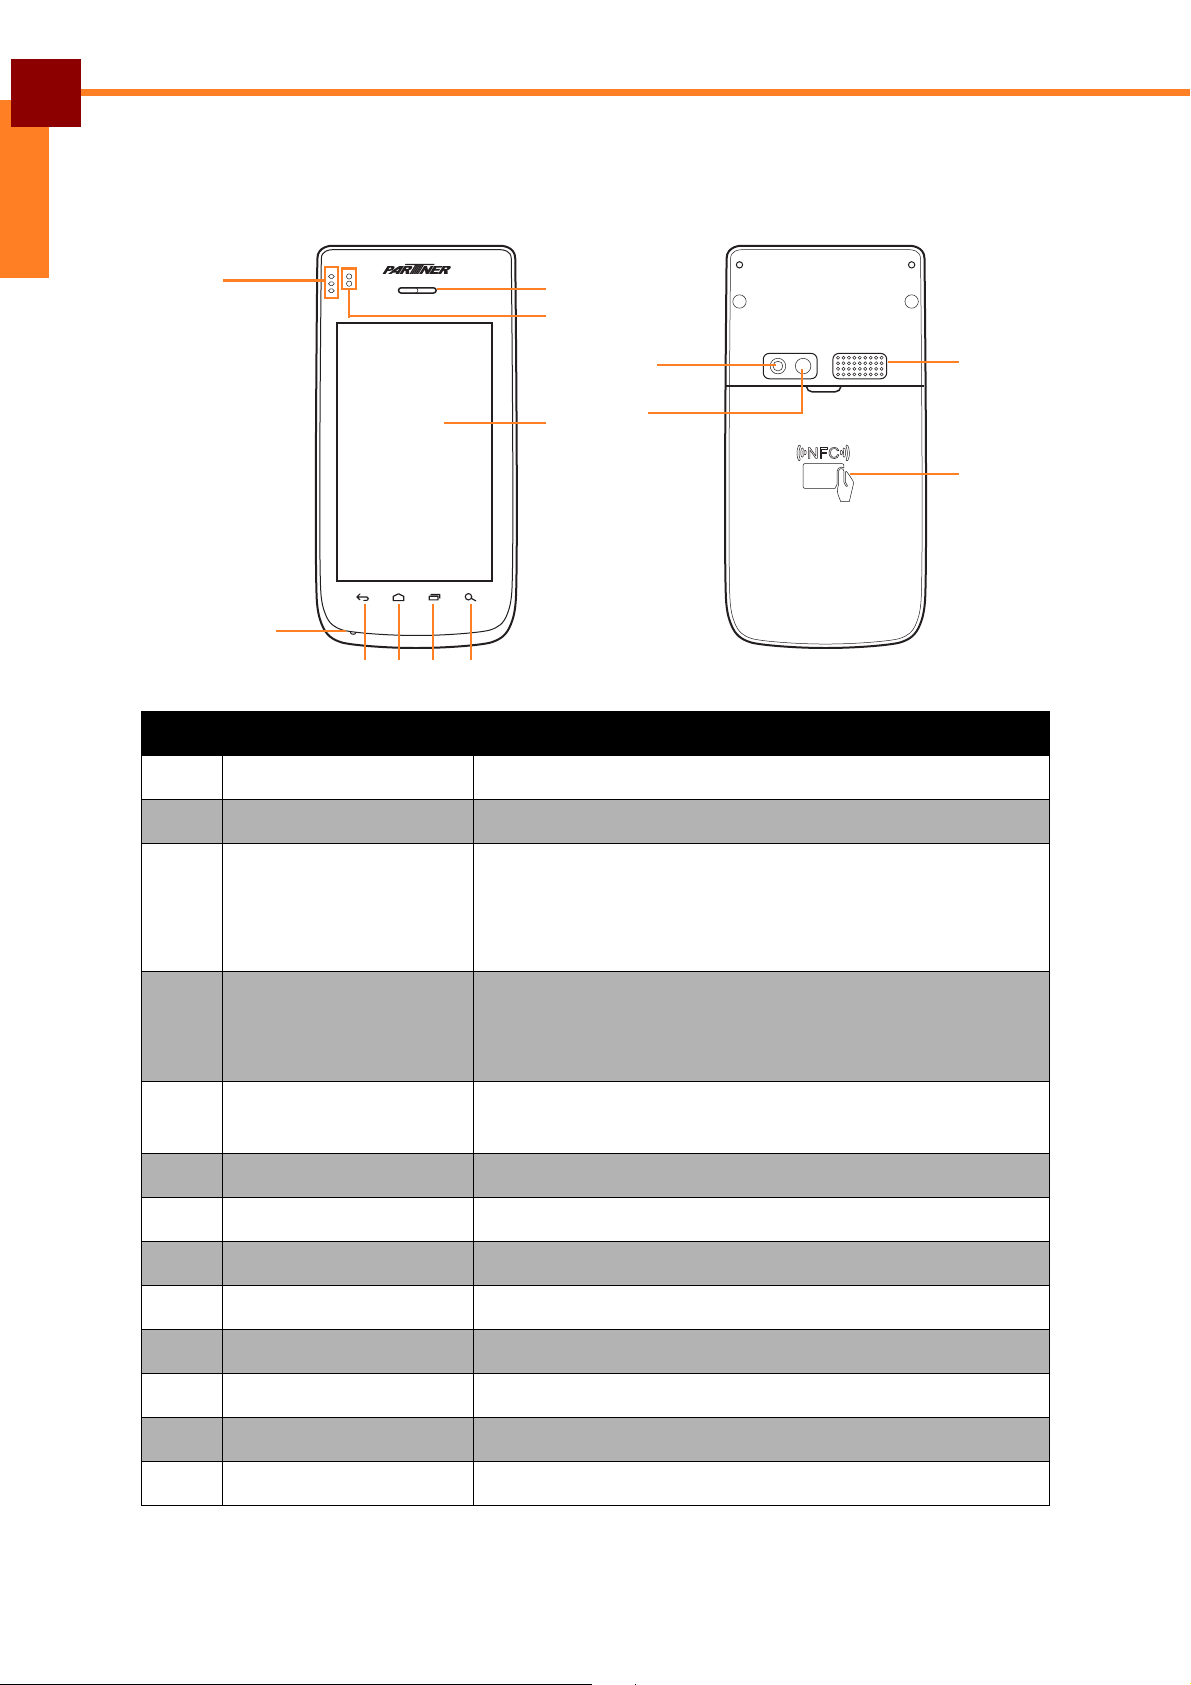
Front and Back
No. Item Description
1 3 LEDs Used for power system and application notifications.
2 Receiver Speaker for handheld phone calls.
3 Proximity and light
sensor
4 Display with touch
panel
5 Search Search action. Action depends on active application/
6 Recent App Select a previously started activity.
7 Home Touch to return to the Home screen.
8 Back Return to previous activity.
9 Microphone Audio input for voice calls and applications.
10 Flash LED Flash LED for camera and applications.
Proximity sensor for detection of near objects (e.g.,
used for turning off touch display during voice calls).
Light sensor for automatically adjusting display
backlight to the environmental light.
• Display the screen output.
• Touch and drag items on the screen to provide
user input.
view.
11 Camera For taking pictures or recording videos.
12 Speaker Loudspeaker for ringtones, notifications, etc.
13 NFC Read NFC tags and wireless smartcards.
2
Page 7
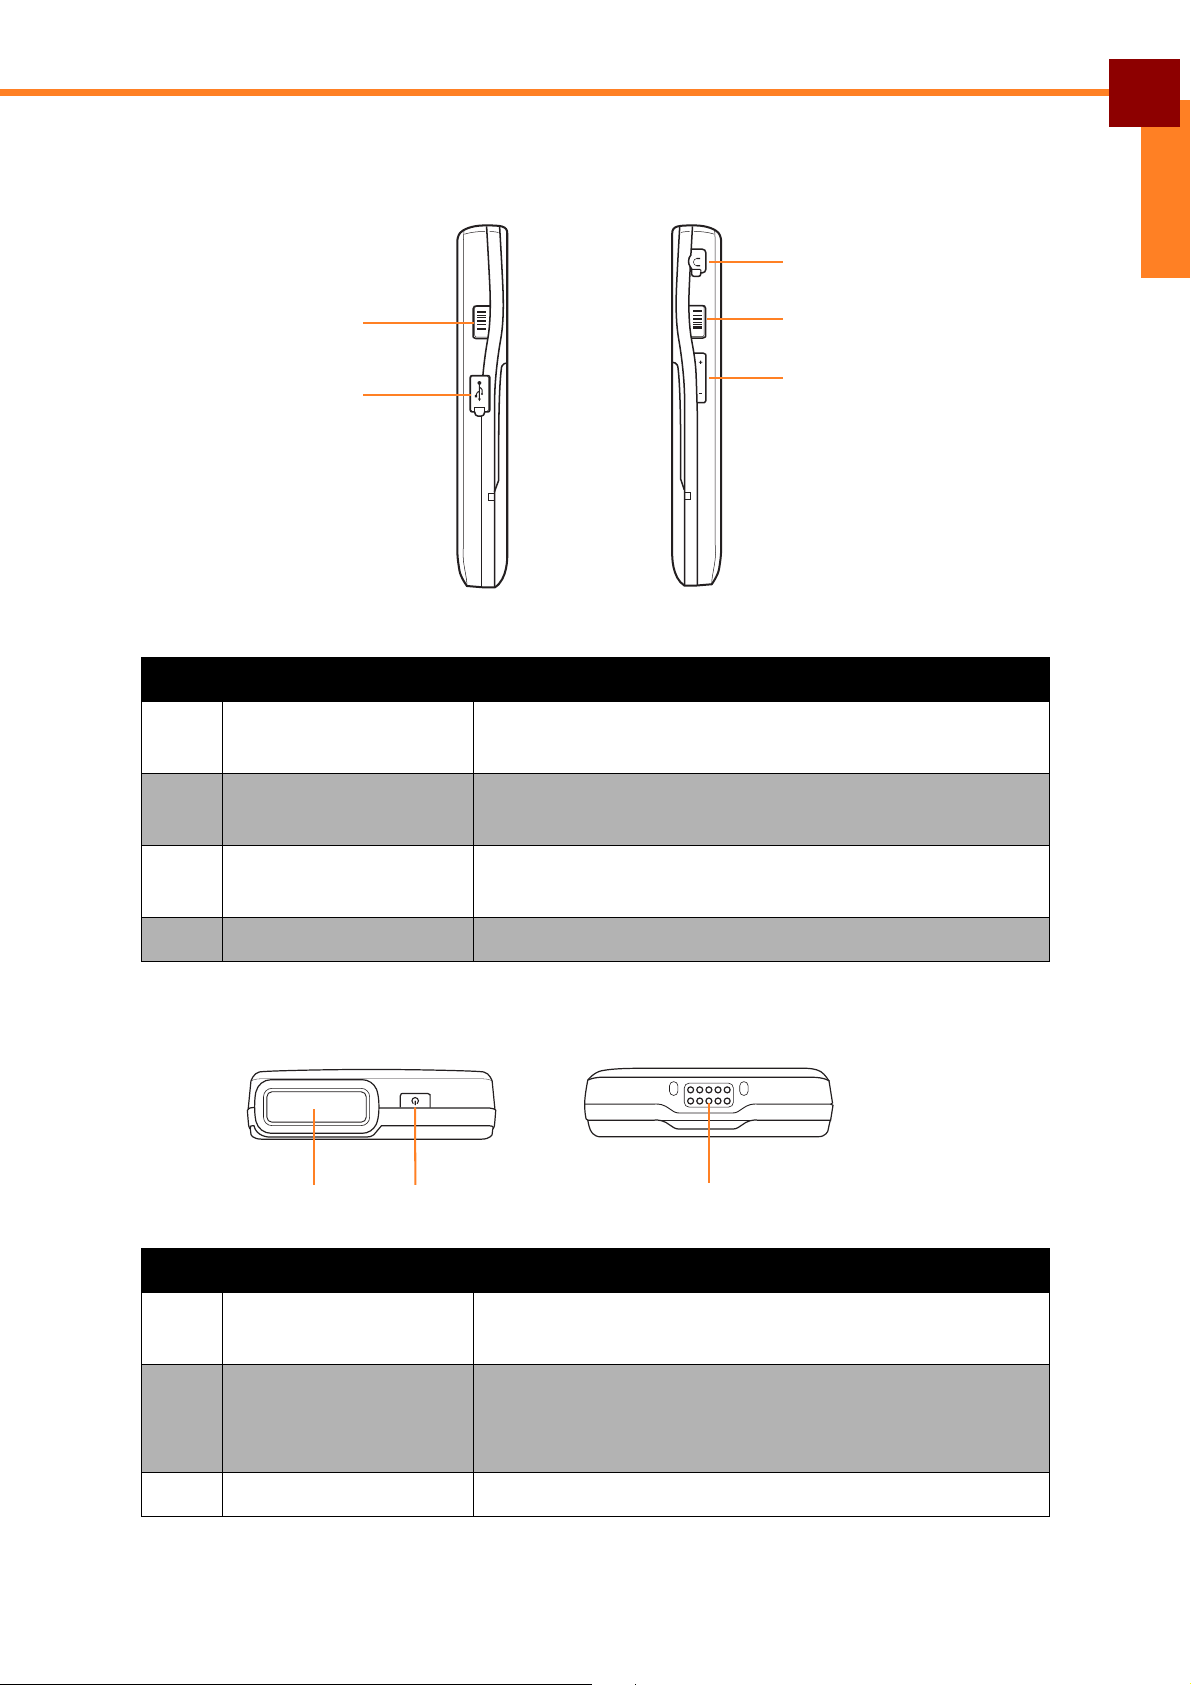
Left and Right
1
2
3
4
1
1
3
2
INTRODUCTION: Product Overview
ENGLISH
No. Item Description
1 Barcode scan trigger
Press to scan barcodes.
keys
2 Micro USB OTG port Connect to a USB cable for data transfer or battery
charging purposes.
3 Earphone jack 3.5mm audio jack with same pin configuration as
iPhone.
4 V o lume keys Press to adjust the volume.
Top and Bottom
No. Item Description
1 Barcode scan
window
Point this scan window to scan barcodes.
2 Power button • Turn on/off the device.
• Press once to put the device into Sleep mode.
• Long press (~10s) for device hard reset.
3 Cradle connector Connect to the cradle unit.
3
Page 8
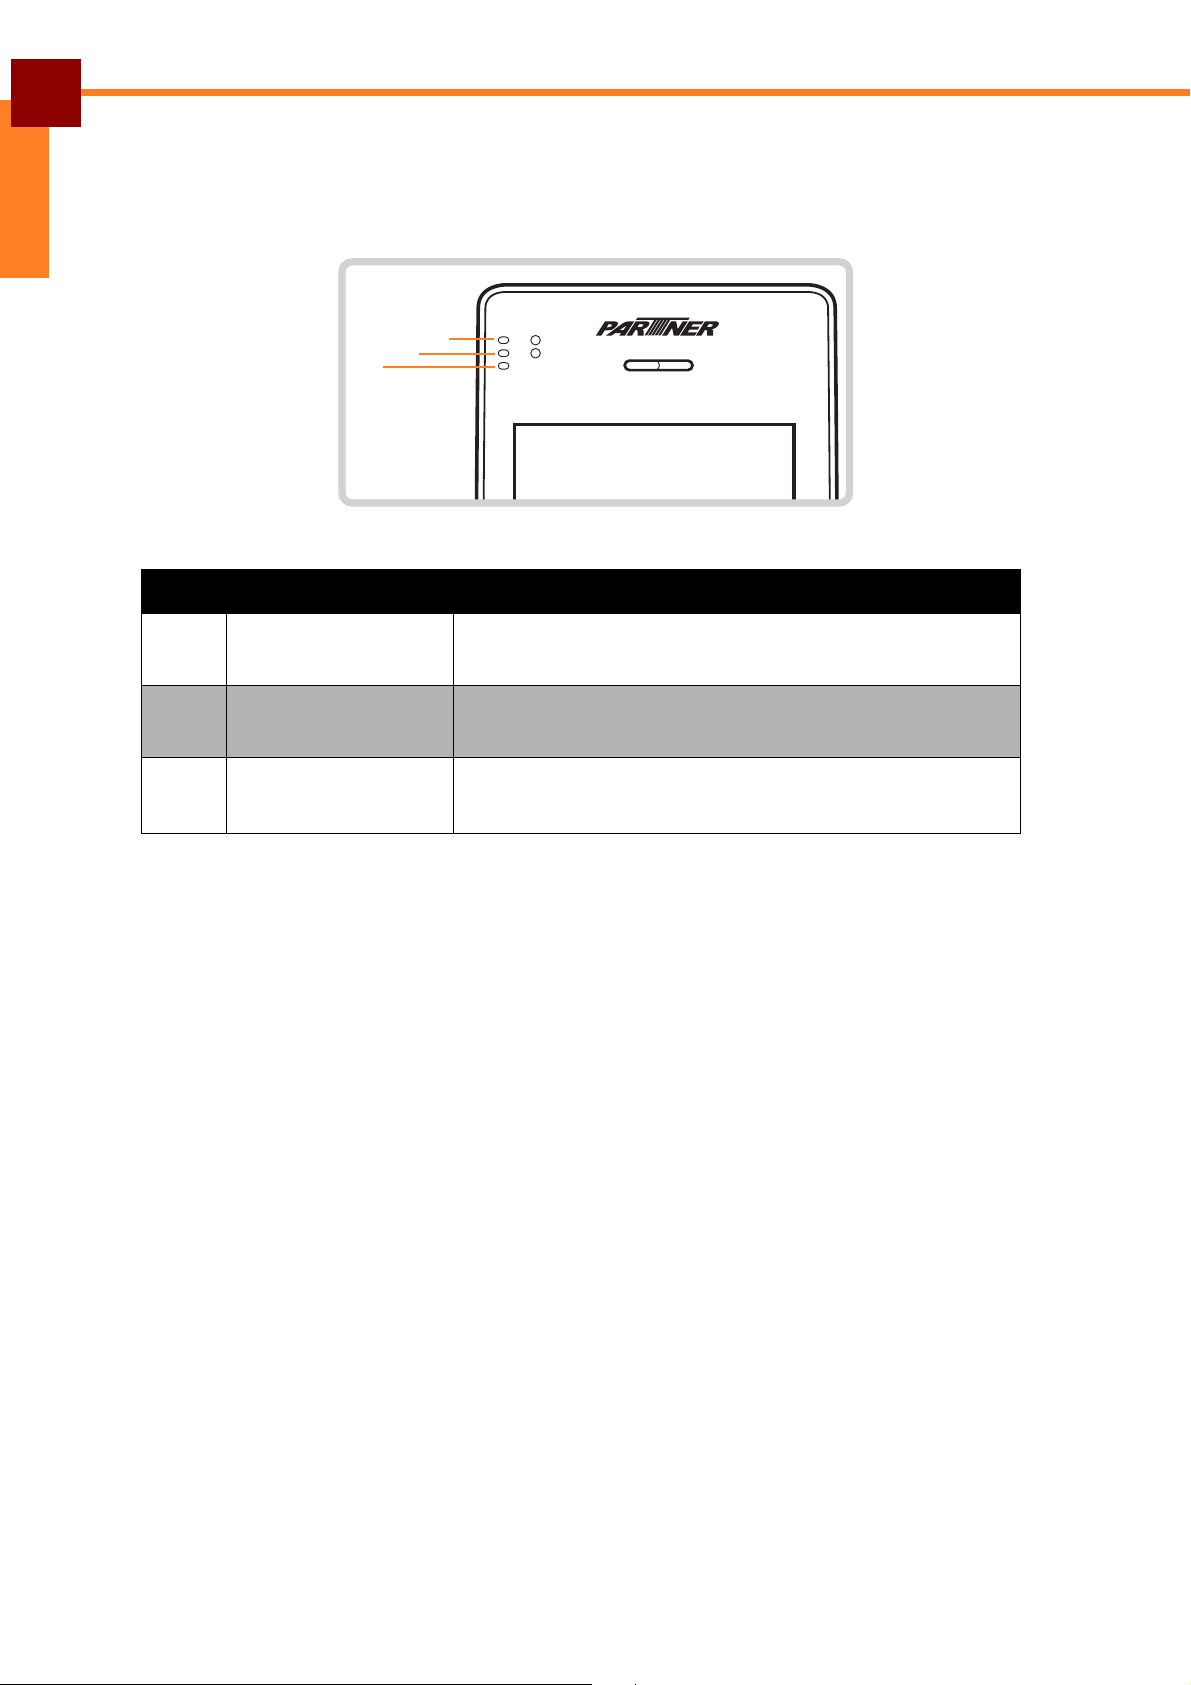
INTRODUCTION: LED Indicators
3
2
1
ENGLISH
LED Indicators
The OT-310 handheld POS terminal has three LED indicators.
No. Item Description
1 Module indicator Lit Green when 1D or 2D barcode scanner is
activated.
2 Wireless indicator Lit Green when wireless connection (3G, Wi-Fi, or
Bluetooth) is activated.
3 Power indicator • Lit Red when the battery is charging.
• Lit Green when the battery is full.
4
Page 9

Getting Started
GETTING STARTED: Installing the Battery
Installing the Battery
1. Place the two thumbs on the back cover. One
on the left and one on the right side of the NFC
logo. Press firmly and slide down to open the
battery cover. Lift up to remove the battery
cover.
2. Align the battery connectors on the battery
with the pins in the battery compartment. Then
insert the battery.
ENGLISH
3. Replace the battery cover.
5
Page 10
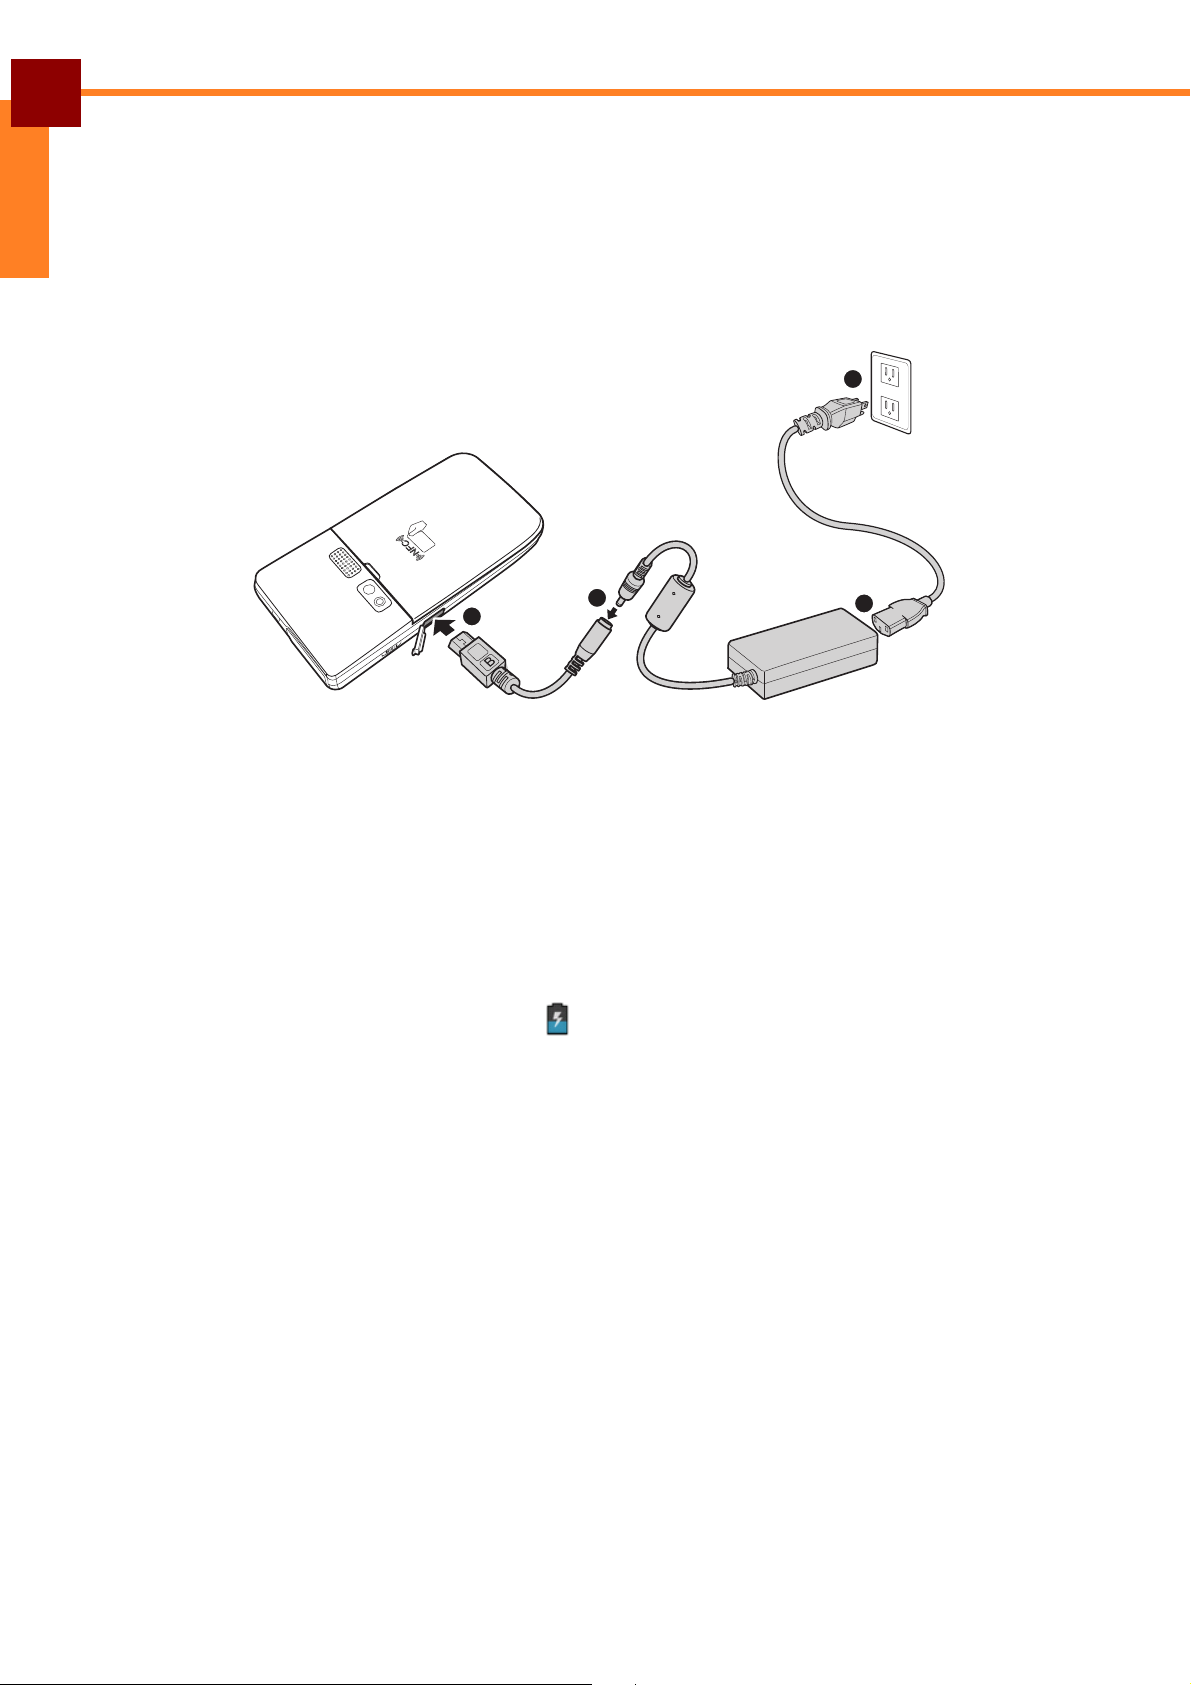
GETTING STARTED: Charging the Battery
1
2
2
3
ENGLISH
Charging the Battery
1. Open the protective cap.
2. Connect the device using the DC to USB cable and power adaptor.
3. Plug the other end of the power adaptor to the wall outlet to start charging.
NOTE: Charging shall also be possible from PC via USB and via OT-310
cradle.Furthermore, any microUSB charger which is compliant with USB
battery charging 1.2 (http://www.usb.org/developers/devclass_docs/
USB_Battery_Charging_1.2.pdf) shall be acceptable.
When the battery is charging:
• The status LED lights red.
• When the device is turned on, the icon is displayed on the top-right corner of
the screen.
6
Page 11
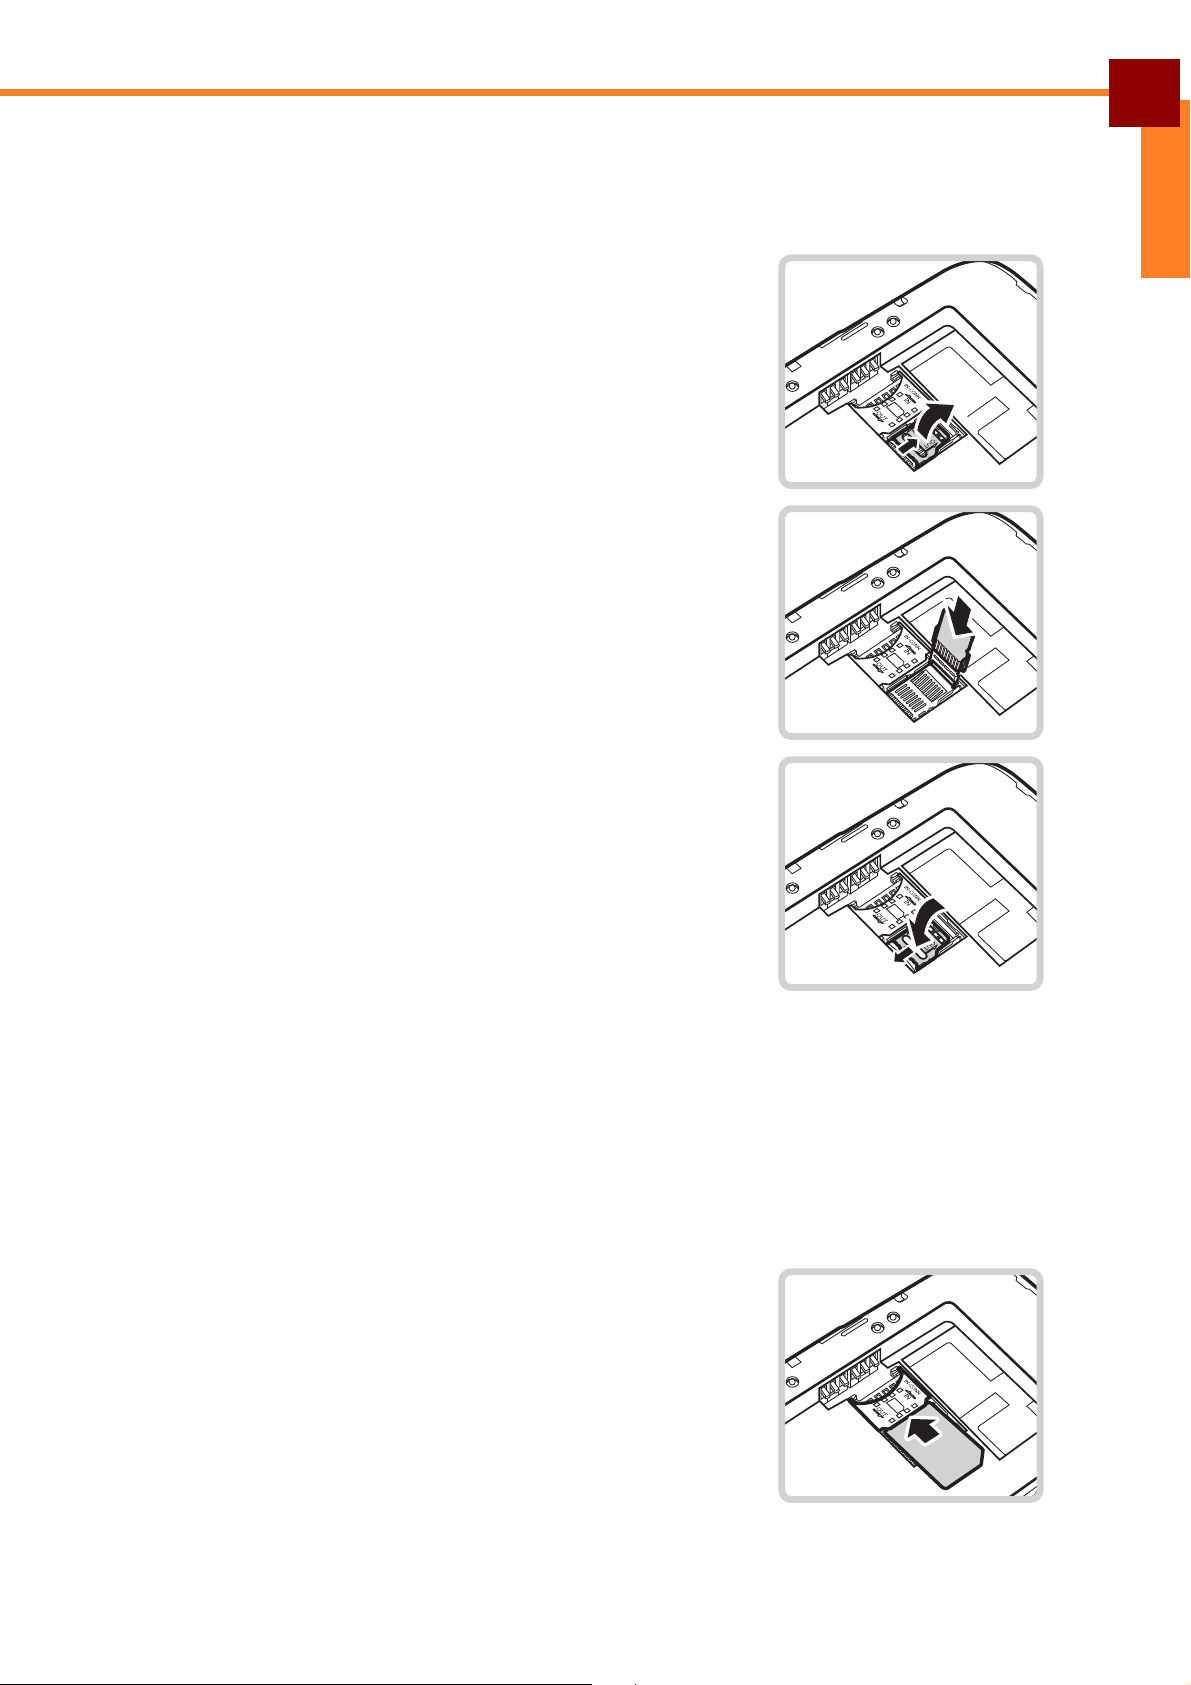
GETTING STARTED: Installing the Memory Card
SIM
Installing the Memory Card
1. Remove the battery compartment cover and remove the battery and SIM card.
2. Unlock the memory card slot by sliding it toward the
bottom of OT-310.
3. Insert a micro SD card into the memory card slot.
ENGLISH
4. Gently place down the memory card slot. Lock the
memory card slot by sliding it toward the top of
OT-310.
5. Replace the SIM card and the battery.
6. Replace the battery cover.
Installing the SIM Card
1. Remove the battery compartment cover and battery.
2. Insert the SIM card into the SIM card slot as shown
in the illustration.
3. Replace the battery and the battery cover.
7
Page 12

GETTING STARTED: Powering the Device On/Off
ENGLISH
Powering the Device On/Off
To turn on the device:
Press and hold the Power button for 3 seconds to turn on the device.
To turn off the device:
1. Press and hold the Power button for at least 3
seconds.
2. Touch Power off.
3. A confirmation message appears on the screen.
Touch OK to turn the device off.
Sleep Mode
To save power, put the device to Sleep mode when not in use. In Sleep mode, the
device is in Power On mode but the screen backlight is turned off.
• To put the device to Sleep mode, press the Power button once. The screen
backlight turns off.
• To turn the backlight on, press the Power button again.
8
Page 13

GETTING STARTED: Unlocking the Screen
Unlocking the Screen
By default, the screen is locked after turning the device on, when leaving sleep mode
or after a period of inactivity. The screen lock time can be set in Settings menu
(see“Configuring Display Settings” on page 16).
ENGLISH
To unlock the screen, drag towards . Or, drag towards to directly
enter the Camera application.
NOTE: When the icon is touched, it automatically changes to .
9
Page 14

ENGLISH
1
5
2
4
3
USING THE HANDHELD POS TERMINAL: Understanding the Interface
Using the Handheld POS Terminal
Understanding the Interface
Home Screen Overview
No. Item Description
1 Status Bar Display status icons and notifications. See “Status
and Notifications” on page 11 for more information.
2 Home screen Main screen display.
• Touch items on the screen to select an application.
• Swipe the finger left or right to change panels.
3 Search Bar Touch to do a search on the internet, application,
4 Shortcut application
5 Application icon Touch to display all applications installed on the
icon (Phone/People/
Messaging/Browser)
and contacts.
Touch to open the Phone/People/Messaging/
Browser application.
device. See “Opening Applications” on page 14 for
more information.
10
Page 15

USING THE HANDHELD POS TERMINAL: Understanding the Interface
253 41
6
Status and Notifications
The Status Bar always appears on top of the screen and indicates different types of
information.
No. Item Description
1 Barcode reader Indicate the barcode reader is enabled.
2 Bluetooth icon Indicate Bluetooth is enabled.
To enable this function, see “Connecting to
Bluetooth Devices” on page 18.
ENGLISH
3 Wi-Fi icon Indicate the Wi-Fi signal strength.
To enable this function, see “Connecting to Wireless
Networks” on page 18.
4 Cellular network icon Indicate the cellular network signal strength.
5 Battery icon Indicate the battery status.
6 Time Display the system time.
To correct the time, see “Setting the Date and Time”
on page 15.
Drag the status bar downwards to display more information.
NOTE: Depending on the current application and available features for the device, the
icons displayed on the status bar may vary.
11
Page 16
USING THE HANDHELD POS TERMINAL: Understanding the Interface
ENGLISH
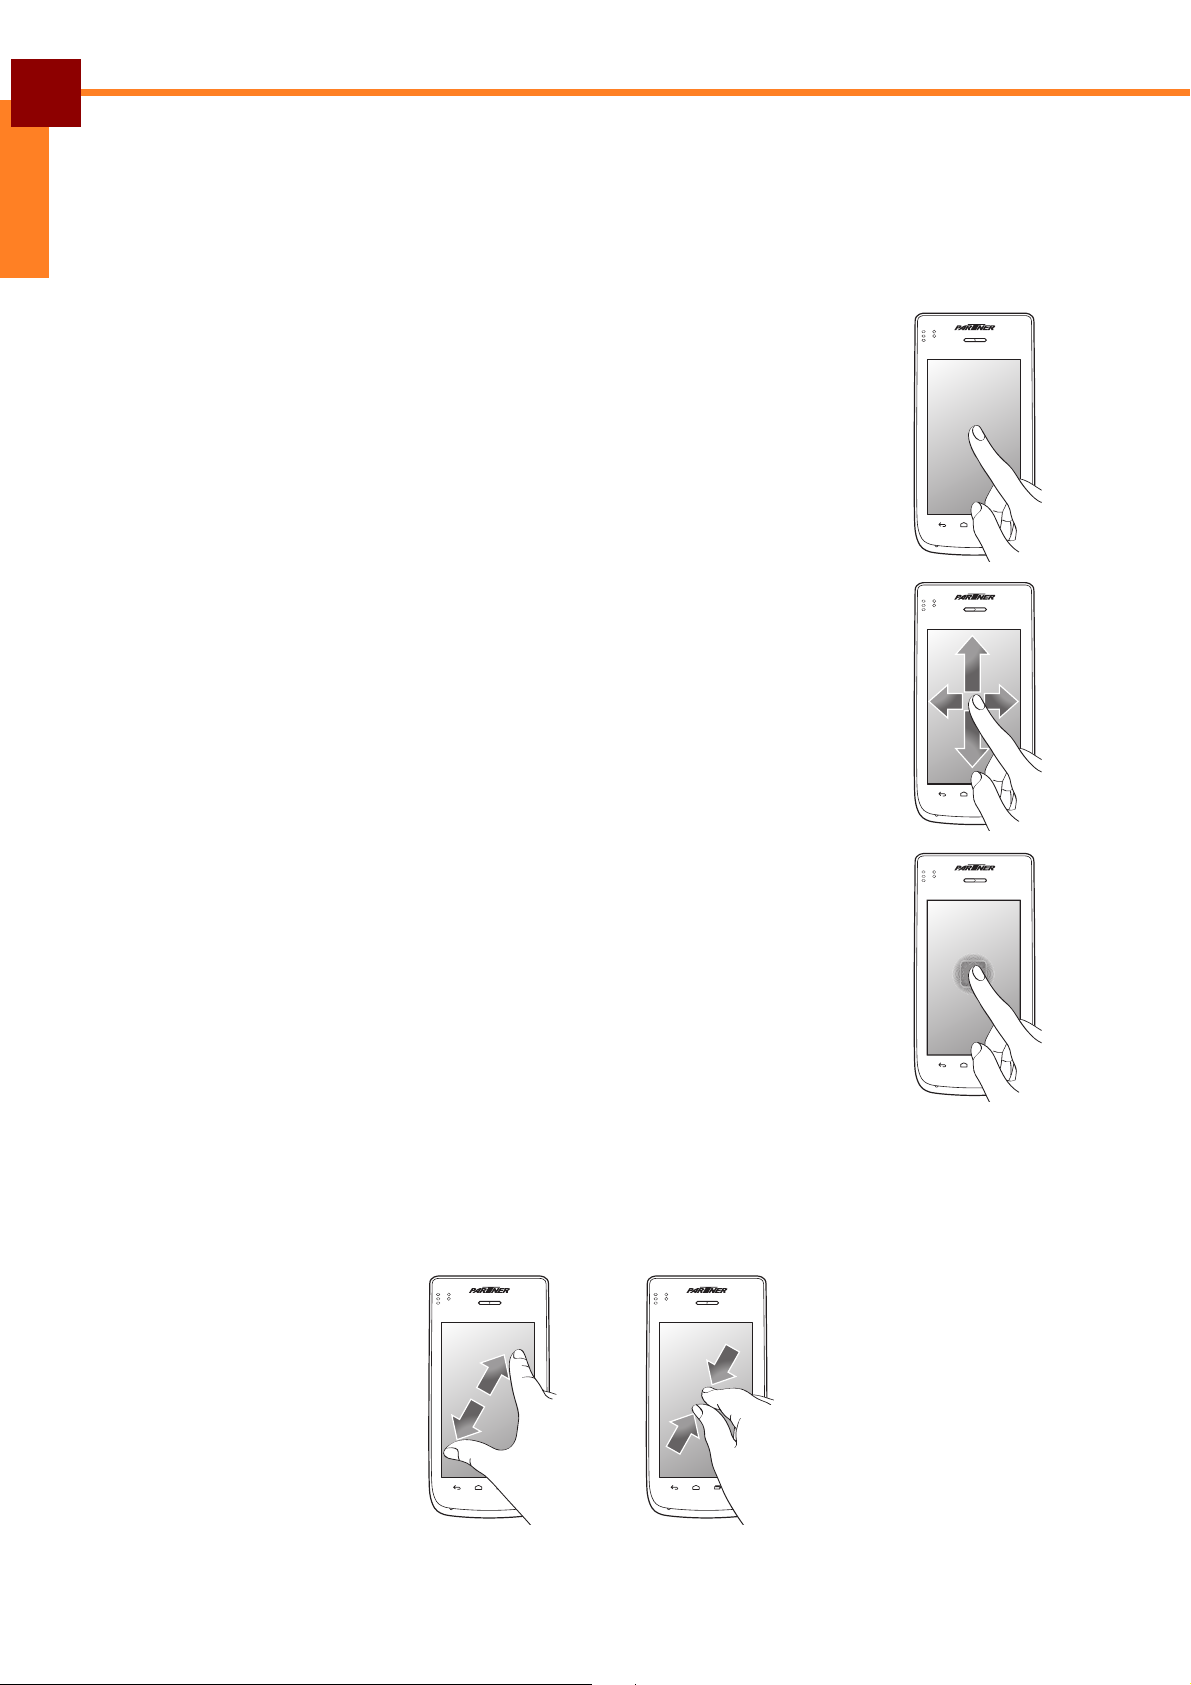
Using the Touch Screen
The device is equipped with a 4.3-inch touch screen.
The following describes some tips on how to use the touch screen.
Touching
• Touch an icon displayed on the screen to select it.
• A pop-out menu may appear (depending on the function in use)
by touching and holding on the screen.
Scrolling
• Scroll up/down: slide the finger up/down on the screen.
• Scroll right/left: slide the finger right/left on the screen.
Dragging
Touch and hold an icon to move its position.
Pinching
• Zoom in: move the two fingers apart from each other at the specific area on the
screen to zoom in.
• Zoom out: move the two fingers closer together at the specific area on the screen
to zoom out.
12
Page 17

USING THE HANDHELD POS TERMINAL: Understanding the Interface
Managing the Home Screen
Add shortcut icons, widgets, and folders on the Home screen and change the
wallpaper.
To change the wallpaper:
1. Touch and hold a blank space on the Home screen.
2. A pop up window appears. Touch one of the
following:
• Gallery: To use pictures saved on the device.
• Live Wallpapers: To use pre-installed
interactive wallpapers that came with the device.
• Wallpapers: To use preset wallpapers that
came with the device.
ENGLISH
NOTE: Live wallpapers increase the power consumption
and might reduce the user time.
To add shortcut icons or widgets:
1. On the Home screen, touch > APPS or
WIDGETS tab to display the applications/widgets.
2. To add an item, touch and hold the application icon,
then drag it to the specific Home screen.
To move items:
Move items from one screen panel to another or rearrange the icons.
1. Touch and hold the desired item until the item is enlarged.
2. Drag and drop the item to the desired location.
13
Page 18

USING THE HANDHELD POS TERMINAL: Understanding the Interface
ENGLISH
To remove items:
1. Touch and hold the desired item to remove.
2. Drag and drop the item to the Remove icon until the
item turns red.
The application icon is removed from the Home
screen.
Opening Applications
Touch > APPS tab to access the pre-installed applications and device settings.
• Touch an icon to open the application.
• Swipe the finger left or right to view more applications.
14
Page 19

USING THE HANDHELD POS TERMINAL: Changing Basic Settings
Changing Basic Settings
Setting the Date and Time
Adjust the date and time of the device to provide accurate operation. The time zone
can also be set accordingly.
To automatically adjust date and time, perform the following:
1. On the Home screen, touch > Settings.
2. In SYSTEM, touch Date & time.
3. Touch Automatic date & time checkbox to automatically set the date and time
according to the network.
To manually adjust date and time, perform the following:
1. On the Home screen, touch > Settings.
ENGLISH
2. In SYSTEM, touch Date & time.
3. Uncheck Automatic date & time checkbox.
4. Touch Set date to set the date.
• Touch or on the related field item to adjust
the value. Touch Set to apply the values.
• To change the date time format, touch Select
date format, and select the date format from the
list
5. Touch Select time zone to select the time zone from
the list.
6. Touch Set time to set the time.
• Touch or on the related field item to adjust the time and touch Set to
apply the values.
• To use a 24-hour format, touch Use 24-hour format checkbox.
15
Page 20

USING THE HANDHELD POS TERMINAL: Changing Basic Settings
ENGLISH
Configuring Display Settings
This device display can be configured in many ways to better suit the working
environment.
To adjust the brightness, perform the following:
1. On the Home screen, touch > Settings.
2. In DEVICE, touch Display > Brightness.
3. Drag the slider to adjust the brightness setting.
4. Touch OK to confirm.
NOTE: To enable the device to automatically adjust the brightness of the screen
depending on the surrounding light, touch Automatic brightness checkbox.
Touch OK to confirm.
To specify the idle time before the device automatically enters Sleep mode, perform
the following:
1. On the Home screen, touch > Settings.
2. In DEVICE, touch Display > Sleep.
3. Select the desired setting.
16
Page 21

USING THE HANDHELD POS TERMINAL: Changing Basic Settings
Configuring Sound Settings
This device has several sound settings such as general sound, ringtones,
notifications, and alarms.
To adjust the volume, perform the following:
1. On the Home screen, touch > Settings.
2. In SOUND, touch Volumes.
3. Drag the respective volume slide to adjust the
volume.
4. Touch OK to confirm the settings.
ENGLISH
To customize the device ringtones and notifi cations, perform the following:
1. On the Home screen, touch > Settings.
2. In SOUND, touch Phone ringtone or Default
notification.
3. Select the desired setting from the available ringtone
options.
4. Touch OK to confirm the settings.
NOTE: To enable the device to vibrate for incoming call or notifications, touch Vibrate
and ring checkbox.
17
Page 22

USING THE HANDHELD POS TERMINAL: Managing Wireless and Network Settings
ENGLISH
Managing Wireless and Network Settings
Connecting to Wireless Networks
To connect to an available wireless network, perform the following:
1. On the Home screen, touch > Settings.
2. In WIRELESS & NETWORK, touch Wi-Fi and set it
to ON to enable the Wi-Fi function.
The device searches for available networks within
range.
3. Touch an available network connection.
4. If prompted, enter the password to connect to the
Wi-Fi network, then touch Connect.
NOTE: Password entry is required only for first time connection. Once the device is
connected to a network and Wi-Fi is enabled on the device, the device will
automatically connect to that network.
Connecting to Bluetooth Devices
To connect to a Bluetooth-enabled device, perform the following:
1. On the Home screen, touch > Settings.
2. In WIRELESS & NETWORK, touch Bluetooth and
set it to ON to enable the Bluetooth function.
3. Touch SEARCH FOR DEVICES for device to search
for compatible Bluetooth devices in range.
4. To connect to a device, touch the device name.
5. Enter the passkey to connect. The passkey must be
the same passkey on the other device.
NOTE: Touch “OT-310” to make the device visible to other
devices.
18
Page 23

USING THE HANDHELD POS TERMINAL: Configuring Language and Keyboard Settings
Configuring Language and Keyboard Settings
Changing the System Language
To change the system language, perform the following:
1. On the Home screen, touch > Settings.
2. In PERSONAL, touch Language & input.
3. Touch Language.
4. Touch the desired language.
5. Touch to return to the Home screen.
ENGLISH
Changing the Input Settings
By default, the device uses the Android keyboard. To manage the keyboard settings,
perform the following:
1. On the Home screen, touch > Settings >
Language & input.
2. In KEYBOARD & INPUT METHODS, touch Default
> Configure input methods.
3. To configure the input method, touch on the
desired keyboard option and change the necessary
settings.
4. Touch to return to the Home screen.
19
Page 24

USING THE HANDHELD POS TERMINAL: Configuring Language and Keyboard Settings
ENGLISH
Using the User Dictionary
The device has a built-in user dictionary, allowing users to add words to it.
To add words to the dictionary, perform the following:
1. On the Home screen, touch > Settings >
Language & input.
2. Touch Personal dictionary.
3. To add words to the dictionary, touch .
4. Type the word to add to the dictionary.
5. Touch OK.
6. Repeat steps 3 to 5 to add more words.
7. Touch to return to the Home screen.
To modify a word in the dictionary, perform the following:
1. On the Home screen, touch > Settings >
Language & input.
2. Touch Personal dictionary.
3. Touch the word to edit.
4. Modify the word, then touch OK.
5. Repeat steps 3 to 4 to modify more words.
6. Touch to return to the Home screen.
To delete a word from the dictionary, perform the following:
1. On the Home screen, touch > Settings >
Language & input.
2. Touch Personal dictionary.
3. Touch next to the word to delete.
The word is removed from the dictionary.
4. Repeat steps 3 to delete more words.
5. Touch to return to the Home screen.
20
Page 25

USING THE HANDHELD POS TERMINAL: Advanced Settings
Advanced Settings
Configuring Location Services
Based on the location, the Location Services settings menu allows interactive options
with Google.
1. On the Home screen, touch > Settings >
Location access.
2. Touch one of the following options:
• Google’ s location service: Check the box to
allow application to use data from sources such
as Wi-Fi and mobile network to determine the
approximate location.
• GPS satellites: Check the box to enable GPS
satellites to pinpoint the location.
ENGLISH
• Location & Google search: Check the box to
let Google use the location to improve search
results and other services.
3. Touch to return to the Home screen.
Configuring Security Settings
Use the Security settings menu to configure the device security options.
1. On the Home screen, touch > Settings >
Security.
2. Touch one of the following options:
• Screen lock: Use slide or set up a pattern, PIN,
or password to lock or unlock the screen.
• Encrypt phone: Set a PIN or password to
decrypt each time the device turns on.
• Set up SIM card lock: Set up SIM card to lock
or change the SIM pin codes.
• Make p assword visible: Check the box to show
the password when the data is entered.
• Device administrators: View or disactivate
device administrators.
21
Page 26

USING THE HANDHELD POS TERMINAL: Advanced Settings
ENGLISH
• Unknown sources: Check the box to allow
installation of applications from unknown
sources.
• Trusted credentials: Allow applications to
display trusted CA certificates.
• Install from storage: Inst all encrypted
certificates from memory card.
• Clear credentials: Clear credential storage of
all contents and reset its password.
3. Touch to return to the Home screen.
Managing Accounts
Synchronize the data, email, calendar and other information of an account with the
device.
To add an Exchange account, perform the following:
1. On the Home screen, touch > Settings > Accounts & sync.
2. Touch ADD ACCOUNT.
22
Page 27

USING THE HANDHELD POS TERMINAL: Advanced Settings
3. Touch Corporate.
4. Enter the Email address and Password.
NOTE: If there are more than one accounts, check
the Send email from this account by
default box to set the current account as the
default account.
5. Touch Next to continue.
6. Enter the required information such as Domain or
Username, Password, Server (for Exchange
account), etc.
NOTE: Obtain these information from the network
administrator or service provider.
7. Touch Next to continue and complete the wizard.
8. Touch to return to the Home screen.
To add a Google account, perform the following:
1. On the Home screen, touch > Settings >
Accounts & sync.
ENGLISH
2. Touch ADD ACCOUNT.
3. Touch Google.
4. Touch Existing to use the existing Google account
or touch New to create new account.
5. Follow the on-screen instructions to complete setup.
6. Touch to return to the Home screen.
23
Page 28

USING THE HANDHELD POS TERMINAL: Advanced Settings
ENGLISH
To synchronize other accounts, perform the following:
1. On the Home screen, touch > Settings >
Accounts & sync.
2. Touch the desired account to sync.
3. Check the boxes of the desired data to sync, such as
Contacts, Calendar.
4. Touch > Sync now.
5. Touch to return to the Home screen.
To remove an account, perform the following:
1. On the Home screen, touch > Settings > Accounts & sync.
2. Touch the desired account to remove.
3. Touch > Remove account.
4. A confirmation message appears. Touch Remove account to confirm.
5. Touch to return to the Home screen.
24
Page 29

USING THE HANDHELD POS TERMINAL: Advanced Settings
Managing Storage Space
Use the Storage settings menu to view the total and available space on the device.
The device has two storage sources:
• USB STORAGE: The internal storage
• SD CARD: The micro SD card
To view the total and available storage space, touch from the Home screen, then
touch Settings > Storage.
To unmount the memory card for safe removal, perform the following:
1. On the Home screen, touch > Settings >
Storage.
2. Touch Unmount SD card.
3. A confirmation message appears on the status bar.
Touch OK to confirm.
ENGLISH
4. Touch to return to the Home screen.
5. Turn off the device and remove the memory card.
25
Page 30

ENGLISH
APPLICATION AND OPERATION: Browser
Application and Operation
This chapter covers information on how to use pre-installed applications and
customize related settings.
Browser
Use Browser to view web pages.
Launching a Web Page
1. On the Home screen, touch > Browser.
2. Touch the address bar.
3. Enter the URL on the address bar
4. Touch Go on the on-screen keyboard.
NOTE: Be sure that the device is properly connected to Internet either via Wi-Fi
connection or mobile data network.
Viewing the Current Web Page
To zoom in on the current page, move the two fingers apart from each other at the
location of the screen to zoom in.
In zoom mode, swipe the finger up/down and left/right to scroll on the page.
To zoom out on the current page, move the two fingers closer together at the location
of the screen to zoom out.
26
Page 31

APPLICATION AND OPERATION: Browser
Managing Web Pages
Touch to change the view current setting or configure
other functions.
• Refresh: Select to reload current web page.
• Forward: Select to go to the next page.
• Bookmarks: Select to view bookmarks, history, or
saved pages.
• Save to bookmarks: Select to save favorite web pages
as bookmarks.
• Share page: Select to share the current page via
Bluetooth, Email, or Messaging.
• Find on page: Select to find texts on the current web
page.
ENGLISH
• Request desktop site: Select to open the current web page in desktop display
mode.
• Save for offline reading: Select to save the current web page to be available
even when the internet service is not available.
• Settings: Select to configure other advanced settings.
NOTE: The availability of options varies depending on the current web page.
27
Page 32

APPLICATION AND OPERATION: Camera
Flash mode
Touch to view the
latest record file.
Zoom icon
Touch to enter
Camera menu.
ENGLISH
Camera
Use Camera to capture photos and panorama shots and record videos.
Capturing Photos
1. On the Home screen, touch > Camera.
2. Aim the device at the subject.
NOTE: Drag the icon to zoom in/out on the subject.
3. Touch to capture the shot.
Reviewing Photos
Touch the thumbnail frame to preview the latest captured
photo.
• Touch to view other recorded photos or videos in
Gallery.
• Touch a sharing application (i.e. Bluetooth, Messaging,
Email) to share the current photo.
28
Page 33

Configuring Camera Settings
Touch to enter the camera menu.
APPLICATION AND OPERATION: Camera
Perform the following:
• Touch to configure the basic camera settings.
Available options: S tore location (OFF/ON), Picture size
(5M Pixels/3M Pixels/2M Pixels/WXGA/HD720/1M
Pixel/SVGA/WVGA/VGA/CIF/QVGA/QCIF), Focus
mode (Normal/Macro), Anti Banding (Auto/60 Hz/50 Hz/
Off), Restore defaults (Cancel/OK).
• Touch to change the auto exposure settings.
Available options: Frame Average, Center Weighted,
Sport Metering.
• Touch to specify the image quality settings.
Available options: Super fine, Fine, Normal.
• Touch to change the color effect settings.
Available options: None, Mono, Sepia, Negative, Solarize.
• Touch to change the white balance settings.
ENGLISH
Available options: Auto, Incandescent, Daylight, Fluorescent, Cloudy.
• Touch to change the flash mode settings.
Available options: On, Off.
• Touch to close the menu screen.
29
Page 34

APPLICATION AND OPERATION: Camera
Touch to view the
latest record file.
Zoom icon
Touch to enter
Video menu.
ENGLISH
Recording Videos
1. On the Home screen, touch > Camera.
2. Touch and select to switch to Video mode.
3. Aim the device at the subject.
4. Touch to start recording the video.
NOTE: Drag the icon to zoom in/out on the subject.
5. Touch to stop recording.
Reviewing Videos
Touch the thumbnail frame to preview the latest recorded
video.
• Touch to play the video.
• Touch to view other recorded photos or videos in
Gallery.
• Touch a sharing application (i.e. Bluetooth, Messaging,
Email) to share the current video.
30
Page 35

Configuring Video Settings
Touch to enter the video menu.
APPLICATION AND OPERATION: Camera
Perform the following:
• Touch to configure the basic video settings.
Available options: Store location (OFF/ON), Video
Encoder (H264/H263/MPEG4), Audio Encoder (AAC/
AMRNB), Video duration (30 minutes/15 minutes/10
minutes/30 seconds), Color effect (None/Mono/Sepia/
Negative/Solarize), Power Mode (Normal_Power/
Low_Power), Restore defaults (Cancel/OK).
• Touch to specify the video quality settings.
Available options: CIF, QCIF.
• Touch to select the time lapse interval.
Available options: Off, 1s, 1.5s, 2s, 2.5s, 3s, 5s, 10s.
• Touch to change the white balance settings.
Available options: Auto, Incandescent, Daylight, Fluorescent, Cloudy.
• Touch to change the flash mode settings.
ENGLISH
Available options: On, Off.
• Touch to close the menu screen.
31
Page 36

APPLICATION AND OPERATION: Camera
Touch to view the
latest record file.
Shooting guideline
ENGLISH
Capturing Panorama Shots
1. On the Home screen, touch > Camera.
2. Touch and select to switch to Panorama mode.
3. Aim the device at the subject.
4. Touch to start capturing the shot.
5. Pan the device horizontally and follow the shooting guideline as shown on the
screen.
6. Touch to stop shooting.
32
Page 37

APPLICATION AND OPERATION: Email
Use the device to send and receive emails using Internet email accounts.
Setting up an Email Account
1. On the Home screen, touch > Email.
2. Enter the email address and password.
3. Touch Next.
NOTE: Touch Manual setup to manually configure
the email.
NOTE: To setup an Exchange email account, refer to
“Managing Accounts” on page 22.
ENGLISH
4. Set the Inbox checking frequency setting and touch
other options box to enable the necessary settings.
5. Touch Next to continue.
33
Page 38

APPLICATION AND OPERATION: Email
Indicates this email
contains attachment.
Unread emails
Read emails
Indicates this email
has been added to
the Starred folder.
ENGLISH
6. Enter the account and display names and touch
Next.
Once the account setup is complete, the device will
automatically retrieve the emails.
Viewing Emails
By default, emails are automatically saved in the Inbox folder .
• Touch to manually receive emails.
• Touch to view other folders.
• Touch to search email that contains specific text in the current folder.
• Touch to compose a new email.
34
Page 39

Composing and Sending an Email
1. On the Home screen, touch > Email.
APPLICATION AND OPERATION: Email
2. Touch .
3. Enter the recipient’s email address in the To field.
4. Enter a subject in the Subject field (if necessary).
5. Compose the email.
NOTE: To add attachments to emails, touch >
Attach file. Then select the file to attach.
6. Touch to send the email.
Reading and Replying an Email
1. On the Home screen, touch > Email.
2. Touch an email to open it.
3. Perform any of the following:
ENGLISH
• To reply the email, touch or touch >
Reply all.
• To forward the email, touch > Forward.
Then enter the recipient email in the To field.
• To view the attachment, touch the Attachments
tab. To save the file into the device, touch SAVE.
NOTE: To view the attached photo in full screen,
touch VIEW.
4. Compose the email.
5. Touch to send the email.
35
Page 40

APPLICATION AND OPERATION: Email
ENGLISH
Deleting Emails
To delete an email at a time, perform the following:
1. On the Home screen, touch > Email.
2. Touch an email to open it.
3. Touch to delete the current email.
To delete selected emails in the same folder, perform the following:
1. On the Home screen, touch > Email.
2. Touch and hold the desired email to delete. Select
other email(s) if necessary.
3. Touch to delete the selected email(s).
36
Page 41

Adding Other Email Accounts
1. On the Home screen, touch > Email.
APPLICATION AND OPERATION: Email
2. Touch > Settings.
3. Touch ADD ACCOUNT.
4. Repeat Steps 2~6 in “Setting up an Email Account”
on page 33.
NOTE: Check the Send email from this account by
default box to set this new account as the default
email account.
Customizing Email Settings
1. On the Home screen, touch > Email.
2. Touch > Settings.
ENGLISH
3. Touch General or an email account.
4. Touch an option and change the necessary settings.
37
Page 42

APPLICATION AND OPERATION: File Manager
ENGLISH
File Manager
Use File Manager to browse and manage files/folders stored in the internal memory
(the device) or the memory card installed in the device.
Browsing Files
1. On the Home screen, touch > File Manager.
2. Select the directory by touching SD card or Device.
3. Browse the folder list and touch the folder to explore.
Managing Files and Folders
Perform one of the following:
• To create a new folder, touch . Enter the folder
name and touch OK.
• To rename the folder or file, touch and hold the item and
touch Rename. Enter the new name and touch OK.
• To sort item by size, touch > Sorting by Size.
• To switch to memory card while browsing the content of
the memory device, touch > SD card.
• To copy file or folder, touch and hold the item to copy
and touch Copy. To paste the file or folder, select the
destination path and touch > Paste.
• To delete a file or folder, touch and hold the item to
delete and touch Delete. Touch OK to confirm the
deletion.
• To move a file or folder, touch and hold the item to move and touch Cut. To paste
the file or folder, select the destination path and touch > Paste.
38
Page 43

APPLICATION AND OPERATION: Gallery
Gallery
Use Gallery to view captured photos, recorded videos, or downloaded photos stored
in the internal memory (the device) or the memory card installed in the device.
Viewing Photos
1. On the Home screen, touch > Gallery.
2. Touch the desired album/folder.
The recorded files are displayed in thumbnails.
ENGLISH
3. Touch the desired image to view it in full screen.
4. Perform the following:
• To view other files, swipe the finger to the left or
right.
• To share this photo, touch and select the
desired sharing application.
• To delete or edit this photo, play the slideshow,
or show more options, touch .
39
Page 44

APPLICATION AND OPERATION: Gallery
ENGLISH
Playing Videos
1. On the Home screen, touch > Gallery.
2. Touch the desired album/folder.
The recorded files are displayed in thumbnails.
3. Touch the desired video to playback.
4. Perform one of the following:
• To play the video, touch .
• To view other files, swipe the finger to the left or
right.
• To share this video, touch and select the
desired sharing application.
• To delete this video or show more options, touch
.
Playing Slideshow
1. On the Home screen, touch > Gallery.
2. Touch the desired album/folder.
The recorded files are displayed in thumbnails.
3. Touch to start the slideshow.
4. To stop the slideshow at anytime, touch the screen.
40
Page 45

APPLICATION AND OPERATION: Messaging
Messaging
Use Messaging to send and receive text and MMS messages.
Creating and Sending a Text Message
1. On the Home screen, touch > Messaging.
2. Touch .
3. Enter the recipient’s phone number in the To field.
4. Compose the message.
5. Touch to send the message.
NOTE: By exiting Messaging before sending the message,
the unsent message will be automatically saved as
a draft.
ENGLISH
Adding an Attachment to a Message
1. On the Home screen, touch > Messaging.
2. Touch .
3. Enter the recipient’s phone number in the To field.
4. Compose the message.
5. Touch to add an attachment and select one of
the following options:
• Pictures: Select to attach a photo from Gallery.
• Capture picture: Select to take a picture to
attach.
• Videos: Select to attach a video clip.
• Capture video: Select to record a video to
attach.
• Audio: Select to attach an audio file.
• Record audio: Select to record the voice to attach.
• Slide show: Select to attach a slideshow.
6. Touch to send the message.
41
Page 46

APPLICATION AND OPERATION: Messaging
ENGLISH
Configuring Messaging Settings
1. On the Home screen, touch > Messaging.
2. Touch > Settings.
3. Touch an option and change the necessary settings:
• Delete old messages: Select this option to
delete old messages as limits are reached.
• Text message limit: Select to specify the
maximum limit of text message per
conversation.
• Multimedia message limit: Select to specify
the maximum limit of multimedia message per
conversation.
• Delivery report s: Select to request a delivery
report for each sent text message.
• Manage RUIM card messages: Select to
manage messages stored on the SIM card.
• Delivery report s (MMS): Select to request a delivery report for each sent
multimedia message.
• Read reports: Select to request a read report for each sent multimedia
message.
• Auto-retrieve: Select to automatically retrieve new messages.
• Roaming auto-retrieve: Select to automatically retrieve new messages
while roaming.
• Notifications: Select to display message notifications in status bar.
• Choose ringtone: Select to choose a ringtone of new messages.
• Vibrate: Select to disable/enable vibration when new message is received.
42
Page 47

APPLICATION AND OPERATION: Music
Touch to skip to the
next song.
Touch to pause the
playback.
Touch again to play.
Touch to skip to the
previous song.
Slide to go forward/backward.
Touch to toggle the
repeat mode.
T ouch to enable/disable
the shuffle mode.
Touch to enter Now
Playing screen.
Music
Use Music to listen to the favorite songs using the device.
Playing a Song
1. On the Home screen, touch > Music.
2. Touch the Song tab.
All songs are displayed on the screen.
ENGLISH
3. Touch a song to play.
NOTE: Touch to view more options.
43
Page 48

APPLICATION AND OPERATION: Music
ENGLISH
Creating a Playlist
1. On the Home screen, touch > Music.
2. Touch and hold the desired song to add.
3. Touch Add to playlist.
4. Select a playlist.
To create a new playlist, touch New. Enter the new
playlist name and touch Save.
Assigning a Song as Ringtone
1. On the Home screen, touch > Music.
2. Touch and hold the desired song to be the device
ringtone.
3. Touch Use as phone ringtone.
44
Page 49

Deleting a Song
1. On the Home screen, touch > Music.
APPLICATION AND OPERATION: Music
2. Touch and hold the desired song to delete.
3. Touch Delete.
4. Touch OK to delete the selected song.
Configuring the Sound Effect
1. On the Home screen, touch > Music.
2. Touch a song to play.
3. Touch > Sound effects.
ENGLISH
4. Touch Equaliser and set it to ON.
5. Touch an option and change the necessary settings.
45
Page 50

APPLICATION AND OPERATION: People
ENGLISH
People
Use People to view and manage the contact list.
Adding a New Contact
1. On the Home screen, touch > People.
2. Touch .
3. Touch one of the following:
• New Cont act in Device: To save the new
contact to the phone memory.
• New Cont act in Card: To save the new contact
to the memory card.
4. Enter the contact information such as name, phone
number, email address, home address, and other
related data.
5. Touch DONE to save the contact.
46
Page 51

APPLICATION AND OPERATION: People
Importing Contacts
To import contacts from the SIM card, perform the following:
1. On the Home screen, touch > People.
2. Touch > Import/export > Import from SIM card.
3. Touch the desired contact to import.
To import contacts from the memory card, perform the following:
1. On the Home screen, touch > People.
2. Touch > Import/export > Import from storage.
ENGLISH
3. Select the vCard file(s) to import.
4. Touch OK to import contacts.
47
Page 52

APPLICATION AND OPERATION: People
ENGLISH
Backing Up Contacts
To copy contacts to the SIM card, perform the following:
1. On the Home screen, touch > People.
2. Touch > Import/export > Export to SIM/RUIM
card.
3. Touch the desired contact to export.
To copy contacts to the memory card, perform the following:
1. On the Home screen, touch > People.
2. Touch > Import/export > Export to storage.
3. Touch OK to copy contacts to the memory card.
48
Page 53

APPLICATION AND OPERATION: People
Managing Contacts
To edit a contact information, perform the following:
1. On the Home screen, touch > People.
2. Touch the desired contact to modify.
3. Touch > Edit.
4. Modify the necessary information.
5. Touch DONE to save the changes.
To share a contact information, perform the following:
1. On the Home screen, touch > People.
2. Touch the desired contact to share.
ENGLISH
3. Touch > Share.
4. Select the desired sharing application to send the contact information.
To assign a contact ringtone, perform the following:
1. On the Home screen, touch > People.
2. Touch the desired contact to assign a ringtone to.
3. Touch > Set ringtone.
4. Select the desired ringtone and touch OK to confirm.
To delete a contact, perform the following:
1. On the Home screen, touch > People.
2. Touch the desired contact to delete.
3. Touch > Delete.
4. Touch OK to confirm the deletion.
49
Page 54

APPLICATION AND OPERATION: People
ENGLISH
To send all calls from specific contact to voicemail, perform the following:
1. On the Home screen, touch > People.
2. Touch the desired contact to revert all calls directly to voicemail.
3. Touch > All calls to voicemail.
To add a contact to Favorite list, perform the following:
1. On the Home screen, touch > People.
2. Touch the desired contact to add to the Favorite list.
3. Touch and it turns , indicating the current
contact has been added to the Favorite list.
4. Touch Favorite tab ( ) to view the favorite
contact(s).
To remove a specific contact from Favorite list, perform the
following:
1. On the Home screen, touch > People.
2. Touch the desired contact to remove from the
Favorite list.
3. Touch and it turns , indicating the current
contact has been removed from the Favorite list.
50
Page 55

APPLICATION AND OPERATION: Phone
Phone
Use Phone to make or receive a phone call using the device.
Making a Call
1. On the Home screen, touch > Phone.
2. Enter the phone number using the on-screen
keypad.
• To delete a wrong number, touch .
• To delete the entire number, touch and hold
.
3. Touch to make a call after the user finishes
entering the phone number.
ENGLISH
4. To end the call after dialing, touch .
NOTE: As an alternative, calls can be made directly from
the contact lists. Touch People ( ) tab and touch
the desired contact’s phone number.
51
Page 56

APPLICATION AND OPERATION: Phone
ENGLISH
Answering a Call
• To answer a call, touch and drag it to the icon.
• To reject the call, touch and drag it to the icon.
• To reject and send a message directly to the caller,
touch and drag it to the icon.
NOTE: When the icon is touched, it automatically
changes to .
Viewing Call Log
The Call Log screen displays the recent outgoing, received, or missed calls.
To view the Call Log screen, touch the Call Log ( ) tab.
• To remove an entry from the list, select the desired entry and touch > Remove
from call log.
• To edit the phone number before making a call, touch > Edit number before
call. Edit the phone number and touch to make a call.
• To clear all call log, touch > Clear call log. Touch OK to confirm.
• To configure the call settings, touch > Settings. Tap the desired option and
change the necessary settings.
52
Page 57

APPLICATION AND OPERATION: Barcode Scanner Module
Barcode Scanner Module
This device is equipped with a barcode scanner module which supports many of the
popular barcode formats currently used worldwide.
NOTE: During the system initialization (after powering on the device for the first time
or resetting the device to factory default), the scanner will take approximately
30 seconds to be activated. It is highly recommended not to press the barcode
scan trigger key within 30 seconds.
Configuring Barcode Reader Settings
Use the Barcode Reader settings menu to configure the barcode reader related
settings.
1. On the Home screen, touch > Settings >
Barcode Reader.
2. Touch one of the following options:
• Barcode reader: Check the box to enable
barcode module function.
• Good read notification: Check the box to
enable sound after scanning barcodes.
• Prefix Suffix settings: Configure the prefix and
ENGLISH
suffix characters.
• Code readable settings: Configure the code
readable settings.
• Code options: Configure the code options.
• Read options: Configure the read options including read mode, read time,
margin, redundancy, positive and negative, and scan angle settings.
• Output mode: Select the output mode.
• Trigger Key: Specify which button(s) to be used
as trigger key(s).
• Restore factory default settings: Return all
barcode reader settings to the factory default
settings.
• Backup current settings: Back up the current
barcode reader settings.
• Restore current settings: Restore the current
barcode reader settings.
53
Page 58

APPLICATION AND OPERATION: Barcode Scanner Module
ENGLISH
• Show the notification icon: Check the box to enable notification icon to
be displayed on the status bar.
• Firmware Version: View the module firmware version.
3. Touch to return to the Home screen.
Reading a Barcode
To read a 1D barcode, perform the following:
1. Press and release the barcode scan
trigger key.
2. Aim the scanning beam at the barcode.
3. The scanned data appears on the screen.
To read a 2D barcode, perform the following:
1. Press and hold the barcode scan trigger
key.
2. Aim the scanning beam at the barcode.
3. The scanned data appears on the screen.
4. Release the trigger key.
54
Page 59

APPLICATION AND OPERATION: MSR Module
MSR Module
The Magnetic Stripe Reader module supports tracks 1, 2, and 3 covering possible
reading methods currently in use.
Configuring MSR Settings
Use the MSR settings menu to configure the MSR module related settings.
1. On the Home screen, touch > Settings >
MSR Settings.
2. Touch one of the following options:
• Track setting: Configure tracks order, start
sentinels, and end sentinels settings.
By default, the start sentinel of a magnetic stripe
card is already set based on the ISO standard:
- Track 1: %
- Track 2: ;
- Track 3: +
• Prefix and suffix setting: Configure the prefix
and suffix characters for package/track settings.
ENGLISH
• Output setting: Configure the output mode,
reader and buzzer settings.
• Restore factory default settings: Return all MSR settings to the factory
default settings.
• MSR Demo: Select to test the MSR module.
• Firmware Version: The module firmware version will display on screen
within 10 seconds.
3. Touch to return to the Home screen.
55
Page 60

APPLICATION AND OPERATION: MSR Module
ENGLISH
Testing the MSR Module
1. On the Home screen, touch > Settings > MSR
Settings.
2. Touch MSR Demo to open the swipe test screen.
3. Swipe a magnetic stripe card through the MSR module. Make sure the
magnetic stripe is facing upward.
4. Data appears on the screen if the test is successful.
56
Page 61

Appendix
APPENDIX: Specifications
Specifications
OT-310 Specifications
Processor Qualcomm MSM8960 Dual Core Krait– 1.5GHz
OS Android 4.2
Memory Standard: 1GB
Storage Standard: 8GB
Display • 4.3" TFT, 800*480
• Brightness 350nits
Capacitive Touch • 2 finger touch
• Gorilla glass+ AR solution
WWAN 1. (RF WCDMA+GSM)GWTR-1605 support
• GSM850/900/1800/1900
• EDGE850/900/1800/1900
• GPRS850/900/1800/1900
• WCDMA850/1700(AWS)/1900/2100
2. Voice
3. HSPA+ Modem
ENGLISH
Bluetooth V4.0 + LE
WiFi 802.11a/b/g/n ; 13 channels; need roaming function
WCN3660
GPS • Gen 8 GPSOne with GPS and GLONASS.
• Strong Signal/Open Sky (-130 dBm) Cold start 32s
• Weak signal/Mild indoor (-161 dBm) 60s
NFC (Optional) NFC standards according to Android 4.2 CDD +
ISO15693 and MIFARE
Back Camera (Internal) CMOS, 5.0 Mega Pixels, auto focus, Flash Light, mipi
interface
Battery pack 3.7V, capacity 2860mAh
Charging time 2.5~3 hours
Backup Battery • Li-ion Polymer 3.7V,80-100mA
• hot swap time of 3-5 min.
• battery cover detection
Hotswap functionality Battery cover sensor and backup battery voltage
detection for securing hotswap functionality
Working time Video timeGaround 8 hours@film with speaker, 50%,
Brightness 50%,WIFI Turn ON
Standby time 150 hours @ WIFI of & 3G Power on, 20mA
57
Page 62

ENGLISH
APPENDIX: Specifications
OT-310 Specifications
Speaker Internal, 1 (0.5W) more than 80 dB SPL at 1m
Receiver Internal, 1, add HAC compliant receiver
Microphone Internal, 1
I/O • 1 x SIM
• 1 x Micro SD
• 1 x Micro USB Female type, OTG & Charging function
• 1 x Earphone Jack (pin defined as Apple)
• 6 x Function Key (2 function key)
• 1 x Power button, 2 x Volume button (Power button for
7-10 seconds for reset function)
• 1 x POGO Pins (for Cradle), include charging function,
OTG USB function
• 1 x Internal Host usb for MSR or IC Card reader
Power Adaptor • Input:100V to 240V AC 50/60Hz 0.8A
• Output: 5V DC 3A(DC-plug) (Micro USB male Type
only support 1.5A)
• AC Cable
• Certification: UL, FCC, CE, PSE & BSMI, +/-2KV surge
test
Dimension 77mm(W) x 147mm(L) x 19.9 mm(T)
Operating temperature
Storage temperature
Charging temperature
-10oC to +50oC
-20oC to +70oC (without battery)
0oC to +40oC
Humidity 5% to 95% RH (no condensation)
Sealing IP54 per applicable IEC sealing specifications
Drop specification Multiple 1.5 meters(4 feet) drop to concrete, 6 faces, 6
times per face, at 25 degree C operating temperature
Electrostatic Discharge
(ESD)
• +/- 15kVdc air discharge @ could be reboot
• +/- 8kVdc direct discharge@ could be re boot
*Design and specifications are subject to change without prior notice.
58
Page 63

Troubleshooting
1. The device powers off automatically.
• The battery power is depleted. Charge the battery.
2. No sound comes out from the device.
• Check whether the volume is set to mute. Press the volume keys to adjust
volume.
• Check whether the music file is damaged, try other files to test.
3. Cannot copy a file to the micro SD card.
• Check whether the micro SD card capacity is full.
• Try to delete or move some files to free space.
4. Cannot connect to the Internet.
• Check whether the device is connected to a wireless network.
APPENDIX: Troubleshooting
ENGLISH
• If no wireless network is available, try to use the SIM card’s data network
connection.
• The battery may be too low. Network connectivity uses more power. Be
sure to charge the battery.
5. Captured photos are too dark.
• Check whether the flash mode setting is set to Off. To enable the flash
usage during photography, set the flash mode setting to On.
• Turn on the room light or go outdoor to take pictures.
59
Page 64

ENGLISH
Preface
Copyright
Copyright © 2014. All rights reserved.
No part of this user manual may be reproduced, transmitted, stored in a retrieval
system, or translated into any language, in any form or by any means, without
permission from the manufacturer.
Google, the Google logo, Android, the Android logo and Tags are trademarks of
Google Inc.
Wi-Fi is a registered trademark of the Wireless Fidelity Alliance.
microSD is a trademark of SD Card Association.
Bluetooth and the Bluetooth logo are trademarks owned by Bluetooth SIG, Inc.
Java, JME and all other Java-based marks are trademarks or registered trademarks
of Sun Microsystems, Inc. in the United States and other countries.
All other products use in this device and trademarks mentioned herein are trademarks
or registered trademarks of their respective owners.
Safety Information
Read the following safety information before using the device.
• Use only the power adaptor provided by the manufacturer. Use of unauthorized
accessories may void the warranty.
• Avoid using the device near electromagnetic sources such as TVs, radios, and
microwave ovens.
• Unplug the power adaptor from the wall outlet during lightning storms to avoid
electric shock or fire.
• Do not expose the device to direct sunlight over a long period of time.
• Do not use harsh chemicals or detergents to clean the device.
• Do not handle the device with wet hands while it is being charged. This may cause
an electric shock or serious damage to the device.
• Do not operate the device while it is being charged. This may cause unforeseen
damage.
• Do not store the device in temperatures lower than -20ºC or higher than 60ºC.
• The operating temperature for this device is from -5ºC to 50ºC.
• Do not use the device on board an aircraft.
60
Page 65

Regulatory Statement
RF Exposure Information (SAR)
This phone is designed and manufactured not to exceed the emission limits for
exposure to radio frequency (RF) energy set by the Federal Communications
Commission of the United States.
During SAR testing, this device was set to transmit at its highest certified power level
in all tested frequency bands, and placed in positions that simulate RF exposure in
usage against the head with no separation, and near the body with the separation of
10 mm. Although the SAR is determined at the highest certified power level, the actual
SAR level of the device while operating can be well below the maximum value. This is
because the phone is designed to operate at multiple power levels so as to use only
the power required to reach the network. In general, the closer you are to a wireless
base station antenna, the lower the power output.
The exposure standard for wireless devices employing a unit of measurement is
known as the Specific Absorption Rate, or SAR.
The SAR limit set by the FCC is 1.6W/kg.
This device is complied with SAR for general population /uncontrolled exposure limits
in ANSI/IEEE C95.1-1992 and had been tested in accordance with the measurement
methods and procedures specified in IEEE1528. This device has been tested and
meets the FCC RF exposure guidelines when tested with the device directly contacted
to the body.
ENGLISH
The FCC has granted an Equipment Authorization for this model phone with all
reported SAR levels evaluated as in compliance with the FCC RF exposure
guidelines. SAR information on this model phone is on file with the FCC and can be
found under the Display Grant section of www.fcc.gov/oet/ea/fccid after searching on
FCC ID: NDPOT -310.
While there may be differences between the SAR levels of various phones and at
various positions, they all meet the government requirements.
SAR compliance for body-worn operation is based on a separation distance of 10 mm
between the unit and the human body. Carry this device at least 10 mm away from
your body to ensure RF exposure level compliant or lower to the reported level. To
support body-worn operation, choose the belt clips or holsters, which do not contain
metallic components, to maintain a sep aration of 10 mm between this device and your
body.
RF exposure compliance with any body-worn accessory, which contains metal, was
not tested and certified, and use such body-worn accessory should be avoided.
61
Page 66

ENGLISH
WEEE Notice
The WEEE logo on the product or on its box indicates that this product must not be
disposed of or dumped with your other household waste. You are liable to dispose of
all your electronic or electrical waste equipment by relocating over to the specified
collection point for recycling of such hazardous waste. Isolated collection and proper
recovery of your electronic and electrical waste equipment at the time of disposal will
allow us to help conserve natural resources. Moreover, proper recycling of the
electronic and electrical waste equipment will ensure safety of human health and
environment. For more information about electronic and electrical waste equipment
disposal, recovery, and collection points, please contact your local city center,
household waste disposal service, shop from where you purchased the equipment, or
manufacturer of the equipment.
FCC Regulations
15.19(a)(3):
This device complies with part 15 of the FCC Rules. Operation is subject to the
following two conditions: (1) This device may not cause harmful interference, and (2)
this device must accept any interference received, including interference that may
cause undesired operation.
15.105(b):
NOTE: This equipment has been tested and found to comply with the limits for a Class
B digital device, pursuant to part 15 of the FCC Rules. These limits are designed to
provide reasonable protection against harmful interference in a residential installation.
This equipment generates, uses and can radiate radio frequency energy and, if not
installed and used in accordance with the instructions, may cause harmful
interference to radio communications. However, there is no guarantee that
interference will not occur in a particular installation. If this equipment does cause
harmful interference to radio or television reception, which can be determined by
turning the equipment off and on, the user is encouraged to try to correct the
interference by one or more of the following measures:
• Reorient or relocate the receiving antenna.
• Increase the separation between the equipment and receiver.
• Connect the equipment into an outlet on a circuit different from that to which the
receiver is connected.
• Consult the dealer or an experienced radio/ TV technician for help
Changes or modifications not expressly approved by the party responsible for
compliance could void the user‘s authority to operate the equipment.
62
Page 67

About this Manual
The content in this manual is as accurate as possible. However, due to continuous
product improvements, some contents and specifications may have been changed
since this manual was written. In this case, take the actual device as basis.
No part of this user manual may be reproduced, transmitted, stored in a retrieval
system, or translated into any language, in any form or by any means, without a
written permission from the manufacturer.
Information is subject to change without prior notice.
ENGLISH
63
Page 68

 Loading...