

Page 1

VM-8 User Manual
Page 2

1. Introduction
Front view with stand
Back view with optional USB, PS2 and 9-pin D-sub connector in stand
Page 3

Panel Rotation with stand:
Vertical: 30
o
Horizontal: 30o clockwise, 180o anti-clockwise
Accessories:
VGA Signal Cable
12VDC, 1.5A Power Adaptor
Page 4
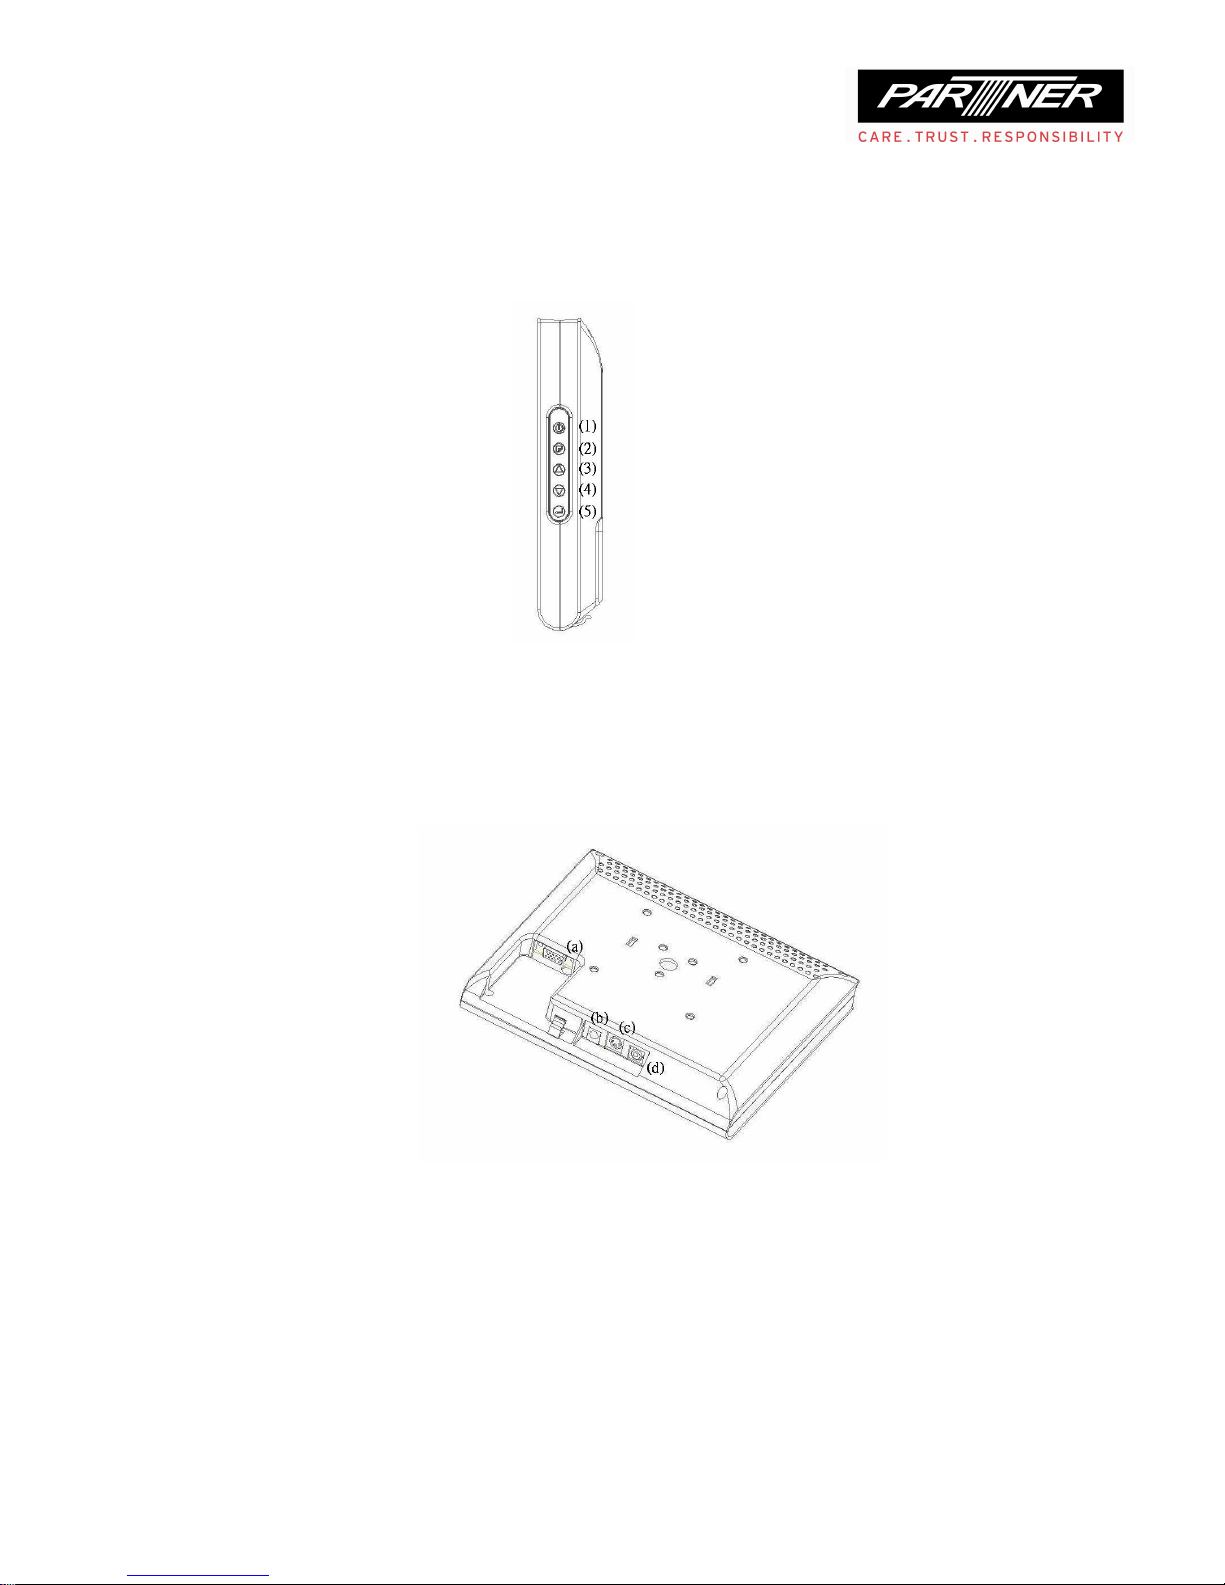
2. Setup
(1)—Power button
(2)—OSD Menu display button
(3), (4)—Level adjustment button
(5)—Select button
(a) VGA 15-pin, D-sub connector
(b) Power adaptor port
(c) Touchpad port
(d) RCA CVBS jack
1. Plug the Power Adaptor for the monitor into a nearby outlet. Connect the Adaptor
to the power port(b) on the back of the monitor.
Page 5

2. Set the display resolution to 800x 600 in your PC. Connect the VGA signal cable
from the D-sub (Analog) connector on the video card of your PC to the 15-pin, D-sub
connector(a) on the back of your monitor.
3. Turn on monitor by pressing the Power Button(1). If your monitor displays an
image, installation is complete.
4. If you have a touchpad, connect the touchpad cable from port (c) to the
PS2/USB/RS232 of the PC.
Note: you may also use CVBS (d) input with proper cables(not included in
accessories) in step 2. to display your image.
VESA mounting:
1. Turn off the monitor and unplug the Power Adaptor.
2. Remove the stand by taking out the cap and the three screws in the rear.
3. Align the VESA mount with the holes in the VESA compliant mounting pad and
secure it with the four screws supplied with the arm-type base, wall mount hanger or
other base.
Page 6

3. On-Screen Display (OSD)
A detail view of the OSD panel control is in the right hand side of the panel. There are
five buttons in all. From up to down, they are: Power On/Off function, Menu function,
the Up symbol, the Down symbol and Enter function.
1. Use the Power button to power on or off the panel.
2. Use the Menu button to open / exit the OSD main menu.
3. Use the Up or Down button to highlight and adjust the item(s) in the menu.
4. Use the Enter button to enter the sub-menu, and set the item's value.
Main Menu:
The main menu is opened or exited by using the Menu button. There has five items:
Brightness, Contrast, Chroma, Language and Exit. Each has its own function and is
controlled by the Up, Down and Enter buttons.
Page 7

Brightness:
1. Push the Menu button;
2. Push the Up or Down button until the BRIGHTNESS icon is highlighted;
3. Push the Enter button to open the brightness menu;
4. The value bar is highlighted. Its value is started from 0 to 100;
5. Adjust the brightness by using the Up or Down button;
6. Push the Enter button to save the adjusted value, and return to main menu.
Contrast:
1. Push the Menu button;
2. Push the Up or Down button until the CONTRAST icon is highlighted;
3. Push the Enter button to open the contrast menu;
4. The value bar is highlighted. Its value is started from 0 to 100;
5. Adjust the contrast by using the Up or Down button;
6. Push the Enter button to save the adjusted value, and return to main menu.
Page 8

Chroma:
1. Push the Menu button;
2. Push the Up or Down button until the CHROMA icon is highlighted;
3. Push the Enter button to open the chroma menu;
4. The value bar is highlighted. Its value is started from 0 to 100;
5. Adjust the chroma by using the Up or Down button;
6. Push the Enter button to save the adjusted value, and return to main menu.
Page 9

Language:
1. Push the Menu button;
2. Push the Up or Down button until the Language icon is highlighted;
3. Push the Enter button to open the language menu;
4. Three languages can be selected. They are ENGLISH, 中文
中文中文
中文 (中文简体) and
繁體
繁體繁體
繁體 (中文繁體);
5. Select the language by using the Up or Down button;
6. Push the Enter button to save the selected language and return to main menu.
Exit:
1. Push the Menu button;
2. Push the Up or Down button until the EXIT icon is highlighted;
3. Push the Enter button to exit the main menu;
4. The OSD menu is disappeared.
Page 10

Page 11

4. Product Specification
Viewing Area 8.0 inches
Resolution 800 x 600
Active Display Area (mm) 111.3 x 84.7
Color 26.2k
Response Time TR/TF 10/15 ms
Contrast Ratio 500:1
Viewing Angle
Up/Down/Left/Right
50°/ 70°/ 70°/ 70°
Panel
Brightness 250 cd/m2(LED Backlight)
VGA Signal RGB Analog
Horizontal Frequency 31 to 48kHz
Vertical Frequency 56 to 72Hz
Video Input
CVBS Signal 1.0Vp-p PAL/NTSC
Input Universal AC100~240V,
50/60Hz
Power Adaptor
Output DC +12V
Management VESA DPMS
Power
Consumption
≦4W
Storage Temperature
-25℃ ~ 70℃
Operating Temperature
0℃ ~ 42℃
Environment
Operating Humidity 10% ~ 85%
Vertical
30°
Rotation
Horizontal
Anti-clockwise: 180°
Clockwise: 30°
Glass Strengthen Glass
Color Light Gray / Black
Optional
Dummy Base Ports PS/2, USB, RS232
 Loading...