

Page 1
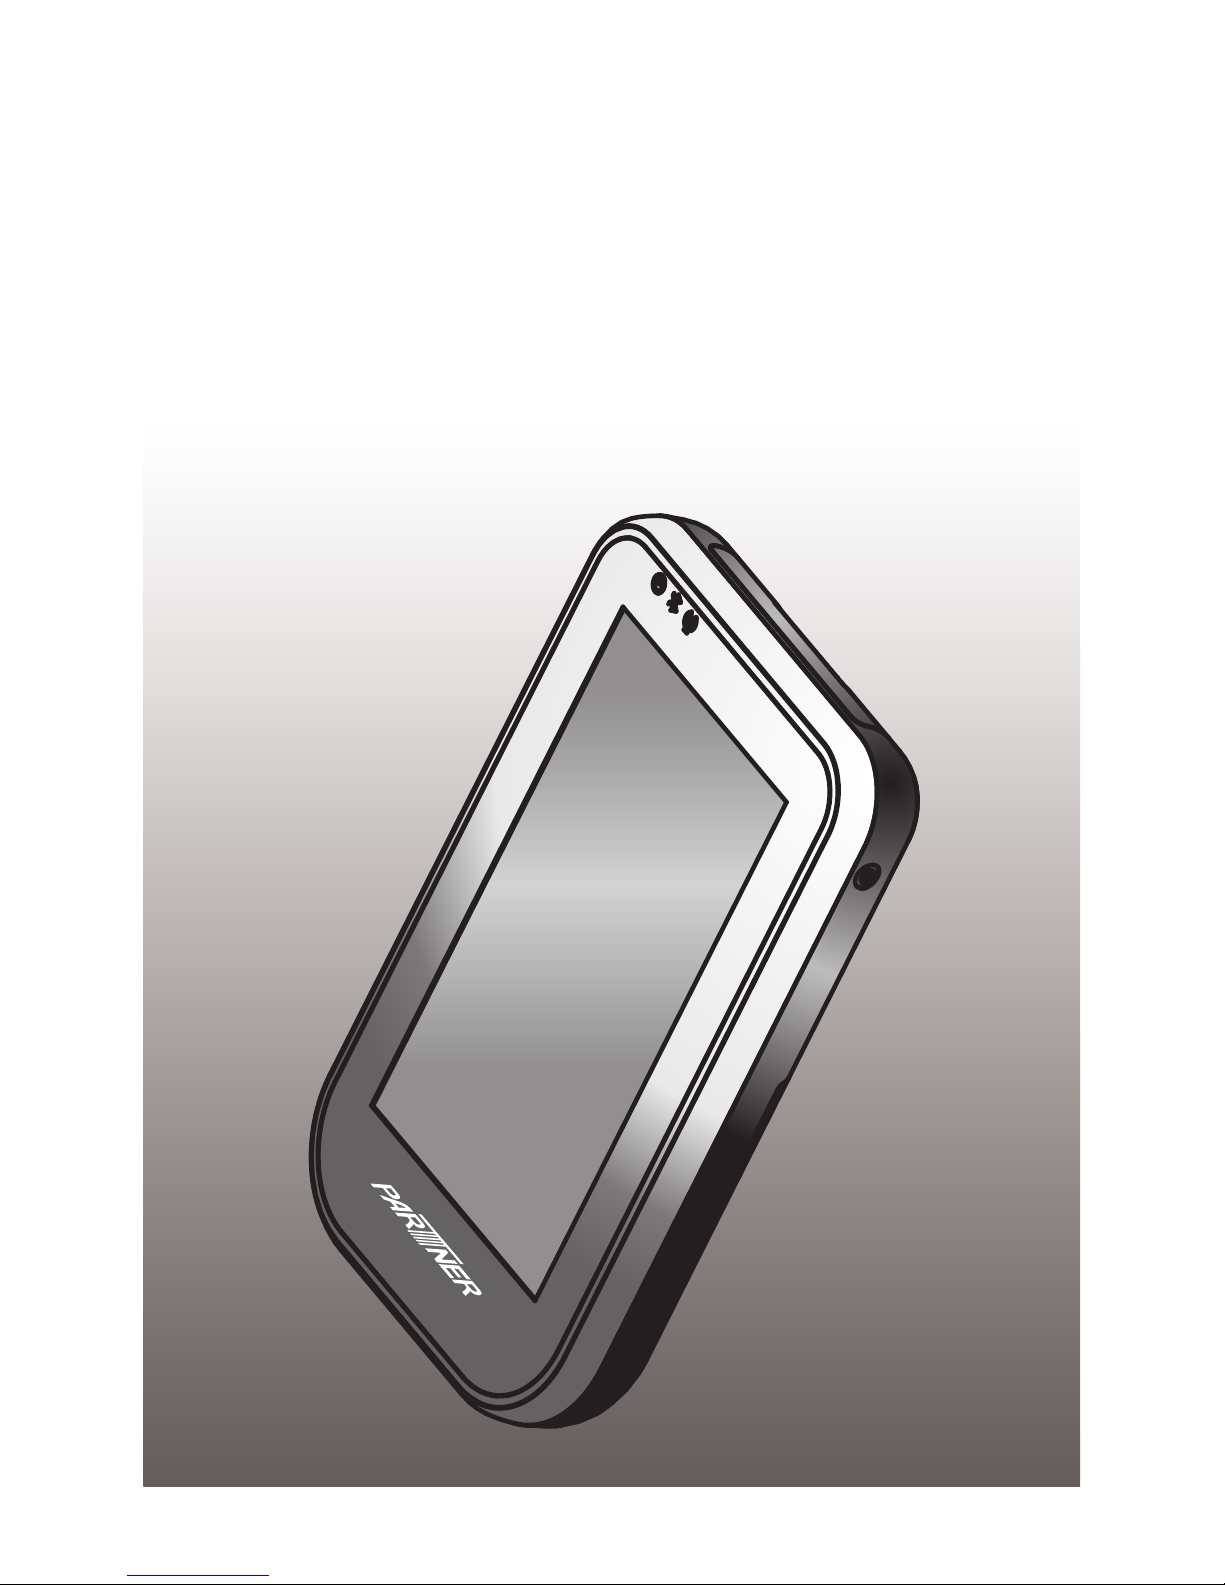
OT-100
User Manual
Page 2

Page 3

i
Copyright
This publication, including all photographs, illustrations and software, is protected under international
copyright laws, with all rights reserved. Neither this manual, nor any of the material contained herein, may be
reproduced without written consent of PARTNER Tech Corp.
Disclaimer
The information in this document is subject to change without notice. The manufacturer makes no
representations or warranties with respect to the contents hereof and specically disclaims any implied
warranties of merchantability or tness for any particular purpose. The manufacturer reserves the right to
revise this publication and to make changes from time to time in the content hereof without obligation of the
manufacturer to notify any person of such revision or changes.
Trademark recognition
All product names used in this manual are the properties of their respective owners and are acknowledged.
Federal Communications Commission (FCC)
This equipment has been tested and found to comply with the limits for a Class B digital device, pursuant
to Part 15 of the FCC Rules. These limits are designed to provide reasonable protection against harmful
interference in a residential installation. This equipment generates, uses, and can radiate radio frequency
energy and, if not installed and used in accordance with the instructions, may cause harmful interference
to radio communications. However, there is no guarantee that interference will not occur in a particular
installation. If this equipment does cause harmful interference to radio or television reception, which can be
determined by turning the equipment off and on, the user is encouraged to try to correct the interference by
one or more of the following measures:
Reorient or relocate the receiving antenna.
Increase the separation between the equipment and the receiver.
Connect the equipment onto an outlet on a circuit different from that to which the receiver is connected.
Consult the dealer or an experienced radio/TV technician for help.
Shielded interconnect cables and a shielded AC power cable must be employed with this equipment to
ensure compliance with the pertinent RF emission limits governing this device. Changes or modications not
expressly approved by the system’s manufacturer could void the user’s authority to operate the equipment.
Declaration of conformity
This device complies with part 15 of the FCC rules. Operation is subject to the following conditions:
This device may not cause harmful interference, and
This device must accept any interference received, including interference that may cause undesired operation.
Page 4

ii
Revision history
Version 1.0, August 2009
Version 1.1, February 2010
About this manual
This manual is intended for system administrators who are familiar with setting up a new system and
installing programs.
The manual consists of the following sections:
Chapter 1 Getting Started: This section covers unpacking and checking the
package contents, identifying components, charging
the battery, installing the SD card, and powering on the
device.
Chapter 2 Using The Device: This section provides information on how to use the
device features.
Chapter 3 Using The Accessories: This section provides information on how to use the
accessories.
Appendix: The appendix covers troubleshooting, information
on having the OT-100 serviced, supported Bluetooth
proles, and technical specications.
Safety information
Before installing and using the OT-100, take note of the following precautions:
SAR compliance for body-worn operations requires at least 2 cm of separation between the device and
the user’s body
Request service for damaged products: Turn off the product, unplug it from the electrical outlet, and
request service from a service partner under the following conditions:
The power cord or plug is damaged.•
Liquid has been spilled into the product.•
An object has fallen into the product.•
The product has been exposed to rain or water.•
The product has been dropped or damaged.•
The product does not operate normally when you follow the operating instructions.•
Avoid hot areas: The product should be placed away from heat sources such as radiators, heat registers,
stoves, and other products (such as ampliers) that produce heat.
Allow the product to cool: Allow the product to cool before removing covers and touching internal
components.
Avoid wet areas: Never use the product in a wet location.
Avoid inserting objects into product: Never insert objects of any kind into slots or other openings in the
product.
Clean the product properly: Unplug the product from the wall outlet before cleaning it. Do not use liquid
cleaners or aerosol cleaners. Use a soft cloth dampened with water for cleaning exterior components, but
NEVER apply water directly to the product or to an LCD screen.
Page 5

iii
Use the product with approved equipment: Use your product only with the computers and accessories
identied as suitable for use with your product.
Adjust the volume: Turn down the volume before using headphones or other audio devices.
When device will not be used for a long period of time, please remove the battery, and store both device
and battery in a cool, dark, and dry place. For storage over a long period of time, please place product
in a dry box.
SAR compliance for body-worn operations requires at least 2 cm of separation between the device and
the user’s body.
Battery Handling Precaution
Do not attempt to disassemble or reconstruct the packs. • The battery has integrated protection circuits
and safety functions to avoid danger. If battery is damaged, it may rupture, generate heat, or cause smoke
and ame.
Do not short circuit battery. • Neither short connect the positive terminal and negative terminal with
metals, nor carry or store the battery with metal objects. If the battery is short circuited, excessive large
current will ow and generate heat, rupture or ame will occur, and also it will cause heat generation for
metals. Please cover the plug with waterproof cap when not using the battery.
Do not incinerate or heat the battery. • This will cause the insulator to melt, damage the gas release vent,
and cause loss of safety function, or electrolyte ignition. Above mentioned matters will cause battery to
rupture, generate heat, or cause smoke and ame.
Do not use near high temperature areas. • Do not use or leave battery near re, stove or heated areas of
more than 80˚C, to avoid melting of the polymer separator which would cause internal short circuits to
occur in individual cells, and cause the battery to rupture, generate heat, or cause smoke and ame.
Do not immerse the battery in water, seawater, or get it wet. • This may cause internal short circuits to
occur within individual cells, and cause the battery to rupture, generate heat, or cause smoke and ame.
Donotchargebatterynearreorundertheblazingsun.• If the battery protection circuit does not
function properly due to high temperature, or it is broken, the battery will be charged at an abnormal
current, and abnormal chemical reaction may occur, causing the battery to rupture, generate heat, or cause
smoke and ame.
Onlyusetheofcialproductchargerandobservethechargingrequirement.• If the battery is charged
in unusual conditions, it will cause loss of safety functions, or abnormal chemical reactions, causing the
battery to rupture, generate heat, or cause smoke and ame.
Do not try to damage the battery. • Do not drive a nail into the battery, strike it with a hammer, or tread on
it. The impact will cause leakage, causing the battery to rupture, generate heat, or cause smoke and ame.
Do not attempt to solder anything onto the battery.• This will cause the insulator to melt due to heat, or
cause the gas release vent to break, causing the battery to rupture, generate heat, or cause smoke and ame.
Do not connect battery to a plug socket or car-cigarette plug. • Connecting high voltage to the battery,
means excessive current will ow in it, and cause the battery to rupture, generate heat, or cause smoke and
ame.
Do not use battery for powering other equipment. • If the battery is used for powering other equipment, it
will deteriorate its performance and cycle-life. At worst, abnormal current will ow, and cause the battery
to rupture, generate heat, or cause smoke and ame.
Do not touch a leaked battery directly. • If battery leaks and hands touch leaked electrolyte, wash your
hands with soap immediately. If leaked electrolyte gets into your eyes, do not rub them, and wash eyes
Page 6
iv
immediately with fresh water. Consult a doctor immediately.
Donotcontinuetochargeoverspeciedtime.• If the battery has not nished charging over recommended
time, let it stop charging. There is a possibility that the battery might be defective, and continued charging
may cause the battery to deform, generate heat, or cause smoke or ame.
Do not insert battery into a microwave or high pressure container. • This may cause battery to deform,
generate heat, or cause smoke or ame, because of sudden heat, intense pressure, or damage to the sealing
condition of the battery.
Donotputleakedbatterynearre.• If liquid leaks from the battery, or the battery give outs a bad smell,
do not leave battery near ammable objects. Otherwise, the electrolyte leaked from battery will catch on
re.
Do not use an abnormal battery. • If battery has a bad smell, changes color, deforms, or causes something
wrong during usage, remove it from equipment or charger, and do not use. If an abnormal battery is used, it
may cause battery to rupture, generate heat, or cause smoke and ame.
WARNING
Warning! Batteries may explode if not handled properly. Do not
disassemble or dispose of them in fire. Keep them away from children.
Follow local regulations when disposing of used batteries.
警告
不正確地更換電池會有爆炸的危險。僅可更換為廠商建議的相同電池或相同型
式電池。請依據廠商說明書棄置電池。
注意
用错误型号电池更换会有爆炸危险务必按照说明处置用完的电池。
注意
正しく交換しないと電池が爆発する危険があります。製造業者の推奨する電
池又は同タイプの電池と交換して下さい。使用後の電池を捨てる時は製造業
者の指示に従って下さい。
Page 7

v
TABLE OF CONTENTS
CHAPTER 1 GETTING STARTED ................................................ 1
Unpacking the OT-100 ..................................................................................1
Checking the package contents ....................................................................2
Identifying components .................................................................................4
Charging Cradle .............................................................................................8
Setup the OT-100 ...........................................................................................9
Using the cradle ...........................................................................................12
Charge the device in cradle .........................................................................12
Charge the battery in cradle .........................................................................12
Changing the battery ....................................................................................13
Using SD cards ............................................................................................16
Installing a SD card ......................................................................................16
View the contents of a SD card ....................................................................18
CHAPTER 2 USING THE DEVICE ............................................. 19
Entering text .................................................................................................19
Shortcut menus ............................................................................................19
Windows CE help .........................................................................................19
Performing a reset........................................................................................20
Opening and closing programs ....................................................................20
Program switch ............................................................................................20
Status icons..................................................................................................20
Adjusting the volume ....................................................................................21
Changing the device name ..........................................................................23
Entering owner information ..........................................................................24
Recalibrating the screen ..............................................................................26
Setting the date and time .............................................................................27
Turning WiFi on/off .......................................................................................29
Turning Bluetooth on/off ...............................................................................31
Setting the screen rotation ...........................................................................32
Connecting to a WiFi network ......................................................................34
Automatically connect to a WiFi network .................................................34
Manually connect to a WiFi network ........................................................35
Find your IP address ................................................................................36
Specify the IP address and domain name servers (DNS) .......................36
Using Settings Manager ...............................................................................39
Lock Screen .................................................................................................44
Page 8

vi
Upgrading OS Image or Bootloader .............................................................48
Connect device to computer ........................................................................52
Install ActiveSync (for Windows XP) ........................................................52
Synchronize your data with ActiveSync and Windows XP .......................52
Copy or move les between the computer and OT-100 ..........................54
Synchronize les between the computer and OT-100 .............................55
Install and remove programs ...................................................................58
CHAPTER 3 USING THE ACCESSORIES ............................... 61
Attaching the stylus cord ..............................................................................61
Attaching the hand strap ..............................................................................62
Using the leather pouch ...............................................................................63
Attaching the leather pouch cord .................................................................64
Using the high quality stylus.........................................................................65
APPENDIX .................................................................................. 67
Troubleshooting ...........................................................................................67
Tips for Troubleshooting ...............................................................................67
General Problems .......................................................................................67
Having the OT-100 Serviced .......................................................................68
Guidelines for care and maintenance ..........................................................68
Using the device ......................................................................................68
Cleaning the device .................................................................................68
Transporting and storing the device.........................................................68
Bluetooth supported proles ........................................................................69
Specications ...............................................................................................70
Page 9
1
CHAPTER 1
GETTING STARTED
This chapter describes the procedures from unpacking the OT-100, to powering it on. The following topics are
described.
Unpacking the OT-100 on page • 1
Checking the package contents on page • 2
Identifying components on page • 4
Charging Cradle on page • 8
Setup the OT-100 on page • 9
Using the cradle on page 1• 2
Charge the device in cradle on page 1• 2
Charge the battery in cradle on page 1• 2
Changing the battery on page 1• 3
Using SD cards on page 1• 6
Install a SD card on page 1• 6
View the contents of a SD card on page 1• 8
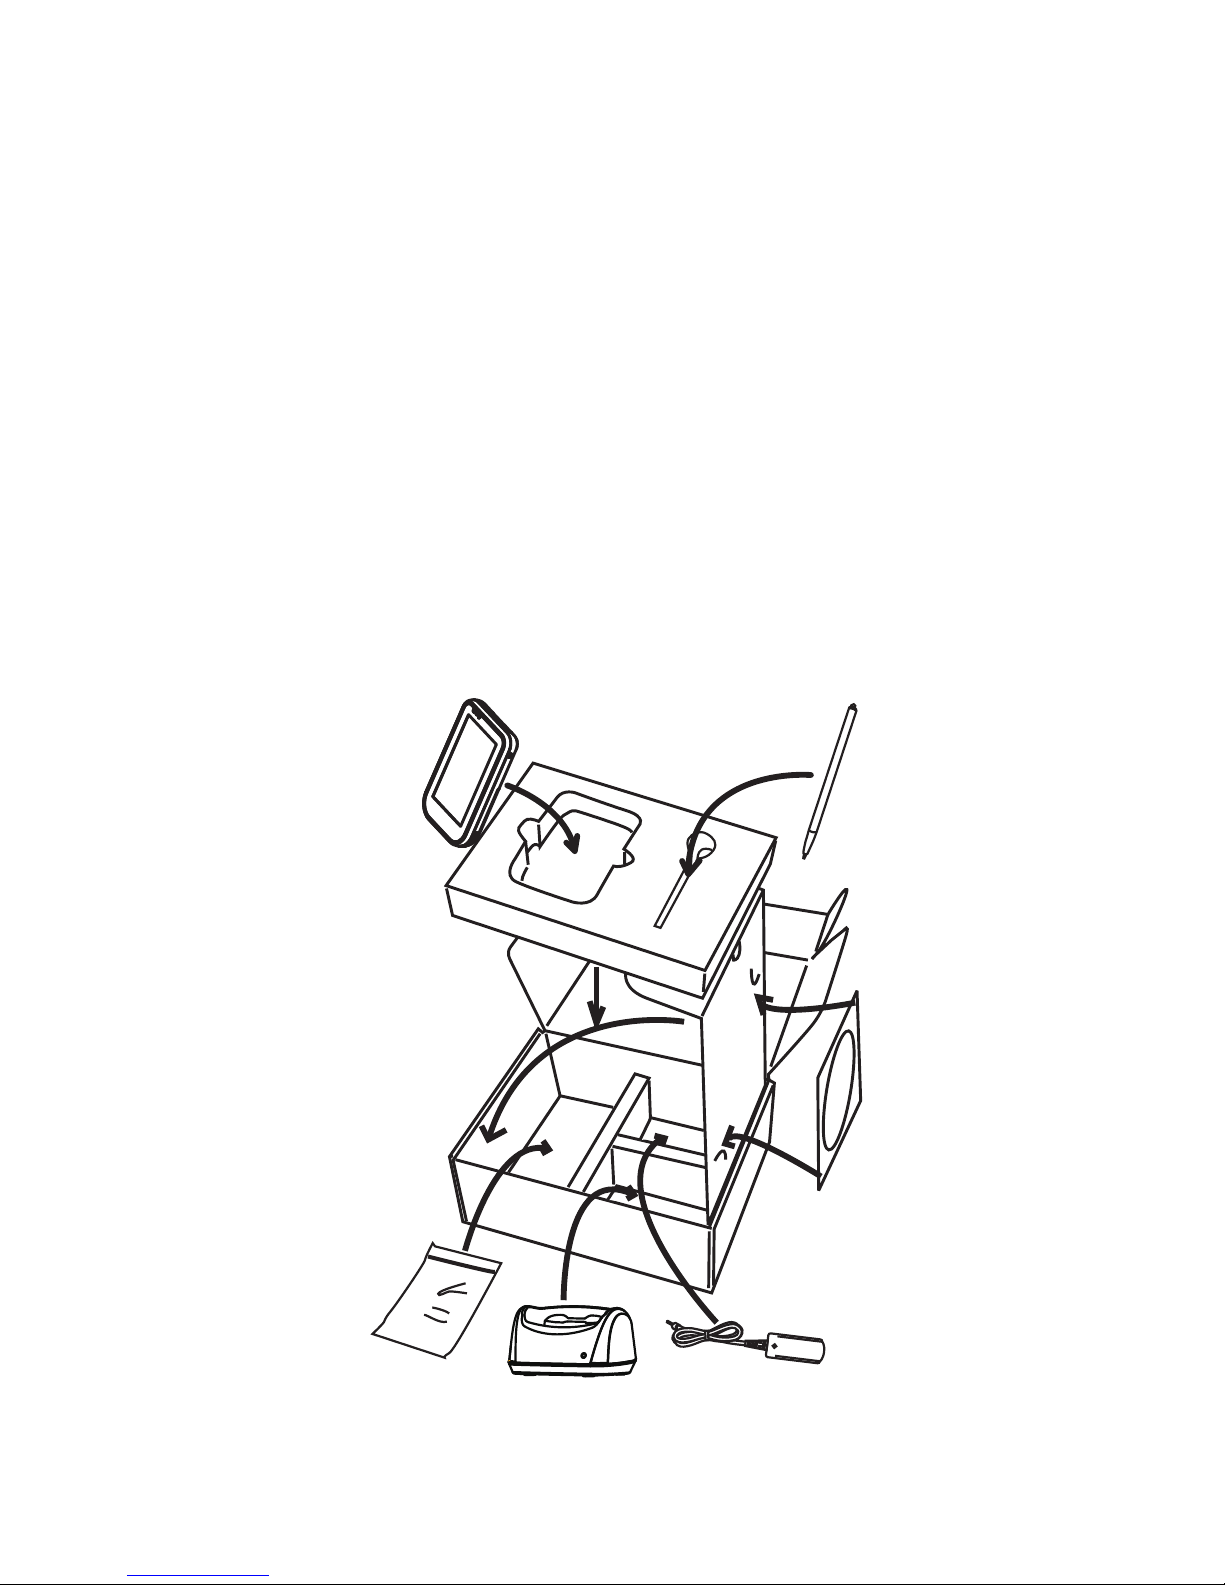
Unpacking the OT-100
The device and accessories are packed in a cardboard carton with foam padding for protection during
shipping.
Figure 1.1 Unpacking the OT-100
Carefully unpack the machine and keep the packing materials. If you need to ship it in the future, repack it as
shown in Figure 1.1.
OT-100
Accessories
package
Cradle
Adaptor
CD-ROM
Page 10
2 C H A P T E R 1 G E T T I N G S T A R T E D
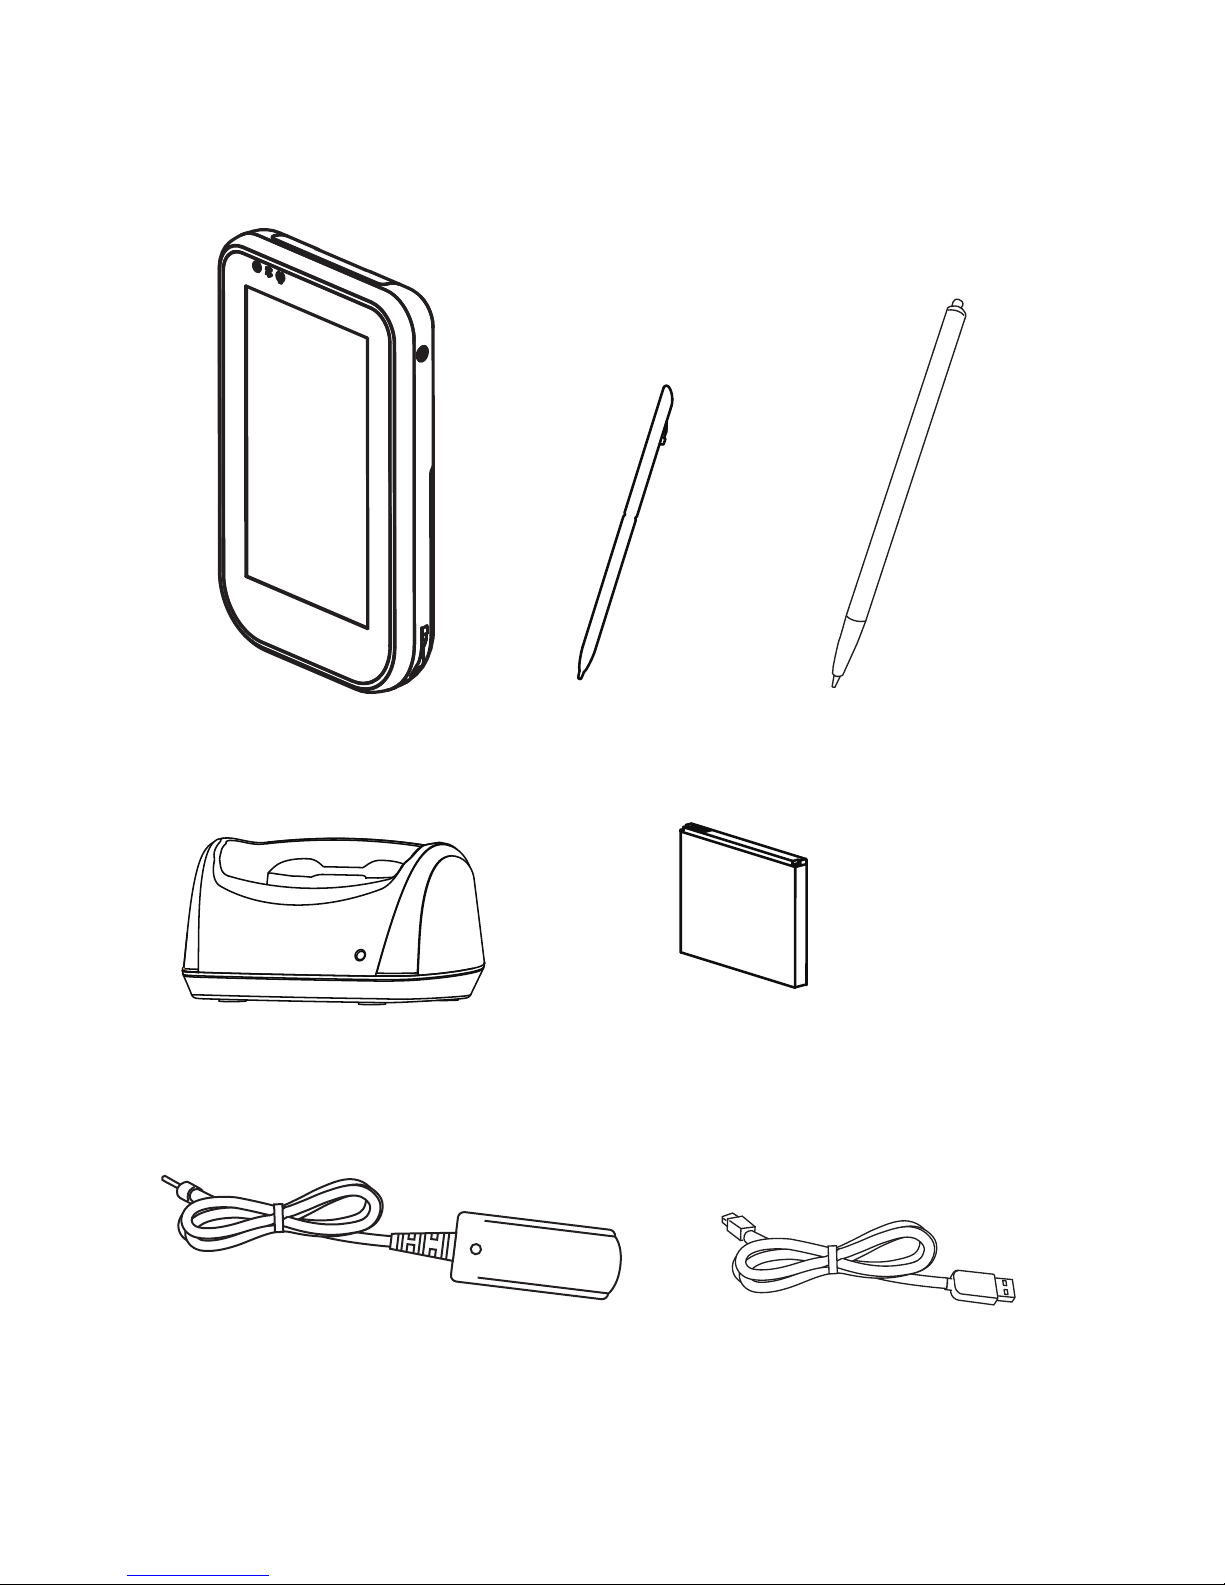
Checking the package contents
After you unpack the device check that the following items are included.
OT-100
Stylus
Battery
High quality stylus
AC adaptor
Cradle
mini-USB to USB cable
Page 11
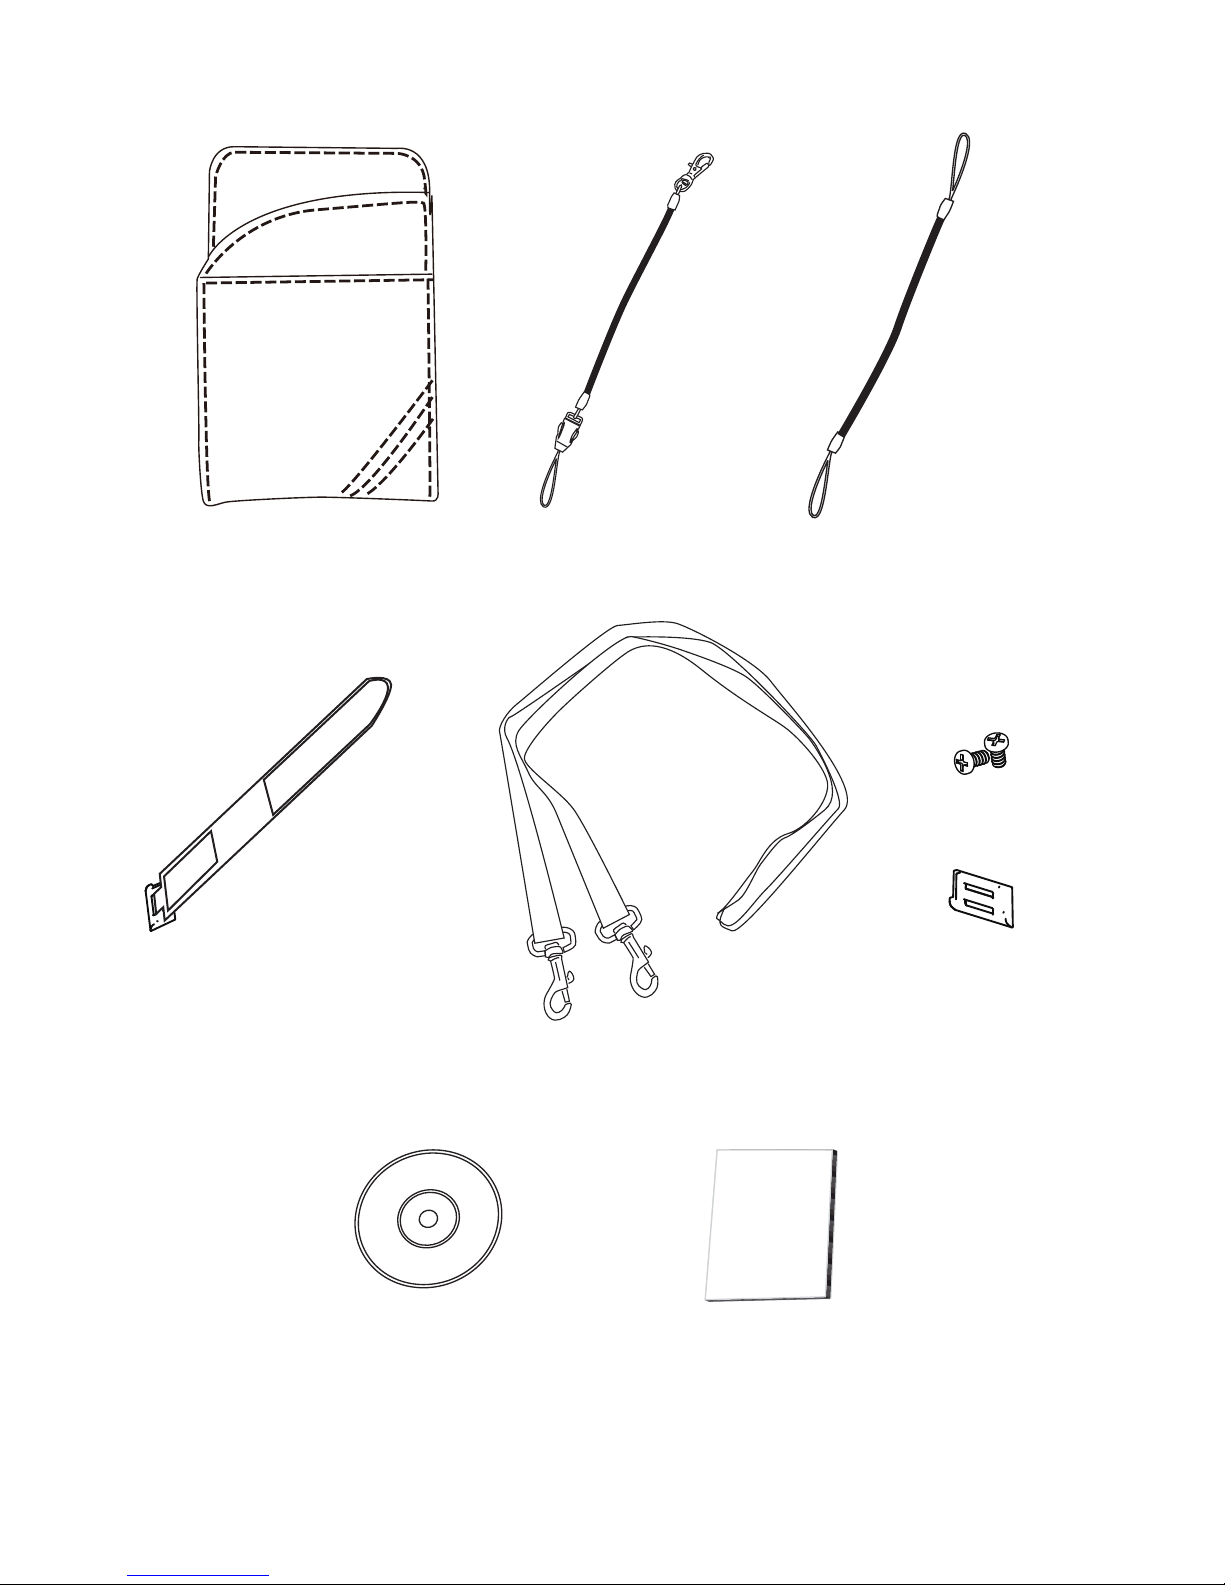
3
If any item is missing or appears damaged, contact your dealer immediately.
Leather pouch
Leather pouch cord
Stylus cord
2 screws
Plastic hinge
Hand strap
Shoulder strap
CD-ROM with user
manual pdf le and
API
Quick start guide
QSG
Page 12
4 C H A P T E R 1 G E T T I N G S T A R T E D
Identifying components
This section describes the parts and connectors on the OT-100.
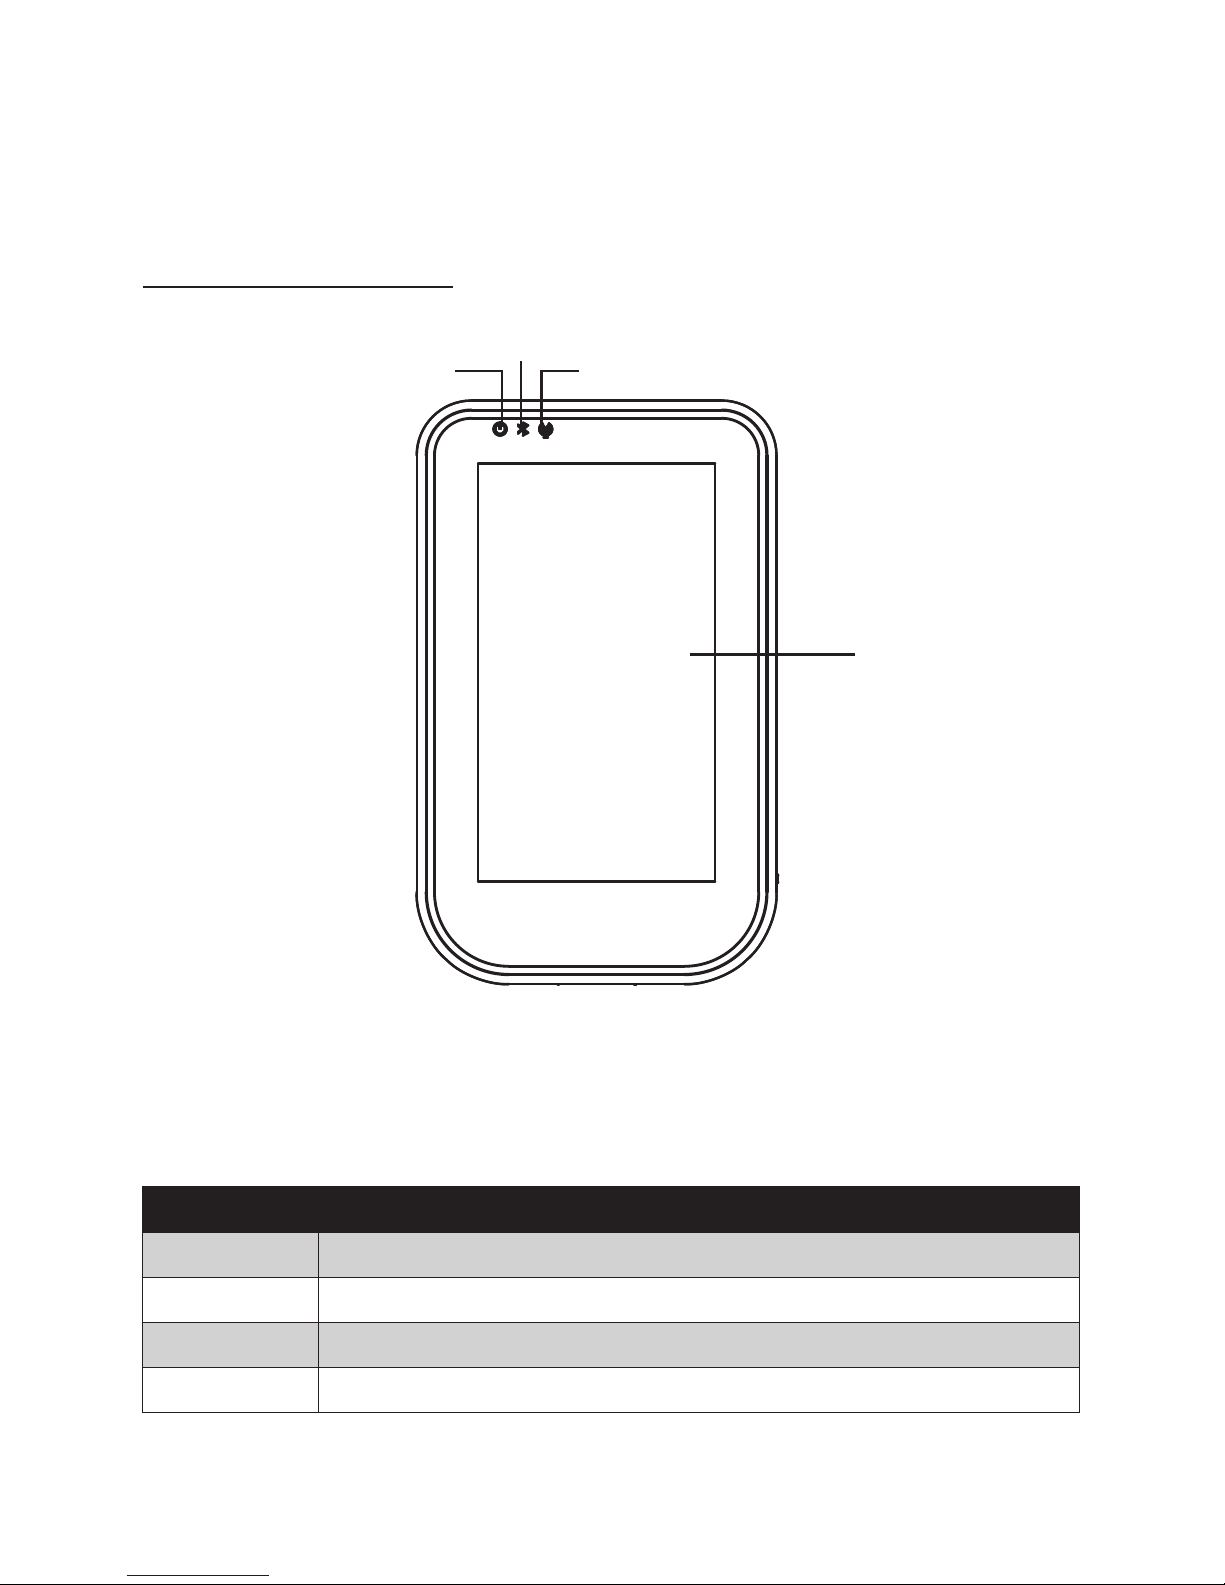
Front panel components
1
2
3
4
Figure 1.2 Front view
Component Description
1 4.3-inch touch screen
2 Power indicator (Green: power on, Red: charging)
3 Bluetooth indicator (Blue: Bluetooth is enabled)
4 WiFi indicator (Green: WiFi is enabled)
Page 13
5
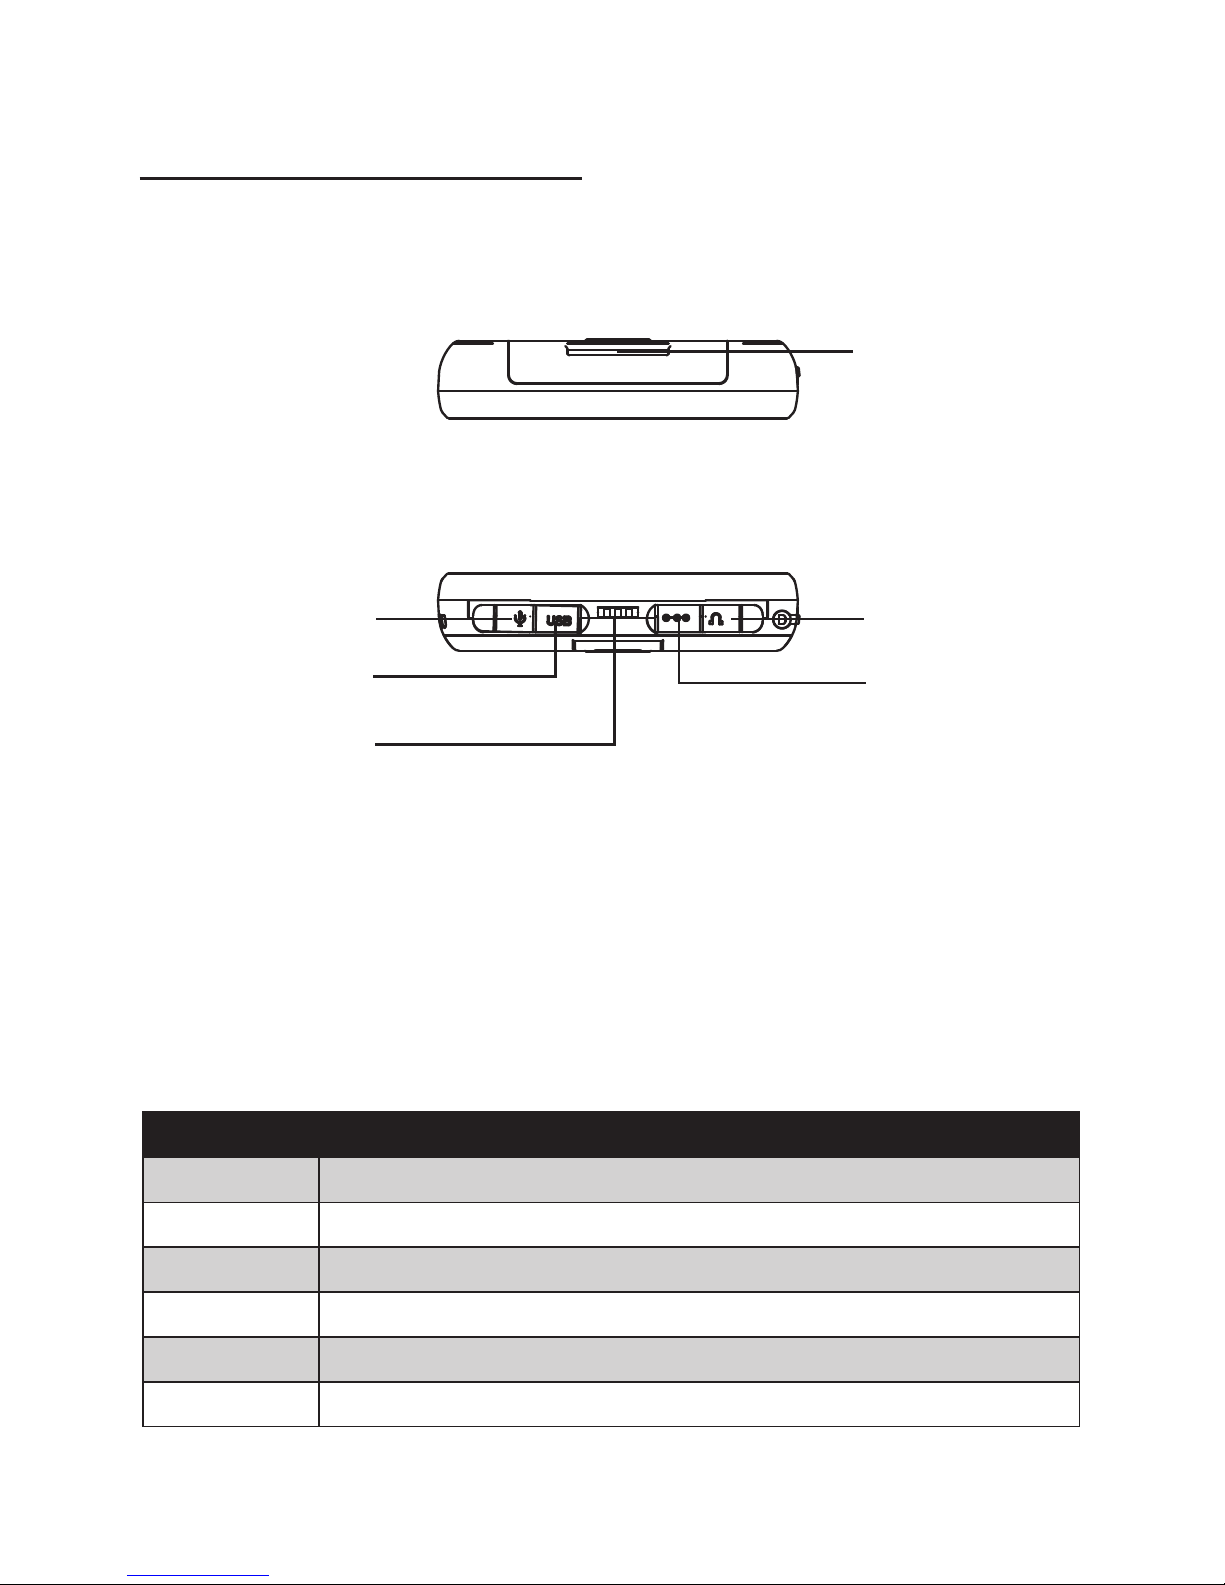
Top and bottom panel components
1
Figure 1.3 Top and bottom view
Component Description
1 Top hand strap eyelet
2 3.5mm microphone jack
3 Mini-USB port
4 Cradle connector
5 DC power jack
6 3.5mm headphone jack
3
2
4
6
5
Page 14
6 C H A P T E R 1 G E T T I N G S T A R T E D
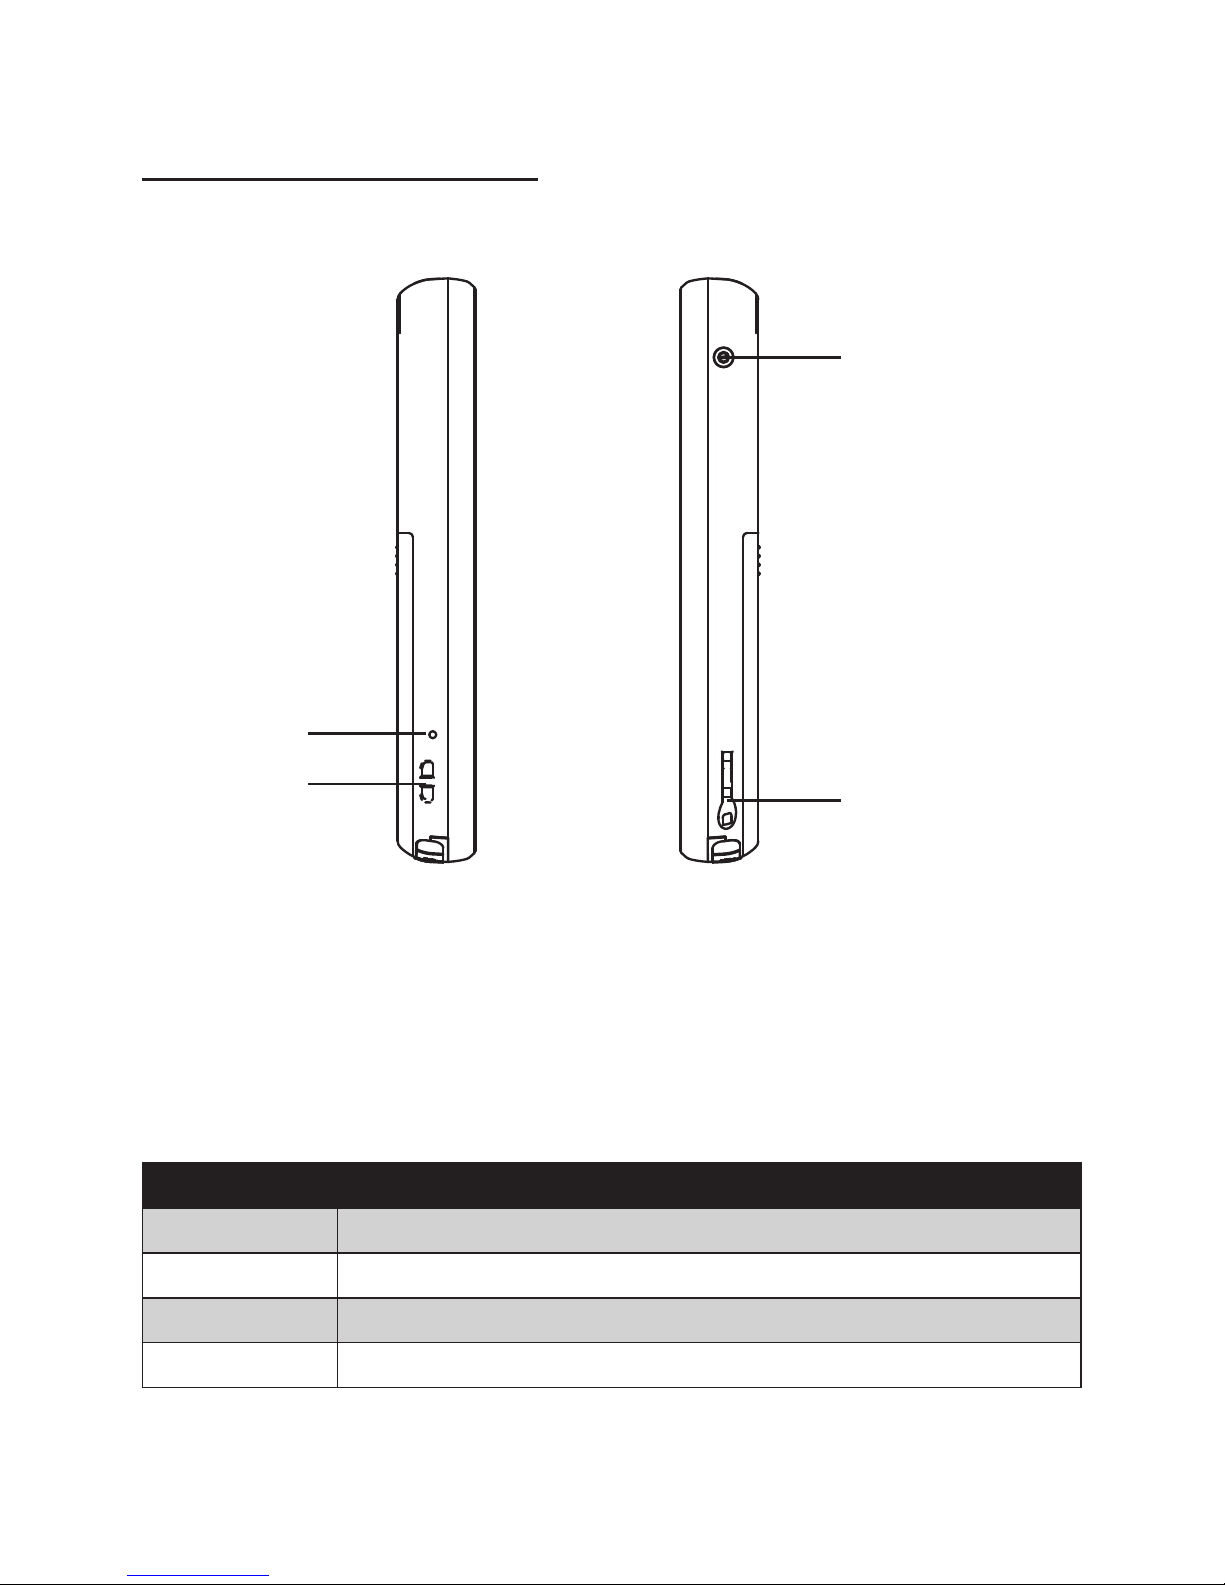
Left and right side components
Figure 1.4 Left and right side view
4
1
2
3
Connector Description
1 Reset button
2 Leather pouch strap eyelet
3 Standby button
4 Stylus dock
Page 15
7
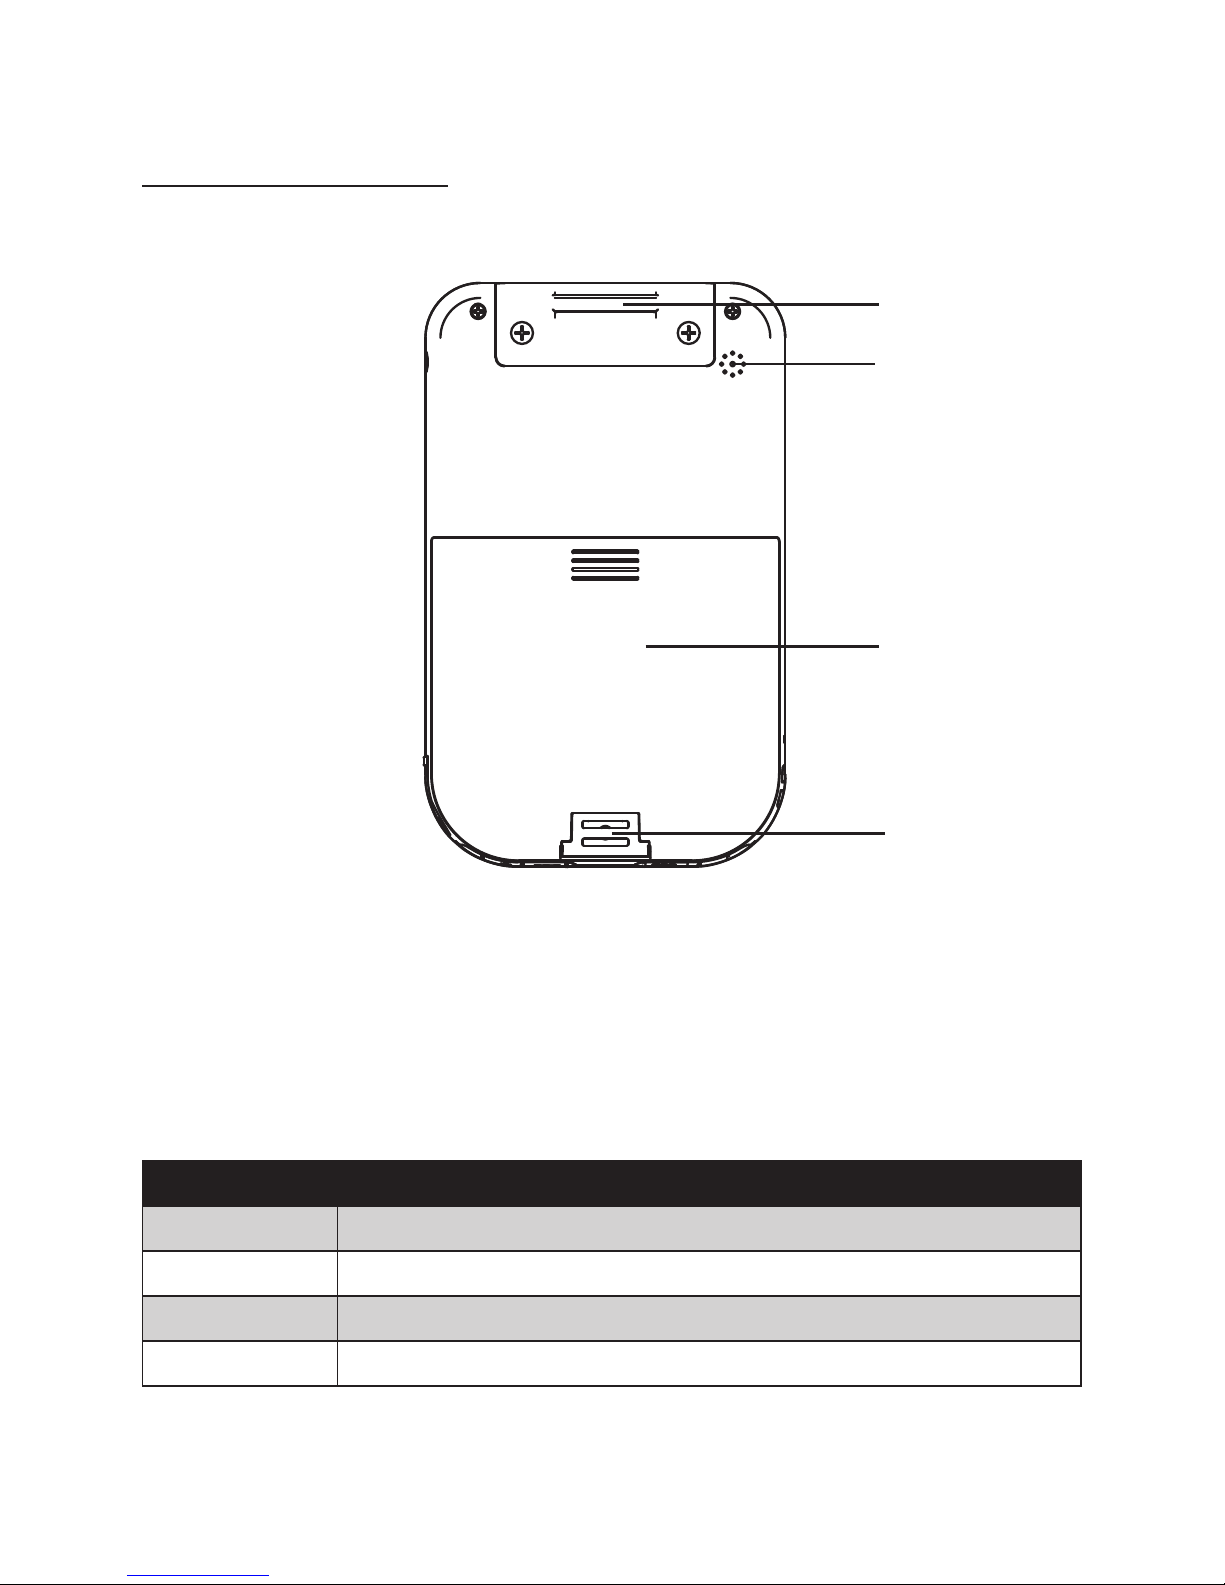
Back panel components
4
1
2
3
Connector Description
1 Top hand strap eyelet
2 Speaker
3 Battery cover
4 Bottom hand strap eyelet
Figure 1.5 Back view
Page 16
8 C H A P T E R 1 G E T T I N G S T A R T E D
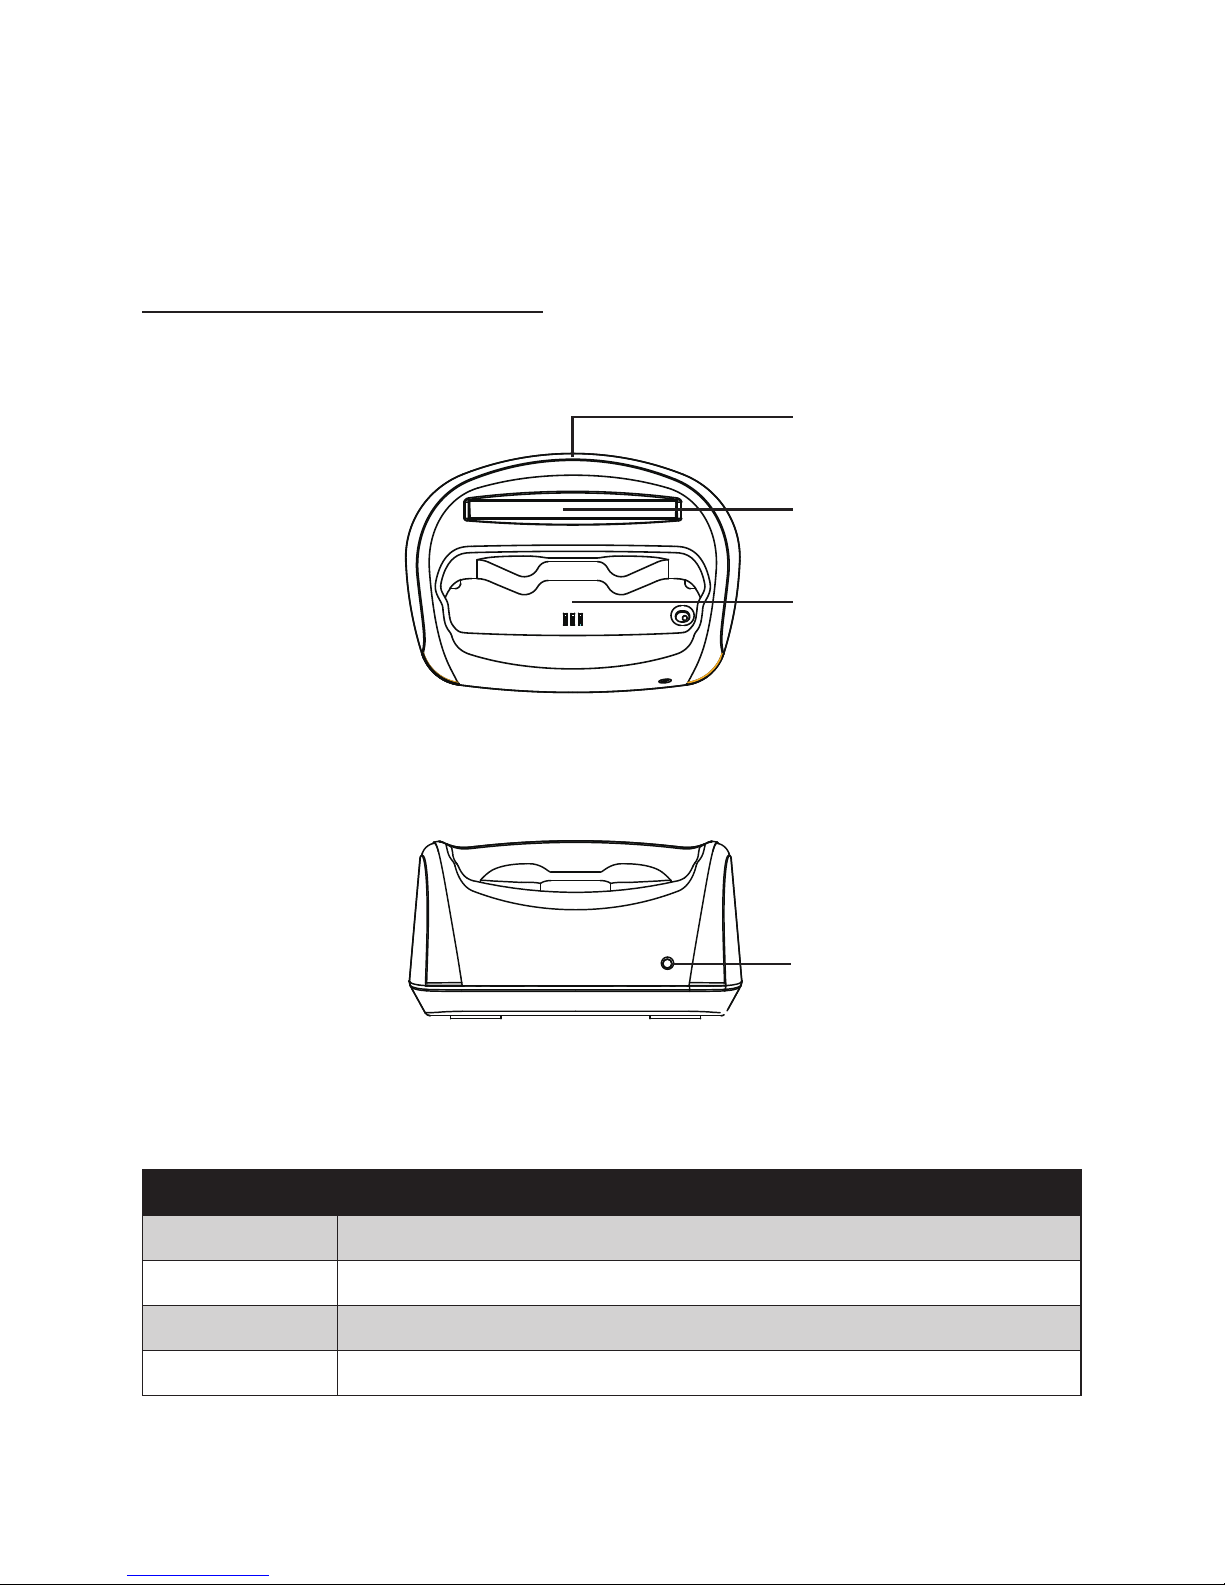
Charging Cradle
This section introduces the charging cradle for the OT-100.
The charging cradle is used to charge the OT-100. A second slot is also available for charging a spare battery.
Top and front view of the cradle
4
1
2
3
Connector Description
1 DC power connector
2 Battery slot
3 OT-100 socket
4 Battery slot charging indicator
Figure 1.6 Top view of the cradle
Figure 1.7 Front view of the cradle
Page 17
9
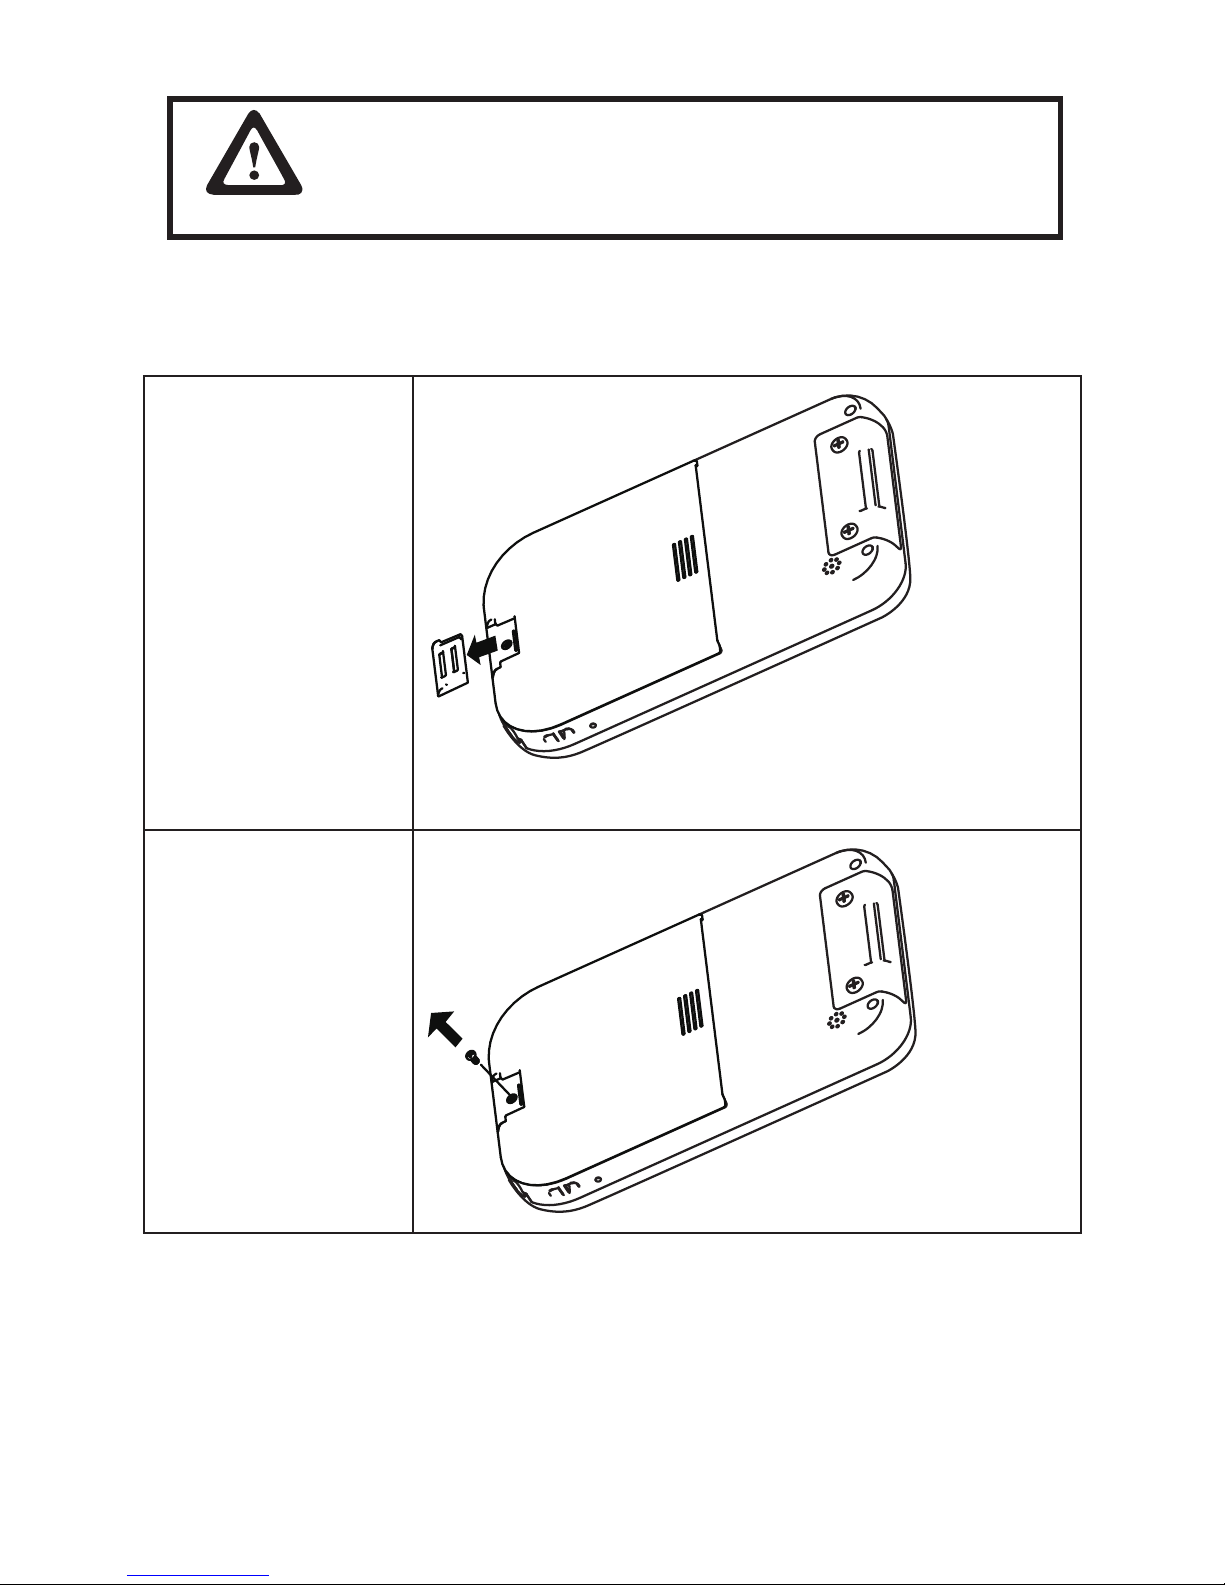
Setup the OT-100
Refer to the following to setup the OT-100.
Remove the battery 1.
cover.
Slide the cover downwards to open.
Lift up to remove the battery cover.
Page 18

10 CHAPTER 1 GETTING STARTED
Install the battery.2.
Align the battery connectors on the battery with the pins in the battery
compartment and insert the battery.
Replace the battery 3.
cover.
Slide the battery cover back until it locks.
Install the screw if 4.
required.
Page 19

11
Insert the plastic hinge, 5.
or attach the hand strap.
(Refer to Chapter
3 - Attaching the hand
strap).
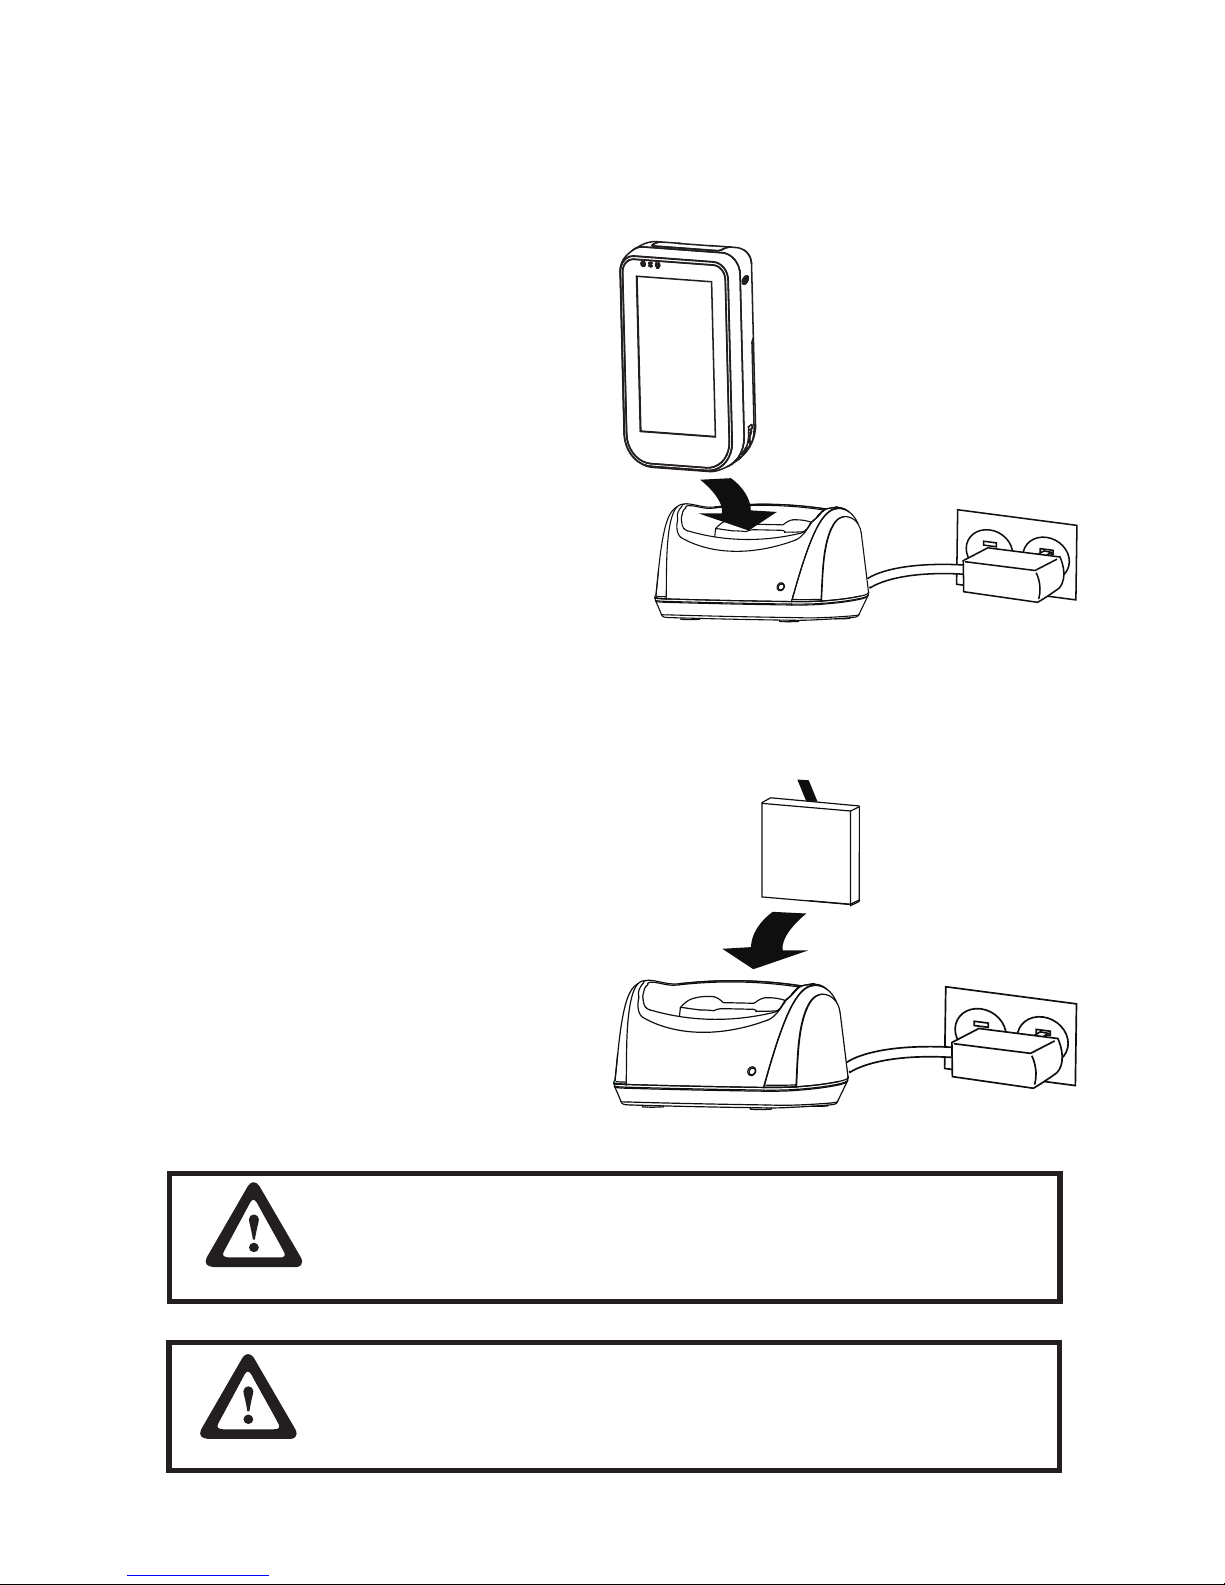
Charge the battery.6.
Open the power jack cover. Plug the AC adaptor power cord into an
electrical outlet, then connect the DC plug of the adaptor cable to the
OT-100. It takes approximately 6 hours to fully charge the battery for the
rst time. Subsequent charges might take longer.
CAUTION
To avoid damaging OT-100 or the AC adaptor,
make sure all connectors are properly
connected.
Device will 7.
automatically start up
when charged battery or
adaptor is inserted. The
Standby button can be
used to enter and exit
Standby mode.
Page 20
12 CHAPTER 1 GETTING STARTED
Using the cradle
The charging cradle allows a more convenient way to charge OT-100. You can charge a spare battery
(optional) individually or simultaneously as well.
Charge the device in cradle
Plug the AC adaptor power cord into an electrical 1.
outlet, then connect the DC plug of the adaptor
cable to the power jack at the back of cradle.
Insert OT-100 into the cradle with front of device on 2.
same side as front of cradle.
When device is inserted into cradle correctly, the 3.
Power LED on top left of device should turn red.
Device charging is complete when the device Power
LED turns green.
Charge the battery in cradle
Plug the AC adaptor power cord into an electrical outlet, then connect the DC plug of the adaptor cable to 1.
the power jack at the back of cradle.
Align the battery connectors on the battery with the 2.
pins in the second battery slot of the cradle, then
install the battery in the direction of the arrow.
When battery is inserted into cradle correctly, the 3.
battery LED on the cradle should light up red.
Battery charging is complete when the battery LED
on the cradle turns green.
IMPORTANT
To protect and prolong the life of the battery, do not charge it for 24
hours or longer at a time.
If battery is not used, please store in dry area, ideally with storage
temperature around 25˚C, or within a temperature range of -10˚C ~
30˚C to maximize longetivity.
IMPORTANT
Page 21
13
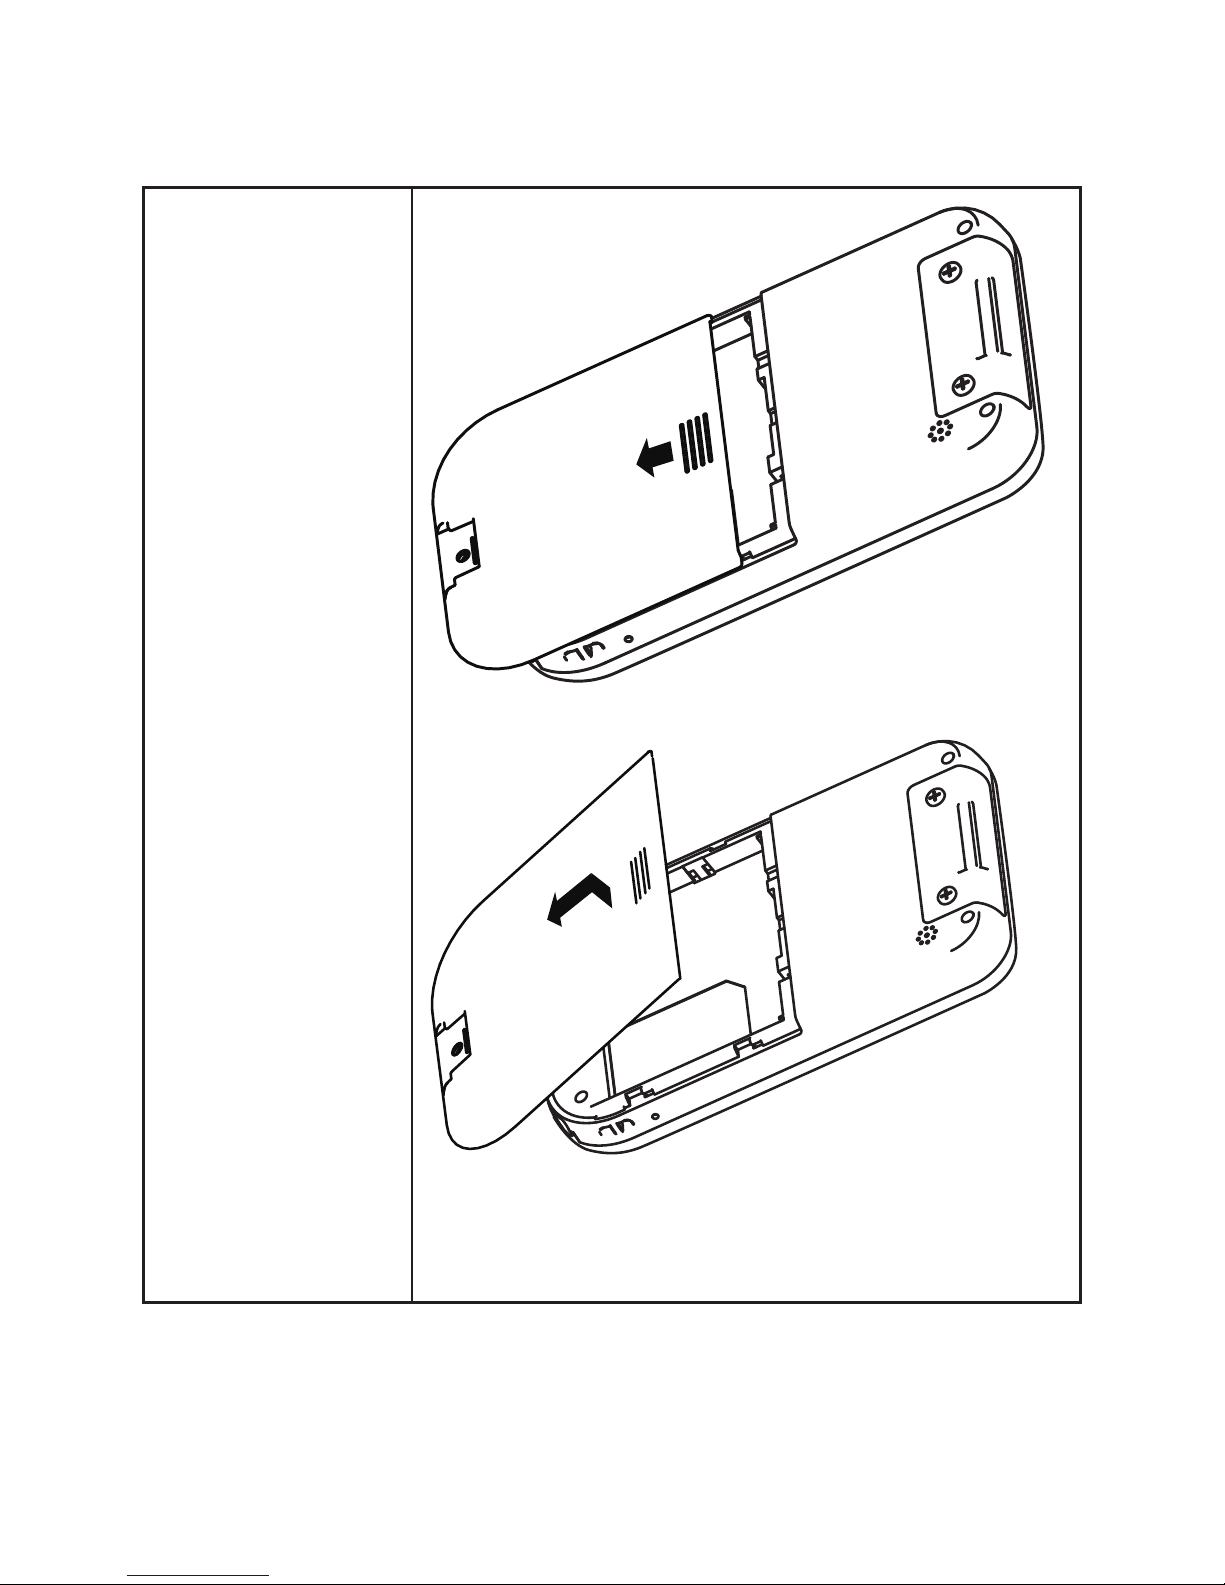
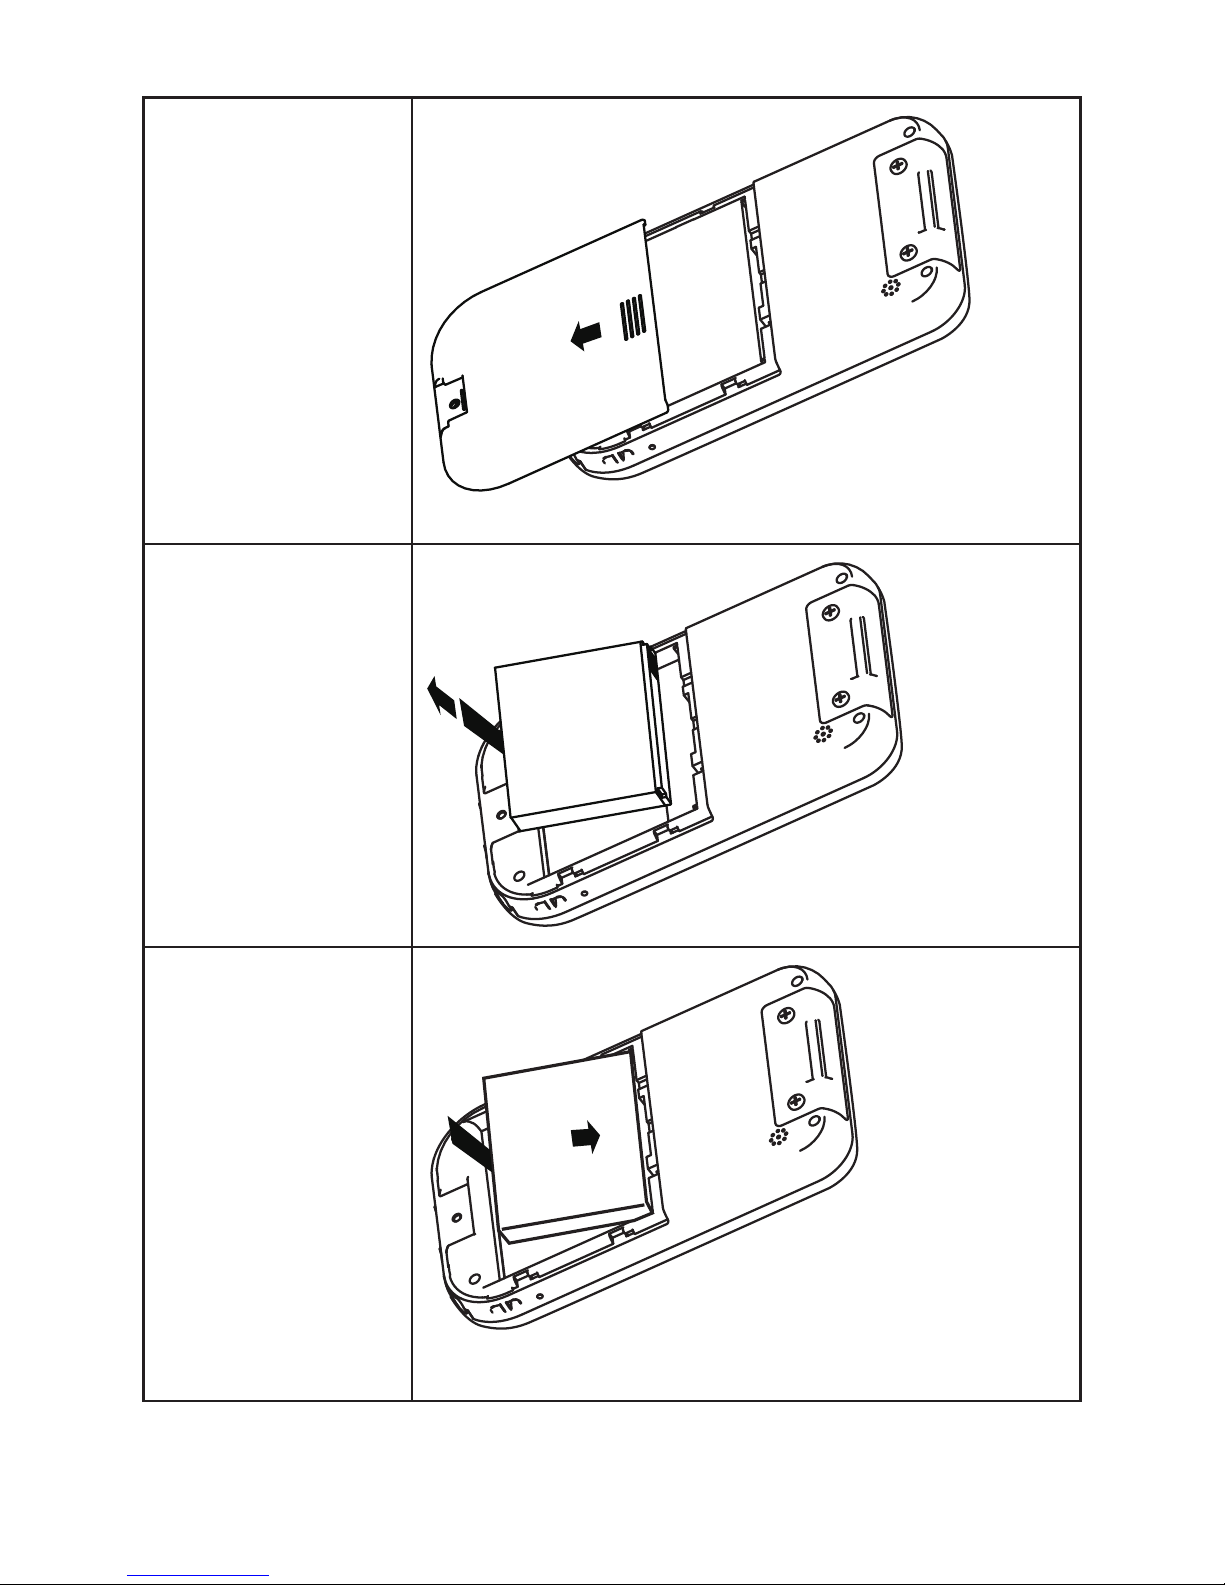
Changing the battery
Refer to the following to change the battery.
Press the Standby 1.
button to turn off the
OT-100.
Remove the plastic 2.
hinge or the bottom of
the hand strap.
Slide the plastic hinge or hand strap down and away from the battery
cover.
Remove the screw if the 3.
battery cover is locked.
Please make sure to perform 3 complete full charge and discharge
cycles to get optimal battery capacity. Failure to comply will result in
shorter battery lifespan.
IMPORTANT
Page 22
14 CHAPTER 1 GETTING STARTED
Remove the battery 4.
cover.
Slide the cover down, then lift up to remove.
Remove the battery by 5.
pulling on the plastic
ap.
Install the new battery.6.
Align the battery connectors on the battery with the pins in the battery
compartment and insert the battery.
Page 23

15
Replace the battery 7.
cover.
Slide the battery cover back until it locks.
Reinstall the screw.8.
Replace the plastic 9.
hinge or the bottom of
the hand strap.
Page 24
16 CHAPTER 1 GETTING STARTED
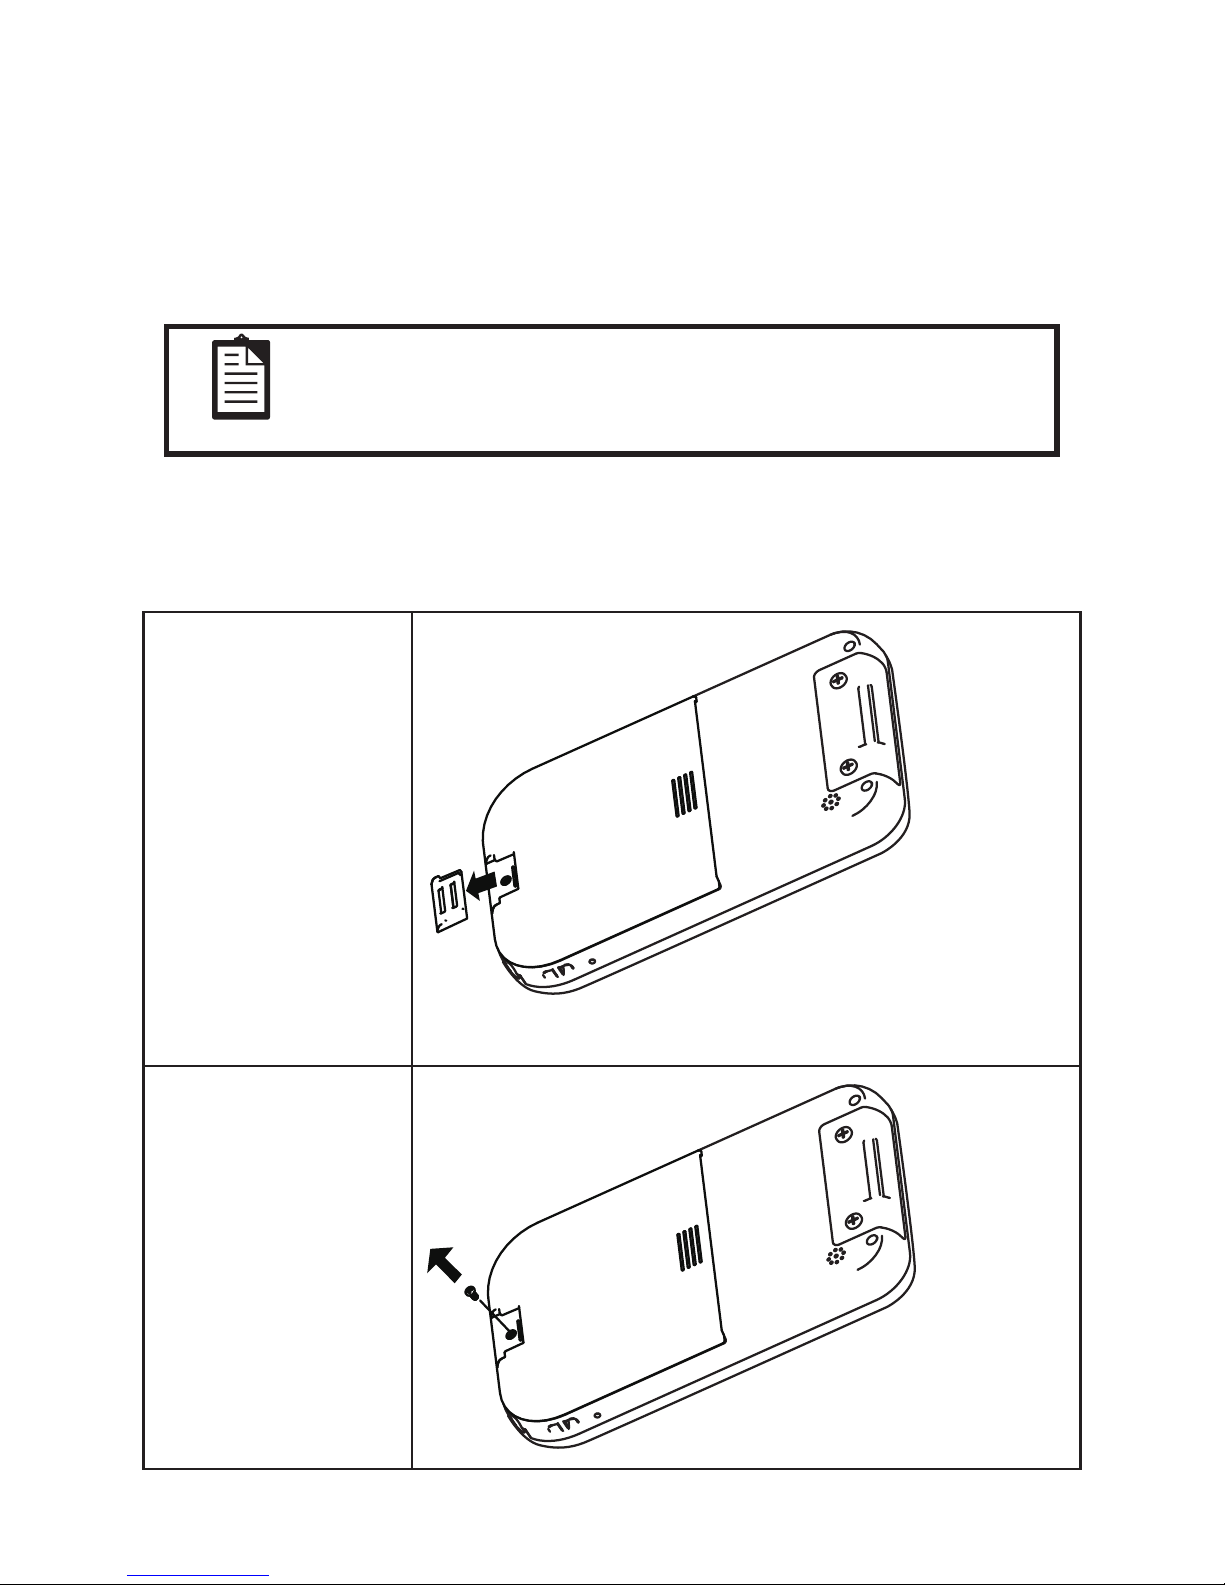
Using SD cards
Use optional SD cards for:
Expanding the memory of the OT-100•
Adding functionality•
The OT-100 supports SD cards up to 16G. You can use SD cards for additional data storage. The micro SD
and mini SD cards can also be used with an SD adaptor in the OT-100.
NOTE
SD cards must be purchased separately and are not included with the
OT-100.
Installing a SD card
Refer to the following to install a SD card.
Press the Standby 1.
button to turn off the
OT-100.
Remove the plastic 2.
hinge or the bottom of
the hand strap.
Slide the plastic hinge or hand strap down and away from the battery
cover.
Remove the screw if the 3.
battery cover is locked.
Page 25

17
Remove the battery 4.
cover.
Slide the cover down, then lift up to remove.
Remove the battery by 5.
pulling on the plastic
ap.
Insert the SD card into 6.
the slot with the label
facing out.
Push the SD card into •
the slot until it clicks
into place.
To remove the SD card, •
press it to eject it from
the slot.
Page 26

18 CHAPTER 1 GETTING STARTED
View the contents of a SD card
Refer to the following to view the contents of a SD card.
Double tap My Device on desktop.1.
Double tap SD Memory to see a 2.
list of les and folders.
If the OT-100 does not recognize •
your SD card, make sure you have
rmly pushed the SD card into the
slot.
Page 27

19
CHAPTER 2
USING THE DEVICE
This chapter describes how to use OT-100 features. The following topics are described.
Entering text on page 1• 9
Shortcut menus on page 1• 9
Windows CE help on page 1• 9
Performing a reset on page 2• 0
Opening and closing programs on page 2• 0
Program switch on page 2• 0
Status icons on page 2• 0
Adjusting the volume on page 2• 1
Changing the device name on page 2• 3
Entering owner information on page 2• 4
Recalibrating the screen on page 2• 6
Setting the date and time on page 2• 7
Turning WiFi on/off on page 2• 9
Turning Bluetooth on/off on page 3• 1
Setting the screen rotation on page 3• 2
Connecting to a WiFi network on page 3• 4
Using Settings Manager on page 3• 9
Lock Screen on page 4• 4
Upgrading OS Image or Bootloader on page 4• 8
Connect device to computer on page 5• 2
Install ActiveSync (for Windows XP) on page 5• 2
Synchronize your data with ActiveSync and Windows XP on page 5• 2
Copy or move les between the computer and OT-100 on page 5• 4
Synchronize les between the computer and OT-100 on page 5• 5
Install and remove programs on page 5• 8
Entering text
You can use the Input Panel to enter text. To use the Input Panel, tap the on the taskbar.
Tap keys on the Input Panel to enter text.
Shortcut menus
A shortcut menu is displayed when you tap and hold an item. This menu
displays the most common commands for the specic item. When the shortcut menu displays, tap the action
you want to perform. To close a shortcut menu without performing an action, tap anywhere outside the menu.
Windows CE help
Read the help information when you want to learn more about the program by tapping the on the left top
of the program window. The help window will pop-up.
Page 28

20 CHAPTER 2 LEARNING THE BASICS
Performing a reset
A reset stops all running applications, but does not erase any
programs, saved data, or registry information.
NOTE
Be sure to close all running
applications before performing
a reset.
To perform a reset:
Locate the recessed Reset button on the device.1.
Use the stylus to lightly press the Reset button.2.
Opening and closing programs
You do not need to exit a program to open another or to conserve memory. The system
manages memory automatically.
To open a program, tap , and then select the required program from the list. If you do not
see the program you want to launch, tap → Programs.
In most cases, selecting or will close an application.
Program switch
You can use the program switch to quickly select the running program. To use the program switch, tap the
on the taskbar, then tap the program you want on the list.
Status icons
There are status icons in taskbar. The following table lists the icons and their meanings.
Icon Status
Battery charging
Battery level low
Battery level critical
Icon Status
WiFi connected
WiFi not connected
USB connected
Page 29

21
Adjusting the volume
Tap 1. → Settings → Control Panel.
Double tap the Volume & Sounds 2.
icon.
Page 30

22 CHAPTER 2 LEARNING THE BASICS
Select the Volume tab.3.
Move the system volume slider on the 4.
screen to the required volume level.
Tap the OK button.5.
Page 31

23
Changing the device name
The device name is used to identify the OT-100 in the following situations:
Connecting with a computer•
Connecting to a network•
Refer to the following to change the device name.
Tap 1. → Settings → Control Panel.
Double tap the System icon.2.
Page 32

24 CHAPTER 2 LEARNING THE BASICS
Select the Device Name tab.3.
Enter a name. The device name must 4.
begin with a letter, consist of letters
from A to Z and numbers from 0 to 9,
and should not contain spaces.
Tap the OK button.5.
Entering owner information
Enter your personal information, such as your name and address, so that the OT-100 can be returned to you if
it is lost. Refer to the following to enter the information.
Tap 1. → Settings → Control Panel.
Page 33

25
Double tap the Owner icon.2.
On the Identication tab, enter your 3.
personal information.
Page 34

26 CHAPTER 2 LEARNING THE BASICS
Recalibrating the screen
If your stylus seems to be out of sync with the screen, then recalibrate the screen using your stylus.
Tap 1. → Settings → Control Panel.
Double tap the Stylus icon.2.
Page 35

27
Select the Calibration tab then tap the 3.
Recalibrate button.
Follow the displayed instructions 4.
to recalibrate. Please use the stylus
to calibrate the screen for better
accuracy.
Setting the date and time
Refer to the following to set date and time.
Tap 1. → Settings → Control Panel.
Page 36

28 CHAPTER 2 LEARNING THE BASICS
Double tap the Date/Time icon.2.
Change the date or time and select the 3.
correct time zone.
Tap the Apply button.4.
Page 37

29
Turning WiFi on/off
Refer to the following to turn the WiFi on / off. To turn on WiFi automatically when device boots up, please
use the Settings Manager (see ‘Using Settings Manager’ section).
Double tap My Device on 1.
desktop.
Tap View → Options from 2.
the My Device toolbar.
Uncheck Hide protected 3.
operating system les
Tap the OK button to apply, 4.
then the Windows folder
icon will be available in
My Device window.
Page 38

30 CHAPTER 2 LEARNING THE BASICS
Double tap the Windows 5.
folder.
Double tap the 6.
SetWiFiBind /
SetWiFiUnBind icon to
turn on / off the WiFi.
Turn the
WiFi off
Turn the
WiFi on
Page 39

31
Turning Bluetooth on/off
Refer to the following to turn the Bluetooth on / off. To turn on Bluetooth automatically when device boots
up, please use the Settings Manager (see ‘Using Settings Manager’ section).
Tap 1. → Settings →
Control Panel.
Double tap the Bluetooth 2.
Power icon to turn on or off
the Bluetooth.
Page 40

32 CHAPTER 2 LEARNING THE BASICS
Setting the screen rotation
Refer to the following to set the screen rotation.
Tap 1. → Settings →
Control Panel.
Double tap the Rotation 2.
icon.
Page 41

33
Screen rotation can be 3.
changed by tapping the
different buttons (0, 90,
180, 270). To activate
Auto Rotation, please
enable the checkbox. Once
Auto Rotation is enabled,
the screen will rotate
automatically when OT-100
is turned sideways.
Tap the OK button to apply.4.
Page 42

34 CHAPTER 2 LEARNING THE BASICS
Connecting to a WiFi network
With wireless access, you can connect the device to the Internet. The OT-100 can connect to an IEEE
802.11b/g device or connect directly to other WiFi-enabled devices.
Automatically connect to a WiFi network
When you turn on the WiFi radio (refer to P.29), OT-100 automatically detects WiFi networks that are
broadcasting their signals (SSID network name). If your WiFi network is not set to broadcast SSID, then
you have to connect to it manually. Before trying to connect to a WiFi network, determine if authentication
information is needed by contacting your network administrator.
To automatically connect to a WiFi network:
Turn on the WiFi. (refer to P.29)1.
Double tap 2. or on the
taskbar.
Select the Wireless Information 3.
tab.
Select an available network.4.
Tap the Connect button.5.
Page 43

35
Set the properties. Normally, 6.
all settings will be detected
automatically. If necessary, you
can change settings as follow.
To use data encryption, select •
an encryption method from the
Encryption list.
To use authentication, select the •
authentication method from the
Authentication list.
Tap the OK button.7.
Enter network
key if necessary
Manually connect to a WiFi network
A wireless network can be added manually by entering the settings information to add the network. Contact
your network administrator to determine if authentication information is needed before trying to connect to a
WiFi network.
To manually connect to a WiFi network:
Turn on the WiFi. (refer to P.29)1.
Double tap 2. or on the
taskbar.
Select the Wireless Information 3.
tab.
Tap Add New...4.
Page 44

36 CHAPTER 2 LEARNING THE BASICS
Set the properties.5.
Enter the SSID.6.
To use data encryption, select •
an encryption method from the
Encryption list.
To use authentication, select the •
authentication method from the
Authentication list.
Tap the OK button.7.
Enter network
key if necessary
Find your IP address
To nd your IP address:
Double tap 1. or on
the taskbar.
The WiFi IP address 2.
is displayed at the IP
Information tab.
Specify the IP address and domain name servers (DNS)
The IP address and name server addresses are automatically assigned if DHCP in enabled on the wireless
access point or network server. If your network does not automatically assign the addresses, ask your network
administrator for the information and follow the instructions below.
Page 45

37
Tap 1. → Settings → Control Panel.
Double tap the Network and Dial-up 2.
Connections icon.
Page 46

38 CHAPTER 2 LEARNING THE BASICS
Double tap the WiFi connection icon.3.
Tap 4. Specify an IP address.
Enter 5. IP address, Subnet Mask,
Default Gateway.
Tap the6. Name Servers tab on top
Enter the DNS or WINS addresses.7.
Tap the OK button.8.
Page 47

39
Using Settings Manager
Settings Manager controls settings for WiFi/ Bluetooth during device boot up, wireless SSID lock, BT
Manager, and device Lock Screen.
To enter Settings Manager
Tap 1. → Settings →
Control Panel.
Double tap the Settings 2.
Manager icon.
Page 48

40 CHAPTER 2 LEARNING THE BASICS
There are three tabs in the Settings Manager window.
WiFi tab
1
2
3
Box Description
1
Check this box to enable WiFi when device boots up. Factory default setting is enabled.
2 SSID Lock allows device to only connect to a dened SSID network. This feature saves time
as device no longer searches for available networks, and also saves battery power. Check
this box and enter the SSID name of the network device should connect to. Factory default
is disabled.
3 Whenever device attempts to connect to a wireless network and fails, there is a delay before
it attempts to connect again. This reconnect timeout value is 60 seconds by default under
WinCE. To change this value, please enter a number between 1 and 600 seconds.
Bluetooth tab
1
2
Box Description
1 Check this box to enable Bluetooth when device boots up. Factory default setting is
disabled.
2 Check this box to use BT manager, and also run BT manager when device boots up. When
it is enabled, the BT manager icon will appear on the taskbar shown as below. Factory
default setting is disabled. For more information on BT manager, please consult following
section “Using BT Manager”.
Page 49

41
Lock Screen tab
1
Box Description
1 Check this box to enable Lock Screen utility when device backlight turns off. Factory
default setting is disabled.
Using BT Manager
BT Manager is a small utility which allows OT-100 to search and connect to Bluetooth devices using the SPP
prole (Serial Port Prole).
To use the BT Manager, please enable it via the Settings Manager.
Once enabled, the BT manager icon will appear on the taskbar shown as below.
Double-click on the icon to open 1.
the BT Manager window.
Click on the Search button to 2.
search for devices.
Page 50

42 CHAPTER 2 LEARNING THE BASICS
The window name on top will 3.
change to “Search running…”.
Bluetooth devices will appear in
the list as shown Please wait for
search to nish. To cancel the
search, please press the STOP Sch.
button.
MP-300
Searching is complete once 4.
window name shows “BT
Manager” again. Select the
Bluetooth device in the list that you
wish to connect to, and click on the
Connect button.
MP-300
The Bluetooth device may ask 5.
for a PIN number to authenticate
with OT-100. Enter the same
PIN number on both devices. For
Partner Tech MP-300 Bluetooth
mobile printer, the default PIN
number is 0000.
Once the Bluetooth device is 6.
connected successfully, a message
appears in the window (“…
running on COM8”).
When connected to Partner Tech 7.
MP-300 Bluetooth mobile printer,
click on the Print button to print a
test message.
To disconnect from the Bluetooth 8.
device, click on the STOP button.
To hide the BT Manager window, 9.
click on the Hide button.
MP-300
Page 51

43
ATTENTION
Clicking on the X button on the top right of the window will close the
BT Manager utility.
Page 52

44 CHAPTER 2 LEARNING THE BASICS
Lock Screen
When activated, Lock Screen will disable audio and lock the screen. User will see the following when touch
the screen.
To unlock, press the top left button, then the bottom right button.
Page 53

45
Restore device to Factory Default settings
The Factory Default utility allows you to reset device to factory settings. Once applied, all user les/data and
settings will be erased. Registry will also be restored to default values.
To restore to factory default:
Double tap My Device on 1.
desktop.
Tap View → Options from 2.
the My Device toolbar.
Page 54

46 CHAPTER 2 LEARNING THE BASICS
Uncheck Hide protected 3.
operating system les.
Tap the OK button to apply, 4.
then the Windows folder
icon will be available in
My Device window.
Double tap the Windows 5.
folder.
Page 55

47
Double tap the 6.
FactoryDefault icon.
Tap the Restore Factory 7.
default button.
Click on the Yes button. 8.
The device will reboot
automatically and start
factory default process. A
blank screen will appear
after the initial Partner logo
boot-up sequence, this is
normal. It takes around
3 minutes for process to
nish and continue boot up
into WinCE.
CAUTION
During the factory default process, a blank screen will appear for 3
minutes. Please do not remove the battery, unplug the AC adaptor, or
press Reset during this time. Any loss of power or reset of device may
cause device to no longer function properly.
Page 56

48 CHAPTER 2 LEARNING THE BASICS
Upgrading OS Image or Bootloader
Unless you are familiar with the OS Image and Bootloader, do not do the following operation.
To upgrade OS Image or Bootloader:
After downloading the .ZIP 1.
le with new OS, please
uncompress the les. There
will be:
NK.nb0 OS le
EBOOT.nb0 Bootloader le
Copy both les to the root 2.
directory of your SD card.
Insert the SD card into 3.
OT-100.
Power on OT-100.4.
Double tap My Device icon 5.
on the desktop.
Tap View → Options from 6.
the My Device toolbar.
Page 57

49
Uncheck Hide protected 7.
operating system les.
Tap the OK button to apply, 8.
then the Windows folder
icon will be available in
My Device window.
Double tap the Windows 9.
folder.
Page 58

50 CHAPTER 2 LEARNING THE BASICS
Double tap the NandTools 10.
icon.
Tap the 11. Bootloader
upgrade button.
Page 59

51
The bootloader upgrades 12.
very quickly, once it is
nished you will see this
screen.
Tap the OS Image upgrade 13.
button.
The OS will take a few 14.
minutes to upgrade, once it
is nished you will see this
screen.
Tap Exit button.15.
Reset device by pressing 16.
the reset button.
Check the new OS version 17.
by clicking on the Version
icon in the Control Panel.
You may remove SD card 18.
now.
Page 60

52 CHAPTER 2 LEARNING THE BASICS
Connect device to computer
The following describe how to connect OT-100 to the computer and transfer the data:
Install ActiveSync (for Windows XP)
If your computer runs on the Windows XP operating system, you must install ActiveSync on your computer.
To fully install ActiveSync on the computer, you can download ActiveSync from Windows Mobile at http://
www.microsoft.com/windowsmobile/en-us/downloads/microsoft/activesync-download.mspx
Synchronize your data with ActiveSync and Windows XP
Synchronizing the computer and OT-100 lets you transfer data from your computer to OT-100 or from OT100 to the computer. You must install ActiveSync on your computer before you can synchronize the computer
and OT-100.
The ActiveSync setup wizard helps you with these steps the rst time that you connect OT-100 to the
computer.
We will use ActiveSync version 4.5 to make a description of how to synchronize your data.
Plug OT-100 into the computer 1.
by using a Mini-USB to USB
cable. The Synchronization
Setup Wizard appears on your
computer.
On your computer, Select Yes in 2.
Set Up a Partnership dialog, then
click Next.
Page 61

53
Select the check box next to each 3.
information type you want to
synchronize, and then click Next.
Click Finish. ActiveSync 4.
synchronizes the selected
information types.
Page 62

54 CHAPTER 2 LEARNING THE BASICS
Copy or move les between the computer and OT-100
To copy or move les between the computer and the OT-100:
Connect the OT-100 to the 1.
computer by using the Mini-USB
to USB cable.
On your computer, right-click 2.
Start, click Explore, and then open
the folder to or from which you
want to copy or move a le.
Right-click the le that you want 3.
to copy or move, then click Copy
or Cut.
Scroll to and then click Mobile 4.
Device, open the folder to or from
which you want to copy or move
a le. Right-click in the folder that
you want to move it to, and then
click Copy, Cut, or Paste.
If the File Conversion dialog box 5.
appears, click OK.
Page 63

55
Synchronize les between the computer and OT-100
You can use ActiveSync to synchronize les on the computer and OT-100. To synchronizing les between the
computer and OT-100:
Disconnect your device from your 1.
computer, if it is connected by
using a USB cable or cradle.
Click Start > All Programs > 2.
Microsoft ActiveSync.
Click Tool > Options3.
Page 64

56 CHAPTER 2 LEARNING THE BASICS
Select Files, click Settings.4.
Click Add to select the les that 5.
you want to synchronize, and then
Click OK.
Page 65

57
Connect the OT-100 to the 6.
computer by using the Mini-USB
to USB cable.
The les will be synchronize in 7.
folder \My Document\OT-100 My
Document on the computer and
\My Device\My Document on the
OT-100.
Page 66

58 CHAPTER 2 LEARNING THE BASICS
Install and remove programs
To install programs on the OT-100:
Use a Mini-USB to USB cable 1.
to connect the OT-100 to the
computer.
Follow the instructions in the 2.
Installation Wizard provided with
the program you want to install.
Check the screen on the 3.
OT-100 to see if any further steps
are necessary to complete the
program installation.
To remove programs from the OT-100:
Tap 1. → Settings → Control Panel.
Page 67

59
Double tap the Remove Programs 2.
icon.
Select the programs you want to 3.
remove, and then tap the Remove
button.
Page 68

60 CHAPTER 2 LEARNING THE BASICS
Page 69

61
CHAPTER 3
USING THE ACCESSORIES
This chapter describes how to use the device accessories.
Attaching the stylus cord on page 6• 1
Attaching the hand strap on page 6• 2
Using the leather pouch on page 6• 3
Attaching the leather pouch cord on page 6• 4
Using the high quality stylus on page 6• 5
Attaching the stylus cord
Refer to the following to attach the stylus cord.
Thread the small loop of the 1.
stylus cord through the strap
eyelet on the stylus and pull the
other end of the cord through
the small loop until the cord is
rmly secured.
Thread the other small loop of 2.
the stylus cord through the top
hand strap eyelet on the device
and use stylus pull the cord
through the small loop until the
cord is rmly secured.
Page 70

62 CHAPTER 3 USING THE ACCESSORIES
Attaching the hand strap
Refer to the following to attach the hand strap.
Insert the bottom of the 1.
hand strap into the slot
at the bottom of the
battery cover, until it
clicks into place.
Thread the end of the 2.
hand strap through the
top hand strap eyelet
on the device then fold
and stick together.
The hand strap length •
can be adjusted by
sticking the Velcro to a
higher or lower position
on the strap.
Page 71

63
Using the leather pouch
Using the leather pouch to carry the OT-100 is a good way to keep it protected. Simply insert the device into
the leather pouch as shown below.
A belt clip located on the back of the leather pouch allows you to wear the OT-100 on your side. In addition, a
shoulder strap can be attached to the two integrated rings on the back side.
Shoulder strap is
adjustable
Clip to your belt
Page 72

64 CHAPTER 3 USING THE ACCESSORIES
Attaching the leather pouch cord
A leather pouch cord is provided to attach device to the leather pouch.
Open the battery cover.1.
Thread the small loop of the 2.
cord through the bottom corner
strap eyelet on the device.
Pull the other end of the cord
through the small loop until the
cord is rmly secured.
Replace the battery cover.3.
Lock the other end of the cord 4.
to one of the rings on the back
of the leather pouch.
To insert device into cradle 5.
for charging, simply detach as
shown.
Page 73

65
Using the high quality stylus
A high quality stylus is included for your convenience.
Page 74

66 CHAPTER 3 USING THE ACCESSORIES
Page 75

67
APPENDIX
This appendix describes locating and solving problems that you may encounter while using the OT-100.
Troubleshooting
Often after time spent troubleshooting, the problem is traced to something as simple as a loose connection.
Check the following before proceeding to the problem-specic solutions.
Tips for Troubleshooting
In each problem-specic section, try the steps in the order suggested. This may help you to solve the problem
more quickly. Try to pinpoint the problem and thus avoid replacing non-defective parts. For example, if you
replace batteries and the problem remains, put the original batteries back and go to the next step.
Keep a record of the steps you take when troubleshooting: The information may be useful when calling for
technical support or for passing on to service personnel.
Use some other electrical device to conrm that the electrical outlet is working.•
Ensure all connections are securely attached.•
General Problems
Refer to the following for general problems you may encounter.
PROBLEM SOLUTION
You cannot turn on the device Plug AC adaptor directly into device to check device is •
functioning. If device functions properly, then issue may be
with the battery.
Check that the battery is fully charged and properly installed •
into device.
You have trouble charging the battery Check that the AC adaptor is plugged in correctly to the DC •
jack on the device, and the other end into the wall outlet.
If using the cradle for charging, check that the AC adaptor is •
plugged in correctly to the cradle and the wall outlet.
Check for damage to the power cables.•
If battery has been used extensively and is old, replace with •
new battery and try again.
You have trouble connecting to the
Internet
Check that device is connected to a WiFi network with the •
correct network key (password).
Check if the WiFi network provides an IP address •
automatically via DHCP. If not, contact your network
administrator for the relevant IP address, subnet, gateway,
and DNS servers, which you need to enter manually.
Page 76

68 APPENDIX
Why does the device operate slowly at
times?
Reset device. Does problem remain? If this solves problem, •
check if user installed applications are causing system to
slow down.
Check that enough free storage memory remains on device, •
so that device operates smoothly and efciently.
If device shows low storage memory, delete unnecessary •
les, or transfer les to SD card.
Having the OT-100 Serviced
If you are unable to solve the problem, you should have the device serviced. Pack the device in the original
box. (See “Unpacking the OT-100” on page 1.) Include a description of the problem and a checklist of the
steps you took when trying to x the problem. The information may be useful to the service personnel. Return
the device to the place you purchased it.
Guidelines for care and maintenance
It is recommended that you follow certain guidelines to prevent possible damage to the device and to keep it
in a good condition.
Using the device
Avoid using the device in dusty and extremely high or low temperature environments.•
Do not spill water on the device or expose it to the rain.•
Avoid removing the battery without turning off the device.•
Do not apply strong force or shocks to the device.•
Keep the device and its accessories away from children.•
Do not insert metal objects into the charging/communications port of the device. This can short-circuit •
the battery and result in danger.
Cleaning the device
Use a soft, clean, and slightly moistened cloth to clean the device. Do not let water come into contact •
with the microphone, speaker, or with any of the connectors.
Do not wipe the device with any corrosive liquid or coarse objects. This can damage the outer surface •
of the device.
Transporting and storing the device
Do not leave the device in extremely high or low temperature environments.•
If device is to be transported or stored for a long period of time, please remove the battery, and store •
both device and battery in a cool, dark, and dry place. Ideally, batteries should be stored at around
25˚C, or within a temperature range of -10˚C ~ 30˚C to maximize longetivity. Batteries in storage
need to be charged every 3 months to prevent battery degradation
Batteries in storage need to be charged every 3 months to prevent battery degradation.•
Page 77

69
Bluetooth supported proles
Bluetooth supported proles are:
Bluetooth HS/HF and Audio Gateway Service – supports the Headset Prole (HSP) and the Hands-•
Free Prole (HFP) by using the Audio Gateway Service
Bluetooth LAP (LAN Access Prole) and Conguration Utility•
Bluetooth PAN (Personal Area Network)•
Bluetooth SPP (Serial Port Prole) – available only when Partner Tech’s Bluetooth Manager is •
enabled (via Settings Manager in the Control Panel)
Page 78

70 APPENDIX
CPU Freescale i.MX31L CPU @ 532MHz with system bus at 133MHz
Memory NAND Flash 128MB, Mobile DDR 128MB
LCD 4.3” widescreen (WQVGA resolution 480*272)
WiFi 802.11b/g
Bluetooth V1.1, V1.2, V2.0 Enhanced Data Rate (2&3Mbps) /Class2
Audio Speaker, Headphone jack, Microphone jack
Storage SD card (SDHC up to 16G)
Connectors Mini-USB
Special features
Vibration
Direction sensor
Battery Rechargeable Li-ion 2200mAh (removable)
Power adapter DC 5V/2A
Ruggedness IP54, 1.2 meter drop test
Environmental
Operating temperature: 0°C ~ 40°C
Device storage temperature: -20°C ~ 60°C
Battery storage temperature: -20°C ~ 40°C
Operation Humidity: 15% ~ 80%
Storage Humidity: 15% ~ 80%
Certications
RF: FCC / CE / NCC (for WiFi 802.11b/g, Bluetooth, RFID)
EMC: FCC / CE / BSMI / VCCI
Safety: LVD / BSMI / CB (IEC60950-1:2005 / EN60950-1:2001, 1st edition)
Accessories
AC adaptor, Cradle, Battery, Stylus cord, Hand strap, Leather pouch, Leather
pouch cord, Shoulder strap, High quality stylus
OS Windows CE 5.0
Weight 220g
Dimensions 133 * 82 * 19 mm (H x W x D)
Specications
 Loading...