

Page 1

U
SE R GUI DE
1 / 75
MF-2350
User Guide
Version 1.0
July 27th, 2010
Page 2

U
SE R GUI DE
2 / 75
T
ABLE OF CONTENTS
Table of Contents........................................................................................................................ 2
Box Contents...............................................................................................................................4
Overview..................................................................................................................................... 5
List of features ........................................................................................................5
COM port sharing ................................................................................................... 6
Powering on/off......................................................................................................7
Reset device............................................................................................................7
Enabling backup battery......................................................................................... 7
Hot swap main battery........................................................................................... 8
Standard Features ......................................................................................................................9
Device Settings ................................................................................................................... 9
Stylus ...................................................................................................................... 9
Regional settings .................................................................................................... 9
Multilingual Language Interface............................................................................. 9
Backlight ............................................................................................................... 10
Keypad lighting.....................................................................................................10
Button configuration ............................................................................................ 10
Printer............................................................................................................................... 11
Printer language support......................................................................................11
Printer firmware update....................................................................................... 11
Paper roll .............................................................................................................. 11
Test utility .............................................................................................................12
Printer settings ..................................................................................................... 16
WiFi 802.11 b/g................................................................................................................ 17
Turn WiFi on/off...................................................................................................17
Connection settings.............................................................................................. 18
IP Information & MAC address............................................................................. 21
Setup IP address manually ................................................................................... 23
Bluetooth.......................................................................................................................... 24
Turn Bluetooth on/off...........................................................................................24
Search and connect Bluetooth devices ................................................................26
MSR ..................................................................................................................................27
Microphone...................................................................................................................... 28
Optional Features.....................................................................................................................31
IC card............................................................................................................................... 31
GSM/GPRS........................................................................................................................ 35
Page 3

U
SE R GUI DE
3 / 75
Insert SIM card .....................................................................................................35
Turn GSM/GPRS on/off.........................................................................................35
Using GSM functionality.......................................................................................36
Sending SMS.........................................................................................................40
Using GPRS functionality ...................................................................................... 41
RFID .................................................................................................................................. 42
Turn RFID on/off ................................................................................................... 42
Reading & writing RFID card.................................................................................44
Reading & writing ISO 15693 RFID card ............................................................... 45
Barcode scanner...............................................................................................................46
Using the Barcode Scanner .................................................................................. 46
Continuous scanning mode.................................................................................. 48
Barcode settings...................................................................................................49
GPS ...................................................................................................................................51
Turn GPS on/off .................................................................................................... 51
View GPS data ...................................................................................................... 52
Camera ............................................................................................................................. 54
Turn Camera on/off..............................................................................................54
Using Camera utility .............................................................................................55
Fingerprint scanner ..........................................................................................................59
Enroll Fingerprint..................................................................................................59
Delete Fingerprint ................................................................................................ 63
Register Password................................................................................................. 65
Accessories ............................................................................................................................... 68
Cradle ...............................................................................................................................68
Testing COM port on cradle..................................................................................68
Connect external scanner.....................................................................................68
Interface information of cradle ............................................................................ 69
Upgrading the OS ..................................................................................................................... 70
Upgrade using microSD Card............................................................................................70
Upgrade by PC through USB cable ...................................................................................70
Install device driver onto your PC ........................................................................ 70
Upgrade OS from PC to device ............................................................................. 73
Appendix................................................................................................................................... 74
Device specifications ............................................................................................74
Environmental specs ............................................................................................75
Supported Bluetooth profiles............................................................................... 75
Supported RFID types...........................................................................................75
Page 4

U
SE R GUI DE
4 / 75
B
OX CONTENTS
– MF-2350 device
– AC adaptor and power cord
– Battery
– Stylus
– Hand strap
– Device-to-PC USB cable
– Screen protection film
– Paper roll
Page 5
U
SE R GUI DE
5 / 75
O
VERVIEW
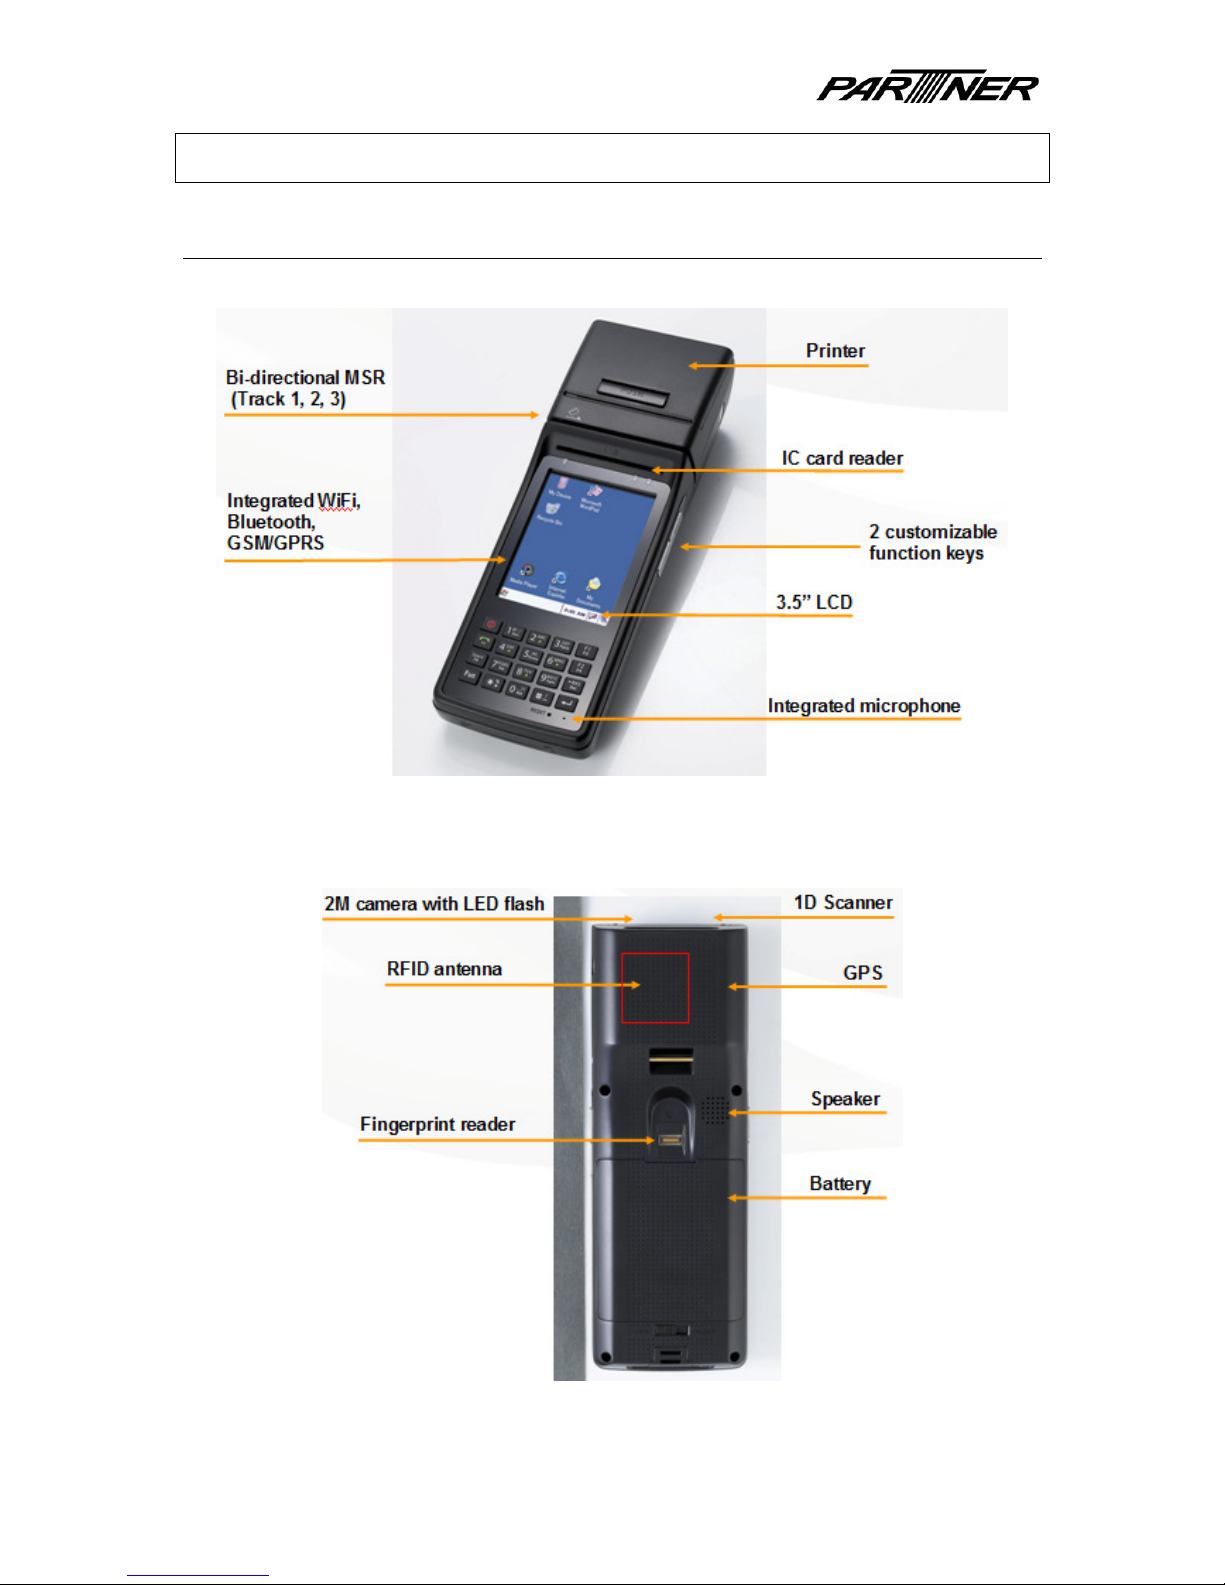
List of features
Page 6
U
SE R GUI DE
6 / 75
MF-2350 device includes the following features.
Standard Features Optional Features
2” Thermal Printer
WiFi 802.11 b/g
Bluetooth Class2
MSR 3-track reader
Integrated microphone
IC card reader
Quad-band GSM/GPRS
RFID 13.56MHz reader
Barcode scanner (1D)
GPS
Camera
Fingerprint scanner
COM port sharing
Some functions share COM ports, and therefore cannot be used simultaneously.
Module COM port Comment
Barcode scanner 1D COM1
MSR
IC card
Printer
COM5 Shared
Bluetooth
RFID
COM9 Shared
Cradle RS232
GPS
COM6 Shared
GSM/GPRS
COM8
Page 7

U
SE R GUI DE
7 / 75
Powering on/off
Device has three different power states: Off, Standby, and On. Below table shows how to
power on/off, enter Standby mode, and wake-up from Standby mode.
Off On Press Reset pinhole
On Off Press and hold Reset pinhole for 5 seconds
On Standby Press Power key
Standby On Press Power key
Note: The first time you use device, it will be in Off mode.
Reset device
Device has soft reset and hard reset functions, as well as a factory default function.
ATTENTION: Factory default will erase all user files and settings!
Soft reset Press Reset pinhole
Hard reset Press Power key and Reset pinhole at the same time
Factory default Press and hold Power key, and press Reset pinhole. Keep
holding down Power key until message appears on screen to
press the FUN key. Press the FUN key to do Factory Default, or
press Reset to cancel.
Enabling backup battery
Backup battery is used to store Standby mode data when main battery is empty, or is
removed. Backup battery can keep the information for 10 minutes. Charging of the backup
battery is automatically done via AC adaptor, or when main battery is present.
To enable/disable the backup battery:
1) Remove main battery.
2) At the bottom left of the battery slot, there is a switch. Put switch towards the right
side to disable backup battery. Put switch towards the left to enable backup battery.
Page 8

U
SE R GUI DE
8 / 75
Hot swap main battery
When Backup battery is enabled, hot swap of the main battery is possible.
3) Press Power key to enter Standby mode.
4) Remove main battery, and replace with another battery.
5) Press Power key to wake up device.
Page 9

U
SE R GUI DE
9 / 75
S
TANDARD FEATURES
Device Settings
Stylus
1) Start > Settings > Control Panel > Stylus.
2) In the Double-tap tab, adjust speed for double-tap by tapping/clicking in the grid.
3) In the Calibration tab, click on the Recalibrate button to calibrate stylus. Screen will
display a point, use the stylus to click on the point as accurately as possible. A total of
five points need to be clicked on for calibration.
Regional settings
1) Start > Settings > Control Panel > Regional Settings.
2) Select your locale in the pull-down list. This will change the display of certain
information as shown at the bottom of the window.
3) You can also customize settings for display of Numbers, Currency, Time, and Date. To
do this, click on the Customize button.
Multilingual Language Interface
Device supports a multilingual user interface, which allows changing the user interface
language very easily. Simple change the setting below and restart device.
1) Start > Settings > Control Panel > Regional Settings.
2) Select the Language tab.
3) Select the language in the pull-down list.
4) Click on the OK button on the top right side of the window.
5) Press the Reset pinhole to reset device. The device interface will now be in the
language you selected.
Page 10

U
SE R GUI DE
10 / 75
Backlight
1) Start > Settings > Control Panel > Backlight.
2) In the first tab (Level), you can adjust backlight setting for when device is using
battery power, or for when device is using AC adaptor power.
3) In the second tab (Backlight), you can enable/disable if you wish backlight to turn off
automatically after a certain period of time. You can configure settings for when
device is using battery power, or for when device is using AC adaptor power.
Keypad lighting
1) Start > Settings > Control Panel > KeyPadLed.
2) Two choices are available:
o Turn on keypad lighting when user presses any key, and lighting stays on.
o Turn on keypad lighting when user presses any key, but lighting stays on only for
a defined period of time.
3) Default setting is to turn on keypad lighting for 60 seconds when user presses button.
Button configuration
1) Start > Settings > Control Panel > Button_Configuration.
2) Click on a key in the list to select it.
3) Click on the Find button to select application you wish to associate to the key.
4) Click on the OK button on the top right side of the window to save setting.
5) To remove setting from a key, select the key in the list, then click on the Empty
button.
6) To remove settings from all keys, enable checkbox All Empty, then click on the Empty
button.
Page 11

U
SE R GUI DE
11 / 75
Printer
Printer language support
Printer supports fonts for the following languages:
– Latin based languages (English and all European languages)
– Traditional Chinese
– Simplified Chinese
– Japanese
Printer firmware update
1) Double-click on My Device to open Explorer window.
2) In the menu bar on top of the screen, select View> Options. A pop-up window
appears.
3) Uncheck box “Hide protected operating system files (Recommended)”
4) Click on the OK button in the pop-up window.
5) The Windows folder should have appeared in the Explorer window. Double-click on it.
6) Find and run the program Printer_Update
7) Click on the button … to locate the printer firmware file. There are three types of file:
firmware file, boot file, and font file. Depending on the file you load, please select
one of the three radio boxes Boot, F/W, or Font.
8) Click on the Auto Update button. Upgrading starts, you should see the progress
displayed underneath.
9) After upgrade is finished, the version number displayed should change. You may also
click on the Check version button to refresh the version numbers.
Paper roll
1) When device tries to print, but paper is not present, device will beep.
2) Open the printer cover.
3) Insert paper roll into slot. Make sure some paper is showing when printer cover is
closed.
4) You can check paper roll level by looking through the transparent window on the right
side of the printer.
Page 12
U
SE R GUI DE
12 / 75
Test utility
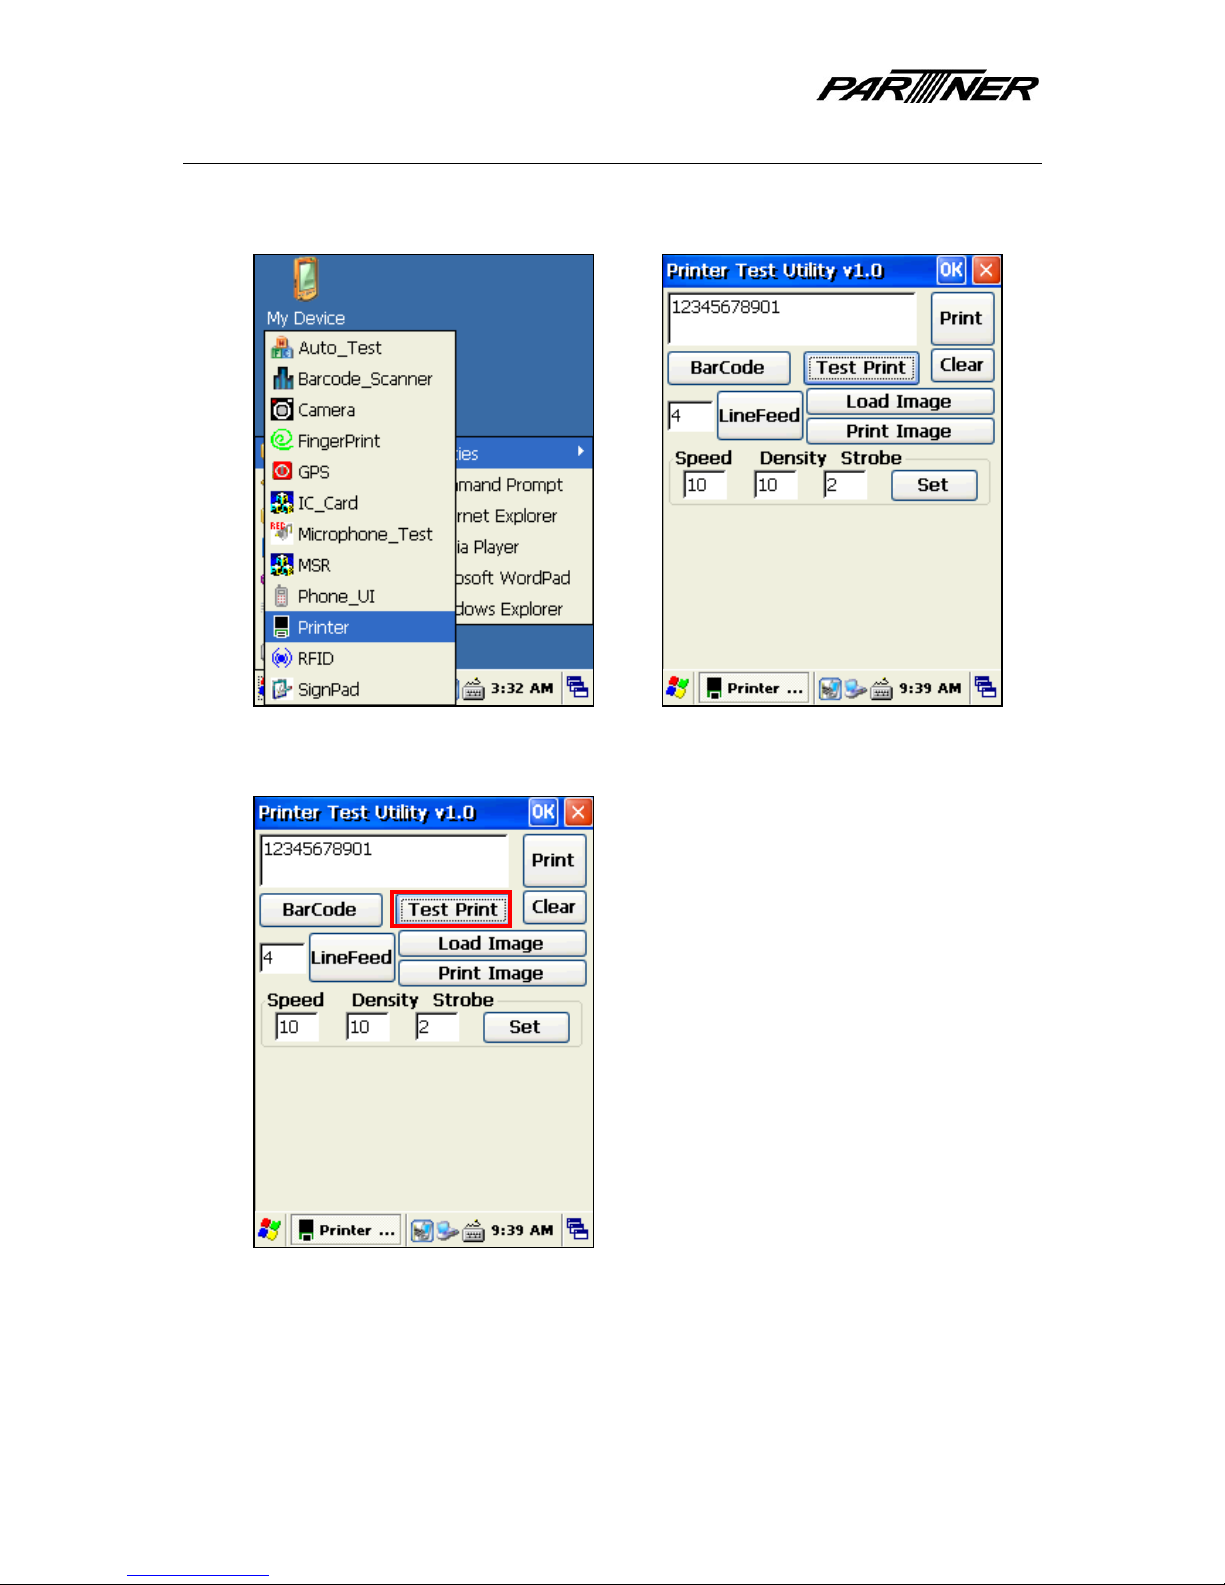
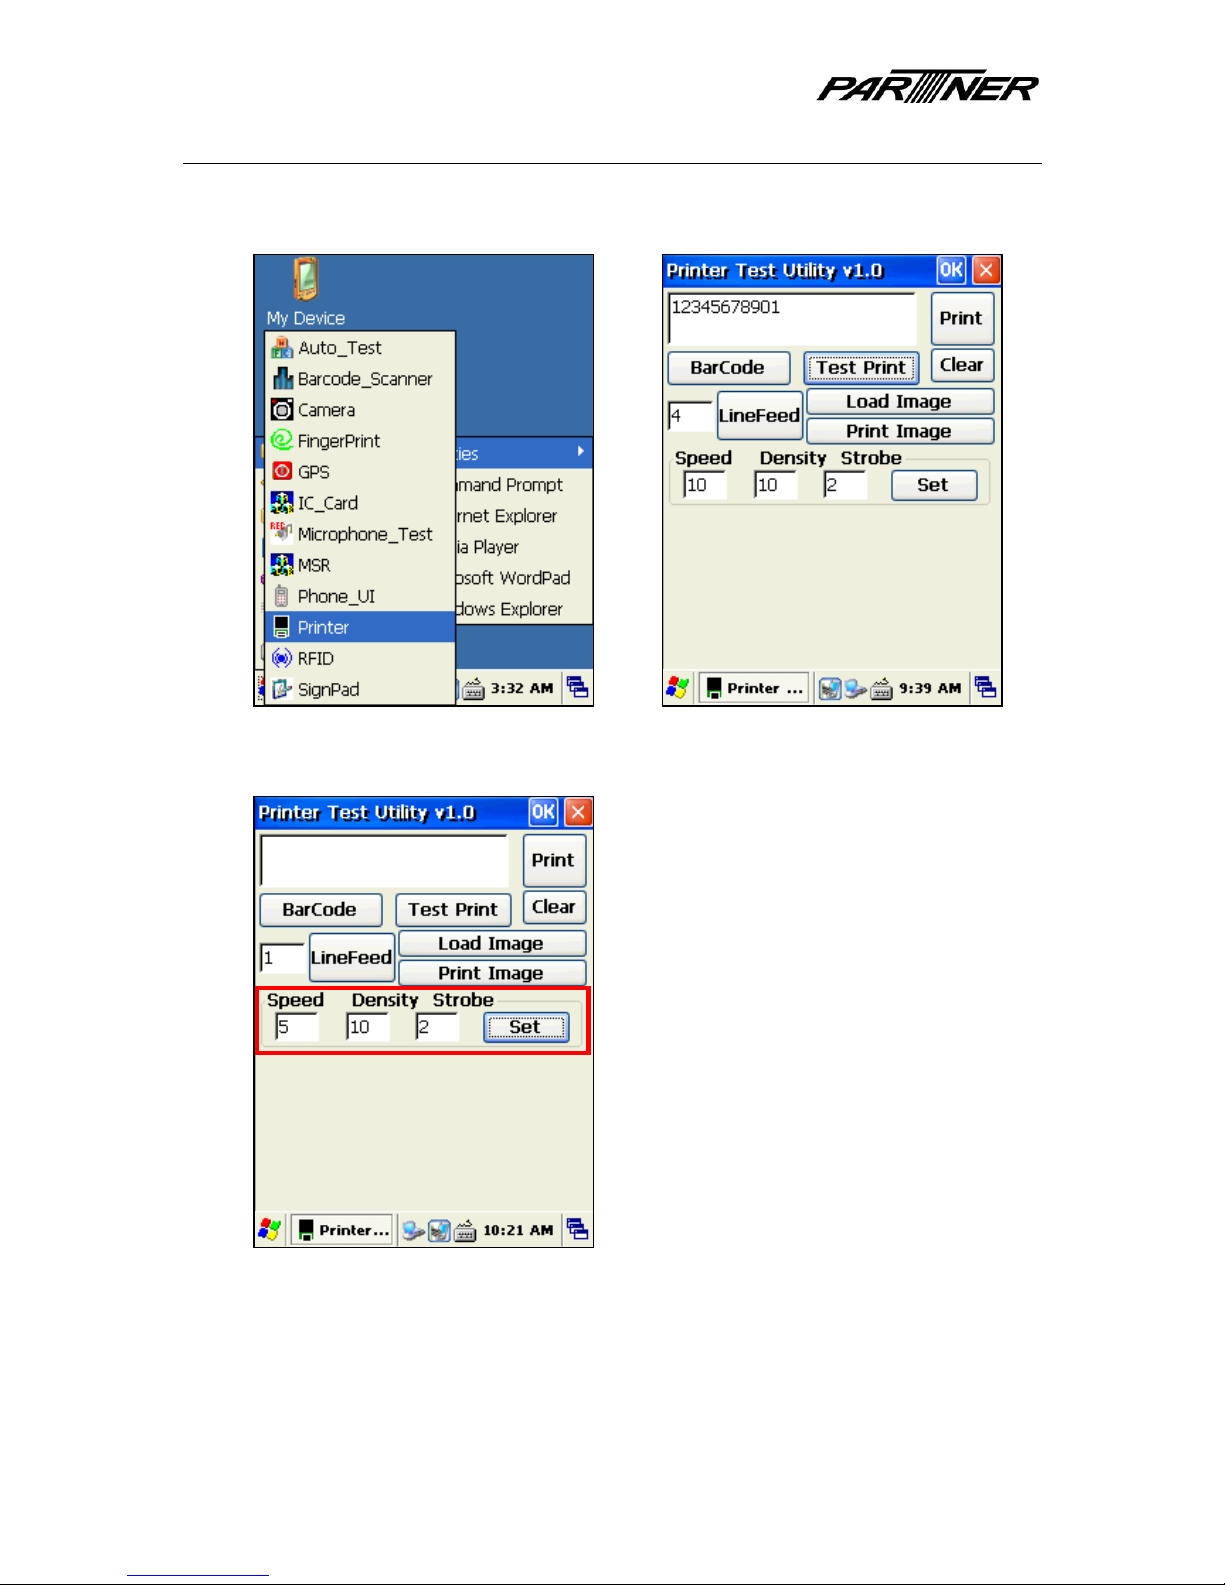
1) Start > Programs > Utilities > Printer. A test utility will appear (right).
2) Test Print button: predefined test data will be printed.
Page 13
U
SE R GUI DE
13 / 75
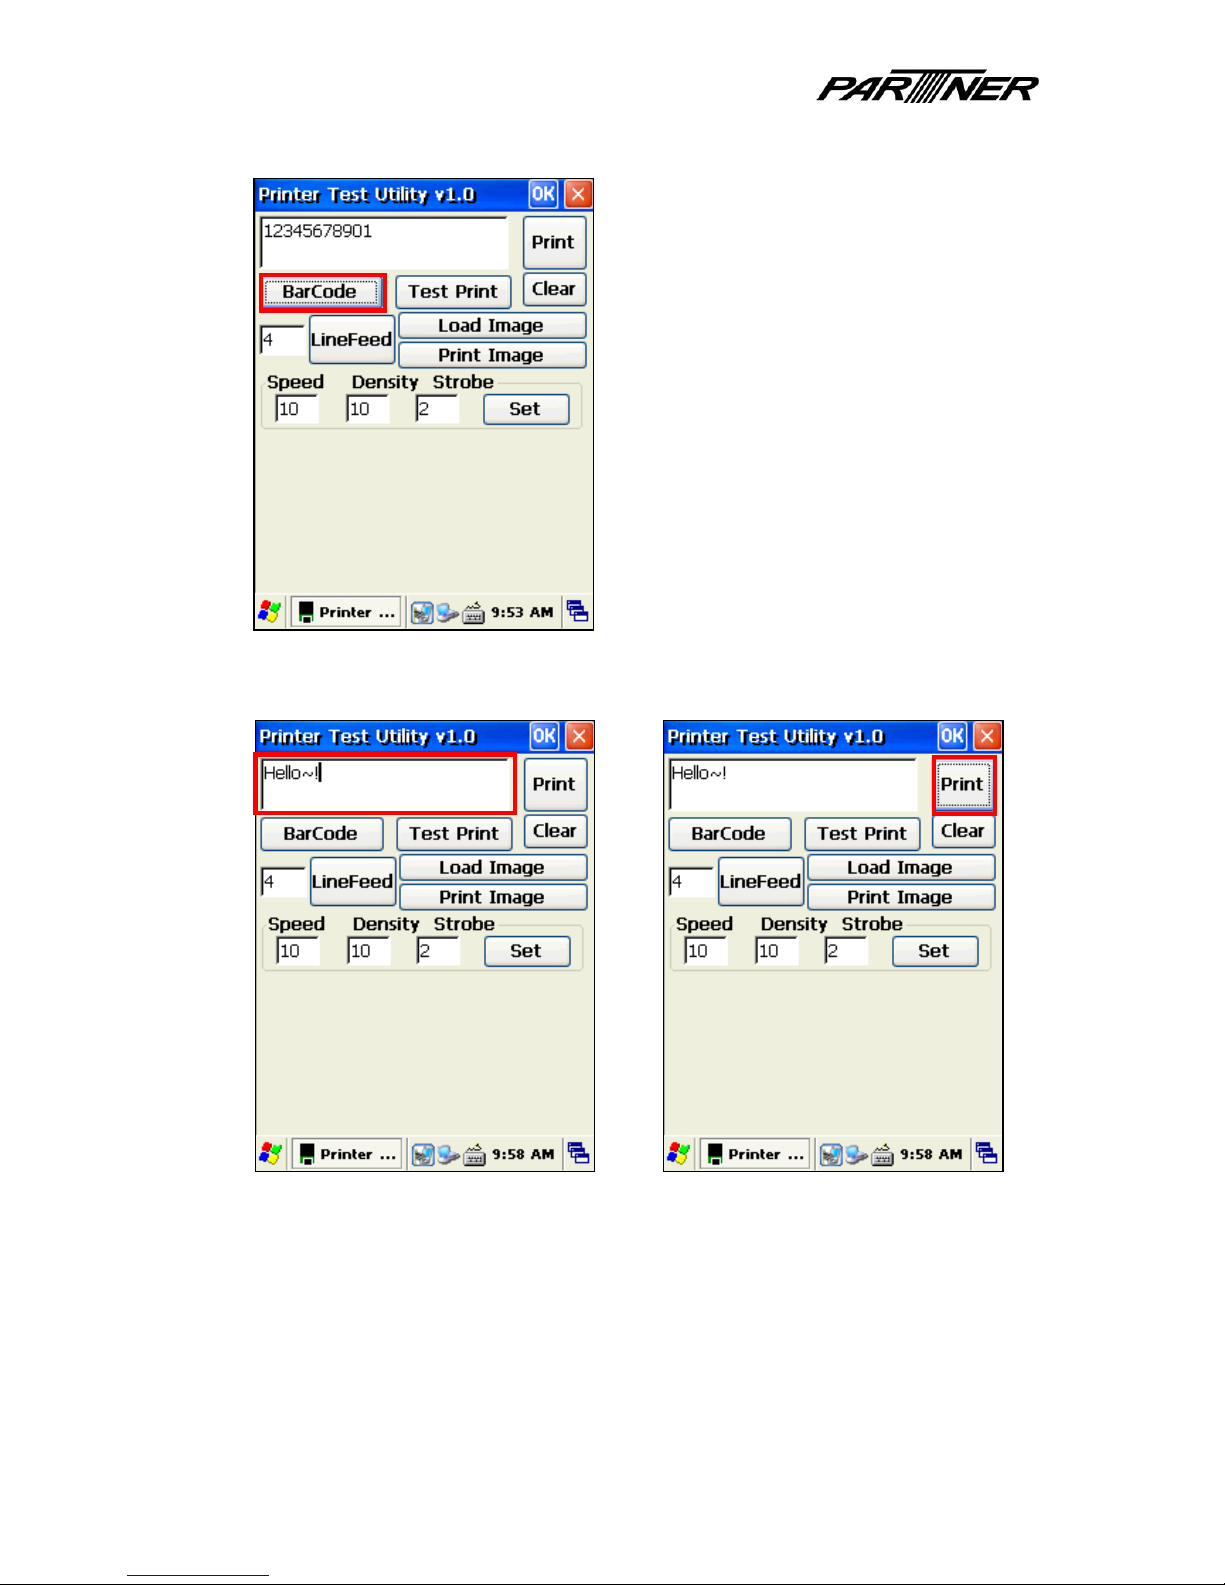
3) BarCode button: sample barcodes will be printed.
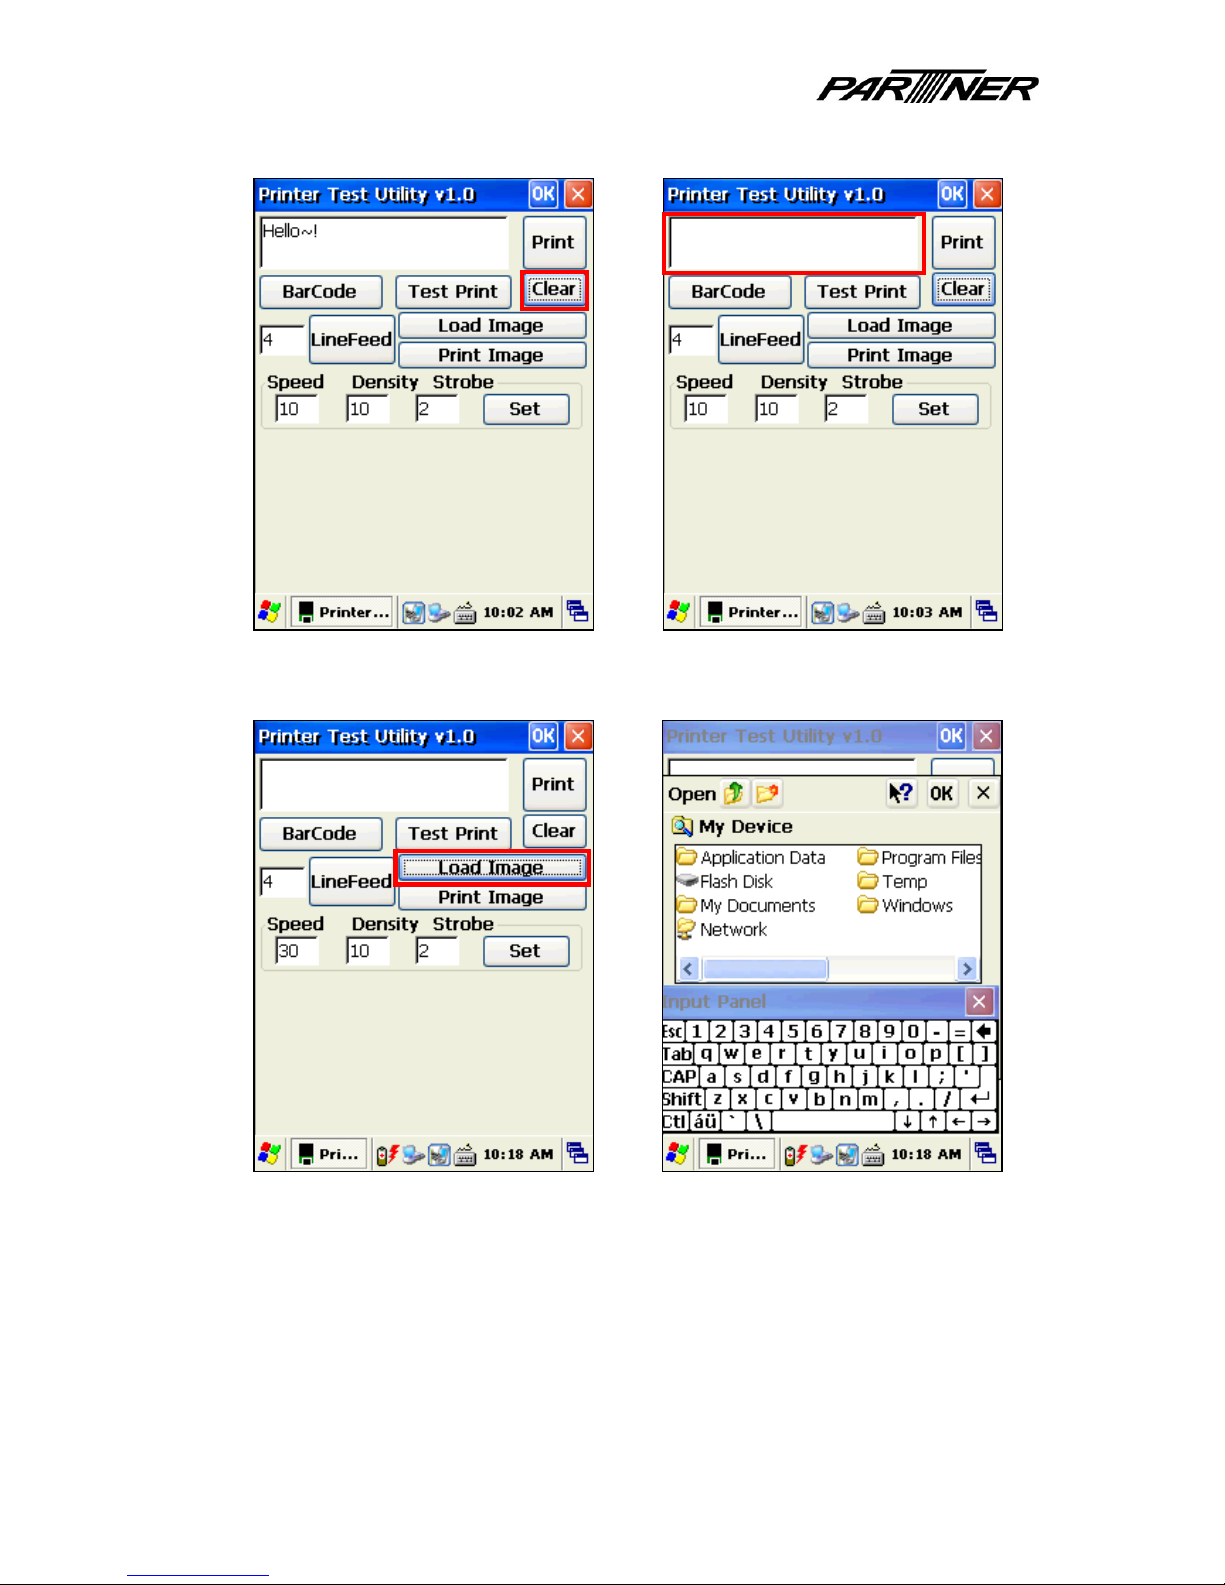
4) You can also enter text to print manually (left). Click Print button to print (right).
Page 14
U
SE R GUI DE
14 / 75
5) Click on the Clear button to erase the text field.
6) Load Image button: load the image that you want to print.
Page 15
U
SE R GUI DE
15 / 75
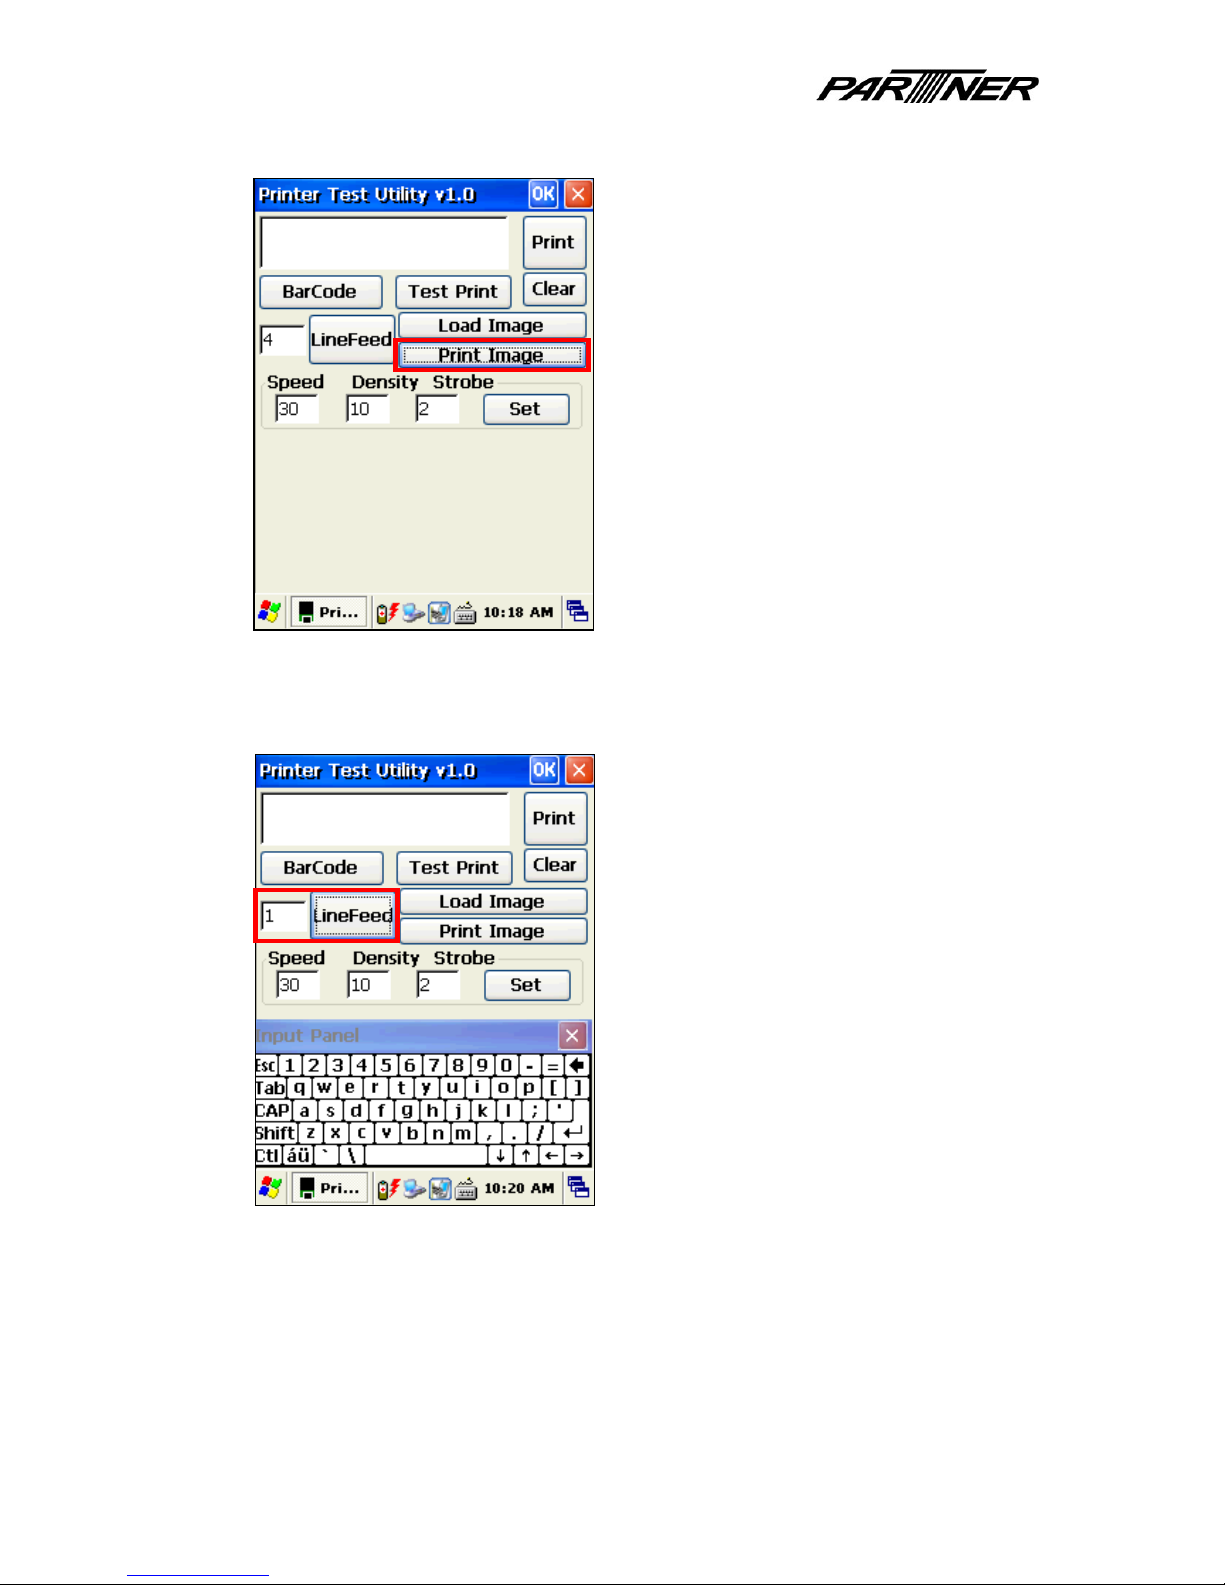
7) Print Image button: the image loaded will be printed.
8) To line feed the paper, enter a value in the text area on the left side of LineFeed
button. Then click on LineFeed button. Printer will blank print 0.125cm for each line.
Page 16
U
SE R GUI DE
16 / 75
Printer settings
1) Start > Programs > Utilities > Printer. A test utility will appear (right).
2) Printing speed and density can be customized.
3) Speed: values between 1 (slowest) and 32 (fastest). Default is 22.
4) Density: values between 1 (darkest) and 4 (lightest). Default is 4.
5) Click on Set button to apply.
* Note: changing these settings will affect battery performance.
Page 17
U
SE R GUI DE
17 / 75
WiFi 802.11 b/g
Turn WiFi on/off
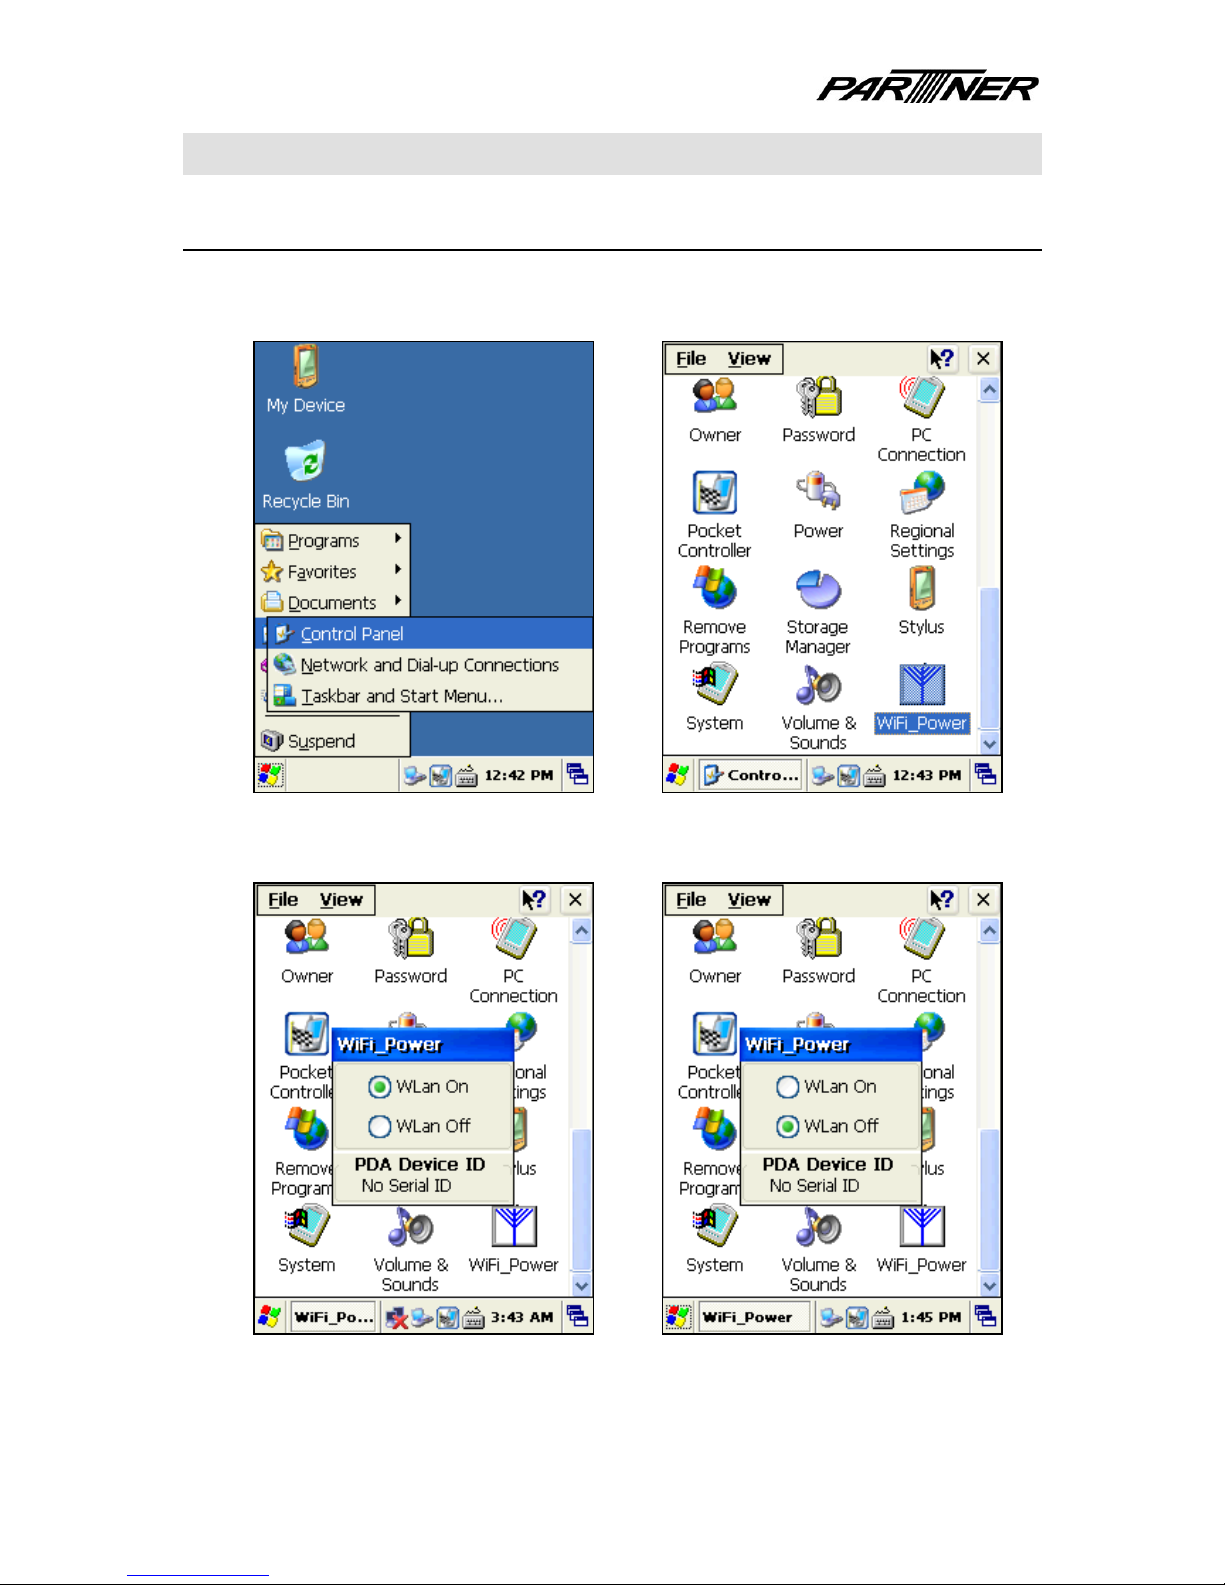
1) Start > Settings > Control Panel. Then double-click on WiFi_Power icon.
2) Select WLan On (right pic) to turn WiFi on, or WLan Off (left pic) to turn off WiFi.
Page 18
U
SE R GUI DE
18 / 75
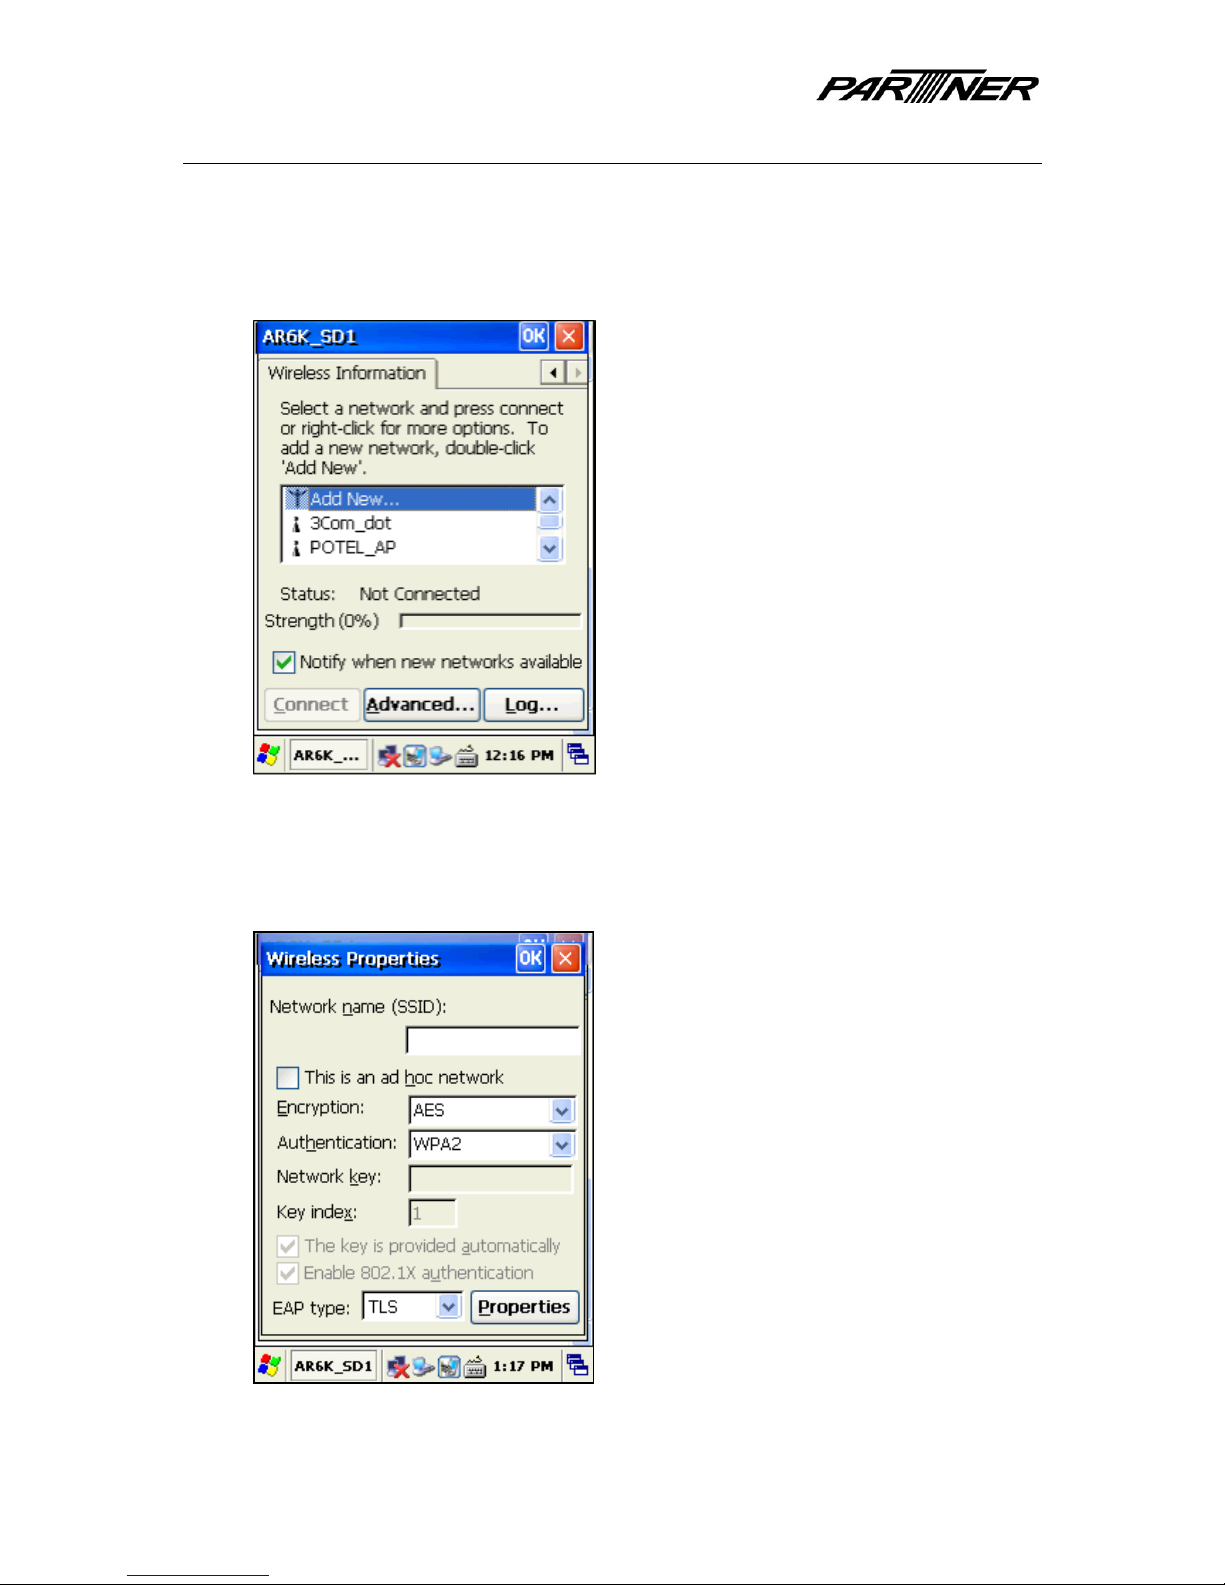
Connection settings
1) After WiFi is turned on, the window below should appear after a few seconds. Select
a wireless network in the list and click on Connect, or click Add New to add new
network.
2) Select the encryption and authentication type. If required, please enter the network
key of the wireless network. (Please consult your wireless network administrator for
the network key). Click OK when finished.
Page 19
U
SE R GUI DE
19 / 75
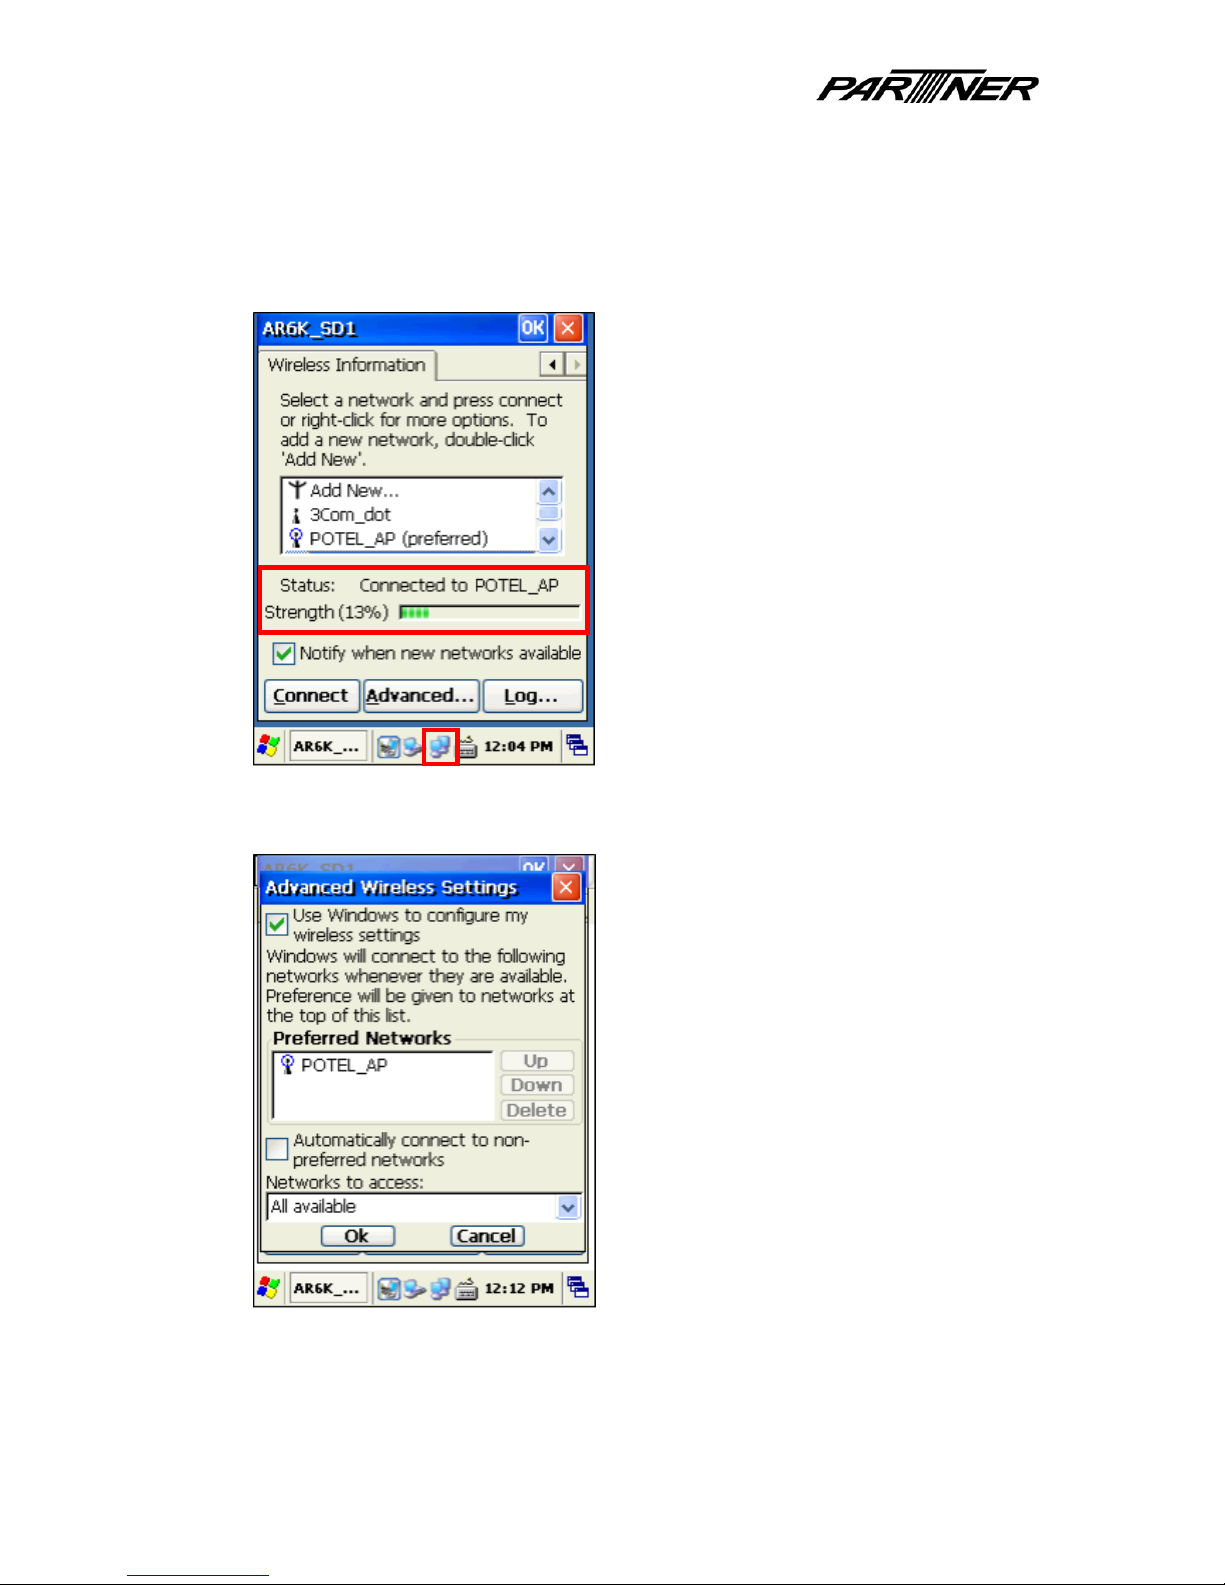
3) Status will show the connection status. When it says “Connected to [network]” this
indicates connection was successful. Icon in the taskbar also shows connected. You
can also view signal strength for connected wireless network. The strength of the
signal will vary depending on the distance between device and the wireless access
point.
4) Press Advanced.. button to set the preferred network.
Page 20
U
SE R GUI DE
20 / 75
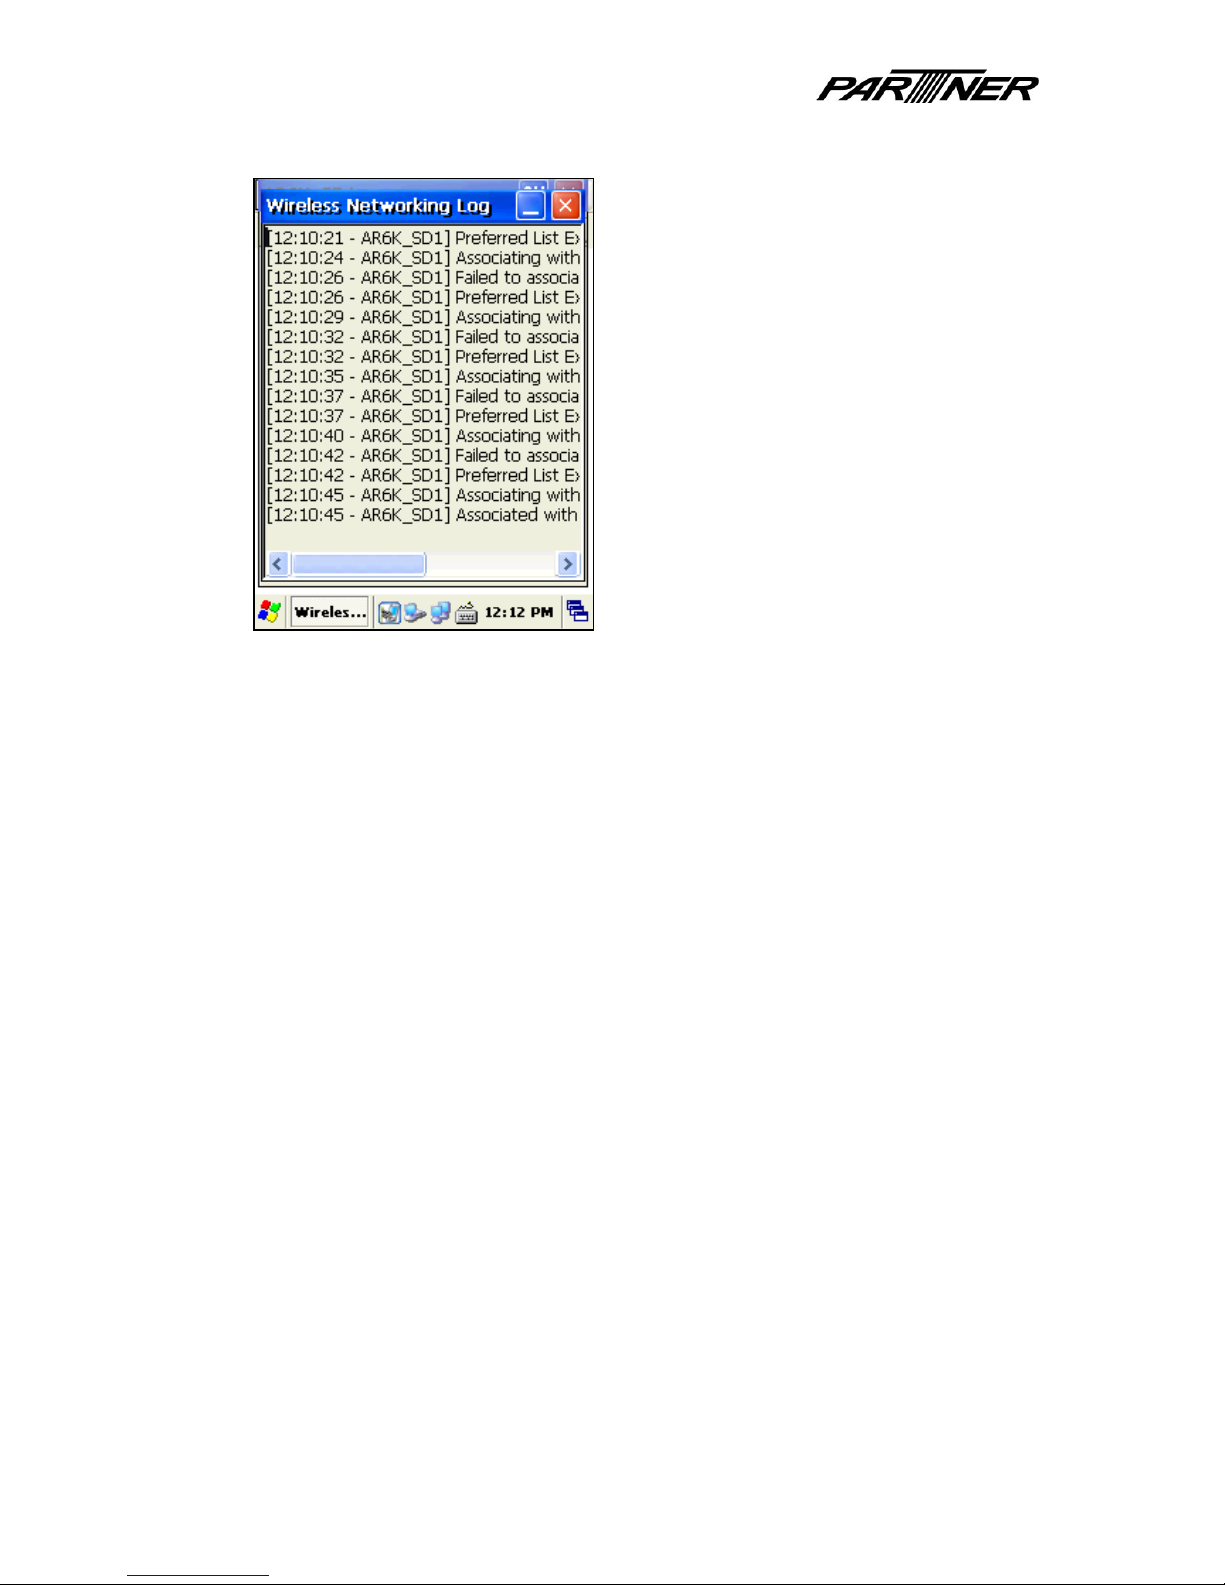
5) Press Log.. button to check the connection log details.
Page 21
U
SE R GUI DE
21 / 75
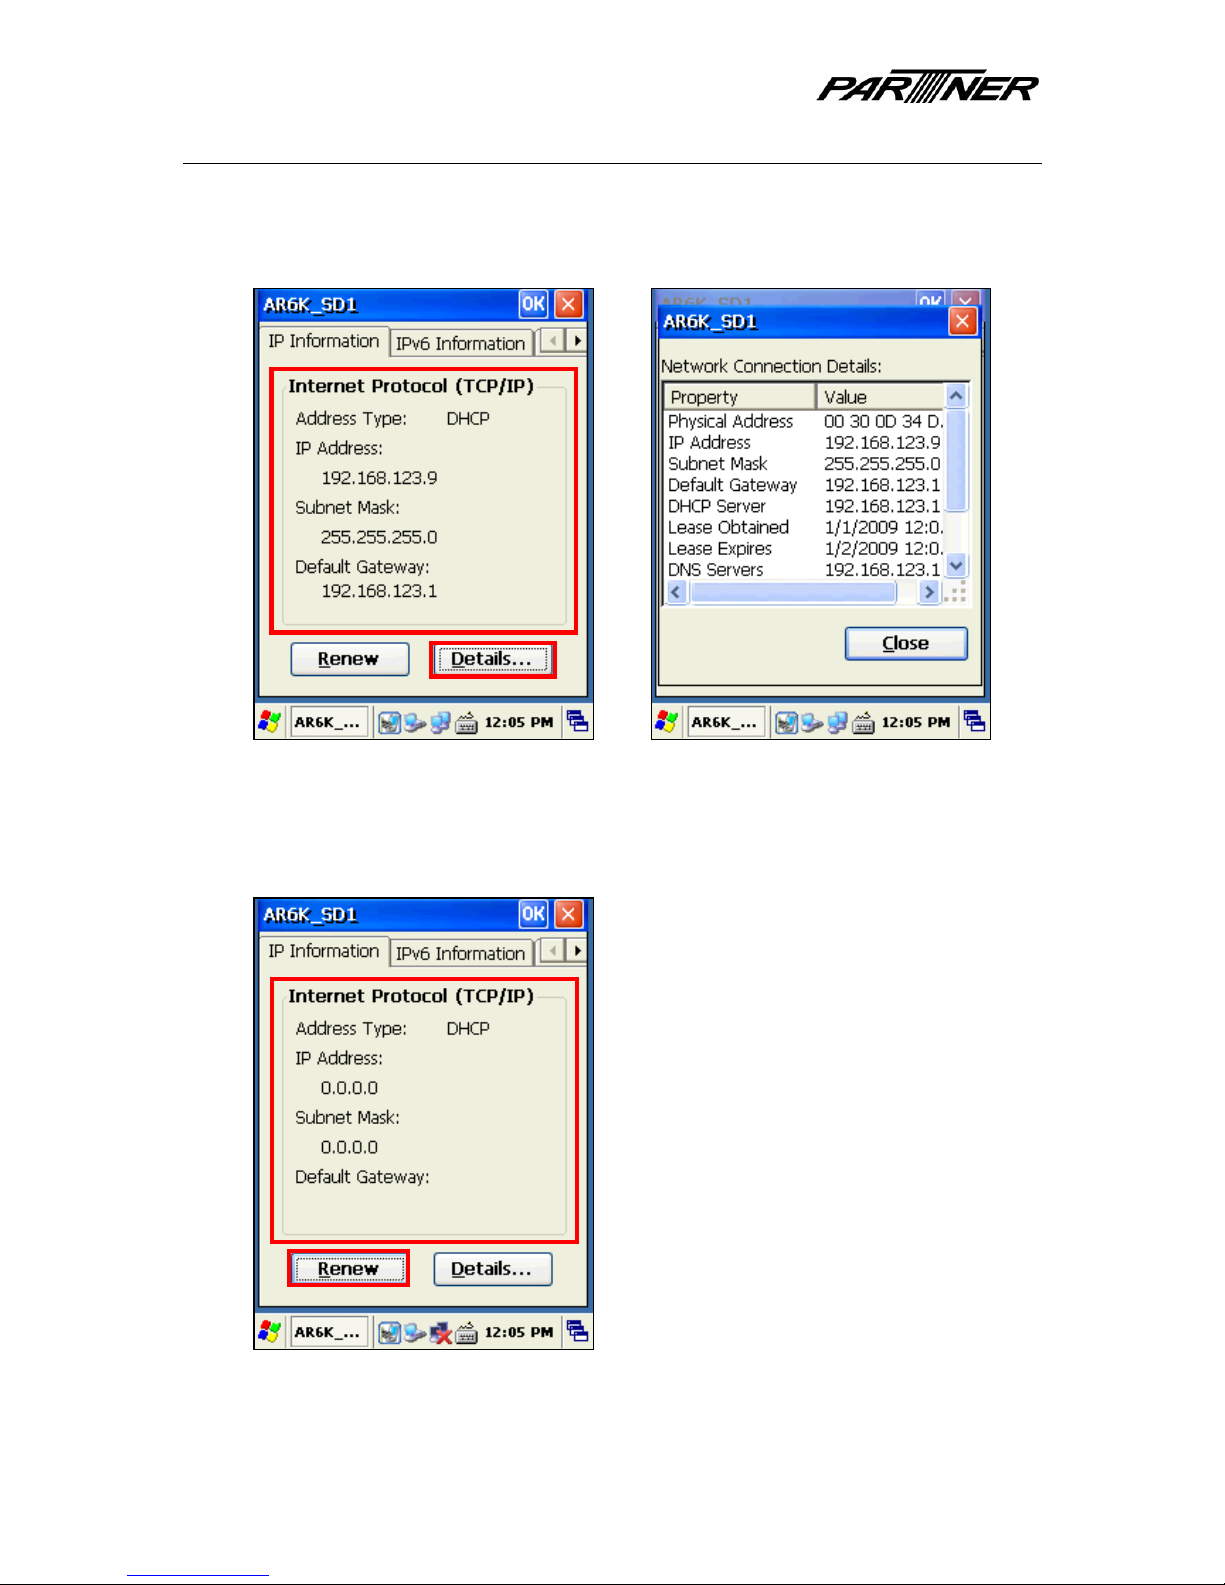
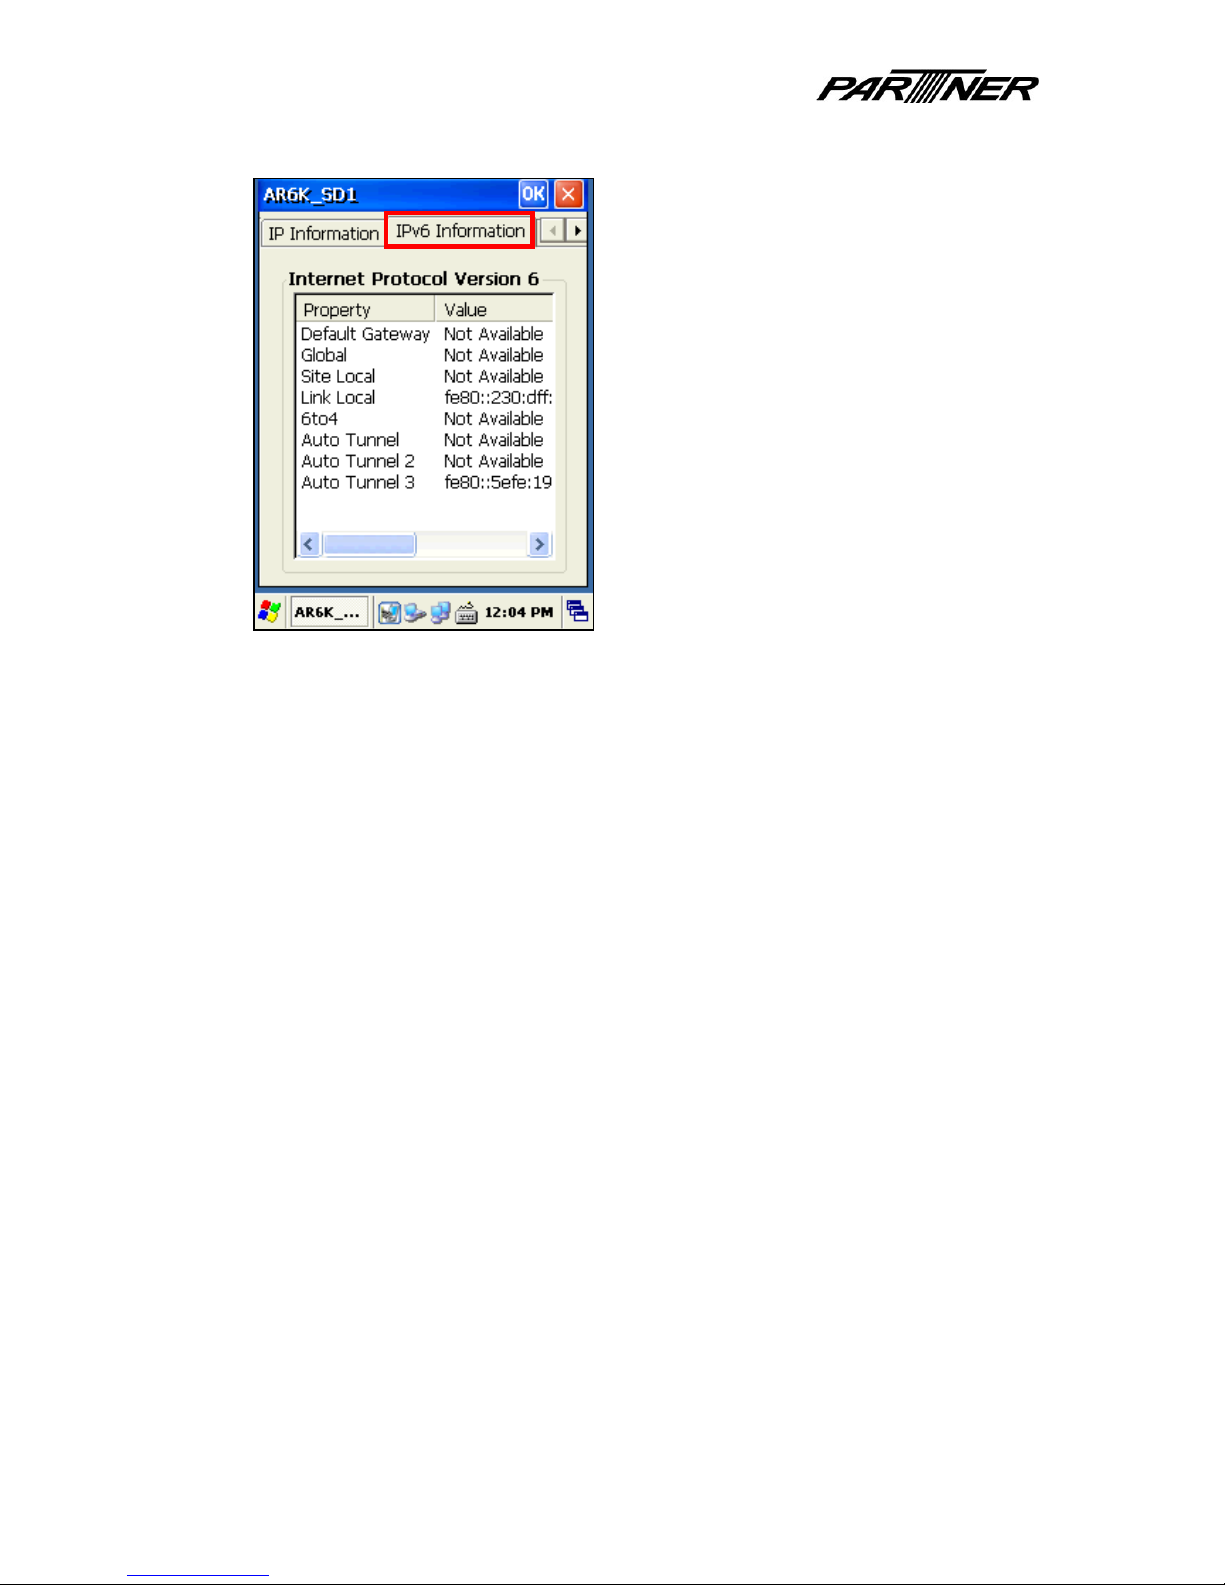
IP Information & MAC address
1) You can check IP information in the IP Information tab. Press Details.. button to
obtain more information, such as the MAC address of your WiFi hardware.
2) Press Renew button to reinitialize IP information. Device will request new IP address
from the wireless access point. It may take a few moments for the new information to
appear.
Page 22
U
SE R GUI DE
22 / 75
3) For IPv6 information, select the IPv6 Information tab.
Page 23
U
SE R GUI DE
23 / 75
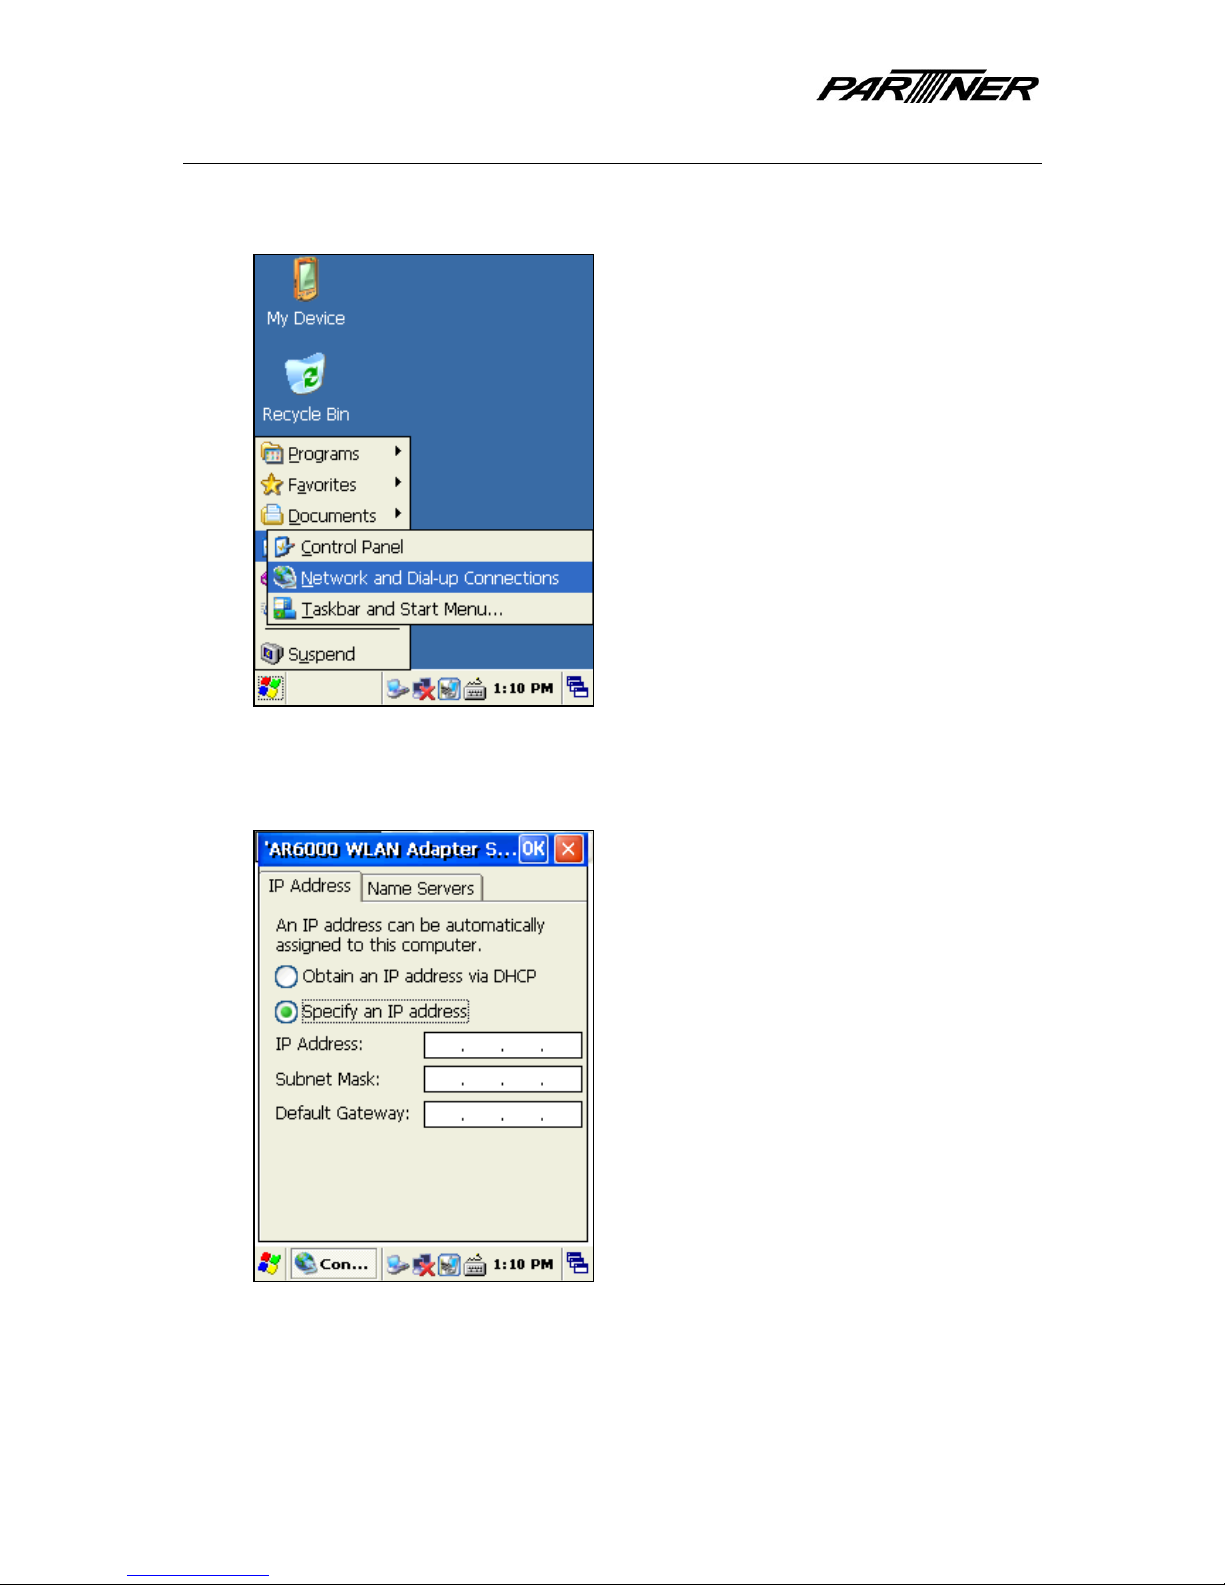
Setup IP address manually
1) Start > Settings > Network and Dial-up Connections
2) Select Specify an IP address and enter your IP address, subnet mask, and gateway
information. Click on OK button to apply settings.
Page 24

U
SE R GUI DE
24 / 75
Bluetooth
Turn Bluetooth on/off
1) Start > Settings > Control Panel. Then double-click on Bluetooth_Power icon.
2) Tray icon appears in taskbar as disabled status (left). This is normal. After about 10
seconds, tray icon will change to show Bluetooth is enabled (right). Please note that
RFID needs to be disabled for Bluetooth to activate, because they share the same
COM port.
Page 25

U
SE R GUI DE
25 / 75
3) To turn off Bluetooth, right click on the taskbar icon. Select Bluetooth OFF as shown
below. The taskbar icon will disappear.
Page 26

U
SE R GUI DE
26 / 75
Search and connect Bluetooth devices
1) Right click on tray icon and select Bluetooth Manager. Or, you can also double-click
on Bluetooth Device Manager icon in the Control Panel.
2) Click on Scan Device button. Bluetooth devices will appear in the list during the
search.
3) Right click on one of the devices to see possible actions (example: connect).
Page 27

U
SE R GUI DE
27 / 75
MSR
Using the MSR
1) Start > Programs > Utilities > MSR. A test utility will appear (right).
2) Physically swipe a magnetic card in device, and the track data will display onscreen.
3)
To close utility, click on the OK button or X button on the top right side of the window.
Page 28

U
SE R GUI DE
28 / 75
Microphone
Using the microphone
1) Start > Programs > Utilities > Microphone_Test. A test utility will appear (right).
2) Select your recording settings sample rate, bits, channel, and recording time (left). A
summary of your selection will be shown under Info. (right).
Page 29

U
SE R GUI DE
29 / 75
3) Press REC button to start recording. Speak normally. Please note that recording
volume and quality will depend on how far you are from the device.
4) When recording is finished, the Status will be shown as below.
Page 30

U
SE R GUI DE
30 / 75
5) Press the Play button to listen to your recording. The recording can also be found
in .WAV format in My Device root directory. If you wish to keep the .WAV file, please
copy to another location, or it will be overwritten the next time you record.
6) To close utility, click on the Exit button, or the OK button, or the X button on the top
right side of the window.
Page 31

U
SE R GUI DE
31 / 75
O
PTIONAL FEATURES
IC card
Using the IC card reader
1) Start > Programs > Utilities > IC_Card. A test utility will appear (right).
2) Physically insert IC card into device. Click on On button to enable IC card reader.
Page 32

U
SE R GUI DE
32 / 75
3) If an IC card is not in device, or is not a proper IC card, read will fail (left). If IC card is
detected correctly, card information will be shown (right).
4) APDU(Select) will show applied protocol control information and user data
information. You can choose ISO / EMV for card standard.
Page 33

U
SE R GUI DE
33 / 75
5) Click on Status button to display current status.
6) To obtain some version and firmware information on the IC card reader, click on the
Ver button.
Page 34

U
SE R GUI DE
34 / 75
7) To turn off the IC card module, click on the Off button.
8) To close utility, click on the OK button or X button on the top right side of the window.
Page 35

U
SE R GUI DE
35 / 75
GSM/GPRS
Insert SIM card
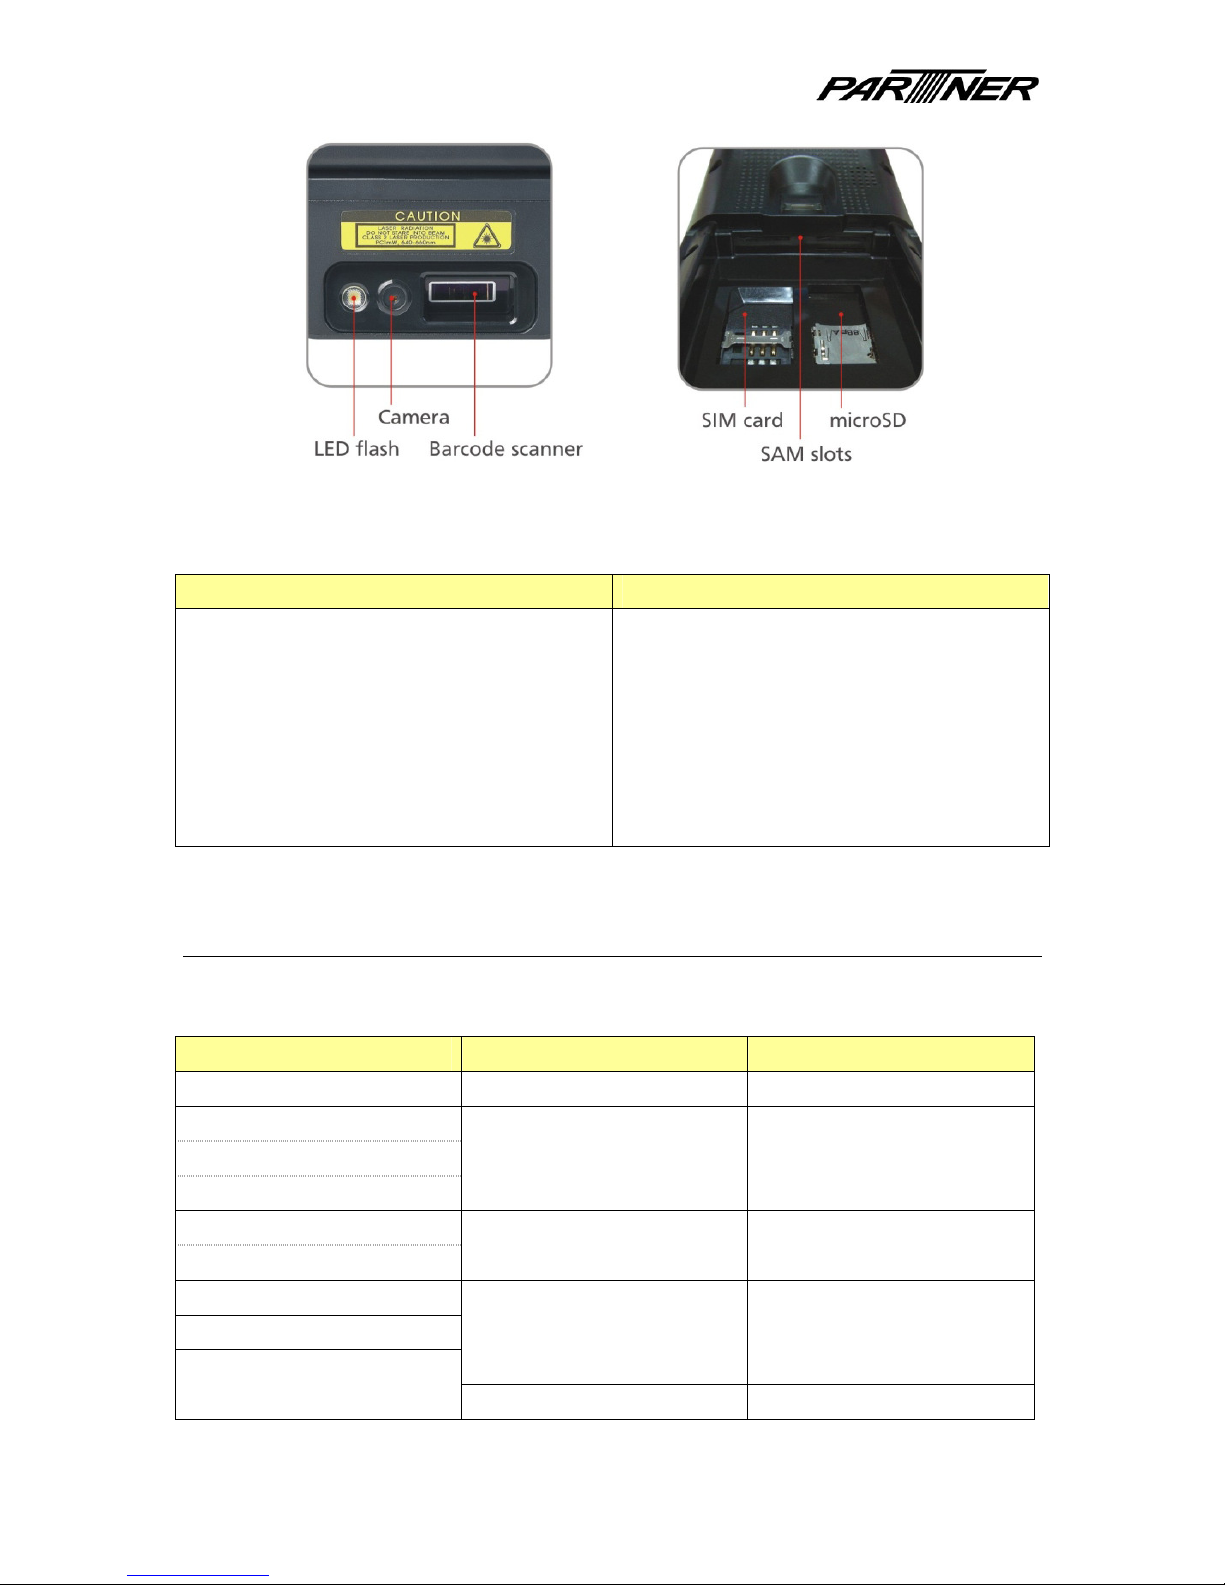
1) Unlock and remove battery from the PDA and insert SIM card into device. Push SIM
card firmly into the slot with IC chip facing down.
2) Put battery back, and lock battery.
Turn GSM/GPRS on/off
1) Start > Settings > Control Panel. Then double-click on GSM/GPRS Power icon.
2) Select Modem On to turn GSM/GPRS on, or Modem Off to turn GSM/GPRS off.
Page 36

U
SE R GUI DE
36 / 75
Using GSM functionality
1) Press the green phone button on the keypad.
2) Enter the four digit Pin code for your SIM card. Please note, you only have three
attempts to enter PIN code. If you fail all three attempts, you will need to enter the
ten digit PUK number instead. You will have ten attempts to enter correct PUK
number, if you fail the SIM card will be locked and you will need to contact your
phone provider to unlock it.
3) Once PIN code is entered correctly, you will see the interface below. You can dial
using the numbers on screen or using the physical keypad.
Note: Long press of “0” button will become space. Long press of “*” button will
become “+”.
Page 37

U
SE R GUI DE
37 / 75
4) To view recent call list, click and hold
5) You can view Dialed, Received, or Missed calls by clicking on the different tabs on top.
You can also Call or Delete numbers in the list by selecting the number and clicking on
Call or Delete buttons on the bottom. Click on Exit to return to main phone interface.
6) You can also click and hold button to see only the Dialed list.
Page 38

U
SE R GUI DE
38 / 75
7) Open the Phone Book by clicking button.
8) You can Edit, Call, Delete, or Send SMS to a contact after selecting the contact in the
list.
9) To add a contact, click on the New button. Fill in the information in the window that
appears and click OK. You can save as many contacts as allowed by your SIM card.
Page 39

U
SE R GUI DE
39 / 75
10) To obtain some detailed information, click on button.
Page 40

U
SE R GUI DE
40 / 75
Sending SMS
1) Press the green phone button on the keypad.
2) Click on button. The SMS manager will appear as below. You can view Unread,
Read, Unsent, and Sent message by clicking through the different tabs on top.
3) Click on New button to compose a message. Enter your SMS message and click Send.
Page 41

U
SE R GUI DE
41 / 75
Using GPRS functionality
1) Press the green phone button on the keypad.
2) Click on GPRS button. In the list that appears, select your SIM card operator
and click OK. A status window will appear showing connection status (right).
Page 42

U
SE R GUI DE
42 / 75
RFID
Turn RFID on/off
1) Start > Programs > Utilities > RFID. A test utility will appear (right).
2) Click on Open button to enable RFID. The status area (right) shows current status.
Please note that Bluetooth needs to be disabled for RFID to activate, because they
share the same COM port.
Page 43

U
SE R GUI DE
43 / 75
3) To deactivate the RFID reader, press the Close button. To simply disable the antenna,
click on AntennaOff button.
4) To close utility, click on the OK or X button on the top right side of the window.
Page 44

U
SE R GUI DE
44 / 75
Reading & writing RFID card
1) Put a RFID tag on the top back side of device and press MF_UID button. Tag ID will be
displayed in status area.
2) Press BlockRead button to read and write block. You can increment and decrement
block data by using the buttons at the bottom of the utility.
Page 45

U
SE R GUI DE
45 / 75
3) Press Ver button to display Firmware version of the RFID module.
Reading & writing ISO 15693 RFID card
1) Click on the ISO button to open the ISO 15693 tag window. You can read ISO 15693
tag ID, and read and write block data.
Page 46

U
SE R GUI DE
46 / 75
Barcode scanner
Using the Barcode Scanner
1) Start > Programs > Utilities > Barcode_Scanner. A test utility will appear (right).
2) Click on the Start button (left) – the laser will activate. Scan a barcode. If read was
successful, you should hear a beep, and data will be displayed (right). The barcode
type is shown as well as the barcode data.
Page 47

U
SE R GUI DE
47 / 75
3) To clear the data in the list, click on the Clear button.
4) To close utility, click on the OK button or X button on the top right side of the window.
Page 48

U
SE R GUI DE
48 / 75
Continuous scanning mode
1) To initiate continuous scanning, click on the Auto button. In this mode, the laser will
be on/off continuously, to read barcodes one after another.
2) Press the Stop button to stop scanning.
Page 49

U
SE R GUI DE
49 / 75
Barcode settings
1) Click on the Barcode tab. Select which barcode types you want the scanner to decode
by clicking on the checkbox next to each type. Click on the Apply button to apply
settings.
2) Click on the Detail tab. Here, you can change settings for each barcode type. Select
the barcode type by clicking on the pull-down list. Click on the Apply button to apply
settings.
Page 50

U
SE R GUI DE
50 / 75
3) Click on the Default tab. Here you can reset the scanner settings to factory default
settings by clicking on Load factory default (left). A pop-up window will appear asking
for confirmation (right).
Page 51

U
SE R GUI DE
51 / 75
GPS
Turn GPS on/off
1) Start > Settings > Control Panel. Then double-click on GPS Power icon.
2) Select GPS On (right pic) to turn GPS on, or GPS Off (left pic) to turn off GPS. Click on
the OK button in the top right corner to apply setting.
Page 52

U
SE R GUI DE
52 / 75
View GPS data
1) If you use your own GPS software, you only need to enable GPS in the Control Panel,
and set your software to receive data on COM6.
2) Start > Programs > Utilities > GPS. A test utility will appear (right).
3) To view GPS data using the test utility, click GPS Read Start button. GPS data starts
appearing very quickly.
Page 53

U
SE R GUI DE
53 / 75
4) Click on GPS Read Stop button to stop displaying the GPS data.
Page 54

U
SE R GUI DE
54 / 75
Camera
Turn Camera on/off
1) Start > Programs > Utilities > Camera. A test utility will appear (right).
2) Click on Open button to enable camera. Click on Close button to disable camera.
Page 55

U
SE R GUI DE
55 / 75
Using Camera utility
1) Click on the Setting button (left). Select screenshot capture resolution, image format,
and save location. Click on the OK button to save settings (right).
2) Click on the Preview Start button to activate camera. Click on the Preview Stop button
to stop the camera.
Page 56

U
SE R GUI DE
56 / 75
3) Use the slider bar to adjust display resolution (zoom in and zoom out).
4) Click on the Flash On button to turn on the LED flash (left). Click on the Flash Off
button to turn off the LED flash (right).
Page 57

U
SE R GUI DE
57 / 75
5) To make a screenshot, click on Capture button. The image file resolution, format, and
save directory are defined in Settings.
6) You can select an image filter by selecting from the Effect pull-down list. Preview of
the effect is displayed immediately (example: Sepia effect is selected in right image
below).
Page 58

U
SE R GUI DE
58 / 75
7) To adjust the image exposure rate manually, uncheck the Auto checkbox. Then use
the Exposure Rate slide bar to select your exposure. To avoid accidental change in
exposure, you can check the Lock checkbox to lock current setting.
8) To flip the image vertically, check the Vertical checkbox. To flip the image horizontally,
check the Horizontal checkbox.
9) Click on the Close button to deactivate camera module. Then click on the OK button
or X button to quit test utility.
Page 59

U
SE R GUI DE
59 / 75
Fingerprint scanner
Enroll Fingerprint
1) Start > Programs > Utilities > Fingerprint_Utility. A test utility will appear (right).
2) Click on Run… and select FingerPrint (left). The main utility page appears (right).
Page 60

U
SE R GUI DE
60 / 75
3) Click on the Enroll button to start fingerprint registration process (left). You will see a
new window. Click on the Enroll button on this screen (right).
4) Swipe the finger you want to register on the fingerprint scanner (on back of device).
To swipe correctly, please swipe finger downwards. A good swipe will display your
fingerprint with a message on top of screen (right). Four good swipes are required.
Page 61

U
SE R GUI DE
61 / 75
5) If swipe is bad, display will show messages as below.
6) Four good swipes are required. Enrollment is finished when you see pop-up window
with Success message (right). Click on the OK button in the pop-up window.
Page 62

U
SE R GUI DE
62 / 75
7) Enter a name to save the fingerprint. Click on the Save button to save. Pop-up
window appears for confirmation, click on Yes button to apply.
8) NOTE: Once you save fingerprint, you will need it each time you start the device. To
complete the fingerprint enrollment process, click on the Save-Exit button (left). You
will be back to the first interface (right). If you wish to enroll more fingerprints before
Save-Exit, click on Enroll button instead. Otherwise, you will need to swipe the saved
fingerprint next time, before you can enroll another fingerprint or delete a
fingerprint.
Page 63

U
SE R GUI DE
63 / 75
Delete Fingerprint
1) Click on the Enroll button (left). Since a fingerprint is already enrolled, you need to
swipe it before you can enroll another fingerprint, or delete existing fingerprint.
2) Click on the Delete button (left). Select which fingerprint you want to delete, then
click on the Delete button (right).
Page 64

U
SE R GUI DE
64 / 75
3) A pop-up window appears. Click the Yes button to confirm fingerprint delete.
4) Click on the Save-Exit button to finish.
Page 65

U
SE R GUI DE
65 / 75
Register Password
1) You can choose to password protect device instead of using fingerprint. At the bottom
of window, under Active LAP, select lap_pw. Click on the Set button. A pop-up
window will confirm setting (right).
2) Click on Enroll button to register password.
Page 66

U
SE R GUI DE
66 / 75
3) If you have not set a password yet, leave Old Password field blank. Enter your
password in New Password and Confirm password fields. To save, click on the OK
button on top right of window, or press the Enter key on the physical keypad.
4) You can also set password protection in Start > Settings > Control Panel > Password.
5) To delete password, simply change password to blank.
Page 67

U
SE R GUI DE
67 / 75
6) To quit utility, click on the OK button on top right of screen (left). Then click on the X
button (right).
Page 68

U
SE R GUI DE
68 / 75
A
CCESSORIES
Cradle
Testing COM port on cradle
1) Double-click on My Device to open Explorer window.
2) In the menu bar on top of the screen, select View> Options. A pop-up window
appears.
3) Uncheck box “Hide protected operating system files (Recommended)”
4) Click on the OK button in the pop-up window.
5) The Windows folder should have appeared in the Explorer window. Double-click on it.
6) Find and run the program Serialtest
7) Select the COM port, the baud rate, the click on the Connect button. You can test
simple operations such as Open/Read/Write.
Connect external scanner
1) Connect a scanner to the DSUB-9 connector on the cradle
2) In your own software, call function BSDK_SetSelExtUart12PortActive (the function is
located in the header file of PlatformDevSdkCmn.h)
3)
External scanner can be used now
Page 69

U
SE R GUI DE
69 / 75
Interface information of cradle
– DC jack
o Connector for AC adaptor
o Supplies cradle and device with power
– Spare battery charging slot
– USB-A connector
o USB host
o USB device (client) interface (for example USB memory)
– RS-232 DSUB-9 (male) connector
Pin# Pin name
Description
2 RXD_2 Ext. uart ch-2, input to device, RS-232C level
3 TXD_2 Ext. uart ch-2, output of device, RS-232C level
5 GND Ground terminal
9 5VDC 5Vdc 0.5A output of cradle, PowerSupply for external application
– 24-pin IO connector
Pin# Pin name Description
2 USBHP
USB-Host pin, data
3 USBHN
USB-Host pin, data
4 5VDC
5Vdc 0.5A output of CRADLE, PowerSupply for external
application
6 USBH_PWR
USB-Host pin, power output from DOTH-100
10 USBCN
USB-Device (client) pin, data
12, 19 GND
Ground terminal
13 RXD_2
ext. uart ch-2, input to DOTH-100, RS-232C level
14 TXD_2
ext. uart ch-2, output of DOTH-100, RS-232C level
15 USBCP
USB-Device (client) pin, data
16 V_USB_PC
USB-Device (client) pin, power input from USB-HOST such as PC
17 RXD_3
ext. uart ch-3, input to DOTH-100, RS-232C level
18 TXD_3
ext. uart ch-3, output of DOTH-100, RS-232C level
Page 70

U
SE R GUI DE
70 / 75
U
PGRADING THE
OS
There are 2 ways to upgrade the OS. You can upgrade using a microSD card, or upgrade by
connecting device to a PC via USB.
Please note, there are two types of OS image files. Do not install wrong OS as this may cause
unpredictable behavior on device.
– TKxxxxxxxxxxxxxxxxF.DI For devices with fingerprint
– TKxxxxxxxxxxxxxxxx.DI For devices without fingerprint
Upgrade using microSD Card
Use a microSD card formatted to FAT32.
1) Extract the OS file, and copy file to the root directory of microSD card. Please copy
correct OS image file depending on device hardware.
2) Insert microSD card into device.
3) Press and hold the Power button, and press the Reset pinhole button
4) Release the Power button only when you see the first screen with flowers
5) At the bottom of the screen, a message should appear: “Waiting for Downloading…”
6) Then “Reading Image In Card…”. This step will take around two minutes.
7) Then “Writing OS Image…”. This step will take around one minute.
8) Upgrade process is complete when you see message “Image Update Complete!”
9) Do a cold reset to reboot device (press Power and Reset at the same time)
10) Check new OS version number in Control Panel > System
Upgrade by PC through USB cable
To upgrade device from your PC, you need to install a device driver first.
Install device driver onto your PC
1) Copy the USB Download Utility into a folder on your PC. The files are:
dot180bulkusb.inf / dot170bulkusb.sys / USBDownLoad.exe
2) Plug device to computer using the USB cable provided
3)
Press and hold the Power button, and press the Reset pinhole button
Page 71

U
SE R GUI DE
71 / 75
4) Release the Power button only when you see the first screen with flowers
5) At the bottom of the screen, a message should appear: “Waiting for Downloading…”
6) On your computer, an alert will appear - Found New Hardware
7) Found New Hardware Wizard
8) Choose Install from a list or specific location(Advanced), then click on the Next button
Page 72

U
SE R GUI DE
72 / 75
9) Click on the Browse… button to locate your driver file(s)
10) Pass the Windows Logo Test by clicking on Continue Anyway button
11) Click on the Finish button.
Page 73

U
SE R GUI DE
73 / 75
Upgrade OS from PC to device
1) Remove microSD from device
2) If not done yet, please install the Device Driver (see previous section)
3) Copy the USB Download Utility into a folder on your PC. The files are:
dot180bulkusb.inf / dot170bulkusb.sys / USBDownLoad.exe
4) Press and hold the Power button, and press the Reset pinhole button
5) Release the Power button only when you see the first screen with flowers
6) At the bottom of the screen, a message should appear: “Waiting for Downloading…”
7) Using the provided USB cable, connect the device to your PC
8) On your PC, run the utility USBDownLoad.exe
9) Click on File Open and select the OS file on your PC. Or, you can also drag-and-drop
the OS file onto the Filename area.
10) Click on the Download button to start the OS upgrade. A progress bar will appear on
the PC utility. At the same time, device should show upgrade status.
11) When progress bar is finished, check device, it should say “Image Update Complete!”
12) Do a cold reset to reboot device (press Power and Reset at the same time)
13) Check new OS version number in Control Panel > System
Page 74

U
SE R GUI DE
74 / 75
A
PPENDIX
Device specifications
CPU Intel® Monahan™ PXA320 624 MHz
Operating System Microsoft Windows™ CE 5.0 Professional
Display 3.5” TFT LCD with touch screen, 260K color, 240*320
Memory 256M Flash, 128MB SDRAM
Communication WiFi 802.11b/g
Bluetooth 2.0 Class2
Telecom standards
(optional)
Quad-band GSM/GPRS
Printer 2” (58mm) thermal printer, 600 dots/sec (75mm/sec), Roll ф30, 10M
MSR (optional) ISO7811 – Track 1,2,3 support (Bi-directional)
IC card (optional)
ISO7816 – EMV2000 Level 1, 2 certified
(1 * ID-1 full size card-slot, 3 * ID-000 SAM slots)
Barcode scanner
(optional)
1D Laser
2D Imager
RFID (optional) Mifare 13.56MHz
GPS (optional) SIRFstar III
Camera (optional) 2 Megapixel with LED Flash
Fingerprint sensor
(optional)
Swipe electric field sensor, 128x8 pixels at 500ppi
Extension slot microSD card (supports SDHC)
Interface USB 1.1 Host and Client
Other Earphone / Microphone jack
Speaker
Integrated Microphone
Vibrator motor
Environmental
Operating temperature: 0° C to 40° C
Storage temperature: -20° C to 60° C
Battery Rechargeable Li-ion battery 7.4V 1800mAh
Power adaptor
Input: 100V to 240V AC 50/60Hz 1.2A
Output: 9.5V DC 3A
Dimensions (W*L*H)
76.2 * 220 * 37 mm
Weight Full feature model 545g (including battery)
Page 75

U
SE R GUI DE
75 / 75
Cradle
RS-232 Serial port
USB port
Spare battery charging slot
Accessories Hand strap
Leather carrying case with shoulder strap
Environmental specs
– Drop test 1.2m on concrete floor (6 sides, 10 times each)
– Operation temp: -10 ~ 50 ° C
– Storage temp: -20 ~ 60°C
– Humidity: 25°C, 50%R.H.
40°C, 30%R.H.
60°C, 95%R.H.
25°C, 50%R.H.
Supported Bluetooth profiles
– Bluetooth HS/HF and Audio Gateway Service
Supports the Headset Profile (HSP) and the Hands-Free Profile (HFP) by using the Audio
Gateway Service
– Bluetooth LAP (LAN Access Profile) and Configuration Utility
– Bluetooth PAN (Personal Area Network)
– SPP (Serial Port Profile)
Supported RFID types
– Mifare 13.56MHz
 Loading...