

Page 1

M1-POS User Manual
Page 2

2
User Guide & Copyright
The information in this document is provided “as is” without warranty of any kind,
including, but not limited to, the implied warranties of merchantability and fitness
for a particular purpose, and is subject to change without notice for improvement of
the product.
This document contains proprietary information that is protected by copyright. No
part of this document may be photocopied, reproduced, or translated to another
language without the prior written consent of Partner Tech Corp.
This User Guide is basically available for those who are familiar with Windows OS.
You can refer to your PC manual or User guide for further information on PC
operation.
Programs included in the product are protected by copyright. No programs may be
produced, remade, or translated to another language without the prior written
consent of Partner Tech Corp.
Microsoft, ActiveSync, Windows, the Windows logo and Windows CE logo are
either registered trademarks or trademarks of Microsoft Corporation in the United
States and /or other countries. License of Microsoft Products OEM is offered by
Microsoft Licensing Inc.
All other product names mentioned herein may be trademarks of their respective
companies.
ⓒ2007 PARTNER TECH CORP. CO.,LTD
Tel: 886-2-2918-8500
Page 3

3
Contents
1. Contents of the Box
2. Getting Started
3. Precautions
4. Printer
5. Card Reader
6. Bar-code Reader
7. Wireless LAN
8. Connection to a Computer
9. Setting and Optimizing
10. GSM Dial-up Setting
Page 4

4
1. Contents of the Box
1-1 Components and Peripherals
Confirm that the main component and peripherals are all included.
M1-POS (main component) ACAdapter
Battery Stylus pen
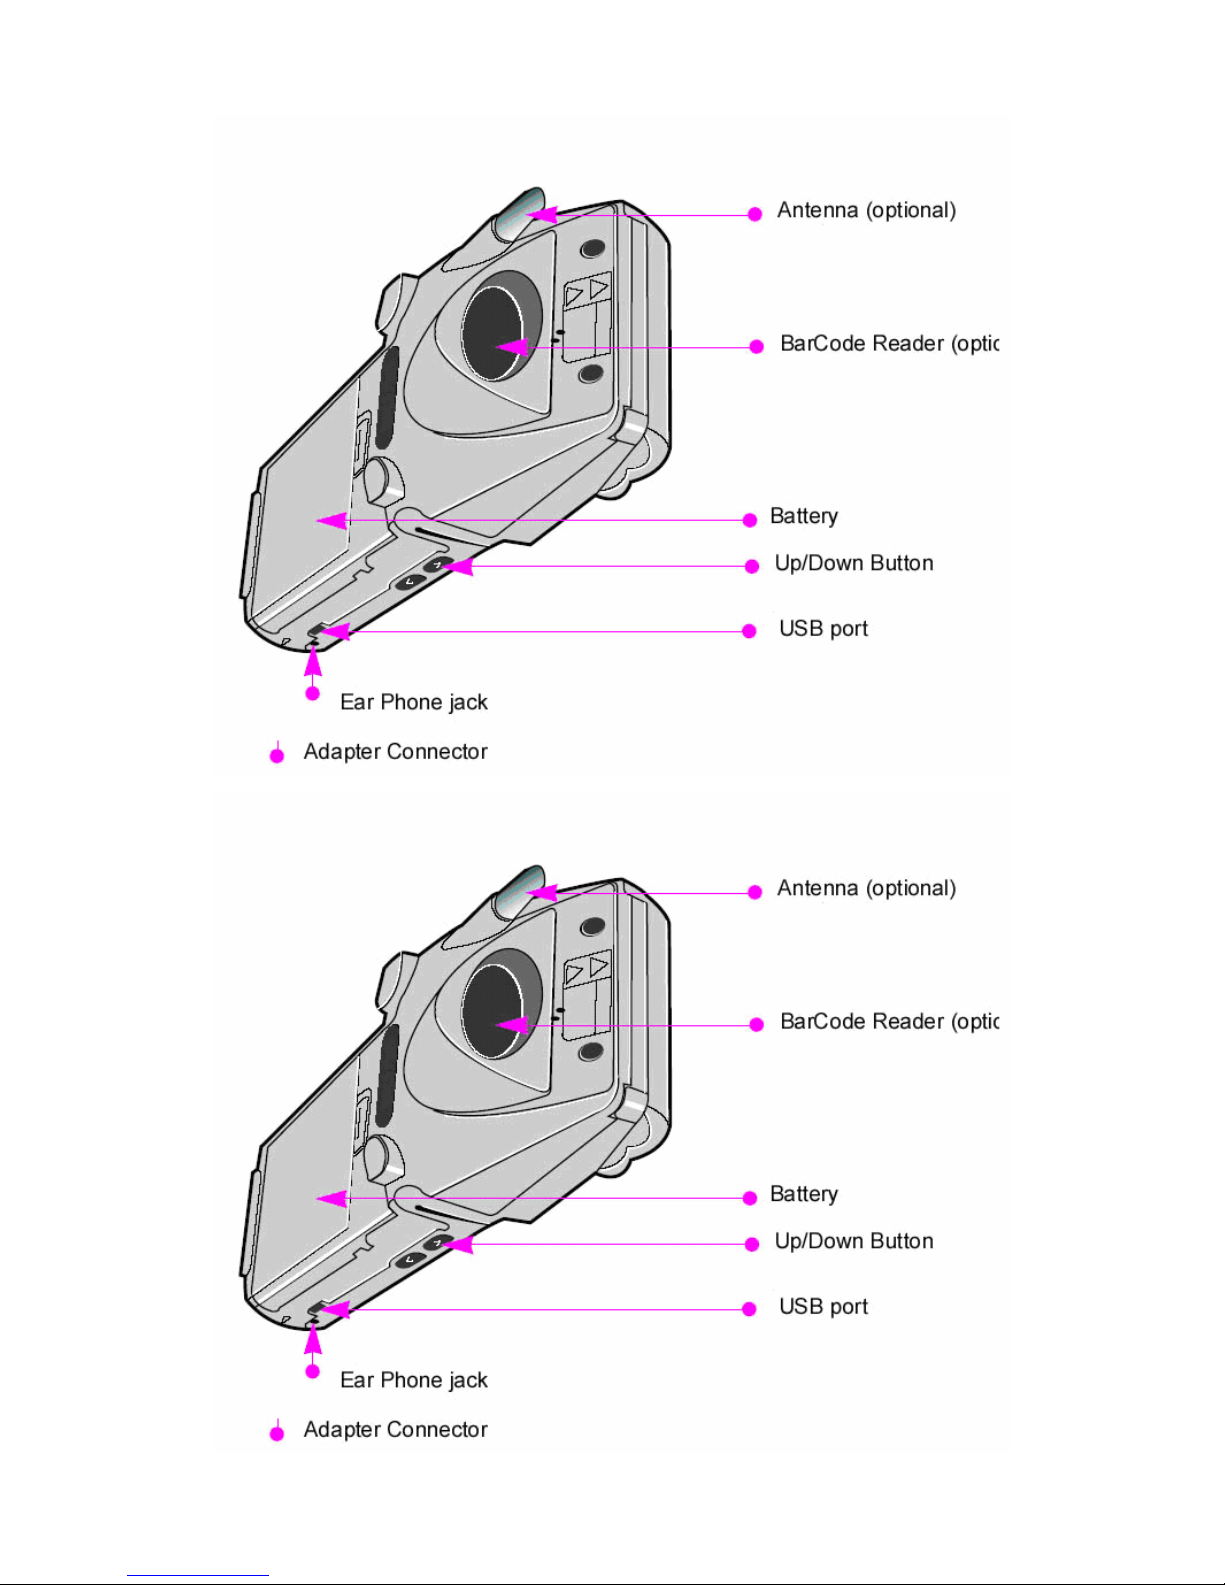
1-2 Overview
See pictures below and check how it works.
Page 5
5
Page 6

6
1-3 Hardware Specifications
System Feature M1-POS
OS
MMiiccrroossooffttWWiinnddoowwssCCEE55..0
0
CPU
IInntteellPPXXAA227700552200MMHHz
z
Memory
3322MMBBNNOORR,,6644MMBBNNAANNDD((uuppttoo225566MMBB))//112288MMBBSSDDRRAAM
M
((uuppttoo112288MMBB)
)
Display
332200xx224400,,33..55””226600KKccoolloorrTTFFTT--LLCCDDwwiitthhTToouucchhSSccrreeeen
n
Battery
33880000mmAAhhLLii--iioonnrreecchhaarrggeeaabbllee((DDeettaacchhaabbllee)
)
Keys
1122nnuummeerriicckkeeyy&&FFuunnccttiioonnaallkkeeyysswwiitthhLLEEDDLLiigghhttiinng
g
Indication
44LLEEDDss((GGRRPPSS//GGSSMM,,WWLLAANN,,CChhaarrggiinngg,,PPrriinntteerr))&&BBuuzzzzeer
r
I/O
UUSSBB//SSeerriiaall,,IIrrDDAA,,SSppeeaakkeerr,,SStteerreeooEEaarr--mmiiccjjaacckk,,DDCCjjaacck
k
Dimension
33..0000""((7766..22mmmm))xx88..7744""((222222mmmm))xx11..4466""((3377mmmm)
)
Weight
440000g
g
Communication
880022..1111bb//ggWWiirreelleessssLLAANN&&GGSSMM//GGPPRRS
S
Card reader
TTrraacckk11,,22,,33..((oorrJJIISS--22))BBii--ddiirreeccttiioonnaall.
.
Printer
22""TThheerrmmaallPPrriinntteerrbbuuiilltt--iinn;;SSppeeeedd::7700mmmm//sseecc.
.
11..1188""((3300mmmm;;ddiiaammeetteerr))ppaappeerrrroollll.
.
Barcode Scanner (option)CCllaassss22LLaasseerrpprroodduucctt
※ LED indicators
Upper left: GSM/GPRS communication
Down left: WLAN communication
Upper right: Power & Charge indicator
Down right: Printer active
Cradle right: Power & Charge indicator
Cradle left: Battery Charge Indicator
2. Getting Started
2-1 Power ON/OFF
Push ‘Power’ to turn power on.
While power is on, press and hold power button to turn off backlight.
2-2. Battery Charge
A. Install/Remove
Page 7

7
Install the battery: While hold up ‘Release latch’, gently push battery to the slot.
Remove the battery: While hold up ‘Release latch’, hold grooves both sides with
fingers and full to remove the battery.
B. Charge the Battery
Charging with the battery installed
① Plug theA/C adapter into the power connector.
② Place the device on the universal cradle.
Charging the battery alone
- Place the battery downward to the charging connector on the Re-charger.
Battery indicator shows you three states of the battery below.
Charging
Fully Charged
Low Battery Indicator
Caution!
• Do not force to plug the device to I/O connector. It can be damaged.
• Charging with the battery installed: The battery indicator shows the battery status.
<LED indication>
Charging: red
Fully charged: green
2-3. Reset & Hard Reset
When system does not work properly, or does not response, press RESET button by
the stylus pen. You will lose unsaved files and every programs opened will closed. It
is same as RESET on Desktop. It is called ‘RESET’.
Press RESET button with pressing and holding down-left button and down-right
button. Then release RESET button and release others. Your device turns back to the
default setting. Your device loses every program, documents, and options saved in
RAM. It is called ‘HARD RESET’.
Before HARD RESET, you should try RESET to recover your device. Do not try
HARD RESET indiscreetly. HARD RESET does not delete files and documents in
FileBox folder. Back up important data to FileBox folder. When FileBox folder is
full, you can buy additional SD/MMC Cards for back-up.
Page 8

8
3. Precautions (Guidelines for Safe and Efficient Use)
3-1. Product precautions
1). Fully be aware of User Guide and Safety directions before use your product.
2). Only use included or recommended accessories. Partner Tech Corp. is not
responsible for using not authorized accessories.
3). Stay away your eyes from Bar-code reader.
4). Turn off your mobile phone before removing the battery.
5). Do not attempt to disassemble or modify your product. It can cause fire, injury,
electric shock and other damages to you and your product.
6). Do not use your product in an area where a potentially explosive atmosphere
exits.
7). Do not use when it storms or lightning.
8). Do not use in the pool, bathroom or where are wet. And do not deal with it with
wet hands not to be gotten electric shock.
9). Do not leave your product in hot or cold places, such as in a car. Direct rays of
the sun can also cause harmful influences on your product.
10). Keep out of pets and children's reach.
11). Use only designated battery charger. Other chargers may not be designed to the
same safety and performance standards.
12). Do not use your product near medical equipment, when in, or around aircraft,
and when you driving.
13). Do not expose your product to the security inspection in the airport.
14). Do not use it in high and humid temperature. It can harm your device severely.
15). Do not drop, throw or try to bend your product. It can cause serious damages.
Use the leather case for protection.
16). Charge the battery fully before the initial use.
3-2. Directions for ActiveSync
A. At Initial Use
① Delete existingActiveSync.
② Install Active Sync 3.8 or later version.
B. Appearing "unknown device" dialogue with USB port plugged.
Page 9
9
① It can happen when you turn on your device with it is docked on the cradle.
② Undock your device from the cradle and dock it again.
C. Stopping at 'Connecting' status
① Undock your device from the cradle.
② Tap File -> Connection settings. Uncheck "Allow USB connection with this
desktop computer" and then tap OK.
③ Tap File -> Connection Settings. Re-check "Allow USB connection with this
desktop computer" and then tap OK.
④ Dock your device on the cradle.
D. Several failure and 'Unknown Hardware Device' icon in PC tray.
①
Undock your device from the cradle and reboot your PC. Then dock your device ag
ain.
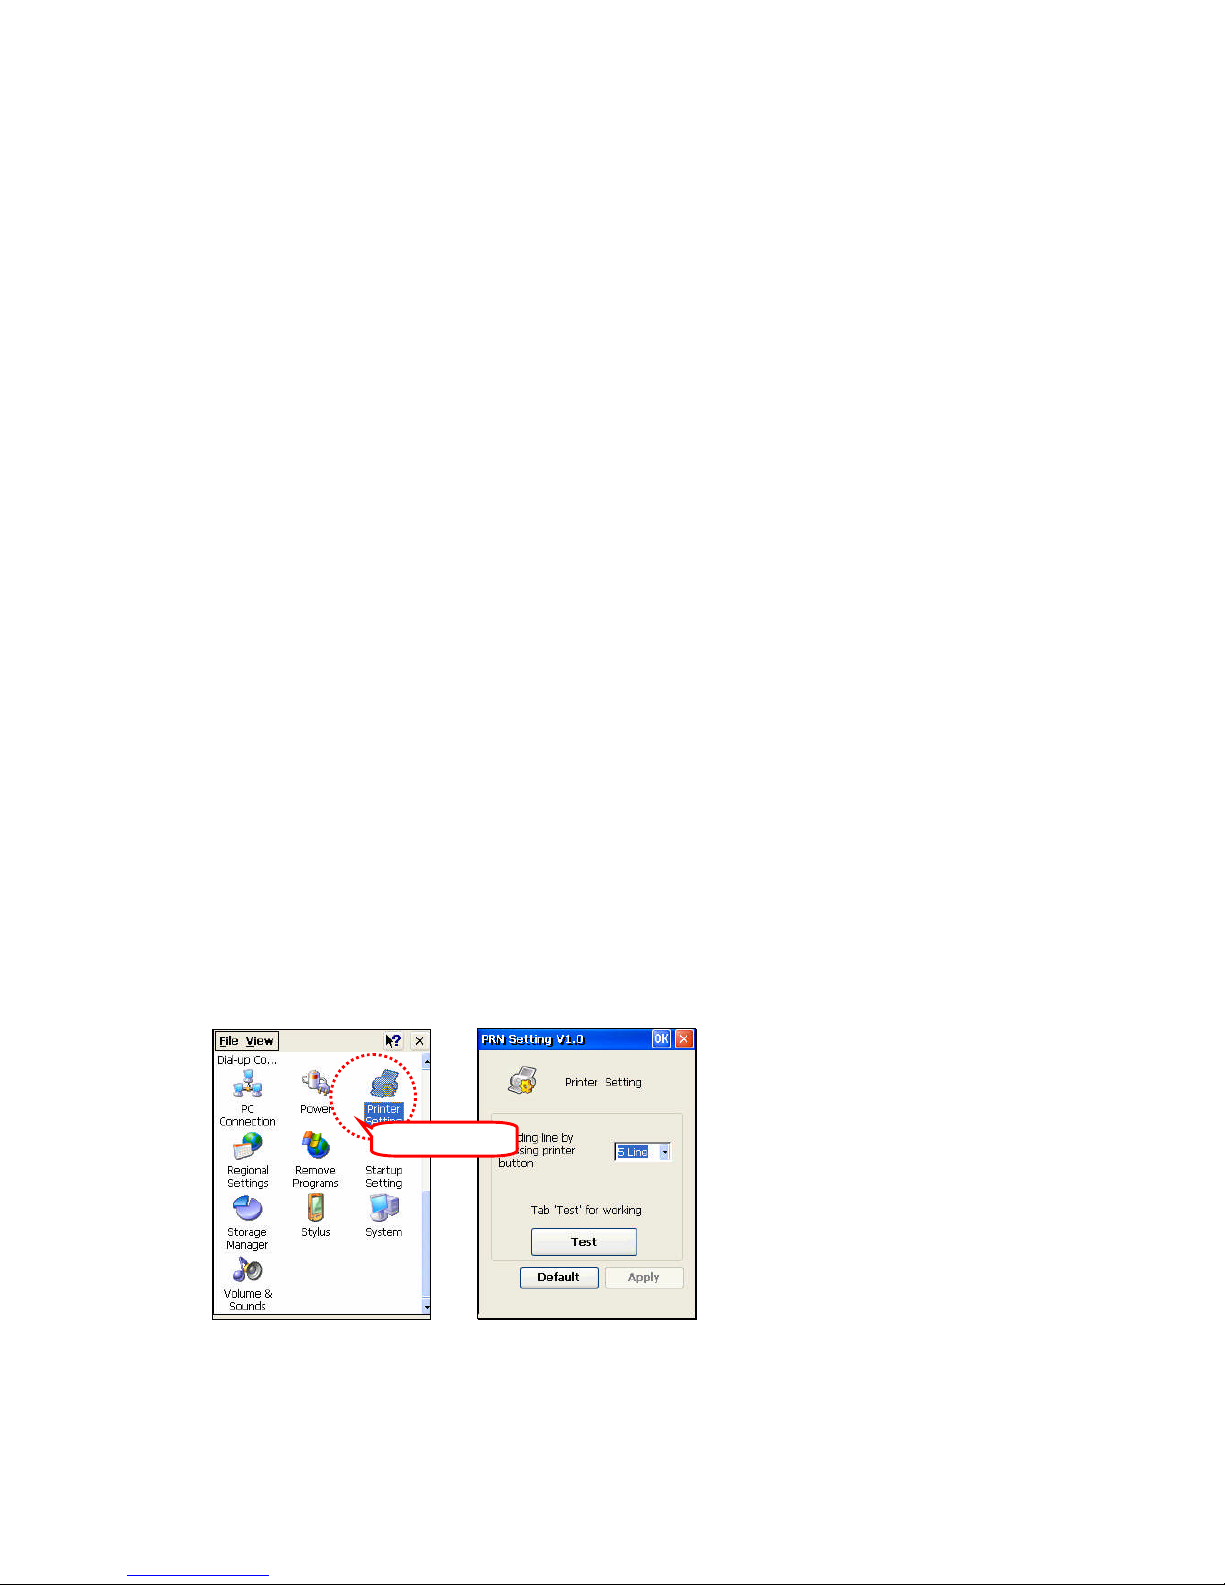
4. Printer
4-1. Printer Setting
Start > Setting > Printer Setting
4-2. Printer Test
A. Printer Test Process
Tap Test to check the operation on setting window
B. Paper Inserting
Double Click!
Page 10
10
Open the paper cover and insert papers
C. Paper Feeding
Press and hold Print button to feed paper without printing.
D. LED
Printing: Blue lighting
Paper Deficiency/Error: Blinking
※
In case of using other programs, please ask the production company of each programs.
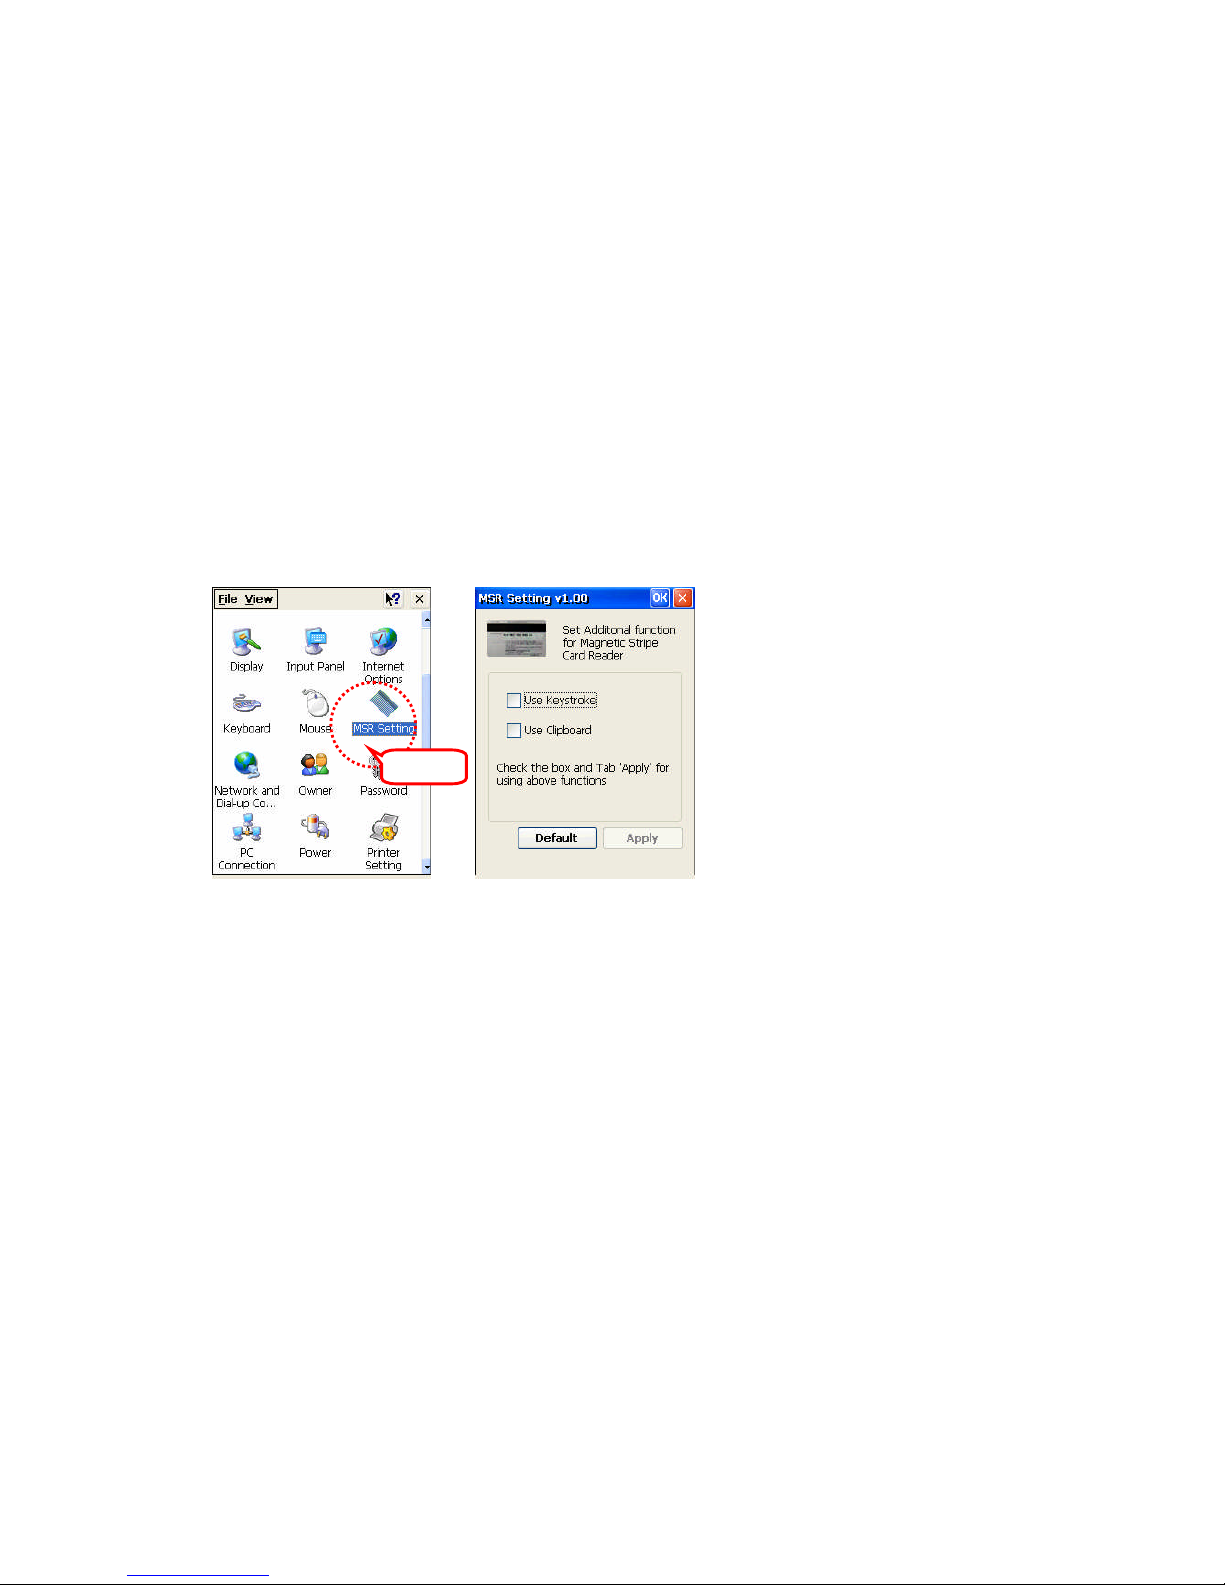
5. Card Reader
5-1. Card Reader Setting
Start > Setting > MSR setting
5-2. Card Reader Test
Card Reader Test Process
① Open new memo in Word Pad.
② Read the magnetic stripe of a card to the end of it. Any direction is OK.
③ The result will be shown on new memo.
※
In case of using other programs, please ask the production company of each programs.
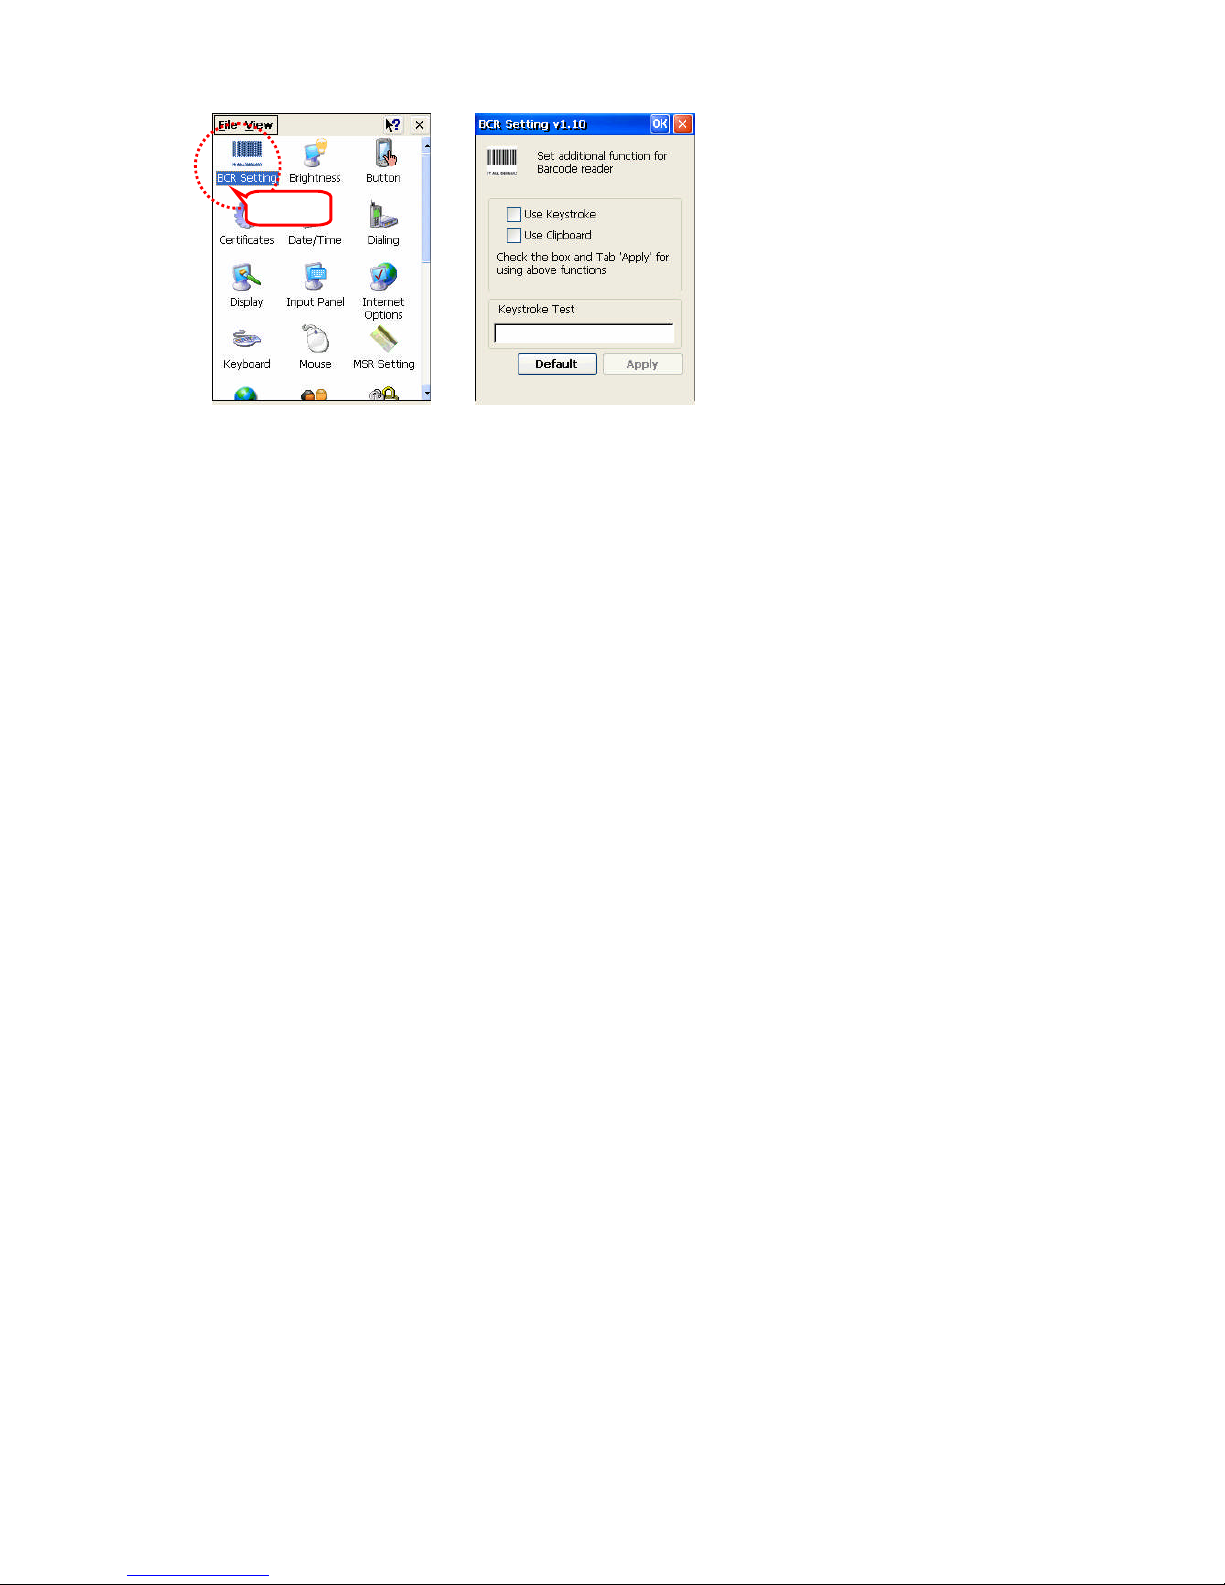
6. Bar-code Reader
This is optional function. There can be products that have no Bar-code reader.
6-1. Bar-code Reader Setting
Start > Setting > BCR Setting
Click !
Page 11
11
6-2. Bar-code Reader Test
Bar-code Reader Test Process
① Open Word pad
② Open new memo
③ Press Bar-code button to scan Bar-code.
④ The result will be shown on new memo.
※ In case of using other programs, please ask the production company of each
programs.
7. M1-POS W-LAN Setting Manual
M1-POS W-LAN setting manual is described based on Full O.S Version.
7-1 Boot the M1-POS and start setting W-LAN.
Click !
Page 12
12
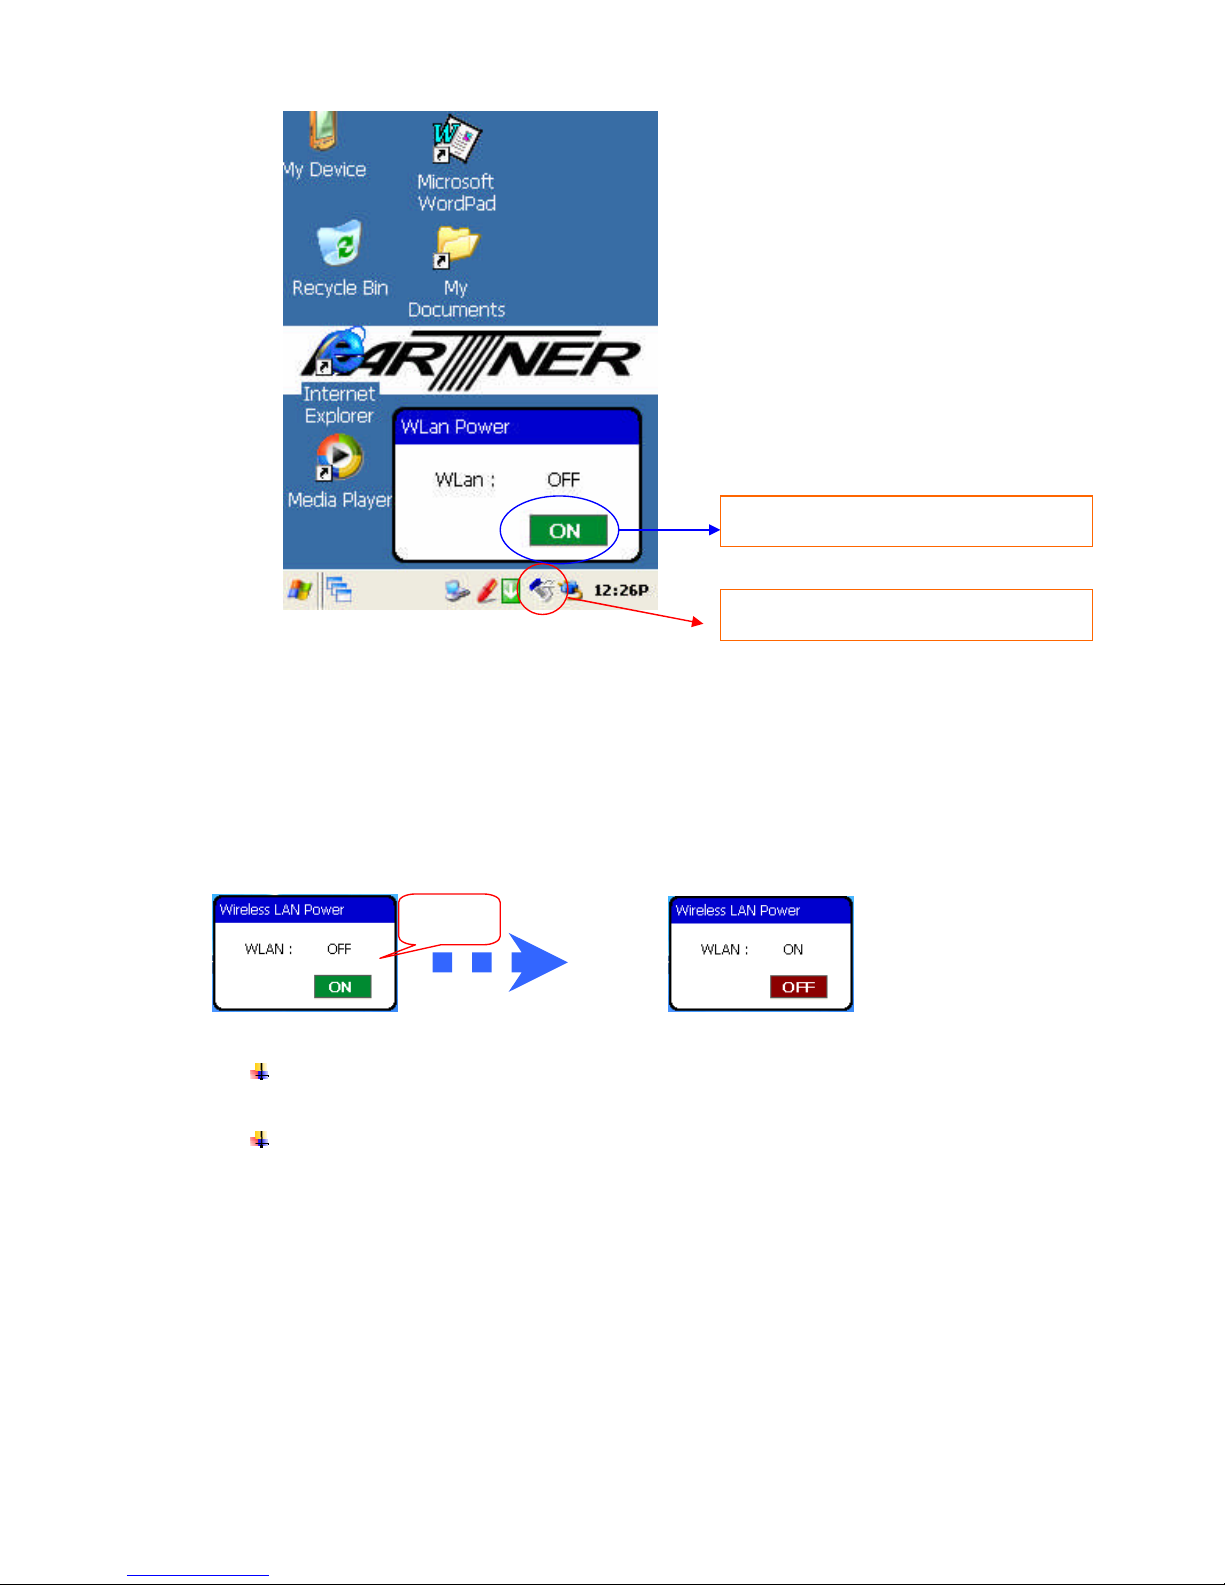
7-2 Click WLAN icon (①).
7-3 Click “ON” in “ Wireless LAN Power” (②).
7-4 WLAN is now “ON”.
If W-LAN is applied to O.S, it automatically turns on the W-LAN Power.
(Optional)
Otherwise, turn on W-LAN Power described as above for proper use.
7-5 If W-LAN Power is ON, Zero-Config Icon (③) is created and W-LAN is available.
W-LAN Power is “ON”, but “Network “is not connected.
② Run W-LAN Power ON ( OFF)
① Open W-LAN Power ON/OFF window
CLICK !!
Page 13

13
7-6 Double-click Zero-Config icon (③) and go to “ SWLD23NI “ setting window.
7-7 In “Wireless Information” menu, check “A.P Environment” for A.P connection,”
“Advanced setting”, and “Network LOG”.
③ Zero-Config icon: W-LAN Power is “ ON”, but “ Network “ is not
connected.
:
1. W-LAN Power ON
2. Network : Not connected
1. W-LAN : Power ON
2. Network : connected
A.P & POS device are connected through SSID and can
communicate in network.
I.P Information
-I.P Address
-Subnet Mask
-Default Gateway
W-LAN Card setting condition.
For I.P setting, refer the manuals .
Details…
- Check W-LAN Card setting and detailed contexts.
Network Connection Details
- Display setting details of Network.
- Physical Address, DHCP Server , DNS Server..
CLICK !!
Page 14

14
7-8 Wireless Information Menu Descriptions
Add New…: Display availableAP Lists in Network.
Status: AP connection status in Network.
Signal Strength: Display RF signal strength
Signal strength is divided into 6 steps from Strongest to weakest.
Notify when new networks available:
When checking the Check Box, new available Network is shown in AP lists.
Although Wireless Information window is closed, if new AP is available,
wireless information runs.
Connect: connect to the AP
Advanced: “ Advanced Wireless Settings “
Delete AP in Network or use advanced setting menu.
LOG: “Wireless Network LOG “ A.P in Network or check logged MAC
Address.
7-9 Choose Setting> Network and Dial-up Connections for IP Setting of W-LAN Card.
Page 15

15
7-10 Select SWLD23N1 to go to I.P or Server I.P setting window.
Page 16

16
7-11 Network Certification Key setting window: Set if Network certification server is
not used
7-12 Network Certification Key Use setting Window: set if Network certification
server is used
Obtain an I.P Address via DHCP:
- For DHCP setting
- DHCP (Dynamic Host Configuration Protocol)
Specify an IP Address:
- Set assigned I.P address
- Set Subnet Mask in the Network
- Set Default Gateway
Click “ OK”, and finish IP setting.
“Name Server “
- DNS (domain name system) Setting
- WINS (Windows Internet Naming Service)
Setting
Network Key Setting
-this is an ad hoc network: Check Box- not checking
-encryption: WEP setting
-Authentication: WPA-PSK setting
Network Key: Characters or numbers setting
Network Key A.P Setting
-Set certification key usage in AP
-Check certification key usage for each AP
Page 17

17
Network Certification Key Use improves security by encryption.
When using Network Certification Key, it reduces system errors from external
interference of W-LAN.
7-13 Network Connection Test can be done through IP Ping Test.
Select Start > Programs > Command Prompt.
Network Certification Server Setting
-this is an ad hoc network: Check Box - checking
-encryption: WEP Setting
If WPA-PSK is set, it is changed to TKIP automatically
-Authentication: WPA-PSK Setting
Network Key : Characters or numbers setting
Network Key A.P Setting
-Set certification key usage in AP
-Check certification key usage for each AP
CLICK !!
Page 18

18
7-14 In Command Prompt, type I.P Address for ping test.
7-15 Network status check with Internet Explorer
After Network setting, Internet explorer can be used to check Networking
status
Fixed I.P: type assigned PDA I.P address, Network key and connect
DHCP: set DHCP and connect. (if Network key uses, type it and connect)
If Internet explorer is not exist, do Ping Test for Networking status
For page reload, window pause or change delay depends on the network
environment or numbers of W-LAN in AP
For each A.P, Proper W-LAN numbers are below 13 EA (check environment
Ping Test
- ping 211.233.226.195 –t >a.txt
ping 211.233.226.195 : I.P for test
-A.P , POS Server ,VAN Server, IIS Server ..etc
-t : for continuous test
To stop Ping Test: “CTRL” +”C”
>a.txt : store ping test results to text file
a.txt file is in my computer and can be checked with
WORDPAD.
Ping Test results are used for “RF” pause in network, or
network status for AP or server.
Page 19

19
for A.P model)
At least 2 EA AP setting environment is needed for roaming from one AP to
the other.
7-16 Normal Internet explorer window
7-17 W-LAN Network Environment
If the PDA is used W-LAN environment, environmental factors are very important on
A.P Setting condition (Channel Power, Roaming condition) or Network Server (IIS
Server, VAN Server).
When applying fields in PDA, you should set the network environment at the same
time.
8. Connection to a Computer
Using Microsoft ActiveSync, you can synchronize the information on your personal
computer with information on your M1-POS. Synchronization compares the data on
your PDA with your personal computer and updates both devices with the most recent
information
To establish a partnership with a PC, you need to install Microsoft ActiveSync on your
PC.
8-1. ActiveSync Installation
Minimum Requirements for MicrosoftActiveSync 3.8 (or 4.2 version) Installation
Page 20

20
√ Microsoft
Windows XP, 2000, ME, Windows NT Workstation 4.0 with SP6 or later, or
Windows 98
√ Microsoft Outlook 98 or later required for synchronization to the desktop or
portable computer of e-mail, calendar, contacts, tasks, and notes. (Outlook 2003 is
recommended)
√ Microsoft Internet Explorer 4.01 SP1 or later
√ Hard-disk drive with 12 to 65 MB of available hard-disk space (actual
requirements will vary based on selection of features and user's current system
configuration)
√ Available 9- or 25-pin communications port (adaptor required for 25-pin
communications port), infrared port, or USB port
(available for Windows 98,
Windows Me, Windows 2000, and Windows XP only)
√ VGA graphics card or compatible video graphics adapter at 256 color or later
√ Keyboard
√ Microsoft Mouse or compatible input device
MicrosoftActiveSync 3.8 (or 4.2) Installation Environment and Necessary Files
√ Microsoft ActiveSync 3.8 install file : MSASYNC380_E.EXE
- Download URL :
https://www.microsoft.com/windowsmobile/downloads/eula_activesync38_1033.mspx?producti
d=2
√ PC OS :
Microsoft Windows XP Professional Version 2002 Service Pack 2
Page 21

21
8-2 Click the "Next"
8-3 ActiveSync will be installed in the folder, and it displays required space and available space.
You can specify the different folder by selecting Change button. And click “Next > “ to go next
step.
Page 22

22
USB
USB
8-4 Connect the M1-POS with USB cable -> connect USB cable to PC -> turn on M1POS, and click “Next”.
=============================================================
How to connect the M1-POS with the USB cable
① Connect the M1-POS Mini USB Port to the USB 1 Cable
② Connect the M1-POS to the Cradle, and connect the Cradle USB Port to the
USB 2 Cable
√ color of USB Cable
may be changed.
=============================================================
Page 23

23
8-5 Checking the Port to recognize the M1-POS. click “Next” to proceed.
=============================================================
√ If connection failed between the M1-POS and PC, follow the steps below.
- Copy wceusbsh.inf, wceusbsh.sys files from C:\Program Files\Microsoft
ActiveSync\drivers, and paste them in C:\WINDOWS\system32 and
C:\WINDOWS\system32\drivers.
If changed the specified folder by using “change” button during installation, the files
will exist in user-defined folder in \driver
=============================================================
Page 24

24
8-6 Select “Yes” or ”No” for setting up a partnership between PC and M1-POS, click
“Next”
to go to next.
=============================================================
If selected “Yes”
.
– Synchronization will be made between M1-POS and PC, so that can keep up to
date for Outlook Data such as Calendar, Contacts, Mail etc, and user usually sets
up a partnership with her or his main PC.
If selected “No”.
- Program add/remove and file copy/move are only allowed between M1-POS and
PC.
If selected “No”, warning screen pops up and connected with a Guest, therefore, select
“Yes” to explain further.
=============================================================
Page 25

25
√ Connected screen with not setting up the partnership
8-7 Synchronization setting options appeared; you can select “Settings” to set it for
detailed synchronization. Or you can make it later, and click “Next” to go on.
Page 26

26
8-8 ActiveSync setup completed. Select “Finished” button and ActiveSync will be
started, and synchronization with items selected above will be performed.
8-9 ActiveSync process is done and screen is displayed.
=============================================================
- If it is the first synchronization, follow the process described above and use it. If
existing partnership is gone or wants to have new partnership, the following screen
will be appeared
The name of M1-POS is already existed as Mobile device, therefore, provide new
name and press “Next”, then synchronization will be done with new name.
=============================================================
9. Device Setting and Optimizing
9-1. Display
Page 27

27
Background image Backlight time-out
9-2. Brightness level
9-3. Stylus Setting
When stylus does not operate correctly, you can tap Re-Align to revise the coordinates.
Double Click !
Double Click !
Double Click !
Click !
Page 28

28
Tap Align for revision.
9-4. System
Basic system information Storage memory & Program memory setting
9-5. Internet Option
Double Click !
Page 29

29
Double Click !
Page 30

30
9-6. Storage management (SD/MMC formatting)
Tap Property Tap Isolation
Option is needless to change. Tap Start to start formating. Check 'Quick format' to
format quickly.
PART00 * : '*' means that
SD/MMC is mounted on the
system. To format the storage,
you need to isolate it.
Loaded SD/MMC disjunction
Double Click !
Click !
Click !
Click !
Check !
Click !
Page 31

31
Tap Mount. (Otherwise, you cannot see it in File explorer.)
9-7. Power
Choosing Sleep status.
Showing Device status
Click !
Double Click !
Page 32

32
9-8. Memory
You can use two kinds of memory for M1-POS(Built-in RAM and SD Card).
1) Built-in RAM(Random-Access Memory)
RAM is volatile memory divided into Storage memory and Program memory and OS
assigns the proportion. But, OS may not control memories in case there's not enough
memory space. If you encounter the message Storage or Program memory shortage,
follow directions below.
※ How to free Storage memory?
- Move needless files and programs to Web folder. Files in the folder do not use storage
memory.
- Buy additional SD Card and move files to a SD Card.
- Delete unnecessary files.
- Delete temporary internet files for the Offline browsing in File Explorer.
- Remove programs you no longer use.
※ How to free Program memory
- Stop programs you are not currently using. Most programs are automatically closed
but it
often does not work.
- As explained above, free storage memory. Empty storage memory can be assigned as
program memory.
- Undock the device from the cradle and remove SD Card.
2) SD(Secure Digital) Card
SD Card is a small and removable flash memory that allows you to store more data.
You can back-up important data and transfer big-sized data to other devices. SD Card
is available in many electronic product shops.
10. GSM DIAL-UP SETTING
10-1 Step 1
- GSM_control.exe program > GSM module to POWER “ON”
Page 33

33
10-2 Step 2
- Start > setting > network and dial-up connections > select “make new connection
“
10-3 Step 3
- Device properties > port settings
Page 34

34
-
10-4 Step 4
- Device properties > call options setting
10-5 Step 5
- PT properties > phone number setting >”OK”
Change to NONE
Page 35

35
10-6 Step 6
- Start > setting > network and dial-up connections >select “ my connection “
10-7 Step 7
-PT status > dialing
Page 36

36
10-8 step 8
- TEST finish
Page 37

37
 Loading...