

Page 1

K3000 EL
Operator ′ s manual
Please read the operator’s manual carefully and
make sure you understand the instructions before
using the machine.
Page 2
2 –
English
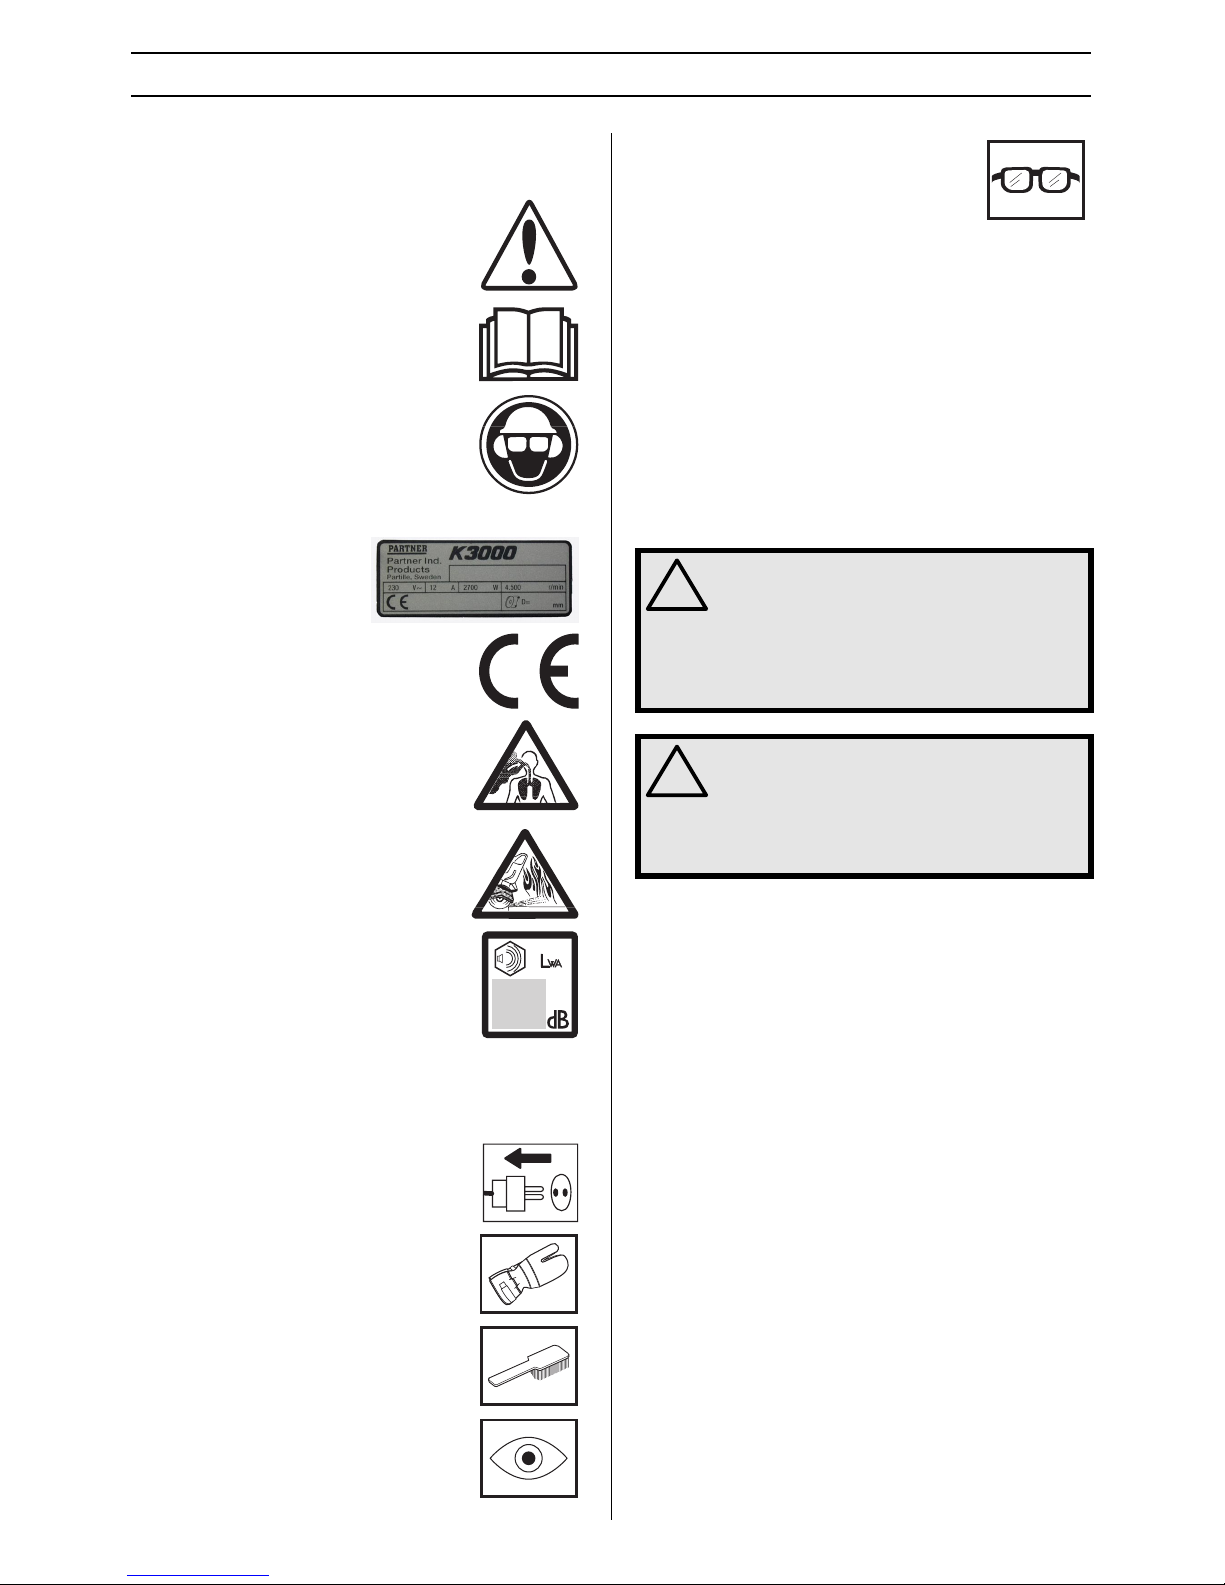
KEY TO SYMBOLS
Key to symbols
WARNING! The machine can be a
dangerous tool if used incorrectly or
carelessly, which can cause serious or fatal
injury to the operator or others.
Please read the operator’s manual carefully
and make sure you understand the
instructions before using the machine.
Always wear:
• Approved protective helmet
• Approved hearing protection
• Protective goggles or a visor
Rating plate
This product is in accordance
with applicable EC directives.
WARNING! Dust forms when cutting, which
can cause injuries if inhaled. Use an
approved breathing mask. Always provide
for good ventilation.
WARNING! Sparks from the cutting blade
can cause fire in combustible materials
such as: petrol (gas), wood, dry grass etc.
Noise emission to the environment
according to the European Community’s
Directive. The machine’s emission is
specified in chapter Technical data and on
label.
Other symbols/decals on the machine refer to special
certification requirements for certain markets.
Inspection and/or maintenance should be
carried out with the motor switched off and
the plug disconnected.
Always wear approved protective gloves.
Regular cleaning is required.
Visual check.
Protective goggles or a visor must be worn.
Steps before using a new power
cutter.
• Please read the operator’s manual carefully.
• Check the cutting blades mounting, see the chapter
”Assembly”.
• Check that the cord and extension cord are intact and in
good condition.
• Do not use a rolled up extension cord
Let your Partner dealer check the power cutter and make
essential adjustments and repairs.
!
WARNING! Under no circumstances may the
design of the machine be modified without
the permission of the manufacturer. Always
use genuine accessories. Non-authorized
modifications and/or accessories can result
in serious personal injury or the death of the
operator or others.
!
WARNING! Use of products which cut, grind,
drill, sand or shape material can generate
dust and vapors which may contain harmful
chemicals. Know the nature of the material
being worked on and wear appropriate dust
mask or respirator protection.
Page 3

English
– 3
CONTENTS
Contents
KEY TO SYMBOLS
Key to symbols ............................................................. 2
Steps before using a new power cutter. ....................... 2
CONTENTS
Contents ...................................................................... 3
SAFETY INSTRUCTIONS
Personal protective equipment ..................................... 4
Machine ′ s safety equipment ........................................ 4
Checking, maintaining and servicing the machine ′ s
safety equipment .......................................................... 5
General safety precautions .......................................... 5
General working instructions ....................................... 6
Cutting blades .............................................................. 8
WHAT IS WHAT?
What is what on the power cutter? ............................... 10
ASSEMBLY
Fitting the cutting blade ................................................ 11
Blade guard ................................................................. 11
STARTING AND STOPPING
Starting and stopping ................................................... 12
MAINTENANCE
Maintenance ................................................................ 13
TECHNICAL DATA
Cutting equipment ........................................................ 15
EC-declaration of conformity ........................................ 15
Page 4
4 –
English
SAFETY INSTRUCTIONS
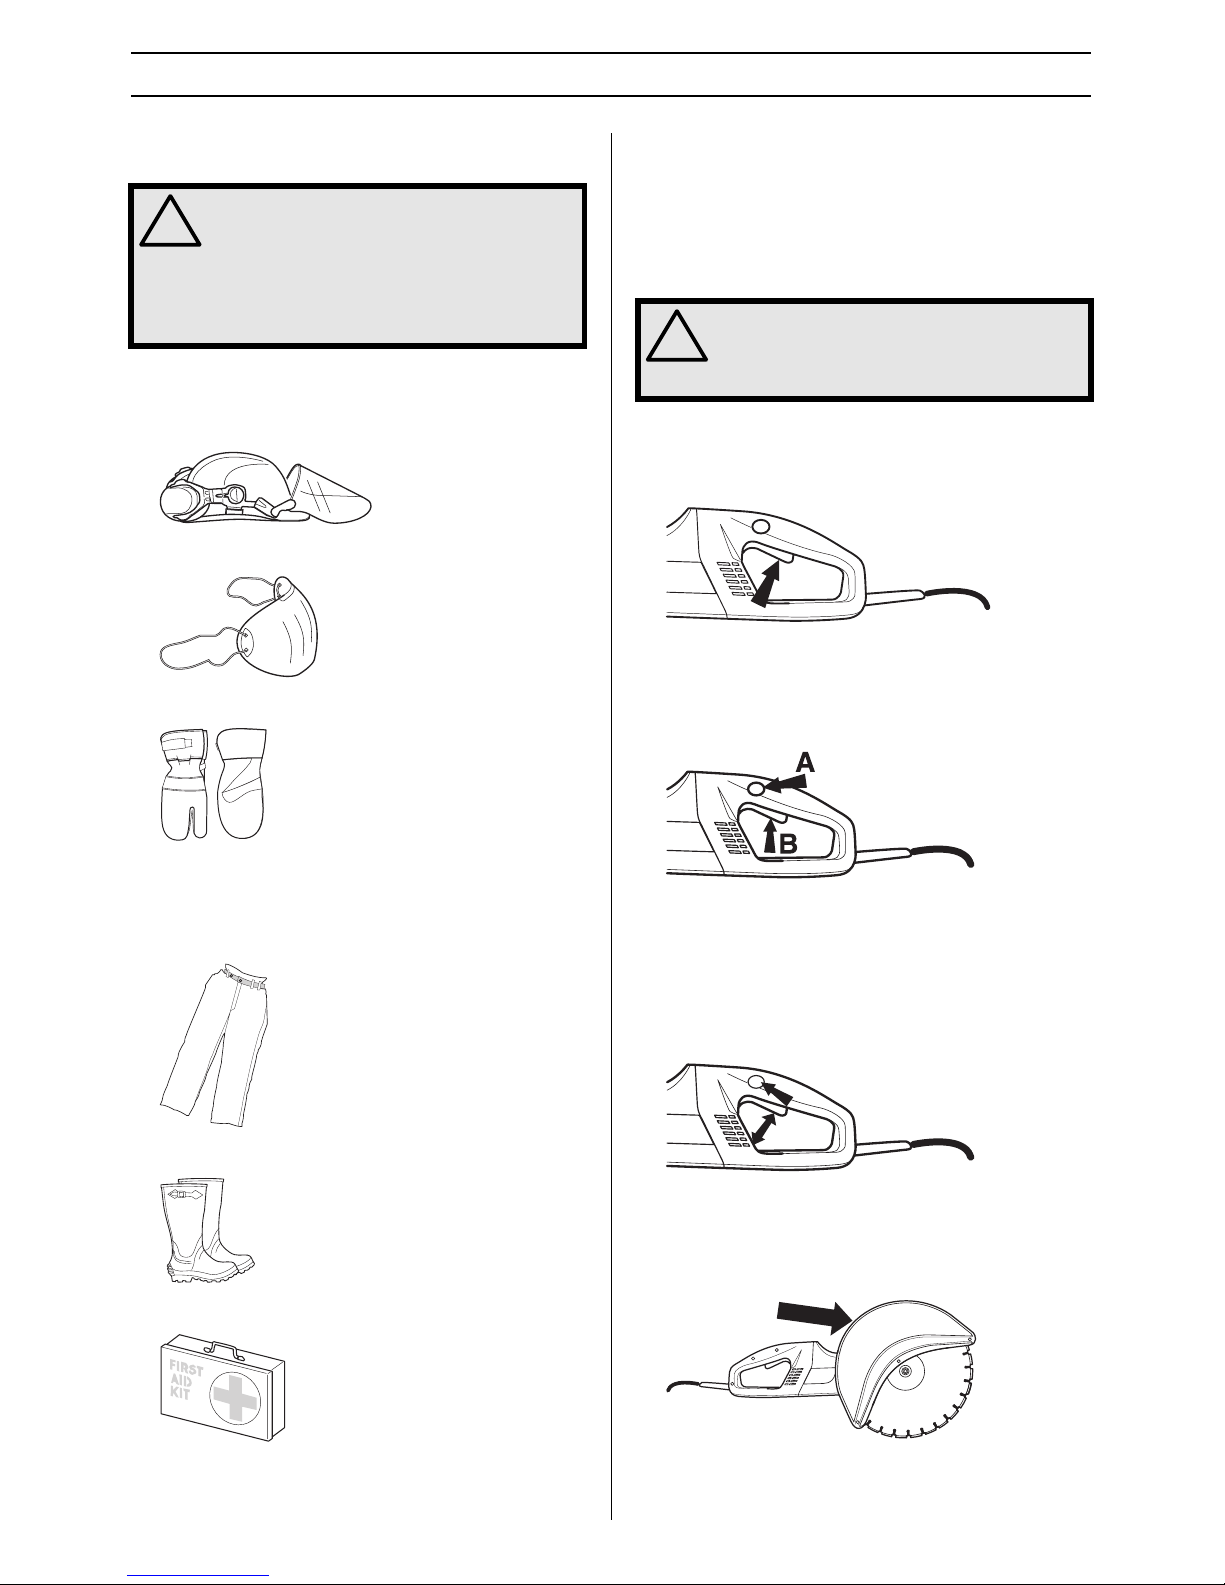
Personal protective equipment
• Protective helmet
• Hearing protection
• Protective glasses or a full face guard
• Breathing mask
• Heavy-duty, firm grip gloves.
• Tight-fitting, heavy-duty and comfortable clothing that
permits full freedom of movement.
• Leg protection (to protection against sparks and cutting
tools).
• Boots with steel toe-caps and non-slip sole
• Always have a first aid kit nearby.
Machine ′′
′′
s safety equipment
This section describes the machine ′ s safety equipment, its
purpose, and how checks and maintenance should be carried
out to ensure that it operates correctly. See the ”What is
what?” section to locate where this equipment is positioned
on your machine.
Switch
The power switch should be used to start and stop the
machine.
Power switch lock
The power switch lock is designed to prevent accidental
operation of the switch. When the lock (A) is pressed in the
power switch (B) is released.
The power switch lock remains depressed as long as the
power switch is depressed.
When the grip on the handle is released both the power
switch and power switch lock are reset. This movement is
controlled by two independent return springs. This position
results in the machine stopping and the power switch being
locked.
Guard for the cutting blade
This guard is fitted above the cutting blade and is designed to
prevent parts of the blade or cutting fragments from being
thrown towards the user.
!
WARNING! You must use approved personal
protective equipment whenever you use the
machine. Personal protective equipment
cannot eliminate the risk of injury but it will
reduce the degree of injury if an accident
does happen. Ask your dealer for help in
choosing the right equipment.
!
WARNING! Never use a machine that has
faulty safety equipment! Carry out the
inspection, maintenance and service
routines listed in this section.
Page 5
English
– 5
SAFETY INSTRUCTIONS
Checking, maintaining and servicing
the machine ′′
′′
s safety equipment
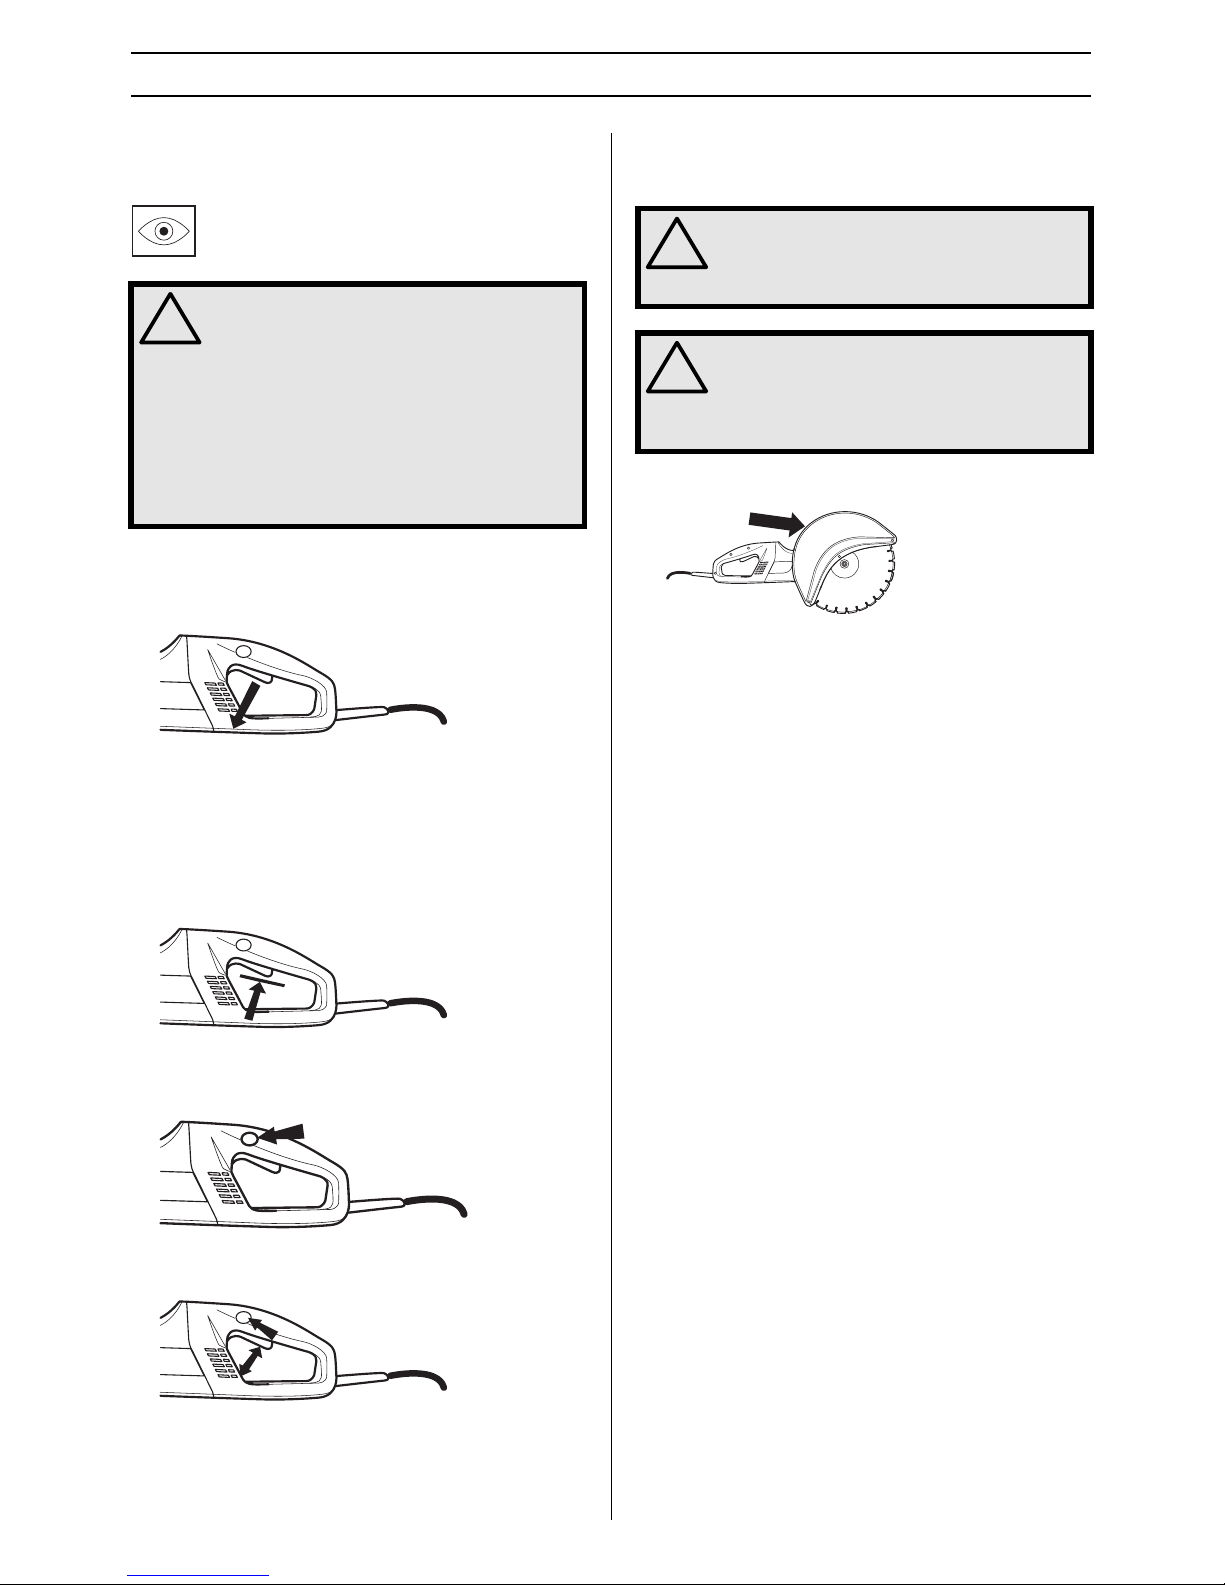
Checking the power switch
Start the machine, release the power switch and check that
the engine and the cutting blade stop.
A defective power switch should be replaced by an authorized
service workshop
Checking the power switch lock
Make sure the power switch is locked when the power switch
lock is in its original position.
Press in the power switch lock and make sure it returns to its
original position when you release it.
Check that the power switch and power switch lock move
freely and that the return springs work properly.
Start the machine, release the power switch and check that
the engine and the cutting blade stop.
Inspection of the guard for the cutting
blade
Check that the guard is intact and that the material is not
cracked or deformed.
General safety precautions
• A power cutter is designed to cut hard materials such as
concrete/stone and steel/iron. Observe the increased risk
of kickback when cutting soft materials. See instructions
under the heading How to avoid kickback.
• Do not use the power cutter until you have read the entire
contents of this Operator’s Manual.
All servicing, in addition to the points listed in the section
”Control, maintenance and service of the power cutter’s
safety equipment”, should be carried out by trained
service specialists.
• Never use the machine if you are tired, if you have drunk
alcohol, or if you are taking medication that could affect
your vision, your judgement or your co-ordination.
• Wear personal protective equipment. See instructions
under the heading Personal protective equipment.
• Never use a machine that has been modified in any way
from its original specification.
• Do not use the machine in wet or humid surroundings,
close to water, in the rain or snow. Dampness can cause
short circuiting.
• Be on your guard for electrical shocks. Avoid having body
contact with lightning-conductors/metal in the ground.
• Never carry the machine by means of the cord and never
pull out the plug by pulling the cord. Keep all cords and
extension cords away from water, oil and sharp edges.
Make sure the cord is not pinched in doors, fences or the
like. Otherwise it can cause the object to become live.
• Check that the cord and extension cord are intact and in
good condition. Never use the machine if the cord is
damaged, hand it in to an authorized service workshop for
repair.
!
WARNING! All servicing and repair work on
the machine requires special training. This is
especially true of the machine′′
′′
s safety
equipment. If your machine fails any of the
checks described below you must contact
your service agent. When you buy any of our
products we guarantee the availability of
professional repairs and service. If the
retailer who sells your machine is not a
servicing dealer, ask him for the address of
your nearest service agent.
!
WARNING! Always check that the blade
guard is correctly fitted before starting the
machine. See instructions under the
heading Assembly.
!
WARNING! Check that the cutting blade is
fitted correctly and does not show signs of
damage. A damaged cutting blade can
cause personal injury. See instructions
under the heading Assembly.
Page 6
6 –
English
SAFETY INSTRUCTIONS
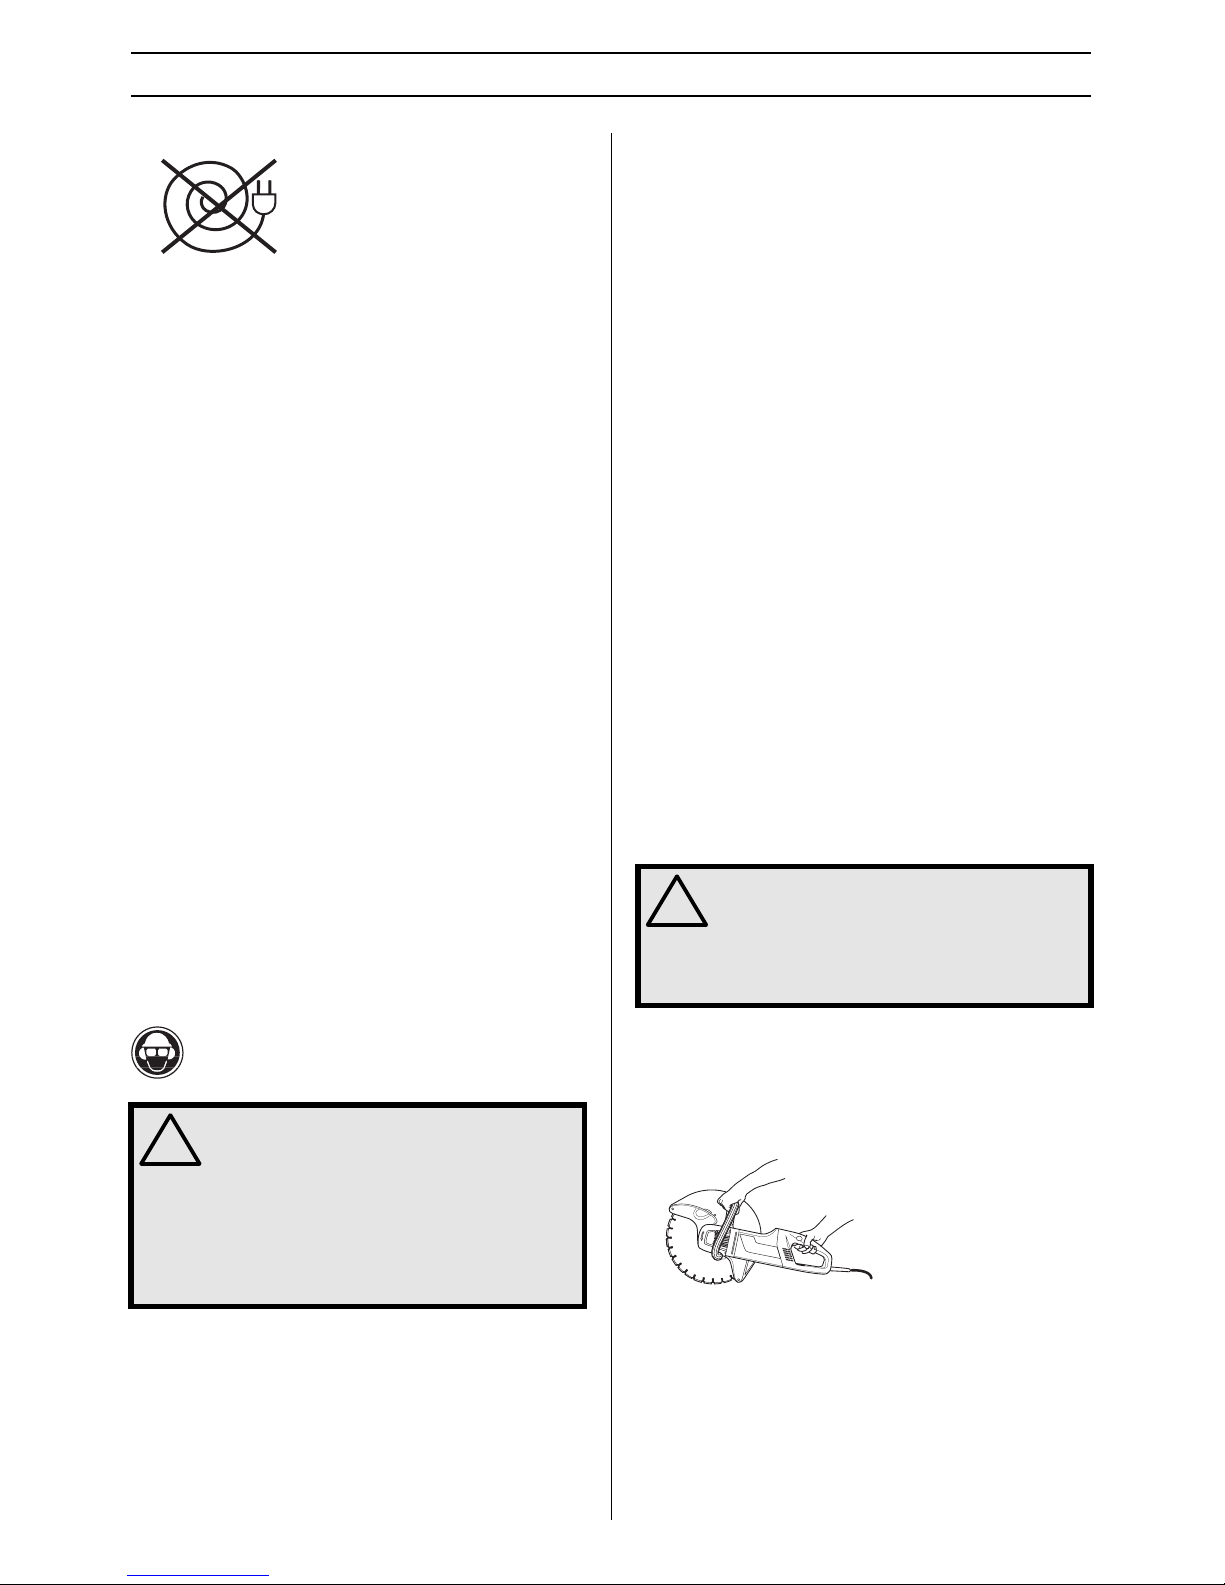
• Do not use a rolled up extension cord
• The machine should be connected to an earthed outlet
socket.
• Check that the mains voltage corresponds with that stated
on the rating plate on the machine.
• Never use a machine that is faulty. Carry out the checks,
maintenance and service instructions described in this
manual. Some maintenance and service measures must
be carried out by trained and qualified specialists. See
instructions under the heading Maintenance.
• Never allow anyone else to use the machine without first
ensuring that they have understood the contents of the
operator’s manual.
Transport and storage
Do not store or transport the power cutter with the cutting
blade fitted.
Store the power cutter in a lockable area so that it is out of
reach of children and unauthorised persons.
All blades should be removed from the cutter after use and
stored carefully. Store cutting blades in dry, frost free
conditions.
Special care should be taken with abrasive discs. Abrasive
discs must be stored on a flat, level surface. If blades are
supplied with a backing pad then a spacer should be used to
keep them flat.
If an abrasive disc is stored in humid conditions, this can
cause imbalance resulting in injury.
Inspect new blades for transport or storage damage.
General working instructions
Basic safety rules
• Look around you:
- To ensure that people, animals or other things cannot
affect your control of the machine.
- To make sure that none of the above come into contact
with the cutting blade.
• Do not use the machine in bad weather, such as dense
fog, rain, strong wind, intense cold, etc. Working in bad
weather is tiring and can lead to dangerous conditions,
e.g. slippery surfaces.
• Never start to work with the power cutter before the
working area is clear and you have a firm foothold. Look
out for any obstacles with unexpected movement. Ensure
when cutting that no material can become loose and fall,
causing operating injury.Take great care when working on
sloping ground.
• Make sure clothing and parts of the body do not come into
contact with the cutting blade when the engine is started.
• Maintain a safe distance from the cutting blade when the
engine is running.
• The blade guard should always be fitted when the engine
is running.
• Ensure that the working area is sufficiently illuminated to
create a safe working environment.
• Do not move the power cutter with the blade rotating.
• Always ensure you have a safe and stable working
position
• Make sure that no pipes or electrical cables are routed in
the area to be cut.
• Ensure the cord is behind you when you start to use the
machine so that the cord will not be damaged.
• The machine should be connected to an earthed outlet
socket.
Cutting
General
• Start cutting with the engine at full throttle.
• Always hold the power cutter in a firm grip with both
hands. Hold the machine so that the thumb and fingers
grip around the handle.
!
WARNING! This section describes basic
safety directions for using a power cutter.
This information is never a substitute for
professional skills and experience. If you get
into a situation where you feel unsafe, stop
and seek expert advice. Contact your dealer,
service agent or an experienced power
cutter user. Do not attempt any task that you
feel unsure of!
!
WARNING! The safety distance for the power
cutter is 15 metre. You are responsible that
animals and onlookers are not in the
working area. Do not start to work with the
power cutter before the working area is clear
and you have a firm foothold.
Page 7
English
– 7
SAFETY INSTRUCTIONS
Cutting technique
The technique described below is of a general character.
Check information for each blade regarding individual cutting
characteristics (for example, a diamond blades requires less
feeding pressure than an abrasive discs).
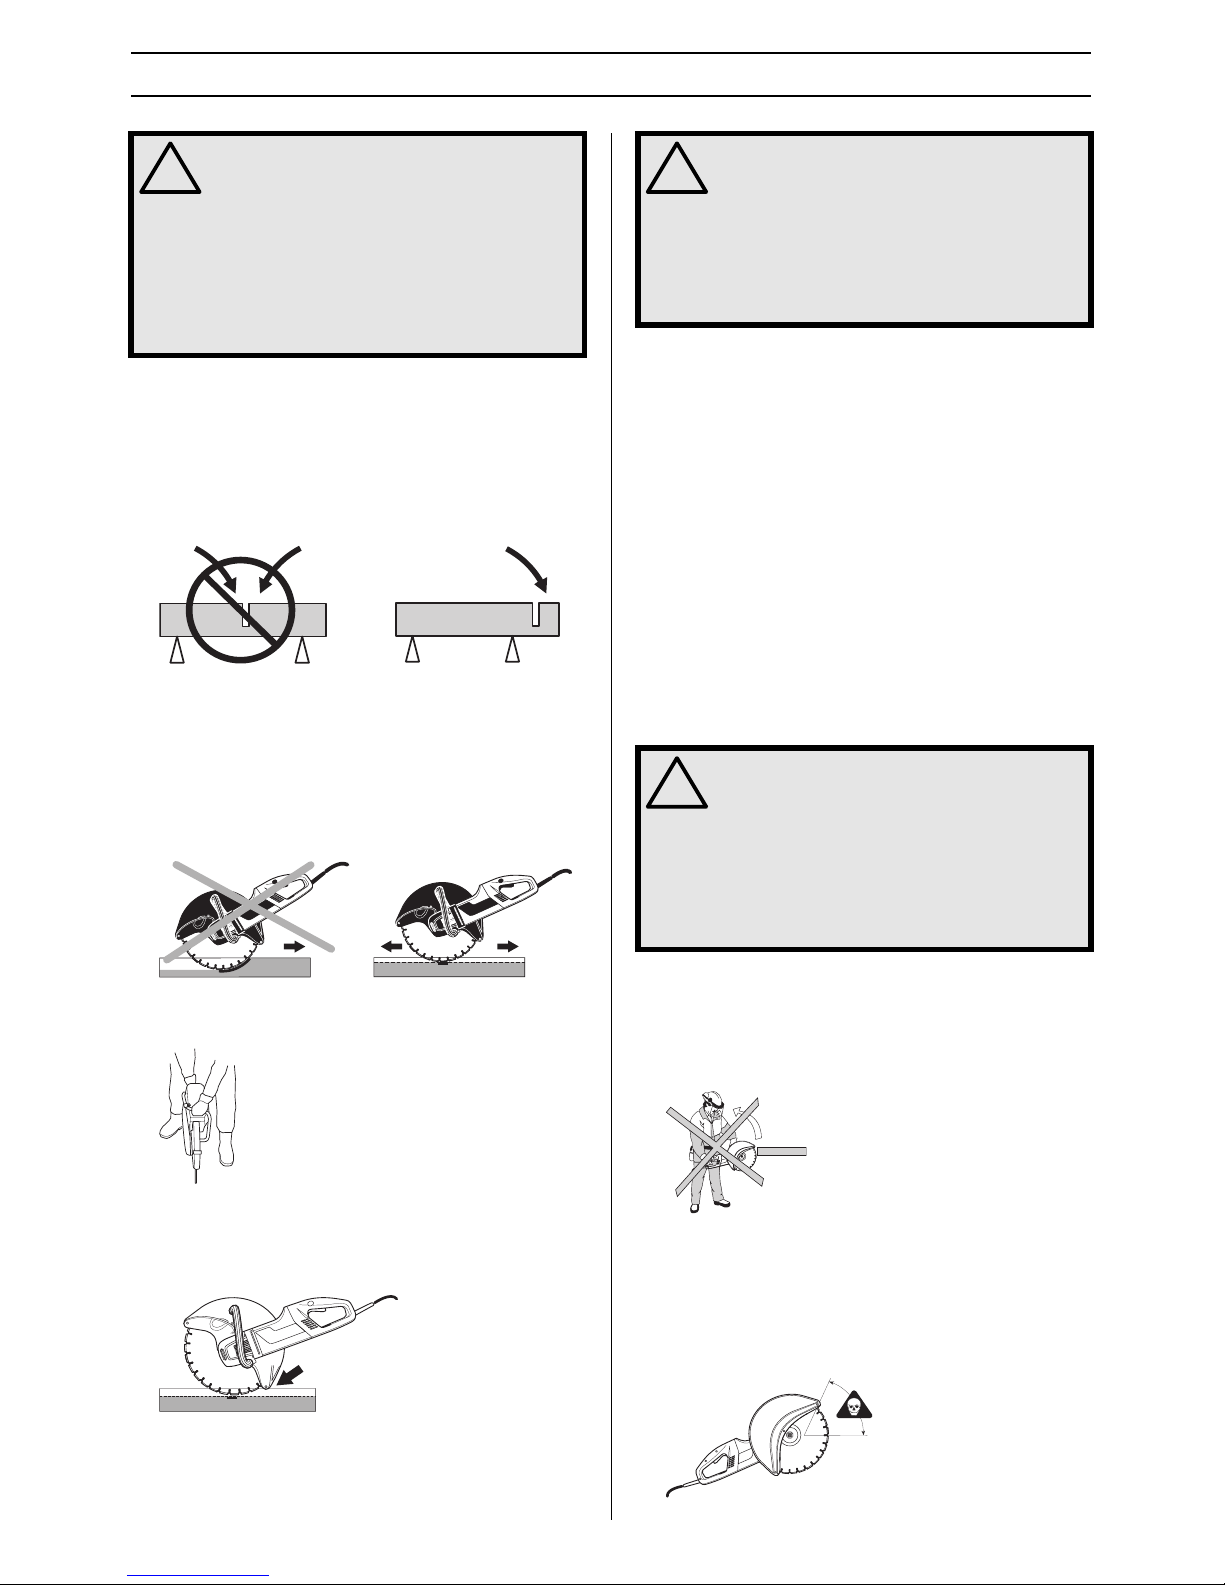
• Support the work piece in such away that you can predict
what will happen and so it will not pinch.
• Check that the blade is not in contact with anything when
the machine is started
• Always cut at full throttle.
• Start cutting gently, do not force or squeeze the blade in.
• Move the blade slowly backwards and forwards.
Use a small part of the blade’s cutting edge.
• Cut with the blade fully vertical – at right angles to the
work piece.
• The guard should be adjusted so that the rear section
rests against the work piece. Abrasive particles and
sparks are then collected by the guard and led away from
the user.
Sharpening diamond blades
Diamond blades can become dull when the wrong feeding
pressure is used or when cutting certain materials such as
heavily reinforced concrete. Working with a dull blade causes
overheating and finally the loss of a segment (part of a cutting
blade).
Sharpen against a soft material such as sandstone or brick.
Blade vibration
The blade can become out of shape (not round) and vibrate if
a too high feeding pressure is used or if the blade is pressed
into the work piece.
A lower feeding pressure ought to stop the vibration.
Otherwise replace the cutting blade.
How to avoid kickback
What is kickback?
The word kickback is used to describe the sudden reaction
that causes the power cutter and cutting blade to be thrown
from an object when the upper quadrant of the blade, known
as the kickback zone, touches an object.
Kickback only occurs when the cutting blades kickback zone
touches an object.
General rules
• Never cut with the cutting blades upper quadrant, i.e. the
kickback zone.
!
WARNING! Overexposure to vibration can
lead to circulatory damage or nerve damage
in people who have impaired circulation.
Contact your doctor if you experience
symptoms of overexposure to vibration.
These symptoms include numbness, loss of
feeling, tingling, pricking, pain, loss of
strength, changes in skin colour or
condition. These symptoms normally appear
in the fingers, hands or wrists.
!
WARNING! Under all circumstances avoid
cutting using the side of the blade; it will
almost certainly be damaged, break and can
cause immense damage. Only use the
cutting section.
Do not pull the power cutter to one side, this
can cause the blade to jam or break
resulting in injury to people.
!
WARNING! Kickback can happen very
suddenly and violently; kicking the power
cutter and cutting blade back at the user. If
this happens when the cutting blade is
moving it can cause very serious, even fatal
injuries. It is vital you understand what
causes kickback and that you can avoid it by
taking care and using the right working
technique.
Page 8
8 –
English
SAFETY INSTRUCTIONS
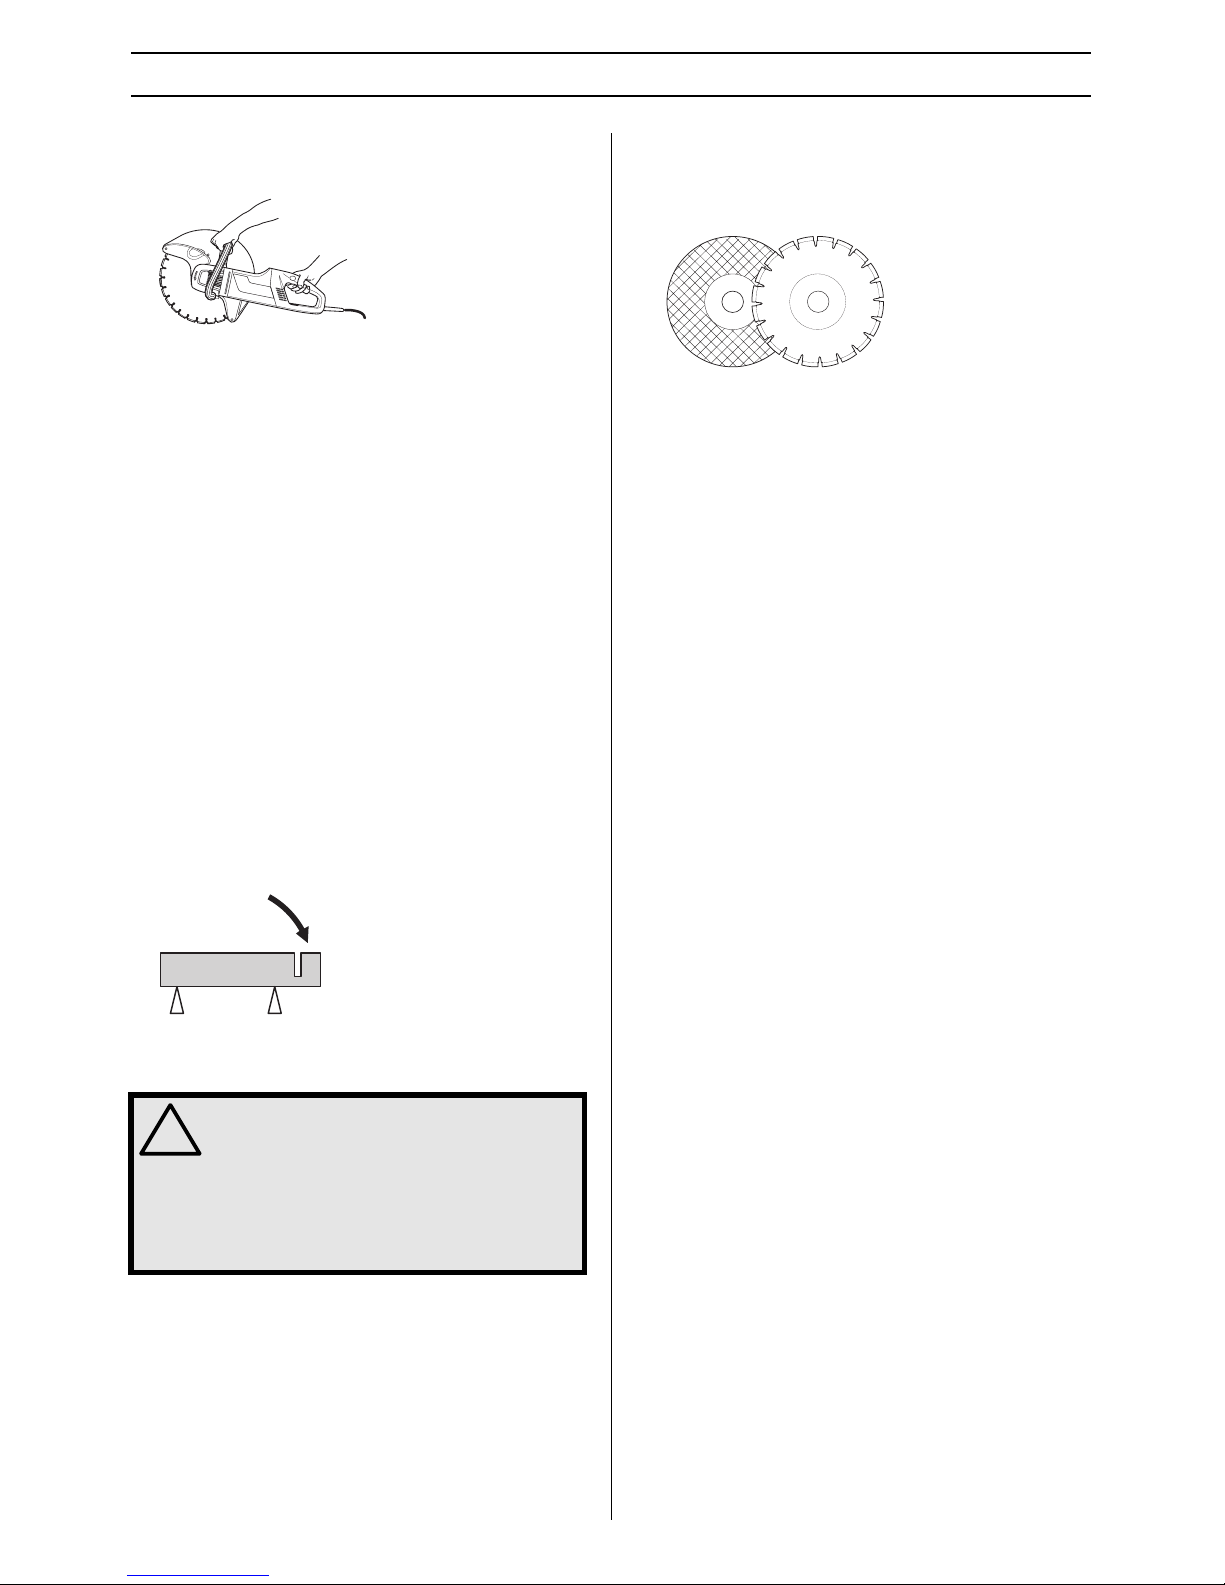
• Always hold the power cutter in a firm grip with both
hands. Hold the machine so that the thumb and fingers
grip around the handle.
• Keep a good balance and a firm foothold.
• Always cut at full throttle.
• Stand at a comfortable distance from the work piece.
• Take care when inserting the blade in an existing cut.
• Never cut above shoulder height.
• Be alert to movement of the work piece or anything else
that can occur, which could cause the cut to close and
pinch the blade.
Pull in
Pull in occurs when the discs lower section suddenly stops or
when the cut closes. (To avoid, see the heading ”Basic rules”
and ”Jamming/rotation”, here below.)
Pinching/rotation
Pinching occurs when the cut closes. The power cutter can be
pulled down suddenly with a very powerful movement.
How to avoid pinching
Support the work piece in such a way that the cut remains
open during the cutting operation and when the cut is
finished.
Cutting blades
The machine must not be used with a rescue blade. The risk
of kick-back is greater with this type of cutting blade, as the
machine does not have a slipping clutch.
General
Cutting blades are available in two basic designs; abrasive
discs and diamond blades.
Always remove the cutting blade when the machine is
transported.
Make sure that the right bushing is used for the cutting blade
to be fitted on the machine. See the instructions under the
heading Assembling the cutting blade.
High speed portable tools
Our cutting blades are manufactured for high-speed, portable
power cutters. If blades from other manufacturers are used,
ensure that the blades conform to all regulations and
demands that concern this type of power cutter.
Special blades
Some cutting blades are designed for stationary equipment
and for use with attachments.Such cutting blades must not be
used on portable power cutters.
Always contact local authorities and make sure you are
following applicable directives.
Abrasive discs
The cutting material on abrasive discs consists of grit bonded
using an organic binder. ”Reinforced blades” are made up of
a fabric or fibre base that prevents total breakage at maximum
working speed if the blade should be cracked or damaged.
(The term reinforced does not refer to those cutting blades
that are only reinforced around the flange).
A cutting blade’s performance is determined by the type and
size of abrasive corn, and the type and hardness of the
bonding agent.
Characteristics that give the blade a shorter service life and
greater cutting capacity are said to make the blade ”softer”. A
blade with a longer service life and slower cutting capacity is
a blade with a ”harder” effect.
High quality cutting blades are normally more economical.
Lower quality cutting blades usually have an inferior cutting
capacity and shorter service life, which results in higher cost
per processed material.
!
WARNING! A cutting blade may burst and
cause injury to the operator.
Never use a cutting blade at a lower speed
rating than that of the power cutter.
Never use a cutting blade for any other
materials than that it was intended for.
Page 9
English
– 9
SAFETY INSTRUCTIONS
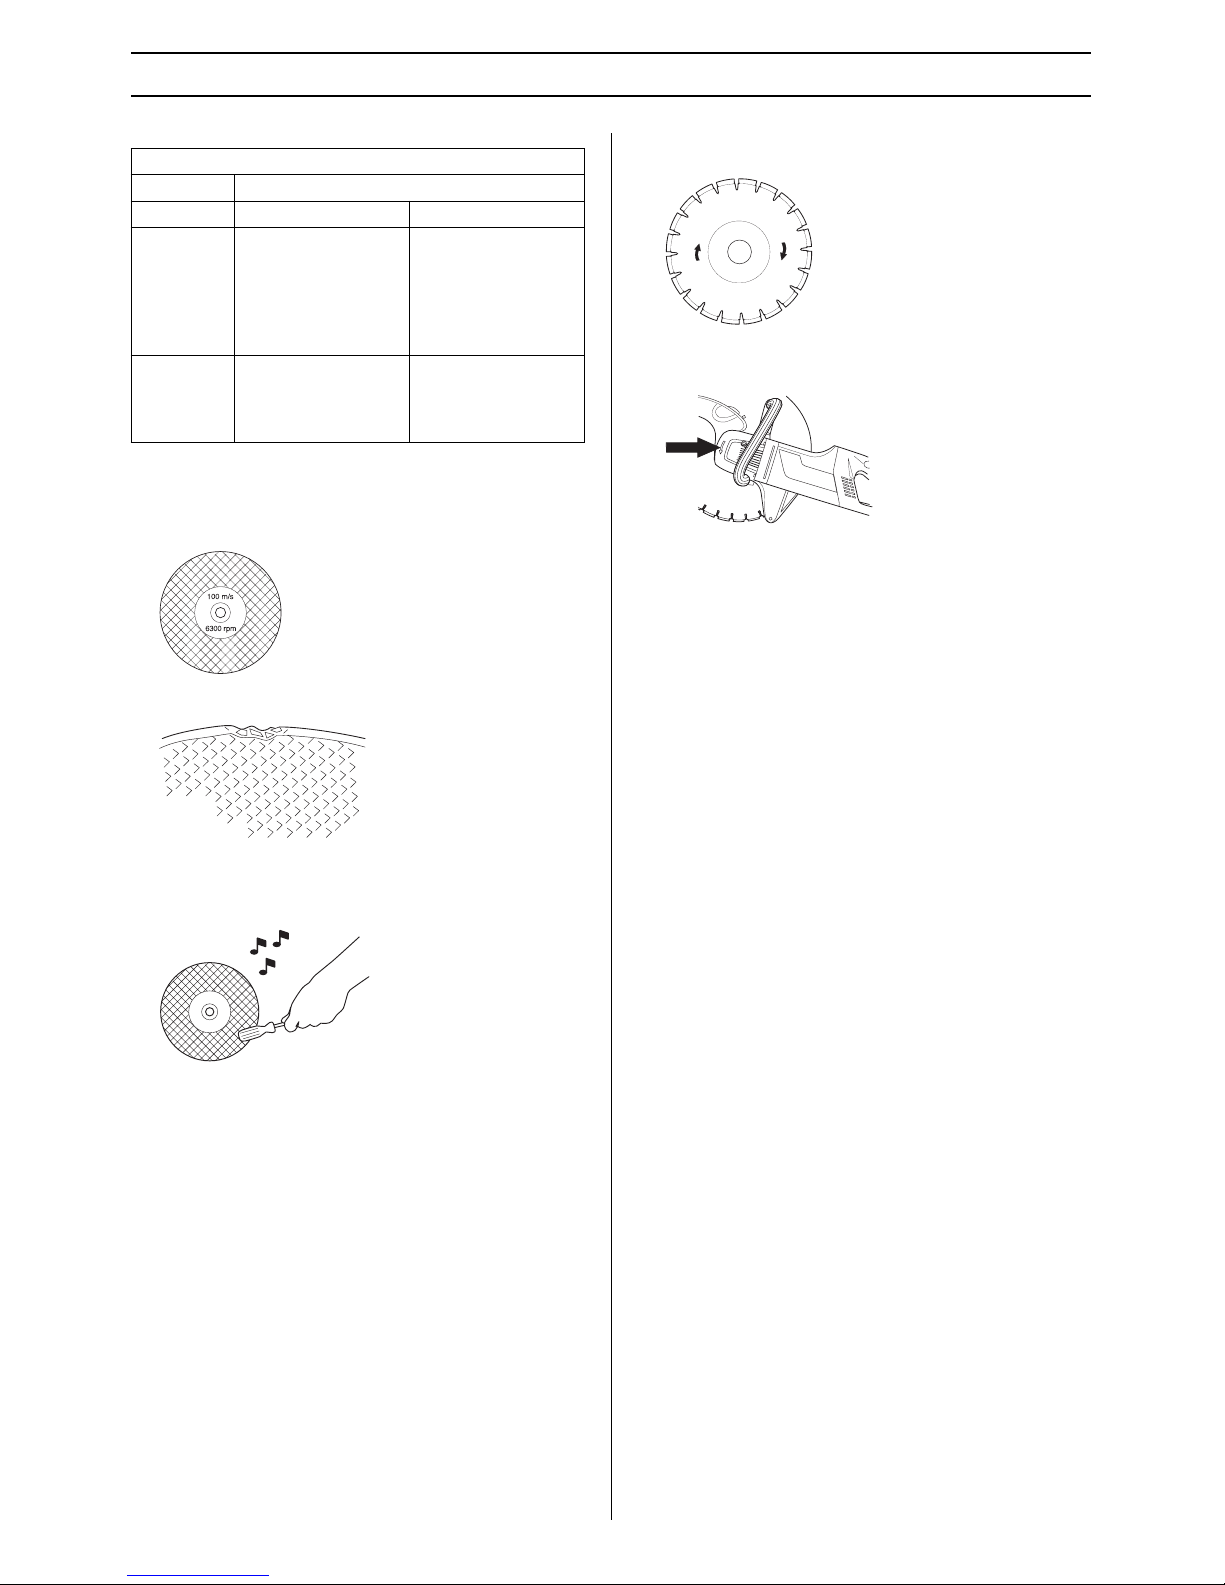
Check that the blade is approved for the same or higher
speed according to the aproval plate of the engine. Never use
a cutting blade with a lower speed rating than that of the
power cutter.
Ensure the blade it not cracked or damaged in any other way.
Test the abrasive disc by hitting it lightly with a piece of wood.
If the blade does not give a full-sounding ring then it is
damaged.
Diamond blades
Diamond blades for dry cutting are a new generation of
blades that do not require water cooling. However, the blades
are still damaged by excessive heat. It is good economics to
let the blade cool by simply lifting the blade from the cut every
30-60 seconds and let it rotate in the air, for 10 seconds to
cool.
Always use a sharp diamond blade.
General properties
Diamond blades give a lower cost per cutting operation, less
blade replacement, constant cutting depth and less dust.
When using diamond blades make sure that it rotates in the
direction indicated by the arrow on the blade.
There is an arrow on the rear of the machine that indicates the
axles direction of rotation that the disc is mounted on.
Material
Diamond blades are ideal for masonry, reinforced concrete
and other composite materials. Diamond blades are not
recommended for cutting metal.
Abrasive discs, types and use
Intended Use
Disc type General properties Material
Concrete
Universal use,
economy.
Concrete, asphalt,
stone masonry, cast
iron, aluminium,
copper, brass, cables,
rubber, plastic, etc.
Metal
Unrivalled for steel
(does not works well
on materials like
concrete).
Steel, steel alloys and
other hard metals.
Page 10
10 –
English
WHAT IS WHAT?
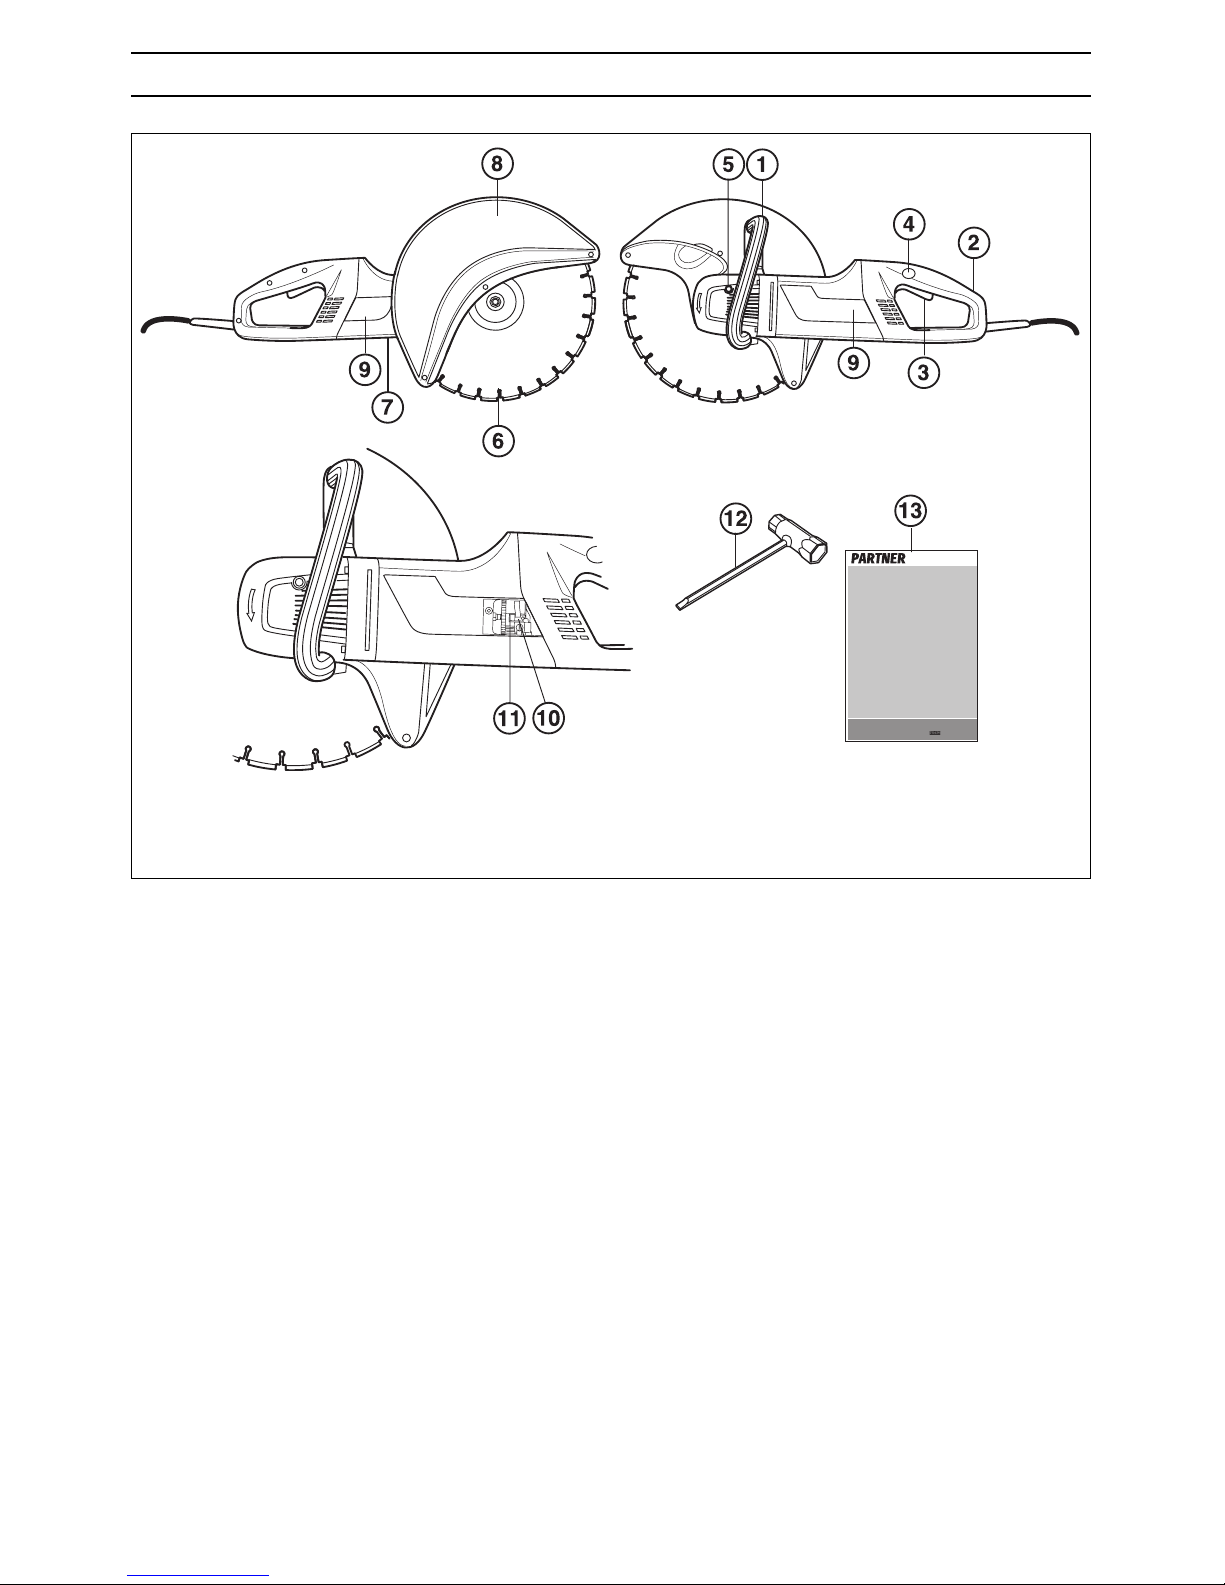
What is what on the power cutter?
1 Front handle
2 Rear handle
3 Switch
4 Power switch lock
5 Locking the axle
6 Cutting blade
7 Rating plate
8 Blade guard
9 Inspection covers
10 Carbon brushes
11 Brush retainer
12 Combination spanner
13 Operator ′ s manual
Page 11
English
– 11
ASSEMBLY
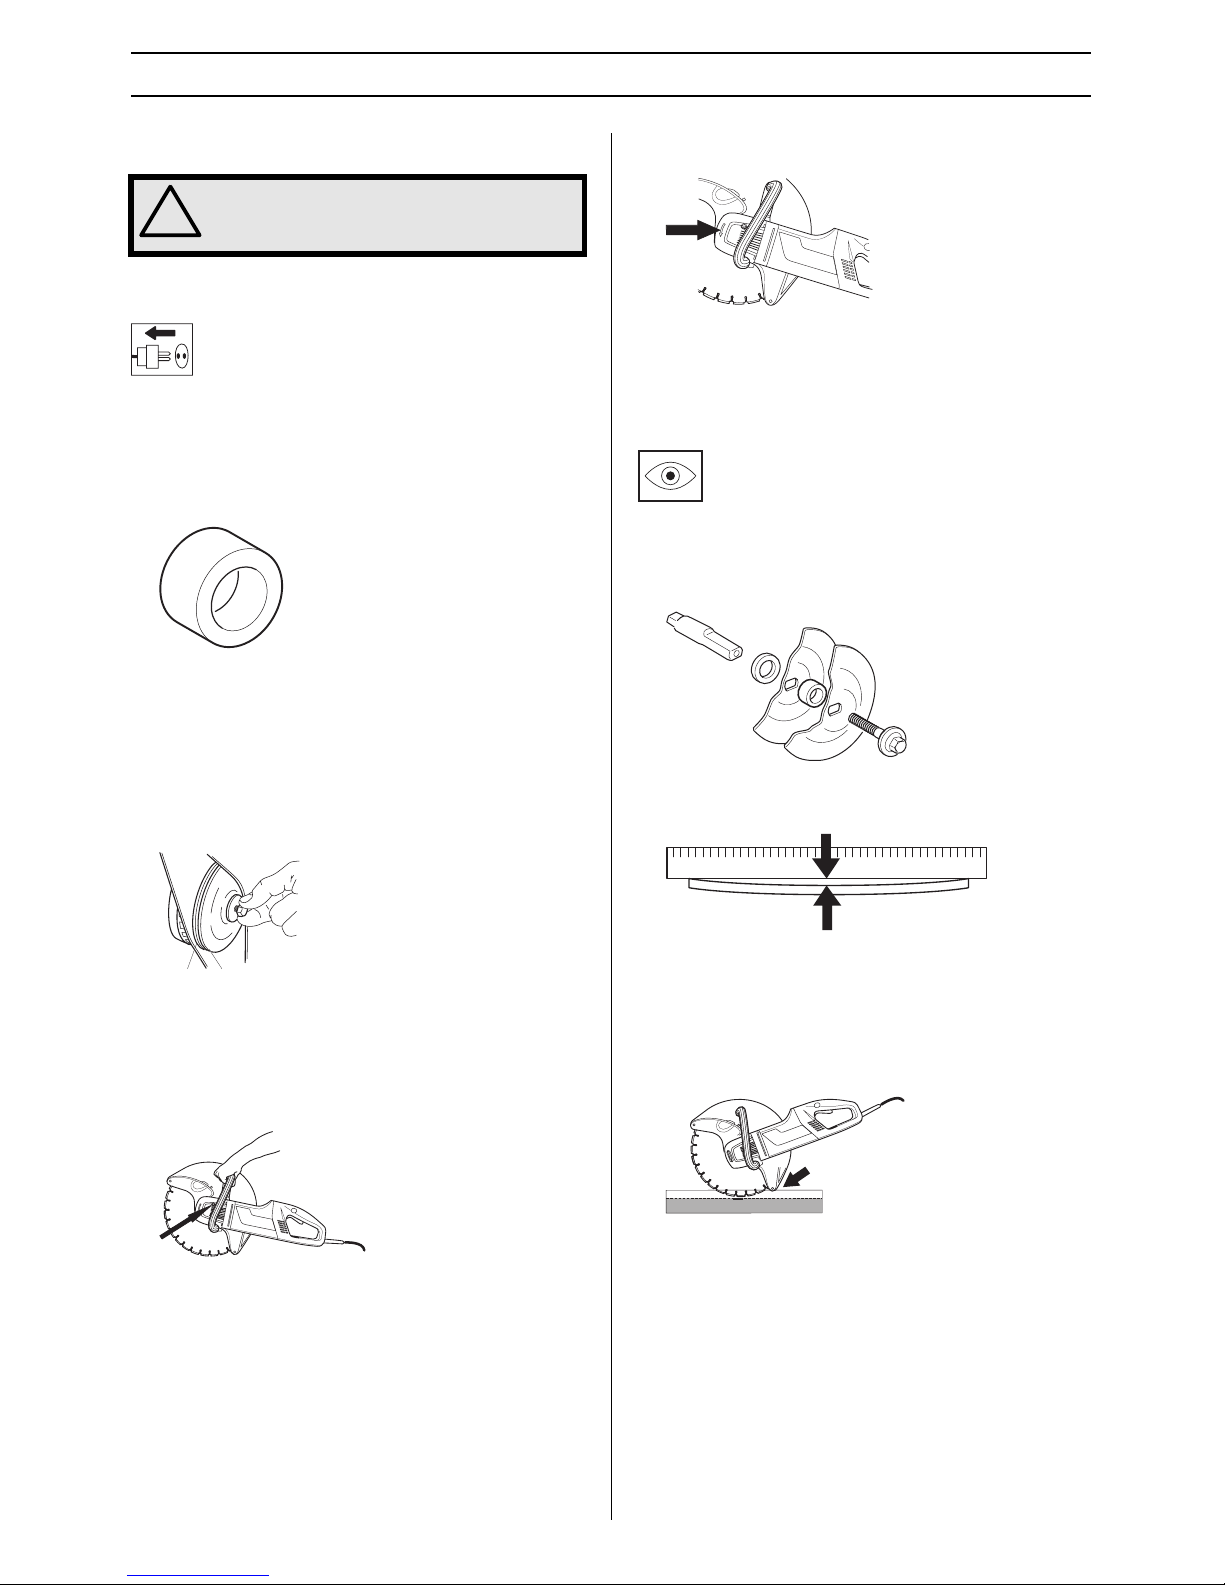
Fitting the cutting blade
Partner cutting blades are manufactured and approved for
freehand cutting. The paper labels on each side of the blade
are there to distribute the pressure from the flange washer
and prevent the blade from slipping.
Fit the right bushing on the drive axle and then the cutting
blade on the bushing.
Different cutting blades have different inside measurements,
which is why different bushings must be used. Ensure that the
bushing to be used has the outside diameter intended for the
cutting blades inner diameter. The inner diameter
measurement is marked on the cutting blade.
The blade is placed between the flange hub (A) and the
flange washer (B). The flange washer is turned so that it fits
on the axle.
Tightening torque for the bolt holding the blade is: 15-25 Nm
(130-215 in.lb).
The cutting blade/axle can be locked by holding in the locking
button on the rear of the machine. The button is spring-loaded
and is reset when button is released.
When a diamond blade is mounted on the power cutter make
sure that the diamond blade will rotate in the direction
indicated by the arrow on the blade.
There is an arrow on the rear of the machine that indicates the
axles direction of rotation that the disc is mounted on.
When the cutting blade is replaced with a new blade check
the flanges and drive axle, see the instructions under the
heading Checking the drive axles and flanges.
Checking the drive shaft and flanges
Check that the threads on the drive shaft are undamaged.
Check that the contact surfaces of the cutting blade and
flanges are flat, run correctly on the spindle and are free from
foreign objects.
Do not use flanges that are twisted, have damaged edges,
untrue or dirty. Do not use different size flanges..
Blade guard
The blade guard should always be fitted on the machine.
The guard should be adjusted so that the rear section rests
against the work piece. Abrasive particles and sparks are
then collected by the guard and led away from the user.
!
WARNING! Always pull out the plug from the
outlet socket before cleaning, maintenance
or assembly.
A
B
Page 12
12 –
English
STARTING AND STOPPING
Starting and stopping
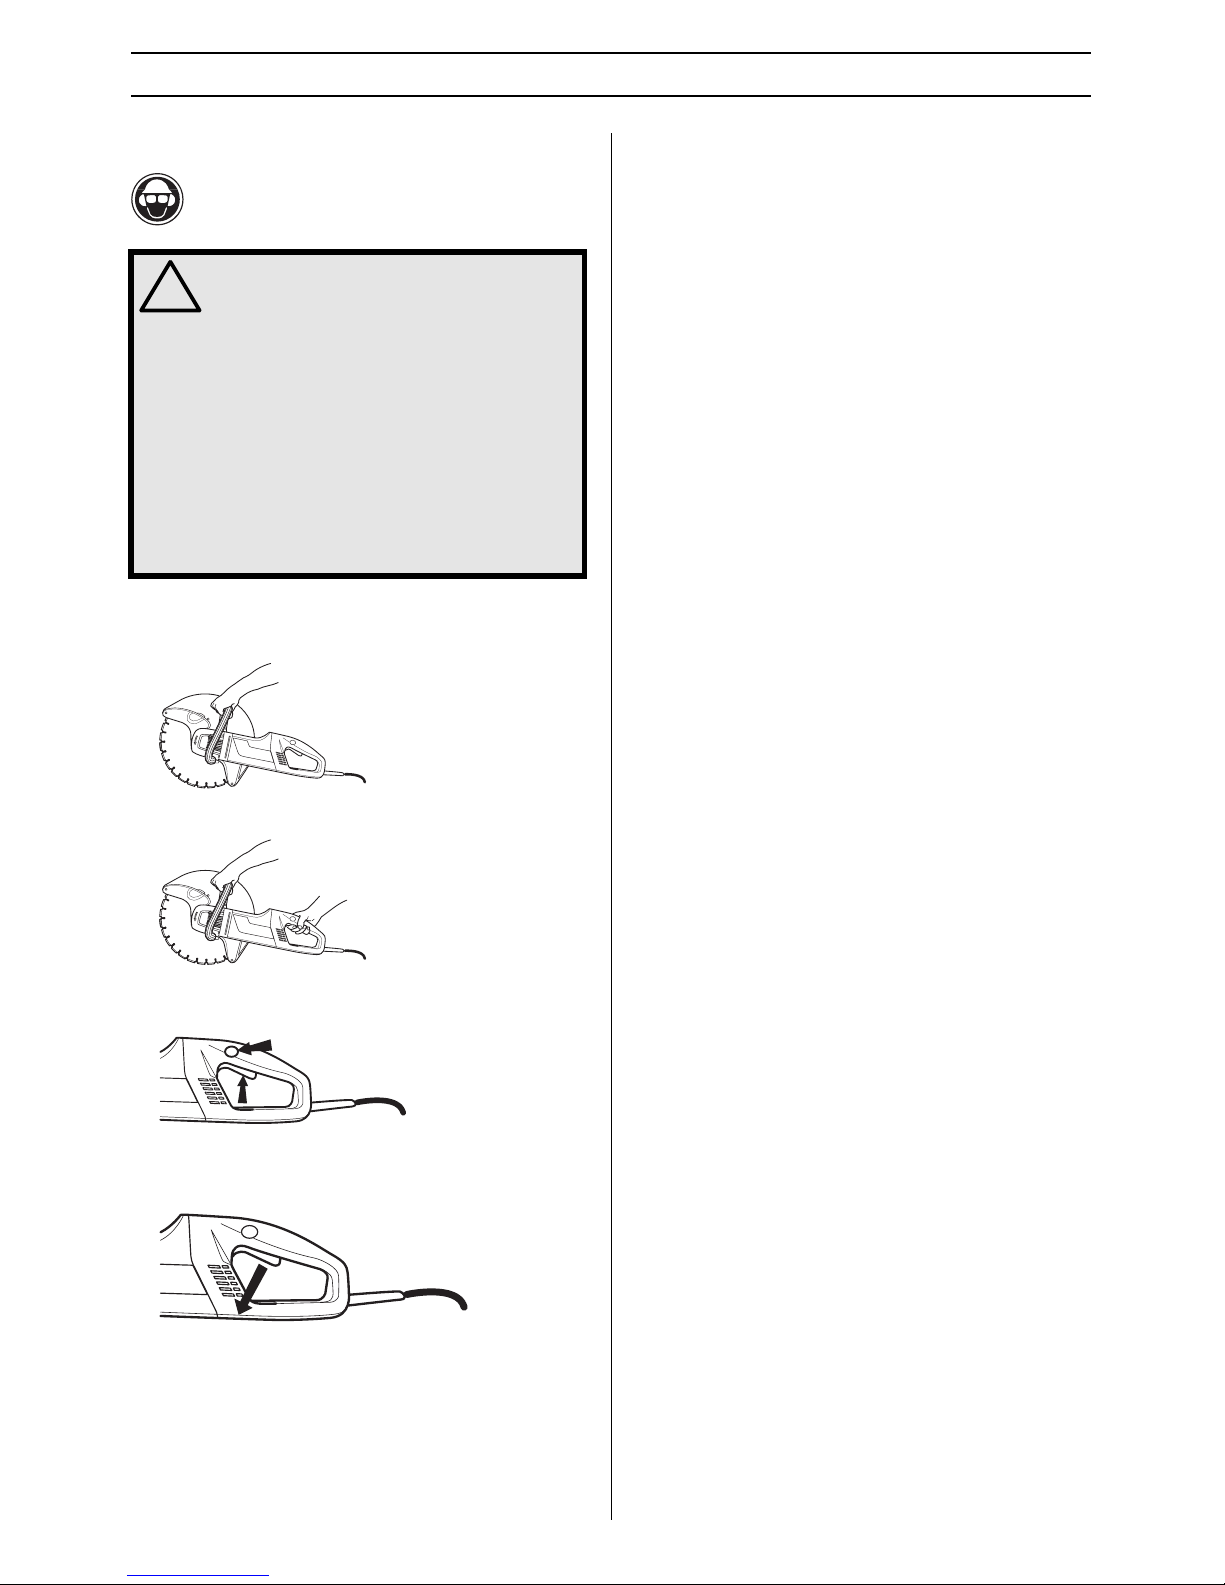
Starting
• Grip the front handle with your left hand.
• Grip the rear handle with your right hand.
• Press in the power switch lock with your right-hand thumb
and press in the power switch.
Stopping
Stop the motor by releasing the power switch
!
WARNING! Note the following before
starting:
The machine should be connected to an
earthed outlet socket.
Check that the mains voltage corresponds
with that stated on the rating plate on the
machine.
Make sure you have a secure footing and
that the cutting blade cannot touch
anything.
Keep people and animals well away from the
working area.
Page 13
English – 13
MAINTENANCE
Maintenance
Partner’s power cutters are robust and durable. However, as
they are used at a high processing rate all service procedures
must be carried out at the times and in the manner described,
so that the machine always works efficiently and safely.
Cooling system
The machine is equipped with an efficient fan to cool the
motor.
Cooling air which is drawn in through the grille by the
machines rear handle passes over the stator and rotor and
out through the front of the motor housing.
In order for the machine to always be cooled sufficiently the
cooling air openings must be kept clear and clean. Blow down
the machine regularly with compressed air.
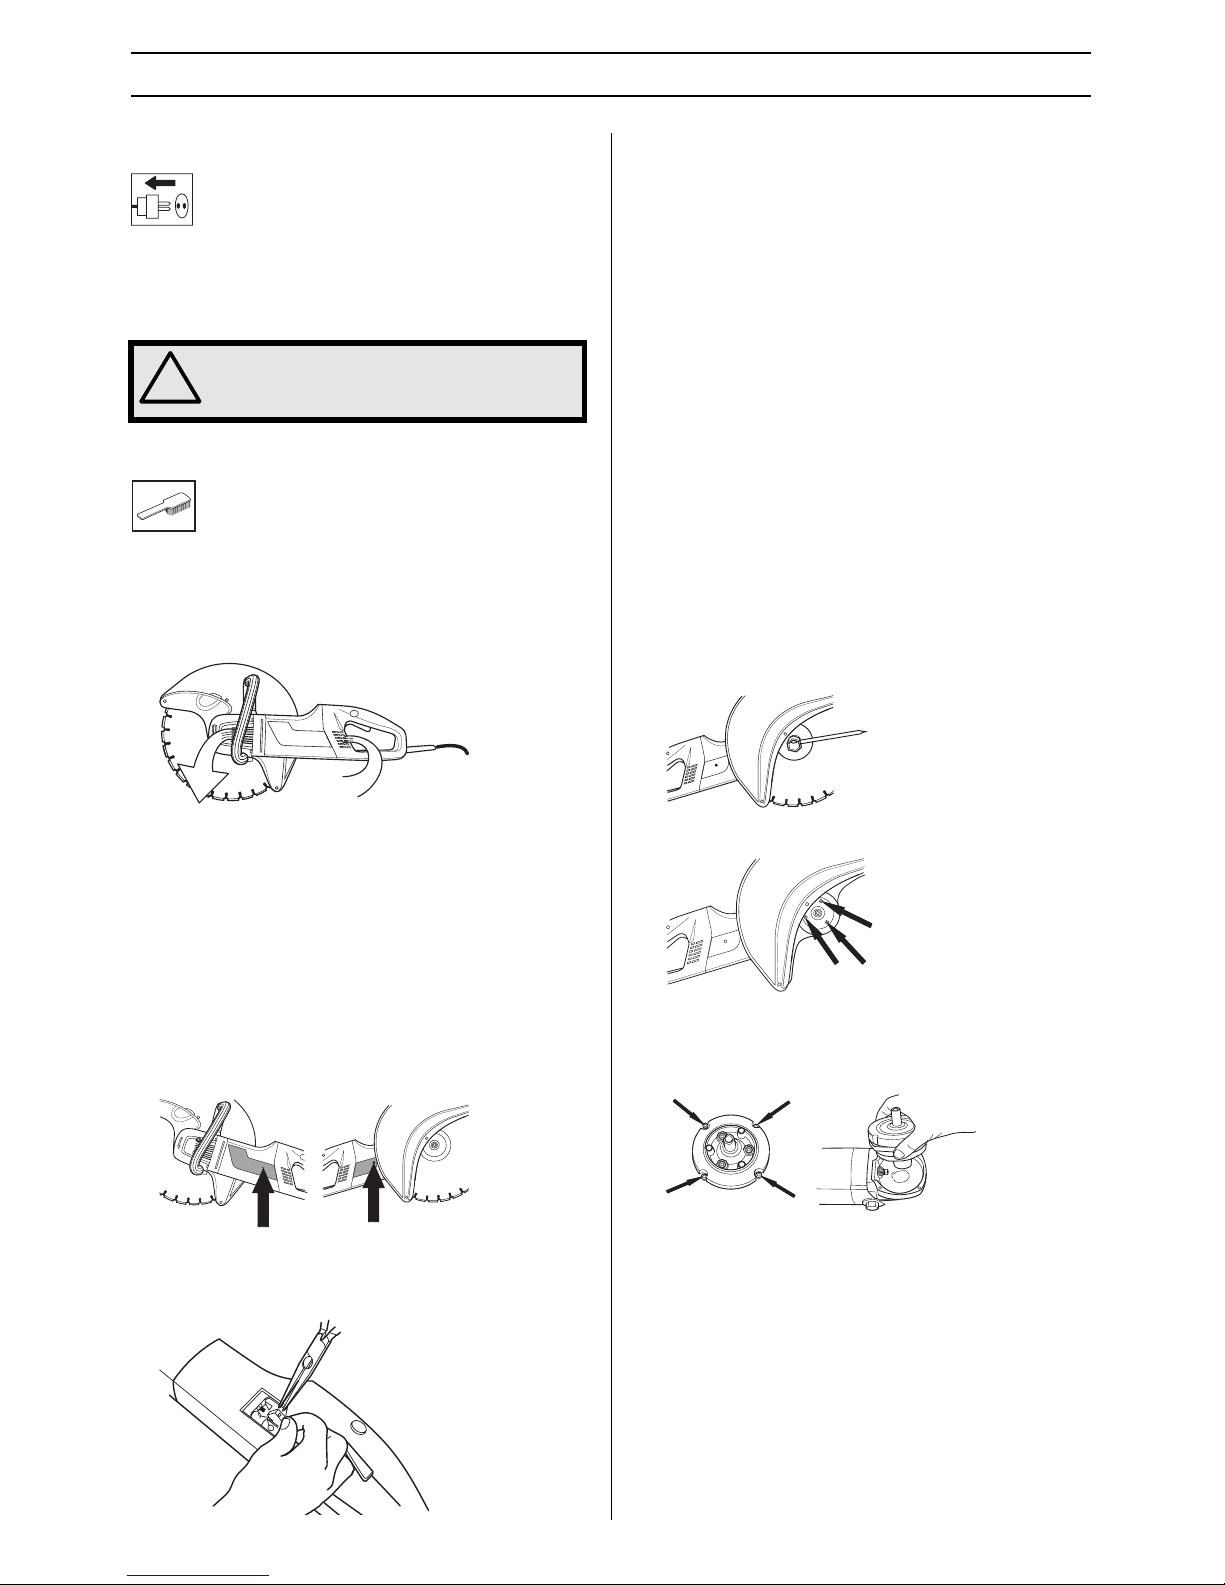
Replacing the carbon brushes
Check the carbon brushes at least once a month. The carbon
brushes should be replaced with new brushes if they are
worn, cracked or in any other way deformed.
All carbon brushes must be replaced when the brushes are
replaced.
• Remove both inspection covers by loosening both screws.
• Unscrew the cable holding the carbon brush. Now lift up
the spring and then lift out the carbon brush from the
brush retainer.
• Clean the brush retainers with a dry brush.
• Carefully blow away the dust.
• Fit the new carbon brushes and, at the same time, check
that they slide easily in the brush retainers.
• Fold down the springs and tighten the cable.
• New carbon brushes must be run in for approximately 40
minutes while idling.
Bevel gear
The grease in the gear housing should be changed every 4
months. Use high quality gear grease
The gear housing must not be filled completely with grease.
The grease expands as the machine heats up during
operation. If the gear housing was completely filled with
grease it could damage the seals and lead to leakage of
grease.
The gear housing should contain 90 g of grease in total.
Changing the grease
The following parts must be dismantled to change the grease
in the gear housing:
1 Flange washers holding the cutting blade
2 Support flange for the guard
3 Guard
4 The four screws holding the shield. Lift the shield together
with the drive wheel unit out of the gear housing.
5 Wipe out the grease and fill with new, good quality gear
grease. The gear housing should contain 90 g of grease
in total.
CAUTION! Exercise care when dismantling so as not to
damage the gaskets. These are used both as seals and
spacers for the gear setting.
!
WARNING! Inspection and/or maintenance
should be carried out with the motor
switched off and the plug disconnected.
Page 14
14 – English
MAINTENANCE
´®z*xyh¶6R¨
´®z*xyh¶6R¨
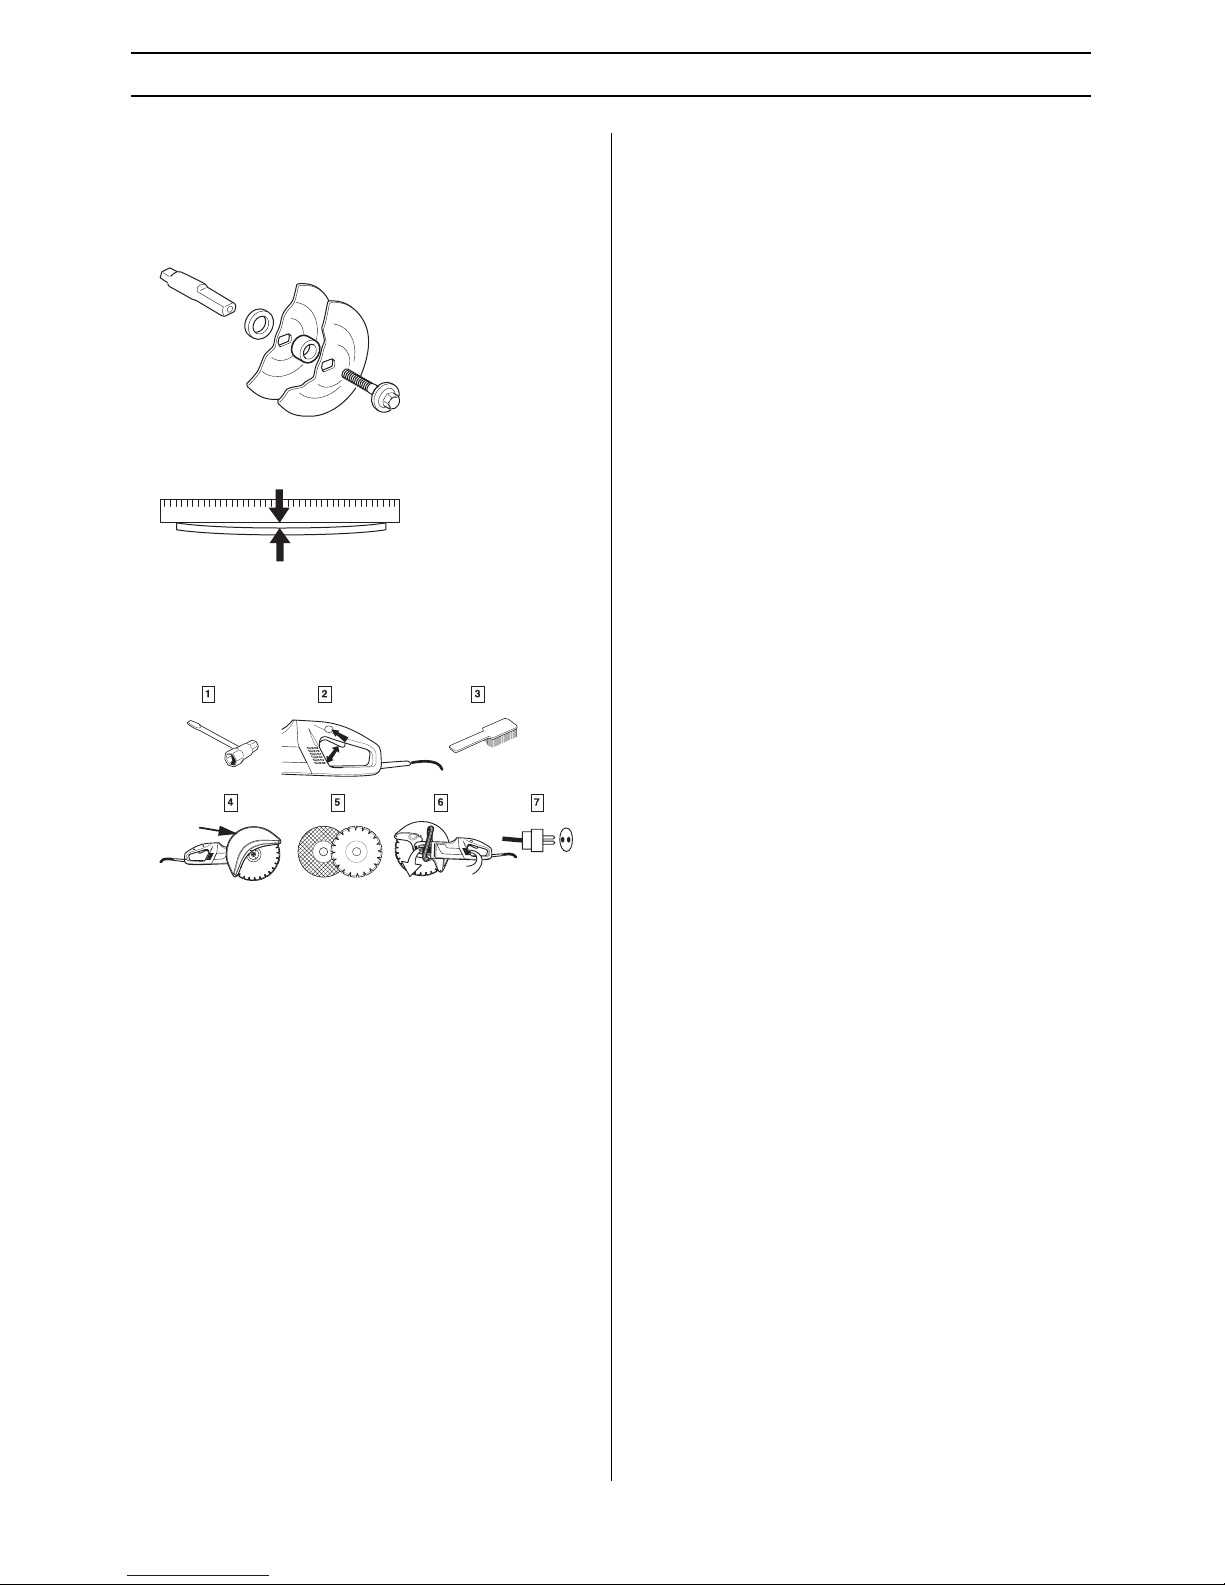
Checking the drive shaft and flanges
Check that the threads on the drive shaft are undamaged.
Check that the contact surfaces of the cutting blade and
flanges are flat, run correctly on the spindle and are free from
foreign objects.
Do not use flanges that are twisted, have damaged edges,
untrue or dirty. Do not use different size flanges..
Below you will find some general maintenance
instructions.
Daily maintenance
1 Check that nuts and screws are tight.
2 Check that the power switch unit works smoothly.
3 Clean the outside of the machine.
4 Inspection of the guard for the cutting blade
5 Check the condition of the cutting blade.
6 Check and clean the cooling air openings
7 Check that the cord and extension cord are intact and in
good condition.
Page 15
English – 15
TECHNICAL DATA
Note 1: Handle vibrations are measured according to ISO/CD 8662-4
Cutting equipment
EC-declaration of conformity
(Applies to Europe only)
Partner Industrial Products, SE-433 81 Partille, Sweden, tel: +46-31-949000, declares under sole responsibility that the power
cutter Partner K3000 EL dating from 2003 serial numbers and onwards (the year is clearly stated on the rating plate, followed by
the serial number), complies with the requirements of the COUNCILS DIRECTIVE:
of June 22, 1998 ”relating to machinery” 98/37/EC, annex IIA.
of May 3, 1989 ”relating to electromagnetic compatibility” 89/336/EEC, and applicable supplements.
of February 19, 1973 ”relating to electrical equipment” 72/23/EEC
The following standards have been applied: EN 292-2, EN50144-1, EN50144-2-3, EN55014-1, EN55014-2, EN61000-3-2,
EN61000-3-3.
Let your Partner dealer check the power cutter and make essential adjustments and repairs.
The supplied power cutter conforms to the example that underwent EC type examination.
Partille 10 may 2003
Ove Donnerdal, Development Manager
K3000 EL
Engine
Insulation Class 1 (The machine is not double insulated - must be grounded)
Max. speed of output shaft, rpm 4500
Rated voltage, V
Europe 230
Great Britain 110
USA / Canada / Japan 100-120
Rated output, W
Europe 2700/12 A
Great Britain 2200 /20 A
USA / Canada / Japan 15 A, 50-60 Hz
Weight
Power cutter without cutting blade, kg 8,9
Noise levels
Noise pressure level at the operators ear, max speed,
measured according to ISO/DIS 11201, dB (A)
95
Noise power level, max. speed, measured according to
ISO 3744, dB (A)
108
Vibration levels
(see note 1)
Front handle, m/s
2
3,7
Rear handle, m/s
2
4,2
Cutting
blade
Max. peripheral
speed, m/s
12" 80
14" 100
Page 16

´®z*xyh¶6R¨
2003-08-26
´®z*xyh¶6R¨
1088897-26
www.partner-industrial.com
 Loading...