

Partilink VP-QV41 User Manual

Usermanual
Multiview Video Processor

Contents
1. Overview ................................................................................................... 1
2. Features .................................................................................................... 1
3. Specifications ......................................................................................... 2
4. Hardware Descriptions ......................................................................... 3
4.1 Product Appearance .................................................................. 3
4.2 Front Panel ................................................................................... 4
4.3 Rear Panel .................................................................................... 6
4.4 IR Remote Control ...................................................................... 7
5. Installation ............................................................................................. 10
5.1 Wiring Diagram .......................................................................... 10
5.2 Rack Mount Installation .......................................................... 11
6. Configurations ...................................................................................... 12
6.1 Front Panel Buttons ................................................................. 12
6.2 Front Panel Buttons ................................................................. 12
6.3 Web UI .......................................................................................... 12
6.3.1 Directly Connect to PC via Ethernet Cable .................... 12
6.3.2 Ethernet Hub or Router ....................................................... 13
6.3.3 System Setting Page in Web UI ........................................ 14
6.3.4 Multi View Page in Web UI ................................................. 15
6.4 RS232/TELNET .......................................................................... 22
6.4.1 Serial Port Settings .............................................................. 22
6.4.2 Commands ............................................................................. 22
7. Package Contents ................................................................................ 26
A. Appendix 1: Function NA list ............................................................ 27
B. Appendix 2: Front Panel Screen Layout Indicator ...................... 28

1. Overview
The Multiview Video Processor is a simple, cost-effective video scaler
designed to enable a true 4K@60Hz UHD, HD, SD video display device,
virtually handling any input resolution up to 4K@60Hz. It provides 4 HDMI
inputs, 1 VGA input, 1 DisplayPort input, 1 analog audio input, 1 HDMI
output and 1 DP loop out.
2. Features
Support 4K@60 dual display output, the primary display does full
screen/PIP/POP/multi-view and secondary display does full screen.
Support 14 different screen layouts including 6 preset screen layouts and
extra 8 customized screen layouts
Support input resolution up to 4K@60Hz, 4:4:4 color sampling
Support output resolution up to 4K@60Hz, 4:4:4 color sampling
Support upscaling up to 4K@60Hz, 4:4:4 color sampling
Support Deep Color and HDCP 1.4 / 2.2
Fast switching between input channels or screen layout modes
Rotation R90o/ L90o or flip output in full screen layout
Receive Dolby Digital® 5.1, DTS® 5.1 and uncompressed 7.1 linear PCM
audio includes stereo analog audio input
Support stereo audio output
Support front panel button, IR remote control, RS232/TELNET and Web
UI control
Support USB port firmware upgrade
1
UPGRADE
RESOLUTION
3. Specifications
MODEL NO. Multiview Video Processor
4 x HDMI 2.0 with locking
INPUT
OUTPUT
CONTROL
1 x DP 1.2
1 x VGA
Audio R/L
1 x HDMI 2.0 with locking
1 x DP 1.2
Audio R/L
Front panel buttons
IR remote control
RS232/TELNET
Web UI
FIRMWARE
VIDEO OUTPUT
ETHERNET PORT 1 x RJ45
LED INDICATOR
POWER SUPPLY DC 12V/2A, locking barrel connector
POWER
CONSUMPTION
ENVIRONMENT
DIMENSION 440.4 x 230 x 45 mm (L x W x H, standard1U)
WEIGHT 2.72 KG
1 x USB 2.0
4096 x 2160@60Hz, 4:4:4 color sampling
INPUT, blue backlight
LAYOUT, blue backlight
INPUT SWAP, blue backlight
PANEL LOCK, blue backlight
STANDBY on, red backlight
STANDBY off, green backlight
15W
Operating temperature 0 ℃~ 45℃
Operating humidity 20~90% RH
Storage temperature -20 ℃ ~60 ℃
2
2 3
MULTIVIEW VIDEO PROCESSOR
4K@60Hz
e screwed on the unit
s assembl
spare screws included in the package as accessories to screw the
Attach the bracket to the left side of the system
chassis for rack mount installation
ss
Video and Audio signal via r
and the size is 1 rack unit
Attach the bracket to the right side of the system
chassis for rack mount installation
4
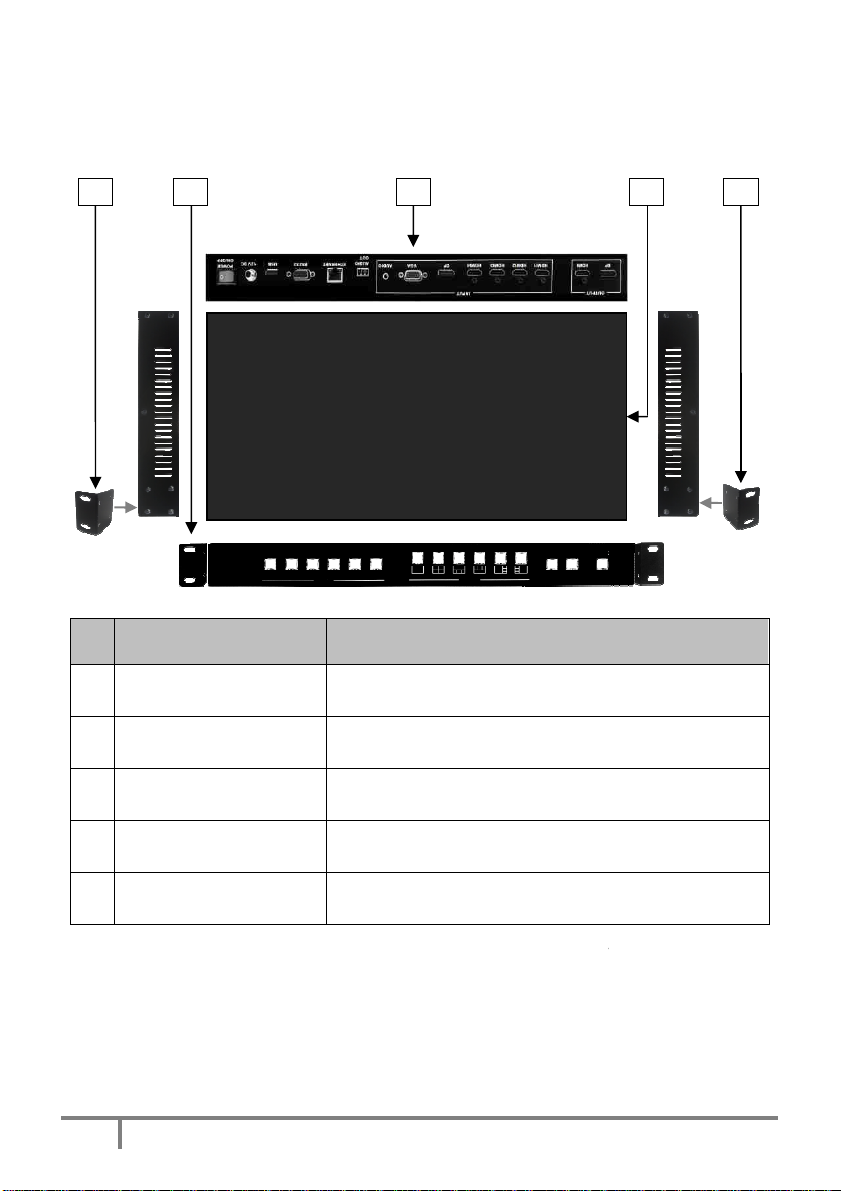
4. Hardware Descriptions
4.1 Product Appearance
1
HDMI1 HDMI2 HDMI3
No.
1 Rack Mount Bracket *
2 Front Panel
3 Rear Panel
Feature Description
DP VGA
HDMI4
INPUT
LAYOUT
INPUT
SWAP
Control Multiview Video Proce
the front panel push Buttons
Connect
input connectors
STANBY
PANEL
LOCK
or or directly via
5
ear panel
4 System Chassis Black metal housing
5 Rack Mount Bracket *
* Rack Mount Bracket: 4 screws per bracket ar
in advance when the
Multiview Video Processor
i
bracket.
3
ed. There are
Receives signals from the remote control
Press to select the HDMI 1 input
elect HDMI 1 audio in m
input
2 audio in m
input
elect HDMI 3 audio in m
Press to select the HDMI 4 input
in full screen
ulti
in full screen
Select "VGA" for audio in multiview mode
select Layout A (full screen mode)
INPUT
SWAP
2 3 4 5 6 7 8 9 10 11 12 13
14
MULTIVIEW VIDEO PROCESSOR
15 16
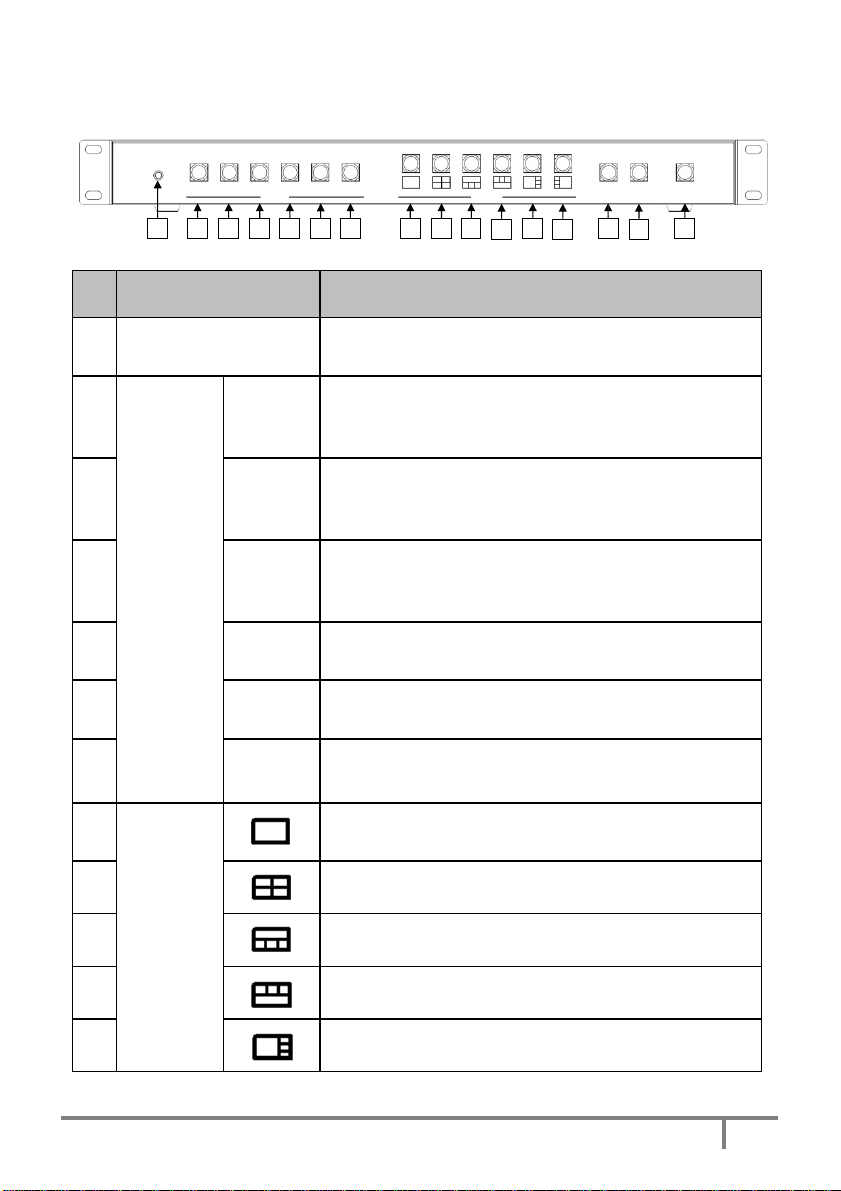
4.2 Front Panel
No.
HDMI1 HDMI2 HDMI3
1
Feature Description
1 IR Receiver
2
HDMI1
3 HDMI2
4 HDMI3
INPUT*
5 HDMI4
6 DP
HDMI4 DP VGA
INPUT LAYOUT
transmitter
Press to s
screen
Press to select the HDMI 2
Press to select HDMI
screen
Press to select the HDMI 3
Press to s
screen
Press to select the DP input
Press to select DP audio in m
4K @ 60Hz
PANEL
STANBY
LOCK
in full screen
ulti-view
in full screen
ulti-view
in full screen
ulti-view
in full screen
-view screen
7 VGA
8
9
LAYOUT*
10
11
12
Press to select the VGA input
Press to
Press to select Layout B
Press to select Layout C
Press to select Layout D
Press to select Layout E
4
Toggle the input source in Layout B, C,
Press to lock or unlock the front panel buttons
ndby mode or
D, E and
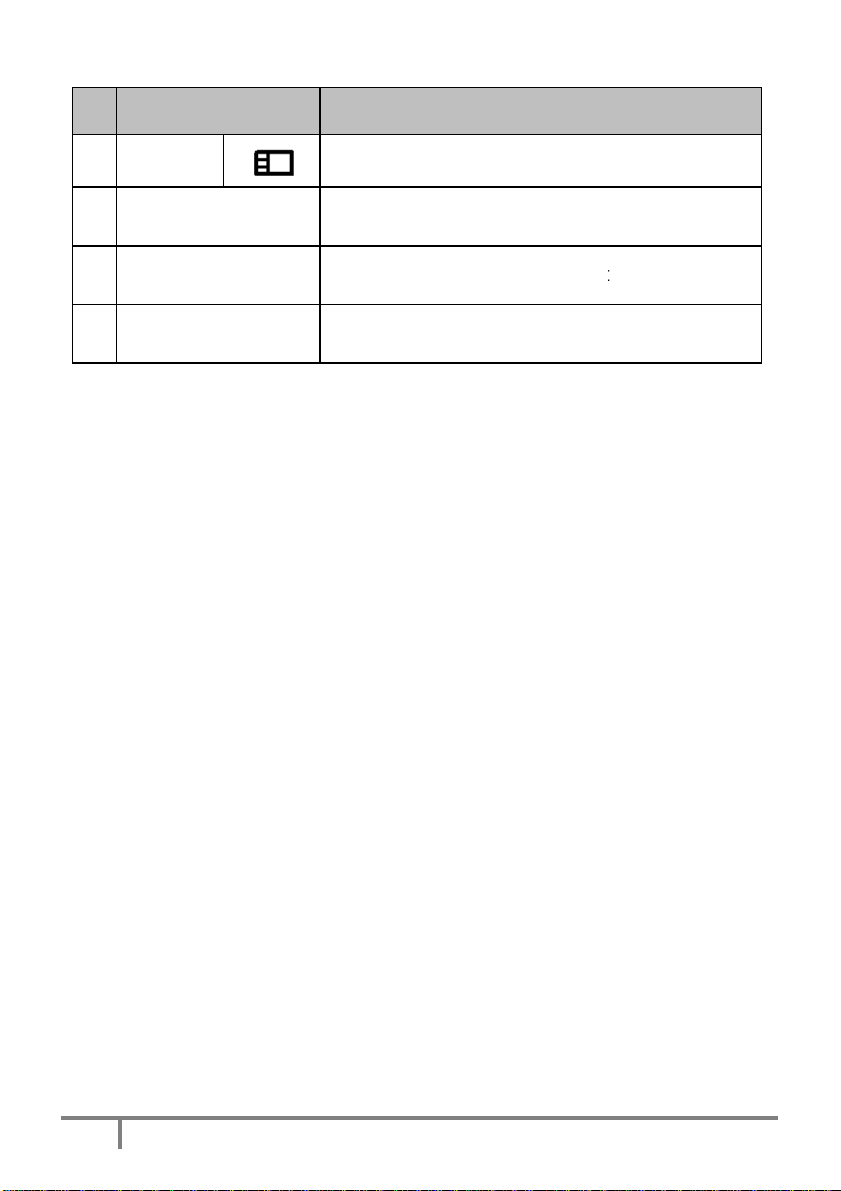
No.
13 LAYOUT*
14
15
16
Feature Description
Press to select Layout F
INPUT SWAP
F mode
PANEL LOCK
STANDBY
Press to put the system into sta
wake up the system
* Please see Appendix 1 and Appendix 2
5
device
device
HDMI source, connector on
HDMI source, connector on
HDMI source, connector on
source, , connector on
Connect to PC, NB or other Controller through IP
Connect to PC, NB or other Controller
Connect to PC for firmware upgrade
power supply, connector on
switch for turn ON or OFF
AUDIO
AUDIO
1 2 3 4 5 6 7 8 9
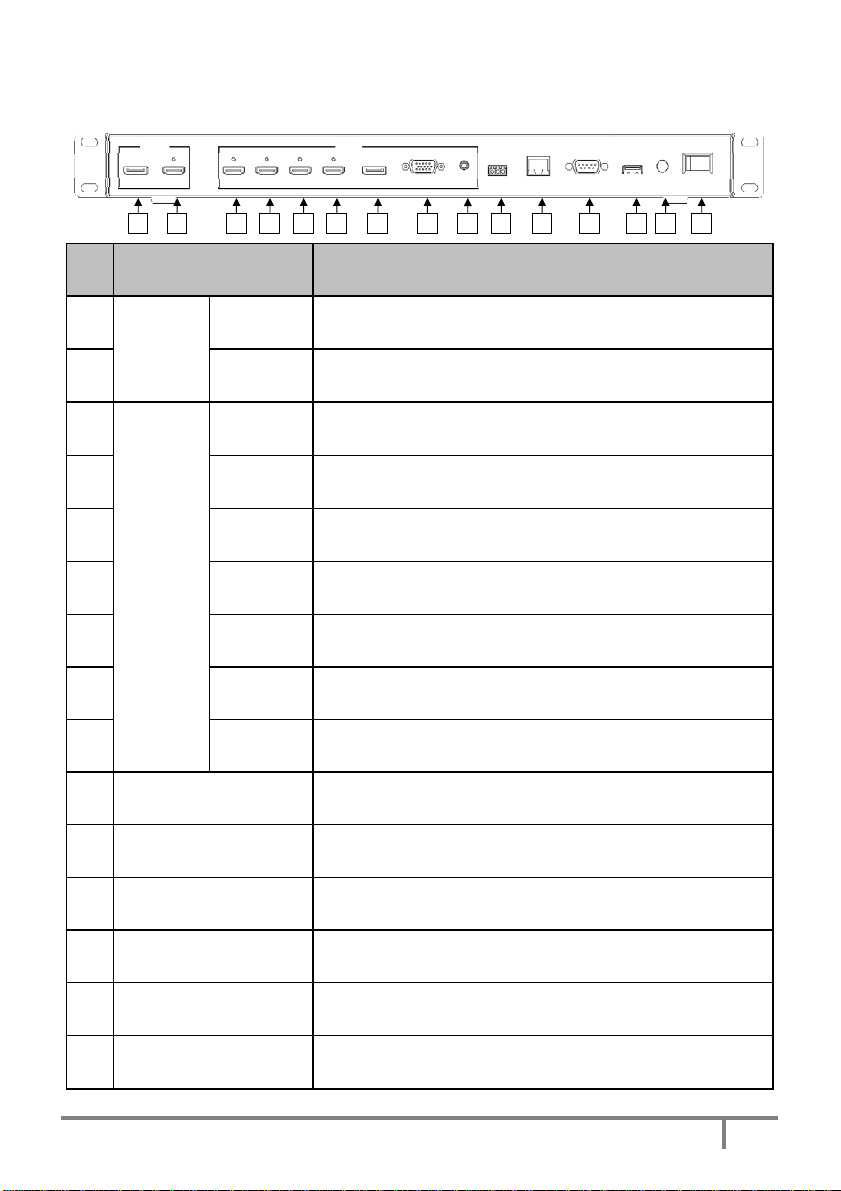
4.3 Rear Panel
OUTPUT
DP HDMI
HDMI1 HDMI2
HDMI3
HDMI4
INPUT
DP VGA
OUT
10 11 12
ETHERNET
RS232
USB
12V DC
POWER
ON/OFF
13 14 15
No.
1
2
3
4
5
6
7
8
9
10
Feature Description
Connect to the DP display
window A.
Connect to the HDMI display
rear panel with locking
Connect to the
panel with locking
Connect to the
panel with locking
Connect to the
panel with locking
Connect to the HDMI
panel with locking
OUTPUT
INPUT
DP
HDMI
HDMI1
HDMI2
HDMI3
HDMI4
DP Connect to the DP source
VGA Connect to the VGA source
AUDIO Connect to the audio source
AUDIO OUT Connect to the audio amplifier
, video fellow
, connector on
rear
rear
rear
rear
11
12
13
14
15 POWER ON/OFF
ETHERNET
RS232/TELNET
USB
12V DC
network
Connect to the 12V/2A
rear panel with locking
Power
Multiview Video Processor
the
6
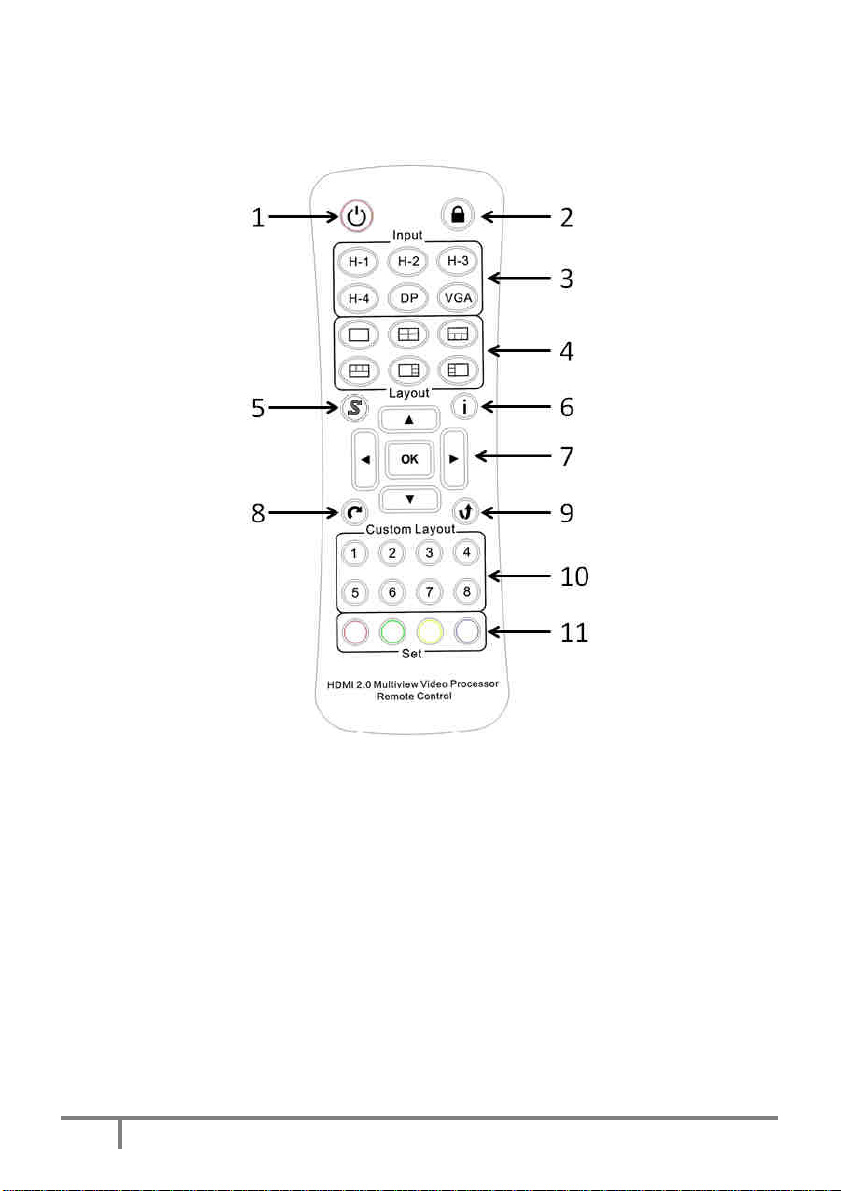
4.4 IR Remote Control
7
 Loading...