


P2K-HRSL3E1/ P2K-
Partilink Technology Co., Ltd Copyright @2016
Usermanual
P2K-HL3E1 1080p HDMI Extender over IP
P2K-HL3E1-P 1080p HDMI Extender over IP with PoE
P2K-HRSL3E1 / P2K-LHRS1E3
P2K-HRSL3E1-P / P2K-LHRS1E3-P


1. Introduction 2
2. Features & Application 3
3. Specifications 4
4. Hardware Description 5
5. Installation 9
5.2 Configuration 10
5.3 Application Pattern 10
5.4 PC Tool Setup and Control 13
6. Web-based UI configuration 25
7. Package Contents 33

Partilink Technology Co., Ltd Copyright @ 2016
2
1. Introduction
HDMI over IP Extender for point to point, point
to multi-point, multi- point to multi-point and
screen wall broadcast including RS-232 and IR
control extension. Easy installation with
networking 10/100 BASE-T switch hub and
CAT-5 cable for building up the extension or
broadcast system.
*** P2K-HL3E1-P supports power over Ethernet

Partilink Technology Co., Ltd Copyright @ 2016
3
2. Features & Application
RS-232 bi-directional extension
6 bits switch for 64 stream channel selection
HDCP compliant and Blu-Ray ready
Support IR extension
Automatic or manual EDID configuration
Networking environment under 10/100 BASE-T
switch hub and CAT-5 cable
Point to point extension, unicast, multicast and
screen wall system
Point to point extension via CATx without
Ethernet switch up to 100M
Support PC tool Ethernet control
P2K-HL3E1-P version supports Power over
Ethernet.
Partilink Technology Co., Ltd Copyright @ 2016
4
3. Specifications
P2K-HRSL3E1 P2K-
HRSL3E1-P
1080p HDMI
Extender over IP
P2K-HRSL3E1
P2K-HRSL3E1-P
Transmitter
P2K-LHRS1E3
P2K-LHRS1E3-P
Receiver
VIDEO INPUT
HDMI Type-A female connector
None
VIDEO OUTPUT
HDMI Type-A female connector for
loop through
HDMI Type-A female connector
IR
3.5mm phone jack for IR emitter to
control video source device
3.5mm phone jack for IR receiver
cable to receive remote signal
COMPRESSION
H.264 compression video format Full HD encoder/ decoder
MP3 compression audio format stereo 192Kbps encoder/ decoder
Media stream up to 18Mbps
HDMI
INPUT RESOLUTION
1080p 60/50, 1080p 30/25, 1080i 60/50,720p 60/50,
480i 60/50, 480p 60/50
HDMI
OUTPUT RESOLUTION
1080p 30/25, 1080i 60/50, 720p 60/50, 480i 60/50,
480p 60/50
AUDIO FORMAT
Stereo 192Kbps
IP PROTOCOL
TCP, UDP, RTSP, RTP, DHCP, IGMP, Multicast, IPV4
LAN PORT
RJ-45 connector for 10/100 BASE-T CAT-5 extension
SERIAL
DB-9 female connector for RS-232
POWER INPUT
2.0mm power jack for DC5V/2A
RJ-45, Power over Ethernet 36V~57V / 7W in (PoE model only)
OPERATING
TEMPERATURE
0~55℃
OPERATING HUMIDITY
5%~90% RH
POWER ADAPTER
AC in 100~240V (50~60Hz), DC5V/2A out
ESD
ESD protection air gap discharge ±8KV, contact discharged ±4KV
DIMENSION (W x D x L)
130 x 82 x 30.25 mm ( L x W x H )

Partilink Technology Co., Ltd Copyright @ 2016
5
WEIGHT
290g per transmitter or receiver unit
** Product specifications are subject to change without notice.
4. Hardware Description
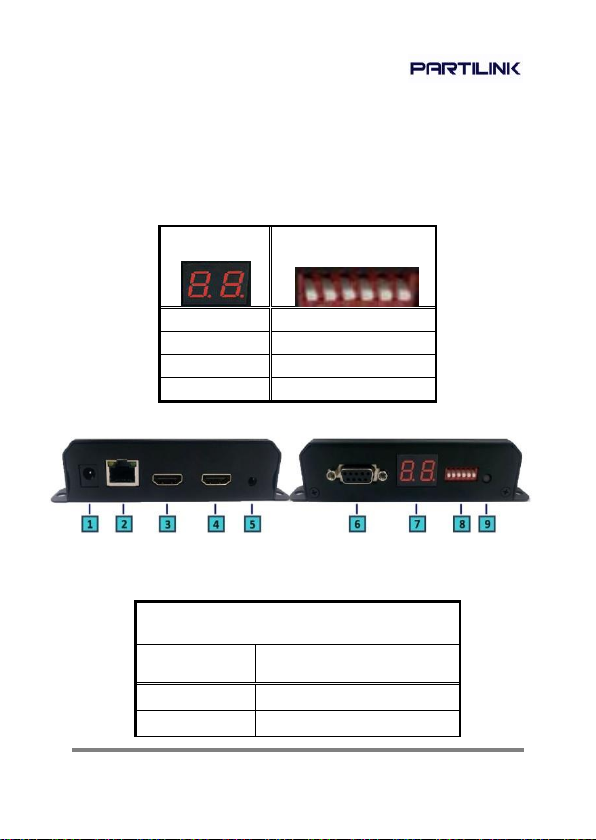
■ P2K-HRSL3E1 /P2K-HRSL3E1-P(TX)
1. 2.0 mm power jack for DC5V2A power input.
2. LAN port, RJ-45 connector for 10/100 BASE-
T CAT5 extension.
3. HDMI Type-A female connector for loop
through video output.
4. HDMI Type-A female input connector.
5. 3.5mm phone jack for IR emitter to control
video source device.
6. DB-9 female connector for RS-232 cable bidirectional remote extension
Partilink Technology Co., Ltd Copyright @ 2016
6
7. Display group indication.
8. Group configuration, 6 bits switch for 64
stream channel selection.
9. Reset button.
Channel
DIP SWITCH
00
000000
01
100000
~
~
63
111111
Dimension
Transmitter
P2K-HRSL3E1
P2K-HRSL3E1-P
Shell
Metal
Width
110mm/130mm
Height
30mm

Partilink Technology Co., Ltd Copyright @ 2016
7
Depth
86mm
Weight
290g
■ P2K-LHRS1E3 /P2K-LHRS1E3 -P(RX)
1. 2.0 mm power jack for DC5V2A power input.
2. LAN port, RJ-45 connector for 10/100 BASE-
T CAT5 extension.
3. HDMI Type-A female connector for video
output.
4. 3.5mm phone jack for IR receiver cable to
receive signal from remote controller.
5. DB-9 female connector for RS-232 bidirectional remote extension.
6. Display group indication.
7. Group configuration, 6 bits switch for 64
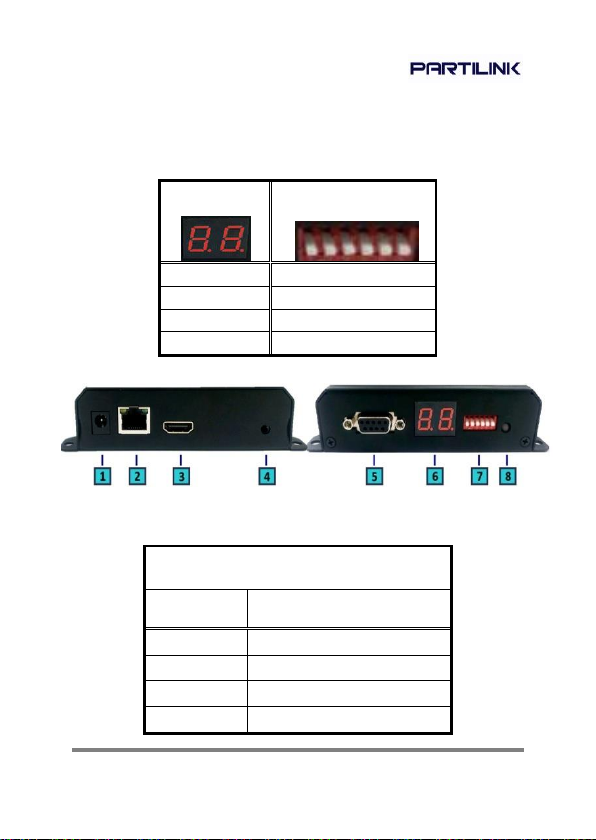
Partilink Technology Co., Ltd Copyright @ 2016
8
stream channel selection.
8. Reset button.
Channel
DIP SWITCH
00
000000
01
100000
~ ~ 63
111111
9. Dimension
Receiver
P2K-LHRS1E3
P2K-LHRS1E3-P
Shell
Metal
Width
110mm/130mm
Height
30mm
Depth
86mm
Weight
290g

Partilink Technology Co., Ltd Copyright @ 2016
9
5. Installation
5.1 Device Connection
1. Set up the group of the transmitter with the
correspondent receiver for signal extension
and display.
2. Connect the HDMI cables between the source
and transmitter for input, and the display and
receiver for output.
3. Connect CAT5 cable among thetransmitter,
Ethernet switch and receiver.
4. Connect the DC5V power adapter with the
transmitter and receiver for power supply.
5. Turn on and play source.
6. Connect the IR emitter cable with the
transmitter and the IR receiver cable with the
receiver to control the source remotely.

Partilink Technology Co., Ltd Copyright @ 2016
10
5.2 Configuration
5.3 Application Pattern
■ Unicast

Partilink Technology Co., Ltd Copyright @ 2016
11
■Multicast

Partilink Technology Co., Ltd Copyright @ 2016
12
■ Screen Wall

Partilink Technology Co., Ltd Copyright @ 2016
13
5.4 PC Tool Setup and Control
The P2K-HL3E1 / P2K-HL3E1-P is a Ethernet
based system, administrator can control the
system by PC via the PC tool ”
IPTV_Control_Center.exe” to set up and control
the system.
※Please download the PC tool from the
Partilink website or contact us by email to
get the software.
Download Site: “Technical Service”
http://www.partilink.com/index.php/en/download-2
Service Email: sales@partilink.com
1. The IP address default of the P2K-HRSL3E1 /
P2K-HRSL3E1-P is B
classNetworking :168.254.xxx.xxx, please set
up the IP address of the connected PC as
static IP, such as 169.254.xxx.xxx and the sub
mask as 255.255.0.0.

Partilink Technology Co., Ltd Copyright @ 2016
14
2. Connect the PC with the Ethernet switch of
application site to enter.
3. Activate the tool “IPTV_Control_Center.exe”
to search and setup.

Partilink Technology Co., Ltd Copyright @ 2016
15
4. Enter the tool in “Device Scan Page” and click
on “Start Scan”to search for the connected
devices. The connected devices will be
indicated in “Output Window” area. (Illustration
[1] [2])
5. In the

Partilink Technology Co., Ltd Copyright @ 2016
16
“TX Setup Page” to do transmitter setting and
in the“RX Setup Page” to do receiver setting
separately. ( Illustration [3])
6. TRANSMITTER SETTING
In the “TX Setup Page”, please select the TX
device which is required to setup on the “TX
Device Selection” and the relevant setting
information of the selected TX device will be
shown in the “TX Device Info” area (Illustration
[4] [5])

Partilink Technology Co., Ltd Copyright @ 2016
17
The setting functions of the transmitter clarified
below, please set up based on the request of
the application site.
IP Setup:
Setting the static IP of the selected TX. **We

Partilink Technology Co., Ltd Copyright @ 2016
18
suggest activating the DHCP automatic IP
assignment to avoid the conflict of IP
address. (Illustration [6])
Video Bitrate:
Setting the resolution’s video bitrate of each
group on the selected TX (Illustration [7])
Down Scale Setup:
Setting the resolution downscale of each
group on the selected TX. (Illustration [8])
Group ID:
Setting the selected TX group ID, maximum
up to 64 groups from 0 to 63. (Illustration [9])
UART Baudrate:
Setting the baud rate of RS-232 extension on
the selected TX. (Illustration [10])
Stream Output Path:
Setting the selected TX video output path.
Options including “Loopthrough and Network
Output”, “Disable Network Output”, “Disable
Loopthrough Output” and “Disable All Video
Output” to activate the HDMI output on the
transmitter and receiver simultaneously or

Partilink Technology Co., Ltd Copyright @ 2016
19
separately. (Illustration [11])
MAC Address:
Setting the selected TX MAC address with
12 digits and hexadecimal base, values is
limited to 0~F. Please use the legal MAC
address to avoid conflict with other devices.
(Illustration [12])
Device Name:
Setting the selected TX name for
identification. Up to 32 digits is accepted for
the device name setting. (Illustration [13])
7. RECEIVER SETING
In the “RX Setup Page”, please select the RX
device which is required to setup on the “RX

Partilink Technology Co., Ltd Copyright @ 2016
20
Device Selection” and the relevant setting
information of the selected RX device will be
shown in the “RX Device Info” area (Illustration
[14] and [15])

Partilink Technology Co., Ltd Copyright @ 2016
21
The setting functions of the receiver clarified
below, please set up based on the request of
the application site.
IP Setup:
Setting the static IP of the selected
RX(Illustration [16])
Screen Mode:
Setting to display the video on the selected
RX or not. (Illustration [17])
OSD Information:
Setting the OSD display mode on the
selected RX, OSD display modes including
“Info Display Auto Mode”, “Infor Display On
Mode” and “Info Display Off Mode”.
(Illustration [18])
UART Baudrate:
Setting the baud rate of RS-232 extension on
the selected RX. (Illustration [19])
MAC Address:
Setting the selected RX MAC address with

Partilink Technology Co., Ltd Copyright @ 2016
22
12 digits and hexadecimal base, values is
limited to 0~F. Please use the legal MAC
address to avoid conflict with the devices.
(Illustration [20])
Group ID: Setting the selected RX to the
group ID for streaming between the
correspondingTX and RX, maximum up to 64
groups from 0 to 63 (Illustration [21])
Device name: Setting the selected RX name
for identification. Up to 32 digits is accepted
for the device name setting. (Illustration [22])
8. NOTICE:

Partilink Technology Co., Ltd Copyright @ 2016
23
Please reboot after setting up the P2K-HL3E1
system via the PC tool and the previous
setting via hardware or software will be
ignored, the system will auto detect to update
the latest setting and apply as the start mode.
(Illustration [23] and [24])
9. When the system is instable or setting

Partilink Technology Co., Ltd Copyright @ 2016
24
incompletely, please click on “Factory Reset”
to recover the initial default of the system.
(Illustration [25])
10. The P2K-HL3E1 / P2K-HL3E1-P system can
be firmware upgraded via PC. To upgrade the
firmware please click on “Firmware Upgrade”
and select the path to save the firmware and
click on “Upgrade TX Firmware” to accomplish
upgrade version. (Illustration [26] and [27])

Partilink Technology Co., Ltd Copyright @ 2016
25
6. Web User Interface Configuration
6.1 TX System
6.1.1 TX Log-in
Log-in page will pop up when entering TX
system
Default User Name and Password:

Partilink Technology Co., Ltd Copyright @ 2016
26
User Name: ite000
Password: 123456
Update User Name and Password
System provides 1 set user name and
password. If user doesn’t want to user
default, please put preferred User Name
and Password as follows. Then press
“Confirm” to change user name and
password.

Partilink Technology Co., Ltd Copyright @ 2016
27
6.1.2 Version Information
Here user can see firmware information
and network setting of TX
Note. Please also set TX and all RXs in the
same group by setting DIP SWITCH.

Partilink Technology Co., Ltd Copyright @ 2016
28
6.1.3 Multicast
To support several RX please press
“Multicast” to enable multicast function.
6.1.4 Upgrade firmware
Please download firmware from the Partilink
website and put it in local folder.
Download Site: “Technical Service”
http://www.partilink.com/index.php/en/download-2
To upgrade firmware please press “Upgrade”
button which is under “Upgrade Firmware”. Please
choose the location of firmware file. Then
press ”Upgrade” button again to load firmware and

Partilink Technology Co., Ltd Copyright @ 2016
29
system will start firmware upgrade automatically.
6.1.5 Reset
Encoder Reset: To reboot Encoder only
please click on “Encoder Reset” button.

Partilink Technology Co., Ltd Copyright @ 2016
30
Reboot Device: To reboot whole device
please click on “Reboot” button.
6.2 RX System
6.2.1 RX Log-in
Log-in page will pop up when entering RX
system
Default User Name and Password:
User Name: admin
Password: 123456

Partilink Technology Co., Ltd Copyright @ 2016
31
6.2.2 Upgrade firmware
Please download firmware from the Partilink
website and put it in local folder.
Download Site: “Technical Service”
http://www.partilink.com/index.php/en/download-2
To upgrade firmware please press “Upgrade”
button which is under “Upgrade Firmware”. Please
choose the location of firmware file. Then
press ”Upgrade” button again to load firmware and
system will start firmware upgrade automatically.

Partilink Technology Co., Ltd Copyright @ 2016
32
6.2.3 Reboot
To reboot whole device please click on “Reboot”
button. It will show message as “Reload page after
10 seconds” in the bottom of the page.

Partilink Technology Co., Ltd Copyright @ 2016
33
7. Package Contents
1. HRSL3E1 / HRSL3E1-P HDMI Extender
over IP transmitter (1)
2. LHRS1E3 / LHRS1E3-P HDMI extender
over IP receiver (1)
3. DC5V 2A power adapter, one comes with
transmitter and one comes with receiver
(2)
4. IR receiver cable comes with receiver (1)
5. IR emitter cable comes with transmitter (1)
6. User manual (1)

Partilink Technology Co., Ltd Copyright @ 2016
34
www.partilink.com
 Loading...